flash_conf
怎么看时序图--nand flash的读操作详解

这篇文章不是介绍nand flash的物理结构和关于nand flash的一些基本知识的。
你需要至少了解你手上的nand flash的物理结构和一些诸如读写命令操作的大概印象,你至少也需要看过s3c2440中关于nand flash控制寄存器的说明。
由于本人也没有专门学过这方面的知识,下面的介绍也是经验之谈。
这里我用的K9F2G08-SCB0 这款nand flash 来介绍时序图的阅读。
不同的芯片操作时序可能不同,读的命令也会有一些差别。
当然其实有时候像nand flash这种s3c2440内部集成了他的控制器的外设。
具体到读写操作的细节时序(比如CLE/ALE的建立时间,写脉冲的宽度。
数据的建立和保持时间等),不明白前期也没有多大的问题。
因为s3c2440内部的nand flash控制器做了大部分的工作,你需要做的基本就是设置几个时间参数而已。
然后nand flash会自动进行这些细节操作。
当然如果处理器上没有集成nand flash的控制器那么久必须要自己来写时序操作了。
所以了解最底层的时序操作总是好的但是上层一点的,比如读写操作的步骤时序(比如读操作,你要片选使能,然后发命令,然后发地址,需要的话还需发一个命令,然后需要等待操作完成,然后再读书数据)。
是必须要明白的。
这都不明白的话,怎么进行器件的操作呢也就是说s3c2440 可以说在你设置很少的几个时间参数后,将每一个步骤中细微的操作都替你做好了。
(比如写命令,你只要写个命令到相应寄存器中,cpu内部就会协各个引脚发出适应的信号来实现写命令的操作)。
而我们所需要做的就是把这些写命令,写地址,等待操作完成。
等步骤组合起来。
从而完成一个读操作就像上面说的,虽然我们不会需要去编写每个步骤中的最细微的时序。
但是了解下。
会让你对每个操作步骤的底层细节更加明了先来看一个命令锁存的时序。
也就是上面说的读nand flash操作中不是有一个写命令步骤吗。
flash代码,双网卡设置方法

//键盘事件控制程序
onClipEvent(keyDown)
}
//取得按键的键值
keycode=Key.getCode();
//判断是否为Enter键
if(keycode==Key.ENTER) {
//判断输入的答案是否正确
//answer=Number(A)
if(_root,ans=="A" or _root.ans=="a"{
//显示“答对了”信息
tellTsrget(_root.q1) {
gotoAndPlay(2);
}
} else {
//显示“答错了”信息
tellTarget(_root.q1) {
gotoAndplay(16)
}
}
}
}
3.声音的加载和控制
插入一段音乐:在Pile/Import to Library中,找到要插入的音乐(如战马奔腾),打开符
mySound.start();
关闭指定音乐
mySound.stop("1");
外部调用音乐
mySound=new Sound();
mySound.loadSound("music.mp3",true);
mySound.start(0,100)
关闭音乐
mySound.stop();
Command是指令的相关命令,arguments是命令的参数。
下面我们就来讲讲如何通过Fscommand指令来实现全屏播放、取消Flash播放时的右键
菜单以及关闭Flash动画。
1、全屏播放Flash
思科路由器命令大全(完整版)

思科交换机路由器命令大全交换机命令:switch> 用户模式1:进入特权模式 enableswitch> enableswitch#2:进入全局配置模式 configure terminalswitch> enableswitch#configure terminalswitch(conf)#3:交换机命名 hostname aptech2950 以aptech2950为例switch> enableswitch#configure terminalswitch(conf)#hostname aptch-2950aptech2950(conf)#4:配置使能口令 enable password cisco 以cisco为例switch> enableswitch#configure terminalswitch(conf)#hostname aptch2950aptech2950(conf)# enable password cisco5:配置使能密码 enable secret ciscolab 以cicsolab为例--设置禁用IP地址解析特性,设置启用消息同步特性switch> enableswitch#configure terminalswitch(conf)#hostname aptch2950aptech2950(conf)# enable secret ciscolabaptech2950(conf)#no ipdomain-lookup -----设置禁用IP 地址解析特性aptech2950(conf)#loggingsynchronous -----设置启用消息同步特性aptech2950(conf)#interface range fastethernet0/1-20aptech2950(conf-if-range)#spanning-treeportfast -----设置快速端口aptech2950(conf)#interface range fastethernet 0/23-24aptech2950(conf-if-range)#swichport modetrunk -----设置主干道端口aptech2950(conf)#spanning-treeuplingkfast ---设置阻塞启用迅速〔只可以在访问层启用〕6:设置虚拟局域网vlan 1 interface vlan 1switch> enableswitch#configure terminalswitch(conf)#hostname aptch2950aptech2950(conf)# interface vlan 1配置交换机端口ip和子网掩码aptech2950(conf-if)#noshut 是配置处于运行中aptech2950(conf-if)#exit设置网关地址7:进入交换机某一端口 interface fastehernet0/17 以17端口为例switch> enableswitch#configure terminalswitch(conf)#hostname aptch2950aptech2950(conf)# interface fastehernet 0/17aptech2950(conf-if)#8:查看命令 showswitch> enableswitch# show version 观察系统中的所有版本信息show interface vlan 1 查看交换机有关ip 协议的配置信息show running-configure 查看交换机当前起作用的配置信息show interface fastethernet 0/1 观察交换机1接口具体配置和统计信息show mac-address-table 查看mac地址表show mac-address-table aging-time 查看mac地址表自动老化时间9:交换机恢复出厂默认恢复命令switch> enableswitch# erase startup-configureswitch# reload10:双工模式设置switch> enableswitch#configure terminalswitch2950(conf)#hostname aptch-2950aptech2950(conf)# interface fastehernet0/17 以17端口为例aptech2950(conf-if)#duplexfull/half/auto 有full , half, auto 三个可选项11:cdp相关命令switch> enableswitch# show cdp 查看设备的cdp全局配置信息show cdp interface fastethernet 0/17 查看17端口的cdp配置信息show cdp traffic 查看有关cdp包的统计信息show cdp nerghbors 列出与设备相连的cisco设备12:csico2950的密码恢复拔下交换机电源线。
flash与C#通信 CallFunction 出现COM组件错误处理

return sb.ToString();
}
然后再 swf.CallFunction(EncodeInvoke("sconfCall", CInput.Text))就可以正常工作了。
2、CallFunction中调用的函数名与AS中的函数名不一致,也报上面的错误。这个查错的时候,一定要注意。
xw.WriteAttributeString("returntype", "xml");
xw.WriteStartElement("arguments");
xw.WriteStartElement("string"); //此处直接创建string类型,没做别的类型判断
<arguments>
<string>aa</string>
</arguments>
</invoke>"
其中红字部分为可以变的,sconfCall为函数名,即要调用flash中AS的函数名。aa为参数。
我开始的错误在于:
直接swf.CallFunction("<invoke name=\"sconfCall\" returntype=\"xml\"><arguments><string>aa</string></arguments></invoke>").不管如何试,都不能成功。报“对COM 组件的调用返回了错误HRESULT E_FAIL ”。
上网查没直接解决办法。后终于解决,现sconf将解决思路及办法列如下:
STM32固件库使用手册的中文翻译版

因为该固件库是通用的,并且包括了所有外设的功能,所以应用程序代码的大小和执行速度可能不是最优 的。对大多数应用程序来说,用户可以直接使用之,对于那些在代码大小和执行速度方面有严格要求的应 用程序,该固件库驱动程序可以作为如何设置外设的一份参考资料,根据实际需求对其进行调整。
1.3.1 变量 ................................................................................................................................................ 28 1.3.2 布尔型 ............................................................................................................................................ 28 1.3.3 标志位状态类型 ........................................................................................................................... 29 1.3.4 功能状态类型 .............................................................................................................
网页FLASH无法显示解决办法

网页FLASH无法显示解决办法淘宝店铺:关于网页上的Flash图片无法显示,在线视频无法播放,进入QQ空间里QQ秀无法看到的解决办法!网页Flash都不显示了,但是插件已经安装,还是播放不了??我就是因为清理系统“过猛”导致FLASH无法显示,如在线视频不能显示等,这种应该属于认为的,呵呵。
还有一种不是认为的,如中毒,恶意软件等。
以下是解决办法,希望遇到类似问题的友友可以解决(仅供参考,不保证可以解决,视个人情况而言)◎缺少插件如无法播放音乐问题的解决方法:1、开始--运行输入regedit 找到HKEY_LOCAL_MACHINE\SOFTWARE\Microsoft\Internet Explorer\ActiveXCompatibility删除{CFCDAA03-8BE4-11CF-B84B-0020AFBBCCFA}或{d27cdb6e-ae6d-11cf-96b8-444553540000}和{6bf52a52-394a-11d3-b153-00c04f79faa6}找到哪个删除哪个,然后关闭注册表,重新打开浏览器。
2、开始--运行输入(注册控件)regsvr32 jscript.dll 回车regsvr32 vbscript.dll 回车◎无法显示Flash问题的解决方法:如果确定以下设置无问题:1. IE是否禁止了播放Flash动画IE主窗口的菜单--选“工具"→Internet选项--“高级”选项卡,在下面的列表中找到“多媒体“---”播放网页中的动画”选项并将其选中,再单击“应用→确定”保存设置。
(有时候可以把勾去掉,确定,在打上勾,确定)2. 在internet 选项—安全—自定义级别里要把运行activeX控件和插件,已选为启用3. FLASH插件已安装4. 未装yahoo助手之类的软件5. 确保您的计算机里是干净的,没有病毒如果以上设置无误,那么以下就是解决办法(仅供参考)方法一(适合表现为Flash显示位置总是显示一个红叉)打开网页系统并不提示重装Flash插件,就是由于控制这个属性的注册表键已经被改变了,导致系统认为插件已经安装,可以通过修改注册表的办法来解决第一步:开始--运行--输入regedit-回车进入注册表找到[HKEY_LOCAL_MACHINE\SOFTWARE\Microsoft\Internet Explorer\ActiveX Compatibility]将其下面的{D27CDB6E-AE6D-11CF-96B8-444553540000}项或{D3f97240-C9f4-11CF-BFCr-00A0C90-00A0C90C2BDB}项的主键删除后关闭注册表。
口令恢复大全

口令恢复大全交换机口令恢复的步骤⒈连接交换机的console口到终端或PC仿真终端。
用无Modem的直连线连接PC的串行口到交换机的console口。
⒉先按住交换机面板上的mode键,然后打开电源。
⒊初始化flash。
>flash_init⒋更名含有password的配置文件。
>rename flash:config.text flash:config.old⒌启动交换机。
>boot⒍进入特权模式。
>enable⒎此时开机是已忽略password。
#rename flash:config.old flash:config.text⒏copy配置文件到当前系统中。
#copy flash:config.text system:running-config⒐修改口令。
#configure terminal#enable secret⒑保存配置。
#write路由器口令恢复步骤⒈连接路由器的console口到终端或PC仿真终端。
用无Modem的直连线连接PC的串行口到路由器的console口。
⒉用show version命令显示并记录配置寄存器的值,通常为0x2102或0x102.如果用show version命令不能获得有关提示,可以查看类似的路由器来获得配置寄存器的值或用0x2102试试。
⒊关闭路由器的电源,然后再打开。
⒋在启动的前60秒内按Break键,你将会看到“〉”提示符(无路由器名),如果没有看到“〉”提示符,说明你没有正确发出Break信号,这时可检查终端或仿真终端的设置。
⒌在“〉”提示符下键入o/r 0x42从Flash memory中引导或键入o/r0x41从ROM中引导(注意:这里“o”是小写字母“O”)。
如果它有Flash且原封没动过,0x42是最好的设置,因为它是缺省值,仅当Flash被擦除或没有安装时使用0x41。
如果用0x41,你可以查看或删除原配置,但你不能改变口令。
conf命令参数

conf命令参数摘要:1.引言2.conf命令简介3.常用conf命令参数a.-configb.-printc.-setd.-show4.参数详解a.-configi.作用ii.使用方法b.-printi.作用ii.使用方法c.-seti.作用ii.使用方法d.-showi.作用ii.使用方法5.结论正文:Conf命令是Linux系统中一个非常重要的命令,用于配置系统参数和设置环境变量。
通过conf命令,用户可以修改系统配置文件,从而实现对系统参数的调整。
conf命令支持多种参数,用户可以根据实际需求选择合适的参数进行操作。
以下为conf命令的四个常用参数:1.-config该参数用于显示配置文件的内容。
使用方法为:`conf -config`。
当用户需要查看某个配置文件的内容时,可以使用此参数。
例如,查看`/etc/hosts`文件的内容,可以使用`conf -config /etc/hosts`命令。
2.-print该参数用于打印配置文件中的某一行。
使用方法为:`conf -print`。
当用户需要查看配置文件中的特定行时,可以使用此参数。
例如,查看`/etc/hosts`文件中的第一行,可以使用`conf -print /etc/hosts`命令。
3.-set该参数用于设置配置文件中的某个参数。
使用方法为:`conf -set`。
当用户需要修改配置文件中的某个参数时,可以使用此参数。
例如,将`/etc/hosts`文件中的某个IP地址修改为新的地址,可以使用`conf -set /etc/hosts<old_ip> <new_ip>`命令。
4.-show该参数用于显示配置文件中某个参数的值。
使用方法为:`conf -show`。
当用户需要查看配置文件中某个参数的值时,可以使用此参数。
例如,查看`/etc/hosts`文件中某个主机的IP地址,可以使用`conf -show /etc/hosts <hostname>`命令。
MK64FN1M0xxx12_flash.ld链接文件解析

MK64FN1M0xxx12_flash.ld链接⽂件解析1.前⾔本⽂主要对MK64FN1M0xxx12_flash.ld⽂件进⾏分析,以此来加深对链接⽂件的理解2.⽂件详解/*** ###################################################################** Processors: MK64FN1M0CAJ12** MK64FN1M0VDC12** MK64FN1M0VLL12** MK64FN1M0VLQ12** MK64FN1M0VMD12**** Compiler: GNU C Compiler** Reference manual: K64P144M120SF5RM, Rev.2, January 2014** Version: rev. 2.9, 2016-03-21** Build: b170817**** Abstract:** Linker file for the GNU C Compiler**** Copyright 2016 Freescale Semiconductor, Inc.** Copyright 2016-2017 NXP** Redistribution and use in source and binary forms, with or without modification,** are permitted provided that the following conditions are met:**** 1. Redistributions of source code must retain the above copyright notice, this list** of conditions and the following disclaimer.**** 2. Redistributions in binary form must reproduce the above copyright notice, this** list of conditions and the following disclaimer in the documentation and/or** other materials provided with the distribution.**** 3. Neither the name of the copyright holder nor the names of its** contributors may be used to endorse or promote products derived from this** software without specific prior written permission.**** THIS SOFTWARE IS PROVIDED BY THE COPYRIGHT HOLDERS AND CONTRIBUTORS "AS IS" AND** ANY EXPRESS OR IMPLIED WARRANTIES, INCLUDING, BUT NOT LIMITED TO, THE IMPLIED** WARRANTIES OF MERCHANTABILITY AND FITNESS FOR A PARTICULAR PURPOSE ARE** DISCLAIMED. IN NO EVENT SHALL THE COPYRIGHT HOLDER OR CONTRIBUTORS BE LIABLE FOR** ANY DIRECT, INDIRECT, INCIDENTAL, SPECIAL, EXEMPLARY, OR CONSEQUENTIAL DAMAGES** (INCLUDING, BUT NOT LIMITED TO, PROCUREMENT OF SUBSTITUTE GOODS OR SERVICES;** LOSS OF USE, DATA, OR PROFITS; OR BUSINESS INTERRUPTION) HOWEVER CAUSED AND ON** ANY THEORY OF LIABILITY, WHETHER IN CONTRACT, STRICT LIABILITY, OR TORT** (INCLUDING NEGLIGENCE OR OTHERWISE) ARISING IN ANY WAY OUT OF THE USE OF THIS** SOFTWARE, EVEN IF ADVISED OF THE POSSIBILITY OF SUCH DAMAGE.**** http: ** mail: support@**** ###################################################################*//* Entry Point */NOTE:程序中第⼀条运⾏的指令被称为⼊⼝点entry point,可以使⽤ENTRY链接脚本命令设置entry point,参数是⼀个符号名:有⼏种⽅法可以设置entry point,链接器会按照如下的顺序来try各种⽅法,只要任何⼀种⽅法成功则会停⽌:the ‘-e’ entry command-line option;the ENTRY(symbol) command in a linker script;the value of the symbol start, if defined;the address of the first byte of the ‘.text’ section, if present;The address 0ENTRY(Reset_Handler)/*DEFINED(symbol)⽤于判断symbol在符号表中是否有定义,如果有定义则返回1否则返回0*/HEAP_SIZE = DEFINED(__heap_size__) ? __heap_size__ : 0x0400; STACK_SIZE = DEFINED(__stack_size__) ? __stack_size__ : 0x0400; /* Specify the memory areas */ /*定义内存区域的起始地址和长度*/MEMORY{m_interrupts (RX) : ORIGIN = 0x00000000, LENGTH = 0x00000400m_flash_config (RX) : ORIGIN = 0x00000400, LENGTH = 0x00000010m_text (RX) : ORIGIN = 0x00000410, LENGTH = 0x000FFBF0m_data (RW) : ORIGIN = 0x1FFF0000, LENGTH = 0x00010000m_data_2 (RW) : ORIGIN = 0x20000000, LENGTH = 0x00030000}/* Define output sections */SECTIONS{/* The startup code goes first into internal flash */.interrupts :{. = ALIGN(4);/*isr_vector在start.S中定义:.section .isr_vector, "a",按照MEMORY命令说明,isr_vector由于没有指定输出section,因此会创建与输⼊section同名的输出section,且会按照isr_vector的属性放到合适的内存区域,此处KEEP是保证isr_vector的输出section不会被删除*/KEEP(*(.isr_vector)) /* Startup code */. = ALIGN(4);} > m_interrupts.flash_config :{. = ALIGN(4);KEEP(*(.FlashConfig)) /* Flash Configuration Field (FCF) */. = ALIGN(4);} > m_flash_config/* The program code and other data goes into internal flash */.text :{. = ALIGN(4);*(.text) /* .text sections (code) */*(.text*) /* .text* sections (code) */*(.rodata) /* .rodata sections (constants, strings, etc.) */*(.rodata*) /* .rodata* sections (constants, strings, etc.) */*(.glue_7) /* glue arm to thumb code */*(.glue_7t) /* glue thumb to arm code */*(.eh_frame)KEEP (*(.init))KEEP (*(.fini)). = ALIGN(4);} > m_text.ARM.extab :{*(.ARM.extab* .gnu.linkonce.armextab.*)} > m_text.ARM :{__exidx_start = .;*(.ARM.exidx*)__exidx_end = .;} > m_text.ctors :{__CTOR_LIST__ = .;/* gcc uses crtbegin.o to find the start ofthe constructors, so we make sure it isfirst. Because this is a wildcard, itdoesn't matter if the user does notactually link against crtbegin.o; thelinker won't look for a file to match awildcard. The wildcard also means that itdoesn't matter which directory crtbegin.ois in. */KEEP (*crtbegin.o(.ctors))KEEP (*crtbegin?.o(.ctors))/* We don't want to include the .ctor section fromfrom the crtend.o file until after the sorted ctors.The .ctor section from the crtend file contains theend of ctors marker and it must be last */KEEP (*(EXCLUDE_FILE(*crtend?.o *crtend.o) .ctors))KEEP (*(SORT(.ctors.*)))KEEP (*(.ctors))__CTOR_END__ = .;} > m_text.dtors :{__DTOR_LIST__ = .;KEEP (*crtbegin.o(.dtors))KEEP (*crtbegin?.o(.dtors))KEEP (*(EXCLUDE_FILE(*crtend?.o *crtend.o) .dtors))KEEP (*(SORT(.dtors.*)))KEEP (*(.dtors))__DTOR_END__ = .;} > m_text.preinit_array :{PROVIDE_HIDDEN (__preinit_array_start = .);KEEP (*(.preinit_array*))PROVIDE_HIDDEN (__preinit_array_end = .);} > m_text.init_array :{PROVIDE_HIDDEN (__init_array_start = .);KEEP (*(SORT(.init_array.*)))KEEP (*(.init_array*))PROVIDE_HIDDEN (__init_array_end = .);} > m_text.fini_array :{PROVIDE_HIDDEN (__fini_array_start = .);KEEP (*(SORT(.fini_array.*)))KEEP (*(.fini_array*))PROVIDE_HIDDEN (__fini_array_end = .);} > m_text__etext = .; /* define a global symbol at end of code */__DATA_ROM = .; /* Symbol is used by startup for data initialization */.data : AT(__DATA_ROM){. = ALIGN(4);__DATA_RAM = .;__data_start__ = .; /* create a global symbol at data start */*(.data) /* .data sections */*(.data*) /* .data* sections */KEEP(*(.jcr*)). = ALIGN(4);__data_end__ = .; /* define a global symbol at data end */} > m_data__DATA_END = __DATA_ROM + (__data_end__ - __data_start__);text_end = ORIGIN(m_text) + LENGTH(m_text);ASSERT(__DATA_END <= text_end, "region m_text overflowed with text and data") /* Uninitialized data section */.bss :{/* This is used by the startup in order to initialize the .bss section */. = ALIGN(4);__START_BSS = .;__bss_start__ = .;*(.bss)*(.bss*)*(COMMON). = ALIGN(4);__bss_end__ = .;__END_BSS = .;} > m_data.heap :{. = ALIGN(8);__end__ = .;PROVIDE(end = .);__HeapBase = .;. += HEAP_SIZE;__HeapLimit = .;__heap_limit = .; /* Add for _sbrk */} > m_data_2.stack :{. = ALIGN(8);. += STACK_SIZE;} > m_data_2/* Initializes stack on the end of block */__StackTop = ORIGIN(m_data_2) + LENGTH(m_data_2);__StackLimit = __StackTop - STACK_SIZE;PROVIDE(__stack = __StackTop);.ARM.attributes 0 : { *(.ARM.attributes) }ASSERT(__StackLimit >= __HeapLimit, "region m_data_2 overflowed with stack and heap") }。
mini2440 nandflash操作总结

Mini2440 nand flash 操作总结首先要感谢CSDN论坛的赵春江老师的文章。
这篇文章基本上是他文章的内容。
百度上搜“CSDN 赵春江”就能找到。
一:硬件连接Nand flash操作对于自己编写mini2440启动代非常关键。
因为一般来说,嵌入式系统都有一片nand flash用来作为存储器。
所以掌握nand flash 的操作非常的必要和关键。
在操作之前,首先应该对nand flash 的硬件上有一定的了解。
我的mini2440板子自带的是K9F1G08U0A。
大小是128M。
其芯片上的重要引脚如下:I/O0~I/O7:数据总线,用于nandflash的所有命令,地址的输入,和数据的双向传输.CE:芯片使能引脚CLE (Command Latch Enable):命令锁存允许引脚ALE(Address Latch Enable):地址锁存允许引脚WE/:写芯片允许引脚RE/:读芯片允许引脚RB:状态读取引脚(低电平表示忙;高电平表示空闲)其他引脚:诸如电源之类因为S3C2440硬件自带有nand flash控制器,所以具有相对应的引脚可以和nand flash 芯片连接。
系统总线引脚DA TA0~DA TA7:直接与I/O0~I/O7相连接nFCE/GPA22 :直接与CE引脚相连CLE/GPA17:直接与CLE引脚相连ALE/GPA18 :直接与ALE引脚相连nFWE/GPA19:直接与WE/引脚相连nFRE/GPA20 :直接与WE/引脚相连FRnB:直接与RB引脚相连除此之外,S3C2440还有另外几个引脚用于配置nandflash控制器。
比如页大小,地址周期数等等。
这些引脚主要有如下:OM[1:0] ; NCON ; GPG13 ; GPG14 ; GPG15。
他们的配置方式在S3C2440说明书上已经很详细。
所以综上所述,S3C2440 与nandflash(K9F1G08U0A)的硬件连接图如下所示:二:nand flsah 工作原理简介Nand flash 主要是用于大容量的存储。
NOR Flash配置设计指南说明书

ENT-AN1263-4.5Application Note Flash Configuration Design GuideReleasedJuly2018Contents1Revision History (1)2Introduction (2)2.1NOR Flash Configurations and Options for 4.5.0APPL (2)2.2NOR Flash Layout (2)2.3Flash Budget (2)2.4Flash Deployment Considerations (2)Contents1Revision HistoryRevision 1.1Revision 1.1was published in July 2018to align with the Linux application software release 4.5.The following is a summary of changes in revision 1.1of this document.•Updated the Introduction section.For more information,see Introduction on page 2.•Updated the NOR Flash Configurations and Options for 4.5.0APPL section.For more information,see NOR Flash Configurations and Options for 4.5.0APPL on page 2.•Updated the NOR Flash Layout section.For more information,see NOR Flash Layout on page 2.•Updated the Flash Budget section.For more information,see Flash Budget on page 2.•Updated the Flash Deployment Considerations section.For more information,see Flash Deployment Considerations on page2.Revision 1.0Revision 1.0was published in May 2018.It was the first publication of this document.Revision HistoryThe revision history describes the changes that were implemented in the document. The changes are listed by revision, starting with the most current publication.This application note provides guidelines for running with SPI NOR flash only(without NAND flashdeployment)on a Microsemi based Ethernet switch,including WebStaX™,SMBStaX™,IStaX™,andCEServices™software variants.This document focuses on application using64MB NOR flash.For32MBNOR flash,please refer to AN1263-4.4.Note:This document assumes that the reader is familiar with the flash configuration introducedin4.1.0or later software versions.For more information about the flash configurationon the Microsemi switch applications,see ENT-AN1144-4.00(SPI Flash Design for VCore-III).2.1NOR Flash Configurations and Options for4.5.0APPLAt least a32-MB NOR flash is required to run WebStaX™,SMBStaX™,IStaXLiteProtection™,andIStaXLiteTiming™on a Micromsemi switch without NAND flash.However,if you want to grow yourapplications or run IStaX or CEServices,a64-MB NOR flash is required.The default flash layout for a64-MBNOR flash includes:•Boot-loader•Dual-image support•Application-writable section for persistent data2.2NOR Flash LayoutThe following is the typical flash layout of a64-MB flash in a NOR-flash-only system managed by flash imagesystem(FIS)under RedBoot.RedBoot> fis listName FLASH addr Mem addr Length Entry point.FisValid 0x00000000 0x00000000 0x00000000 0x00000000RedBoot 0x40000000 0x00000000 0x00040000 0x00000000conf 0x40040000 0x00000000 0x00010000 0x00000000linux 0x40050000 0x80100000 0x01400000 0x80100000linux.bk 0x41450000 0x80100000 0x01400000 0x80100000rootfs_data 0x42850000 0x00000000 0x01780000 0x00000000FIS directory 0x43FD0000 0x00000000 0x00010000 0x00000000RedBoot config 0x43FE0000 0x00000000 0x00001000 0x00000000Redundant FIS 0x43FF0000 0x00000000 0x00010000 0x00000000When customizing the application firmware image(the.MFI file),the size of the.MFI file cannot exceed20MB in a NOR-flash-only system with a64-MB NOR flash.2.3Flash BudgetAs the size of the.MFI file is limited to20MB,if you intend to grow your applications to exceed20MB,you need to use a combination of NOR flash and NAND flash.2.4Flash Deployment ConsiderationsAs the NAND flash cannot be pre-programmed by a NOR flash programmer,Microsemi provides a softwareboard bootstrapping procedure.This procedure requires a pre-programmed NOR flash that can format andupdate the NAND flash with the final production image during the first boot.Manufacturing-wise,thisprocedure may be time-consuming and inconvenient.On the other hand,NAND flash is significantly cheaperthan NOR flash,so a combined NOR/NAND-flash option reduces the BOM cost compared to a NOR-only solution.Starting from4.5.0software packages,Microsemi provides the following flash combination options.•16MB NOR flash+128MB NAND flash•32MB NOR flash+128MB NAND flash•16MB NOR flash+256MB NAND flash•32MB NOR flash+256MB NAND flash•32MB NOR flash only•64MB NOR flash onlyMicrosemi makes no warranty,representation,or guarantee regarding the information contained herein or the suitability of its products and services for any particular purpose,nor does Microsemi assume any liability whatsoever arising out of the application or use of any product or circuit.The products sold hereunder and any other products sold by Microsemi have been subject to limited testing and should not be used in conjunction with mission-critical equipment or applications.Any performance specifications are believed to be reliable but are not verified,and Buyer must conduct and complete all performance and other testing of the products,alone and together with,or installed in,any end-products.Buyer shall not rely on any data and performance specifications or parameters provided by Microsemi.It is the Buyer's responsibility to independently determine suitability of any products and to test and verify the same.The information provided by Microsemi hereunder is provided "as is,where is"and with all faults,and the entire risk associated with such information is entirely with the Buyer.Microsemi does not grant,explicitly or implicitly,to any party any patent rights,licenses,or any other IP rights,whether with regard to such information itself or anything described by such rmation provided in this document is proprietary to Microsemi,and Microsemi reserves the right to make any changes to the information in this document or to any products and services at any time withoutnotice.Microsemi HeadquartersOne Enterprise,Aliso Viejo,CA 92656USAWithin the USA:+1(800)713-4113Outside the USA:+1(949)380-6100Sales:+1(949)380-6136Fax:+1(949)215-4996Email:***************************©2019Microsemi.All rights reserved.Microsemi and the Microsemi logo aretrademarks of Microsemi Corporation.Allother trademarks and service marks are theproperty of their respective owners.Microsemi,a wholly owned subsidiary of Microchip Technology Inc.(Nasdaq:MCHP),offers a comprehensive portfolio of semiconductor and system solutions for aerospace &defense,communications,data center and industrial markets.Products include high-performance and radiation-hardened analog mixed-signal integratedcircuits,FPGAs,SoCs and ASICs;power management products;timing and synchronization devices and precise time solutions,setting the world's standard for time;voice processing devices;RF solutions;discrete components;enterprise storage and communication solutions;security technologies and scalable anti-tamper products;Ethernet solutions;Power-over-Ethernet ICs and midspans;as well as custom design capabilities and services.Microsemi is headquartered in Aliso Viejo,California,and has approximately 4,800employees globally.Learn more at .VPPD-04628Legal。
stm32f10x_conf.h错误解决办法

stm32f10x_conf.h错误解决办法14写第⼀个STM32程序常见错误及解决⽅法1.启动KEIL,创建⼯程以后,先⽤创建⽂件,然;到你的⼯程⽂件夹下⾯,命名为main.c(其他也;然后输⼊以下⼏⾏代码:;#include"stm32f10x.;voidmain(void);}然后点击Build,会有以下报错信息:;C:\Keil\ARM\Inc\ST\STM32;这是说stm32f10x.h中要求⼯程在预编译时;解决办法:请点1. 启动KEIL,创建⼯程以后,先⽤创建⽂件,然后什么也不⼲,直接点击保存,保存到你的⼯程⽂件夹下⾯,命名为main.c(其他也可以,命名为main.c是为了⽅便你同其他的C⽂件快速区分开来)。
然后输⼊以下⼏⾏代码:#include "stm32f10x.h"void main(void){} 然后点击Build,会有以下报错信息:C:\Keil\ARM\Inc\ST\STM32F10x\stm32f10x.h(96): error: #35: #error directive: "Please select first the target STM32F10x device used in your application (in stm32f10x.h file)"这是说stm32f10x.h中要求⼯程在预编译时通过⼀个字符串,来识别所⽤的芯⽚FLASH⼤⼩,然后确定头⽂件中哪些语句有效。
ST把STM32按FLASH⼤⼩尺⼨来归类的,具体在STM32参考⼿册⾥⾯有。
解决办法:请点击中的打开的界⾯中选到选项,然后Define⾥⾯输⼊STM32F10X_MD(因为这个实验板上⽤的STM32F103C8T6对应这个“中等容量的FLASH”,换做其他芯⽚不⼀定是这个字符串),如图:然后点击OK。
再,然后会出第⼆个错误:C:\Keil\ARM\Inc\ST\STM32F10x\stm32f10x.h(8297): error: #5: cannot open source input file "stm32f10x_conf.h": No such file or directory这说明⽂件包含的路径没有设置好。
Nand Flash数据存储规则与数据读写方法

谈到Nand Flash的数据存储方式,关于NAND Flash的数据读写方法方面的文章不多,这篇文章详细讲述了Nand Flash数据存储方式和数据读写方法,并用具体的芯片为例作了详细的解释。
NAND Flash 的数据是以bit 的方式保存在memory cell,一般来说,一个cell 中只能存储一个bit。
这些cell 以8 个或者16 个为单位,连成bit line,形成所谓的byte(x8)/word(x16),这就是NAND Device 的位宽。
这些Line 会再组成Page,(Nand Flash 有多种结构,我使用的Nand Flash 是K9F1208,下面内容针对三星的K9F1208U0M),每页528Byte,每32 个page 形成一个Block,Sizeof(block)=16kByte 。
1 block=16kbyte,512Mbit=64Mbyte,Numberof(block)=4096 1block=32page, 1page=528byte=512byte(Main Area)+16byte(Spare Area)Nand flash 以页为单位读写数据,而以块为单位擦除数据。
按照这样的组织方式可以形成所谓的三类地址:--Block Address -- Page Address --Column Address 。
对于NAND Flash 来讲,地址和命令只能在I/O[7:0]上传递,数据宽度是8 位。
512byte需要9bit来表示,对于528byte系列的NAND,这512byte被分成1st half和2nd half,各自的访问由地址指针命令来选择,A[7:0]就是所谓的column address。
32 个page 需要5bit 来表示,占用A[13:9],即该page 在块内的相对地址。
Block的地址是由A14 以上的bit 来表示,例如512Mb 的NAND,共4096block,因此,需要12 个bit 来表示,即A[25:14],如果是1Gbit 的528byte/page的NAND Flash,则block address用A[26:24]表示。
21-22、NandFlash控制器

//写入地址 列地址(页内地址) NF_ADDRESS(nColAddr & 0xFF); NF_ADDRESS(((nColAddr >> 8)& 0xF)); NF_ADDRESS((nRowAddr >> 0) & 0xFF);
行地址(即页地址)
NF_ADDRESS((nRowAddr >> 8) & 0xFF); NF_ADDRESS((nRowAddr >> 16) & 0x1);
NandFlash控制指令
NandFlash控制指令
NandFlash控制指令
NandFlash控制指令
NandFlash控制指令
NandFlash控制指令
NandFlash控制指令
NandFlash控制指令
NandFlash控制指令
NandFlash控制指令
NandFlash控制指令
• Block:是组成Nand Flash的最大单元,它由若干个 Page组成,Block的个数由Nand Flash的具体容量决定。 Block是Flash擦除的最小单位. • Page: 是Nand Flash的基本读写单位,Page内部划分 为主数据区(Main Area)和备用区(Spare Area)两块区域, 主数据区用于存储写入Flash的数据.备用区一般用于保存该 Page存储属性和数据ECC校验值等信息. • 目前Nand Flash的Page主要有 (512+16)Bytes和 (2048+64)Bytes两种规格,我们通常也忽略掉备用区的 字节数称之为Page大小为512Bytes和2Kbyte的Flash.
NandFlash组成结构
flashcp用法 -回复

flashcp用法-回复Flashcp是一个用于拷贝文件和目录的Linux命令。
它可以在不覆盖已有内容的情况下,将文件或目录从源位置复制到目标位置。
在本文中,我们将一步一步地回答关于Flashcp用法的问题,以帮助读者更好地理解和应用这个命令。
Flashcp的基本用法如下:flashcp [OPTIONS] SOURCE DEST其中,SOURCE表示源文件或目录的路径,DEST表示目标文件或目录的路径。
选项(OPTIONS)是可选的,用于控制拷贝行为的参数,可以根据需要进行设置。
第一步:了解源文件或目录的路径在使用Flashcp命令之前,我们需要明确源文件或目录的位置。
可以通过使用ls命令浏览文件系统来查找源文件或目录的路径。
假设我们要将一个名为"source.txt"的文件复制到一个名为"destination"的目录中,那么源文件的路径将是当前工作目录下的"source.txt"。
第二步:了解目标文件或目录的路径和源文件一样,我们还需要明确目标文件或目录的位置。
可以使用相同的方法来查找目标文件或目录的路径。
在这个例子中,目标目录的路径将是当前工作目录下的"destination"。
第三步:执行拷贝命令有了源文件的路径和目标文件的路径之后,我们可以执行Flashcp命令来进行拷贝操作。
在终端中输入以下命令来复制源文件到目标目录:flashcp source.txt destination/上述命令将会把"source.txt"文件复制到"destination"目录中。
需要注意的是,如果目标目录已经存在同名文件,Flashcp将不会覆盖该文件,而是在文件名后面添加一个数字后缀。
第四步:检查结果在执行了拷贝命令后,我们需要检查拷贝结果以确保操作成功。
可以使用ls命令查看目标目录中是否出现了源文件的副本。
FLASH基础知识

主要内容o第一部分手机使用的存储卡简介o第二部分MTK平台下内部Flash驱动简介o第三部分MTK平台下外部Flash驱动简介2第一部分手机使用的记忆卡简介目前手机上使用的存储卡有:CF、MMC、SD、MINI-SD、RS-MMC、T-Flash、MS、MS PRO、MS Duo九种。
34CF 卡o 即Compact Flash ,尺寸为43mm*36mm*3.3mm,存储文件的速度比较快、存储容量适中,能耗低,在中、高档数字照相机上应用比较多。
CF 存储卡采用Standard ATA/IDE 接口界面,配备有专门的PCM-CIA 适配器(转接卡),笔记本电脑的用户可直接在PCMCIA 插槽上使用,使数据很容易在数码相机与电脑之间传递。
5图1-CF卡6MMC 卡o 即MultiMediaCard 。
由西门子公司和首推CF 的SanDisk 于1997年推出。
1998年1月十四家公司联合成立了MMC 协会(MultiMediaCardAssociation 简称MMCA ),现在已经有超过84个成员。
MMC 的发展目标主要是针对数码影像、音乐、手机、PDA 、电子书、玩具等产品,尺寸只有32mm * 24mm * 1.4mm ,重量在2克以下。
7图2-MMC卡8SD 卡o 即Secure Digital Card 卡,由松下、东芝和SanDisk 联合推出,1999年8月发布。
于2000年2月1日发起成立了SD 协会(Secure Digital Association 简称SDA ),成员公司已经超过90个,其中包括IBM ,Microsoft ,Motorola ,NEC 、Samsung 等。
SD 卡数据传送和物理规范由MMC 发展而来,大小和MMC 差不多,尺寸为32mm * 24mm *2.1mm ,仅重约1.6克。
SD 卡与MMC 卡保持着向上兼容,也就是说,MMC 可以被新的SD 设备存取,兼容性则取决于应用软件,但SD 卡却不可以被MMC 设备存取。
Cisc0路由器模拟实验

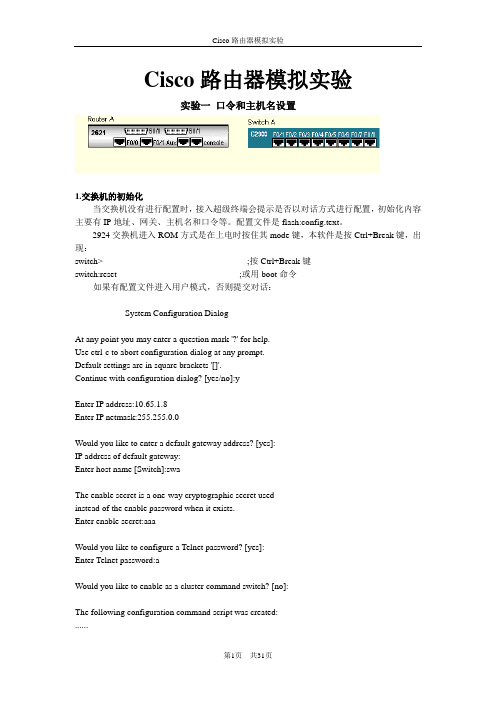
Cisco路由器模拟实验实验一口令和主机名设置1.交换机的初始化当交换机没有进行配置时,接入超级终端会提示是否以对话方式进行配置,初始化内容主要有IP地址、网关、主机名和口令等。
配置文件是flash:config.text。
2924交换机进入ROM方式是在上电时按住其mode键,本软件是按Ctrl+Break键,出现:switch> ;按Ctrl+Break键switch:reset ;或用boot命令如果有配置文件进入用户模式,否则提交对话:--- System Configuration Dialog ---At any point you may enter a question mark '?' for help.Use ctrl-c to abort configuration dialog at any prompt.Default settings are in square brackets '[]'.Continue with configuration dialog? [yes/no]:yEnter IP address:10.65.1.8Enter IP netmask:255.255.0.0Would you like to enter a default gateway address? [yes]:IP address of default gateway:Enter host name [Switch]:swaThe enable secret is a one-way cryptographic secret usedinstead of the enable password when it exists.Enter enable secret:aaaWould you like to configure a Telnet password? [yes]:Enter Telnet password:aWould you like to enable as a cluster command switch? [no]:The following configuration command script was created:......Press RETURN to get started.swa>enpassword:aaaswa#copy run start (保存配置信息)swa#dir flash: (查看闪存中的文件)再次进入对话方式:swa#setup2.路由器的初始化路由器初始化与交换机类似,上电时按Ctrl+Break,进入ROM监控状态router> ;用户模式,按Ctrl+Break rommon>reset ;进入ROM监控状态,复位引导(没有配置文件或采用寄存器设置跳过配置文件提示对话信息)Continue with configuration dialog? [yes/no]:yesAt any point you may enter a question mark '?' for help.Use ctrl-c to abort configuration dialog at any prompt.Default settings are in square brackets '[ ]'.Basic management setup configures only enough connectivityfor management of the system,extended setup will ask youto configure each interface on the systemWould you like to enter basic management setup? [yes/no]:yesConfiguring global parameters:Enter host name [router]:ra回车The enable secret is a password used to protect access toprivileged EXEC and configuration modes. This password,after entered,becomes encrypted in the configuration.Enter enable secret:aaa回车The enable password is used when you do not specify anenable secret password,with some older software versions,and some boot images.Enter enable password:aa回车The virtual terminal password is used to protectaccess to the router over a network interface.Enter virtual terminal password :a回车Enter interface name used to connect to the managementnetwork from the above interface summary:FastEthernet0/0回车Configuring interface FastEthernet0/0:回车Use the 100 Base-TX (RJ-45) connector? [yes]:回车Operate in full-duplex mode? [no]:回车Configure IP on this interface? [yes]:回车IP address for this interface [ ]:10.1.1.1回车Subnet mask for this interface [ ]:255.0.0.0回车[0] Go to the IOS command prompt without saving this config.[1] Return back to the setup without saving this config.[2] Save this configuration to nvram and exit.Enter your selection [2]:回车ra>enpassword aaa (进入特权模式)ra#show run (显示配置信息)ra#w (保存配置信息)ra#dir flash: (显示配置文件)(配置文件在2621路由器不能删除,放弁配置文件要用寄存器设置0x2142);3. 用命令行设置交换机和路由器的口令和主机名交换机和路由器的口令和主机名的设置基本相同,在提问对话时,回答n,则进入命令行的状态。
FPGA配置

Stratix II √ √ √
Cyclone II √ √
Cyclone √ √
APEX II √
Mercury √
ACEX 1K √
FLEX6000 √
被动串行(PS) 主动串行(AS) 快速被动并行(FPP) 被动并行同步(PPS)
√
√ √ √ √ √ √ √ √ √
被动并行异步(PPA)
被动串行异步(PSA) JTAG
7
FPGA 配置流程图
8
Power-Up Sequence
volts
Power supply ramp time, TRAMP
time Device Power Sequence Device Mode Power-off Power-Up Power-On
POR
Configuration
User- Mode
5
1.2 FPGA配置过程
FPGA的配置包括3各阶段:复位、配置和初始化。
复位
配置
配置过程波形图
初始化
进入 用户模式
6
1.2 FPGA配置过程
FPGA的配置包括3各阶段:复位、配置和初始化。
复位
配置
配置数据写入到器件中
初始化
器件内部逻辑和寄存器 初始化,I/O缓冲使能
进入 用户模式
配置过程波形图
14
VCC
VCC
VCC
10k
10k
10k
Cylone(Cyclone II) FP GA
nSTATUS CONFIG_DONE nCONFIG nCE 10k nCEO N.C.
EP CS
DATA DCLK nCS ASDI DATA0 DCLK nCSO ASDO MSEL0 MSEL1 low or high
