网件NETGEAR设置说明书
netgear无线路由器设置图文详解
netgear无线路由器设置图文详解netgear无线路由器在市场上也占有很大的份额,而我们对netgear无线路由器设置却可能不太了解,下面是店铺整理的netgear 无线路由器设置的相关知识,希望对您有一些帮助!netgear无线路由器设置图文详解1.进入初始的设置向导后,我们发现有5个步骤。
前面两个步骤是提醒用户需要做的准备工作以及连接设备,这里我们不做详细阐述,跳过前两个步骤,直接进入第三步——激活网络。
页面提示我们是否通过设置向导设置网络。
这里本人建议对路由器设置还不大熟悉的大虾们选择“是”,通过向导设置,方便省事。
然后我们点击下一步。
2.接着,系统要求我们设置无线网络名,用于在多个无线网络下,对此网络进行识别。
如果采用默认名字的话,很有可能跟别人的热点重名,会造成很大干扰,所以我们最好改一个个性化的SSID。
输入好自定义名字之后,点击下一步进入下一个步骤。
3.接着我们进入第四步骤——网络安全。
简单的选择是否引导无线安全设置。
选择是,点击下一步继续设置。
4.接着系统询问我们希望使用哪种加密功能,由于我的设备支持WPA-PSK加密方式,所以选择了这个选项。
大家也可以根据自己设备的具体状况选择相应的加密方式,然后点击下一步输入密匙。
5.接下来的这一步非常简单,输入密码即可。
不过这一页面的亮点在打印按钮上,由此看出Netgear为用户考虑周到,方便用户把密码打印下来,以便日后忘记密码后能够有迹可寻。
6.最后,系统询问我们是否更改管理员的帐号密码。
这里我们建议大家把管理员帐号密码改成一个自己不易忘记而别人又不知道的密码,这样便能防止别人胡乱修改你的设置。
如果不需要更改,则选择下面的选项,点击下一步。
7.这样,我们就进入了第五步骤,完成了网络设置向导。
8.完成设置向导后,我们进入基本设置页面。
首先我们需要弄清楚我们是否通过拨号的方式上网,一般ADSL用户都是使用拨号方式进行上网,专线的话则不需要拨号。
网件NETGEAR设置说明书
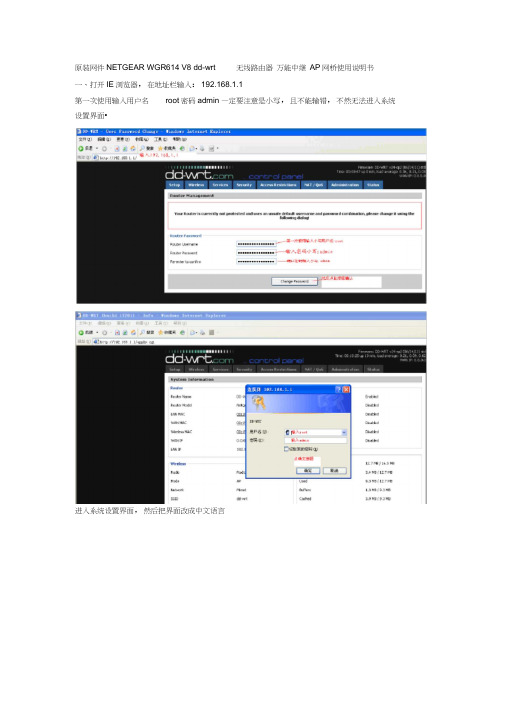
原装网件NETGEAR WGR614 V8 dd-wrt 无线路由器万能中继AP网桥使用说明书一、打开IE浏览器,在地址栏输入:192.168.1.1第一次使用输入用户名root密码admin —定要注意是小写,且不能输错,不然无法进入系统设置界面•进入系统设置界面,然后把界面改成中文语言3 I l.h ulld 1 T?<UI | ■ ■ 1st E lit IM ■ VtnddDVf lift BiEAiit Xfepl fUfi-EMML.-W L^rd bupwtMT1C n-vr-IP Flftrr(drifiatl: Hine fnr P :TB 匚ar”b5 Ccrfcrcrdd-wrt..-nrnccrtnol panel|时机孑&: £Xj-«A"l € i -^xr 厲:!aa.■ r :・artM — e RM 轨灯巧您 册」厢■' I-.-iiiArbwr^t^F^inn™ i .ii 〔.-.naiWBwmt t 申 fti 怯(wtni#whWillFvU 审hs.堆事屮 **ft* ki*■wtw PawRvdi R^jki 」箝”3亡 EnJrr 刊肝rE加卸d EsTtnWebj^CLU Pcdtgriijn Twirls JE?^hh Wa ShniS Sfe P*3£rd h«L£rtli \ Ip-r § 打kWgH M1P '□ HTTPStavw^n AniE ■■■getting<*) Enahb Dusaih捌 turn 怙 Wet 'M fltfriTijri- * 卅*iriitiri^dl d dnc WtuipFngl^i■□-irme liaJlEind•-中文:界面R*uter M*R^perwse<it JTftl' Mil.'置总塑 换炉 工AH) —.申中M 中电n t.2屮时下粒剽止进项如果还没有变成中文界面,请点IE 菜单栏的刷新,就会出现中文界面,或者重新打开IE 浏览器 二、上网设置(此功能相当于一台普通的无线路由器, 下面的“三、无线中继设置”可省略) 1基本设置。
NETGEAR 非网管交换机操作指南说明书

注:产品外观因型号而异。
第 2 步:连接到电源并开机。
第 1步:连接设备。
注:电源适配器因地区而异。
计算机因特网第 3 步:检查状态。
电源 LED端口 LED通电以太网连接未通电活动(闪烁)无连接(熄灭)技术支持感谢您购买此 NETGEAR 设备。
安装设备后,请找到产品标签上的序列号并使用它在https://上注册产品。
只有在注册产品后,才能使用 NETGEAR 电话支持。
NETGEAR 建议通过 NETGEAR网站注册产品。
如需产品更新和网络支持,请访问 。
NETGEAR 建议您只使用 NETGEAR 官方支持资源。
您可以在以下网站上找到多种语言的安装指南: 。
有关产品规格的信息,请参阅产品页面或通过以下网站下载数据表: 。
如需最新的欧盟符合性声明,请访问/app/answers/detail/a_id/11621/ 。
有关法规遵从性信息,请访问/about/regulatory/ 。
连接电源之前,请查阅合规性文件。
警告:出于安全考虑,务必仅使用随附产品销售的电源适配器。
如果您不确定要使用哪种电源适配器,请与 NETGEAR 技术支持联系。
支持热线:4008303815中文技术支持站点:网件社区:技术规格百兆和千兆非网管交换机200 和 300 系列200 系列:• 8 口千兆交换机 GS208300 系列:• 8 口百兆交换机 FS308• 8 口千兆交换机 GS3082016 年 7 月有限保修产品注册感谢您选择NETGEAR产品。
如果您想注册您的产品、获取免费支持期(可以于购买产品后的 90 天内通过电话获得基础技术支持)以及查看通用的产品信息和文档,请浏览:https:///registration/login.aspx敬请保管好您产品的有效购买凭证。
本保修声明涵盖的产品NETGEAR 通过本保修声明赋予消费者的权益是对消费者在与商品和服务保修相关的中国法律项下所享有的权利和救济的补充(如果其范围超过消费者在中国法律项下的权利和救济)。
NETGEAR 产品指南说明书
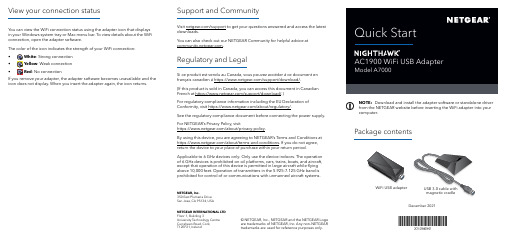
Support and CommunityVisit /support to get your questions answered and access the latest downloads.You can also check out our NETGEAR Community for helpful advice at .Regulatory and LegalSi ce produit est vendu au Canada, vous pouvez accéder à ce document en français canadien à https:///support/download/.(If this product is sold in Canada, you can access this document in Canadian French at https:///support/download/.)For regulatory compliance information including the EU Declaration of Conformity, visit https:///about/regulatory/.See the regulatory compliance document before connecting the power supply.For NETGEAR’s Privacy Policy, visithttps:///about/privacy-policy.By using this device, you are agreeing to NETGEAR’s Terms and Conditions at https:///about/terms-and-conditions. If you do not agree, return the device to your place of purchase within your return period.Applicable to 6 GHz devices only: Only use the device indoors. The operation of 6 GHz devices is prohibited on oil platforms, cars, trains, boats, and aircraft, except that operation of this device is permitted in large aircraft while flying above 10,000 feet. Operation of transmitters in the 5.925-7.125 GHz band isprohibited for control of or communications with unmanned aircraft systems.December 2021You can view the WiFi connection status using the adapter icon that displays in your Windows system tray or Mac menu bar. To view details about the WiFi connection, open the adapter software.The color of the icon indicates the strength of your WiFi connection:• White : Strong connection •Yellow : Weak connection •Red : No connectionIf you remove your adapter, the adapter software becomes unavailable and the icon does not display. When you insert the adapter again, the icon returns.View your connection statusNOTE: Download and install the adapter software or standalone driver from the NETGEAR website before inserting the WiFi adapter into your computer.NETGEAR, Inc.350 East Plumeria Drive San Jose, CA 95134, USA NETGEAR INTERNATIONAL LTD Floor 1, Building 3University Technology Centre Curraheen Road, Cork, T12EF21, Ireland© NETGEAR, Inc., NETGEAR and the NETGEAR Logo are trademarks of NETGEAR, Inc. Any non-NETGEAR trademarks are used for reference purposes only.The adapter software allows you to connect the adapter to a WiFi network. You can install the adapter software on Windows or Mac computersInstall the Windows adapter software1. Visit https:///support/download/?model=A7000 anddownload the latest software file for Windows.2. Unzip the files from the .zip file.3. Double-click the file that ends in.exe and does not include Standalone inthe file name.4. Follow the prompts to complete installation.Install the Mac adapter software1. Visit https:///support/download/?model=A7000 anddownload the latest software file for Mac.2. Unzip the files from the .zip file.3. Double-click the file that ends in .dmg.4. Follow the prompts to complete installation.Install the Windows or Mac adapter softwareJoin a WiFi networkThe Windows standalone driver allows you to use your computer’s built-inWindows WiFi network settings to connect the adapter to a WiFi network insteadof using the adapter software.1. Visit https:///support/download/?model=A7000 anddownload the latest software file for Windows.2. Unzip the files from the .zip file.3. Double-click the file that ends in.exe and includes Standalone in the filename.4. Follow the prompts to complete installation.Install the Windows standalone driver You can join a WiFi network using the Windows or Mac adapter software, theWindows computer’s built-in Windows WiFi network connection settings, or Wi-FiProtected Setup (WPS) if your WiFi router supports it.Join a WiFi network using the Windows adapter software1. Make sure the adapter software is installed.For more information, see Install the Windows adapter software.2. Insert the adapter into a USB port on your computer.3.4. Click the Join a Network button.5. Select a WiFi network.6. Click the Connect button.7. If the WiFi network is secure, enter its password or network key.The adapter joins the WiFi network, which might take a few minutes.Join a WiFi network using WPSsettings are saved in a profile.Join a WiFi network using the Mac adapter software1. Make sure the adapter software is installed.For more information, see Install the Mac adapter software.2. Insert the adapter into a USB port on your computer.3.A list of WiFi networks in your area displays.4. Select a WiFi network.5. If the network is secure, enter its password or network key, and click the Joinbutton.The adapter joins the network, which might take a few minutes.After installing the adapter software or standalone driver, you can insert your• With the cradle: Place the adapter into thecradle and connect the USB cable to the USBport on your computer.When the adapter is placed in the cradle, youcan fold out the adapter to its maximum anglefor increased WiFi performance.NOTE:to connect the adapter to the USB port on your computer. Use themight affect the performance of youradapter.• Without the cradle: Insert the adapter intoa USB port on your computer. Position theperformance.Insert the adapter into your computer Join a WiFi network using the built-in Windows WiFi networksettings1. Make sure the standalone driver is installed.For more information, see Install the Windows standalone driver.2. Insert the adapter into a USB port on your computer.3. Open the WiFi network settings on your computer and select a WiFi networkto connect.For more information about how to connect to a WiFi network using yourcomputer, see the Microsoft Windows support site.。
NETGEAR无线路由器说明书

注意:完成上述连接并启动Modem 及路由器后,请检查路由器面板的指示灯。若正确连接,电源指示
灯、无线指示灯、WAN 口指示灯及对应的LAN 口指示灯均亮,对照“WGR614v10 的指示灯及端口” 介
绍检查指示灯是否显示正常。
计算机网络属性配置
例:某电信ADSL 用户,电信提供的相关信息如下:
宽带用户名gzDSL1234@163.gd
密码12345678
1.
选择菜单设置→基本设置:第一个问题您的因特网
连接需要登录吗? 选择“ 是” ;因特网服务提供商
选择“PPPoE” ;在登录名和密码后面的空白栏中分
别输入所用宽带的帐号和密码,如右图:
WGR614v10
固件升级
进入管理界面,显示路由器正在检查固件升级。若选中“ 登
录时检测新版本” 复选框,则每次登录WGR614v10 管理界
面时,路由器会自动检查NETGEAR 服务器,查看是否有
新的固件发布。
通常情况下,路由器现有固件都可以稳定工作,不必经常
升级。如果需要刷新固件,建议您登录NETGEAR 中文站
201-12333-01
手动连接:若您希望自己控制路由器与Internet 的连接或断开,请选择手动连接;需要上网时,首先进
入路由器管理界面,在路由器状态→连接状态中点击连接即可,需要注意的是,手动连接后路由器将一
直保持在线,必须在连接状态中点击断开连接方可断开与Internet 的连接。
端口已获取到IP 地址,说明路由器与Internet 连接成功。
关于WGR614v10
连接模式的说明
网件NETGEAR WNR2000无线路由器设置指南
网件NETGEAR WNR2000无线路由器设置指南无线路由器已经成为现代生活中必不可少的一部分。
它们为我们提供了无线网络连接,使我们能够在家中工作、学习和娱乐。
本文将为您提供关于如何设置网件NETGEAR WNR2000无线路由器的详细指南。
请按照以下步骤进行设置,以确保您的路由器正常工作和保持安全。
1. 连接硬件设备在开始设置之前,首先确保您已正确连接所有硬件设备。
将您的无线路由器与电源适配器连接,并将其插入电源插座。
接下来,将一根网线连接到您的互联网提供商(ISP)的调制解调器,并将其插入无线路由器的WAN端口。
2. 访问路由器设置页面要访问网件NETGEAR WNR2000无线路由器的设置页面,首先打开您的互联网浏览器,如Google Chrome、Mozilla Firefox或Microsoft Edge。
在浏览器的地址栏中键入路由器的默认网关地址,通常为192.168.1.1。
按下回车键,将会显示一个登录页面。
3. 登录路由器在登录页面中,输入默认的用户名和密码。
默认情况下,网件NETGEAR WNR2000的用户名为"admin",密码为空。
如果您之前更改过用户名和密码,请使用您自己设置的来登录。
点击“登录”按钮,您将会被重定向到路由器的设置界面。
4. 更改管理员密码为了保护您的路由器和网络安全,我们建议您立即更改管理员密码。
在设置页面中,找到“管理”或“管理设置”选项。
在该选项下,您可以更改管理员密码为一个强密码,以防止他人未经授权地访问您的路由器。
5. 配置无线网络设置在设置页面中,找到“无线设置”或“无线网络”选项。
在该选项下,您可以配置无线网络的名称(也称为SSID)和密码。
SSID是您无线网络的名称,将被其他设备用于识别和连接到您的网络。
密码是访问您网络所需的安全代码,以防止未经授权的设备访问。
强烈建议您使用WPA2-PSK加密,并选择一个强密码以确保网络的安全。
美国网件路由器netgear如何设置
美国网件路由器netgear如何设置netgear路由器中文名为美国网件路由器。
设置基本和国内的小型路由器WEB设置是一样的。
只是登录地址不同。
下面是店铺整理的具体设置方法!美国网件路由器netgear设置方法用一根网线一端连接netgear路由器的LAN任意一个口,另一端连接电脑网卡口。
确保你的IP地址是自动获取的。
然后在浏览器中输入。
(这个地址在路由器的背面也能找到,有时候这个地址输入打不开网页,应多试几次。
如果还是进不去就试试192.168.0.1或者192.168.1.1)登录用户名密码可以路由器底部查看,默认的是:用户名admin 密码是 password进入路由器,点击“基本设置”。
如果你是家庭用户选择下面第一项.如果是单位并且网络公司给你的是一个静态IP地址,选择下面第二项。
如果你是在单位网络的基础上连接,选择第三项或者第二项。
第一项:您的因特网连接需要登录吗? 如果你是家庭用户,买带宽时,会给你一个用户名和密码。
那么选择是,输入网络公司给你的用户名和密码就行了。
第二项:因特网IP地址和域名服务器 (DNS) 地址都是网络公司给你的。
第三项:IP和DNS都从ISP处动态获取。
点击“无线设置”:无线网络标识(SSID):为你连接无线的时候看到的名称。
加密选择:WPA-PSK[TKIP]+WPA2-PSK[AES]。
密码:为登录无线时需要输入的密码。
点击“局域网IP设置”。
ip地址设置为192.168.X.1(x可以为0到255,但是推荐使用100到255之间,以免和局域网其他路由器网段重复)。
IP子网掩码为255.255.255.0,其他设置如下图就行。
设置完上面的几个就基本完成了。
外线接广域网蓝口WAN。
就可以上网了,无线也可以连接了。
netgear无线路由器设置以及设置密码
netgear无线路由器设置以及设置密码随着互联网的普及和应用的需求增加,无线路由器成为了现代家庭和办公场所必备的网络设备之一。
Netgear作为一家知名的网络设备制造商,其无线路由器产品在市场上非常受欢迎。
本文将为您介绍如何设置Netgear无线路由器并设置密码,以确保网络的安全和稳定。
第一步:连接和设置1. 确保您的Netgear无线路由器已正确连接到电源并且开启。
您可以通过观察路由器的指示灯来确认电源是否正常工作。
2. 将您的电脑或移动设备与Netgear无线路由器进行连接。
您可以使用无线连接或者通过网线连接到路由器的LAN接口。
3. 打开您的浏览器,输入默认的路由器IP地址。
通常情况下,Netgear路由器的默认IP地址为192.168.1.1或者192.168.0.1。
按下回车键进入路由器的管理界面。
4. 输入您的管理员用户名和密码。
默认情况下,Netgear路由器的用户名为"admin",密码为空。
如果您之前更改过这些信息,请使用您所设置的用户名和密码进行登录。
第二步:基本设置1. 在路由器的管理界面中,找到“基本设置”或类似的选项。
在这个页面上,您可以配置路由器的基本网络设置。
2. 首先,在“Internet连接类型”或“WAN设置”中选择您的网络连接类型。
如果您是通过电缆或DSL接入互联网,选择动态IP。
如果您是通过宽带账号登录,选择PPPoE。
3. 根据您的网络服务提供商的要求,输入相应的网络设置信息,比如IP地址、子网掩码、默认网关和DNS服务器。
4. 然后,设置无线网络名称(SSID)。
您可以设置一个易于记忆的名称,并确保启用无线网络。
5. 设置无线网络的安全性。
选择WPA2-PSK(当前较为安全的加密方式),并设置一个强密码。
密码应包含大小写字母、数字和特殊字符,并且足够长以提高安全性。
6. 保存并应用更改。
路由器将重新启动并应用新的设置。
第三步:高级设置1. 在路由器管理界面中,找到“高级设置”或类似的选项。
NETGEAR路由器用户手册说明书

iTunes Server and AirPlay Setup for RoutersUser ManualSeptember 2015202-11594-01350 East Plumeria DriveiTunes Server and AirPlay Setup for RoutersSupportThank you for purchasing this NETGEAR product. You can visit /support to register your product, get help, access the latest downloads and user manuals, and join our community. We recommend that you use only official NETGEAR support resources.ConformityFor the current EU Declaration of Conformity, visit /app/answers/detail/a_id/11621.ComplianceFor regulatory compliance information, visit /about/regulatory.See the regulatory compliance document before connecting the power supply.Trademarks© NETGEAR, Inc. NETGEAR and the NETGEAR Logo are trademarks of NETGEAR, Inc. Any non-NETGEAR trademarks are used for reference purposes only.ContentsChapter 1Set Up the Router as an iTunes ServerSet Up the Router as an iTunes Server. . . . . . . . . . . . . . . . . . . . . . . . . . . . . . . . . . . 5Supported NETGEAR Routers for iTunes Server. . . . . . . . . . . . . . . . . . . . . . . . . 5Supported USB Storage Devices. . . . . . . . . . . . . . . . . . . . . . . . . . . . . . . . . . . . . . 5Supported File Formates for iTunes Server. . . . . . . . . . . . . . . . . . . . . . . . . . . . . 5Maximum Number of Files iTunes Server Supports. . . . . . . . . . . . . . . . . . . . . . 6 Set Up the Router’s iTunes Server With iTunes. . . . . . . . . . . . . . . . . . . . . . . . . . . . 6Set Up the Router’s iTunes Server With the Remote App . . . . . . . . . . . . . . . . . . . 8 Chapter 2Set Up AirPlay and Stream Media Using iTunes Server Set Up AirPlay and Stream Media Using iTunes Server . . . . . . . . . . . . . . . . . . . . 141This chapter contains the following sections:•Set Up the Router as an iTunes Server•Set Up the Router’s iTunes Server With iTunes•Set Up the Router’s iTunes Server With the Remote AppFor more information about the topics covered in this manual, visit the support website at .Set Up the Router as an iTunes ServerIf your router can be set up as an iTunes server, the router’s iTunes Server lets you play music from a USB storage device that is connected to a USB port on your router with iTunesNote:The router shown in this image is the Nighthawk R7000.Supported NETGEAR Routers for iTunes ServerTo determine if your NETGEAR router can be set up as an iTunes server, see your router’s user manual, which is available at .Supported USB Storage DevicesFor the most up-to-date list of USB storage devices that your router supports, visit/readyshare.Supported File Formates for iTunes ServerThe following music file formats are supported with iTunes Server:•MP3•AAC•FLACMaximum Number of Files iTunes Server SupportsThe maximum number of music files supported is 10,000.Set Up the Router’s iTunes Server With iTunes You can play music from a USB storage device that is connected to your router with iTunes on your Windows or Mac computer using Home Sharing. To set up Home Sharing, you need an Apple account and the latest version of iTunes installed on your computer.Note:The iTunes images used in this section were taken with a MacBookAir with iTunes version 12.2.1.16 installed.To set up the router’s iTunes server to play music on iTunes:1. Connect a USB storage device to a USB port on your router.2. Launch a web browser from a computer or WiFi device that is connected to your router’snetwork.3. Enter .A login window displays.4. Enter the router user name and password.The user name is admin. The default password is password. The user name andpassword are case-sensitive.The BASIC Home page displays.5. Select ADVANCED > USB Functions > ReadySHARE Storage.The USB Storage (Advanced Settings) page displays.Note:This navigation path might be different depending on your router. Seeyour router’s user manual for more information. Your router’s usermanual is available online at .6. Select the Media Server tab.7. Select the Enable iTunes Media Server (Music Only) check box and click the Applybutton.Your settings are saved.8. On your Windows or Mac computer, launch iTunes.9. Select File > Home Sharing > Turn On Home Sharing.10. Enter your Apple ID email address and password and click the Turn On Home Sharingbutton.When Home Sharing is enabled, a Home Sharing icon displays in iTunes .11. Click the Home Sharing icon and from the menu, select your router.The music that is on the USB storage device that is connected to the router displays in iTunes.Set Up the Router’s iTunes Server With the Remote App You can play music from a USB storage device that is connected to your router on your iPhone or iPad using the Apple Remote app.Note:The Remote app images used in this section were taken with aniPhone 5S running iOS 8.4.To set up the router’s iTunes server to play music on your iPhone or iPad:1. Connect a USB storage device to a USB port on your router.2. Connect your iPhone or iPad to your router’s WiFi network.3. Download the Remote app from the Apple App Store.4. Launch the Remote app from your iPhone or iPad.5. Click the Add a Device button.6. Specify the passcode in the router to set up your iTunes Server:unch a web browser from a computer or WiFi device that is connected to your router’snetwork.b. Enter .A login window displays.c. Enter the router user name and password.The user name is admin. The default password is password. The user name andpassword are case-sensitive.The BASIC Home page displays.d. Select ADVANCED > USB Functions > ReadySHARE Storage.The USB Storage (Advanced Settings) page displays.Note:This navigation path might be different depending on your router. See your router’s user manual for more information. Your router’s usermanual is available online at .e. Select the Media Server tab.f. Select the Enable iTunes Media Server (Music Only) check box and click theApply button.g. Enter the passcode and click the Allow Control button.Your settings are saved.Your iPhone or iPad pairs with the router and the iTunes Server is ready. The router displays in the Remote app.7. In the Remote app, tap the router your iPhone or iPad is connected to.The music that is on the USB storage device that is connected to the router displays in the app.2If you own an Apple TV, you can use AirPlay to stream media from a USB storage device connected to your router onto a TV.Set Up AirPlay and Stream Media Using iTunes Server You must first set up iTunes server on your iOS device before you can stream the media from the USB storage device. For more information about setting up iTunes server, see Set Up the Router’s iTunes Server With the Remote App on page8.To use an Apple TV and the Remote app to stream media from your USB storage device to a TV:1. Make sure that your Apple TV is connected to your router’s network.For more information, see the documentation that came with your Apple TV.2. Connect a USB storage device to a USB port on the router.3. Connect your iOS device to the router’s WiFi network.4. Set up iTunes server on your iOS device using the Remote app.For more information see, Set Up the Router’s iTunes Server With the Remote App on page8.5. On your iOS device, swipe up from the bottom of your screen.The Control Center displays.6. T ap AirPlay.7. T ap Apple TV.8. Slide the Mirroring slider to right to display your iOS device’s screen on the TV.9. On your iOS device, open the remote app.10. T ap the router your iPhone or iPad is connected to.11. T ap a media file.The media file displays on your TV.。
netgear网件路由器设置.doc
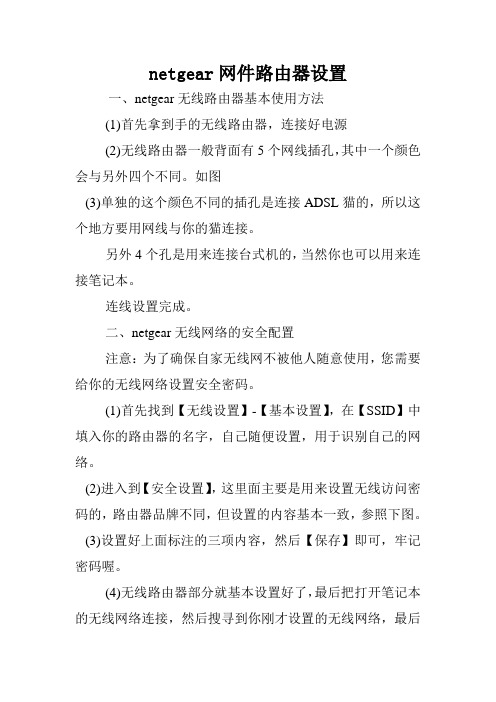
netgear网件路由器设置一、netgear无线路由器基本使用方法(1)首先拿到手的无线路由器,连接好电源(2)无线路由器一般背面有5个网线插孔,其中一个颜色会与另外四个不同。
如图(3)单独的这个颜色不同的插孔是连接ADSL猫的,所以这个地方要用网线与你的猫连接。
另外4个孔是用来连接台式机的,当然你也可以用来连接笔记本。
连线设置完成。
二、netgear无线网络的安全配置注意:为了确保自家无线网不被他人随意使用,您需要给你的无线网络设置安全密码。
(1)首先找到【无线设置】-【基本设置】,在【SSID】中填入你的路由器的名字,自己随便设置,用于识别自己的网络。
(2)进入到【安全设置】,这里面主要是用来设置无线访问密码的,路由器品牌不同,但设置的内容基本一致,参照下图。
(3)设置好上面标注的三项内容,然后【保存】即可,牢记密码喔。
(4)无线路由器部分就基本设置好了,最后把打开笔记本的无线网络连接,然后搜寻到你刚才设置的无线网络,最后点击连接,输入你自己刚刚设置的密码,一切OK啦。
三、netgear无线路由器软件的设置方法要让无线路由器正常工作,需要对路由器进行软件设置,告诉路由器你的ADSL用户名和密码,还有如何对你的无线网络进行加密。
(1)用一根网线,把笔记本与路由器连接(图中四个孔其一),然后你就可以通过浏览器对无线路由进行设置了。
路由器地址是:192.168.1.1,直接输入访问即可,访问成功的话,浏览器会提示你输入登陆用户名和密码,绝大多数的路由器用户名是admin,密码也是admin。
(2)登陆后,您首先要设置ADSL虚拟拨号(PPPoE),输入你的ADSL用户名密码,这样路由器就能自动拨号上网。
如果您是把这台无线路由与另外一台有线路由相连,那么你可以跳过ADSL设置的步骤,直接设置无线网络。
(3)找到【快速设置】,设置ADSL。
由于不同品牌路由器,设置界面不同,所以这里仅以IPCom无线路由器为例,其它品牌路由器的设置过程基本类似,总之你找到设置ADSL的地方就可以了。
网件(NETGEAR)无线路由器设置图文教程
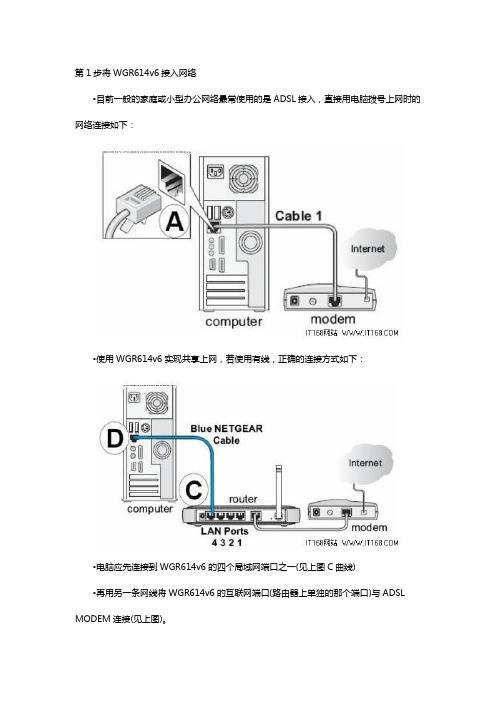
第1步将WGR614v6接入网络•目前一般的家庭或小型办公网络最常使用的是ADSL接入,直接用电脑拨号上网时的网络连接如下:•使用WGR614v6实现共享上网,若使用有线,正确的连接方式如下:•电脑应先连接到WGR614v6的四个局域网端口之一(见上图C曲线)•再用另一条网线将WGR614v6的互联网端口(路由器上单独的那个端口)与ADSL MODEM连接(见上图)。
第2步电脑网络属性配置•在配置路由器前,首先要对用来管理路由器的电脑进行网络属性的配置,下面以Windows XP Home Edition Service Pack 2为例来说明电脑的配置过程:2.1. 启动电脑,右键单击桌面或“开始”中的“网上邻居”选“属性”,右键单击“本地连接”选“属性”,选中“Internet协议(TCP/IP)”,点击“属性”:2.2. 将电脑设为“自动获得IP地址”,“自动获得DNS服务器地址”点击“确定”:第3步登录路由器3.1. 确保电脑已按照第一步所述通过有线连接到路由器的四个LAN口之一,启动路由器。
3.2. 打开电脑的Internet Explorer或者Netscape Navigator等其他浏览器,在浏览器的地址栏键入http://192.168.1.1/basicsetting.htm后回车『注』初次设置路由器须按以上步骤,以后管理路由器或者更改配置,只需要在IE浏览器中输入192.168.1.1,此时路由器会要求提供用户名和密码。
登录路由器用户名:admin,密码:password,都是小写:默认进入的页面是”基本设置”页面,如图:『注意』无论您的宽带采用何种接入方式,都须先通过有线方式连接到路由器,在基本设置页面中进行相应的设置,完成后无线收发功能才会开启,才可使用无线连接。
接下去的内容就将介绍ADSL拨号、固定IP及动态IP三种宽带接入方式在基本设置中的配置。
重要提示:如果3.2的操作结果并非如上所述,而是无法打开网页,则继续3.3步骤,否则跳至第4步。
网件路由器设置
网件路由器设置一、简介网件(Netgear)是一家全球领先的网络设备制造商,其路由器产品在用户中非常受欢迎。
通过网件路由器,用户可以将家庭或办公室的网络连接到互联网,实现无线和有线设备的联网访问。
本文将介绍网件路由器的设置过程,帮助用户快速搭建自己的网络环境。
二、前期准备在开始设置网件路由器之前,确保完成了以下准备工作:1. 购买了一台网件路由器,并确保其处于正常状态。
2. 准备了一个可以连接路由器的电脑或手机。
3. 能够连接到互联网的宽带或者光纤网络。
三、连接路由器1. 确保电脑或手机处于可连接网络的状态,打开无线或有线连接。
2. 将电脑或手机的网线或无线信号连接到网件路由器的WAN口或LAN口。
如果使用有线连接,插入网线时要确保连接牢固。
3. 如果是使用无线连接,打开电脑或手机的Wi-Fi功能,并搜索网络列表中的网件路由器名称(通常以NETGEAR_开头)。
选择该网络并输入密码进行连接。
四、登录路由器管理界面1. 打开电脑或手机上的浏览器,输入默认的路由器管理IP地址,通常为192.168.1.1。
如果无法访问,请参考路由器说明书中的IP地址。
2. 在弹出的登录界面中,输入初始的用户名和密码,默认为admin/admin。
如果之前更改过密码,请输入新密码进行登录。
五、设置无线网络1. 在管理界面中,找到“无线设置”菜单或选项。
2. 在无线设置页面中,可以更改无线网络的名称(SSID)、加密方式(如WPA2-PSK)、密码等参数。
确保设置一个足够强壮的密码以提高网络安全性。
3. 配置完成后,保存设置并等待路由器重启。
六、配置有线网络1. 在管理界面中,找到“LAN设置”菜单或选项。
2. 在LAN设置页面中,可以更改局域网的IP地址、子网掩码等参数。
如果不太了解这些参数的含义,建议使用默认设置。
3. 确认设置无误后,保存设置并等待路由器重启。
七、高级功能设置1. 在管理界面中,可以找到各种高级功能设置,如端口转发、UPnP、QoS等。
美国网件(NETGEAR)路由器的设置
美国⽹件(NETGEAR)路由器的设置美国⽹件NETGEAR)路由器的设置1、在设置⽹件(NETGEAR)路由器的时候,可以在浏览器中输⼊,也可以输⼊,也可以直接输⼊IP地址:192.168.1.1打开设置界⾯。
其实,⽹件(NETGEAR)路由器机⾝的标签(铭牌)上,已经标明了登陆地址的。
初次设置,当精灵设置向导询问“需要NETGEAR精灵为您提供帮助吗?”请选择:不需要,我想⾃⼰配置因特⽹连接——>点击“下⼀步”——>再点击“确定”;有的⽤户或许会看到写有“重要的更新”的提⽰,请点击继续。
、设置NETGEAR路由器上⽹重要说明:宽带类型有三种:PPPoE、固定IP、动态IP。
⽤户在设置之前,应该弄清楚⾃⼰办理的宽带属于哪⼀种类型;如果不清楚,可以拨打宽带运营商的客服电话,进⾏咨询。
(1)PPPoE拨号上⽹设置:PPPoE拨号介绍:宽带运营商会提供⼀个宽带账号、宽带密码给⽤户,在未使⽤路由器的时候,电脑上需要⽤“宽带连接”程序拨号上⽹。
详细设置:点击“设置”——>“基本设置”——>“您的因特⽹连接需要登录吗”选择:是——>“因特⽹服务提供商”选择PPPoE——>在“登录”和“密码”后⾯的空⽩栏中分别输⼊:宽带的帐号、宽带密码——>“因特⽹IP地址”选择:从ISP处动态获取——>点击“应⽤”如下图:⽹线(NETGEAR)路由器PPPoE拨号上⽹设置(2)动态IP上⽹设置动态IP上⽹介绍:如果直接使⽤电脑上⽹时,电脑中的IP和DNS只需要设置为:⾃动获得,且⽆需运⾏任何拨号或连接程序,就能上⽹,那么您就属于这种接⼊⽅式了。
详细设置:选择菜单“设置”—>“基本设置”—>“您的因特⽹连接需要登录吗”选择:否——>“因特⽹IP地址”选择:从ISP处动态获取——>“域名服务器(DNS)地址”选择:从ISP处动态获取——>“路由器MAC地址”选择:使⽤缺省地址——>点击上⽅“应⽤”如下图⽹线(NETGEAR)路由器动态IP 上⽹设置(3)固定IP上⽹设置固定IP上⽹介绍:宽带运营商会提供固定IP地址、⼦⽹掩码、⽹关、DNS服务器地址给⽤户;未使⽤路由器的情况下,需要在电脑本地连接中,⼿动填写宽带运营商(⽹络管理员)提供的IP地址、⼦⽹掩码、⽹关和DNS,之后电脑才能上⽹。
网件路由器设置教程
网件路由器设置教程
1. 连接网线:将一个端口连接到你的MODEM设备的LAN口,另一个端口连接到网件路由器的WAN口。
2. 电源连接:将路由器插入电源插座,并打开电源开关。
3. 无线网络设置:打开你的电脑或移动设备的无线功能,搜索可用的无线网络,并连接到“NETGEAR”网络。
4. 输入默认IP地址:打开一个网页浏览器,输入“192.168.1.1”(没有引号)作为网址,然后按下回车键。
5. 登录路由器:输入默认的用户名和密码。
默认用户名和密码通常是“admin”,但是如果你之前修改过这些信息,就输入你
自己设置的用户名和密码。
6. 创建管理员密码:为了增加路由器的安全性,你应该创建一个具有强密码的管理员账户。
在设备管理页面上找到“设置管
理员密码”选项,输入一个新密码,并确认。
7. 设置无线网络名称(SSID):在无线设置页面上找到“设置
无线网络名称(SSID)”选项,在相应的输入框中输入你想要
的无线网络名称。
8. 设置无线密码:在同一页面上找到“设置无线安全密码”选项,在相应的输入框中输入一个安全的无线密码,并确认。
9. 应用设置:点击“应用”或“保存”按钮,保存所有的设置。
10. 完成设置:断开电源,等待几秒钟,然后重新连接电源。
这将使新的设置生效,并启用你的无线网络。
希望以上教程对你有所帮助!。
NETGEAR 交换机设置指南说明书
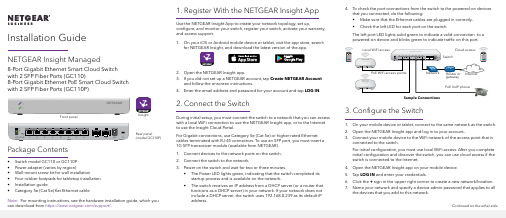
Installation Guide 4. To check the port connections from the switch to the powered-on devicesthat you connected, do the following:• Make sure that the Ethernet cables are plugged in correctly.• Check the left LED for each port on the switch.The left port LED lights solid green to indicate a valid connection to apowered-on device and blinks green to indicate traffic on this port.3. Configure the Switch1. On your mobile device or tablet, connect to the same network as the switch.2. Open the NETGEAR Insight app and log in to your account.3. Connect your mobile device to the WiFi network of the access point that isconnected to the switch.For initial configuration, you must use local WiFi access. After you complete initial configuration and discover the switch, you can use cloud access if the switch is connected to the Internet.4. Open the NETGEAR Insight app on your mobile device.5. Tap LOG IN and enter your credentials.6. Click the + sign in the upper right corner to create a new network/location.7. Name your network and specify a device admin password that applies to allthe devices that you add to this network.NETGEAR Insight Managed8-Port Gigabit Ethernet Smart Cloud Switch with 2 SFP Fiber Ports (GC110)8-Port Gigabit Ethernet PoE Smart Cloud Switch with 2 SFP Fiber Ports (GC110P)Package Contents• Switch model GC110 or GC110P• Power adapter (varies by region)• Wall-mount screw kit for wall installation• Four rubber footpads for tabletop installation• Installation guide• Category 5e (Cat 5e) flat Ethernet cable 1. Register With the NETGEAR Insight AppUse the NETGEAR Insight App to create your network topology, set up, configure, and monitor your switch, register your switch, activate your warranty, and access support.1. On your iOS or Android mobile device or tablet, visit the app store, searchfor NETGEAR Insight, and download the latest version of the app.2. Open the NETGEAR Insight app.3. If you did not set up a NETGEAR account, tap Create NETGEAR Accountand follow the onscreen instructions.4. Enter the email address and password for your account and tap LOG IN. 2. Connect the SwitchDuring initial setup, you must connect the switch to a network that you can access with a local WiFi connection to use the NETGEAR Insight app, or to the Internet to use the Insight Cloud Portal.For Gigabit connections, use Category 5e (Cat 5e) or higher-rated Ethernet cables terminated with RJ-45 connectors. To use an SFP port, you must insert a1G SFP transceiver module (available from NETGEAR).1. Connect devices to the network ports on the switch.2. Connect the switch to the network.3. Power on the switch and wait for two or three minutes.• The Power LED lights green, indicating that the switch completed its startup process and is available on the network.• The switch receives an IP address from a DHCP server (or a router that functions as a DHCP server) in your network. If your network does notinclude a DHCP server, the switch uses 192.168.0.239 as its default IPaddress.Sample Connections Front panelRear panel(model GC110P)InsightNote: For mounting instructions, see the hardware installation guide, which youcan download from https:///support/.Continued on the other side.NETGEAR, Inc.350 East Plumeria DriveSan Jose, CA 95134, USA NETGEAR INTL LTDBuilding 3, University Technology Centre Curraheen Road, Cork, Ireland© NETGEAR, Inc., NETGEAR and the NETGEAR Logo are trademarks of NETGEAR, Inc. Any non‑NETGEAR trademarks are used for reference purposes only.October 20188. Tap NEXT .9. To add the switch to your account, use one of these options:• Enter the serial number.• Scan the serial number bar code.•Tap Switch as the device type and follow the prompts to scan the network or scan the QR code.You are prompted to add the switch to a network.10. Either select a network or create a new one.11. When prompted, name the switch.The switch automatically updates to the latest firmware (if needed). This might take several minutes. When the blue Cloud LED lights on the switch, you can begin configuring it.Other Configuration MethodsYou can also use the NETGEAR Insight Cloud Portal to set up your network and manage your devices as well as your subscription. A Premium subscription is required to use the Insight Cloud Portal. (A limited time, free trial is included with 24-port and larger Insight switch purchases.) When using the Insight Cloud Portal, the configuration steps are the same except that you manually enter the serial number of the device when prompted. For more information on NETGEAR Insight, visit https:///#/login .For more information about how to connect a NETGEAR Insight managed switch to an existing network, visit https:///000044341.Note: We do not recommend using the switch’s local browser–basedmanagement interface to configure the switch offline. Changes made using this method are not pushed to the cloud, so they are not reflected in the NETGEAR Insight app or the Insight Cloud Portal, and might create conflicts with the Insight-managed network to which the switch is connected. If you cannotconnect your switch to a network with Internet access, and you want to use the local-only browser interface to access the switch, see the user manual.To download the user manual, visit /support/product/GC110 or /support/product/GC110P .If you cannot discover or configure the switch, you might need to temporarily disable the firewall, Internet security, or antivirus programs. Make sure to reenable these security services after discovering and configuring the switch.PoE Troubleshooting for Model GC110PHere are some tips for correcting simple problems that might occur:•Make sure that the PoE Max LED is off. The switch provides a total power budget of 62 watts. If the PoE Max LED is solid amber, disconnect one or more powered devices (PDs) to prevent PoE oversubscription. Start by disconnecting the PD from the highest-numbered port.Note: You can manually override the amount of power that is reserved for each PoE port and attached PD by using the NETGEAR Insight app or the Insight Cloud Portal. •Check the right LED for the port on the switch that is connected to apowered PD. The right port LED on the switch lights solid green to indicate that PoE is being delivered to the PD. If the right port LED lights solid amber, a PoE fault occurred.SupportThank you for purchasing this NETGEAR product. You can visit/support to register your product, get help, access the latest downloads and user manuals, and join our community. We recommend that you use only official NETGEAR support resources.Si ce produit est vendu au Canada, vous pouvez accéder à ce document en français canadien à https:///support/download/.(If this product is sold in Canada, you can access this document in Canadian French at https:///support/download/.)For regulatory compliance information including the EU Declaration of Conformity, visit https:///about/regulatory/.See the regulatory compliance document before connecting the power supply.Do not use this device outdoors. If you connect cables or devices that are outdoors to this device, see https:///000057103 for safety and warranty information.。
netgear无线路由器设置图解教程
netgear无线路由器设置图解教程无线路由器在现代网络生活中扮演着至关重要的角色。
其中,Netgear无线路由器因其功能强大、易用性好而备受用户青睐。
本文将为您提供一份详细的Netgear无线路由器设置图解教程,帮助您快速、准确地完成路由器的安装和设置。
第一步:准备工作首先,我们需要准备以下物品:1. 一个Netgear无线路由器(确保您已经购买了适合您需求的型号)。
2. 一台电脑或移动设备(使用电脑更加方便)。
3. 一根以太网网线。
4. 一个可用的宽带或者ADSL上网账号。
确保您具备了以上所有物品后,我们可以开始设置过程。
第二步:连接路由器1. 将您的Netgear无线路由器放在离调制解调器(如光纤/宽带猫)近的地方。
2. 使用一根以太网网线将调制解调器与Netgear无线路由器的WAN 口相连。
插入时,请确保连接坚固稳定。
3. 使用另一根以太网网线将您的电脑或移动设备与Netgear无线路由器的任一LAN口连接。
完成上述连接后,我们可以进入下一步:配置路由器。
第三步:配置路由器1. 打开您的电脑或移动设备上的浏览器(推荐使用最新版本的Chrome、Safari或Firefox)。
2. 在地址栏中输入路由器的默认IP地址(一般为192.168.1.1或192.168.0.1),然后按下回车键。
3. 弹出登陆页面后,输入默认的用户名和密码进行登录。
若您没有更改过默认设置,用户名为空,密码为admin。
点击登录按钮进入路由器的设置界面。
注:如果您曾经更改过默认的用户名和密码,那么请使用您自己设定的账号信息登录路由器。
4. 进入路由器设置界面后,您可以根据自己的需求进行各项设置。
下面是几个常用设置的图解示范:(1)无线网络设置在路由器设置界面的菜单中找到“Wireless”或“无线设置”选项。
点击进入后,您可以对无线网络名称(SSID)、无线密码、频段选择等进行设置。
(2)网络安全设置在路由器设置界面的菜单中找到“Security”或“安全设置”选项。
NETGEAR 产品使用指南.pdf_1705875043.1365414说明书
December 2014NETGEAR, Inc.350 East Plumeria Drive San Jose, CA 95134, USA© NETGEAR, Inc. NETGEAR and the NETGEAR Logo are trademarks of NETGEAR, Inc. Any non-NETGEARtrademarks are used for reference purposes only.Set Up Your Internet ServiceSet up Internet service by using Comcast Xfinity’s self-activation process. If you are unable to self-activate your cable modem, call Comcast Xfinity customer service. After you complete the setup, perform a speed test.Use the Self-Activation Process to Set Up Your Internet ConnectionBefore you start the self-activation process, make sure that your account number, account phone number, and login information (your email address or user name and password) are nearby.¾To set up your Internet connection with Comcast Xfinity’sself-activation process:1. Close all web browsers.2. Launch a web browser.You are redirected to the Xfinity self-activation page. If you are not redirected to the Xfinity self-activation page, visit /activate 3. Provide your Xfinity credentials and complete the self-activationprocess.This process might take up to 15 minutes, during which the cable modem reboots a couple times.Call Comcast Xfinity to Set Up Your Internet ConnectionIf you are unable to self-activate your cable modem, call Comcast Xfinity customer service.Before you call Comcast Xfinity, make sure that your account number, account phone number, email address, and password are nearby. The cable modem’s model number is CM500. The serial number and MAC address are on the product label on the bottom of the cable modem.¾To set up your Internet connection by calling Comcast Xfinity:1. Call Comcast Xfinity customer service at 1-800-XFINITY(1-800-934-6489).2. When asked, provide your account information and provide thecable modem’s model number and MAC address.3. Wait for Comcast Xfinity to confirm that your cable modem is active.4. If you do not get an Internet connection with the cable modem, askComcast Xfinity to look for your cable modem online, and do one of the following depending on what Comcast Xfinity tells you about your cable modem:• If the cable modem is not visible, Comcast Xfinity can give youinstructions to verify why the cable modem does not connect with your high-speed Internet service.• If the cable modem is visible to Comcast Xfinity, reboot thecable modem. Check your online status again.Perform a Speed TestTo determine the accurate Internet speed, visit the Comcast Xfinity speed test site at and perform a speed test. If your actual speed is lower than your subscribed speed, contact Comcast Xfinity.Connect a RouterAfter you install and activate the cable modem, you can disconnect the computer and connect a router to the cable modem. ¾To connect a router to the cable modem:1. Reboot the cable modem by unplugging the power cable from thecable modem and plugging it back in.Wait for the Internet LED to stop blinking and light solid green.2. Use an Ethernet cable to connect the Ethernet port on the cable modem tothe WAN or Internet port on the router.3. Power on the router.Wait until the router is ready.SupportThank you for purchasing this NETGEAR product. After installing your device, locate the serial number on the label of your product and use it to register your product at https:// .You must register your product before you can use NETGEAR telephonesupport. NETGEAR recommends registering your product through the NETGEAR website.For product updates and web support, visit . NETGEAR recommends that you use only the official NETGEAR support resources.You can get the user manual online at .For regulatory compliance information, visit /about/regulatory/.See the regulatory compliance document before connecting the power supply.。
网件NETGEAR设置说明书

网件NETGEAR设置说明书原装网件NETGEAR WGR614 V8 dd-wrt无线路由器万能中继AP 网桥使用说明书一、第一次使用输入用户名root 密码admin 一定要注意是小写,且不能输错,不然无法进入系统设置界面.进入系统设置界面,然后把界面改成中文语言\如果还没有变成中文界面,请点IE菜单栏的刷新,就会出现中文界面,或者重新打开IE浏览器二、上网设置(此功能相当于一台普通的无线路由器,下面的“三、无线中继设置”可省略)1.基本设置。
一般宽带是ADSL上网方式,请按如下设置,设置完后要点保存并应用。
2.无线安全设置三、无线中继设置(此功能相当于一个中继器使用,上面的二、上网设置是可省略的)1.修改路由器的IP,使之跟被中继的路由器IP 不一样例如:被中继的前一级无线信号的可点击“无线网络连接”—“支持”注意:改了之后要及时保存,并且点击应用。
应用后再要成功访问路由器则应在地址栏输入修改后的IP地址才可成功访问。
2.查找无线信号3.选择您需要中继的信号,并点“加入”按钮4.设置物理接口和添加及设置虚拟接口5.如果对方的无线加了密码,还要进行加密设置安全模式可访问对方无线路由器的无线安全查看是什么模式或通过刷新无线网络表列查看无线信号是启用安全的无线网络()中的安全模式还可以通过查看对方的无线设置知道加密计算等信息设置好后要点保存并应用,后再访问一下中继路由器“状态”——“WAN”查看路由器是否分配到了IP地址,而不是,如果分配到了说明中继成功。
否则再进入下一步。
对方无线基本设置中的信道(频道)是否为自动,如为自动就应改为1或6或11等固定值,修改后还要保存和重启对方的路由器。
(此步骤是无法中继对方信号下才用)注意:如果设置失败或无法访问路由器可恢复路由器的出厂设置再从新上述设置。
恢复路由器的方法如下。
方法1:在断电情况下,用铅笔,牙签等尖端顶住路由器天下附近的小孔(reset空)一直不放。
NETGEAR 网络开关连接指南说明书
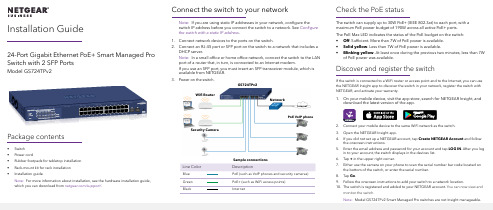
Connect the switch to your network Note: If you are using static IP addresses in your network, configure theswitch IP address before you connect the switch to a network. See Configure the switch with a static IP address .1. Connect network devices to the ports on the switch.2. Connect an RJ-45 port or SFP port on the switch to a network that includes aDHCP server.Note: In a small office or home office network, connect the switch to the LAN port of a router that, in turn, is connected to an Internet modem.If you use an SFP port, you must insert an SFP transceiver module, which is available from NETGEAR.3. Power on the switch.Check the PoE statusThe switch can supply up to 30W PoE+ (IEEE 802.3at) to each port, with a maximum PoE power budget of 190W across all active PoE+ ports.The PoE Max LED indicates the status of the PoE budget on the switch:• Off . Sufficient. More than 7W of PoE power is available.• Solid yellow . Less than 7W of PoE power is available.• Blinking yellow . At least once during the previous two minutes, less than 7Wof PoE power was available.Discover and register the switchIf the switch is connected to a WiFi router or access point and to the Internet, you can use the NETGEAR Insight app to discover the switch in your network, register the switch with NETGEAR, and activate your warranty.1. On your mobile device, visit the app store, search for NETGEAR Insight, anddownload the latest version of the app.2. Connect your mobile device to the same WiFi network as the switch.3. Open the NETGEAR Insight app.4. If you did not set up a NETGEAR account, tap Create NETGEAR Account and followthe onscreen instructions.5. Enter the email address and password for your account and tap LOG IN . After you login to your account, the switch displays in the devices list.6. Tap + in the upper right corner.7. Either use the camera on your phone to scan the serial number bar code located onthe bottom of the switch, or enter the serial number.8. Tap Go .9.Follow the onscreen instructions to add your switch to a network location.10. The switch is registered and added to your NETGEAR account. You can now view andmonitor the switch.24-Port Gigabit Ethernet PoE+ Smart Managed Pro Switch with 2 SFP PortsModel GS724TPv2Package contents• Switch • Power cord• Rubber footpads for tabletop installation • Rack-mount kit for rack installation •Installation guideNote: For more information about installation, see the hardware installation guide, which you can download from /support/.Sample connectionsNetworkInternetGS724TPv2Line ColorDescriptionBlue PoE (such as VoIP phones and security cameras)Green PoE+ (such as WiFi access points) BlackInternetWifi RouterPoE VoIP phoneSecurity CameraNETGEAR, Inc.350 East Plumeria Drive San Jose, CA 95134, USANETGEAR INTERNATIONAL LTD Floor 1, Building 3University Technology Centre Curraheen Road, Cork, T12EF21, Ireland© NETGEAR, Inc., NETGEAR and the NETGEAR Logo are trademarks of NETGEAR, Inc. Any non‑NETGEAR trademarks are used for reference purposes only.SupportThank you for purchasing this NETGEAR product. You can visithttps:///support/ to register your product, get help, access the latest downloads and user manuals, and join our community. We recommend that you use only official NETGEAR support resources.Si ce produit est vendu au Canada, vous pouvez accéder à ce document en français canadien à https:///support/download/.(If this product is sold in Canada, you can access this document in Canadian French at https:///support/download/.)For regulatory compliance information including the EU Declaration of Conformity, visit https:///about/regulatory/.See the regulatory compliance document before connecting the power supply.Do not use this device outdoors. If you connect cables or devices that are outdoors to this device, see https:///000057103 for safety and warranty information.September 2019Configure the switch with a static IP addressNote: If your network uses a DHCP server, this section does not apply . If you are using static IP addresses in your network, configure the switch IP address before you connect the switch to a network.1. Configure a computer with a static IP address in the 192.168.0.x subnet. 2. Power on the switch, and connect your computer to the switch using anEthernet cable.3. Open a web browser and enter 192.168.0.239 in the address bar.(The default IP address of the switch is 192.168.0.239.) A login page displays.4. Enter password for the password.The System Information page displays.5. Select System > Management > IP Configuration . Select the Static IPAddress radio button.6. Enter the static IP address, subnet mask, and default gateway IP address thatyou want to assign to the switch and click the Apply button.Your settings are saved.Configure the switchTo configure the switch either:• Use the local browser browser–based interface.• Install the NETGEAR Switch Discovery Tool on your Mac or a 64-bit Windows-based computer.•Install the Smart Control Center utility on your Windows-based computer.Access the local browser interface1. For initial configuration, open a web browser on a computer that is on thesame network and subnet as the switch and enter the switch’s IP address.If you are unsure how to determine the IP address of the switch, you can use the Smart Control Center utility.2. A login page displays. Enter password for the password.The System Information page displays.3. Configure the switch for your network.For information about switch configuration, see the user manual for your switch, which you can download from /support/.Other discovery and configuration methodsThe NETGEAR Switch Discovery Tool and the Smart Control Center utility let you discover the IP address and configure the switch. •NETGEAR Switch Discovery Tool . You can use a Mac or a 64-bit Windows-based computer on the same network as the switch. To download this tool, visit /support/product/netgear-switch-discovery-tool.aspx •Smart Control Center utility . You can use a Windows-based computer on the same network as the switch. To download this utility, visit /support/product/SCC .Troubleshooting tipsHere are some tips for correcting simple problems that might occur.•Be sure to power on your computer and switch in the following sequence:a. Turn on the switch and wait about two minutes.b. Turn on the computer and connect it to the switch.•Make sure the Ethernet cables are plugged in.For each powered-on computer connected to the switch, the corresponding switch LAN port status LED is lit.•Make sure the network settings of the computer are correct.In most cases, computers should be configured to obtain an IP addressthrough DHCP . If your network uses static IP addresses, be sure that the switch and computer are configured with valid IP addresses. For more i nformation, see the user manual.。
- 1、下载文档前请自行甄别文档内容的完整性,平台不提供额外的编辑、内容补充、找答案等附加服务。
- 2、"仅部分预览"的文档,不可在线预览部分如存在完整性等问题,可反馈申请退款(可完整预览的文档不适用该条件!)。
- 3、如文档侵犯您的权益,请联系客服反馈,我们会尽快为您处理(人工客服工作时间:9:00-18:30)。
原装网件NETGEAR WGR614 V8 dd-wrt无线路由器万能中继AP 网桥使用说明书
一、打开IE浏览器,在地址栏输入:192.168.1.1
第一次使用输入用户名root 密码admin 一定要注意是小写,且不能输错,不然无法进入系统设置界面.
进入系统设置界面,然后把界面改成中文语言
\
如果还没有变成中文界面,请点IE菜单栏的刷新,就会出现中文界面,或者重新打开IE浏览器二、上网设置(此功能相当于一台普通的无线路由器,下面的“三、无线中继设置”可省略)1.基本设置。
一般宽带是ADSL上网方式,请按如下设置,设置完后要点保存并应用。
2.无线安全设置
三、无线中继设置(此功能相当于一个中继器使用,上面的二、上网设置是可省略的)1.修改路由器的IP,使之跟被中继的路由器IP不一样
例如:被中继的前一级无线信号的默认网关192.168.1.1(可点击“无线网络连接”—“支持”选项卡下查看)应把192.168.1.1改为192.168.0.1或192.168.2.1等相异的IP
注意:改了之后要及时保存,并且点击应用。
应用后再要成功访问路由器则应在地址栏输入修改后的IP地址才可成功访问。
2.查找无线信号
3.选择您需要中继的信号,并点“加入”按钮
4.设置物理接口和添加及设置虚拟接口
5.如果对方的无线加了密码,还要进行加密设置
安全模式可访问对方无线路由器的无线安全查看是什么模式
或通过刷新无线网络表列查看无线信号是启用安全的无线网络()中的安全模式
还可以通过查看对方的无线设置知道加密计算等信息
设置好后要点保存并应用,后再访问一下中继路由器“状态”——“W AN”查看路由器是否分配到了IP地址,而不是0.0.0,如果分配到了说明中继成功。
否则再进入下一步。
对方无线基本设置中的信道(频道)是否为自动,如为自动就应改为1或6或11等固定值,修改后还要保存和重启对方的路由器。
(此步骤是无法中继对方信号下才用)
注意:如果设置失败或无法访问路由器可恢复路由器的出厂设置再从新上述设置。
恢复路由器的方法如下。
方法1:在断电情况下,用铅笔,牙签等尖端顶住路由器天下附近的小孔(reset空)一直不放。
接通路由器,此时路由器一行指示灯均亮7秒左右才就熄灭(除电源灯不灭),在断电。
再重复红色字体操作4次,即可恢复路由器的出厂设置。
方法2:再可以访问路由器的前提下,自己慢慢找,好像在管理菜单下。
