CAV7EPHP
Moxa MPC-2070 Windows Embedded Standard 7用户手册说明书
MPC-2070 Windows Embedded Standard 7User’s ManualEdition 1.0, July 2017/product© 2017 Moxa Inc. All rights reserved.MPC-2070 Windows Embedded Standard 7User’s ManualThe software described in this manual is furnished under a license agreement and may be used only in accordance withthe terms of that agreement.Copyright Notice© 2017 Moxa Inc. All rights reserved.TrademarksThe MOXA logo is a registered trademark of Moxa Inc.All other trademarks or registered marks in this manual belong to their respective manufacturers.DisclaimerInformation in this document is subject to change without notice and does not represent a commitment on the part of Moxa.Moxa provides this document as is, without warranty of any kind, either expressed or implied, including, but not limited to, its particular purpose. Moxa reserves the right to make improvements and/or changes to this manual, or to the products and/or the programs described in this manual, at any time.Information provided in this manual is intended to be accurate and reliable. However, Moxa assumes no responsibility for its use, or for any infringements on the rights of third parties that may result from its use.This product might include unintentional technical or typographical errors. Changes are periodically made to the information herein to correct such errors, and these changes are incorporated into new editions of the publication.Technical Support Contact Information/supportMoxa AmericasToll-free: 1-888-669-2872 Tel: +1-714-528-6777 Fax: +1-714-528-6778Moxa China (Shanghai office) Toll-free: 800-820-5036Tel: +86-21-5258-9955 Fax: +86-21-5258-5505Moxa EuropeTel: +49-89-3 70 03 99-0 Fax: +49-89-3 70 03 99-99Moxa Asia-PacificTel: +886-2-8919-1230 Fax: +886-2-8919-1231Moxa IndiaTel: +91-80-4172-9088 Fax: +91-80-4132-1045Table of Contents1.Introduction ...................................................................................................................................... 1-1Software Components ......................................................................................................................... 1-2 2.System Initialization ......................................................................................................................... 2-1Overview ........................................................................................................................................... 2-2 Initializing User Settings .............................................................................................................. 2-2 3.Configuring the Serial Interface ........................................................................................................ 3-1Overview ........................................................................................................................................... 3-2 Configuring Serial Interface Mode ......................................................................................................... 3-2 4.Enabling Embedded Filters ................................................................................................................ 4-1Enhanced Write Filter .......................................................................................................................... 4-2 Overview .................................................................................................................................... 4-2Enabling Enhanced Write Filter ...................................................................................................... 4-2 File-Based Write Filter ......................................................................................................................... 4-5 Overview .................................................................................................................................... 4-5Configuring File-Based Write Filters (FBWF) .................................................................................... 4-6 5.OSD ................................................................................................................................................... 5-1OSD .................................................................................................................................................. 5-2 6.Examples ........................................................................................................................................... 6-1Watchdog .......................................................................................................................................... 6-2 Enabling Watchdog Function ......................................................................................................... 6-2 Serial Interface................................................................................................................................... 6-2 DIO................................................................................................................................................... 6-4 7.System Recovery ............................................................................................................................... 7-1Recovery Environment ........................................................................................................................ 7-2 Recovery Procedure ............................................................................................................................ 7-2 Saving the System to the USB Drive ..................................................................................................... 7-91Introduction Thank you for buying Moxa’s MPC-2070 panel computer. The MPC-2070 comes with the Windows EmbeddedStandard 7 software platform, providing a simple and familiar development environment for various industrialapplications.Software ComponentsSoftware ComponentsThe software components of the Windows Embedded Standard 7 (WES7), which is pre-installed on the MPC-2070 computer, are listed in the following table:Windows Embedded Standard 7Core OS:• 64-bit support• Remote Client• Remote Procedure CallApplications and Services Development:• .Net Framework 3.5• Remote Desktop Protocol 7.1• COM OLE Application Support• COM+ Application Support• MSMQInternet Services:• Internet Explorer 8.0• IIS 7.0File Systems and Data Store:• Windows Data Access Components• Windows Backup and RestoreDiagnostics:• Common Diagnostic Tools• Problem Reports and SolutionsGraphics and Multimedia:• MPEG DTV-DVD Audio Decoder (MPEG-2, AAC)• MPEG Layer-3 Audio Codecs(MP3)• MPEG4 Decoders• Windows Media Video VC-1 (WMV) Codecs• DirectX and Windows Device Experience• Photo Viewer• Remote media streaming• Windows Media PlayerManagement:• Group Policy Management• Windows Management Instrument (WMI)• Windows UpdateNetworking:• Extensible Authentication Protocol (EAP)• Internet Authentication Service• Telnet Server• Bluetooth• Domain Services• Network Access Protection• Network and Sharing Center• Quality of Service• Remote Access Service (RAS)• Telephony API Client• Windows Firewall• Wireless NetworkingSecurity:• Credential Roaming Service• Credentials and Certificate Management• Windows Authorization Manager (AZMAN)• Windows Security Center• Active Directory Rights Management• Security Base• Encrypted File System (EFS)Embedded Features:• Enhanced Write Filter (EWF)• File-Based Write Filter (FBWF)• Message Box Default Reply• Registry Filter• WSDAPI for .NETEmbedded Self-Health Diagnostic Software:• SNMP-based remote scripting layer for monitoring, reporting, and control2System Initialization This chapter describes how to initialize the system settings on the MPC-2070 computer when you boot up thecomputer for the first time.The following topics are covered in this chapter:❒OverviewInitializing User SettingsOverviewA setup wizard will guide you through the system initialization process when you boot up the MPC-2070computer for the first time.Initializing User Settings1.In the Set Up Window, enter a user name for this computer and click Next.2.Type a password and retype the password to confirm it.In addition, you can also specify a password hint that the system should display in case you forget yourpassword.If you do not want to set a password, leave it blank and click Next.3.Select a windows update method.4.Select your computer’s current location. Windows will automatically apply the correct network settingsbased on the network’s location.5.Start using the MPC-2070 embedded computer.3 Configuring the Serial InterfaceThis chapter describes how to configure the serial interface on the MPC-2070 computer.The following topics are covered in this chapter:❒Overview❒Configuring Serial Interface ModeMPC-2070 Series Configuring Serial InterfaceOverviewThe MPC-2070 supports the serial modes RS232, RS485-2-wire, and RS422/RS485-4-wire. These modes can be configured as COM1 and COM2.Configuring Serial Interface ModeFollow these steps to change the serial interface mode.1.From the Start menu, Click All apps >Moxa >mxSetSerialInterface.2.Select the port for which you want to set the mode.3.Select the mode that you want to set for the selected port.4.Click OK.4Enabling Embedded FiltersThis chapter describes how to enable and operate the embedded filters on the MPC-2070 computer.The following topics are covered in this chapter:❒Error! Reference source not found.❒Error! Reference source not found.Enhanced Write FilterOverviewEnhanced Write Filter (EWF) provides a means for protecting a volume from writes. This allows the operating system (OS) to boot from write-protected hard disks. Data written to a EWF-protected volume (the Hard disk in the following figure) is redirected to an overlay (EWF Volume in the following figure). Because the EWFprevents direct writes to the hard disk, it can protect the hard disk from sudden power cut. The data is cached in the overlay and made available as part of the volume. This gives the appearance that the volume is writeable.The overlay is an independent storage location, which exists in random access memory (RAM). If desired, the data stored in the overlay may be committed to the protected volume. Refer to the following figure for theoverview of the EWF structure.Enabling Enhanced Write FilterFollow these steps to enable the Enhanced Write Filter (EWF):1.Open the EWF by right-clicking on a lock icon in the system tray.2.In the Volume information table, select the volume and click Configure .3.Select Enable in the Pending command field.4.Reboot the system.5.After the system has rebooted, check to confirm that the EWF icon has changed to a locked state (asshown below)6.Right-click on the icon to open the EWF configuration window and click Configure.7.Select a volume and a Pending Command as per your requirement8.Click OK or Apply.File-Based Write FilterOverviewAccording to Microsoft:File-Based Write Filter (FBWF) allows the Windows Embedded platform to maintain the appearanceof read and write access on write-sensitive or read-only storage. FBWF makes read and write accesstransparent to applications.Writing to storage media may be undesirable or impossible in embedded devices. FBWF redirects allwrites targeted for protected volumes to a RAM cache called an overlay. Used in this context, anoverlay is similar to a transparency overlay on an overhead projector. Any change made to theoverlay affects the picture as seen in the aggregate, but if the overlay is removed, the underlyingpicture remains unchanged.FBWF provides the advanced feature than EWF to let user specify the directory to write the data to disk drive directly, in our default setting, the default directory is under c:\temp, which means you can read/write the data into disk without commit action.Configuring File-Based Write Filters (FBWF) To enable FBWF, do the following:1.Right-click on the lock icon in the system tray.2.Click Configure.3. In the Configuration tab, check the Filter state enabled and Cache pre-allocation enabled boxes.Select the volume C:, click Protect and then click Apply.4. Reboot the system5. After the system has rebooted, right-click on the lock icon in the system tray.6.Click Configure7.Open the Exclusion List tab and click on the browse button8.Select the file (for example, wscript.exe) that you want to exclude from the protection list.9.Click the + button to add the file path to the list.10.Confirm that the file path has been added to the exclusion list.11.Open the Cache Content tab12.Select the file that you want to save to the physical disk and click Commit.13.Reboot system for the settings to take effect.5OSD This chapter describes how to use OSD utility on the MPC-2070 computer. This utility will display a barindicating the brightness of the screen when you press the display buttons.The following topics are covered in this chapter:OSDMPC-2070 Series Enabling Embedded FiltersOSDThe MPC-2070 computer provides an OSD utility for displaying the brightness bar on the screen.The executable for the OSD utility is available at:<Software DVD>\driver\MPC-2070-W7E_V1.0_Driver_Perpheral folderTo install and use the OSD utility:1.Run the OSD utility executable file.2.After completing the installation process, reboot the MPC-2070 computer.3.Press the display buttons to changes the brightness.A bar indicating the brightness level is displayed on the screen.6Examples This chapter describes how to use the example programs provided in the <Software DVD>\Example\ folderto enable the watchdog function, monitor and control the UARL (serial) interface, and monitor and control the DIO states in the MPC-2070 computer.The following topics are covered in this chapter:❒WatchdogEnabling Watchdog Function❒Serial Interface❒DIOWatchdogThe Watchdog script is available at: <Software DVD>\Example\Watchdog.Enabling Watchdog FunctionFollow the steps below to enable and test the watchdog function in your MPC-2070 computer:1.Create a folder C:\programs\example folder and copy the following files from the software DVD to thefolder:mxdwg.dll: <Software DVD>\example\3.Library\x64\mxdwg\mxGeneralIo.dll: <Software DVD>\example\3.Library\x64\MxGeneralIo\Watchdog.exe: <Software DVD>\example\x64\Release\Watchdog\2.Run Watchdog.exe.You must press the Enter key every 10 seconds to prevent the system from rebooting.3.To stop the watchdog function, press q to exit the program.Serial InterfaceThe serial interface script is available at: <Software DVD>\Example\UartMode.This script reports on the status and controls the UART mode.Create a folder C:\programs\example folder and copy the following files from the software DVD to thefolder:mxsp.dll: <Software DVD>\example\3.Library\x64\mxspmxGeneralIo.dll: \example\3.Library\x64\MxGeneralIo\UartMode.exe: <Software DVD>\example\x64\Release\UartMode1.Run UartMode.exe.2.To set the serial interface, type 2 and follow the on-screen instructions.3.To display the current serial interface settings, type 1.DIOThe DIO script is available at: <Software DVD>\Example\DIO.This script reports on the status and controls the DIO states, switching them between high and low states.Create a folder C:\programs\example folder and copy the following files from the product software DVD.mxgpio.dll: <Software DVD>\example\3.Library\x64\mxgpiomxGeneralIo.dll: <Software DVD>\example\3.Library\x64\MxGeneralIo\DIO.exe: <Software DVD>\example\x64\Release\DIO1.Run DIO.exe.2.To display the current status of the DIOs, type 2 and follow the on-screen instructions.3.To set a digital input value, Type 1 and follow the on-screen instructions. Enter the target port and value.4.After you have successfully set a digital output, type 2 to check the DIO status.5.Type 3 to execute the test program. Enter the number of test (example, 100). After the test program runs,a report is generated as shown in the following screen (100 times * 4 ports).7System Recovery The MPC-2070 ready-to-run embedded computers are a Windows Embedded Standard 7 software platform.This chapter describes the recovery process in the event of system instability.The following topics are covered in this chapter:❒Recovery Environment❒Recovery Procedure❒Saving the System to the USB DriveRecovery EnvironmentThe environment includes a MPC-2070 panel computer and a bootable USB disk with the recovery programs and system image file.The hardware used includes a PC, a MPC-2070 computer, and a USB disk with the recovery programs.NOTEThe USB disk should be at least 5GB.Recovery ProcedureStep 1: Prepare your USB drive1. Execute tuxboot-windows-23.exe from the <Software DVD>\recovery , then select Pre Download ,and then click “…”.USB Disk(Recovery data included)MPC-2070 USB Ports2.Select the ISO file from <Software DVD>\recovery3.Select USB Drive type, select a Drive, and then click OK to continue.4.The boot files will be copied to your USB drive.5.When finished, click Exit to stop the program.6.Manually copy the os_image directory from the <Software DVD>\recovery folder to \home\partimag\on the USB drive.Step 2: Change the BIOS SettingsYou will need to change the BIOS settings to boot from the USB disk.1.Turn on the computer and press F2 when you hear the beep sound to enter the BIOS setup menu. Selectthe Boot tab and then select the Boot Type option. Change the value to “Daul Boot Type”.2.When you insert the USB device which has the recovery image, the Boot Order Priority will create Legacy– Boot Device Priority and EFI – Boot Device Priority options. Enter the Legacy – Boot Device Priority option and then press “+” to move the USB device to the first boot device position.Step 3: Restore the system from the USB driveConnect the USB disk to any of the MPC-2070’s USB ports and then reboot the computer. The system will boot from the USB disk and the Pre-installation Environment. After this the recovery utility will appear.1.Select clonezilla live restore disk.2.Wait for the USB drive boot process to finish.3.Wait for the process to finish.4.Select (0) Poweroff to power off the computer.5.Remove the USB drive after the computer has been powered off.Step 4: Change the BIOS Settings to Boot from the Original DiskNow you will need to change the boot priority so that it can boot from the original disk. As the system reboots, press F2 to enter the BIOS setup menu then select the Boot tab.1.Enter the Legacy – Boot Device Priority option and then press “+” to move the original disk to the firstboot device position. Make sure the hard disk has first boot priority.2.Press F10 and then press Enter to save settings and exit BIOS settings.Step 5: Reboot the ComputerYou need to wait about 10 to 15 minutes for the system to restart two times automatically, since the system configuration files will be initiated while booting up for the first time. Do not turn off the computer or shut down the computer while the system is restarting; otherwise, the IIS service will be terminated. When the operating system has successfully launched, you will need to restart your computer so that the new settings can be activated.Saving the System to the USB DriveYou may also save the current system to the USB drive for system recovery in case the system crashes. Before saving the system to the USB drive, we suggest you remove all files under \home\partimag\ on the USB drive. In addition, change the BIOS settings to make the USB drive the first boot priority.When the system has been launched, take the following steps.1.Select clonezilla live save disk.2.Enter y to continue.3.Wait for the process to finish.4.Select (0) Poweroff so that the computer will power off when the process has finished.。
LW2287数字无线摄像头系统快速启动指南说明书

A. Installation des caméras
1 Monter la caméra au mur ou au plafond à l’aide des vis (incluses).
Encoche pour câble
Pour une utilisation extérieure, il est conseillé de l’installer dans un endroit protégé.
Avant de procéder à l’installation permanente de la caméra :
Planifier l’endroit ainsi que la position de la caméra. Déterminer l’endroit où les câbles qui connectent la caméra à l’adaptateur d’alimentation électrique seront acheminés. Vérifier les performances de la caméra en regardant l’image sur le moniteur lorsque la caméra est située à l’endroit où elle sera installée de façon permanente. Éviter d’installer la caméra dans des endroits où le signal sans fil doit traverser des structures en ciment, en béton ou en métal. Cela réduira la portée d’émission.
理光RICOH Pro VC70000连续供墨喷墨打印机 全彩 492 fpm 手册说明书
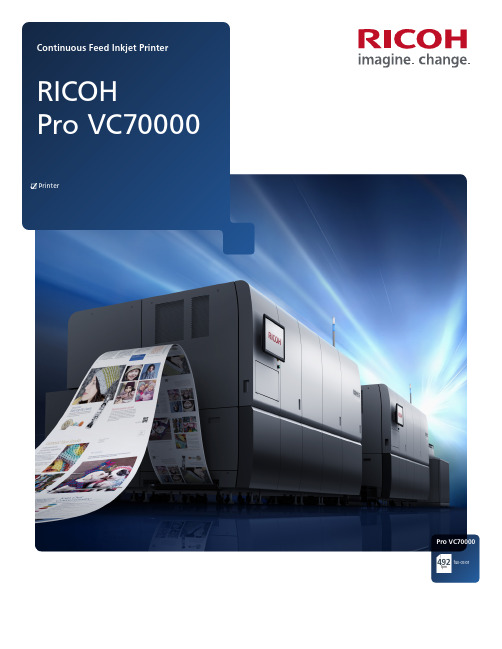
Printer492fpmsolution the industry’s been waiting forRemoving the previous barriers to print quality, productivity and cost-effectiveness, the award-winningRICOH Pro VC70000 Continuous Feed Inkjet Printer elevates your business today and provides a scalable,field-upgradable platform to protect your investment for years to come. Finally, a viable alternative tooffset printing has arrived, delivering all the benefits of digital printing and powerful data-driven communications without sacrificing the affordable media choices, image integrity and speed of offset.The RICOH Pro VC70000 provides powerful advantagesfor your business, including:• New extended gamut inks make it possible to print onto a variety of different types of stocks, including offset coated and uncoated papers, without pre- or post-coating• Media support for offset coated, IJ coated, IJ treated and uncoated papers from 40 to 250 gsm• Ricoh’s latest generation stainless steel printheads for years of dependable use• Dynamic drop technology at the image level to render fine details, consistent half-tones and optimized ink usage on high coverage areas• Production volumes up to 40 million impressions per month• Repeatable print lengths of up to 54"• Output speeds up to 492 ft/min• Advanced drying and cockling correction technologies, which are required when printing on lightweight papers • RICOH TotalFlow® Print Server R600A Digital Front End (DFE) for powerful job and data processing with support for multiple data streams, access to color management and additional job tools• Unparalleled technical and field support from the industry’s largest, dedicated production service organizationAchieve finer detail and reduced inkusage with image-level variable drop sizesWhile other inkjet systems can apply differing drop sizes at a page or file level, the RICOH Pro VC70000 gives you the power to vary them down to the pixel level. That means crisp, sharp text, improved grayscales and halftones, and efficient ink usage on high-coverage areas.Reliably produce the colors you need with Ricoh’s exclusive extended gamut inksFurther removing the barriers to transitioning jobs from offset are Ricoh’s new, proprietary extended gamut inks. With a higher pigment-to-water ratio, these inks deliver superior adhesion andallow you to confidently produce more colors consistently, impression after impression and job after job.Get polished results with advanced drying technologies and built-in anti-cocklingInnovative new drying technologies set and cure inks inline for outstanding results on offset coated papers and a wider variety of media while allowing for high-speed print production. For jobs requiring very light stocks, anti-cockling technology prevents media wrinkling in your output so you can take on an even broader mix of work where heavy ink coverage is required.Solutions to get your bottom line soaringProduce high-value, personalized and data-driven applications — from sales collateral and brochures to direct mail, catalogs, color manuals, custom publications and more — at speeds up to 492 feet per minute. Print on offset coated paper with no priming orpretreatment required to immediately achieve savings in media costs. Deliver true image quality up to 1200 × 1200 dpi with the latest generation, industry-leading Ricoh printheads to meet and exceed customer expectations on every job.Redefine what’s possibleThe speed, media flexibility and color quality to migrate work fromoffset to digital intelligently and affordably1O perator Attention Light: Alerts operators about warnings, errors or when intervention is requiredwhile printing.2P rint Unit: Houses the cyan, magenta, yellow and black printhead arrays, paper steering mechanisms,bar code and finishing mark sensors.3P rinthead Array: The array for each color consists of 10 Ricoh 1200 dpi stainless steel piezo drop-on-demand printhead modules that are capable ofdynamically jetting variable drop sizes. Each RICOHPro VC70000 printhead housing can be pulled outto provide easy access for operator cleaning andmaintenance. The printheads remain capped when the printer is not printing, and automatically are uncapped prior to printing. An operator can elect to park colorprintheads when printing monochrome for morecost-effective operation.4I nk Supply Station: The Ink Supply Station houses two 10-liter cartridges for each color of ink. When acartridge is near empty, the operator is notified that the cartridge needs to be replaced, and the operator cando so on-the-fly so the printer can continue to print.5G raphical User Interface (GUI): Provides access to the RICOH TotalFlow® Print Server R600A DFE. The HTML 5 GUI layout is configurable to provide easy access to job setup/submission, job management, administration and maintenance control of the system. 6R ICOH TotalFlow® R600A Digital Front End: With powerful data processing and intuitive operation, operators can control job management, systemconfiguration, and maintenance tasks.7T urn Bar Unit for I or L Configurations: The turn bar for I (inline) and L (left-angle) configurations turns thepaper over in preparation for the second engine to print on the back side of the paper web.8D ryer Unit: The RICOH Pro VC70000 Dryer Unit uses a new, radiant heat drum dryer in combination with heat rollers and air movement to remove the water content of the inks, curing only the colorant on the media and preparing it for printing on the second side or inlinefinishing. This new dryer technology supports printingon offset coated papers at up to 492 ft/min.9I mage Inspection Unit: The new Image Inspection Unit Lite is embedded into the Pro VC70000 Exit Unitand can reduce make-ready times by up to 70%.Fine-tune media handling and tensioning controlsto help ensure every page is produced withuncompromising consistency. For quality assurance,a new high resolution strip camera system is usedduring the make-ready process to check for clogging,alignment and uniformity of print heads.10S upport for a Variety of Finishing: Choose from multiple Ricoh partners to provide a variety of finishing solutions, such as, unwind, rewind, cut, fold, dynamicperforation, vision systems and inline processing, plusa solution for books. And even though the finishingdevices are from a Ricoh partner, Ricoh provides theservice and support on those items.6User-friendly design and operationThe RICOH Pro VC70000 doesn’t just enable betterresults, it makes it easier to help your operatorsachieve them. In fact, the interface can be fine-tunedand customized to suit operators with a range ofexperience and technical expertise. The system’s GUIprovides intuitive control of the RICOH TotalFlow®Print Server R600A DFE. Access tools, such as jobsetup and management tools, plus administrative andmaintenance menus quickly. An operator attentionlight clearly lets staff know, from anywhere on yourshop floor, when the system needs intervention.The RICOH TotalFlow® Print Server R600A Digital Front Endis scalable to support a range of complex jobs.Print and monitor jobs from anywhereFor ultimate convenience, the RICOH TotalFlow ® Print Server R600A DFE makes it easy to print, monitor and manage your workflows from almost any location using the intuitive HTML job management console. Whether you’re on the shop floor, at your desk or working remotely, you can access critical job information from a web browser. Check status, manage configurations, plan maintenance remotely and transition to the next job with fewer delays.Perform production print tasks faster, more accuratelyWith the RICOH TotalFlow ® Print Server R600A DFE, tackle even the most complex jobs, including variable addressing and variable images. Check status and errors with a single glance, and make changes or schedule maintenance in only moments. It accepts a wide range of native data streams — including PS, PDF, PDF/VT, AFP/IPDS and JDF — without requiring transforms which can affect file fidelity to help you complete jobs with incredible speed, accuracy and convenience.Ricoh delivers more ways to help make significant ROI a realityOur priority is ensuring that we match the right equipment to your workflows and provide the application support you’re counting on. To help you visualize the economics of the RICOH Pro VC70000, your Ricoh representative will guide you through ROI estimates based on current and projected workflows. We take a deliberate, assessment-minded sales approach to ensure that this system is truly the right fit for your operations before you allocate budget dollars.A partnership that extends beyond the shop floorWe've built a production organization designed to deliver everything your business needs to be more competitive, more efficient andmore profitable. That includes dedicated, 24/7 nation-wide technical support to keep you up and running. From implementation services to ongoing color management, finishing, operator training, business development, postal optimization and beyond, our portfolio is firmly centered around helping you maximize your technology investment.Imaging TechnologyPiezo Drop on DemandDynamic Variable Drop Size – @ 2 bits/drop Stochastic ScreeningRicoh Printheads – 10 printheads per colorEngine TechnologyColor Inkjet 4 colors CMYK,Paper Path Tight WebWeb Width 20.5" (520.7 mm)Printable Area – 20" (508 mm)(non-printed area 2 mm from paper edges)*Paper Length 4" to 54" (101.6 to 1371.6 mm)Machine Layout – Duplex "L" or Inline ConfigurationEngine ComponentsBase Unit*Dimensions (W ×D×H) 168.9" (4290.5 mm) × 97.6"(2478 mm) × 78.74" (2000 mm)Weight 9321.1 lb (4228 kg)Operating EnvironmentTemperature 64.4 – 75.2° F (18 – 24° C) (recommended)Humidity (recommended) 40 – 60%Productivity Resolution/Print speed 600 × 600 dpi : 492 feet/min*, or 150 meters/min600 × 600 dpi : 394 feet/min, or120 meters/min1200 × 600 dpi: 246 feet/min and 328 feet/min, or 75 and 100 meters/min1200 × 1200 dpi: 164 feet/min, or50 meters/min*max paper weight printing at 492 feet/min is 157gsmMedia SupportMedia Types Plain, General Offset Coated* andUncoated, IJ coated, IJ treated, Ground-Wood, Recycled Paper Weight40 gsm to 250 gsmSuppliesPro Ink Cartridge Black VC60000 Type D Pro Ink Cartridge Cyan VC60000 Type D Pro Ink Cartridge Magenta VC60000 Type D Pro Ink Cartridge Yellow VC60000 Type DFinishingSpecification 3rd party finishing devices I/Fspecification: Type 1A/+Finishing Solutions Multiple partners provide a variety of unwind, rewind, cut, fold, dynamicperforation, vision systems andinline processing, including a solution for booksRICOH TotalFlow R600A Digital Front End ArchitectureProcessor Architecture Intel Xeon x64OS LinuxPhysical CharacteristicsDimensions (W ×D ×H) 39.5" (1003 mm) × 24" (609 mm) × 49" (1245 mm)Weight 716.5 lb (325 kg)Data Stream SupportPostScript PDF (APPE)PDF/VT IPDSJob SubmissionFTP SFTP IPP LPRRaw PortOperator ConsoleVirtual Printer/Hot Folder SupportGraphical User InterfaceDisplay on each print engineLogin by Role: Admin, Operator, Maintenance or Customizable Highly customizable user interface layout by role Graphical Printer & Supplies Status Operator MessagesPaper Catalog/Paper SetupJob ManagementGraphical Job Ticketing/Job Preview – Native JDF BannerOperator Comments Sides Printed CopiesRotate, Reduce/Enlarge, Image Alignment Special Marks Job ImpositionJob Queue Management Submit Suspend HoldProcess Next Delete Job View JobsJob Status Active Inactive Stored All Jobs Job HistoryColor ManagementICC Profile SupportEnhanced Color Management by Side and Object Type Device Link SupportSpot color dictionaries (Pantone, Toyo, DIC, and HKS)CMR Support (AFP/IPDS)Software SupportRicoh ProcessDirector for AIX, Linux or Windows Version 3.7 or later releases TotalFlow BatchBuilder for Windows Version 2.3InfoPrint manager for AIX, Linux, Windows Version 4.8 or later releasesPrint Services Facility for AIX, Linux or Windows Version 3.1 or later releases Note: For Linux SLES, or, Red HatR4013*For maximum performance and yield we recommend using genuine Ricoh parts and supplies. Specifications are subject to change without notice.Ricoh USA, Inc., 70 Valley Stream Parkway, Malvern, PA 19355, 1-800-63-RICOH©2019. Ricoh USA, Inc. All rights reserved. Ricoh and the Ricoh logo are registered trademarks of Ricoh Company, Ltd. All other trademarks are the property of their respective owners. The content of this document, and the appearance, features and specifications of Ricoh products and services are subject to change from time to time without notice. Products are shown with optional features. While care has been taken to ensure the accuracy of this information, Ricoh makes no representation or warranties about the accuracy, completeness or adequacy of the information contained herein, and shall not be liable for any errors or omissions in these materials. Actual results will vary depending upon use of the products and services, and the conditions and factors affecting performance. The only warranties for Ricoh products and services are as set forth in the express warranty statements accompanying them.。
奥斯卡7.0操作说明
奥斯卡7.0操作说明⼀.软硬件要求1. ⼯作站硬件配置CPU:赛扬2.66GHz以上内存:512M以上(推荐1G)⽹络单机版1G以上主板:INTER G31芯⽚以上主板幻影:天敏SDK2500卡+神龙五代卡(1.注意⽅案上主板所带的PCI插槽是否⾜够2.只能⽤神龙五代卡上的S端和AV端,3.建议⽤神龙新⼀代解压卡)2.服务器硬件配置CPU:奔腾E5200以上内存:2GDDRII以上主板:华硕P5BV_C服务器主板注意事项:1。
炫影不⽀技遥控和控制⾯板点歌,只⽀持触模屏。
2.炫影的数据库可供声扬使⽤,但声扬的数据库不能供炫影使⽤,主要炫影有歌词数据表3.⽹络配置要求主⼲⽤千兆⽹络,终端⽤百兆⽹络。
(做⽆盘⽹络时,如果⼯作站主板是板带千兆⽹卡,交换机必须⽤纯千兆⽹络)推荐使⽤H3C系列交换机4.软件要求1.服务器安装Windows2000 Server +Sp4操作系统,并安装硬件驱动,打上⼤硬盘补丁。
2.安装Microsoft SQL Server+SQL SP4 补丁(版本:8.00.2039)。
3.安装AskServer7.0V2(中⽂发).EXE,直⾄安装完成(默认会安装加密狗驱动),如果是标准版,请打上标准版补丁,版本与补丁以实际公布最新版本为准。
4.⼯作站安装Windwos xp操作系统,并安装主板、解压卡,视频卡等硬件驱动。
5.安装AskVod7.0V2_竖屏.EXE或横屏版本,直⾄安装完成,如果是标准版,请打上标准版补丁。
⼆. 新增功能2.1 滑屏滑屏:歌曲列表或歌星列表⽔平向左或向右翻页,所在页逐渐消失,下页或上页逐渐出现,酒⽔列表和公关列表⽆滑屏功能。
2.2 划歌划歌:即批量选歌,在已点歌曲列表中⽆效,只有在⼀般点歌列表、歌星点歌、歌曲查询、已唱歌曲、歌词点歌、私家歌库中有效。
2.3 移歌移歌:在已点列表中定选某⾸歌(0.5秒左右),就可把它选中后移到相应的位置,改变歌曲顺序。
MV7_guide_zh-CN说明书
MV7播客话筒The Shure MV7 USB cardioid microphone online user guide. Includes specifications and how to set up, update, and troubleshoot the mic. Version: 3.0 (2023-A)Table of ContentsMV7 播客话筒3简要说明3产品特点 3连接 MV7 3快速设置 4触控面板界面4控制部件 5 LED 指示灯运行状态 5 MV7 话筒5 MV7 输出 5安装说明5防风罩 6自动电平模式6近 7远 7其他技巧 7 Shure MOTIV 桌面应用程序7话筒设置:自动电平 8话筒设置:手动模式 9监听混音合成 9 EQ 模式 10高级话筒设置 10关于 MV7 的提示10 Control your Levels 11使用锁定模式锁定您的声音11监听声音11 MV7 播客话筒的三种使用方式11录音时如何避免爆破声11使用 MV7 进行视频通话11如何在 iOS DAW 中将 MV7 设置为聚合设备11故障排除 11 Firmware Update12在更新过程中保持设备连接 12系统要求12系统要求和兼容性:Mac 12系统要求和兼容性:Windows 12系统要求和兼容性:iOS 12系统要求和兼容性:Android 13规格13 MV7 轭架组装 15附件16提供的附件 16可替换配件 17可选配附件 17认证17用户信息 17••••••1.2.3.MV7 播客话筒简要说明Shure MV7 是一款具有专业品质的 USB 动圈话筒,非常适合要求声音清晰且音色均衡的近距离话筒应用场景。
美观耐用的全金属设计,具有可调节的轭架,可安装在各种话筒支架上,从而实现灵活放置。
触控面板用户界面可控制话筒增益、耳机电平、监听混音合成和静音。
产品特点便捷的即插即用操作兼容 Windows 和 Mac 计算机。
SPVA 24 7操作多功能显示器说明书

SPVA1920 x 1080DVI-DMini D-sub 15 pin5 BNC (RGB/HV)DisplayPortComposite (BNC)S-VideoHDMIBNCStereo Mini JackRS-232C in/out for multiple monitor control, Ethernet, IR, DDC/CI15W Stereo / 8Ω10W Stereo / 8Ω41-104°F / 5-40°C20-80%55”4000:147.6 x 26.8 in. /1209.6 x 680.4 mm4.6 A@100-120V1.85 A@220-240V255W<0.5W0.73 in. / 0.73 in.,18.5 mm / 18.5 mm49.2 x 28.4 x 4.9 in. /1250.2 x 721 x 125.4 mm60.2 x 37.1 x 12.2 in.1530 x 942 x 311 mm88.2 lbs. / 40 kg111.3 lbs. / 50.5 kg400 x 400 mm (4 holes)46”0.530 mm3500:140.1 x 22.5 in. /1018.1 x 572.7 mm3.6 A@100V1.5 A@240V155W0.6 in. / 0.6 in.,16.5 mm / 16.5 mm41.6 x 24 x 4.1 in. /1055.4 x 608.6 x 103 mm47.6 x 30.8 x 10.3 in. /1210 x 782 x 261 mm52.5 lbs. / 23.8 kg67.9 lbs. / 30.8 kg40”0.461 mm3000:134.9 x 19.6 in. /885.6 x 498.2 mm3.5 A@100V1.45 A@240V145W0.6 in. / 0.6 in.,15.5 mm / 15.5 mm36.2 x 21 x 4.1 in. /919.7 x 532.2 x 103 mm42 x 26.9 x 10.3 in. /1066 x 682 x 261 mm45.9 lbs. / 20.8 kg59.1 lbs. / 26.8 kgViewable Size (Diagonal)Panel TechnologyNative ResolutionPixel PitchBrightness (Typical/Maximum)Contrast Ratio (Typical)Active Screen Area (W x H)Input TerminalsOutput TerminalsExternal ControlSpeaker OutputAdditional FeaturesPower RequirementsPower Consumption (Typical)Power Consumption (Standby Mode)Bezel Width (L/R, T/B)Dimensions (without stand; WxHxD)Packaging Dimensions (WxHxD)Net Weight (without stand)Gross Weight (with box)VESA Hole ConfigurationOperating TemperatureOperating HumidityIncludedOptionalRGB1 (Digital)RGB2 (Analog)RGB3 (Analog)RGB4 (Digital)Video 1Video 2Video 3Component Video 1 (DVD/HD)AudioRGB (Analog)RGB (Digital)VideoAudioExternal Speaker JackInternal SpeakerLCD MODULECONNECTIVITYFEATURESPOWERPHYSICAL SPECIFICATIONSENVIRONMENTAL CONDITIONSACCESSORIES70”0.807 mm420 cd/m² / 600 cd/m²2000:161.0 x 34.3 in. /1549.4 x 871.6 mm8.2 A@100-120V3.3 A@220-240V545W2.5 in. / 2.5 in.,62.4 mm / 63.4 mm66.1 x 39.5 x 7.8 in. /1680 x 1004 x 198 mm76.8 x 49.6 x 18.1 in. /1950 x 1260 x 460 mm208.3 lbs. / 94.5 kg251.3 lbs. / 114 kgAdvanced thermal capabilities, Sealed professional panel, Expansion slot, Ethernet control and Communication, CableComp+, TileMatrix (10x10),TileComp, Programmable lookup tables, Plug and Play (DDC/CI, DDC2B), PIP (remote), POP, 6-axis colour adjustment, Multi-level programmable zoom,Scheduler (w/ RTC), Sharpness/softness, Off-timer (countdown), Screen saver, Vacation switch, 10-bit gamma,AutoBright (signal input), Windows Vista-certified IR, Portrait-capable,Metal rear cabinet, Handles, Touch- and protective screen-ready, Ambient light sensor,Carbon footprint meter, Colour temperature adjustment (2600-10,000K)Stand (ST-4020),Speakers (SP-P4046PV),DVI Daisy Chain Board (SB-L008WU),SBC (NET-SBC-01/NET-SBC-02),Media Player Board (SB-L008KU),HD-SDI Board (SB-L007KK),Slot Adapter (SB-02AM),SBC (N8000-8830 / N8000-8822) *3Stand (ST-4620),Speakers (SP-P4046PV),Speakers (SP-RM1),DVI Daisy Chain Board (SB-L008WU),SBC (NET-SBC-01/NET-SBC-02),Media Player Board (SB-L008KU),HD-SDI Board (SB-L007KK),Slot Adapter (SB-02AM),SBC (N8000-8830 / N8000-8822) *3Power cord, Mini D-sub 15 pin cable, Wireless remote control, Batteries, Cable cover,Setup manual, Clamps, Screws, CD-ROM (user manual), Thumbscrew for optional stand (*1), Eyebolt (*2)300 x 300 mm (4 holes)0.630 mm500 cd/m² / 700 cd/m²500 cd/m² / 650 cd/m²<0.5WStand (ST-701), Speakers (SP-RM1),DVI Daisy Chain Board (SB-L008WU),SBC (NET-SBC-01/NET-SBC-02),Media Player Board (SB-L008KU),HD-SDI Board (SB-L007KK),Slot Adapter (SB-02AM),SBC (N8000-8830 / N8000-8822) *3Stand (ST-5220), Speakers (SP-RM1),DVI Daisy Chain Board (SB-L008WU),SBC (NET-SBC-01/NET-SBC-02),Media Player Board (SB-L008KU),HD-SDI Board (SB-L007KK),Slot Adapter (SB-02AM),SBC (N8000-8830 / N8000-8822) *3/ap/Large-Screen LCDDimensionsProfessional Series LCD Public Displays P702: 1680P702: 198P702: 60.5P72:14P72:877.2P402: 888.7P462: 1022.4P552: 1213.2P402: 919.7P462: 1055.4P552: 1250.2P402: 103P462: 103P552: 125.4P42:51.2P462:575.6P552:684P42:532.2P462:68.6P552:721P702: 1555.2All hardware and software names are brand namesand/or registered trademarks of the respective manufacturers.All rights reserved.All specifications are subject to change without notice.Feb 2012WLCD-1202-083D(mm)*1 : Excludes P702 *2 : Only for P702 *3:SB-02AM requiredSharing with 5 BNC (RGB/HV)Audio 1 & 2 (Stereo Mini Jack), Audio 3 Stereo (RCA), HDMINoDVI-D ( DVI-D IN, HDMI IN), DisplayPort ( DisplayPort IN)Stable and reliable 24/7 operation in full HDThe professional-grade construction of P Series panels contributes to 24/7 usage, an overalllonger panel life, lower likelihood of the Mura effect from localized heat, virtually no imageretention and the ability to use in landscape or portrait orientation. Thermal protection of thepanels starts with an extra thermal layer on the display panels to diffuse heat, followed bymulti-fan-based technology specially designed to work in both landscape and portrait modesand be controlled locally or remotely. Internal temperature sensors control self-protective circuits,while special self-diagnostics communicate the status of the thermal characteristics.The screen is equipped with an advanced slim bezel that has beenreduced to 15.5 mm. The bezel* is so slim and inconspicuous that itblends in well with the installation environment while highlighting thepicture.The discreet, slim bezel enables the stunningfull HD images to become the focus of the display*On the P402. The P552 and P462 have bezels of 18.5 mm and 16.5 mm, respectively.A built-in expansion slot for flexible functionality and installationFlexible installation opportunitiesThe expansion slot enables you to integrate an internal board, whichprovides greater flexibility to install displays in locations without space fordisplay devices like computers and display controllers. With a conversionadapter(SB-02AM: option), you can also use OPS*-compliant SBC.Expansion slot for enhanced functionalityThis series comes with an expansion slot, enabling you to expand or addfunctions to the display. You can integrate an internal board at any time,future proofing your investment.*OPS is a standard set up by Intel Corporation.*SB-02AM requiredW i th thi s fe atu re the b r i g htne s s leve l i s adju s te dautomatically, ensuring perfect brightness at all timesavoiding uncomfortable brightness levels and reducingunnecessary power consumption. The ambient light sensorcan be programmed by the user to perfectly adjust thesensor performance to the users needs.Ambient light mode adjusts the panel brightnessautomatically to match ambient light conditionsHigh reliability and user-friendly control function for professional useRS-232C enables multi-display control and daisy chain, allowingfor individual and group-addressable control, and simple,effective setup and monitoring of the display.Ethernet connectivity adds the same RS-232C control plusautomatic email notification for diagnostic purposes.SNMP function allows users to control and monitor items suchas power, brightness and screen mode via network.NaViSet™ software offers an intuitive graphical interface,allowing easy adjustment of display settings via mouse andkeyboard operations. NaViSet Administrator provides all theadvanced control to remotely located IT professionals.DDC/CI standard allows PC control of the display based on theVESA command set.HDMI connector Thinner and lighter (excludes P702)Board SBC (Single Board Controller)Media Player BoardSlot Adapter HD-SDI BoardNET-SBC-01 (with OS)NET-SBC-02 (without OS)N8000-8830/N8000-8822SB-L008KUSB-02AM SB-L007KKThe P Series boasts the industry’ s most extensive control, diagnostics and communication features, providing the highest level of remote display management.。
清新微视使用说明
清新微视使用说明目录第1章:清新微视简介1第2章:产品外观2第3章:快速使用指导3安装方式3配置说明4功能说明10修改网络14恢复出厂15第4章:维护和注意事项15使用手册西安十方电子科技有限公司为了使购买此产品的用户能够轻松掌握安装使用方法,特制作该产品使用说明书,供其参考,在安装和使用前,请仔细阅读本使用说明书。
第1 章:清新微视简介本产品适用于家庭监控,商铺监控等。
主要利用基于无线(WIFI/IP网络等)视频传输的监控系统,基于iCVS2.0 云视频管理平台,采用P2P传输方式,安全简便的实现客户的需求。
本方案所需要使用到的产品包括:清新微视多功能旋转联网摄像机、手机客户端/PC 客户端。
由于监控采用P2P 的传输方式,摄像机需要接入网络,接入方法可以采用WIFI 或者有线网络的方式。
当采用PC 或手机等掌上设备进行观看监控视频等,也需要保证这些设备的网络接入正常。
第2 章:产品外观本产品是清新互联清新微视多功能旋转联网摄像机。
设备图片以及相应接口可参照下图:第3 章:快速使用指导安装方式在安装摄像机前,应根据用户需求和现场的环境选择合适的位置,使得监控的效果更佳。
同时要考虑安装位置的网络信号问题,推荐在家庭和商铺视野较为开阔,能够很好地观看到需要注意的场景的地点安装。
安装方式除了可以直接摆放使用外,还可以采用吊装或者壁装方式,具体安装实例如下图:配置说明1.给摄像机接通电源,可按照设备提示音进行操作。
2.安装“清新微视”手机客户端,注册账号。
请用手机扫描包装盒上二维码下载安装或联系厂家索取,安装后的“清新微视”图标如图1所示。
点击“清新微视”图标,进入软件登录界面,请输入用户名和密码,点击登录(图2)。
新用户请点击“注册新账号”,跳转到注册新用户页面(暂不支持“使用QQ登录”)。
输入手机号码,点击下一步,发送验证码(图3)。
填写收到的验证码,并点击下一步(图4)。
输入密码完成注册(图5)。
DX-7说明书

SPEAKER PLACEMENT
1. Place speakers to the front of listener and position symmetrically. 2. Do not place the speakers side by side. A minimum of 1.5 meter between
NOTICES
1. This speaker system was designed for domestic use only. If used outside of these guidelines, warranty may not apply and we would recommend that you seek for professional advice with regards to setup and installation.
04
CONNECTION DX-7
CONNECTION 2
BI-WIRING, DRIVEN BY TWO AMPLIFIER
1、Before connecting any wires, ensure the power amplifier is turned off. 2、Take off the two set of gold strap in the real board, Ensure the Positive pole
黑色端,线的另一端与音箱的正负极分别连接起来。(见图) 4、最后再打开功放机的电源。
W567CXXX 16通道语音+音乐处理器(BandDirector Series)说明书
W567CXXX DATASHEET16-CHANNEL SPEECH+MELODY PROCESSOR(BandDirector TM Series)Table of Contents-1.GENERAL DESCRIPTION (2)2.FEATURES (3)3.PIN DESCRIPTION (4)4.BLOCK DIAGRAM (5)5.ITEM VS PIN TABLE (6)6.ELECTRICAL CHARACTERISTICS (7)6.1Absolute Maximum Ratings (7)6.2DC Characteristics (7)6.3AC Characteristics (8)7.TYPICAL APPLICATION CIRCUIT (9)8.REVISION HISTORY (12)1. GENERAL DESCRIPTIONThe W567Cxxx is a powerful microcontroller (uC) dedicated to speech and melody synthesis applications. With the help of the embedded 8-bit microprocessor & dedicated H/W, the W567Cxxx can synthesize 16-channel speech+melody simultaneously.The two channels of synthesized speech can be in different kinds of format, for example ADPCM and MDPCM. The W567Cxxx can provide 16-channel high-quality WinMelody TM , which can emulate the characteristics of musical instruments, such as piano and violin. The output of speech/melody channels are mixed together through the on-chip digital mixer to produce colorful effects. With these hardware resources, the W567Cxxx is very suitable for high-quality and sophisticated scenario applications.The W567Cxxx provides at most 24 bi-directional I/Os, maximum 512 bytes RAM, IR carrier, Serial Interface Management, and 32KHz-Divider for more and more sophisticated applications, such as interactive toys, cartridge toys and final count down function. 3 LED output pins with 256-level control means that numerous combination of RGB colors may result in a versatility of colorful effects. In addition, W567Cxxx also provides PWM mode output to save power during playback and Watch Dog Timer to prevent latch-up situation occurring.Note:*: The duration time is based on 5-bit MDPCM at 6 KHz sampling rate. The firmware library and timber library have beene xcluded from user’s ROM space for the duration estimation.2. FEATURES∙Wide range of operating voltage:-************~5.5volt-************~5.5volt∙Power management:- 4 ~ 8 MHz system clocks, with Ring type or crystal type.-Stop mode for stopping all IC operations∙Provides up to 24 I/O pins∙F/W speech synthesis:Multiple format parser that supportsNew 4-bit MDPCM(NM4), 5-bit MDPCM(MDM), 4-bit MDPCM(MD4), 4-bitADPCM(APM), 8-bit Log PCM(LP8) algorithm can be usedPitch shippable ADPCM for voice changer applicationProgrammable sample rate∙Melody synthesis:16 melody channels that can emulate characteristics of musical instrumentsMulti-MIDI simultaneousMulti-MIDI channels dynamic controlMore MIDI events are supported for colorful melody playback∙Built-in IR carrier generation circuit for simplifying firmware IR application∙Built-in TimerG0 for general purpose applications∙Harmonized synchronization among MIDI, Speech, LED, and Motor∙Build-in 3 LED outputs with 256-level control of brightness.∙Built-in Watch-Dog Timer (WDT) and Low Voltage Reset (LVR)∙Built-in 32KHz crystal oscillator with divider for time-keeping application∙Provide serial interface to access the external memoryW55Fxx, W551CxxSPI flash∙Dynamic control of the Pan assignment to the dual speaker output for stereo effects in the parts of W567Cxx6∙Stereophonic current type digital-to-analog converters (DAC) with 13-bit resolution to drive speaker output∙Stereophonic direct-drive 12-bit PWM output to save power consumption∙Support PowerScript TM for developing codes in easy way∙Full-fledged development systemSource-level ICE debugger (Assembly & PowerScript TM format)Ultra I/O TM tool for event synchronization mechanismICE system with USB portUser-friendly GUI environment∙Available package form:COB is essential3. PIN DESCRIPTION1Only W567Cxx6 series provides these pins for dual speaker output.4. BLOCK DIAGRAMDAC/PWM+PWM-5. ITEM VS PIN TABLE6. ELECTRICAL CHARACTERISTICS6.1 Absolute Maximum RatingsNote: Exposure to conditions beyond those listed under Absolute Maximum Ratings may adversely affect the life and reliability of the device.6.2 DC Characteristics(V DD-V SS = 4.5 V, F M = 8 MHz, Ta = 25︒C, No Load unless otherwise specified)6.3 AC Characteristics(V DD-V SS = 4.5 V, F M = 8 MHz, Ta = 25︒C; No Load unless otherwise specified)7. TYPICAL APPLICATION CIRCUIT(a) Rosc with 2 BatteryNotes:1. The block (1): If the project is two-battery application (Voltage 3.6V~2.2V), it is necessary to connect CVDD to VDD.2. The block (2): The low-pass filter circuit is necessary for VDD stability, in order to avoid VDDSPK noise.3. The block (3): The capacitor,4.7uF, shunted between VDD and GND is necessary for power stability. However, thevalue of capacitor depends on the power loading of the application.4. The typical value of Rosc is 300 KΩ for 8MHz and 390 KΩ for 6MHz, and the Rosc should be connected to GND(VSS). Please refer to design guide to get typical Rosc value for each part number.5. The block (4):The capacitor, 120pF, shunted between OSCIN and VDD is optional for Fosc stability, which canprevent noise from happening, because it can block the affection of larger current while playing. However, the value of capacitor depends on the application (100pF~200pF is recommended)6. The block (5): The Rs value is suggested of 270Ω ~ 1KΩ to limit large DAC output current flowing into transistor.7. The above application circuit is for reference only. No warranty for mass production.(b) Rosc with 3 BatteryNotes:1. The block (1): If the project is three-battery application (Voltage 5.5V~3.0V), it is necessary to connect a 0.1uFbetween CVDD and GND (VSS).2. The block (2): The low-pass filter circuit is necessary for VDD stability, in order to avoid VDDSPK noise3. The block (3): The capacitor,4.7uF, shunted between VDD and GND is necessary for power stability. However,the value of capacitor depends on the power loading of the application.4. The typical value of Rosc is 300 KΩfor 8MHz and 390 KΩfor 6MHz, and the Rosc should be connected toGND (VSS). Please refer to design guide to get typical Rosc value for each part number.5. The block (4)The capacitor, 120pF, shunted between OSCIN and VDD is optional for Fosc, which can preventnoise from happening, because it can block the affection of larger current while playing. However, the value of capacitor depends on the application (100pF~200pF is recommended)6. The block (5): The Rs value is suggested of 270Ω~ 1KΩto limit large DAC output current flowing intotransistor.7. The above application circuit is for reference only. No warranty for mass production.(c) CrystalNotes:1. The block (1): Please refer to (a) and (b) circuits for two-battery or three-battery application.2. The block (2): The low-pass filter circuit is necessary for VDD stability, in order to avoid VDDSPK noise.3. The block (3): The capacitor,4.7uF, shunted between VDD and GND is necessary for power stability. However thevalue of capacitor depends on the power loading of the application4. The block (4): Cp1 and Cp2 (15~30pF) are optional for main Crystal, which can be skipped normally.5. The block (5): The Rs value is suggested of 270Ω ~ 1KΩ to limit large DAC output current flowing into transistor.6. Cp3 and Cp4 (15~30pF) are optional for 32KHz Crystal, which can be skipped normally.7. Please connect all VDD pins include VDDOSC/VDD_BP1 to VDD. If with SIM application, the VDD_BP1 pin canconnect to different voltage for SPI flash or W551Cxx and the BP10~BP17 also use the same power VDD_BP1.8. The above application circuit is for reference only. No warranty for mass production.9. Other application circuits please refer to Design Guide.(d) PCB layout guide1. The IC substrate should be connected to VSS in PCB layout, but VSSSPK can’t connect withIC substrate directly. Both VSS and VSSSPK tie together in battery negative power.2. Each VDD, VDDOSC, VDD_BP1, VDD1 and VDDSPK pad must connect to positive power tosupport stable voltage for individual function work successfully. (Don’t let them be floating.)8. REVISION HISTORYA0.0 Dec 2006 Preliminary release.A1.0 May 2007 ●Add IO description for different body ●Modify application circuitA2.0 Nov 2007 ●Modify application circuit (naming) ●Modify LogoA3.0 Sep. 2008 ●Change logoA4.0 Jun. 2009 ●Modify application circuitA5.0 Jun. 2010 ●Add application circuit for 2 batteryA6.0 Dec. 2010 ●UpdateoutputcurrentforBP1/******/*********************●Add application circuit for Ring OSCin pin to 120pF to VDD for option●Modify the description for application circuit●Support MD4 format for F/W library79~159~153A7.0 July 2011 ●Add new chip W567C151/171 application circuit 2, 5 9~18A8.0 Aug. 2011 ●Remove W567C150/170●Add new chip W567C151/171 pad description●Add new chip W567C151/171 application circuit●Add SIM application circuits259~2020A9.0 Jan. 2012 ●Add W567CP80 OTP chip●Add items vs pad table●Modify application circuits27A10.0 Mar. 2012●BP00~BP03 share pins as OTP writer in W567CP80.●Update operating current DC spec. 4 9A11.0 Jun. 2012 ●Revised VDD_SIM to VDD_BP1 5, 7 11~13Important NoticeNuvoton Products are neither intended nor warranted for usage in systems or equipment, any malfunction or failure of which may cause loss of human life, bodily injury or severe property damage. Such applications are deemed, “Insecure Usage”.Insecure usage includes, but is not limited to: equipment for surgical implementation, atomic energy control instruments, airplane or spaceship instruments, the control or operation of dynamic, brake or safety systems designed for vehicular use, traffic signal instruments, all types of safety devices, and other applications intended to support or sustain life.All Insecure Usage shall be made a t customer’s risk, and in the event that third parties lay claims to Nuvoton as a result of customer’s Insecure Usage, customer shall indemnify the damages and liabilities thus incurred by Nuvoton.。
安桥 fr x7说明书
安桥fr x7说明书Condition条件.CD playback confirmed.。
CD回放确认。
-Checked sound output via AUX-经Aux检查的声音输出-When you insert MD,it comes out immediately.-Other functions not tested-当你插入MD时,它会立即出来-其他功能还没有经过测试There are some scratches and dirt.有一些划痕和污垢。
Accessories附件none无Practical maximum output:20W+20W(4Q·JEITRated output实际最大输出:20W+20W(4Q·JEITRATED输出):14W+14W(42):12W+12W(62):14W+14W(42):12W+12W(62)External dimensions(mm):W205 x H154 x D354Weight:5.3kg外部尺寸(毫米):W 205 x H 154 x D354W:5.3kgShipping航运with tracking number.with tracking number.ln addition,depending on the shipping location,additional fees may be required for the remotelocation.In that case,we will charge you after thepurchase.ln addition,depending on the shipping location,additional fees may be required for the remotelocation.In that case,we will charge you after thepurchase.lnternational Buyers-Please Note:国际买家-请注意:lmport duties,taxes,and charges are not included inthe item price or shipping cost.These charges are thebuyer's responsibility.Please check with your country'scustoms office to determine what these additionalcosts will be prior to bidding or buying.lmport duties,taxes,and charges are not included inthe item price or shipping cost.These charges are thebuyer's responsibility.Please check with your country'scustoms office to determine what these additionalcosts will be prior to bidding or buying.。
Cav560高档中文家庭影院

Cav560高档中文家庭影院开场白:这是Cav560高档中文家庭影院,它是国际上第一台进入中国市场的全中文勾通机型,代表中国家庭影院发展的最终趋势;国内同类产品的价格还在1万元至1万5千元,所以它刚刚上市就在全国引起了极大的轰动。
效果讲解:视《三步杀人曲》《魔幻屠龙》或《SONY DVD试音碟》《EAGIES》DVD均可。
560采用了一个精英型的32兆超大容量4合1专用CPU芯片,内置CA V独有的程序式合成式解码器,能够处理100%片源,既可单独使用,也能够与CA V的DC2000型解码器配套升级,成为一套顶级家庭影院系统。
[开机中文演示,时域频域分析显示,吸音系数与反射面积设定] 家庭影院现在已经成为一种普及型和大众化的消费品,以后像这种家庭影院的产品,用英文显示的机型就没有了,这就跟中文手机的普及是一样的道理。
听《卓依亭DTS CD 2》家庭影院音乐效果。
普通家庭影院的中置环绕声音都很闷,CA V560的中置环绕采用的是德国LIPPIC(利普克)4倍超强振膜,环绕声非常清晰明亮,听感舒适。
《CA V560 CD试音碟》CA V560的音质不仅声压强大,现代感强,而且它是CA V 的音响专家专门针对中国听众的口味而设计的,全方位满足中国人的审美传统和听音习惯,它的设计思想就是——为中国家庭量体定做。
〈席琳迪翁爱的力量〉〈李娜青藏高原〉〈明月几时有〉主音箱的高音喇叭采用的是法国蓝色海岸天然蚕丝绢膜制造的发烧级猫眼高音,是三层振膜复合式结构,高音非常突出炫耀,音色丰富。
〈560CD〉中低音单元采用的是高分子聚合纤维底膜外加美国杜邦FFD降噪涂层,清除锯沫噪音,一改家庭影院尾音普遍不干净的通病。
所以CA V560的高中低音一律量感十足。
低音单元使用双8吋对称模式,不仅增强了大动态的爆棚震撼效果,而且提高了低音的真实结像力。
这一套家庭影院比一般市面上的家庭影院声音都大,关键是它功放的功率大,它的不失真功率达到了每声道80W,最大功率可达到每声道400W,保证给主音箱SP500和中置环绕C50 S50提供足够强劲的推动力。
深圳市科亚威科技有限公司介绍企业发展分析报告
Enterprise Development专业品质权威Analysis Report企业发展分析报告深圳市科亚威科技有限公司免责声明:本报告通过对该企业公开数据进行分析生成,并不完全代表我方对该企业的意见,如有错误请及时联系;本报告出于对企业发展研究目的产生,仅供参考,在任何情况下,使用本报告所引起的一切后果,我方不承担任何责任:本报告不得用于一切商业用途,如需引用或合作,请与我方联系:深圳市科亚威科技有限公司1企业发展分析结果1.1 企业发展指数得分企业发展指数得分深圳市科亚威科技有限公司综合得分说明:企业发展指数根据企业规模、企业创新、企业风险、企业活力四个维度对企业发展情况进行评价。
该企业的综合评价得分需要您得到该公司授权后,我们将协助您分析给出。
1.2 企业画像类别内容行业计算机、通信和其他电子设备制造业-电子器件制造资质空产品服务是:电子产品的技术开发与销售。
,许可经营1.3 发展历程2工商2.1工商信息2.2工商变更2.3股东结构2.4主要人员2.5分支机构2.6对外投资2.7企业年报2.8股权出质2.9动产抵押2.10司法协助2.11清算2.12注销3投融资3.1融资历史3.2投资事件3.3核心团队3.4企业业务4企业信用4.1企业信用4.2行政许可-工商局4.3行政处罚-信用中国4.4行政处罚-工商局4.5税务评级4.6税务处罚4.7经营异常4.8经营异常-工商局4.9采购不良行为4.10产品抽查4.11产品抽查-工商局4.12欠税公告4.13环保处罚4.14被执行人5司法文书5.1法律诉讼(当事人)5.2法律诉讼(相关人)5.3开庭公告5.4被执行人5.5法院公告5.6破产暂无破产数据6企业资质6.1资质许可6.2人员资质6.3产品许可6.4特殊许可7知识产权7.1商标7.2专利7.3软件著作权7.4作品著作权7.5网站备案7.6应用APP7.7微信公众号8招标中标8.1政府招标8.2政府中标8.3央企招标8.4央企中标9标准9.1国家标准9.2行业标准9.3团体标准9.4地方标准10成果奖励10.1国家奖励10.2省部奖励10.3社会奖励10.4科技成果11土地11.1大块土地出让11.2出让公告11.3土地抵押11.4地块公示11.5大企业购地11.6土地出租11.7土地结果11.8土地转让12基金12.1国家自然基金12.2国家自然基金成果12.3国家社科基金13招聘13.1招聘信息感谢阅读:感谢您耐心地阅读这份企业调查分析报告。
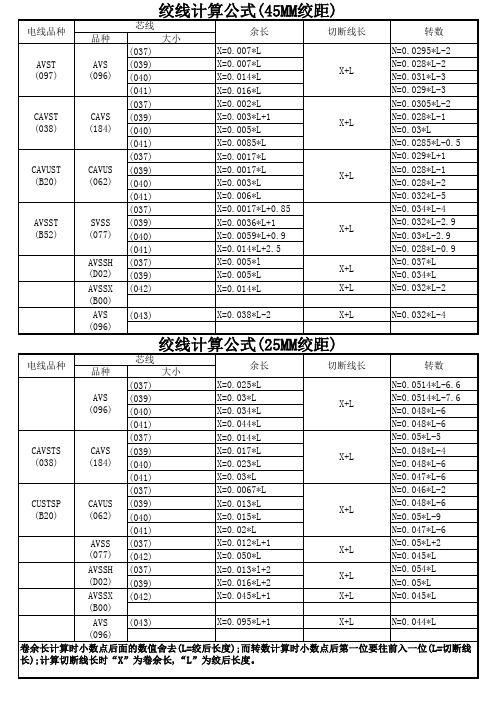
绞线计算公式
单纯、干净的声音KEF C7音箱

单纯、干净的声音KEF C7音箱
魏珏;学明(摄影)
【期刊名称】《中国电子商情:视听前线》
【年(卷),期】2008(000)010
【摘要】KEF建于1961年,是由原来在英国广播公司工程部担任技术主管雷蒙德·库克(Raymond Cook)创办的,到今天已有40多年的历史了。
上个世纪80年代伦敦出版的《High Performance Loudspeakers》一书,在这本专论扬声器的书中涉及到KEF至少有4、5次之多,可见KEF名声之大。
音响是门艺术,不仅止于追求声学的发烧境界,同时,与工业设计息息相关的外观美学,
【总页数】3页(P52-54)
【作者】魏珏;学明(摄影)
【作者单位】无
【正文语种】中文
【中图分类】TP391
【相关文献】
1.KEF X300A Wireless一款功能比声音更好的音箱 [J], ;
2.KEF C系列多声道音响系统C7、C5主音箱·C6LCR中置·C1环绕箱 [J], 吴蒙
3.KEF双极式环绕声音箱 [J],
4.技术品质与声音的再度挺进——听KEF iQ7音箱 [J], 孔祥军
5.好声音就是如此简单--KEF LS50 Wireless有源音箱 [J],
因版权原因,仅展示原文概要,查看原文内容请购买。
安桥7.2声道前级功放TX-NR616
安桥7.2声道前级功放TX-NR616
无
【期刊名称】《实用影音技术》
【年(卷),期】2012(000)002
【摘要】正日本知名音响厂商安桥于近日推出一款全新入门级7.2声道前级功放TX-NR616,这款功放经过THX认汪。
而值得一提的是,安桥TX-NR616功放支持InstaPrevue技术,切换HDMI源以便捷使用电视和AV接收器。
用户无需再去记住蓝光播放器是"HDMI-1"还是"HDMI-4",用户的连接装置
【总页数】1页(P6-6)
【作者】无
【作者单位】
【正文语种】中文
【中图分类】TN722.75
【相关文献】
1.7.2声道的次世代功放雅马哈RX-V765AV功放 [J],
2.4K离我们不再遥远Onkyo TX-NR616 7.2声道AV放大器 [J], 崔俊
3.审美不疲劳雅骏FMJ AV8 7.1声道前级/解码器和FMJ-P7 7声道后级功放 [J], 彭坡
4.审美不疲劳——雅骏FMJ AV87.1声道前级/解码器和FMJ-P77声道后级功放[J], 彭坡
5.安桥推出7.2声道前级功放TX-NR616 [J], 无
因版权原因,仅展示原文概要,查看原文内容请购买。
- 1、下载文档前请自行甄别文档内容的完整性,平台不提供额外的编辑、内容补充、找答案等附加服务。
- 2、"仅部分预览"的文档,不可在线预览部分如存在完整性等问题,可反馈申请退款(可完整预览的文档不适用该条件!)。
- 3、如文档侵犯您的权益,请联系客服反馈,我们会尽快为您处理(人工客服工作时间:9:00-18:30)。
2009年山东省教师资格考试中学教育心理学真题一、不定向选择题1、一个人智商的个体测量分数是90,同年龄组的平均分数是80,同年龄组的标准差是10,这个人的智商是多少?A、100B、115C、120D、1402、程序教学的特点:A、小步子原则B、由易到难C、循序渐进D、自行控制时间3、改变学习者原有认知结构的是:A、上位学习B、派生下位学习C、并列结合学习D、概念学习4、每个人都有这样的感受,当你遇到一个很久没见的朋友,一时想不起他的名字,等他离开时却又突然想起他的名字,这种现象称:A、痕迹消退B、**C、遗忘二、填空31.在工作记忆中为了保持信息,运用内部语言在大脑中重现学习资料或刺激,以便将注意力维持在学习资料上的学习策略叫()32.学习者头脑中所有的知识观念及其组织,心理学上称之为()33.当有机体面对一个新刺激情境时,如果主体能够利用已有的图式将刺激整合到自己的认识结构中,皮亚杰称之为()34.学生现有水平与经他人帮助可以达到的较高水平间的差距,维果斯基称之为()35.根据埃里克森的人格发展理论,中学生人格发展主要任务是()36.心里自我调控理论提出者是()37.个体凭经验而产生的行为或行为潜能变化,心理学上称之为()38.学习者通过观察他人行为所带来的奖励性后果而受到强化,心理学上称之为()三、判断并说明理由46.一般说来,发现学习是一个主动思维过程,接受学习是一个被动接受过程。
48.只要学生能够给出概念的精确定义,就说明其学习已经达到概念水平50.认知失调是改变学生态度必要而充分的条件。
四、简答51.简述初中生情感发展特点52.简述加德纳多元智力理论主要内容53.简述学习的联结学说主要内容及学习规律五、论述2.人们常说,在学校教育中,尽可能让学生获得成就感减少挫折感。
请用所学教育心里学理论分析这一说法合理性2008年山东省教师资格考试中学教育心理学试题一、选择题1.心智技能形成过程中各阶段顺序是()。
A.原型操作、原型定向、原型内化B.原型操作、原型内化、原型定向C.原型内化、原型定向、原型操作D.原型内化、原型操作、原型定向E.原型定向、原型操作、原型内化2.智力的群体差异包括()。
A.性别差异B.年龄差异C.种族差异D.智商分数差异E.同龄团体差异3.构成品德心理结构的基本成分是()。
A.认知B.情感C.意志D.行动E.态度4、中学生观察力发展的特点有()A、目的更明确,B、持久性明显发展,C、精确性提高,D、概括性更强。
5、系统脱敏法由()在20世纪20年代首创。
A、沃尔朴B、福勒C、雅各布松D、奥苏贝尔E、布朗二、填空题:1、通过变更对象的非本质特征的表现形式,变更人们观察事物的角度或方法,以突出对象的本质特征,突出那些隐蔽的本质要素,在心理学上被称为变式2、学习者在某一领域内的观念及其组织认知结构3、儿童在有指导的情况下,借助成人帮助所能达到的解决问题的水平与独自解决问题所达到的水平之间的差异,实际上是两个邻近发展阶段的过渡状态最近发展区三、判断:1、学习是直接的练习形成的,而迁移是间接的经验形成的。
2、概念的定义是规则的特殊形式。
四、问答:1、什么是观察学习,观察学习的过程?2、奥苏贝尔迁移学习观(简述奥苏贝尔的认知迁移理论的主要内容)五、论述1、结合中学教学的实际,分析埃里克森的心理社会发展理论及其教育意义。
山东省2007年5月20日省中学教育心理学考题一.不定向选择题。
(在每小题的五个备选答案中,选出正确的答案,并将正确答案的序号分别填在题干的括号内,多选、少选、错选均不得分。
每小题1分,本题总分30分)1.如果一个人喜欢富有创造性地、有安排、有计划的解决问题,凡事乐于自己制定规则,喜欢以自己的做事方式行事,喜欢没有预先建构好的问题,喜欢自己去搭建结构并决定如何去解决问题,喜欢自己去搭建结构并决定如何去解决问题,喜欢基于创造性和建构性计划的活动,则这个人的思维风格属于()。
A.自由开放型 B.保守拘谨型 C.主动独立型D.被动执行型E.分析评判型2.研究发现,专家型教师与新教师的差异,主要表现在()。
A.课前指导B.课堂教学过程 C.课后评价 D.课时计划E.学年计划3.根据埃里克森的人格发展阶段理论,中学生要解决的矛盾是()。
A.信任与不信任的矛盾 B.勤奋感对自卑感的矛盾C.同一性对同一性混乱的矛盾D.自主对羞怯、怀疑的矛盾 E.亲密对孤独的矛盾4.现有的影响较大的教育理论有()。
A.桑代克的联结说 B.布鲁纳的认知结构学习理论C.皮亚杰的认知发展理论D.维果斯基的发展理论 E.埃里克森的心理社会发展理论5.在实际教学中,教师不能突袭(比如,应该学习新知识,却进行考试),不利于学生学习,这种做法依据是学习的()。
A.准备率 B.练习率 C.效果率D.刺激 E.条件反射6.美国心理学家布鲁纳认为学习的实质在于()。
A.获得知识 B.习得学习方法 C.主动形成认知结构 D.建立知识系统 E.了解新生事物7.如果一个人情绪消极,对生活感到全无乐趣,觉得自己的活动没有价值,这种人患有()。
A.焦虑症 B.抑郁症C.强迫症 D.恐怖症E.性格障碍与人格缺陷8.人们对自己是否能够成功地进行某一成就行为的主观推测和判断是()。
A.学习需要B.动机归因 C.成就动机D.学习动机E.自我效能感9.智力的群体差异包括()。
A.性别差异 B.年龄差异C.种族差异D.智商分数差异E.同龄团体差异10.在英语学习中,学生在学习eye(眼)和ball后学习eye ball就比较容易,这种现象属于()。
A.一般迁移B.负迁移 C.水平迁移D.垂直迁移E.正迁移11.构成品德心理结构的基本成分是()。
A.知 B.情 C.意 D.行E.态度12.原认知知识包括()。
A.关于个体内差异的认识 B.对任务的认识 C.对有关学习策略及其使用方面的认识D.关于个体间差异的认识 E.对个人作为学习者的认识13.创造性地培养,常用方法有()。
A.提供具有创造性地榜样B.头脑风暴训练C.自我设计训练D.发散思维训练E.推测与假设训练14.心智技能形成过程中各阶段顺序是()。
A.原型操作、原型定向、原型内化 B.原型操作、原型内化、原型定向C.原型内化、原型定向、原型操作 D.原型内化、原型操作、原型定向E.原型定向、原型操作、原型内化15.在操作形式中,把模仿阶段习得的动作固定,并一体化称为()。
A.操作模仿B.操作整合 C.操作熟练 D.原型定向 E.原型内化16.对有效完成任务所需的技能、策略及其来源的意识称之为()。
A.认知策略 B.元认知策略C.元认知知识 D.元认知控制E.元认知计划17.根据马斯洛的需要层次说,人的需要可分为生长需要和缺失需要,下列所列需要属于缺失需要的是()。
A.饮食需要B.力避下岗的需要 C.被人尊重的需要D.审美的需要E.寻找归属和爱的需要18.问题的基本特点是()。
A.目的性 B.认知性C.序列性D.外显性E.扩展性19.一般认为,态度和品德的形成过程经历如下阶段()。
A.依从B.服从 C.认同D.内化 E.完善20.当一个人熟悉了某种事物潜在作用,这种阻碍理解的因素是()。
A.已有的知识经验B.问题特征C.功能固着 D.原型启发E.变式21.我国心理学界一般认为,品德的心理结构包括()。
A.认识B.情感C.控制 D.行为 E.干预22.技能的基本特点是()。
A.技能是通过遗传获得的B.技能是通过学习或练习而形成的,不同于本能行为C.技能是由一系列动作及执行方式构成的D.技能是通过系统的学习与教学而形成的E.技能中的各动作要素及其执行顺序要体现活动本身的客观法则的要求,不是一般的习惯动作23.知识的表征存储方式有()。
A.命题网络 B.产生式系统 C.图式D.认知方式 E.概念网络24.下列那些原则和策略是奥苏贝尔提出的()。
A.逐分原则 B.整合协调原则 C.先行组织者原则 D.小步子原则 E.及时反馈原则25.根据适当过渡学习原理,要想使记忆效果达到最好,学习的熟练程度应达到刚好能够回忆出来的次数的()。
A.100% B.120% C.150% D.200% E.250%26.维果斯基的发展观的基本内容包括()。
A.文化历史发展理论 B.心理发展观 C.内化学说D.最近发展区理论 E.心智技能按阶段形成理论27.在心理学上,一般将教师的期望的预言效应称之为()。
A.罗森塔尔效应B.霍桑效应 C.晕轮效应 D.冯雷斯托夫效应E.约翰亨利效应28.当学生违反校规校纪时,我们会给他一个处分,经过一段时间教育,发现该生表现越来越好,为了巩固其良好行为,才撤销了处分,这种做法在心理学上叫()。
A.消退 B.惩罚C.负强化D.抑制E.正强化29.下列哪些强化程式是延缓式强化()。
A.定时距式B.变时距式 C.定比率式D.变比率式E.每次都给学生强化30.学与教相互作用的过程是一个系统过程,它有一些子系统构成的,这些子系统包括()。
A.学习过程 B.教学过程C.评价过程 D.反思过程 E.反馈过程二.填空题。
(共15题,每题1分,根据所学知识将答案填在每题横线上,本题总分15分。
)31.教育心理学研究的核心内容是。
32.个体通过与环境相互作用后获得的信息及其组织,在心理学上称之为。
33.应用一系列的认知操作,从问题的起始状态到达目标状态的过程称之为。
34.个体依据一定的社会道德行为规范、行动时表现出来的比较稳定的心理特征和倾向,在心理学上称之为。
35.学习迁移的形式训练说的心理学基础是。
36.引起、维持和指引个体学习活动的心理动因或内部动力称为。
37.操作技能形成的基本途径是。
38.学习者为了提高学习效果和效率,有目的有意识的制定的有关学习过程的方案称为。
39.如果一个学生无论什么事情,都出现“你要我遵守,你也要遵守;你让我做好,你也得做好”,则该学生道德发展处于。
40.按照我国心理学家关于个体心理发展的分类11、12岁到14、15岁这一期间属于。
41.曾被一条大狗咬过的人,看见小狗也产生恐惧,这种现象心理学上叫。
42.知识建构的基本机制是。
43.通过学习而形成的,影响个人行为选择的内部准备状态或反应倾向性,心理学上称为。
44.按照奥苏伯尔的观点,个体有自己的工作或学业成就而获得相应的地位的愿望叫。
45.人们对自己是否能够成功地进行某一成就行为的主观推测和判断是。
三.辨析题(共5题,每题5分,请先判断正误,然后说明原因,本题总分25分。
)46.教育心理学是应用心理学的一种,是心理学一般原理在教育中的应用。
47.根据维果斯基的的观点,教学必需要考虑学生已经达到的水平,而且任何教学也必须着眼于学生的已有水平。
48.根据斯金纳的操作条件反射理论,强化分正强化和负强化,无论正强化还是负强化,其作用都是改变同类反映在将来发生的概率。
