Dell QSA Rev 3.0 中英文版(2003)
DELL笔记本中英文选项对照表

USB仿真:使用该选项可以在不直接支持USB的操作系统中使用USB键盘、USB鼠标及USB软驱。该设置在BIOS启动过程中自动启用。启用该功能后,控制转移到操作系统时仿真继续有效。禁用该功能后在控制转移到操作系统时仿真关闭。
Pointing Device
指针设备:设置为“SERIAL MOUSE”时外接串口鼠标启用并集成触摸板被禁用。设置为“PS/2 MOUSE”时,若外接PS/2鼠标,则禁用集成触摸板。设置为“TOUCH PAD-PS/2 MOUSE”(默认设置)时,若外接PS/2鼠标,可以在鼠标与触摸板间切换。更改在计算机重新启动后生效。
LAN Controller
网络控制器:使用该选项可启用或禁用PCI以太网控制器。禁用后该设备在操作系统中不可见。
PXE BIS Policy/PXE BIS Default Policy
PXE BIS策略:该选项控制系统在没有认证时如何处理(启动整体服务Boot Integrity Services(BIS))授权请求。系统可以接受或拒绝BIS请求。设置为“Reset”时,在下次启动计算机时BIS将重新初始化并设置为“Deny”。
硬盘驱动器
USB Storage Device
USB存储设备
CD/DVD/CD-RW Drive
光驱
CD-ROM device
光驱
Modular Bay HDD
模块化硬盘驱动器
Cardbus NIC
Cardbus总线网卡
Onboard NIC
板载网卡
Boot POST
进行开机自检时(POST)硬件检查的水平:设置为“MINIMAL”(默认设置)则开机自检仅在BIOS升级,内存模块更改或前一次开机自检未完成的情况下才进行检查。设置为“THOROUGH”则开机自检时执行全套硬件检查。
QSA Audit(Dell)(工厂稽查)

Dell Confidential Document No. COR.40.WWP.SQ.0003 Rev 3.0Information and InstructionsPURPOSEThis document was developed as an Audit Tool to assess a supplier's Quality Systems against Dell's Quality Systems Requirements.The Dell Quality Systems Audit (QSA) is build upon the ISO-9000 Quality Systems Standard, but with additional Dell specific requirements included.SCOPEThe Dell Quality Systems Audit is not commodity specific, therefore it may be used to assess the Quality Systems deployed by a supplier/manufacture irrespective of the commodity.AUDIT BY SELF ASSESSMENTA supplier's facility is required to complete a self assessment using this tool in advance of the Dell Audit. (One QSA is required per facility.)By doing this, a facility will be able to prepare for the audit and seek advance help and guidance from Dell SQE to be best positioned to succeed.It is expected that during the self-assessment process, that the supplier will use this opportunity to ask questions for either clarification or to better understand intent of the audit criteria. Waiting for the formal Dell audit to ask these types of questions is too late. It is also expected that based on self audit results, a supplier will inform the Dell team of their readiness for a formal Dell audit.A self assessment is completed by scoring the relevant column in each worksheet.AUDIT BY DELLDuring the audit process, the Dell SQE may wish to review every question/criterion listed on the audit document, or alternatively the SQE may choose to focus only on those questions for which the supplier awarded themselves a score of 1 by self-assessment. The path taken is left to SQE discretion.The score awarded by the SQE Auditor will be entered in the 'Score' column on each worksheet.AUDIT RESULTSThe SQE Auditor must complete ALL sections before an Audit Result can be declared.The Audit Result of each section is based on the number of questions scored as 1 versus the total number of questions of the section.Any questions that are scored as N/A are adjusted automatically in the score denominator.The overall average score does not determine the Audit Result, rather all the individual section scores will determine the Audit Result.The 'Pass' score for the Audit is 90%. If the Audit Scores for all sections of equal or greater than 90% are achieved, a 'Pass' or 'Approved' result is awarded.If an Audit Score of equal or greater than 80% but less than 90% is achieved at any section, a 'Conditionally Approved' result is awarded.If an Audit Score of less than 80% is achieved at any section, a 'Fail' or 'Not Approved' result is awarded.If a "Conditionally Approved" Result is awarded, a Corrective Action Plan is due from the supplier within TWO weeks of the date of audit completion for any sections of the QSA that are below 90%.If a "Not Approved" Result is awarded, a Corrective Action Plan is due from the supplier within TWO weeks of the date of audit completion for any sections of the QSA that are below 80%. On completion of this Corrective Action Plan, a supplier is required to generate second Corrective Action Plan to bridge to the 90% 'Approved' Status.All Corrective Action Plans must contain a timeline to 'bridge' to a 'Conditionally Approved' or 'Approved' status, depending on the initial audit result, and must propose a target date for a Dell follow-up Audit.Failure to achieve a 'Conditionally Approved' Result on a follow up Audit may impact business award decisions.A PASS RESULTOnce a supplier's facility has Passed the Audit, the Quality Systems are approved for the facility audited, not all supplier facilities.Passing the QSA does not guarantee a business award, but is the first step towards winning technical approval for a site. In addition, many commodities have a commodity specific Quality Process Audit (QPA), which also requires to be passed before technical approval may be obtained.AUDIT MECHANICS and QUESTIONSThe Audit breaks down the Quality System into individual sections, each of which is represented by an individual worksheet.Within each worksheet is contained a series of questions specifically pertaining to the section being examined.The questions were devised and developed as closed questions with every attempt to avoid ambiguity.Because of the closed nature of the questions, there can only be one of three answers to any question, i.e. Yes (1), No (0), or N/A (x).If the Criterion is fully met, a score of 1 is obtained. If the Criterion is not met, a score of 0 is obtained.A score of N/A (x) may be awarded if the SQE believes that any particular question is truly Not Applicable in the case of the supplier facility under review.In any cases the total number of N/A should be kept as minimum as possible.If there is any doubt as to the score to award for any given Criterion, a score of zero shall be awarded by default.Any Criterion that scores 1 shall be clearly demonstrated, followed, and be beyond reproach.In the event that a supplier clearly meets the intent of the audit question, but does not exactly do what the question asks, a score of 1 shall be given.TRAININGThe QSA is very technical in content with regard to Quality Systems and Engineering Techniques.An internal training session will be provided to the SQEs who use this checklist.SQEs who use this tool are considered within Dell as being sufficiently qualified to conduct this audit.AUDIT SCHEDULEThe Audit may be used as and when the need arises. However, Dell may conduct an official audit annually for key suppliers. The frequencyof the re-audit will be based on the audit result & action closure of the last audit, as well as the supplier quality performance in the past year period.Before conducting an audit, the auditor must ensure the Dell commodity management team responsible for the relationship are advised of the audit schedule.It is also intended for suppliers to conduct internal audits by self assessment every quarter so progress may be reported to Dell.ADDITIONAL QUESTIONSDELL Quality Systems Audit ChecklistCOR.40.WWP.SQ.0003 Rev 3.0Please contact Alfred Lau at alfred_lau@ for additional information.REVISION HISTORYDate Description Of RevisionRevised ByRev.Original document.Pak Chew Ng 1.0Changes to make it generic.Frank Widjaja 1.1Corrected typographical errors, added revision history Robert Yeopage and added header stating revision number.Modified to use for all commodities as the new QSA Audit Tim W. Boyd/ Jill Terry5-May-99(replacing the 135pt audit form) -- changed subject tabs, 2.0numbering, question content, and scoring.14-Dec-01Added tab for Field Services use, Changed final scoring calculation to (total actual score overall/total questions asked)* 100.Karla Sartin/Jeff Scott2.119-Apr-98 1.2Quality System AuditDell Confidential Document No. COR.40.WWP.SQ.0003 Rev 3.0。
DELL QSA中英
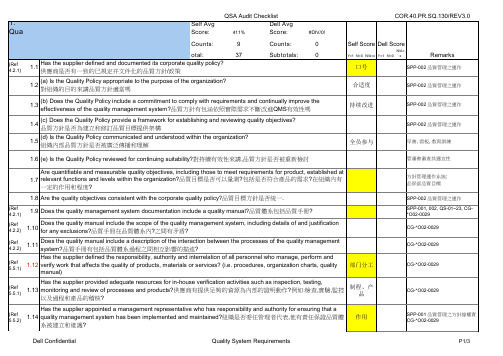
Remarks
SPP-002 品質管理之運作
ቤተ መጻሕፍቲ ባይዱ
口号 合适度 持续改进
SPP-002 品質管理之運作
(b) Does the Quality Policy include a commitment to comply with requirements and continually improve the effectiveness of the quality management system?品質方針有包涵依照實際需求不斷改進QMS有效性嗎 (c) Does the Quality Policy provide a framework for establishing and reviewing quality objectives? 品質方針是否為建立和修訂品質目標提供架構 (d) Is the Quality Policy communicated and understood within the organization? 組織內部品質方針是否被廣泛傳播和理解
(Ref 4.2.1) (Ref 4.2.2) (Ref 4.2.2) (Ref 5.5.1)
管審會審查其適宜性
方針管理運作系統; 品保部品質目標 SPP-002 品質管理之運作 SPP-001, 002, QS-01~23, CG*O02-0029 CG-*O02-0029
1.9 Does the quality management system documentation include a quality manual?品質體系包括品質手冊? 1.10 1.11 Does the quality manual include the scope of the quality management system, including details of and justification for any exclusions?品質手冊在品質體系內?之間有矛盾?
WDR3_0英中对照翻译

About: 关于本软件
说明:关于维修硬盘的选择:
先接到硬盘
第六个:Head Map 磁头地图
第七个:Edit Passport 硬盘信息编辑
第八个:Clear smart 清除SMART
选择工作目录
超级内格,清译码,重建译码
ARCO
适合新手入门,修复一般坏道(500以内)效果非常好,对于固件没有损坏的盘,直接清除SMART-〉
检测修复后的硬盘 正常 没有坏道。
对于更严重的,通刷固件再SF 砍头等。
对于不认盘的,检测固件并修复。
一、主程序菜单
清除T表
扫描并把磁道加入P表
扫描并把磁道加入G表
快速擦除
磁头读写测试
Auto Close Progress: 自动关闭进度条
Use Temp Dir: 使用临时目录
Sound: 声音
二、维修界面 ቤተ መጻሕፍቲ ባይዱ
1、快捷键:
快捷键
第一个:identinfy 读磁盘信息
第二个:S.M.A.R.T SMART信息
双点选定维修盘后
回到软件界面后,再先HDD-〉WD-MARVELL 或WD-ROYL
可以看到你维修的盘的信息了
第九个:Clear G-list 清除G表
第十个:can Write 写磁道
第十一个:Format Unit 内部格式化
此版本为原版未加密正式版 并非3.0的(破)(解) 。
支持L板和ROYL板(目前所有版本)
独家中英文对照说明 图片文档,一看就明白
常用的功能:
P表操作
G表操作
SA表操作
Inspiron Micro Desktop 3000 系列服务手册说明书
Inspiron Micro Desktop 3000 Series服务手册计算机型号: Inspiron 3050管制型号: D12U管制类型: D12U001注、小心和警告注: “注”表示可以帮助您更好地使用计算机的重要信息。
小心: “小心”表示可能会损坏硬件或导致数据丢失,并说明如何避免此类问题。
警告: “警告”表示可能会造成财产损失、人身伤害甚至死亡。
版权所有© 2015 Dell Inc. 保留所有权利。
本产品受美国、国际版权和知识产权法律保护。
Dell™ 和 Dell 徽标是 Dell Inc. 在美国和/或其他司法管辖区的商标。
所有此处提及的其他商标和产品名称可能是其各自所属公司的商标。
2015 - 04Rev. A00目录拆装计算机内部组件之前 (7)开始之前 (7)安全说明 (7)建议工具 (8)拆装计算机内部组件之后 (9)技术概览 (10)计算机内部视图 (10)系统板组件(俯视图) (11)系统板组件(仰视图) (12)卸下基座盖 (13)步骤 (13)装回基座盖 (16)步骤 (16)卸下内存模块 (17)前提条件 (17)步骤 (17)装回内存模块 (19)步骤 (19)完成条件 (21)卸下处理器风扇 (22)前提条件 (22)步骤 (22)3装回处理器风扇 (25)步骤 (25)完成条件 (25)卸下处理器散热器 (26)前提条件 (26)步骤 (26)装回处理器散热器 (28)步骤 (28)完成条件 (28)卸下无线网卡 (29)前提条件 (29)步骤 (30)装回无线网卡 (32)步骤 (32)完成条件 (34)取出币形电池 (35)前提条件 (35)步骤 (36)装回币形电池 (38)步骤 (38)完成条件 (38)卸下固态驱动器 (39)前提条件 (39)步骤 (40)4装回固态驱动器 (42)步骤 (42)完成条件 (42)卸下硬盘驱动器。
(43)前提条件 (43)步骤 (44)装回硬盘驱动器 (47)步骤 (47)完成条件 (47)卸下系统板 (48)前提条件 (48)步骤 (48)装回系统板 (50)步骤 (50)完成条件 (50)卸下顶部护盖部件 (51)前提条件 (51)步骤 (51)装回顶部护盖部件 (53)步骤 (53)完成条件 (53)BIOS 设置程序 (54)概览 (54)进入 BIOS 设置程序 (54)清除已忘记的密码 (55)前提条件 (55)步骤 (56)5完成条件 (57)清除 CMOS 设置 (58)前提条件 (58)步骤 (59)完成条件 (60)刷新 BIOS (61)获取帮助和联系 Dell (62)自助资源 (62)联系 Dell (62)6拆装计算机内部组件之前小心: 持拿组件和插卡时,请持拿其边缘,切勿触碰插针和接点,以避免损坏。
戴尔生命周期控制器集成 3.3 版发行说明说明书
Dell Lifecycle Controller Integration Version 3.3 for Microsoft System Center Configuration ManagerRelease NotesRelease Type and DefinitionDell Lifecycle Controller Integration for Microsoft System Center Configuration Manager 3.3 Dell Lifecycle Controller Integration (DLCI) for Microsoft System Center Configuration Manager enables the administrators to use the Configuration Manager console to apply the remote enablement capabilities of Dell Lifecycle Controller (LC), available as part of the integrated Dell Remote Access Controller (iDRAC).Version3.3Release DateJanuary 2017Previous Version3.2ImportanceOPTIONAL: Dell recommends the customer review specifics about the update to determine if it applies to your system. The update contains changes that affect only certain configurations, or provides new features that may or may not apply to your environment. Platform(s) AffectedFor information about supported platforms, see “Supported Target Systems and operating systems” under “What is supported.”What is SupportedHardware and Software RequirementsFor information about the hardware and software requirements; installing and uninstalling Dell Lifecycle Controller Integration 3.3, or upgrading from Dell Lifecycle Controller Integration 3.2, see the Installation Guide, which is part of the Dell Lifecycle Controller Integration 3.3 download package.Supported Target Systems and Operating SystemsFor a list of supported Dell systems that you can use as target systems and the operating systems that you can deploy on these target systems, see the “Dell Lifecycle Controller Integration Version 3.3 for Microsoft System Center Configuration Manager User’s Guide”.What’s NewThis release of DLCI for Configuration Manager provides support for the following:•Support for Microsoft System Center Configuration Manager Version 1610.•Support for Agent-free properties for configuration manager.•Support for deployment of Windows 2016, ESXI 6.0 U2, and RHEL 6.8.•Support for 64-bit firmware update.Important Notes•DLCI 3.3 has minimum prerequisite of Windows Server 2008 SP2 for the site systems and server running Dell Provisioning Service (DPS).•When you deploy an operating system on a target system with iDRAC configured in a shared network mode, the Windows PE environment may fail to startup on the network drivers, causing the system to restart before reaching the task sequence.•If the Lifecycle Controller of a system is in use, then the system is not discovered.•If the Lifecycle Controller of the target system is locked by another process, then the following error message is displayed in the following path <Microsoft Configuration Manager installation \XmlStorage\Extensions\DLCPlugin\DLCTaskManager.log file: folder>\AdminConsole "Lifecycle Controller is being used by another process."•If you do not enter the service tag name of the target system correctly, the discovery and handshake fails and the following error message is displayed: "[Server Name] - Handshake - getCredentialsInternal(): [Server Name]: NOT AUTHORIZED: No credentials returned."•During Discovery and Handshake, the DPS.log displays an empty Site code: followed by a cryptography exception. You can ignore this.•During Discovery and Handshake, the DPS.log displays numerous messages createDellCollecions() Either Connection Mgr param is NULL or Collection not yet created. You can ignore this.•The System Viewer utility does not display the latest RAID configuration. To view the latest configuration, re-launch the System Viewer utility.•The modular systems cannot use the hostname in the path to the Common Internet File System (CIFS) share, but monolithic systems can use the hostname. For modular systems use the IP address instead of hostname.•After deploying Non-Windows OS using DLCI the service tag of system name is displayed as hostname in configuration manager console.Limitations•DLCI for System Center Configuration Manager 2012 does not support operating system deployment on Dell PowerEdge R330, R230, T330, and T130 Platforms.•When you deploy Red Hat Enterprise Linux or ESXi OS on servers having iDRAC on shared Lan on Motherboard (LOM), the deployment may fail. To resolve this, disable STP on the PowerEdge switches (ports connecting to the Shared LOM port directly) and enable Rapid Spanning Tree Protocol (RSTP), PortFast, or FastLink on those switches.•If the Windows PE environment is unresponsive while running an operating system deployment, the system may have run out of memory. By default, Windows PE allocates 32 megabytes (MB) of writeable memory, known as scratch space. You can increase the scratch space up to 512 MB.2•Before upgrading to DLCI version 3.3, ensure that all the scheduled firmware update jobs are either completed or deleted.•During installation of DLCI, the Configuration Manager credentials specified are not validated. Installation succeeds, and an errorin import.log indicates the same. Use Dell Provision Service (DPS) configure utility (import.exe) to specify the correctcredentials before proceeding with discovery of servers.•The Advertise option does not display in an existing task sequence after uninstalling and reinstalling DLCI for Configuration Manager. To advertise the task sequence, edit the task sequence and correct if there are any errors.•If Active Directory (AD) authentication is used for communicating with iDRAC on modular servers, ensure that the iDRAC version is upgraded to 3.32. Affected version: DLCI 3.3 with 11G iDRAC 3.30 (or earlier).•If the host system has the Lifecycle Controller version 1.5, ensure that while configuring user name as part of the iDRAC configuration, the user name length is fewer than 16 characters. Affected version: DLCI 3.3 with 11G Lifecycle Controller 1.5.•If the host system is Dell’s 11th generation of the PowerEdge server and has the Lifecycle Controller version 1.5, Redundant Array of Independent Disk configuration of H200 controller using DLCI 3.3 does not work correctly. Upgrade to the Lifecycle Controller firmware version 1.5.1. Affected version: DLCI 3.3 with 11G Lifecycle Controller 1.5.•While applying minimum bandwidth on the Qlogic Partitionable NIC cards, if the summation of minimum bandwidth on all partitions of a port reaches more than 100 the apply operation fails. Ensure that you apply ‘0’ on all partitions as minimum bandwidth before applying any other values.•BIOS Configuration fails when it is completed for the second time if Dell’s 11th generation of the PowerEdge server has either 1.9 (monolithic) or 3.4 (modular) version of the iDRAC firmware. Ensure that you upgrade the iDRAC firmware level to 1.92 (monolithic) or 3.42 (modular).•Dell recommends that you delete and reimport the server from Configuration Manager before installing a Non-Windows operating system on the server which is already having Windows OS installed and Configuration Manager client configured.•If you deploy the Windows server operating systems on Dell’s 11th generation of the PowerEdge servers where drivers were already applied from Lifecycle Controller, then few device drivers may not work or are unavailable. As a workaround, manually update drivers or in Task Sequence in the server where you deployed the OS, as a fallback for the option Apply Drivers from the Lifecycle Controller use option Apply Driver Package.•Before installing the DLCI version 3.3, if the servers were discovered or imported, then after installation must rediscover or reimport the servers. The Node ID Property is displayed on the Dell out-of-band controllers properties page.•DLCI Auto discovery does not work with iDRACs (version 2.10.10.10) Transport Layer Security (TLS) 1.2 protocol. As a workaround, ensure that you have TLS 1.1 available in the system where you have installed DLCI.•DLCI Auto discovery does not work with iDRACs (version 2.10.10.10) TLS 1.2 custom certificate.•Ensure that the password does not contain an @ character in it, while using CIFS share. Else, firmware update may fail.•Auto-discovery job fails with iDRAC version 2.30.30.30 and later, if DPS is installed on Windows 2016. For resolutions, see http://dell.to/2jtcrCG.Software RequirementsConfiguration Manager Version 1610, or System Center 2012 R2 SP1 Configuration Manager, or System Center 2012 SP2 Configuration Manager, or System Center 2012 R2 Configuration Manager, or System Center 2012 SP1 Configuration Manager, or System Center 2012 Configuration Manager.InstallationBrowse to the folder where the files are extracted and see the installation guide.Installation InstructionsExtract Files:1.Click Browse, and then navigate to the self-extractable .zip file that you downloaded.2.Double-click on the .zip file to extract the downloaded package.3.Click Continue.4.Specify the location to extract the files.5.Click OK to extract files. After the files are extracted All files were successfully unzipped message is displayed.6.Click OK to exit.3Installation and Configuration NotesFor installation or update procedure-related information, see the “Dell Lifecycle Controller Integration Version 3.3 for Microsoft System Center Configuration Manager Installation Guide”.Accessing Documents from Dell Support SiteYou can access the required documents in one of the following ways:•Using the following links:–For Enterprise Systems Management documents — /openmanagemanuals–For all Systems Management documents — /softwaresecuritymanuals–For Remote Enterprise Systems Management documents — /esmmanuals–For Client Systems Management documents — /clientsystemsmanagement–For Serviceability Tools documents — /serviceabilitytools–For OpenManage Connections Enterprise Systems Management documents — /OMConnectionsEnterpriseSystemsManagement–For OpenManage Connections Client Systems Management documents — /connectionsclientsystemsmanagement •From the Dell Support site:a.Go to /support/manuals.b.Under General support section, click Software & Security.c.In the Software & Security group box, click the required link from the following:–Serviceability Tools–Enterprise Systems Management–Client Systems Management–Remote Enterprise Systems Management–Connections Client Systems Managementd.To view a document, click the required product version.•Using search engines:–Type the name and version of the document in the Search box.Contacting DellNOTE: If you do not have an active Internet connection, you can find contact information on your purchase invoice, packing slip, bill, or Dell product catalog.Dell provides several online and telephone-based support and service options. Availability varies by country and product, and some services may not be available in your area. To contact Dell for sales, technical support, or customer service issues:1.Visit /support.2.Select your support category.3.Verify your country or region in the Choose a Country/Region drop-down menu at the top of page.4.Select the appropriate service or support link based on your need.Copyright © 2017 Dell Inc. or its subsidiaries. All rights reserved. Dell, EMC, and other trademarks are trademarks of Dell Inc. or its subsidiaries. Other trademarks may be trademarks of their respective owners.4。
戴尔Precision 3530固态硬盘安装指南说明书

Dell Precision 3530Solid State Drive Installation GuideNotes, cautions, and warningsNOTE: A NOTE indicates important information that helps you make better use of your product.CAUTION: A CAUTION indicates either potential damage to hardware or loss of data and tells you how to avoid the problem.WARNING: A WARNING indicates a potential for property damage, personal injury, or death.© 2018 Dell Inc. or its subsidiaries. All rights reserved. Dell, EMC, and other trademarks are trademarks of Dell Inc. or its subsidiaries. Other trademarks may be trademarks of their respective owners.2018 - 05Rev. A001 Before you begin (4)Safety instructions (4)Before working inside your computer (4)Safety precautions (5)Electrostatic discharge—ESD protection (5)ESD field service kit (6)Transporting sensitive components (7)After working inside your computer (7)2 Solid State Drive (8)Installing the Solid State Drive (8)3 Getting help (15)Contacting Dell (15)Contents3Before you begin Safety instructionsUse the following safety guidelines to protect your computer from potential damage and to ensure your personal safety. Unless otherwise noted, each procedure included in this document assumes that the following conditions exist:•You have read the safety information that shipped with your computer.•A component can be replaced or, if purchased separately, installed by performing the removal procedure in reverse order. WARNING: Disconnect all power sources before opening the computer cover or panels. After you finish working inside thecomputer, replace all covers, panels, and screws before connecting to the power source.WARNING: Before working inside your computer, read the safety information that shipped with your computer. For additional safety best practices information, see the Regulatory Compliance Homepage at /regulatory_complianceCAUTION: Many repairs may only be done by a certified service technician. You should only perform troubleshooting and simple repairs as authorized in your product documentation, or as directed by the online or telephone service and support team.Damage due to servicing that is not authorized by Dell is not covered by your warranty. Read and follow the safety instructions that came with the product.CAUTION: T o avoid electrostatic discharge, ground yourself by using a wrist grounding strap or by periodically touching an unpainted metal surface at the same time as touching a connector on the back of the computer.CAUTION: Handle components and cards with care. Do not touch the components or contacts on a card. Hold a card by its edges or by its metal mounting bracket. Hold a component such as a processor by its edges, not by its pins.CAUTION: When you disconnect a cable, pull on its connector or on its pull-tab, not on the cable itself. Some cables have connectors with locking tabs; if you are disconnecting this type of cable, press in on the locking tabs before you disconnect the cable. As you pull connectors apart, keep them evenly aligned to avoid bending any connector pins. Also, before you connect acable, ensure that both connectors are correctly oriented and aligned.NOTE: The color of your computer and certain components may appear differently than shown in this document.Before working inside your computer1 Ensure that your work surface is flat and clean to prevent the computer cover from being scratched.2 Turn off your computer.3 If the computer is connected to a docking device (docked), undock it.4 Disconnect all network cables from the computer (if available).CAUTION: If your computer has an RJ45 port, disconnect the network cable by first unplugging the cable from yourcomputer.5 Disconnect your computer and all attached devices from their electrical outlets.6 Open the display.7 Press and hold the power button for few seconds, to ground the system board.CAUTION:To guard against electrical shock unplug your computer from the electrical outlet before performing Step # 8.CAUTION: To avoid electrostatic discharge, ground yourself by using a wrist grounding strap or by periodically touching anunpainted metal surface at the same time as touching a connector on the back of the computer.8 Remove any installed ExpressCards or Smart Cards from the appropriate slots.1 4Before you beginSafety precautionsThe safety precautions chapter details the primary steps to be taken before performing any disassembly instructions.Observe the following safety precautions before you perform any installation or break/fix procedures involving disassembly or reassembly:•Turn off the system and all attached peripherals.•Disconnect the system and all attached peripherals from AC power.•Disconnect all network cables, telephone, and telecommunications lines from the system.•Use an ESD field service kit when working inside any to avoid electrostatic discharge (ESD) damage.•After removing any system component, carefully place the removed component on an anti-static mat.•Wear shoes with non-conductive rubber soles to reduce the chance of getting electrocuted.Standby powerDell products with standby power must be unplugged before you open the case. Systems that incorporate standby power are essentially powered while turned off. The internal power enables the system to be remotely turned on (wake on LAN) and suspended into a sleep mode and has other advanced power management features.Unplugging, pressing and holding the power button for 15 seconds should discharge residual power in the system board.BondingBonding is a method for connecting two or more grounding conductors to the same electrical potential. This is done through the use of a field service electrostatic discharge (ESD) kit. When connecting a bonding wire, ensure that it is connected to bare metal and never to a painted or non-metal surface. The wrist strap should be secure and in full contact with your skin, and ensure that you remove all jewelry such as watches, bracelets, or rings prior to bonding yourself and the equipment.Electrostatic discharge—ESD protectionESD is a major concern when you handle electronic components, especially sensitive components such as expansion cards, processors, memory DIMMs, and system boards. Very slight charges can damage circuits in ways that may not be obvious, such as intermittent problems or a shortened product life span. As the industry pushes for lower power requirements and increased density, ESD protection is an increasing concern.Due to the increased density of semiconductors used in recent Dell products, the sensitivity to static damage is now higher than in previous Dell products. For this reason, some previously approved methods of handling parts are no longer applicable.Two recognized types of ESD damage are catastrophic and intermittent failures.•Catastrophic – Catastrophic failures represent approximately 20 percent of ESD-related failures. The damage causes an immediate and complete loss of device functionality. An example of catastrophic failure is a memory DIMM that has received a static shock and immediately generates a "No POST/No Video" symptom with a beep code emitted for missing or nonfunctional memory.•Intermittent – Intermittent failures represent approximately 80 percent of ESD-related failures. The high rate of intermittent failures means that most of the time when damage occurs, it is not immediately recognizable. The DIMM receives a static shock, but the tracing is merely weakened and does not immediately produce outward symptoms related to the damage. The weakened trace may take weeks or months to melt, and in the meantime may cause degradation of memory integrity, intermittent memory errors, etc.The more difficult type of damage to recognize and troubleshoot is the intermittent (also called latent or "walking wounded") failure. Perform the following steps to prevent ESD damage:•Use a wired ESD wrist strap that is properly grounded. The use of wireless anti-static straps is no longer allowed; they do not provide adequate protection. T ouching the chassis before handling parts does not ensure adequate ESD protection on parts with increased sensitivity to ESD damage.Before you begin5•Handle all static-sensitive components in a static-safe area. If possible, use anti-static floor pads and workbench pads.•When unpacking a static-sensitive component from its shipping carton, do not remove the component from the anti-static packing material until you are ready to install the component. Before unwrapping the anti-static packaging, ensure that you discharge static electricity from your body.•Before transporting a static-sensitive component, place it in an anti-static container or packaging.ESD field service kitThe unmonitored Field Service kit is the most commonly used service kit. Each Field Service kit includes three main components: anti-static mat, wrist strap, and bonding wire.Components of an ESD field service kitThe components of an ESD field service kit are:•Anti-Static Mat – The anti-static mat is dissipative and parts can be placed on it during service procedures. When using an anti-static mat, your wrist strap should be snug and the bonding wire should be connected to the mat and to any bare metal on the system being worked on. Once deployed properly, service parts can be removed from the ESD bag and placed directly on the mat. ESD-sensitive items are safe in your hand, on the ESD mat, in the system, or inside a bag.•Wrist Strap and Bonding Wire – The wrist strap and bonding wire can be either directly connected between your wrist and bare metal on the hardware if the ESD mat is not required, or connected to the anti-static mat to protect hardware that is temporarily placed on the mat. The physical connection of the wrist strap and bonding wire between your skin, the ESD mat, and the hardware is known as bonding. Use only Field Service kits with a wrist strap, mat, and bonding wire. Never use wireless wrist straps. Always be aware that the internal wires of a wrist strap are prone to damage from normal wear and tear, and must be checked regularly with a wrist strap tester in order to avoid accidental ESD hardware damage. It is recommended to test the wrist strap and bonding wire at least once per week.•ESD Wrist Strap T ester – The wires inside of an ESD strap are prone to damage over time. When using an unmonitored kit, it is a best practice to regularly test the strap prior to each service call, and at a minimum, test once per week. A wrist strap tester is the best method for doing this test. If you do not have your own wrist strap tester, check with your regional office to find out if they have one.T o perform the test, plug the wrist-strap's bonding-wire into the tester while it is strapped to your wrist and push the button to test. A green LED is lit if the test is successful; a red LED is lit and an alarm sounds if the test fails.•Insulator Elements – It is critical to keep ESD sensitive devices, such as plastic heat sink casings, away from internal parts that are insulators and often highly charged.•Working Environment – Before deploying the ESD Field Service kit, assess the situation at the customer location. For example, deploying the kit for a server environment is different than for a desktop or portable environment. Servers are typically installed in a rack within a data center; desktops or portables are typically placed on office desks or cubicles. Always look for a large open flat work area that is free of clutter and large enough to deploy the ESD kit with additional space to accommodate the type of system that is being repaired. The workspace should also be free of insulators that can cause an ESD event. On the work area, insulators such as Styrofoam and other plastics should always be moved at least 12 inches or 30 centimeters away from sensitive parts before physically handling any hardware components•ESD Packaging – All ESD-sensitive devices must be shipped and received in static-safe packaging. Metal, static-shielded bags are preferred. However, you should always return the damaged part using the same ESD bag and packaging that the new part arrived in.The ESD bag should be folded over and taped shut and all the same foam packing material should be used in the original box that the new part arrived in. ESD-sensitive devices should be removed from packaging only at an ESD-protected work surface, and parts should never be placed on top of the ESD bag because only the inside of the bag is shielded. Always place parts in your hand, on the ESD mat, in the system, or inside an anti-static bag.•Transporting Sensitive Components – When transporting ESD sensitive components such as replacement parts or parts to be returned to Dell, it is critical to place these parts in anti-static bags for safe transport.ESD protection summaryIt is recommended that all field service technicians use the traditional wired ESD grounding wrist strap and protective anti-static mat at all times when servicing Dell products. In addition, it is critical that technicians keep sensitive parts separate from all insulator parts while performing service and that they use anti-static bags for transporting sensitive components.6Before you beginTransporting sensitive componentsWhen transporting ESD sensitive components such as replacement parts or parts to be returned to Dell, it is critical to place these parts in anti-static bags for safe transport.Lifting equipmentAdhere to the following guidelines when lifting heavy weight equipment:CAUTION: Do not lift greater than 50 pounds. Always obtain additional resources or use a mechanical lifting device.1Get a firm balanced footing. Keep your feet apart for a stable base, and point your toes out.2Tighten stomach muscles. Abdominal muscles support your spine when you lift, offsetting the force of the load.3Lift with your legs, not your back.4Keep the load close. The closer it is to your spine, the less force it exerts on your back.5Keep your back upright, whether lifting or setting down the load. Do not add the weight of your body to the load. Avoid twisting your body and back.6Follow the same techniques in reverse to set the load down.After working inside your computerAfter you complete any replacement procedure, ensure that you connect external devices, cards, and cables before turning on your computer.CAUTION: T o avoid damage to the computer, use only the battery designed for this particular Dell computer. Do not use batteries designed for other Dell computers.1 Connect any external devices, such as a port replicator or media base, and replace any cards, such as an ExpressCard.2 Connect any telephone or network cables to your computer.CAUTION: To connect a network cable, first plug the cable into the network device and then plug it into thecomputer.3 Connect your computer and all attached devices to their electrical outlets.4 Turn on your computer.Before you begin7Solid State DriveInstalling the Solid State Drive1Follow the procedure in Before working inside your computer .2 Remove the base cover:aLoosen the M2.5x5 (8) captive screws that secure the base cover to the system [1].b Pry the base cover from the recess at the top edge [2] and continue prying throughout the outer sides of the base cover inclockwise direction to release the base cover.NOTE:Use a plastic scribe to pry the base cover from the edges.c Lift the base cover from the system.28Solid State Drive3 Remove the battery:a Disconnect the battery cable from the connector on the system board [1] and unroute the cable from the routing channel.b Loosen the M2.5x5 (2) captive screws that secures the battery to the system [2].c Lift the battery away from the system [3].Solid State Drive94 Install the Solid State Drive (SSD) bracket:a Place the SSD bracket into the slot in the system [1].b Replace the M2x3 screw that secures the SSD bracket to the system [2].10Solid State Drive5 Install the SSD:a Insert the SSD into the connector on the system [1].b Replace the M2x3 screw that secures the SSD card to the system [2].c Place the Mylar shield over the SSD [3].Solid State Drive116 Replace the battery:a Insert the battery into the slot on the system [1].b Route the battery cable through the routing channel.c Tighten the M2.5x5 (2) screws to secure the battery to the system [2].d Connect the battery cable to the connector on the system board [3].12Solid State Drive7 Replace the base cover:a Align the base cover with the screw holders on the system [1].b Press the edges of the base cover until it clicks into place.c Tighten the M2.5x5 (8) captive screws to secure the base cover to the system [1].Solid State Drive138 Follow the procedure in After working inside your computer.14Solid State DriveGetting helpContacting DellNOTE: If you do not have an active Internet connection, you can find contact information on your purchase invoice, packing slip, bill, or Dell product catalog.Dell provides several online and telephone-based support and service options. Availability varies by country and product, and some services may not be available in your area. T o contact Dell for sales, technical support, or customer service issues:1Go to /support.2Select your support category.3Verify your country or region in the Choose a Country/Region drop-down list at the bottom of the page.4 Select the appropriate service or support link based on your need.3Getting help 15。
DELL品质系统稽核中英文版
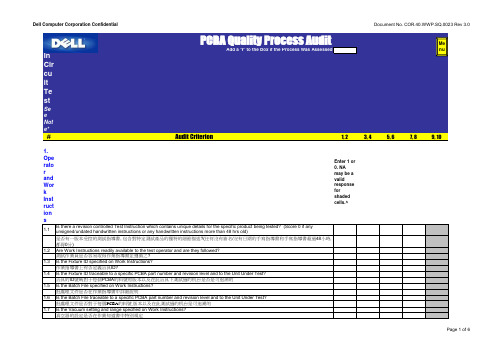
PCBA Quality Process AuditAdd a 'Y' to the Box if the Process Was AssessedIn Circuit Test See Note*#Audit Criterion1, 23, 45, 67, 89, 101. Operator and Work Instructions1.1Is there a revision controlled Test Instruction which contains unique details for the specific product being tested? (Score 0 if any unsigned/undated handwritten instructions or any handwritten instructions more than 48 hrs old)是否有一版本受控的測試指導書, 包含對特定測試產品的獨特的細節描述?(任何沒有簽名/沒有日期的手寫指導書和手寫指導書超過48小時, 都得0分)1.2Are Work Instructions readily available to the test operator and are they followed?測試作業員是否容易取得作業指導書並遵循之?1.3Is the Fixture ID specified on Work Instructions?作業指導書上有否定義治具ID?1.4Is the Fixture ID traceable to a specific PCBA part number and revision level and to the Unit Under Test?治具的ID 號碼對于每個PCBA 的料號和版本以及在此治具下測試過的机台是否是可追溯的1.5Is the Batch File specified on Work Instructions?批處理文件是否在作業指導書中詳細說明1.6Is the Batch File traceable to a specific PCBA part number and revision level and to the Unit Under Test?批處理文件是否對于每個PCBA 的料號,版本以及在此測試過的机台是可追溯的1.7Is the Vacuum setting and range specified on Work Instructions?真空器的設定是否在作業知道書中特別規定1.8Is the PCB orientation to the Fixture identified in the Work Instructions or on the Fixture?PCB 板對于治具的方向是否在作業指導書中或者治具上定義了1.9Does the test Operator have the Standard Operating Procedure (SOP) for the tester available to them at all times?測試人員可以很容易的得到關於測試儀器的SOP 文件?1.10Is there evidence that the Operator has been trained and certified against the Standard Operating Procedure for the Tester?是否有証據顯示操作操作員有經過對於此測試儀器SOP 的教育訓練?1.11Does the Operator know the content of the Standard Operating Procedure for the Tester and do they and follow it?測試操作人員是否清楚的知道所使用的SOP 是否能用於此台測試儀器,並很好的執行?1.12Are Operators required to log in at the Test station and does this provide an automatic verification of training status?操作人員登入機台的身份驗証是否自動鑒定在測試站?2. ICT Fixture1, 23, 45, 67, 89, 102.1Is the ICT fixture identified with a name or number?2.2ICT 測試治具是否有進行編號和機種的名稱來定義?2.3Is the Preventative Maintenance / Calibration sticker on the ICT fixture current and up to date?2.4是否有相應的最新預防保養標簽被貼在ICT 治具上?2.5Is there a Preventative Maintenance procedure and schedule for ICT fixtures?2.6ICT 測試治具是否有預防保養程序和時間表?2.7Is there evidence to demonstrate that Preventative Maintenance records are up-to-date?2.8是否有証據表明ICT 測試治具的保養記錄是最新的?3. ICT S Are spare test fixture parts (excluding probes) stocked?1, 23, 45, 67, 89, 103.1是否有備用的測試治具備件?3.2Are spare test fixture probes stocked for each design required to support Dell fixtures?3.3是否有供dell 治具設計需要的備用的探針供替換?Me nuNote*: ICT may not be deployed in some cases for products of complexity 9 and 10 as determined by Dell.如果你覺得NA是個合适的輸入, 請看Instructions一章對NA的詳細說明.注意:在某些情況下不會為那些DELL決定的複雜性為9和10的產品配置ICT.。
戴尔DELL笔记本最新BIOS 中英文对照表
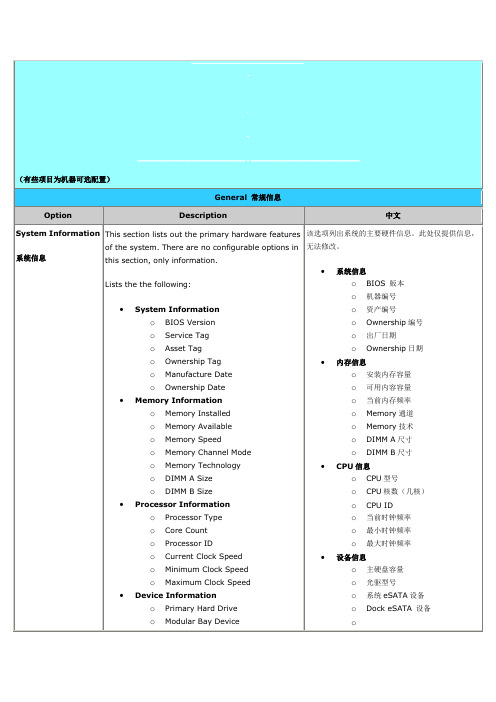
系统信息
oBIOS版本
o机器编号
o资产编号
oOwnership编号
o出厂日期
oOwnership日期
内存信息
o安装内存容量
o可用内容容量
o当前内存频率
oMemory通道
oMemory技术
oDIMM A尺寸
oDIMM B尺寸
CPU信息
oCPU型号
oCurrent Clock Speed
oMinimum Clock Speed
oMaximum Clock Speed
Device Information
oPrimary Hard Drive
oModular Bay Device
oSystem eSATA Device
oDock eSATA Device
oCPU核数(几核)
oCPU ID
o当前时钟频率
o最小时钟频率
o最大时钟频率
设备信息
o主硬盘容量
o光驱型号
o系统eSATA设备
oDock eSATA设备
o
o显卡
o显卡BIOS版本
o显存大小
o液晶屏类型
o分辨率
o
o声卡
oModem控制器
oWi-Fi设备型号
oCellular Device
o蓝牙
Battery Information
o
oVideo Controller
oVideo BIOS Version
oVideo Memory
oPanel Type
oNative Resolution
o
oAudio Controller
dell win2003 安装

Dell 2003 安装本文档介绍了在不使用Dell Open Manage Server Assistant (DOSA) 光盘引导的情况下,如何安装Windows 2003 Server 到您的Dell PowerEdge 2850 上。
这个过程需要大约45 到60 分钟。
*通常不使用Dell Open Manage Server Assistant 光盘引导安装主要是基于以下一些原因:1. 原有的硬盘分区里有重要的数据, 需要保留. 而使用DOSA 光盘安装, 将会删去硬盘上的原有分区;2. 原有硬盘上有动态磁盘分区,DOSA 光盘引导将导致系统自动重启, 而进入不了安装界面。
索引步骤1. 识别您的Power Edge 服务器的系统配置步骤2. 安装前的准备步骤3. win2003 安装步骤步骤4. 驱动程序的安装步骤1. 识别您的PowerEdge 服务器的系统配置Note:具体信息随配置不同,请根据自己的配置正确安装。
常见2850 服务器集成的设备:.集成一块网络适配器Intel Gigabit 10/100/1000 以太网卡;.ATI Radeon(TM) 7000-M 显示卡;.DRAC 4 远程控制卡(可选).PowerValult (tm) 100T DAT72 磁带机(可选);.常见使用的硬盘控制卡:- CERC SATA 6CH 控制器(可选)- LSI Logic Ultra320 SCSI 控制器- PERC 4e/DI 控制器(可选)- PERC 4e/DC 控制器(可选)- PERC 4/DC 控制器(可选)步骤2. 安装前的准备2.1 安装操作系统前请您先准备好以下物品. 硬盘控制卡驱动软盘Note:硬盘控制卡识别以及驱动制作请参考《8G 服务器磁盘控制卡识别及Windows 2003 驱动制作》. Windows 2003 安装光盘2.2 设置BIOS1.开机自检时按F2 键进入系统BIOS2.光标移到BOOT SEQUENCE ,敲回车进入引导设备列表3.光标移到CD_ROM DEVICE,按"-"键直到CD_ROM 跳到第一项,并保证此项最左边有"v"标志(该标志用空格键选取)(图1)(图1)4.用同样方法把Hard drive C:列为第二引导设备,并也有"v"标志5.按ESC 键退出引导设备选择界面6.按ESC 键,敲Enter 键保存退出步骤3. Windows 2003 Text Mode Setup 文本模式安装Text Mode Setup 文本模式安装1. 把Windows 2003 安装光盘放入光驱,并从光盘引导。
戴尔机箱管理控制器固件版本3.2自述文件说明书
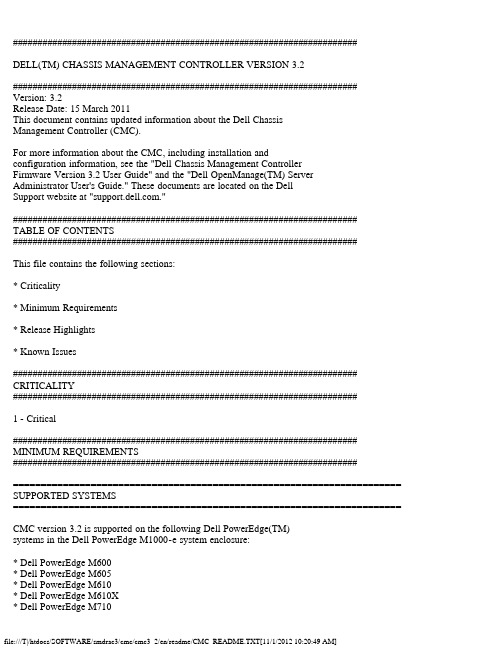
######################################################################DELL(TM) CHASSIS MANAGEMENT CONTROLLER VERSION 3.2###################################################################### Version: 3.2Release Date: 15 March 2011This document contains updated information about the Dell ChassisManagement Controller (CMC).For more information about the CMC, including installation andconfiguration information, see the "Dell Chassis Management ControllerFirmware Version 3.2 User Guide" and the "Dell OpenManage(TM) ServerAdministrator User's Guide." These documents are located on the DellSupport website at "."######################################################################TABLE OF CONTENTS######################################################################This file contains the following sections:* Criticality* Minimum Requirements* Release Highlights* Known Issues###################################################################### CRITICALITY######################################################################1 - Critical###################################################################### MINIMUM REQUIREMENTS######################################################################====================================================================== SUPPORTED SYSTEMS====================================================================== CMC version 3.2 is supported on the following Dell PowerEdge(TM)systems in the Dell PowerEdge M1000-e system enclosure:* Dell PowerEdge M600* Dell PowerEdge M605* Dell PowerEdge M610* Dell PowerEdge M610X* Dell PowerEdge M710* Dell PowerEdge M710HD* Dell PowerEdge M805* Dell PowerEdge M905* Dell PowerEdge M910====================================================================== SUPPORTED WEB BROWSERS====================================================================== CMC version 3.2 is supported on the following web browsers:* Microsoft Internet Explorer 7: Windows XP 32-bit SP3, WindowsVista SP2 x32 and x64 SP2, Windows Server 2003 SP2 x32 and x64,Windows Server 2008 SP2 x32 and x64.* Microsoft Internet Explorer 8: Windows XP 32-bit SP3, WindowsVista SP2 x32 and x64, Windows 7 x32 and x64, Windows Server 2003SP2 x32 and x64, Windows Server 2008 x32 and x64, Windows Server2008 R2 x64.* Microsoft Internet Explorer 8 (x64): Windows Vista SP2 x64,Windows 7 x64, Windows Server 2003 SP2 x64, Windows Server 2008 x64,Windows Server 2008 R2 x64.* Mozilla Firefox 3.5: Windows XP 32-bit SP3, Windows Vista SP2 x32and x64, Windows 7 x32, Windows Server 2003 SP2 x32 and x64, WindowsServer 2008 x32 and x64, Windows Server 2008 R2 x64.* Mozilla Firefox 3.6: Windows XP 32-bit SP3, Windows Vista SP2 x64,Windows 7 x32 and x64, Windows Server 2003 SP2 x32 and x64, WindowsServer 2008 x32 and x64, Windows Server 2008 R2 x64.* Mozilla Firefox 3.6 (x64): Windows 7 x64, Windows Server 2008 R2 x64.=============================================FIRMWARE VERSIONS=============================================CMC Firmware Version: 3.2=============================================RECOMMENDED MODULE FIRMWARE VERSIONS=============================================The following chassis module firmware versions are recommendedadditionally if CMC version 3.2 is installed:* iDRAC Firmware Version:- 3.20 for Dell PowerEdge M610, M610X, M710, M710HD, M910- 1.53 for Dell PowerEdge M600, M605, M805, M905* Dell Lifecycle Controller Version:- 1.5 for Dell PowerEdge M610, M610X, M710, M710HD, M910* BIOS Version:- 3.0.0 for Dell PowerEdge M610, M610X, M710- 2.0.0 for Dell PowerEdge M710HD- 2.1.0 for Dell PowerEdge M910- 2.3.1 for Dell PowerEdge M600- 5.4.1 for Dell PowerEdge M605- 2.3.3 for Dell PowerEdge M805, M905* CPLD Version:- 1.0.3 for Dell PowerEdge M610, M610X, M710- 1.0.0 for Dell PowerEdge M710HD- 1.0.1 for Dell PowerEdge M910- 1.1.1 for Dell PowerEdge M600- 1.1.0 for Dell PowerEdge M605, M805, M905###################################################################### RELEASE HIGHLIGHTS###################################################################### * Resolves a vulnerability in CMC3.0 and CMC3.1 firmware versions,which can allow a non-Administrator user to perform Administratoroperations over the WS-MAN interface.* Firmware update of server component(s) across multiple servers in thechassis using Lifecycle Controller.* Extended Non-Volatile (persistent) Storage, using 2 GB Secure Digital(SD) media in the CMC card slot(s).* Power Cap can be set to 16685W AC.* Chassis Group Quick Launch and Single-Sign On (SSO) from the leaderto iDRAC GUI and KVM.* Support for the following new hardware:* QLogic QME8242-k CNA Mezz Card* PowerConnect M8024-k 10Gb Ethernet Switch* Dell 10Gb Ethernet Pass Through -k* QLogic QMD8252-k CNA NDC* Broadcom 57712-k NDC* Support for remote management of MAC addresses.###################################################################### KNOWN ISSUES FOR BROWSERS###################################################################### No known issues for this release.###################################################################### KNOWN ISSUES FOR CMC Version 3.2###################################################################### * The new one to many Lifecycle Controller based update feature requiresserver firmware versions be updated before using this feature. Referto the "RECOMMENDED MODULE FIRMWARE VERSIONS" section for the proper version numbers. The modules should be updated in the following order:- BIOS- Lifecycle Controller- iDRAC6* While using the command "racadm config -f" with:- CMC 3.2 or later versions of firmware, ensure that the RemoteRACADM client version 6.3.0 or later is installed.- CMC with an earlier version of 3.2 firmware, ensure that theRemote RACADM client version earlier than 6.3.0 is installed.* The remote racadm testfeature command(racadm -r <IP Address> testfeature ...) does not support the-d (debug) option.* For Single Sign-On and Smart Card login, the client system must bea part of the Active Directory domain and Kerberos Realm. OnWindows 7, clients under the Local Security Polices, must ensure toconfigure the security option "Network security: Configureencryption types allowed for Kerberos." This policy setting allowsyou to set the encryption types that Kerberos is allowed to use.The DES_CBC_MD5 encryption type must be selected. If thisencryption type is not selected, the encryption type will not beallowed. This setting may affect compatibility with client computersor services and applications.* When you add a member chassis to a chassis group using theMulti-Chassis Management feature, you cannot specify the groupmembers with an IPv6 address.###################################################################### KNOWN ISSUES FOR USER INTERFACE ONLINE HELP###################################################################### No known issues for this release.###################################################################### KNOWN ISSUES FOR DOCUMENTATION###################################################################### No known issues for this release.###################################################################### Information in this document is subject to change without notice.(C) 2011 Dell Inc. All rights reserved.Reproduction in any manner whatsoever without the written permissionof Dell Inc. is strictly forbidden.Trademarks used in this text: "Dell(TM)", "OpenManage(TM)", and "PowerEdge(TM)" are trademarks of Dell Inc. "Microsoft(R)", "Windows(R)", "Windows(R) 7", "Windows Vista(R)", "Windows Server(R)", "Windows(R) XP", “Internet Explorer(R)”, and "Active Directory(R)"are either trademarks or registered trademarks of Microsoft Corporationin the United States and/or other countries. "Mozilla(R)" and"Firefox(R)" are registered trademarks of the Mozilla Foundation"Red Hat(R)" and "Red Hat Enterprise Linux(R)" are registered trademarks of Red Hat,Inc. in the United States and other countries.Other trademarks and trade names may be used in this document torefer to either the entities claiming the marks and names or theirproducts. Dell Inc. disclaims any proprietary interest in trademarksand trade names other than its own.March 2011。
戴尔DELL新版BIOS中英文对照表

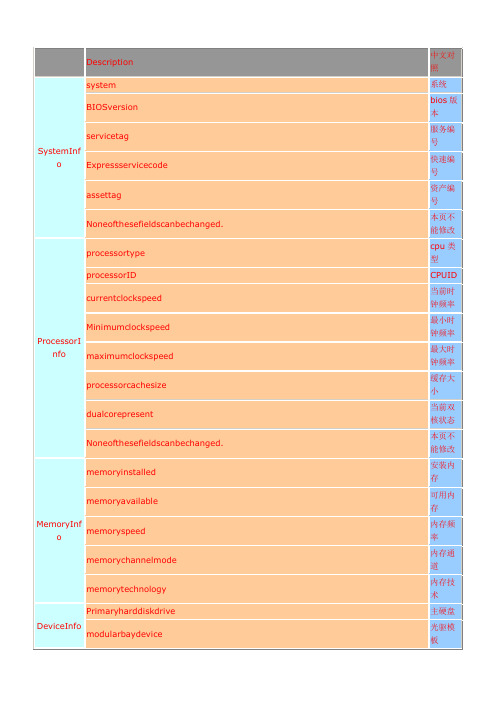
Noneofthesefieldscanbechanged.
本页不能修改
MemoryInfo
memoryinstalled
安装内存
memoryavailable
可用内存
memoryspeed
内存频率
memorychannelmode
内存通道
memorytechnology
内存技术
DeviceInfo
该页是控制安全芯片
Off-TheBIOSwillnotturnontheTPMatPOST.
off--关闭
On-TheBIOSwillturnontheTPMatPOSTsoitcanbeusedbytheoperatingsystem.
on--开启
TPMActivation
ThisfieldletsyoucontroltheTrustedPlatformModule(TPM)isdeactivatedoractivated.Thesettingsare:
该页设置,修改,删除硬盘密码
PasswordChanges
Denied-Thesystempasswordmaybemodifiedordeletedwithouthavingknowledgeoftheadministratorpassword.
拒绝--系统密码修改或删除无须管理员密码
Premitted-Avalidadministratorpasswordisrequiredtomodifyordeletethesystempassword.
Brightness
调整电池时亮度
Brightness(AC)
调整使用电源时亮度
LCDPanelExpansion
(完整版)戴尔中英文简介

Personal Background:Michael Dell Dell Computer 3-year return:4,200% Age:45 CEO since:1984个人资料:迈克尔·戴尔戴尔计算机3年内的利润:4200%年龄:45岁成为首席执行官的年份:1984年。
It's often said in business that some event—— good or bad——happened on a particular chief execu tive's “watch.” It's a nautical expression suggesting that the enterprise is a ship and that this particular chief executive took the helm at some moment mid-journey,just in time to land a great white whale or hit an iceberg. Good or bad,that course and the event that followed were already set before the CEO entered the pilothouse. The idea is that CEOs come and go,but great companies go on forever.商界经常称某些事件——无论是好的或者糟糕的——常常发生在某个特别的首席执行官的值班时间。
这是海员的说法,说明企业就是一艘船,而这位特别的首席长官在航行途中某段时间掌着舵,恰好此时捕得一条巨大的白鲸或者撞上了冰山。
好的或者糟糕的路线以及紧随其后的结果在CEO进入操舵室前就已成定局了。
这种观念就是说CEO们变来变去,但是好的公司会一直在运转。
戴尔dell笔记本bios 中英文对照表
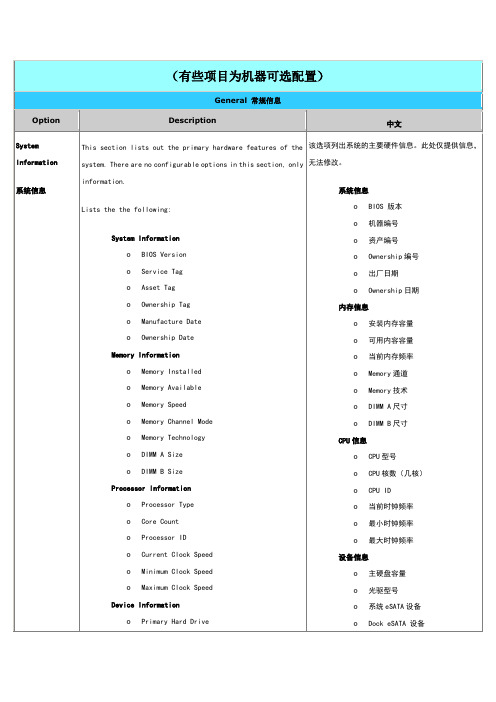
This section lists out the primary hardware features of the system. There are no configurable options in this section, only information.Lists the the following:System Informationo BIOS Versiono Service Tago Asset Tago Ownership Tago Manufacture Dateo Ownership DateMemory Informationo Memory Installedo Memory Availableo Memory Speedo Memory Channel Modeo Memory Technologyo DIMM A Sizeo DIMM B SizeProcessor Informationo Processor Typeo Core Counto Processor IDo Current Clock Speedo Minimum Clock Speedo Maximum Clock SpeedDevice Informationo Primary Hard Drive 该选项列出系统的主要硬件信息。
此处仅提供信息,无法修改。
系统信息o BIOS 版本o机器编号o资产编号o Ownership编号o出厂日期o Ownership日期内存信息o安装内存容量o可用内容容量o当前内存频率o Memory通道o Memory技术o DIMM A尺寸o DIMM B尺寸CPU信息o CPU型号o CPU核数(几核)o CPU IDo当前时钟频率o最小时钟频率o最大时钟频率设备信息o主硬盘容量o光驱型号o系统eSATA设备o Dock eSATA 设备The computer attempts to boot from the sequence of devices specified in this list:Diskette driveUSB Storage DeviceCD/DVD/CD-RW Drive.Internal HDD (IRRT)Cardbus NICOnboard NICThis list specifies the order that the BIOS searches devices when trying to find an operating system to boot. To change the boot order, select the device to be changed in the list then click the up/down arrows or use the keyboard PgUp/PgDn keys to change the boot order of the device. The boot devices can also 计算机尝试从以下列表顺序启动:软驱USB存储设备光驱Internal HDD (IRRT)Cardbus NICOnboard NIC我们可以勾选需要启动的设备。
Dell SQ QSA_check listVer3_0
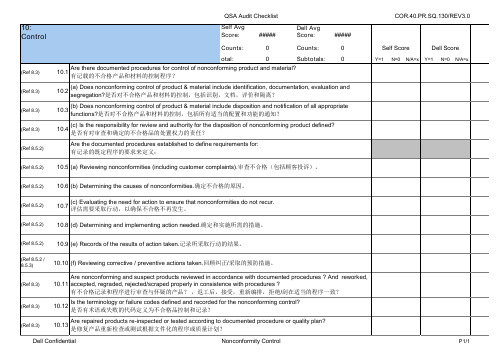
(Ref 8.3, 4.2.4)
(Ref 8.4, 8.5)
(Ref 8.5) (Ref 8.5, 4.2.4)
10.28 Are all corrective actions and results documented?是否所有的纠正措施和结果记录?
Dell Confidential
Nonconformity Control
P2/1
QSA Audit Checklist Does the corrective action request include root cause/containment/short term action? If defect is supplier related, is there any system to feedback to IQC for actions? 10.29 纠正措施是否包括根源请求/控制/短期行动?如果缺陷是供应商的关系,是否有任何反馈系统采取行动,来料质量 控制? Does the corrective action request include long term/preventive action? 10.30 是否有纠正措施的要求,包括长期/预防行动? 10.31 10.32 10.33 10.34 10.35 Is there a system to track status of corrective action requests? 是否有一个系统来跟踪纠正行动请求的状态? Are the contents of the responses/corrective actions appropriate to prevent future occurrences? 是否有回应/适当的纠正措施,以防止日后出现的相同错误? Is the corrective action report reviewed and approved by relevant authorities? 纠正措施报告是否经有关部门审查和批准? Are corrective actions monitored for effectiveness in preventing similar nonconformance? 效能监察是在防止类似的不符合项的纠正措施? Is action taken when progress/implementation of improvement actions is not satisfactory? 是否有采取行动的进展/改善行动的执行情况并不理想?
戴尔DELL新版BIOS中英文对照表
戴尔DELL新版BIOS中英文对照表在计算机的世界里,BIOS(基本输入输出系统)是一个至关重要的部分,它控制着计算机硬件的基本操作和初始化。
对于许多用户来说,理解 BIOS 中的各种设置选项是优化计算机性能、解决问题和进行系统配置的关键。
然而,由于 BIOS 界面通常提供英文选项,这可能给一些用户带来困扰。
为了帮助大家更轻松地应对戴尔 DELL 新版 BIOS 的设置,下面为您提供一份详细的中英文对照表。
一、Main(主要)System Information(系统信息)BIOS Version(BIOS 版本)Service Tag(服务标签)Asset Tag(资产标签)Processor Information(处理器信息)Memory Information(内存信息)Hard Drive Information(硬盘信息)Date/Time(日期/时间)Boot Sequence(启动顺序)Boot List Option(启动列表选项)UEFI Boot(UEFI 启动)Legacy Boot(传统启动)二、Advanced(高级)Processor Settings(处理器设置)Virtualization Technology(虚拟化技术)Intel Turbo Boost Technology(英特尔睿频加速技术)USB Configuration(USB 配置)USB Legacy Support(USB 传统支持)USB 30 Mode(USB 30 模式)Power Management(电源管理)AC Power Recovery(交流电源恢复)Wake on LAN(网络唤醒)SATA Operation(SATA 操作)AHCI Mode(AHCI 模式)RAID Mode(RAID 模式)Video(视频)Primary Video(主视频)三、Security(安全)Set Supervisor Password(设置管理员密码)Set User Password(设置用户密码)Secure Boot(安全启动)Secure Boot Enable(启用安全启动)Secure Boot Mode(安全启动模式)TPM Security(TPM 安全)TPM 20 State(TPM 20 状态)四、Boot(启动)Boot Options(启动选项)Boot Option 1(启动选项 1)Boot Option 2(启动选项 2)Boot Settings(启动设置)Quick Boot(快速启动)Bootup NumLock State(启动时数字锁定状态)五、Exit(退出)Exit Saving Changes(退出并保存更改)Exit Discarding Changes(退出不保存更改)Load Setup Defaults(加载设置默认值)在进行 BIOS 设置时,请务必谨慎操作。
dell optiplex 9030 一体机用户手册说明书

Dell OptiPlex 9030 一体机用户手册管制型号: W09C管制类型: W09C001注、小心和警告注: “注”表示可以帮助您更好地使用计算机的重要信息。
小心: “小心”表示可能会损坏硬件或导致数据丢失,并说明如何避免此类问题。
警告: “警告”表示可能会造成财产损失、人身伤害甚至死亡。
版权所有© 2014 Dell Inc. 保留所有权利。
本产品受美国、国际版权和知识产权法律保护。
Dell™和 Dell 徽标是 Dell Inc. 在美国和 / 或其他管辖区域的商标。
所有此处提及的其他商标和产品名称可能是其各自所属公司的商标。
2014 - 06Rev. A00目录1 拆装计算机 (5)拆装计算机内部组件之前 (5)建议工具 (6)关闭计算机电源 (6)拆装计算机内部组件之后 (6)重要信息 (7)2 卸下和安装组件 (8)系统概览 (8)卸下 VESA 支架 (9)安装 VESA 支架 (10)卸下后盖 (10)安装后盖 (11)卸下内存模块 (11)安装内存模块 (12)卸下 VESA 固定支架 (12)安装 VESA 固定支架 (13)卸下电源和 OSD 按钮板 (13)安装电源和 OSD 按钮板 (14)卸下系统板护罩 (14)安装系统板护罩 (15)卸下转换板 (15)安装转换板 (16)取出币形电池 (17)安装币形电池 (17)卸下光盘驱动器 (17)安装光盘驱动器 (19)卸下硬盘驱动器 (19)安装硬盘驱动器 (20)卸下防盗开关 (21)安装防盗开关 (21)卸下无线局域网 (WLAN) 卡 (22)安装 WLAN 卡 (22)卸下散热器部件 (22)安装散热器部件 (23)卸下处理器风扇 (23)安装处理器风扇 (24)3卸下电源设备风扇 (25)安装电源风扇 (26)卸下 I/O 板护罩 (26)安装 I/O 板护罩 (27)卸下电源装置 (PSU) (28)安装电源设备 (29)卸下处理器 (29)安装处理器 (30)卸下扬声器 (30)安装扬声器 (31)卸下系统板 (32)系统板布局 (33)安装系统板 (34)卸下显示屏面板 (34)安装显示屏面板 (37)卸下摄像头 (38)安装摄像头 (39)3 系统设置程序 (40)引导顺序 (40)导航键 (40)系统设置程序选项 (41)更新 BIOS (50)系统密码和设置密码 (51)设定系统密码和设置密码 (51)删除或更改现有系统密码和/或设置密码 (52)4 技术规格 (53)5 联系 Dell (58)41拆装计算机拆装计算机内部组件之前遵循以下安全原则有助于防止您的计算机受到潜在损坏,并有助于确保您的人身安全。
戴尔(DELL)新版BIOS中英文对照表
PasswordChanges
Denied-Thesystempasswordmaybemodifiedordeletedwithouthavingknowledgeoftheadministratorpassword.
拒绝--系统密码修改或删除无须管理员密码
Premitted-Avalidadministratorpasswordisrequiredtomodifyordeletethesystempassword.
许可--修改或删除系统密码需要有效的管理员密码
Thefactorydefaultsettingis:Premitted
默认:许可
Wi-FiCatcherChange
Permitted-TheWi-Ficatchersettingsmaybemodifiedordeletedwithouthavingknowledgeoftheadministratorpassword.
off
不显示警告信息
enable
如检测到电源问题将出现提示
FNkeyemulation
off
外接键盘任何时候都没有模拟fn键
scrolllk
当系统电源管理没有使用时,允许外接键盘使用scrolllk键模拟fn键
FastBoot
minimal
最小化启动
thorought
完全启动
auto
自动模式
Keypad
off
关闭扩展lcd面板
enable
启用拓展lcd面板
PrimaryVideo
Dockvideocard
Dock显卡
Onboadvideo
主板显卡
Security
戴尔DELL服务器的Win2003操作系统安装方法教程
戴尔DELL服务器的Win2003操作系统安装方法教程注意:采用DOSA光盘引导和安装服务器系统,将使您服务器硬盘上的所有数据丢失,因此此方法仅供全新的服务器和确认数据有备份前提下的服务器安装此安装方式仅支持零售版操作系统,如果是盗版光盘,如市面上常见的WINDOWS20 03 3IN1版本则无法使用(DELL强烈建议您采用正版软件)安装前请确认您的服务器光驱为DVD首先,将随机配送的Systems Management Tools and Documentation version6.0光盘放入服务器光驱,将服务器设置为光驱引导。
注:此版本dosa支持相应系统为:1、Server 2003 sp2 ;2、Server 2003 sp2 64 bit ;3、windows 2003 SBS sp2;4、Server 2008;5、windows 2008 SBS\EBS x64;6、Red hat Linux4.7 32bit;7、Red hat Linux 4.7 64bit;8、Red hat Linux5.2 32bit;9、Red hat Linux 5.2 64bit;10、S use Linux10 sp2 64bit;11、ESX 3.5 U4操作系统光盘版本一定要和DOSA 安装时选择的版本一致,否则DOSA会报告插入无效光盘。
支持的服务器类型:PowerEdge M610PowerEdge M710PowerEdge R610PowerEdge R710PowerEdge T610PowerEdge T710PowerEdge R410PowerEdge T410DOSA6.0 下载地址:/support/downloads/download.aspx?c=us&l=en&s=gen&releaseid=R 215376&SystemID=pwe_r710&servicetag=CLQRN2X&os=WNET&osl=en&deviceid=17861&d evlib=0&typecnt=0&vercnt=1&catid=-1&impid=-1&formatcnt=1&libid=36&fileid=305539稍等片刻,屏幕出现如下界面(不同版本的DOSA光盘界面可能略有不同,但所有步骤一样)引导光碟将检测您的服务器硬件,这里需要5分钟左右,请耐心等待。
- 1、下载文档前请自行甄别文档内容的完整性,平台不提供额外的编辑、内容补充、找答案等附加服务。
- 2、"仅部分预览"的文档,不可在线预览部分如存在完整性等问题,可反馈申请退款(可完整预览的文档不适用该条件!)。
- 3、如文档侵犯您的权益,请联系客服反馈,我们会尽快为您处理(人工客服工作时间:9:00-18:30)。
(b) Does the Quality Policy include a commitment to comply with requirements and continually improve the effectiveness of the quality 1.3 management system? 质量方针是否包含遵从要求的承诺,及不断提升质量管理系统的有效 性? (c) Does the Quality Policy provide a framework for establishing and 1.4 reviewing quality objectives? 質量方針是否有一個針對設定和審核品質目標的框架?
(Ref 8.2.2)
Dell Confidential
Quality System Requirements
P4/3
QSA Audit Checklist Do the internal audits determine whether the quality management system is effectively implemented and maintained? (e.g., meeting the 1.33 customer requirements?) 内部审核是否确认质量管理系统被有效地实施和维护? Are the internal audits planned on the basis of the status and importance of the activity, as well as the results of previous audits? 内部审核计划是不是基于该审核的进展和重要性,以及之前审核的结 果? Are the audit criteria, scope, frequency and methods defined for the internal audit? Are the selection of auditors and conduct of audits ensuring the objectivity and impartiality of the audit process? (e.g. auditors shall not audit their own work.) 审核员的甄选和审核的执行是否可以保证审核的客观公正性?(例如, 审核员不可以审核自己的工作) Is there a procedure documented the responsibilities and requirements for planning and conducting audits, and for reporting results and maintaining records ? 是否有流程定义以下责任和要求:计划和实施审查,报告审查结果和保 留记录。 SQA, Yes
SQA, Yes.
SQA, Yes.
(Ref 4.2.2)
SQA, Yes.
(Ref 4.2.2)
SQA, Yes.
(Ref 5.5.1)
SQA, Yes.
(Ref 5.5.1)
Dell Confidential
Quality System Requirements
P2/3
QSA Audit Checklist SQA, Yes. Has the supplier appointed a management representative who has responsibility and authority for ensuring that a quality management 1.14 system has been implemented and maintained? 是否有指定一名管理者代表確保品質管理系統被有效的執行與維持?
COR.40.PR.SQ.130/REV3.0
(Ref 5.5.2)
(Ref 5.5.2)
Has the management representative tracked and drove the improvement on quality management system performance with 1.15 record/report. 管理代表人是否追踪和推动改善管理系统作用,是否有記录/报告作为佐 证? Has the improvement effectiveness verified (record/evidence required)? 是否有验证改善措施的有效性?(需要有记录/证据)
Y=1 N=0 N/A=x Y=1 N=0 N/A=x Remarks
(Ref 4.2.1)
1.1
Has the supplier defined and documented its corporate quality policy? 是否有定义和文件化质量方针?
SQA, Yes. 1.2 (a) Is the Quality Policy appropriate to the purpose of the organization? 质量方针是否适用于公司的产品?
COR.40.PR.SQ.130/REV3.0
(Ref.5.6.3)
SQA, Yes
SQA, Yes SQA, Yes SQA, Yes
Are implementation of action items from management review tracked? 1.29 是否追踪管理评审中的措施的实施状况? Are records maintained of these management reviews? 是否保留管理评审的记录? SQA, Yes SQA, Yes
(Ref 8.2.2)
1.30
Does the supplier conduct internal audits at planned intervals? 1.31 是否执行定期的内部审核? Do the internal audits verify compliance with planned arrangements, 1.32 ISO standards and quality management system? 内部审核是否确认与计划的一致性,ISO标准和质量管理系统? SQA, Yes
SQA, Yes. 1.8 Are the quality objectives consistent with the corporate quality policy? 质量目标是否与质量方针一致?
(Ref 4.2.1)
Does the quality management system documentation include a quality 1.9 manual? 质量管理系统文件体系是否包含质量手册? Does the quality manual include the scope of the quality management 1.10 system, including details of and justification for any exclusions? 质量手册是否包含质量管理系统的应用范围,还包括排除条款的细节及 Does the quality manual include a description of the interaction between 1.11 the processes of the quality management system? 质量手册是否描述:质量管理系统过程之间的相互关系? Has the supplier defined the responsibility, authority and interrelation of all personnel who manage, perform and verify work that affects the 1.12 quality of products, materials or services? (i.e. procedures, organization charts, quality manual) Has the supplier provided adequate resources for in-house verification activities such as inspection, testing, monitoring and review of 1.13 processes and products? 是否为内部验证活动,如检验,测试,监控,过程和产品审核等,提供 充分的资源?
1.18 1.19 1.20
Dell Confidential
Quality System Requirements
P3/3
QSA Audit Checklist 1.21 1.22 1.23 1.24 1.25 (d) Process performance and product conformity 过程的绩效及产品的符合性 (e) Status of preventive and corrective actions 各项预防和改善措施的状态 (f) Follow-up actions from previous management reviews 前次管理审查决议事项的跟催 (g) Changes that could affect the quality management system, and 可能影响质量管理系统的变化? (h) Recommendations for improvement 改善建议? Does the output of management reviews include any decisions and actions related to: 管理评审的输出是否包括与以下相关的决定和措施? (a) Improvement of the effectiveness of the quality management system 1.26 and its process? 质量管理系统和其过程有效性的改善? 1.27 1.28 (b) Improvement of product related to customer requirements, and 以下方面的产品改善:客户要求,和 (c) Resource needs 所需资源。 SQA, Yes
