Phonesuite使用说明V1.04-01
Unify 桌面电话说明书
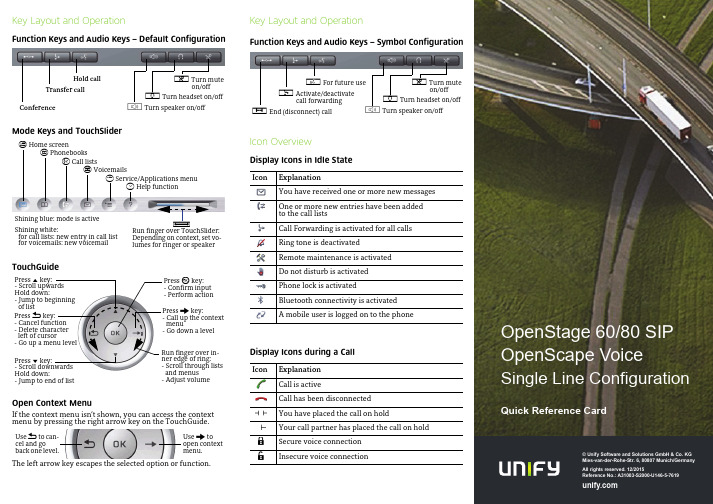
© Unify Software and Solutions GmbH & Co. KGMies-van-der-Rohe-Str. 6, 80807 Munich/GermanyAll rights reserved. 12/2015Reference No.: A31003-S2000-U146-5-7619Key Layout and OperationFunction Keys and Audio Keys – Default ConfigurationMode Keys and TouchSliderTouchGuideOpen Context MenuIf the context menu isn’t shown, you can access the contextmenu by pressing the right arrow key on the TouchGuide.The left arrow key escapes the selected option or function.Hold callTransfer callConferencep Turn muteon/offo Turn headset on/offn Turn speaker on/offt Home screenu Phonebooksw Call listsx Voicemailsv Service/Applications menuy Help functionRun finger over TouchSlider:Depending on context, set vo-lumes for ringer or speakerXShining blue: mode is activeShining white:for call lists: new entry in call listfor voicemails: new voicemailPress m key:- Scroll upwardsHold down:- Jump to beginningof listPress l key:- Scroll downwardsHold down:- Jump to end of listPress g key:- Call up the contextmenu- Go down a levelPress h key:- Cancel function- Delete characterleft of cursor- Go up a menu levelPress i key:- Confirm input- Perform actionRun finger over in-ner edge of ring:- Scroll through listsand menus- Adjust volumeUse g toopen contextmenu.Use h to can-cel and goback one level.Key Layout and OperationFunction Keys and Audio Keys – Symbol ConfigurationIcon OverviewDisplay Icons in Idle StateDisplay Icons during a CallIcon ExplanationYou have received one or more new messagesOne or more new entries have been addedto the call listsCall Forwarding is activated for all callsRing tone is deactivatedRemote maintenance is activatedDo not disturb is activatedPhone lock is activatedBluetooth connectivity is activatedA mobile user is logged on to the phoneIcon ExplanationCall is activeCall has been disconnectedYou have placed the call on holdYour call partner has placed the call on holdSecure voice connectionInsecure voice connectionq For future user Activate/deactivatecall forwardings End (disconnect) callp Turn muteon/offo Turn headset on/offn Turn speaker on/off{}OpenStage60/80SIPOpenScape VoiceSingle Line ConfigurationQuick Reference CardUsing your OpenStagePlace a Call•Lift handset, dial number and press i, or•dial number and lift handset, or•for handsfree call: dial number and press i.Answer a Call•Lift handset, or•for handsfree call: press n.End a Call•Hang up,or•to end a handsfree call: press n.Use the headset•Place a call: dial number and press i.•Answer or end a call: press o.Redial a Number1.Select "Redial" in the context menu and press i.2.Lift handset to use handset mode.Hold or Retrieve a Call•During a call press pre-programmed Hold key.•To retrieve a call: press pre-programmed Hold key.Make a Conference Call1.During a call with party A, press pre-programmed Conferencekey.2.Enter the phone number for party B and press i.3.Once connected with party B, press pre-programmed Confe-rence key.You are now connected in a conference with party A and B. Transfer a CallBlind transfer (no consultation):1.During the call with party A, select"Blind transfer" in the con-text menu and press i.2.Enter the phone number of party B and press i.Semi-attended transfer (transfer while ringing):1.During the call with party A, press pre-programmed Transferkey.2.Enter the phone number of party B and press i.3.When the phone starts to ring, select "Complete transfer"and press i.Attended transfer (with consultation):1.During the call with party A, press pre-programmed Transferkey.2.Enter the phone number of party B and press i.3.Announce the call to party B.4.Select "Complete Xfer" in the context menu and press ing your OpenStageProgramm Call Forwarding1.Press pre-programmed Call Forwarding Key.2.Select "Set a forwarding destiantion" and press i.3.Enter the destination number and press i.4.Select "Save&Exit" in the menu and press i.5.Press v to return to phone mode.Turn Call Forwarding on or off for All Calls•Press r for turning Call Forwarding on/off.Dial from the Call List1.Press w.2.The "Missed" tab will appear first, press w repeatedly for"Dialed", "Received", or "Forwarded" tabs.3.Select the desired phone number and press i.Activate Callback while calling1.Enter the destination phone number and press i.2.If there is no answer or the line is busy: select "Callback"from the context menu and press i.Deflect a Call while ringing1.Select "Deflect" from the context menu and press i.2.Enter a destination phone number and press i.Use Mute during a call•Press p for turning mute on or off.Switch to Speakerphone Mode during a Call•US mode:press n and hang up.•Default mode: hold down n until you hang up.Switch to Handset Mode during a Call•Lift handset.Save a Function to a Key1.Press and hold the desired programmable keyuntil a popup appears.2.Press i to confirm entering programming mode.3.Select "Normal" or "Shifted" and press i.4.Select desired function and press i.5.Define an appropriate key label and press i.6.In some cases: enter additional parameters and press i.7.Select "Save&Exit" in the context menu and press i.8.Press v to return to phone mode.List of Programmable Functions* only visible if provided by adminFunction ExplanationUnallocated Clears the keySelected dialing Dials a pre-defined numberRepeat dialing Calls the last dialed numberForward all calls Forwards all incoming callsForward no reply Forwards calls only if they are notansweredForward busy Forwards calls only when the line isbusyRinger off Switches the ringer off/onHold Places a call on holdAlternate Switches between two callsBlind transfer call Transfers a call without consultationTransfer call Transfers a call with consultationDeflect Deflects a call to another destinationShift Switches to the shifted key levelConference Places a conference callHeadset Answers a call using the headsetDo not disturb Switches the ringer off; callers hear thebusy signalGroup pickup Picks up a group callRepertory dial Dials pre-defined numbers and controlsequencesShow phone screen Toggles features hosted by OpenScapeVoiceMobility Login/Logoff for mobile usersDirected pickup Picks up another ringing phoneCallback Requests an automatic call back(busy/no answer)Cancel callbacks Cancels a callback requestConsultation Puts an active call on hold and providesa prompt for dialingDSS*Dials a pre-defined internal numberCall Waiting Notifies of a second incoming call whilein active callImmediate ring Ringing keyset line without delay(Executive/Assistant configuration)Preview Preview line details for shared linesAICS Zip tone*For headset operation only:auto answer and alert toneStart application Launches an application (short cut)Built in fwd Turns Call Forwarding on/off。
MTK手机最新pc套件PhoneSuite V2

MTK手机最新pc套件PhoneSuite V2.3.0及操作指南重磅推荐!MTK手机最新pc套件PhoneSuite V2.3.0及操作指南很高兴入伙,发一个适用于MTK平台的MT6205—MT6229芯片手机的最新pc套件PhoneSuite V2.3.0,给机油们共享。
软件为台湾制作,语言为中文繁体。
我机子联想A710属于MT6225芯片,经实机测试,完全适用。
安装步骤:1、分卷下载,解压。
2、插入数据线,手机上选择“序列接口”,电脑上查找到新硬件,然后将其需要的配置文件定位到软件\ usb-软件\2K_XP_COM;3、打开PC套件里的SETUP.EXE,安装PhoneSuite V2.3.0;4、打开PhoneSuite V2.3.0安装目录,打开PhoneSuite.ini,[MTK6226]修改LCD_WIDTH = 240,LCD_HEIGHT = 320;把下载的附件PhoneSuite中文简体说明改名为“PhoneSuite.chm”替换软件原PhoneSuite.chm文件。
5、打开PhoneSuite V2.3.0,选择settings—language:中文繁体,手机型号:MTK6226,其实随便选;通讯埠(端口)设置为COM*(非com1,下面一个);记忆体:sim下面一个(有点乱码的);载入outlook express联系人资料方框中打√。
拨接、建立连线就不用选了。
6、软件下方会提示“已经连接”,可以通过电脑同步手机了。
具体使用方法,我在附件备有中文简体说明,也可以直接看已经替换的软件中的“?”说明—说明主题。
注意:1、已经安装PhoneSuit其他版本的机油,请先删除程序再安装。
2、已经安装mtk平台数据线驱动的机油,请直接进入第三个步骤,第一、二步骤省略。
PhoneSuite V2.3.0与PhoneSuite 1.2.9相比,增加六项功能:1、支持通过软件名片式编辑手机电话薄。
Rokit G4 中文用户手册说明书

用户手册DSP控制监听音箱欢迎使用 ROKIT G4。
首先,我们想告诉您一些历史。
在 2016 年,经过与超过 300 名专家长达两年的不懈努力,KRK 发布了 V 系列 4 监听音箱。
这些产品在专业制作人、工程师和高级用户中广受欢迎而且赞誉有加。
开发 ROKIT G4 时,我们一开始就把目标定位在为 ROKI T G4 客户设计一款兼具音质和外观的 V 系列 4。
这意味着,在超过 30 年里,在我们的高级监听音箱产品系列中,这是 ROKIT 历史上首次使用Kevlar® 材料设计的驱动器。
与 V 系列 4 一样,我们使用功能强大的 DSP 来为您提供不可思议的音景,同时通过深度 EQ 控制,帮助您提升房间声效。
这仅仅是个开始。
下面给出一些可帮助您增强听觉体验的其他提示技巧以及信息。
房间布置和设置。
KRK 设计团队煞费苦心对成百上千个监视器布置和房间声学场景进行建模分析,以确保 KRK 提供最有用的 EQ 工具,同时尽量减少用户侧调试。
房间的设计和构造往往不完美,所以房间声学是当前工作室所面临的最大问题。
许多了不起的工作室都设在经过改造的房子里。
我们通过让您控制系统,从而避免这类情况导致的问题。
通过LOW EQ和HIGH EQ两个功能,系统提供 25 种不同的 EQ 和弦配置组合,帮助您调试工作室声学,实现更为准确的监听。
首先,将LOW EQ和HIGH EQ设置为3:FLAT,纯调,无减弱或增强,VOLUME 设置为 0.0dB。
根据以下说明和图表在您房间内进行设置。
听一些喜欢的歌曲和混音片段。
调试 EQ 前,在房间内尝试不同位置和不同布置,然后调试 EQ,获取最佳听觉和监听体验。
SYSTEM SETUP整体系统设置对于避免不必要的声互作用十分关键。
房间的自然音响效果可能由于异常阻尼或回声而导致在各种频率时改变声级。
有关更多细节,请遵守下面的检查表。
1.系统设定(监听音箱和工作台)必须置于房间的前三分之一内。
总机服务手机客户端产品使用手册

总机服务手机客户端产品使用手册重庆号百信息服务有限公司2011年6月9日本使用手册主要是指导开通总机服务业务的单位群内用户在手机终端上正确下载、安装、使用手机客户端功能;目前手机客户端只支持Android和mobile系统的智能手机,本使用手册主要以Android系统为例。
目录一、下载客户端 (3)二、安装客户端 (4)三、使用客户端 (5)1.添加通信录账号 (5)2、总机通信录下载 (5)3、更新总机通信录 (6)4.使用总机通讯录 (7)5、使用手机联系人 (9)5.1查看联系人 (10)5.3搜索联系人 (12)5.4编辑联系人 (13)5.5删除联系人 (13)6、使用短信群发 (14)7、使用通信记录 (15)8、使用拨号面版 (15)8.1其本功能 (15)8.2功能菜单介绍 (16)8.3快捷检索功能 (18)8.4检索配置 (19)8.5人工服务 (21)9.其他功能 (21)9.1信息纠错 (21)9.2主题管理 (22)9.3账号管理 (22)9.4设置 (22)9.5版本升级 (23)9.6问题反馈 (23)9.7分享下载地址 (23)登录用户管理界面选择总机服务选项,进入总机服务管理界面;进入总机服务用户管理界面,选择“总机服务手机客户端立即下载”链接,进入客户端下载界面选择手机操作系统(Android或mobile)进行下载;点击手机终端中文件管理器,选择安装文件所在的相关目录,点击安装文件进行客户端安装;1.添加通信录账号通过工具栏“更多” →“账号管理” →“添加” 到达添加账号界面。
先在①中输入总机号码,然后触摸②提交验证。
稍后系统会以通知方式提示用户添加绑定账号的结果。
2、总机通信录下载通过工具栏“更多” →“通讯录下载” 到达总机通讯录下载界面。
先在②中勾选需要下载的部门,然后点击③进行下载操作。
若有过个总机账号,可在①中进行切换。
此界面手机会检查网络连接,用户需要先设置好网络连接并确保网络通畅,若网络不通会导致更新失败。
2020年(OA自动化)iOAv2004功能说明书

(OA自动化)iOAv2004功能说明书iOAv2004功能说明书版本号:1.12004年4月重要须知本文档旨在针对客户需求而呈交产品的基本功能描述。
本建议书提及的系统及系统实施的细节仅在同时兼备有法律效力的合同约束下才有效。
本系统阅读者不得将系统之全部或系统之部分内容在未经创新通软书面允许的情况下披露于第三方。
深圳市创新通软科技有限公司版权所有,保留所有权利。
http://.cn在本建议书内提及的公司及产品可能是相关拥有者的注册商标。
目录1.产品概述11.1.业务价值11.2.系统实施要求31.3.系统的先进性32.业务系统组成及系统模块介绍52.1.系统功能结构图52.2.系统功能描述53.系统管理154.系统安全175.系统技术体系和性能参数185.1.系统运行方法185.2.技术体系185.3.开发平台205.4.运行环境201.产品概述iOAv2004,全新理念设计,为企业业务目标的实现提供强大的交流、协同、工作任务、统一信息管理平台。
iOAv2004,全面提升办公效率!1.1.业务价值通过实施创新通软iOA系统,企业能够轻易获得如下好处:●通过电子化实现文档的管理、传递和审批,改变传统手工办公模式,提高办公效率●提供电子邮件、电子论坛等方便灵活的交流方式,让员工及企业更具活力。
●利用公共信息库和讨论组,共享信息和知识,将所有员工的智慧积累和发扬。
●协调和协同工作,让工作组的所有人员都能掌握工作进度,发挥群体工作的威力。
个人信息和日程管理,协助员工工作更出色。
●通过集中的信息处理,加强公司的管理和控制能力。
解决传统办公存在的难题,面向企业实际业务应用传统办公中,信息以纸张,口头话语存在于不同的人手中,分散的信息需要集中的管理和共享。
当组织跨越多个地域时,交流沟通变得困难,通讯成本提高。
采用创新通软iOA,能够:⏹集中管理信息,使有用的知识得到不断积累⏹通过简单的方式共享信息,使每个员工都能够得到更多的支持和帮助⏹通过Email、论坛、留言等手段,加强交流和沟通,让员工和企业更具活力⏹摆脱时间空间限制,提供更加灵活的办公方式和手段⏹有效的管理各种行政事务,提高办公效率⏹通过工作周报,及时总结工作进展,发现问题,并不断改善投入少,收益大创新通软iOA办公系统作为企业信息化的基石,不需复杂庞大的实施工作和高额的费用,却能获得众多实在的收益:⏹网络远程办公节约纸张、差旅、会议、通讯等方面的费用⏹提高员工日常办公效率⏹提高政策、制度、任务指标等信息的传播、共享速度⏹提高各部门协同工作能力⏹增强对下属部门人员的业务监管能力,提高其信息透明度另外,创新通软iOA还能带来增值的战略性投资回报:⏹建设透明化、协作型、学习型、以市场为中心的企业办公文化⏹提高员工业务水平;提高企业对市场的服务质量与反应速度⏹建设国际标准的IT基础平台,建立开放性的业务模式融合知识管理思想,采用先进.NET体系架构开发创新通软iOA基于知识管理理念设计,实现了消息、文档、知识的统一管理,并能够与人力资源管理、客户关系管理等其他企业信息系统融合,提供源源不绝的办公动力。
4G多模手机伴侣产品手册
LTE多模手机伴侣用户手册邦讯技术股份有限公司欢迎使用本公司产品,使用前请详细阅读说明书以便更好的为您服务一、产品概述LTE多模产品是在不干扰无线通信网络的手机伴侣平台上开发设计的,新型的频分、时分多路实时检测处理模块化,分区、多系统统一采集处理,具有抗干扰能力强、时隙检测控制精度高、多系统间平衡等优点的全新产品,在适应终端CSFB技术表现更优。
LTE多模手机伴侣的特点在于见效快、周期短、安装方便、不容易产生资源浪费。
可为用户提供稳定、可靠的信号,使用户享受高质量的个人通信服务,解决通话质量差、上网速率慢等问题。
1.产品示意图2.产品使用范围LTE多模手机伴侣适用多系统盲区:小型隧道营业厅用户投诉解决物联网应用小型经营场所应急覆盖场合小区地下场所城中村用户覆盖非法直放站替换别墅、VIP使用场合高层乒乓效应解决车载、船载等移动场合3.产品的特色功能自适应安装“傻瓜”式安装,无需专业调测大范围数字ALC 同时兼容初级、成熟期建网伪自激筛选功能精准判别自激信号,反应速度更快隔离度自动调整实时监测,自动调整,满足隔离度需求实时自激自动消除实时监测、实时发现、实时处理增益不平衡保护主动保障基站与终端之间的无线链路平衡网络变动自动优化跟随大网变化,设备自动优化,保证设备性能二、技术指标1.产品指标型号4T2G6 / 4T2G3 / 4T1G9频率TD-LTE GSMD: 2575~2635MHz上行:889~909MHz下行:934~954MHz E: 2320~2370MHzF: 1880~1920MHz增益上行65±3dB60±3dB 同步方式基带--接收灵敏度-110dBm -115dBm最大输出功率17±2dBm 13±2dBm带内平坦≤3 ≤3噪声系数UL≦6dB; DL≦9dB ≦6dB 互调-- UL≥36dBc DL≥45dBc ACLR UL≥36dBc DL≥45dBc -- 自动功率控制≧30dB ≧30dB矢量幅度误差EVM ≦5% (64QAM) ≦2% (8PSK) 输入功率范围≤-10dBm带外杂散≤-36dBm/100khz驻波比≤1.8时延≦1μs功耗≦13W2.天线指标指标项目定向壁挂天线橡皮终端天线极化方式垂直电压驻波比<1.8 <2增益9dBi3dBi接头SMA-J馈线类型5D-FB馈线长度16米无天线重量900g 10g三、安装说明1.产品连接示意图将设备连接安装完毕后,将电源适配器接上电源(AC220V)并将其输出DC12V 接到主机电源插座,开启设备。
手机助手安装及使用PPT学习教案

第10页/共17页
客户经理 李尧、王懿玲 王懿玲 仇净晓 魏海鹏 王志强 魏海鹏 马相龙
崔陆峰 仇铮晓 仇争晓
宿琳 王懿玲 宿琳 宿琳
项目负责人 白金刚 白金刚 白金刚 白金刚 白金刚 李雪松 李雪松 李雪松 李雪松 李雪松 李雪松 李雪松 李雪松 李雪松 李雪松 李雪松
目录
1 移动网工程进度 2 固网工程进度
2012-3-1 2012-3-6
宽甸黄椅山附近 宽甸
2012-3-9
小计3:
总计:
第9页/共17页
覆盖用户 175 2557 318 415 620 1733 1209 7027 777 1847 1360 1448 348 5780 1593 905 713 638 3849 16656
端口数 120 1448 256 224 288 920 632 3888 440 760 928 688 192 3008 896 432 384 272 1984 8880
宿琳
李雪松
李雪松 李雪松
第16页/共17页
第5页/共17页
移动网
克隆集团—东港桥南
浪头港:租用边防监控塔,属于现网直放站无线改有线。已经完工。 新区公务员楼基站:租赁楼顶天面,谈点困难。力争3月底完工。 文斌村基站:现网直放站改造。已经开工,预计3月15日前完工。 一撮毛基站:利用边防监控塔。已经完工。开通后将解决港口附近的集中投诉 。 东港国际城基站:基站选址和洽谈已完成。基站建设预计3月25日前完成。 大东港基站:利用现有的固网机房,已经开通。由于美化天线的方案等待日林 集团领导确认,我们临时将天线安装在机房内。目前已经解决了大东港生活区 的信号覆盖
固网
小区接入
共计开通16个小区,覆盖用户数16656户, 端口数 8880线
索尼爱立信PC套件使用教程
同步前准备事项:
如果手机中包含项目,请使用备份和恢复窗口执行一次手机备份。 要检查手机上有哪些可用的联系人,请转到通讯录窗口。您可以: -手动在手机和计算机之间移动联系人项目。 -- 编辑和删除联系人项目。 要检查手机上有哪些可用的日历和任务项目,请转到日历窗口。您可以: -手动在手机和计算机之间移动日历和任务项目。 -- 编辑和删除日历和任务项目。
重要事项!
为了同步,必须以计算机模式连接手机。如果手机断开连接或是在USB存储/MTP 模式下连接,将无法进行同步。
手机连接状态 手机连接状态显示在主应用程序窗口的顶部。当连接模式发生变化时,它自动 进行刷新,有四种不同的模式: 1、手机未连接(灰色) Sony Ericsson PC Suite 未发现任何手机连接到计算机。 2、以 USB 存储模式连接手机(橙色) Sony Ericsson PC Suite 在此模式下无法访问您的手机。当以 USB 存 储模式连接时,手机和存储卡在 Windows 文件浏览器中显示为 USB 海量 存储设备。 3、以计算机模式连接手机(绿色) 在此模式下,手机正常工作,所有 PC Suite 功能都可以访问手机。 4、以 MTP 模式连接手机(蓝色) Sony Ericsson PC Suite 在此模式下无法访问您的手机。当以 MTP 模式连 接时,手机在计算机中显示为一个媒体设备。
同步窗口:
“同步”故障排除:
我可以同步或读取我的 SIM 卡吗? 不可以,应用程序只能管理您手机存储卡上的通讯录。您可以使用手机菜单将 SIM 联系人复 制到手机存储器中。 我是一个初级用户。您建议我使用同步吗? 如果您不熟悉同步,可以通过打开通讯录和日历窗口手动管理通讯录、日历和任务项目。 自动同步不工作 请检查 PC Suite 是否在运行以及 Windows 托盘栏中是否显示 PC Suite 图标。确认是否以计 算机模式连接了手机。 同步时间太长 您的数据库可能太大,或者位于网络上(而不是计算机上)。打开数据库可能需要很长时间。 要缩小同步范围,请转到设置。请注意,完全同步(一般是第一次同步)需要的时间较长, 以后的同步会较快。 同步存在例外的重复发生约会 存在例外的重复发生约会很难进行管理。与 PIM(Outlook、Lotus)相比,手机针对例外和 重复发生约会提供更多的不同设置。在一些情况下,应用程序无法管理手机上的所有约会。
Basic FX Suite 使用说明书
⢪欽霹僈⛼Basic FX SuiteZH目录目录Basic FX Suite (2)Sweet Spot Morphing Channel Strip (2)REV-X (2)Guitar Amp Classics (2)如何打开VST插件 (3)从Inspector(查看器)中 (3)从MixConsole(混音控制台)中 (3)选择效果 (3)软件 (4)Sweet Spot Morphing Channel Strip (4)REV-X (5)Guitar Amp Classics.......................................7Basic FX SuiteBasic FX Suite是一种包含Yamaha开发的多种效果和声音处理器的VST插件,其中多个插件的开发全面应用了建模技术。
Basic FX Suite包含3个软件组件:Sweet Spot Morphing Channel Strip、REV-X和Guitar Amp Classics。
安装Basic FX Suite时,以下3个程序会同时被安装。
Sweet Spot Morphing Channel Strip这种效果是一种带有压缩器和均衡器的综合效果器。
REV-X这种效果处理器是Yamaha为专业音频设备专门开发的一种数字混响平台。
Guitar Amp Classics这种效果带有Yamaha全面采用建模技术开发的吉他音箱模拟效果。
注Basic FX Suite 组件不支持 iOS设备,如iPad。
信息•本使用说明书中出现的插图和LCD画面仅供说明用途。
•Steinberg Media Technologies GmbH和Yamaha公司不承担有关软件及文件使用的责任或担保,对使用本说明书及软件的后果不负责任。
•Apple、Mac、Macintosh和iPad是Apple Inc.在美国和其它国家的注册商标。
Iphone手机客户端说明书20130809

Iphone手机访问设置方法:目录1)在PC端下载及安装 (1)2)在APP Store商店下载及安装 (2)3) 手机客户端访问设置 (6)4)DVR端网络配置 (11)注意:该手机客户端程序,要求iphone手机系统支持4.1版本以上。
1)在PC端下载及安装进入汉邦官网->技术支持->下载中心->应用软件->手机客户端->手机客户端 V1.2.4 (Iphone版),然后点击“点击下载”按钮进行下载。
下载完后,将Iphone手机与PC连接,并使用Itunes或Itools等软件安装工具与Iphone 进行连接后,双击下载下来的手机客户端程序,然后进入iTunes进行安装。
2)在APP Store商店下载及安装进入苹果软件市场APP Store搜索“HBRealView”,找到下载并安装。
下载安装步骤如下:1、选择“App Store”进入苹果手机商店;2、在输入栏上填写“HBRealView”手机客户端名称(不区分大小写)进行搜索,找到搜索后点“下载”进行下载客户端程序;3、下载完后点“更新”进行安装更新客户端软件;(这一步也可不操作,正常情况从AppStore 下载到的就是最新的了)4、安装成功后点“打开”或点击手机主界面上的客户端软件图标,运行手机客户端软件;3) 手机客户端访问设置1、点击“HBrealview”打开手机客户端,点“主页”按钮进入设备系统功能设置;2、点“设备列表”,进行编辑或添加DVR设备;3、点已添加的DVR设备列表,则进入编辑DVR设备;4、点“编辑”后,再点“添加”可以添加新的DVR设备;5、手机客户端设备添加设置:在“设备信息”界面,分别填入主机设备名称,默认为“Device 01”,外网IP地址或域名地址(汉邦域名完整地址,不需要加81端口)●TCP端口:默认8000(在DVR端“系统设置”->“网络设置”->“网络设置”->“端口设置”->设置“监听端口”,默认为8101)●用户名:输入DVR用户名●密码:输入DVR密码注意:手机客户端访问DVR,要求手机通过WLAN或其他方式上外网,DVR端通过拨号或域名解析(路由器端口映射)上外网。
中维安卓版 Homecloud 产品说明书

产品说明书——安卓版Homecloud中维世纪科技有限公司400-630-7888非常感谢您购买我公司的产品,如您有任何疑问或需求请随时联系我们。
本说明书适用于安卓版Homecloud软件系统。
我公司将根据产品功能的增强或变化而更新本说明书的内容,并将定期改进及更新本说明书中描述的软件产品,更新的内容将会在本说明书的新版本中说明,恕不另行通知。
本说明书中内容仅为用户提供指导作用,不保证与实物完全一致,请以实物为准。
目录1.产品概述 (4)1.1.产品简介 (4)1.2.产品特点 (4)1.3.运行环境 (4)1.3.1.硬件设备 (4)1.3.2.软件环境 (5)2.产品安装 (5)3.系统功能介绍 (5)3.1.登录 (5)3.2.注册帐号 (8)3.3.找回密码 (8)3.4.设备管理 (10)3.4.1.添加设备 (10)3.4.2.编辑设备 (12)3.4.3.删除设备 (12)3.5.网络设置 (13)3.6.连接模式 (14)3.7.安全防护设置 (14)3.7.1.开启安全防护 (14)3.7.2.设置防护时间 (15)3.8.查看健康生活 (16)3.9.录像管理 (17)3.9.1.开启/停止录像 (17)3.9.2.远程录像回放 (18)3.10.抓拍图像 (19)3.11.开启/关闭音频监听 (19)3.12.开启/停止语音对讲 (19)3.13.云台控制 (20)3.14.演示点 (20)3.15.更多功能 (21)3.15.1.更改帐户密码 (22)3.15.2.媒体功能 (25)3.15.3.摇一摇配置设备 (26)3.15.4.场景图片 (29)3.15.5.报警设置 (30)1.产品概述1.1.产品简介中维安卓版Homecloud客户端是中维公司最新研发的一款基于安卓手机操作系统的软件,是所有家庭安防产品的远程监控客户端。
它不仅融合了中维公司优秀的云视通网传技术、高效的音视频编解码技术和独特的图像显示技术,而且具有友好而清新的用户界面,既能使该软件很好的展现高清流畅的画面,而且操作快捷、简单,是顺应信息时代需要的监控产品。
Windows Phone 风格指南说明书

WINDOWS PHONES TYLE GUIDE FOR S IMPLIFIED C HINESE Contents1.Goals of This Guide (3)2.The Windows Phone Voice (3)nguage-Specific Guidelines (4)3.1.General Tone & Voice—Share the Message (4)3.2.Style—Help Deliver the Voice (5)age—Sound Natural (6)3.4.Terminology—Be Consistent (6)3.4.1.Naming Guidelines and Trademark Requirements (8)3.5.Handling Fictitious Content (8)3.6.Measurements (9)4.Windows Phone UI Localization Guidelines (10)4.1.How to Translate UI Elements (10)4.1.1.App Bar Icon (10)4.1.2.App List Item (10)4.1.3.Buttons (12)4.1.4.Check Box Label (14)4.1.5.Edit Box Label (14)4.1.6.Group Label (15)4.1.7.Hub Title (16)4.1.8.List Item in Settings (16)4.1.9.Menu Items (17)4.1.10.Message Box (18)4.1.11.Notification Toast (19)4.1.12.Page Title (20)4.1.13.Pane Section Title (20)4.1.14.Phone Control Label (21)4.1.15.Pivot Item (21)4.1.16.Progress Indicator Text (21)4.1.17.Text Box (22)4.1.18.Tile Label (23)4.1.19.Toggle Switch (24)4.2.How to Translate References to UI Elements (25)4.4.Capitalization—Mind the Case (26)4.5.Words—Show as well as Tell (27)4.6.Punctuation—Divide and Conquer (28)4.7.Editing/Screen Review—Fine-Tune the Translation (29)4.8.Handling Input from External Stakeholders (31) (31)5.1.General (31)5.2.Terminology (32)5.3.Elements Specific to (33)5.3.1.Image Captions (33)5.3.2.Topic Titles (33)5.3.3.References to UI Elements (34)5.3.4.Mix of Western and Asian Characters (35)5.4.Sample Translations of Texts (35)5.4.1.Marketing Text (35)5.4.2.How-to Text (35)5.5.Fine-Tuning during Editing/Screen Review (37)1.Goals of This GuideThis document describes the tone, style and some specific translation instructions which should be used as reference during the Simplified Chinese localization of Windows Phone and its documentation. Windows Phone is a unique project as regards tone, style and terminology usage. The main goal of this guide is to help the translator understand and learn how to deal with all its linguistic and stylistic nuances during localization.There are 4 main focus areas in this guide:1.Windows Phone Voicenguage-specific guidelines on tone, style and terminology3.UI-specific Localization Guidelines—e.g. capitalization, text overflow,punctuation4.UA-specific stylePlease note this style guide is intended to be the main stylistic reference for Windows Phone projects. It is also a live document—it may be updated at certain stages to make sure the examples reflect all the latest information and guidelines.2.The Windows Phone VoiceThe language related to Windows Phone should make consumers (users) feel that they are empowered and supported. Windows Phone should be perceived as genuine, spirited, balanced, and supportive:Genuine•Speak with confidence.•Be an experienced guide.•Be friendly, focusing on the customer’s needs.Spirited•Genuinely express your own enthusiasm.•Express the achievable and talk about the difference it makes.•Reveal the unexpected, the sparkle, the delight.•Express a pleasant, engaging rhythm.Balanced•Be an experienced concierge: personal, friendly, enthusiastic, attentive.•Know when to keep things light, when to get down to facts.•Keep the moment, the audience, and the message in mind.•Don’t overpromise—be quick, clear, concise.Supportive•Lend help where it's needed, when it's needed.•Convey your knowledge like a trusted friend.•Strive to put others at ease.•Frame things positively, with a friendly demeanor.nguage-Specific Guidelines3.1.General Tone & Voice—Share the MessageThe Windows Phone device targets a group of modern, career-oriented people who expect their mobile phone to meet their needs in both their professional and private lives.In order to appeal to this audience, use contemporary, up-to-date style and terminology, close to what people actually say in everyday settings rather than theformal, technical language that is often used for technical and commercial content. Avoid using overly colloquial language, and keep a professional tone instead.3.2. Style—Help Deliver the VoiceThe style is direct and e straightforward translations and keep the user always in mind. The language used should sound natural.For Simplified Chinese, the formal second person is to be used with the following considerations:a)Use "您" instead of "你" to express respect to the user.b)Follow the rules of conciseness and clarity. Use "您" only if it is necessary.Minimize the occurrence of "您" in UI and documentation.If the source contains a structure in the first person plural, the decision whether to keep the sentence in the first person plural or use an impersonal structure will depend on the context. Generally, an impersonal structure should be used for error messages.Examples:The characters "&", "+" appear frequently in the source as connectors. The ampersand char acter should be localized using the Chinese preposition “and” (和). The plus symbol (“+”) is part of the design language of the phone and saves space, so it should be preserved in the translation based on the decision of Microsoft. The plus symbol should be surrounded by spaces.Examples:age—Sound NaturalIn order to transmit a positive and friendly tone, direct speech should be used instead of indirect. This will also help avoid redundancy and improve the fluency of the text. Keep the following general points in mind:∙Be straightforward and concise. Avoid redundancy.∙Be accurate but not over-exhaustive, as it might harm legibility.∙Avoid slang and be careful with colloquialisms.∙Make sure explanations are pleasant to read.∙Make the complicated uncomplicated without oversimplifying: focus on essentials.Examples:3.4.Terminology—Be ConsistentUse terminological options which are easy to understand, up to date and in line with the terminology used by competitors. The focus should not be on following Microsoftstandard terminology, but rather on researching and identifying those terms most widely used within the mobile industry of your target country.Always refer to the Windows Phone terminology as priority no. 1. Please note that approved translations for Windows Phone key terms are to be found in the Windows Phone MultiTerm database.When translating Windows Phone for Office applications such as presentations, e-mails, spreadsheets etc., aim for consistency with current Office applications in order to give the user a consistent experience. Please pay special attention to Excel formulas and functions—verify their translation in the latest localized version of Excel and/or in TRES.Microsoft standard terminology should be used in conjunction with other Microsoft products (Xbox, Internet Explorer, etc.) as secondary source of reference. As part of your terminology research, always check what is used in other products in TRES and TermStudio.If needed, please provide feedback on Windows Phone terminology you feel is incorrect (but please do not attempt to change approved terminology before receiving confirmation from the project team).Also contact the project team if you come across a new app, product or feature name that is not included as part of the Windows Phone terminology. Product names are normally not translated (e.g. Windows Phone). Feature names can usually be translated (e.g. Data Sense, voicemail). In any case, it is extremely important to always confirm localizability of any such items with the project team.Examples:3.4.1.Naming Guidelines and Trademark RequirementsPlease follow Windows Phone Naming Guideline and Trademark Requirements provided separately.3.5.Handling Fictitious ContentFictitious content is legally sensitive material and as such cannot be handled as a pure localization issue. When dealing with fictitious company and people names in Windows Phone, please use the list of legally approved names provided by the Microsoft Legal department (LCA). The Windows Phone product team representative will be able to provide you with the list of legally approved names managed by LCA.*******************The domain name should be left unlocalized, as it is a globally recognized domain created by the IANA (Internet Corporation for Assigned Names and Numbers) for sample purposes. “Someone” should stay as-is for SimplifiedChinese, so the fictitious address will be the same as in EN-US(*******************).3.6.MeasurementsThe EN US source contains measurements in strings such as:Please add a blank space between the value and the unit of measurement in the translation if the unit of measurement needs to be translated as Simplified Chinese. If the unit of measurement should be kept in English, don’t add a blank space between the value and the unit of measurement if there is no space between the value and the unit of measurement in source. The following is the sample translation of the above strings:The unit “KB” (kilobyte) should be translated as “KB”, keeping the letter “K” in uppercase.4.Windows Phone UI Localization Guidelines 4.1.How to Translate UI Elements4.1.1.App Bar Icon4.1.2.App List Item4.1.3.Buttons4.1.3.1.Dialog Button4.1.3.2.Push Button4.1.3.3.Radio Button4.1.4.Check Box Label4.1.5.Edit Box Label4.1.6.Group Label4.1.7.Hub Title4.1.8.List Item in Settings4.1.9.Menu Items4.1.9.1. Application Menu Item4.1.9.2.Context Menu Item4.1.10.Message Box4.1.10.1. Message Box Body4.1.10.2. Message Box Header4.1.11.Notification Toast4.1.12.Page Title4.1.13.Pane Section Title4.1.14.Phone Control Label4.1.15.Pivot Item4.1.16.Progress Indicator Text4.1.17.Text Box4.1.18.Tile Label4.1.19.Toggle Switch4.1.19.1. Toggle Switch Label4.1.19.2.Toggle Switch Title4.2.How to Translate References to UI ElementsReferences to UI elements within the UI can be found in error messages, task messages, etc. It is important to have a consistent approach towards the localization of such references. References to UI elements can appear in examples such as the below.Example:SourceMake sure your email address and password are correct, and then tap Sign In.DescriptionThe string above makes a reference to the “sign in“ push button. In the EN US source, push buttons are in all lowercase when appearing on their own as standalone UI options; however, when there is a direct reference to these elements in UI messages, English does not use lowercase, but title casing instead, i.e. the 1st letter of each word is capitalized. This is why in the source example above “Sign In“ appears in title casing.Translation StrategyFor Simplified Chinese, references to UI elements within UI strings should be translated using the Chinese double quotation marks enclosing the UI element. As a result, the translation of the source string in the example above would be as follows.Translation请确保您的电子邮件地址和密码正确,然后点击“登录”。
PhoneSuite操作指南

通过PhoneSuite,您可以使用您的个人电脑轻松的管理您的移动电话。
功能模块●电话本用于在移动电话和PC文件夹之间管理联系人信息。
除了增加、编辑和删除功能,您还可以获取现有电话本数据并将它们备份到PC文件夹。
●短信息可以帮助您直接在PC上阅读、编辑和发送短消息。
此外,您还可以在PC上创建个人文件夹用于分类所有的消息。
●设置包含了系统相关的设置,消息的默认设置,以及拨号上网。
●图片用于编辑各种类型的图片。
●铃声提供了一个易于操作的图形界面,通过它,您可以预览铃声。
●彩信可以帮助您直接在电脑上阅读、编辑彩信。
当编辑完彩信后,您可以将电脑上的彩信上传到手机上,再通过手机操作将彩信发送出去。
●U盘管理用于帮助您管理手机上面的文件,您可以手机和PC上面的文件进行删除,复制,剪切和粘贴。
本文主要是介绍PhoneSuite电话本、短信息、拨号上网以及一些常见问题的解答,一、安装PhoneSuite,连接手机在安装PhoneSuite过程中,会同时安装驱动程序。
所以在这个过程中,不要把手机与电脑相连接,这样可能导致驱动安装完后手机无法与电脑连接。
1、手机在开机状态,电脑已经安装了phonesuite工具和数据端口的驱动。
将USB线一端插入电脑的USB接口,另一端插入手机的I/O接口。
2、手机弹出如下提示:3、选择“数据端口”后,打开PhoneSuite工具,选中左侧“设置”,在“设置”选项卡中选择端口。
如果不清楚手机与PC连接的端口,可以通过以下步骤获得:鼠标右键单击“我的电脑”,选择属性,如下图操作:从上右图可知端口是COM11,选择COM11几秒后,工具右下角提示“已经连接”,如图:(备注:其中“通讯端口”决定能否连接成功。
)二、拨号上网(注意由于通过PhoneSuite连接手机进行拨号上网,是采用cmnet网络,而此网络上网费用比较高,请在保证您的手机已开通cmnet包月情况下使用)把手机作为modem,在电脑端上网,先要进行如下的设置:①打开“设置”,选择“建立连接”,如下图所示:②打开“设置”,选择“连接”,如下图所示:连接成功后,在右下角的状态拦弹出已连接成功的提示,如下图所示:,以上连接成功后,即可进行上网。
Dell Wyse Management Suite 1.4.1 管理指南说明书
Dell Wyse Management Suite Version 1.4.1 Administrator’s Guide註、警示與警告:「註」表示可以幫助您更有效地使用產品的重要資訊。
:「警示」表示有可能會損壞硬體或導致資料遺失,並告訴您如何避免發生此類問題。
:「警告」表示可能的財產損失、人身傷害或死亡。
© 2019 Dell Inc. 或其子公司。
版權所有,翻印必究。
Dell、EMC 及其他商標均為 Dell Inc. 或其子公司的註冊商標。
其他商標可能為其各自擁有者的商標。
2019 - 11Rev. A001 Wyse Management Suite 簡介 (9)2 開始使用 Wyse Management Suite (10)登入公有雲端的 Wyse Management Suite (10)在私人雲端部署 Wyse Management Suite 的先決條件 (11)管理主控台的功能區 (11)設定及管理精簡型用戶端 (12)3 Wyse Management Suite 儀表板 (13)檢視警示 (13)檢視事件清單 (14)檢視裝置狀態 (14)變更使用者偏好 (14)存取線上說明 (14)變更您的密碼 (14)登出 (15)4 管理群組與組態 (16)新增群組 (17)編輯群組 (17)移除群組 (18)編輯未代管群組 (18)設定全域層級原則 (18)設定群組層級原則 (18)設定裝置層級原則 (18)匯出群組原則 (18)匯入群組原則 (19)編輯 ThinOS 原則設定 (20)ThinOS–精靈模式 (20)ThinOS–進階模式 (24)編輯 Windows Embedded Standard 原則設定 (54)設定系統個人化 (55)設定桌面體驗 (58)進行網路設定 (58)進行安全性和鎖定設定 (59)進行其他設定 (60)進行遠端連線設定–Citrix (61)進行遠端連線設定–VMware (63)進行遠端連線設定–RDP (64)進行遠端連線設定–瀏覽器 (66)進行 Latitude 行動精簡型用戶端 BIOS 設定 (67)進行 Wyse 7040 精簡型用戶端 BIOS 設定 (68)設定裝置資訊 (69)進行 Wyse Easy Setup 設定 (70)Contents3於搭載 Windows 10 IoT Enterprise 的 Wyse 5070 精簡型用戶端進行 BIOS 設定 (72)為搭載 Windows 10 IoT Enterprise 的 Wyse 5470 多合一精簡型用戶端進行 BIOS 設定 (73)於搭載 Windows 10 IoT Enterprise 的 Wyse 5470 精簡型用戶端進行 BIOS 設定 (75)編輯 Linux 原則設定 (77)設定系統個人化 (77)設定桌面體驗 (78)進行登入體驗設定 (79)進行網路設定 (79)進行安全性設定 (79)進行中央組態設定 (80)進行其他設定 (81)進行指定 VDI 全域設定 (81)進行遠端連線設定–Citrix (82)進行遠端連線設定—VMware (84)進行遠端連線設定 — RDP (85)進行遠端連線設定–瀏覽器 (87)進行進階設定 (87)編輯 ThinLinux 原則設定 (87)設定系統個人化 (88)設定桌面體驗 (90)設定登入體驗 (91)進行網路設定 (91)進行安全性設定 (91)進行中央組態設定 (93)進行其他設定 (93)進行 VDI 全域設定 (94)進行遠端連線設定—Citrix (95)進行遠端連線設定–VMware (97)進行遠端連線設定 — RDP (99)進行遠端連線設定–瀏覽器 (101)進行進階設定 (101)設定裝置資訊 (101)進行 Wyse 3040 精簡型用戶端 BIOS 設定 (101)為搭載 ThinLinux 的 Wyse 5070 精簡型用戶端進行 BIOS 設定 (103)進行全域瀏覽器設定 (105)進行 Proxy 設定 (106)為搭載 ThinLinux 的 Wyse 5470 精簡型用戶端進行 BIOS 設定 (107)編輯 Teradici 原則設定 (108)進行時區設定 (108)進行語言設定 (109)進行公司徽標設定 (109)進行影片設定 (109)設定電源設定 (110)進行安全性設定 (110)升級韌體設定 (111)進行遠端連線設定 (111)編輯 Wyse 軟體精簡型用戶端原則設定 (113)設定系統個人化 (113)4Contents進行安全性和鎖定設定 (116)進行其他設定 (117)進行遠端連線設定—Citrix (118)進行遠端連線設定–VMware (120)進行遠端連線設定–RDP (121)進行遠端連線設定–瀏覽器 (123)設定裝置資訊 (124)進行 Wyse Easy Setup 版本設定 (124)進行 VNC 設定 (125)進行網域設定 (126)5 管理裝置 (127)將裝置註冊至 Wyse Management Suite 的方法 (127)使用 Wyse Device Agent 註冊 ThinOS 裝置 (128)使用 Wyse Device Agent 將 Wyse 軟體精簡型用戶端註冊至 Wyse Management Suite (128)使用 Wyse Device Agent 註冊 Linux 精簡型用戶端 (129)使用 Wyse Device Agent 在 Wyse Management Suite 中註冊 Windows Embedded Standard 精簡型用戶端 (129)使用 FTP INI 方法註冊 ThinLinux 2.0 版裝置 (129)使用 FTP INI 方法註冊 ThinLinux 1.0 版裝置 (130)使用 FTP INI 方法註冊 ThinOS 裝置 (130)使用 Wyse Device Agent 註冊 ThinLinux 精簡型用戶端 (131)使用 DHCP 選項標籤來註冊裝置 (131)使用 DNS SRV 記錄來註冊裝置 (132)使用篩選條件搜尋裝置 (133)儲存目前的篩選條件 (133)查詢裝置狀態 (133)鎖定裝置 (134)重新啟動裝置 (134)取消註冊裝置 (134)重設為原廠預設設定 (134)變更群組指派 (135)傳送訊息至裝置 (135)啟動裝置 (135)檢視裝置詳細資料 (135)管理裝置摘要 (136)檢視系統資訊 (136)檢視裝置事件 (136)檢視已安裝的應用程式 (136)重新命名精簡型用戶端 (137)設定遠端鏡像處理連線 (137)關閉裝置 (138)標記裝置 (138)裝置的相容性狀態 (138)提取 Windows Embedded Standard 或 ThinLinux 映像 (139)將 ThinLinux 1.x 升級至 2.1 及更新版本 (139)準備 ThinLinux 2.x 映像 (139)將 ThinLinux 1.x 版升級至 2.x 版 (140)Contents56 應用程式與資料 (143)應用程式原則 (143)設定精簡型用戶端應用程式清查 (143)設定 Wyse 軟體精簡型用戶端應用程式清查 (144)建立及部署精簡型用戶端的標準應用程式原則 (144)建立及部署精簡型用戶端的進階應用程式原則 (145)建立標準應用程式原則並部署至 Wyse 軟體精簡型用戶端 (146)建立及部署 Wyse 軟體精簡型用戶端的進階應用程式原則 (146)使用標準應用程式原則,啟用 Citrix StoreFront 的單一登入 (147)映像原則 (148)新增 Windows Embedded Standard 作業系統和 ThinLinux 映像到儲存庫 (148)新增 ThinOS 韌體至儲存庫 (148)在儲存庫中新增 ThinOS 套件檔案 (148)將 ThinOS BIOS 檔案新增至儲存庫 (149)將 Teradici 韌體加入儲存庫 (149)建立 Windows Embedded Standard 與 ThinLinux 映像原則 (149)管理檔案儲存庫 (150)7 管理規則 (151)編輯註冊規則 (151)建立未代管裝置自動指派規則 (151)編輯未受管理裝置的自動指派規則 (152)停用及刪除規則 (152)儲存規則順序 (152)新增警示通知規則 (152)編輯警示通知規則 (152)8 管理工作 (154)同步處理 BIOS 系統管理員密碼 (155)使用篩選條件搜尋排定的工作 (155)排定映像原則 (156)排定應用程式原則 (156)排定裝置命令工作 (156)9 管理事件 (158)使用篩選條件搜尋事件或警示 (158)使用篩選器搜尋事件或警示 (159)檢視事件摘要 (159)檢視稽核記錄 (159)10 管理使用者 (160)新增管理員設定檔 (161)編輯管理員設定檔 (161)停用管理員設定檔 (162)刪除系統管理員設定檔 (162)編輯使用者設定檔 (162)6Contents11 入口網站管理 (164)新增 Active Directory 伺服器資訊 (164)在公有雲端設定 Active Directory 同盟服務功能 (165)透過 Active Directory 將使用者匯入公有雲端 (166)警示分類 (166)建立應用程式設計介面 API 帳戶 (166)存取檔案儲存庫 (167)進行其他設定 (167)管理 Teradici 組態 (168)啟用雙因素驗證 (168)產生報告 (168)啟用多租用戶帳戶 (169)啟用自訂品牌 (169)管理授權訂閱 (170)從 Wyse Management Suite 公有雲端匯入授權 (170)將授權匯出至 Wyse Management Suite 私人雲端 (170)精簡型用戶端配置 (170)授權訂單 (171)管理系統設定 (171)12 使用 Wyse Management Suite 設定 Wyse Easy Setup (172)安裝 Wyse Easy Setup (172)部署 Wyse Easy Setup 組態 (172)13 使用 Wyse Management Suite 設定 Wyse Converter for PC (173)將 Wyse 軟體精簡型用戶端註冊至 Wyse Management Suite (173)使用 Wyse Device Agent 將 Wyse 軟體精簡型用戶端註冊至 Wyse Management Suite (173)使用 DHCP 選項標籤將裝置註冊至 Wyse Management Suite (174)使用 DNS SRV 記錄在 Wyse Management Suite 中註冊 Wyse 軟體精簡型用戶端 (174)使用 Wyse Management Suite 設定 Wyse 軟體精簡型用戶端 (175)14 Teradici 裝置管理 (176)探索 Teradici 裝置 (176)CIFS 使用個案情況 (178)15 Wyse Device Agent (179)16 疑難排解 Wyse Management Suite (180)當已設定 WinHTTP 代理時,裝置無法註冊至 Wyse Management Suite (183)A 安裝或升級 Wyse Device Agent (185)使用 Wyse Management Suite 應用程式原則升級 Wyse Device Agent (185)手動安裝 Wyse Device Agent (185)在 ThinLinux 及 Linux 用戶端上安裝或升級 Wyse Device Agent (186)B Wyse Management Suite feature matrix (187)Contents7C Wyse management Suite 支援的精簡型用戶端 (189)D 無線設定檔密碼編輯器 (191)設定 Windows 無線設定檔 (191)設定無線設定檔密碼編輯器 (191)無線設定檔密碼編輯器的限制 (192)E 建立和設定 DHCP 選項標籤 (193)F 建立和設定 DNS SRV 記錄 (199)G 將主機名稱變更為 IP 位址的步驟 (206)8ContentsWyse Management Suite 簡介Wyse Management Suite 是下一代的管理解決方案,可讓您集中設定、監控、管理及最佳化 Dell Wyse 精簡型用戶端。
WEXS BLE手机应用用户操作手册说明书
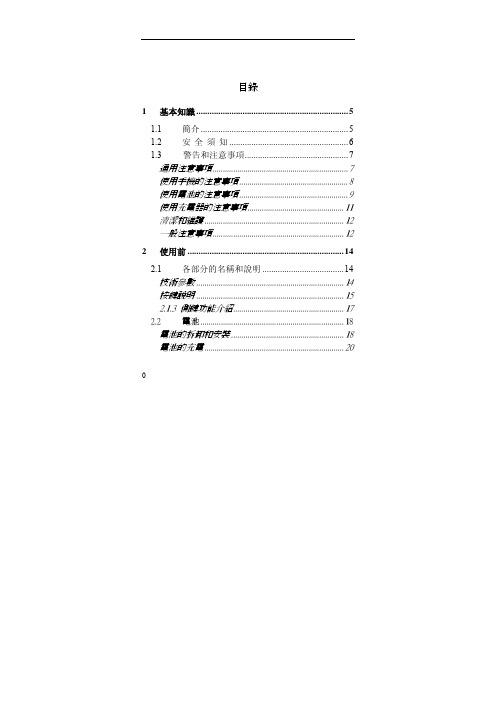
WEXS BLEManual(Android)Compatible with ALL Phoenix Sensors BLE ProductsRevision Initial Date Notesv1.4KH3/18/2020Added how tochange displayname of sensorv1.5JL2/9/2021Added more detailon saving operation,added pre-requirements, andgeneralizeddocument for allAndroid appsPre-Requirements:There are several things you must do before using the app to ensure all aspects of it are working correctly. See below for further detail.First, navigate to Settings > Apps > (WEXS, WEXS-10, or WEXS-BLE-AN). After you have gotten there, you should see a screen similar as shown in Figure 1. Then, scroll down until you see “Permissions”, as shown in Figure 2. Finally, go into Permissions, and ensure that both “Location” and “Storage” are allowed (Figure 3). If any permissions are denied, the app will not work correctly.Figure 1Figure 2Figure 3Note:All data will be saved to your Android device under My Files > Internal Storage in an Excel file named “pressData.csv”. Again, if location permissions are not allowed, this will not function correctly.Scanning and Connecting to Sensors:Open your WEXS BLE app and tap the scan button that's located at the top right corner of the screen. Array Scan ButtonThen open the drop-down menu next the scan button and find the MAC ID of thesensor you want to connect to. If you do not know the sensor's MAC ID the first fournumbers of the MAC ID should be listed on the sensor's label. Each sensor's MAC ID is unique to the type of sensor.Drop Down MenuDisconnecting and Saving Data:Once you have selected your sensor, it will appear in the sensor list below and begin to display data. To disconnect to a sensor, you just press the delete button that will be above the Zero button. Do not press the zero button unless you are setting up the sensor for the first time and you need start data collection from zero.To save data you press the save button above the displayed data, you will then be prompted with a pop up displaying the data file (.csv). Press the save button on the pop up to save the data file or press cancel to cancel the action. All data recorded up to that point will be saved. The amount of data points saved over a period of timedepends on the response time.Discon.Data Pop-UpSave DataChanging Response Time:To set response time, go to the setup screen by pressing the setup button on the bottom right of the screen. Here you can change the displayed name of your sensor and set up the response time (mS).To set response time press the box displaying the current response time (right side of the sliding bar) and type in the response time you want to set it to (Max limit of 10000mS). Remember that the response time is in mS.Changing the Sensor's Displayed Name:To change the sensor's name, press on the box displaying the sensor's current display name (upper left of sliding bar) and delete the current display name and change it what you want it to display. Then go back to the home screen (press the home button) and disconnect from the sensor. Close the app and find the sensor whose display name you changed and remove the battery from it for 5 seconds. Place the battery back in and then open the WEXS BLE app and reconnect to the sensor. TheDisplay Name Response Time SetUp ButtonHome ButtonReading Graphical Data:To see the graphical data, press on the Chart button and you will be greeted by a graph displaying recorded data within the set PSI range and Time (s) range. On the upper left of the graph the name and current data of the sensor will be displayed and color coded. Each sensor will have a different color and the graph lines will also be color coded. You can change the PSI range and Time (s) range of the graph by moving the sliding bars to the left (decrease) or right (increase). Note: the PSI range is the Y-axis and the Time range is the X-axis.Sensor Name andDataPSI (Y-Axis)Time (X-axis)Chart Button。
杭普电话小管家使用说明书解读

杭普电话小管家使用说明书解读使用说明杭州兰富科技有限公司电话小管家使用说明版本:2.0.3著者:技术部1使用说明杭州兰富科技有限公司目录1功能特点简述 ..................................................................... ............................. 3 2登录界面 ..................................................................... (3)3主界面功能 ..................................................................... ................................ 44添加联系人 ..................................................................... ................................ 9 5联系人管理 ..................................................................... .............................. 13 6查询呼叫记录 ..................................................................... ........................... 20 7系统设置 ....................................................................................................... 26 8语言选择 ..................................................................... .................................. 28 9修复手机号码归属地 ..................................................................... ................ 28 10用户管理 ..................................................................... ................................ 28 11修改密码 ..................................................................... ................................ 33 12备份录音记录 ..................................................................... ......................... 33 13查询备份数据 ..................................................................... . (34)14备份电话薄...................................................................... ............................ 37 15还原电话薄...................................................................... ............................ 37 16导入电话薄...................................................................... . (38)17导出电话薄至EXCEL .................................................................. ................ 3918导入电话薄从EXCEL .................................................................................. 40 19生成EXCEL电话薄模版...................................................................... ........ 41 20从旧系统中导入数据...................................................................... .. (42)2使用说明杭州兰富科技有限公司1功能特点简述电话小管家是一款免安装、功能简捷、解压即用的软件产品,方便有户最大限度的快捷投入使用,它集成了一路电话盒子、二路电话盒子和一体机客户端三种功能于一体。
泛蓝无线手机链接系统用户操作指南说明书
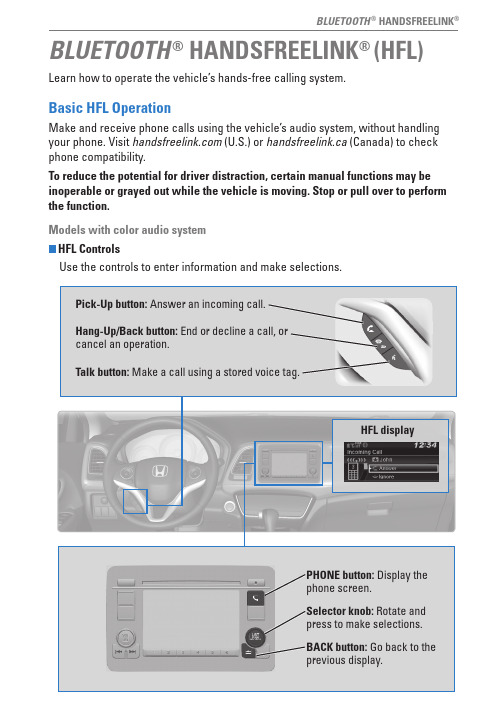
BLUETOOTH® HANDSFREELINKLearn how to operate the vehicle’s hands-free calling system.Basic HFL OperationMake and receive phone calls using the vehicle’s audio system, without handling To reduce the potential for driver distraction, certain manual functions may be inoperable or grayed out while the vehicle is moving. Stop or pull over to perform the function.Models with color audio systemHFL ControlsUse the controls to enter information and make selections. BLUETOOTH® HANDSFREELINK® (HFL) Pick-Up button: Answer an incoming call.Hang-Up/Back button: End or decline a call, or cancel an operation.Talk button: Make a call using a stored voice tag.Selector knob: Rotate andpress to make selections.BACK button: Go back to the previous display.PHONE button: Display the phone screen.HFL displayBLUETOOTH® HANDSFREELINK®Models with color audio systemPairing a PhoneTo use hands-free phone and streaming audio functions, you must first pair your phone to the system. This can only be done when the vehicle is stopped. Use the selector knob to make and enter selections.Pairing the First Phone1. Press the Phone button to go to the Phone screen. A prompt appears. Select Yes.2. Make sure your phone is in discovery mode.Select OK.3. HFL searches for your phone. Select your phonewhen it appears on the list.If your phone does not appear:Select Phone Not Found and search forHandsFreeLink from your phone. Connect to HFL.4. HFL gives you a pairing code. Compare it to thecode that appears on your phone. Connect to HFLfrom your phone.Pairing an Additional Phone1. Press the Phone button to go to the Phone screen. If a prompt appears asking to connect to a phone, select No.2. Select Phone Setup.3. Select Bluetooth Setup.4. Select Add New Device.5. Make sure your phone is in discovery mode.Select OK.6. HFL searches for your phone. Select it when itappears on the list.If your phone does not appear: Select Phone Not Found, and search forHandsFreeLink from your phone. Connect to HFL.7. HFL gives you a pairing code. Enter it on your phone when prompted.State or local laws may prohibit the operation of handheld electronic devices while operating a vehicle.BLUETOOTH® HANDSFREELINK®Models with color audio systemMaking a CallYou can make a call using several methods.Dialing a NumberEnter a 10-digit phone number to call. Use the selector knob to make and enter selections. This method is inoperable while the vehicle is moving.1. Press the Phone button.2. Select Dial.3. Enter the phone number. Select the green phone icon to call.Using the PhonebookWhen your phone is paired, its phonebook is automatically imported to the system. Use the selector knob to make and enter selections. This method is inoperable while the vehicle is moving.1. Press the Phone button.2. Select Phonebook.3. Scroll through the list to find the name and number you want to call, and select it to call.Storing Speed Dial EntriesStore up to 20 numbers for quick dialing. Use the selector knob to make and enter selections.1. Press the Phone button.2. Select Phone Setup3. Select Speed Dial, then select Add New.4. Select an entry method.5. If desired, you can create a voice tag for the number. Follow the prompts.Using Speed DialMake calls quickly using stored speed dial entries. Use the selector knob to make and enter selections.1. Press the Phone button.2. Select Speed Dial.3. Scroll through the list to find the entry you want tocall, and select it to call.Speed dial entries with stored voice tags can be called using the Talk button. Press the Talk button and follow the prompts.BLUETOOTH® HANDSFREELINK®Basic HFL OperationMake and receive phone calls using the vehicle’s audio system, without handling your phone. Visit (U.S.) or handsfreelink.ca (Canada) to checkphone compatibility.To reduce the potential for driver distraction, certain manual functions may be inoperable or grayed out while the vehicle is moving. Stop or pull over to performHang-Up/Back button: End or decline a call, or cancel an operation.Talk button: Make a call using a stored voice tag.+ / - buttons: Scroll the list after pressing and holdingthe Menu button.SOURCE button: Press to enter a selection afterpressing and holding the Menu button.MENU button:to display speed dial, call history, or redial.BLUETOOTH ® HANDSFREELINK Talk Button Tips• When using the Talk button, wait until you hear a beep before speaking.• To bypass the system prompts, simply press the Talk button again to say your command.*• When the Talk button is pressed, all available voice commands are highlighted in yellow.*• Speak in a clear, natural voice.• Reduce all background noise.• Adjust the dashboard vents away from the microphone on the audio system.• Close the windows and moonroof.Phone: From the HOME screen, display the phone screen.MENU: From the *vehicles with navigationBLUETOOTH® HANDSFREELINK®Models with touchscreenPairing a PhoneTo use hands-free phone and streaming audio functions, you must first pair your phone to the system. This can only be done when the vehicle is stopped. Use the touchscreen to make and enter selections.1.From the Home screen, select Settings.2.Select Phone.3.Select Bluetooth Device List.4.Select Add Bluetooth Device.5.Make sure your phone is in discovery mode. SelectContinue.6.HFL searches for your phone. Select your phonewhen it appears on the list.If your phone does not appear: Select Phone Not Found and search forHandsFreeLink from your phone. Connect to HFL.7.HFL gives you a pairing code. Compare it to thecode that appears on your phone. Connect to HFLfrom your phone.8.The system asks if you want to enable options:HondaLink Assist: Select On to enable emergencycollision notification.Phone Synchronization: Select On to automaticallyimport contacts and call history from your phone.9.Press BACK to exit the menu.State or local laws may prohibit the operation of handheld electronic devices while operating a vehicle.BLUETOOTH® HANDSFREELINK®Models with touchscreenMaking a CallYou can make a call using several methods.Dialing a NumberEnter a 10-digit phone number to call.Using voice commandsPress the Talk button before you say each command.1. Say “Dial by number.”2. Say the phone number: For example,3-1-0-5-5-5-1-2-3-4.”3. The system begins to dial.Using the touchscreenManual operation is limited while the vehicle is moving. Voice commands are always available.1. From the Home screen, select Phone.2. Select MENU.3. Select Dial.4. Enter the phone number. Select the green phone icon to call.Using the PhonebookWhen your phone is paired, its entire phonebook can be automatically imported to the system. Phone synchronization must be turned on.Using voice commandsPress the Talk button before you say each command.1. Say “Dial by name.”2. Say the phonebook name and phone type. For example, “John Smith mobile.”Using the touchscreenManual operation is limited while the vehicle is moving. Voice commands are always available.1. From the Home screen, select Phone.2. Select MENU.3. Select Phonebook.4. Scroll through the list to find the name and number you want to call, and select it to call.BLUETOOTH® HANDSFREELINK®Storing Speed Dial EntriesStore up to 20 numbers for quick dialing. 1. From the Home screen, select Phone.2. Select MENU.3. Select Edit Speed Dial, then select New Entry.4. Select an entry method.5. If desired, you can create a voice tag for the number. Follow the prompts.Using Speed DialMake calls quickly using stored speed dial entries. Using voice commandsPress the Talk button before you say each command.1. Say “Dial by name.”2. Say the stored voice tag name. For example,“John Smith.”Using the touchscreen1. From the Home screen, select Phone.2. Scroll through the list to find the entry you wantto call, and select it to call.。
phone Manual(10)说明书
3.2 緊急呼叫 .........................................................29 3.3 接聽電話 .........................................................30 3.4 通話記錄 .........................................................30 3.5 通話功能表 .....................................................30
3 基本操作 ....................................... 撥打電話 .........................................................27 撥打國內電話................................................................ 27 撥打固定電話分機 ....................................................... 27 撥打國際電話................................................................ 28 撥打列表中電話............................................................ 29
- 1、下载文档前请自行甄别文档内容的完整性,平台不提供额外的编辑、内容补充、找答案等附加服务。
- 2、"仅部分预览"的文档,不可在线预览部分如存在完整性等问题,可反馈申请退款(可完整预览的文档不适用该条件!)。
- 3、如文档侵犯您的权益,请联系客服反馈,我们会尽快为您处理(人工客服工作时间:9:00-18:30)。
Phonesuite使用说明
备注:此工具支持Windows2000,WindowsXP系统,WindowsXP系统如果升级过则该工具可能不能使用。
一、安装驱动
在使用phonesuite程序前,请先安装驱动程序usb2ser_2kXP。
二、开始使用
phonesuite程序无需安装,解压后可以直接使用。
1、准备工作
#手机,开机,使用USB线(用户线)连接手机和PC
#手机提示USB设定-选择“序列接口”
2、双击PhoneSuite.exe图标,直接打开程序,可以看到如下界面:
3、进入设定,按照手机实际情况设置参数:
#手机型号:TYM730
#通讯端口:连接手机数据线的usb接口
#语言:english、中文简体、中文繁体(根据需要选择)
#记忆体:选择你想要下载的存储位置,例如:手机或SIM卡
4、点击信息或电话簿或其他标签。
出现如下提示:
5、如果选择“是”,下载手机/sim卡中的信息到PC;,出现如下界面
如果选择“否”,不从手机/sim卡下载信息。
6、此时便可以根据需要进行增加、删除、修改、复制、粘贴等操作了。
7、手机与PC连接成功后,会导出手机和SIM卡电话,界面如下
8.修改电话簿:双击选中电话号码,可对弹出窗口进行姓名和号码修改
9.添加新号码:点击菜单栏图标“新增联系人”,可将新号码存至指定位置,如SIM卡、手机或PC
10.导出手机和SIM卡中的通讯录:
a.点击菜单栏“文件”图标,如下图所示
b.如命名文件为“contact”,保存至指定位置。
(此保存的文件不能被修改,否则下次无法导入手机)
11.导入已备份的通讯录,PC端进行修改或新增:
a.点击菜单栏“文件”图标,如下图所示
b.将备份在电脑中的文件导入(从指定位置中获取该文件)
c.导入后会显示在“电脑文件夹”目录下,如下图所示:
d.新增号码至已备份的通讯录中,方法同步骤9,选择“PC”项
12.将电脑文件夹已导入的通讯录存至手机或SIM卡中,操作如下:a. Ctrl+A,全部复制或单个复制
b. 粘贴至手机文件夹中,这样就导入手机中了,如下图所示。
C.导完后可去手机中查看一下,这样通讯录整个导入导出的操作完毕了。