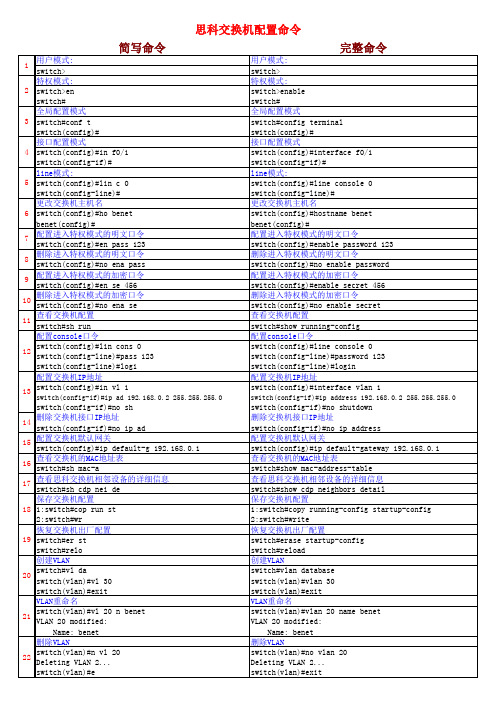
思科交换机和路由器配置命令简写与完整对照
思科交换机和路由器配置命令简写与完整对照(Excel文章多个页签_下载可见)

完整命令
将端口加入到VLAN switch(config)#interface f0/2 switch(config-if)#switchport access vlan 30 验证VLAN配置信息 switch#show vlan brief switch#show vlan-switch 删除VLAN中的端口 1:switch(config-if)#no switchport access vlan 3 switch(config-if)#end 2:switch(config-if)#default interface f0/2 Building configuration...
宣告启用RIP的
switch(config)#end 同时将多个端口加入VLAN并验证 switch(config)#interface range f0/3 - 10 switch(config-if-range)#switchport access vlan 3 switch(config)#end switch#show vlan-switch 配置VLAN TRUHK switch(config)#interface f0/15 switch(config-if)#switchport mode trunk 从TRUNK中添加某个VLAN switch(config)#interface f0/15
switch(config-if)#no shutdown 删除交换机接口IP地址 switch(config-if)#no ip address 配置交换机默认网关 switch(config)#ip default-gateway 192.168.0.1 查看交换机的MAC地址表 switch#show mac-address-table 查看思科交换机相邻设备的详细信息 switch#show cdp neighbors detail 保存交换机配置 1:switch#copy running-config startup-config 2:switch#write 恢复交换机出厂配置 switch#erase startup-config switch#reload 创建VLAN switch#vlan database switch(vlan)#vlan 30 switch(vlan)#exit VLAN重命名 switch(vlan)#vlan 20 name benet VLAN 20 modified: Name: benet 删除VLAN switch(vlan)#no vlan 20 Deleting VLAN 2... switch(vlan)#exit
思科交换机路由器命令

exit 回到上一个模式
switch(config)#host (名字) 更改主机名
reset
copy startup-config running-config
config-register 0x2102
exit
copy running-config startup-config
交换机密码恢复
拔掉交换机电源——接通电源按住mode 键
# showversion 显示系统ios名称以及版本信息
# show mac-address-table 查看mac地址表
(dynamic)显示动态地址表
(config-if)#duplex (full丨half 丨auto) 配置双工模式
enable secret (密码) 配置特权密文密码
interface vlan1 配置远程管理密码
ip address (ip 地址)
no shutdown
line vty 0 4 路由器用接口的ip 不用配置ip
name qw
exit
no vlan 1 删除vlan
将交换机端口加入到vlan中
configure termanal
interface f0/0
switchport mode access
switchport access vlan1
erase startup-config 清除以保存的信息
line console 0 配置console(登录)密码
password 密码
login
(config)# enable password (密码) 配置特权密码
思科交换机配置命令

Cmd1. switch配置命令(1)模式转换命令用户模式----特权模式,使用命令"enable"特权模式----全局配置模式,使用命令"config t"全局配置模式----接口模式,使用命令"interface+接口类型+接口号" 全局配置模式----线控模式,使用命令"line+接口类型+接口号"注:用户模式:查看初始化的信息.特权模式:查看所有信息、调试、保存配置信息全局模式:配置所有信息、针对整个路由器或交换机的所有接口接口模式:针对某一个接口的配置线控模式:对路由器进行控制的接口配置(2)配置命令show running config 显示所有的配置show versin 显示版本号和寄存器值shut down 关闭接口no shutdown 打开接口ip add +ip地址配置IP地址secondary+IP地址为接口配置第二个IP地址show interface+接口类型+接口号查看接口管理性show controllers interface 查看接口是否有DCE电缆show history 查看历史记录show terminal 查看终端记录大小hostname+主机名配置路由器或交换机的标识config memory 修改保存在NVRAM中的启动配置exec timeout 0 0 设置控制台会话超时为0service password-encryptin 手工加密所有密码enable password +密码配置明文密码ena sec +密码配置密文密码line vty 0 4/15 进入telnet接口password +密码配置telnet密码line aux 0 进入AUX接口password +密码配置密码line con 0 进入CON接口password +密码配置密码bandwidth+数字配置带宽no ip address 删除已配置的IP地址show startup config 查看NVRAM中的配置信息copy run-config atartup config 保存信息到NVRAMwrite 保存信息到NVRAMerase startup-config 清除NVRAM中的配置信息show ip interface brief 查看接口的谪要信息banner motd # +信息+ # 配置路由器或交换机的描素信息description+信息配置接口听描素信息vlan database 进入VLAN数据库模式vlan +vlan号+ 名称创建VLANswitchport access vlan +vlan号为VLAN为配接口interface vlan +vlan号进入VLAN接口模式ip add +ip地址为VLAN配置管理IP地址vtp+service/tracsparent/client 配置SW的VTP工作模式vtp +domain+域名配置SW的VTP域名vtp +password +密码配置SW的密码switchport mode trunk 启用中继no vlan +vlan号删除VLANshow spamming-tree vlan +vlan号查看VLA怕生成树议2. 路由器配置命令ip route+非直连网段+子网掩码+下一跳地址配置静态/默认路由show ip route 查看路由表show protocols 显示出所有的被动路由协议和接口上哪些协议被设置show ip protocols 显示了被配置在路由器上的路由选择协议,同时给出了在路由选择协议中使用的定时器等信息router rip 激活RIP协议network +直连网段发布直连网段interface lookback 0 激活逻辑接口passive-interface +接口类型+接口号配置接口为被动模式debug ip +协议动态查看路由更新信息undebug all 关闭所有DEBUG信息router eigrp +as号激活EIGRP路由协议network +网段+子网掩码发布直连网段show ip eigrp neighbors 查看邻居表show ip eigrp topology 查看拓扑表show ip eigrp traffic 查看发送包数量router ospf +process-ID 激活OSPF协议network+直连网段+area+区域号发布直连网段show ip ospf 显示OSPF的进程号和ROUTER-IDencapsulation+封装格式更改封装格式no ip admain-lookup 关闭路由器的域名查找ip routing 在三层交换机上启用路由功能show user 查看SW的在线用户clear line +线路号清除线路3. 三层交换机配置命令配置一组二层端口configure terminal 进入配置状态nterface range {port-range} 进入组配置状态配置三层端口configure terminal 进入配置状态interface {{fastethernet | gigabitethernet} interface-id} | {vlan vlan-id} | {port- channel port-channel-number} 进入端口配置状态no switchport 把物理端口变成三层口ip address ip_address subnet_mask 配置IP地址和掩码no shutdown 激活端口例:Switch(config)# interface gigabitethernet0/2Switch(config-if)# no switchportSwitch(config-if)# ip address 192.20.135.21 255.255.255.0Switch(config-if)# no shutdown配置VLANconfigure terminal 进入配置状态vlan vlan-id 输入一个VLAN号, 然后进入vlan配态,可以输入一个新的VLAN 号或旧的来进行修改。
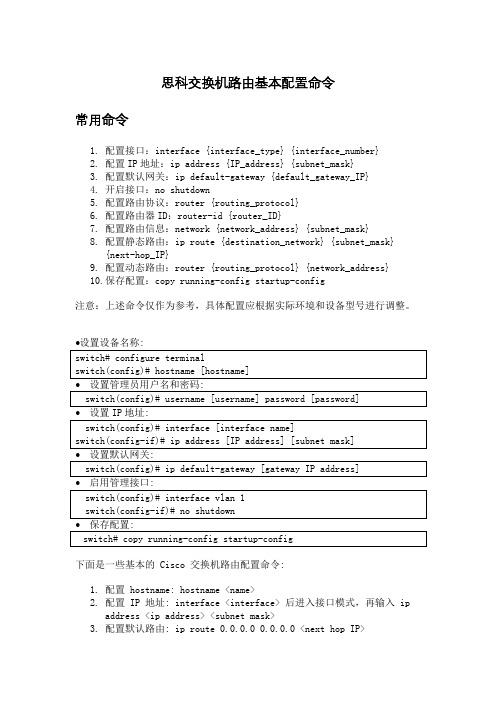
思科交换机路由基本配置命令

思科交换机路由基本配置命令常用命令1.配置接口:interface {interface_type} {interface_number}2.配置IP地址:ip address {IP_address} {subnet_mask}3.配置默认网关:ip default-gateway {default_gateway_IP}4.开启接口:no shutdown5.配置路由协议:router {routing_protocol}6.配置路由器ID:router-id {router_ID}7.配置路由信息:network {network_address} {subnet_mask}8.配置静态路由:ip route {destination_network} {subnet_mask}{next-hop_IP}9.配置动态路由:router {routing_protocol} {network_address}10.保存配置:copy running-config startup-config注意:上述命令仅作为参考,具体配置应根据实际环境和设备型号进行调整。
下面是一些基本的 Cisco 交换机路由配置命令:1.配置 hostname: hostname <name>2.配置 IP 地址: interface <interface> 后进入接口模式,再输入 ipaddress <ip address> <subnet mask>3.配置默认路由: ip route 0.0.0.0 0.0.0.0 <next hop IP>4.启用路由协议: router <protocol> (例如: router rip)5.配置路由连接: network <network address> (例如: network192.168.1.0)6.查看路由表: show ip routeCisco 交换机路由配置步骤1.进入配置模式:configure terminal2.配置 IP 地址和子网掩码:interface [interface-name] ; ip address[ip-address] [subnet-mask]3.配置默认路由:ip route 0.0.0.0 0.0.0.0 [next-hop-IP-address]4.启用路由协议:router [protocol-name] (如:router ospf)5.配置路由协议参数: [protocol-name] [process-id] (如:ospf 1)6.配置路由连接:network [network-address] [wildcard-mask] area[area-id] (如:network 192.168.1.0 0.0.0.255 area 0)7.保存配置:copy running-config startup-config8.退出配置模式:exit。
cisco交换机和路由器配置命令大全

cisco交换机和路由器配置命令大全最近在学习交换机和路由器的配置,把整理的资料发到博文上,以便日后的学习。
switch> 用户模式1:进入特权模式 enableswitch> enableswitch#2:进入全局配置模式 configure terminalswitch> enableswitch#c onfigure terminalswitch(conf)#3:交换机命名 hostname aptech2950 以aptech2950为例switch> enableswitch#c onfigure terminalswitch(conf)#hostname aptch-2950aptech2950(conf)#4:配置使能口令 enable password cisco 以cisco为例switch> enableswitch#c onfigure terminalswitch(conf)#hostname aptch2950aptech2950(conf)# enable password cisco5:配置使能密码 enable secret ciscolab 以cicsolab为例switch> enableswitch#c onfigure terminalswitch(conf)#hostname aptch2950aptech2950(conf)# enable secret ciscolab6:设置虚拟局域网vlan 1 interface vlan 1switch> enableswitch#c onfigure terminalswitch(conf)#hostname aptch2950aptech2950(conf)# interface vlan 1aptech2950(conf-if)#ip address 192.168.1.1 255.255.255.0 配置交换机端口ip和子网掩码aptech2950(conf-if)#noshut 是配置处于运行中aptech2950(conf-if)#exitaptech2950(conf)#ip default-gateway 192.168.254 设置网关地址7:进入交换机某一端口 interface fastehernet 0/17 以17端口为例switch> enableswitch#c onfigure terminalswitch(conf)#hostname aptch2950aptech2950(conf)# interface fastehernet 0/17aptech2950(conf-if)#8:查看命令 showswitch> enableswitch# show version 察看系统中的所有版本信息show interface vlan 1 查看交换机有关ip 协议的配置信息show running-configure 查看交换机当前起作用的配置信息show interface fastethernet 0/1 察看交换机1接口具体配置和统计信息show mac-address-table 查看mac地址表show mac-address-table aging-time 查看mac地址表自动老化时间9:交换机恢复出厂默认恢复命令switch> enableswitch# erase startup-configureswitch# reload10:双工模式设置switch> enableswitch#c onfigure terminalswitch2950(conf)#hostname aptch-2950aptech2950(conf)# interface fastehernet0/17 以17端口为例aptech2950(conf-if)#duplexfull/half/auto 有full , half, auto 三个可选项11:cdp相关命令switch> enableswitch# show cdp 查看设备的cdp全局配置信息show cdp interface fastethernet 0/17 查看17端口的cdp配置信息show cdp traffic 查看有关cdp包的统计信息show cdp nerghbors 列出与设备相连的cisco设备12:csico2950的密码恢复拔下交换机电源线。
思科交换机配置命令简写表

简写命令完整命令1)用户模式:switch> switch>2)特权模式:switch>en switch>enableswitch# switch#3)全局配置模式:switch#conf t switch#config terminalswitch(config)# switch(config)#4)接口配置模式:switch(config)#in f0/1 switch(config)#interface f0/1 switch(config-if)# switch(config-if)#5)line模式:switch(config)#lin c 0 switch(config)#line console 0switch(config-line)# switch(config-line)#6)更改交换机主机名:switch(config)#ho benet switch(config)#hostname benetbenet(config)# benet(config)#7)配置进入特权模式的明文口令:switch(config)#en pass 123 switch(config)#enable password 123 8)删除进入特权模式的明文口令:switch(config)#no ena pass switch(config)#no enable password9)配置进入特权模式的加密口令:switch(config)#en se 456 switch(config)#enable secret 45610)删除进入特权模式的加密口令switch(config)#no ena se switch(config)#no enable secret11)查看交换机配置:switch#sh run switch#show running-config12)配置console口令:switch(config)#lin cons 0 switch(config)#line console 0switch(config-line)#pass 123 switch(config-line)#password 123switch(config-line)#logi switch(config-line)#login13)配置交换机IP地址:switch(config)#in vl 1 switch(config)#interface vlan 1switch(config-if)#ip ad 192.168.0.2 255.255.255.0 switch(config-if)#ip address 192.168.0.2 255.255.255.0switch(config-if)#no sh switch(config-if)#no shutdown14)配置交换机默认网关:switch(config)#ip default-g 192.168.0.1 switch(config)#ip default-gateway 192.168.0.115)查看交换机的MAC地址表:switch#sh mac-a switch#show mac-address-table16)查看思科交换机相邻设备的详细信息:switch#sh cdp nei de switch#show cdp neighbors detail17)保存交换机配置:1:switch#cop run st 1:switch#copy running-config startup-config 2:switch#wr 2:switch#write18)恢复交换机出厂配置:switch#er st switch#erase startup-configswitch#relo switch#reload19)创建VLAN:1:switch#vl da switch#vlan databaseswitch(vlan)#vl 30 switch(vlan)#vlan 30switch(vlan)#e switch(vlan)#exit2:20)删除VLAN:switch(vlan)#n vl 20 switch(vlan)#no vlan 20Deleting VLAN 2... Deleting VLAN 2...switch(vlan)#e switch(vlan)#exit21)将端口加入到VLAN:switch(config)#in f0/2 switch(config)#interface f0/2switch(config-if)#sw a v 30 switch(config-if)#switchport access vlan 3022)验证VLAN配置信息:switch#sh vlan b switch#show vlan briefswitch#sh vlan-s switch#show vlan-switch23)删除VLAN中的端口:1:switch(config-if)#no sw a v 3 switch(config-if)#no switchport access vlan 3 switch(config-if)#end switch(config-if)#end2:switch(config-if)#def interface f0/2 switch(config-if)#default interface f0/2 Building configuration... Building configuration...Interface FastEthernet0/2 set to default configuration Interface FastEthernet0/2 set to default configurationswitch(config)#end switch(config)#end24)同时将多个端口加入VLAN并验证:switch(config)#in r f0/3 - 10 switch(config)#interface range f0/3 - 10switch(config-if-range)#sw a v 3 switch(config-if-range)#switchport access vlan 3switch(config)#end switch(config)#endswitch#sh vlan-s switch#show vlan-switch25)配置VLAN TRUHK:switch(config)#in f0/15 switch(config)#interface f0/15switch(config-if)#sw m t switch(config-if)#switchport mode trunk26)从TRUNK中添加某个VLAN:switch(config)#in f0/15 switch(config)#interface f0/15switch(config-if)#sw t a v ad 3 switch(config-if)#switchport trunk allowed vlan add 3switch(config-if)#end switch(config-if)#end27)从TRUNK中删除某个VLAN:switch(config)#in f0/15 switch(config)#interface f0/15switch(config-if)#sw t a v r 3 switch(config-if)#switchport trunk allowed vlan remove 3switch(config-if)#end switch(config-if)#end28)验证接口模式(检查中断端口允许的VLAN列表):switch#sh int f0/15 switchp switch#show interface f0/15 switchport29)查看用过的命令:switch#sh hi switch#show histor。
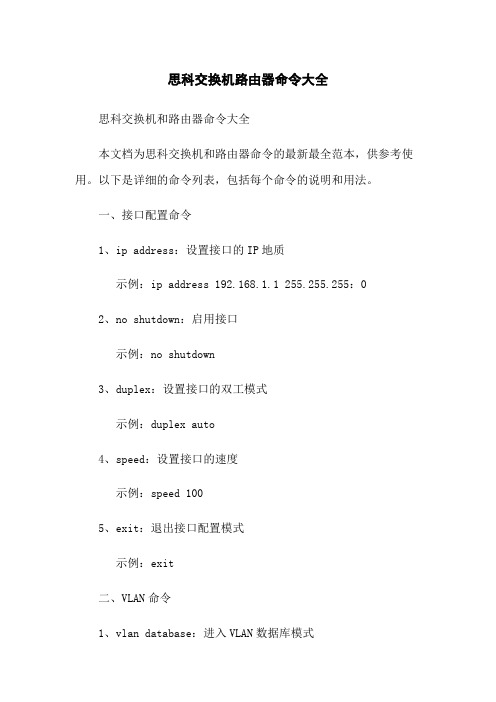
思科交换机路由器命令大全

思科交换机路由器命令大全思科交换机和路由器命令大全本文档为思科交换机和路由器命令的最新最全范本,供参考使用。
以下是详细的命令列表,包括每个命令的说明和用法。
一、接口配置命令1、ip address:设置接口的IP地质示例:ip address 192.168.1.1 255.255.255:02、no shutdown:启用接口示例:no shutdown3、duplex:设置接口的双工模式示例:duplex auto4、speed:设置接口的速度示例:speed 1005、exit:退出接口配置模式示例:exit二、VLAN命令1、vlan database:进入VLAN数据库模式示例:vlan database2、vlan id name:创建VLAN并设置名称示例:vlan 10 name VLAN-103、vlan id:删除VLAN示例:no vlan 104、show vlan:显示VLAN信息示例:show vlan5、exit:退出VLAN数据库模式示例:exit三、路由命令1、ip route:设置静态路由示例:ip route 192.168.2:0 255.255.255:0 192.168.1.22、router rip:启用RIP路由协议示例:router rip3、network:将网络添加到RIP路由表中示例:network 10:0:0:04、redistribute:将静态路由或其他路由协议添加到RIP路由表中示例:redistribute static5、exit:退出路由配置模式示例:exit四、ACL命令1、access-list:创建标准或扩展ACL示例:access-list 10 permit 192.168.1:0 0:0:0.2552、ip access-group:应用ACL到接口示例:ip access-group 10 in3、show access-lists:显示ACL信息示例:show access-lists4、exit:退出ACL配置模式示例:exit五、SNMP命令1、snmp-server community:设置SNMP团体字符串示例:snmp-server community public RO2、snmp-server enable traps:启用SNMP陷阱示例:snmp-server enable traps3、snmp-server host:配置SNMP陷阱接收主机示例:snmp-server host 192.168.1.1004、exit:退出SNMP配置模式示例:exit六、SSH命令1、ip ssh version:设置SSH协议版本示例:ip ssh version 22、crypto key generate rsa:RSA密钥对示例:crypto key generate rsa3、username:创建新的本地用户示例:username admin privilege 15 password password1234、exit:退出SSH配置模式示例:exit七、其他命令1、show running-config:显示当前配置示例:show running-config2、copy running-config startup-config:将当前配置保存到启动配置中示例:copy running-config startup-config3、reload:重新启动设备示例:reload4、exit:退出CLI命令行模式示例:exit本文档涉及附件:1、无附件本文所涉及的法律名词及注释:1、ACL(Access Control List):访问控制列表,用于控制网络流量的进出。
思科交换机路由器常规配置命令大全

思科交换机路由器常规配置命令大全你还在为不知道思科交换机路由器常规配置命令大全而烦恼么?接下来是小编为大家收集的思科交换机路由器常规配置命令大全教程,希望能帮到大家。
思科交换机路由器常规配置命令大全一、基本路由器的检验命令show versionshow processesshow protocolsshow memshow ip routeshow startup-configshow running-configshow flash>show interfaces二、基本路由配置命令进入:config terminal/memory/network 配置网络时常采用的命令:copy和load1.标识:hostname 标识名2.启动标识:banner 启动标识3.接口:interface 端口号4.密码:line 0 6loginpasswd 口令enable password/secret 口令5.接口:1)配置端口interface 端口号clock rate 时钟速率(64000)/* 在串口中配置*/ bandwidth 带宽(缺省56) /* 在串口中配置*/ media-type 介质类型/* 在以太网口上*/ early-token release /* 在令牌环网口上*/ ring-speed 16 /* 在令牌环网口上*/no shutdownwrite memory2)检验端口show interfacesshow controllers6. 配置环境1) 引导方式boot system flash IOS-filenameboot system tftp IOS-filename tftp-address boot system rom2) 配置Register值config-register 0x21027. 查看邻居路由show cdp interfaceshow cdp neighbors [detail]show cdp entry routerA8.IP Address 配置Ip address 网络地址掩码Ip host 主机名addressIp name-server 服务器地址1 服务器地址2 。
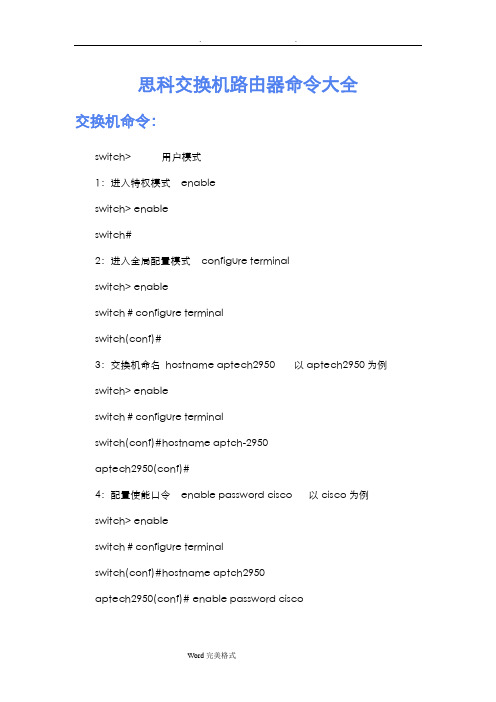
思科路由器命令大全(完整版)

思科交换机路由器命令大全交换机命令:switch> 用户模式1:进入特权模式enableswitch> enableswitch#2:进入全局配置模式configure terminalswitch> enableswitch#configure terminalswitch(conf)#3:交换机命名hostname aptech2950 以aptech2950为例switch> enableswitch#configure terminalswitch(conf)#hostname aptch-2950aptech2950(conf)#4:配置使能口令enable password cisco 以cisco为例switch> enableswitch#configure terminalswitch(conf)#hostname aptch2950aptech2950(conf)# enable password cisco5:配置使能密码enable secret ciscolab 以cicsolab为例--设置禁用IP地址解析特性,设置启用消息同步特性switch> enableswitch#configure terminalswitch(conf)#hostname aptch2950aptech2950(conf)# enable secret ciscolabaptech2950(conf)#no ip domain-lookup -----设置禁用IP 地址解析特性aptech2950(conf)#logging synchronous -----设置启用消息同步特性aptech2950(conf)#interface range fastethernet0/1-20aptech2950(conf-if-range)#spanning-tree portfast -----设置快速端口aptech2950(conf)#interface range fastethernet 0/23-24aptech2950(conf-if-range)#swichport mode trunk -----设置主干道端口aptech2950(conf)#spanning-tree uplingkfast ---设置阻塞启用迅速(只可以在访问层启用)6:设置虚拟局域网vlan 1 interface vlan 1switch> enableswitch#configure terminalswitch(conf)#hostname aptch2950aptech2950(conf)# interface vlan 1aptech2950(conf-if)#ip address 192.168.1.1 255.255.255.0 配置交换机端口ip和子网掩码aptech2950(conf-if)#no shut 是配置处于运行中aptech2950(conf-if)#exitaptech2950(conf)#ip default-gateway 192.168.254 设置网关地址7:进入交换机某一端口interface fastehernet 0/17 以17端口为例switch> enableswitch#configure terminalswitch(conf)#hostname aptch2950aptech2950(conf)# interface fastehernet 0/17aptech2950(conf-if)#8:查看命令showswitch> enableswitch# show version 察看系统中的所有版本信息show interface vlan 1 查看交换机有关ip 协议的配置信息show running-configure 查看交换机当前起作用的配置信息show interface fastethernet 0/1 察看交换机1接口具体配置和统计信息show mac-address-table 查看mac地址表show mac-address-table aging-time 查看mac地址表自动老化时间9:交换机恢复出厂默认恢复命令switch> enableswitch# erase startup-configureswitch# reload10:双工模式设置switch> enableswitch#configure terminalswitch2950(conf)#hostname aptch-2950aptech2950(conf)# interface fastehernet 0/17 以17端口为例aptech2950(conf-if)#duplex full/half/auto 有full , half, auto 三个可选项11:cdp相关命令switch> enableswitch# show cdp 查看设备的cdp全局配置信息show cdp interface fastethernet 0/17 查看17端口的cdp配置信息show cdp traffic 查看有关cdp包的统计信息show cdp nerghbors 列出与设备相连的cisco设备12:csico2950的密码恢复拔下交换机电源线。
思科交换机和路由器配置命令简写与完整对照

思科2600系列路由器的enable密码恢复原理:因enable密码保存在startup-config中,可以使路由器启动时绕过startup-config配置,然后重新如果想让路由器启动时绕过startup-config配置,只有修改配置寄存器的值.正常情况下配置寄存器的值是0x2102,把2102换算成16进制为:0010.0001.0000.0010其中第三段中的第二个比特位即0000中的第二个0可以控制路由器启动时的顺序,当这一位为0,表示启动时运行startup-config的配置,如果为1,则表示启动时忽略startup-config的配置,进入setup模式当该位为1时,配置寄存器的值为0x2142恢复步骤:1:重启路由器,在启动60S内按下Ctrl+Break键,使路由器进入ROM Monitor模式2:在提示符下输入命令修改配置寄存器的值,然后重启路由器rommon1>confreg 0x2142rommon2>resetrommon3>boot3:重启路由器后进入setup模式,选NO退回到exec模式,此时路由器原有配置仍保存在startup-config中,为使路由器恢复密码后配置不变,应把startup-config中的配置保存到running-config中,然后重新设置enable密码,并把Router>enableRouter#copy startup-config running-configRouter# config terminalRouter(config)# enable secret 123456Router(config)# config-register 0x2102Router(config)#exit4:保存当前配置到startup-config,然后重启路由器.Router# copy running-config startup-config或WRRouter#reload后重新配置密码即可.。
思科路由器配置命令简写与完整对照

简写命令
完整命令
1 Router>
2 Router>en
用户模式: Router>
特权模式: Router>enable
Router#
Router# 全局配置模式
3 Router#conf t
Router#config terminal
Router(config)#
Router(config)#
Router(config-subif)#
Router(config-subif)#
line模式:
6 Router(config)#lin c 0
Router(config)#line console 0
Router(config-line)#
Router(config-line)#
路由模式
7 Router(config)#router rip(rip是一种路由协议)
14 Router(config)#in f1/0 (有些写成e0/1,e0) Router(config-if)#ip ad 10.20.30.40 255.0.0.0
Router(config)#interface f1/0 (有些写成e0/1,e0) Router(config-if)#ip address 10.20.30.40 255.0.0.0
Router(config-if)#no shutdown Router(config-if)#exit
Router(config)#ip route 目标网段 目标网段掩码 下一跳入口IP地址 Router(config)#ip route 目标网段 目标网段掩码 下一跳入口IP地址
默认路由的配置
思科路由器命令大全完整版

思科路由器命令大全完整版Modified by JEEP on December 26th, 2020.思科交换机路由器命令大全交换机命令:switch> 用户模式1:进入特权模式 enableswitch> enableswitch#2:进入全局配置模式 configure terminalswitch> enableswitch#configure terminalswitch(conf)#3:交换机命名 hostname aptech2950 以aptech2950为例switch> enableswitch#configure terminalswitch(conf)#hostname aptch-2950aptech2950(conf)#4:配置使能口令 enable password cisco 以cisco为例switch> enableswitch#configure terminalswitch(conf)#hostname aptch2950aptech2950(conf)# enable password cisco5:配置使能密码 enable secret ciscolab 以cicsolab为例--设置禁用IP地址解析特性,设置启用消息同步特性switch> enableswitch#configure terminalswitch(conf)#hostname aptch2950aptech2950(conf)# enable secret ciscolabaptech2950(conf)#no ip domain-lookup -----设置禁用IP地址解析特性aptech2950(conf)#logging synchronous -----设置启用消息同步特性aptech2950(conf)#interface range fastethernet0/1-20aptech2950(conf-if-range)#spanning-tree portfast -----设置快速端口aptech2950(conf)#interface range fastethernet 0/23-24aptech2950(conf-if-range)#swichport mode trunk -----设置主干道端口aptech2950(conf)#spanning-tree uplingkfast ---设置阻塞启用迅速(只可以在访问层启用)6:设置虚拟局域网vlan 1 interface vlan 1switch> enableswitch#configure terminalswitch(conf)#hostname aptch2950aptech2950(conf)# interface vlan 1配置交换机端口ip和子网掩码aptech2950(conf-if)#no shut 是配置处于运行中aptech2950(conf-if)#exit设置网关地址7:进入交换机某一端口 interface fastehernet 0/17 以17端口为例switch> enableswitch#configure terminalswitch(conf)#hostname aptch2950aptech2950(conf)# interface fastehernet 0/17aptech2950(conf-if)#8:查看命令 showswitch> enableswitch# show version 察看系统中的所有版本信息show interface vlan 1 查看交换机有关ip 协议的配置信息show running-configure 查看交换机当前起作用的配置信息show interface fastethernet 0/1 察看交换机1接口具体配置和统计信息show mac-address-table 查看mac地址表show mac-address-table aging-time 查看mac地址表自动老化时间9:交换机恢复出厂默认恢复命令switch> enableswitch# erase startup-configureswitch# reload10:双工模式设置switch> enableswitch#configure terminalswitch2950(conf)#hostname aptch-2950aptech2950(conf)# interface fastehernet 0/17 以17端口为例aptech2950(conf-if)#duplex full/half/auto 有full , half, auto 三个可选项11:cdp相关命令switch> enableswitch# show cdp 查看设备的cdp全局配置信息show cdp interface fastethernet 0/17 查看17端口的cdp配置信息show cdp traffic 查看有关cdp包的统计信息show cdp nerghbors 列出与设备相连的cisco设备12:csico2950的密码恢复拔下交换机电源线。
路由器和交换机的配置命令的简写

那可多了~Cisco路由配置语句汇总启动接口,分配IP地址:router>router> enablerouter#router# configure terminalrouter(config)#router(config)# interface Type Portrouter(config-if)# no shutdownrouter(config-if)# ip address IP-Address Subnet-Maskrouter(config-if)# ^z配置RIP路由协议:30秒更新一次router(config)# router riprouter(config-if)# network Network-Number <——通告标准A,B,C类网——>router(config-if)# ^z配置IGRP路由协议:90秒更新一次router(config)# router igrp AS-Number <—— AS-Number范围1~65535——>router(config-if)# network Network-Number <——通告标准A,B,C类网——>router(config-if)# ^z配置Novell IPX路由协议:Novell RIP 60秒更新一次router(config)# ipx routing [node address]router(config)# ipx maximum-paths Paths <——设置负载平衡,范围1~512——>router(config)# interface Type Portrouter(config-if)# ipx network Network-Number [encapsulation encapsulation-type] [secondary] <——通告标准A,B,C类网——>router(config-if)# ^z配置DDR:router(config)# dialer-list Group-Number protocol Protocol-Type permit [list ACL-Number]router(config)# interface bri 0router(config-if)# dialer-group Group-Numberrouter(config-if)# dialer map Protocol-Type Next-Hop-Address name Hostname Telphone-Numberrouter(config-if)# ^z配置ISDN:router(config)# isdnth-typeth-Type <——配置ISDN交换机类型,中国使用basic-net3——>router(config-if)# ^z配置Frame Relay:router(config-if)# encapsulation frame-relay [cisco | ietf ]router(config-if)# frame-relay lmi-type [ansi | cisco | q933a ]router(config-if)# bandwidth kilobitsrouter(config-if)# frame-relay invers-arp [ Protocol ] [dlci ]<——配置静态Invers ARP表:router(config)# frame-relay Protocol Protocol-Address DLCI [ Broadcast ] [ ietf | cisco ] [ payload-compress | packet-by-packet ]——><——设置Keepalive间隔:router(config-if)# keepalive Number——><——为本地接口指定DLCI:router(config-if)# frame-lelay local-dlci Number——><——子接口配置:router(config-if)# interface Type Port.Subininterface-Number [ multipoint | point-to-point ]router(config-subif)# ip unnumbered Interfacerouter(config-subif)# frame-lelay local-dlci Number——>router(config-if)# ^z配置标准ACL:router(config)# access-list Access-List-Number [ permit | deny ] source [ source-mask ] <——Access-List-Number 范围:1~99标准ACL;100~199扩展ACL;800~899标准IPX ACL;900~999扩展IPX ACL;1000~1099 IPX SAP ACL;600~699Apple Talk ACL——>router(config)# interface Type Portrouter(config-if)# ip access-group Access-List-Number [ in | out ]router(config-if)# ^z配置扩展ACL:router(config)# access-list Access-List-Number [ permit | deny ] [ Protocol | Protocol-Number ] source source-wildcard [ Source-Port ] destination destination-wildcard [ Destination-Port ] [ established ]router(config)# interface Type Portrouter(config-if)# ip access-group Access-List-Number [ in | out ]router(config-if)# ^z配置命名ACL:router(config)# ip access-list [ standard | extended ] ACL-Namerouter(config [ std- | ext- ] nacl)# [ permit | deny ] [ IP-Access-List-Test-Conditions ]router(config [ std- | ext- ] nacl)# no [ permit | deny ] [ IP-Access-List-Test-Conditions ]router(config [ std- | ext- ] nacl)# ^zrouter(config)# interface Type Portrouter(config-if)# ip access-group [ACL-Name | 1~199 ] [ in | out ]router(config-if)# ^zywELinux联盟配置DCE时钟:router# show controllers Type Port <——确定DCE接口——>router(confin-if)# clock rate 64000 <——进入DCE接口设置时钟速率——>router(config-if)# ^z配置PPP协议:router(config)# username Name password Set-Password-Here <——验证方建立数据库——>router(config)# interface Type Portrouter(config-if)# encapsulation ppp <——启动PPP协议——>router(config-if)# ppp outhentication [ chap | chap pap | pap chap | pap ] <——选择PPP认证——>router(config-if)# ppp pap sent-username Name password Password <——发送验证信息——>router(config-if)# ^zPAP单向认证配置实例:验证方:router-server(config)# username Client password 12345 <——验证方建立数据库——>router-server(config)# interface serial 0router-server(config-if)# encapsulation ppprouter-server(config-if)# ppp authentication pap <——选择使用PAP实现PPP认证——>router-server(config-if)# ^z被验证方:router-client(config-if)# encapsulation ppprouter-client(config-if)# ppp pap sent-username Client password 12345 <——发送验证信息——>router-client(config-if)# ^zywELinux联盟PAP双向认证配置实例:路由器 A:routerA(config)# username B password 12345routerA(config)# interface serial 0routerA(config-if)# encapsulation ppprouterA(config-if)# ppp authentication paprouterA(config-if)# ppp pap sent-username A password 54321routerA(config-if)# ^z路由器 B:routerB(config)# username A password 54321routerB(config)# interface serial 1routerB(config-if)# encapsulation ppprouterB(config-if)# ppp authentication paprouterB(config-if)# ppp pap sent-username B password 12345 routerB(config-if)# ^zCHAP单向认证配置实例:验证方:router-server(config)# username router-client password 12345 router-server(config)# interface serial 0router-server(config-if)# encapsulation ppprouter-server(config-if)# ppp authentication chaprouter-server(config-if)# ^z被验证方:router-client(config-if)# encapsulation ppprouter-client(config-if)# ppp authentication chaprouter-client(config-if)# ppp chap hostname router-client router-client(config-if)# ppp chap password 12345router-client(config-if)# ^z CHAP双向认证配置实例:路由器 A:routerA(config)# username routerB password 12345routerA(config)# interface serial 0routerA(config-if)# encapsulation ppprouterA(config-if)# ppp authentication chaprouterA(config-if)# ppp chap hostname routerArouterA(config-if)# ppp chap password 54321routerA(config-if)# ^z路由器 B:routerB(config)# username routerA password 54321routerB(config)# interface serial 1routerB(config-if)# encapsulation ppprouterB(config-if)# ppp authentication chaprouterB(config-if)# ppp chap hostname routerBrouterB(config-if)# ppp chap password 12345routerB(config-if)# ^zywELinux联盟Telnet使用:routerA# terminal monitor <——可以传回在远端主机执行Debug命令的结果——>routerA# telnet IP-Address [ Router-Name ] <——Telnet到指定的地址或名字的主机——> routerB# [ exit | logout ] <——退出Telnet——>routerB# ++<6>再按 <——挂起Telnet——>routerA# show sessions <——显示当前所有Telnet的信息,包括Connect-Number ——>routerA# Connect-Number <——返回指定的Telnet连接——>routerA# disconnect IP-Address [ Router-Name ] <——断开指定地址或名字的主机的连接——> routerA# show user <——显示Telnet到本机的连接信息——>routerA# clear line [ 0 | 1 | 2 | 3 | 4 ] <——断开指定Telnet到本机的连接——>禁止任何Telnet到本机:router(config)# line vty 0 4router(config-line)# access-class ACL-Numberrouter(config)# ^z设置主机名:router(config)# hostname Set-Hostnamerouter(config)# ^zrouter(config)# ^z设置用户模式密码:router(config)# line console 0router(config-line)# loginrouter(config-line)# password Set-Passwordrouter(config-line)# ^zywELinux联盟设置Telnet密码:router(config)# line vty 0 4router(config-line)# loginrouter(config-line)# password Set-Passwordrouter(config-line)# ^z设置特权模式密码:router(config)# enable password Set-Password <——不加密的密码,明码——>router(config)# enable secret Set-Password <——经过加密的密码——>router(config)# ^z给所有密码加密:router(config)# service password-ancryption Set-Password-Hererouter(config)# no service password-ancryption <——取消加密——>router(config)# ^z设置登录Banner:router(config)# banner motd 分隔符 Set-Banner-InFORMation-Here 分隔符 <——前后分隔符一定要一致——>设置接口的描述信息:router(config-if)# description Set-Port-InFORMation-Hererouter(config)# ^zCDP的控制:router(config-if)# cdp enable <——在指定端口启用CDP,缺省——>router(config-if)# no cdp enable <——在指定端口关闭CDP——>router(config)# cdp run <——使所有端口启用CDP——>router(config)# no cdp run <——使所有端口关闭CDP——>Ping的使用:router# ping IP-Addressrouter# ping <——扩展Ping命令——>Protocol [ip]:[ Protocol-Type ] <——选择协议类型——>Target IP address:IP-Address <——输入测试地址——>Repeat count [5]: <——选择发送的ICMP包数量——>Datagram size [100]: <——选择每个包的大小——>Timeout in seconds [2]: <——设置每个包的超时时间——>Extended commands [n]:y <——使用扩展Ping命令——>Sweep range of sizes [n]:ywELinux联盟Tracke的使用:router# trace IP-Address [ Host-Name ]为Cisco 4000路由器指定媒体类型:router(config-if)# media-type 10baset <——使AUI(默认)失效,改为使用RJ-45——>router(config-if)# ^z更改路由器启动顺序:router(config)# boot system flash IOS-FileNamerouter(config)# boot system tftp IOS-FileName TFTP-IP-Addressrouter(config)# boot system romrouter(config)# ^z修改寄存器数值:router(config)# config-register value <——Cisco出厂默认value=0x2102,value范围:0x2100(进入ROM监视器),0x2101(使系统从ROM启动),0x2102~0x210F(使系统从NVRAM启动)。
思科路由器交换机配置命令大全

思科路由器交换机配置命令大全1. 交换机支持的命令:交换机基本状态:switch: ;ROM状态,路由器是rommon> hostname> ;用户模式hostname# ;特权模式hostname(config)# ;全局配置模式hostname(config-if)# ;接口状态交换机口令设置:switch>enable ;进入特权模式switch#config terminal ;进入全局配置模式switch(config)#hostname ;设置交换机的主机名switch(config)#enable secret xxx ;设置特权加密口令switch(config)#enable password xxa ;设置特权非密口令switch(config)#line console 0 ;进入控制台口switch(config-line)#line vty 0 4 ;进入虚拟终端switch(config-line)#login ;允许登录switch(config-line)#password xx ;设置登录口令xxswitch#exit ;返回命令交换机VLAN设置:switch#vlan database ;进入VLAN设置switch(vlan)#vlan 2 ;建VLAN 2switch(vlan)#no vlan 2 ;删vlan 2switch(config)#int f0/1 ;进入端口1switch(config-if)#switchport access vlan 2 ;当前端口加入vlan 2 switch(config-if)#switchport mode trunk ;设置为干线switch(config-if)#switchport trunk allowed vlan 1,2 ;设置允许的vlan switch(config-if)#switchport trunk encap dot1q ;设置vlan 中继switch(config)#vtp domain ;设置发vtp域名switch(config)#vtp password ;设置发vtp密码switch(config)#vtp mode server ;设置发vtp模式switch(config)#vtp mode client ;设置发vtp模式交换机设置IP地址:switch(config)#interface vlan 1 ;进入vlan 1 switch(config-if)#ip address ;设置IP地址switch(config)#ip default-gateway ;设置默认网关switch#dir flash: ;查看闪存交换机显示命令:switch#write ;保存配置信息switch#show vtp ;查看vtp配置信息switch#show run ;查看当前配置信息switch#show vlan ;查看vlan配置信息switch#show interface ;查看端口信息switch#show int f0/0 ;查看指定端口信息2. 路由器支持的命令:路由器显示命令:router#show run ;显示配置信息router#show interface ;显示接口信息router#show ip route ;显示路由信息router#show cdp nei ;显示邻居信息router#reload ;重新起动路由器口令设置:router>enable ;进入特权模式router#config terminal ;进入全局配置模式router(config)#hostname ;设置交换机的主机名router(config)#enable secret xxx ;设置特权加密口令router(config)#enable password xxb ;设置特权非密口令router(config)#line console 0 ;进入控制台口router(config-line)#line vty 0 4 ;进入虚拟终端router(config-line)#login ;要求口令验证router(config-line)#password xx ;设置登录口令xxrouter(config)#(Ctrl+z) ;返回特权模式router#exit ;返回命令路由器配置:router(config)#int s0/0 ;进入Serail接口router(config-if)#no shutdown ;激活当前接口router(config-if)#clock rate 64000 ;设置同步时钟router(config-if)#ip address ;设置IP地址router(config-if)#ip address second ;设置第二个IProuter(config-if)#int f0/0.1 ;进入子接口router(config-subif.1)#ip address ;设置子接口IProuter(config-subif.1)#encapsulation dot1q ;绑定vlan中继协议router(config)#config-register 0x2142 ;跳过配置文件router(config)#config-register 0x2102 ;正常使用配置文件router#reload ;重新引导路由器文件操作:router#copy running-config startup-config ;保存配置router#copy running-config tftp ;保存配置到tftprouter#copy startup-config tftp ;开机配置存到tftprouter#copy tftp flash: ;下传文件到flashrouter#copy tftp startup-config;下载配置文件ROM状态:Ctrl+Break ;进入ROM监控状态rommon>confreg 0x2142 ;跳过配置文件rommon>confreg 0x2102 ;恢复配置文件rommon>reset;重新引导rommon>copy xmodem: flash: ;从console传输文件rommon>IP_ADDRESS=10.65.1.2 ;设置路由器IPrommon>IP_SUBNET_MASK=255.255.0.0 ;设置路由器掩码rommon>TFTP_SERVER=10.65.1.1 ;指定TFTP服务器IP rommon>TFTP_FILE=c2600.bin ;指定下载的文件rommon>tftpdnld ;从tftp下载rommon>dir flash: ;查看闪存内容rommon>boot ;引导IOS静态路由:ip route ;命令格式router(config)#ip route 2.0.0.0 255.0.0.0 1.1.1.2 ;静态路由举例router(config)#ip route 0.0.0.0 0.0.0.0 1.1.1.2 ;默认路由举例动态路由:router(config)#ip routing ;启动路由转发router(config)#router rip ;启动RIP路由协议。
思科的路由器配置及H3C交换机命令详解

思科的路由器配置及H3C交换机命令详解思科路由器配置在网络设备中,路由器是一个重要的组件,用于将数据包从一个网络传输到另一个网络。
思科公司是一个广泛使用的路由器制造商,下面将详细介绍思科路由器的配置。
一、连接到路由器1. 打开终端程序,输入路由器的IP地址。
例如:192.168.1.12. 输入用户名和密码以登录路由器的管理界面。
默认情况下,用户名为"admin",密码为空。
3. 成功登录后,将进入路由器的配置界面。
二、基本配置1. 设置路由器的主机名。
使用以下命令:hostname 路由器名称2. 配置路由器的IP地址和子网掩码。
使用以下命令:interface GigabitEthernet0/0ip address 192.168.1.1 255.255.255.0这里的“GigabitEthernet0/0”是代表路由器的接口名称,具体根据路由器型号和配置来定。
三、路由配置1. 配置静态路由。
使用以下命令:ip route 目标网络子网掩码下一跳IP地址例如,要将数据包发送到目标网络192.168.2.0/24,下一跳IP地址为192.168.1.2:ip route 192.168.2.0 255.255.255.0 192.168.1.22. 配置动态路由。
使用以下命令:router ospf 进程号network 目标网络区域号例如,将192.168.1.0/24和192.168.2.0/24添加到OSPF进程号为1的区域0:router ospf 1network 192.168.1.0 0.0.0.255 area 0network 192.168.2.0 0.0.0.255 area 0H3C交换机命令详解H3C交换机是一种高级网络设备,用于在局域网中转发数据包。
下面将详细介绍H3C交换机的配置命令。
一、连接到交换机1. 打开终端程序,使用Console或SSH连接到交换机。
CISCO配置命令简写速记表

全称 enable configure terminal interface f0/0 interface f0/0.1 line console 0 password 123 enable password 123 enable secret 321 service passwordencryption no shutdown hostname benet exit router rip network 192.168.1.0 network 172.16.1.0 no router rip show ip route hostname zsc show interfaces f0/0 show clock ip address 10.20.30.40 255.0.0.0 show version show running-config 简写 en conf t in f0/0 in f0/0.1 lin c 0 pas 123 ena p 123 ena s 321 ser pas n sh ho benet ex ro ne ne no sh ho rip 192.168.1.0 172.16.1.0 router r ip ro zsc 含义 特权模式 配置模式 f0/0 接口配置模式 子接口配置模式 line模式 配置控制台密码 配置特权模式密码 配置加密保存的密码 对所有密码加密 开启端口 更改交换机主机名 退出(特权、配置模 式支持) 路由模式用rip协议 动态路由配置,f0/0 动态路由配置,f0/1 删除RIP动态路由协议 查看路由表 更改路由器主机名 查看接口状态 查看路由器当前时间 配置路由器接口IP地 址 查看路由器版本信息 查看当前配置
sh int f0/0 sh clo ip ad 10.20.30.40 255.0.0.0 sh ve sh run
- 1、下载文档前请自行甄别文档内容的完整性,平台不提供额外的编辑、内容补充、找答案等附加服务。
- 2、"仅部分预览"的文档,不可在线预览部分如存在完整性等问题,可反馈申请退款(可完整预览的文档不适用该条件!)。
- 3、如文档侵犯您的权益,请联系客服反馈,我们会尽快为您处理(人工客服工作时间:9:00-18:30)。
v
ad
3
switch(config-if)#end
从TRUNK中删除某个VLAN
29
switch(config)#in f0/15 switch(config-if)#sw t a
v
r
3
switch(config-if)#end
30
验证接口模式(检查中断端口允许的VLAN列表) switch#sh int f0/15 switchp
switch(config)#end
switch#sh vlan-s
配置VLAN TRUHK
27 switch(config)#in f0/15
switch(config-if)#sw m t
从TRUNK中添加某个VLAN
28
switch(config)#in f0/15 switch(config-if)#sw t a
switch(config-if)#switchport trunk allowed vlan add 3
switch(config-if)#end 从TRUNK中删除某个VLAN switch(config)#interface f0/15
switch(config-if)#switchport trunk allowed vlan remove 3
2:switch#wr
恢复交换机出厂配置
19 switch#er st
switch#relo
创建VLAN
20
switch#vl da switch(vlan)#vl
30
switch(vlan)#exit
VLAN重命名
21
switch(vlan)#vl 20 VLAN 20 modified:
n
benet
Interface FastEthernet0/2 set to default configuration
switch(config)#end
同时将多个端口加入VLAN并验证
switch(config)#in r f0/3 - 10
26 switch(config-if-range)#sw a v 3
思科交换机配置命令
简写命令
1
用户模式: switch>
特权模式:
2 switch>en
switch#
全局配置模式
3 switch#conf t
switch(config)#
接口配置模式
4 switch(config)#in f0/1
switch(config-if)#
line模式:
5 switch(config)#lin c 0
Name: benet 删除VLAN switch(vlan)#no vlan 20 Deleting VLAN 2... switch(vlan)#exit
简写命令
将端口加入到VLAN
23 switch(config)#in f0/2
switch(config-if)#sw a v 30
验证VLAN配置信息
switch(config-if)#end 2:switch(config-if)#default interface f0/2
Building configuration...
Interface FastEthernet0/2 set to default configuration
switch(config)#end 同时将多个端口加入VLAN并验证 switch(config)#interface range f0/3 - 10 switch(config-if-range)#switchport access vlan 3 switch(config)#end switch#show vlan-switch 配置VLAN TRUHK switch(config)#interface f0/15 switch(config-if)#switchport mode trunk 从TRUNK中添加某个VLAN switch(config)#interface f0/15
switch(config-line)#logi
配置交换机IP地址
13
switch(config)#in vl 1 switch(config-if)#ip ad 192.168.0.2
255.255.255.0
switch(config-if)#no sh
14
删除交换机接口IP地址 switch(config-if)#no
switch(config-if)#end 验证接口模式(检查中断端口允许的VLAN列表) switch#show interface f0/15 switchport 查看用过的命令 switch#show history
switch(config-line)#
更改交换机主机名
6 switch(config)#ho benet
benet(config)#
7
配置进入特权模式的明文口令 switch(config)#en pass 123
8
删除进入特权模式的明文口令 switch(config)#no ena pass
9
Name: benet
删除VLAN
22
switch(vlan)#n vl 20 Deleting VLAN 2...
switch(vlan)#e
完整命令
用户模式: switch> 特权模式: switch>enable switch# 全局配置模式 switch#config terminal switch(config)# 接口配置模式 switch(config)#interface f0/1 switch(config-if)# line模式: switch(config)#line console 0 switch(config-line)# 更改交换机主机名 switch(config)#hostname benet benet(config)# 配置进入特权模式的明文口令 switch(config)#enable password 123 删除进入特权模式的明文口令 switch(config)#no enable password 配置进入特权模式的加密口令 switch(config)#enable secret 456 删除进入特权模式的加密口令 switch(config)#no enable secret 查看交换机配置 switch#show running-config 配置console口令 switch(config)#line console 0 switch(config-line)#password 123 switch(config-line)#login 配置交换机IP地址 switch(config)#interface vlan 1 switch(config-if)#ip address 192.168.0.2 255.255.255.0 switch(config-if)#no shutdown 删除交换机接口IP地址 switch(config-if)#no ip address 配置交换机默认网关 switch(config)#ip default-gateway 192.168.0.1 查看交换机的MAC地址表 switch#show mac-address-table 查看思科交换机相邻设备的详细信息 switch#show cdp neighbors detail 保存交换机配置 1:switch#copy running-config startup-config 2:switch#write 恢复交换机出厂配置 switch#erase startup-config switch#reload 创建VLAN switch#vlan database switch(vlan)#vlan 30 switch(vlan)#exit VLAN重命名 switch(vlan)#vlan 20 name benet VLAN 20 modified:
24 switch#sh vlan b
switch#sh vlan-s
删除VLAN中的端口
1:switch(config-if)#no sw a v 3
switch(config-if)#end
25 2:switch(config-if)#def interface f0/2
Building configuration...
ip
ad
15
配置交换机默认网关 switch(config)#ip default-g
192.168.0.1
16
查看交换机的MAC地址表 switch#sh m信息 switch#sh cdp nei de
保存交换机配置
18 1:switch#cop run st
配置进入特权模式的加密口令 switch(config)#en se 456
10
删除进入特权模式的加密口令 switch(config)#no ena se
11
查看交换机配置 switch#sh run
配置console口令
12
switch(config)#lin cons 0 switch(config-line)#pass 123
31
查看用过的命令 switch#sh hi
完整命令
将端口加入到VLAN switch(config)#interface f0/2 switch(config-if)#switchport access vlan 30 验证VLAN配置信息 switch#show vlan brief switch#show vlan-switch 删除VLAN中的端口 1:switch(config-if)#no switchport access vlan 3
