RIP OSPF EIGRP路由重分发
路由更新操作
操纵路由更新路由更新的控制以及路由的重发布知识部分一、路由更新控制1.passive-interface(被动接口)①RIPv1/RIPv2/IGRP不存在邻居关系。
若一个接口配置为passive-interface,则可以从该接口接收路由更新,但不能发送路由更新信息。
②EIGRP/OSPF存在邻居关系。
若一个接口配置为passive-interface,则邻居关系将无法建立。
双方都无法学习到对方的路由信息。
2.分发列表(distribute-list)分发列表的操作步骤:第1步:确定要过滤的路由的网络地址,并用访问列表(access-list)或前缀列表(prefix-list)创建一个匹配组;第2步:确定要过滤入站接口、出站接口还是从另一个路由协议重分发而来的路由更新;第3步:使用distribute-list命令,将上面创建的匹配组应用于路由器出入接口上。
①方式一:使用access-list来匹配一组路由(粗略的匹配IP路由)示例1:单个路由协议的过滤router(config)#access-list 1 permit 192.168.1.0 0.0.0.255router(config)#router rip /eigrp 100router(config-router)#distribute-list 1 out #本路由器从所有接口发出的rip /eigrp 100更新时,只能发送192.168.1.0/24的路由。
router(config-router)#distribute-list 1 out e0 #本路由器从e0接口发出的rip /eigrp 100更新时,只能发送192.168.1.0/24的路由。
router(config-router)#distribute-list 1 in #本路由器从所有接口接收的rip /eigrp 100更新中,只能接收192.168.1.0/24的路由。
路由重分发工作原理
路由重分发工作原理路由重分发工作原理网络协议有很多种,例如isis、rip、ospf、bgp等,在大型公司中经常会出现网络设备之间运行多种网络协议的情况,各种网络协议之间如果不进行一定的配置那么设备之间是不能进行互通信息的,在这种情况下就出现了路由重分发技术,路由重分发的作用就是为了实现多种路由协议之间的协同工作。
路由重分发的工作原理:通过在各种路由协议的配置中添加一定的配置使将路由协议广播到另外的路由协议中,让各个路由协议都能检测到运行其他的路由协议的网段,从而实现数据的传输。
路由重分发技术需要用到redistribute命令rip协议的redistribute命令redistribute protocol 【metric metric-value】【match internal | external nssa-external type】【route-map map-tag】protocol:路由重分发的源路由协议 metric metric-value:设置路由重分发的度量值(1···6),没有将使用default-metric命令设置的metric值 match internal | external nssa-external type:设置重分发路由的条件,只适合重分发的源路由协议是ospf route-map map-tag应用路由图进行重分发ospf协议的redistribute命令 redistribute protocol 【subnets】【metric metric-value】【metric-type{1 | 2}】【tag tag-value】【route-map map-tag】protocol:路由重分发的源路由协议subnets:设置是否重分发子网metric metric-value:设置路由重分发的度量值(1···16777214),没有将使用default-metric命令设置的metric值metric metric-type:设置重分发的路由度量类型,默认值为2 tag tag-value:设置重分发的路由的tag(0···2147483647)默认为0 route-map map-tag应用路由图进行重分发重分发到ospf中的时候,除了直连路由和默认路由外,其他重分发的路由的默认的度量值是20,默认度量值类型是2,且默认不重分发子网。
路由重分发-redistribute
路由重分发-redistribute路由重分发 redistribute什么叫路由重分发?属于路由策略,主要⽤于不同的路由协议之间,使它们相互融合进⾏导⼊导出路由条⽬。
具体⽤在哪⾥呢?边界⽹关设备上,那企业内部会⽤到路由重分发吗?通常情况下是不可能⽤到的,因为⼀个企业内部通常是这样⼉的防⽕墙充当⽹关/双线接⼊/双⽹关———核⼼交换机———汇聚交换机,HSRP/VRRP(双GW),SLA上⾏监测,流量分摊MST,也就没啥了,然后只运⾏⼀种路由协议,这样能够保证安全的同时,还可以保证稳定。
这是⼀个企业内部⽹络的需求,⽽路由协议的重分布,多⽤于外部,/IDC/ISP像BGP的重分布学到⽬前为⽌,我们见到的协议有Rip eigrp ospf static connected 默认⽆论是哪种协议之间的重分发,都要遵循⼀个原则,就是“嫁鸡随鸡,嫁狗随狗”要遵循本地协议的“标准”如rip 参考的是跳数,Eigrp 参考的是复合度量值,带宽延迟可靠性负载 MTUOSPF 参考的是带宽 cost如果是宣告到他们的协议中,⼀定要遵循他们的标准实例Rip------eigrpR1-----R2运⾏ripR2-----R3运⾏eigrp最终由R2进⾏双向的重分发配置rip 和eigrp就不多说了R2(config-router)#router eigrp 1R2(config-router)#redistribute rip metric 10000 100 255 1 1500这就是前⾯所提到的,分布到什么协议,就要遵循什么协议的标准,Eigrp采⽤复全度量值做为参考,那么就要在重分布的时候设置这些参数顺序是带宽延迟(微秒)换算后=1ms 可靠性负载 MTUR2(config-router)#router ripR2(config-router)#redistribute eigrp 1 metric 1⽽RIP使⽤的是跳数,那么eigrp进rip后,也要遵循跳数的原则,这⾥需要注意的是如果将Metric设置为15的话,将会发⽣⼀个现象,所有的重分布进rip的条⽬都将不可达,因为原始就是1 ,再加上15=16,,还有,就是如果不设置metric值的话,系统也会默认将这个跳数置为⽆穷⼤,也就是不可达。
OSPF双点双向重分布
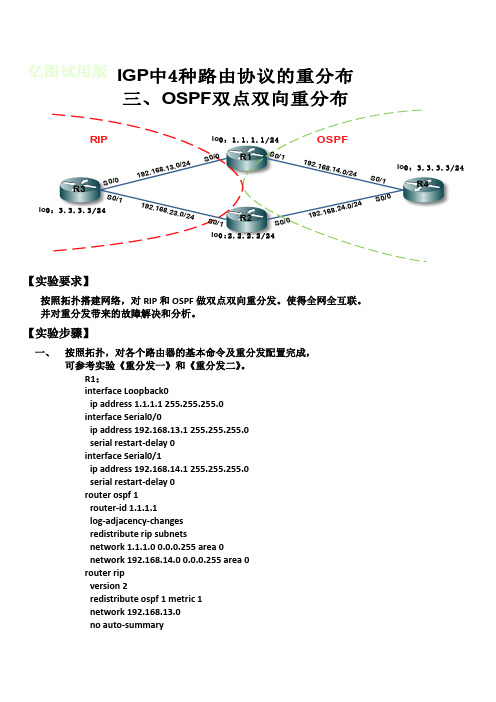
【实验要求】按照拓扑搭建网络,对RIP 和OSPF 做双点双向重分发。
使得全网全互联。
并对重分发带来的故障解决和分析。
【实验步骤】一、 按照拓扑,对各个路由器的基本命令及重分发配置完成,可参考实验《重分发一》和《重分发二》。
R1:interface Loopback0ip address 1.1.1.1 255.255.255.0interface Serial0/0ip address 192.168.13.1 255.255.255.0serial restart-delay 0interface Serial0/1ip address 192.168.14.1 255.255.255.0serial restart-delay 0router ospf 1router-id 1.1.1.1log-adjacency-changesredistribute rip subnetsnetwork 1.1.1.0 0.0.0.255 area 0network 192.168.14.0 0.0.0.255 area 0router ripversion 2redistribute ospf 1 metric 1network 192.168.13.0no auto-summaryRIP OSPFR1R2R3R4S 0/0 192.168.13.0/24 S 0/0S 0/0 192.168.24.0/24 S 0/0S 0/1 192.168.14.0/24 S 0/1S 0/1 192.168.23.0/24 S 0/1lo 0:1.1.1.1/24lo 0:2.2.2.2/24lo 0:3.3.3./24lo 0:3.3.3.3/24IGP 中4种路由协议的重分布三、OSPF 双点双向重分布R2:!interface Loopback0ip address 2.2.2.2 255.255.255.0interface Serial0/0ip address 192.168.24.2 255.255.255.0serial restart-delay 0interface Serial0/1ip address 192.168.23.2 255.255.255.0serial restart-delay 0router ospf 1router-id 2.2.2.2log-adjacency-changesredistribute rip subnetsnetwork 2.2.2.0 0.0.0.255 area 0network 192.168.24.0 0.0.0.255 area 0!router ripversion 2redistribute ospf 1 metric 1network 192.168.23.0no auto-summaryR3:interface Loopback0ip address 3.3.3.3 255.255.255.0interface Serial0/0ip address 192.168.13.3 255.255.255.0serial restart-delay 0interface Serial0/1ip address 192.168.23.3 255.255.255.0serial restart-delay 0router ripversion 2network 3.0.0.0network 192.168.13.0network 192.168.23.0R4:interface Loopback0ip address 4.4.4.4 255.255.255.0interface Serial0/0ip address 192.168.24.4 255.255.255.0serial restart-delay 0interface Serial0/1ip address 192.168.14.4 255.255.255.0serial restart-delay 0router ospf 1router-id 4.4.4.4log-adjacency-changesnetwork 4.4.4.0 0.0.0.255 area 0network 192.168.14.0 0.0.0.255 area 0network 192.168.24.0 0.0.0.255 area 0R1#sh ip rou//查看R1的路由表1.0.0.0/24 is subnetted, 1 subnetsC 1.1.1.0 is directly connected, Loopback0C 192.168.13.0/24 is directly connected, Serial0/02.0.0.0/8 is variably subnetted, 2 subnets, 2 masksO 2.2.2.2/32 [110/129] via 192.168.14.4, 00:03:05, Serial0/1 R 2.2.2.0/24 [120/2] via 192.168.13.3, 00:00:24, Serial0/0C 192.168.14.0/24 is directly connected, Serial0/13.0.0.0/24 is subnetted, 1 subnetsO E2 3.3.3.0 [110/20] via 192.168.14.4, 00:03:05, Serial0/14.0.0.0/32 is subnetted, 1 subnetsO 4.4.4.4 [110/65] via 192.168.14.4, 00:03:06, Serial0/1O 192.168.24.0/24 [110/128] via 192.168.14.4, 00:03:06, Serial0/1 O E2 192.168.23.0/24 [110/20] via 192.168.14.4, 00:03:06, Serial0/1 R1#R2#sh ip rou//查看R2的路由表1.0.0.0/8 is variably subnetted, 2 subnets, 2 masksO 1.1.1.1/32 [110/129] via 192.168.24.4, 00:02:46, Serial0/0 R 1.1.1.0/24 [120/2] via 192.168.23.3, 00:00:23, Serial0/1O E2 192.168.13.0/24 [110/20] via 192.168.24.4, 00:02:46, Serial0/02.0.0.0/24 is subnetted, 1 subnetsC 2.2.2.0 is directly connected, Loopback0O 192.168.14.0/24 [110/128] via 192.168.24.4, 00:02:46, Serial0/03.0.0.0/24 is subnetted, 1 subnetsR 3.3.3.0 [120/1] via 192.168.23.3, 00:00:23, Serial0/14.0.0.0/32 is subnetted, 1 subnetsO 4.4.4.4 [110/65] via 192.168.24.4, 00:02:46, Serial0/0C 192.168.24.0/24 is directly connected, Serial0/0C 192.168.23.0/24 is directly connected, Serial0/1R1#traceroute 3.3.3.3//R1上跟踪路由3.3.3.3Type escape sequence to abort.Tracing the route to 3.3.3.31 192.168.14.4 116 msec 112 msec 100 msec2 192.168.24.2 136 msec 104 msec 44 msec3 192.168.23.3 152 msec * 244 msecR1#//发现,R1去往3.3.3.0/24的路由,要通过R4,再通过R2,才到达R3,在OSPF区域绕了一圈之后进入RIP,OSPF双点双向重分布会造成环路。
重分布和策略路由
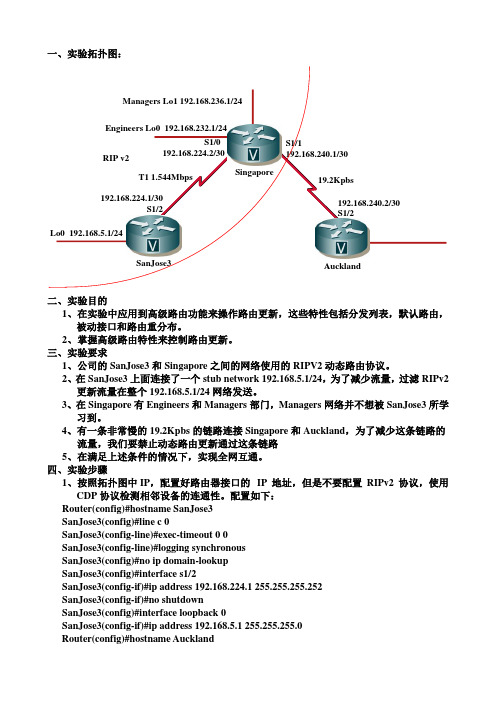
一、实验拓扑图:AucklandSanJose3Singapore 192.168.224.1/30S1/2192.168.240.2/30S1/2 S1/0192.168.224.2/30S1/1192.168.240.1/30 Engineers Lo0 192.168.232.1/24T1 1.544Mbps19.2Kpbs RIP v2Managers Lo1 192.168.236.1/24Lo0 192.168.5.1/24二、实验目的1、在实验中应用到高级路由功能来操作路由更新,这些特性包括分发列表,默认路由,被动接口和路由重分布。
2、掌握高级路由特性来控制路由更新。
三、实验要求1、公司的SanJose3和Singapore 之间的网络使用的RIPV2动态路由协议。
2、在SanJose3上面连接了一个stub network 192.168.5.1/24,为了减少流量,过滤RIPv2更新流量在整个192.168.5.1/24网络发送。
3、在Singapore 有Engineers 和Managers 部门,Managers 网络并不想被SanJose3所学习到。
4、有一条非常慢的19.2Kpbs 的链路连接Singapore 和Auckland ,为了减少这条链路的 流量,我们要禁止动态路由更新通过这条链路5、在满足上述条件的情况下,实现全网互通。
四、实验步骤1、按照拓扑图中IP ,配置好路由器接口的 IP 地址,但是不要配置RIPv2协议,使用CDP 协议检测相邻设备的连通性。
配置如下:Router(config)#hostname SanJose3SanJose3(config)#line c 0SanJose3(config-line)#exec-timeout 0 0SanJose3(config-line)#logging synchronousSanJose3(config)#no ip domain-lookupSanJose3(config)#interface s1/2SanJose3(config-if)#ip address 192.168.224.1 255.255.255.252SanJose3(config-if)#no shutdownSanJose3(config)#interface loopback 0SanJose3(config-if)#ip address 192.168.5.1 255.255.255.0Router(config)#hostname AucklandAuckland (config)#interface s1/2Auckland (config-if)#ip address 192.168.240.2 255.255.255.252Auckland (config-if)#no shutdownAuckland (config)#interface loopback 0Auckland (config-if)#ip address 192.168.248.1 255.255.255.0Router(config)#hostname SingaporeSingapore(config)#interface loopback 0Singapore(config-if)#ip address 192.168.232.1 255.255.255.0Singapore(config-if)#description EngineersSingapore(config)#interface loopback 1Singapore(config-if)#ip address 192.168.236.1 255.255.255.0Singapore(config-if)#description ManagerSingapore(config)#interface s1/0Singapore(config-if)#ip address 192.168.224.2 255.255.255.252Singapore(config-if)#no shutdownSingapore(config)#interface s1/1Singapore(config-if)#ip address 192.168.240.1 255.255.255.252Singapore(config-if)#no shutdown配置完成后使用CDP 协议检查相邻设备的连通性,如下2、在SanJose3上,配置RIPv2协议通告物理直连的网络,配置如下:SanJose3(config)#router ripSanJose3(config-router)#version 2SanJose3(config-router)#network 192.168.224.0SanJose3(config-router)#network 192.168.5.0因为192.158.5.0是一个stub network,这个网络里没有路由器或者主机需要RIPv2协议的更新。
OSPF多进程之间的路由重发布

OSPF多进程之间的路由重发布1、实验拓扑如下图:R1R4R3 R2Area 00spf 10Area 0Ospf 1002、实验目的:1、实现R2与R3之间互相访问时的数据分流。
R2访问R3的3.3.3.3/32时走R1,R2访问R3的30.30.30.30/32时走R4。
R3访问R2的2.2.2.2/32时走R1,R3访问R2的20.20.20.20/32时走R1。
2、实现线路的冗余备份。
当R1链路故障时数据可以走R4,当R4链路故障时数据可以走R1。
实现链路的冗余备份。
3、理解并掌握route-map在控制路由方面的应用。
3、实验配置文档R1配置:config terint f0/0ip add 10.0.0.1 255.255.255.252no shutint f1/0ip add 10.0.0.5 255.255.255.252no shutint lo 0ip add 1.1.1.1 255.255.255.255endwriteconfig terrouter ospf 10router-id 1.1.1.1network 10.0.0.0 0.0.0.3 area 0redistribute ospf 100 metric-type 1 subnets route-map ospf100_to_ospf10 distribute-list deny_ospf100 inendconfig terrouter ospf 100router-id 1.1.1.1network 10.0.0.4 0.0.0.3 area 0redistribute ospf 10 metric-type 1 subnets route-map ospf10_to_ospf100 distribute-list deny_ospf10 inendwriteip access-list standard deny_ospf10deny 2.2.2.2 0.0.0.0deny 20.20.20.20 0.0.0.0permit anyip access-list standard deny_ospf100deny 3.3.3.3 0.0.0.0deny 30.30.30.30 0.0.0.0permit anyaccess-list 10 permit 2.2.2.2 0.0.0.0access-list 11 permit 3.3.3.3 0.0.0.0access-list 20 permit 20.20.20.20 0.0.0.0access-list 21 permit 30.30.30.30 0.0.0.0route-map ospf100_to_ospf10 permit 10match ip address 11set metric 100route-map ospf100_to_ospf10 permit 20match ip address 21set metric 200route-map ospf10_to_ospf100 permit 10match ip address 10set metric 100route-map ospf10_to_ospf100 permit 20match ip address 20set metric 200R4配置:config terint f0/0ip add 172.16.0.1 255.255.255.252no shutint f1/0ip add 172.16.0.5 255.255.255.252no shutint lo 0ip add 4.4.4.4 255.255.255.255endwriteconfig terrouter ospf 10router-id 4.4.4.4network 172.16.0.4 0.0.0.3 area 0redistribute ospf 100 metric-type 1 subnets route-map ospf100_to_ospf10 distribute-list deny_ospf100 inendconfig terrouter ospf 100router-id 4.4.4.4network 172.16.0.0 0.0.0.3 area 0redistribute ospf 10 metric-type 1 subnets route-map ospf10_to_ospf100 distribute-list deny_ospf10 inendwriteip access-list standard deny_ospf10deny 2.2.2.2 0.0.0.0deny 20.20.20.20 0.0.0.0permit anyip access-list standard deny_ospf100deny 3.3.3.3 0.0.0.0deny 30.30.30.30 0.0.0.0permit anyaccess-list 10 permit 2.2.2.2 0.0.0.0access-list 11 permit 3.3.3.3 0.0.0.0access-list 20 permit 20.20.20.20 0.0.0.0access-list 21 permit 30.30.30.30 0.0.0.0route-map ospf100_to_ospf10 permit 10 match ip address 11set metric 200route-map ospf100_to_ospf10 permit 20 match ip address 21set metric 100route-map ospf10_to_ospf100 permit 10 match ip address 10set metric 200route-map ospf10_to_ospf100 permit 20 match ip address 20set metric 100R2的配置:config terint f0/0ip add 10.0.0.2 255.255.255.252no shutint f1/0ip add 172.16.0.6 255.255.255.252no shutint lo 0ip add 2.2.2.2 255.255.255.255int lo 1ip add 20.20.20.20 255.255.255.255 endwriteconfig terrouter ospf 10router-id 2.2.2.2network 172.16.0.4 0.0.0.3 area 0 network 10.0.0.0 0.0.0.3 area 0 network 2.2.2.2 0.0.0.0 area 0network 20.20.20.20 0.0.0.0 area 0endwriteR3的配置:config terint f0/0ip add 10.0.0.6 255.255.255.252no shutint f1/0ip add 172.16.0.2 255.255.255.252no shutint lo 0ip add 3.3.3.3 255.255.255.255int lo 1ip add 30.30.30.30 255.255.255.255endwriteconfig termrouter ospf 100router-id 3.3.3.3network 172.16.0.0 0.0.0.3 area 0network 10.0.0.4 0.0.0.3 area 0network 3.3.3.3 0.0.0.0 area 0network 30.30.30.30 0.0.0.0 area 0endwrite4、实验测试1、在R2上show ip route查看结果,可以看出实现了数据分流。
路由重发布

当把OSPF充分布到RIP中的时候,默认的METRIC为无穷大,如果不用default-metric来进行修改,或用redistribute ospf 1 metric (number) 的话,那样就无意义了。
1.当把OSPF充分布到RIP中的时候,默认的METRIC为无穷大,因此,RIP是不接受的!!!所以,要通过default-metric来进行修改,当然,也可以在redis 命令后进行修改的!2.在将其他协议redis to ospf中的时候,必须加sub,否则只会redistribute class routing!一.重发布基础:大家都知道,一般来说一个组织或者一个跨国公司很少只使用一个路由协议,而如果一个公司同时运行了多个路由协议,或者一个公司和另外一个公司合并的时候两个公司用的路由协议并不一样,这个时候该怎么办呢?所以必须采取一种方式来将一个路由协议的信息发布到另外的一个路由协议里面去,这样,重发布的技术就诞生了。
(重发布的概念:将一种路由选择协议获悉的网络告知另一种路由选择协议,以便网络中每台工作站能到达其他的任何一台工作站,这一过程被称为重发布。
)重发布只能在针对同一种第三层协议的路由选择进程之间进行,也就是说,OSPF,RIP,IGRP等之间可以重发布,因为他们都属于TCP/IP协议栈的协议,而AppleTalk或者IPX 协议栈的协议与TCP/IP协议栈的路由选择协议就不能相互重发布路由了。
二.重发布的命令:Router(config-router)#redistribute protocol [protocol-id] { level-1 | level-2 | level-1-2 } {metric metric-value} {metric-type type-value} {match ( internal | external 1 | external 2 ) } {tag Tag-value} {route-map map-tag} {weight weight } {subnets}对此命令就不详细介绍了,大家可以参考人民邮电出版社《CCNP BSCI 认证指南(第三版)》第435页。
OSPF与RIP路由重发布

实验十五OSPF与RIP路由重发布实验题目:OSPF与RIP路由重发布实验目的:在本次实验中,你将重分布RIPv2到OSPF协议,并且在RIPv2路由器提供缺省路由。
在完成本次实验之后,你需要完成下列任务:在不同的路由协议之间重分布路由信息。
实验学时: 2实验设备及环境:路由器RSR10、路由器以太网接口、 PC机实验基本配置:1.RIP 协议⑴全局设置指定使用RIP协议 router rip(2)路由设置指定与该路由器相连的网络 network network2.OSPF 协议⑴全局设置指定使用OSPF协议 router ospf process-id (2)路由设置指定与该路由器相连的网络 network address wildcard-mask area area-id 指定与该路由器相邻的节点地址 neighbor ip-address启用路由重发布命令 default-information originate 指定与该路由器相邻的节点地址 neighbor ip-address实验拓扑图图19 OSPF与RIP路由重发布实验拓扑图实验步骤1.在路由器上配置IP路由选择和IP地址。
RA#config tRA(config)# interface FastEthernet 0/0 //进入以太网接口RA(config-if)#ip address 172.16.1.5 255.255.255.252 //配置ip地址RA(config)# interface Loopback 0 //进入回环接口RA(config-if)#ip address 192.168.1.1 255.255.255.252 //配置ip地址RA(config)#interface Loopback 1 //进入回环接口RA(config-if)#ip address 192.168.2.1 255.255.255.0 //配置ip地址RB(config)#interface FastEthernet 0/0 //进入以太网接口RB(config-if)#ip address 172.16.1.6 255.255.255.252 //配置ip地址RB(config)#interface FastEthernet 0/1 //进入以太网接口RB(config-if)#ip address 172.16.1.1 255.255.255.252 //配置ip地址RC(config)# interface FastEthernet 0/0 //进入以太网接口RC(config-if)# ip address 172.16.1.2 255.255.255.252 //配置ip地址RC(config)# interface FastEthernet 0/1 //进入以太网接口RC(config-if)#ip address 172.16.1.9 255.255.255.252 //配置ip地址RC(config)#interface Loopback 0 //进入回环接口RC(config-if)#ip address 172.16.3.1 255.255.255.0 //配置ip地址RD(config)#interface FastEthernet 0/0 //进入以太网接口RD(config-if)#ip address 172.16.1.10 255.255.255.252 //配置ip地址RD(config)#interface Loopback 0 //进入回环接口RD(config-if)#i p address 10.1.1.1 255.255.255.0 //配置ip地址RD(config)#interface Loopback 1 //进入回环接口RD(config-if)#ip address 10.1.2.1 255.255.255.0 //配置ip地址RD(config)#interface Loopback 2 //进入回环接口RD(config-if)#ip address 200.1.1.1 255.255.255.0 //配置ip地址2.配置RIP和OSPF。
EIGRP协议介绍

AD:AdvertisedDistance(RD:ReportDistance)通告距离Successor:后继站
FS:FeasibleSuccessor可行后继站
FC:FeasibleCondition可行性条件
4.Protocol-dependentmodules(PDMS)协议相关模块
R1(config-router)#network0.0.0.0,包含的第一层概念就是将本地路由器的所有接口都宣告进EIGRP进程,第二层概念是当该路由本地拥有一条0.0.0.0/0并且只关联出站接口的静态路由时,该命令也会将该缺省路由以EIGRP更新的形式通告。所以network0.0.0.0不可以随
实验 1:路径度量值计算
三台路由器都摹拟一个环回网段
Show interfaces0/0:可以看到接口带宽和延迟(延迟除以 10)
不查看路由表的情况下, 手工计算每台路由器去往每一个网段的度量值。验证EIGRP 计算路由的Metric 使用的带宽如何提取
实验 2:
通过修改带宽和延迟来实现 R1 到 R3 的负载均衡。
Showipeigrpneighbrosdetail查看EIGRP邻居表详细信息
一台路由器只要运行了 EIGRP,这台路由器需要有一个域内惟一的标识,称为 RID (Router ID) ,优先手工指定,然后是环回口地址,最后是物理接口的最大地址。
EIGRP想要建邻居,需要保证 EIGRP 的 RID 不相同
EIGRP
EIGRP有5种报文,当今只用到4种
Hello:Establishneighborrelationships默认以组播发送。通过修改可以使单播发送。
2021年下半年网络规划设计师考点总结
WLAN、IPV6、QoS、大数据和云计算、物联网技术
网络安全解决方案
网络安全基础、网络攻击、恶意软件和病毒防止、加密技术、数字签名、保文摘要、数字证书、安全协议、PKI体系、网络隔离、防火墙技术、入侵检测技术、VPN技术、802.1X、AAA
服务器和网络存储技术
服务器概述、RAID、网络存储、灾备技术
2019
1.论IPv6在企业网络中的规划与设计。2.论网络虚拟化技术在企业网络中的设计与应用
路由规划
路由概念基础、静态路由和默认路由、单臂路由、RIP、OSPF、EIGRP、路由重分发、BGP、NAT、策略路由
传输层和应用层
传输层概念、UDP、TCP、DNS、电子邮件、FTP、DHCP
网络管理
网络管理的功能、网络管理架构、SNMP、RMON、网络故障的排除
广域网和接入网
广域网基础、DDN、SDH、MSTP、移动通讯网络、光纤接入网、XDSL
网络规划与设计
网络需求分析、通信规范分析、逻辑网络设计、物理网络设计、网络相关测试和维护
非网络部分
软件开发基础、应用数学、计算机硬件、操作系统、项目管理、知识产权
英语
计算机专业英语
二、下午案例分析考点
考点类型
具体考点
企业内部网络规划
网络设备的选择、VLAN、Trunk、STP、三层交换、HSRP、VRRP、GLBP、子网划分的规划、通信流量分析、机房设计
2021年下半年网络规划设计师考点总结
一、上午选择题考点
考点类型
具体考点
网络基础概念
OSI七层模型、TCP/IP体系结构、信道速率计算、调制技术、PCM技术、编码方案、复用技术、差错控制、传输介质和设备
路由重分布配置
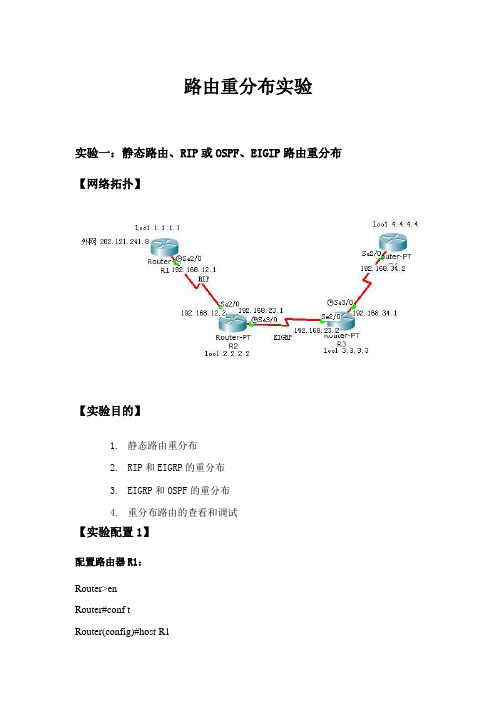
路由重分布实验实验一:静态路由、RIP或OSPF、EIGIP路由重分布【网络拓扑】【实验目的】1.静态路由重分布2.RIP和EIGRP的重分布3.EIGRP和OSPF的重分布4.重分布路由的查看和调试【实验配置1】配置路由器R1:Router>enRouter#conf tRouter(config)#host R1R1(config)#no ip domain looR1(config)#int loo1R1(config-if)#ip add 1.1.1.1 255.255.255.0R1(config-if)#no shutR1(config-if)#exitR1(config)#int loo2R1(config-if)#ip add 202.121.241.8 255.255.255.0 R1(config-if)#no shutR1(config-if)#exitR1(config)#int s2/0R1(config-if)#ip add 192.168.12.1 255.255.255.0 R1(config-if)#clock rate 64000R1(config-if)#no shutR1(config-if)#exitR1(config)#router ripR1(config-router)#ver 2R1(config-router)#no autoR1(config-router)#network 192.168.12.0R1(config-router)#exitR1(config)#ip route 0.0.0.0 0.0.0.0 loo2R1(config)#exit配置路由器R2:Router>enRouter#conf tRouter(config)#host R2R2(config)#no ip domain looR2(config)#int loo1R2(config-if)#ip add 2.2.2.2 255.255.255.0R2(config-if)#no shutR2(config-if)#exitR2(config)#int s2/0R2(config-if)#ip add 192.168.12.2 255.255.255.0 R2(config-if)#no shutR2(config-if)#exitR2(config)#int s3/0R2(config-if)#ip add 192.168.23.1 255.255.255.0 R2(config-if)#clock rate 64000R2(config-if)#exitR2(config)#router eigrp 1R2(config-router)#network 192.168.23.0R2(config-router)#no autoR2(config-router)#exitR2(config)#router ripR2(config-router)#ver 2R2(config-router)#no autoR2(config-router)#network 192.168.12.0R2(config-router)#exit配置路由器R3:Router>enRouter#conf tRouter(config)#host R3R3(config)#no ip domain looR3(config)#int loo1R3(config-if)#ip add 3.3.3.3 255.255.255.0R3(config-if)#no shutR3(config-if)#exitR3(config)#int s2/0R3(config-if)#ip add 192.168.23.2 255.255.255.0R3(config-if)#no shutR3(config-if)#exitR3(config)#int s3/0R3(config-if)#ip add 192.168.34.1 255.255.255.0R3(config-if)#clock rate 64000R3(config-if)#no shutR3(config-if)#exitR3(config)#router eigrp 1R3(config-router)#network 3.3.3.0 0.0.0.255R3(config-router)#network 192.168.23.0 0.0.0.255R3(config-router)#no autoR3(config-router)#exitR3(config)#router ospf 1R3(config-router)#router-id 3.3.3.3R3(config-router)#network 192.168.34.0 0.0.0.255 area 0 R3(config-router)#exit配置路由器R4:Router>enRouter#conf tRouter(config)#host R4R4(config)#no ip domain looR4(config)#int loo1R4(config-if)#ip add 4.4.4.4 255.255.255.0R4(config-if)#exitR4(config)#int s2/0R4(config-if)#ip add 192.168.34.2 255.255.255.0R4(config-if)#no shutR4(config-if)#exitR4(config)#router ospf 1R4(config-router)#router-id 4.4.4.4R4(config-router)#network 4.4.4.0 0.0.0.255 area 0R4(config-router)#network 192.168.34.0 0.0.0.255 area 0 R4(config-router)#exit【实验测试1】测试局部连通性:R1 ping R2R2 ping R3R3 ping R4显示路由表R1R2R3R4【实验配置2】路由重分布配置:在R1上进行静态重分布R1(config)#router ripR1(config-router)#redistribute static metric 3R1(config-router)#exit在R2将RIP重分布到EIGRP中,将EIGRP重分布到RIP中:R2(config)#router eigrp 1R2(config-router)#redistribute rip metric 10000 100 255 1 1500R2(config-router)#exitR2(config)#router ripR2(config-router)#redistribute eigrp 1 metric 10R2(config-router)#exit在R3将OSPF重分布到EIGRP中,将EIGRP重分布到OSPF中:R3(config)#router eigrp 1R3(config-router)#redistribute ospf 1 metric 10000 100 255 1 1500R3(config-router)#distance eigrp 90 150R3(config-router)#exitR3(config)#router ospf 1R3(config-router)#redistribute eigrp 1 metric 30 metric-type 1 subnetsR3(config-router)#exit【实验测试2】显示路由表:R1R2R3R4测试连通性:在R1上ping其他网段,通:实验二:路由重分布综合配置【网络拓扑】【实验目的】1.静态路由重分布2.RIP和EIGRP的重分布3.EIGRP和OSPF的重分布4.重分布路由的查看和调试【实验配置1】R1:Router>enRouter#conf tRouter(config)#host R1R1(config)#no ip domain looR1(config)#int loo0R1(config-if)#ip addr 192.168.19.1 255.255.255.0R1(config-if)#exitR1(config)#int loo1R1(config-if)#ip add 192.168.8.1 255.255.255.0R1(config-if)#exitR1(config)#int s2/0R1(config-if)#ip add 172.16.62.1 255.255.255.0R1(config-if)#clock rate 64000R1(config-if)#no shutR1(config-if)#exitR1(config)#int s3/0R1(config-if)#ip add 172.16.63.1 255.255.255.0R1(config-if)#no shutR1(config-if)#exitR1(config)#router ripR1(config-router)#ver 2R1(config-router)#network 192.168.19.0R1(config-router)#network 192.168.8.0R1(config-router)#exitR1(config)#router ospf 100R1(config-router)#network 172.16.62.0 0.0.0.255 area 0 R1(config-router)#network 172.16.63.0 0.0.0.255 area 0 R1(config-router)#exitR2:Router>enRouter#conf tRouter(config)#host R2R2(config)#no ip domain looR2(config)#int loo0R2(config-if)#ip add 192.168.16.1 255.255.255.0R2(config-if)#exitR2(config)#int loo1R2(config-if)#ip add 192.168.17.1 255.255.255.0R2(config-if)#exitR2(config)#int s3/0R2(config-if)#ip addr 172.16.64.2 255.255.255.0R2(config-if)#clock rate 64000R2(config-if)#no shutR2(config-if)#exitR2(config)#int s2/0R2(config-if)#ip add 172.16.62.2 255.255.255.0R2(config-if)#no shutR2(config-if)#exitR2(config)#router ripR2(config-router)#ver 2R2(config-router)#net 192.168.16.0R2(config-router)#net 192.168.17.0R2(config-router)#exitR2(config)#router ospf 100R2(config-router)#net 172.16.62.0 255.255.255.0 area 0 R2(config-router)#net 172.16.64.0 255.255.255.0 area 0 R2(config-router)#exitR3:Router>enRouter#conf tRouter(config)#host R3R3(config)#no ip domain looR3(config)#int s2/0R3(config-if)#ip add 172.16.64.3 255.255.255.0R3(config-if)#no shutR3(config-if)#exitR3(config)#int s3/0R3(config-if)#ip add 172.16.63.3 255.255.255.0R3(config-if)#clock rate 64000R3(config-if)#no shutR3(config-if)#exitR3(config)#int loo0R3(config-if)#ip add 192.168.24.1 255.255.255.0R3(config-if)#exitR3(config)#router ripR3(config-router)#net 192.168.24.0R3(config-router)#ver 2R3(config-router)#exitR3(config)#router ospf 100R3(config-router)#network 172.16.64.0 0.0.0.255 area 0 R3(config-router)#network 172.16.63.0 0.0.0.255 area 0 R3(config-router)#exitR3(config)#【实验测试1】显示路由表:R1:R2:R3:【重分布配置】R1:R1(config)#router ripR1(config-router)#redistribute ospf 100 match internal external 1 external 2 R1(config-router)#exitR1(config)#router ospf 100R1(config-router)#redistribute rip subnetsR1(config-router)#exitR2:R2(config)#router ripR2(config-router)#redistribute ospf 100 match internal external 1 external 2 R2(config-router)#exitR2(config)#router ospf 100R2(config-router)#redistribute rip subnetsR2(config-router)#exitR3:R3(config)#router ripR3(config-router)#redistribute ospf 100 match internal external 1 external 2 R3(config-router)#exitR3(config)#router ospf 100R3(config-router)#redistribute rip subnetsR3(config-router)#exit【实验测试2】显示路由表:R1:R2:R3:。
路由重发布-七种发布类型

今天我们就来配置这几种路由重分发。试验拓扑图都使用如下拓扑:
配置主机名、配置接口IP等基本步骤省略。
一.rip和eigrp之间路由重分发
假设R1上运行的是rip路由协议;R3上运行的是eigrp路由协议
在rip和eigrp之间配置路由重分发时要注意:
三、 rip和isis之间的路由重分发
假设R1上运行的是rip路由协议;R3上运行的是isis路由协议
在rip和isis之间配置路由重分发时要注意:
Rip的度量值为跳数
Isis要注意isis类型,当把其他路由协议重分发到isis中时,必须使用level-2
r2(config)#router rip 把isis重分发到rip中
r2(config)#router ospf 1 把isis重分发到ospf中
r2(config-router)#redistribute isis metric 2 level-1-2
% Only classful networks will be redistributed
% Only classful networks will be redistributed
r2(config-router)#exit
五.eigrp和isis之间的路由重分发
假设R1上运行的是eigrp路由协议;R3上运行的是isis路由协议
Eigrp的度量值为带宽、延迟、可靠、负载最大传输单元。
Isis要注意isis类型,当把其他路由协议重分发到isis中时,必须使用level-2
r2(config)#router eigrp 100 把isis重分发到eigrp中
动态路由协议RIPOSPFEIGRP

动态路由协议RIPOSPFEIGRP动态路由协议是用于在计算机网络中自动选择最佳路径来传送数据的一种协议。
它们能自动探测网络中的路由器,并且将网络中的路由表信息分享给其他路由器。
在这篇文章中,我们将讨论三种常见的动态路由协议:RIP、OSPF和EIGRP。
1. RIP(Routing Information Protocol)是一种最早出现的动态路由协议,它基于距离向量算法。
RIP使用跳数作为衡量路径距离的指标。
当路由器收到其他路由器发送的路由表信息时,它会将这些信息保存在本地路由表中,并选择距离最短的路径作为下一跳。
RIP协议使用了限制性距离,使得在选择路径时可以避免出现问题,最大跳数为15、RIP协议的优点是简单易用,但是它的网络收敛速度较慢,且对大型网络的支持较弱。
2. OSPF(Open Shortest Path First)是一种基于链路状态算法的动态路由协议。
与RIP协议不同,OSPF通过收集路由器通告的网络拓扑信息来计算最短路径。
OSPF协议使用了不同的度量标准,包括带宽、延迟、可靠性等,来决定最佳路径。
OSPF协议的一个重要特点是将网络划分为不同的区域,每个区域内部的路由器仅需知道到达其他区域的最佳路径即可。
这种划分可以减少网络的复杂性,提高网络的扩展性以及收敛速度。
3. EIGRP(Enhanced Interior Gateway Routing Protocol)是一种由思科系统开发的高级路由协议。
EIGRP结合了距离向量和链路状态算法的优点。
与RIP和OSPF协议不同,EIGRP协议使用带宽、延迟、可靠性和负载等多个度量标准来选择最佳路径。
EIGRP协议还具有快速收敛、低带宽消耗和有效负载分担等特点。
EIGRP协议只能在思科设备之间使用,因此它适用于只使用思科设备的网络环境。
总结来说,RIP、OSPF和EIGRP是三种常见的动态路由协议。
RIP协议简单易用,适用于小型网络;OSPF协议通过链路状态算法提供更高的网络扩展性和收敛速度;EIGRP协议是一种高级路由协议,具有快速收敛、低带宽消耗和有效负载分担等特点。
RIP与OSPF双点双向重分布
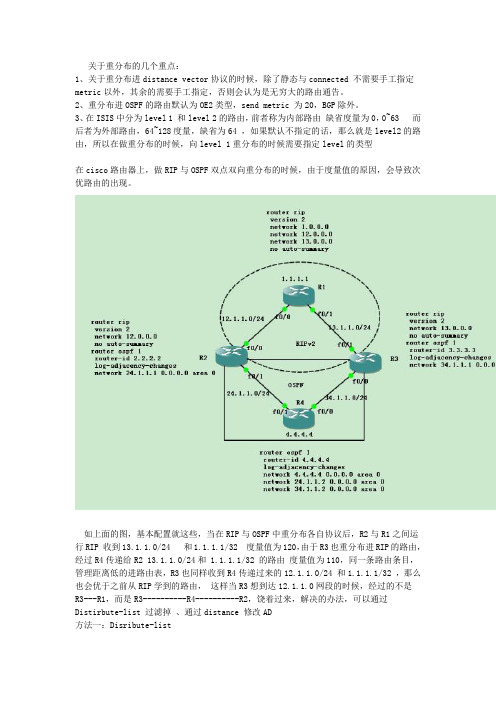
关于重分布的几个重点:1、关于重分布进distance vector协议的时候,除了静态与connected 不需要手工指定metric以外,其余的需要手工指定,否则会认为是无穷大的路由通告。
2、重分布进OSPF的路由默认为OE2类型,send metric 为20,BGP除外。
3、在ISIS中分为level 1 和level 2的路由,前者称为内部路由缺省度量为0,0~63 而后者为外部路由,64~128度量,缺省为64 ,如果默认不指定的话,那么就是level2的路由,所以在做重分布的时候,向level 1重分布的时候需要指定level的类型在cisco路由器上,做RIP与OSPF双点双向重分布的时候,由于度量值的原因,会导致次优路由的出现。
如上面的图,基本配置就这些,当在RIP与OSPF中重分布各自协议后,R2与R1之间运行RIP 收到13.1.1.0/24 和1.1.1.1/32 度量值为120,由于R3也重分布进RIP的路由,经过R4传递给R2 13.1.1.0/24和 1.1.1.1/32 的路由度量值为110,同一条路由条目,管理距离低的进路由表,R3也同样收到R4传递过来的12.1.1.0/24 和1.1.1.1/32 ,那么也会优于之前从RIP学到的路由,这样当R3想到达12.1.1.0网段的时候,经过的不是R3---R1,而是R3----------R4----------R2,饶着过来,解决的办法,可以通过Distirbute-list 过滤掉、通过distance 修改AD方法一:Disribute-listR2上:access-list 1 permit 34.1.1.0 0.0.0.255access-list 1 permit host 4.4.4.4router ospf 1disribute-list 1 inR3上 access-list 1 permit 24.1.1.0 0.0.0.255access-list 1 permit host 4.4.4.4router ospf 1distribute-list in这时候在看下路由表各自的路由域都正常收到路由,没出现次优路由的问题。
实验六 配置RIP与OSPF路由重发布
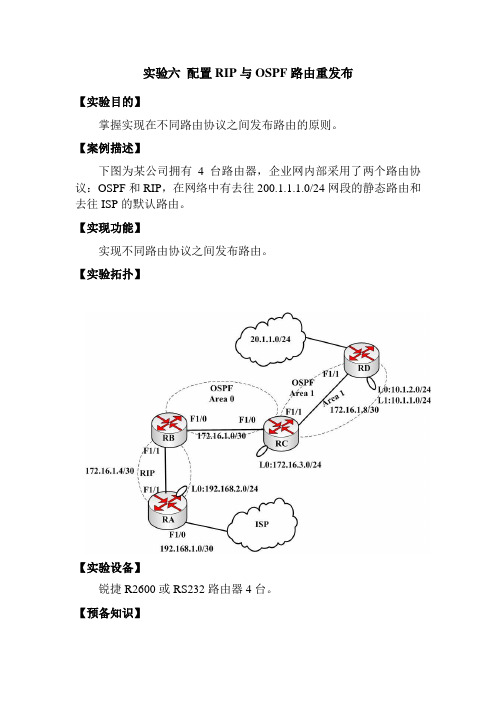
实验六配置RIP与OSPF路由重发布【实验目的】掌握实现在不同路由协议之间发布路由的原则。
【案例描述】下图为某公司拥有4台路由器,企业网内部采用了两个路由协议:OSPF和RIP,在网络中有去往200.1.1.1.0/24网段的静态路由和去往ISP的默认路由。
【实现功能】实现不同路由协议之间发布路由。
【实验拓扑】【实验设备】锐捷R2600或RS232路由器4台。
【预备知识】路由器基本配置,RIP路由协议,OSPF路由协议,路由重发布。
【实验步骤】第一步:配置路由器的接口IP地址。
第二步:配置RIP和OSPFRA(config)#router ospf 1RA(config-router)#network 10.1.1.0 0.0.0.255 area 1RA(config-router)#network 10.1.2.0 0.0.0.255 area 1RA(config-router)#network 172.16.1.8 0.0.0.3 area 1RB(config)#router ospf 1RB(config-router)#network 172.16.1.0 0.0.0.3 area 0RB(config)#router ripRB(config-router)#version 2RB(config-router)#network 172.16.0.0RB(config-router)#no auto-summaryRC(config)#router ospf 1RC(config-router)#network 172.16.1.0 0.0.0.3 area 0RC(config-router)#network 172.16.3.0 0.0.0.255 area 0RC(config-router)#network 172.16.1.8 0.0.0.3 area 1RD(config)#router ospf 1RD(config-router)#network 10.1.1.0 0.0.0.255 area 1RD(config-router)#network 10.1.2.0 0.0.0.255 area 1RD(config-router)#network 172.16.1.8 0.0.0.3 area 1第三步:配置路由重发布RA(config)#router ripRA(config-router)#default-information originateRB(config)#router ospf 1RB(config-router)#redistribute rip metric 50 subnetsRB(config-router)# default-information originateRB(config)#router ripRB(config-router)# redistribute ospf metric 1RD(config)#router ospf 1RD(config-router)#ridistribute static subnets第四步:验证测试。
5)重分发总结

重分发讲到的工具:@分发列表@前缀列表@route maps将路由协议A重分发进RIP,seed metric为0,代表不可达,需要手工修改将静态路由重分发进RIP,seed metric为1,可达,无需修改,并且0.0.0.0缺省路由可以进入进程。
将直连路由重分发进rip,seed metric为1,可达,无需修改。
Default-metric命令只会影响协议A重分发进rip路由,以及静态重分发进rip的路由,但是不会修改connected充分发进rip的seed metric。
如果在重分发路由器上开启的是ripv1或者开启的是基于自动汇总的ripv2则重分发进入的路由依旧会遵循自动汇总原则。
将路由协议A重分发进OSPF,缺省seed metric为20,metric-type为O E2可以使用default-metric命令修改这类重分发进入的路由的seed metric将static路由重分发进ospf,缺省seed metric为20,type为O E2,只有明细static路由可以进入,缺省路由无法进入。
将connected路由重分发进ospf,类似重分发static。
Default-metric命令可以修改static和来自于协议A的重分发路由的seed metric,对connected 路由无效。
将协议A重分发进EIGRP,缺省seed metric为0,不可达,需要手工修改将静态路由重分发进EIGRP,缺省seed metric不为0,可达,并且缺省路由可以进入将直连路由重分发进EIGRP,缺省seed metric不为0,可达。
Default-metric会影响静态以及其他路由协议重分发进入路由的seed metric,对直连无效。
默认将ISIS重分发进任何其他协议的时候,都只会将level-2路由发送出去,并且不能携带智联路由,只能携带通过ISIS学习到的打i的路由。
将路由选择协议A的路由重分发进ISIS,缺省seed metric 为0,可达,并且路由类型是level-2 将静态路由重分发进ISIS,缺省seed metric为0,可达,只能包含明细路由,缺省路由无法进入将直连路由重分发进ISIS,缺省seed metric为0,可达。
路由重分发

Router(config)#access-list 1 deny 1.1.1.0
Router(config)#access-list 1 permit any
除了1.1.1.0这条路由之外,其他的所有路由都允许被重分发。
除了1.1.1.0这条路由之外i,其他所有路由都允许被重分发。
配置四:
Router(config)#route-map OSPF2RIP deny
Router(config-route-map)#match ip address 1
Router(config)#access-list 1 deny 1.1.1.0
配置三:
Router(config)#route-map OSPF2RIP deny
Router(config-route-map)#match ip address 1
Router(config)#route-map OSPF2RIP permit 100
Router(config)#access-list 1 permit 1.1.1.0
Router(config)#access-list 1 permit any
将只有1.1.1.0这条路由允许被重分发。
策略路由配置:(ACL写permit any将针对所有的数据包)
Router(config)#access-list 100 permit host <源ip add> host <目标ip add>
Router(config)#interface <input interface>
路由重分发基本配置
路由重分发基本配置路由重分发是一种将路由表中的路由信息重新分发到其他路由器的技术。
它可以帮助网络管理员更好地管理网络,提高网络的可靠性和性能。
下面是路由重分发的基本配置方法。
1. 配置路由器的接口首先,需要配置路由器的接口。
在路由器上输入命令“interface interface-name”,其中interface-name是要配置的接口名称。
然后,输入命令“ip address ip-address subnet-mask”,其中ip-address是要分配给接口的IP地址,subnet-mask是子网掩码。
最后,输入命令“no shutdown”来启用接口。
2. 配置路由器的路由表接下来,需要配置路由器的路由表。
在路由器上输入命令“ip route destination-network subnet-mask next-hop-address”,其中destination-network是要到达的目标网络,subnet-mask是目标网络的子网掩码,next-hop-address是下一跳路由器的IP地址。
3. 配置路由器的路由重分发最后,需要配置路由器的路由重分发。
在路由器上输入命令“redistribute protocol-name”,其中protocol-name是要重分发的协议名称,如OSPF、EIGRP等。
然后,输入命令“network network-address subnet-mask”,其中network-address是要重分发的网络地址,subnet-mask是网络的子网掩码。
需要注意的是,在配置路由重分发时,需要确保所有路由器都使用相同的协议和路由表。
否则,可能会导致路由环路和其他问题。
总之,路由重分发是一种非常有用的技术,可以帮助网络管理员更好地管理网络。
通过上述基本配置方法,可以轻松地实现路由重分发,并提高网络的可靠性和性能。
EIGRP与OSPF双向重分发
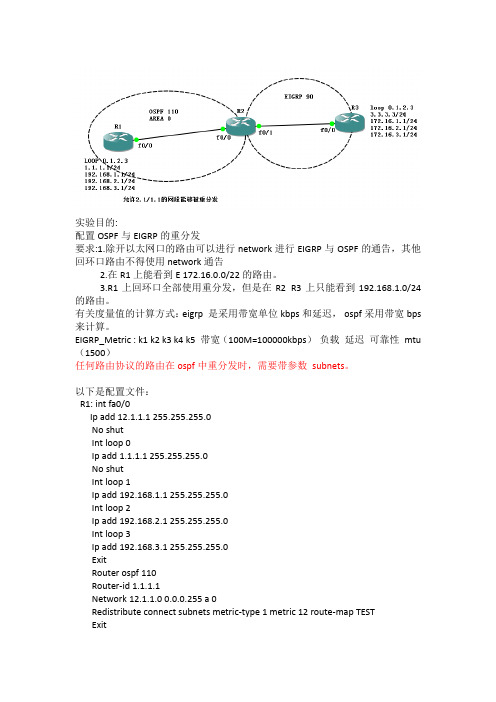
实验目的:配置OSPF与EIGRP的重分发要求:1.除开以太网口的路由可以进行network进行EIGRP与OSPF的通告,其他回环口路由不得使用network通告2.在R1上能看到E 172.16.0.0/22的路由。
3.R1上回环口全部使用重分发,但是在R2 R3上只能看到192.168.1.0/24的路由。
有关度量值的计算方式:eigrp 是采用带宽单位kbps和延迟,ospf采用带宽bps 来计算。
EIGRP_Metric : k1 k2 k3 k4 k5 带宽(100M=100000kbps)负载延迟可靠性mtu (1500)任何路由协议的路由在ospf中重分发时,需要带参数subnets。
以下是配置文件:R1: int fa0/0Ip add 12.1.1.1 255.255.255.0No shutInt loop 0Ip add 1.1.1.1 255.255.255.0No shutInt loop 1Ip add 192.168.1.1 255.255.255.0Int loop 2Ip add 192.168.2.1 255.255.255.0Int loop 3Ip add 192.168.3.1 255.255.255.0ExitRouter ospf 110Router-id 1.1.1.1Network 12.1.1.0 0.0.0.255 a 0Redistribute connect subnets metric-type 1 metric 12 route-map TESTExitAccess-list 100 permit ip 192.168.1.0 0.0.0.255 any Route-map TEST permit 10Match ip address 100ExitR2Int fa0/0Ip add 12.1.1.2 255.255.255.0No shutInt fa0/1Ip add 23.1.1.2 255.255.255.0No shutInt loop 0Ip add 2.2.2.2 255.255.255.0ExitRouter ospf 110Router-id 2.2.2.2Network 12.1.1.0 0.0.0.255 a 0ExitRouter eigrp 90No auto-summaryNetwork 23.1.1.0 0.0.0.255Redistribute ospf 110 metric 100000 11 20 255 1500 ExitRouter ospf 110Redistribute eigrp 90 subnets metric-type 1 metric 12 ExitR3Int fa0/0Ip add 23.1.1.3 255.255.255.0No shutInt loop 0Ip add 3.3.3.3 255.255.255.0Int loop 1Ip add 172.16.1.1 255.255.255.0Int loop 2Ip add 172.16.2.1 255.255.255.0Int loop 3Ip add 172.16.3.1 255.255.255.0Router eigrp 90No auto-summaryNetwork 23.1.1.0 0.0.0.255Redistribute connect metric 100000 20 255 1 1500Exit将172.16.网段汇总,有两种方式,1).在R3 :int fa0/0 ip summary-address eigrp 90 172.16.0.0 255.255.252.02).在R2:router ospf 110Summary-address 172.16.0.0 255.255.252.0在R2上使用show ip route ospf 查看是否有192.168.2.1 192.168.3.1 1.1.1的路由,如果没有这证明实验成功。
- 1、下载文档前请自行甄别文档内容的完整性,平台不提供额外的编辑、内容补充、找答案等附加服务。
- 2、"仅部分预览"的文档,不可在线预览部分如存在完整性等问题,可反馈申请退款(可完整预览的文档不适用该条件!)。
- 3、如文档侵犯您的权益,请联系客服反馈,我们会尽快为您处理(人工客服工作时间:9:00-18:30)。
RIP OSPF EIGRP路由重分发
路由器接口IP地址子网掩码路由协议
R1 Fa0/0 192.168.1.1 255.255.255.0 RIP
OSPF
EIGRP Fa0/1 192.168.2.1 255.255.255.0
Fa1/0 192.168.3.1 255.255.255.0
R2
Fa0/0 192.168.1.2 255.255.255.0
RIP loopback 0 3.3.3.3 255.255.255.0
R3
Fa0/1 192.168.2.2 255.255.255.0 OSPF loopback 0 2.2.2.2 255.255.255.0
R4
Fa0/0 192.168.3.2 255.255.255.0
EIGRP Loopback 0 3.3.3.3.3 255.255.255.0
RIP配置
R2配置
R2>ena (进入特权模式) R2#conf t (进入全局模式)R2(config)#in fa 0/0 (进入接口模式)R2(config-if)#ip add 192.168.1.2 255.255.255.0 (配置IP地址)R2(config-if)#no shut (启动接口)R2(config-if)#in loopback 0 (进入虚接口)R2(config-if)#ip add 1.1.1.1 255.255.255.0 (配置IP地址)R1配置
R1>ena (进入特权模式) R1#conf t (进入全局模式)R1(config)#in fa 0/0 (进入接口模式)R1(config-if)#ip add 192.168.1.1 255.255.255.0 (配置IP地址)R1(config-if)#no shut (启动接口)
R2配置
R2>ena
R2#conf t
R2(config)#router rip (进入RIP)
R2(config-router)#v 2 (使用RIP版本2)
R2(config-router)#no auto-summary (关闭自动汇总)
R2(config-router)#ne 192.168.1.0 (公布网络)
R2(config-router)#ne 1.1.1.0 (公布网络)
R1配置
R1>ena
R1#conf t
R1(config)#router rip
R1(config-router)#v 2
R1(config-router)#no auto-summary
R1(config-router)#ne 192.168.1.0
RIP显示图
OSPF配置
R3配置
R3>ena
R3#conf t
R3(config)#in fa 0/1
R3(config-if)#ip add 192.168.2.2 255.255.255.0 R3(config-if)#no shut
R3(config)#in loopback 0
R3(config-if)#ip add 2.2.2.2 255.255.255.0
R1配置
R1>ena
R1#conf t
R1(config)#in fa 0/1
R1(config-if)#ip add 192.168.2.1 255.255.255.0
R1(config-if)#no shut
R3配置
R3>ena
R3#conf t
R3(config)#router ospf 11 (进入OSPF 11)
R3(config-router)#ne 192.168.2.0 0.0.0.255 a 0 (公布接口的网段,反掩码,区域)
R3(config-router)#ne 2.2.2.0 0.0.0.255 a 0
R1配置
R1>ena
R1#conf t
R1(config)#router ospf 11
R1(config-router)#ne 192.168.2.0 0.0.0.255 a 0
OSPF显示图
EIGRP配置
R4配置
R4>ena
R4#conf t
R4(config)#in fa 0/0
R4(config-if)#ip add 192.168.3.2 255.255.255.0 R4(config-if)#no shut
R4(config)#in loopback 0
R4(config-if)#ip add 3.3.3.3 255.255.255.0
R1配置
R1>ena
R1#conf t
R1(config)#in fa 1/0
R1(config-if)#ip add 192.168.3.1 255.255.255.0 R1(config-if)#no shut
R4配置
R4>ena
R4#conf t
R4(config)#router eigrp 1
R4(config-router)#no auto-summary R4(config-router)#ne 192.168.3.0
R4(config-router)#ne 3.3.3.0
R1配置
R1>ena
R1#conf t
R1(config)#router eigrp 1
R1(config-router)#no auto-summary R1(config-router)#ne 192.168.3.0 EIGRP显示图
RIP OSPF EIGRP 重分发配置
R1配置
R1>ena
R1#conf t
R1(config)#router rip
R1(config-router)#redistribute ospf 11 metric 2
R1(config-router)#redistribute eigrp 1 metric 2
R1(config)#router ospf 11
R1(config-router)#redistribute rip subnets
R1(config-router)#redistribute eigrp 1 subnets
R1(config)#router eigrp 1
R1(config-router)#redistribute rip metric 100000 10 255 1 1500 R1(config-router)#redistribute ospf 11 metric 100000 10 255 1 1500
R2 R3 R4 ip route显示图
R2
R3
R4
结果测试
R2 ping R3 R4。
