Word2007SetupTutorial
Office 2007专业版 安装使用详细步骤教程

首先我先说下,源于网上个人整理后分享的整理也要花费时间和精力,这几个币下载也不算贵的,购买别人的劳动成果也是对别人的一种肯定。
如果你不下可以去网上自己去找,请不要骂人。
Office 2007专业版安装使用详细步骤教程
双击运行“setup.exe”程序,然后弹出安装框,如图:
输入序列号:KGFVY-7733B-8WCK9-KTG64-BC7D8
可以按升级,也可以按“自定义”,建议“自定义”
选择“删除所有早期版本”,安装Office2007必须要删除以前的早期版本,如:Office2003
安装选项,这里可以自定义想要安装的组建,可以默认
输入用户信息,随便输都行
安装过程可能要10几分钟左右吧,等待~
OK,安装完成,可以转到官方升级,个人觉得没必要
看,安装好了,完整版,所有组建必备
别以为这样就可以使用了,当你打开word时,系统会自动弹出“自动配置”过程,还是要等待一会
OK,现在可以进入Word了,建议取消“勾选”,然后“下一步”
自动更新功能,可以开启,也可以关闭,我选择不更新
现在,就已经全部安装完毕了,接下来就可以正常使用了,Office2007只会安装运行第一次时“自动配置”,以后就可以直接进入软件操作了。
怎么样Office 2007专业版安装使用过程是否已经都学会了。
Word2007版使用详细教程
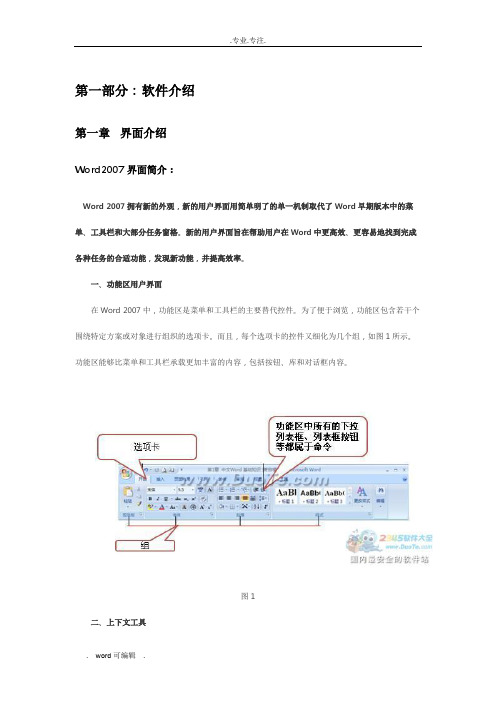
第一部分:软件介绍第一章界面介绍Word2007界面简介:Word 2007拥有新的外观,新的用户界面用简单明了的单一机制取代了Word早期版本中的菜单、工具栏和大部分任务窗格。
新的用户界面旨在帮助用户在Word中更高效、更容易地找到完成各种任务的合适功能,发现新功能,并提高效率。
一、功能区用户界面在Word 2007中,功能区是菜单和工具栏的主要替代控件。
为了便于浏览,功能区包含若干个围绕特定方案或对象进行组织的选项卡。
而且,每个选项卡的控件又细化为几个组,如图1所示。
功能区能够比菜单和工具栏承载更加丰富的内容,包括按钮、库和对话框内容。
图1二、上下文工具上下文工具使用户能够操作在页面上选择的对象,如表、图片或绘图。
当用户选择文档中的对象时,相关的上下文选项卡集以强调文字颜色出现在标准选项卡的旁边,如图2所示。
图2三、程序选项卡当用户切换到某些创作模式或视图(包括打印预览)时,程序选项卡会替换标准选项卡集,如图3所示。
图3四、Office按钮“Office”按钮位于Word窗口的左上角,单击该按钮,可打开Office菜单,如图4所示。
图4五、快速访问工具栏默认情况下,快速访问工具栏位于Word窗口的顶部,如图5所示,使用它可以快速访问用户频繁使用的工具。
用户可以将命令添加到快速访问工具栏,从而对其进行自定义。
图5用户还可以将常用的命令添加到快速访问工具栏中。
操作方法一:(1)单击“Office”按钮,然后在弹出的菜单中选择“Word选项”选项。
(2)弹出“Word选项”对话框,在该对话框左侧的列表中选择“自定义”选项,如图6所示。
图6(3)在该对话框中的“从下列位置选择命令”下拉列表中选择需要的命令,然后在其下边的列表框中选择具体的命令,单击“添加”按钮,将其添加到右侧的“自定义快速访问工具栏”列表框中。
(4)添加完成后,单击“确定”按钮,即可将常用的命令添加到快速访问工具栏中。
注意:在对话框中选中复选框,可在功能区下方显示快速访问工具栏。
WORD2007培训教程
WORD2007培训教程随着信息技术的迅猛发展,电脑已经成为人们工作、学习和生活中必不可少的工具。
而办公软件更是电脑的核心应用程序之一。
在众多的办公软件中,WORD是最为重要的一个。
它是微软公司开发的处理文字的应用程序,是文档处理的首选软件。
WORD能够提供丰富的文字排版、编辑和格式化工具,能够轻松地处理各种文档格式,并具有丰富的插入工具,能够轻松地插入图片、表格、图形等,使用户能够自由地编辑和排版各种文档。
然而,由于WORD的功能丰富且复杂,初学者往往由于缺少积极有效的培训和指导而无法熟练使用。
为此,本文将介绍一份WORD2007培训教程,以帮助初学者了解WORD2007的使用方法。
目录一、课程介绍2二、WORD2007介绍3三、WORD2007用户界面4四、新建和打开文档5五、写作和编辑文档6六、格式化文档7七、排版和样式8八、图片、表格和图形9九、页眉、页脚和页码10十、插入超链接和目录11十一、总结12一、课程介绍本课程旨在帮助初学者快速入门WORD2007,全面掌握WORD2007的使用方法。
本课程将包括简单又实用的培训指南,逐步带领学生了解各种高效的文档处理技巧。
通过本课程,学生将学会如何新建文档、打开文档、编辑文档、格式化文档、排版、插入图像、表格或图形,以及如何在文档中插入超链接、目录、页眉、页脚和页码等等。
二、WORD2007介绍微软WORD一直是处理文档的一种主要方式。
而WORD2007是其最新版,它与前一代的WORD不同之处正在于用户界面的改进,使其更加人性化。
WORD2007简洁明了的菜单、强大的字体、排版工具和平稳流畅的文件操作等功能集于一体,使得写作更加高效。
WORD2007有一个全新的用户界面,叫做“独立的Ribbon界面”或“基于Ribbon界面”。
在这个新的界面下,通过选项卡和组按钮,以非常直观和友好的方式组织各种工具。
若是初次使用,这可能需要一些时间,但在了解之后,用户将会享受到极大的方便和实用性。
WORD2007学习教程课件

2021/3/29
1
Word2007课程内容
2021/3/29
2
Word2007界面介绍
①标题栏:显示正在编辑的文档的名称以及正在使用的软件的名称。 ②Office 按钮:在使用“新建”、“打开”、“另存为”、“打印”以及“关闭”等基本命令时,可单击 此按钮。 ③快速访问工具栏:此处包含经常使用的命令,例如“保存”和“撤消”。您也可以添加常用的 命令。 ④功能区:工作所需的命令均位于此处。相当于其他软件中的“菜单”或“工具栏”。 ⑤编辑窗口:显示正在编辑的文档。 ⑥显示按钮:可根据需要更改正在编辑的文档的显示模式。 ⑦滚动条:可更改正在编辑的文档的显示位置。 ⑧显示比例滑块:可更改正在编辑的文档的显示比例设置。 ⑨状态栏:显示关于正在编辑的文档的信息。
17
Word2007文档排版
方法二
利用标尺进行缩进 (以悬挂缩进为例介绍) 将插入点置于要进行缩进控制
的段落前,或选定多个段落 将鼠标指向标尺上的悬挂缩进
标识,按住鼠标向右托动。拖动 过程中 会出现虚线来表明缩进 的位置。 拖到所需的位置和,释放鼠标左 键。
2021/3/29
18
Word2007文档排版
20
Word2007文档排版
在出现的“边框和底纹”对话框中,我们可以看 到“边框”、“页面边框”和“底纹”。
选择相应按钮设置边框和底纹。边框可以选择不 同的样式、颜色、及宽度,右侧即可进行效果预 览。“应用于”可选择所要应用的范围,入整段 或者仅文字。进入选项设置边框和正文的间距。
页面边框与边框除了应用于对象的不同外在宽度 下方多了一个“艺术型”。
2021/3/29
14
Word2007文档排版
Word2007文档使用教程

Word2007文档使用教程Word 2007文档使用教程Word 2007是微软发布的一款常用办公软件,具有强大的文字处理功能和丰富的排版工具。
本文将为您详细介绍如何使用Word 2007创建、编辑和格式化文档,以及利用其中的一些高级功能。
一、新建文档要创建一个新文档,在Word 2007中按下“Ctrl + N”快捷键,或者点击菜单栏中的“文件”选项,选择“新建”命令。
接下来可以选择空白文档或者从模板创建文档。
选择模板可以加快文档的创建速度,并提供一些专业的排版样式。
二、文本输入和编辑在Word 2007中,您可以直接在空白文档中输入文字。
要进行编辑,可以使用鼠标选中文本,然后进行剪切、复制、粘贴等操作。
还可以使用“撤销”和“重做”按钮来取消或恢复之前的操作。
三、格式化文本Word 2007提供了丰富的格式化选项,可以使文本看起来更漂亮、易读。
您可以选择文字并更改字体、字号、颜色等属性。
还可以通过应用样式来统一整篇文档的格式,如标题、正文、引用等。
此外,还可以添加下划线、斜体、粗体等效果。
四、段落设置段落设置可以调整文字在页面上的布局和排列方式。
您可以通过选择文字并设置对齐方式来改变段落的格式。
还可以调整行距、段间距、缩进等参数,以使文档具有更好的可读性。
五、插入图片和表格Word 2007支持插入图片和表格,以丰富文档的内容和排版效果。
要插入图片,可以点击菜单栏中的“插入”选项,选择“图片”命令,并从计算机中选择要插入的图片文件。
要插入表格,可以选择“插入表格”命令,并设置表格的行数、列数等属性。
六、页眉和页脚Word 2007允许在页面的顶部和底部添加页眉和页脚内容,如页码、日期等。
要设置页眉和页脚,可以选择“插入”选项卡中的“页眉”或“页脚”命令,并在弹出的编辑框中输入或选择要显示的内容。
七、目录和标题样式如果需要为文档创建目录或添加标题样式,Word 2007提供了方便的工具。
要创建目录,可以在“引用”选项卡中选择“目录”命令,并根据需要选择不同的样式。
中文word2007基础培训教程
中文word2007基础培训教程中文Word 2007基础培训教程尊敬的读者,欢迎你来到中文Word 2007基础培训教程!本文档的目的是帮助您快速了解和掌握Word 2007的基本操作和功能。
无论您是初学者还是愿意提升自己的Word技能,本教程都将为您提供详细的指导和实践机会。
1. Word 2007简介Word 2007是微软Office套件中的一部分,是一款专业的文字处理软件。
Word 2007相较于早期版本有许多改进和新增的功能,如新的用户界面,增强的格式设置等。
2. 创建新文档在Word 2007中,您可以通过点击“文件”菜单上的“新建”按钮或者使用快捷键“Ctrl + N”来创建新文档。
新建文档后,您可以输入文字、编辑文本和设置页面布局。
3. 文本输入和编辑在Word 2007中,您可以直接在文档中输入文字。
如果需要编辑已有的文本,只需选中文本并使用常见的剪切、复制和粘贴操作即可。
还可以使用快捷键和菜单上的各种命令来进行格式调整和文本效果设置。
4. 格式设置Word 2007提供了多种格式设置选项,包括字体、字号、颜色、对齐方式、行间距等。
您可以使用鼠标选中文本后点击“主页”菜单上的各种格式按钮进行设置。
5. 段落格式Word 2007不仅可以设置整篇文档的格式,还可以对单个段落进行格式设置,如缩进、行间距、对齐方式等。
您可以选中需要设置的段落,然后点击“主页”菜单上的段落格式按钮进行操作。
6. 插入图片、表格和图表Word 2007允许您在文档中插入图片、表格和图表,以丰富文档内容。
您可以使用“插入”菜单上的相应按钮来进行插入和编辑。
7. 页面设置在Word 2007中,您可以通过点击“页面布局”菜单上的“页面设置”按钮来进行页面设置,如页面大小、边距、页眉页脚等调整。
此外,还可以设置页面的纸张方向、行号等选项。
8. 拼写检查和语法检查Word 2007内置了拼写检查和语法检查功能,可以帮助您发现并纠正文档中的错误。
OFFICE 2007 SP1安装手册
OFFICE 2007 SP1安装说明
1)找到\\Hpml350\安装软件\办公软件\通用软件\OFFICE 2007 SP1,运行
SETUP.EXE文件。
2)选择setup.exe后出现以下安装界面,选择“我接受此协议的条款”。
3)按照向导,按“继续”安装,出现以下界面,选择“自定义”。
4)在“升级”选项界面里,选择“删除所有早期版本”。
5)点击“安装选项”,在Microsoft Office Outlook的下拉菜单里,选择从本机运行,在Microsoft Office Publisher的下拉菜单里,选择从本机运行。
6)按照向导,按“升级”开始安装。
7)在弹出瑞星注册表监控提示对话框后,选择“不再显示该对话框,以后使用相同的处理方式”,然后点击“确定”。
8)安装进度,这里需要等待几分钟时间。
9)在弹出瑞星注册表监控提示对话框后,选择“不再显示该对话框,以后使用相同的处理方式”,然后点击“确定”。
10)“正在应用更新”的时间比较长,请耐心等待。
11)安装成功,点击“关闭”。
弹出对话框,选择“否”。
12)点击“关闭”后,弹出对话框,选择“否”。
13)软件安装成功,然后打电话通知信息中心对计算机进行更新。
中文word2007基础培训教程
中文word2007基础培训教程中文Word2007是微软公司推出的一款文字编辑软件,用于制作各种文档和报告,如信件、简历、宣传品、合同等等。
通过Word2007可以实现丰富的排版效果,包括字体颜色、大小、粗细、对齐方式、行距等等,并可以插入图片、图表、表格等元素来丰富文档内容,使其更加生动有趣。
为了帮助初学者掌握中文Word2007的基本使用技巧,以下是一份详细的培训教程,供初学者参考学习。
一、界面介绍进入中文Word2007后,首先进入的是主界面,包含了各种工具栏和选项卡。
下面是主界面各部分的介绍:1. Office 按钮:打开、新建、保存、打印、关闭文档等命令。
2. 快速访问工具栏:提供快速访问最常用的命令。
3. 标签页/选项卡:包含文本编辑、插入、页面布局、参考资料、邮件合并、查看和帮助等选项卡,每个选项卡下面有不同的组,组下面是各种命令。
4. 滚动条和缩放滑块:用来滚动文档和改变文档的缩放比例。
5. 状态栏:显示页码、包含字数、状态、缩放比例和选择方式等信息。
6. 标尺和边框:用来调整页面边距和文字对齐方式。
二、新建、打开、保存文档1. 新建文档:点击Office按钮,在弹出的菜单中选择“新建”,然后选择“空白文档”或“从模板创建”。
2. 打开文档:点击Office按钮,在弹出的菜单中选择“打开”,然后选择需要打开的文档。
3. 保存文档:点击Office按钮,在弹出的菜单中选择“保存”或“另存为”,如果是第一次保存,需要设置保存路径和文件名。
三、编辑文本1. 输入文本:在文档中直接点击鼠标光标处,然后开始输入文字即可。
2. 选择文本:双击鼠标左键选择单个词,三击鼠标左键选择整个段落,拖拽鼠标左键选择任意区域。
3. 剪切、复制、粘贴文本:选择需要剪切或复制的文本,点击“剪切”或“复制”命令,然后将光标移到需要粘贴的位置,点击“粘贴”命令即可。
4. 撤销和重做:可以通过点击“撤销”和“重做”命令撤销或重做上一步操作。
中文word2007培训课件

1 选择所有需要 删除的文本
2 按下Delete键
完成删除后的效果
(二) 设置字符格式
选择要设置字体的字符,切换至“开始”选项卡, 在“字体”组中进行设置。
2 单击此按钮,打开 “字体”下拉列表框
3 单击要应用的字 体选项
1 选择要设置 字体的文本
1、 设置字符字号
选择要设置字号的字符,切换至“开始”选项卡, 在“字体”组中进行设置。
浮动工具栏
有些格式命令非常有用, 您希望无论执行任何操 作时都可以使用它们。
假设您想快速设置某些文本的格式,但是您现在正在使用 “页面布局”选项卡。
您可以单击“开始”选项卡查看格式选项,但还有一种更 快捷的方法。
WORD的基本操作
创建新文档 设置文档的页面布局 打开、保存、关闭文档 打印文档
2007中的页边距。
1 切换至该 选项卡
2 单击
4 再此设置上、 下、左、右边距
5 单击
3 选择该命令
3 、保存文档
在完成新文档的创建,
单击Word窗口右上角的
“关闭”按钮,系统会自
动询问用户是否要保存文
档。
1 单击要进 入的对象
2 选择进 入的盘符
3 输入文件名 4 单击
“另存为”对话框
文件的重命名及保存类型
加粗 下划线
下标 青色突显 灰色底纹
3 、设置字符颜色
选择要设置字符颜色,切换至“开始”选项卡,在 “字体”组中进行设置。
2 单击右侧 倒三角按钮
3 单击要应用 的颜色图标
设置颜色后 的文本效果
5 单击
1 选择要设 置字符颜色 的文本
或单击该 命令
4 单击要应用 的颜色图标
(完整版)word2007教程_word2007使用教程(免费下载)
word2007教程_word2007使用教程(免费下载)1. 问:WORD 里边怎样设置每页不同的页眉?如何使不同的章节显示的页眉不同?答:分节,每节可以设置不同的页眉。
文件――页面设置――版式――页眉和页脚――首页不同2. 问:请问word 中怎样让每一章用不同的页眉?怎么我现在只能用一个页眉,一改就全部改了?答:在插入分隔符里,选插入分节符,可以选连续的那个,然后下一页改页眉前,按一下“同前”钮,再做的改动就不影响前面的了。
简言之,分节符使得它们独立了。
这个工具栏上的“同前”按钮就显示在工具栏上,不过是图标的形式,把光标移到上面就显示出”同前“两个字来3. 问:如何合并两个WORD 文档,不同的页眉需要先写两个文件,然后合并,如何做?答:页眉设置中,选择奇偶页不同/与前不同等选项4. 问:WORD 编辑页眉设置,如何实现奇偶页不同? 比如:单页浙江大学学位论文,这一个容易设;双页:(每章标题),这一个有什么技巧啊?答:插入节分隔符,与前节设置相同去掉,再设置奇偶页不同5. 问:怎样使WORD 文档只有第一页没有页眉,页脚?答:页面设置-页眉和页脚,选首页不同,然后选中首页页眉中的小箭头,格式-边框和底纹,选择无,这个只要在“视图”――“页眉页脚”,其中的页面设置里,不要整个文档,就可以看到一个“同前”的标志,不选,前后的设置情况就不同了6. 问:如何从第三页起设置页眉?答:在第二页末插入分节符,在第三页的页眉格式中去掉同前节,如果第一、二页还有页眉,把它设置成正文就可以了●在新建文档中,菜单―视图―页脚―插入页码―页码格式―起始页码为0,确定;●菜单―文件―页面设置―版式―首页不同,确定;●将光标放到第一页末,菜单―文件―页面设置―版式―首页不同―应用于插入点之后,确定。
第2 步与第三步差别在于第2 步应用于整篇文档,第3 步应用于插入点之后。
这样,做两次首页不同以后,页码从第三页开始从 1 编号,完成。
Word2007版使用详细教程.

3、在弹出的“常规选项”对话框中可以任意给Word文档加密。
第五章新增功能
Word2007新增功能:
大家都知道Word2007是微软Office最新的版本了,界面和功能都比Word2003要高效得多。但是我们在使用最新版本时,你是否能发现它比以前的版本新增加了些什么功能吗?你都了解吗?不了解也没关系,相信你就会轻易的了解许多知识。
第2步,打开“新建文档”对话框,在左窗格中单击“根据现有内容创建”按钮,如图所示。
第3步,在打开的“根据现有文档新建”对话框中选择新建文档的保存位置,并输入文件名称,然后单击“新建”按钮即可,如图所示。
保存文档:
在用户编辑完成word文档之后,通过文档保存功能将该文档进行永久性保存,但是针对不同的文档有不同的保存方式。
Ctrl+]组合键:逐磅增大字号
Ctrl+[组合键:逐磅减小字号
Ctrl+Shift+C组合键:复制格式
Ctrl+Shift+V组合键:粘贴格式
Ctrl+1组合键:单倍行距
Ctrl+2组合键:双倍行距
Ctrl+5组合键:1.5倍行距
Ctrl+0组合键:在段前添加一行间距
Ctrl+E组合键:段落居中
Ctrl+J组合键:两端对齐
图2008081110取消“选择时显示浮动工具栏”复选框
第二章视图方式
五种视图解析:
在Word2007中提供了5种视图供用户选择,这5种视图包括页面视图、阅读版式视图、Web版式视图、大纲视图和普通视图。用户可以在“视图”功能区中自由切换文档视图,也可以在Word2007窗口的右下方单击视图按钮切换视图。
Word2007 文档使用教程
页眉内容Word2007 文档使用教程1:新建 Word 文档:启动 Word 2007 程序后将自动新建一个名为“文档1”的Word 文档,下面将介绍新建 Word 文档的方法。
在 windows 系统桌面上单击鼠标右键,选择[新建]——选择[Microsoft word] ,桌面自动创建一个名为“文档1”的 Word 文档。
通过以上操作即可启动 Word2007 程序并创建 Word 文档。
2:在 Word2007 中根据现有内容新建Word 文档在Word2007 中,用户不仅可以使用Word 文档模板新建 Word 文档,还可以根据当前打开的 Word 文档新建 Word 文档,操作步骤如下所述:第 1 步,打开 Word2007 文档窗口,依次单击Office 按钮→ “新建”按钮,如图所示。
单击“新建”按钮第 2 步,打开“新建文档”对话框,在左窗格中单击“根据现有内容创建”按钮,如图所示。
单击“根据现有内容创建”按钮第 3 步,在打开的“根据现有文档新建”对话框中选择新建文档的保存位置,并输入文件名称,然后单击“新建”按钮即可,如图所示。
页眉内容“根据现有文档新建”对话框多学一招:使用快捷键也可以创建 Word 文档:在键盘上按下按钮〈Ctrl〉+〈N〉可快速创建一个新的空白 Word 文档3:保存 Word 文档第一步:创建 Word 2007 后,在 Word 文档标题栏左侧单击[Office] 按钮,在弹出的文件菜单中选择 [保存]菜单项。
第二步:弹出[另存为]对话框,选择准备保存的位置,在[文件名]文本框中输入准备保存的名称“XXX”,单击[保存]按钮,即可保存名为“XXX”的 Word 文档在指定位置。
多学一招:使用快捷键也可快速保存文档:在键盘上按下组合键[Ctrl]+[S]也可以弹出[另存为]对话框。
4 :输入文本:将光标定位在文档编辑区中,在文档编辑区中输入文本信息即可。
OFFICE2007正版软件安装指南
OFFICE2007正版软件安装指南
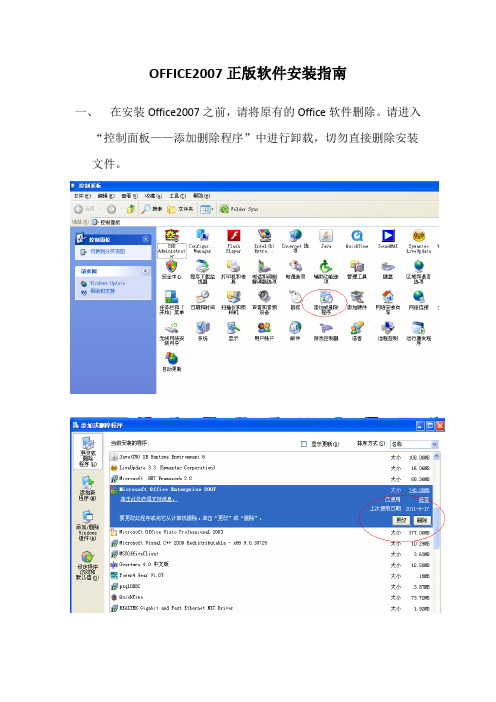
一、在安装Office2007之前,请将原有的Office软件删除。
请进入
“控制面板——添加删除程序”中进行卸载,切勿直接删除安装文件。
二、原有版本删除后,确认C盘可用空间大于1G,然后点击“开
始——运行”,输入“\\10.80.62.1”进入软件安装包所在目录。
点击确认后,将弹出服务器文件目录。
注:此时如提示输入用户名和密码,说明计算机未按公司要求加入
AD域,请先参考贵州联通办公终端
加入域自助操作手册.进行安装。
三、进入“集团正版软件——Office2007”目录
四、运行“Setupwin”进行安装
五、按照提示输入密码(密码在安装说明文件中,可直接拷贝到密
码框中)
六、输入密码后点击“确定”进行安装,安装时间大约3-15分钟
(视计算机性能),在系统提示安装完成之前请勿关闭或重启计算机。
中文Word2007教程第2章
1)单击“Office” 命令,弹出“新建文档”对话框。
2)在该对话框左侧的“模板”列表框中选择“已安装的模 板”选项,在对话框的右侧将显示已安装的模板,如图2.1.2所示。
图2.1.2 “已安装的模板”选项
3)在“已安装的模板”列表框中选择需要的文档模板, 在对话框的右侧可对文档模板进行预览,单击“创建”按钮,即 可根据已安装的模板创建新文档。
1.格式设置限制 后单击“设置”超链接,弹出“格式设置限制”对话框,如图 2.1.17所 示。在该对话框中限制文档格式,以防止他人对文档进行修改, 还可以防止用户直接将格式应用于文本。
图2.1.16 “限制格式和编辑”任务窗格 图2.1.17 “格式设置限制”对话框
2.编辑限制 文档指定为无限制。还可以授予权限,允许用户修改无限制的文 档。
2.2.3 插入符号
符号。其具体操作步骤如下:
1)在功能区用户界面中的“插入”选项卡中的“符号” 组中选择“符号”选项,在弹出的下拉菜单中选择“其他符号” 选项,弹出 “符号”对话框,如图2.2.5所示。
处。定位插入点的方法主要有使用键盘定位和定位到特定位置 两种。
1.使用键盘定位插入点
点。表2.1为定位插入点的快捷键列表。
表2.1 定位插入点的快捷键列表
2.定位到特定位置
位”命令直接定位到所需的特定位置,该功能在长文档的编辑中 非常有用。
1)在功能区用户界面中的“开始”选项卡中的“编辑” 组中选择“查找”选项,在弹出的下拉菜单中选择“转到”选项, 弹出“查找和替换”对话框,默认情况下打开“定位”选项卡。
4.保存为网页文件 Word普通文件保存为网页文件的具体操作步骤如下: 1)单击“Office”
word2007学习教程-培训教材
Office2007 word教程第一讲WORD 2007基础知识学习目标在本讲中将通过学习了解word2007的新增功能和特点,word2007的工作界面以及word2007的基本操作。
主要内容word2007简介word2007新增功能和特点Word2007的工作界面Word2007的基本操作1.1 word2007简介Word是Microsoft公司的一个文字处理器应用程序。
它最初是由Richard Brodie 为了运行DOS的IBM计算机而在1983年编写的。
随后的版本可运行于Apple Macintosh (1984年), SCO UNIX,和Microsoft Windows (1989年),并成为了Microsoft Office 的一部分。
2006 年发布的Word 2007,现在最新的版本是Word 2010。
1.2 word2007新增功能和特点一、输入法如果是Windows XP用户,在Office 2007安装完毕后点击“输入法”按钮,会发现原有Windows XP自带的“微软拼音输入法2003”自动更新为“微软拼音输入法2007”,与以前的输入法版本相比,“微软拼音输入法2007”字词库得到了更新,而且更加智能。
二、文档保存格式我们在使用Microsoft Office 97~Microsoft Office 2003时,对保存Word文档时生成的“.doc”格式文档非常熟悉,而新发布的Microsoft Office 2007改变了部分文档格式,Word文档的默认保存格式为“.docx”,改变格式后文档占用空间将有一定程度的缩小。
但同时出现的问题是安装Microsoft Office 97~2003的计算机无法打开格式为“.docx”的文档,解决方法是到微软官方网站上下载兼容性插件,安装到装有Microsoft Office 97-2003的计算机上,就可以打开“.docx”文档了。
中文版Word-2007实用教程
中文版Word 2007实用教程
2.1 输入文本
输入文本是Word中的一项基本操作。当用户新建一个Word文档后,在文 档的开始位置将出现一个闪烁的光标,称之为“插入点”,在Word中输入,选择一种输入法即 可开始文本的输入。
输入英文 输入中文 输入符号
当前文件名
“最小化”按钮 “”
“关闭”按钮 “”
“最大化”按钮
中文版Word 2007实用教程
1.2.5 状态栏
状态栏位于Word窗口的底部,显示了当前的文档信息,如当前显示的文 档是第几页、第几节和当前文档的字数等。在状态栏中还可以显示一些特定命 令的工作状态,如录制宏、当前使用的语言等,当这些命令的按钮为高亮时, 表示目前正处于工作状态,若变为灰色,则表示未在工作状态下。
中文版Word 2007实用教程
1.2 Word 2007的操作界面
启动Word 2007后,就进入其主界面。Word 2007的操作界面主要由
Office按钮、快速访问工具栏、功能区、标题栏、状态栏及文档编辑区等部分
组成。
Office按钮
标题栏
Office按钮 快速访问工具栏 功能区
状态栏
中文版Word 2007实用教程
2.1.2 输入中文
在Word 2007中,选择一种中文输入法,就可以在插入点处开始文本的输 入。
中文版Word 2007实用教程
2.1.3 输入符号
在文档中通常不会只有中文或英文字符,在很多情况下还需要输入一些 符号,例如☆、¤、®以及™等,这时仅通过键盘是无法输入这些符号的。 Word 2007提供了插入符号的功能,用户可以在文档中插入各种符号。 插入符号 插入特殊符号
中文版Word 2007实用教程
中文版Office2007三合一循序渐进教程

1.3 Word 2007的操作界面应用
1.3.1 Office按钮应用
单击“Office按钮”打开Office菜单,即可从中选择 所需的命令。如选择“准备”>“检查文档”命令。
1 选择菜单中的 “准备”命令
2 从弹出的下级 菜单中选择“检 查文档”命令
Office菜单
1.3.2 功能区应用
1. 对话框启动器
表格工具的“设计”与“布局”选项卡
3. 显示/隐藏组
功能区将Word 2007中的所有选项巧妙地集中在一 起,以方便用户查找。如果只是想处理文档希望可 以拥有更有的空间,以方便工作,可以隐藏功能区 中的“组”。
2 双击任意选项卡 的空白位置处
隐藏
1
2
显示
1 双击激活选项卡 的空白位置处
1.3.3 自定义快速访问工具栏
用户可将常用的命令,添加至“快速访问工具栏”。 例如,将“插入”选项卡“形状”添加至“快速访 问工具栏”。
2 右击 1 切换至“插入” 选项卡 3 从弹出的快捷菜 单中选择该命令
4 添加的快速访问按钮
1.3.4 视图的应用
不同的视图模式有自己的特点,单击“视图快捷方 式”工具栏中的对应按钮即可改变窗口显示状态。
单击“功能区”中“组”右下角的“对话框启动器” 可调出相应的设置对话框。
单击“对话框启 动器”按钮
打开的“字 体”对话框
2. 显示特定选项卡
在Word 2007程序窗口中,有些特定选项卡只有在 需要时才会出现。例如在文档中插入了表格,会显 示“表格工具”选项卡的“设计”与“布局”两个 选项卡。
选择表格后显示 的“表格工具” 两个选项卡
2 单击此按钮,退 出Word 2007
Office2007详细教程(免费)
Office2007详细教程(免费)Office 2007详细教程(免费)Office 2007是微软公司发布的办公软件套件,包括Word、Excel、PPT等常用办公软件。
本文档将为您提供Office 2007的详细教程,并帮助您了解如何使用这些软件。
WordWord是一款强大的文字处理软件,可以用于创建和编辑文档。
以下是一些常用的Word功能和操作步骤:- 创建新文档:点击"文件"选项卡,选择"新建",然后选择"空白文档"来创建一个新的Word文档。
创建新文档:点击"文件"选项卡,选择"新建",然后选择"空白文档"来创建一个新的Word文档。
- 插入图片:点击"插入"选项卡,选择"图片",然后从计算机中选择要插入的图片。
插入图片:点击"插入"选项卡,选择"图片",然后从计算机中选择要插入的图片。
- 设置页面布局:点击"页面布局"选项卡,可以设置页面的大小、边距、方向等。
设置页面布局:点击"页面布局"选项卡,可以设置页面的大小、边距、方向等。
- 使用样式:在"开始"选项卡中,可以选择不同的样式来改变文字的字体、大小、颜色等。
使用样式:在"开始"选项卡中,可以选择不同的样式来改变文字的字体、大小、颜色等。
- 保存和打印文档:点击"文件"选项卡,选择"保存"来保存文档,并且可以选择"打印"来打印文档。
保存和打印文档:点击"文件"选项卡,选择"保存"来保存文档,并且可以选择"打印"来打印文档。
ExcelExcel是一款广泛用于数据处理和计算的电子表格软件。
Word基础与案例教程
项目小结
项目实训
状态栏
下页
Word 2007基础与案例教程
功能区选项卡
组 垂 直 滚 动 条
视图切换区
比例缩放区
Word 2007基础与案例教程
项目一
绪论 欢迎来到 Word 2007的世界
任务四 退出Word 2007
任务一 任务二 任务三 任务四
活动 退出Word 2007
情景描述:下班了,关闭计算机前,别忘了先退 出一直陪伴您工作的好助手Word 2007哟!
下页
项目一
绪论 欢迎来到 Word 2007的世界
任务一 任务二 任务三 任务四 项目小结 项目实训
下页
Word 2007基础与案例教程
任务列表:
任务一 介绍Word 2007的主要功能 任务二 启动Word 2007 任务三 认识Word 2007的工作界面 任务四 退出Word 2007
Word 2007基础与案例教程
所需素材在:素材\01 源文件在: 实例\01
Word 2007基础与案例教程
项目一
绪论 欢迎来到 Word 2007的世界
任务一
能力目标:
任务二 任务三 任务四
掌握启动 Word 2007的方法 学会在桌面上建立 Word 2007快捷方式
项目小结
项目实训
下页
Word 2007基础与案例教程
项目一
绪论 欢迎来到 Word 2007的世界
任务一
操作流程
方法二:从“运行”对话框启动
任务二
任务三 任务四
①输入Winword
项目小结 项目实训
②单击“确定”按 钮
下页
Word 2007基础与案例教程
- 1、下载文档前请自行甄别文档内容的完整性,平台不提供额外的编辑、内容补充、找答案等附加服务。
- 2、"仅部分预览"的文档,不可在线预览部分如存在完整性等问题,可反馈申请退款(可完整预览的文档不适用该条件!)。
- 3、如文档侵犯您的权益,请联系客服反馈,我们会尽快为您处理(人工客服工作时间:9:00-18:30)。
Introduction: Using Microsoft Word more EffectivelyMicrosoft Word has many functions and features that can help in creating better documents faster and easier. Some useful and powerful features include:∙Automatic spelling, grammar and style checks that are specific for the primary editing language ∙Automatic page numbering∙Consistent page headers and page footers∙Styles, allowing faster formatting and a single point to make global changes to the format∙Displaying formatting marks so you can seeThis document shows how to use many of these features more effectively, saving you time and effort.To use these features properly, you need to change some settings in Word. Some things need to be set before creating a new document. Those settings and options may not affect existing documents. Other settings and features can easily help with both new and existing documents. But some of those features usually require some rework of existing documents to gain full advantage.Writing Documents in Different LanguagesMicrosoft Office includes a language settings tool. This tool is very important if you create documents in languages other than Chinese. By using this tool to set your Primary Editing Language to another language – BEFORE creating a new document – many Microsoft Office default options are features are changed to better support the language standards, formatting standards, spell checking and grammar checking of the Primary Editing Language. For example, setting the Primary Editing Language to American English changes the default font to a western font, the default paragraph style to left aligned, the default paragraph indent to ½ inch, etc. In addition, the spelling checker will check for American English spelling (showing British English spelled words as misspelled), and American English grammar.Microsoft Word StylesDocuments built using Word Styles are more stable and more easily edited than documents formatted without them. Styles provide a faster means to format documents with a consistent look and feel, and make it easier to change the format and look of standard items in a document such as titles or headings by changing one style. Some advantages of using styles in your Word documents include: ∙Faster Formatting. All the bold, underlines, font sizes, paragraph indents, etc, can be contained in just one style.∙Consistent look and feel to documents. When the same styles are used across the board in a firm, the documents have a consistent look and everyone knows how to work with them.∙Global Formatting. Without styles, if you have a 60-page document and you need to change the font size or style on fifty headings in the document, you need to go to each heading and change itmanually, or you need to know how to use very advanced find and replace. With Microsoft WordStyles you change the style once and the change is automatically changed throughout the document.∙Automatically Build Tables of Content. Using Heading styles, Word can automatically create a TOC.∙Documents are smaller. The amount of space a style definition takes up in a document is significantly less than all the direct formatting applied to fonts and paragraphs.Creating and using styles is explained later in this document.Table of ContentsIntroduction: Using Microsoft Word more Effectively (i)Writing Documents in Different Languages (i)Microsoft Word Styles (i)Table of Contents ............................................................................................................................................... i i Checklist: Configuring Word for Creating Documents in English .................................................................... i i Changing Office to Write and Edit in English (1)Document Standards: Modified APA/MLA Formats (2)Recommended: Show Formatting Marks (3)Set Spelling, Grammar and Style Checking Options (3)Set Page Margins: 1 inch (2.54 cm) top, bottom, left and right (4)Verify and Set Page Size (5)Change Page Size Default (5)Set Standard Font (modifying the ‘Normal’ <正文> style) (6)Modify the ‘Normal’ <正文> style to be Single spaced with no extra spacing (7)Create Page Header with Page Numbers (8)Create the Main Body paragraph style: double spaced, first line indented ½ inch (1.27 cm) (10)Create the Reference paragraph style: double spaced, first line hanging ½ inch (1.27 cm) (12)Checklist: Configuring Word for Creating Documents in English1.Configure Office and Word Language Settings to American English as the primary editing language.2.Verify page size is A4 – if not configure page size to A43.Set page margins to 1 inch (2.54 cm) top, bottom, left and right4.Modify ‘Normal’ paragraph style to be Times New Roman, 12 point5.Modify ‘Normal’ paragraph style t o be Single Spaced with No extra spacing Before or After6.Create Page Header with page numbers, course name, student name and ID, and assignment due date7.Create Body paragraph style: double spaced, first line indented ½ inch (1.27 cm)8.Create Reference paragraph style: double spaced, first line hanging ½ inched (1.27 cm)Changing Office to Write and Edit in EnglishTo most effectively use Microsoft Word to write and edit in English, itis best to set the primary editing language to English. This changes many of thedefaults in the Office applications including grammar and spelling checking,default fonts, paragraph styles, header styles, etc. English language choicesinclude American (US) English, British English (UK) and others. BecauseAmerican English and British English have some differences in spelling, it isimportant to select the appropriate language based on your intended readers. Forassignments in this class, American English should be used.The Primary Editing Language for Microsoft Office is set using theOffice Language Settings Tool, an application found in the Office Tools folder.9.Make sure no Microsoft Office Applications are running.10.From the Windows ‘Start Button’, browse to the ‘Microsoft Office’folder,then the ‘Microsoft Office Tools’ <Microsoft Office 工具> folder.11.From the ‘Microsoft Office Tools’ folder, select ‘Microsoft Office 2007Language Settings’ <Microsoft Office 语言设置2007> tool.12.On the ‘Editing Languages’ tab <编辑语言(E)>, change the Primary Editing Language to ‘English(United States)’ <英语(美国)>.13.Click on ‘Ok’ <确定> then restart Microsoft Word.Document Standards: Modified APA/MLA FormatsAll documents produced for class should follow a modified APA/MLA format. APA and MLA standards were created by international groups to standardize the way documents are formatted and submitted for publication. These standards have been adopted internationally, and are used in universities, research facilities and professional publications around the world.APA stands for American Psychological Association, and the APA standard is used in most social and psychological areas of study including business, intercultural communication, linguistics, sociology, etc.MLA stands for Modern Language Association and the MLA standards are used in most areas of language research that are not sociological or psychological in nature. For example, research on literature is usually presented in MLA format.These standards define many aspects of the final document look including:1.page layouts including margins, page headers and footers2.font styles and sizes3.paragraph layouts including indentation and spacing4.title page content and format (or a specification for no title page)5.reference or citation contents and formatsMany of these aspects are the same in both APA and MLA, but some are very different.The standards for documents produced in this class follow a modified APA/MLA format. This format includes the following standard formats:1.One inch (2.54 cm) margins all around (top, bottom, left, and right)2.Almost all written text in Times New Roman, 12 point font3.Main body paragraphs double spaced, with the first line indented ½ inch (1.27 cm); that is, the first lineof the paragraph is indented to the right of the left margin by 1.27 cm, but all following lines are at the left margin.4.Main body paragraphs are also left aligned (), not justified; meaning the right side of the paragraphsshould not have a straight vertical line.5.Page numbers at the top right of the page (in the page header)6.The first line of header includes (from left to right) course title, student name, student id in parentheses,and page number7.Second line of header at the left margin is the assignment DUE date.8.References or citations are also double spaced, but have a hanging indent; that is, the first line of thereference is at the left margin, and all following lines are indented to the right by 1.27 cm.Microsoft Word has many features to allow for easily setting and maintaining these standards throughout your document. Some of these features include paragraph styles, font styles, page headers, page footers and page settings.Recommended: Show Formatting MarksMicrosoft Word can show many differentformatting marks on the screen while you are editing adocument. These include a special mark for the end of aparagraph, and a mark showing where there is a blankspace. These will not appear in the printed document.Showing these while editing a document helps to identifyformatting problems.1.To show Tabs, Spaces, Paragraph and/or other formattingmarks, start Microsoft Word, click on the Office button, then click on the ‘Word Options’ <Word选项(I)>button (see right), and the ‘Word Options’ <Word 显示>dialog appears (see below).2.On the ‘Word Options’ <Word选项> dialog, select thesecondoption,‘Display’ <显示> (see below).3.In the ‘Always show these formatting marks on the screen’<始终在屏幕上显示这些格式标记> section of the dialog,check ‘Tab characters’ <制表符(T)>, ‘Spaces’ <空格(S)>,‘Paragraph marks’ <段落标记(M)> and any other optionsyou think are useful (see left).Set Spelling, Grammar and Style Checking OptionsMicrosoft Word has powerful spelling and grammarchecking features which can help identify spelling andgrammar errors in the document. With the primary editinglanguage set to American English (see earlier section), Wordcan automatically check for proper American English spellingof words. (Note: if the primary editing language is set to‘English (United Kingdom)’ <英语(英国)> , the document will be checked for properBritish Englishspelling).1.On the ‘WordOptions’ <Word选项> dialog, select the third option,‘Proofing’ <校对> (see below)2.In the ‘When correcting spelling and grammar inWord’ <在 Word中更正拼写和语法的> section ofthe dialog, check the first four items (see right)3. In the same section, set the ‘Writing Style’<写作风格(W)> to ‘Grammar & Style’4.In the same section, c lick the ‘Settings’ <设置>button, and the ‘Grammar Settings’ <语法设置>dialog appears (see below).5.On the ‘Grammar Settings’ <语法设置> dialog,set ‘Punctuation required with quotes’ to ‘inside’(American English style; For British English setto ‘outside’), and set ‘Spaces required betweensentences’ to ‘1’6.All other options should be checked.7.Click ‘Ok’ <确定> on the ‘Grammar Settings’<语法设置> dialog to save.8.Click ‘Ok’ <确定> on the ‘Word Options’<Word选项> dialog to save.Set Page Margins: 1 inch (2.54 cm) top,bottom, left and rightMargins are the white space between thetext and the edge of the paper. The standard is 1inch or 2.54 cm around all text: top, bottom, leftand right. The margin width is set from the ‘PageLayout’ <页面布局> tab.1.From the ‘Page Layout’ <页面布局> tab ribbon, clickon the small arrow icon in the lower right corner ofthe ‘Page Setup’ <页面设置> tab section (see right).T he ‘Page Setup’ <页面设置> tab dialog appears.2.On the ‘Page Setup’ <页面设置> dialog, in the‘Page Margins’ <页边距> section of the dialog, the‘Top’ <上> and ‘Bottom’ <下> margins shouldalready be ‘2.54 cm’ <2.54 厘米> (see right).Change the ‘Left’ <左> and ‘Right’ <右> margins toalso be ‘2.54 cm’ <2.54 厘米>, then cli ck ‘OK’ tosave the settings.Verify and Set Page SizeWhen creating a new document, Word will use the default page size setting for the new document. When Word is initially installed, the default page size is usually NOT A4. The document page size can be checked and set from the ‘Page Layout’ <页面布局> tab. To quickly check the current page size of your document, select the ‘Size’ <纸张大小> drop down list. If the current page size i s not set to ‘A4’, change it by clicking on the ‘A4’ option in the list (see right: changing ‘Letter’ to ‘A4’).Change Page Size DefaultYou can also change your personal copy of Word so that all futuredocuments will be created as ‘A4’. This default page size is set on the ‘PageSetup’ <页面设置> dialog.3.From the ‘Page Layout’ <页面布局> tab ribbon, click on the small arrowicon in the lower right corner of the ‘Page Setup’ <页面设置> tab section(see left).4.The ‘Page Setup’ <页面设置> dialog appears(see right).5.On the ‘Page Setup’ <页面设置> dialog (right),select the second tab: ‘Paper’ <纸张>.6.On this tab page, verify that ‘Paper size’<纸张大小 (R):> is set to ‘A4’.7.At the bottom of the dialog, press the ‘Default…’<默认(D) …> button, then click the ‘Yes’ <是(Y)> button on the confirmation dialog.With this change saved, all new documentsshould be created as A4 size.Set Standard Font (modifying the ‘Normal’ <正文> style)The best way to manage the format of all of the text in your document (e.g. headings, paragraphs, etc.) is by using paragraph styles. This feature simplifies maintaining a consistent look for your entire document. It also allows for generating Styles are managed in the ‘Styles’ <样式> dialog accessed from the ‘Home’ <开始> tab.1.On the ‘Home’ <开始> tab ribbon, click on the small arr ow icon in the ‘Styles’ <样式> tab section.2.The ‘Styles’ <样式> dialog appears (shown at right).3.First, modify the font of the ‘Normal’ <正文> paragraph style, click on the rightside of the ‘Normal’ <正文> style, and a dropdown appears (see below).4.From the dropdown, select ‘Modify’<修改> (see right), and the‘Modify Style’ <修改样式> dialog appears(see below).5.On the ‘Modify Style’ <修改样式> dialog forthe ‘Normal’ <正文> paragraph style, in the‘Formatting’ <格式> section, change the‘Font’ <字体> to ‘Times New Roman’ andthe size to ‘12’ point (see below).6.DO NOT click ‘Ok’ <确定> yet. The next section discusses further modifications to the ‘Normal’ <正文>paragraph style.Modify the ‘Normal’ <正文> style to be Single spaced with no extra spacingIn a standard installation of Word, the Normal paragraph style includes extra line spacing and extra space after each paragraph. To conform to the modified MLA/APA standard, there should be no extra spacing. To remove this spacing, modify the paragraphoptions of the Normal paragraph style.1.At the bottom of the ‘Modify Style’ <修改样式>dialog, click on the ‘Format’ <格式(O)> button, thenchoose ‘Paragraph’ <段落(P)> (see right).2.The ‘Paragraph’ <段落> dialog appears (see below).3.On the ‘Paragraph’ <段落> dialog, in the‘Spacing’ <间距> section, set ‘Line Spacing’<行距(N):> to ‘Single’ <单倍行距>.4.Also in the ‘Spacing’ <间距> section, set both‘Before:’ <段前(B):> and ‘After:’ <段后(F):> to‘0’.5.Click ‘Ok’ <确定> on the ‘Paragraph’ <段落>dialog to save the changes.6.Click ‘Ok’ <确定> on the ‘Modify Style’<修改样式> dialog to save the changes.Create Page Header with Page NumbersA page header is text that appears at the top of each page, and a page footer is text that appears at the bottom of each page. Microsoft Word includes features to specify the contents for a page header and a page footer once, and then have the page header and page footer automatically appear on each page of the document. In addition, Word supports automatic page numbering in the page header or page footer. This section explains how to set these features in Microsoft Word.APA and MLA have different standards for the content of page headers. If your document must conform to a specific standard such as APA or MLA, consult the specific standard documentation for the content and format of page headers for that standard. This section explains content and format that should be used for page headers in all class homework. The class homework page header includes: course name, student name, student id, assignment due date and page number. For class homework, there is no page footer.The easiest way to start the page header in Word 2007 is to add a page number, then edit the header to include the other contents.1.On the ‘Insert’ <插入> tab ribbon, in the ‘Header & Footer’ <页眉和页脚> tab section, click on the‘Page Number’ <页码> drop down menu, and t hen select ‘Top of Page’ <页面> (see below).2.At this point, choices will appear showing thepage number in different positions (see left). Forthis class, the page number should be in theupper right, so select ‘Plain Number 3’<普通数字 3>. At this point, the page headerappears with a page number field at the rightcorner of the page header (see below).Intercultural Communication Intercultural Communication3. At this point the text cursor is in the header, highlighting the page number. In the keyboard, press the left arrow key to move the cursor to the left of the page number.4. Be sure the page number is no longer highlighted, then type your English Name, one space, and then your Student ID number in parentheses, then two spaces before the page number (see below).5. Next, using the left arrow key or the mouse, move the cursor to the left of your name, and press the ‘Tab’ key twice. This places tab spaces to the left of your name in the page header.7. Now move the cursor to the beginning of the second line of the header. In this location, type the due date of the assignment (see below).8. To leave the page header and have the cursor return to the main document, click on the ‘Close Header and Footer ’ <关闭页眉和页脚> tab section , in the ‘Header and Footer Tools Design ’ tab (see below).Create the Main Body paragraph style: double spaced, first line indented ½ inch (1.27 cm) Next, create a new style that will be used for the main body paragraphs. The main body paragraphs should be double spaced, and the first line of each paragraph should be indented by ½ inch (1.27 cm).9.While the ‘Normal’ <正文> style is selected, click on the ‘New Style’ <新建样式>button (see right).10.The ‘New Style’ <根据格式设置创建新样式> dialog opens (see right).11.In the ‘Name:’ <名称(N):>field, specify a name suchas “Body”12.Change the line spacing todouble space by clickingthe ‘Double Space’<2倍行距> button (seeright).13.To indent the first line, firstclick on the ‘Format’<格式(O)> button (see right)and a menu of choicesappears (see below).14.From the menu, select‘Paragraph…’ <段落(P)…>(below) and the ‘Paragraph’<段落> dialog appears (seenext page).Step 4:‘Double space’<2倍行距>button Step 3:‘Name:’<名称(N):>buttonStep 6:‘Paragraph…’<段落> menu itemStep 5:‘Format’<格式(O)>buttonStep 1:‘New Style’<新建样式>button‘Indentation’ <缩进> section, click on theSpecial <特殊格式(S)> drop down and select‘First Line’ <首行缩进>.16.The ‘By’ <磅值(Y)> field should beautomatically set to “1.27 cm” <1.27 厘米>; ifnot, Word has not been configured for Englishas the primary editing language (see first pageof this document).17.If the ‘By’ <磅值(Y)> field is not “1.27 cm”<1.27 厘米>, then change the value to“1.27 cm” <1.27 厘米>.18.Click the ‘Ok’ <确定> button on the‘Paragraph’ <段落> dialog to save theparagraph settings19.Click ‘Ok’ <确定> on the ‘New Style’<根据格式设置创建新样式> dialog to save thenew “Body” style.This new “Body” style should be used forALL main text in ALL written assignments for theclass.To set any paragraph to this new “Body”style, highlight the paragraph(s), then select the“Body” style from the ‘Styles’ <样式> tab section of the ‘Home’ <开始> tab ribbon, or select the “Body”style in the ‘Styles’ <样式> dialog (see below).Create the Reference paragraph style: double spaced, first line hanging ½ inch (1.27 cm) Next, create a new style that will be used for references or bibliography. The references should be double spaced, and the first line of each paragraph should be hanging by ½ inch (1.27 cm), that is, the first line is at the left margin, while subsequent lines are indented ½ inch (1.27 cm) to the right of the left margin.1.While the ‘Body’ style is selected in the ‘Styles’ <样式> dialog, click on the ‘NewStyle’ <新建样式> button (see right).2.The ‘New Style’ <根据格式设置创建新样式> dialog opens.3.In the ‘Name:’ <名称(N):> field, specify a name such as “Reference”4.To chang e the indent of first line, first click on the ‘Format’ <格式(O)> button anda menu of choices appears.5.From the menu, select ‘Paragraph…’ <段落(P)…> (below) and the ‘Paragraph’<段落> dialog appears (see next page).6.On the ‘Paragraph’ <段落> dialog, in the ‘Indentation’ <缩进> section, click onthe Special <特殊格式(S)> drop down and change ‘First Line’ <首行缩进> to‘Hanging’ <悬挂缩进>.7.Click the ‘Ok’ <确定> button on the ‘Paragraph’ <段落> dialog to save theparagraph settings8.Click ‘Ok’ <确定> on the ‘New Style’<根据格式设置创建新样式> dialog to save the new “Reference” style.Step 1:‘New Style’<新建样式>button。
