本地服务器安装说明
UNIS 服务器 操作系统安装指导说明书

UNIS服务器操作系统安装指导紫光恒越技术有限公司资料版本:5W300-20220520Copyright © 2022 紫光恒越技术有限公司及其许可者版权所有,保留一切权利。
未经本公司书面许可,任何单位和个人不得擅自摘抄、复制本书内容的部分或全部,并不得以任何形式传播。
UNIS为紫光恒越技术有限公司的商标。
对于本手册中出现的其它公司的商标、产品标识及商品名称,由各自权利人拥有。
由于产品版本升级或其他原因,本手册内容有可能变更。
紫光恒越保留在没有任何通知或者提示的情况下对本手册的内容进行修改的权利。
本手册仅作为使用指导,紫光恒越尽全力在本手册中提供准确的信息,但是紫光恒越并不确保手册内容完全没有错误,本手册中的所有陈述、信息和建议也不构成任何明示或暗示的担保。
环境保护本产品符合关于环境保护方面的设计要求,产品的存放、使用和弃置应遵照相关国家法律、法规要求进行。
目录1简介 ··························································································································· 1-1 2安装操作系统 ··············································································································· 2-12.1 准备OS镜像 ············································································································ 2-12.2 登录服务器··············································································································· 2-12.2.1 通过本地登录服务器 ·························································································· 2-12.2.2 通过BMC登录服务器远程控制台 ········································································· 2-12.3 连接OS镜像文件 ······································································································ 2-22.4 配置RAID ················································································································ 2-32.5 选择启动介质············································································································ 2-32.6 安装银河麒麟操作系统 ································································································ 2-4 3查看并安装设备驱动程序 ································································································ 3-13.1 检查设备驱动程序······································································································ 3-13.2 安装设备驱动程序······································································································ 3-2 4常见问题解答 ··············································································································· 4-14.1 如何远程控制服务器? ································································································ 4-14.2 如何制作可引导U盘 ·································································································· 4-14.2.1 使用Win32DiskImage制作可引导U盘·································································· 4-14.2.2 使用UltraISO制作可引导U盘············································································· 4-24.2.3 使用Linux dd命令制作可引导U盘······································································· 4-34.3 如何使用PXE方式安装操作系统?················································································ 4-34.4 如何查看系统的内核版本? ·························································································· 4-54.5 RAID卡支持哪些RAID级别? ······················································································ 4-64.6 设备出厂是否默认安装了操作系统? ·············································································· 4-6 5技术支持 ····················································································································· 5-15.1 技术支持网址············································································································ 5-15.2 获取技术支持············································································································ 5-1 6缩略语 ························································································································ 6-1手册中涉及的软件界面可能会不定期更新,请以产品实际显示界面为准。
HPE ProLiant服务器安装与启动服务说明书
Service overviewHPE Installation and Startup of HPE ProLiant servers provides for the installation of your new HPE ProLiant server and eligible operating system. This service will assist you in bringing your new HPE ProLiant server and operating system into operation in a timely and professional manner.Service benefitsThis service provides a trained HPE service specialist to perform an installation that meets HPE quality standards, for:• Delivery of the service at a mutually scheduled time convenient to your organization• Helps you effectively utilize HPE products from the knowledge gained during on-site delivery of the service• Custom installation as detailed in “Delivery specifications’’ or in a Statement of Work (SOW)• Verification prior to installation that all service prerequisites are metService feature highlights• Service planning• Service deployment• Installation verification tests (IVTs)• Customer orientation sessionHPE Installation and Startup of HPE ProLiant servers HPE Support ServicesData sheetTable 1. Service featuresFeature Delivery specificationsService planning An HPE service specialist will confirm with the Customer that the prerequisites have been met and schedule the delivery of theservice at a time mutually agreed upon by HPE and the Customer, which shall be during local HPE standard business hoursexcluding HPE holidays, unless otherwise agreed by HPE. Any services provided outside of HPE standard business hours may besubject to additional charges.Service deployment The deployment activities will include:Hardware• Installation of the server: Unpacking the server, inspecting it for damage, and installing it according to the product specifications(If the server is part of a rack system, it will be inserted into the rack.)• Installation of hardware options: System hardware options purchased with the system will be installed at the same time• Physical connection of the product to a LAN, as appropriate• Consolidation of all packaging material and notification to the Customer that the materials are ready for removalSoftwareInstallation of one eligible Operating System. Eligible Operating Systems are defined below:• For Microsoft® Windows Server®:–Installation of the operating system and the appropriate network protocols, as required–Creation of a Windows Server account with up to three user accounts–Creation and setup of one Windows Server file share on a local disk–For ProLiant DL380 Packaged Cluster only, installation and configuration of Microsoft Cluster software according to theproduct installation guide• For Linux® server operating systems:*–Installation of the operating system and the appropriate network protocols, as required–Installation of HPE drivers, as applicable–Creation of a Linux server account with up to three user accountsThe supported Linux distributions for installation as part of this service are Red Hat® Enterprise Linux (RHEL) and SUSE LinuxEnterprise Server (SLES).*For systems with multiple servers per chassis, one operating system (OS) image will be installed on one server node within thechassis. If an established HPE Insight Cluster Management Utility (CMU) or Microsoft WDS environment exists with a functionalPXE boot environment and server provisioning capabilities to load an OS image, then the HPE installation engineer will load oneOS image to all server nodes within the chassis.Enable remote support to allow for automatic case creation for hardware failures, and for proactive deliverables provided underapplicable service levels. This enablement is for supported devices only and is conditional on the existence of a foundationalHPE remote support application already established in the Customer’s server environment.For more information on remote support, go to /services/getconnected.Installation verification tests (IVTs)HPE will run the appropriate installation verification tests required for this service, such as Power-On Self-Tests (POSTs) specificto the product being installed, verification of product operation, and verification that the current device software and firmwareare loaded.Customer orientation session Upon completion of the deployment activities, the HPE service specialist will provide an orientation session, up to one hour, on theproduct and/or technology, to include information on basic hardware product usage and hardware features.Service eligibilityThe Customer must meet the following prerequisites for the delivery of this service:• Have a new HPE ProLiant server and a supported version of Microsoft or Linux operating system and valid licenses• Have no earlier version of the operating system installed on the new HPE ProLiant server for which this service is to be applied• Have all cabling and network connections installed and functionalService limitationsExcluded from this service are activities such as, but not limited to, the following:• Service deployment on hardware not covered by an HPE warranty or HPE support agreement• Service deployment on hardware covered by a third-party maintenance contract• Operating system provisioning with a third-party or customized software tool• Installation of ineligible operating systems or more than one operating system• Planning, design, implementation, or assessment of the Customer’s overall SAN or fabric architecture• Services that, in the opinion of Hewlett Packard Enterprise, are required due to unauthorized attempts by non-HPE personnel to install, repair, maintain, or modify hardware, firmware, or software• Site inspection activities such as a comprehensive analysis of the Customer facility’s power, cooling humidity, airborne contaminant, vibration levels, and determination of whether the data center’s raised floor has sufficient structural capability to accommodate the weight of newly installed equipment• Environmental compliance or site preparation• External cabling• Application integration or integration of third-party products or peripherals not included with the system• Assembly of external storage devices• Assembly of racks or other computer room site preparation• Software training, troubleshooting, repair, tuning, or customization• Any services not clearly specified in this documentCustomer responsibilitiesThe Customer will:• Contact an HPE specialist within 90 days of date of purchase to schedule the delivery of the service• Coordinate service deployment on third-party-maintained products (if applicable) with Hewlett Packard Enterprise• Designate a person from the Customer’s staff who, on behalf of the Customer, will grant all approvals, provide information, and otherwise be available to assist HPE in facilitating the delivery of this service• Ensure that all service prerequisites as identified under “Service eligibility’’ are met• Ensure that all site preparation, power supply compatibility requirements, network cabling and configuration, and other specified service prerequisites, as listed in the “Service eligibility” section have been met• Allow Hewlett Packard Enterprise full and unrestricted access to all locations where the service is to be performed• Provide a suitable work area for delivery of the service, including access to an outside telephone line, power, and any network connections required• Be responsible for all data backup and restore operationsGeneral provisions/other exclusionsHPE reserves the right to charge, on a time and materials basis, for any additional work over and above this service package pricing that may result from work required to address service prerequisites or other requirements that are not met by the Customer.HPE reserves the right to reprice this service if the Customer does not schedule and provide for subsequent delivery within 90 days of purchase.HPE’s ability to deliver this service is dependent upon the Customer’s full and timely cooperation with HPE, as well as the accuracy and completeness of any information and data the Customer provides to HPE.Travel charges may apply; please consult your local office.Learn more at /services/support Data sheet© Copyright 2005, 2007, 2014, 2016–2017 Hewlett Packard Enterprise Development LP. The information contained herein is subjectto change without notice. The only warranties for Hewlett Packard Enterprise products and services are set forth in the express warrantystatements accompanying such products and services. Nothing herein should be construed as constituting an additional warranty.Hewlett Packard Enterprise shall not be liable for technical or editorial errors or omissions contained herein.This data sheet is governed by the Hewlett Packard Enterprise current standard sales terms, which include the supplemental data sheet,or, if applicable, the Customer’s purchase agreement with Hewlett Packard Enterprise.Microsoft and Windows Server are either registered trademarks or trademarks of Microsoft Corporation in the United States and/or othercountries. Red Hat is a registered trademark of Red Hat, Inc. in the United States and other countries. Linux is the registered trademarkMake the right purchasedecision. Chat with ourpresales specialists.。
Sun Fire X4800 服务器安装指南说明书
本指南介绍了首次给 Oracle Sun Fire X4800 服务器通电并引导服务器所必须执行的基本步骤。
《Sun Fire X4800 服务器安装指南》中提供了详细的安装信息,可从以下网址获得该指南: /app/docs/prod/sf.x4800?l=zh有关此系统的文档列表,请参阅本文档末尾处的“本产品的文档”一节。
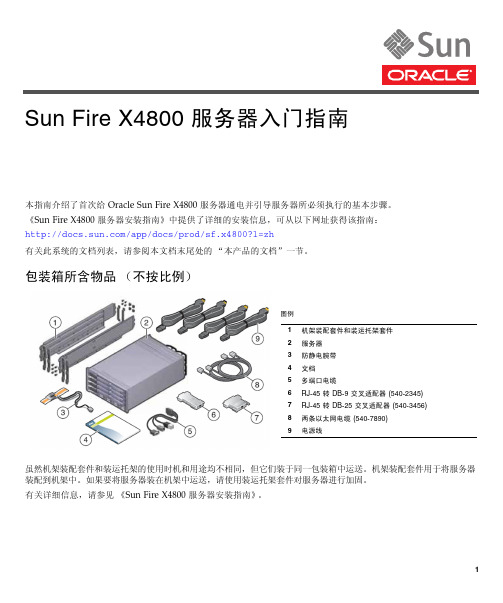
包装箱所含物品(不按比例)虽然机架装配套件和装运托架的使用时机和用途均不相同,但它们装于同一包装箱中运送。
机架装配套件用于将服务器装配到机架中。
如果要将服务器装在机架中运送,请使用装运托架套件对服务器进行加固。
有关详细信息,请参见《Sun Fire X4800 服务器安装指南》。
图例1机架装配套件和装运托架套件2服务器3防静电腕带4文档5多端口电缆6RJ-45 转 DB-9 交叉适配器 (540-2345)7RJ-45 转 DB-25 交叉适配器 (540-3456)8两条以太网电缆 (540-7890)9电源线Sun Fire X4800 服务器入门指南文档和介质工具包文档和介质工具包是系统的可订购选件。
该工具包包含安装文档、Tools and Drivers CD/DVD 、Sun Installation Assistant CD/DVD 和 SunVTS CD/DVD 。
您可以随时使用以下市场部件号码订购文档和介质工具包:X8514A - Sun Fire X4800 MEDDOCKIT也可以从以下站点下载文档和介质工具包中所包含的文档和软件:■文档:/app/docs/prod/sf.x4800?l=zh ■软件:/goto/x4800问题和更改《Sun Fire X4800 服务器产品说明》提供了有关问题和已知解决方法的信息。
要配置选项或向服务器中添加硬件,请参见《Sun Fire X4800 Server Service Manual 》或维修标签。
安全和法规遵循信息执行安装之前,请参阅以下文档了解有关 Sun Fire X4800 的安全信息:■《Important Safety Information for Sun Hardware Systems 》- 产品包装箱中随附了此文档的印刷版本。
WSUS部署指南

WSUS部署指南一、WSUS 安装要求1、硬件要求:对于多达 13000 个客户端的服务器,建议使用以下硬件:* 4 Core E5-2609 2.1GHz 的处理器* 8 GB 的 RAM2、软件要求:要使用默认选项安装 WSUS,必须在计算机上安装以下软件。
* Microsoft Internet 信息服务 (IIS) 6.0。
* 用于Windows Server 2012 R2 的 Framework 1.1 Service Pack 1。
* Background Intelligent Transfer Service (BITS) 2.0。
3、磁盘要求:要安装 WSUS,服务器上的文件系统必须满足以下要求:* 系统分区和安装 WSUS 的分区都必须使用 NTFS 文件系统进行格式化。
* 系统分区至少需要 1 GB 的可用空间。
* WSUS 用于存储内容的卷至少需要 60 GB 的可用空间,建议预留空间为 40 GB。
二、环境描述·目前用于WSUS的服务器一台,配置和功能如下:WSUS 配置清单操作系统版本: Windows Server 2012 R2 ChsServerName: CNHZWS01IP Address :192.168.1.12Mask 255.255.255.0GateWay 192.168.1.1DNS Server 192.168.1.10 192.168.1.11系统盘(C)大小 1TBPageFile位置以及大小你们按照常规定义备注:所在域名名称:三、安装服务器角色首先,我们检查第一台已经安装Windows Server 2012 R2的服务网络的相关配置,确保服务器IP地址、子网掩码、默认网关的参数如下操作如下步骤 1:配置修改服务器的IP和DNS地址步骤 2:修改WSUS服务器名,并将服务加入至VANCEN域步骤 3:输入加域权限的用户名和密码将服务器加入VANCEN域步骤 4:提示服务器成功加入VANCEN域步骤 5:立即重动服务器让应用生效步骤 6:使用本地 Administrators 组成员的帐户登录到你计划安装 WSUS 服务器角色的服务器。
服务器说明书

服务器说明书服务器说明书简介本文档旨在对服务器进行全面的说明,包括服务器的安装、配置和使用方法等,以帮助用户能够正确、高效地使用服务器。
目录- [1. 服务器概述](1-服务器概述)- [2. 服务器安装](2-服务器安装)- [3. 服务器配置](3-服务器配置)- [4. 服务器使用](4-服务器使用)1. 服务器概述服务器是一种可以提供计算、存储和网络服务的计算机系统。
它具备较高的性能和稳定性,常用于托管网站、提供云服务等场景。
本服务器采用xx型号服务器,配置如下:- 处理器:xx型号- 内存:xx GB- 存储:xx TB- 网络接口:xx个2. 服务器安装服务器安装通常包括硬件安装和操作系统安装两个步骤。
2.1 硬件安装- 将服务器放置在稳固的地面上,确保通风良好。
- 连接电源线,并确认电源正常启动。
- 连接鼠标、键盘、显示器等外部设备。
- 连接网络线,确保网络正常连通。
2.2 操作系统安装- 按照操作系统提示,将安装光盘或U盘插入服务器。
- 进入操作系统安装界面,根据提示进行安装设置。
- 选择安装位置和分区方式,并设置管理员密码。
- 等待操作系统安装完成后,重新启动服务器。
3. 服务器配置服务器配置包括网络配置、防火墙配置和服务配置等。
3.1 网络配置- 打开网络配置界面,设置服务器的IP地址、子网掩码、网关等网络参数。
- 配置DNS服务器地址,以确保服务器可以正确解析域名。
- 进行网络连通性测试,确保网络配置正确。
3.2 防火墙配置- 配置防火墙规则,禁止不必要的网络访问。
- 限制入站和出站流量,确保服务器的网络安全。
- 配置防火墙日志,以便及时发现异常情况。
3.3 服务配置- 配置服务器所需的基础服务,如Web服务、数据库服务等。
- 设置服务的启动参数和监听端口。
- 进行服务连接测试,确保服务正常运行。
4. 服务器使用服务器使用包括远程连接和管理等方面。
4.1 远程连接- 使用SSH客户端远程连接服务器。
本地服务器配置! 教程
本地服务器配置! 教程本地服务器配置教程随着互联网技术的不断发展,服务器已经成为企业不可或缺的一部分,用于支持网站、应用程序和其他网络服务。
而本地服务器配置对于企业的运行和维护至关重要。
本文将为大家提供一个简单的本地服务器配置教程,帮助大家了解如何配置和管理本地服务器。
一、服务器的选择和安装首先,您需要选择一款适合自己需求的服务器。
服务器的种类繁多,包括物理服务器、虚拟服务器和云服务器等。
对于中小企业或个人用户,虚拟服务器或云服务器可能是一个更实惠的选择。
安装服务器的过程可能会因服务器的类型和操作系统而异。
一般来说,您需要确保服务器的硬件符合要求,然后根据服务器的类型和操作系统的说明进行安装。
二、网络配置安装好服务器后,您需要配置网络。
这包括设置IP地址、子网掩码、网关等。
您还需要为服务器设置一个静态IP地址,以确保服务器始终位于同一IP地址。
三、安全配置安全是服务器配置中的一个重要部分。
您需要采取措施来保护服务器免受未经授权的访问和潜在威胁。
为了实现这一目标,您可以采取以下措施:1、安装防火墙:防火墙可以阻止未经授权的访问,保护服务器免受外部威胁。
2、更新软件和操作系统:更新软件和操作系统可以修复潜在的安全漏洞,从而减少安全风险。
3、限制访问:您可以设置只有特定IP地址或用户才能访问服务器,以确保只有授权人员才能访问。
四、服务配置服务配置是服务器配置的一个重要部分,因为它们控制着服务器的运行方式。
您可以采取以下措施来配置服务:1、安装和配置Web服务器:如果您打算运行网站,则需要安装和配置Web服务器,如Apache或Nginx。
2、安装数据库服务器:如果您需要存储和管理数据,则需要安装数据库服务器,如MySQL或PostgreSQL。
3、安装其他服务:根据需求安装其他服务,例如邮件服务器、FTP服务器等。
五、性能优化最后,您需要进行性能优化,以确保服务器能够高效地处理请求和数据。
您可以采取以下措施来优化性能:1、优化数据库:通过优化数据库查询、使用索引和使用缓存等技术来提高数据库性能。
浪潮英信服务器 操作系统安装指南说明书

浪潮英信服务器操作系统安装指南文档版本V1.0发布日期2022-05-20版权所有© 2022浪潮电子信息产业股份有限公司。
保留一切权利。
未经本公司事先书面许可,任何单位和个人不得以任何形式复制、传播本手册的部分或全部内容。
内容声明您购买的产品、服务或特性等应受浪潮集团商业合同和条款的约束。
本文档中描述的全部或部分产品、服务或特性可能不在您的购买或使用范围之内。
除非合同另有约定,浪潮集团对本文档内容不做任何明示或暗示的声明或保证。
由于产品版本升级或其他原因,本文档内容会不定期进行更新。
除非另有约定,本文档仅作为使用指导,本文档中的所有陈述、信息和建议不构成任何明示或暗示的担保。
商标声明●Inspur浪潮和“英信”是浪潮集团有限公司的注册商标。
●Windows是微软公司的注册商标。
●Intel、Xeon是Intel公司的注册商标。
●其他商标分别属于其相应的注册公司。
使用声明在您正式使用本服务器系统之前,请您先阅读以下声明。
只有您阅读了以下声明并且同意以下各条款后,方可正式开始使用本服务器系统;如果您对以下条款有任何疑问,请和您的供货商联系或直接与我们联系。
如您未向我们就以下条款提出疑问并开始使用本系统,则是默认您已经同意了以下各条款。
●我们提醒您特别注意:在任何时候,除了我们提示您可以修改的参数以外,您不要修改本服务器系统主板BIOS中的任何其他参数。
●在您使用的服务器系统出现任何硬件故障或您希望对硬件进行任何升级时,请您将机器的详细硬件配置反映给我们的客户服务中心;您不要自行拆卸服务器系统机箱及机箱内任何硬件设备。
●本服务器系统的内存、CPU、CPU散热片、风扇、硬盘托架、硬盘、电源等都是特殊规格的,请您不要将它们和任何其他型号机器的相应设备混用。
●您在使用服务器系统过程中遇到的任何软件问题,我们希望您首先和相应软件的提供商联系,由他和我们联系,以方便我们沟通、共同解决您遇到的问题。
对于如数据库、网络管理软件或其他网络产品等的安装、运行问题,我们尤其希望您能够这样处理。
sun fire t2000 服务器 安装指南说明书

Sun Fire TM T2000 伺服器安裝指南Sun Microsystems, Inc.文件號碼:819-4539-112006 年 4 月,修訂版 A請將您對本文件的意見提交至:/hwdocs/feedback請回收Copyright 2006 Sun Microsystems, Inc., 4150 Network Circle, Santa Clara, California 95054, U.S.A. 版權所有。
Sun Microsystems, Inc. 對於本文件所述技術擁有智慧財產權。
這些智慧財產權包含 /patents 中列示的一項或多項美國專利,以及在美國與其他國家/地區擁有的一項或多項其他專利或申請中專利,但並不以此為限。
本文件及相關產品在限制其使用、複製、發行及反編譯的授權下發行。
未經 Sun 及其授權人 (如果有) 事先的書面許可,不得使用任何方法、任何形式來複製本產品或文件的任何部份。
協力廠商軟體,包含字型技術,其版權歸 Sun 供應商所有,經授權後使用。
本產品中的某些部份可能源自加州大學授權的 Berkeley BSD 系統的開發成果。
UNIX 是在美國和其他國家/地區的註冊商標,已獲得 X/OpenCompany, Ltd. 專屬授權。
Sun 、Sun Microsystems 、Sun 標誌、Java 、AnswerBook2、 、Sun Fire 和 Solaris 是 Sun Microsystems, Inc. 在美國及其他國家/地區的商標或註冊商標。
所有 SPARC 商標都是 SPARC International, Inc. 在美國及其他國家/地區的商標或註冊商標。
凡具有 SPARC 商標的產品都是採用 Sun Microsystems, Inc. 所開發的架構。
OPEN LOOK 和Sun™ Graphical User Interface (Sun 圖形化使用者介面) 是 Sun Microsystems, Inc. 為其使用者與授權者所開發的技術。
戴尔UPS本地节点管理器安装及配置用户指南说明书

戴尔™ UPS 本地节点管理器®安装及配置用户指南说明说明:说明表示的是能帮助您更好的利用您计算机的重要信息。
____________________本文件所含信息如有更改,恕不另行通知。
© 2013 Dell Inc. 保留所有权利。
严禁在无 Dell Inc. 书面许可的情况下以任何方式对这些资料进行复制。
本文中使用到的商标: Dell及 Dell 标志是 Dell Inc. 的商标; Hyper-V、Microsoft、Windows、Internet Explorer、Windows Server、Windows 7、Windows XP 及 Windows Vista 为微软公司在美国及/或其他国家的商标或注册商标; Internet Explorer 是微软公司的注册商标;Firefox 是 Mozilla 基金会的注册商标; Linux 是 Linus Torvalds 公司的注册商标; Red Hat 是 Red Hat, Inc.的注册商标; Fedora 是 Red Hat, Inc 的注册商标;Safari 是苹果公司的注册商标; Ubuntu 是岛商肯诺有限公司的注册商标; VMware、ESX 及ESXi 是 VMware, Inc.公司的商标或注册商标; Mandriva 是 Mandriva S.A. 的注册商标; Novell是 Novell, Inc. 公司的注册商标以及 openSUSE 及 SUSE 是 Novell, Inc. 公司的注册商标;Xen、XenServer、XenCenter 及 XenMotion 是 Citrix Inc. 公司的注册商标或商标; Debian 是 Software in the Public Interest, Inc. (SPI) 公司的注册商标;Google 及Chrome 是谷歌公司的商标或注册商标;GNOME 是 GNOME 基金会的商标;Opera 是 Opera Software ASA 公司的商标; GNU 是自由软件基金会的注册商标。
HP DL380 Gen9服务器 安装手册

设置概述适用于HP ProLiant DL380 Gen9 服务器开始之前•有关安全、环境和管制信息,请参阅Safety and Compliance Information for Server, Storage, Power, Networking, and Rack Products(服务器、存储、电源、网络和机架产品的安全和遵从性信息)。
•选择的安装场所要满足服务器用户指南中介绍的安装场所的详细要求。
•打开服务器的包装箱,找到安装服务器所需的材料和文档。
•确认操作系统支持—有关ProLiant 服务器支持的操作系统的信息,请参阅操作系统支持矩阵。
有关预安装的详细信息,请参阅《HP ProLiant DL380 Gen9 服务器用户指南》。
组件识别前面板组件•小尺寸机型(8 驱动器)•小尺寸机型(24 驱动器)•大尺寸机型(12 驱动器)•大尺寸机型(4 驱动器)•小尺寸机型前面板LED 指示灯和按钮• 大尺寸机型 LED 指示灯和按钮后面板组件后面板LED 指示灯和按钮安装硬件选件安装所有硬件选件,然后再对服务器进行初始化。
有关选件安装信息,请参阅选件附带的文档。
有关服务器的特定信息,请参阅服务器用户指南。
在机架中安装服务器安装服务器之前,务必了解以下警告和注意。
警告:为减小电击或损坏设备的危险,请注意以下事项:务必使用电源线的接地插头。
接地插头是重要的安全保护功能。
将电源线插入始终易于够到的接地电源插座。
从电源上拔下电源线插头,以切断设备电源。
请勿将电源线放到容易被踩踏或被夹住的地方。
特别注意插头、电源插座以及电源线从服务器伸出的点。
警告:为减少设备表面过热而造成人身伤害的危险,请在接触驱动器和内部系统组件之前先等待其冷却。
注意:不要在检修面板打开或卸下的情况下长时间运行服务器。
否则,可能会造成气流不畅,无法正常冷却,可能会因温度过高造成损坏。
将服务器和电缆管理臂安装在机架上。
有关详细信息,请参阅2U 快速部署导轨系统附带的安装说明。
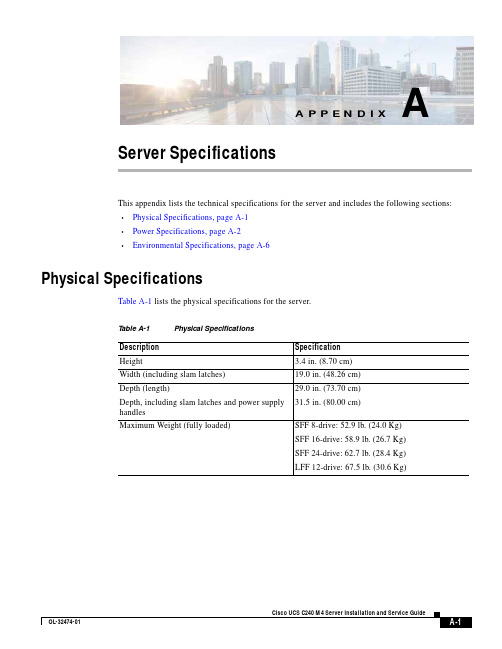
Cisco UCS C240 M4服务器安装和维护指南说明书
A-1Cisco UCS C240 M4 Server Installation and Service GuideOL-32474-01A P P E N D I XAServer SpecificationsThis appendix lists the technical specifications for the server and includes the following sections:•Physical Specifications, page A-1 •Power Specifications, page A-2 •Environmental Specifications, page A-6Physical SpecificationsTable A-1 lists the physical specifications for the server.T able A-1Physical SpecificationsDescription Specification Height3.4 in. (8.70 cm)Width (including slam latches)19.0 in. (48.26 cm)Depth (length)Depth, including slam latches and power supply handles29.0 in. (73.70 cm) 31.5 in. (80.00 cm)Maximum Weight (fully loaded)SFF 8-drive: 52.9 lb. (24.0 Kg)SFF 16-drive: 58.9 lb. (26.7 Kg)SFF 24-drive: 62.7 lb. (28.4 Kg)LFF 12-drive: 67.5 lb. (30.6 Kg)Appendix A Server Specifications Power SpecificationsPower SpecificationsThe power specifications for the power supply options are listed in the following sections:•650 W AC Power Supply, page A-2•1200 W AC Power Supply, page A-3•1400 W AC Power Supply, page A-4•930 W DC (Version 2) Power Supply, UCSC-PSU2V2-930DC, page A-5•930 W DC (Version 1) Power Supply, UCSC-PSU-930WDC, page A-5You can get more specific power information for your exact server configuration by using the Cisco UCSPower Calculator:650 W AC Power SupplyTable A-2 lists the specifications for each 650 W AC power supply(Cisco part number UCSC-PSU2V2-650W=).T able A-2650 W AC Power Supply SpecificationsDescription SpecificationAC input voltage Nominal range: 100–120 VAC, 200–240 VAC(Range: 90–132 VAC, 180–264 VAC)AC input frequency Nominal range: 50 to 60Hz(Range: 47–63 Hz)Maximum AC input current7.6 A at 100 VAC3.65 A at 208 VACMaximum input volt-amperes760 VA at 100 VACMaximum output power per PSU650 WMaximum inrush current35 A (sub-cycle duration)Maximum hold-up time12 ms at 650 WPower supply output voltage12 VDCPower supply standby voltage 3.3 VDCEfficiency rating Climate Savers Platinum Efficiency (80Plus Platinum certified)Form factor RSP1Input connector IEC60320 C14Cisco UCS C240 M4 Server Installation and Service GuideOL-32474-01Appendix A Server SpecificationsPower Specifications1200 W AC Power SupplyTable A-3 lists the specifications for each 1200 W AC power supply(Cisco part number UCSC-PSU2V2-1200W=).T able A-31200 W AC Power Supply SpecificationsDescription SpecificationAC input voltage Nominal range: 100–120 VAC, 200–240 VAC(Range: 90–132 VAC, 180–264 VAC)AC input frequency Nominal range: 50 to 60Hz(Range: 47–63 Hz)Maximum AC input current11 A at 100 VAC7 A at 200 VACMaximum input volt-amperes1456 VAMaximum output power per PSU800 W at 100–120 VAC1200 W at 200–240 VACMaximum inrush current35 A (sub-cycle duration)Maximum hold-up time12 ms at 1200 WPower supply output voltage12 VDCPower supply standby voltage12 VDCEfficiency rating Climate Savers Platinum Efficiency (80Plus Platinum certified)Form factor RSP1Input connector IEC60320 C14Cisco UCS C240 M4 Server Installation and Service Guide OL-32474-01Appendix A Server Specifications Power Specifications1400 W AC Power SupplyTable A-2 lists the specifications for each 1400 W AC power supply(Cisco part number UCSC-PSU2V2-1400=).T able A-41400 W AC Power Supply SpecificationsDescription SpecificationAC input voltage Nominal range: 200–240 VAC(Range: 180–264 VAC)AC input frequency Nominal range: 50 to 60Hz(Range: 47–63 Hz)Maximum AC input current8.5 A at 200 VACMaximum input volt-amperes1700 VAMaximum output power per PSU1400 W at 200–240 VACMaximum inrush current<30 A at 25° C (sub-cycle duration)Maximum hold-up time12 ms at 1200 WPower supply output voltage12 VDCPower supply standby voltage12 VDCEfficiency rating Climate Savers Platinum Efficiency (80Plus Platinumcertified)Form factor RSP1Input connector IEC60320 C14Cisco UCS C240 M4 Server Installation and Service GuideOL-32474-01Appendix A Server SpecificationsPower Specifications930 W DC (Version 2) Power Supply, UCSC-PSU2V2-930DCTable A-6 lists the specifications for each 930 W DC power supply(Cisco part number UCSC-PSU2V2-930DC=).T able A-5930 W DC Version 2 Power Supply SpecificationsDescription SpecificationDC input voltage range Nominal range: –48 to –60 VDC nominal(Range: –40 to –60 VDC)Maximum DC input current28 A at –40 VDCMaximum input W1104 WMaximum output power per PSU930 WMaximum inrush current35 A (sub-cycle duration)Maximum hold-up time 5 ms at 930 WPower supply output voltage12 VDCPower supply standby voltage12 VDCEfficiency rating> 92% at 50% loadForm factor RSP1 (C-Series 2U and 4U servers)Input connector Fixed 3-wire block930 W DC (Version 1) Power Supply, UCSC-PSU-930WDCTable A-6 lists the specifications for each 930 W DC power supply(Cisco part number UCSC-PSU-930WDC=).T able A-6930 W DC Version 1 Power Supply SpecificationsDescription SpecificationDC input voltage range Nominal range: –48 to –60 VDC nominal(Range: –40 to –60 VDC)Maximum DC input current23 A at –48 VDCMaximum input W1104 WMaximum output power per PSU930 WMaximum inrush current35 A (sub-cycle duration)Maximum hold-up time8 ms at 930 WPower supply output voltage12 VDCPower supply standby voltage12 VDCEfficiency rating> 92% at 50% loadForm factor RSP1 (C-Series 2U and 4U servers)Input connector Removable connector block UCSC-CONN-930WDC=Cisco UCS C240 M4 Server Installation and Service Guide OL-32474-01Cisco UCS C240 M4 Server Installation and Service GuideOL-32474-01Appendix A Server SpecificationsEnvironmental SpecificationsEnvironmental SpecificationsTable A-7 lists the environmental specifications for the server.T able A-7Environmental SpecificationsDescriptionSpecificationTemperature, operating41 to 95°F (5 to 35°C)Derate the maximum temperature by 1°C per every 305 meters of altitude above sea level.Temperature, nonoperating(when the server is in storage or is transported)–40 to 149°F (–40 to 65°C)Humidity (RH), operating 10 to 90%Humidity, non-operating 5 to 93%Altitude, operating 0 to 10,000 feet Altitude, nonoperating(when the server is in storage or is transported)0 to 40,000 feetSound power level Measure A-weighted per ISO7779 LwAd (Bels)Operation at 73°F (23°C)5.8Sound pressure levelMeasure A-weighted per ISO7779 LpAm (dBA)Operation at 73°F (23°C)43。
Istorage服务器安装和使用指南
Istorage服务器安装和使⽤指南Istorage服务器安装和使⽤指南准备⼀台服务器。
注意:安装程序会将系统盘上的所有分区删除,原来的数据会都丢失,有⽤的数据要先备份。
先下载安装光盘iso,然后刻录成⼀张光盘,将启动光盘放⼊光驱中,让光盘引导系统启动。
系统启动完毕,提⽰输⼊⽤户名和密码。
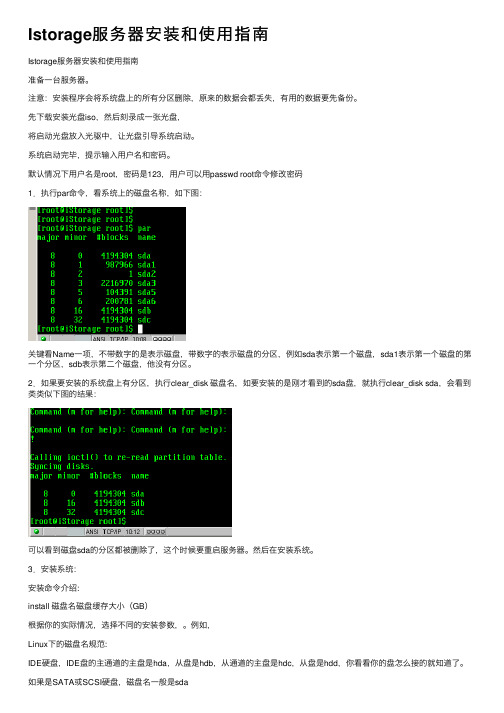
默认情况下⽤户名是root,密码是123,⽤户可以⽤passwd root命令修改密码1.执⾏par命令,看系统上的磁盘名称,如下图:关键看Name⼀项,不带数字的是表⽰磁盘,带数字的表⽰磁盘的分区,例如sda表⽰第⼀个磁盘,sda1表⽰第⼀个磁盘的第⼀个分区,sdb表⽰第⼆个磁盘,他没有分区。
2.如果要安装的系统盘上有分区,执⾏clear_disk 磁盘名,如要安装的是刚才看到的sda盘,就执⾏clear_disk sda,会看到类类似下图的结果:可以看到磁盘sda的分区都被删除了,这个时候要重启服务器。
然后在安装系统。
3.安装系统:安装命令介绍:install 磁盘名磁盘缓存⼤⼩(GB)根据你的实际情况,选择不同的安装参数,。
例如,Linux下的磁盘名规范:IDE硬盘,IDE盘的主通道的主盘是hda,从盘是hdb,从通道的主盘是hdc,从盘是hdd,你看看你的盘怎么接的就知道了。
如果是SATA或SCSI硬盘,磁盘名⼀般是sda如果还不清楚,安装前执⾏par,看看是否有:hda,hdb,hdc,hdd或sda,sdb ,sdc的名称。
例⼦:IDE硬盘,⼀般执⾏install hdaSATA或SCSI硬盘,⼀般执⾏install sda4. 重启服务器:取出光盘,执⾏reboot命令重启服务器。
5. 注册服务器:执⾏管理客户端istorage。
exe,输⼊ip,默认没有密码,进去了可以修改密码,登陆服务器,如下图:注意,服务器的默认ip为192。
168。
0。
251,如果你的⽹络不是192。
168。
0⽹段的,在你的客户端计算机上加⼀个这个⽹段的ip(windows的⽹络tcp/ip配置的⾼级中可以添加多个的),就可以了。
完整版服务器安装说明

完整版服务器安装说明完整版服务器安装说明(车辆定位+人员定位)一、“完整版服务器”安装要求1. 操作系统要求:Windows Server 2003 操作系统2. 数据库要求:SQL Server2000 / 2005 / 20083.“GPS监控服务器”需要打开的端口:89、1501、6969、6767、2099端口号端口类型后台车辆管理89 TCP端口后台车辆管理1501 TCP端口客户端连接服务器6969 TCP端口TCP终端设备上传数据6767 UDP端口UDP终端设备上传数据2099 服务器端口服务器初始化端口“人员定位服务器”需要打开的端口:89、1504、7979、7878端口号端口类型人员定位管理89 TCP端口人员定位后台管理1504 TCP端口客户端连接服务器7979 TCP端口TCP终端设备上传数据7878 UDP端口UDP终端设备上传数据二、下载“完整版服务器”安装程序登录EXLIVE主网站,在“下载中心—> 服务器端—> 完整安装包”中,点击“完整安装包”下载安装程序(如图1)。
图1三、安装“完整版服务器”下载完成后,双击,进入安装界面(如图2、3)图2图3点击,进入“许可证协议”(如图4)图4仔细阅读协议后,点击进入客户信息界面,如图5图5填写客户信息,如:用户名,公司名称,序列号(默认即可)等,点击,进入目的地文件夹选择界面(如图6)图6选择安装位置后,点击,系统自动生成EXLIVE定位服务平台文件夹,如图7图7 点击,进入安装状态(如图8)图8 待服务器程序安装完成(如图9);图9点击,进入“EXLIVE定位服务平台系统配置” 界面(如图10)。
四、配置“EXLIVE定位服务平台系统”参数1.数据库连接参数配置(如图10)>> 数据库类型:根据客户服务器数据库安装程序不同,选择不同数据库类型SQL Server 2000 /2005 / 2008>> 服务器地址:数据库所在服务器的IP地址>> 数据库名称:默认gserver_synth(车辆定位数据库),pgps(人员定位数据库)>> 登录用户,密码:连接数据库的账号及密码>> 附加数据库:是否将数据库模板附加到用户数据库中,第一次安装,必须选择该项>> 启动服务器(车辆、人员):选中此项,服务器安装成功后,程序会自动启动车辆定位服务器和人员定位服务器。
NF5280服务器操作系统安装说明

NF5280服务器操作系统安装说明本说明主要是对于NF5280随机用户手册的补充,简单描述除windows server2008、Red Hat Enterprise Linux 5.2外的其他版本操作系统安装操作。
此处介绍的操作系统安装均指手动安装过程。
有些操作系统可能需要使用软驱加载硬盘控制器驱动程序,驱动程序软盘的制作方法可参阅浪潮系统驱动程序光盘根目录下的readme.pdf文件。
在登录到驱动程序光盘的驱动制作界面中,可以查看并制作相关配置下操作系统安装过程中需要加载的控制器驱动程序。
本说明描述的安装操作主要适用于主板集成SATA RAID/AHCI、外插SAS daughter卡(SAS 子卡)配置,如果您的服务器配置有外插RAID卡,请您参照外插RAID卡配套光盘中用户手册说明来添加硬盘控制器驱动程序,对于网卡驱动、显卡驱动和系统补丁程序仍可参照本章节指导来安装。
1.安装Windows Server 2003 Enterprise Edition1.1安装前的准备*Windows Server 2003 Enterprise Edition安装光盘(支持32bit或EMT64bit版本)。
* 浪潮驱动程序光盘。
* SAS子卡driver for Windows 2003驱动软盘(适用使用外插SAS daughter卡的配置,通过浪潮驱动程序光盘制作)* Sata hostraid driver for Windows 2003驱动软盘(适用使用主板集成SATA控制器的RAID配置,通过浪潮驱动程序光盘制作)* SATA AHCI Driver for Windows 2003驱动软盘(适用使用主板集成SATA控制器的AHCI 模式配置,通过浪潮驱动程序光盘制作)* Windows Server 2003 Service Pack 1(需要您自己准备;如果使用集成SP1版本的安装光盘,则无需再单独安装此补丁程序)1.2安装步骤1.加电启动服务器,将Windows Server 2003安装光盘放入到光驱中,选择从光盘引导。
安装说明_服务器端组件安装说明

服务器端组件安装说明一、前言金格目前的中间件产品,基本上都是基于前后台通信的工作原理。
所以服务器端都要部署一个组件(一般名称为iMsgServer2000.dll或.class),用来解析客户端发来的信息包以及封装发会给客户端的信息包。
服务器端的组件根据开发语言的不同分为COM类和JA V A类两大部分,不同的开发语言和环境注册服务器端组件的方式也不相同。
下面,我们介绍基于各种B/S开发语言和环境下的服务器端组件安装方法。
(C/S结构的开发方式用不到服务器端组件)二、COM组件安装2.1 ASPASP开发语言用到的COM组件,有两种安装方式:一是直接用Regsvr32命令方式注册;另一种是在组件管理中进行安装。
2.1.1Regsvr32命令方式注册:在“开始”→“运行”中用“Regsvr32+空格+控件地址”进行注册:(图2-1 打开“开始”菜单中的“运行”)(图2-2 输入注册代码)(图2-3 运行后的成功提示)注册成功后就部署完成了。
注意注册后控件的文件是不能移动的,一定要找一个不容易被删除到的目录来存放。
但是这种注册方式有一个缺点,就是权限不好控制,很有可能注册后在程序中依然引用不到而产生错误,这个时候只能用第二种方式,也就是组件服务的方式安装。
2.1.2组件服务安装首先打开控制面板,找到“管理工具”:(图2-4 控制面板)打开“管理工具”选择里面的“组件服务”:(图2-5 管理工具)(图2-6 组件服务)分别点击进入“组件服务”→“计算机”→“我的电脑”→“COM+应用程序”:(图2-7 COM+应用程序)点击右键,选择“新建”→“应用程序”:(图2-8 新建应用程序)(图2-9 新建应用程序)在向导中选择“创建空应用程序”按钮:(图2-10 创建空应用程序)给新建的应用程序起一个名称,这里我们起“GoldGrid”:(图2-11 创建空应用程序)(图2-12 用户回头选这里点“下一步”)(图2-13 完成应用程序的安装)应用程序安装好以后,我们需要把组件放入到刚才新建的应用程序中。
Dell OpenManage 服务器管理器版本 6.5 安装指南说明书

Dell OpenManage 服务器管理器版本 6.5 安装指南注和小心本说明文件中的信息如有更改,恕不另行通知。
© 2011 Dell Inc. 版权所有,翻印必究。
未经 Dell Inc. 书面许可,严禁以任何形式复制这些材料。
本文中使用的商标:Dell™、DELL™ 徽标、PowerEdge™、PowerVault™ 和 OpenManage™ 是 Dell Inc. 的商标。
Microsoft ®、Windows ®、Internet Explorer ®、Active Directory ®、Windows Server ® 和 Windows NT ® 是 Microsoft Corporation 在美国和/或其他国家/地区的商标或注册商标。
EMC ® 是 EMC Corporation 的注册商标。
Java ® 是 Sun Microsystems, Inc. 在美国 和其他国家或地区的商标或注册商标。
Novell ® 和 SUSE ® 是 Novell, Inc. 在美国和其他国家或地区的注册商标。
Red Hat ® 和 Red Hat Enterprise Linux ® 是 Red Hat, Inc. 在美国和其他国家或地区的注册商标。
VMware ® 是 VMware Inc. 在美国和/或其他管辖区域的注册商标,ESX Server™ 是 VMware Inc. 在美国和/或其他管辖区域的商标。
Mozilla ® 和 Firefox ® 是 Mozilla Foundation 的注册商标。
Citrix ®、Xen ®、XenServer ® 和 XenMotion ® 是 Citrix Systems, Inc. 在美国和/或其他国家或地区的注册商标或商标。
Sun SPARC Enterprise T5120 和 T5220 服务器安装指南 说明书
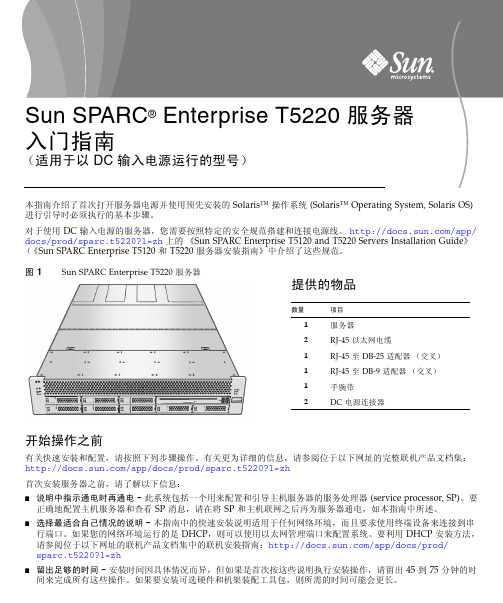
本指南介绍了首次打开服务器电源并使用预先安装的 Solaris™ 操作系统 (Solaris™ Operating System, Solaris OS) 进行引导时必须执行的基本步骤。
对于使用 DC 输入电源的服务器,您需要按照特定的安全规范搭建和连接电源线。
/app/docs/prod/sparc.t5220?l=zh 上的《Sun SPARC Enterprise T5120 and T5220 Servers Installation Guide 》(《Sun SPARC Enterprise T5120 和 T5220 服务器安装指南》中介绍了这些规范。
图 1Sun SPARC Enterprise T5220 服务器提供的物品■说明中指示通电时再通电 - 此系统包括一个用来配置和引导主机服务器的服务处理器 (service processor, SP)。
要正确地配置主机服务器和查看 SP 消息,请在将 SP 和主机联网之后再为服务器通电,如本指南中所述。
■选择最适合自己情况的说明 - 本指南中的快速安装说明适用于任何网络环境,而且要求使用终端设备来连接到串行端口。
如果您的网络环境运行的是 DHCP ,则可以使用以太网管理端口来配置系统。
要利用 DHCP 安装方法,请参阅位于以下网址的联机产品文档集中的联机安装指南:/app/docs/prod/sparc.t5220?l=zh■留出足够的时间 - 安装时间因具体情况而异,但如果是首次按这些说明执行安装操作,请留出 45 到 75 分钟的时间来完成所有这些操作。
如果要安装可选硬件和机架装配工具包,则所需的时间可能会更长。
数量项目1服务器2RJ-45 以太网电缆1RJ-45 至 DB-25 适配器(交叉)1RJ-45 至 DB-9 适配器(交叉)1手腕带2DC 电源连接器■获取终端设备-将使用内置的串行管理端口和网络管理端口通过 SP 配置该机架装配式服务器,而不是通过图形界面和 Sun 键盘进行配置。
Dell服务器管理软件包套件5.0.1安装指南说明书
面向 Microsoft System Center Operations Manager 和 System Center Essentials 的 Dell Server Management Pack Suite 版本 5.0.1安装指南注、小心和警告注: “注”表示可以帮助您更好地使用计算机的重要信息。
小心: “小心”表示可能会损坏硬件或导致数据丢失,并说明如何避免此类问题。
警告: “警告”表示可能会造成财产损失、人身伤害甚至死亡。
© 2012 Dell Inc.本文中使用的商标:Dell™、Dell 徽标、Dell Boomi™、Dell Precision ™、OptiPlex™、Latitude™、PowerEdge™、PowerVault™、PowerConnect™、OpenManage™、EqualLogic™、Compellent™、KACE™、FlexAddress™、Force10™和 Vostro™是 Dell 公司的商标。
Intel®、Pentium®、Xeon®、Core®和 Celeron®是 Intel 公司在美国和其他国家/地区的注册商标。
AMD®是 Advanced Micro Devices 公司的注册商标,AMD Opteron™、AMD Phenom™和 AMD Sempron™是 AMD (Advanced Micro Devices) 公司的商标。
Microsoft®、Windows®、Windows Server®、Internet Explorer®、MS-DOS®、Windows Vista®和 Active Directory®是微软公司在美国和/或其他国家/地区的商标或注册商标。
Red Hat®和 Red Hat® Enterprise Linux®是 Red Hat 公司在美国和/或其他国家/地区的注册商标。
Dell EMC 服务器部署包版本 4.1 安装指南说明书
用于 Microsoft System Center Configuration Manager 的 Dell EMC Server Deployment Pack 版本 4.1安装指南8 2021注意、小心和警告:“注意”表示帮助您更好地使用该产品的重要信息。
:“小心”表示可能会损坏硬件或导致数据丢失,并告诉您如何避免此类问题。
:“警告”表示可能会导致财产损失、人身伤害甚至死亡。
© 2019 - 2021 年 Dell Inc. 或其子公司。
保留所有权利。
Dell、EMC 和其他商标是 Dell Inc. 或其附属机构的商标。
其他商标可能是其各自所有者的商标。
章 1: 概览 (4)此版本中的新功能 (4)前提条件与要求 (5)支持的系统 (6)用于 Dell EMC Server Deployment Pack 的 Configuration Manager、操作系统、AIK/ADK 支持值表 (6)安装 Dell EMC Server Deployment Pack (8)首次在系统上安装 Dell EMC Server Deployment Pack (8)升级 Dell EMC Server Deployment Pack (9)迁移至 Microsoft System Center Configuration Manager (9)使用 GUI 卸载 Dell EMC Server Deployment Pack (10)使用命令行安装、升级和卸载 Dell EMC Server Deployment Pack (10)安装 Dell EMC Server Deployment Pack (10)卸载 Dell EMC Server Deployment Pack (10)升级 Dell EMC Server Deployment Pack (11)使用 Configuration Manager Admin Console (11)故障排除 (12)PCI 设备驱动程序的运行状况显示为“严重” (12)使用控制面板卸载 Dell EMC Server Deployment Pack (12)在一个或多个 SMS 提供程序关闭时安装 Dell EMC Server Deployment Pack (12)使用 WinPE 3.0 在第 13 代 PowerEdge 平台上部署操作系统 (12)可能需要的其他 Dell 说明文件 (12)联系 Dell (13)访问 Dell EMC 支持网站上的支持内容 (13)目录3概览本指南提供了有关安装和卸载用于 Microsoft System Center Configuration Manager (SCCM) 或 Microsoft Endpoint Configuration Manager(MECM) 的 Dell EMC Server Deployment Pack (DSDP) 的软件前提条件和要求的信息。
2U服务器安装图解
2U服务器安装图解1. 介绍在本文档中,我们将详细说明如何正确地安装一台2U服务器。
通过图解和文字描述,您可以轻松了解每个步骤的具体操作方法。
2. 准备工作在开始之前,请确保已经准备好以下物品:- 一个适用于该型号服务器的机架或支架。
- 所需数量的螺丝和其他固定件。
- 相应规格及容量的硬盘、内存等组件(根据实际需要)。
3. 安装过程步骤1:打开机箱门并检查内容物是否完整。
确认所有配件都在包裹里,并按照清单核对数量。
步骤2:选择合适位置放置你要安装这台服务器设备,在此基础上确定所选区域有足够空间供给后期使用以及散发出来产生高温时候能得到良好排风效果.步骤3: 小心提起主板, 并插入CPU芯片至相应槽位上.图例:[图片]4. 连接电源线确认连接方式无误后即可通电启动测试运行情况5.配置BIOS设置按下DEL键进入bios界面,进行相应的设置6. 安装操作系统根据实际需求选择合适的操作系统,并按照安装向导完成相关步骤。
7.连接网络将服务器与局域网或互联网连接起来。
8. 配置防火墙和安全性设置为了保护您的数据和服务器免受潜在威胁,请配置防火墙并采取其他必要措施提高服务器的安全性。
9.备份策略制定一个有效且可靠地备份计划以确保重要数据不会丢失。
10.维护与升级定期检查硬件设备是否正常工作,并根据需要对其进行升级或更换部分组件。
11. 结束语感谢您使用本文档所提供的2U服务器安装图解指南。
如果有任何问题,请随时联系我们获取进一步帮助。
12、本文档涉及附件:- 图片文件:包含示意图等图片素材13、法律名词及注释:- CPU芯片: 中央处理器(Central Processing Unit)是电子计算机中心思考运行核心, 是整个主板上最关键也是负责所有数学/逻辑运算任务.- BIOS: 基本输入输出系统(Basic Input/Output System)是一种固化在计算机主板上的固件,它包含了开机自检、硬件初始化以及启动操作系统等功能。
- 1、下载文档前请自行甄别文档内容的完整性,平台不提供额外的编辑、内容补充、找答案等附加服务。
- 2、"仅部分预览"的文档,不可在线预览部分如存在完整性等问题,可反馈申请退款(可完整预览的文档不适用该条件!)。
- 3、如文档侵犯您的权益,请联系客服反馈,我们会尽快为您处理(人工客服工作时间:9:00-18:30)。
本地服务器安装说明
1. 双击安装图标:
2. 选择“我同意”,点击“下一步”:
3. 直接把“C”盘改成其它的盘,不要点击“Browse”浏览:
4. 上面图标是“创建快速启动图标”,下面图标是“创建桌面图标”,建议都打上勾:
5. 点击“Install”安装:
6.安装过程:
7. 直接点击“打开”即可。
8. 这些不用动,直接点击“下一步”:
9. 是否马上运行服务器?需要则打上勾,不需要则不打勾:
10. 服务器启动后,桌面右下角会出来这个图标,启动成功:
11. 浏览器输入http://localhost/测试本地服务器是否安装成功,安装成功后会出现下面的测试页面。
如果安装失败,建议从网上下载一个其它版本的,或者xmapp ,安装。
