Moud Professional word
AutoCAD Vault Professional PDF 自动创建文件说明书

MFG220676Automatic PDF Creation for Drawings in Vault Professional Based on a Custom WorkflowShaya GhanbarDescriptionTake advantage of Vault Professional (Pro) lifecycle and workflow tools to automatically create PDFs for your drawings. In this class, you will learn the steps required to create a lifecycle, workflow, and category for automatic PDF creation. This class will also help you to understand the functionality of the Job Server application for the PDF generation. Based on the knowledge you gain in this class, your Vaulted environment will be set up to automatically convert your IDW and DWG™ drawings to PDF files upon r eleasing the drawing files. This workflow will save you time by avoiding manual drawing file conversion to PDF. In addition, all the Vault users will always have access to the latest PDF drawings.Your AU ExpertAs a Mechanical Engineer, Shaya Ghanbar has several years of experience in mechanical component design in the automotive industry and knowledge in design and simulation of advance remote medical equipment. In 2010, Shaya co-published the Characterization of a Robotic Drug Delivery System Based on Magnetic Propulsion in the IEEE/ASME journal. In 2016, he acquired his Professional Engineering designation in Ontario, Canada. Throughout his engineering carrier, Shaya has used several CAD and FEA applications such as Autodesk Inventor, ANSYS and Pro Engineer for 2D/3D design and simulation analysis. He has also had the opportunity to use and manage both Vault Professional and PLM 360 for engineering project management. Currently, Shaya is working as a Manufacturing Industry Consultant with SolidCAD. He is taking advantage of his engineering and CAD design experience to help SolidCAD’s clients to improve their manufacturing processes and determine methods for time and cost management.*************************Table of ContentsOverview (1)Pros and Cons of Utilizing the Vault Pro PDF Creation Feature (1)Requirements for the Automatic PDF Creation (2)Setup and Configuration Procedures (2)Setup and Configuration for a New Install of Vault 2018 or a Newer Version (2)Deleting the rule (3)Disabling the Design Representation Category (5)Lifecycle Definition Creation and Configuration (7)Category Creation and Configuration (18)Correction to the PDF lifecycle definition (23)Rule Creation and Configuration (24)Necessary Changes to the Source Drawing File’s Lifecycle (27)Job Server Configuration (29)PDF File Name Configuration (31)Knowledge References (32)Lifecycle and Revision Control Setup (32)User Account Creation (32)Job Server (32)PDF File Name Modification (32)OverviewConversion of Inventor and AutoCAD drawing files, IDW and DWG, to PDF can be time consuming and can cause confusion if the PDF files are saved in a wrong location. In addition, businesses that practice storing their PDF drawings in their Vault database must ensure that converted PDF files are checked back into their Vault.By taking advantage of the PDF creation feature that was introduced in Vault Pro 2018, companies can automate the drawing file conversion to PDF. This method will not only save time, it will store the PDF drawings automatically in a designated location. As a result, once a designer releases a drawing the file will be automatically converted to PDF and saved in Vault. Pros and Cons of Utilizing the Vault Pro PDF Creation FeatureBelow is an evaluation of Autodesk Vault Pro PDF creation feature. This evaluation will help you decided if this feature is suitable for your business needs:∙Pros:o Time savings: no more manual conversion of drawing files to PDF.o Accurate naming convention: automatically created PDF files inherit the source drawing file name.o Accurate location: PDF files will be automatically saved in either the same location as the source drawing file or in a single designated location based on theuser’s preferences.∙Cons:o File name: there is a limitation on how customized the PDF name can be.Customisation to the PDF file name requires advanced Vault knowledge.o File location: PDF files cannot be automatically saved in a subfolder of a project.o Lifecycle definition: as of Vault Pro 2019.1, the state of the PDF lifecycle definition does not change in accordance with source drawing file’s state. As aresult, users need to manually change the state of their automatically createdPDF file.o If the PDF file is relocated/renamed in Vault, after rereleasing the source drawing Vault does not recognize the relocated/renamed file and creates a new PDFdocument.This document demonstrates the steps required to setup a workflow for automatic PDF creation.Requirements for the Automatic PDF CreationThe following is required to setup a workflow for the automatic PDF creation:∙Vault Pro 2018, or a newer version.∙ A functional lifecycle that is consistent of a released state:o The released state of an existing workflow will be used to trigger the PDF conversion.o If you do not have a functional lifecycle already setup in your Vault environment, please refer to the Knowledge References, Page 32, of this report.∙Administrative user right: the user who will make the changes needs to be a Vault administrator.Setup and Configuration ProceduresThe steps below will guide you to create a custom lifecycle, category and rule for the purpose of creating PDF drawings on release.Please note that the red boxes and the numbers in the images show the sequence of steps that needs to be followed and the buttons that have to be pressed.Setup and Configuration for a New Install of Vault 2018 or a Newer VersionIf you had Vault Pro prior to the 2018 version and you have migrated your Vault database from an older version to 2018 or a newer version, please ignore this section and move on to the Lifecycle Definition Creation and Configuration section of this report on Page 7.A fresh installation of Vault Pro 2018 comes with an out-of-the-box PDF creation workflow. Companies that implement Vault Pro 2018, or newer, for the first time have access to the out-of-the-box workflow for the PDF creation. The out-of-the-box workflow contains the following components: lifecycle (Design Representation Process), category (Design Representation) and rule (Design Representation). Since the out-of-the-box solution is not customized to meet every organization’s unique requirements, this report provides a solution that can be customized based on each individual firm’s unique needs.In order to create a customized workflow, first the out-of-the-box category (Design Representation) and rule (Design Representation) need to be disabled. The following steps demonstrate how to:∙Delete the rule (Design Representation).∙Disable the category (Design Representation).Deleting the ruleFigure 1: Accessing Vault SettingsFigure 2: Deleting the Design Representation ruleDisabling the Design Representation CategoryFigure 3: Removing the Design Representation Process lifecycle from the Design PresentationcategoryFigure 4: Removing the Design Representation Process lifecycle from the Assign CategoryoptionLifecycle Definition Creation and Configuration1A lifecycle is a powerful and flexible method for managing file access and revision control. Lifecycle configuration is the first step to creating a customized workflow. Defining and configuring a lifecycle includes the following tasks:∙Creation of a new lifecycle definition.∙Assigning lifecycle states.∙Configuring ‘Control’.∙Setting up user security.∙Transitions between states.The following images demonstrate the step-by-step tasks required to create a customized lifecycle:Figure 5: Accessing Vault Settings1 Lifecycle Definition Creation and ConfigurationFigure 6: Creating a new lifecycle definitionFigure 6 shows the 3 steps required to create a new lifecycle. Since step number 3 requires more setup than what is shown, below are the breakdown of required tasks:Step 3: after selecting ‘New’, you will be prompted with the ‘New Lifecycle Definition’ window. At this stage you have to customize the following options:1. Definition Name: in this example, PDF is chosen.2. Category: since a customized category for PDF has not been created, select Base asthe File Category.3. Adding Lifecycle States: Released and WIP (work in progress).a. By pressing the green plus icon, states can be added.b. Make sure that the Released state is marked as default.Figure 7: New lifecycle definition, before customizationFigure 8: New lifecycle definition, after customizationAs shown in Figure 8, only two states (Released and WIP) are added. As it was explained in the Pros and Cons of Utilizing the Vault Pro PDF Creation Feature section, PDF lifecycle definition is not linked to the source drawing file lifecycle definition. As a result, it is easier to only work with a simple two state lifecycle definition.Ensure the following options are selected:Figure 9: Customising the new lifecycle definition, Control tab for Released stateFigure 10: Customising the new lifecycle definition, Control tab for WIP stateAdd the required user security for the PDF lifecycle definition. This security is going to be applied to PDF files while they are in Released or WIP sates. Based on your criteria, users added under the Security tap will have Read, Modify or Delete permission. The majority of organizations lock the Released state to their users so users cannot edit released files. As presented in Figure 11, only the Administrator and Job Processor users are capable of making changes to a released PDF file.Ensure that the Job Processor user is added.For more information regarding the Job Processor user, please refer to Page 30.Figure 11: Customizing the new lifecycle definition, Security tab for Released stateFigure 12: Customizing the new lifecycle definition, Security tab for WIP stateStep number 6 ensures that the file changes its revision number if it is moved from Released state to WIP.Figure 13: Customizing the new lifecycle definition, Transitions tab: Released to WIP stateUnless you would like to add security regarding the users that are capable of changing the state from Released to WIP, check mark No restriction on this transition.Figure 14: Customizing the new lifecycle definition, Transitions: Released to WIP stateIn the transition state from WIP to Released, make sure that No restriction on this transition is marked.Figure 15: Customizing the new lifecycle definition, Transitions tab: WIP to Released stateCategory Creation and ConfigurationA file category defines the associated lifecycle, revision and file properties. Creating a customized category requires the following tasks:∙Creating a new category.∙Assigning a lifecycle to the category.∙Assigning a revision scheme to the category.The images below demonstrate how to create a customized category for the PDF workflow. As shown in step 5, the name of this category is PDF.Figure 16: Category creationSteps 4 and 5 of Figure 16 define the name of the category and the colour which represents this category. Once the PDF category is created, a lifecycle and a revision scheme need to be assigned to this category. The lifecycle definition assigned to this category is going to be the PDF lifecycle that was created in the Lifecycle Definition Creation and Configuration section of the report. The revision scheme assigned to this category needs to match the revision scheme of the source drawing file. For instance, if the source drawing file’s revision scheme is calledStandard Alphabetic Format, the PDF revision scheme also needs to be Standard Alphabetic Format.Figure 17: PDF category configuration, lifecycle assignmentAs presented in Figure 18, Vault Demo Standard Alphabetic revision scheme that was used in the source file category is also being used in the PDF file category.Figure 18: PDF category configuration, revision number assignmentFigure 19 shows the revision scheme that was used in the source drawing file category, DWG.Figure 19: Revision scheme used in the source drawing fileCorrection to the PDF lifecycle definitionNow that a customized lifecycle exists for PDF files, the category selected in the PDF lifecycle definition needs to be modified. Previously the Base category was selected. In order to correct the PDF Lifecycle, the following task is required:Deselecting the ‘Base’ category.The image below shows the modification that is required:Figure 20: Modification to PDF lifecycle, deselecting the Base categoryRule Creation and ConfigurationA rule associates a file to a category based on the file’s metadata properties or file extension. In the case of automatic PDF creation, the PDF rule finds the files in the Vault database with the file extension of .pdf and associates them with the PDF category. In this case, the rule is called PDF and the Category Assignment is set to PDF. The following tasks are required to create a customized category:∙Creating a new rule (PDF).∙Adding conditions to the rule.Below is a demonstration on how to create a customized rule:Figure 21: Creation of PDF ruleOnce the rule is created, a rule condition needs to be added. The rule condition defines which type of file is going to be enforced by the rule. Figure 22, demonstrates the settings that need to be selected for PDF rule condition.Figure 22: Rule conditionNecessary Changes to the Source Drawing File’s LifecycleThe Released state of the source drawing file is going to be utilized to trigger the PDF creation. Thus, when the drawing is transitioned to the Released state Vault will trigger the creation of a PDF file for that drawing. The trigger or so called the Synchronization needs to be selected in the source file’s transition to released state.In this example, Vault Pro Lifecycle Demo is the lifecycle dentition used for the source drawings files. As presented in the step 9 of Figure 23 , on the transition from For Review to Released the ‘Synchronize properties, update view and pdf using Job Server’ option is selected. Since the Synchronize option is selected, on Release of the source file Job Server will task the PDF creation to a Job Processor computer to convert the drawing to PDF.Figure 23: Synchronise properties, update view and pdf using Job ServerSince the Released state of the source file is going to trigger the PDF creation, the Job Processor user account needs to have Read and Write security access to carry on the PDF creation tasks. Figure 24 shows how the Job Processor user is added to the security of the Released state of the source file.Figure 24: Job Processor Security setup for the source file’s lifecycle definitionJob Server ConfigurationJob Server is a feature of Vault Professional and is designed to perform batch-processing operations. In addition to the standard functionality that Job Server provides (DWF creation, property synchronization and PDF conversion), Job Server can be configured to perform custom actions on lifecycle state changes. In order to configure the Job Server, it is important to understand some important aspects of this feature. Tasks are performed by a “Job Processor” which is a workstation-based application. Any workstation with Vault Pro client and Inventor installation can be leveraged as a Job Processor. Alternatively, a separate workstation, physical or virtual, can be implemented as a dedicated Job Processor.Jobs on the queue may not get processed immediately. Jobs would be delayed if either a Job Processor workstation is not logged into the vault or there are higher priority jobs on the Job Queue.In order to use the functionalities of the Job Server, Job Server needs to be enabled by the Vault administrator. The images below show how to enable this feature:Figure 25: Vault Global SettingsFigure 26: Enabling the Job ServerJob Process requires being log into Vault server in order to carry on the tasks designated by the Job Server. In this report, a user called Job Processor 2 with Administrative user permission is created. As shown below, once the Job Processor is opened the Job Processor user account can be used to log into Vault.Figure 27: Job Processor log in2 Job Processor Vault user accountPDF File Name ConfigurationAutomatically created PDF file name can be modified to include or exclude certain information. By editing the JobProcessor.exe.config file, the PDF file name can be changed. Below is a list of modifications that can be done to the PDF file naming convention:∙Removing the source file's extension, such as .idw or .dwg, from the PDF file name.∙Adding a prefix.∙Adding a suffix.∙Adding a property value.∙Adding a date property.Please refer to the Knowledge References section on Page 32 for detailed information on how to make changes to the PDF file name.Knowledge References3The links provided in this section will assist with the learning and setup of the following topics in Vault Pro environment.Lifecycle and Revision Control SetupAutodesk Knowledge Network, Lifecycle State Administration:https:///support/vault-products/learn-explore/caas/CloudHelp/cloudhelp/2019/ENU/Vault-Admin/files/GUID-FD67DFAA-1220-485B-AF15-38ABD19CF440-htm.htmlYouTube, Unlocking Vault Lifecycles | Autodesk Virtual Academy:https:///watch?v=oKXlCNoUNMAUser Account CreationAutodesk Knowledge Network, Add a New Userhttps:///support/vault-products/learn-explore/caas/CloudHelp/cloudhelp/2019/ENU/Vault-Admin/files/GUID-B71398EE-4A6B-4202-B472-25452C840366-htm.htmlJob ServerAutodesk Knowledge Network, documentation related to Job Server:https:///support/vault-products/learn-explore/caas/CloudHelp/cloudhelp/2017/ENU/Vault-Admin/files/GUID-DAE28A42-45C3-4501-9BF2-78EE2F42808D-htm.htmlPDF File Name ModificationAutodesk Knowledge Network, Publish PDF from 2D CAD Fileshttps:///support/vault-products/learn-explore/caas/CloudHelp/cloudhelp/2019/ENU/Vault-Admin/files/GUID-F05BFEAF-A362-4070-BBA6-F3A74602967E-htm.html3 Knowledge References。
(2021年整理)高级口译第三版教程2梅德明

(完整)高级口译第三版教程2梅德明编辑整理:尊敬的读者朋友们:这里是精品文档编辑中心,本文档内容是由我和我的同事精心编辑整理后发布的,发布之前我们对文中内容进行仔细校对,但是难免会有疏漏的地方,但是任然希望((完整)高级口译第三版教程2梅德明)的内容能够给您的工作和学习带来便利。
同时也真诚的希望收到您的建议和反馈,这将是我们进步的源泉,前进的动力。
本文可编辑可修改,如果觉得对您有帮助请收藏以便随时查阅,最后祝您生活愉快业绩进步,以下为(完整)高级口译第三版教程2梅德明的全部内容。
Unit Three Business NegotiationText Passage One进出口商品交易会 import and export commodities fair 销售部经理 sales manager supply department 采购部 brochure 宣传小册子scope of business 经营范围 machine tool 机床workmanship 工艺 make an inquiry 询价quotation 报价 C.I.F Seattle 西雅图到岸价(*cost,insurance。
freight)调整价格 adjust the price competitive 具有竞争力bulk 很大 substantially 大大地展台 exhibition stand1.欢迎光临上海进出口商品交易会。
我叫陈明。
我是上海机械公司的销售部经理。
Welcome to Shanghai Import and Export Commodities Fair。
My name is Ming Chen。
I am Sales manager of the Shanghai Machinery Company Inc。
2.Hi, Mr。
Chen。
My name is Sean Hudson. I am from Seattle, USA. I am in charge of the supply department of the Pacific Trading Company Ltd。
办公软件高级应用任务驱动教程

第二章:Excel高级应用
2.1 数据处理与分析
教程大纲
数据导入与清洗
数据筛选、排序 和汇总
数据透视表的使 用与创建
教程大纲
2.2 公式与函数的高级应用 常用函数(:如SUM、AVERAGE 、IF等)的进阶使用方法
数组公式的应用技巧 自定义公式的开发与维护
教程大纲
2.3 数据可视化与 图表制作
希望您能将这些知识运用 到日常工作中,不断追求
卓越
如有任何疑问或需要进一 步的指导,请随时联系我
们
祝您在办公软件的学习与 应用中取得更多的收获与
成长
-
THANKS
感谢观看
XXX
处理段落格式的重复设置问题:在设置段落格式前,先选择所有文本或选定要设置格 式的文本。设置好所需格式后,再按Ctrl+Q应用快速样式。如需更改已设置格式的段 落,只需重新选择相应格式即可
教程附录
设置单元格的输入和输出限制:在"数据"选项卡中选择"数据验证",在弹 出的对话框中设置允许输入的数据类型、长度、范围等条件。如需加密整 个工作簿,可选择"文件"菜单中的"另存为"选项,在弹出的对话框中选择 "工具">"常规选项",输入密码即可 处理不同版本间的兼容性问题:在保存文档时,选择与目标版本相匹配的 格式进行保存。例如,如需将文档保存为旧版Word可编辑的格式,可选择 ".doc"格式进行保存。如需在PowerPoint演示文稿中展示画笔、激光笔 和幻灯片备注等实用技巧,只需在演示过程中依次点击相应工具即可
自定义快捷键:通过"选项"菜单中的"自定义功能 区"选项卡,可以为常用操作设置自定义快捷键
《Office办公软件高级应用》课程教学大纲
《Office办公软件高级应用》课程教学大纲一、课程简介随着信息技术的高速发展,Office软件作为办公辅助工具已经成为现实。
目前出版的与Office软件相关的教材,通常以功能介绍为主线,附以小型样例。
通过这些教材内容的学习,只能初步掌握软件的功能操作,对于解决难度大且复杂的问题往往无从着手。
课程基于微软公司的Office 软件,以任务驱动的方式进行教学,所选择的项目均来自于实际工作中有一定难度的日常事务。
每个项目均以“背景与项目”、“项目分析”、“实施”、“总结”、“实践与体会”等方面的内容进行描述。
以实际应用为主线,剖析Office 软件的功能体系与解决问题的方法和途径,体现软件的设计思想精髓,从而提高读者应用办公软件的高度与深度,提高工作效率。
二、课程性质与目的Office办公软件高级应用是一门重要的计算机公共基础课程,它能帮助学生熟练地应用办公软件处理日常事务,实现办公自动化,提高工作效率。
通过学习可以帮助学生独立并正确地掌握办公软件的高级应用技术,使学生今后能得心应手地应用办公软件处理复杂的办公业务。
使学生能够掌握办公自动化技术的基本概念以及办公集成软件的高级应用技术,进而理解计算思维的典型应用,为后续专业课程提供必要的支持。
三、教学内容与学时分配第1章Word基本操作(3学时)1、教学内容1.1根据模板创建“论文”文档。
1.2制作“会议通知”文档。
1.3实训--制作“公司信函”文档。
2、教学要求掌握Word的基本操作,包括新建、保存、加密,以及关闭和打开文档等。
3、重点文档的基本操作,文本的编辑操作。
4、难点设置文档的字符和段落格式。
第2章编辑文档格式(3学时)1、教学内容2.1 编辑“招聘启事”文档。
2.2 制作“产品说明书”文档。
2.3 实训--编辑“联合公文”文档。
2、教学要求了解使用制表位对齐文本的方法。
熟练掌握设置文档字符格式和段落格式的方法。
熟练掌握文档项目符号和编号的使用方法。
【STAAD】GS. About STAAD.Pro Documentation关于专业技术人员文档
【STAAD】GS. About STAAD.Pro Documentation关于专业技术人员文档The documentation for STAAD.Pro consists of the following sections that make up the online help.文件专业技术人员由以下部分组成联机帮助。
All the manuals can be accessed from the Help facilities of STAAD.Pro.所有手册都可以从专业技术人员.Getting Started (GS.)This section contains information on the contents ofthe STAAD.Pro package, computer system requirements, installation process, copy protection issues and a description on how to run the programs in the package.本节包含有关专业技术人员软件包、计算机系统要求、安装过程、复制保护问题以及如何运行程序包中的程序的说明。
What's New?This section contains the software release reportfor STAAD.Pro contains detailed information on additions and changes that have been implemented since the release of STAAD.Pro 2007 build 06.此部分包含的软件版本报告专业技术人员包含自发布以来已实施的添加和更改的详细信息专业技术人员2007年第06期。
Tutorials (T.)Tutorials that provide detailed and step-by-step explanation on using the programs are also provided.此外,还提供了有关使用这些程序的详细和分步说明的教程。
wps 海外版 语言模板

WPS Office 海外版支持多种语言模板,包括英语、法语、德语、西班牙语、葡萄牙语、意大利语等。
这些模板提供了多种语言环境下常用的文本、符号和格式,可以帮助用户更方便地创建高质量的文档。
要使用WPS Office 海外版,您需要先下载并安装WPS Office 海外版软件,然后打开软件并选择您需要的语言模板。
您可以在软件界面上方的菜单栏中选择“文件”-“新建”-“模板”,然后选择您需要的语言模板。
您还可以在软件界面的右侧选择“语言”选项卡,然后选择您需要的语言模板。
如果您需要更多关于WPS Office 海外版的帮助,可以访问WPS Office 官网或联系WPS Office 客服团队。
office 2016 专业增强版 英文语言包
office 2016 专业增强版英文语言包Title: Office 2016 Professional Plus English Language PackIntroduction:Office 2016 Professional Plus is a comprehensive suite of productivity tools developed by Microsoft. In order to cater to a global audience, Microsoft offers language packs that enable users to switch the interface language to their preferred language. This article aims to provide a detailed overview of the Office 2016 Professional Plus English Language Pack, highlighting its key features and benefits.I. Key Features of Office 2016 Professional Plus English Language Pack:1.1 Enhanced User Interface:- The English Language Pack offers a seamless and intuitive user interface, allowing users to navigate through the various Office applications effortlessly.- It provides a consistent and familiar experience for English-speaking users, making it easier to access and utilize the full range of features.1.2 Language Customization:- With the English Language Pack, users can customize the language settings of Office 2016 Professional Plus to English, enabling them to work comfortably in their preferred language.- Language customization includes options for menus, toolbars, ribbons, and other interface elements, ensuring a consistent and cohesive experience.1.3 Compatibility and Integration:- The English Language Pack seamlessly integrates with other Office applications, ensuring compatibility and smooth collaboration across different language settings.- It allows users to share documents, presentations, and spreadsheets with colleagues and partners who use the English language, eliminating language barriers and enhancing productivity.II. Benefits of Office 2016 Professional Plus English Language Pack:2.1 Improved Efficiency:- By using the English Language Pack, users can navigate through Office applications more efficiently, as they are familiar with the English interface.- This familiarity leads to increased productivity and reduced learning curve, enabling users to accomplish tasks more quickly and effectively.2.2 Enhanced Collaboration:- With the English Language Pack, users can collaborate seamlessly with English-speaking colleagues and clients, ensuring clear communication and efficient teamwork.- It eliminates language-related misunderstandings and facilitates effective collaboration, resulting in improved project outcomes.2.3 Access to Extensive Resources:- The English Language Pack provides users with access to a vast array of online resources, tutorials, and support materials available in English.- Users can leverage these resources to enhance their knowledge and skills, enabling them to make the most of Office 2016 Professional Plus.III. Conclusion:In conclusion, the Office 2016 Professional Plus English Language Pack offers a range of features and benefits that enhance the user experience and improve productivity. Its intuitive interface, language customization options, compatibility, and integration make it an essential tool for English-speaking users. By utilizing the English LanguagePack, users can work efficiently, collaborate effectively, and access extensive resources, ultimately maximizing their productivity and achieving their goals in the workplace.。
可编辑word模板:传统花边聘书word聘书证书模板
可编辑word模板:传统花边聘书word
聘书证书模板
模板简介
这是一个传统花边聘书的Word模板,可以用于制作聘书证书。
模板设计精美,结合了传统花边和现代元素,使得聘书具有独特的
风格和专业感。
你可以根据需要进行个性化编辑,包括公司名称、
聘用人员信息和时间等。
如何使用模板
1. 打开Word软件。
2. 导入传统花边聘书Word模板。
3. 根据需要进行编辑。
编辑步骤
请按照以下步骤进行编辑:
1. 在模板首部的"公司名称"一栏中,将默认的公司名称替换为
你自己的公司名称。
2. 在"聘用人员信息"一栏中,填写被聘用人员的姓名、职位等
相关信息。
3. 在"日期"一栏中,填写聘用的日期。
注意事项
- 请确保填写的信息准确无误。
- 在编辑完成后,请仔细检查并保存文档。
- 请不要使用模板中的任何内容进行违法活动或侵犯他人权利。
感谢使用我们的模板!祝你顺利完成聘书的制作!如有任何问题,请随时与我们联系。
引用信息
本文档中的模板设计和内容为原创,版权归我司所有。
模板中
的图片和元素来源于合法渠道,并遵守相关版权规定。
如果需要引
用本文档的内容,请联系我司管理员以获得授权。
威尔克姆制版软件简明教程
威尔克姆制版软件简明教程第一节电脑绣花制版基本知识1、花样编辑器和花样浏览器:威尔克姆软件包由花样编辑器和花样浏览器组成;花样编辑器即制版软件,它是电脑绣花制版和设计的主程序,它可以设计、编辑和修改花型,并将已设计好的花型输入到绣花磁盘上,在桌面上的图标为花样浏览器是编辑器的一个辅助程序,在桌面上的图标为它专用于查看和管理已设计好的EMB格式的花形,并可进行一些简单的辅助性操作,如通过双击EMB格式的花型图象可直接打开文件、格式化磁盘、删除、复制花样、将花样文件转换到绣花磁盘上等。
要运行浏览器,必须先打开花样编辑器;读者要注意,花样浏览器不能直接查看 DST或DSB等电脑绣花机可读入的文件,这些类型的文件可由富怡花样管理软件来查看。
2、花样文件格式和绣花磁盘文件格式通常情况下,不论是什么制版软件,它所设计出来的花型都是以一种电脑绣花机不能直接读出的文件格式保存下来的,然后再转换成电脑绣花能读出的格式。
例如:DOS版本的田岛软件所生成的花型设计文件格式为*.ESD,Windows版本的田岛软件所成的花样文件格式为*.EMB,Windows版本的威尔克姆软件所成的花样文件格式为*.EMB ,DOS版本的天木软件所生成的花样文件格式为*.ndp等;这些格式的文件电脑绣花机都不能直接使用,必须转换成*.DST(田岛绣花机三进制格式)或*.DSB(百灵达二进制格式),电脑绣花机才能读进内存进行绣花。
为什么制版软件所生成的花型设计文件(EMB格式)绣花机不能读进呢?这是因花样设计文件实际上是一种特殊的格式的图形文件,它含有图象信息(如图形大小、色彩、相对位置等信息)和制版编辑信息(如选用的针迹类型和密度等信息),而绣花机只能读DST(三进制)或DSB(二进制)格式的针位文件,因为绣花机的步进电机X轴和Y轴的位移尺寸(最低偏移量为0.1mm)以及停止、换色、剪线等控制信息只能用二进制或三进制来编码。
由此可见,DST或DSB格式的文件是由EMB文件经过滤除去制版信息转换而来的。
SOLIDWORKS PDM 2016安装指南说明书
安装指南SOLIDWORKS PDM 2016目录法律通告 (8)1SOLIDWORKS PDM安装指南 (11)2安装概述 (12)必要的安装组件 (13)可选安装组件(仅对于SOLIDWORKS PDM Professional) (15)SOLIDWORKS PDM调用情形 (15)系统要求 (17)安装摘要 (18)安装帮助 (18)3安装和配置SQL Server (19)SQL Server2014支持 (19)安装SQL Server2014 (19)安装SQL Server2014之前 (20)执行SQL Server2014安装 (20)安装SQL Server2014之后 (23)验证SQL Server2014安装 (23)升级到SQL Server2014 (24)向SQL Server2014升级 (24)升级到SQL Server2014之后 (26)安装SQL Server2012 (26)在安装SQL Server2012之前 (26)执行SQL Server2012安装 (26)安装SQL Server2012之后 (30)验证SQL Server2012安装 (30)升级到SQL Server2012 (30)执行SQL Server2012升级 (30)升级到SQL Server2012之后 (32)SQL Server疑难解答 (32)客户端不能处理文件库 (32)SOLIDWORKS PDM管理功能失败 (33)SOLIDWORKS PDM不能连接到服务器 (33)创建新的SQL登录帐户 (34)对SOLIDWORKS PDM存档使用新的SQL登录名 (34)向SQL用户授予访问现有SOLIDWORKS PDM文件库数据库的db_owner权限 (35)SQL权限不足 (36)4安装和配置SQL Server Express (37)SQL Server2014Express支持 (37)安装和管理SQL Server2014Express (37)安装SQL Server2014Express之前 (37)安装SQL Server Express数据库引擎 (38)安装SQL Server Express Management Studio (40)安装SQL Server2014Express之后 (42)验证SQL Server2014Express安装 (43)将SQL Server Express2014升级到SQL Server2014 (43)5安装SOLIDWORKS PDM (44)启动SOLIDWORKS PDM的安装 (44)安装SOLIDWORKS PDM数据库服务器 (45)安装数据库服务器之前 (46)执行数据库服务器安装 (46)安装SOLIDWORKS PDM存档服务器 (47)安装存档服务器之前 (48)执行存档服务器安装 (48)为客户端/服务器通信打开端口 (52)在WAN环境中添加存档服务器 (53)安装和配置SolidNetWork许可 (54)安装SolidNetWork许可管理器。
Adobe Acrobat 7.0 Professional的使用方法-2019年文档
将图片转换成word1.首先,先确认你的计算机安装以下设备:扫描仪。
如果没有扫描仪,也可以使用数码相机。
扫描仪可以将纸质文件扫描到计算机中。
2.其次,要确认你的计算机安装如下软件:扫描仪配备的扫描软件,Microsoft Office Word,Adobe Acrobat 7.0 Professional(版本7.0或者几点零的都没关系,但是确认要安装这个,只安装Adobe Acrobat 7.0 Reader 版本的是不行的),CAJViewer 7.1软件,如果这些软件没有,可以到网络上下载。
用百度或者迅雷狗狗搜都行(本人认为狗狗搜索的软件相对安全好用一些);下载完以后安装即可。
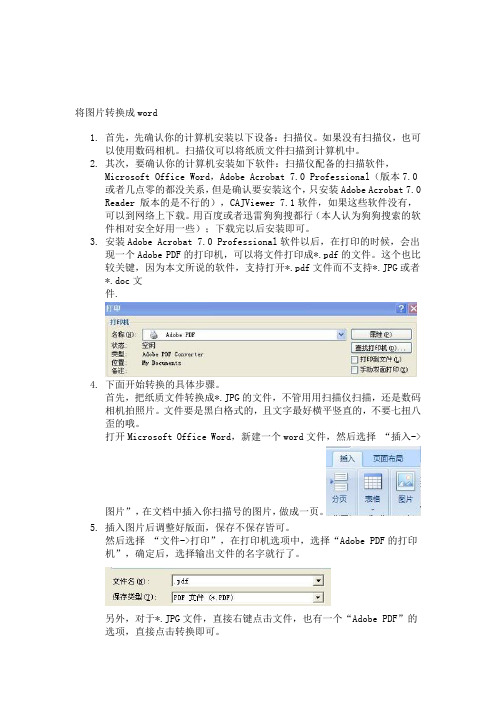
3.安装Adobe Acrobat 7.0 Professional软件以后,在打印的时候,会出现一个Adobe PDF的打印机,可以将文件打印成*.pdf的文件。
这个也比较关键,因为本文所说的软件,支持打开*.pdf文件而不支持*.JPG或者*.doc文件.4.下面开始转换的具体步骤。
首先,把纸质文件转换成*.JPG的文件,不管用用扫描仪扫描,还是数码相机拍照片。
文件要是黑白格式的,且文字最好横平竖直的,不要七扭八歪的哦。
打开Microsoft Office Word,新建一个word文件,然后选择“插入->图片”,在文档中插入你扫描号的图片,做成一页。
5.插入图片后调整好版面,保存不保存皆可。
然后选择“文件->打印”,在打印机选项中,选择“Adobe PDF的打印机”,确定后,选择输出文件的名字就行了。
另外,对于*.JPG文件,直接右键点击文件,也有一个“Adobe PDF”的选项,直接点击转换即可。
转换完成以后,就可以进行下一步识别了。
6.打开CAJViewer7.1软件,打开你刚才存储好的*.PFD文件,鼠标变成十字空心,然后用鼠标选中想要转换的文字就行了。
在菜单栏的左上角,有一个“文字识别”的快捷工具,点击“文字识别”,选中以后,会弹出一个对话框,就是将文字转换好了。
milestones professional手册
Milestones Professional手册1. 简介Milestones Professional是一款强大的项目管理软件,被广泛应用于计划、跟踪和可视化项目进展。
本手册将深入介绍Milestones Professional的功能和用法,以帮助用户更好地利用这一工具进行项目管理。
1.1 Milestones Professional的定义解释Milestones Professional是什么,其作用和在项目管理中的地位,为读者提供整体认识。
1.2 软件特点和优势介绍Milestones Professional的特点,包括图形化项目计划、易用性和与其他项目管理工具的集成等方面的优势。
2. 安装与设置本节将详细讲解如何安装Milestones Professional并进行基本设置,以确保用户能够顺利启动和使用软件。
2.1 下载和安装提供Milestones Professional的下载链接和安装步骤,让用户能够轻松地完成软件的安装。
2.2 基本设置介绍软件的基本设置,包括语言选择、时间格式、项目文件存储位置等,以确保软件按照用户的需求进行配置。
3. 项目计划创建与编辑这一部分将详细说明如何使用Milestones Professional创建和编辑项目计划,包括添加任务、调整时间轴和设置关键里程碑等。
3.1 创建新项目讲解如何在Milestones Professional中创建新的项目,设置项目基本信息和计划开始日期。
3.2 任务添加与编辑介绍如何添加任务,设置任务的起止日期、优先级等信息,并讲解如何进行任务的编辑。
3.3 时间轴调整解释如何调整项目时间轴,包括放大、缩小、移动时间轴等功能,以满足不同项目的时间要求。
4. 项目可视化与报告Milestones Professional强大的可视化功能是其一大特点,本节将详细说明如何利用这些功能制作项目图表和报告。
4.1 甘特图绘制介绍如何使用Milestones Professional绘制甘特图,展示项目任务的时间关系和进度。
word2003教程ppt_-_副本

1.2.4 关闭文档
对文档完成所有的操作后,要关闭时,可选择“文 件”|“关闭”命令,或单击窗口右上角的“关闭”按钮 。 在关闭文档时,如果没有对文档进行编辑、修改,可直接 关闭;如果对文档做了修改,但还没有保存,系统将会打 开一个提示框,询问是否保存对文档所做的修改。单击 “是”按钮即可保存并关闭该文档。
Copyright © 2010 Lifewood Copyright 2010 Lifewood
1
1
Committed Knowledge Caring World Committed Talents to Talents to Knowledge Caring World
目录
Copyright © 2010 Lifewood Copyright 2010 Lifewood
15
15 Committed
Committed Knowledge Caring World Talents to Talents to Knowledge Caring World
1.3 Word 2003的视图方式
1.2.1 新建文档
Word文档是文本、图片等对象的载体,要在文档中进 行操作,必须先创建文档。创建的文档可以是空白文档, 也可以是基于模板的文档。 创建空白文档 根据现有文档创建文档
Copyright © 2010 Lifewood Copyright 2010 Lifewood
acrobat professional 9.0
Acrobat Professional 9.0IntroductionAcrobat Professional is a powerful software developed by Adobe that allows users to create, edit, and manage PDF documents. The 9.0 version of Acrobat Professional offers various new features and enhancements that make it even more versatile and user-friendly. This document aims to provide an overview of the key features and capabilities of Acrobat Professional 9.0.Key Features1. PDF Creation and ConversionWith Acrobat Professional 9.0, users can easily convert files from various formats, such as Microsoft Office documents, images, and web pages, to PDF format. This feature simplifies the process of creating PDF files, ensuring compatibility and consistency across different platforms. Additionally, Acrobat Professional 9.0 allows users to combine multiple documents into a single PDF file, further enhancing document management convenience.2. Document EditingAcrobat Professional 9.0 offers powerful editing tools that enable users to modify PDF documents effortlessly. Users can add, delete, or rearrange pages within a PDF file, as well as insert or replace images and text. The software also supports text and image editing, allowing users to make changes directly within the PDF document. Moreover, Acrobat Professional 9.0 provides advanced features likeredaction, which allows sensitive information to be permanently removed or hidden from the document.3. Collaboration and ReviewCollaboration and document review are made easy with Acrobat Professional 9.0. The software enables users to add comments, annotations, and markups to PDF documents. Multiple reviewers can collaborate simultaneously, contributing their input and suggestions. A review tracker keeps track of comments and changes made by different reviewers, providing a comprehensive review history. Users can also create custom stamps and use them for quick and consistent feedback.4. Document SecurityAcrobat Professional 9.0 includes robust security features to protect sensitive information within PDF documents. Users can apply passwords, permissions, and digital signatures to restrict access and prevent unauthorized modifications to the document. The software also supports certification, allowing users to verify the authenticity of digitally signed documents. Redaction tools enable users to permanently delete sensitive information, ensuring its confidentiality.5. Forms Creation and Data CollectionAcrobat Professional 9.0 offers an intuitive form creation feature, allowing users to easily design interactive PDF forms. Users can add form fields, such as text fields, checkboxes, and dropdown menus, to create dynamic and user-friendly forms. The software also supports data collection through form submission, making it convenient to collect and process information from respondents. Form data can be exported to various formats, enabling easy data analysis.6. Accessibility and Document OptimizationAccessibility is an essential aspect of document creation, especially for organizations that need to comply with accessibility standards. Acrobat Professional 9.0 assists in optimizing PDF documents by providing features like built-in accessibility checks and a user-friendly accessibility wizard. The software supports the creation of tagged PDFs, which ensures compatibility with assistive technologies used by individuals with disabilities.ConclusionAcrobat Professional 9.0 is a comprehensive software that offers a wide range of features and capabilities for PDF document management. From creating and converting documents to editing, collaborating, and ensuring document security, Acrobat Professional 9.0 caters to the needs of both individuals and organizations. With its intuitive interface and powerful tools, Acrobat Professional 9.0 simplifies the process of working with PDF documents, making it an essential software for professionals in various industries.。
professional的用法及短语
professional的用法及短语
嘿,咱今儿就来好好唠唠“professional”这个词儿!“professional”,
不就是“专业的”“职业的”嘛。
比如说,“He is a professional athlete.”(他是个职业运动员。
)你看,这就很直白地表明了他靠这个吃饭,是专
业干这个的。
再来说说和它相关的短语,像“professional skills”(专业技能),咱
每个人都得有自己的专业技能吧,不然怎么在社会上立足呢?就好比
厨师得有做菜的专业技能,司机得有开车的专业技能,这都是吃饭的
家伙呀!(哎呀,可不是真的吃饭的家伙,是说这是他们工作的倚仗呀!)
还有“professional advice”(专业建议),咱遇到难题的时候,是不
是特别希望能有个专业人士给咱提点专业建议呀?(那可太重要啦!)比如你生病了,肯定想听医生的专业建议,而不是随便听个路人甲说
啥就是啥吧!
“professional training”(专业培训)也很关键呢!你想想,要想成为
专业的,不经过专业培训怎么行呢?(就像学画画,不经过系统的培训,能画得好吗?)
你说是不是这么个理儿?“professional”这个词在我们生活中可太常见、太重要啦!咱可都得好好理解它、运用它。
反正我觉得,不管干
啥,都得有点专业精神,这样才能把事情做好,做出色!这就是我的观点,不用啥总结的话,就是这么直接!。
《Office for Windows Professional》的Windows专业应用案例分析
《Office for Windows Professional》的Windows专业应用案例分析Office for Windows Professional是微软推出的办公软件套件,是专为Windows系统设计的。
该软件套件包括了Word、Excel、PowerPoint、Outlook、Publisher、Access等多个应用程序,可以为个人及商业用户提供高效、方便的办公服务。
本文将围绕Office for Windows Professional这个话题,就Windows专业应用进行案例分析,来探究它对于Windows系统的应用有哪些优势,帮助用户更加全面了解Office for Windows Professional的应用价值。
Office for Windows Professional这个软件套件具有丰富的应用场景,为企业和个人用户提供了非常好的办公工具。
比如,我们在工作中经常用到的Word,是用于处理文本的工具。
它可以处理各种语言、字体、颜色和图像,并且具有良好的排版功能。
在正式的文档编辑中,我们需要大量使用表格、插图、图表、标题等等。
Word可以为用户提供这些基本功能的支持,同时还有拼写检查、语法检查、自动纠错、自动排版等功能。
除此之外,Word还可以进行版本控制,为用户提供方便的文档管理功能。
另一个常用的应用程序是Excel,它是著名的电子表格软件。
许多企业和个人用户用Excel来解决各种计算和问题。
为了能够更加高效地使用Excel,用户需要充分了解它的各种功能和操作。
比如,对于常见的工作薄和电子表格维护,Excel提供了完善的手工输入、公式计算、图表绘制等功能。
用户还可以使用Excel的自动化功能,实现自动更新、自动报表、自动化图表等等。
Excel还支持宏,可以为用户提供更高级别的操作和自定义功能。
另外,Office for Windows Professional还提供了PowerPoint等多媒体应用程序,这些应用程序可以用于演示文稿、幻灯片、音频和视频等内容的制作。
ntd office用语-概述说明以及解释
ntd office用语-概述说明以及解释1.引言1.1 概述NTD(New Tongue Dynasty)Office作为一款办公软件,是为了满足工作和商务场景下的办公需求而开发的。
它集成了各种实用的工具和功能,能够帮助用户高效地处理文件、创建表格、演示报告等任务。
NTD Office在界面设计上简洁明了,操作简单直观,用户可以轻松上手并快速地完成各种办公任务。
本篇文章将重点介绍NTD Office的常用用语,帮助读者更好地理解和运用该办公软件。
通过掌握这些用语,读者将能够更高效地使用NTD Office,并在工作中取得更好的效果。
文章将分为三个部分进行详细介绍。
首先,在引言部分会概述整篇文章的结构和目的。
接下来,在正文部分将重点介绍NTD Office的用语要点,包括一些常用的操作和功能描述。
最后,在结论部分对全文进行总结,并对NTD Office的优势和未来发展进行展望。
阅读本文后,读者将能够了解NTD Office的基本概念和常用用语,掌握使用NTD Office的关键技巧,提高办公效率,为个人和组织的工作带来更多的便利性和效益。
无论是初次接触NTD Office的用户,还是希望深入了解其功能和用法的用户,本文都将为他们提供有价值的帮助和指导。
文章结构文章的结构是指文章整体内容的组织和呈现方式,它是确保文章逻辑清晰、条理分明的基础。
一个良好的文章结构可以使读者更好地理解和掌握文章的主题和要点。
本文将按照以下结构展开:1. 引言1.1 概述在这一部分,我们将简要介绍NTD Office以及与其相关的用语。
NTD Office是一款功能强大的办公软件,广泛应用于各种工作场景中。
它具备多项实用的功能和特点,如处理文档、制作演示文稿、创建电子表格等。
本文将围绕NTD Office中常用的用语展开讨论。
1.2 文章结构这一部分将详细说明本文的文章结构。
文章按照引言、正文和结论三个部分进行组织,下面将对每个部分的要点进行介绍。
Microsoft Word - Mentor使用疑问和总结
原理图绘制1、 place Symbol 和place device 的区别是什么?Symbol 不和封装库对应,比如定义好的原理图Border 。
尽管Symbol 里面也有元器件,但是如果是为了画PCB ,不能用symbol 里面的元器件。
2、 拷贝其他原理图内容到自己的原理图上时,默认是不拷贝位号的,系统会自动为每个器件生成XREF 前缀的位号(对不同类型的元件都用该前缀,这和通过place device 系统自动生成的位号前缀是不一样的,其为不同类型的元件设置不同的前缀)。
所以为了以后批量更改位号方便,要修改系统默认设置,连位号一起拷贝到自己的原理图上,方法是:Tool -》Option -》Setting -》Copy Refrence designator with symbol 设置为yes 。
3、 同上,拷贝其他原理图内容到自己的原理图上时,默认是不拷贝NetName 的,需要修改系统默认设置,Tool -》Option -》Setting -》Copy Net Name wires 设置为yes 。
4、保存时不自动Verify :Tool -》Option -》Setting -》Automatically Verify on save 设置为no 。
5、 器件批量Replace :Edit -》Replace Devices -》Find 下拉选择PartNumber ,Value 中输入需要替换掉的器件的PartNumber 。
Part 选择用来替换的器件,点Replace 就ok 。
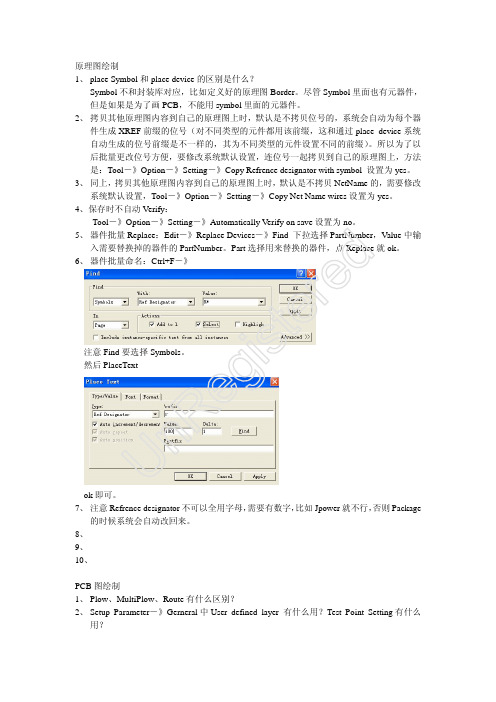
6、 器件批量命名:Ctrl+F -》注意Find 要选择Symbols 。
然后PlaceTextok 即可。
7、 注意Refrence designator 不可以全用字母,需要有数字,比如Jpower 就不行,否则Package的时候系统会自动改回来。
8、 9、 10、PCB 图绘制1、 Plow 、MultiPlow 、Route 有什么区别?2、 Setup Parameter -》Gerneral 中User defined layer 有什么用?Test Point Setting 有什么用?U n Re gi st e r ed3、 四层板默认23层是不能布线的,所以需要更改默认设置。
office专业版增强版 英语语言包
office专业版增强版英语语言包
Office 专业版增强版英语语言包是 Microsoft Office 专业版的一部分,它提供了一系列用于支持英语语言的工具和功能。
这些工具和功能可以帮助用户更轻松地编辑、翻译和格式化文档,同时还可以提高文档的可读性和可访问性。
以下是 Office 专业版增强版英语语言包的一些特点:
1. 拼写和语法检查:该语言包提供了拼写和语法检查器,可以帮助用户检查文档中的拼写和语法错误,并提供更正建议。
2. 翻译工具:该语言包提供了翻译工具,可以将文档中的文本翻译成多种语言,并支持在线翻译。
3. 格式化工具:该语言包提供了格式化工具,可以帮助用户更轻松地格式化文档,包括字体、颜色、大小、对齐方式等。
4. 可读性和可访问性工具:该语言包还提供了一些可读性和可访问性工具,可以帮助用户提高文档的可读性和可访问性,包括字体选择、颜色对比度、文本放大等。
总之,Office 专业版增强版英语语言包是一个非常有用的工具,可以帮助用户更轻松地编辑、翻译和格式化文档,同时还可以提高文档的可读性和可访问性。
复古少数民族风格PPT模版 (21)

单击编辑标题
单击此处可编辑内容
单击编辑标题
单击此处可编辑内容
单击此处编辑您要的内容,建议 您在展示时采用微软雅黑字体, 本模版所有图形线条及其相应素 材均可自由编辑、改色、替换。 更多使用说明和作品请详阅模版 最末的使用手册。
单击输入您的标题
单击编辑标题
单击此处可编辑内容,根据您的需 要自由拉伸文本框大小
单击编辑标题
单击此处可编辑内容, 根据您的需要自由拉伸 文本框大小
单击编辑标题
单击此处可编辑内容, 根据您的需要自由拉伸 文本框大小
单击输入您的标题
单击编辑标题
单击此处可编辑内容, 根据您的需要自由拉 伸文本框大小
单击编辑标题
单击此处可编辑内容, 根据您的需要自由拉 伸文本框大小
单击编辑标题
单击此处可编辑内容, 根据您的需要自由拉 伸文本框大小
单击编辑标题
单击输入您的标题
单击此处编辑您要的内容,建议您在展示时采用微软雅黑字 体,本模版所有图形线条及其相应素材均可自由编辑、改色、 替换。更多使用说明和作品请详阅模版最末的使用手册。
单击此处编辑您要的内容,建议您在展示时采用微软雅黑字体,本模版所有图形线条及其相应素材均可自由编辑、改色、替换。更多使 用说明和作品请详阅模版最末的使用手册。 单击此处编辑您要的内容,建议您在展示时采用微软雅黑字体,本模版所有图形线条及其相应素材均可自由编辑、改色、替换。更多使 用说明和作品请详阅模版最末的使用手册。 单击此处编辑您要的内容,建议您在展示时采用微软雅黑字体,本模版所有图形线条及其相应素材均可自由编辑、改色、替换。更多使 用说明和作品请详阅模版最末的使用手册。
单击输入您的标题
单击编辑标题
- 1、下载文档前请自行甄别文档内容的完整性,平台不提供额外的编辑、内容补充、找答案等附加服务。
- 2、"仅部分预览"的文档,不可在线预览部分如存在完整性等问题,可反馈申请退款(可完整预览的文档不适用该条件!)。
- 3、如文档侵犯您的权益,请联系客服反馈,我们会尽快为您处理(人工客服工作时间:9:00-18:30)。
模具专业英语培训——注塑模English Training——Injection Mold(一)模具专业基本用词Professional Terms1.塑料—plastic, resin2.样件—sample3.钢料—steel4.注塑机—injection machine, press5.产品—part, product, moulding6.模具—mold, mould, toolA 简易模(样板模)—prototype moldB 量产用模具—production mold 7.三维造型(数模)—model, 3D data8.二维产品图—2D part drawing9.设计—design10.制造—manufacture, build up, construction11.检验—check, inspection12.测量—measure, inspection13.修改—change, modify, correction14.工程更改—engineering change15.质量—quality16.数量—quantity17.基准—datum, reference(二)如何解析2D 产品图?How to read 2D part drawing?一.产品几何Geometry1.点—point2.线(边)—line, edge3.面faceA 侧面—sideB 表面—surfaceC 外观面—appearance surface 4.壁厚—wall thickness, stock thickness5.加强筋(骨位)—rib6.孔—hole7.细长的槽—slot8.柱位—boss9.角—cornerA 圆角—filletB 倒角—chamferC 尖角—sharp corner 10.斜度—angle, taper11. 凹槽—recess , groove, concave12: residue(残留)二.分模信息Splitting1.分型线—parting line (P/L), splitting line2.主分模方向—main direction, line of draw3.浇口设定—gating三.产品标识Part Identification1.产品名称—part name (P/N)2.产品编号+版本号—part number + revision (Rev.)3.型腔号—cavity number4.材料标记—material symbol5.模具编号—mold number (no.)6.日期印—dating insert, date code7.循环印—cycling code8.公司标志—company logo四.技术要求Specification (Special Requirement)1.项目启动表Kick-off sheet1)项目名称—program name, project name2)产品名称—part name, product name, part description3)产品编号—part number (P/N)4)客户模号—customer mold no.5)项目启动日期—kick off date, start date6)项目完成日期—due date,lead time7)内模件用钢—tool steel8)型腔数量—number of cavities9)数模文件编号—data file no.10)注塑材料—resin, plastic, raw material11)收缩率—shrink, shrinkage, shrink factor12)注塑机吨位—molding machine size, injection machine size 13)成型周期—cycle time14)型腔光洁度—cavity polish15)型芯光洁度—core polish16)皮纹(晒纹)—texture, grain etching17)拔模斜度—draft angle, removal taper18)注塑件颜色及光泽—molded color & gloss19)模具加工地—manufacturing facility20)热流道供应商—manifold manufacturer, manifold supplier 21)浇口位置—gate location / position22)浇口类型—gate type23)产品标识—stamp information, part identification24)特殊要求—special instructions2.产品质量及外观要求Part Quality & Appearance1)尺寸及公差Dimension & Tolerance①重要尺寸—critical dimension, important dim., key dim.②理论尺寸—nominal dimension③实际尺寸—actual dimension④公差—tolerance⑤公差带—tolerance range⑥尺寸超差—dimension deviation⑦接受(合格)—accept, OK⑧拒绝(不合格)—reject, refuse, obsolete, NG⑨让步接受—concession, special admit⑩返工—re-work2)产品缺陷(较常见)Defect s (normal)①缩印—sink mark, shrinkage②飞边—flash, burr③段差—mismatch discrepancy④银丝纹—snake marks, streak⑤弯曲—warpage, distortion bend⑥打不足(缺料)—short shot⑦熔接线—weld line3.产品外观Part Appearance①产品颜色—part color②产品光泽—gloss③皮纹粒度—grain4.常用词汇、词组及短语Normal Word, Short Sentence1)单边—per side2)双边—both sides3)加入,添加—add, incorporate4)去除,取消—remove, cancel5)满足…的要求,符合,与…要求一致—according to, conform to, satisfy, meet 6)要求,需要—require, need, demand7)确认—be approved, agreed by …8)允许—permit, allow9)在…范围之内—within10)不可以,不允许,禁止—free from, prevent, avoid11)…,除非有另指—…unless otherwise specified12)…或少于—…or less13)自动化运作—automatic operation14)未注尺寸(详细形状)见三维造型Non dimensioned contour (detailed shape) see 3D model.15)分型线上的飞边(披缝)或段差应小于…Burrs and discrepancy on the P/L shall be … or less.五.标题栏Title Block1.产品名称—part name2.图纸编号 + 版本号(索引号)—drawing no. + level (index)3.一般公差[的标准] —general tolerance(三)如何阅读制模标准?How to read tooling standard? 一.模具结构术语Mold Construction TerminologyA.模架Mold Base1.模架量化特征Measurement Feature①长X 宽X 高—Length X Width X Height②模具推高尺寸(模厚)—stack height of mould③模具重量—total weight of mould, mould thickness2.定模底板—front plate, top clamping plate, clamp plate, clamping plate 3.定模板—cavity plate, fixed mould plate, A – plate4.动模板—core plate, moving mould plate, B – plate5.支撑板—support plate, backing plate6.模脚—support blocks, rail s, risers, spacer block7.顶杆固定板—retaining plate, ejector retaining plate8.顶板—ejector plate9.动模底板—back plate10.导柱—guide pillar, leader pin, guide pin11.导套—guide bush, leader pin bush12.复位杆—return pin, push-back pin13.弹簧—spring14.撑头—support pillar15.推板导柱、导套—ejection guide pin / bush16.挡钉—stop pin, stop button17.站立脚—standing-off pillars18.标牌—plaque scutcheonB.成型零部件moulding components19.型芯—core20.型腔—cavity21.镶针—core pin22.镶块—insert, split23.滑块—slide, sliding split24.斜顶—lifter, angled-lift splitA 斜顶头—lifter headB 斜顶杆—lifter rod, lifter shaft 25.成型顶杆—moulding face pin, form pinC.浇注系统Feed System1.塑料Mouldinga.主流道—sprueb.分流道runner①主分流道—main runner②二级分流道—branch runner分流道断面形状cross-sectional shape of runner①圆形—full round②半圆形—semicircular③梯形—trapezoidalc.浇口gate常用浇口形式normal gate type :①边缘浇口(J型浇口)—edge gate, J – gate②侧浇口—side gate③潜伏式浇口—sub-gate, cashew gate, subsurface gate, submarine gate④潜伏式二次浇口(隧道式浇口) —tunnel gate onto feeder post⑤点浇口—pin gate⑥直接浇口(主流道型浇口) —sprue gate, direct gate⑦护耳式浇口—tab gated.模腔—impressione.冷料井—cold slug wellf.热流道—hot runner2.模具零件mold componentsa.定位圈—locating ring, location ring, register ringb.浇口套—sprue bushc.挡圈—stop ringd.浇口镶块—gate inserte.热流道板—manifoldf.热嘴—hot dropD.分型面及其锁紧、排气Parting Surface, inter-locking & venting 1.分型线—parting line ( P/L )2.镶拼线—bodyline, joint line3.平/ 不平的分型面—flat / non – flat parting surface4.封胶面—shut off surfaces, seal-off surfaces5.擦位—shut off6.碰穿位—kiss-off7.管位—parting line lock8.分型面的释放(避空) —relief of parting surface9.分型面的平衡—balancing of parting surface10.锁紧角度—locking angle11.锁紧力—clamping force12.锁模板—safety strap13.精定位—Interlock, die lock14.困气—air trap15.排气槽—vent, vent slotE.滑块机构Slide1.驱动Actuation①斜导柱—angled pin, horn pin, cam pin②弹簧—spring③油缸—hydraulic cylinder2.制动Detention①滑块固定器—slide retainer②弹簧制动器—spring-loaded detention (plunger)③挡钉、挡板—stop pin, stop plate, slide stop3.导轨—gib, guide strip4.锁紧块(楔紧块)—heel block, locking heel, wedge block, chase block 5.耐磨片—wear plate, wear strip6.压板—retainer7.螺钉—screw8.定位销—dowelF.斜顶机构Lifter1.斜顶头—lifter head2.斜顶杆—lifter rod, lifter shaft3.开口销—split pin4.固定板(压板)—retainer plate5.耐磨片—wear plate6.铜导套—bronze bushing7.衬套—spacer8.导轨—L – gib9.滑动块—slideG.顶出系统Ejection System1.基本词汇Basic Word①顶出行程—ejection stroke②模具开档—daylight③粘模—stick④产品脱模—part is push off from, clear part of mould, separation of part 2.顶板机构Ejector plate assembly①顶板(推板)—ejector plate②顶板固定板—retaining plate③推板导柱—ejector guide pin④推板导套—ejector guide bush⑤撑头—support pillar, pillar support3.复位机构Return System①复位杆(回程杆)—return pin, push – back pin②挡钉—stop pin, stop button③压簧—compressed spring④碟簧—a stack of ―Belleville‖ washers⑤早复位机构—early return system⑥强制复位机构—positive return system4.顶出方法Ejection Techniques1)顶杆顶出—pin ejection2)顶管顶出—sleeve ejection3)顶块顶出—bar ejection4)扁顶顶出—blade ejection5)顶板顶出—stripper ejection6)油缸顶出—hydraulic ejection7)气顶—air ejection8)阀门顶出—valve ejection5.顶出元件Ejection Elements1)拉料杆—sprue puller, sucker pin2)顶杆—ejector pin3)阶梯式顶杆—stepped ejector pin4)顶管—ejection sleeve, sleeve5)扁顶—ejector blade, slabbed off ejector pin6)顶块—stripper bar7)顶环—stripper ring8)推板—stripper plate9)加速顶—accelerated ejection6.顶出辅助机构Supplementary operating system1)弹簧柱塞器—spring – loaded plunger2)弹珠定位器—ball catch system3)插销式锁扣—Latch – lock4)尼龙拉杆装置—friction puller device7.电器元件Electric Components1)压力传感器—pressure transducer2)限位开关—limit switchF.冷却系统Cooling System1.基本词汇Basic Word1)温差—temperature variation2)水孔(水道)—waterlines, water-ways, flow-way, channel3)水路—cooling circuit4)水路示意图—water schematic, schematic circuit5)冷却液—coolant, coolant fluid6)内连接—interconnect7)外连接—external connection8)出口、入口—outlet、inlet9)漏水—water leakage2.水路分布Circuits1)阶梯式水路—stepped system2)喷淋—baffled hole system3)斜孔式水路—angled hole system3.水路元件Components1)闷头(螺塞、止水栓)—(threadless)brass pressure plug : female plug & male 2)隔水片—baffle3)密封圈—O – ring4)快插水路接头—quick disconnect fitting, quick connection adaptor5)弯头—elbow6)偶合器(连接器、接头)—adaptor (including a plug & a socket)7)橡皮管—rubber hose8)分水板—water manifoldG.螺纹、螺纹孔& 螺钉Thread, thread hole & screw1.螺纹—thread2.管螺纹—pipe thread3.螺纹孔—screw hole, tapped hole4.起吊孔—handling hole, jack screw hole, eye bolt hole5.螺钉—screw6.内六角螺钉—socket headed cap screw (s.h.c.s.)7.沉头螺钉—flat headed cap screw (f.h.c.s)8.螺栓—bolt, eye bolt9.螺母—nut10.锁紧螺母—locknut11.螺纹标准Thread Standard①公制标准—Metric②英制标准—Imperial③英制管螺纹标准—British Standard Pipe thread (BSP)④美制管螺纹标准—NPT⑤美制粗螺纹标准—United Coarse thread (UNC)⑥美制细螺纹标准—United Fine thread (UNF)H.润滑Lubrication1.润滑槽—grease groove2.加油管—grease line3.油杯—lubrication fittingI.测量仪器Measuring Instruments1.游标卡尺—vernier caliper2.千分尺—micrometer3.高度规—height gauge4.刻度规—dial gauge5.三坐标测量仪—Coordinate Measure Machine(CMM)6.塞规—pin gauge7.圆角量规—radii gauge8.輪廓投影機—profile projectorJ.注塑机参数Injection Machine Parameter1.注塑机规格参数Injection Machine Specification①锁紧类型clamp typea.油缸—hydraulic b.肘杆式—toggle②垂直注塑机导柱间距—tie bar vertical clearance③水平注塑机导柱间距—tie bar horizontal clearance④台板尺寸—platen dim.⑤最小/ 最大模厚—mold height Min. / Max., Min. / Max. mold thickness⑥最小/ 最大注塑机开档—open daylight Min. / Max.⑦锁紧行程—clamp stroke⑧锁紧力—clamping force⑨顶出行程—ejector stroke⑩顶出力—ejector force2.试模工艺参数Moulding Process Parameter, machine setting①时间Timer(TM), seca.注塑(充填)时间—filling time, injection timeb.冷却时间—cooling timec.补缩时间—packing timed.保压时间—holding timee.成型周期—cycle time②速率、速度Velocity, %、speed, in/seca.注塑(充填)速度—injection speedb.保压速率—hold pressure velocityc.螺杆转速—screw rotation speed③压力Pressure(Prs.), psia.注塑压力—injection pressureb.保压压力—hold pressurec.回压(背压)—back pressure④温度Temperature(Temp.), °Fa.注塑机喷嘴温度—nozzle temp.b.料筒前段、中段、后段温度—barrel front、middle、rear temp.c.模温—mould temp.d.料温—purged resin melt temp.e.空射料温—air shot melt temp.。
