Weblogic_11g集群搭建
Weblogic_11g集群搭建
Weblogic_11g集群搭建Weblogic集群部署1.Server⽤过tomcat的朋友应该清楚,当我们有多个项⽬部署在同⼀个tomcat服务器下的时候,我们只需要启动这个tomcat就可以根据⽬录的不同,访问这些应⽤,此时我们⽤的端⼝号不需要改变。
在weblogic服务器中,⼀个server同等于⼀个tomcat。
⾸先我们在创建⼀个server的时候需要给它指定⼀个ip和端⼝(这个ip可以是⼀台远程机器的ip)。
创建好server以后,我们就可以将项⽬部署在其中了。
如果我们有多个项⽬,并且我希望每个项⽬能对应不同的端⼝,那么我们就可以通过创建多个server来实现。
有时候我们称server为'节点',所以以后听到别⼈说节点的时候也不要茫然,说的就是它了。
2.Cluster这个,就是我们本⽂要讲的重点,集群。
按照我个⼈的理解,集群就是把具有相同应⽤的⼀些server,放在⼀起,统⼀管理。
举个很简单的例⼦,就是我现在有项⽬,我分别放在三个不同的server⾥⾯(先别管我为什么放三个不同的server中)。
那么问题来了,我项⽬要有改动了怎么办?分别去各⾃的server中重新部署?别开玩笑了,万⼀不是三个是⼗个呢?万⼀不是在同⼀台机器上呢(前⾯说了,可以是⼀台远程机器)?我们带着这个问题再来看⼀下集群,放在⼀起....统⼀管理....现在明⽩了吧,这就是集群给我们带来的便利,将这些server加⼊到同⼀个集群当中,如果项⽬有变动的话,我们只需要在部署项⽬的时候,通过集群去部署,那么weblogic会⾃动帮我们将应⽤分配到各个⼦节点中。
3.domaindomian我们有时候也会把它称作为'域',他就相当于⼀个⼤的容器,⾥⾯可以存放很多server,其中有⼀个默认的server,它会随着域的启动⽽启动。
有⼀点我们必须要清楚,就是当你想要启动某个domain下的server 的时候,必须先启动这个domain。
weblogic11g集群部署控制台版
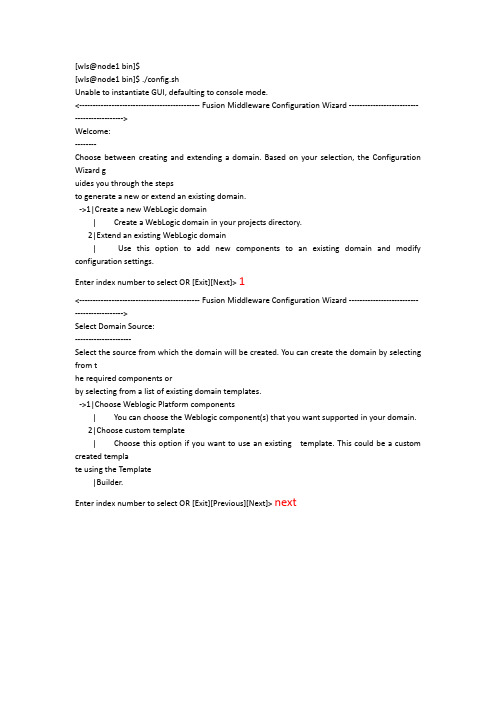
[wls@node1 bin]$[wls@node1 bin]$ ./config.shUnable to instantiate GUI, defaulting to console mode.<--------------------------------------------- Fusion Middleware Configuration Wizard -------------------------- ------------------>Welcome:--------Choose between creating and extending a domain. Based on your selection, the Configuration Wizard guides you through the stepsto generate a new or extend an existing domain.->1|Create a new WebLogic domain| Create a WebLogic domain in your projects directory.2|Extend an existing WebLogic domain| Use this option to add new components to an existing domain and modify configuration settings.Enter index number to select OR [Exit][Next]>1<--------------------------------------------- Fusion Middleware Configuration Wizard -------------------------- ------------------>Select Domain Source:---------------------Select the source from which the domain will be created. You can create the domain by selecting from the required components orby selecting from a list of existing domain templates.->1|Choose Weblogic Platform components| You can choose the Weblogic component(s) that you want supported in your domain.2|Choose custom template| Choose this option if you want to use an existing template. This could be a custom created template using the Template|Builder.Enter index number to select OR [Exit][Previous][Next]>next<--------------------------------------------- Fusion Middleware Configuration Wizard -------------------------- ------------------>Application Template Selection:-------------------------------Available Templates|_____Basic WebLogic Server Domain - 10.3.2.0 [10.3]x|_____WebLogic Advanced Web Services Extension - 10.3.2.0 [10.3] [2]Enter number exactly as it appears in brackets to toggle selection OR [Exit][Previous][Next]>ne xt<--------------------------------------------- Fusion Middleware Configuration Wizard -------------------------- ------------------>Edit Domain Information:------------------------| Name | Value |_|________|_____________|1| *Name: | base_domain |Enter value for "Name" OR [Exit][Previous][Next]>wang<--------------------------------------------- Fusion Middleware Configuration Wizard -------------------------- ------------------>Edit Domain Information:------------------------| Name | Value |_|________|_______|1| *Name: | wang |Use above value or select another option:1 - Modify "Name"2 - Discard ChangesEnter option number to select OR [Exit][Previous][Next]>next<--------------------------------------------- Fusion Middleware Configuration Wizard -------------------------- ------------------>Select the target domain directory for this domain:"Target Location" = [Enter new value or use default "/u01/wls/weblogic10/user_projects/domains"]Enter new Target Location OR [Exit][Previous][Next]>next<--------------------------------------------- Fusion Middleware Configuration Wizard -------------------------- ------------------>Configure Administrator User Name and Password:-----------------------------------------------Create a user to be assigned to the Administrator role. This user is the default administrator used to startdevelopment modeservers.| Name | Value |_|_________________________|_________________________________________|1| *User name: | weblogic |2| *User password: | |3| *Confirm user password: | |4| Description: | This user is the default administrator. |Use above value or select another option:1 - Modify "User name"2 - Modify "User password"3 - Modify "Confirm user password"4 - Modify "Description"Enter option number to select OR [Exit][Previous][Next]>2<--------------------------------------------- Fusion Middleware Configuration Wizard -------------------------- ------------------>Configure Administrator User Name and Password:-----------------------------------------------Create a user to be assigned to the Administrator role. This user is the default administrator used to startdevelopment modeservers."*User password:" = []Enter new *User password: OR [Exit][Reset][Accept]><--------------------------------------------- Fusion Middleware Configuration Wizard -------------------------- ------------------>Configure Administrator User Name and Password:-----------------------------------------------Create a user to be assigned to the Administrator role. This user is the default administrator used to startdevelopment modeservers.| Name | Value |_|_________________________|_________________________________________|1| *User name: | weblogic |2| *User password: | ********* |3| *Confirm user password: | |4| Description: | This user is the default administrator. |Use above value or select another option:1 - Modify "User name"2 - Modify "User password"3 - Modify "Confirm user password"4 - Modify "Description"5 - Discard ChangesEnter option number to select OR [Exit][Previous][Next]> 3<--------------------------------------------- Fusion Middleware Configuration Wizard -------------------------- ------------------>Configure Administrator User Name and Password:-----------------------------------------------Create a user to be assigned to the Administrator role. This user is the default administrator used to startdevelopment modeservers."*Confirm user password:" = []Enter new *Confirm user password: OR [Exit][Reset][Accept]><--------------------------------------------- Fusion Middleware Configuration Wizard -------------------------- ------------------>Configure Administrator User Name and Password:Create a user to be assigned to the Administrator role. This user is the default administrator used to startdevelopment modeservers.| Name | Value |_|_________________________|_________________________________________|1| *User name: | weblogic |2| *User password: | ********* |3| *Confirm user password: | ********* |4| Description: | This user is the default administrator. |Use above value or select another option:1 - Modify "User name"2 - Modify "User password"3 - Modify "Confirm user password"4 - Modify "Description"5 - Discard ChangesEnter option number to select OR [Exit][Previous][Next]>next<--------------------------------------------- Fusion Middleware Configuration Wizard -------------------------- ------------------>Domain Mode Configuration:--------------------------Enable Development or Production Mode for this domain.->1|Development Mode2|Production ModeEnter index number to select OR [Exit][Previous][Next]> 2<--------------------------------------------- Fusion Middleware Configuration Wizard -------------------------- ------------------>Java SDK Selection:-------------------1|Sun SDK 1.6.0_14 @ /u01/wls/weblogic10/jdk160_14_R27.6.5-32->2|JRockit SDK 1.6.0_14 @ /u01/wls/weblogic10/jrockit_160_14_R27.6.5-323|Other Java SDKEnter index number to select OR [Exit][Previous][Next]>2<--------------------------------------------- Fusion Middleware Configuration Wizard -------------------------- ------------------>Select Optional Configuration:------------------------------1|Administration Server [ ]2|Managed Servers, Clusters and Machines [ ]3|RDBMS Security Store [ ]Enter index number to select OR [Exit][Previous][Next]>1<--------------------------------------------- Fusion Middleware Configuration Wizard -------------------------- ------------------>Select Optional Configuration:------------------------------1|Administration Server [x]2|Managed Servers, Clusters and Machines [ ]3|RDBMS Security Store [ ]Enter index number to select OR [Exit][Previous][Next]>2<--------------------------------------------- Fusion Middleware Configuration Wizard -------------------------- ------------------>Select Optional Configuration:------------------------------1|Administration Server [x]2|Managed Servers, Clusters and Machines [x]3|RDBMS Security Store [ ]Enter index number to select OR [Exit][Previous][Next]>next<--------------------------------------------- Fusion Middleware Configuration Wizard -------------------------- ------------------>Configure the Administration Server:------------------------------------Enter adminstration server configurations. Each WebLogic Server domain must have one Administration Server. The AdministrationServer hosts the Administration Console which is used to perform administrative tasks.| Name | Value |_|__________________|_____________________|1| *Name: | AdminServer |2| *Listen address: | All Local Addresses |3| Listen port: | 7001 |4| SSL listen port: | N/A |5| SSL enabled: | false |Use above value or select another option:1 - Modify "Name"2 - Modify "Listen address"3 - Modify "Listen port"4 - Modify "SSL enabled"Enter option number to select OR [Exit][Previous][Next]> 2<--------------------------------------------- Fusion Middleware Configuration Wizard -------------------------- ------------------>Configure the Administration Server:------------------------------------Enter adminstration server configurations. Each WebLogic Server domain must have one Administration Server. The AdministrationServer hosts the Administration Console which is used to perform administrative tasks.| Name | Value |_|__________________|_____________________|1| *Name: | AdminServer |2| *Listen address: | All Local Addresses |3| Listen port: | 7001 |4| SSL listen port: | N/A |5| SSL enabled: | false |Enter value for "Listen address" OR [Exit][Previous][Next]>172.19.114.203<--------------------------------------------- Fusion Middleware Configuration Wizard -------------------------- ------------------>Configure the Administration Server:Enter adminstration server configurations. Each WebLogic Server domain must have one Administration Server. The AdministrationServer hosts the Administration Console which is used to perform administrative tasks.| Name | Value |_|__________________|________________|1| *Name: | AdminServer |2| *Listen address: | 172.19.114.203 |3| Listen port: | 7001 |4| SSL listen port: | N/A |5| SSL enabled: | false |Use above value or select another option:1 - Modify "Name"2 - Modify "Listen address"3 - Modify "Listen port"4 - Modify "SSL enabled"5 - Discard ChangesEnter option number to select OR [Exit][Previous][Next]> next<--------------------------------------------- Fusion Middleware Configuration Wizard -------------------------- ------------------>Configure Managed Servers:--------------------------Add or delete configuration information for Managed Servers. A typical production environment has one or more Managed Servers.Each Managed Server is an instance of WebLogic Server used to host enterprise applications.| Name* | Listen address* | Listen port | SSL listen port | SSL enabled |_|_______|_________________|_____________|_________________|_____________| Enter name for a new OR [Exit][Previous][Next]> Server1<--------------------------------------------- Fusion Middleware Configuration Wizard -------------------------- ------------------>Configure Managed Servers:Add or delete configuration information for Managed Servers. A typical production environment has one or more Managed Servers.Each Managed Server is an instance of WebLogic Server used to host enterprise applications.| Name* | Listen address* | Listen port | SSL listen port | SSL enabled |_|_________|_____________________|_____________|_________________|_____________ |1->| Server1 | All Local Addresses | 7003 | N/A | false | Use above value or select another option:1 - Modify "Name"2 - Modify "Listen address"3 - Modify "Listen port"4 - Modify "SSL enabled"5 - DoneEnter option number to select OR [Exit][Previous][Next]>2<--------------------------------------------- Fusion Middleware Configuration Wizard -------------------------- ------------------>Configure Managed Servers:--------------------------Add or delete configuration information for Managed Servers. A typical production environment has one or more Managed Servers.Each Managed Server is an instance of WebLogic Server used to host enterprise applications.| Name* | Listen address* | Listen port | SSL listen port | SSL enabled |_|_________|_____________________|_____________|_________________|_____________ |1->| Server1 | All Local Addresses | 7003 | N/A | false | Modify "Listen address" OR [Exit][Previous][Next]> 172.19.114.203<--------------------------------------------- Fusion Middleware Configuration Wizard -------------------------- ------------------>Configure Managed Servers:--------------------------Add or delete configuration information for Managed Servers. A typical production environment has one or more Managed Servers.Each Managed Server is an instance of WebLogic Server used to host enterprise applications.| Name* | Listen address* | Listen port | SSL listen port | SSL enabled |_|_________|_________________|_____________|_________________|_____________| 1->| Server1 | 172.19.114.203 | 7003 | N/A | false | Use above value or select another option:1 - Modify "Name"2 - Modify "Listen address"3 - Modify "Listen port"4 - Modify "SSL enabled"5 - DoneEnter option number to select OR [Exit][Previous][Next]>5<--------------------------------------------- Fusion Middleware Configuration Wizard -------------------------------------------->Configure Managed Servers:--------------------------Add or delete configuration information for Managed Servers. A typical production environment has one or more Managed Servers.Each Managed Server is an instance of WebLogic Server used to host enterprise applications.| Name* | Listen address* | Listen port | SSL listen port | SSL enabled |_|_________|_________________|_____________|_________________|_____________| 1| Server1 | 172.19.114.203 | 7003 | N/A | false | Use above value or select another option:1 - Add2 - Modify3 - DeleteEnter option number to select OR [Exit][Previous][Next]> 1<--------------------------------------------- Fusion Middleware Configuration Wizard -------------------------------------------->Configure Managed Servers:--------------------------Add or delete configuration information for Managed Servers. A typical production environment has one or more Managed Servers.Each Managed Server is an instance of WebLogic Server used to host enterprise applications.| Name* | Listen address* | Listen port | SSL listen port | SSL enabled |_|_________|_________________|_____________|_________________|_____________| 1| Server1 | 172.19.114.203 | 7003 | N/A | false | Enter name for a new OR [Exit][Previous][Next]> Server2<--------------------------------------------- Fusion Middleware Configuration Wizard -------------------------------------------->Configure Managed Servers:--------------------------Add or delete configuration information for Managed Servers. A typical production environment has one or more Managed Servers.Each Managed Server is an instance of WebLogic Server used to host enterprise applications.| Name* | Listen address* | Listen port | SSL listen port | SSL enabled |_|_________|_____________________|_____________|_________________|_____________ |1| Server1 | 172.19.114.203 | 7003 | N/A | false |2->| Server2 | All Local Addresses | 7003 | N/A | false | Use above value or select another option:1 - Modify "Name"2 - Modify "Listen address"3 - Modify "Listen port"4 - Modify "SSL enabled"5 - DoneEnter option number to select OR [Exit][Previous][Next]>2<--------------------------------------------- Fusion Middleware Configuration Wizard -------------------------------------------->Configure Managed Servers:--------------------------Add or delete configuration information for Managed Servers. A typical production environment has one or more Managed Servers.Each Managed Server is an instance of WebLogic Server used to host enterprise applications.| Name* | Listen address* | Listen port | SSL listen port | SSL enabled |_|_________|_____________________|_____________|_________________|_____________ |1| Server1 | 172.19.114.203 | 7003 | N/A | false |2->| Server2 | All Local Addresses | 7003 | N/A | false |Use above value or select another option:1 - Modify "Name"2 - Modify "Listen address"3 - Modify "Listen port"4 - Modify "SSL enabled"5 - DoneModify "Listen address" OR [Exit][Previous][Next]>172.19.114.204<--------------------------------------------- Fusion Middleware Configuration Wizard -------------------------------------------->Configure Managed Servers:--------------------------Add or delete configuration information for Managed Servers. A typical production environment has one or more Managed Servers.Each Managed Server is an instance of WebLogic Server used to host enterprise applications.| Name* | Listen address* | Listen port | SSL listen port | SSL enabled |_|_________|_____________________|_____________|_________________|_____________ |1| Server1 | 172.19.114.203 | 7003 | N/A | false |2->| Server2 | 172.19.114.204 | 7003 | N/A | false |Use above value or select another option:1 - Modify "Name"2 - Modify "Listen address"3 - Modify "Listen port"4 - Modify "SSL enabled"5 - DoneEnter option number to select OR [Exit][Previous][Next]> 5<--------------------------------------------- Fusion Middleware Configuration Wizard -------------------------------------------->Configure Managed Servers:--------------------------Add or delete configuration information for Managed Servers. A typical productionenvironment has one or more Managed Servers.Each Managed Server is an instance of WebLogic Server used to host enterprise applications.| Name* | Listen address* | Listen port | SSL listen port | SSL enabled |_|_________|_____________________|_____________|_________________|_____________ |1| Server1 | 172.19.114.203 | 7003 | N/A | false |2->| Server2 | 172.19.114.204 | 7003 | N/A | false |Use above value or select another option:1 - Add2 - Modify3 - Delete4 - Discard ChangesEnter option number to select OR [Exit][Previous][Next]> 1<--------------------------------------------- Fusion Middleware Configuration Wizard -------------------------------------------->Configure Managed Servers:--------------------------Add or delete configuration information for Managed Servers. A typical production environment has one or more Managed Servers.Each Managed Server is an instance of WebLogic Server used to host enterprise applications.| Name* | Listen address* | Listen port | SSL listen port | SSL enabled |_|_________|_____________________|_____________|_________________|_____________ |1| Server1 | 172.19.114.203 | 7003 | N/A | false |2->| Server2 | 172.19.114.204 | 7003 | N/A | false |Enter name for a new OR [Exit][Previous][Next]> Server3<--------------------------------------------- Fusion Middleware Configuration Wizard -------------------------------------------->Configure Managed Servers:--------------------------environment has one or more Managed Servers.Each Managed Server is an instance of WebLogic Server used to host enterprise applications.| Name* | Listen address* | Listen port | SSL listen port | SSL enabled |_|_________|_____________________|_____________|_________________|_____________ |1| Server1 | 172.19.114.203 | 7003 | N/A | false |2| Server2 | 172.19.114.204 | 7003 | N/A | false |3->| Server3 | All Local Addresses | 7003 | N/A | false | Use above value or select another option:1 - Modify "Name"2 - Modify "Listen address"3 - Modify "Listen port"4 - Modify "SSL enabled"5 - DoneEnter option number to select OR [Exit][Previous][Next]> 2<--------------------------------------------- Fusion Middleware Configuration Wizard -------------------------------------------->Configure Managed Servers:--------------------------Add or delete configuration information for Managed Servers. A typical production environment has one or more Managed Servers.Each Managed Server is an instance of WebLogic Server used to host enterprise applications.| Name* | Listen address* | Listen port | SSL listen port | SSL enabled |_|_________|_____________________|_____________|_________________|_____________ |1| Server1 | 172.19.114.203 | 7003 | N/A | false |2| Server2 | 172.19.114.204 | 7003 | N/A | false |3->| Server3 | All Local Addresses | 7003 | N/A | false | Modify "Listen address" OR [Exit][Previous][Next]>172.19.114.205<--------------------------------------------- Fusion Middleware Configuration Wizard -------------------------------------------->Configure Managed Servers:--------------------------environment has one or more Managed Servers.Each Managed Server is an instance of WebLogic Server used to host enterprise applications.| Name* | Listen address* | Listen port | SSL listen port | SSL enabled |_|_________|_____________________|_____________|_________________|_____________ |1| Server1 | 172.19.114.203 | 7003 | N/A | false |2| Server2 | 172.19.114.204 | 7003 | N/A | false |3->| Server3 | 172.19.114.205 | 7003 | N/A | false |Use above value or select another option:1 - Modify "Name"2 - Modify "Listen address"3 - Modify "Listen port"4 - Modify "SSL enabled"5 - DoneEnter option number to select OR [Exit][Previous][Next]>5<--------------------------------------------- Fusion Middleware Configuration Wizard -------------------------------------------->Configure Managed Servers:--------------------------Add or delete configuration information for Managed Servers. A typical production environment has one or more Managed Servers.Each Managed Server is an instance of WebLogic Server used to host enterprise applications.| Name* | Listen address* | Listen port | SSL listen port | SSL enabled |_|_________|_________________|_____________|_________________|_____________| 1| Server1 | 172.19.114.203 | 7003 | N/A | false |2| Server2 | 172.19.114.204 | 7003 | N/A | false | 3->| Server3 | 172.19.114.205 | 7003 | N/A | false | Use above value or select another option:1 - Add2 - Modify3 - Delete4 - Discard ChangesEnter option number to select OR [Exit][Previous][Next]>next<--------------------------------------------- Fusion Middleware Configuration Wizard -------------------------------------------->Configure Clusters:Add or delete configuration information for clusters. A cluster consists of multiple server instances working together toprovide increased scalability and reliability.| Name* | Cluster messaging mode | Multicast address | Multicast port | Cluster address |_|_______|________________________|___________________|________________|_______ __________|Enter name for a new Cluster OR [Exit][Previous][Next]> cluster1<--------------------------------------------- Fusion Middleware Configuration Wizard -------------------------------------------->Configure Clusters:-------------------Add or delete configuration information for clusters. A cluster consists of multiple server instances working together toprovide increased scalability and reliability.| Name* | Cluster messaging mode | Multicast address | Multicast port | Cluster address |_|__________|________________________|___________________|________________|____ _____________|1->| cluster1 | unicast | N/A | N/A | |Use above value or select another option:1 - Modify "Name"2 - Modify "Cluster messaging mode"3 - Modify "Cluster address"4 - DoneEnter option number to select OR [Exit][Previous][Next]>2<--------------------------------------------- Fusion Middleware Configuration Wizard -------------------------------------------->Configure Clusters:-------------------Add or delete configuration information for clusters. A cluster consists of multiple server instances working together toprovide increased scalability and reliability.*Enter index number to modify "Cluster messaging mode"1|multicast->2|unicast3|UnspecifiedEnter index number to select OR [Exit][Reset][Accept]> 1<--------------------------------------------- Fusion Middleware Configuration Wizard -------------------------------------------->Configure Clusters:-------------------Add or delete configuration information for clusters. A cluster consists of multiple server instances working together toprovide increased scalability and reliability.| Name* | Cluster messaging mode | Multicast address | Multicast port | Cluster address |_|__________|________________________|___________________|________________|____ _____________|1->| cluster1 | multicast | 239.192.0.0 | 7001 | |Use above value or select another option:1 - Add Cluster2 - Modify Cluster3 - Delete Cluster4 - Discard ChangesEnter option number to select OR [Exit][Previous][Next]> next<--------------------------------------------- Fusion Middleware Configuration Wizard -------------------------------------------->Assign Servers to Clusters:---------------------------Assign Managed Servers to a cluster in the domain.Cluster|_____cluster1 [1]Enter number exactly as it appears in brackets to toggle selection OR [Exit][Previous][Next]>next<--------------------------------------------- Fusion Middleware Configuration Wizard -------------------------------------------->Configure Machines:-------------------Add or delete machines. A machine hosts one or more WebLogic Server instances. The Admin Serverand Node Manager use thismachine definition to start remote servers.| Name* | Node manager listen address | Node manager listen port |_|_______|_____________________________|__________________________| Enter name for a new Machine OR [Exit][Previous][Next]> next<--------------------------------------------- Fusion Middleware Configuration Wizard -------------------------------------------->Creating Domain...0% 25% 50% 75% 100%[------------|------------|------------|------------][***************************************************]编辑WebLogic口令文件创建目录<DOMAIN_NAME>/servers/<Server_name>/security并在该目录下创建boot.properties文件 内容为username=weblogicpassword=weblogic1将整个WebLogic拷贝到另外两个节点启动WebLogic服务建议按照顺序启劢服务器 叧有当管理服务器首先启劢完毕后 受管服务器才能启劢完成。
ssl-poodle漏洞weblogic11g设置

ssl-poodle漏洞weblogic11g配置方法1)关闭浏览器的sslv3协议上图为ie浏览器的设置,其余浏览器都有类似设置,请自行查找。
如果你不能确定自己的浏览器是否有问题,可以访问下列网址,可以进行测试:https://zmap.io/sslv3/上图表明测试正常,不会被sslv3攻击。
2)关闭服务端的sslv3协议startWebLogic.sh启动文件加入如下启动项,强制关闭sslv3协议:-Dweblogic.security.SSL.protocolVersion=TLS1关闭sslv3的CBC-based加密算法编辑config.xml文件,如下:<ssl><enabled>true</enabled><ciphersuite>TLS_RSA_WITH_RC4_128_SHA</ciphersuite><ciphersuite>TLS_RSA_WITH_RC4_128_MD5</ciphersuite><hostname-verification-ignored>true</hostname-verification-ignored><listen-port>7002</listen-port><server-private-key-alias>xxxxxxx</server-private-key-alias><server-private-key-pass-phrase-encrypted>xxxxxx</server-private-key-pass-phrase-en crypted></ssl>3)确认服务端sslv3协议是否关闭Linux或aix下的测试命令如下:openssl s_client-connect10.10.71.79Windows的测试命令如下:Openssl s_client-ssl3-host10.10.10.71.79-port433openssl工具下载地址:openssl for linux or aix or unix:https:///openssl for windows:/products/Win32OpenSSL.htmlSsl v3关闭后测试显示结果(windows10下自定义ssl端口为7002):openssl s_client-host localhost-port7002-ssl3WARNING:can't open config file:/usr/local/ssl/fLoading'screen'into random state-doneCONNECTED(000001DC)12996:error:1408F10B:SSL routines:SSL3_GET_RECORD:wrong version number:.\ssl\s3_pkt.c:362:---no peer certificate available---No client certificate CA names sent---SSL handshake has read5bytes and written0bytes---New,(NONE),Cipher is(NONE)Secure Renegotiation IS NOT supportedCompression:NONEExpansion:NONENo ALPN negotiatedSSL-Session:Protocol:SSLv3Cipher:0000Session-ID:Session-ID-ctx:Master-Key:Key-Arg:NonePSK identity:NonePSK identity hint:NoneSRP username:NoneStart Time:1442913199Timeout:7200(sec)Verify return code:0(ok)---从上面执行日志可以看到,ssl v3已经关闭了。
64位weblogic安装部署以及常见问题解决

64位weblogic11g安装部署以及常见问题解决方案目录(一) 安装 (1)在Windows 64位操作系统安装Weblogic的注意事项 (3)(二) 部署运行 (3)1. 包引入错误 (3)2.乱码现象 (3)3.mime-typeType配置问题 (4)4.应用不存在 (4)5.ClassNotFoundException: org.hibernate.hql.ast.HqlToken (4)6.weblogic部署war包action不能访问问题解决方法[There is no Action mapped fornamespace / and action name] (5)ng.StackOverflowError (5)(一)安装我们在64位的服务器上为提高性能要安装64位的weblogic。
经常在网上看到有人问,weblogic有64位的么?weblogic需要破解么?weblogic有专门的64位版本,这里安装的是weblogic11g,也就是10.3.6版本,12c的版本安装应该类似。
weblogic从bea被oracle收购后,不需要破解,就只有授权。
什么意思呢?就是说从oracle官网上下载的weblogic 就是全功能版本,不管是集群还是其他,功能没有任何限制。
但是如果要用于商业环境,必须要向oracle买license,当然可以偷偷的用,那就是盗版,侵权,有一天oracle可以告的破产……。
1、下载64位weblogic,打下这个地址::// oracle/technetwork/middleware/ias/downloads/wls-main-097127.html,在这里可以看到除了mac os X操作系统外,其他系统的64位都是同一个版本,wls1036_generic.jar。
如下列图,weblogic的下载需要注册一个oracle官网的帐号。
2、下载64位JDK,我们下载的文件wls1036_generic.jar文件里面不包括JDK,如有可能, 请尽量在Windows/Linux平台下使用JRockit虚拟机,下载地址::// oracle/technetwork/middleware/jrockit/downloads/index.html。
RedHat系统安装Weblogic11g及创建域

Weblogic产品安装与创建域1.应用服务器1.1操作系统硬盘空间:∙Swap分区:文件格式为swap;分区大小至少1G∙物理内存大于2G∙临时交换区:文件格式为ext3;挂载点为/tmp空间大小至少2G∙Soft分区:文件格式为ext3;挂载点为/weblogic空间大小建议10G以上1.2安装JDK切换到root用户,在安装盘server目录下执行rpm -ivh java-1.6.0-openjdk-1.6.0.0-1.7.b09.el5.x86_64.rpmrpm -ivh java-1.6.0-openjdk-devel-1.6.0.0-1.7.b09.el5.x86_64.rpm安装完成后使用java -version 检查JDK是否安装成功,安装成功后安装Weblogic产品1.3安装Weblogic产品1.3.1创建Weblogic用户与组a)新建组groupadd weblogicb)新建用户useradd –g weblogic –d /weblogic weblogicc)修改/weblogic目录的用户及组chown weblogic. weblogic /weblogicmkdir /opt/middleware/weblogic815chown weblogic:weblogic –Rf /opt/middleware/weblogic815chown weblogic:weblogic weblogic815_linux32.bin(不用)ROOTchmod a+x weblogic815_linux32.bin weblogicjava -jar wls1035_generic.jar|/usr/lib/jvm/java-1.6.0-openjdk-1.6.0.0.x86_64[x]1.3.2安装Weblogic使用软件:Xmanager 3.0a)将图形化输出权限赋予所有用户root用户执行xhost +b)将图形输出到的主机export DISPLAY=”10.215.25.234:0.0”(划线部分为本机IP地址,其它不变)c)选择文字集export LANG=en_usd)切换到weblogic用户下执行java –jar wls1033_ generic_linux_x86_64.jar可在界面内安装产品;若无相应工具即不能用图形界面内安装产品可执行java –jar wls1033_ generic_linux_x86_64.jar –mode=console以命令行形式安装。
weblogic11g(10.3.6)安装过程及问题解决

非税系统安装过程及遇到问题后的解决办法概述目前weblogic系统中包含四台主机,226、227、229、231,每台主机上运行4-6个weblogic server,共16个。
都为单server模式,应用部署在adminserver上,共16个域。
因为管理和部署不方便,用户因此想重建系统,在一个Domain里进行统一管理。
系统架构图原系统环境226/227/229操作系统:Linux Weblogic版本:10.3.6 JDK版本:Sun 1.6.0.31231操作系统:Linux Weblogic版本:10.3.4 JDK版本:Sun 1.6.0.32安装过程1.231主机上新装weblogic10.3.6及1.6.0.31JDK,保证同一个域里软件版本一致。
2.在新建domain的控制台上新建所有的16个server3.新建4个machine,并且把新建的server按照原来的部署方案添加分配到4个machine中。
4.每个server的listen address改为对应主机的IP地址,防止多个监听地址引起的通信问题。
5. Node Manager的监听地址要改为对应主机的IP地址。
6. 去除HostName验证,域中Admin Server以及使用Node Manager启停的受管Server都需要设置。
7. 配置使用节点管理器启停的被管Server启动参数8.在使用nodemanager启动被管server前,使用命令方式启动启动一次被管server,目的是创建server目录,为以后nodemanger启动写入servers/servername/data/nodemanger/nodemanager.properties文件中一些相关的信息做准备。
9.重启域中所有的weblogic server,启动每台主机上的nodemanager server。
10.在控制台中观察nodemanager server的状态,如果为Reachable,表明节点管理器可以正常工作,如果为Unreachable状态,说明配置有问题。
weblogic_11g的安装和集群部署

weblogic 11g安装部署及集群目录1. Weblogic的安装与单个项目部署 (4)1.1. Weblogic的安装 (4)1.2. 创建域 (11)1.3. 配置系统使用的数据源 (16)1.4. 发布应用程序 (20)2. 集群的简介、部署和运行 (24)2.1. 集群的简介 (24)2.1.1. 集群的定义 (24)2.1.2. 集群的优点 (24)2.1.3. 主要功能 (25)2.1.4. 配置集群应用的必要条件 (25)2.2. WebLogic单台主机集群的部署 (25)2.2.1. 运行weblogic的配置向导 (25)2.2.2. 创建新的Domain (26)2.2.3. 选择安装域源 (27)2.2.4. 指定域的名称和位置 (28)2.2.5. 配置管理员用户名和密码 (29)2.2.6. 配置域启动模式和JDK (30)2.2.7. 选择可选配置 (31)2.2.8. 配置管理服务器 (32)2.2.9. 配置受管理服务器 (33)2.2.10. 配置群集信息 (34)2.2.11. 将“受管理服务器”添加到“集群”中 (35)2.2.12. 创建HTTP 代理应用程序 (36)2.2.13. 配置计算机 (37)2.2.14. 配置向计算机分配服务器 (38)2.2.15. 检查WebLogic 域配置 (39)2.2.16. 正在创建域 (40)2.2.17. 编辑WebLogic 服务启动文件 (41)2.3. 增加新的受控节点 (41)2.3.1. 增加计算机 (42)2.3.2. 增加受控服务器 (43)2.3.3. 在新主机上配置weblogic服务 (45)2.3.4. 编辑weblogic服务启动文件 (51)2.4. 运行WebLogic 服务 (51)2.5. 将应用部署到集群上 (55)2.5.1. 配置数据源 (55)2.5.2. 点击“部署”菜单 (55)2.5.3. 锁定并编辑 (56)2.5.4. 开始安装 (57)2.5.5. 部署成功验证 (60)2.6. 部署集群过程中的问题 (62)1.Weblogic的安装与单个项目部署1.1.Weblogic的安装1)运行安装程序,初始界面如下:2)点击下一步按扭:3)选择安装的目录,这里我是在虚拟机中进行操作,所以目录为C:\Oracle\Middleware,点击下一步按钮继续:4)去掉勾选的选项,并点击“yes”,之后点击下一步按钮继续:5)选择安装的配置组件,这里我们选择“定制”手动配置安装的组件,点击下一步按钮继续:6)这里我们选择安装Weblogic Server,将Server 的默认组件勾选上,下方的oracle coherence不需要勾选,点击下一步按钮继续:7)选择安装JDK,按照默认的设置即可,点击下一步按钮继续:8)选择安装组件服务的目录,这里我选择的均为默认填写的位置,点击下一步按钮继续:9)系统询问是否安装远程管理的Server 服务器,这里我们选择不进行管理点击下一步继续:10)这里选择快捷方式位置,默认选择即可,点击下一步。
WebLogic集群环境搭建
WebLogic集群环境搭建2013年11月13日17:30 wp安装64位JDK,建议安装web logic提供的jdk.安装64位weblogic.集群机器的weblogic的安装目录必须相同。
选择刚安装的64位JDK以上步骤在集群服务器上安装web logic,安装目录必须相同。
创建域ps dbdomian若创建集群,必须勾选‘受管服务器,集群和计算机’创建admin server创建server1、server2、proxyserver.并分配端口。
创建集群配置集群服务器创建集群HTTP代理分配计算机给计算机分配服务启动D:\oracle\Middleware\user_projects\domains\psdb_domain\bin下startWebLogic.cmd 无法启动,建议安装64位配套jdk配置启动服务用户密码脚本。
在D:\oracle\Middleware\user_projects\domains\psdb_domain下创建脚本boot.properties将此脚本放在D:\oracle\Middleware\user_projects\domains\psdb_domain\servers\AdminServer\security,需要创建文件夹security启动服务成功在bin下创建server1的启动脚本startMangedServer1.bat上图解释:ManagedServer_1 -->配置ser ver1的名字t3://10.19.33.190:7000-->adminserver 的地址端口启动使生成server1目录ManagedServer_1复制admin server中security文件夹到ManagedServer_1中再次启动startMangedServer1.bat出现提示需要启动集群中其他服务复制user_projects目录到另一台服务器上修改startMangedServer2.bat创建startProxyServer.bat启动server2.bat、proxyserver.bat 使生成相应文件复制用户名密码所在文件夹启动server1上的server1.bat、startweblogic.cmd 启动server2上的server2.bat、proxyserver.bat启动完成,集群配置完成。
Weblogic11g部署web应用程序详细图解

Weblogic 11g 部署web应用程序详细图解----浪花滚滚1. 手动部署A.创建web工程。
B.将web工程导出war格式。
导出的包:C.启动weblogic服务。
服务启动成功:D.打开服务配置页面并登陆。
E.登陆成功后,点击左侧菜单栏的部署F.点右边的安装按钮G.点上传文件F.选择刚才导出的war包,将其上传,下一步。
G.选择上传好的文件,下一步。
H.选择“讲次部署安装为应用程序”,下一步。
I.可以在这里为工程取个别名,也可以用默认。
其他都选择默认,下一步。
J.完成。
H.再点左侧菜单栏的部署,显示部署的应用程序的状态。
J.地址栏输入工程的地址:http://localhost:7001/工程文件名(或者刚才改过的别名),发现网页正常运行,部署成功!2. weblogic和myeclips集成的配置部署A.点击myeclips工具栏的按钮的黑色小三角,在弹出窗口的左侧选择Configure Server →Servers→WebLogic→Weblogic 10.xB.选择EnableC.配置WebLogic的路径及其登录用户名和密码D.左侧点击JDK右边点ADD按钮点Directory…选择weblogic安装目录下的JDK包。
注意:weblogic的版本和JDK的版本是严格匹配的,一定要选择正确的版本号。
并且需要使用跟安装weblogic时选择的同一个JDK。
E.点左侧的Launch,右边选择Run modeF.配置完成!G.部署工程点myeclips上方工具栏的按钮,选择要部署的工程点ADD后Server选择WebLogic10.x点finashi,ok后,部署完成。
H.点的黑色小箭头后选择WebLogic 10.x→Start启动服务。
I.服务启动成功。
J.当工程有重名时,会发生冲突,部署失败。
比如上图的情况,手动部署了该工程,再集成部署,就会失败。
同时,在启动服务时,myeclips会抛出异常。
WebLogic11g 安装教程

第I条Weblogic安装步骤服务器基础信息App01ip:10.188.11.40管理机以及第一个节点App02ip:10.188.11.41第二个节点安装weblogic之前,如果是linux、AIX系统,应该先进行性能调优,调整内容详见《中创软件创新中心项目实施问题总结.doc》2.5.2Linux、AIX安装应用服务器前应该查询的事项。
修改weblogic为weblogic2015在根目录创建weblogicsetup(放置源文件)chown–Rf weblogic:weblogic/weblogicsetupchmod755安装jdk在/usr/java下建立安装路径进入/weblogicsetupexport LANG='zh_CN.UTF8java-jar wls1036_generic.jar设置weblogic用户口令为weblogic2015修改Linux上Weblogic使用的jdk$JAVA_HOME/jre/lib/security/java.security文件将securerandom.source=file:/dev/urandom修改为securerandom.source=file:/dev/./urandom这样可以解决Weblogic启动慢的问题进入域目录./startWeblogic.sh启动服务启动管理器[weblogic@app01bin]$lsinternational setWLSEnv.sh startNodeManager.sh[weblogic@app01bin]$pwd/home/weblogic/Oracle/Middleware/wlserver_10.3/server/binhttp://10.188.11.40:7001/console登陆weblogic界面,进行相应集群操作启动节点即可。
第二台服务器安装此处第二台节点服务器只创建受管服务器和计算机及集群第二台不创建集群安装完成后,在第二台下启动note第II条启动管理机Su到weblogic用户进入目录/home/weblogic/Oracle/Middleware/user_projects/domains/base_domain执行./startWeblogic.sh启动过程等待输入用户名密码进入第一台app01目录/home/weblogic/Oracle/Middleware/wlserver_10.3/server/bin执行执行./startNodeManager.sh第III条启动第二台节点[weblogic@app01bin]$pwd/home/weblogic/Oracle/Middleware/wlserver_10.3/server/bin [weblogic@app01bin]$lsinternational setWLSEnv.sh startNodeManager.sh执行./startNodeManager.sh节 3.01登陆管理界面http://10.188.11.40:7001/console用户名:weblogic密码:weblogic2015进服务器选择web-proxy、app01-1、app02-1启动其中web-porxy为http代理端口为8080访问地址http://10.188.11.40:8080观察到状态如下:第IV条部署测试war包点击左侧部署。
weblogic11g安装配置手册

Weblogic11g安装配置手册1安装Weblogic前的准备工作1.1创建weblogic安装目录以root用户登录系统,打开命令终端,执行命令:1.2创建weblogic组和用户(单行执行)1.3安装JDK1.通过SSH用weblogic用户登录上传JDK安装文件jdk-6u35-linux-x64.bin至weblogic中【SSH的使用详细见:说明文档/SSH使用说明】2.执行命令:chmod u+x jdk-6u35-linux-x64.bin3.切换至weblogic用户,命令:su - weblogic4.执行命令:./jdk-6u35-linux-x64.bin【注释:见附录/SQMPMS/soft/jdk/jdk-6u35-linux-x64.bin】5.配置系统JAVA环境变量,执行命令:vi .bash_profile,在.bash_profile文件尾添加以下内容:6.保存并退出文件编辑模式,具体步骤:先按键盘“ESC”键,进入命令模式,然后同时按住键盘“Shift”+“;”键,输入命令“wq”,文件保存退出。
导入配置到环境变量中,命令:source .bash_profile我的方法:2安装weblogic通过SSH用weblogic用户登录上传wls1036_generic.jar到weblogic根目录,执行如下命令即可看到安装界面,命令:$ java -jar wls1036_generic.jar 【附录/SQMPMS/soft/weblogic/wls1036_generic.jar】注:如果无法看到安装界面,请使用root帐户执行如下命令后再运行安装程序:$ export DISPLAY=:0.0或者ip:0.0$ xhost +如果出现界面乱码现象,执行以下命令:$ export LANG=en出现安装界面后,根据界面提示进行相关的设置:1.进入控制台安装的欢迎界面,点击下一步,如下图所示:2.指定weblogic安装目录,如下图所示:3.选择Yes,进入下一步4.点击继续进入下一步5.选择安装类别(定制)如下图所示:6.默认配置点击下一步7.接受默认的Weblogic安装目录,如下图示:8.去掉“运行 Quickstart”,单击完成按钮完成安装,如下图所示:3创建domain域1.切换到weblogic用户,命令:su – weblogic2.执行命令:cd /data/weblogic/Oracle/Middleware/wlserver_10.3/common/bi n3.执行命令: ./config.sh,创建domain4.单击“下一步”继续域名:mase_domain5.配置AdminServer的用户名和密码(名称:weblogic口令:weblogic123,如果出现用户口令无法输入的情况,再尝试输入)6.选择生产模式,并且选择JDK下图两个受管服务器不用添加7.如果不需要集群,则此处直接点下一步8. weblogic 域创建完成之后点击“完成”9.weblogic应用内存参数调整1)执行命令:cd /data/weblogic/Oracle/Middleware/user_projects/domains/sqdomain/bin2)执行命令:vi setDomainEnv.sh3)查找相关行并修改参数:WLS_MEM_ARGS_64BIT="-Xms1500m –Xmx1500m"中,大小调为“1500m”MEM_MAX_PERM_SIZE_64BIT="-XX:MaxPermSize=1024m"中,大小调为“1024m”以上weblogic以及jdk安装完成4应用配置4.1 创建服务4.1.1创建应用服务4.1.1.1w ebl ogic启动1.# su - weblogic登录weblogic用户cd /data/weblogic/Oracle/Middlewere/user_projects/domains/mase_domain/bin2../startWebLogic.sh 完成服务启动,注意:启动时间根据硬件配置不同而不同,如果服务器没有配置boot.properties文件,则需要手工输入用户名及密码。
WebLogic_Server 11g 节点服务器配置单机版

WebLogic Server 11g节点管理器和Machine配置单机版(Windows)(本文讲述如何在WebLogic Server 11g上配置集群中的节点服务器,以及通过控制台启动和停止服务器)2009-11-6作者: 刘长炯 BeanSoft@预备知识请您事先阅读文章: 配置WebLogic Server 11g集群单服务器版(Windows)来了解集群配置相关的操作信息, 本文不再赘述。
本文的主要目的在于讲述节点管理器、 Machine 的配置及其管理(远程启动和停止)。
节点管理器概述WebLogic Server 生产环境中的服务器实例通常分布在多个域、计算机和地理位置上。
节点管理器是一个 WebLogic Server 实用工具,可以使用它来启动、关闭和重新启动远程位置上的管理服务器和受管服务器实例。
尽管节点服务器是可选工具,但如果您的WebLogic Server 环境所承载的应用程序具有较高的可用性要求,则建议您使用该工具。
节点管理器进程与特定 WebLogic 域无关,而与计算机有关。
您可以使用同一个节点管理器进程控制任意 WebLogic Server 域中的服务器实例,只要该服务器实例与节点管理器进程驻留于同一台计算机上。
节点管理器必须在承载要通过节点管理器控制的WebLogic Server 实例(管理服务器或受管服务器)的计算机。
本文环境¾平台:Windows XP SP3, 3G RAM¾软件:WebLogic Server 11gR1配置WebLogic Server的Machine配置前的准备工作在配置集群应用前要对集群的配置信息有一个良好的设计,下面就是我们这次配置的集群信息:在同一台机器上配置集群及其Machine(在一台机上只安装一套WebLogic 11g产品就可以了)提示:建议您的测试服务器有4G以上的内存,否则服务器启动过程将会很漫长。
WebLogic 11gR1服务器管理(安装、配置和部署)
WebLogic服务器管理WebLogic服务器管理 (1)1. 安装服务器 (2)2. 安装域 (2)3. 启动服务控制台 (7)4. 配置JNDI (8)5. 在MyEclipse中集成WebLogic服务器 (12)6. 部署应用程序 (13)7. 其他 (15)7.1 JNDI、已部署应用的描述信息保存在哪 (15)7.2 运行JavaEE应用的步骤 (17)1. 安装服务器从Oracle官方网站上免费下载最新的WebLogic服务器软件,按照提示选择默认选项即可一步步完成WebLogic服务器的安装。
形如“wls1034_oepe111161_win32.exe”的安装软件大小在1.03GB左右,安装完成后的主目录大约占用1.57GB左右。
2. 安装域安装服务器完成后,在弹出如图1所示的对话框(也可从菜单中选择“Oracle WebLogic”、“Quick Start”打开图1所示的对话框),提醒用户是否进行下一步操作。
图1 Quick Start安装完WebLogic服务器后,还不能直接对服务器进行操作,应该安装域(domain)。
单击“Getting started with WebLogic Server® 10.3.4”,运用配置向导,一步步完成域的安装,如图2-图10所示。
图2 新建或扩展域图3 选择域源图4 指定域名和位置图5 配置管理员用户名和口令图6 配置服务器启动模式和JDK图7 选择可选配置图8 配置管理服务器图9 配置概要图10 创建域3. 启动服务控制台依次从菜单中选择“Oracle WebLogic”、“User Projects”、“mydomain”、“Start Admin Serverfor Weblogic Server Domain”,启动WebLogic域服务,如图11所示。
图11 启动WebLogic域服务依次从菜单中选择“Oracle WebLogic”、“User Projects”、“mydomain”、“Admin Server Console”,启动WebLogic服务管理控制台,如图12所示。
weblogic 11g 配置集群
weblogic 11g 配置集群分类:weblogic 2013-10-25 15:22 185人阅读评论(0) 收藏举报weblogic 集群部署我选用了8台服务器,ip分别为:10.120.20.189:主域10.120.20.187:代理10.120.20.181:节点110.120.20.182:节点210.120.20.183:节点310.120.20.184:节点410.120.20.185:节点510.120.20.186:节点6我先把weblogic安装文件都放到了每台机器的D:\weblogic_11g目录下对所有的weblogic安装过程,,就以10.120.20.189为例,后边就不在赘述了。
运行安装文件,需要有jdk环境,并且通过命令行对jar包进行运行等待读取数据,到了100%之后,可以进行安装操作:安装路径选用D:\weblogic_11g\Middleware下输入密码操作,我写的是weblogic,可以根据自己的需求来写(我这里因为是测试环境,所以密码很简单,真实环境的话,需要更复杂的密码,一般需要字母大小写+数字+特殊字符,eg.q2E@#Dxz0,一般在8位以上)选择典型安装:选择默认,下一步选择下一步开始进行安装ok,这样就安装成功了,其他的7个也是这样安装,以上是通用安装的过程。
安装主控制域服务器:10.120.20.189打开配置项:创建新的domain,下一步:学则默认的weblogic Server Domain就可以了,点击下一步:域名为:MyCluster_Domain,域位置为:D:\weblogic_11g\Middleware\user_projects\domains,下一步:设置密码为:weblogic,我的密码是:weblogic123,点击下一步:选用生产模式,然后又可用JDK,使用默认就可以了,下一步:选中"管理服务器","受管理服务器,集群和计算机",点击"下一步":配置管理服务器中的监听ip和监听端口,点击下一步:这其中,代理服务器(Proxy_Server)也属于受管理服务器,所以也需要加入受管理服务器中,并且加上其他的6个节点,点击下一步:点击"添加"以后,进行配置,最后的集群地址可以不用写,点击下一步:把所有节点,放入集群中,注意,在这里代理不要放入集群,点击下一步:然后,我们需要为集群配置代理,配置ok以后,点击下一步:配置计算机,点击下一步:将相应的计算机和所属功能结点进行结合指定,点击下一步:这个页面,是对于前面我们做了这么多工作所综合的概述,可以检查一下对不对,不对的话,可以再回去修改,。
03 Weblogic11g安装及部署详细步骤
Weblogic11g安装部署第一步:安装weblogic11g1.找到weblogic11g程序目录。
2.打开安装程序wls1033_oepe111150_win32.exe,出现界面如下图。
3.初始化完成后4.点击下一步5 选择安装目录为d:\bea11g点击.6.把“我希望通过My Oracle Support接收安全更新”方框前的勾去掉7.点击下一步8.下一步9.默认,下一步10.默认,下一步11.开始安装。
12.点击完成,完成安装第二步:配置weblogic 1.创建域2.选择创建新的Weblogic域3.下一步4.默认,下一步5.配置用户名和密码。
用户名:weblogic 密码:111111116,选择默认的Sun SDK 1.6.0_18 0 d:\bea11g\jdk160_18,下一步7 选择“管理服务器”,下一步8 默认,下一步9 点击“创建”10 显示安装进程11 点击完成。
11 测试配置是否正确打开浏览器,输入地址http://127.0.0.1:7001/console后出现如下页面输入用户名密码:weblogic/11111111进入页面表明配置正确,启动正常。
第三步:修改端口7001为8012 依次点击base_domain->环境->服务器出现如下界面点击AdminServer(admin)3 将图中的7001改为80,然后点击界面最下方的保存按钮。
第四步:配置数据源1依次点击base_domain->服务->JDBC->数据源出现如下界面2 点击新建按钮,出现如下界面3 填写jdbc和jndi的名称,选择你所用的数据库,下一步4 选择正确的数据库驱动程序,点击下一步5 默认下一步6.填写正确的数据库用户名、密码和数据库的地址上图中的密码为password7.点击测试配置,测试一下配置的jndi是否能正常连上数据库8.点击完成即可。
第五步:部署应用1进入部署页面。
redhat5.6+weblogic11g集群By DrMeng切图
Weblogic:weblogic2011OA_Cluster : 10.0.15.64:7082,10.0.15.65:7080二.安装NODE2[root@rac2 drmeng]# export DISPLAY=10.20.0.43:0.0[root@rac2 drmeng]# ./wls1035_oepe111172_linux32.bin编辑口令文件/usr/Oracle/Middleware/user_projects/domains/oa_domain/servers/AdminServer/security在刚才创建的域目录下建立boot.properties文件,内容为:username=weblogicpassword=weblogic2011编辑启动管理服务器的文件在刚才创建的域目录下的bin目录中创建startAdminServer.sh,内容为:./startWebLogic.sh编辑启动代理服务器的文件在刚才创建的域目录下的bin目录中创建startProxyServer.sh,内容为:./startManagedWebLogic.sh Proxy_Server http://10.0.15.64:7001编辑启动受管理服务器(ManagedServer_1)的文件在刚才创建的域目录下的bin目录中创建startManagedServer_1.sh,内容为:./startManagedWebLogic.sh ManagedServer_1 http://10.0.15.64:7001在刚才创建的域目录下的bin目录中创建startManagedServer_2.sh,内容为:./startManagedWebLogic.sh ManagedServer_2 http://10.0.15.64:7001启动WebLogic服务在集群服务器上所创建的域的bin中做如下操作。
WebLogic 11g配置数据库连接池详细图文步骤
WebLogic 11g 配置数据库连接池----浪花滚滚一、手动配置1.创建web工程index.jsp页面的部分代码如下:DbConn类:Authors类:AuthorsDao类:2.把数据库驱动jar包拷到E:\bea\wlserver_10.3\server\lib目录下。
(以下以SQLServer 2005 为例)3.用记事本打开D:\bea\user_projects\domains\base_domain\bin\setDomainEnv.cmd在最后加入以下代码:setCLASSPATH=%PRE_CLASSPATH%;%WEBLOGIC_CLASSPATH%;%POST_CLASSPA TH%; %WLP_POST_CLASSPA TH%;%WL_HOME%\server\lib\sql2005jdbc.jar其中“\server\lib\sql2005jdbc.jar”是驱动JAR包的路径4.启动WebLogic服务,将工程导出war包,手动部署该web应用程序。
看到有sql2005jdbc.jar的信息,说明驱动加载成功。
如果没有,检查setDomainEnv.cmd配置文件中书写的路径。
5.打开服务器配置页面。
在左侧菜单栏选择数据源6.启动数据库服务,配置数据库。
这里就以PUBS数据库为例。
7.点击“新建”取一个别名,也可以用默认的。
选择数据库类型级数据库驱动下一步8.使用默认的选择,继续下一步。
9.填写连接属性。
10.点测试配置,看是否连接测试成功。
注意这里只是测试数据库驱动是否正确。
11.为服务器部署数据源。
12.完成。
13.点击该数据源名称测试数据源。
14.至此,连接池配置成功!15.打开页面测试。
同时,控制台页面也会输出程序中System.out.println();的内容:二、在myeclips中配置1.打开myeclips中的服务器配置界面,找到WebLogic 10.x,点Paths。
- 1、下载文档前请自行甄别文档内容的完整性,平台不提供额外的编辑、内容补充、找答案等附加服务。
- 2、"仅部分预览"的文档,不可在线预览部分如存在完整性等问题,可反馈申请退款(可完整预览的文档不适用该条件!)。
- 3、如文档侵犯您的权益,请联系客服反馈,我们会尽快为您处理(人工客服工作时间:9:00-18:30)。
Weblogic集群部署1.Server用过tomcat的朋友应该清楚,当我们有多个项目部署在同一个tomcat服务器下的时候,我们只需要启动这个tomcat就可以根据目录的不同,访问这些应用,此时我们用的端口号不需要改变。
在weblogic服务器中,一个server同等于一个tomcat。
首先我们在创建一个server的时候需要给它指定一个ip和端口(这个ip可以是一台远程机器的ip)。
创建好server以后,我们就可以将项目部署在其中了。
如果我们有多个项目,并且我希望每个项目能对应不同的端口,那么我们就可以通过创建多个server来实现。
有时候我们称server为'节点',所以以后听到别人说节点的时候也不要茫然,说的就是它了。
2.Cluster这个,就是我们本文要讲的重点,集群。
按照我个人的理解,集群就是把具有相同应用的一些server,放在一起,统一管理。
举个很简单的例子,就是我现在有项目,我分别放在三个不同的server里面(先别管我为什么放三个不同的server中)。
那么问题来了,我项目要有改动了怎么办?分别去各自的server中重新部署?别开玩笑了,万一不是三个是十个呢?万一不是在同一台机器上呢(前面说了,可以是一台远程机器)?我们带着这个问题再来看一下集群,放在一起....统一管理....现在明白了吧,这就是集群给我们带来的便利,将这些server加入到同一个集群当中,如果项目有变动的话,我们只需要在部署项目的时候,通过集群去部署,那么weblogic会自动帮我们将应用分配到各个子节点中。
3.domaindomian我们有时候也会把它称作为'域',他就相当于一个大的容器,里面可以存放很多server,其中有一个默认的server,它会随着域的启动而启动。
有一点我们必须要清楚,就是当你想要启动某个domain下的server 的时候,必须先启动这个domain。
Cluster和domain之间的关系也差不多如此,总之呢,先有domain再谈其他。
如果还不理解,没有关系,看完下面这幅图,我想你大概也就明白了。
1.安装前安装前要将 jdk安装好,并配置好环境变量,检查防火墙和selinux设置,确定weblogic版本被认证首先请确认您要安装的Weblogic版本所在的平台已通过了BEA的认证,完整的认证平台列表请参考/wls/certifications/certs_810/index.html1.2 确定一个安装目录建议该目录下至少有1个G的空间,可以使用du来察看磁盘空间的使用情况(实际情况是我们大多数人都没有这么大的内存,如果你有256,我想也是可以的,因为你是用来自己开发,不是用来对外发布的)1.3 创建一个BEA用户组帐号(你可以自己建一个Weblogic组&Weblogic帐户,官方也是这样建议的,但是你也可以不这么做。
用你的常用帐户作为工作目录也可以)1.4 创建一个Weblogic用户帐号把WebLogic的.jar包放在/home目录上创建weblogic用户组groupadd weblogicuseradd -g weblogic weblogicpasswd weblogic(修改weblogic密码)创建安装目录#mkdir /usr/local/weblogic(此目录是weblogic在安装提示时所选择的安装目录)#chmod 755 /home/finame.jar2. 安装时Weblogic在Linux平台下的安装方法一般有三种:图形窗口模式,控制台模式,无人守护安装模式。
由于控制台模式的使用最为广泛且不受任何其它硬件条件的限制。
2.1 安装JRE环境Weblogic安装程序需要JRE的支持,根据安装平台的不同,Weblogic的安装介质也分为两类,一种自带了JRE(后缀名为.bin),一种需要下载平台厂商所提供的JRE环境(后缀名为.jar)。
顺便说一句,wls1034_linux32.bin它自带了两个jre环境的jdk,一个是jdk160_21,一个是jrockit_160 _22_D1.1.1-3,虽然后者可以同时支持64位的环境,但是一般来说我们程序的编译环境都是SUN的,因此安装的时候建议选SUN的jdk。
有的时候会出现编译jdk和发布jdk不一致造成发布失败的问题!2.3 开始安装2.3.1 .bin的安装方法①进入到安装介质所在的路径cd /home②赋予.bin可执行权限chmod a+x filename.bin③执行安装命令./filename.bin -mode=console(你可以不加“-mode=console”的控制台文本模式,因为在你安装时无法启动图形安装界面时它会自动的进入文本控制台模式的)2.3.2 .jar的安装方法(如果你的WLS8.1没有带jre的话才有以下的步骤,自己如果提前安装jdk环境,也可以使用这个)执行安装命令:java -jar filename.jar -mode=console2.4 控制台安装完成2.3的步骤后,进入控制台安装的欢迎界面,如下:键入“下一步”继续此时出现选择中间件主目录,如果需要更改目录,直接输入即可,如下:然后回车,进入到下一界面,出现选”注册安全更新”的方式,如下所示我们不需要更新,所以输入“3”后回车,出现如下情况:回车后提示是否希望绕过配置管理器的启动过程并且不接收配置中存在严重安全问题的通知,如下:此时输入“Yes”确认我们之前的选择,回到“注册安全更新”的界面,如下:此时就可以看到[3]中的接收更新的方式被改成了[No],就是不更新的意思,输入“下一步”继续,出现“选择安装类型”的界面,如下图:一般来说,这一步默认就行(如果要更改的话就选择前面的序号,比如1回车,然后输入安装路径就行),输入“下一步”后回车,出现安装的产品系列,如下图:输入“下一步”后回车继续,出现开始安装的界面,如下图:看到如上图的信息,就代表weblogic11g安装成功,此时回车(输入“退出”)就可以退回到命令台上。
软件安装完毕后,下一步配置Domain域,进入Weblogic安装目录/usr/local/weblogic/wlserver_ 10.3/common/bin,找到文件config.sh,执行./config.sh,出现如下界面:注意:有的系统执行config.sh后并没有出现可视化界面,但是和以下图中的操作是一样的因为我们首次进入到weblogic中,所以选择“1”后回车(新建一个域,类似于Tomcat中的webapp文件夹,用于发布web工程的),出现“选择域源”的界面,如下图:我们暂时不定制,默认就行。
输入“1”后回车,出现“应用程序模板选择”界面,如下图所示:这步直接默认就行,输入“下一步”回车,出现编辑域信息(主要是编辑域名、域的用户名和密码),如下图所示:然后回车,如下图:输入“下一步”进入目标域目录选择,如下图所示:在上图中输入之前创建好的安装目录后回车,此时进入到域的“配置管理员用户名和口令”界面,如下图所示:先输入“2”后回车,配置密码(密码要求至少8个字符且含有字符、数字、下划线,比如weblogic_11g),输入密码后回车,看到[2]中出现如下图:接下来输入“3”进行密码的确认,请输入和[2]中一样的密码后回车,出现如下图:如果需要修改输入相应的序号,然后输入新值回车就可以,密码配置成功后,输入“下一步”后回车,进入“域模式配置”界面,如下图:如果是生产环境,请输入“2”后回车,如果是开发环境,请选择“1”后回车,这里我们选择生产环境,进入到“Java SDK 选择”界面,如下图所示:此时我们输入“2”后回车(当然也可以指定你自己的JDK,输入“3”回车,然后配置JDK路径,建议使用默认的JDK,以保证和weblogic配套使用,因为weblogic和JDK的对应有比较严格的关系),此时进入到“选择可选配置”界面,如下图所示:配置主管理服务器地址192.168.34.6,端口号是7001,还有受管服务器和代理服务器,下面的步骤介绍了一台物理机的安装方法,其他节点添加方法雷同。
Cluster_ManagedServer_1 地址 192.168.34.6 端口:7003Cluster_ManagedServer_2 地址 192.168.34.9 端口:7004Proxy_Server 地址 192.168.34.6 端口:8080以上地址请根据实际情况进行填写Select Optional Configuration:------------------------------1|Administration Server [ ]2|Managed Servers, Clusters and Machines [ ]3|RDBMS Security Store [ ]Enter index number to select OR [Exit][Previous][Next]> 1<-------------------------------- Fusion Middleware Configuration Wizard--------------------------------> Select Optional Configuration:------------------------------1|Administration Server [x]2|Managed Servers, Clusters and Machines [ ]3|RDBMS Security Store [ ]Enter index number to select OR [Exit][Previous][Next]> 2<---------------------- Fusion Middleware Configuration Wizard --------------------------------------> Select Optional Configuration:------------------------------1|Administration Server [x]2|Managed Servers, Clusters and Machines [x]3|RDBMS Security Store [ ]Enter index number to select OR [Exit][Previous][Next]> next<-------------------------------- Fusion Middleware Configuration Wizard --------------------------------> Configure the Administration Server:------------------------------------Enter adminstration server configurations. Each WebLogic Server domain must have one Administrati on Server. The AdministrationServer hosts the Administration Console which is used to perform administrative tasks.| Name | Value ||_____________|_____________|1| *Name: | AdminServer |2| *Listen address: | All Local Addresses |3| Listen port: | 7001 |4| SSL listen port: | N/A |5| SSL enabled: | false |Use above value or select another option:1 - Modify "Name"2 - Modify "Listen address"3 - Modify "Listen port"4 - Modify "SSL enabled"Enter option number to select OR [Exit][Previous][Next]> 2<------------------------------- Fusion Middleware Configuration Wizard ----------------------------------> Configure the Administration Server:------------------------------------on Server. The AdministrationServer hosts the Administration Console which is used to perform administrative tasks.| Name | Value ||_____________|_____________|1| *Name: | AdminServer |2| *Listen address: | All Local Addresses |3| Listen port: | 7001 |4| SSL listen port: | N/A |5| SSL enabled: | false |Enter value for "Listen address" OR [Exit][Previous][Next]> 192.168.34.6<---------------------------------- Fusion Middleware Configuration Wizard ------------------------------> Configure the Administration Server:------------------------------------Enter adminstration server configurations. Each WebLogic Server domain must have one Administrati on Server. The AdministrationServer hosts the Administration Console which is used to perform administrative tasks.| Name | Value ||_____________|__________|1| *Name: | AdminServer |2| *Listen address: | 192.168.34.6 |3| Listen port: | 7001 |4| SSL listen port: | N/A |5| SSL enabled: | false |Use above value or select another option:1 - Modify "Name"2 - Modify "Listen address"3 - Modify "Listen port"4 - Modify "SSL enabled"5 - Discard ChangesEnter option number to select OR [Exit][Previous][Next]> next<------------------------------- Fusion Middleware Configuration Wizard ------------------------------ Configure Managed Servers:--------------------------Add or delete configuration information for Managed Servers. A typical production environment has o ne or more Managed Servers.Each Managed Server is an instance of WebLogic Server used to host enterprise applications.| Name* | Listen address* | Listen port | SSL listen port | SSL enabled ||_______|_________________|_____________|_________________|_____________|Enter name for a new OR [Exit][Previous][Next]> Cluster_ManagedServer_1<------------------------------- Fusion Middleware Configuration Wizard -------------------------------> Configure Managed Servers:--------------------------Add or delete configuration information for Managed Servers. A typical production environment has one or more Managed Servers.Each Managed Server is an instance of WebLogic Server used to host enterprise applications.| Name* | Listen address* | Listen port | SSL listen port | SSL enabled ||_________|_____________________|_____________|_________________|_____________| 1->| Cluster_ManagedServer_1 | All Local Addresses | 7003 | N/A | false |Use above value or select another option:1 - Modify "Name"2 - Modify "Listen address"3 - Modify "Listen port"4 - Modify "SSL enabled"5 - DoneEnter option number to select OR [Exit][Previous][Next]> 2<-------------------------------- Fusion Middleware Configuration Wizard --------------------------------> Configure Managed Servers:--------------------------Add or delete configuration information for Managed Servers. A typical production environment has o ne or more Managed Servers.Each Managed Server is an instance of WebLogic Server used to host enterprise applications.| Name* | Listen address* | Listen port | SSL listen port | SSL enabled ||_________|_____________________|_____________|_________________|_____________|1->| Server1 | All Local Addresses | 7003 | N/A | false |Modify "Listen address" OR [Exit][Previous][Next]> 192.168.34.6<------------------------------ Fusion Middleware Configuration Wizard ----------------------------------> Configure Managed Servers:--------------------------Add or delete configuration information for Managed Servers. A typical production environment has o ne or more Managed Servers.Each Managed Server is an instance of WebLogic Server used to host enterprise applications.| Name* | Listen address* | Listen port | SSL listen port | SSL enabled |_|_________|_________________|_____________|_________________|_____________|1->| Server1 | 192.168.34.6 | 7003 | N/A | false |Use above value or select another option:1 - Modify "Name"2 - Modify "Listen address"3 - Modify "Listen port"4 - Modify "SSL enabled"5 - DoneEnter option number to select OR [Exit][Previous][Next]> 5然后next后,开始配置群集,名字为 My_Cluster_1,消息传递模式为multicast,地址是239.192.0.0,端口改为7777,集群地址为192.168.34.6:7003,192.168.34.9:7004,此处为所有节点的地址和端口,如下<------------------------------- Fusion Middleware Configuration Wizard ----------------------------------> Configure Clusters:-------------------Add or delete configuration information for clusters. A cluster consists of multiple server instances wo rking together toprovide increased scalability and reliability.| Name* | Cluster messaging mode | Multicast address | Multicast port | Cluster address ||_______|____________________|_______________|____________|______________|Enter name for a new Cluster OR [Exit][Previous][Next]> My_Cluster_1<-------------------------------- Fusion Middleware Configuration Wizard --------------------------------> Configure Clusters:-------------------Add or delete configuration information for clusters. A cluster consists of multiple server instances wo rking together toprovide increased scalability and reliability.| Name* | Cluster messaging mode | Multicast address | Multicast port | Cluster address ||________|_________________|__________________|____________|______________|1->| My_Cluster_1 | multicast | N/A | N/A | |Use above value or select another option:1 - Modify "Name"2 - Modify "Cluster messaging mode"3 - Modify "Cluster address"4 - DoneEnter option number to select OR [Exit][Previous][Next]> 2<--------------------------------- Fusion Middleware Configuration Wizard --------------------------------> Configure Clusters:-------------------Add or delete configuration information for clusters. A cluster consists of multiple server instances working together toprovide increased scalability and reliability.*Enter index number to modify "Cluster messaging mode"1|multicast->2|unicast3|UnspecifiedEnter index number to select OR [Exit][Reset][Accept]> 1<------------------------------ Fusion Middleware Configuration Wizard ----------------------------------> Configure Clusters:-------------------Add or delete configuration information for clusters. A cluster consists of multiple server instances wo rking together toprovide increased scalability and reliability.| Name* | Cluster messaging mode | Multicast address | Multicast port | Cluster address ||_________|____________________|_______________|____________|_____________|1->| My_Cluster_1 | multicast | 239.192.0.0 | 7777 | |Use above value or select another option:1 - Add Cluster2 - Modify Cluster3 - Delete Cluster4 - Discard ChangesEnter option number to select OR [Exit][Previous][Next]> next向域中的集群分配受管服务器,输入1,如下图选择所有节点1,2。
