Smart_Fan
PWM设置
fan start PWM value(设定智能风扇开始的PWM 选项为数值)
fan start temp ℃(设定智能风扇开始的温度 选项为温度 )
fan limit temp ℃(设定智能风扇运行的温度界限 选项为温度 )
fan slope select PWM/℃(设定智能风扇的slope PWM 选项为数值)
在PWM控制方法中,风扇的电压为额定值(例如12V风扇中的12V电源)或零电压,但由于风扇没有满负荷运转,因而它的反向电动势就会减少,这将导致PWM导通期间的电流可能会大于正常值。虽然风扇的设计使其能够处理较大的电流,但在风扇启动阶段,电流将每秒增加30倍,这将对风扇的可靠性产生很大影响。尽管如此,PWM仍然是低成本应用的理想选择。
下面是详细解释
smart fan control(智能风扇控制,会有auto自动(请谨慎使用,本人设置后不知为何开机很久风扇都没转,有可能是还没达到自动模式的启动温度吧) manual手动模式(要想自己定制请选择此模式,建议对硬件有一定了解的人常识) disabled关闭(风扇会使用最大转速) 选项)
言归正传:
在fan start PWM value选项中 你输入的数值就是风扇开始的转数的百分比(这是比较通俗的解释,其实不一定正确,但这样比较好理解)
比如风扇最大转速3000转 那你设置为60 在你设置的fan start temp ℃达到你设置的温度时 他就会运行在1800转左右 (实际会有一定偏差,风扇也没必要特别精确)
(注:以上讲解仅限于有智能风扇控制而且设置功能相近的的主板。你必须具备拥有此功能的设备以及配件。如果你对硬件不是很了解,更改智能风扇还是有一定危险性的,有可能造成设置错误,导致停转或转速不够,以此造成的硬件损坏概不负责,最后提醒请谨慎设置,如发现温度上升明显请及时处理或回复初始状态)
机械革命风扇设置参数
机械革命风扇设置参数
机械革命电脑的风扇设置参数可以通过多种方式进行设置,具体步骤如下:
方法一:
1. 打开“机械革命电竞控制台”。
2. 在控制台中选择“性能”,这里可以控制风扇的响应速度。
3. 在“性能”设置中,可以看到三种模式,分别是“办公模式”、“游戏模式”、“狂飙模式”。
在每种模式下,都可以进行不同的风扇设置。
4. 在“办公模式”下,可以设置风扇的开关速度。
例如,可以将风扇开关速度设置为1500ms/%左右,以控制风扇转速提升的快慢。
5. 对于“游戏模式”和“狂飙模式”,可以根据需要开启或关闭风扇,或者调整风扇的转速。
6. 另外,还可以选择左侧的“风扇设定”,勾选“开启风扇独立输出”。
这个设置是基于CPU或者GPU运行温度来设定风扇转速的百分比。
需要根据自己对电脑日常使用的特点和经验来设置。
方法二:
1. 打开PC Health Status单元,在其中找到CPUFAN1 Mode Setting选项。
这个选项用于控制CPU风扇的工作模式。
2. 可选择的模式包括Thermal Cruise Mode(按温度调节)、Speed Cruise Mode(按转速调节)以及Smart FAN III+ Mode(智能模式)。
3. 选择Smart FAN III+ Mode,这是一种自动适应的智能模式。
然后,通过设定一个合适的范围值(CPUFAN1 Tolerance Value),主板会根据CPU温度来自动控制风扇转速。
请注意,上述设置可能需要一定的技术知识和经验,如果不确定如何进行设置,建议寻求专业技术人员的帮助,以免对电脑造成损害。
Z590 VISION D 使用手册说明书

目录清点配件 (5)选购配件 (5)Z590 VISION D主板配置图 (6)Z590 VISION D主板功能线框图 (7)第一章硬件安装 (9)1-1 安装前的注意事项 (9)1-2 产品规格 (10)1-3 安装中央处理器及散热风扇 (14)1-3-1 安装中央处理器(CPU) (14)1-3-2 安装散热风扇 (16)1-4 安装内存条 (17)1-4-1 双通道内存技术 (17)1-4-2 安装内存条 (18)1-5 安装扩展卡 (19)1-6 构建AMD CrossFire™系统 (20)1-7 后方设备接口介绍 (21)1-8 插座及跳线介绍 (24)第二章 BIOS 程序设置 (39)2-1 开机画面 (40)2-2 BIOS设置程序主画面 (41)2-3 Smart Fan 6 (43)2-4 Favorites (F11) (最爱设置) (45)2-5 Tweaker (频率/电压控制) (46)2-6 Settings (设置) (53)2-7 System Info. (系统信息) (60)2-8 Boot (开机功能设置) (61)2-9 Save & Exit (存储设置值并结束设置程序) (64)第三章构建磁盘阵列 (65)3-1 设置SATA控制器模式 (65)3-2 安装RAID驱动程序及操作系统 (70)3-3 安装Intel® Optane™内存与存储管理应用程序 (71)- 3 -第四章驱动程序安装 (75)4-1 Drivers & Software (驱动程序及应用软件) (75)4-2 Application Software (软件应用程序) (76)4-3 Information (信息清单) (76)第五章产品功能介绍 (77)5-1 BIOS更新方法介绍 (77)5-1-1 如何使用Q-Flash更新BIOS (77)5-1-2 如何使用@BIOS更新BIOS (80)5-1-3 如何执行Q-Flash Plus (81)5-2 APP Center (82)5-2-1 EasyTune (83)5-2-2 Fast Boot (84)5-2-3 Game Boost (85)5-2-4 RGB Fusion (86)5-2-5 Smart Backup (88)5-2-6 System Information Viewer (90)第六章附录 (91)6-1 音频输入/输出设置介绍 (91)6-1-1 2 / 4 / 5.1 / 7.1声道介绍 (91)6-1-2 S/PDIF输出设置 (93)6-1-3 立体声混音功能 (94)6-1-4 语音录音机使用介绍 (95)6-1-5 DTS:X® Ultra介绍 (96)6-2 疑难排解 (98)6-2-1 问题集 (98)6-2-2 故障排除 (99)6-3 纠错灯号代码说明 (101)Regulatory Notices (105)技嘉主板售后服务及质量保证卡 (109)技嘉科技全球服务网 (111)- 4 -清点配件5Z590 VISION D 主板- 1片5驱动程序光盘- 1片5使用手册- 1本5硬件安装指南- 1本5SATA 排线- 4条5天线- 1支5M.2螺丝5RGB LED灯带延长线- 1条5检测噪音线- 1条5感温线- 2条5G Connector - 1个上述附带配件仅供参考,实际配件请以实物为准,技嘉科技保留修改的权利。
华硕服务器产品简介_2011H1

SMART-FAN 智能风扇技术
华硕SMART-FAN智能风扇技术让服务器风扇“聪明”地工作,实现 持续节能及降低噪音的目的 通过内嵌于服务器主机板上的温度感应装置,合理调节机器内部风扇 的转速,确保服务器内部关键组件(处理器/内存)处于稳定的工作状态, 实现按需制冷,动态调配 同时动态控制风扇运行转速可以有效降低整机的运行噪音,并延长风 扇组件的使用寿命
RS300-E7/PS4(热插拔) RS300-E6/PS4(热插拔) RS300-E6/PS2(热插拔) RS100-E7(内置) RS100-E6(内置)
塔式双路
TS700-E6(冗余电源8盘位) TS500-E6(单电源4盘位) TS300-E7(热插拔) TS300-E6(热插拔) TS100-E7(内置) TS100-E6(内置) 内置
产品特征: •1U 单路热插拔机种 •单路Intel 3420平台 •1U 4个热插拔3.5”硬盘位 •采用PIKE技术,支持SAS RAID •采用80PLUS节能静音电源 •VMWare认证
1U单路热插拔4盘位:RS300-E7/PS4
产品规格 CPU 内存 磁盘阵列 存储 扩展槽 Intel 四核至强E3-1200系列 DDR3 1333 ECC,4根内存槽,最 大32G 集成SATA RAID 0/1/5/10, 可搭配PIKE套件,支持SAS RAID 4个热插拔SAS/SATA 3.5”硬盘位 1个PCI-E 2.0 x16接口插槽(x8 link)(全高半长) 1个PCI-E 2.0 x8接口插槽(x8 link)(全高半长) 网络 远程管理 电源 Intel四1000M高速以太网 ASWM2.0远程管理套件 ASMB5远程管理模块 350W 80PLU电源
塔式单路
BIOS智能风扇设置共9页文档
BIOS智能风扇设置。
此时开机进入系统,你可能感觉CPU风扇声音过大,p5q主板可以对CPU风扇和3个机箱风扇进行智能温控(前提是机箱风扇支持调速,且电源插到主板风扇接口)。
再BIOS里调节如下选项:Power-Hardware Monitor上图,Q-Fan Control即为智能温控,默认Disabled,即风扇都是全速运转,噪音很大!设置成Enabeld,出现Fan Profile选项。
第 1 页风扇分为三种模式,想静音选安静模式,Silent。
第 2 页第 3 页BIOS中风扇智能调速设置中的delta temp(~C)一项有什么作用,设置为多少较合理?根据用户当前正在运行的程序和系统资源的利用情况自动智能的调节,一般设置为20-25左右为好。
查了不少资料,但都与N7AS的Bios设置不同。
经过个人试验,智能风扇的解释如下:(注本人使用Q9650芯片,酷冷V4智能风扇,不同芯片和风扇的参数会不同)CPU FAN TargetTemp Value (0-255):cpu温度的相对值。
如果CPU温度高于这个设置值,风扇用Starup Value设置的速度运转。
以我的CPU而言,55相当于CPU温度75, 50相当于CPU温度70度。
CPU Fan Tolerance Value (0-20):CPU温度的相对值每下降一,CPU风扇速度下降的相对值。
可能挺绕口,自己理解吧。
CPU Fan Startup Value (0-255):智能风扇开始运转的相对速度。
对我的风扇而言,100相当于1650转, 32相当于750转。
CPU Fan Stop Value (0-255):智能风扇停止转动的相对值。
如果风扇转速到达这个相对值,就会停止转动。
第 4 页举例如下:CPU FAN TargetTemp Value (0-255):50CPU Fan Tolerance Value (0-20):3CPU Fan Startup Value (0-255):100CPU Fan Stop Value (0-255):32当CPU温度达到70度(对应50的相对值),CPU风扇开始以1650转(100的相对值)开始转动;随着CPU温度下降,CPU 风扇以40转每度(3的相对值)速度下降;当风扇转速到达750转(32的相对值),风扇停转。
微星主板及周边组件MSI CENTER使用手册说明书

MSI CENTER使用手册(适用于微星的主板,桌面电脑和周边组件)目录关于 MSI Center (5)入门 (6)系统要求 (6)支持的硬件 (6)安装 MSI Center (6)启动 MSI Center (8)如何完全卸载 MSI Center (8)MSI Center 基础知识 (9)功能集 (10)电竞模式 (11)电竞模式选项 (11)如何将游戏加入电竞模式 (12)如何在电竞模式卸载游戏 (13)如何启用电竞模式 (14)智能优先级 (15)如何启用智能优先级 (16)场景设置 (17)选择场景设置 (17)取消场景设置 (18)设置用户选项 (19)如何调整CPU频率 (19)如何调整主板电压 (20)如何使用 Game Boost 电竞加速引擎 (21)如何调整 GPU 和 GPU 内存频率 (23)如何调整 DRAM Timing (DRAM 时序) (24)如何调整 DRAM 电压 (25)调整风扇速度 (26)如何启用微星 Fast Boot (快速启动) (28)Hardware Monitoring (硬件监控) (29)Frozr AI 散热 (可选) (30)如何启用 Frozr AI 散热 (30)设置 Frozr AI 散热的手动模式 (31)精彩一刻 (32)如何将精彩游戏重播分享到社交媒体 (33)如何删除游戏影片 (34)安装 MSI Companion (35)2目录设置 MSI Companion (37)设置精彩一刻 (39)真彩视界 (41)真彩视界默认选项 (41)如何自定义屏幕颜色 (42)局域网管理器 (43)网络控制菜单 (43)设置网络速度 (44)自定义应用程序优先级 (45)炫光灯效 (46)炫光同步环境连接 (49)龙魂动态面板 (可选) (54)龙魂动态面板 II (可选) (56)M-Vision 动态面板 (可选) (58)游戏外设 (61)电竞旋钮 (可选) (62)HMI 2.0 (可选) (66)Firmware Update (固件更新) (67)Hardware Monitor (硬件监控) (69)Video /Image (70)System Clock (71)Live Weather (72)设置应用程序快捷 (73)MSI Sound Tune (可选) (74)Devices Speed Up (设备加速) (75)快充 (76)Smart Image Finder (智能图像查找器) (77)使用 Smart Image Finder (智能图像查找器) (77)在图像上添加或删除标签 (80)系统诊断(可选) (81)岩心液 (可选) (82)Case 机箱(可选) (86)Power Supply Unit 电源(选配) (91)产品注册 (96)在线更新 (98)系统信息 (99)3目录商店应用(UWP) (100)常规事项 (101)版权声明 (101)修订 (101)4目录关于 MSI Center∙最佳化电竞设置,享受高品质的电竞体验。
BIOS智能风扇设置
BIOS智能风扇设置。
此时开机进入系统,你可能感觉CPU风扇声音过大,p5q主板可以对CPU风扇和3个机箱风扇进行智能温控(前提是机箱风扇支持调速,且电源插到主板风扇接口)。
再BIOS里调节如下选项:Power-Hardware Monitor上图,Q-Fan Control即为智能温控,默认Disabled,即风扇都是全速运转,噪音很大!设置成Enabeld,出现Fan Profile选项。
风扇分为三种模式,想静音选安静模式,Silent。
+++++++++++++++++++BIOS中风扇智能调速设置中的delta temp(~C)一项有什么作用,设置为多少较合理?根据用户当前正在运行的程序和系统资源的利用情况自动智能的调节,一般设置为20-25左右为好。
查了不少资料,但都与N7AS的Bios设置不同。
经过个人试验,智能风扇的解释如下:(注本人使用Q9650芯片,酷冷V4智能风扇,不同芯片和风扇的参数会不同)CPU FAN TargetTemp Value (0-255):cpu温度的相对值。
如果CPU温度高于这个设置值,风扇用Starup Value设置的速度运转。
以我的CPU而言,55相当于CPU温度75,50相当于CPU温度70度。
CPU Fan Tolerance Value (0-20):CPU温度的相对值每下降一,CPU风扇速度下降的相对值。
可能挺绕口,自己理解吧。
CPU Fan Startup Value (0-255):智能风扇开始运转的相对速度。
对我的风扇而言,100相当于1650转,32相当于750转。
CPU Fan Stop Value (0-255):智能风扇停止转动的相对值。
如果风扇转速到达这个相对值,就会停止转动。
举例如下:CPU FAN TargetTemp Value (0-255):50CPU Fan Tolerance Value (0-20):3CPU Fan Startup Value (0-255):100CPU Fan Stop Value (0-255):32当CPU温度达到70度(对应50的相对值),CPU风扇开始以1650转(100的相对值)开始转动;随着CPU温度下降,CPU风扇以40转每度(3的相对值)速度下降;当风扇转速到达750转(32的相对值),风扇停转。
PWM智能温控风扇的原理BIOS调速的方法

PWM智能温控风扇的原理:1.PWM的技术背景PWM (Pulse Width Modulation)Intel对散热器的评定标准非常严格。
传统的温控风扇是利用风扇轴承附近的测温探头侦测风扇的进风口温度,从而对风扇的转速进行调节。
这种温控虽然解决了一定的问题,但是存在着精度粗糙,而且温控的转速只能做到高速低速两极变速。
PWM是脉宽调制电路的简称,在工业控制,单片机上早已经广泛的应用。
而Intel将他和主板的CPU 温度侦测相结合,将其应用于散热器风扇的转速精确控制上,取得了良好的效果。
2.PWM智能温控风扇的功能特点首先,PWM风扇调节风扇转速是直接从CPU获取温度信息,在风扇上无任何测温装置。
根据不同的CPU温度,温控风扇会有不同的转速调节与之对应,并且风扇的转速变化可以做到四级五级,甚至更多,基本上是无极变速的感觉。
由于是脉宽信号的实时调节,风扇转速的变化非常灵敏,转速和CPU温度的变化几乎是同步的。
第二,PWM风扇在计算机待机的时候,可以保持在一个非常低的转速上。
在待机时候,CPU温度在四五十度以下,其转速仅为一千转左右,大大降低了运转的噪音。
而设计的最高转速,两千多转,只有在CPU温度接近极限温度,即65-67度时候,才会出现。
相比传统的温控风扇有着更大的转速控制范围,更好的解决了噪音和性能的问题。
第三,PWM温控风扇在开机的瞬间,转速会提升到最高,持续数秒后,降低到待机的低转速水平。
这个特点也是PWM智能温控风扇的最明显特征,可以用来判断风扇和主板是不是真的具有PWM功能,或者其功能是否有故障,甚至可以用来作为真假盒包散热器的参考判断标准。
3.PWM 智能温控风扇的简单原理在具有PWM功能的主板上,除了原先的测温电路之外,多了一个PWM的控制芯片,他的作用是根据测温电路测得的CPU温度,发出不同占空比的PWM脉冲信号。
这个脉冲是一种方波,在一个周期内,此方波信号的高电平时段占整个周期的比例,我们称之为占空比。
BIOS风扇转速调整

BIOS风扇转速调整在BIOS的H/W Monitor选项中开启CPU Smart FAN Target,设置风扇调速的目标温度,就是设置你希望风扇全速运转的温度,比如设置在45,就是CPU温度达到45℃时风扇全速运转,低于45℃时低速运转设置了目标温度后,就弹出一项CPU Min.FAN Speed(%)选项,这是让你设置风扇的最低转速。
这里用全速的百分比表示,12.5%-87.5%,你可以依据自己PC和环境实际情况设置,比如设置在50%,在CPU温度低于目标温度是就以风扇全速的一半速度运转。
设置BIOS调整风扇转速首先汗一个,在“硬件答疑”板块居然看到号称CFAN形象代言人说出了这样的话“我还没有遇见过CMOS能调风扇转速的”,另外考虑到这儿可能有些朋友也在找这类设置吧,所以发一个在这儿不知道合适不。
【原创,转载请注明出处】以双核速龙4200+、4针原装风扇(3针的不支持调速)、A78GT主板为例: 1:首先安装好CPU双核补丁、系统优化补丁,并在电源管理选项选择“最小电源管理”。
2:开机进入BIOS,选择进入power,即硬件安全配置;(1):在CPUFAN Mode Setting设置manual mode(即手动模式) ,cpufan 设置为100-150之间(默认250),这样风扇的转速就下降到1800--2400之间,噪音会小得多了,但是此时风扇并不是智能调节转速的,即转速是一定值! (2):设置智能调速,CPUFAN Target Temp valun(CPU风扇模式设置)--40 CPUFAN Tolerance value----03 CPUFAN Startup value(CPU风扇的启动数)---40,就是CPU温度达到40°后开始启动智能调速 CPUFAN STOP value(CPU风扇停止数)---35,即CPU温度到35°后停止调速,并随之降速! 选03那个选项翻译出来为CPU风扇的宽容数值,我也没明白什么意思,呵呵,来个鸟语高手解答下吧。
cpu风扇转速如何设置

本文整理于网络,仅供阅读参考
cpu风扇转速如何设置
cpu风扇转速设置方法如下:
主板和cpu风扇都具备自动调速,也可以进入bios手动设置风扇转速。
1、进入主板bios。
在pc health
status单元里面有一个cpufan1 mode setting选项,这个选项就是控制cpu风扇的,分别有三个模式thermal cruise mode(按温度调节)、speed cruise mode(按转速调节)、smart fan iii+ mode(智能模式)。
2、speed cruise mode选项比较简单,分别是cpufan1 targetspeed value(目标转速)、cpufan1 tolerance value(线性变化速率)。
3、smart fan iii+ mode是智能模式,所以选项也最简单,只有一个调节选项cpufan1 tolerance value,只需要设定一个范围值,主板就可以自动针对cpu温度来控制风扇的转速。
4、这里用比较直观快捷的speed cruise mode(按转速调节)来测试,默认情况下cpufan1 targetspeed value是55,cpufan1 tolerance value是03,这时风扇转速为20。
看了“cpu风扇转速如何设置”文章的。
RQ&MJ Smart FAN Setting
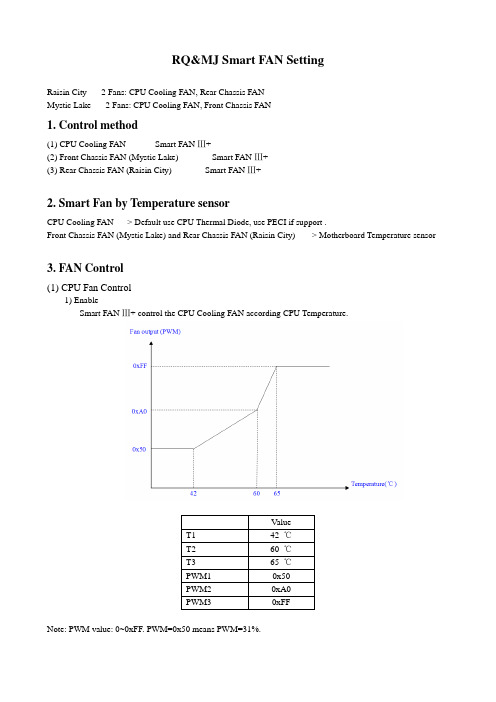
RQ&MJ Smart FAN SettingRaisin City-----2 Fans: CPU Cooling FAN, Rear Chassis FANMystic Lake-----2 Fans: CPU Cooling FAN, Front Chassis FAN1. Control method(1) CPU Cooling FAN----------Smart FAN Ⅲ+(2) Front Chassis FAN (Mystic Lake) ---------- Smart FAN Ⅲ+(3) Rear Chassis FAN (Raisin City) ---------- Smart FAN Ⅲ+2. Smart Fan by Temperature sensorCPU Cooling FAN ----> Default use CPU Thermal Diode, use PECI if support .Front Chassis FAN (Mystic Lake) and Rear Chassis FAN (Raisin City) -----> Motherboard Temperature sensor3. FAN Control(1) CPU Fan Control1) EnableSmart FAN Ⅲ+ control the CPU Cooling FAN according CPU Temperature.Note: PWM value: 0~0xFF. PWM=0x50 means PWM=31%.2)DisableDisable Smart FAN Ⅲ+, set the PWM output to 100%, CPU Cooling FAN always run at full speed.(2) Front/Rear Chassis Fan Control1)Enable[1] Lowest Fan Speed (Slow)Smart FAN Ⅲ+ control the Front Chassis FAN (Mystic Lake) or Rear Chassis FAN (Raisin City)according the motherboard temperature. The fan run at a lowest speed when the motherboardtemperature is lower than T1(35℃).[2] Lowest Fan Speed (Off)Smart FAN Ⅲ+ control the Front Chassis FAN (Mystic Lake) or Rear Chassis FAN (Raisin City) according the motherboard temperature. The fan will stop working when the motherboard temperature is lower than T1(30℃).2)DisableDisable Smart FAN Ⅲ+, set Front Chassis FAN or Rear Chassis FAN PWM output to 100%, the fan always run at full speed.。
技嘉z390gamingx说明书
技嘉z390gamingx说明书
技嘉Z390GAMINGX
技嘉Z390 GAMING X是一款集高级功能与完美设计为一体的游戏主板,旨在帮助您获得极致的游戏体验。
它配备了英特尔Z390芯片组,这款组
合支持第九代英特尔Core处理器来运行极具挑战性的游戏和应用程序。
Z390 GAMING X配备了高性能的GIGABYTE数字RGB头和Smart Fan技术,可根据您的个性化需求进行调整。
它有两个M.2插槽,一个全长PCI-E插
槽和一个PCI-E x1插槽,允许您安装并运行各种功能强大的配件。
另外,它还采用Intel Turbo USB 3.1 Gen2技术,可提供最新的接口速度。
核心组件
技嘉Z390 GAMING X采用英特尔Z390芯片组,支持第九代英特尔
Core处理器。
这个集成了高级技术的芯片组提供了超高性能,并且在最
大的温度范围内实现最大的稳定性。
它还支持多种存储解决方案,可支持
最大的跨度,使您能够同时充分利用不同类型的设备。
它还支持Intel Optane内存技术,可以提高游戏的性能,确保游戏体验最畅快。
设计
技嘉Z390 GAMING X有一个拥有高性能数字RGB头的设计,可以使您
个性化定制电脑的灯光效果。
它还有Smart Fan技术,该技术可以根据负
载情况自动调节风扇速度,以确保您享受最舒适的游戏体验。
此外,它还
配备了散热模块,以确保系统温度始终处于安全范围。
扩展性。
电风扇关于智能电风扇的外文翻译
电风扇关于智能电风扇的外文翻译电风扇关于智能电风扇的外文翻译2010-12-14求关于智能电风扇方面的外文翻译?有的发我邮箱***************不甚感激smart fan modules and syst document type and number:united states patent 6592449 abstract:a fan module including:two or more individual fans,each fan having an air movent means and amotor engaged with the air movent means for accelerating airentering each of the two or more individual fans;a tperature sensor for sensing atperature associated with the two or more fans and for outputting afirst signal corresponding to the tperature;rotational speed sensor for outputting asecond signal corresponding toarotational speed of each of the two or more fans;and aprocessor for receiving the first and second signals and controlling the two or more individual fans based on the first and second signals.功能描述本设计主要目标是使普通的电风扇的功能更加强大,使操作简单化、智能化,主要实现以下几个部分的功能:温度智控功能:风扇可以感知环境的温度,以调节风扇的转速,达到更好的工作效果。
DCS800 SMART FAN CONTROL用户指南说明书
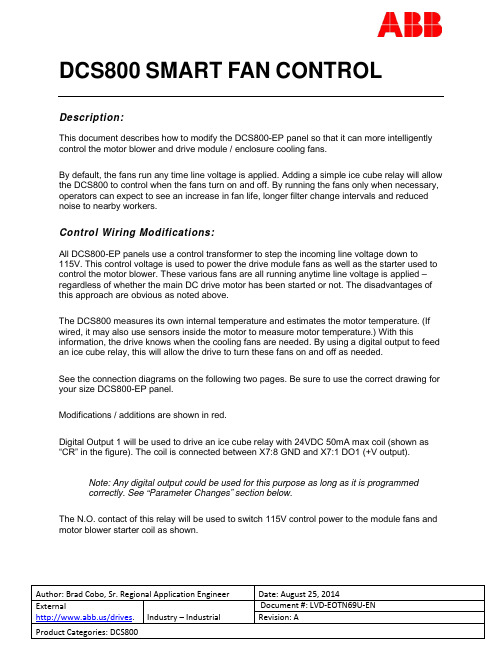
DCS800SMART FAN CONTROLDescription:This document describes how to modify the DCS800-EP panel so that it can more intelligently control the motor blower and drive module / enclosure cooling fans.By default, the fans run any time line voltage is applied. Adding a simple ice cube relay will allow the DCS800 to control when the fans turn on and off. By running the fans only when necessary, operators can expect to see an increase in fan life, longer filter change intervals and reduced noise to nearby workers.Control Wiring Modifications:All DCS800-EP panels use a control transformer to step the incoming line voltage down to115V. This control voltage is used to power the drive module fans as well as the starter used to control the motor blower. These various fans are all running anytime line voltage is applied – regardless of whether the main DC drive motor has been started or not. The disadvantages of this approach are obvious as noted above.The DCS800 measures its own internal temperature and estimates the motor temperature. (If wired, it may also use sensors inside the motor to measure motor temperature.) With this information, the drive knows when the cooling fans are needed. By using a digital output to feed an ice cube relay, this will allow the drive to turn these fans on and off as needed.See the connection diagrams on the following two pages. Be sure to use the correct drawing for your size DCS800-EP panel.Modifications / additions are shown in red.Digital Output 1 will be used to drive an ice cube relay with 24VDC 50mA max coil (shown as “CR” in the figure). The coil is connected between X7:8 GND and X7:1 DO1 (+V output).Note: Any digital output could be used for this purpose as long as it is programmedcorrectly. See “Parameter Changes” section below.The N.O. contact of this relay will be used to switch 115V control power to the module fans and motor blower starter coil as shown.New Control Relay (CR)24VDC 50mA Max CoilCRConnect coil to DCS800X7:8 GND andX7:1 DO1(+)CRFigure 1. Control Power Diagram C1 – 10-250HP (DCS800-EP1-0020 through EP2-0250)New Control Relay (CR)24VDC 50mA Max CoilConnect coil to DCS800CRX7:8 GND andX7:1 DO1(+)CRFigure 2. Control Power Diagram C2 – 300-600HP (DCS800-EP1-0610 through EP2-1010)Parameter Changes:If the Factory Macro is used (which is the default setting), Digital Output 1 (DO1) is programmed to be a “FansOn” command. It is advisable to double check this by verifying:PARAMETER 14.01 DO1Index= 603PARAMETER 14.02 DO1BitNo= 0Note: If DO1 is already used for something else, feel free to use any other availableoutput. The Group 14 parameters for that particular output must be set the same way as above.By default, the drive will turn off the fans at the same time the drive is switched off. If the user would like for the fans to run a bit longer, to allow the equipment to cool down for example, the following parameter should be set:PARAMETER 21.14 FanDly= 60 seconds (Default is 0, Range is 0-300 sec) Description of Operation:Once the drive receives a start command, it will turn on DO1 thus energizing the control relay and providing power to the drive module’s cooling fans as well as the motor blower starter.When the drive receives a stop command, the fans will turn off immediately unless an “off delay” has been programmed into parameter 21.14 or the drive detects an overtemperature condition within itself or the motor. If that is the case, the drive will continue to run the fans until the overtemperature condition has passed (temperature falls below alarm limit). At that point, the off delay timer starts and the fans will shut off after the delay has expired.See the DCS800 Firmware Manual -> Fault Tracing section -> Motor Thermal Model for more detailed information on alarm and fault temperature thresholds and their associated parameters. Documents or other reference material:DCS800-EP Installation and Start Up ManualDCS800 Panel Drive (20-1000 Amps)A supplement to the DCS800 Hardware manualDocument No. 3AUA000007 6338 REV DFirmware ManualDCS800 Drives (20 to 5200A)Document No. 3ADW000193 R0701 REV GCorrective Actions:N/A。
电源也玩Smart Fan打造温控开关的电源风扇
电源也玩Smart Fan打造温控开关的电源风扇
张歌
【期刊名称】《微型计算机》
【年(卷),期】2005(000)009
【摘要】@@ 电源风扇你需要吗?需要!但在任何时候都需要它吗?不一定!从P电源启动的一刹那直到关机,电源风扇都在"孜孜不倦"地工作,其精神虽可嘉但却带给我们无尽的噪声骚扰.能不能让风扇聪明一点,主动地"找点空闲,找点时间"休息一下,在延长使用寿命的同时也让机箱多一份安静呢?本文作者就想出了这样一个办法……
【总页数】2页(P92-93)
【作者】张歌
【作者单位】无
【正文语种】中文
【相关文献】
1.电源静音新动向:14cm散热风扇金河田劲霸ATX-S528和航嘉冷静王至尊版电源 [J],
2.根植在华硕服务器上的绿色基因(二)华硕服务器绿色节能技术解析之Smart-Fan 智能风扇 [J],
3.电盛兰达推出工业用电脑专用电源薄型,无风扇,多路输出基板型电源ZWX系列 [J],
4.售后服务消费者满意品牌揭晓电源类/风扇噪音过大、输出不稳定成为电源投诉
的主要话题 [J],
5.TDK-Lambda电源新品---无风扇Ⅰ类或Ⅱ类医疗和工业电源 [J],
因版权原因,仅展示原文概要,查看原文内容请购买。
Fanco 风扇使用说明书

SMART GuideDownload the app and register an accountGo to the App Store or Google Play and search for the TuyaSmart Appand download it.Open the TuyaSmart App, choose sign up if you are new to the App.Select “agree” toUser agreementand Privacy Policy toproceed.Register with yourpreferred emailaccount and getverification code.Enter verification code.Set up a password andpress done.Select notification options as yourpreference.Add device.Select “Small HomeAppliance” – “Fan (WIFI)”.Select the WiFi that your mobile is connected to and type in the WiFi password,then select “Next”. Connect and pair the deviceWiFi must be enabled when setting up the fanFanco IMPORTANT - BEFORE MOVING ON TO THE NEXT STEPS - Turn on the isolation switch/wall switch and connect the fan to the power. If the fan is connected to the power before pairing, please turn it off and wait for 10s before turning it back on.The learning process needs to be triggered within 10s after the fan gets connected to the power. Double Press ON/OFF button and hold it down on the 3rd press. Release the button after you hear 2 beeps.Select the device you wish to control by App.Turn on or off the fan bypressing the switch icon.In App ControlsSelect “Next” and tap “Blink Quickly”. Note: You will not see an indicator blink on the fan or remote as it’s built in, but you can still proceed.The App startssearching for device. Select “Done” after thedevice is added.Fanco FanAdjust fan speed by sliding wind speedlevel control button.Select to choose“Normal” and “Naturalwind mode”.Select to turn on/off the light, adjustbrightness and choose colour temperatures.Select to change timer settings and air movement direction.More 3rd party device TuyaSmart supports can be found in “Me” – “More Services”.TroubleshootingIf you cannot find the device or add the device to Tuya app. Try the steps below.Check if the network configuration is set to 2.4 Hz WiFi.Fanco smart fans only work on 2.4 Hz WiFi. If your router is configured tobroadcast a 5GHz signal, Fanco smart fans won’t detect the WiFi.Check your router capacity.Eve ry rou ter has its limit of how many devices can be connected. If the numbers of connected devices have reached your router’s capacity, newdevice will not be connected to the router.Try to disconnect other devices from the router, then pair Fanco smart fanswith the router. Or switch to another network, which less devices areto.connectedPair Fanco smart fan under “AP mode” in Tuya App.Pair Fanco smart fan under “AP mode” in Tuya App.1. Power off the Fanco smart fan.2. Open the “Tuya smart” app, go to “Add device”. – “Small homeappliance – Fan (wifi)” – “Select 2.4 Ghz WiFi and enter password”(Refer to page 2 in Fanco smart guide), select “Next”.3. Turn the power back on. Quick press ON/OFF b utton on the remote 3 times,hold it down for the 4th press. Release the button until the receiver beeps twice.4. Select “Next” and tap “Blink Slowly”. Note: You will not see an indicatorblink on the fan or remote as it’s built in, but you can still proceed.5. Follow the instruction to select device “smartlife-xxxx” in WiFi settings.Then select “go to connect”6. The “Adding device” page shall pop up.。
AMDCPU风扇怎么调速
AMD CPU风扇怎么调速
有不少网友说CPU温度太高,风扇转速太低散热不好想要调高,或者说CPU风扇转速太高嫌吵要调低转速,那么,CPU风扇怎么调速呢?小编在这里给大家带来2种方法。
两种方法:
1.、开机按del(本本自己看看该按哪个键)进BIOS 的CPU Configuration里有一项Smart Fan,把它开启即可。
2、运用win平台软件speedFan调速。但前提你的风扇最好是4针的,三针的貌似不能调速,当然你的主板也不能太老。
如何降低cpu风扇转速
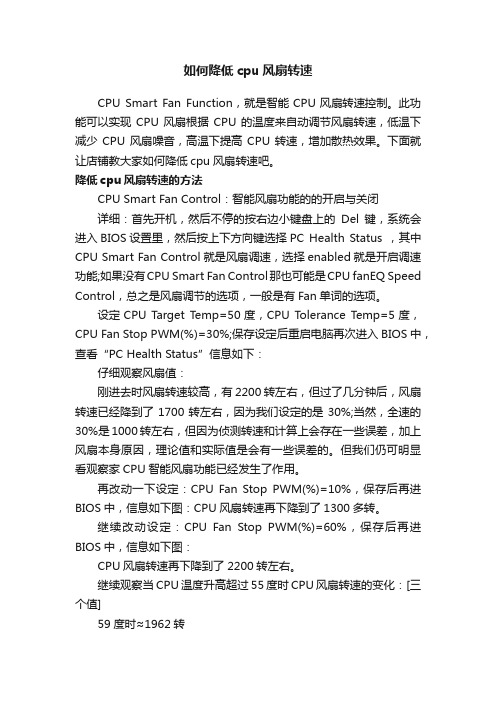
如何降低cpu风扇转速CPU Smart Fan Function,就是智能CPU风扇转速控制。
此功能可以实现CPU风扇根据CPU的温度来自动调节风扇转速,低温下减少CPU风扇噪音,高温下提高CPU转速,增加散热效果。
下面就让店铺教大家如何降低cpu风扇转速吧。
降低cpu风扇转速的方法CPU Smart Fan Control:智能风扇功能的的开启与关闭详细:首先开机,然后不停的按右边小键盘上的Del键,系统会进入BIOS设置里,然后按上下方向键选择PC Health Status ,其中CPU Smart Fan Control就是风扇调速,选择enabled就是开启调速功能;如果没有CPU Smart Fan Control那也可能是CPU fanEQ Speed Control,总之是风扇调节的选项,一般是有Fan单词的选项。
设定CPU Target T emp=50度,CPU Tolerance Temp=5度,CPU Fan Stop PWM(%)=30%;保存设定后重启电脑再次进入BIOS中,查看“PC Health Status”信息如下:仔细观察风扇值:刚进去时风扇转速较高,有2200转左右,但过了几分钟后,风扇转速已经降到了1700转左右,因为我们设定的是30%;当然,全速的30%是1000转左右,但因为侦测转速和计算上会存在一些误差,加上风扇本身原因,理论值和实际值是会有一些误差的。
但我们仍可明显看观察家CPU智能风扇功能已经发生了作用。
再改动一下设定:CPU Fan Stop PWM(%)=10%,保存后再进BIOS中,信息如下图:CPU风扇转速再下降到了1300多转。
继续改动设定:CPU Fan Stop PWM(%)=60%,保存后再进BIOS中,信息如下图:CPU风扇转速再下降到了2200转左右。
继续观察当CPU温度升高超过55度时CPU风扇转速的变化:[三个值]59度时≈1962转71度时≈2860转74度时≈3096转我们再观察一下随着CPU温度下降,CPU风扇的变化:[五个值] 观察得到:温度下降到了45~55度区间下限值45度后,CPU转速开始自动开始降低转速。