5301368-Lenovo Concept Store-Cook Book_0629_V3
联想 IdeaPad Y530 使用说明书

Lenovo IdeaPad Y530 UG V1.0_SC.book Page 1 Tuesday, June 24, 2008 5:30 PM“能源之星”型号信息ENERGY STAR®是“美国环境保护局”和“美国能源部”共同研发的计划,该计划通过省电产品和行动,达到节省成本与保护环境的目的。
Lenovo®很荣幸能提供客户符合“能源之星”标准的产品。
如果以下联想计算机机型贴有“能源之星”标签,则表明其设计经测试为符合“能源之星4.0”计划的计算机要求。
• 20009• 4051通过使用符合“能源之星”标准的产品以及利用计算机的电源管理功能,可以降低耗电率。
降低耗电率有助于节约经费、净化环境,以及降低温室气体的排放量。
如需“能源之星”的相关信息,请访问以下网站:.联想鼓励您将节约能源视为日常生活中的一部分。
为了达到这个目标,联想预设以下电源管理功能,如果计算机在特定期间内未运行,这些预设值会自动生效。
若要将计算机从“睡眠”或“系统待机”模式中唤醒,请按键盘上的任意键。
如需这些设定的相关信息,请参阅“Windows 帮助和支持”信息系统。
表 1“能源之星”电源管理功能,按照操作系统划分Windows XPWindows Vista• 关闭显示器:10分钟后• 关闭硬盘:30分钟后• 系统待机:20分钟后• 系统休眠:2小时后• 电源计划:已平衡• 关闭显示屏:10分钟后• 使电脑进入睡眠模式:25分钟后• 高级电源设定:- 关闭硬盘:20分钟后- 休眠:1小时后Lenovo IdeaPad Y530 UG V1.0_SC.book Page 2 Tuesday, June 24, 2008 5:30 PMLenovo IdeaPad Y530 UG V1.0_SC.book Page i Monday, June 30, 2008 1:13 PM敬告用户敬告用户亲爱的用户:感谢您购买联想笔记本电脑!在您使用本产品前,请务必仔细阅读使用说明书,并请妥善保管。
联想 IdeaPad 系列用户手册
打开 Novo 按钮菜单 . . . . . . . . . . 12 与计算机交互 . . . . . . . . . . . . . . 13
• 宽:359.3 毫米(14.1 英寸) • 深:235 毫米(9.3 英寸) • 厚:17.9 毫米(0.7 英寸) 对于 16 英寸型号:
• 宽:359.2 毫米(14.1 英寸) • 深:257 毫米(10.1 英寸) • 厚:17.9 毫米(0.7 英寸) • 输入:100 V 到 240 V 交流电,50 Hz 到 60 Hz • 输出:20 V 直流电,3.25 A • 功率:65 W • 容量:47 Wh • 芯数:3 注:电池容量为典型值或平均值,根据特定实验环境测定。其他环境中获得的数据 可能会有所不同,但不会低于额定容量(见产品标签)。
智能功能 . . . . . . . . . . . . . . . . 17 多维手势(触摸屏/触摸板)(适用于特定型 号) . . . . . . . . . . . . . . . . . 17 超分辨率(适用于特定型号) . . . . . . . 17 护眼模式 . . . . . . . . . . . . . . . 17 智能降噪 . . . . . . . . . . . . . . . 17 Smart Appearance . . . . . . . . . . . 17
机器类型(MT) 82XL 82XN 83EQ 82XA 83EL 82X6 82XM 82XQ 83ER 82XB、83D7 83EM 82X7 82XR 83ES 83EN 82X8
联想 ideapad 120S-11IAP 120S-14IAP 使用说明书
注释:虚线区域表示外部不可见的部件。 注意:
• 显示屏打开切勿超过 180 度角。合上显示屏时,请注意不要在显示屏和键盘之间遗留下钢笔或任何其他物 件,否则可能会损坏显示屏。
2
第 1 章 认识您的计算机
a 内置摄像头 b 内置麦克风 c 计算机显示屏 d 无线局域网天线 5 电源按钮 6 触控板
俘ᨀ皮˖ ᛘਟԕ䲿ᰦ䇯䰞㚄ᜣᇈᯩ㖁ㄉ˄˅ԕ㧧ᗇᘛᦧⲴ㖁㔌᭟ᤱᴽ࣑ ⛩ࠫĀ傡ࣘл䖭у४ā❦ਾ䗃ޕᛘⲴѫᵪ㕆ਧᡆᵪරˈণਟḕ䈒ᵪಘⲴ䝽㖞ǃ઼؞؍ᓄⲴ傡ࣘ 〻ᒿؑ˗ ⛩ࠫĀ㔤؞㖁⛩ā❦ਾ䘹ᤙᛘᡰ൘ⲴᐲоᛘⲴӗ૱ˈণਟḕ䈒ᖃൠⲴᴽ࣑㖁⛩ؑԕׯҾᛘ䘱؞ 䇑㇇ᵪ 䉒䉒 ㅢж⡾δ2017ᒪ5ᴾε © ⡾ᵹᡶᴿ 㚊ᜩ 2017Ⱦ
商标 ................................................................................................................................................... 22
第 3 章 恢复系统 ................................................................................................................................ 16 重置此电脑.................................................................................................................................................... 16
联想 Yoga Air 13s IAP7 设置指南

开始使用Get it started插图仅供参考。
I The illustrations are for your reference.请阅读《用户指南》中的USB传输速率声明。
I See User Guide for USB transfer rate.概述Overview摄像头开关 I Camera switch电源按钮 I Power buttonUSB-C接口/组合音频插孔 I USB-C connector/Combo audio jack电源接口/Thunderbolt™ 4 接口 I Power connector/Thunderbolt™ 4 connector智能感知Zero Touch塑料袋声明危险:塑料袋具有危险性。
请将塑料袋放在婴儿和儿童接触不到的位置,以避免窒息危险。
常规电池声明(适用于特定型号)危险:Lenovo 提供的用于产品的电池已经过兼容性测试,并应该仅用核准的部件进行更换。
非 Lenovo 指定的电池或经过拆卸或改装的电池不在保修范围之内。
电池使用不当或错误操作可能导致电池过热、漏液或爆炸。
为避免可能造成的伤害,请注意以下几点:•请勿打开、拆开或维修任何电池。
•请勿挤压或刺穿电池。
•请勿使电池短路、接触水或其他液体。
•使电池远离儿童。
•使电池远离火源。
如果电池损坏,或发现从电池中流出异物或电池引线上堆积异物,请停止使用电池。
请在室温下存放可充电电池或含有可充电电池的产品,并将电池电量充至大约 30% 到 50%。
建议每年对电池充电一次以防止过量放电。
请勿将电池丢入以掩埋方式处理的垃圾中。
处理电池时,请遵守当地的法令或法规。
可拆卸充电电池声明(适用于特定型号)危险:只能严格按照产品文档中包含的说明对电池进行充电。
更换电池不当有爆炸的危险。
电池中含有少量有害物质。
内置充电电池声明(适用于特定型号)危险:请勿尝试拆卸或更换内置可充电电池。
必须由 Lenovo 授权维修机构、技术人员或独立的有资质的专业人员更换电池。
联想IdeaCentre Q190系列机器型号10115 6281 31503530用户指南说明书

Description Use this connector to attach a microphone to your computer when you want to record sound or if you use speech-recognition software. Use this connector to attach headphones to your computer when you want to listen to music or other sounds without disturbing anyone. Use this connector to attach a device that requires a USB connection. Use to view and share digital photos, music, and videos, stored on a media card. Use this connector to attach the computer to an Ethernet-typelocal area network. Used to attach a VGA monitor or other devices that use a VGA monitor connector. Connect to the HDMI connector on your display or TV.
Contents i
ii Contents
联想 ThinkPad X13 Yoga Gen 2 用户指南

ThinkPad X13Yoga Gen2用户指南用前必读在参考此资料使用相关产品之前,请务必阅读并了解以下信息:•《安全与保修指南》•《设置指南》•《常规安全与合规性声明》第一版(2023年5月)©Copyright Lenovo2021,2023.有限权利声明:如果数据或软件依照美国总务署(GSA)合同提供,则其使用、复制或披露将受到GS-35F-05925号合同的约束。
目录了解您的Lenovo笔记本 (iii)第1章认识您的计算机 (1)前视图 (1)侧视图 (3)底视图 (4)规格 (4)USB规格 (4)第2章开始使用您的计算机 (7)访问网络 (7)连接到Wi-Fi网络 (7)连接到有线以太网 (7)连接到蜂窝网络(适用于特定型号) (8)开启飞行模式 (8)与计算机交互 (8)使用键盘快捷键 (9)使用TrackPoint指针设备 (10)使用轨迹板 (11)使用触摸屏 (13)连接到外接显示屏 (14)了解YOGA模式 (15)使用Lenovo Integrated Pen(适用于特定型号) (16)第3章探索您的计算机 (19)Lenovo应用程序 (19)智能功能(适用于特定型号) (21)智能散热 (23)管理电源 (24)检查电池状态 (24)为计算机充电 (24)更改电源设置 (25)传输数据 (25)设置蓝牙连接 (25)设置NFC连接 (26)使用智能卡(适用于特定型号) (26)附件 (27)购买附件 (27)第4章保护计算机和信息安全..29锁定计算机 (29)使用指纹登录 (29)使用面部ID登录(适用于特定型号) (30)隐私保护(适用于特定型号).......30使用HPD智能感知功能(适用于特定型号) (30)断电数据保护(适用于特定型号) (31)UEFI BIOS密码 (31)密码类型 (32)设置、更改和删除密码 (33)将指纹与密码关联(适用于特定型号) (34)第5章配置高级设置 (35)UEFI BIOS (35)进入UEFI BIOS菜单 (35)UEFI BIOS界面导航 (35)设置系统日期和时间 (35)更改启动顺序 (35)更新UEFI BIOS (35)恢复 (36)将系统文件和设置恢复到较早的时间点 (36)从备份还原文件 (36)重置计算机 (36)使用高级选项 (36)Windows自动恢复 (36)创建和使用USB恢复驱动器 (37)安装Windows操作系统和驱动程序 (37)第6章更换CRU (39)CRU列表 (39)禁用快速启动和内置电池 (39)更换CRU (40)底盖组合件 (40)无线广域网卡(适用于特定型号) (42)M.2固态驱动器(适用于特定型号) (43)第7章帮助和支持 (47)常见问题 (47)错误消息 (48)蜂鸣声错误 (49)自助资源 (50)Windows标签 (51)致电Lenovo (51)联系Lenovo之前 (51)Lenovo客户支持中心 (52)购买附加服务 (53)附录A辅助功能和人体工程学信息 (55)©Copyright Lenovo2021,2023i附录B合规性信息.........57附录C声明和商标 (61)ii ThinkPad X13Yoga Gen2用户指南了解您的Lenovo笔记本感谢您选择Lenovo®笔记本电脑!我们致力于为您提供最佳解决方案。
ThinkTop D30商品说明书

Signed on behalf of: Alfa Laval Kolding A/S
Global Product Quality Manager
Title
Kolding, Denmark
Place
2022–10–01
Date (YYYY-MM-DD)
DoC Revison_01_102022
Lars Kruse Andersen Name
Lars Kruse Andersen Name
Signature
This Declaration of Conformity replaces Declaration of Conformity dated 2017-03-01
4
1 Declarations of Conformity
UK Declaration of Conformity
2.ays read the manual befor e using the ThinkTop! WARNING Indicates that special procedures must be followed to avoid serious personal injury. CAUTION Indicates that special procedures must be followed to avoid damage to the ThinkTop D30. NOTE Indicates important information to simplify or clarify procedures.
Maintenance:
Always read the technical data thoroughly Always fit the seals between the valve and ThinkTop D30 correctly Never install the ThinkTop D30 before valve or relay is in a safe position Never service the ThinkTop D30 with the valve/actuator under pressure Never clean the ThinkTop D30 with high pressure cleaning equipment Never touch the moving parts if the actuator is supplied with compressed air Never use cleaning agents that will attack the exterior of the ThinkTop D30. Check with your cleaning agent supplier Never clean using Alcohol, Acetone, Chloroform, Methanol, Ammonium chloride and Ammonium Hydroxide etc.
联想V530-15ICB 用户指南和硬件维护手册说明书

附录 B 商标 . . . . . . . . . . . . . 61
© Copyright Lenovo 2019
i
ii V530-15ICB 用户指南和硬件维护手册
第 1 章 概述
本章提供的基本信息可帮助您熟悉计算机。
2 V530-15ICB 用户指南和硬件维护手册
后视图
注:您的计算机型号可能与插图略有不同。
图 2. 后视图
1 麦克风接口 3 DisplayPort® 1.2 输出接口 5 USB 2.0 接口(4 个) 7 音频输入接口 9 以太网接口 11 PCI-Express 卡区域 13 安全锁插槽
2 VGA 输出接口 4 HDMITM 1.4 输出接口 6 音频输出接口 8 串口 10 串口(选配) 12 挂锁环 14 电源线接口
图 5. 锁住计算机外盖
© Copyright Lenovo 2019
9
连接 Kensington 式钢缆锁
可使用 Kensington 式钢缆锁,将计算机固定到桌子或其他非永久性的固定物上。钢缆锁连接到计算 机背面的安全锁插槽。根据所选类型的不同,可用钥匙或密码控制钢缆锁。钢缆锁也锁住了用来打 开计算机外盖的按钮。许多笔记本电脑也使用同一类型的锁。可通过在以下网址搜索 Kensington, 直接从 Lenovo 订购此类钢缆锁: /support
USB 设备 3.1 Gen 1 3.1 Gen 2 3.2
数据速率(Gbit/s) 5 10 20
8 V530-15ICB 用户指南和硬件维护手册
第 3 章 计算机锁
本章介绍了如何使用锁定设备锁定计算机以确保计算机安全。
lenovo 21.5 英寸一体机用户手册(第二版)说明书
Lenovo - "⭞产品编号LS2334A65C6-HCT*-CT第二版(2016年9月)© 版权所有 Lenovo 2016。
LENOVO 产品、数据、计算机软件、及服务基于专项资金开发,作为48 C.F.R. 2.101定义的商品销售给政府机构,并授予政府机构有限的受限制的使用、复制和公开权利。
受限制的有限权利声明:如果产品、数据、计算机软件、或服务按照总务管理器“GSA”合约交付,则其使用、复制、或公开须遵循在合约号GS-35F-05925中制定的限制。
目录安全事项 (iii)一般安全原则 (iii)第1章开始使用..............................................................1-1物品清单............................................................................................................................................................................................... 1-1使用注意事项....................................................................................................................................................................................... 1-2产品概述............................................................................................................................................................................................... 1-3调整类型......................................................................................................................................................................................... 1-3倾斜................................................................................................................................................................................................. 1-3显示器控制..................................................................................................................................................................................... 1-4线缆锁槽......................................................................................................................................................................................... 1-4设置显示器........................................................................................................................................................................................... 1-5连接和打开显示器电源................................................................................................................................................................. 1-5第2章调整和使用显示器......................................................2-1舒适和辅助功能................................................................................................................................................................................... 2-1安排您的工作区域......................................................................................................................................................................... 2-1放置显示器..................................................................................................................................................................................... 2-1关于健康工作习惯的小技巧......................................................................................................................................................... 2-2调整显示器图像 ...................................................................................................................................................................................2-3使用直接访问控件......................................................................................................................................................................... 2-3使用On-Screen Display (OSD,屏幕显示)控件........................................................................................................................ 2-4选择受支持的显示模式................................................................................................................................................................. 2-8了解电源管理 .......................................................................................................................................................................................2-9保养显示器 .........................................................................................................................................................................................2-10卸下显示器底座和支撑臂................................................................................................................................................................. 2-10第3章参考信息..............................................................3-1显示器规格........................................................................................................................................................................................... 3-1故障排除............................................................................................................................................................................................... 3-3手动图像设置................................................................................................................................................................................. 3-4手动安装显示器驱动程序............................................................................................................................................................. 3-5在Windows 7系统中安装显示器驱动程序.............................................................. 3-5在Windows 10系统中安装显示器驱动程序............................................................. 3-6获得进一步帮助.................................................................................... 3-6附录A. 服务和支持...................................................................................................................... A-1在线技术支持...................................................................................................................................................................................... A-1附录B. 声明................................................................................................................................... B-1商标...................................................................................................................................................................................................... B-2《废弃电器电子产品回收处理管理条例》提示性说明.................................................................................................................. B-2中国环境标志产品认证提示性说明.................................................................................................................................................. B-2中国能源效率标识.............................................................................................................................................................................. B-2有害物质.............................................................................................................................................................................................. B-3安全事项一般安全原则有关安全使用计算机方面的提示,请转到:/safety在安装本产品之前,请阅读“安全事项”。
Lenovo LTO6 内部SAS磁带驱动器产品指南(已撤销产品)说明书

Lenovo LTO Generation 6 (LTO6) Internal SAS Tape DriveProduct Guide (withdrawn product)The Half-High LTO Generation 6 (LTO6) SAS Tape Drive is a high-performance, high-capacity data-storage device that is designed to back up and restore open-systems applications. It offers native storage capacity of 2.5 TB per cartridge (6.2 TB at 2.5:1 compression) and a maximum native data transfer rate of up to 160 Mbps (400 Mbps compressed). This enterprise data protection offering has a 5.25” half-height internal form factor for integration into Lenovo tower servers.Figure 1 shows the internal Half High LTO Ultrium Gen 6 Internal SAS Tape Drive.Figure 1. Half High LTO Ultrium Gen 6 Internal SAS Tape DriveDid you know?LTO Generation 6 tape drives feature hardware-based data encryption capabilities and support write once, read many (WORM) cartridges to help protect your data. With WORM cartridges you can store vital data in a non-erasable, non-rewritable format, while AES256 hardware encryption can securely store data to help ensure compliancy with data security, information disclosure, and privacy regulations for data at rest.This drive is compatible with the cartridges of its predecessor, the Half-High LTO Ultrium 5 Tape Drive. It can also read generation 4 cartridges.Click here to check for updatesTable 3. Server support - ThinkSystem (Part 1 of 3)Part NumberDescriptionEdge1S Intel V2AMD V3Intel V34T27A10726ThinkSystem Internal Half HighLTO Gen6 SAS Tape DriveN N N N N N N N N N N N N N N N N N N7T27A01502Tandberg LTO G6 HH InternalN N N N N N N N N N N N N N N N N N NTable 4. Server support - ThinkSystem (Part 2 of 3)Part NumberDescription Dense V32S Intel V2AMD V1Dense V24S V28S4T27A10726ThinkSystem Internal HalfHigh LTO Gen6 SAS Tape DriveN N N N N N N N N N N N N N N N N N NN7T27A01502Tandberg LTO G6 HH Internal N N N N N N N N N N N N N N N N N N NN Table 5. Server support - ThinkSystem (Part 3 of 3)Part NumberDescription4S V11S Intel V12S Intel V1Dense V14T27A10726ThinkSystem Internal Half HighLTO Gen6 SAS Tape DriveN N N N N N N Y N N N N N N N N N N N7T27A01502Tandberg LTO G6 HH InternalN N N N N N N Y N N N N N N N N N N NS E 350 (7Z 46 / 7D 1X )S E 350 V 2 (7D A 9)S E 360 V 2 (7D A M )S E 450 (7D 8T )S E 455 V 3 (7D B Y )S T 50 V 2 (7D 8K / 7D 8J )S T 250 V 2 (7D 8G / 7D 8F )S R 250 V 2 (7D 7R / 7D 7Q )S R 635 V 3 (7D 9H / 7D 9G )S R 655 V 3 (7D 9F / 7D 9E )S R 645 V 3 (7D 9D / 7D 9C )S R 665 V 3 (7D 9B / 7D 9A )S R 675 V 3 (7D 9Q / 7D 9R )S T 650 V 3 (7D 7B / 7D 7A )S R 630 V 3 (7D 72 / 7D 73)S R 650 V 3 (7D 75 / 7D 76)S R 850 V 3 (7D 97 / 7D 96)S R 860 V 3 (7D 94 / 7D 93)S R 950 V 3 (7D C 5 / 7D C 4)S D 665 V 3 (7D 9P )S D 665-N V 3 (7D A Z )S D 650 V 3 (7D 7M )S D 650-I V 3 (7D 7L )S T 650 V 2 (7Z 75 / 7Z 74)S R 630 V 2 (7Z 70 / 7Z 71)S R 650 V 2 (7Z 72 / 7Z 73)S R 670 V 2 (7Z 22 / 7Z 23)S R 635 (7Y 98 / 7Y 99)S R 655 (7Y 00 / 7Z 01)S R 655 C l i e n t O SS R 645 (7D 2Y / 7D 2X )S R 665 (7D 2W / 7D 2V )S D 630 V 2 (7D 1K )S D 650 V 2 (7D 1M )S D 650-N V 2 (7D 1N )S N 550 V 2 (7Z 69)S R 850 V 2 (7D 31 / 7D 32)S R 860 V 2 (7Z 59 / 7Z 60)S R 950 (7X 11 / 7X 12)S R 850 (7X 18 / 7X 19)S R 850P (7D 2F / 2D 2G )S R 860 (7X 69 / 7X 70)S T 50 (7Y 48 / 7Y 50)S T 250 (7Y 45 / 7Y 46)S R 150 (7Y 54)S R 250 (7Y 52 / 7Y 51)S T 550 (7X 09 / 7X 10)S R 530 (7X 07 / 7X 08)S R 550 (7X 03 / 7X 04)S R 570 (7Y 02 / 7Y 03)S R 590 (7X 98 / 7X 99)S R 630 (7X 01 / 7X 02)S R 650 (7X 05 / 7X 06)S R 670 (7Y 36 / 7Y 37)S D 530 (7X 21)S D 650 (7X 58)S N 550 (7X 16)S N 850 (7X 15)Supported HBAsThe following table lists the ThinkSystem host bus adapters that are supported with the tape drives Table 6. Supported ThinkSystem HBAsPart number Feature code Description7Y37A01088AUNL ThinkSystem 430-8i SAS/SATA 12Gb HBA7Y37A01089AUNM ThinkSystem 430-16i SAS/SATA 12Gb HBAThe following table lists the System x host bus adapters that are supported with the tape drives.Table 7. Supported System x HBAsPart number Feature code Description47C8675A3YY N2215 SAS/SATA HBA46M090738756Gb SAS HBA44E8700*35833Gb SAS HBA v2* Withdrawn from marketingFront panelThe following figure shows the front panel of the tape drive.Figure 2. Front panelThe single-character display presents a single-character code for error conditions and informational messages. When the drive is in maintenance mode, the display shows diagnostic or maintenance functions. The SCD dot is off during normal operations; it is used only while the drive is in maintenance mode.Supported software productsRed Hat Enterprise Linux 8.1Y Y Red Hat Enterprise Linux 8.2Y Y Red Hat Enterprise Linux 8.3Y Y Red Hat Enterprise Linux 8.4Y Y Red Hat Enterprise Linux 8.5Y Y Red Hat Enterprise Linux 8.6Y Y Red Hat Enterprise Linux 8.7Y Y Red Hat Enterprise Linux 8.8Y Y Red Hat Enterprise Linux 8.9Y N Red Hat Enterprise Linux 9.0Y Y Red Hat Enterprise Linux 9.1Y Y Red Hat Enterprise Linux 9.2Y Y Red Hat Enterprise Linux 9.3Y N SUSE Linux Enterprise Server 11 SP4N Y SUSE Linux Enterprise Server 11 SP4 with Xen N Y SUSE Linux Enterprise Server 12 SP2N Y SUSE Linux Enterprise Server 12 SP2 with Xen N Y SUSE Linux Enterprise Server 12 SP3N Y SUSE Linux Enterprise Server 12 SP4Y Y SUSE Linux Enterprise Server 12 SP4 with Xen Y Y SUSE Linux Enterprise Server 12 SP5Y Y SUSE Linux Enterprise Server 12 SP5 with Xen Y Y SUSE Linux Enterprise Server 15Y Y SUSE Linux Enterprise Server 15 SP1Y Y SUSE Linux Enterprise Server 15 SP1 with Xen Y Y SUSE Linux Enterprise Server 15 SP2Y Y SUSE Linux Enterprise Server 15 SP2 with Xen Y Y SUSE Linux Enterprise Server 15 SP3Y Y SUSE Linux Enterprise Server 15 SP3 with Xen Y Y SUSE Linux Enterprise Server 15 SP4Y Y SUSE Linux Enterprise Server 15 SP4 with Xen Y Y SUSE Linux Enterprise Server 15 SP5Y Y SUSE Linux Enterprise Server 15 SP5 with Xen Y Y SUSE Linux Enterprise Server 15 with Xen Y Y Ubuntu 22.04 LTSY Y VMware vSphere Hypervisor (ESXi) 6.0 U3N YOperating systems S T 550 (X e o n G e n S T 550 (X e o n G e nVMware vSphere Hypervisor (ESXi) 6.5N Y VMware vSphere Hypervisor (ESXi) 6.5 U1N Y VMware vSphere Hypervisor (ESXi) 6.5 U2Y Y VMware vSphere Hypervisor (ESXi) 6.5 U3Y Y VMware vSphere Hypervisor (ESXi) 6.7N Y VMware vSphere Hypervisor (ESXi) 6.7 U1Y Y VMware vSphere Hypervisor (ESXi) 6.7 U2Y Y VMware vSphere Hypervisor (ESXi) 6.7 U3Y Y VMware vSphere Hypervisor (ESXi) 7.0Y Y VMware vSphere Hypervisor (ESXi) 7.0 U1Y Y VMware vSphere Hypervisor (ESXi) 7.0 U2Y Y VMware vSphere Hypervisor (ESXi) 7.0 U3Y Y VMware vSphere Hypervisor (ESXi) 8.0 U1Y Y VMware vSphere Hypervisor (ESXi) 8.0 U2Y YOperating systemsTable 9. Operating system support for LTO 6 Internal Tape Drive, 7T27A01502Operating systemsMicrosoft Windows Server 2012 R2N Y Red Hat Enterprise Linux 6.10N Y Red Hat Enterprise Linux 6.9N Y Red Hat Enterprise Linux 7.3N Y Red Hat Enterprise Linux 7.4N Y Red Hat Enterprise Linux 7.9Y Y Red Hat Enterprise Linux 8.3Y Y Red Hat Enterprise Linux 8.4Y Y Red Hat Enterprise Linux 8.5Y Y Red Hat Enterprise Linux 8.6Y Y Red Hat Enterprise Linux 8.7Y Y Red Hat Enterprise Linux 8.8Y Y Red Hat Enterprise Linux 8.9Y N Red Hat Enterprise Linux 9.0Y YS T 550 (X e o n G e n S T 550 (X e o n G e n S T 550 (X e o n G e n 2)S T 550 (X e o n G e n 1)Red Hat Enterprise Linux 9.1Y Y Red Hat Enterprise Linux 9.2Y Y Red Hat Enterprise Linux 9.3Y N SUSE Linux Enterprise Server 11 SP4N Y SUSE Linux Enterprise Server 11 SP4 with Xen N Y SUSE Linux Enterprise Server 12 SP2N Y SUSE Linux Enterprise Server 12 SP2 with Xen N Y SUSE Linux Enterprise Server 12 SP3N Y SUSE Linux Enterprise Server 12 SP3 with Xen N Y SUSE Linux Enterprise Server 15Y Y SUSE Linux Enterprise Server 15 SP1Y Y SUSE Linux Enterprise Server 15 SP1 with Xen Y Y SUSE Linux Enterprise Server 15 SP2Y Y SUSE Linux Enterprise Server 15 SP2 with Xen Y Y SUSE Linux Enterprise Server 15 SP3Y Y SUSE Linux Enterprise Server 15 SP3 with Xen Y Y SUSE Linux Enterprise Server 15 SP4Y Y SUSE Linux Enterprise Server 15 SP4 with Xen Y Y SUSE Linux Enterprise Server 15 SP5Y Y SUSE Linux Enterprise Server 15 SP5 with Xen Y Y SUSE Linux Enterprise Server 15 with Xen Y Y VMware vSphere Hypervisor (ESXi) 7.0 U2Y Y VMware vSphere Hypervisor (ESXi) 7.0 U3Y Y VMware vSphere Hypervisor (ESXi) 8.0Y Y VMware vSphere Hypervisor (ESXi) 8.0 U1Y Y VMware vSphere Hypervisor (ESXi) 8.0 U2Y YOperating systems Physical specificationsS T 550 (X e o n G e n S T 550 (X e o n G e nTrademarksLenovo and the Lenovo logo are trademarks or registered trademarks of Lenovo in the United States, other countries, or both. A current list of Lenovo trademarks is available on the Web athttps:///us/en/legal/copytrade/.The following terms are trademarks of Lenovo in the United States, other countries, or both:Lenovo®ServerProven®System x®ThinkSystem®The following terms are trademarks of other companies:Intel® and Xeon® are trademarks of Intel Corporation or its subsidiaries.Linux® is the trademark of Linus Torvalds in the U.S. and other countries.Microsoft®, Hyper-V®, Windows Server®, and Windows® are trademarks of Microsoft Corporation in the United States, other countries, or both.Other company, product, or service names may be trademarks or service marks of others.。
ThinkColour Solution Guidebook说明书
Solution Guidebook:Lenovo Display Control Center -ThinkColourWhy ThinkColourforis a software developed based on theplatform, offered on a range of select models of ThinkVision monitors within our diverse portfolio. Easily enhance and customize your visual experience with ThinkColour.offers comprehensive display management to maximize productivity, from simple adjustments between sources, to specialized color-critical settings for uncompromising quality of work, to easy monitoring and control to ensure efficiency and security -ThinkColour gives you complete control of your display and how you choose to work.We have led the industry in the adoption of standards to support eye health, continually pushing the envelope through purposeful design and relentless innovation, to offer user comfort through ThinkColour.The today faces a brand-new era of extended screen time and a that is heavily reliant on IT knowledge to facilitate day-to-day tasks. To maintain high levels of self-sufficiency, businesses require accessible tools without sacrificing employee time or health.•New research shows that average screen time is now more than per day 2•Over 50% of people who work in front of a computer screen experience digital eye strain 3The drastic increase in device-use has led to the need for employees tomanage IT tasks on their own, as calling IT interrupts their workflow and can create a bottleneck for overall productivity.•Top IT requests include mundane tasks such as “my shortcuts are missing” or “on -screen text is too small” 4•Enterprise workers spend of their time on admin tasks and only of their time performing primary job duties 5Many small business with leaner teams oftendo not have the resources for professional IT support, while small-and medium-sized enterprises (SMEs) represent over90% of the business population.1Whyinstall nowof businesspopulation are SMEswith limited IT of workday time wastedof people suffer from eye strain1 –World Trade Organization2 –Nielsen/Eyesafe3 –YourSightMatters4 –teamviewerWhyWith the rapid shift to accelerated, IT departmentseverywhere have needed to quickly deploy technologies toGiven the influx of remote workers off-site, IT managers face newdynamics and for remote asset management.Companies are also increasing investment in and upgrading outdatedinfrastructure as an imperative.At least 40% of employees will continueworking remotely, making remote assetmanagement a top priority for IT 6ThinkColouran effortless,user-centric softwareThinkColour provides a simple yet intuitive interface for full control of your monitor……without the need for extensive IT support for set -up. With its remote management capabilities which are supported by third party central management solutions such as Microsoft Endpoint Manager, IT managers are also better equipped to ensure that assets are secure and Display software is an integral part in utilizing a monitor’s full range of capabilities.ThinkColour is a one-stop tool to further enhance and elevate your user experience with our innovative ThinkVision monitors , providing premium and exclusive features and functions thatempower users with intuitive tools to maximize productivity in the workplace.Designed to be easy to understand and use,ThinkColour is a graphical interface for quick control of display attributes, accurate and easy color setting and calibration, simple management between sources, and utilities for better and smarter functionality.Enhanced ergonomic features prioritize user health and optimize viewing comfort.L e n o v o M o n i t o rDesigners, Editors & Advanced Users •Inaccurate, sub-standard color display •Limited options for display customization •Need to change resolution or color settings with ease•Need to manage a multi-screen setup •Time wasted re-adjusting settings or profile on different monitors usesCustomer pain pointsEveryday Employees•Complex setup that requires IT support•Difficulty changing settings or making quick adjustments •Cluttered desktop limits productivity •Eye strain over prolonged useIT Managers•Inability to remotely manage monitor fleet •Time wasted onmanual monitoring and reporting •Complicated process for batch adjustment •Need to streamline work with autoinstallation and updatesEveryday EmployeesAdvanced UsersIT ManagersL e n o v o M o n i t o rWhatThinkColour offersCREATING THE IDEAL WORKPLACE for everyday employees•Simplify the set-up•Personalize your settings and make quick adjustments •Multi-task easily with multiple screensOPTIMIZING THE VIEWING EXPERIENCE for advanced users, editors, or designers•Higher performance and customization •color correction and calibration•Create and save multiple scenarios for different use casesMANAGING THE MONITOR FLEET*for IT managers•Facilitate information gathering and reporting •Remote asset management*•Maximize efficiency, control multiple monitorsThinkColoura powerful, smartdisplay softwareto maximize efficiency and productivitySIMPLE INTERFACE FOR EASE OF USEThinkColour is designed to simplify the user experience,without compromising quality and reliability of work.•Basic to Advanced Settings for display adjustments or assistance found on home page•User-friendly interface that is easy to understand•Accessible manual ensures any employee can fully utilize software capabilities Intelligent functions for productivityThinkColour is smarter technology that ‘Thinks’ for you –learning from common use patterns to become your personal assistant. From its powerful desktop partitioning, PiP/PbP, Mouse Positioning, Task Scheduler, and other intuitive functions, its features are designed to streamline workflow and achieve multiple tasks with ease.EASY COLOUR ADJUSTMENTThinkColour helps users see true color with the ability to customize color gamut & temperature, gamma, RGB gain, and color tuning for full creative control. ENHANCED ERGONOMIC FEATURES ThinkColour does not compromise health –its low bluelight mode ensures maximum comfort and eye health over prolonged periods of use.An optional reminder prompts users with adjustment options so you’re never in the dark about your screen time.REMOTE ASSET MANAGEMENT AND SECURITY ThinkColour offers the tools enabling IT managers to manage assets remotely via the control and support of third party central management solutions such as Microsoft Endpoint Manager. This powerful software ensures seamless collaboration between devices of your desktop or office ecosystem.L e n o v o M o n i t o rThe graphical interface of ThinkColour is designed to be simple and easy to use, so users can skip a lengthy IT session or training to create their personalized setup.ELEVATE YOUR DISPLAY EXPERIENCE WITH EASE•Find basic info and user guide at ThinkColour home page•Access hot features and navigator to update and change features•Auto match with the default language of your OS (supports 33 languages)•Make easy adjustments by mouse (brightness &contrast, video source, scenario modes, volume control, USB charging, and more)•Firmware update optionDisplay software that simplifies your workLe n o v o M o n i t o rMULTI-TASKING MADE SIMPLE•Effectively layout your task Windows with Desktop Partition-Set partitions crossing multiple monitors-Drag app window and put into desired destination window -Place app window into partition crossing multiple monitors •Set the Picture-in-Picture and Picture-by-Picture (PiP/PbP) with simple clicks, for multiple sources-Move PiP anywhere and resize window -Set PbP to view two windows side by side •Easily apply configuration to multiple monitors with Multi-monitor Sync•Automatic Cross Screen function –automatically move mouse cross border from one screen to anotherCOLLABORATION TOOLS•KVM Switch Enables two PCs to use one set of monitor, keyboard, and mouse-Switch video, keyboard, and mouse simultaneously -Set video source and USB source for every PC -Custom shortcut options or double-click CTRLL e no v o M o n i t o rThinkColour is designed to better understand and prioritize user needs and preferences, so you can spend more time focusing on the tasks at hand.SOFTWARE THAT LEARNS AS YOU USE•ThinkColour’s self-learning UI acquires from user pattern and preferences while maintaining user privacy and security, then automatically helps prioritize frequently used hot features by displaying them on the home page for quick access •Work undisturbed –ThinkColour doesn’t disrupt yourworkflow with messages or notifications, and alerts can be turned on or offTOOLS FOR ASSISTANCE•Mouse Positioning function -locate your mouse with a ‘shake’•Print Assistant •Task Scheduler•Automatic changes to display settings based on saved profiles and set timesDisplay software that simplifies your workL e n o v o M o n i t o rCUSTOMIZE YOUR DISPLAY•Save settings to your PC, apply, import, and export User Profiles to other PCs with ThinkColour •Set shortcut keys for often-used functions•Customize hot features displayed on home page•Easily adjust resolution, refresh rate, and response timeSMARTER FUNCTIONALITY•Intelligent functions for power management-Smart Power function helps manage and optimize device charging-Smart Energy automatically lights up the monitor with your presence-Energy Saving Mode helps lower costs •Sound Redirect ensures that audio goes to the right deviceLe n o v o M o n i t o rComplete control of your color paletteThinkColour can help users whose jobs depend on color-critical settings, ensuring uncompromising quality and reliability for their work.Never miss a shade, while ensuring full control of your display elevates your work to next level efficiency.EASY COLOUR ADJUSTMENT•Multi-color gamut & color temperature, color tuning, gamma, RGB gain, temperature customization •User-customized modes•Adaptive color function to auto-match color settings on different applications or tasks•Real-time adjustment to fine-tune colors with just your mouse •HDR mode for more realistic visual effectsL e n o v o M o n i t o rEnhanced for healthy workingThinkColour puts the user first with enhanced ergonomic features to ensure a healthy working environment over prolonged periods of use .EYE-HEALTH PROTECTION•Low blue light mode reduces eye strain•Health Reminders prompts user to take a break at set time intervals and can be switched on/off•Color Filter function changes the colour settings that make the display easier to see for those with colour weakness or blindnessGET THE PERFECT ANGLE•Rotate the Monitor with ONE click –find what suits your posture or usage scenarioL e n o v o M o n i t o rRemote asset management for IT managersThinkColour offers a smart ,secure , and efficient asset management platform* designed for remote working or managing many monitors in a large office.STAY SECURE, FROM ANYWHERE•Remote asset management-Lock monitor-Disable OSD and USB/Video ports-Turn PC(s) on/off (*when connected by USB-C) -Manage display settings -Apply software updates •Get notified when monitor is disconnected•ThinkColour prompts IT managers to make remote firmware updates•Information obtaining & monitoring for model name, connected status, running time •Asset Report generationBoost EfficiencyView all monitors, apply adjustments/ settings to selected monitorsAdjust settings as a batch deploymentEnable scheduled settings*this function is supported by third party central management solutions such as Microsoft Endpoint ManagerL e n o v o M o n i t o rEveryday employees•Use monitor as hub for extension to other devices•Layout windows for multi-tasking •Manage multiple screens•Make quick adjustments via mouse •Smart Power & devicecharging when connected via USB-C •Rotate screen for different usage scenarios •Maintain eye health after prolonged screen timeDesigner / Editor Advanced Users•Color calibration and customization for visual or creative applications •Collaboration between multiple sources, PiP/PbP•Store personalizedsettings for easy access •Update with latest features IT Managers•Information obtaining and monitoring •Asset report generating•Adjust monitor settings or deploy new firmware as a batch•Enable scheduled settings •Remotely lock or disable monitors/portsUse CasesEveryday EmployeesAdvanced UsersIT Managersthanks。
联想Yoga S730-13IML 用户指南说明书

Lenovo Yoga S730-13IML 用户指南用前必读使用本文档及其支持的产品之前,请务必先阅读和了解以下信息:•第25页附录A“重要安全信息”•《安全与保修指南》•《设置指南》第一版(2019年5月)©Copyright Lenovo2019.目录关于本文档 (iii)第1章了解计算机 (1)前视图 (1)底座视图 (2)左视图 (3)右视图 (4)功能和规格 (5)USB传输率声明 (5)运行环境 (5)第2章开始使用您的计算机 (7)Windows10入门 (7)Windows帐户 (7)Windows用户界面 (9)Lenovo Vantage和联想电脑管家 (10)连接到Wi-Fi网络 (10)忘记Wi-Fi网络 (10)打开或关闭飞行模式 (10)与计算机交互 (11)键盘热键 (11)第3章了解您的计算机 (13)连接到外接显示设备 (13)连接到有线显示设备 (13)连接到无线显示设备 (13)管理电源 (13)检查电池状态 (14)为电池充电 (14)检查电池温度 (14)设置电源按钮行为 (14)更改或创建电源计划 (14)设置性能模式 (15)在UEFI/BIOS设置实用程序中更改设置..15 UEFI/BIOS设置实用程序是什么 (15)打开UEFI/BIOS设置实用程序 (15)更改启动顺序 (15)更改热键模式 (15)启用或禁用always-on (15)在UEFI/BIOS设置实用程序中设置密码..16密码类型 (16)设置管理员密码 (16)更改或删除管理员密码 (16)设置用户密码 (17)启用开机密码 (17)设置硬盘密码 (17)更改或删除硬盘密码 (18)重置或恢复Windows (18)Windows10恢复选项 (18)Windows系统还原 (18)重置Windows (19)创建恢复驱动器 (19)使用恢复驱动器恢复或重置Windows (20)第4章帮助和支持 (21)常见问题 (21)自助资源 (21)致电Lenovo (23)联系Lenovo之前 (23)Lenovo客户支持中心 (23)购买附加服务 (24)附录A重要安全信息 (25)附录B辅助功能和人体工程学信息 (37)附录C合规性信息 (41)附录D声明和商标 (55)©Copyright Lenovo2019iii Lenovo Yoga S730-13IML用户指南关于本文档•本文档中插图的外观可能与您的产品不同。
联想 Lenovo G27-30 用户指南

Lenovo G27-30用户指南产品编号C22270FG066E7-G*C2-WW第一版(2022年1月)©2022 年联想版权所有。
联想产品、数据、计算机软件、及服务等均基于专项资金开发,作为48 C.F.R. 2.101定义的商品销售给政府机构,并授予政府机构有限的受限制的使用、复制和公开权利。
受限制的有限权利声明:如果产品、数据、计算机软件、或服务按照美国总务管理局“GSA”合约交付,则其使用、复制、或公开须遵循在合约号GS-35F-05925中规定的限制。
目录安全信息 (iii)一般安全原则 (iii)第1章开始使用.......................................................................1-1物品清单................................................................................................1-1使用注意事项............................................................................................1-1产品概述................................................................................................1-2调整类型 ............................................................................................1-2倾斜 ................................................................................................1-2高度调整 ............................................................................................1-2显示器控制 ..........................................................................................1-3线缆锁槽 ............................................................................................1-3设置显示器..............................................................................................1-4连接和开启显示器电源 ................................................................................1-4注册您的选件............................................................................................1-8第2章调整和使用此显示器.............................................................2-1舒适和辅助功能..........................................................................................2-1安排您的工作区域 ....................................................................................2-1放置显示器 ..........................................................................................2-1关于健康工作习惯的小技巧 ............................................................................2-2调整显示器图像..........................................................................................2-3使用直接访问控件..........................................................................................................................................................................2-3使用On-Screen Display(OSD,屏幕显示)控件......................................................................................................................2-4选择支持的显示模式 ..................................................................................2-7了解电源管理............................................................................................2-8保养显示器..............................................................................................2-9卸下显示器底座和支撑臂..................................................................................2-9壁挂(可选)............................................................................................2-9第3章参考信息.......................................................................3-1显示器规格..............................................................................................3-1故障排除................................................................................................3-3手动安装显示器驱动程序 ..............................................................................3-4在Windows 10系统中安装显示器驱动程序 ..............................................................3-4在Windows 11系统中安装显示器驱动程序 ..............................................................3-5获取进一步帮助 ....................................................................................3-5附录A. 服务和支持...................................................................A-1注册您的选件............................................................................................A-1在线技术支持............................................................................................A-1电话技术支持............................................................................................A-1附录B. 声明.........................................................................B-1回收信息................................................................................................B-2商标....................................................................................................B-2电源线和电源适配器......................................................................................B-2《废弃电器电子产品回收处理管理条例 》提示性说明.........................................................B-3中国环境标志产品认证提示性说明..........................................................................B-3中国能源效率标识........................................................................................B-3有害物质................................................................................................B-3 China RoHS 合格评定制度标识.............................................................................B-4安全信息一般安全原则有关安全使用计算机方面的帮助提示,请转到:/safety在安装此产品之前,请阅读“安全信息”。
联想 Lenovo Y27-30 用户指南
Lenovo Y27-30用户指南产品编号F22270FY066F8-GCS3-CB初版(2022 年 6 月)©版权所有 Lenovo 2022。
LENOVO 产品、数据、计算机软件、及服务基于专项资金开发,作为 48 C.F.R. 2.101 定义的商品销售给政府机构,并授予政府机构有限的受限制的使用、复制和公开权利。
受限制的有限权利声明:如果产品、数据、计算机软件或服务按照美国总务管理局“GSA”合约交付,则其使用、复制、或公开须遵循在合约号 GS-35F-05925 中规定的限制。
目录产品编号 (i)安全事项 (iii)一般安全原则 (iii)第 1 章.开始使用....................................................................................................................................1-1物品清单 .....................................................................................................................................................................................1-1使用注意事项..............................................................................................................................................................................1-2产品概述 .....................................................................................................................................................................................1-2调整类型 ................................................................................................................................................................................1-2倾斜........................................................................................................................................................................................1-2旋转........................................................................................................................................................................................1-3高度调整 ................................................................................................................................................................................1-3显示器枢轴.............................................................................................................................................................................1-3显示器控制.............................................................................................................................................................................1-4线缆锁槽 ................................................................................................................................................................................1-4设置显示器 .................................................................................................................................................................................1-5连接和打开显示器电源...........................................................................................................................................................1-5注册您的选件..............................................................................................................................................................................1-9第 2 章.调整和使用显示器 .....................................................................................................................2-1舒适和辅助功能 ..........................................................................................................................................................................2-1安排您的工作区域..................................................................................................................................................................2-1放置显示器.............................................................................................................................................................................2-1关于健康工作习惯的小技巧 ...................................................................................................................................................2-2辅助功能信息 .........................................................................................................................................................................2-2调整显示器图像 ..........................................................................................................................................................................2-3使用直接访问控件..................................................................................................................................................................2-3使用屏幕显示(OSD)控件...................................................................................................................................................2-4选择受支持的显示模式...........................................................................................................................................................2-7了解电源管理..............................................................................................................................................................................2-8电源管理模式 .........................................................................................................................................................................2-8保养显示器 .................................................................................................................................................................................2-9卸下显示器底座和支架 ...............................................................................................................................................................2-9壁挂(可选)..............................................................................................................................................................................2-9第 3 章.参考信息....................................................................................................................................3-1显示器规格 .................................................................................................................................................................................3-1故障排除 .....................................................................................................................................................................................3-3手动安装显示器驱动程序 .......................................................................................................................................................3-5在 Windows 7 系统中安装显示器驱动程序 .......................................................................................................................3-5在 Windows 10 系统中安装显示器驱动程序 .....................................................................................................................3-6在 Windows 11 系统中安装显示器驱动程序 .....................................................................................................................3-7获得进一步帮助.................................................................................................................................................................3-7服务信息 .....................................................................................................................................................................................3-8客户责任 ................................................................................................................................................................................3-8附录 A. 服务和支持 ..............................................................................................................................A-1电话技术支持............................................................................................................................................................................A-1附录 B. 声明 .........................................................................................................................................B-1商标 ...........................................................................................................................................................................................B-2电源线和电源适配器..................................................................................................................................................................B-2《废弃电器电子产品回收处理管理条例》提示性说明.............................................................................................................B-2中国环境标志产品认证提示性说明 ............................................................................................................................................B-2中国能源效率标识 .....................................................................................................................................................................B-2有害物质 ....................................................................................................................................................................................B-3 China RoHS 合格评定制度标识 ................................................................................................................................................B-3安全事项一般安全原则有关安全使用计算机方面的提示,请转到:/safety在安装本产品之前,请仔细阅读安全注意事项。
联想小新Pro-13 2019、Pro-13 2020、Pro-13S 2020用户指南

用户指南Lenovo小新Pro-132019,Lenovo小新Pro-13S2019,Lenovo小新Pro-132020,Lenovo小新Pro-13S2020用前必读使用本文档及其支持的产品之前,请务必先阅读和了解以下信息:•第29页附录A“重要安全信息”•《安全与保修指南》•《设置指南》第一版(2019年12月)©Copyright Lenovo2019.有限权利声明:如果数据或软件依照美国总务署(GSA)合同提供,其使用、复制或公开受编号为GS-35F-05925的合同的条款的约束。
目录关于本文档 (iii)第1章了解计算机 (1)前视图 (1)底座视图 (2)左视图 (3)右视图 (4)底视图 (5)功能部件和规格 (6)USB传输速率声明 (7)运行环境 (7)第2章开始使用您的计算机 (9)Windows10入门 (9)Windows帐户 (9)Windows用户界面 (11)Lenovo Vantage和联想电脑管家 (12)连接到Wi-Fi网络 (12)忽略Wi-Fi网络 (12)打开或关闭飞行模式 (12)与计算机交互 (13)键盘热键 (13)第3章了解您的计算机 (15)智能功能 (15)在Lenovo Vantage中定制智能功能 (15)连接到外接显示设备 (15)连接到有线显示设备 (16)连接无线显示设备 (16)管理电源 (16)检查电池状态 (16)为电池充电 (17)检查电池温度 (17)设置电源按钮行为 (17)更改或创建电源计划 (17)设置性能模式 (17)更改UEFI/BIOS Setup Utility中的设置..17 UEFI/BIOS Setup Utility是什么 (17)打开UEFI/BIOS Setup Utility (18)更改启动顺序 (18)更改Hotkey Mode (18)启用或禁用Always-on (18)在UEFI/BIOS Setup Utility中设置密码..18密码类型 (18)设置管理员密码 (19)更改或删除管理员密码 (19)设置用户密码 (20)启用开机密码 (20)设置硬盘密码 (20)更改或删除硬盘密码 (20)重置或还原Windows (21)Windows10恢复选项 (21)Windows系统还原 (21)重置Windows (22)创建恢复驱动器 (22)使用恢复驱动器还原或重置Windows (22)第4章帮助和支持 (25)常见问题 (25)自助资源 (25)CRU是什么? (26)适用于您产品型号的CRU (26)致电Lenovo (27)联系Lenovo之前 (27)Lenovo客户支持中心 (27)购买附加服务 (28)附录A重要安全信息 (29)附录B辅助功能和人体工程学信息 (41)附录C合规性信息 (45)附录D声明和商标 (59)©Copyright Lenovo2019iii用户指南关于本文档•本文档中插图的外观可能与您的产品不同。
联想 Yoga Pro 14c 2021 用户指南

用户指南Yoga Pro14c2021用前必读使用本文档及其支持的产品之前,请务必先阅读和了解以下信息:•第35页附录A“重要安全信息”•《安全与保修指南》•《设置指南》第一版(2020年9月)©Copyright Lenovo2020.有限权利声明:如果数据或软件依照美国总务署(GSA)合同提供,其使用、复制或公开受编号为GS-35F-05925的合同的条款的约束。
目录关于本指南 (iii)第1章了解计算机 (1)前视图 (1)底座视图 (2)左视图 (3)右视图 (4)底视图 (5)功能部件和规格 (6)USB传输速率声明 (7)运行环境 (7)第2章开始使用您的计算机 (9)Windows10入门 (9)Windows帐户 (9)Windows桌面 (11)Windows更新 (12)Lenovo Vantage和联想电脑管家 (12)连接到网络 (12)连接到有线网络 (12)连接到Wi-Fi网络 (12)Novo按钮菜单 (13)打开Novo按钮菜单 (13)Yoga模式 (13)打开屏幕旋转锁定 (15)使用Windows触摸键盘 (15)打开或关闭平板电脑模式 (16)与计算机交互 (16)键盘热键 (16)使用多点触控式屏幕 (17)Lenovo Integrated Pen (18)第3章了解您的计算机 (23)管理电源 (23)检查电池状态 (23)为电池充电 (23)检查电池温度 (23)设置电源按钮行为 (23)更改或创建电源计划 (23)设置性能模式.............24更改UEFI/BIOS Setup Utility中的设置..24 UEFI/BIOS Setup Utility是什么.. (24)打开UEFI/BIOS Setup Utility (24)更改启动顺序 (24)更改热键模式 (24)启用或禁用Always-on (24)在UEFI/BIOS Setup Utility中设置密码..25密码类型 (25)设置管理员密码 (25)更改或删除管理员密码 (25)设置用户密码 (26)启用开机密码 (26)设置硬盘密码 (26)更改或删除硬盘密码 (27)重置或还原Windows (27)Windows10恢复选项 (27)Windows系统还原 (27)重置Windows (28)创建恢复驱动器 (28)使用恢复驱动器还原或重置Windows (29)第4章帮助和支持 (31)常见问题 (31)自助资源 (31)CRU是什么? (32)适用于您产品型号的CRU (32)致电Lenovo (33)联系Lenovo之前 (33)Lenovo客户支持中心 (33)购买附加服务 (34)附录A重要安全信息 (35)附录B辅助功能和人体工程学信息 (45)附录C合规性信息 (49)附录D声明和商标 (63)©Copyright Lenovo2020iii用户指南关于本指南•本指南适用于下面列出的Lenovo产品型号。
联想m3a780m主板说明书
联想m3a780m主板说明书联想am3 m3a780m m3a760m v 主板1.01CFM1D3M支持DDR3 显示器上海电脑硬件电脑周边主板上海蓝光上海蓝光联想AM3主板M3A780MM3A760MV全新联想am3 m3a780m 760 ddr3主板店全新联想AM3主板M3A780M 联想760主板M3A760MCM3A76ME主板DDR3 惠普显示器广东广州电脑硬件电脑周边主板恒通三佳戴尔联想联想m3a780m v1 . 0启天主板显示器广东佛山电脑硬件电脑周边主板琪琪668321戴尔联想惠普1号店联想M3A780MV1.0启天M5600M5650M5690M560EM565EAM3主板联想am3 m3a780m m3a760m v 主板1.01CM3A76ME支持DDR3支持HDMI 显示器江苏无锡电脑硬件电脑周边主板chichi201314无锡万力电脑联想AM3主板M3A780MM3A760MV联想am3 780g集成显卡ddr3内存主板显示器上海电脑硬件电脑周边主板上海芯宇Lenovo联想配件联想AM3主板780G集成显卡DDR3内存锋行K305K320K3R1M3A780M原装联想m3a780m v 1.0启天主板1.0主板启天M5650扬天主板AM3接口780主板显示器江苏无锡电脑硬件电脑周边主板chichi201314无锡万力电脑原装联想M3A780MV全新盒装联想am3主板LM3LM2K320主板AM3 显示器广东广州电脑硬件电脑周边主板雄业long乐购DIY全新盒装联想780GM3A780MM3A760MRS780联想am3 m3a780m m3a760m原装拆机显示器安徽合肥电脑硬件电脑周边主板jsphard捷贝电脑店联想AM3原装拆机M3A780MM3A760M联想F558F518M5650K305F2905保真原装联想am3 780g集成显卡主板2005联想配件汇天店保真原装联想AM3主板780G集成显卡DDR3内存M3A780M11200699 显示器浙江杭州电脑硬件电脑周边主板百年数码联想am3 m3a780m m3a760m v 主板1.01RS780Q 显示器江苏无锡电脑硬件电脑周边主板daihongxun一一电脑店联想AM3主板M3A780MM3A760MV LM支持DDR3支持HDMI联想m3a780m v1 . 0启天主板显示器湖南长沙电脑硬件电脑周边主板魅力无限168168誉诚电脑电子配件联想M3A780MV1.0启天M5600M5650M5690M560EM565EAM3主板联想m3a780m cm3a76me家悦主板显示器北京电脑硬件电脑周边主板中关村华众新芯hzxx联想电脑配件专供联想M3A780MCM3A76ME家悦E2595R3123013615432R672主板联想am3 780g集成显卡ddr3内存主板2005联想配件汇天店联想AM3主板780G集成显卡DDR3内存锋行K305K320K3R1M3A780M 显示器浙江杭州电脑硬件电脑周边主板百年数码全新联想thinkcentre a63主板LM689Y1256 显示器广东深圳电脑硬件电脑周边主板枚枚2011硕丰电脑全新联想ThinkCentreA63主板M3A780MRS780Q联想m3a780m v1 . 0启天主板店联想M3A780MV1.0启天M5600M5650M5690M560EM565EAM3主板惠普显示器广东广州电脑硬件电脑周边主板恒通三佳戴尔联想联想m3a780m am3家悦301 3615主板显示器北京电脑硬件电脑周边主板youyanhong2008北京联想电脑配件批发联想M3A780MAM3主板家悦E2595R3123013615432R672主板联想am3 m3a780m 760 ddr3主板显示器广东广州电脑硬件电脑周边主板雄业long乐购DIY联想AM3主板M3A780M联想760主板M3A760MCM3A76ME主板DDR3联想am3 780g集成显卡ddr3内存主板店联想AM3主板780G集成显卡DDR3内存锋行K305K320K3R1M3A780M 惠普显示器广东广州电脑硬件电脑周边主板恒通三佳戴尔联想全新联想m75e m76锋行k305启天主板显示器广东深圳电脑硬件电脑周边主板枚枚2011硕丰电脑全新联想M75EM76锋行K305启天M5650主板M3A780M03T7012。
联想 ThinkVision P23i-10快速安装指南
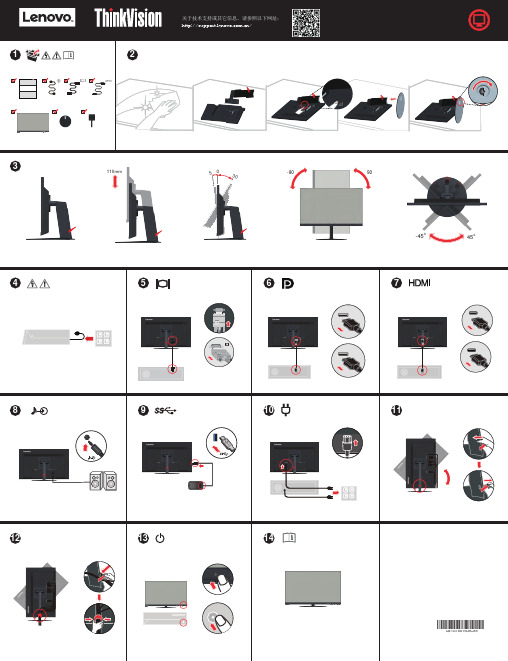
1340°-45o45o 110mmQ41G78S1608C88-90°90°联想产品标准保修承诺[D]601041-N E G -W L :N 本文件的任何内容均不会排除和限制消费者的权利,也不会减轻或免除我们对消费者的责任。
如相关法律对本文件规定事项另有要求,在法律规定的范围内,按法律规定执行。
本文件中所称的“我们”是指联想、产品销售商及服务提供商。
您购买的产品在保修期内将不会发生因不符合质量要求导致的性能故障。
本文件项下的保证是我们就产品作出的全部保证,将取代所有其他明示或默示的保证或条件,包括但不限于默示的关于适销性和适用于某些特定用途的保证或条件。
上述保证仅适用于用户为自己使用目的而购买的出厂配置的联想品牌产品。
日的,保修期自实际交付日起算。
但无论如何,产品保修期的起算日最迟不应晚于规定的宽限期届满日(见产品保修信息)。
产品或部件经修理或更换后,在剩余保修期内继续享有保修,剩余保修期不足三(3)个月的按三(3)个月计算,但保修期在一(1)年以下的产品和/或部件,剩余保修期不足三十(30)天的按三十(30)天计算。
获取保修服务,也可拨打产品服务电话由我们为您安排服务。
您应向我们指定的或距离您最近的服务商,按产品所享有的或我们指定的服务类型申请服务。
除非事先明确需由您承担的费用外,我们将不就保修服务向您收费。
申请保修时,您应提供清晰、完整和准确的①销售发票和②保修卡,这是您有权获得保修的凭证。
在适用的情况下,在提供服务前,您应:①遵守指定的服务申请程序;②备份产品中包含的所有程序和数据或确保它们的安全;③提供必要的支持和配合以便我们提供服务,包括提供系统密钥或口令及必要的场地等;④从产品中删除所有受法律保护的保密和个人信息;如您不能删除产品中的此类信息,您需在申请保修时告知服务提供方。
如产品文件有要求,你应及时按规定的流程对产品进行注册。
可行的情况下,我们可能会尝试通过网络、电话或其他远程帮助方式来诊断和解决您的产品故障。
- 1、下载文档前请自行甄别文档内容的完整性,平台不提供额外的编辑、内容补充、找答案等附加服务。
- 2、"仅部分预览"的文档,不可在线预览部分如存在完整性等问题,可反馈申请退款(可完整预览的文档不适用该条件!)。
- 3、如文档侵犯您的权益,请联系客服反馈,我们会尽快为您处理(人工客服工作时间:9:00-18:30)。
2007/6/29
1
目录
基本元素使用规范
Lenovo Logo使用规范 ……………………………………… 04 ThinkPad Logo使用规范 …………………………………… 05 标准颜色 ……………………………………………………… 06 字体 …………………………………………………………… 07 主题墙组合 …………………………………………………… 08 店面楣板组合 ………………………………………………… 09 形象墙组合 …………………………………………………… 10 产品说明牌 …………………………………………………… 12 产品托架 ……………………………………………………… 13 APS托架 ……………………………………………………… 16 电脑台 ………………………………………………………… 17 产品资料架 …………………………………………………… 19
一字型店面布局
效果图 …………………………………………………………. 42
环岛型店面布局
效果图 …………………………………………………………. 45
店面元素制作规范
固定装饰物平面图 …………………………………………… 48 施工电图 ……………………………………………………… 49 门头平面施工图 ……………………………………………… 50 包拄施工图 …………………………………………………… 52 橱窗施工图 …………………………………………………… 55 展台施工图 …………………………………………………… 56 吊顶造型施工图 ……………………………………………… 60 墙面施工图 …………………………………………………… 61
标准店面布局
平面图…………………………………………………………. 21 效果图 …………………………………………………………. 22
U型店面布局
平面图…………………………………………………………. 32 效果图 …………………………………………………………. 33
L型店面布局
效果图 …………………………………………………………. 38
2007/6/29
2
基本元素使用规范
2007/6/29
3
基本元素使用规范
Lenovo标志用法
2007/6/29
4
基本元素使用规范
ThinkPad标志用法
2007/6/29
5
基本元素使用规范
标准颜色
2007/6/29
6
基本元素使用规范
字体
2007/6/29
7
基本元素使用规范
主题墙组合
2007/6/29
8
基本元素使用规范
店面楣板组合
2007/6/29
9
基本元素使用规范
形象墙组合
2007/6/29
10
形象墙组合A
由于新品的发布以上文字和图片近期还将更新,请使用更新后的设计,以上内容仅供参考
形象墙组合B
产品说明牌
产品托架
产品托架
产品托架
APS托架
电脑台
电脑台
产品资料架
标准店面布局
2007/6/29
21
标准店面布局
平面图
2007/6/29
22
标准店面布局
效果图
2007/6/29
23
标准店面布局
效果图
2007/6/29
24
标准店面布局
2007/6/29
25
标准店面布局
效果图
2007/6/29
26
标准店面布局
效果图
2007/6/29
27
标准店面布局
效果图
2007/6/29
28
标准店面布局
效果图
2007/6/29
29
标准店面布局
效果图
2007/6/29
30
标准店面布局
效果图
2007/6/29
31
U型店面布局
2007/6/29
32
U型店面布局
平面图
2007/6/29
33
U型店面布局
效果图
2007/6/29
34
U型店面布局
效果图
2007/6/29
35
U型店面布局
效果图
2007/6/29
36
U型店面布局
效果图
2007/6/29
37
L型店面布局
2007/6/29
38
L型店面布局
效果图
2007/6/29
39
L型店面布局
效果图
2007/6/29
40
L型店面布局
效果图
2007/6/29
41
一字型店面布局
2007/6/29
42
一字型店面布局
效果图
2007/6/29
43
一字型店面布局
效果图
2007/6/29
44
环岛型店面布局
2007/6/29
45
环岛型店面布局
效果图
2007/6/29
46
环岛型店面布局
效果图
2007/6/29
47
店面元素制作规范
2007/6/29
48
店面元素制作规范
固定装饰物体平面位置图
2007/6/29
49
店面元素制作规范
施工电图
2007/6/29
50
。
