打印机字体测试
EPSON(爱普生)常见打印机的自检与设置方法
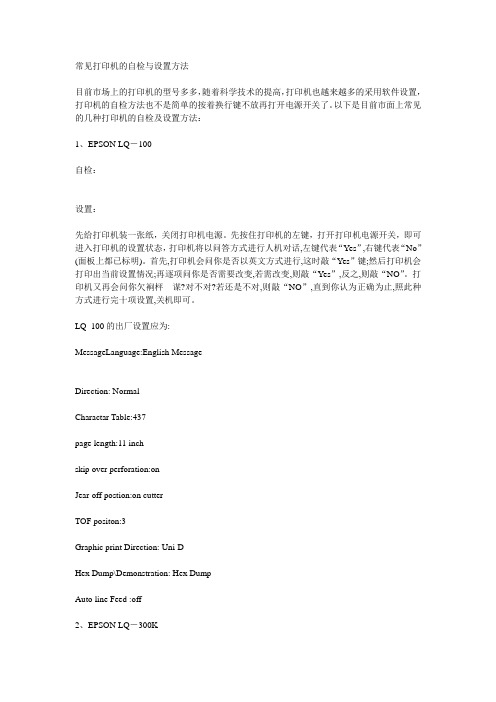
常见打印机的自检与设置方法目前市场上的打印机的型号多多,随着科学技术的提高,打印机也越来越多的采用软件设置,打印机的自检方法也不是简单的按着换行键不放再打开电源开关了。
以下是目前市面上常见的几种打印机的自检及设置方法:1、EPSON LQ-100自检:设置:先给打印机装一张纸,关闭打印机电源。
先按住打印机的左键,打开打印机电源开关,即可进入打印机的设置状态,打印机将以问答方式进行人机对话,左键代表“Yes”,右键代表“No”(面板上都已标明)。
首先,打印机会问你是否以英文方式进行,这时敲“Yes”键;然后打印机会打印出当前设置情况;再逐项问你是否需要改变,若需改变,则敲“Yes”,反之,则敲“NO”。
打印机又再会问你欠裥枰谋?对不对?若还是不对,则敲“NO”,直到你认为正确为止,照此种方式进行完十项设置,关机即可。
LQ_100的出厂设置应为:MessageLanguage:English MessageDirection: NormalCharactar Table:437page length:11 inchskip over perforation:onJear-off postion:on cutterTOF positon:3Graphic print Direction: Uni-DHex Dump\Demonstration: Hex DumpAuto line Feed :off2、EPSON LQ-300K3、EPSON LQ-1600K自检先按住“换行“键(ASCII码方式)或“换页“键(汉字方式),打开打印机电源开关,打印机开始自检,临时停止按“联机“键(暂停),继续再次按“联机“键,关掉打印机电源开关结束自检。
DIP开关设置:SW1_1,SW1_2,SW1_3为国际字符集,其中:ON,ON,ON 为美国; ON,ON,OFF为法国;ON,OFF,ON 为德国; ON,OFF,OFF为英国;OFF,ON,ON 为丹麦; OFF,ON,OFF为瑞典;OFF,OFF,ON 为意大利; OFF,OFF,OFF为西班牙。
打印机字体测试
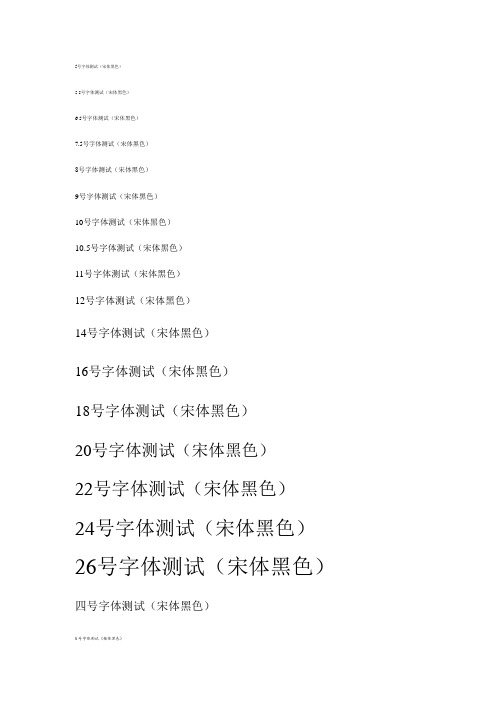
5号字体测试(宋体黑色)5.5号字体测试(宋体黑色)6.5号字体测试(宋体黑色)7.5号字体测试(宋体黑色)8号字体测试(宋体黑色)9号字体测试(宋体黑色)10号字体测试(宋体黑色)10.5号字体测试(宋体黑色)11号字体测试(宋体黑色)12号字体测试(宋体黑色)14号字体测试(宋体黑色)16号字体测试(宋体黑色)18号字体测试(宋体黑色)20号字体测试(宋体黑色)22号字体测试(宋体黑色)24号字体测试(宋体黑色)26号字体测试(宋体黑色)四号字体测试(宋体黑色)5.5号字体测试(楷体黑色)6.5号字体测试(楷体黑色)7.5号字体测试(楷体黑色)8号字体测试(楷体黑色)9号字体测试(楷体黑色)10号字体测试(楷体黑色)10.5号字体测试(楷体黑色)11号字体测试(楷体黑色)12号字体测试(楷体黑色)14号字体测试(楷体黑色)16号字体测试(楷体黑色)18号字体测试(楷体黑色)20号字体测试(楷体黑色)22号字体测试(楷体黑色)24号字体测试(楷体黑色)26号字体测试(楷体黑色)四号字体测试(楷体黑色)5.5号字体测试(楷体红色)6.5号字体测试(楷体红色)7.5号字体测试(楷体红色)8号字体测试(楷体红色)9号字体测试(楷体红色)10号字体测试(楷体红色)10.5号字体测试(楷体红色)11号字体测试(楷体红色)12号字体测试(楷体红色)14号字体测试(楷体红色)16号字体测试(楷体红色)18号字体测试(楷体红色)20号字体测试(楷体红色)22号字体测试(楷体红色)24号字体测试(楷体红色)26号字体测试(楷体红色)四号字体测试(楷体红色)5.5号字体测试(楷体蓝色)6.5号字体测试(楷体蓝色)7.5号字体测试(楷体蓝色)8号字体测试(楷体蓝色)8号字体测试(楷体蓝色)10号字体测试(楷体蓝色)10.5号字体测试(楷体蓝色)11号字体测试(楷体蓝色)12号字体测试(楷体蓝色)14号字体测试(楷体蓝色)16号字体测试(楷体蓝色)18号字体测试(楷体蓝色)20号字体测试(楷体蓝色)22号字体测试(楷体蓝色)24号字体测试(楷体蓝色)26号字体测试(楷体蓝色)四号字体测试(楷体蓝色)5.5号字体测试(楷体绿色)6.5号字体测试(楷体绿色)7.5号字体测试(楷体绿色)8号字体测试(楷体绿色)8号字体测试(楷体绿色)10号字体测试(楷体绿色)10.5号字体测试(楷体绿色)11号字体测试(楷体绿色)12号字体测试(楷体绿色)14号字体测试(楷体绿色)16号字体测试(楷体绿色)18号字体测试(楷体绿色)20号字体测试(楷体绿色)22号字体测试(楷体绿色)24号字体测试(楷体绿色)26号字体测试(楷体绿色)四号字体测试(楷体绿色)5.5号字体测试(楷体黄色)6.5号字体测试(楷体黄色)7.5号字体测试(楷体黄色)8号字体测试(楷体黄色)8号字体测试(楷体黄色)10号字体测试(楷体黄色)10.5号字体测试(楷体黄色)11号字体测试(楷体黄色)12号字体测试(楷体黄色)14号字体测试(楷体黄色)16号字体测试(楷体黄色)18号字体测试(楷体黄色)20号字体测试(楷体黄色)22号字体测试(楷体黄色)24号字体测试(楷体黄色)26号字体测试(楷体黄色)四号字体测试(楷体黄色)5.5号字体测试(宋体黄色)6.5号字体测试(宋体黄色)7.5号字体测试(宋体黄色)8号字体测试(宋体黄色)9号字体测试(宋体黄色)10号字体测试(宋体黄色)10.5号字体测试(宋体黄色)11号字体测试(宋体黄色)12号字体测试(宋体黄色)14号字体测试(宋体黄色)16号字体测试(宋体黄色)18号字体测试(宋体黄色)20号字体测试(宋体黄色)22号字体测试(宋体黄色)24号字体测试(宋体黄色)26号字体测试(宋体黄色)四号字体测试(宋体黄色)5号字体测试(宋体绿色)5.5号字体测试(宋体绿色)6.5号字体测试(宋体绿色)7.5号字体测试(宋体绿色)8号字体测试(宋体绿色)9号字体测试(宋体绿色)10号字体测试(宋体绿色)10.5号字体测试(宋体绿色)11号字体测试(宋体绿色)12号字体测试(宋体绿色)14号字体测试(宋体绿色)16号字体测试(宋体绿色)18号字体测试(宋体绿色)20号字体测试(宋体绿色)22号字体测试(宋体绿色)24号字体测试(宋体绿色)26号字体测试(宋体绿色)四号字体测试(宋体绿色)5号字体测试(宋体红色)6.5号字体测试(宋体红色)7.5号字体测试(宋体红色)8号字体测试(宋体红色)9号字体测试(宋体红色)10号字体测试(宋体红色)10.5号字体测试(宋体红色)11号字体测试(宋体红色)12号字体测试(宋体红色)14号字体测试(宋体红色)16号字体测试(宋体红色)18号字体测试(宋体红色)20号字体测试(宋体红色)22号字体测试(宋体红色)24号字体测试(宋体红色)26号字体测试(宋体红色)四号字体测试(宋体红色)5号字体测试(宋体蓝色)5.5号字体测试(宋体蓝色)6.5号字体测试(宋体蓝色)7.5号字体测试(宋体蓝色)8号字体测试(宋体蓝色)9号字体测试(宋体蓝色)10号字体测试(宋体蓝色)10.5号字体测试(宋体蓝色)11号字体测试(宋体蓝色)12号字体测试(宋体蓝色)14号字体测试(宋体蓝色)16号字体测试(宋体蓝色)18号字体测试(宋体蓝色)20号字体测试(宋体蓝色)22号字体测试(宋体蓝色)24号字体测试(宋体蓝色)26号字体测试(宋体蓝色)四号字体测试(宋体蓝色)下滑线及加粗5号字体测试(宋体)5.5号字体测试(宋体)6.5号字体测试(宋体)7.5号字体测试(宋体)8号字体测试(宋体)9号字体测试(宋体)10号字体测试(宋体)10.5号字体测试(宋体)11号字体测试(宋体)12号字体测试(宋体)14号字体测试(宋体)16号字体测试(宋体)18号字体测试(宋体)20号字体测试(宋体)22号字体测试(宋体)24号字体测试(宋体)26号字体测试(宋体)四号字体测试(宋体)5号字体测试(楷体黑色)5.5号字体测试(楷体黑色)6.5号字体测试(楷体黑色)7.5号字体测试(楷体黑色)8号字体测试(楷体黑色)9号字体测试(楷体黑色)10号字体测试(楷体黑色)10.5号字体测试(楷体黑色)11号字体测试(楷体黑色)12号字体测试(楷体黑色)14号字体测试(楷体黑色)16号字体测试(楷体黑色)18号字体测试(楷体黑色)20号字体测试(楷体黑色)22号字体测试(楷体黑色)24号字体测试(楷体黑色)26号字体测试(楷体黑色)四号字体测试(楷体黑色)倾斜+双下滑+加粗字体5号字体测试(楷体黑色)5.5号字体测试(楷体黑色)6.5号字体测试(楷体黑色)7.5号字体测试(楷体黑色)8号字体测试(楷体黑色)9号字体测试(楷体黑色)10号字体测试(楷体黑色)10.5号字体测试(楷体黑色)11号字体测试(楷体黑色)12号字体测试(楷体黑色)14号字体测试(楷体黑色)16号字体测试(楷体黑色)18号字体测试(楷体黑色)20号字体测试(楷体黑色)22号字体测试(楷体黑色)24号字体测试(楷体黑色)26号字体测试(楷体黑色)四号字体测试(楷体黑色)。
针式打印机打印发票字体变大解决方法

针式打印机打印发票字体变大解决方法
发布时间:[2010-07-30]
1. Windows 2000/XP 操作系统
第一步,选择“开始”--“设置”--“打印机(打印机与传真)”,用鼠标右键点击所使用的针式打印机图标,然后选择“属性”;第二步,选择“高级”--“打印处理器”,将“默认的数据类型”选择为“RAW”,点击“确定”即可。
2. Windows98 操作系统(以ML740C 为例)
第一步,用鼠标点击电脑左下端“开始”--“设置”—“打印机”,会弹出“打印机窗口”如图所示;
第二步,鼠标右键选中ML740C,点击“属性”,进入属性界面后,选择点击“详细资料”,选中“后台打印”,如下图所示;
第三步,将“后台打印的数据格式”选择成“RAM”,点击“确定”即可,如图所示;
到此设置完毕。
联想系列打印机常用自检方法

P系列打印机(LJ6P/6P+、LJ2110P/2210P)及LJ6010MFP打印机1.打印自检和复位(1)按住面板按钮打开打印机电源开关。
(2)面板上四个灯亮后,第一个灯再亮时松开面板按钮。
按住面板按钮:一秒钟之内松开面板按钮为打印普通自检样张。
按住直到第二个灯亮再松开面板按钮,为打印硒鼓寿命样张。
按住直到第三个灯亮再松开面板按钮。
为打印机复位(初始化)。
2.打印测试(检测卡纸时使用)(1)打开打印机顶盖.(2)按住面板按钮打开打印机电源开关。
(3)面板上四个灯亮后,第一个灯再亮时松开面板按钮。
(4)按住面板按钮 , 直到第二个灯亮再松开.(5)关闭打印机顶盖.注:进行打印测试时,除非关机打印机将一直打印,检测走纸通道是否卡纸3. LJ2312P/LJ2412P/LJ8212打印机测试按照下列步骤选择想使用的测试模式;(1) 关闭打印机开关,关闭前盖。
(2) 按住面板按钮打开打印机开关,直到 Drum 灯亮。
Drum 灯亮表示打印机进入了打印测试模式。
(3) 如果想打印测试页, 当 Drum 灯亮时,松开面板按钮然后再按一下。
如果想选择其它项目,按住按钮选择下表中的模式,选中后松开按钮然后再按一下面板按钮。
灯检测模式功能Drum简单测试页打印机打印简单测试页,打印完毕后回复ready状态。
Ready 打印配置& 打印字体测试页打印机打印当前配置和内部字体表,打印完毕后回复ready状态。
Alarm复位打印机恢复出厂设置,打印完毕后回复ready状态。
Data十六进制数据打印打印机将数据打印成十六进制数据,检查数据错误或问题。
要退出此模式必须关闭打印机。
M系列打印机(一).LJ6106/6206MFC1. 按下帮助/顺序同报发送键,将打印一份帮助信息表.2. 顺序按下功能、1 、7 、5 键,将打印一份用户设置信息表(包括打印张数).(二).LJ6112MFC/LJ6212MFC3. 按下帮助/顺序同报发送键,将打印一份帮助信息表. 顺序按下功能、 1 、7 、5 键,将打印一份用户设置信息表(包括打印张数)M系列打印机A系列打印机1.LJ6C/6C+ 先按下打印机控制面板上的联机键,使打印机处于脱机状态;按下自检键.,即可打印出自检样张。
打印机驱动中TrueType字体渲染引擎的实现

文 献 『1 到 。 体 文 件 中 指令 相 关 的 表 主 要 是 四个 : 舯 , 7提 字 f pe ,v,lf rp cts 。其中 fs pe, v表都是可选 的,1 表是必需 y pm, rp ct gr ) f 体 轮 廓更 加 光 滑 ; 最后 是 本 文 的 总结 。 的 。fg 存 放 的 是 一 组 指 令 序列 。 成 函数 定 义 和扩 展 指 令 定 pm 完 2 r F文 件 格 式 r r 文 献 f 给 出 了 TuT p 3 1 re ye中 用 到 的所 有 数 据 类 型 , r r F文 件 义 。 r r pe 是 一 组指 令 序 列 , 成 特定 字 体大 小 , 备 分辨 率 , p也 完 设 转 V 曲 存放 各个 字符 轮 廓 的数 据 , 中所 有 数 据 的 编 码 方 式 均 为 Mo rl—tl fi E da . t o s e Bg n i 即低 地 换 矩 阵 条件 下 C T数 据 的设 置 。 o a y n 址 存放 最 高 有 效 字节 ) 文 献『1 出 了 r F文 件框 架 , 括 三 部 其 中 的指 令 数 据完 成 该 字符 轮 廓 在 特 定 设 备 条 件 下 的 Hni 。 。 4给 r 包 it g n 分: 文件 头 。 述 表 目录 , 系 列 描述 表 。文 献 f 给 出 了 r F的 这 里 的设 备 条 件 指 P E . 每个 E 对 应 的 P e数 量 。 描 一 5 】 r r PM 即 M il x
【 要】 摘 :微软 Vs ia操作 系统和 X S文档格式 沿用了 TuTp 技 术, t P re ye 因此对 TuT p reye字体渲 染引擎的研究显得 尤为 重要 。 有 引 擎在 效 率 和 字 体 美观 度 等 方 面 并不 能 全 面照 顾 。 文 研 究 了打 印机 驱 动 中 TuT p 现 本 re ye字体 渲 染 引擎 的一 种 实现 。
Zebra打印机中文字体指令调用说明

使用指令调用中文字体时正确完整的流程应该包含以下三指令:^SE用于选择所需的ZPL 或ZPL II 编码表。
^CW所有内置字体都是通过使用单字符的标识符进行引用。
^CI使用^CI 命令可以调用您要用来进行打印的国际字符集,可以在标签上组合打印不同的字符集,开机后默认的字符集代码为0。
说明:
1,对于工业打印机有时候可以不使用SE指令指定,估计是默认的编码表可以打印中文
2,必须对内置的字体进行单字符的标识符来引用
3,CI指令上常用的值为14、26、28,对于14来说只能打印每行文字全是中文,26可以打印每行文字既有中文也有英文,28是UTF-8字符,要是一个标签既有中文,英文,俄文之类的可以通过CI指令指定。
打印机子菜单设置说明书

打印子菜单程序或打印机驱动程序(如果已安装正确的驱动程序)可提供此菜单中的某些项目。
程序和打印机驱动程序设置会覆盖控制面板的设置。
通常情况下,最好通过打印机驱动程序更改这些设置(如果可以)。
下表中列出了设置和可能值。
在“值”栏中,每个设置的默认值旁边会有一个星号 (*)。
打印质量子菜单程序或打印机驱动程序(如果已安装正确的驱动程序)可提供此菜单中的某些项目。
程序和打印机驱动程序设置会覆盖控制面板的设置。
有关详细信息,请参阅使用打印机驱动程序。
通常情况下,最好通过打印机驱动程序更改这些设置(如果可以)。
下表中列出了设置和可能值。
在“值”栏中,每个设置的默认值旁边会有一个星号 (*)。
系统设置子菜单此菜单中的项目会影响打印机运行。
请根据打印需要配置打印机。
下表中列出了设置和可能值。
在“值”栏中,每个设置的默认值旁边会有一个星号 (*)。
装订器/集纸箱子菜单如果已安装可选装订器/集纸箱,可使用此子菜单选择设置。
程序或打印机驱动程序(如果已安装正确的驱动程序)可提供此菜单中的某些项目。
下表中列出了设置和可能值。
在“值”一栏中,每个设置的默认值旁边都会有一个星号 (*)。
I/O 子菜单I/O(输入/输出)菜单中的项目可以影响打印机和计算机之间的通信。
I/O 子菜单中的内容视安装的 EIO 卡而定。
下表中列出了设置和可能值。
在“值”栏中,每个设置的默认值旁边会有一个星号 (*)。
复位子菜单Resets(复位)子菜单中的项目与返回默认设置和更改设置(如“睡眠模式”)有关。
下表列出了设置和可能值。
在“值”栏中,每个设置的默认值旁边会有一个星号 (*)。
佳能打印机mf247dw说明书
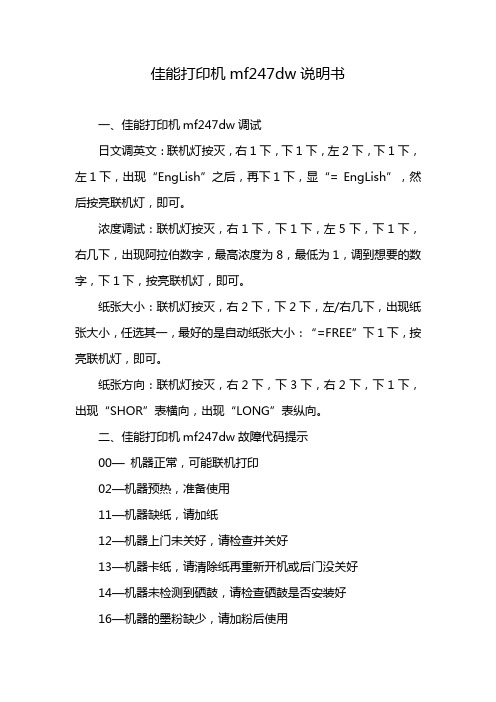
佳能打印机mf247dw说明书一、佳能打印机mf247dw调试日文调英文:联机灯按灭,右1下,下1下,左2下,下1下,左1下,出现“EngLish”之后,再下1下,显“= EngLish”,然后按亮联机灯,即可。
浓度调试:联机灯按灭,右1下,下1下,左5下,下1下,右几下,出现阿拉伯数字,最高浓度为8,最低为1,调到想要的数字,下1下,按亮联机灯,即可。
纸张大小:联机灯按灭,右2下,下2下,左/右几下,出现纸张大小,任选其一,最好的是自动纸张大小:“=FREE”下1下,按亮联机灯,即可。
纸张方向:联机灯按灭,右2下,下3下,右2下,下1下,出现“SHOR”表横向,出现“LONG”表纵向。
二、佳能打印机mf247dw故障代码提示00—机器正常,可能联机打印02—机器预热,准备使用11—机器缺纸,请加纸12—机器上门未关好,请检查并关好13—机器卡纸,请清除纸再重新开机或后门没关好14—机器未检测到硒鼓,请检查硒鼓是否安装好16—机器的墨粉缺少,请加粉后使用17—机器没有装入下纸盒或下纸盒没有放入纸张41—机器选用纸张尺寸或方向与电脑选用的纸张不对00 正常工作代码02 正常工作代码11 机器缺纸12 机器门未关好13 机器卡纸14 机器未检测到硒鼓16 机器的墨粉缺少17 机器没有装入下纸盒41 机器选用纸张尺寸或方向与电脑选用的纸张不对。
42 I/F: 2 ERROR Interface problem: CENTRO* (parallel) RS232 (serial) 5F-50 机器的定影器损坏或没有定影电压。
5F-50 Service CTL SFT E E 定影器可能结露,潮湿引起温控保护或短路保护。
佳能LBP-730定影器出此代码比较多,温控系统设计或元件有缺陷,不稳定!5F-51 没有检测到激光束,可能是激光偏转马达损坏或硒鼓没装好。
5F-51 Service CTL SFT E E 激光偏转马达转速异常,可能轴承缺油或铁锈过多,造成摩擦过大,转速变慢。
如何改变戴尔打印机上打印字体大小

这就是你NeedPrinterOffice的生产力softwarePaperShow MoreInstructions 1打开要打印的文件。您可以打开文件直接用鼠标右键单击“我的电脑”,导航到文件,并双击它。您也可以通过点击“开始”,选择“所有程序”,找到程序,打开程序。然后点击“文件”,选择“打开”,然后选择你想上的“打印预览”按钮,工具栏上看到什么完成的文件会看起来像打印时open.2Click文件。您也可以访问,通过点击“文件”菜单上,选择从菜单中的“打印预览”中的“打印预览”。 “打印预览”窗口将打开,并告诉你,你的网页看起来像paper.3Change需要的字体大小,利润和其他元素,直到你的文档看起来的样子,你想让它。您的文件已经被调整后,单击工具栏上的“打印”按钮,或单击“文件”菜单上,从下拉列表中选择“打印”。
惠普LaserJet M209系列打印机PostScript 3操作说明书

内存 打印大型或复杂数据时,打印机可能会用完内存并且变得不稳定或者无法打印。
字体 • 本打印机上安装的类型 1 字体符合 Adobe Type1 字体格式(1.1)标准。不过,如 果该字体的设计会自动干扰其轮廓,则系统可能无法正确打印该字体。 • 如果应用程序使用并下载了没有字体提示信息的字符,则这些字符在打印时可能显 得不清晰,具体取决于这些字符经过了放大还是经过了压缩。
关于 IP 地址
在本手册中,“IP 地址”涵盖 IPv4 和 IPv6 环境。请阅读与所用环境相关的说明。
3
1. 引言
PostScript 3 驱动程序的功能
在特殊纸张上进行打印 您可以在不同于普通纸或再生纸的纸张(例如厚纸和特殊纸)上进行打印。
在自定义尺寸纸张上进行打印 您可以指定要用于打印的纸张尺寸,然后在自定义尺寸纸张上进行打印。您可以在打印 机驱动程序中注册常用的纸张尺寸。
PostScript 3 单元 要在本机上使用 PostScript 3,必须安装仿真扩展。要安装 PostScript 3 单元,请向 服务代表咨询。
其他 • 使用 PostScript 3 驱动程序时,实际输出可能与某些应用程序预览的输出不一 致。 • 如果将某些应用程序与 PostScript 3 驱动程序搭配使用,则系统可能会在奇数页 的双面打印作业结束时,添加一张额外的空白页。所添加的空白页将计为黑白页。 • 细线的打印效果可能不甚理想。宽度和颜色相同的线条可能会显得不一样。 • 打印时,如果指定了大于 297 x 418.4 mm(11.7 x 16.5 英寸)的自定义尺寸 页面,则该页面将被计为 A3 尺寸。使用计费选购件时,请格外注意。介绍有关 PostScript 3 打印机驱动程序的基本信息并介绍如何使用该驱动程序。
Zebra 斑马打印机字体安装步骤

Zebra 打印机字体安装步骤
以下安装方式在Zebra 110Xi4 600 dpi已测试成功
1.安装随打印机附件光盘内软件ZebraNet Bridge Enterprise
2.打开软件后选择:工具 字体向导
3.字体向导窗口如下图
4.点要导入源字体后面的浏览后如下图所示:
5.下图为选择好字体后进行转换ZPL文件
6.生成的ZPL文件如下(设备中的字体名字一定不能超过6位)
7.打开设备和打印机,找到已连接好的打印机
8.选择打印机首选项,进行ZPL文件发送到打印机
需要注意观察打开机数据指示灯变化,闪烁 说明文件发送正常,等到停止闪烁后打印机器内部参数来确认是否安装字体成功.以上所有字体安装步骤全部结束,TKS
打印DRAM中所有目标列表(用下面的ZPL代码来打印出打印机内部参数):
^XA^WD*:^XZ
特别说明:
安装打印机驱动程序必须使用新版,否则如果是旧的驱动程序可能无法看到工具选项卡
本教程版权归作者所有,未经许可禁止转载!。
打印机常用英语大全
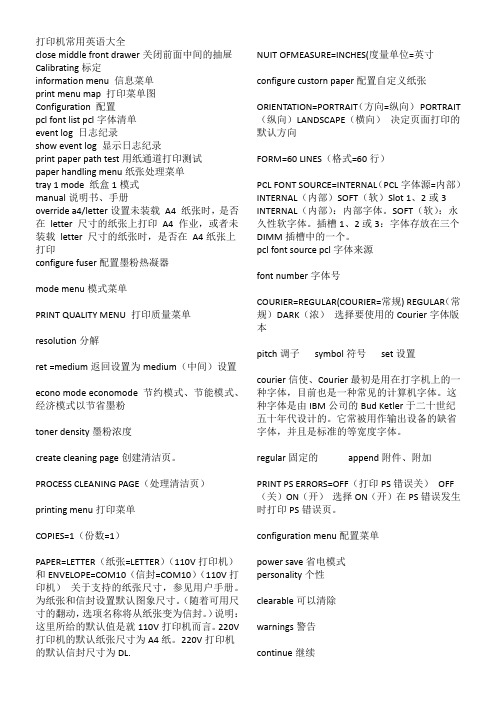
打印机常用英语大全close middle front drawer关闭前面中间的抽屉Calibrating标定information menu 信息菜单print menu map 打印菜单图Configuration 配置pcl font list pcl字体清单event log 日志纪录show event log 显示日志纪录print paper path test用纸通道打印测试paper handling menu纸张处理菜单tray 1 mode 纸盒1模式manual说明书、手册override a4/letter设置未装载A4 纸张时,是否在letter 尺寸的纸张上打印A4 作业,或者未装载letter 尺寸的纸张时,是否在A4纸张上打印configure fuser配置墨粉热凝器mode menu模式菜单PRINT QUALITY MENU 打印质量菜单resolution分解ret =medium返回设置为medium(中间)设置econo mode economode节约模式、节能模式、经济模式以节省墨粉toner density墨粉浓度create cleaning page创建清洁页。
PROCESS CLEANING PAGE(处理清洁页)printing menu打印菜单COPIES=1(份数=1)PAPER=LETTER(纸张=LETTER)(110V打印机)和ENVELOPE=COM10(信封=COM10)(110V打印机)关于支持的纸张尺寸,参见用户手册。
为纸张和信封设置默认图象尺寸。
(随着可用尺寸的翻动,选项名称将从纸张变为信封。
)说明:这里所给的默认值是就110V打印机而言。
220V 打印机的默认纸张尺寸为A4纸。
220V打印机的默认信封尺寸为DL. NUIT OFMEASURE=INCHES(度量单位=英寸configure custorn paper配置自定义纸张ORIENTATION=PORTRAIT(方向=纵向)PORTRAIT(纵向)LANDSCAPE(横向)决定页面打印的默认方向FORM=60 LINES(格式=60行)PCL FONT SOURCE=INTERNAL(PCL字体源=内部)INTERNAL(内部)SOFT(软)Slot 1、2或3 INTERNAL(内部):内部字体。
Printronix T8000 热敏打印机用户手册说明书
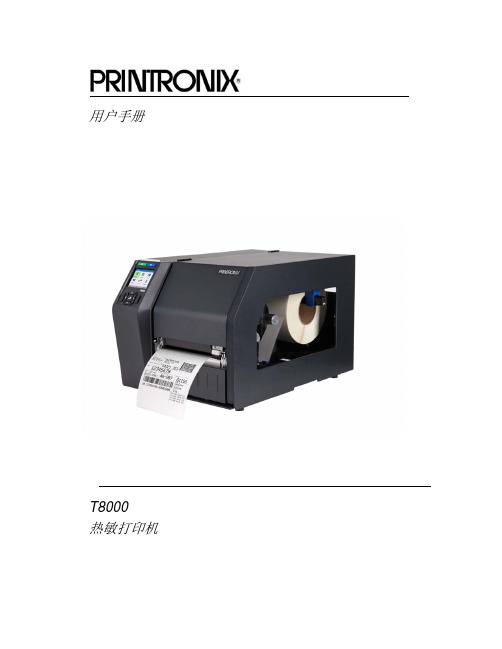
用户手册T8000热敏打印机Printronix对本资料不作任何声明或担保,包括但不限于适销性和用于特定目的适用性的暗示担保。
对于本资料包含的错误或疏漏或因本资料的提供、分发、执行或使用造成的任何直接或间接、意外或间接损害,Printronix 概不负责。
本手册所含信息如有更改,恕不另行通知。
本文档包含受版权法保护的专有信息。
未经 Printronix 书面许可,不得以任何形式或手段(手工、图片、电子、机械或其它方式)复制、复印、翻译此文档的任何部分或与其它任何资料进行合并。
© 2015 PRINTRONIX, INC.版权所有。
保留所有权利。
商标确认Printronix、IGP、Auto Label Mapping、LinePrinter Plus、 PGL、和PrintNet是Printronix,Inc的注册商标。
T8是Printronix, Inc.的注册商标。
Artifex、Artifex标识、Ghostscript和Ghostscript标识是Artifex Software, Inc.的注册商标。
PostScript是Adobe系统公司的商标。
HP是Hewlett-Packard Company的注册商标。
Code V是Quality Inc的商标。
QMS是Quality Micro Systems,Inc的注册商标。
IBM是商用机器公司(IBM)的注册商标。
MS-DOS和Windows是Microsoft Corporation的注册商标。
Centronics是Genicon公司的注册商标。
IEEE是电气和电子工程师协会(Institute of Electrical and Electronics Engineers,Inc)的注册服务标志。
EIA是电子工业协会(Electronics Industries Association)的注册服务商标。
ZPL、ZPL II、和Zebra是Zebra Technologies Corporation的注册商标。
联想打印机系列维修资料及代码
联想系列维修资料及代码(一)、LJ2312/LJ2412/LJ2500/LJ2600 关闭打印机开关,关闭前盖。
按住面板按钮打开打印机开关,直到Drum灯亮。
Drum 灯亮表示打印机进入了打印测试模式。
如果想打印测试页, 当Drum 灯亮时,松开面板按钮然后再按一下。
如果想选择其它项目,按住按钮选择下表中的模式,选中后松开按钮然后再按一下面板按钮。
灯检测模式功能Drum 简单测试页打印机打印简单测试页,打印完毕后回复ready 状态。
Ready打印配置&打印字体测试页打印机打印当前配置和内部字体表,打印完毕后回复ready 状态。
Alarm复位打印机恢复出厂设置,打印完毕后回复ready 状态。
Data十六进制数据打印打印机将数据打印成十六进制数据,检查数据错误或问题。
要退出此模式必须关闭打印机。
2(二)、LJ880/LJ1600 按住演示按钮2 秒,直到控制面板所以指示灯慢速闪烁,打印机打印出一页演示页,打印机必须处于就绪模式。
3(三)、LJ2110/LJ2210/LJ6P/LJ6P+/LJ6010 按住面板按钮打开打印机电源开关。
面板上四个灯亮后,第一个灯再亮时松开面板按钮。
按住面板按钮:一秒钟之内松开面板按钮为打印普通自检样张。
按住直到第二个灯亮再松开面板按钮,为打印硒鼓寿命样张。
按住直到第三个灯亮再松开面板按钮。
为打印机复位(初始化)。
4 (四)、LJ3010A/LJ3116/LJ3220A/LJ6C/LJ6C+ 在就绪模式下按一下联机,使打印机处于脱机状态,按一下执行键,打印出一页测试页。
在就绪模式下按一下联机,使打印机处于脱机状态,同时按住CANCEL 和ALT ,待蜂鸣器响一声,打印机会重启动,即恢复出厂状态。
5 、LJ2800 关闭打印机开关,关闭前盖。
按住取消键,开机,至墨粉灯亮。
然后按一下启动按钮,可打印测试页。
关闭打印机开关,关闭前盖。
按住取消键,开机,至纸张灯亮,即恢复出厂状态。
HP 打印机字体和符号集说明书

Chapter 12: Unbound Fonts and Downloaded Symbol Sets Contents of this Chapter•Introduction ................................................................................. 12-1•Unbound Font Operations ............................................................ 12-2•Downloading Symbol Sets ........................................................... 12-5•Managing User-Defined Symbol Sets ......................................... 12-11This chapter describes the following PCL commands:Symbol Set Code ................ Esc*c#R................................................... 12-5Download Symbol Set ........ Esc(f#W[symbol set definition] ................ 12-6Symbol Set Control ............ Esc*c#S................................................. 12-1112.1 IntroductionBound and Unbound FontsA bound font is restricted to a single symbol set. An unbound font contains the union of multiple symbol sets described by a Symbol Index such as Hewlett-Packard's Master Symbol List (MSL) or Unicode (TrueType). Unbound fonts typically contain 300, 400, or even more characters. Downloading Symbol SetsSymbol sets may be downloaded like fonts. Both customized and standard HP-supported symbol sets may be downloaded.12 - 2 Unbound Fonts and Downloaded Symbol Sets12.2 Unbound Font OperationsFont Selection and Unbound FontsWhen a font is requested, the printer selects an available font that most closely matches the current font selection characteristics ⎯ symbol set, spacing, pitch, height, style, stroke weight, and typeface. (See Chapter 9 for font selection.)Since the symbol set attribute has the highest priority, the printer first makes a list of all the available fonts ⎯ bitmap, bound, and unbound ⎯ that contain the requested symbol set. Bitmap and bound fonts are easily checked because they contain only one symbol set. However, to determine which unbound fonts match a symbol set, the printer must identify the appropriate symbol collections.Symbol CollectionsThe symbols in an unbound font can be divided into symbol collections that classify symbols according to language or application. The symbols in each collection do not change from one unbound font to another ⎯ that is, the Basic Latin collection always contains the same symbols. However, different fonts may contain different collections. For example, the internal Univers font in LaserJet IIIP contains the Latin, Math, and Semi-graphic collections, which together contain all the symbols required for the 35 symbol sets that Univers provides. On the other hand, the Dingbats font contains only the Dingbats collection, which contains all the symbols required for the five supported Dingbat symbol sets.Matching Unbound Fonts to Requested Symbol SetsThe Character Complement number, which is a 64-bit field in an unbound font definition (see Chapter 11), identifies the symbol collections contained in the font. Each bit in this field corresponds to a symbol collection. For example, if bit 63 is cleared, an unbound Intellifont contains the Basic Latin collection. If bit 31 is cleared, an unbound TrueType font contains ASCII.The Character Requirements number, which is a 64-bit number provided to the printer for each symbol set, identifies the character collections needed by the symbol set. The printer matches bit-by-bit the Character Requirements number for the requested symbol set with the Character Complement number of every unbound font in the printer.After matching the Character Complement number with the required symbol collections, the printer will contain a list of all fonts (bitmap, bound, and unbound) that support the requested symbol set. If no fonts are found for the requested symbol set, the printer continues with the font selection algorithm described in Chapter 9.Unbound Fonts and Downloaded Symbol Sets 12 - 3Summary of Symbol Set MatchingSymbol set matching for unbound fonts uses the following general procedure:1. The host requests a font through font attribute selection by updating the font attributetable.2. Since the symbol set attribute has the highest priority, the printer looks for the requestedsymbol set.3. The printer uses the Character Requirements number of the requested symbol set toidentify the symbol collections needed by the symbol set.4. The printer checks the Character Complement field of available fonts for symbolcollections that contain symbols in the requested symbol set.5. Fonts whose symbol collections together contain the necessary symbols are included inthe next round of attribute matching.Symbol set or point size are not specified when an unbound scalable font is downloaded. Designation by ID is equivalent to a PCL font select string containing parameters with fixed values (spacing, stroke weight, style, and typeface), but not point size and symbol set. To designate an unbound scalable font by ID, first select the desired symbol set and point size, and then select the font by ID.Symbol Indexes (MSL and Unicode)Symbol Indexes identify HP printer symbols by a unique number. Two symbol indexes are used for unbound fonts. Unbound Intellifonts use MSL (Master Symbol List) numbers; unbound TrueType fonts use Unicode numbers. Character collections differ between Intellifont and TrueType fonts.Since the printer identifies symbols by their Symbol Index Number (0-65535), but receives character codes (0-255), the printer has a symbol set mapping table for each available symbol set. Using this mapping, the printer identifies which indexed character will be printed for the requested character code. A partial mapping for Roman-8 set is shown below.12 - 4 Unbound Fonts and Downloaded Symbol SetsPrinting a CharacterAfter an unbound font has been selected and the printer receives a character code for printing, the printer must access the mapping table to get the Symbol Index Number for that character. The printer then searches the selected unbound font for the correct MSL or Unicode number and prints that character.For example, if Roman-8 is requested and the printer receives character code 254, the printer accesses the Roman-8 mapping table. In the Roman-8 mapping table, character code 254 is mapped to MSL number 191 or Unicode number 0x00b1, corresponding to the plus-over-minus symbol, which is then printed.Unbound Fonts and Downloaded Symbol Sets 12 - 512.3 Downloading Symbol SetsSymbol sets may be downloaded and used to bind an unbound font. The downloaded symbol set may be one of the standard HP-supported symbol sets listed in Chapter 9 that is not internal to the printer, or it may be a user-defined or modified symbol set. The following process is used to download a symbol set:1. Specify an identification number for the symbol set ⎯Esc*c#R.2.Download the symbol set definition ⎯Esc(f#W [data].3. Select the symbol set for printing ⎯Esc(ID.4. Delete the symbol set or designate it as permanent ⎯Esc*c#S.Symbol Set Identification: Before a symbol set can be downloaded or manipulated as an individual entity, it must be assigned a unique identification number. Esc*c#R designates an identification number prior to downloading the symbol set. An existing symbol set with this code is deleted at download.Symbol Set Definition: Esc(f#W downloads a group of symbol set attributes as well as a list that maps each symbol set character code to a character ID number by which the given character may be specified in unbound scalable fonts.Symbol Set Selection: After downloading the symbol set definition, the user may select the symbol set by Esc(ID.Symbol Set Management: Once a user-defined symbol set is downloaded, the Symbol Set Control command (Esc*c#S) can assign symbol sets as temporary or permanent, or delete them. Symbol Set Code Esc * c # r/RAssigns an identification code to a downloadable symbol set.Value(#) = Identification codeDefault = 0Range = 0 to 65535DEVICE NOTE: LJIIIP and 4 have an upper range of 32767, corresponding to 1023Z. They do not allow values above 1023Z for user-defined symbol sets.The Symbol Set Code is analogous to Font ID and Character Code. It is used to download and manage symbol sets.Any downloaded symbol set already associated with this code is deleted when the symbol set definition is received.The value (#) used for this command must match the Encoded Symbol Set Designator field in the downloaded symbol set definition.12 - 6 Unbound Fonts and Downloaded Symbol SetsThe Symbol Set Code is derived from the identification number (ID) used by Esc(ID in font selection:Symbol Set Code= (# * 32) + (L - 64)where # is the number portion of the ID, and L is the ASCII value of the letter portion. (See Chapter 9 for a list of symbol set IDs.)EXAMPLEAssume that a symbol set has an ID of 1Q, which will be used as a font select parameter byEsc(ID⎯ that is, Esc(1Q. The Symbol Set Code command for this symbol set would beEsc*c49R ⎯that is, (1 * 32) + (81 - 64) = 49.Then the Download Symbol Set command, Esc(#W, will create a symbol set with a symbol set code of 49. And the Symbol Set Control command (Esc*c#S) will execute the specified action for any symbol set with a symbol set code of 49.Download Symbol Set Esc ( f # W [symbol set definition]Defines the characters and character mapping for a downloaded symbol set.Value(#) = Number of bytes in symbol set definitionDefault = NARange = 0 to 32767 (command ignored if invalid definition or out-of-memory)This command must be sent subsequent to Symbol Set Code (Esc*c#R). The last symbol set code sent is used; if no code has been sent, the default (0) is assigned.A previously downloaded symbol set with the same symbol set code is deleted. An internal symbol set with the same code is overridden by the new symbol set.If the symbol set definition is invalid, if the Encoded Symbol Set Designator field of the definition does not match the symbol set code, or if there is insufficient memory to create the symbol set, the command is ignored and the symbol set discarded.Unbound Fonts and Downloaded Symbol Sets 12 - 7 The format for a downloaded symbol set definition is shown below:User-defined Symbol Set Definition FormatHeader Size (UINT16)Specifies the number of bytes in the header of the symbol set definition. This is the number of bytes preceding the Symbol Map.For a format 1 (MSL) symbol set definition, the header size must be 18 or greater; otherwise, the symbol set is invalidated.Encoded Symbol Set Designator (UINT16)This field must match the value designated by Symbol Set Code (Esc*c#R).Format (UBYTE)This field specifies the symbol index and format of the symbol set definition:Value Format1 MSL (Intellifont)3 Unicode (TrueType)Unrecognized values invalidate symbol set creation.DEVICE NOTE: LJIIIP recognizes only a format of 1.12 - 8 Unbound Fonts and Downloaded Symbol SetsSymbol set Type (UBYTE)Defines printable and unprintable codes for the symbol set:Value Symbol Set Organization0 7-bit (32-127 are printable)*1 8-bit (32-127 and 160-255 are printable)*2 PC-8 (All codes are printable except 0, 7 - 15, and 27)** All character code positions print in transparency mode.First Code (UINT16)Designates the first character code in the set. In a Format 1 or 3 symbol set, this value can be 0 to 255. The symbol set is invalid unless the First Code is less than or equal to the Last Code.Last Code (UINT16)Designates the last character code in the set. The value must be between 0 and 255 inclusive, and must not be smaller than the First Code.Together, the First Code through the Last Code identify the range of character codes that map to the Symbol Index numbers (characters) in the Symbol Map field.Character Requirements (Array of UBYTE)This 8-byte field, in conjunction with the Character Complement field in the unbound font definition, determines the compatibility of the unbound font to a symbol set. Each bit in the field represents a specific collection of symbols. Setting a bit to 1 indicates that collection is required; setting the bit to 0 indicates that collection is not required. (Bit 63 is the most significant bit of the first byte; bit 0 is the least significant bit of the 8-byte field.) A font and a symbol set are compatible only if the result of AND'ing the Character Complement field of the font definition with the Character Requirements field of the symbol set definition is 8 bytes of zero.Unbound Fonts and Downloaded Symbol Sets 12 - 9 As described below, Character Requirements differ between MSL-based symbol sets and Unicode-based symbol sets. Unbound Intellifonts are ordered in MSL numbers; unbound TrueType fonts are ordered in Unicode numbers.MSL Symbol Index Character RequirementsIndividually defined bits include:Unicode Symbol Index Character Complements12 - 10 Unbound Fonts and Downloaded Symbol SetsIndividually defined bits include:There are no invalid Character Requirements field values. Examples of values are:Symbol Map (Array of UINT16)Maps each character code to a symbol index number. The number of symbol index characters in the array must match the number of character codes in the range, First Code through Last Code. If no printable symbol is associated with a given character code (e.g., codes 128 through 160 of Roman-8), the corresponding entry in the Symbol Map is 65535 (0xffff).Unbound Fonts and Downloaded Symbol Sets 12 - 1112.4 Managing User-Defined Symbol Sets Symbol set management involves the same types of operations as font management: •Designating a symbol set temporary or permanent•Deleting a symbol setSymbol set management operations are performed on the symbol set designated by the current symbol set code (Esc*c#R).Symbol Set Control Esc * c # s/SDesignates user-defined symbol sets as permanent or temporary, or deletes them.Value(#) = 0 Delete all temporary and permanent user-defined symbol sets = 1 Delete all temporary user-defined symbol sets= 2 Delete current user-defined symbol set (last Symbol Set Codespecified)= 4 Make current user-defined symbol set temporary= 5 Make current user-defined symbol set permanentDefault = NARange = 0 to 2, 4, 5A downloaded symbol set is temporary by default. Internal symbol sets cannot be deleted or made temporary; however, a downloaded symbol set can overlay (redefine) an internal symbol set, but this is not recommended. An overlaying symbol set must be deleted to access an overlaid ROM-based symbol set. The priority scheme is (highest priority to lowest):1.Downloaded symbols set (lowest ID)2.Read/Write removeable disk (lowest ID)3.Read/Write removeable flash (lowest ID)4.Read/Write permanent disk (lowest ID)5.Read/Write permanent flash (lowest ID)6.Cartridge (lowest unit to highest unit)17.SIMM (lowest ID)8.Internal1 DEVICE NOTE: On LJIII the left cartridge has priority over the right cartridge. OnDeskJets below 1200, the back cartridge has priority over the front.12 - 12 Unbound Fonts and Downloaded Symbol Sets。
得力 GE500、GE500-W标签打印机 说明书

条码标签打印机GE500/GE500-W用户手册目录手册信息 (1)安全须知 (2)第1章产品简介.........................................................................................................................6.1.1开箱清单 (6)1.2打印机外观及组件 (7)1.3产品尺寸 (9)第2章产品规格 (10)第3章使用方法 (12)3.1安装介质 (12)3.1.1安装纸卷 (12)3.1.2安装碳带 (14)3.1.3安装折叠纸 (16)3.2电源连接 (18)3.3接口连接 (19)3.4标签侦测 (20)3.5操作界面说明 (21)3.6基本功能使用 (22)3.6.1打开/关闭电源 (22)3.6.2打印测试 (22)3.6.3标签学习 (23)3.6.4使用Windows驱动程序打印 (23)第4章接口 (25)第5章打印机日常维护及调校 (26)5.1清洁打印头 (26)5.2清洁传感器、胶辊和纸张路径 (27)附录1:电子信息产品污染控制的说明 (28)手册信息本用户手册包含产品使用、安装等基本信息。
※以下手册对各种技术问题和领域有更为详细的介绍。
1.Windows驱动程序手册此手册提供了Windows驱动程序安装说明。
2.打印机实用工具手册此手册提供了本产品功能选择软件的使用、操作条件的修改等方面的信息。
3.编程手册此手册提供了标签打印机指令方面的信息。
安全须知在操作使用打印机之前,请仔细阅读下面的注意事项:1.安全警告标志警告:打印头为发热部件,打印过程中和打印刚结束,不要触摸打印头以及周边部件。
警告:不要触摸打印头和连接插件,以免因静电损坏打印头。
2.安全注意事项警告:违反以下事项可能会导致严重的伤亡事故。
1)不要同时将几个插头插入一个多孔电源插座中。
热敏打印机 程序设计 模板

热敏打印机程序设计模板英文回答:Thermal printers are widely used in various industries for printing receipts, tickets, labels, and other types of documents. They use heat to create an image on heat-sensitive paper, eliminating the need for ink or toner.Designing a program for a thermal printer involves several key aspects. First, you need to establish a connection between the printer and the computer or device it will be connected to. This can be done through a USB, serial, or network connection, depending on the printer model and the requirements of your application.Next, you need to determine the format and content of the document you want to print. This includes specifying the font type, size, and style, as well as any graphics or images that need to be included. Most thermal printers support a variety of command sets, such as ESC/POS or ZPL,which provide a standardized way to control the printer and format the output.Once you have the basic formatting in place, you can start sending commands and data to the printer. This can be done by sending raw data streams or by using printer-specific APIs or SDKs provided by the printer manufacturer. These APIs often include functions for opening and closing the printer connection, setting printer parameters, and sending print commands.To ensure the printed output matches your design, it's important to thoroughly test the program with different printers and paper types. This can help identify any compatibility issues or limitations that may affect the final result. Additionally, it's a good practice to handle any potential errors or exceptions that may occur during the printing process, such as paper jams or low ink levels.中文回答:热敏打印机广泛应用于各个行业,用于打印收据、票据、标签和其他类型的文件。
惠普打印机打印测试页的方法

惠普激光打印机打印内部测试页的方法HP LAS ERJET 4L和HP LAS ERJET 4ML 打印机∙确认打印机的“就绪”指示灯亮着。
∙暂时地按打印机的前面板按钮(不要将其按下)。
∙大约六秒钟之后,“数据”指示灯就会亮起来,“就绪”指示灯将闪烁,然后将打印“自测”页。
注:HP LASERJET 4ML 打印机的“自测”页程序实际上会生成多个涉及“配置/类型页”的页面---包括其他信息页。
有关其他信息,请参阅HP LASERJET ET 4ML用户手册的5-7页。
HP LAS ERJET 4P和HP LAS ERJET 4MP打印机∙按下打印机的ON LTNE 按钮以使打印机脱机。
00 OFFLINE 出现在显示屏上。
∙反复按MENU,直至TEST MENU出现在打印机的显示屏上。
按ITEM,∙SELF TEST将出现在显示屏上。
∙按ENTER 键,∙05 SELF TEST 将出现在显示屏上几秒钟,然后当“PCL配置”页开始打印时将出现06 PRINTING TEST。
∙打印了该页之后,按下ON LINE 以使打印机恢复联机状态。
HP LAS ERJET 4和HP LAS ERJET 4M打印机∙按下打印机的NO LINE 按钮以使打印机脱机。
∙按住控制面板上的MENU按钮,直至TEST MENU出现在显示屏上。
∙按住ITEM,直至SELF TEST 出现在显示屏上。
∙按ENTER 键,∙将开始进行自测打印。
∙按下ON LINE 以使打印机恢复联机状态。
HP LAS ERJET 4 PLUS和HP LAS ERJET 4M PLUS 打印机∙按下打印机的ON LINE 按钮以使打印机脱机。
∙按住控制面板上的MENU按钮,直至TEST MENU 出现在显示屏上。
∙按住ITEM,直至SELF TEST 出现在显示屏上。
∙按ENTER键,∙将开始进行自测打印。
∙按下ON LINE以使打印机恢复联机状态。
Zebra 斑马打印机字体安装步骤

Zebra 打印机字体安装步骤
以下安装方式在Zebra 110Xi4 600 dpi已测试成功
1.安装随打印机附件光盘内软件ZebraNet Bridge Enterprise
2.打开软件后选择:工具 字体向导
3.字体向导窗口如下图
4.点要导入源字体后面的浏览后如下图所示:
5.下图为选择好字体后进行转换ZPL文件
6.生成的ZPL文件如下(设备中的字体名字一定不能超过6位)
7.打开设备和打印机,找到已连接好的打印机
8.选择打印机首选项,进行ZPL文件发送到打印机
需要注意观察打开机数据指示灯变化,闪烁 说明文件发送正常,等到停止闪烁后打印机器内部参数来确认是否安装字体成功.以上所有字体安装步骤全部结束,TKS
打印DRAM中所有目标列表(用下面的ZPL代码来打印出打印机内部参数):
^XA^WD*:^XZ
特别说明:
安装打印机驱动程序必须使用新版,否则如果是旧的驱动程序可能无法看到工具选项卡
本教程版权归作者所有,未经许可禁止转载!。
打印机驱动中TrueType字体渲染引擎的实现

打印机驱动中字体渲染引擎的实现TrueType李琳琳1, 许春香1,李天瑞2( 1. 电子科技大学计算机科学与工程学院四川成都610054 2. 西南交通大学信息科学与技术学院四川成都610031 )【摘要】: 微软V ista 操作系统和XPS 文档格式沿用了TrueType 技术, 因此对TrueType 字体渲染引擎的研究显得尤为重要。
现有引擎在效率和字体美观度等方面并不能全面照顾。
本文研究了打印机驱动中TrueType 字体渲染引擎的一种实现。
即在特定的设备分辨率和字体大小下,把轮廓字体的字符转化为位图。
这个过程包括三个步骤: Font Raster, Grid- fitting, Raster Image。
【关键词】: 打印机驱动; TrueType; 字体渲染1、引言TrueType Font( 简称TTF) 是一种数学字形描述技术,采用几何学中二次 B 样条曲线及直线来描述字体的外形轮廓。
如文献[1]所述, TTF 技术包括两部分: 字体描述文件, 和读取字体描述文件并生成位图的引擎。
其中字体描述文件包括两部分: 描述字形轮廓的数据信息, 和修正字形轮廓的指令信息。
数据信息包括一系列的轮廓点坐标, 构成字符的原始轮廓; 指令信息则依据字体大小和设备分辨率对原始轮廓进行微调。
通常情况下,TrueType Rasterizer 是作为操作系统或者打印机控制软件的一部分嵌入当中。
TrueType Rasterizer 的作用是为显示屏和打印机生成字符位图, 通过以下这些步骤实现:( 1) 从TTF 文件读取字符轮廓描述信息( 直线和曲线) 。
( 2) 根据字符大小和设备分辨率, 缩放字符轮廓描述信息。
( 3) 根据Hinting 信息把轮廓描述信息调整到栅格上。
( 4) 扫描并填充调整后的轮廓。
如文献[2]所述, 现有的引擎效率还较低、兼容性较差、失真较多, 字体轮廓也不够光滑等。
本文研究的引擎克服了上述不足。
- 1、下载文档前请自行甄别文档内容的完整性,平台不提供额外的编辑、内容补充、找答案等附加服务。
- 2、"仅部分预览"的文档,不可在线预览部分如存在完整性等问题,可反馈申请退款(可完整预览的文档不适用该条件!)。
- 3、如文档侵犯您的权益,请联系客服反馈,我们会尽快为您处理(人工客服工作时间:9:00-18:30)。
5号字体测试(宋体黑色)
5.5号字体测试(宋体黑色)
6.5号字体测试(宋体黑色)
7.5号字体测试(宋体黑色)
8号字体测试(宋体黑色)
9号字体测试(宋体黑色)
10号字体测试(宋体黑色)
10.5号字体测试(宋体黑色)
11号字体测试(宋体黑色)
12号字体测试(宋体黑色)
14号字体测试(宋体黑色)
16号字体测试(宋体黑色)
18号字体测试(宋体黑色)
20号字体测试(宋体黑色)
22号字体测试(宋体黑色)
24号字体测试(宋体黑色)26号字体测试(宋体黑色)四号字体测试(宋体黑色)
5号字体测试(楷体黑色)
5.5号字体测试(楷体黑色)
6.5号字体测试(楷体黑色)
7.5号字体测试(楷体黑色)
8号字体测试(楷体黑色)
9号字体测试(楷体黑色)
10号字体测试(楷体黑色)
10.5号字体测试(楷体黑色)
11号字体测试(楷体黑色)
12号字体测试(楷体黑色)
14号字体测试(楷体黑色)
16号字体测试(楷体黑色)
18号字体测试(楷体黑色)
20号字体测试(楷体黑色)
22号字体测试(楷体黑色)
24号字体测试(楷体黑色)26号字体测试(楷体黑色)四号字体测试(楷体黑色)
5号字体测试(楷体红色)
5.5号字体测试(楷体红色)
6.5号字体测试(楷体红色)
7.5号字体测试(楷体红色)
8号字体测试(楷体红色)
9号字体测试(楷体红色)
10号字体测试(楷体红色)
10.5号字体测试(楷体红色)
11号字体测试(楷体红色)
12号字体测试(楷体红色)
14号字体测试(楷体红色)
16号字体测试(楷体红色)
18号字体测试(楷体红色)
20号字体测试(楷体红色)
22号字体测试(楷体红色)
24号字体测试(楷体红色)26号字体测试(楷体红色)四号字体测试(楷体红色)
5号字体测试(楷体蓝色)
5.5号字体测试(楷体蓝色)
6.5号字体测试(楷体蓝色)
7.5号字体测试(楷体蓝色)
8号字体测试(楷体蓝色)
8号字体测试(楷体蓝色)
10号字体测试(楷体蓝色)
10.5号字体测试(楷体蓝色)
11号字体测试(楷体蓝色)
12号字体测试(楷体蓝色)
14号字体测试(楷体蓝色)
16号字体测试(楷体蓝色)
18号字体测试(楷体蓝色)
20号字体测试(楷体蓝色)
22号字体测试(楷体蓝色)
24号字体测试(楷体蓝色)26号字体测试(楷体蓝色)四号字体测试(楷体蓝色)
5号字体测试(楷体绿色)
5.5号字体测试(楷体绿色)
6.5号字体测试(楷体绿色)
7.5号字体测试(楷体绿色)
8号字体测试(楷体绿色)
8号字体测试(楷体绿色)
10号字体测试(楷体绿色)
10.5号字体测试(楷体绿色)
11号字体测试(楷体绿色)
12号字体测试(楷体绿色)
14号字体测试(楷体绿色)
16号字体测试(楷体绿色)
18号字体测试(楷体绿色)
20号字体测试(楷体绿色)
22号字体测试(楷体绿色)
24号字体测试(楷体绿色)
26号字体测试(楷体绿色)四号字体测试(楷体绿色)
5号字体测试(楷体黄色)
5.5号字体测试(楷体黄色)
6.5号字体测试(楷体黄色)
7.5号字体测试(楷体黄色)
8号字体测试(楷体黄色)
8号字体测试(楷体黄色)
10号字体测试(楷体黄色)
10.5号字体测试(楷体黄色)
11号字体测试(楷体黄色)
12号字体测试(楷体黄色)
14号字体测试(楷体黄色)
16号字体测试(楷体黄色)
18号字体测试(楷体黄色)
20号字体测试(楷体黄色)
22号字体测试(楷体黄色)
24号字体测试(楷体黄色)26号字体测试(楷体黄色)四号字体测试(楷体黄色)
5号字体测试(宋体黄色)
5.5号字体测试(宋体黄色)
6.5号字体测试(宋体黄色)
7.5号字体测试(宋体黄色)
8号字体测试(宋体黄色)
9号字体测试(宋体黄色)
10号字体测试(宋体黄色)
10.5号字体测试(宋体黄色)
11号字体测试(宋体黄色)
12号字体测试(宋体黄色)
14号字体测试(宋体黄色)
16号字体测试(宋体黄色)
18号字体测试(宋体黄色)
20号字体测试(宋体黄色)
22号字体测试(宋体黄色)
24号字体测试(宋体黄色)26号字体测试(宋体黄色)四号字体测试(宋体黄色)
5号字体测试(宋体绿色)
5.5号字体测试(宋体绿色)
6.5号字体测试(宋体绿色)
7.5号字体测试(宋体绿色)
8号字体测试(宋体绿色)
9号字体测试(宋体绿色)
10号字体测试(宋体绿色)
10.5号字体测试(宋体绿色)
11号字体测试(宋体绿色)
12号字体测试(宋体绿色)
14号字体测试(宋体绿色)
16号字体测试(宋体绿色)
18号字体测试(宋体绿色)
20号字体测试(宋体绿色)
22号字体测试(宋体绿色)
24号字体测试(宋体绿色)26号字体测试(宋体绿色)四号字体测试(宋体绿色)
5号字体测试(宋体红色)
5.5号字体测试(宋体红色)
6.5号字体测试(宋体红色)
7.5号字体测试(宋体红色)
8号字体测试(宋体红色)
9号字体测试(宋体红色)
10号字体测试(宋体红色)
10.5号字体测试(宋体红色)
11号字体测试(宋体红色)
12号字体测试(宋体红色)
14号字体测试(宋体红色)
16号字体测试(宋体红色)
18号字体测试(宋体红色)
20号字体测试(宋体红色)
22号字体测试(宋体红色)
24号字体测试(宋体红色)26号字体测试(宋体红色)四号字体测试(宋体红色)
5号字体测试(宋体蓝色)
5.5号字体测试(宋体蓝色)
6.5号字体测试(宋体蓝色)
7.5号字体测试(宋体蓝色)
8号字体测试(宋体蓝色)
9号字体测试(宋体蓝色)
10号字体测试(宋体蓝色)
10.5号字体测试(宋体蓝色)
11号字体测试(宋体蓝色)
12号字体测试(宋体蓝色)
14号字体测试(宋体蓝色)
16号字体测试(宋体蓝色)
18号字体测试(宋体蓝色)
20号字体测试(宋体蓝色)
22号字体测试(宋体蓝色)
24号字体测试(宋体蓝色)26号字体测试(宋体蓝色)四号字体测试(宋体蓝色)
下滑线及加粗
5号字体测试(宋体)
5.5号字体测试(宋体)
6.5号字体测试(宋体)
7.5号字体测试(宋体)
8号字体测试(宋体)
9号字体测试(宋体)
10号字体测试(宋体)
10.5号字体测试(宋体)
11号字体测试(宋体)
12号字体测试(宋体)
14号字体测试(宋体)
16号字体测试(宋体)
18号字体测试(宋体)
20号字体测试(宋体)
22号字体测试(宋体)
24号字体测试(宋体)
26号字体测试(宋体)
四号字体测试(宋体)
5号字体测试(楷体黑色)
5.5号字体测试(楷体黑色)
6.5号字体测试(楷体黑色)
7.5号字体测试(楷体黑色)
8号字体测试(楷体黑色)
9号字体测试(楷体黑色)
10号字体测试(楷体黑色)
10.5号字体测试(楷体黑色)
11号字体测试(楷体黑色)
12号字体测试(楷体黑色)
14号字体测试(楷体黑色)
16号字体测试(楷体黑色)
18号字体测试(楷体黑色)
20号字体测试(楷体黑色)
22号字体测试(楷体黑色)
24号字体测试(楷体黑色)26号字体测试(楷体黑色)四号字体测试(楷体黑色)
倾斜+双下滑+加粗字体
5号字体测试(楷体黑色)
5.5号字体测试(楷体黑色)
6.5号字体测试(楷体黑色)
7.5号字体测试(楷体黑色)
8号字体测试(楷体黑色)
9号字体测试(楷体黑色)
10号字体测试(楷体黑色)
10.5号字体测试(楷体黑色)
11号字体测试(楷体黑色)
12号字体测试(楷体黑色)
14号字体测试(楷体黑色)
16号字体测试(楷体黑色)
18号字体测试(楷体黑色)
20号字体测试(楷体黑色)
22号字体测试(楷体黑色)
24号字体测试(楷体黑色)26号字体测试(楷体黑色)四号字体测试(楷体黑色)。
