CitrixSecureGateway安装配置文档
Citrix安装部署文档
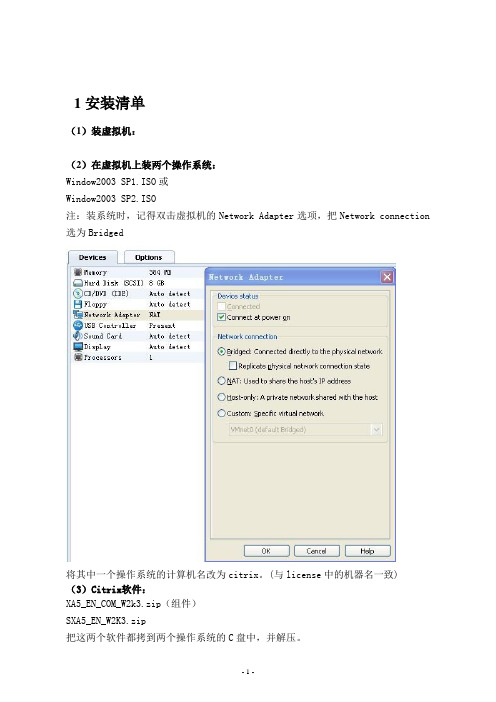
1安装清单(1)装虚拟机:(2)在虚拟机上装两个操作系统:Window2003 SP1.ISO或Window2003 SP2.ISO注:装系统时,记得双击虚拟机的Network Adapter选项,把Network connection 选为Bridged将其中一个操作系统的计算机名改为citrix。
(与license中的机器名一致) (3)Citrix软件:XA5_EN_COM_W2k3.zip(组件)SXA5_EN_W2K3.zip(4)Citrix license文件License文件要靠你自己找了!注:以下安装过程用到的固定IP设置可根据您的实际IP进行替换。
2 部署域环境(citrix机器)(1)安装windows组件先在citrix机器上安装DNS:开始->设置->控制面板->添加或删除程序->添加/删除windows组件:添加域名系统添加应用程序服务添加终端服务器授权,下一步安装过程中要求设置IP(如下图),确定,安装结束注:首选DNS服务器与IP地址要一致(2)终端服务器授权开始->程序->管理工具->终端服务器授权,选中citrix右击->激活服务器选择Web浏览器,下一步点击https://,选择中文简体,点go,点下一步填写相关信息,下一步获得许可证服务器ID输入许可证服务器ID,下一步下一步在之前的获取许可证服务器ID的页面选择“是”。
在许可证程序中选择“Enterprise Agreement”,下一步在接下来的界面中,“产品类型”选“Windows 2003终端服务客户端访问许可证(每设备)”,“数量”为你欲连接的最大用户数(比为“9999”);在“注册号码”中输入6565792,4954438,6879321或者5296992,再“下一步”;获得的许可证密钥包ID把许可证密钥包ID输入安装向导,安装完成。
(3)安装Active Directory打开:开始->运行,输入dcpromo,确定点下一步选择“新域的域控制器”:选择“在新林中的域”输入你想要的域名,格式:×××.com,下一步:下一步下一步下一步下一步下一步密码可不填(如要求填写,则填上),下一步:点下一步至安装结束安装完后要求重启计算机,重启后登陆域:(4)设置Active Directory开始->管理工具->Active Directory用户和计算机”,对着“”点右键,选择“新建->组织单位”,新建一个名为“citrix”的OU(组织单位)。
Citrix Gateway Configuring ServiceNow说明书
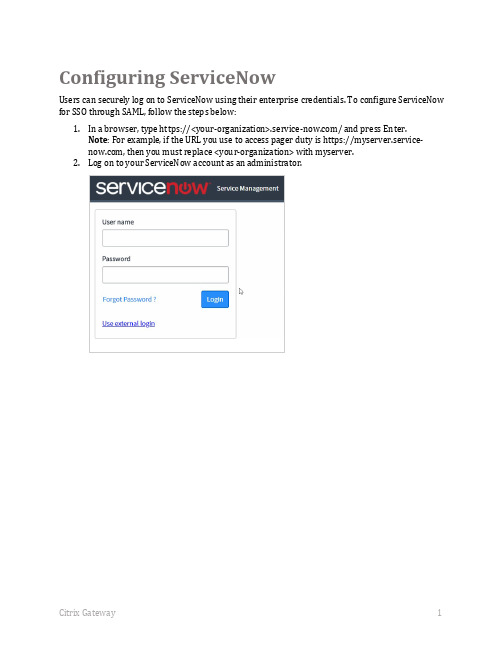
Configuring ServiceNowUsers can securely log on to ServiceNow using their enterprise credentials. To configure ServiceNow for SSO through SAML, follow the steps below:1.In a browser, type https://<your-organization>/ and press Enter.Note: For example, if the URL you use to access pager duty is https://myserver.service- , then you must replace <your-organization> with myserver.2.Log on to your ServiceNow account as an administrator.3.In the upper-left corner, using the Filter Navigator, search for plugins, and click Plugins in the search results.4.In the right pane, in System Plugins section, search for integration.5. In the search results, right-click Integration - Multiple Provider Single Sign-On Installer and click Activate/Upgrade.6. Click Activate.A progress bar indictaes the completion of activation process.7.In the left pane, scroll down to the Multi-Provider SSO section and click Multi-Provider S SO > Identity Providers.8.In the right pane, click New.9.Click SAML.10.If you have the metadata URL, in the Identity Provider New Record section, in the ImportIdentity Provider Metadata pop-up window, click URL and enter the metadata URL and click Import.The values for the Identity Provider record fields are automatically populated.If you have the metadata XML file, click XML. Copy the Identity Provider Metadata XML data and paste in the box. Click Import.The values for the Identity Provider record fields are automatically populated. You can update the values if required.11.If you want to enter the values manually without uploading a metadata file, close the ImportIdentity Provider Metadata pop-up window. In the Identity Provider New record section, specify the following information: – type the name that you want to use for the identity provider.ii.Default – select the check box if you want to set this configuration as default. iii.Identity Provider URL – type the issuer name that can be used while configuring IdPNetScaler for SSO.iv.Identity Provider's AuthnRequest – type the NetScaler URL followed by/saml/login. For example: https://<customerFQDN>/saml/loginv.Identity Provider's SingleLogoutRequest – If you users to log out from NetScalerafter they log out from ServiceNow, enter the logout URL of NetScaler:https://<customerFQDN>/cgi/logout.vi.ServiceNow Homepage – type the URL to access the home page:https:///navpage.dovii.Entity ID / Issuer – Type a unique Issuer ID. For E.g. https://<yourorg.service->viii.Audience URI – type the URL in https://<> format. ID Policy – type urn:oasis:names:tc:SAML:1.1:nameid-format:emailAddress. x.External logout redirect – retain the default values.12.Click Submit.13.In the left pane, click x509 Certificate to upload x509 certificate.14.In the right pane, click New.15.In the X.509 Certificate New record section, specify the following information: – type a certificate name.ii.Format – click the appropriate format: for e.g. PEM.iii.Expiration notification – select the check box.iv.Type – click the appropriate type.v.Notify on expiration – click the Add me icon to get notified. Click the Unlock Notify on expiration to add more users.vi.Active – select the check box.vii.Short Description – type description for the certificate.viii.PEM Certificate – paste the PEM certificate.To obtain your IdP certificate, follow the steps below:i.Remotely access your NetScaler instance using PuTTY.ii.Navigate to /nsconfig/ssl folder (using shell command cd /nsconfig/ssl) andpress Enter.iii.Type cat <certificate-name> and press Enter.iv.Copy the text from -----BEGIN CERTIFICATE----- to -----END CERTIFICATE-----v.Paste the text in a text editor and save the file in an appropriate format suchas <your organization name>.pemix.Click Submit.16.In the left pane, click Identify Providers.17.Click the Identity Provider that you have added.18.On the identity Provider details page, scroll down to the Related Links section. In the X.509 Certificate row, search for the X.509 certificate, and add the appropriate certificate for the identity provider by clicking Edit.Note: To add a new x.509 certificate, click New and to add or remove the certificates, click Edit.19.To save the changes, in the upper right corner on the identity provider details page, c lickUpdate.20.To obtain metadata to be used for IdP configuration, click Generate Metadata.Note: You must click Generate Metadata to complete the updates.The service provider metadata appears in a new window. Save the metadata in xml format to use it while configuring IdP for SSO.You have completed the required configuration on the service provider which is in this case – ServiceNow.。
CitriX_1.3安装与配置
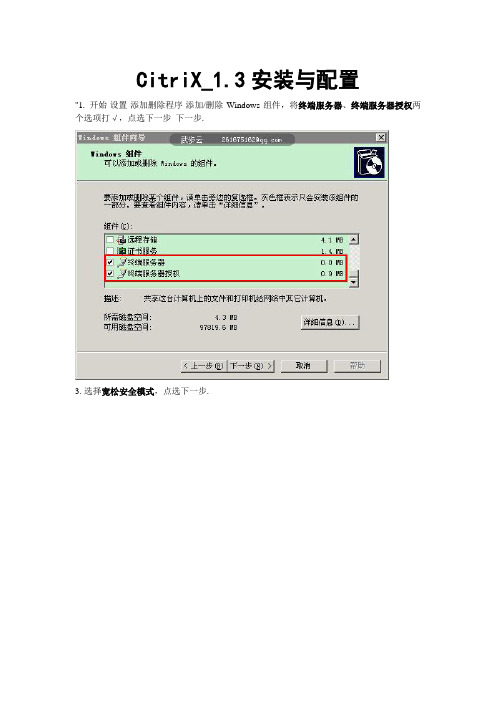
CitriX_1.3安装与配置"1. 开始-设置-添加删除程序-添加/删除Windows组件,将终端服务器、终端服务器授权两个选项打√,点选下一步_下一步.3.选择宽松安全模式,点选下一步.4.选择使用自动搜索的许可证服务器,点选下一步.5.选择每用户授权模式,点选下一步_下一步.6.安装过程中缺少文件,选择Windows Server 2003原版I386目录下的LSERVER.EX_ 打开,点选确定,等待安装成功点选完成.(此时提示重启系统,选择是)7.开始-程序-管理工具-终端服务器授权,右键当前服务器名选择激活服务器,下一步-激活方式选择Web浏览器,下一步.8.复制产品ID,点选打开https:///.9.将下拉列框选择为Chinese(Simplified)点选go.10.页面切换成中文,点选启动许可证服务器,下一步.11.将复制的ID粘贴至产品ID处,填写公司名称与国家地区,下一步.问许可证,点选是.13.许可证程序选择为其他,产品信息与公司信息默认会选择好,点选下一步.9999、协议号码:6565792,下一步.ID框中,点选下一步激活成功,勾选客户端授权向导,下一步.16.将终端服务器授权网站得到的许可证密钥包ID粘贴至终端服务器CAL安装向导-许可证密钥包ID框内,点选下一步,完成.17.查看开始-程序-管理工具-终端配置、终端服务器授权状态.18.开始-程序-控制面板-区域和语言选项-高级-勾选将所有设置应用于当前用户账户和默认用户配置文件,点选确定.(此处先将输入法等安装好,设置之后远程用户是统一的输入法)19.运行Citrix目录下Autorun.exe.20. 选择Install or update MetaFrame XP Server.21.选择MetaFrame XP Feature Release 3.22. 计算机名要求是(A-Z,a-z,0-9,-)可能会提示说计算机名不标准,勿用中文与特殊符号,修改过计算机名后重启电脑再打开安装程序,点选Next.23.选择Iaccept the license agreement,点选Next.24. 选择MetaFrame XPe,点选Next.25.选择Retail,点选Next.26.点选Browse选择安装路径,点选Next.27.默认Yes,点选Next.28.选择Create a new farm,点选Next.29.定义Farm name名称,数据库默认Access Database,其他默认,点选Next.30. 默认会将当前管理员账户与域设置为CitriX控制台登录的凭据,点选Next.31.选择Allow shadowing of ICA sessions on this server,点选Next.32.默认端口80,点选Next.33.设置远程桌面用户组,选择Add the list of users from the Users group now,点选Next.34.确认配置信息,点选Finish,等待安装完毕.35. 取消Launch the ICA Client Distribution wizard的勾选,点选Close,重启系统.36.开始-程序-Citrix-Management Console,默认connect to preferred server,勾选上Enable pass-through authentication,点选OK.37. 选择左树型列Licenses,右边点选License Numbers,右键下方空白处点选Addlicense...38.打开CitriX安装目录Key文件夹下keygen.exe,这里一共需要注册4种类型许可证(MetaFrame XP 1.0 for Windows、Feature Release3、MetaFrame XPe 1.0 for Windows、Citrix User License Pack、MetaFrame XPe 1.0 Connection Pack),点选Generate.39. 将序号粘贴至Add License-Serial Number框中,点选OK,其他3种类型依次操作.40. 有时会出添加许可证成功但未激活,需要进行再次激活.点选Copy to Clipboard粘贴至Serial Activation-Seria处,将代码复制粘贴至Activation Code,点选OK即可,重启服务器.41.开始-程序-管理工具-终端服务配置-连接,右键ICA-tcp属性,设置会话.42.设置环境,CitriX客户端登陆时启动的程序.43.客户映射设置,将不需要的映射项可禁用.44.ICA Settings,勾选By default,connect only the client`s main printer,点选应用-关闭.45. 客户端的安装直接Next即可,先创建ICA客户端登录用户,必须隶属于管理员账户.46. 打开客户端安装目录下的pn.exe,默认Local Area Network,点选下一步.47. 第一行输入应用名称,第二行默认,第三行填写服务器地址,点选下一步.48. 默认加密方式Basic,点选下一步.49. 填写要登录的User name、Password,点选下一步.50. 设置Windows Colors与Window Size,点选下一步.51. 服务端已经设置默认启动的程序,这里无需设置,点选下一步-完成.52. 右键Open创建好的应用,可以看到启动的程序了,右键Create Desktop shortcut可发送快捷方式至桌面.53. 本教程在实体机下制作而成,硬件配置见(52图)软件配置如下:①:Windows Server 2003 SP2微软原版系统,未安装任何补丁.②:CitriX_1.3,此版本历史悠久2003年的版本.③:PCY_DIY_1.5,教程作者用脚本语言编写的XP/2003系统优化设置工具.54 . 本教程只是简单的认识了CitriX的安装与基本配置,其中还有很多细节设置未具体说明,此版本过低,很多功能不能满足现代虚拟化办公,建议使用虚拟化的朋友选择最新的CitriX版本,已满足办公的需求.谢谢观看。
通过电脑连接Citrix使用手册
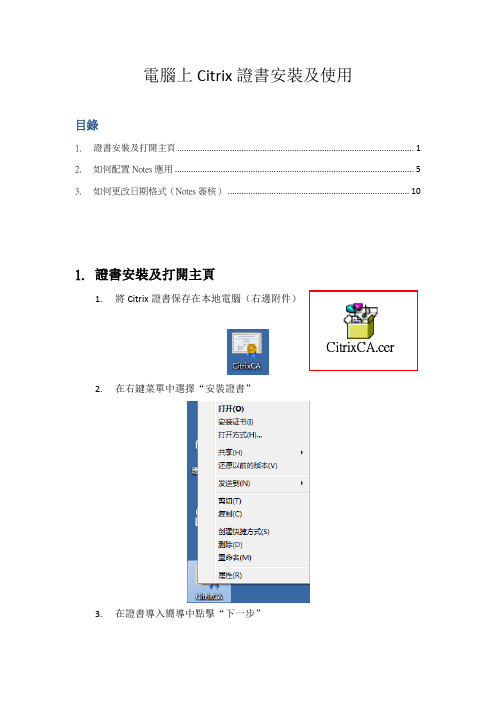
電腦上Citrix證書安裝及使用目錄1.證書安裝及打開主頁 (1)2.如何配置Notes應用 (5)3.如何更改日期格式(Notes簽核) (10)1.證書安裝及打開主頁1.將Citrix證書保存在本地電腦(右邊附件)2.在右鍵菜單中選擇“安裝證書”3.在證書導入嚮導中點擊“下一步”4.在證書存儲提示中,選擇“將所有的證書放入下列存儲”,點擊“瀏覽”5.選擇“受信任的根證書頒發機構”,點擊“確定”注:如是Vista系統,需勾選“顯示物理存儲區”,然後選擇“本地計算機”6.下一步點擊“完成”即可。
7.在電腦IE 瀏覽器中輸入https://,並輸入用戶名及密碼8.進入系統後,下載並安裝Client 文件9.安裝客戶端進入系統後如下圖10.使用完畢後請點擊“注銷”11.Notes配置2.如何配置Notes應用a.在公司園區網中用辦公電腦將Notes ID 上傳到服務器;訪問共享\\xenapp.ecmms.foxconn(\\10.157.152.99), 用戶名為Citrix賬號及密碼。
(用戶名為:ECMMS\xxxxx)。
注:如無法訪問共享,請訪問ftp://10.157.152.99b.複製本機電腦上的Notes ID文件,粘貼到個人目錄中(此目錄在服務器的位置C:/UserData/username,ftp上傳的在C:/UserData/temp)c.啟動Notes 程序d.出現Notes用戶端配置嚮導,點擊下一步e.在Notes配置嚮導中輸入您的信箱名稱及伺服器名稱,並點擊下一步例:你的名稱(Y) CMM-IT-SA/CMM/FOXCONNDomino伺服器名稱 CHNLH05/FOXCONN”f.配置伺服器:輸入伺服器名稱,選擇TCP/IP,並填入Domino伺服器的IP地址,並點擊下一步。
附常用Domino伺服器名稱及IP 地址:CHNLH05/FOXCONN 10.134.102.25CHNLH06/FOXCONN 10.134.101.26CHNLH23/FOXCONN 10.134.102.53CHNLH24/FOXCONN 10.134.101.54CHNVIP01/FOXCONN 10.134.102.101CHNVIP02/FOXCONN 10.134.101.102選擇Notes ID,(Notes ID在C:\UserData\個人目錄下)a.彈出複製文件的提示,選擇“Yes”b.在即時訊息設定提示中,取消“設定即時訊息”,點擊下一步。
citrix安装手册
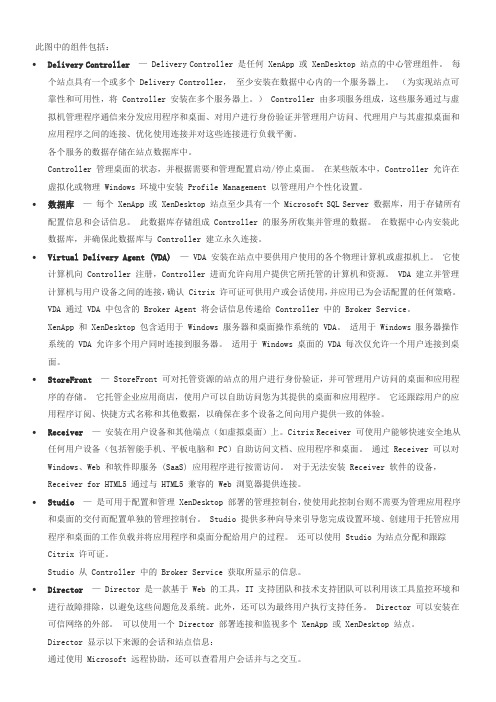
此图中的组件包括:∙Delivery Controller— Delivery Controller 是任何 XenApp 或 XenDesktop 站点的中心管理组件。
每个站点具有一个或多个 Delivery Controller,至少安装在数据中心内的一个服务器上。
(为实现站点可靠性和可用性,将 Controller 安装在多个服务器上。
) Controller 由多项服务组成,这些服务通过与虚拟机管理程序通信来分发应用程序和桌面、对用户进行身份验证并管理用户访问、代理用户与其虚拟桌面和应用程序之间的连接、优化使用连接并对这些连接进行负载平衡。
各个服务的数据存储在站点数据库中。
Controller 管理桌面的状态,并根据需要和管理配置启动/停止桌面。
在某些版本中,Controller 允许在虚拟化或物理 Windows 环境中安装 Profile Management 以管理用户个性化设置。
∙数据库—每个 XenApp 或 XenDesktop 站点至少具有一个 Microsoft SQL Server 数据库,用于存储所有配置信息和会话信息。
此数据库存储组成 Controller 的服务所收集并管理的数据。
在数据中心内安装此数据库,并确保此数据库与 Controller 建立永久连接。
∙Virtual Delivery Agent (VDA)— VDA 安装在站点中要供用户使用的各个物理计算机或虚拟机上。
它使计算机向 Controller 注册,Controller 进而允许向用户提供它所托管的计算机和资源。
VDA 建立并管理计算机与用户设备之间的连接,确认 Citrix 许可证可供用户或会话使用,并应用已为会话配置的任何策略。
VDA 通过 VDA 中包含的 Broker Agent 将会话信息传递给 Controller 中的 Broker Service。
XenApp 和 XenDesktop 包含适用于 Windows 服务器和桌面操作系统的 VDA。
Citrix Secure Gateway数字证书使用说明
Citrix Secure Gateway数字证书安装说明
证书安装说明:
一.安装根证书:
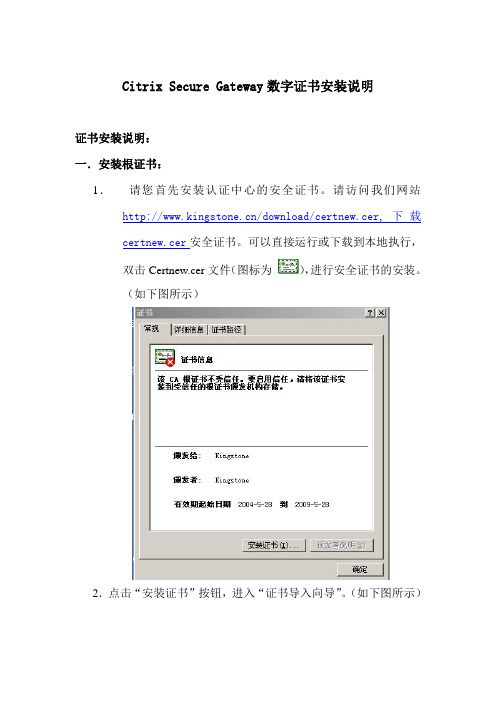
1.请您首先安装认证中心的安全证书。
请访问我们网站/download/certnew.cer,下载
certnew.cer安全证书。
可以直接运行或下载到本地执行,
双击Certnew.cer文件(图标为),进行安全证书的安装。
(如下图所示)
2.点击“安装证书”按钮,进入“证书导入向导”。
(如下图所示)
3.点击“下一步”按钮,出现如下画面。
(如下图所示)
4.直接点击“下一步”按钮,出现如下画面。
(如下图所示)
5.直接点击“完成”按钮,出现下面窗口。
(如下图所示)
6.点击“是”按钮,完成根证书的安装。
(如下图所示)
此时安全证书已经成功的安装到您的电脑上。
Citrix+Access+Gateway配置手册
再新建的资源中输入需要访问的网段
选择认证的方式,如无特殊的选择,请选择 No Authorization
将 Enable Portal Page Authorization 前面的复选框去除,保证一次登陆
填入允许访问的内网 IP 网段,格式:10.0.0.0/8
Dns server 填外网的 DNS 名
选择 staticRouting,填入内网路由,填入内网的 IP 地址段
用于申请证书,也可通过 admin guide 后的指示通过第三方软件或通过微软的传统方式申请 证书
证书必须是 PEM 格式的,做完后在此导入
在 access policy Manager 中在 Default 组上右键,eway Portal 中选择 Redirect to URL: Portal homepage: /citrix/secureaccess Proxy Server: your Citrix Server IP 二、如果直接使用 Access Gateway:
选择 Full Client
Citrix Access Gateway 配置手册
通过 Access Gateway Administration Tool 或 https://homepage:9001 进入
Interface 0 为外网口 Interface 1 为内网口 Fqdn 填完整域名
IP Address 填外网 gateway 地址
9001进入interface0为外网口interface为内网口fqdn填完整域名ipaddress填外网gateway地址dnsserver填外网的dns选择staticrouting填入内网路由填入内网的ip地址段用于申请证书也可通过adminguide后的指示通过第三方软件或通过微软的传统方式申请证书证书必须是pem格式的做完后在此导入在accesspolicyanager中在default组上右键选择propertioes在gatewayportal中选择redirecturl
完整版)部署Citrix桌面虚拟化环境文档
完整版)部署Citrix桌面虚拟化环境文档部署Citrix桌面虚拟化文档为了部署Citrix桌面虚拟化,需要先安装XenServer服务器虚拟化系统。
以下是安装步骤:1.安装XenServer操作系统A)将XenServer 6.5系统安装光盘放入光驱,进入BIOS 选择光盘启动。
B)选择“US”,直接回车。
C)选择默认下一步“OK”,直接回车。
D)选择“接受Citrix的许可协议”,确认【Enter】。
E)确认【OK】,直接选择回车【Enter】进下一步。
F)选择要安装的服务器硬盘,“一般选择安装在服务器本地硬盘”,【下一步】。
G)选择XenServer系统安装方式,“使用本地光盘”,下一步。
H)确认选择“OK”,进行下一步。
I)直接【下一步】,进入系统安装界面。
J)现在系统正在安装。
K)选择【OK】L)设置XenServer管理员密码,注意:密码要满足复杂性要求。
M)设置服务器的IP地址,选择静态IP地址【安装空格键选中】。
N)设置主机名和dns地址。
O)默认下一步,直接回车。
P)如果虚拟化环境中还没有NTP服务器,可以不选择NTP。
如果环境中有ntp服务器,可以选择ntp服务器,设置ntp服务器地址。
Q)选择“Install XenServer”R)系统安装完成,在这里选择跳过“Skip”,继续。
S)设置服务器的本地时间。
设置完成后选择“OK”。
T)系统已经安装完成了,需要重新启动服务器。
【OK】。
U)重启完成后会进入XenServer系统界面。
2.下载并安装XenCenter客户端管理软件。
(安装在管理端PC上)为了管理XenServer服务器,需要下载并安装XenCenter客户端管理软件。
以下是安装步骤:A)使用浏览器访问服务器IP地址。
B)安装XenCenter客户端软件。
双击运行已经下载的软件。
插件程序。
(插件时,计算机需要保证在联网的环境下)C)正在安装D)插件已经安装完成。
E)点击完成后会自动弹出安装XenCenter的界面。
citrix安装配置文档
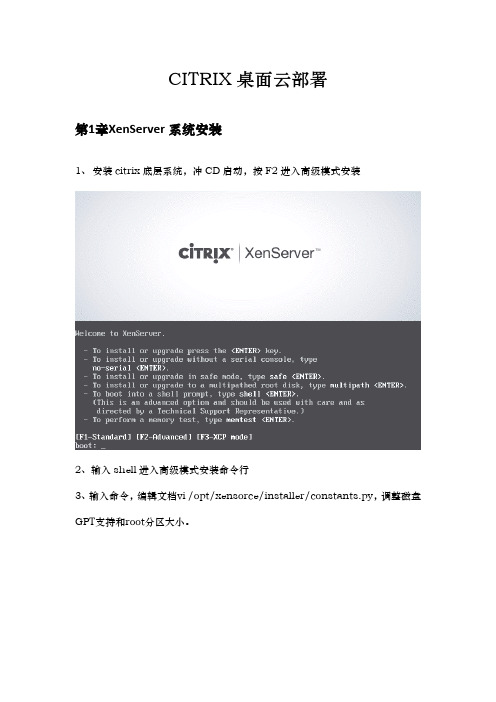
CITRIX桌面云部署第1章XenServer系统安装1、安装citrix底层系统,冲CD启动,按F2进入高级模式安装2、输入shell进入高级模式安装命令行3、输入命令,编辑文档vi /opt/xensorce/installer/constants.py,调整磁盘GPT支持和root分区大小。
4、浏览到大约60%左右,把GPT_SUPPORT = True 修改成GPT_SUPPORT =False#,用来关闭GPT磁盘支持,使用MBR磁盘模式;root_size = 4096 修改成root_size = 20480,把root分区修改成20480MB。
修改完后按ESC,输入如下文本:wq;保存并退出。
5、输入exit,回到安装界面,选择[qwerty] us6、点OK7、选择Accept EULA8、选择0k9、选择Enable thin provisioning(使用空格键选择),为XenDesktop部署做优化,注:如果之前安装过其他版本的XenServer,选择“Perform clean installation”。
10、选择Local media11、Supplemental Packs选择No,不安装帮助文档12、选择Skip verification,跳过安装介质检测13、设置XenServer登录密码14、选择一个网口作为管理网口,并配置IP地址15、输入主机名Host-name:starsino,DNS地址DNS Server 1:XXXX16、选择时区亚洲Asia ,上海17、选择手动时间输入Manual time entry18、选择Install XenServer进行安装19、最后设置时间20、重启安装完成第2章客户端安装登入1、输入服务器网卡地址登入web页面http://172.16.1.139;选择XenCenter installer 下载客户端,进行安装;注:中文版要到官网上下载1、打开客户端,选择add,添加服务器;注:如果添加服务器后,右上角出现“系统报警”,就要对系统进行打补丁包,整体步骤看citrix官网文档。
Citrix产品安装部署文档(XenServer-XenDesktop-XenApp)
Citrix产品安装部署文档XenServer+XenDesktop+XenApp 第一章、安装部署XenServer1、实验环境概述硬件设备为:两台dell台式机。
2、安装XenServer 6.02.1 使用U盘安装xenserver系统,插上U盘,开机按F12(机器不同启动项不同)选择U盘启动:按‘回车’键2.2 直接默认第一个US,点击OK2.3 直接点击OK2.4 点击Accept EULA2.5 点击OK2.6 默认选项,点击OK2.7 默认第一个,点击OK2.8 点击Yes2.9选择‘Skip verification’跳过验证,点击‘OK’2.10 设置密码,点击OK2.11 选择静态IP,设置IP,然后点击’OK’2.12 设置DNS,点击OK2.13选择‘Asia’,点击’OK’2.14 选择’Shanghai’点击’OK’继续:2.15选择‘Manual time entry’点击’OK’(实验环境没有NTP服务器,一般企业都没有)2.16 选择’Install XenServer’安装进行,2.17 点击Skip2.18 设置时间,点击OK2.19点击OK,重启服务器2.20 安装系统完成3、安装XenCenter3.1 在IE,输入xenserver服务器的IP地址3.2下载安装XenCenter3.3运行‘XenCenter’开始---所有程序—citrix---Citrix XenCenter3.4 连接XenServer服务器3.5点击Accept3.5连接成功,Citrix XenServer实验结束!!第二章、安装部署XenDesktop1、实验环境概述1.1实验环境该实验使用2台dell台式机,一台安装XenServer6.0和另一台安装装XenCenter.。
由于是测试环境Xendesktop5.6+AD+Windows 7全部在xenserver虚拟机上创建运行。
宏杉存储_Citrix环境下客户端软件安装配置指南v1.3_.
Citrix 环境下客户端软件安装配置指南 (仅供内部使用杭州宏杉科技有限公司版权所有侵权必究目录Citrix 环境下客户端软件安装配置指南 . .................................................................................. i 第 1章概述 . .............................................................................................................................. 1 1.1 本文使用范围 . ............................................................................................................................ 1 1.2 客户端软件 ................................................................................................................................. 1 1.3 安装说明 (1)1.3.1确认操作系统版本 . ................................................................................................................ 1第 2章网络配置 . ...................................................................................................................... 3 2.1 配置 XenServer6.0网络 . ............................................................................................................ 3 2.1.1选择连接后端存储的网卡 . .................................................................................................... 3 2.1.2创建虚拟网口及配置IP ........................................................................................................ 4 2.2 配置XenServer6.1/6.2网络 . ......................................................................................................5 2.2.1选择连接后端存储的网卡 . .................................................................................................... 5 2.2.2创建网口及配置 IP ................................................................................................................ 6第 3章安装和配置 iSCSI initiator软件 .................................................................................. 7 3.1 查看 iSCSI 软件 ......................................................................................................................... 7 3.2 查看Initiator Name .. (7)3.3 查看 iSCSI 服务运行状态 ......................................................................................................... 8 3.4 配置iscsid.conf 文件 . .................................................................................................................9 3.5 重启 iscsi 服务 . ........................................................................................................................... 9第 4章安装和配置 Multipath 软件 (10)4.1 查看 MultiPath 软件 . ................................................................................................................ 10 4.2 查看MultiPath 驱动模块 . ........................................................................................................10 4.2.1加载 dm-multipath 模块 ....................................................................................................... 10 4.3 配置multipath.conf 文件 (11)4.4 连接存储设备 . .......................................................................................................................... 15 4.5查看多路径状态 . ...................................................................................................................... 15第 5章连接存储设备 . (17)5.1 iSCSI单路径 ............................................................................................................................ 17 5.1.1连接存储设备 . ......................................................................................................................17 5.1.2查看存储资源 . ...................................................................................................................... 19 5.2 FC 单路径 . ................................................................................................................................20 5.2.1查看 FC HBA卡的 WWN号 ............................................................................................... 20 5.2.2连接存储设备 . ...................................................................................................................... 20 5.2.3查看存储资源 . ...................................................................................................................... 22 5.3 iSCSI多路径 (22)5.3.1安装和配置 multipath 软件 . ................................................................................................. 22 5.3.2连接存储设备 . ...................................................................................................................... 23 5.3.3查看存储资源 . ...................................................................................................................... 25 5.3.4查看多路径状态 . .................................................................................................................. 25 5.3.5故障切换时间 . . (26)5.4 FC多路径 . (27)5.4.1查看 FC HBA卡的 WWN号 ............................................................................................... 27 5.4.2安装和配置multipath 软件 . ................................................................................................. 27 5.4.3连接存储设备 . ......................................................................................................................27 5.4.4查看存储资源 . ...................................................................................................................... 29 5.4.5查看多路径状态 . ..................................................................................................................30 5.4.6故障切换时间 . ...................................................................................................................... 31第 6章CHAP认证配置方法 . (31)6.1 单向 CHAP 认证 ...................................................................................................................... 31 6.1.1存储端配置 . ..........................................................................................................................31 6.1.2 xenserver端配置 .................................................................................................................. 33 6.2 双向CHAP 认证 . (33)6.2.1存储端配置 . .......................................................................................................................... 33 6.2.2 xenserver端配置 .................................................................................................................. 36第 7章常见问题 . .................................................................................................................... 38 7.1 如何将存储资源从 IP 链路更换为 FC 链路 . ..........................................................................38 7.2 添加磁盘故障处理办法 . .......................................................................................................... 41 7.2.1在添加SR 存储时出现如下图错误 (41)7.2.2查看目前已经添加的存储 . (42)修订记录第 1章概述本章主要描述了以下内容:●本文使用范围●客户端软件●安装说明1.1 本文使用范围本文使用范围:XenServer 6.0、 Xenserver6.1、 Xenserver6.2、 Xenserver6.5;本文档在 XenServer 6.1环境下完成编写,如果涉及到不同版本之间的区别,本文档会特别指出。
Citrix安装文档
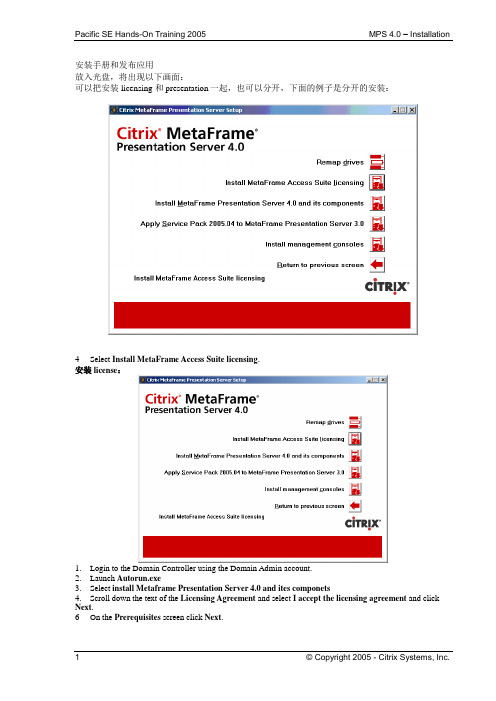
安装手册和发布应用放入光盘,将出现以下画面:可以把安装licensing 和presentation一起,也可以分开,下面的例子是分开的安装:4 Select Install MetaFrame Access Suite licensing.安装license:1.Login to the Domain Controller using the Domain Admin account.unch Autorun.exe3.Select install Metaframe Presentation Server4.0 and ites componets4.Scroll down the text of the Licensing Agreement and select I accept the licensing agreement and click Next.6 On the Prerequisites screen click Next.7 On the Component Selection screen leave the defaults selected and click Next. The JRE will then install first.8 After the install of the JRE, the install of the license server begins. On the Welcome page click Next.9 On the Destination Folder screen leave the defaults and click Next.10 On the Select Features screen leave the defaults and click Next.11 On the License Files Locations screen leave the defaults and click Next.12 On the Web Server Selection screen select Microsoft internet Information service and click Next.13 On the IIS Server screen select OK to restart IIS Server and click Next.14 On the Ready to Install Application screen click Next to install the License Server and the License Management Console.15 After the install is complete click Finish.Step-by-Step Task 3 – Install a Citrix License.In this section you will install a Citrix License on the License Server.Step Action1 Login to the Domain Controller using the Domain Admin account.2 Launch the Citrix License Management Console from Start → Programs → Citrix → Management Consoles → License Management Console.3 After the License Management Console (LMC) launched select Configure License Server.4 Select Step 2: Copy license file to this license server.5 On the Upload license file screen click Browse and browse to the license file and click Open.6 Click Upload.7 You should now return automatically to the License Files screen where the message Copy Completeappears on the page.8 Click on the Current Usage tab to verify if the licenses are installed.9 Close the browser.Step-by-Step Task 1 – Install Citrix Presentation Server 4 and components.In this section you will install Presentation Server and its components on the Presentation Server.1 Login to the Presentation Server using the Domain Admin account.2 Launch Autorun.exe.3 Select Product installation and updates.4 Select Install MetaFrame Presentation Server 4.0 and it’s components.5 Scroll down the text of the Licensing Agreement and select I accept the licensing agreement and click Next.6 On the Prerequisites screen click Next.7 On the Component Selection screen leave the defaults selected and click Next.8 On the next screen select I already have a license server, or will use the product CD to install one later and click Next.9 The installer will now first install the MetaFrame Presentation Server Administration Snap-in (Access Suite Console).10 Take the following steps:1.Welcome screen click Next;2.Select Destination folder screen leave default and click Next;3.Select snap-ins screen leave the default snap-ins selected and click Next;4.Ready to Install the Application screen click Next;5.After the installation click Finish.11 The installer will now install the Web Interface.11 Take the following steps:1.Welcome screen click Next;mon Components screen leave default and click Next;3.Clients screen leave Don’t install the Clients from the Components CD-ROM selected and click Next;4.Ready to Install the Application screen click Next;5.After the installation click Finish.12 The installer will now install MetaFrame Presentation Server.13 Take the following steps:1.Welcome screen click Next;2.Product Edition screen select Enterprise and click Next;ponent Selection screen leave the defaults and click Next;4.Pass-though Authentication screen select Yes and click Next;5.Create or Join a Server Farm screen select Create and click Next;6.Create a Server Farm screen name the farm MPS4DEMO, use Access as the data store, and click Next;7.Assign Farm Administrator screen leave defaults and click Next;8.MetaFrame Access Suite Licensing screen point to ATLSRV1 and click Next;9.Shadowing screen select Allow shadowing and click Next;10.Configure Citrix XML Service Port select Use separate port choose 8080 and click Next;11.Add users to Remote Desktop Users group screen leave defaults (Add users from the group) and click Next;12.Review screen click Finish;13.When the Installer Information window pops up click Yes;14.After the installation uncheck View the Readme file and click Close.14 The installer will now install the Presentation Server Management Console.15 Take the following steps:1.Welcome screen click Next;2.Ready to Install the Application screen click Next;3.After the installation click Finish.16 The installer will now install the Document Center.Take the following steps:1.Welcome screen click Next;2.Destination folder screen leave default and click Next;3.After the installation click Finish.17 When all installations are finalized click Finish.18 Reboot the server.Step-by-Step Task 1 – Run Discovery.In this section you will run the Access Suite Console for the first time and run the discovery.1 Login to the Domain on Presentation Server using the Domain Admin account.2 Launch the Citrix Access Suite Console from Start →Programs → Citrix → MetaFrame Presentation Server → Access Suite Console or from the Citrix taskbar on the right of the screen.3 The Configure and run discovery wizard will start automatically.Take the following steps:1.Welcome screen click Next;2.Select Components screen leave defaults and click Next;3.Configuration Server screen select Contact the following Web Interface configuration servers and click Add, fill in the name of the Presentation Server and click OK, click Next;4.Select Server screen click on Add local Computer to discover your farm and click Next;5.Preview Discover screen verify your settings and click Next to start the discovery process;6.After Discovery Progress is finalized click Finish.Step-by-Step Task 2 – Create Web Interface Site.In this section you will create a Web Interface site in the Access Suite Console.1 Login to the Domain on the Presentation Server using the Domain Admin account.2 Launch the Citrix Access Suite Console from Start →Programs → Citrix → MetaFrame Presentation Server → Access Suite Console or from the Citrix taskbar on the right of the screen.3 In the Access Suite Console click on Web Interface in the left pane and click Create site in the middle pane.4 Select MetaFrame Presentation Server and click Next.5 On the IIS Hosting screen select the following:1.IIS site: Default Web Site;2.Path: /Citrix/MetaFrame/;3.Check Set as the default page for the IIS site;4.Check Use site IIS path;5.Click Next.6 On the Configuration Source screen select Use local configuration file(s) and click Next.7 On the Server farm screen enter the following:1.Farm name: leave default farm name Farm12.Click Add and enter the name of a MPS server in the farm (in our lab we only have one)3.XML service port:enter port number (8080);4.Click Next.8 Review the New Site Summary screen and click Next.9 After creation is finalized click Finish.10 The newly created WI site should be listed in the Access Suite Console.Step-by-Step Task 3 – Create a Program Neighborhood Agent Service.In this section you will create a Program Neighborhood Agent Service in the Access Suite Console.1 Login to the Domain on the Presentation Server using the Domain Admin account.2 Launch the Citrix Access Suite Console from Start →Programs → Citrix → MetaFrame Presentation Server → Access Suite Console or from the Citrix taskbar on the right of the screen.3 In the Access Suite Console click on Web Interface in the left pane and click Create site in the middle pane.4 Select Program Neighborhood Agent Services and click Next.5 On the IIS Hosting screen select the following:1.IIS site: Default Web Site;2.Path: /Citrix/PNAgent/;3.Check Use site IIS path;4.Click Next.6 On the Configuration Source screen select Use local configuration file(s) and click Next.7 On the Server farm screen enter the following:5.Farm name: leave default farm name Farm16.Click Add and enter the name of a MPS server in the farm7.XML service port:enter port number (8080);8.Click Next.Note: PN Agent no longer takes the WI configuration settings. It points to a farm independently of Web Interface8 Review the New Site Summary screen and click Next.9 After creation is finalized click Finish.10 The newly created PN Agent Service should be listed in the Access Suite Console.Step-by-Step Task 1 – Publish Notepad.In this section you will publish Notepad.exe from the Presentation Server Management Console.Step Action1 Login to the Domain on Presentation Server using the Domain Admin account.2 Launch the Presentation Server Console from Start → Programs → Citrix → Management Consoles → Presentation Server Console or from the Citrix taskbar on the right of the screen.3 In the left pane of the Presentation Server Console right-click on Applications and select Publish Application.4 In the first screen type Notepad as the Display Name and click Next.5 In the Specify what to Publish screen click Browse and browse to C:\WINDOWS\NOTEPAD.EXE and click OK. Click Next.6 Complete the rest of the publishing wizard as normal. Grant user demo1access to this published application.7 Close the Presentation Server Console.Step-by-Step Task 2 – Test Published Application with Web Interface.In this section you will test your published application Notepad from the Client device with Web Interface.Step Action1 Login to the Domain on the Domain Controller using the domain admin account. Verify that the ICA client has been installed. If not, install the ICA client, reboot, then login using the demo1 user account.2 Launch a browser.3 Enter http://[Presentation Server Name]in the address bar and press Enter.4 Fill in your credentials:Click Log In.5 After logging in click on the Notepad icon.6 Verify that the application launches successfully.7 Close Notepad.Step-by-Step Task 3 – Test Published Application with Program Neighborhood Agent.In this section you will test your published application Notepad from the Client device with the Program Neighborhood Agent Client.Step Action1 Login to the Domain on the Domain Controller using the demo1 user account.2 Launch the Program Neighborhood Agent from the desktop.3 If this is the first time you use the PN Agent, you will have to specify the Server URL. Right-click on the PN Agent System Tray icon.The following message appears. Click Yes.3 Enter http://[Presentation Server Name] in the address bar and click Update.4 Fill in your credentials:Click OK.21 © Copyright 2005 - Citrix Systems, Inc.22© Copyright 2005 - Citrix Systems, Inc. 5Right-click on the PN Agent System Tray icon and select Notepad from the Applications .6 Verify that the application launches successfully.7 Close Notepad.23 © Copyright 2005 - Citrix Systems, Inc.。
安装和配置Citrix
安装和配置Citrix服务器(一)Citrix,我认识它是在大概三年前,参加了一个在Shangri-La的IT会议,当时有个演讲题目就是有关Citrix的。
在演讲中演示了一个让我记忆深刻的例子,当时无线网络还不是很发达,但在Shangri-La这样的高级饭店里还是有的,不过速度不快,只有11Mbps。
演示者说他连接了这个无线网络到Internet,然后打开Citrix 软件,通过它连接到一个在澳大利亚的一个中间服务器,最后接入在那边的一个电脑的终端桌面,打开了一个Excel,开始编辑,速度相当流畅,然后他故意断开网络,演示停电之后,在继续连上那台电脑,那个Excel仍然在那里。
过去了三年,这个演示仍然让我记忆深刻。
但在结束的时候演讲者告诉我们世界500强有一大半都用他们的产品,Top10的公司有8家都用他们的东西,当时有很多人就在开玩笑,说也只有有钱的公司才能用的起它。
可想而知,它有多贵了。
过了三年,我们终于也拥有了这个产品,虽然只是最低级的版本,但用它终于可以实现当时所见的功能,让我兴奋了很久。
产品买来后,发现需要注意的地方实在太多,首先买它之前,要先申请License,需要确定的告诉Citrix公司你将要安装Citrix服务器的机器名,最值得注意的是,确定大小写(这也是我后来才知道的)。
安装之前还要配置好Microsoft Windows Server上的终端服务,准确的说当你购买Microsoft服务器版的时候,并不包括这个终端服务,它是需要另买的。
(Microsoft可够黑的),但没有关系,我们这里有不错的方法,能让你正常使用。
为了这篇文章,我在虚拟机上反复测试了N遍,希望你们照我的方法操作能顺利的搞定它。
安装环境:宿主机:Dell2850 Intel Xeon 3.0G Memory 4G HD SCSI 10000r/m 73G RAID1虚拟机:VMware Workstation 5.51 Intel×2,Memory 1G HD SCSI 20G (Citrix)宿主机上安装的是MS Windows2003 SP1,上面除虚机外还装有一套eFAX软件;虚拟机上一共有三个虚机,一台是作标准应用的,一台Citrix,一台作为终端登录机。
CITRIX安装和配置指南
CITRIX安装和配置指南一、简介Citrix Systems, Inc.为实现虚拟办公环境提供优秀的软件与服务,并在该领域内居全球领导地位,其核心技术主要是:1、Citrix ICA ——Citrix的独立计算结构(Independent Computing Architecture)是一种领先、成熟的技术, ICA能够在服务器上集中处理网络系统中的所有应用程序,不但节省成本、提高效率,更能降低对带宽的要求,支持各种平台或设备,同时加强安全保障和集群管理功能。
2、Citrix MultiWin(TM)——能使多个用户在不同的客户端平台上,同时进入和运行服务器上的某个应用软件。
微软公司已购买了MultiWin的特许使用权,使MultiWin与Windows NT内核一同工作,以支持多用户并行会话。
事实上,用户可以远程访问和显示所需的应用,但感觉却像在本地单独使用系统一样。
因此,在微软最新推出的Windows 2000 Servers系统中,终端服务的功能被正式命名为RDP(Remote Display Protocal)。
除此以外,Citrix还拥有SpeedScreen Technology、Idependent Managerment Architecture等专利术。
目前其主导的商用产品是:Citrix产品Citrix MetaFrame XP Presentation Server详细>>Citrix MetaFrame Password Manager详细>>Citrix MetaFrame Conferencing Manager详细>>这其中又可分为:A:Citrix MetaFrame XP Prensetation Server可以提供三个版本地解决方案,适合绝大多数用户地需求●Citrix MetaFrame XP Prensetation Server标准版为各部门、工作组和小型公司提供了一个控制级别,以便用来将Microsoft Windows Server 2000和2003地功能扩展到任何设备。
-Citrix部署文档
目录一、准备工作 (2)二、Citrix主机的部署 (3)(1)安装相关网络组件 (3)(2)安装Citrix Licensing (7)(3)安装Citrix必要组件 (13)(4)安装应用程序 (34)(5)创建用户账户 (34)(6)应用程序的发布 (37)(6.1)创建web站点 (37)(6.2)发布应用程序 (43)三、Client主机上的部署 (52)四、客户端访问验证 (59)(1)Web访问方式验证 (59)(2)GUI访问方式验证 (60)五、结束语 (62)Citrix安装部署文档一、准备工作此次Citrix的安装部署是在虚拟机上进行模拟的,所以在正式部署之前需要对虚拟机进行相应的安装和配置。
(1)安装虚拟机。
(2)在虚拟机上创建两台主机,操作系统均为Windows Serve 2003.为便于部署,我们将其中的一台主机命名为Citrix(即计算机名为Citrix),另外一台主机命名为Client(即计算机名为Client)。
(3)配置两台主机在同一个局域网内。
A.Citrix主机配置如下:注意:Citrix服务器将会配置成DNS服务器,这在后面将会提到。
B.Client主机配置如下:C.验证两主机在同一局域网内。
在Citrix主机上ping客户机Client,如果能够ping通,则证明网络配置无误。
(4)网络环境配置拓扑图如下:二、Citrix主机的部署以下操作均在Citrix主机上进行。
其大体部署步骤为:安装相关网络组件->安装Citrix Licensing->安装Citrix必选组件->应用程序(ERP系统等)的安装->创建用户账户->应用程序的发布。
其详细步骤如下:(1)安装相关网络组件打开:开始->设置->控制面板->添加或删除程序->添加/删除windows网络组件,此时会出现Windows组件向导,在该向导中,取消Internet Explorer增强的安全配置,和更新根证书(防止影响Citrix的安装,如若需要可在Citrix安装完毕后再对此进行安装)。
CITRIX安装和配置指南

CITRIX安装和配置指南一、简介Citrix Systems, Inc.为实现虚拟办公环境提供优秀的软件与服务,并在该领域内居全球领导地位,其核心技术主要是:1、Citrix ICA ——Citrix的独立计算结构(Independent Computing Architecture)是一种领先、成熟的技术, ICA能够在服务器上集中处理网络系统中的所有应用程序,不但节省成本、提高效率,更能降低对带宽的要求,支持各种平台或设备,同时加强安全保障和集群管理功能。
2、Citrix MultiWin(TM)——能使多个用户在不同的客户端平台上,同时进入和运行服务器上的某个应用软件。
微软公司已购买了MultiWin的特许使用权,使MultiWin与Windows NT内核一同工作,以支持多用户并行会话。
事实上,用户可以远程访问和显示所需的应用,但感觉却像在本地单独使用系统一样。
因此,在微软最新推出的Windows 2000 Servers系统中,终端服务的功能被正式命名为RDP(Remote Display Protocal)。
除此以外,Citrix还拥有SpeedScreen Technology、Idependent Managerment Architecture等专利术。
目前其主导的商用产品是:Citrix产品Citrix MetaFrame XP Presentation Server详细>>Citrix MetaFrame Password Manager详细>>Citrix MetaFrame Conferencing Manager详细>>这其中又可分为:A:Citrix MetaFrame XP Prensetation Server可以提供三个版本地解决方案,适合绝大多数用户地需求●Citrix MetaFrame XP Prensetation Server标准版为各部门、工作组和小型公司提供了一个控制级别,以便用来将Microsoft Windows Server 2000和2003地功能扩展到任何设备。
部署Citrix安全网关全中文教程

在 CSG 环境中进一步增强安全性
CSG 有三个组件:Secure Ticket Authority (STA),NFuse 和 Citrix 安全网 关。多数实施中,后两个组件通常暴露给 Internet 用户。一个正确配置的防火墙 并不在 CCS 讨论范围之内,因此,本文列出的所有安全策略都应在 CSG 网络 架构中应用。
安全部署 Citrix 安全网关的最佳措施
1
文档概述
暴露在 Internet 中的所有计算机技术都可能遭到恶意使用的潜在威胁。本文 为 CSG for Windows 1.1 的安全实施提供了最佳措施。本文主要关注 Microsoft 2000 服务器和 IIS 5.0 组件。 通过概述网络拓朴结构和处理流程,本文给出了标准的 CSG 实现过程的要 点。根据这些要点,列举了保证 CSG 环境安全的最佳措施方法。 本文假设读者具有一定的 Windows 2000, NFuse 和 Citrix 安全网关的知识。
CSG 部署的优点
CSG 不必发布每台 MetaFrame 服务器的地址,简化了服务器认证管理,并 且允许单点加密和访问 MetaFrame 服务器。其实现方法是通过从 MetaFrame 服务器中分离出网关,并利用被 ICA 数据流普遍采纳的某个端口降低穿越防火 墙的复杂性。其优点如下: 牢固的加密(SSL 128bit ,TLS 140bit)
安全部署 Citrix 安全网关的最佳措施
III
Secure Gateway 快速安装和设置指南
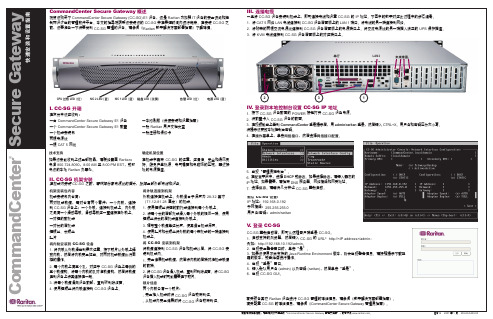
CPU 过热 LED (红) NIC 2 LED (蓝) NIC 1 LED (蓝) 磁盘 LED (淡黄) 告警 LED (红) 电源 LED (蓝)
有关详细指导说明,请查询所附光盘上的“CommandCenter Secure Gateway 管理员指南”,或者访问 。
版本 B 2007 年 1 月 255-80-5400-00
/admin 。
版本,则会出现警告信息。
请按照提示下载正在发货中您应收到:
一台 CommandCenter Secure Gateway E1 设备一个 CommandCenter Secure Gateway E1 前盖一个机架安装包一本印刷版《快速安装和设置指南》一张 Raritan 用户文档光盘一张注册和保修卡
I. CC-SG 开箱
3. 将 KVM 电缆连接到 CC-SG 设备后面板上的对应端口上。
1
LAN 223 串行 未来增强。
1. 按下 CC-SG 设备前面的 POWER 按钮打开 CC-SG 设备电源。
2. 将前盖卡入 CC-SG 设备的前面。
3. 在视频输出上看到 CommandCenter 登录提示后,用 admin /raritan 登录,然后键入 CTRL+X 。
用户名和密码区分大小写。
将提示您更改本地控制台密码。
4. 在操作菜单上,单击网络接口,然后选择网络接口配置。
IV . 登录到本地控制台设置 CC-SG IP 地址
5. 出现“管理员控制台”。
6. 在配置字段中,选择 DHCP 或静态。
如果选择静态,请键入静态的。
