Discoverer Workshop (Admin)
ASUS CREATOR CENTER 用户指南说明书

1CREATOR CENTER for Creation NOTEBOOK2ContentsAbout CREATOR CENTER (4)CREATOR CENTER Basics (5)Main Screen (5)Information Bar (5)Main Menu (6)Sub Menu (6)Creative Applications Optimization (7)Creator Mode (7)How to Enable Creator Mode (8)User Scenario (9)Selecting User Scenario (9)General Settings (10)Monitor (11)True Color (12)True Color Preset Options (12)Mystic Light (13)Voice Command (16)Noise Cancellation (21)Duet Display (22)Create a New Screen Profile (23)Activating Duet Screen Capture (23)Gaming Gear (24)Product Registration (25)Live Update (26)System Info (27)Microsoft APP (28)Battery Master (29)Calibrating Battery (29)Backup (30)Notices (31)Copyright (31)Revision History (31)3ContentsAbout CREATOR CENTER∙Optimize performance for creative applications.∙System performance tuning—you can choose overclock or silent.∙Monitor system information.∙Adjust the best display settings for your eyes.∙Register your MSI products.∙Control LED light effects and synchronize effects to your devices.∙Use utilities to control special features.∙Set the charging method and calibrate the battery.∙Backup system.⚠ImportantTHE SOFTWARE FEATURES IN THIS USER GUIDE VARY BY PRODUCT.THE SCREENSHOTS FOR THE UI IN THIS USER GUIDE ARE FOR REFERENCE ONLY AND THE ACTUAL UI DESIGN MAY VARY.4About CREATOR CENTER5CREATOR CENTER Basics CREATOR CENTER Basics Main Screen⚠Important The screenshots for the UI in this user guide are for reference only and the actual UI design may vary.Operation PanelInformation Bar Display System Profile Picture/Login/ Logout Display Creator Mode Status.Main MenuSub Menu Information Bar Display MSI product currently in use. Click to enter the control page.Display mode currently applied. Switch between different modes by selecting a mode from the drop-down menu.6CREATOR CENTER BasicsSub MenuMain MenuHomeMy DeviceSupportToolsSettingCollapse Button7Creative Applications Optimization Creative Applications OptimizationThe Creator Mode feature will optimize the computer system, monitor, cooler and other peripherals to provide the best experience while using creative applications.Creator Mode Creator Mode main switchSelect Creator Mode in the sub menu to enter Creator Mode control panel You can drag and drop to set the priority List software that supported by creator modeEdit the software listRefresh the software listAdd software to the software listCreator Mode selection User Priority Mode: User-defined software priority Real-Time Mode: Automatically optimize software performance.8Creative Applications OptimizationHow to Enable Creator Mode You can enable the Creator Mode for Processor Affinity, System Performance and Application Priority while using creative applications.1.Go to Home > Creator Mode, and turn on Creator Mode main switch.Turn on Creator Mode main switch2.Select User Priority Mode or Real-Time Mode.Check the box Check the boxor3. Run the application.⚠ImportantIn order to apply the settings, the creator mode must be enabled before running the software.9User Scenario User Scenario Selecting User Scenario The CREATOR CENTER has default scenarios and customized preset options.1. Go to Home > User Scenario.2. Select one of the options. ▪Extreme Performance – A configuration that boosts the highest possible performance. ▪Balanced - MSI recommended settings for average users. ▪Silent - A configuration that allows system to run smoothly with minimum loading. ▪Super Battery - A power-saving mode that lowers the power consumption forbasic needs.Adjust Panel Brightness, Keyboard Brightness and Fan Speed for each scenario.Click to reset to defaultGeneral SettingsYou can enable/disable some general settings in this panel.⚠ImportantThe features in the General Settings vary by product.Windows Key - Click to enable or disable the Windows key on the keyboard. Switch Key - Click to switch the Windows key and the Fn key on the keyboard. WebCam - Click to enable or disable the webcam.Display OverDrive - Only available on certain displays. Once enabled, the response time of the will be overclocked.USB Lighting - Control the USB port lighting mode.GPU Switch - Click to switch the MSHybrid Graphics Mode and the Discrete Graphics Mode.Crosshair Display - Click to enable or disable the Crosshair Display. Click the gear icon to open the True Color control and choose the type of crosshair and its color.10General Settings11Monitor Monitor Monitor feature provides a custom hardware monitor gadget to display the system status.Click to free up memory Click to clean up the disk Select Monitor in the sub menu to enter Monitor page12True ColorTrue Color With True Color function, you can adjust the best screen gamma, saturation, brightness and contrast settings for your eyes.The Ture Color feature supports games in windowed mode.Select True Color in the sub menu to enter True Color control panelSelect the quick screen color optionTrue Color Preset Options When you click the preset option, the screen settings will be immediately applied to your computer. The detailed options are as follows: ⚠Important The features in the True Color vary by product. ▪Gamer - For playing games. ▪Anti-Blue - For reducing the amount of blue light that is emitted from the display to reduce eye fatigue. ▪sRGB - For accurate color when viewing images on websites. ▪Designer - For design applications.▪Office - For office and productivity applications.▪Movie - For watching movies. ▪AdobeRGB - For accurate color when viewing images and other media created in the Adobe RGB color space. ▪Display P3 - For accurate color in wide-gamut cinema mode. ▪Customize - For the True Color 3 application setting.13Mystic Light Mystic Light Mystic Light feature allows you to control LED light effects of MSI & partner products. For some earlier products, you can go to product download page to download the applicable LED control software. ⚠ImportantThe Mystic Light feature is only available when MSI Gear devices are connected.When you click the Apply button, the LED effect settings can be saved to Profile1~3, and you can switch to different settings by clicking Profile1~3.Device synchronizationClick to access Ambient Link All Synchronization LED item drop-down menu Light effect, LED color, speed and brightness lever selectors Apply buttonVoice Command14Mystic Light∙Device synchronization - In this section, you may synchronize LED light effect to your devices.Chain icon - indicates the device has been synchronized.Broken-chain icon - indicates thedevice is not synchronized.Device icon - click it to change LED effect setting for this device. When the device icon turns blue, it indicates the device you’re currently setting.▪Individual - You can also change settings for one single device. To do that, click the chain icon and the color will turn gray as below.▪To synchronize devices - Click the chain icon above device icon. When the chain icon turns blue, it indicates that the device has synchronized LED effect settings with other devices.▪All synchronization - Click the big chain icon on the left side of all the devices.Click the big chain icon∙LED item drop-down menu - Click it to select the LED item on the device. The LED effects vary depending on your LED item selection.15Mystic Light ∙Light effect drop-down menu Click it to select LED light effects. Please note that the options about light effects would be more or less depending on the devices you have. It will only list the light effects which are available for all applicable devices.∙LED Color selector - In this section, you may select the color for one single light effect (Stack, Breathing, Flashing etc.).The outer arc is a custom color picker and the inner arc is the default color picker that cannot be changed. You can simply change the LED color by clicking on the color on the outer or inner arc. To store a custom color, click one of the color slotson the outer arc to store the color of your choice.Use the Hue Circle to choose the color you want. The color you choose will be displayed on the center circle.You can specify a color by editing an RGB (red, green, blue) color value between 0 and 255.Drag the brightness slider up to increase brightness or drag down to decrease brightness. ∙Effect speed and brightness levelDrag the sliders to adjust the LED light effect for switching speed and light brightness.Please note that these function will only be available if your device supports it.Voice CommandMystic Light allows you to use your voice to change LED effects.⚠ImportantThe Voice Command feature is only available for the Notebook with the Per Key RGB keyboard or connected to MSI Gear devices.To start Voice Command, you need to install Windows 10 Speech Voices.1. Go to Windows Settings, and select Time & Language.2. Select Add a preferred language, then add English and the voice packages.3. Change your default speech options to English by selecting Speech.16Mystic Light17Mystic Light How to Control Mystic Light via Voice Command Go to Home > Mystic Light, and click setting in the upper right corner. Enable Voice Command and then you can change the LED style by saying Hey Lucky.Click hereEnable Voice CommandA list of Hey Lucky commands Click to open the list of Hey Lucky commands18Mystic LightAmbient Link With the Ambient Link feature, it will provide visual color feedback on Philips Hue and Nanoleaf depending on what is happening in games. To use Ambient Link, you need to follow the instructions below to complete the link setup.⚠ImportantThe Ambient Link feature is only available for the Notebook with the Per Key RGB keyboard or connected to MSI Gear work Requirements ∙The router is broadcasting a 2.4GHz network. ∙The Wi-Fi network is using WPA/WPA2 security.∙The router is configured for any of the Wi-Fi modes a/b/g/n.Philips Hue Setup (optional)1. Plug in your Hue bridge and it will automatically power up.2. Connect it to the router LAN port.3. Wait for the two lights to come on and you are good to go. (Left is power light and center is local network Nanoleaf Setup (optional) ∙The router is compatible with Bonjour (mDNS).Click to enter the Ambient Link control panelSelect Mystic Light in the sub menu to enter Mystic Light menu19Mystic Light Ambient Link Control PanelGame Mode and Ambient Mode can only be activated one at a time on the Ambient Link control panel.∙Game Mode tab Click to synchronize/ non-synchronize the game Synchronization main switch Click to access the game control panelBack Select Game Event, color and brightnessPreview the effect Apply changes20Mystic Light∙Ambient Mode tab∙Ambient Link tabClick to select an effect asbackground lightClick to switch to PhilipsHue and Nanoleaf Status indicator Click to detectdevicesClick tosynchronize Re-synchronize Removethe device Adjust orientation orpositionApply changesPreview the effectON/OFF backgroundlight & musicDrag the slider to adjust lightbrightness21Noise Cancellation Select Noise Cancellation in the sub menu to enter MSI Sound Tune panel Enable/ Disable Speaker Noise Cancellation.Enable/ Disable Microphone Noise Cancellation.Select Microphone (MSI Sound Tune) in the communication software.Select Speaker (MSI Sound Tune) in the communication software.Noise Cancellation The AI-powered noise cancellation is trained through a deep neural network (DNN), the model is generated with more than 500 million data, simulates the way the human brain works. When a sound is heard, the model automatically recognizes and separates the vocal sound from background noises. Hence, filtering out all the unwanted noise. This feature greatly improves the users’ communication experience.22Duet DisplayDuet Display Duet turns your iOS device & Android phone, tablet, or Chromebook into the most advanced extra display, and offers unparalleled performance and display quality.Click to open the Duet Display introduction window Duet Display InstructionsiOS mode Scan the QR code to download Duet Coach app on your iOS device and follow the app instructions to mirror screen.Screen Profiles Hotkey SettingClick to review the screen profile for 5 seconds Click to remove the screen profileCreate a New Screen Profile1. Connect to a second display.2. Click the New button.3. Enter the name of this new profile and click the Apply button.4. Drag through the portion of the display you want to capture.5. Click the Next Segment button to set maximum 3 segments.6. Click the Done button.Activating Duet Screen Capture1. Connect to a second display.2. Check the hotkey setting of the screen profile and remember it.3. Run the application.4. Press the hotkey and the selected portion will be projected on to the second display.23Duet Display24Gaming GearGaming Gear This panel allows you to control MSI’s gaming gear and supported third-party devices. ⚠ImportantThe Gaming Gear feature is only available when MSI Gear devices are connected.Select Gaming Gear in the sub menu to enter Gaming Gear menu Supported devices will be displayed here. Click the device to enter the control panel of the device.25Product Registration Product RegistrationRegister your MSI product to get exclusive updates, quicker service and product support.Login to your MSI account on this My Devices tab. If you don’t have an MSI account, please click the Join MSI Member button or use Facebook/ Google Plus to login.Click the Product Register button and fill in the product registration form.Select My Device in the sub menuto register your product26Live UpdateLive UpdateLive Update feature allows you to scan system and download the latest drivers and utilities. With Live Update, you don’t need to search the drivers on websites. Live Update will download the appropriate drivers automatically. Some software/ drivers will be installed automatically after downloading, please follow the instructions of the installer.To use Live Update:1. Connect your computer to the internet. 2.Go to Support > Live Update.Select which item you want to update Click to scan the systemUtility and driver listClick to install27System Info System Info The System Info provides information about OS, Product Name, Serial Number and Software information.To open System Info:1. Go to Support > System Info.To export system information:1. Go to Support > System Info.2. Click Export System Info button in the upper right corner.3. Browse to the location where you want to save the new text file, and then click Save.To send the serial number to MSI online customer service:1. Go to Support > System Info.2. Click Content Transfer button in the upper right corner.3. Follow customer service’s instructions, and enter 5-digit encryption code.System InformationClick to export system information to a text file.Click to send the serial number of the laptop to MSI online customer service.28Microsoft APPMicrosoft APPThe Microsoft App feature detects installed drivers and displays a relative Microsoft application download links.To install Microsoft App:1. Go to Support > Microsoft App.2. Click the Get it from Microsoft icon on the right side of the item.3.Download and install the application from Microsoft Store.Click to install29Battery Master Battery Master Battery Master is a function tab related to battery maintenance such as RemainBattery Percentage, Battery Health Option, and Battery Calibration.Battery Health Option - Select the battery charging capacity Remain battery percentage Click to calibrate the batteryCalibrating Battery We recommends doing Battery Calibration every 3 months to have the best battery life.1. Go to Tools > Battery Master.2. Click the Battery Calibration icon.3. Follow the instructions on the Battery Calibration screen to connect to the power adapter, install the battery and close the other windows.4. Click Start.30BackupBackupBackup utility designed to backup the recovery image to a USB flash disk or ISO files. They can be used to recover the system to manufacturer’s default settings when it is needed.⚠ImportantUsage of this application on any product with no authorization may be prohibited.Select to create arecovery USB flashdiskSelect to create anISO image fileAfter choosing the type ofbackup, click Next to start thebackup process.NoticesThe MSI logo used is a registered trademark of Micro-Star Int’l Co., Ltd. All other marks and names mentioned may be trademarks of their respective owners. No warranty as to accuracy or completeness is expressed or implied. MSI reserves the right to make changes to this document without prior notice.Copyright© Micro-Star Int’l Co.,Ltd. 2020 All rights reserved.Revision HistoryVersion 1.0, 2020/11, First release31Notices。
bugzilla的使用帮助
bugzilla的使用帮助Bugzilla是一个bug追踪系统,用以管理bug提交、bug消除,不仅能降低同样错误的重复发生,提高开效率,而且有助于项目管理的难度Bugzilla操作说明1.用户登录及设置1.1用户登录1.用户输入服务器地址http://192.168.1.6/bugzilla/。
<http://192.168.1.6/bugzilla/%E3%80%82>2.进入主页面后,点击'Forget the currently stored login',再点击'login in'进入。
3.进入注册页面,输入用户名和密码即可登录。
用户名为Email 地址,初始密码为用户名缩写。
4.如忘记密码,输入用户名,点击'submit request',根据收到的邮件进行重新设置。
1.2、修改密码及设置1.Login登录后,'Edit prefs'->'accout settings' 进行密码修改。
2.'Edit prefs'->'email settings' 进行邮件设置。
3.'Edit prefs'-> 'permissions' 进行权限查询2、Bug的处理过程2.1、报告Bug2.1.1测试人员报告Bug1.请先进行查询,确认要提交的bug报告不会在原有纪录中存在,若已经存在,不要提交,若有什么建议,可在原有纪录中增加注释,告知其属主,让bug的属主看到这个而自己去修改。
2.若Bug不存在,创建一份有效的bug报告后进行提交。
3.操作:点击New,选择产品后,填写下表。
4.填表注意:Assigned to: 为空则默认为设定的 owner, 也可手工制定。
CC: 可为多人,需用","隔开。
Desription中要详细说明下列情况:1)发现问题的步骤2)执行上述步骤后出现的情况。
(discovery studio 2019 client)DS 2019 Windows
DS2019安装教程DS软件的各个版本的升级,都不是在上一个版本的基础上安装升级包,而是完全卸载原来版本的软件,完全重新安装新版本软件。
1.从控制面板里把DS2016、2017.2018版本软件完全卸载干净。
2.解压安装退出360 管家防火墙等,防止权限阻止;3.仔细阅读安装教程安装,最好有以管理员运行就以管理员一、DS2019服务器的安装如下为DS2019全部软件的列表:1.DS软件包安装license文件的获取:双击DS_Application_license_and_letter,得到DS_Application_license_and_letter目录,该目录内容如下:DS服务器软件包的安装需要这个license文件dsaep-2022.lic,请记住它的位置。
2.DS服务器安装软件包的获取:双击DiscoveryStudio2018_Win64,得到DiscoveryStudio2018_Win64目录,这个目录下即为DS服务器安装软件包。
3.DS服务器基本部分的安装:进入E:\DS2018\DiscoveryStudio2018_Win64\DiscoveryStudio2018\bin目录,如下:双击scitegicsetup开始安装,过程如下:进行到下面这步时请选择DS服务器的安装位置,建议装在除C盘以外的地方,不能有中文,这里我装在G盘下的DS2019文件夹:进行到下面这步时请选择上面1.解压得到的dsaep-2022.lic文件,要包括完整文件路径,但路径中不能包含中文,这里我放在E盘根目录下,点击Next:直接点击Next还是点击Next 还是点击Next等待一直安装等待安装完成,点击Next 点击Next进行下一步Finish时,DS服务器软件基本部分就安装完成了。
接下来还要执行GPL部分的安装,才能完成全部服务器的安装。
4.DS服务器GPL部分的安装:解压BIOVIABiologyGPL2018_Win64,得到目录BIOVIABiologyGPL2018_Win64,如下:进入安装包文件夹E:\DS2018\BIOVIABiologyGPL2018_Win64\BIOVIABiologyGPL2018_Win64\bin,执行Scitegicsetup,开始DS服务器GPL部分的安装:在下面这一步,按照提示,点击“Add/Remove Products”:进入下面这步时,不需要选择License file Path,直接Next到下一步:出现下面这一步的提示时选择Stop Services,此后等待一会直接点击Next点击Next 点击Next至此,DS服务器部分就全部安装完成了。
DokuWiki用户指南说明书
2023-04-11 16:181/2DokuWiki DokuWikiDokuWiki is a simple to use and highly versatile Open Source wiki software thatdoesn't require a database. It is loved by users for its clean and readableFormatting Syntax. The ease of maintenance, backup and integration makes it anadministrator's favorite. Built in access controls and authenticationconnectors make DokuWiki especially useful in the enterprise context and thelarge number of plugins contributed by its vibrant community allow for a broadrange of use cases beyond a traditional wiki.Read the DokuWiki Manual to unleash the full power of DokuWiki.DownloadDokuWiki is available at https:///Read MoreAll documentation and additional information besides the syntax description is maintained in the DokuWiki at .About DokuWikiA feature listHappy UsersWho wrote about itWhat Bloggers thinkCompare it with other wiki softwareInstalling DokuWikiSystem RequirementsDownload DokuWikiChange LogHow to install or upgradeConfigurationUsing DokuWikiWiki SyntaxThe manualFrequently Asked Questions (FAQ)Last update: 2020-07-30 10:00wiki:dokuwiki https:///live/wiki:dokuwikiGlossaryCustomizing DokuWikiTips and TricksHow to create and use templatesInstalling pluginsDevelopment ResourcesDokuWiki Feedback and CommunitySubscribe to the newsletterJoin the mailing listCheck out the user forumTalk to other users in the IRC channelSubmit bugs and feature wishesSome humble thanksCopyright2004-2020 © Andreas Gohr *******************1) and the DokuWiki CommunityThe DokuWiki engine is licensed under GNU General Public License Version 2. If you use DokuWiki inyour company, consider donating a few bucks .Not sure what this means? See the FAQ on the Licenses.1)Please do not contact me for help and support – use the mailinglist or forum instead。
AdminStudio使用文档
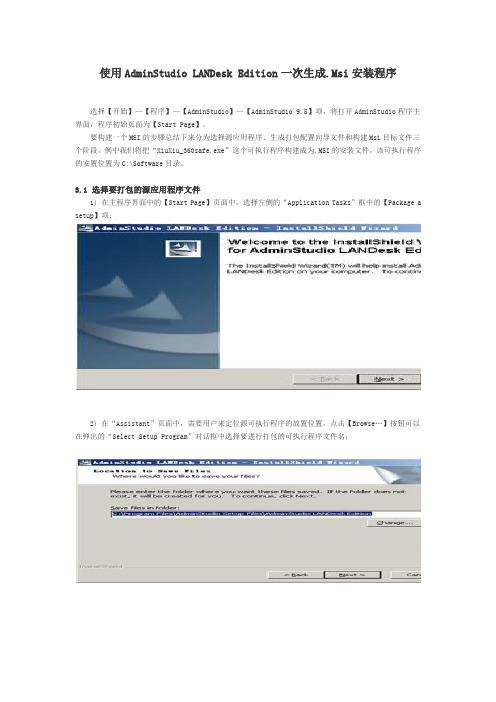
使用AdminStudio LANDesk Edition一次生成.Msi安装程序选择【开始】—【程序】—【AdminStudio】—【AdminStudio 9.5】项,将打开AdminStudio程序主界面,程序初始页面为【Start Page】。
要构建一个MSI的步骤总结下来分为选择源应用程序、生成打包配置向导文件和构建Msi目标文件三个阶段,例中我们将把“XiuXiu_360safe.exe”这个可执行程序构建成为.MSI的安装文件,该可执行程序的安置位置为C:\Software目录。
3.1 选择要打包的源应用程序文件1) 在主程序界面中的【Start Page】页面中,选择左侧的“Application Tasks”框中的【Package a setup】项;2) 在“Assistant”页面中,需要用户来定位源可执行程序的放置位置,点击【Browse…】按钮可以在弹出的“Select Setup Program”对话框中选择要进行打包的可执行程序文件名;3) 在“Package File:”框中选择了要打包的程序名后,在下方的“Product Information”部分会要求用户输入以下一些程序信息:Specify your product name:生成的Msi安装包的文件名称;Version number:输入该应用程序的版本(可以随意输入,但是为了管理程序方便建议还是输入正确的版本号);Command line Parameters(Optional):用于该可执行程序安装时所需要使用的命令行参数,此处为可选项。
4) 在“Repackaging Method”部分,由于是限制功能版,因此只能选择【Snapshot】单选框。
在“Selecta Repackaging Wizard output directory:”部分,点击右侧的【Browse…】按钮来选择输出的打包向导文件的安放目录;3.2 生成.Msi安装程序1) 当目录选择完成后,点击【Repackage】按钮;2) AdminStudio程序这时会弹出“Repackaging Wizard”对话框,在“Welcome to Repackaging Wizard”页面中,点击【下一步】;3) 在“Method Selection”页面中,由于是限制功能版本,因此无需配置直接点击【下一步】;4) 在“Snapshot Method”页面中,选择【Single Step】单选框,点击【下一步】;5) 在“Collect Product Information”页面中,查看用于打包的源安装文件的信息是否正确,并且输入要生成Msi文件的文件信息,完成输入后点击【下一步】;Product Name:程序名称;Version:生成Msi文件的定义版本(随意输入);Company Name:公司名称(随意输入)。
ProSecure Unified Threat Management (UTM) 安装指南说明书
Installation Guide ProSecure™ Unified Threat Management (UTM) Appliance Models UTM5, UTM10, UTM25, UTM50, and UTM150Thank you for selecting NETGEAR products.Follow the instructions in this installation guide to connect the UTM using a single WAN interface, to use the Setup Wizard to configure the basic network and scanning settings, and to register the UTM and activate its licenses.The UTM models differ in the number of LAN and WAN ports that they provide. For information about the different models and about how to configure other options such as multiple WAN settings (not applicable to the UTM 5 and UTM10), the firewall, VPN tunnels, and custom scanning, see the reference manual.You can access the reference manual from the UTM’s web management interface, through the resource CD, and from the NETGEAR support site at.Verify the Package Contents•ProSecure™ UTM appliance•AC power cable•Rubber feet (4) with adhesive backing•Rack-mount brackets (some models)•Installation guide•Resource CD•Service registration card with license keys (some models)Connect the UTMThe front panel of the UTM contains ports and status LEDs; the back panel of theUTM contains a console port, Factory Defaults reset button, cable lock receptacle,and AC power connection.The following figure shows the front panel of the UTM150. The front panels of othermodels differ only in the number of LAN and WAN ports.To connect the UTM:1.Connect a WAN port to a cable or DSL modem, satellite dish, wireless ISPradio antenna, or other WAN device that has an active WAN connection.2.Connect a LAN port to a computer that is configured as a DHCP client.3.Turn on the UTM by connecting one end of the AC power cable to the ACreceptacle on the back panel of UTM and the other end to a power outlet. Afterabout 1 minute, verify the following:•Power LED. The Power LED is solid green.•Test LED. The amber Test LED is lit. The Test LED turns off when theinitialization process is completed, approximately 2minutes after you haveturned on the UTM.•WAN LED. The left LED of the connected WAN port is lit. If it is not, makesure that the Ethernet cable is securely attached to the WAN device and theWAN port, and that the WAN device is on.•LAN LED. The left LED of the connected LAN port is on. If it is not, makesure that the Ethernet cable from the computer to the UTM is securelyattached at both ends, and that the computer is on.Note:If any of these LEDs are not lit, or if the Test LED does not turn off, seeChapter 12, “Troubleshoot and Use Online Support,” of the reference manual.1.Power LED (green)2.Test LED (amber)B portN ports and LEDs5.DMZ LED for LAN port 46.WAN ports and LEDsLog In to the UTMTo log in to the UTM and access its web management interface:1.On the computer that is connected tothe UTM, enter https://192.168.1.1 inthe address field of a browser. TheNETGEAR Configuration ManagerLogin screen displays in the browser.2.Enter admin for the user name andpassword for the password, and clickthe Login button.The web management interfacedisplays.After 5 minutes of inactivity (the defaultlogin time-out), you are automaticallylogged out. You can change the login time-out by selecting Users > Users todisplay the Users screen and modifying the admin user settings.Use the Setup WizardThe Setup Wizard guides you through 10 screens to configure the basic networkand scanning configuration of the UTM.To access the Setup Wizard:1.Open the web management interface.2.Select Wizards.3.Select the SetupWizard radio button.4.Follow the SetupWizard to configurethe following settings:•LAN settings•WAN settings•System date and time, including NTP server configuration•Email and web services (that is, protocols) and ports to scan•Email security (antivirus settings) and scan exceptions based on sizehttps://192.168.1.1December 2012NETGEAR and the NETGEAR logo are registered trademarks of NETGEAR, Inc. in the United States and/or other countries. Other brand and product names are trademarks or registered trademarks of their respective holders. Information is subject to change without notice. © NETGEAR, Inc. All rights reserved.Intended for indoor use only in all EU member states, EFTA states, and Switzerland.•Web security (antivirus settings) and scan exceptions based on size•Web categories to be blocked•Email notification•Scan engine and signatures update settings5.Click the Apply button to save your changes.The UTM reboots. If the IP address of your computer is now on a differentsubnet, restart the computer to refresh its network settings so you can log in to the UTM again.Note:For detailed steps about how to configure the UTM by using the Setup Wizard, see Chapter 2, “Use the Setup Wizard to Provision the UTM in Your Network,” of the reference manual.Register the UTM and Activate the Licenses To receive threat management component updates and use telephone support, you need to register your UTM with NETGEAR. You might have purchased the UTM with a 1- or 3-year license. The UTM also comes with four 30-day trial licenses:•Web protection•Email protection•Support and maintenance•Application control and IPSIf your UTM is unregistered, you can use the 30-day trial period for all four types of licenses to perform the initial testing and configuration.Activating the licenses initiates their terms of use. Activate the licenses only when you are ready to start using the UTM. The 30-day trial licenses are revoked once you activate the purchased licenses.To register the UTM and activate the trial or purchased licenses:1.Make sure that the UTM has Internet access.2.Open the web management interface.3.Select Support > Registration. The Registration screen displays.4.Enter one of the license keys in the Registration Key field.plete the fields in the Customer Information and VAR Information sectionsof the screen.6.Click one of the following buttons:•Trial. Activates a trial license and registers the UTM with the NETGEARregistration and update server.•Register. Activates a purchased license and registers the UTM with theNETGEAR registration and update server.7.If necessary, repeat Step 4 and Step 6 for additional license keys.After the registration and activation are complete, the Registration screenshows the license keys and their expiration dates:Electronic Licensing OptionIf you have purchased the UTM with a 1- or 3-year license, you might be able to usethe electronic licensing option. When the UTM is connected to the Internet, youneed to enter only your customer information and optional value-added reseller(VAR) information on the Register screen but do not need to enter the licensenumbers. When you click the Register button, the UTM automatically downloadsand activates the license keys because the serial number of the UTM is linked to thelicense.If you have purchased a license from a VAR (either directly or over the web) afterpurchase of the UTM, the VAR should email you the license keys or provide them toyou in another way. To register and activate the license keys, follow the regularregistration procedure as explained in the previous section (see steps 1–7).Online Documentation and ResourcesFor extensive information about configuring and using your UTM, see the referencemanual, which you can access from or from theweb management interface.To access online documentation and resources:1.Open the web management interface.2.Select one of the following:•To view the reference manual, select Support > Documentation.•To view the product support page, select Support > Knowledge Base.Technical SupportVisit for product updates and web support.For the complete EU Declaration of Conformity, visit/app/answers/detail/a_id/11621/.NETGEAR recommends that you use only the official NETGEAR supportresources.。
Discoverer
ORACLE9I 数据仓库TR.070课程简介Emerson中国Discoverer作者: 汉得顾问创建日期: June 23, 2004最后修改日期:控制号:版本号: 1审批签字:Emerson项目经理汉得项目经理Copy Number _____文档控制修改记录审阅分发Contents文档控制 ................................................................................................. 错误!未定义书签。
课程概述 ................................................................................................. 错误!未定义书签。
Discoverer基础操作 . (2)课程听众 .......................................................................................... 错误!未定义书签。
先决条件 .......................................................................................... 错误!未定义书签。
课程目标 .......................................................................................... 错误!未定义书签。
课程主题列表 .................................................................................. 错误!未定义书签。
Discoverer管理 (5)课程听众 .......................................................................................... 错误!未定义书签。
craft的使用方法 -回复
craft的使用方法-回复Craft是一款功能强大的内容管理系统(CMS),广泛应用于网站开发、应用程序开发以及数字媒体领域。
在本文中,我将为您介绍Craft的使用方法,逐步回答有关配置、安装、界面导览、内容管理和插件扩展等方面的内容。
一、配置首先,对于Craft的使用,您需要先确保您的服务器满足最低配置要求。
需要PHP版本7.0或更高,并安装有数据库(MySQL或PostgreSQL)和Web服务器(Apache或Nginx)。
另外,您还需要一台支持Craft的主机,并拥有一个域名用于设置您的网站。
二、安装1. 下载Craft:您可以从Craft官方网站下载Craft的最新版本。
2. 解压文件:解压下载的文件,并将其上传至您的服务器。
3. 执行安装:访问您的域名,在浏览器中打开Craft的安装界面。
按照安装页面上的提示进行安装。
三、界面导览Craft的界面非常直观,方便新用户进行操作。
登录后,您将进入控制面板,其中包含重要的模块和功能区域。
1. 顶部导航栏:位于页面最上方,提供了“设置”、“资产”、“插件”等功能的入口。
2. 导航面板:位于左侧,可让您轻松访问不同的编辑区域,例如“条目”、“分类”、“用户”等。
3. 左侧边栏:显示您所选择编辑的特定内容的详细信息和设置。
4. 主编辑区域:显示模板、布局和内容的编辑器。
四、内容管理Craft提供了强大的内容管理功能,让您可以轻松创建、编辑和管理您的网站内容。
1. 创建条目:在导航面板中选择“条目”,然后点击“新建条目”。
根据您的网站需求,填写相关字段,如标题、日期、内容等。
2. 创建分类:在导航面板中选择“分类”,点击“新建分类”。
输入分类名称和其他相关信息,为将来的分类作准备。
3. 页面布局:在左侧边栏中选择“布局”,为页面设置整体结构和样式。
4. 导航菜单:在主编辑区域中,您可以创建导航菜单并设置菜单项,以便于用户在网站上浏览和导航。
五、插件扩展Craft拥有丰富的插件市场,让您可以根据您的需求和喜好,选择合适的插件来扩展和增强Craft的功能。
winaerotweaker获取管理员方法
winaerotweaker获取管理员方法【最新版3篇】目录(篇1)1.WinAeroTweaker 简介2.WinAeroTweaker 的功能3.获取 WinAeroTweaker 管理员方法的步骤正文(篇1)WinAeroTweaker 是一款 Windows 系统优化工具,主要用于调整和优化操作系统的视觉效果。
它可以让用户自定义系统界面的透明度、窗口阴影、任务栏颜色等,以提高用户体验。
然而,要想更好地使用WinAeroTweaker,需要获取管理员权限。
下面将详细介绍如何获取WinAeroTweaker 的管理员方法。
首先,打开 WinAeroTweaker 软件。
在主界面中,可以看到该软件提供了诸多选项,如“系统设置”、“视觉效果”、“任务栏设置”等。
但是,要想对这些选项进行修改,需要获取管理员权限。
其次,点击 WinAeroTweaker 主界面中的“设置”按钮。
在弹出的设置窗口中,可以看到一个“获取管理员权限”的选项。
点击该选项,软件会提示需要以管理员身份运行 WinAeroTweaker。
最后,按照提示操作。
首先,点击“开始”按钮,在搜索框中输入“cmd”,然后右键点击“命令提示符”应用程序,选择“以管理员身份运行”。
在弹出的命令提示符窗口中,输入以下命令:```cd %APPDATA%WinAeroTweaker```接着,输入以下命令以管理员身份运行 WinAeroTweaker:```WinAeroTweaker.exe /admin```此时,WinAeroTweaker 将获得管理员权限,可以对系统进行更深入的优化和调整。
在获取管理员权限后,用户可以自由修改系统设置,提高Windows 系统的视觉效果。
总之,获取 WinAeroTweaker 管理员方法的步骤为:打开WinAeroTweaker 软件,点击“设置”按钮,选择“获取管理员权限”,然后以管理员身份运行 WinAeroTweaker。
Workspace ONE Boxer 管理员指南说明书
Workspace ONE Boxer 管理员指南VMware Workspace ONE UEM您可以从 VMware 网站下载最新的技术文档:https:///cn/。
VMware, Inc.3401 Hillview Ave. Palo Alto, CA 94304 威睿信息技术(中国)有限公司北京办公室北京市朝阳区新源南路 8 号启皓北京东塔 8 层 801/cn上海办公室上海市淮海中路 333 号瑞安大厦 804-809 室/cn广州办公室广州市天河路 385 号太古汇一座 3502 室/cn版权所有© 2020 VMware, Inc. 保留所有权利。
版权和商标信息Workspace ONE Boxer 管理员指南目录1VMware Workspace ONE Boxer5部署 Workspace ONE Boxer 的要求5支持的 Workspace ONE Boxer 功能7将 S/MIME 证书从 Workspace ONE Web 侧载到 Workspace ONE Boxer14对共享 Android 设备的签入/签出支持14Workspace ONE Boxer 中的日历委派15Workspace ONE Boxer 的邮箱委派17将共享邮箱添加到 Workspace ONE Boxer19将共享日历添加到 Workspace ONE Boxer19DISA Purebred 对 Android 上的 Workspace ONE Boxer 的支持19在 Workspace ONE Boxer 中使用 Azure 信息保护 (AIP) 敏感度标签保护您的电子邮件和文档21为您的组织启用 Azure 信息保护 (AIP) 敏感度标签23在 Workspace ONE Boxer 中配置 Azure 信息保护 (AIP) 敏感度标签23将 Azure 信息保护 (AIP) 敏感度标签应用于电子邮件24接收带 Azure 信息保护 (AIP) 敏感度标签的电子邮件24Azure 信息保护 (AIP) 敏感度标签常见问题解答25与 Workspace ONE Boxer 结合使用的组件26Workspace ONE Boxer 的互操作性功能272Workspace ONE Boxer 部署29使用“应用分配”页面分配和配置 Workspace ONE Boxer30Workspace ONE Boxer 中的多个受管帐户36将 Workspace ONE Boxer 添加到公共应用程序40分配 Workspace ONE Boxer 及电子邮件设置41Workspace ONE Boxer 的应用程序配置44配置 Workspace ONE Boxer 的隐私设置60灵活的部署分配与 Workspace ONE Boxer61配置指纹身份验证62配置自定义 SDK 配置文件63使用派生凭证 (PIV-D) 配置 Workspace ONE Boxer643设备管理66阻止对 IBM Traveler 服务器的访问67第三方通讯录解决办法(仅限 iOS)67Workspace ONE Boxer 与 IBM Notes 结合使用时出现的同步和策略错误的解决办法69Android 版 Workspace ONE Boxer 中的后台进程执行70后台执行限制70Workspace ONE Boxer 管理员指南电池优化704Workspace ONE Boxer 比较矩阵71针对 IBM Notes Traveler 的 Workspace ONE Boxer 比较表格76 5Workspace ONE Boxer 常见问题解答81VMware Workspace ONE Boxer1Workspace ONE Boxer 是一个企业电子邮件客户端,让用户在企业自有设备和员工自带设备 (BYOD) 上都能顺畅访问企业电子邮件、日历和联系人。
CORE 2 控制台用户指南说明书
CORE 2 console User guideHI Pole bracket for irrigation J Ethernet port K USB portL Specification label M Equipotential lug N Fuse holder O Power receptacleMotor ports (3); runs2 non-heavy duty handpieces simultaneously. Port location refined to provide more room around the irrigation cassette. Irrigation cassette portwith simple, one-step insertion and removal P Internal audio withdistinct tones for actuation, completion, reverse motor, notifications, errors and prohibited actions Q Passively cooled;no fan, no moving parts or associated noiseG ABIJ PQNKLM ODEC FMotor ListQuick and easy navigation Our flattened menu structure lets you navigate anywhere in just a few clicks, or use shortcuts such as User Profiles and Forward/Quick Access to jump to your desired destination. Further simplifying the process are smart screens which automatically detect and display available options and settings based on the devices you connect.r Listigationte anywhere in just a few and Forward/Quick Access simplifying the process t and display available u connect.Getting startedu Connect motors andfoot pedals as desiredu Press Power Onu Optional irrigation• Place irrigation pole in rear bracket• Insert irrigation cassette • Attach irrigation clips to motor and connect tubing to irrigation bag • Press Initial Prime u Manage Profilesto your likingu Manage System Settingsto your likingC Quick access area – allowsusers to set settings such asdirection, irrigation and mode via the Home screen.D Motor Settings – displaysconnected motors’ name andvalue settings by RPM or percent to power. To adjust, touch the number onscreen and a slider bar will appear.E Increase/decrease – press toadjust motor value settings, or use slider bar described in “D.”F Home keyG System Settings – push toaccess options for console, select motor, rep info, control permissions, import/export and irrigationH Profiles – contains defaultprofiles and stored userpreferences, plus allows creation of personal profiles which are permanently saved and transferable to other Core 2 consoles via USBThe Home Screen is where most interaction occurs and serves as your gateway to other screens and functions.A Navigation bar – includesReset, Profiles, System Settings and HomeB Foot switch assignment –graphically shows foot switch assignment; touch to toggleC D EPowering upis simpleTo turn on the console, follow these steps and you’ll have boot up in less than 20 seconds.Home is your hubI.D. Touch software: Get the GeneralIrrigationMotor Options Control OptionsQuick AccessAccelerateBrakeI.D. T ouch T orque95%35%30%PI DRIVE MOTOR SettingsI.D. Touch software brings a unique level of optimization to Stryker electric motors such asπDrive and πDrive+. This software enables you to adjust torque fromu u u MOTORAdjusting control permissionsand optionsuuu u u uu General Irrigation Motor Options Control Options Quick AccessPI DRIVE MOTOR SettingsNSE FootswitchTPS Two-PedalTPS FootswitchTPS Uni-Directional CORE FootswitchFirst-rate foot pedalsJust because they’re under the table doesn’t mean we’ve overlooked their design. Not only do we provide foot pedal choices, but each pedal has multiple extra feature buttons. Program these to perform the functions you want, including irrigation on/off, forward/reverse direction, change drill port assignment, change RPMs and more.NSE footswitchwith four feature buttons (two left, two right)Bi-directional footswitch Dual pedal with three feature buttons Uni-directional footswitchSingle pedal with twofeature buttonsCORE footswitchwith raised toe loop, 270° open access Handswitch I.D. Touch (Torque) Initial Prime Irrigation Motor Options Motor Settings Quick Access Rep InfoIn addition to the icons inside, here are other icons you may frequently see. For a full listing, please see the Symbol Definition Chart (REF 0036-716-000)supplied with the console upon purchase.Accelerate BrakeControl Options Create Export Footswitch 1Footswitch 2HandpieceHere to helpYour Neurosurgical sales representative is happy to help you get the most from your CORE 2 console, and help set it up with your specific needs and preferences. He/she can also facilitate corresponding implementation, training and service options. To learn more please call your Neurosurgical sales representative, 800 253 3210 or visit .Common software iconsProgram to performNeurosurgicalThis document is intended solely for the use of healthcare professionals. A surgeon must always rely on his or her own professional clinical judgment when deciding whether to use a particular product when treating a particular patient. We do not dispense medical advice and recommend that surgeons be trained in the use of any particular product before using it in surgery.The information presented is intended to demonstrate Stryker’s products. A surgeon must always refer to the package insert, product label and/or instructions for use, including the instructions for cleaning and sterilization (if applicable), before using any of Stryker’s products. Products may not be available in all markets because product availability is subject to the regulatory and/or medical practices in individual markets. Please contact your representative if you have questions about the availability of Stryker’s products in your area.Stryker or its affiliated entities own, use, or have applied for the following trademarks or service marks: CORE, I.D. Touch, πdrive and Stryker. All other trademarks are trademarks of their respective owners or holders.The absence of a product, feature, or service name, or logo from this list does not constitute a waiver of Stryker’s trademark or other intellectual property rights concerning that name or logo.D0000023873 Rev. AAG55/PSCopyright © 2020 StrykerPrinted in USA Stryker1941 Stryker Way Portage, MI 49002 USA t: 269 323 7700f: 269 323 2742toll free: 800 253 3210 Please refer to the current Stryker CORE 2 consolecomplete list of cautions, operational details, troubleshooting tips, cleaning protocols and duty cycles.。
d2-admin中不错的技巧
d2-admin中不错的技巧d2-admin基于vue-cli3路由相关刷新路由,参照官⽅但是搞不明⽩为何加了句 render:h => h(){path: 'refresh',name: 'refresh',hidden: true,component: {beforeRouteEnter (to, from, next) {next(vm => vm.$router.replace(from.fullPath))},render: h => h()}}嵌套路由可以是⼀个⽴即执⾏函数children: (pre => [{ path: 'page1', name: `${pre}page1`, component: () => import ('@/pages/demo/page1'), meta: {...meta, title: '页⾯ 1' } },{ path: 'page2', name: `${pre}page2`, component: () => import ('@/pages/demo/page2'), meta: {...meta, title: '页⾯ 2' } },{ path: 'page3', name: `${pre}page3`, component: () => import ('@/pages/demo/page3'), meta: {...meta, title: '页⾯ 3' } },{ path: 'page4', name: `${pre}page4`, component: () => import ('@/pages/demo/page4'), meta: {...meta, title: '页⾯ 444444' } } ])('demo-')MOCK数据安装mock数据:在vue.config.js中,根据⾃定义的环境变量,来判断是否安装,默认.env⽂件,没有这个环境变量,则开发时,会加⼊模拟数据module.exports = {chainWebpack: config => {const entry = config.entry('app')if (process.env.VUE_APP_BUILD_MODE !== 'nomock') {entry.add('@/mock').end()}}}关于config.entry请查看新建⼀个扩展环境变量⽂件:.env.nomock# 指定构建模式NODE_ENV=production# 标记当前是 No Mock 构建VUE_APP_BUILD_MODE=nomock新建⼀个npm script,"build:nomock": "vue-cli-service build --mode nomock"则运⾏这个命令来打包的时候,不会加⼊mock数据mock安装结构根据上⾯vue.config.js中的设置,在根⽬录建⽴mock⽬录主⽬录index.js:import d2Mock from './d2-mock'const req = context => context.keys().map(context)const options = req(require.context('./api/', true, /\.js$/)).filter(e => e.default).map(e => e.default)options.forEach(option => {d2Mock.load(option)})引⼊api⽬录中的mock数据⽂件, 并且得到所有默认的导出,返回新的数组然后使⽤封闭好d2Mock⼯具来加载并安装mock数据api⽬录中的⽂件这⾥⾯为每个独⽴的url拦截,⽂件名可独⽴命名,代码⽰例:export default [{path: '/api/getMockData',method: 'get',handle: {"code":0,"msg":"正常","count":300,"data|20":[{"tid":"@string(abcdefghijklmnopqrstuvwxyz1234567890, 30,30 )","wxunionid":"@string(abcdefghijklmnopqrstuvwxyz1234567890ABCDEFGHIJKLMNOPQRSTUVWXYZ_, 28,28 )", "timg":"@image('200x200')","eimg":"@image('400x400')","remark":"@cparagraph()","pay_date":"@datetime('yyyy-MM-dd')","title|3":"@ctitle","eid|1-10":0,"totalFee|200-500":0,"count|1-10":0,"tbegin":"@datetime('yyyy-MM-dd')","tend":"@datetime('yyyy-MM-dd')","tstatus|1-4": 0}]}}]直接使⽤mock.js的随机数据语法,注意,这⾥的get或post不能使⽤⼤写,否则⽆效d2-mock⽬录这⾥是d2-admin官⽅扩展的mock安装处理⼯具,先不去研究它在写什么,能⽤就好d2-mock/index.js:import Mock from 'mockjs'import qs from 'qs'import withCredentials from './patch/withCredentials'/* 补丁 */withCredentials(Mock)/* Mock 默认配置 */Mock.setup({ timeout: '200-300' })/* 扩展 [⽣成器] */const Generator = (prop, template) => {const obj = {}obj[prop] = [template]return Mock.mock(obj)}/* 扩展 [循环] */const Repeat = (num, itemTemplate) => Generator(`data|${num}`, itemTemplate).dataconst CustomExtends = {Generator,Repeat,Mock,Random: Mock.Random}const extend = (prop, value) => {CustomExtends[prop] = value}/* 装配配置组 */const wired = ({ url, type, body }) => ({method: type,params: qs.parse(url.split('?').length > 1 ? url.split('?')[1] : ''),body: JSON.parse(body),url: qs.parse(url.split('?')[0]),...CustomExtends})const setup = (path, method, handle) => {Mock.mock(RegExp(path),method,typeof handle === 'function' ? o => handle(wired(o)) : handle)}const load = (collection) => {collection.map(({ path, method, handle }) => {if (method === '*') {method = ['get','GET','head','post','POST','put','delete','connect','options','trace','patch']}//下⾯的判断应该是⽤于同⼀个api路径使⽤了多种⽅法,⽐如 ['post','get'] ,或 'post|get'if (typeof method === 'string' && method.indexOf('|') > -1) method = method.split('|')if (method instanceof Array) {method.map(item => setup(path, item, handle))} else {setup(path, method, handle)}})}export default { setup, load, extend }这个⽂件中导出了⼀个对象,⾥⾯有3个⽅法, 试了⼀下,实际在mock/index.js中,只⽤到了load,⽤来加载mock详情,setup和extend并没在外部⽤到。
likeadmin讲解
likeadmin讲解【实用版】目录1.likeadmin 讲解背景介绍2.likeadmin 讲解的主要内容3.likeadmin 讲解的优势与特点4.likeadmin 讲解的应用场景5.likeadmin 讲解的未来发展正文1.likeadmin 讲解背景介绍随着互联网技术的飞速发展,知识分享和传递的方式也在不断创新。
其中,likeadmin 讲解作为一种新型的知识传播方式,逐渐受到了人们的关注。
它源于国外知名网站 Reddit,其核心理念是让用户以提问和回答的形式进行知识交流。
在这种模式下,用户可以自由提问,而其他用户则可以自由回答,形成一个互动性强、内容丰富的知识库。
2.likeadmin 讲解的主要内容likeadmin 讲解的主要内容涵盖了各个领域,包括科学技术、历史地理、文化艺术、社会热点等。
用户可以在这个平台上提出自己感兴趣的问题,并获得其他用户的解答。
同时,likeadmin 讲解也鼓励用户分享自己的专业知识和经验,为其他用户提供有价值的信息。
3.likeadmin 讲解的优势与特点likeadmin 讲解具有以下几个优势与特点:(1)互动性强:likeadmin 讲解采用提问和回答的形式,让用户之间形成互动,有助于知识的传播和交流。
(2)内容丰富:likeadmin 讲解涵盖了各个领域的知识,用户可以在这里找到自己感兴趣的问题和答案。
(3)去中心化:likeadmin 讲解没有固定的知识提供者,每个用户都可以根据自己的专业知识和经验为其他用户提供解答。
(4)实时更新:likeadmin 讲解的内容实时更新,用户可以在第一时间了解到最新的知识和信息。
4.likeadmin 讲解的应用场景likeadmin 讲解的应用场景非常广泛,包括但不限于以下几个方面:(1)学习与研究:用户可以在 likeadmin 讲解上找到自己感兴趣的知识点,为自己的学习和研究提供有价值的信息。
(2)知识分享:专业人士可以在 likeadmin 讲解上分享自己的专业知识和经验,帮助其他用户解决问题。
Net Customisation User Guide
.NET Customization User GuideAVEVA Solutions LtdDisclaimerInformation of a technical nature, and particulars of the product and its use, is given by AVEVA Solutions Ltd and its subsidiaries without warranty. AVEVA Solutions Ltd and its subsidiaries disclaim any and all warranties and conditions, expressed or implied, to the fullest extent permitted by law. Neither the author nor AVEVA Solutions Ltd, or any of its subsidiaries, shall be liable to any person or entity for any actions, claims, loss or damage arising from the use or possession of any information, particulars, or errors in this publication, or any incorrect use of the product, whatsoever.CopyrightCopyright and all other intellectual property rights in this manual and the associated software, and every part of it (including source code, object code, any data contained in it, the manual and any other documentation supplied with it) belongs to AVEVA Solutions Ltd or its subsidiaries.All other rights are reserved to AVEVA Solutions Ltd and its subsidiaries. The information contained in this document is commercially sensitive, and shall not be copied, reproduced, stored in a retrieval system, or transmitted without the prior written permission of AVEVA Solutions Ltd Where such permission is granted, it expressly requires that this Disclaimer and Copyright notice is prominently displayed at the beginning of every copy that is made.The manual and associated documentation may not be adapted, reproduced, or copied, in any material or electronic form, without the prior written permission of AVEVA Solutions Ltd. The user may also not reverse engineer, decompile, copy, or adapt the associated software. Neither the whole, nor part of the product described in this publication may be incorporated into any third-party software, product, machine, or system without the prior written permission of AVEVA Solutions Ltd, save as permitted by law. Any such unauthorised action is strictly prohibited, and may give rise to civil liabilities and criminal prosecution.The AVEVA products described in this guide are to be installed and operated strictly in accordance with the terms and conditions of the respective licence agreements, and in accordance with the relevant User Documentation. Unauthorised or unlicensed use of the product is strictly prohibited.First published September 2007© AVEVA Solutions Ltd, and its subsidiaries 2007AVEVA Solutions Ltd, High Cross, Madingley Road, Cambridge, CB3 0HB, United KingdomTrademarksAVEVA and Tribon are registered trademarks of AVEVA Solutions Ltd or its subsidiaries. Unauthorised use of the AVEVA or Tribon trademarks is strictly forbidden.AVEVA product names are trademarks or registered trademarks of AVEVA Solutions Ltd or its subsidiaries, registered in the UK, Europe and other countries (worldwide).The copyright, trade mark rights, or other intellectual property rights in any other product, its name or logo belongs to its respective owner.AVEVA .NET CustomizationContents Page.NET Customization User GuideIntroduction. . . . . . . . . . . . . . . . . . . . . . . . . . . . . . . . . . . . . . . . . . . . .1:1 About this Guide . . . . . . . . . . . . . . . . . . . . . . . . . . . . . . . . . . . . . . . . . . . . . . . . . . 1:1 .NET Customization Architecture. . . . . . . . . . . . . . . . . . . . . . . . . . . . . . . . . . . . . 1:1 Common Application Framework Interfaces . . . . . . . . . . . . . . . . . . . . . . . . . . . . . . . . . . . . 1:2 Database Interfaces. . . . . . . . . . . . . . . . . . . . . . . . . . . . . . . . . . . . . . . . . . . . . . . . . . . . . . . 1:2 Geometry Interfaces. . . . . . . . . . . . . . . . . . . . . . . . . . . . . . . . . . . . . . . . . . . . . . . . . . . . . . . 1:3 Shared Interfaces. . . . . . . . . . . . . . . . . . . . . . . . . . . . . . . . . . . . . . . . . . . . . . . . . . . . . . . . . 1:3 Utilities Interfaces. . . . . . . . . . . . . . . . . . . . . . . . . . . . . . . . . . . . . . . . . . . . . . . . . . . . . . . . . 1:4 Graphics Interfaces . . . . . . . . . . . . . . . . . . . . . . . . . . . . . . . . . . . . . . . . . . . . . . . . . . . . . . . 1:4 Sample Code . . . . . . . . . . . . . . . . . . . . . . . . . . . . . . . . . . . . . . . . . . . . . . . . . . . . . 1:4 AttributeBrowserAddin . . . . . . . . . . . . . . . . . . . . . . . . . . . . . . . . . . . . . . . . . . . . . . . . . . . . . 1:4 ExamplesAddin . . . . . . . . . . . . . . . . . . . . . . . . . . . . . . . . . . . . . . . . . . . . . . . . . . . . . . . . . . 1:4 NetGridExample. . . . . . . . . . . . . . . . . . . . . . . . . . . . . . . . . . . . . . . . . . . . . . . . . . . . . . . . . . 1:4 PMLNetExample . . . . . . . . . . . . . . . . . . . . . . . . . . . . . . . . . . . . . . . . . . . . . . . . . . . . . . . . . 1:4 PMLGridExample. . . . . . . . . . . . . . . . . . . . . . . . . . . . . . . . . . . . . . . . . . . . . . . . . . . . . . . . . 1:5 Reference Documentation. . . . . . . . . . . . . . . . . . . . . . . . . . . . . . . . . . . . . . . . . . . 1:5 Compatibility with future versions. . . . . . . . . . . . . . . . . . . . . . . . . . . . . . . . . . . . 1:5How to Write an Addin . . . . . . . . . . . . . . . . . . . . . . . . . . . . . . . . . . . .2:1 The IAddin Interface. . . . . . . . . . . . . . . . . . . . . . . . . . . . . . . . . . . . . . . . . . . . . . . . 2:1 The WindowManager. . . . . . . . . . . . . . . . . . . . . . . . . . . . . . . . . . . . . . . . . . . . . . . 2:3 Window Creation . . . . . . . . . . . . . . . . . . . . . . . . . . . . . . . . . . . . . . . . . . . . . . . . . . . . . . . . . 2:3IWindow Interface . . . . . . . . . . . . . . . . . . . . . . . . . . . . . . . . . . . . . . . . . . . . . . . . . . . . . . . . . . . . . . . . . . . . . . 2:4 Window Events . . . . . . . . . . . . . . . . . . . . . . . . . . . . . . . . . . . . . . . . . . . . . . . . . . . . . . . . . . . . . . . . . . . . . . . . 2:4WindowManager Events. . . . . . . . . . . . . . . . . . . . . . . . . . . . . . . . . . . . . . . . . . . . . . . . . . . . . . . . . . . . . . . . . 2:5 The StatusBar. . . . . . . . . . . . . . . . . . . . . . . . . . . . . . . . . . . . . . . . . . . . . . . . . . . . . . . . . . . . . . . . . . . . . . . . . 2:5Addin Commands . . . . . . . . . . . . . . . . . . . . . . . . . . . . . . . . . . . . . . . . . . . . . . . . . 2:6 Writing a Command Class . . . . . . . . . . . . . . . . . . . . . . . . . . . . . . . . . . . . . . . . . . . . . . . . . . 2:6 Command Events. . . . . . . . . . . . . . . . . . . . . . . . . . . . . . . . . . . . . . . . . . . . . . . . . . . . . . . . . 2:9 Resource Manager. . . . . . . . . . . . . . . . . . . . . . . . . . . . . . . . . . . . . . . . . . . . . . . . . 2:9 Configuring a Module to Load an Addin . . . . . . . . . . . . . . . . . . . . . . . . . . . . . . . 2:9 Menu and Command Bar Customization . . . . . . . . . . . . . . . . . . . . .3:1 Configuring a Module to Load a UIC File. . . . . . . . . . . . . . . . . . . . . . . . . . . . . . . 3:1 Editing the UIC File . . . . . . . . . . . . . . . . . . . . . . . . . . . . . . . . . . . . . . . . . . . . . . . . 3:2 Selection of Active Customization File . . . . . . . . . . . . . . . . . . . . . . . . . . . . . . . . . . . . . . . . 3:3 The Tree . . . . . . . . . . . . . . . . . . . . . . . . . . . . . . . . . . . . . . . . . . . . . . . . . . . . . . . . . . . . . . 3:4Selecting a Node in the Tree. . . . . . . . . . . . . . . . . . . . . . . . . . . . . . . . . . . . . . . . . . . . . . . . . . . . . . . . . . . . . . 3:5 Drag & Drop within the Tree . . . . . . . . . . . . . . . . . . . . . . . . . . . . . . . . . . . . . . . . . . . . . . . . . . . . . . . . . . . . . . 3:5 Node Context Menus. . . . . . . . . . . . . . . . . . . . . . . . . . . . . . . . . . . . . . . . . . . . . . . . . . . . . . . . . . . . . . . . . . . . 3:5 List of Command Tools . . . . . . . . . . . . . . . . . . . . . . . . . . . . . . . . . . . . . . . . . . . . . . . . . . . . 3:6 Selecting a Node in the List. . . . . . . . . . . . . . . . . . . . . . . . . . . . . . . . . . . . . . . . . . . . . . . . . . . . . . . . . . . . . . . 3:6 Drag & Drop from the List to the Tree. . . . . . . . . . . . . . . . . . . . . . . . . . . . . . . . . . . . . . . . . . . . . . . . . . . . . . . 3:6 List Context Menu. . . . . . . . . . . . . . . . . . . . . . . . . . . . . . . . . . . . . . . . . . . . . . . . . . . . . . . . . . . . . . . . . . . . . . 3:7 Tool Types. . . . . . . . . . . . . . . . . . . . . . . . . . . . . . . . . . . . . . . . . . . . . . . . . . . . . . . . . . . . . . . . . . . . . . . . . . . . 3:8 Sorting List via Heading . . . . . . . . . . . . . . . . . . . . . . . . . . . . . . . . . . . . . . . . . . . . . . . . . . . . . . . . . . . . . . . . 3:10 Property Grid . . . . . . . . . . . . . . . . . . . . . . . . . . . . . . . . . . . . . . . . . . . . . . . . . . . . . . . . . . . 3:10 Action Buttons . . . . . . . . . . . . . . . . . . . . . . . . . . . . . . . . . . . . . . . . . . . . . . . . . . . . . . . . . . 3:12 Resource Editor . . . . . . . . . . . . . . . . . . . . . . . . . . . . . . . . . . . . . . . . . . . . . . . . . . . . . . . . . 3:13 Resource Editor Command Bar . . . . . . . . . . . . . . . . . . . . . . . . . . . . . . . . . . . . . . . . . . . . . . . . . . . . . . . . . . 3:14 Using Resources for Properties . . . . . . . . . . . . . . . . . . . . . . . . . . . . . . . . . . . . . . . . . . . . . . . . . . . . . . . . . . 3:16 Standalone Resource Editor. . . . . . . . . . . . . . . . . . . . . . . . . . . . . . . . . . . . . . . . . . . . . . . . . . . . . . . . . . . . . 3:16Database Interface . . . . . . . . . . . . . . . . . . . . . . . . . . . . . . . . . . . . . . .4:1 Data Model Definition Classes . . . . . . . . . . . . . . . . . . . . . . . . . . . . . . . . . . . . . . . 4:1 DbElementType . . . . . . . . . . . . . . . . . . . . . . . . . . . . . . . . . . . . . . . . . . . . . . . . . . . . . . . . . . 4:1Overview. . . . . . . . . . . . . . . . . . . . . . . . . . . . . . . . . . . . . . . . . . . . . . . . . . . . . . . . . . . . . . . . . . . . . . . . . . . . 4:1 Constructors . . . . . . . . . . . . . . . . . . . . . . . . . . . . . . . . . . . . . . . . . . . . . . . . . . . . . . . . . . . . . . . . . . . . . . . . . . 4:1 Methods. . . . . . . . . . . . . . . . . . . . . . . . . . . . . . . . . . . . . . . . . . . . . . . . . . . . . . . . . . . . . . . . . . . . . . . . . . . . 4:2 Related ENUMS . . . . . . . . . . . . . . . . . . . . . . . . . . . . . . . . . . . . . . . . . . . . . . . . . . . . . . . . . . . . . . . . . . . . . . . 4:2 Related Pseudo Attributes. . . . . . . . . . . . . . . . . . . . . . . . . . . . . . . . . . . . . . . . . . . . . . . . . . . . . . . . . . . . . . . . 4:2 DbAttribute. . . . . . . . . . . . . . . . . . . . . . . . . . . . . . . . . . . . . . . . . . . . . . . . . . . . . . . . . . . . . . 4:3 Overview. . . . . . . . . . . . . . . . . . . . . . . . . . . . . . . . . . . . . . . . . . . . . . . . . . . . . . . . . . . . . . . . . . . . . . . . . . . . 4:3 Constructors . . . . . . . . . . . . . . . . . . . . . . . . . . . . . . . . . . . . . . . . . . . . . . . . . . . . . . . . . . . . . . . . . . . . . . . . . . 4:3 Methods. . . . . . . . . . . . . . . . . . . . . . . . . . . . . . . . . . . . . . . . . . . . . . . . . . . . . . . . . . . . . . . . . . . . . . . . . . . . 4:3 Related ENUMS . . . . . . . . . . . . . . . . . . . . . . . . . . . . . . . . . . . . . . . . . . . . . . . . . . . . . . . . . . . . . . . . . . . . . . . 4:4 DbElementTypeInstance . . . . . . . . . . . . . . . . . . . . . . . . . . . . . . . . . . . . . . . . . . . . . . . . . . . 4:4 DbAttributeInstance . . . . . . . . . . . . . . . . . . . . . . . . . . . . . . . . . . . . . . . . . . . . . . . . . . . . . . . 4:4Element access . . . . . . . . . . . . . . . . . . . . . . . . . . . . . . . . . . . . . . . . . . . . . . . . . . . 4:5 DbElement Basics. . . . . . . . . . . . . . . . . . . . . . . . . . . . . . . . . . . . . . . . . . . . . . . . . . . . . . . . 4:5 Overview. . . . . . . . . . . . . . . . . . . . . . . . . . . . . . . . . . . . . . . . . . . . . . . . . . . . . . . . . . . . . . . . . . . . . . . . . . . . 4:5 Constructors . . . . . . . . . . . . . . . . . . . . . . . . . . . . . . . . . . . . . . . . . . . . . . . . . . . . . . . . . . . . . . . . . . . . . . . . . . 4:5 Identity. . . . . . . . . . . . . . . . . . . . . . . . . . . . . . . . . . . . . . . . . . . . . . . . . . . . . . . . . . . . . . . . . . . . . . . . . . . . 4:5 Element Validity. . . . . . . . . . . . . . . . . . . . . . . . . . . . . . . . . . . . . . . . . . . . . . . . . . . . . . . . . . . . . . . . . . . . . . . . 4:6 Error Handling. . . . . . . . . . . . . . . . . . . . . . . . . . . . . . . . . . . . . . . . . . . . . . . . . . . . . . . . . . . . . . . . . . . . . . . . . 4:6 Basic Properties . . . . . . . . . . . . . . . . . . . . . . . . . . . . . . . . . . . . . . . . . . . . . . . . . . . . . . . . . . . . . . . . . . . . . . . 4:6 Navigation. . . . . . . . . . . . . . . . . . . . . . . . . . . . . . . . . . . . . . . . . . . . . . . . . . . . . . . . . . . . . . 4:7 Basic Navigation . . . . . . . . . . . . . . . . . . . . . . . . . . . . . . . . . . . . . . . . . . . . . . . . . . . . . . . . . . . . . . . . . . . . . . . 4:7 Pseudo Attributes Relating to Element Navigation . . . . . . . . . . . . . . . . . . . . . . . . . . . . . . . . . . . . . . . . . . . . . 4:8 Secondary Hierarchies . . . . . . . . . . . . . . . . . . . . . . . . . . . . . . . . . . . . . . . . . . . . . . . . . . . . . . . . . . . . . . . . . . 4:8 Getting Attribute Values. . . . . . . . . . . . . . . . . . . . . . . . . . . . . . . . . . . . . . . . . . . . . . . . . . . . 4:9 Basic Mechanism . . . . . . . . . . . . . . . . . . . . . . . . . . . . . . . . . . . . . . . . . . . . . . . . . . . . . . . . . . . . . . . . . . . . . . 4:9 List of Valid Attributes . . . . . . . . . . . . . . . . . . . . . . . . . . . . . . . . . . . . . . . . . . . . . . . . . . . . . . . . . . . . . . . . . . 4:10 Qualifier. . . . . . . . . . . . . . . . . . . . . . . . . . . . . . . . . . . . . . . . . . . . . . . . . . . . . . . . . . . . . . . . . . . . . . . . . . . 4:11 Getting an Attribute as a Formatted String . . . . . . . . . . . . . . . . . . . . . . . . . . . . . . . . . . . . . . . . . . . . . . . . . . 4:11 Database Modifications . . . . . . . . . . . . . . . . . . . . . . . . . . . . . . . . . . . . . . . . . . . . . . . . . . . 4:11 Overview. . . . . . . . . . . . . . . . . . . . . . . . . . . . . . . . . . . . . . . . . . . . . . . . . . . . . . . . . . . . . . . . . . . . . . . . . . . 4:11 The Modification Pipeline . . . . . . . . . . . . . . . . . . . . . . . . . . . . . . . . . . . . . . . . . . . . . . . . . . . . . . . . . . . . . . . 4:12 Claiming Elements . . . . . . . . . . . . . . . . . . . . . . . . . . . . . . . . . . . . . . . . . . . . . . . . . . . . . . . . . . . . . . . . . . . . 4:13 Pseudo Attributes Relating to Claims . . . . . . . . . . . . . . . . . . . . . . . . . . . . . . . . . . . . . . . . . . . . . . . . . . . . . . 4:13 Set Attribute. . . . . . . . . . . . . . . . . . . . . . . . . . . . . . . . . . . . . . . . . . . . . . . . . . . . . . . . . . . . . . . . . . . . . . . . . . 4:14 Creating Element. . . . . . . . . . . . . . . . . . . . . . . . . . . . . . . . . . . . . . . . . . . . . . . . . . . . . . . . . . . . . . . . . . . . . . 4:14 Moving Element. . . . . . . . . . . . . . . . . . . . . . . . . . . . . . . . . . . . . . . . . . . . . . . . . . . . . . . . . . . . . . . . . . . . . . . 4:15 Changing Type . . . . . . . . . . . . . . . . . . . . . . . . . . . . . . . . . . . . . . . . . . . . . . . . . . . . . . . . . . . . . . . . . . . . . . . 4:15 Pseudo Attributes Relating to Modifications . . . . . . . . . . . . . . . . . . . . . . . . . . . . . . . . . . . . . . . . . . . . . . . . . 4:15 Storage of Rules and Expressions. . . . . . . . . . . . . . . . . . . . . . . . . . . . . . . . . . . . . . . . . . . 4:16 Database Expressions . . . . . . . . . . . . . . . . . . . . . . . . . . . . . . . . . . . . . . . . . . . . . . . . . . . . . . . . . . . . . . . . . 4:16 Rules. . . . . . . . . . . . . . . . . . . . . . . . . . . . . . . . . . . . . . . . . . . . . . . . . . . . . . . . . . . . . . . . . . . . . . . . . . . 4:17 Pseudo Attributes Relating to Rules and Expressions . . . . . . . . . . . . . . . . . . . . . . . . . . . . . . . . . . . . . . . . . 4:17 Comparison of Data with Earlier Sessions. . . . . . . . . . . . . . . . . . . . . . . . . . . . . . . . . . . . . 4:17Filters/Iterators. . . . . . . . . . . . . . . . . . . . . . . . . . . . . . . . . . . . . . . . . . . . . . . . . . . 4:19 Iterators. . . . . . . . . . . . . . . . . . . . . . . . . . . . . . . . . . . . . . . . . . . . . . . . . . . . . . . . . . . . . 4:19 Filters. . . . . . . . . . . . . . . . . . . . . . . . . . . . . . . . . . . . . . . . . . . . . . . . . . . . . . . . . . . . . 4:19Dabacon Tables . . . . . . . . . . . . . . . . . . . . . . . . . . . . . . . . . . . . . . . . . . . . . . . . . . 4:19 Overview of Dabacon Tables. . . . . . . . . . . . . . . . . . . . . . . . . . . . . . . . . . . . . . . . . . . . . . . 4:19 Table Classes. . . . . . . . . . . . . . . . . . . . . . . . . . . . . . . . . . . . . . . . . . . . . . . . . . . . . . . . . . . 4:20 DBs, MDBs and Projects. . . . . . . . . . . . . . . . . . . . . . . . . . . . . . . . . . . . . . . . . . . 4:21 MDB Functionality . . . . . . . . . . . . . . . . . . . . . . . . . . . . . . . . . . . . . . . . . . . . . . . . . . . . . . . 4:21 DB Functionality. . . . . . . . . . . . . . . . . . . . . . . . . . . . . . . . . . . . . . . . . . . . . . . . . . . . . . . . . 4:22 Events . . . . . . . . . . . . . . . . . . . . . . . . . . . . . . . . . . . . . . . . . . . . . . . . . . . . . . . 4:23 Overview of Events . . . . . . . . . . . . . . . . . . . . . . . . . . . . . . . . . . . . . . . . . . . . . . . . . . . . . . 4:23 Overview of C# Mechanism. . . . . . . . . . . . . . . . . . . . . . . . . . . . . . . . . . . . . . . . . . . . . . . . 4:23 General Capture of DB Changes. . . . . . . . . . . . . . . . . . . . . . . . . . . . . . . . . . . . . . . . . . . . 4:24Adding Pseudo Attribute Code. . . . . . . . . . . . . . . . . . . . . . . . . . . . . . . . . . . . . . . . . . . . . . 4:24 DB/MDB Related Events . . . . . . . . . . . . . . . . . . . . . . . . . . . . . . . . . . . . . . . . . . . . . . . . . . 4:26PMLNet . . . . . . . . . . . . . . . . . . . . . . . . . . . . . . . . . . . . . . . . . . . . . . . .5:1 Introduction . . . . . . . . . . . . . . . . . . . . . . . . . . . . . . . . . . . . . . . . . . . . . . . . . . . . . . 5:1 Design Details . . . . . . . . . . . . . . . . . . . . . . . . . . . . . . . . . . . . . . . . . . . . . . . . . . . . 5:1 Using PMLNet . . . . . . . . . . . . . . . . . . . . . . . . . . . . . . . . . . . . . . . . . . . . . . . . . . . . . . . . . . . 5:1Limitations. . . . . . . . . . . . . . . . . . . . . . . . . . . . . . . . . . . . . . . . . . . . . . . . . . . . . . . . . . . . . . . . . . . . . . . . . . . . 5:2 Object Names . . . . . . . . . . . . . . . . . . . . . . . . . . . . . . . . . . . . . . . . . . . . . . . . . . . . . . . . . . . . . . . . . . . . . . . . . 5:3 Query Methods . . . . . . . . . . . . . . . . . . . . . . . . . . . . . . . . . . . . . . . . . . . . . . . . . . . . . . . . . . . . . . . . . . . . . . . . 5:3 Global Method. . . . . . . . . . . . . . . . . . . . . . . . . . . . . . . . . . . . . . . . . . . . . . . . . . . . . . . . . . . . . . . . . . . . . . . . . 5:4 Method Arguments . . . . . . . . . . . . . . . . . . . . . . . . . . . . . . . . . . . . . . . . . . . . . . . . . . . . . . . . . . . . . . . . . . . . . 5:4 Method Overloading . . . . . . . . . . . . . . . . . . . . . . . . . . . . . . . . . . . . . . . . . . . . . . . . . . . . . . . . . . . . . . . . . . . . 5:5 Custom Attributes . . . . . . . . . . . . . . . . . . . . . . . . . . . . . . . . . . . . . . . . . . . . . . . . . . . . . . . . . . . . . . . . . . . . . . 5:5 Private Data and Properties . . . . . . . . . . . . . . . . . . . . . . . . . . . . . . . . . . . . . . . . . . . . . . . . . . . . . . . . . . . . . . 5:6 Scope. . . . . . . . . . . . . . . . . . . . . . . . . . . . . . . . . . . . . . . . . . . . . . . . . . . . . . . . . . . . . . . . . . . . . . . . . . . . 5:6 Instantiation. . . . . . . . . . . . . . . . . . . . . . . . . . . . . . . . . . . . . . . . . . . . . . . . . . . . . . . . . . . . . . . . . . . . . . . . . . . 5:7 ToString() Method. . . . . . . . . . . . . . . . . . . . . . . . . . . . . . . . . . . . . . . . . . . . . . . . . . . . . . . . . . . . . . . . . . . . . . 5:7 Method Names . . . . . . . . . . . . . . . . . . . . . . . . . . . . . . . . . . . . . . . . . . . . . . . . . . . . . . . . . . . . . . . . . . . . . . . . 5:7 Double Precision. . . . . . . . . . . . . . . . . . . . . . . . . . . . . . . . . . . . . . . . . . . . . . . . . . . . . . . . . . . . . . . . . . . . . . . 5:7 Events. . . . . . . . . . . . . . . . . . . . . . . . . . . . . . . . . . . . . . . . . . . . . . . . . . . . . . . . . . . . . . . . . . . . . . . . . . . . 5:7 Error Handling. . . . . . . . . . . . . . . . . . . . . . . . . . . . . . . . . . . . . . . . . . . . . . . . . . . . . . . . . . . . . . . . . . . . . . . . . 5:8 Rules for Calling .NET. . . . . . . . . . . . . . . . . . . . . . . . . . . . . . . . . . . . . . . . . . . . . . . . . . . . . . . . . . . . . . . . . . . 5:8 Tracing. . . . . . . . . . . . . . . . . . . . . . . . . . . . . . . . . . . . . . . . . . . . . . . . . . . . . . . . . . . . . . . . . . . . . . . . . . . . 5:9 .NET Controls. . . . . . . . . . . . . . . . . . . . . . . . . . . . . . . . . . . . . . . . . . . . . . . . . . . . . . . . . . . . 5:9 Creating a Container. . . . . . . . . . . . . . . . . . . . . . . . . . . . . . . . . . . . . . . . . . . . . . . . . . . . . . . . . . . . . . . . . . . . 5:9 Hosting .NET Control . . . . . . . . . . . . . . . . . . . . . . . . . . . . . . . . . . . . . . . . . . . . . . . . . . . . . . . . . . . . . . . . . . 5:10 Events. . . . . . . . . . . . . . . . . . . . . . . . . . . . . . . . . . . . . . . . . . . . . . . . . . . . . . . . . . . . . . . . . . . . . . . . . . . 5:10 Examples. . . . . . . . . . . . . . . . . . . . . . . . . . . . . . . . . . . . . . . . . . . . . . . . . . . . . . . . . . . . . 5:10 PMLGridExample . . . . . . . . . . . . . . . . . . . . . . . . . . . . . . . . . . . . . . . . . . . . . . . . . . . . . . . . . . . . . . . . . . . . . 5:10 PMLNetExample. . . . . . . . . . . . . . . . . . . . . . . . . . . . . . . . . . . . . . . . . . . . . . . . . . . . . . . . . . . . . . . . . . . . . . 5:10The AVEVA C# Grid Control. . . . . . . . . . . . . . . . . . . . . . . . . . . . . . . .6:1Introduction . . . . . . . . . . . . . . . . . . . . . . . . . . . . . . . . . . . . . . . . . . . . . . . . . . . . . . 6:1 Creating a C# Addin which Contains an AVEVA Grid Control. . . . . . . . . . . . . . 6:1 Providing Access to the Addin in PDMS Design or Outfitting Design . . . . . . . 6:3 Using the AVEVA Grid Control with Different Data Sources: . . . . . . . . . . . . . . 6:4 Adding an XML Menu to the Form . . . . . . . . . . . . . . . . . . . . . . . . . . . . . . . . . . . . 6:5 Adding an Event to the Addin. . . . . . . . . . . . . . . . . . . . . . . . . . . . . . . . . . . . . . . . 6:6 Other Functionality Available within the PDMS Environment. . . . . . . . . . . . . . 6:7 Use of the C# Grid Control with PML. . . . . . . . . . . . . . . . . . . . . . . . . . . . . . . . . . 6:7 AVEVA Grid Control API . . . . . . . . . . . . . . . . . . . . . . . . . . . . . . . . . . . . . . . . . . . . 6:7 Input Mask Characters. . . . . . . . . . . . . . . . . . . . . . . . . . . . . . . . . . . . . . . . . . . . . 6:121Introduction1.1About this GuideThis manual is designed to give a software engineer with experience of softwaredevelopment in C# using Visual Studio guidance on the development of .NET customizationfor the AVEVA PDMS and AVEVA Marine products. Customization ArchitectureThe introduction of a customization capability using Microsoft .NET technology has openedup a whole new world of customization and is particularly relevant for the integration ofAVEVA products with other customer systems. .NET API's provided access to variousaspects of the product including Graphical User Interface, Database and Geometry.As part of AVEVA's strategy of 'continual progression' the .NET customization capability hasbeen introduced in such a way that it can be used alongside the existing PML basedcustomization. Through the use of , an enhancement to PML which allows thePML programmer to call .NET code, customization which utilizes the strengths of .NETcompiled code and PML can be achieved.Figure 1: customization ArchitectureThe above diagram illustrates the two new methods of customization using .NETtechnology. The first is via the concept of a .NET Addin and the second using .Both methods provide a mechanism whereby a .NET assembly (dll) can be dynamicallyloaded into a module at runtime.1.2.1Common Application Framework InterfacesThe Common Application Framework (CAF) is an extensible framework which provides the.NET programmer with access to various services which support both applicationdevelopment and customization. The foundations of the CAF are provided by the twointerface assemblies:•Aveva.ApplicationFramework.dll•Aveva.ApplicationFramework.Presentation.dllThese interfaces provide the following major services:Namespace: Aveva.ApplicationFramework•AddinManager: This class provides properties and methods for the management of ApplicationFramework Addins.•ServiceManager: This class defines an interface which provides a means by which the various components of the ApplicationFramework can publish their services. TheServiceManager also acts as a service provider responding to requests for services. Itcan also be used by applications and application addins to publish additional services.•SettingsManager: This class provides properties and methods for the management of application settings which are stored in settings groups which are persisted betweensessions.Namespace: Aveva.ApplicationFramework.Presentation•CommandBarManager: This provides access to the menus and commandbars of a CAF based application. It also has methods to load the definition of menus andcommandbars from User Interface customization (UIC) files.•CommandManager: This class defines an interface to provide the presentation framework client with a mechanism for the management of command objects whichcan be associated with Tools or other User interface objects. The action of invoking atool (e.g clicking a ButtonTool) will cause the execution of the associated commandobject. It is possible to associated the same command object with a number of differentuser interface objects (e.g. ButtonTool on a Menu and a LinkLabel) thereby allowing forthe centralisation of these user interface objects action within a command. Variousstate-like properties of a command (e.g. enabled/checked) would also be reflected in alluser interface objects associated with a command. For example, disabling a commandwould cause all associated user interface objects to be disabled. User interface objectsare associated with a command via a CommandExecutor derived class.•ResourceManager: This class defines an interface to provide Addins with a simplified mechanism to access localizable resources.The ResourceManager provides a numberof methods which allows an addin to then access the various types of resources (string,image, cursor, icon etc.) which resource files may contain.•WindowManager: This provides access to the main application window, the StatusBar and a collection of MDI and docked windows. It also provides the addin writer withmethods to create MDI and docked windows to host user controls.1.2.2Database InterfacesThe database related interfaces are provided by the interface assemblies:•Aveva.Pdms.Database.dll & PDMSFilters.dllThis interface has the following main classes:Namespace: Aveva.Pdms.Database•DatabaseService: The sole purpose of this class is to open a project.。
finderweb 操作方法
finderweb 操作方法
在FinderWeb 操作中,你需要先进行主机管理,以下是一个示例操作流程:
1. 使用 admin 账号登录你的设备,并进入管理控制台。
2. 在管理控制台中,点击主机管理,并进入编辑主机的界面。
3. 在编辑主机的界面中,你可以修改主机的默认名称和 URL。
请确保将URL 修改为当前主机真正的访问地址,并填写正确的地址。
4. 根据需要添加工作空间。
5. 添加其他两台机器,并为每台机器配置好工作空间。
6. 在主机列表中,点击从 master 同步,以确保所有主机都已正确添加并同步。
注意,以上操作都是针对 master 主机的,确保你在 master 这台机器上操作,不要登录其他机器做操作。
以上信息仅供参考,如需了解更多信息,建议咨询专业人士或查阅FinderWeb 的使用说明。
ldapadmin使用手册
ldapadmin使用手册LDAPadmin使用手册LDAPadmin是一款开源的LDAP(轻量目录访问协议)客户端,诸多企业利用LDAP管理其组织的用户和资源。
LDAPadmin提供了一个友好的Web界面来管理LDAP目录。
1.安装LDAPadmin下载最新的LDAPadmin版本并安装到计算机上,并按照安装程序的指示完成安装。
LDAPadmin可以在Windows、Linux和Mac OS X 等操作系统上运行。
2.启动LDAPadmin安装完成后,双击图标启动LDAPadmin。
出现登录窗口,输入LDAP 服务器的地址、SSL端口号、用户名和密码(如果有的话)。
用户也可以使用匿名登录作为LDAP信息服务器访问。
3.连接LDAP服务器在LDAPadmin菜单中选中“文件”--“新建连接”。
输入LDAP服务器的详细信息,如IP地址、端口号、登录帐号及密码。
单击“连接”按钮测试连接。
在连接成功后,下一步就是对LDAP目录进行操作。
4.查看、编辑和添加目录对象LDAPadmin中的“浏览器”选项卡提供了一种方便的方式来浏览LDAP目录及其对象。
用户可以在不同的目录节点下浏览和查看对象及其属性(如名称、属性及其值)。
选择要编辑的对象并在“编辑”选项卡下进行更改。
单击“保存”以保存所做的更改。
要添加新目录对象,选择正确的节点并单击右键,然后选择“新建”菜单项。
LDAPadmin将显示一个新对象的编辑窗口。
为新对象设置属性并保存即可。
5.搜索LDAP目录LDAPadmin提供了一种细粒度的搜索方式,可根据哪些属性(如名称、大小等)返回哪些结果。
选择“搜索”选项卡,则可以进行基本和高级搜索。
输入搜索条件并单击“搜索”按钮,则LDAPadmin将返回与条件匹配的对象。
6.导出和导入数据LDAPadmin提供了一种方便的方法来将LDAP目录数据导出到LDIF或CSV文件中。
选择要导出的节点和属性,单击“导出”菜单项,即可将数据导出到本地计算机。
discoverer的操作手册
《DISCOVER操作手册》一、DISCOVER的安装过程1、先把DISCOVER下载下来。
(下载地址:/Oracle_开发套件_10g_(10.1.2.0.0)/Discoverer/),下载自解压文件Discoverer10.1.2.50.05.exe,里面并包含有补丁目录(Patch\p5566430_10121_WINNT\5592391),先双击setup.exe进行安装,进入后根据自己的需要选择是全部安装还是部分安装。
2安装完毕后将补丁目录中的Patch\p5566430_10121_WINNT\5592391\files\bin\所有文件覆盖到安装Discoverer中的bin下。
里3、在我的电脑属性->高级->环境变量->创建 FND_SECURE 变量值:为安装Discoverer中的bin下创建的SECURE目录例如: E:\oracle\BIToolsHome_1\bin\secure然后将 dbc文件(PROD.dbc文件是生产环境的配置文件,TEST.dbc为克隆环境的配置文件)放入 E:\oracle\BIToolsHome_1\bin\secure2) 在我的电脑属性->高级->环境变量->创建 FND_TOP 变量值: E:\oracle\BIToolsHome_1\bin3) 将tnsnames.ora下载并复制到安装目录Discoverer下\network\ADMIN例如: E:\oracle\BIToolsHome_1\network\ADMIN1、进入administrator界面登陆2、选择应付款管理超级用户3、在administrator用户下选择打开现有的业务数据区4、进入5、选择创建新业务数据区6、选择APPS7、选择输入后,点击下一步,直到完成。
8、9、重命名10、自己创建一个文件夹,鼠标右击“qfd”,选择从数据库新建文件夹。
纠正措施与预防措施处理规程-翻译

1 目的为规范GMP运行过程产生的(潜在)不符合的处理行为,使药品生产符合法规、行业标准规定,降低产品缺陷率及偏差发生的机率,实现质量管理体系的持续改进,特制定纠正措施与预防措施(Corrective Action & Preventive Action,以下简称CAPA)的管理程序。
To regulate the incongruent processing behavior generated in the GMP, and meet the drug production in line with regulations and industry standards, and reduce product defect rate and the probability of the deviation occurrence, and realize the continuous improvement of the quality management system, we specially formulated corrective measures and prevention measures (Corrective Action & Preventive Action, hereinafter referred to as CAPA) management program.2 适用范围2.1 适用于药品GMP运行过程产生的各类(潜在)不符合的CAPA制定、实施及闭环确认。
Applies to all kinds of (potential) formulation, implementation and closed-loop confirmation which do not meet the CAPA in the GMP2.2在生产质量活动中,能够立即采取应急措施解决问题且相关批次产品质量无影响,可以不执行该程序。
“探索者”学习参考-软件的安装使用-Basra在Windows环境下配置与烧录
编写完C代码或图形程序,就可以把程序烧进主控板了
将Basra连在电脑USB口上
此时系统一般会自动安装驱动
自动安装驱动程序
如果没有自动安装驱动,而是运行了自动添 加硬件向导,请按以下步骤处理
从列表和指定位置安装
选择装有驱动程序的文件夹
完成
打开设备管理器,找到Serial端口号,记住它
在Arduino软件中Tools菜单下,选择Board里的Arduino Uno项BaBiblioteka ra在Windows环境下的配置与烧录
1.拷贝软件 2.安装驱动程序 3.查找COM端口 4.设置Arduino软件
请将光盘中整个软件文件夹拷贝到电脑上, 以方便使用
Arduino是我们要用的编程软件,光盘内提供的是 绿色免安装版,拷贝后即可使用
打开Arduino,先看到的是C语言界面
打开Tools→Ardublock,可以看到图形化界面
以及Serial Port里的COM号
点击upload按钮或"下载到Arduino"按钮,程序将自动烧录 进Basra
如果新硬件向导没有运行,请前往设备管理器,在设备管理器未识别硬 件那里点右键,更新驱动程序,手动选择驱动程序文件夹并安装
factorytalk administration 编程 -回复
factorytalk administration 编程-回复FactoryTalk Administration 编程指的是使用Rockwell Automation 的FactoryTalk Administration软件来管理和控制工厂的过程。
FactoryTalk Administration是一种功能强大的工具,可帮助用户管理和配置工厂的设备、用户和权限,以实现高效的生产。
在本文中,我将一步一步地为你解释FactoryTalk Administration编程的主题,并介绍如何使用这种工具来提高工厂的操作效率和产能。
第一步:安装和配置FactoryTalk Administration软件要开始FactoryTalk Administration编程,首先需要安装和配置FactoryTalk Administration软件。
该软件是Rockwell Automation提供的一种集中管理工具,用于配置和管理FactoryTalk View SE和FactoryTalk View ME站点。
安装和配置软件的过程可能因个人情况而异,但通常需要按照软件提供的指南进行操作。
你可以从Rockwell Automation的官方网站上下载软件,并根据提供的安装和配置说明进行操作。
第二步:创建和配置FactoryTalk Administration项目安装和配置软件后,下一步是创建和配置FactoryTalk Administration 项目。
FactoryTalk Administration项目是一个容器,包含了工厂的信息和配置。
在创建项目之前,你需要了解工厂的结构和需要管理的设备。
然后,你可以使用FactoryTalk Administration软件创建一个项目,并根据工厂的实际情况配置项目的设置。
配置项目的设置包括创建站点、定义设备、配置用户和权限等。
通过配置这些设置,你可以实现对工厂设备和过程的有效管理和控制。
- 1、下载文档前请自行甄别文档内容的完整性,平台不提供额外的编辑、内容补充、找答案等附加服务。
- 2、"仅部分预览"的文档,不可在线预览部分如存在完整性等问题,可反馈申请退款(可完整预览的文档不适用该条件!)。
- 3、如文档侵犯您的权益,请联系客服反馈,我们会尽快为您处理(人工客服工作时间:9:00-18:30)。
Identify User Requirements
• What type of information would users like to see? • How would they like the information displayed? • Where can the information be found? • What are the business rules and formula for the
Folder: Sales Fact
Items: Time Key, Product Key, Store Key, Sales Do not save
Create Workbook
• • • •
User: ADM##
Style: Table Business Area: Video Stores
Robert Wu
Senior Consultant Consulting Services Oracle Taiwan
Discoverer Workshop -Administration
D E M O N S T R A T I O N
Overview
Client/Server Architecture
– – –
No Join No LOV No Summary
• •
Name: Video Stores Description: Video Store Information for 1998 to 2000
Create Workbook
• • • • •
•
User: ADM##
Style: Table Business Area: Video Stores
Folder.Item: Time.Transaction Date Year, Product.Department, Store.Region, Sales Fact.Sales
Build a Business Area
Load business area Refine Relational Structure - joins - complex / custom folders - calculated items - conditions
Administration Desktop
SQL*Net
SQL*Net
EUL
table, view
Database Server
Web Architecture
Administration Viewer
HTTP
SQL*Net
Plus
Servlet
EUL
Database Server
SQL*Net
Are built from existing simple and complex folders
Simple Folders
Product
•Product Id •Description •Type •Category •Department
Store
•Store •City •Region
Time
•Day •Month •Quarter •Year
Sales Fact
•Dollar Sales •Dollar Profit •Customer Count
Complex Folders
Video Analysis
•Product Id •Product Description •Product Type •Product Category •Department •Store •City •Region •Day •Month •Quarter •Year •Dollar Sales •Dollar Profit •Customer Count
Create Business Area
Select Users
Select Objects
Set Preferences
Name Business Area
P
R
A
C
T
I
C
E
Load Business Area
Load Business Area
•
•
Select from VIDEO4 schema: Product, Store, Times, and Sales_Fact Set Preferences
Manage summaries
Maintain EUL
Edit formatting properties
Grant access
*
Mandatory
*
EUL
• • •
Consist of database tables and views
Store metadata required by Discoverer Is controlled and accessed by administrator
Login
EUL Manager
Create EUL
P
R
A
C
T
I
C
E
Create EUL
Create EUL
• • •
User Name: ADM##
Password: ADM## Connect String:
D E M O N S T R A T I O N
Load Business Area
Before You Start
Implement Oracle Discoverer
• • •
Identify user requirements
Install EUL tables on the server Set up business areas
–
–
Define folders and items
Store.Store Key=Sales Fact.Store Key
Times.Time Key=Sales Fact.Time Key
Create Workbook
• • • • •
User: ADM ##
Style: Table Business Area: Video Stores
Folder.Item: Time.Transaction Date Year, Product.Department, Store.Region, Sales Fact.Sales Do not save
Business Area
•
•
A logical group of folders that share a common business theme
Can be assigned to either a user or a role
DIMENSION: Time description weekday holiday fiscal DIMENSION: Time description weekday holiday fiscal DIMENSION: Time description weekday holiday fiscal
• • • •
Video rental sales for a large chain of stores Includes sales information by store
Includes product information
Includes time information
Products Store Time
DIMENSION: Time description weekday holiday fiscal
DIMENSION: Time description weekday holiday fiscal
Simple Folder
• • •
Created from Bulk Load Wizard
Represent single table or view Items map to columns
information?
• •
What are the performance requirements? ….
The Role of the Administrator
End User Layer
Employees Hierarchies Joins
Data Dictionary
emp_dta emp_code view_mgr
Complex Folder
• • •
Created in the Work Area
Based on One or More Existing Folders Items Map to Items in the Source Folders
D E M O N S T R A T Βιβλιοθήκη O NCreate EUL
DIMENSION: Time description DIMENSION: weekday Time holiday description fiscal DIMENSION: weekday Time holiday description fiscal weekday holiday fiscal
D E M O N S T R A T I O N
Insert Join
Select Master
Select Detail
Multi-Item Join
Join Options
P
R
A
C
T
I
C
E
Insert Join
Insert Joins
