如何启动服务器
电脑怎么打开服务

电脑怎么打开服务
电脑怎么打开服务?计算机(computer)俗称电脑,是一种用于高速计算的电子计算机器,可以进行数值计算,又可以进行逻辑计算,还具有存储记忆功能。
下面就由店铺来给大家说说电脑怎么打开服务,欢迎大家前来阅读!
电脑怎么打开服务
方法一:比较简单就是直接在开始菜单的搜索栏搜索服务,然后选择服务即可
方法二:熟悉命令的同学就可以在运行(ctrl+r)或者命令行输入services.msc,按回车就可打开服务
方法三:右键点击“我的电脑”-->管理-->服务和应用程序-->服务,当然还可以从控制面板等其他地方打开了,不过没有前面几种便捷
如何自定义服务
打开服务后,你可以看到系统中所有的服务列表,你可以将不用到的服务关闭,或者启动某个服务项,不过你得清楚服务的功能和作用啊,不要随便去停止某个服务,除非你清楚它。
右键任意服务-->启动/停止
你也可以更改服务的启动设置,右键任意一个服务,点击属性
你可以在启动类型那里设置你想要的启动方式,如果很少用到就选择手动,如果用的多单怕影响开机速度选择延迟启动
【注意】不知道功能的服务不要随便停止。
华为XH628 V5服务器节点快速启动指南说明书
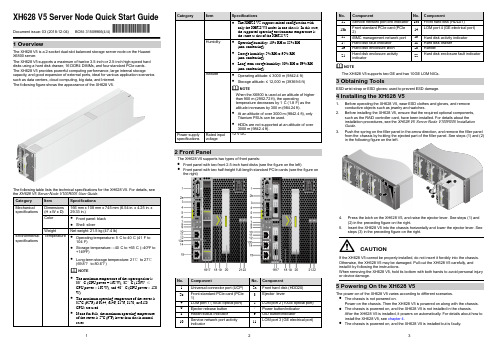
1 2 3XH628 V5 Server Node Quick Start GuideDocument issue: 03 (2018-12-04) BOM: 31509966(4/4)1 OverviewThe XH628 V5 is a 2-socket dual-slot balanced storage server node on the Huawei X6800 server.The XH628 V5 supports a maximum of twelve 3.5-inch or 2.5-inch high-speed hard disks using a hard disk drawer, 16 DDR4 DIMMs, and four standard PCIe cards. The XH628 V5 provides powerful computing performance, large internal storagecapacity, and good expansion of external ports, ideal for various application scenarios such as data centers, cloud computing, big data, and Internet. The following figure shows the appearance of the XH628 V5.The following table lists the technical specifications for the XH628 V5. For details, see 2 Front PanelThe XH628 V5 supports two types of front panels:● Front panel with two front 2.5-inch hard disks (see the figure on the left)● Front panel with two half-height full-length standard PCIe cards (see the figure onthe right)NOTEThe XH628 V5 supports two GE and two 10GE LOM NICs.3 Obtaining ToolsESD wrist strap or ESD gloves: used to prevent ESD damage.4 Installing the XH628 V51. Before operating the XH628 V5, wear ESD clothes and gloves, and remove conductive objects such as jewelry and watches.2.Before installing the XH628 V5, ensure that the required optional components, such as the RAID controller card, have been installed. For details about the installation procedures, see the XH628 V5 Server Node V100R005 Installation Guide .3.Push the spring on the filler panel in the arrow direction, and remove the filler panel from the chassis by holding the ejected part of the filler panel. See steps (1) and (2) in the following figure on the left.4. Press the latch on the XH628 V5, and raise the ejector lever. See steps (1) and (2) in the preceding figure on the right.5.Insert the XH628 V5 into the chassis horizontally and lower the ejector lever. See steps (3) in the preceding figure on the right.CAUTIONIf the XH628 V5 cannot be properly installed, do not insert it forcibly into the chassis. Otherwise, the XH628 V5 may be damaged. Pull out the XH628 V5 carefully, and install it by following the instructions.When removing the XH628 V5, hold its bottom with both hands to avoid personal injury or device damage.5 Powering On the XH628 V5The power-on of the XH628 V5 varies according to different scenarios. ● The chassis is not powered on.Power on the chassis. Then the XH628 V5 is powered on along with the chassis. ● The chassis is powered on, and the XH628 V5 is not installed in the chassis.After the XH628 V5 is installed, it powers on automatically. For details about how to install the XH628 V5, see chapter 4.● The chassis is powered on, and the XH628 V5 is installed but is faulty.4Hold down the power button on the front panel for 6 seconds until the XH628 V5 is powered off, and then press the power button again to power on the XH628 V5. If the power restore policy is set to Stay Off for the server, manually power on the server after the power supply is connected.If the XH628 V5 fails to power on, see the X6800 Server V100R005 Troubleshooting .6 Follow-up ProcedureAfter the XH628 V5 is properly installed in the rack and powered on, install an OS and drivers for the XH628 V5. For details, see the XH628 V5 Server Node V100R005 User Guide .Y ou can obtain more information from the following: ● Product documentation DVD-ROM shipped with thecabinet● Huawei support websites:For enterprises, visit For carriers, visit 。
PXE启动服务器的设置方法

PXE启动服务器的设置方法一般来说,启动服务器包括两个服务器:DHCP服务器:用来动态分配IP地址(同时分配子网掩码、网关、TFTP 服务器地址、启动文件名、DNS服务器、时间服务器等等)。
TFTP服务器:用来提供启动文件的下载1. Hanewin DHCP服务器的安装设置。
安装之前,本机要设置固定IP地址。
1)安装及注册。
安装程序:\\pxzxsrv\clone\software\Hanewin_dhcp303.exe注册机:\\pxzxsrv\clone\software\Hanewin_dhcp217_keygen.zip2)设置首先,启动服务:File – Service – Activate。
(注:Terminate是结束服务)。
第二,Options – Preferences:a) Interfaces –选中要提供DHCP服务的IP地址。
:如果有其它DHCP服务器则暂停服务(备份服务器)。
b) DHCPc) TFTP:注意设置Root Directory到pxe目录。
d) 确定,保存设置。
第三,选定接口(interface)的DHCP具体选项设置。
接口:Options – If-x.x.x.x a) Basic Profileb) DNS:DNS域名及服务器设置c) Time: 时区及时间服务器设置d) Boot:网络启动相关选项设置注意:如果DHCP服务器和TFTP服务器不在同一台服务器上,那么Next ServerIP Address中要填上TFTP服务器的IP地址。
Pxelinux.0就是启动文件名。
e) 确定,保存设置。
第四,重新启动服务。
3)在本机防火墙上打开相关的服务端口:UDP:67、69两个端口。
以XP为例:控制面板-Windows防火墙-例外-添加端口。
例外-添加程序:4)全部设置完毕。
5)如果不想让DHCP服务自动启动,在系统服务中修改对应的服务(DHCPServer),将启动方式设置为手动即可。
Linux终端命令的服务管理技巧启动、停止与管理服务
Linux终端命令的服务管理技巧启动、停止与管理服务在Linux系统中,终端命令是管理服务的关键。
通过终端命令,我们可以轻松地启动、停止和管理各种服务。
本文将介绍一些在Linux终端中管理服务的技巧和命令。
一、服务的启动与停止在Linux系统中,启动和停止服务是我们经常需要使用的命令。
下面是一些常用的命令示例:1. 启动服务:sudo systemctl start 服务名例如,启动Apache Web服务器:sudo systemctl start apache22. 停止服务:sudo systemctl stop 服务名例如,停止MySQL数据库服务器:sudo systemctl stop mysql3. 重启服务:sudo systemctl restart 服务名例如,重启Nginx Web服务器:sudo systemctl restart nginx4. 查看服务状态:sudo systemctl status 服务名例如,查看SSH服务状态:sudo systemctl status sshd二、服务的管理除了启动和停止服务,我们还需要了解一些管理服务的技巧。
以下是一些常用的命令示例:1. 设置开机启动:sudo systemctl enable 服务名例如,将Apache Web服务器设置为开机启动:sudo systemctl enable apache22. 取消开机启动:sudo systemctl disable 服务名例如,取消MySQL数据库服务器的开机启动:sudo systemctl disable mysql3. 查看已启动的服务列表:systemctl list-units --type=service该命令将列出当前已启动的所有服务。
4. 查看服务的启动日志:journalctl -u 服务名例如,查看Nginx Web服务器的启动日志:journalctl -u nginx5. 查看服务的依赖关系:systemctl list-dependencies 服务名该命令将显示指定服务的依赖关系。
服务器操作系统安装

服务器操作系统安装引言服务器操作系统是一种为网络服务器设计和优化的操作系统,其功能包括提供网络服务、维护网络安全和管理服务器资源。
本文将介绍如何安装服务器操作系统。
步骤一:选择操作系统在安装服务器操作系统之前,首先需要选择适合你的需求的操作系统。
常见的服务器操作系统有 Windows Server、Linux、FreeBSD 等。
你可以根据自己的需求和技术背景选择适合的操作系统。
步骤二:准备安装介质在安装服务器操作系统之前,你需要准备合适的安装介质。
可以选择使用光盘、USB 驱动器或网络安装。
步骤三:启动服务器将安装介质插入服务器,并启动服务器。
在启动过程中,你需要按照设备制造商的说明进入 BIOS 设置页面。
步骤四:调整启动顺序在 BIOS 设置页面上,找到“启动顺序”或“启动选项”,将服务器的启动顺序设置为首先从安装介质启动。
保存设置并重新启动服务器。
步骤五:进入安装界面重新启动后,系统将从安装介质启动,进入安装界面。
根据操作系统的不同,安装界面和操作可能会有所不同。
步骤六:选择语言和地区在安装界面中,你需要选择适合你使用的语言和地区。
步骤七:阅读许可协议在继续安装之前,你需要阅读和接受操作系统的许可协议。
如果你不同意协议,无法继续安装操作系统。
步骤八:选择安装类型根据你的需求和服务器的用途,选择适合的安装类型。
常见的安装类型包括全新安装、升级、修复等。
步骤九:分区和格式化磁盘在安装过程中,你需要对服务器磁盘进行分区和格式化。
根据不同的操作系统,你可以选择手动分区或自动分区。
步骤十:设置管理员密码设置管理员密码是确保服务器安全的重要步骤。
选择一个强密码,并妥善保管。
步骤十一:进行安装确认所有设置后,你可以开始安装操作系统。
安装过程可能需要一些时间,请耐心等待。
步骤十二:完成安装安装完成后,系统会提示你重新启动服务器。
完成安装后,你可以开始配置服务器和安装相关软件。
结论通过按照上述步骤,你可以成功地安装服务器操作系统。
如何开启tftp服务器

【网讯网络通信学院】首先,从/index.php?Go=Show::List&ID=6133下载Cisco TFTP Server(如果你知道路由器的品牌,到路由器的厂商网站应该也会有相应的TFTP服务器软件下载),安装在放置有路由器升级文件的那台机器上(此时要设置好此台机器的IP地址,使之与路由器的局域网IP处于同一网段)。然后启动TFTP服务器软件,在选项设置中(一般在“查看”-“设置”菜单下)设定“TFTP服务器根目录”为你路由器升级文件所在的目录,按下“确定”,TFTP服务器设置完成。 织梦内容管理系统
端口漏洞:很多服务器和Bootp服务一起提供TFTP服务,主要用于从系统下载启动代码。可是,因为TFTP服务可以在系统中写入文件,而且黑客还可以利用TFTP的错误配置来从系统获取任何文件。
操作建议:建议关闭该端口。
79端口 :79端口是为Finger服务开放的,主要用于查询远程主机在线用户、操作系统类型以及是否缓冲区溢出等用户的详细信息。
操作建议:建议关闭该端口。
80端口 :80端口是为HTTP(HyperText Transport Protocol,超文本传输协议)开放的,这是上网冲浪使用最多的协议,主要用于在WWW(World Wide Web,万维网)服务上传输信息的协议。
端口说明:80端口是为HTTP(HyperText Transport Protocol,超文本传输协议)开放的,这是上网冲浪使用最多的协议,主要用于在WWW(World Wide Web,万维网)服务上传输信息的协议。我们可以通过HTTP地址加“:80”(即常说的“网址”)来访问网站的,比如:80,因为浏览网页服务默认的端口号是80,所以只要输入网址,不用输入“:80”。
服务器按键操作方法

服务器按键操作方法服务器的按键操作方法可以分为两个部分,一是物理按键操作,二是虚拟按键操作。
一、物理按键操作:服务器通常配有前面板按键,用于控制和监控服务器的各项功能。
常见的物理按键包括电源按钮、重启按钮、报警静音按钮和KVM(键盘、视频、鼠标)切换按钮等。
下面分别介绍各个按键的使用方法:1. 电源按钮:服务器的电源按钮通常是一个带有一个圆圈的按钮,按下按钮可以开启或关闭服务器。
按下按钮不松手就是开启服务器,松手则是关闭服务器。
一般情况下,按下电源按钮开启服务器后,会有指示灯亮起以表示服务器已经启动。
2. 重启按钮:服务器的重启按钮用于重新启动服务器。
按下重启按钮后,服务器会立即关机,然后再次开机。
通常情况下,按下重启按钮后会有指示灯闪烁以表示服务器正在重启。
3. 报警静音按钮:服务器的报警静音按钮用于暂时关闭服务器的报警声音。
当服务器发生故障或者异常时,会发出警报声音以提醒管理员。
按下报警静音按钮后,服务器的警报声音会暂时关闭,但服务器的异常状态不会改变,管理员需要及时处理故障。
4. KVM切换按钮:KVM切换按钮用于在多个KVM设备之间切换。
多个服务器可以连接到一个KVM设备上,管理员可以通过KVM切换按钮来切换不同服务器的显示器、键盘和鼠标输入。
二、虚拟按键操作:除了物理按键外,服务器还可以通过远程控制软件进行虚拟按键操作。
远程控制软件(例如IPMI或iLO)可以通过网络连接到服务器,实现对服务器的远程管理和监控。
常见的虚拟按键包括电源控制、重启控制、虚拟KVM和虚拟光驱等。
下面分别介绍各个虚拟按键的使用方法:1. 电源控制:通过远程控制软件,管理员可以远程控制服务器的电源,实现开机和关机操作。
管理员可以在软件界面上选择相应的选项,然后点击执行按钮来控制服务器的电源。
2. 重启控制:通过远程控制软件,管理员可以远程控制服务器的重启操作。
管理员可以在软件界面上选择相应的选项,然后点击执行按钮来控制服务器的重启。
启动服务的方法有哪些类型

启动服务的方法有哪些类型
启动服务的方法有以下几种类型:
1. 命令行启动:在命令行下使用特定的命令来启动服务,例如使用`start`命令启动Windows服务。
2. 服务管理工具启动:使用操作系统提供的服务管理工具来启动服务,例如Windows操作系统的服务管理器。
3. 脚本启动:编写特定的脚本来启动服务,例如使用Shell脚本、Python脚本或其他脚本语言来启动服务。
4. 自动启动:在操作系统启动时自动启动服务,通常在操作系统的启动配置文件中配置。
5. 集成开发环境(IDE)启动:如果是开发环境中的服务,可以通过集成开发环境来启动,例如使用Eclipse、Visual Studio等IDE启动服务。
需要注意的是,具体使用哪种启动方法取决于服务所运行的操作系统、服务类型和个人的偏好。
Seneca Assurance Series NVR服务器快速启动指南说明书

PLEASE STOP AND READ THIS DOCUMENTSENECA ASSURANCE QUICK START GUIDEThis product contains software that must be registered for continued use and to enjoy the benefits of eligibility for updates. Please take the time to register the operating system and any applications installed on this product.CONTENTS OF SENECA ASSURANCE PACKAGEQuantityItem1Seneca Assurance Series NVR Server 2Power Cords 1Bezel with Key 1Keyboard & MouseBASE CONFIGURATION NOTES• RAID Set(s) and associated spares configured per purchase order.• Operating system installed on drive C:• Video should be stored on Drives D: and higherDRIVE SLOT LOCATIONS BY CHASSIS MODELSLOT-2SLOT-5SLOT-8SLOT-11SLOT-1SLOT-4SLOT-7SLOT-10SLOT-0SLOT-3SLOT-6SLOT-9DEFAULT 1GBE FIXED IP ADDRESSESPort Default Label IP Address Mask Gateway NIC 1*Camera LAN192.168.1.253255.255.255.0192.168.1.1NIC 2*Viewing and Management LAN 192.168.1.252255.255.255.0192.168.1.1NIC 3**Network Storage 10.0.10.254255.255.255.0NIC 4**Network Storage10.0.10.253255.255.255.0*Comes pre-configured with static non-routable addresses. This is the recommended operating mode if a DHCP server is not available. **This is optional; non-routable fixed IP addresses and isolated network is a practical requirement.MAIN BACK PANEL CONNECTIONSI/O Port Connection Port Usage NIC Port 1Camera LANNIC Port 2Viewing and Management LAN NIC Port 3Network Storage NIC Port 4Network Storage VGAVideo DisplayNOTE: NIC Port 3 and 4 are optional.I/O Port Connection Port Usage USB Port 1Mouse USB Port 2KeyboardUSB Port 3USB Port 3Micro USB PortDedicated IDRAC Direct USBVIDEO MANAGEMENT SOFTWARE INSTALLATIONWARNING:Time between installation screens may take up to five (5) minutes for OS and VMS.Many VMS’s default to Drive C: during setup as the receptacle for video storage. It is strongly suggested to use drive letters D: and higher to contain video data.1. After initial startup and configuration, the system is ready to install the Video Management Software (VMS).• Select the VMS Installer Icon on the OS desktop2. Once the VMS Installer is open install the necessary prerequisites, which are listed on the Seneca VMS Installer window3. Select the VMS followed by the VMS Server or Client application. (This process will take several minutes to load).• If the VMS is unlisted, go to the manufacturer’s website for installation reference4. Test to verify the VMS application is working5. OPTIONAL: Select the Uninstall Seneca VMS Installer to reclaim the space on the OS drive (NOTE: This will not remove the VMS installed, ONLY the installer).The xConnect Monitor is a desktop application that can run anywhere on the local network. It shows the health status of the four key areas of the xConnect Management Software. Please go to to download the software from the module on the landing page.Additional HelpA full user guide is available within the xConnect Software under the “Help” tabSERVER INSTALLATION1. Before starting the Seneca Assurance server, the following must be done: Mount and cable hardware. This includes any storage used external to the NVR appliance.2. Map and record any changes to be made to factory default settings.• (i.e. username, password, IP adress, etc.)3. Connect a keyboard, mouse, and monitor to the server.4. Referencing manual or Microsoft documentation, make desired additions and changes.Inability to access appliance or settings could require complete OS and data installation. ALWAYS document configuration changes.NOTE: Please reference manual for more detailed configuration information.。
服务器流程
服务器流程服务器流程是指服务器在工作过程中所执行的一系列操作。
下面将为您介绍一种通用的服务器流程。
一、服务器启动1. 确保服务器硬件设备的安装和连接正确。
2. 按下服务器电源按钮,启动服务器。
3. 系统自检和硬件初始化。
4. 操作系统启动。
二、运行应用程序1. 确定需要运行的应用程序,如数据库、网站、邮件服务器等。
2. 安装并配置相应的软件环境。
3. 启动应用程序,等待客户端连接。
三、接受客户端请求1. 监听指定的端口,等待客户端请求。
2. 接受客户端请求,并建立连接。
3. 验证客户端的身份和权限,确保连接的安全性。
四、处理客户端请求1. 解析客户端请求的数据,确定客户端所需的操作。
2. 执行相应的操作,读取或写入数据。
3. 加载和执行应用程序的相关逻辑。
4. 处理异常情况,如错误请求或安全漏洞。
五、发送响应1. 根据客户端请求的操作结果,生成响应数据。
2. 将响应数据封装为协议格式,发送回客户端。
3. 等待客户端接收响应,并确认。
六、日志记录1. 记录服务器运行状态和相关事件。
2. 记录客户端请求和响应的详细信息。
3. 分析和统计日志数据,用于系统优化和故障排查。
七、维护和管理1. 监测服务器的性能和资源利用情况。
2. 定期进行系统备份和恢复。
3. 定期更新和升级软件和驱动程序。
4. 处理服务器故障和异常,保证系统的稳定运行。
八、关闭服务器1. 停止运行应用程序,释放资源。
2. 关闭服务器监听的端口,断开与客户端的连接。
3. 关闭操作系统。
4. 断开服务器的电源,关机。
以上是一种通用的服务器流程,实际上服务器的流程可能因不同的应用场景、操作系统和软硬件配置而略有不同。
服务器流程的合理规划和执行对于服务器的性能、安全和可靠性都至关重要,需要由专业人员进行管理和维护。
GO服务器操作步骤

开启服务器操作:
1.进入目录( 命令:cd golang40/src//main )
2.运行苹果(安卓)推送子系统(命令:go run push_iphone.go 若是需要后台运行,则使
用命令:nohup go run push_iphone.go & > /dev/null )
3.运行安卓(苹果)推送子系统(命令:go run push_android.go 若是需要后台运行,则使
用命令:nohup go run push_android.go & > /dev/null)
4.运行消息附件子系统(命令:go run message_attach.go 若是需要后台运行,则使用命
令:nohup go run message_attach.go & > /dev/null)
5.运行消息服务子系统(命令:go run message.go 若是需要后台运行,则使用命令:nohup
go run message.go & > /dev/null)
如果服务器挂掉,对服务器进行重启操作:
查看当前运行状态:ps anux ,若发现message.go或其他.go文件没有运行,则按照开启服务器步骤将没有运行的.go文件运行起来。
服务器设备操作规程

服务器设备操作规程服务器设备操作规程一、开机顺序1、打开服务器机柜,按顺序依次打开服务器及其外部设备电源。
2、打开显示器、打印机等外设电源。
3、打开主机电源。
二、关机顺序1、依次关闭主机电源。
2、关闭外设电源(如显示器、打印机等)。
3、关闭服务器及其外部设备的电源。
三、注意事项1、服务器运行时,确保主机电源开关处于“开”状态。
2、不得随意按主机电源复位按钮。
3、不得随意拔、插服务器上的接口插头。
4、不得擅自改动硬件连接线路。
5、关闭服务器时应确认其运行状态,以免造成数据损失。
6、若服务器出现异常,应及时通知管理员进行处理。
四、维护保养1、定期进行服务器硬件的除尘、清理。
2、定期检查服务器硬件设备连接是否正常。
3、定期对服务器硬件设备进行保养维护。
五、安全防范1、确保服务器所在环境的安全,如防火、防盗等。
2、对服务器进行访问权限设置,确保数据安全。
3、确保服务器软件系统的安全,及时更新补丁、升级程序等。
六、其他注意事项1、不得在服务器上进行与工作无关的操作。
2、严格按照操作规程进行,不得擅自进行违规操作。
3、不得将服务器及其配件带出公司,以免造成损失。
4、若发现服务器出现故障或异常,应及时报告并由专业人员进行维修维护。
消防设备操作规程消防设备操作规程一、文章类型及适用范围本文主要介绍消防设备的操作规程,适用于各类建筑场所的消防设备操作和管理人员。
二、关键词消防设备、操作规程、安全操作、设备管理、维护保养三、操作规程1、熟悉设备操作人员应熟悉消防设备的位置、功能和使用方法。
在操作前,务必认真阅读设备说明书,了解设备性能、操作方法和注意事项。
2、检查设备在操作前,对消防设备进行全面的检查。
检查设备的外观是否完好,部件是否齐全,设备是否处于正常状态。
如有异常,应立即报告并处理。
3、按照规定操作操作人员应按照消防设备的操作规程进行操作。
不得擅自改变操作步骤或省略必要的步骤。
在操作过程中,如发现设备故障或异常情况,应立即停止操作,并及时报告。
Linux系统怎么启动和停止Nginx服务器
Linux系统怎么启动和停止Nginx服务器Linu_系统下我们需要对Ngin_服务器启动或停止时,可以直接用命令实现,具体怎么操作呢。
下面由店铺为大家整理了Linu_启动/停止/重启ngin_服务器的命令,希望对大家有帮助!Linu_启动/停止/重启ngin_服务器的命令Linu_启动ngin_服务器的命令启动代码格式:ngin_安装目录地址 -c ngin_配置文件地址例如:[root@Linu_Server sbin]# /usr/local/ngin_/sbin/ngin_ -c /usr/local/ngin_/conf/ngin_.confLinu_停止ngin_服务器的命令ngin_的停止有三种方式:从容停止1、查看进程号[root@Linu_Server ~]# ps -ef|grep ngin_2、杀死进程[root@Linu_Server ~]# kill -QUIT 2072快速停止1、查看进程号[root@Linu_Server ~]# ps -ef|grep ngin_2、杀死进程[root@Linu_Server ~]# kill -TERM 2132或 [root@Linu_Server ~]# kill -INT 2132强制停止[root@Linu_Server ~]# pkill -9 ngin_Linu_重启ngin_服务器的命令1、验证ngin_配置文件是否正确方法一:进入ngin_安装目录sbin下,输入命令./ngin_ -t看到如下显示ngin_.conf synta_ is okngin_.conf test is successful说明配置文件正确!方法二:在启动命令-c前加-t2、重启Ngin_服务方法一:进入ngin_可执行目录sbin下,输入命令./ngin_ -s reload 即可方法二:查找当前ngin_的进程号,然后输入命令:kill -HUP 进程号实现重启ngin_服务。
Oracle Sun SPARC Enterprise T5120服务器初始启动指南说明书
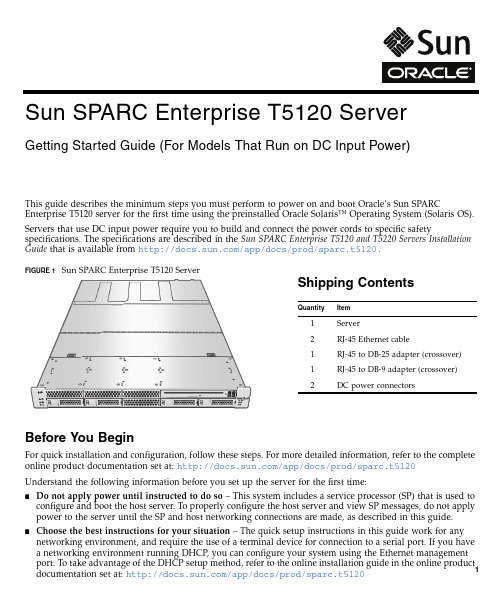
This guide describes the minimum steps you must perform to power on and boot Oracle’s Sun SPARC Enterprise T5120server for the first time using the preinstalled Oracle Solaris™Operating System (Solaris OS).Servers that use DC input power require you to build and connect the power cords to specific safetyspecifications.The specifications are described in the Sun SPARC Enterprise T5120and T5220Servers Installation Guide that is available from /app/docs/prod/sparc.t5120.FIGURE 1Sun SPARC Enterprise T5120ServerShipping ContentsBefore You BeginFor quick installation and configuration,follow these steps.For more detailed information,refer to the complete online product documentation set at:/app/docs/prod/sparc.t5120Understand the following information before you set up the server for the first time:■Do not apply power until instructed to do so –This system includes a service processor (SP)that is used to configure and boot the host server.To properly configure the host server and view SP messages,do not apply power to the server until the SP and host networking connections are made,as described in this guide.■Choose the best instructions for your situation –The quick setup instructions in this guide work for any networking environment,and require the use of a terminal device for connection to a serial port.If you have a networking environment running DHCP,you can configure your system using the Ethernet management Quantity Item1Server 2RJ-45Ethernet cable 1RJ-45to DB-25adapter (crossover)1RJ-45to DB-9adapter (crossover)2DC powerconnectorsSun SPARC Enterprise T5120 ServerGetting Started Guide (For Models That Run on DC Input Power)■Set aside sufficient time–Installation times vary,but if you are performing these setup instructions for the first time,plan to spend about45to75minutes to complete all of these instructions.Additional time might be required for installing optional hardware and rackmounting kits.■Obtain a terminal device–You configure this rackmountable server through the SP using the built-in serial and network management ports,and not through a graphical interface and Sun keyboard.To communicate with the SP,you will need a terminal device,which can be a terminal,terminal server,or laptop running terminal emulation software.■Gather your configuration information–During the configuration,you are prompted for time zone and networking parameters for your e TABLE1to record your configuration information. TABLE1Configuration InformationParameter Description Your EntryLanguage Select a number from the displayed language list.Locale Select a number from the displayed locale list.Terminal Type Select a terminal type that corresponds with your terminal device.Network?Select Yes.Multiple Network Interfaces Select the network interfaces that you plan to configure.If you are not sure, select the first one in the list.DHCP?Select Yes or No according to your network environment.Host Name Enter the host name for the server.IP Address Enter the IP address for the selected Ethernet interfaces.Subnet?Select Yes or No according to your network environment.Subnet Netmask(If subnet was Yes)Enter the netmask for the subnet for your networkenvironment.IPv6?Specify whether or not to use IPv6.If you are not sure,select No toconfigure the Ethernet interface for IPv4.Security Policy Select either standard UNIX security(No)or Kerberos Security(Yes).If you are not sure,select No.Confirm Review the onscreen information and change it if needed.Otherwise,continue.Name Service Select the name service according to your network environment.Note–If you select a name service other than None,you will be promptedfor additional name service configuration information.NFSv4Domain Name Select the type of domain name configuration according to your environment.If you are not sure,select Use the NFSv4domain derived by the system.Time Zone(Continent)Select your continent.Time Zone(Country or Region)Select your country or region.TABLE1Configuration Information(Continued)Time Zone Select the time zone.Date and Time Accept the default date and time,or change the values.root Password Enter the root password twice.This password is for the superuser accountfor the Solaris OS on this server.This password is not the SP password.Quick Setup Instructions1.Unpack the server,and check that you received all of the shipping contents.2.Place the server in its intended location for verification.For rackmounting instructions,refer to the instructions included with the rail kit,the service label on the server,and to the online Sun SPARC Enterprise T5120and T5220Servers Installation Guide.3.Connect a serial cable between the server’s SER MGT port(FIGURE2)and a terminal device.This connection provides your initial communication with the SP.The device must be set up to communicate using9600baud,8bit,no parity,1stop bit.A null modem configuration is needed,meaning the transmit and receive signals are reversed(crossed over)for DTE to DTE communications.You can use the supplied RJ-45crossover adapters with a standard RJ-45cable to achieve the null modem configuration.FIGURE2Server Connections4.(Optional)Connect an Ethernet cable between the server’s NET MGT port(FIGURE2)and the network towhich future connections to the SP and host will be made.After the initial configuration of the system using the SER MGT port,communication with the SP and host is usually performed through this Ethernet interface.5.Connect an Ethernet cable between one of the server’s NET ports(FIGURE2)and the network to which theserver will communicate.6.Build and connect your DC power cables into the server power supplies and into separate power sources.Instructions for building the DC power cables are in the SPARC Enterprise T5120and T5220Servers Installation Guide.To provide redundancy,plug both power supplies into separate power sources.Note that the system can operate with only one power connection,but there is no redundancy in this case.When power is applied,the SP initializes and power supply LEDs illuminate.After a few minutes,the SP login prompt appears on the terminal device.Note that the host is not initialized or powered on yet.7.At the terminal device,log in to the SP as root with a password of changeme .After a brief delay,the SP prompt is displayed (->).At this point,there are many commands you can perform using the Integrated Lights Out Manager interface.For example,to create a user named admin ,and to set the admin account role to Administrator and the CLI mode to alom ,enter:Note that the asterisks in the example will not appear when you enter your password.Additional SP information,such as how to change the password and how to set up the SP network parameters,is available in the online documentation set.8.Power on the server and redirect the host output to display on the serial terminal device:After you start the SP console,the server initialization takes approximately 20minutes to complete.9.When prompted,follow the onscreen instructions and enter the configuration information.Refer to TABLE 1for the list of configuration information and your entries.You will be prompted to confirm the configuration several times,enabling confirmation and changes.If you are not sure how to respond to a particular value,you can accept the default,and make future changes when the Solaris OS is running.When the configuration menus are completed,the server reboots and displays the Solaris login prompt.10.Log in to the server and explore the capabilities.The following commands provide information about the system:■showrev –Displays the hostname and system architecture e the -a option with this command to see the patches that are installed.■psrinfo –Displays information about the number and status of the processors and cores in the host.Review the Solaris OS man pages and documentation for more details.SUNSP00144FAC732F login:rootPassword:changeme. . .->->create /SP/users/admin role=Administrator cli_mode=alomCreating user...Enter new password: ********Enter new password again: ********Created /SP/users/admin ->start /SYSAre you sure you want to start /SYS (y/n)?y->start /SP/consoleAre you sure you want to start /SP/CONSOLE (y/n)?ySerial console started. To stop, type #.. . .Accessing Additional InformationYou can view,print,and download additional information for this product from the following URLs:■Oracle’s Sun SPARC Enterprise T5120server documentation set,including important documents such as product notes:/app/docs/prod/sparc.t5120■A broad selection of Sun documentation,including localized versions:■Preinstalled Solaris™OS information:/software/preinstall■CoolThreads™–Overview and access to Cool Tools:/servers/coolthreads/tnb/index.jsp■CoolThreads–CMT tuning and resources:/servers/coolthreads/tnb/t2.jspTechnical SupportIf you have technical questions about this product that are not answered in this document,go to:/service/contactingDocumentation FeedbackSubmit comments about this document by clicking the Feedback[+]link at:/Please include the title and part number of your document with your feedback:Sun SPARC Server Enterprise T5120Server Getting Started Guide(DC Models),part number820-5838-11Copyright©2008,2010,Oracle and/or its affiliates.All rights reserved.FUJITSU LIMITED provided technical input and review on portions of this material.Copyright©2008,2010,Oracle et/ou ses affiliés.Tous droits réservés.Entrée et revue tecnical fournies par FUJITSU LIMITED sur des parties de ce matériel.。
TeklaStructures16.0多用户服务器启动方式

TeklaStructures16.0多⽤户服务器启动⽅式
Tekla Structures 16.0 多⽤户服务器启动⽅式:
1、多⽤户服务器⼀般电脑开机会⾃⾏启动,由于杀毒软件的拦截,有时候⽆法⾃⾏启动,
需要⼿动打开。
2、现在项⽬的Tekla模型都在我的电脑上E:\TEKLA 多⽤户,所以模型服务器也安装在我
的电脑上,服务器在我电脑的具体位置为:D:\InsTSSVR\ xs_server,双击“xs_server”
这个⽂件即可启动服务器,会出现下⾯所⽰的DOS窗⼝,每个⼈进⼊共享模型都会显⽰在下⾯的DOS窗⼝中,
上图红⾊线框内表⽰没有⼈连接我电脑的模型,所以有没有⼈开着模型我能看出来,⼀般晚上我下班或加班后看⼀下这个窗⼝,要是没有⼈开着模型我就可以关了服务器,关闭电脑。
要是还有⼈开着模型,我就先不关电脑,最后使⽤模型的⼈⿇烦过来把我电脑给关了。
如何开启路由器服务

怎样开启路由器服务这篇怎样开启路由器服务是专门为大家整理的,希望对大家有所帮助 !开启路由器上的服务,不论身在哪处我们都能够经过它来接见家庭网络中的资源,轻松、安全地存取家庭网络中的数据。
下边将向大家介绍路由器服务怎么开启。
利用路由器的DMZ( 隔绝区)设置或许使用网络储存器的应用程序,我们都能够经过互联网存取家庭网络中的资源。
可是要保证通信数据不会被截取,我们应当尽可能地使用 (虚构专用网络 )。
经过服务我们能够轻松、安全地接见家庭网络,办理各样敏感数据。
假如其余人想试试截取我们的网络通信数据,那么他们获取的也只会是加密的通信数据,没法真实偷取我们的数据。
在路由器上开启服务,前提自然是需要路由器支持该功能,其次假如家庭网络接入互联网获取的是动向的互联网 IP 地点,那么路由器还一定支持动向域名 (DDNS) 功能。
当前,大多数路由器都能够支持这两项功能,可是,部分路由器可能需要更新固件以后才能够支持。
以华硕RT-N16 无线网络路由器为例,能够在 Web 设置页面上单击左边的“系统管理”,在右边单击“固件更新”选项卡,单击“检查”按钮查找新的固件。
在找到新固件以后确认进行更新,路由器将自动下载并更新固件。
因为大多数家庭网络使用的ADSL 接入方式上传带宽有限,因此从家庭网络中下载数据的速度会比较慢。
在我们经过接见家庭网络时,对此一定有必定的心理准备,还能够提早做一些有关的准备工作。
比如使用家庭网络储存器上保留照片刻,将照片进行适合的分类,并准备好缩略图,以便我们经过接见时能够迅速地查找到需要的照片。
不论怎样,经过互联网接见家庭网络中的资源,将会是最轻松和安全的方式。
因此,不论当前我们能否需要,也应当掌握为路由器开启服务的方法。
下边,我们将以华硕RT-N16 无线网络路由器为例,为大家演示开启和使用服务的详细方法。
1 开启服务第一,进入路由器Web 设置页面,选择“服务器”设置,在“启用PPTP 服务器”选项中选择“是”。
服务器按键操作方法

服务器按键操作方法
服务器通常没有物理键盘,而是通过远程访问方式进行操作。
以下是一些常见的服务器按键操作方法:
1. 远程桌面(Remote Desktop):通过在本地电脑上安装远程桌面客户端,可以通过网络远程连接到服务器,并在本地电脑上操作服务器。
通常需要输入服务器的IP地址或域名、用户名和密码进行登录。
2. Secure Shell(SSH):SSH是一种加密的网络协议,可以通过SSH客户端远程登录服务器,并在控制台上操作服务器。
需要输入服务器的IP地址或域名、用户名和密码或密钥进行登录。
3. 控制台访问:如果服务器位于机房或数据中心,可以通过物理终端连接到服务器的控制台接口,并在终端上操作服务器。
这通常需要获得机房或数据中心的访问权限。
4. 远程管理卡(Remote Management Card):一些服务器配备了远程管理卡,如iLO(Integrated Lights-Out)或iDRAC(Integrated Dell Remote Access Controller),可以通过远程管理卡访问服务器控制台,并进行远程操作。
远程管理卡通常有自己的IP地址,可以通过网络连接到远程管理卡的界面。
请注意,具体的服务器按键操作方法可能因不同的服务器品牌和型号而有所差异,
建议参考服务器的文档或联系厂商获取更详细的操作指南。
- 1、下载文档前请自行甄别文档内容的完整性,平台不提供额外的编辑、内容补充、找答案等附加服务。
- 2、"仅部分预览"的文档,不可在线预览部分如存在完整性等问题,可反馈申请退款(可完整预览的文档不适用该条件!)。
- 3、如文档侵犯您的权益,请联系客服反馈,我们会尽快为您处理(人工客服工作时间:9:00-18:30)。
如何启动tomcat服务器
亲,你是不是对tomcat服务器一无所知,是不是还在为不知道该怎样启动tomcat服务器而烦恼?没关系,通过本文你可以彻底痛快的玩转tomcat服务器。
好,废话不多说,直接上图
eclipse
图1
现在你所需要做的就是双击eclipse的图标或者选中eclipse的图标然后点击右键选择打开,效果如下图所示
图2
你现在需要做的就是等待,几分钟后就会出现如下情景
图3
相信这张图你应该能看得懂,就算看不懂的话我来为你解释一下
上面那张图主要有三块,左边的是导航区,右上方一大块空白的是工作区,右下方一下快空白的是控制台,可以观察日志及各种打印出来的信息。
那么现在你可以开始启动我们的bhmbc了,记住现在的bhmbc是已经加密了的哟。
1:点击鼠标左键选中我们的bhmbc工程
图4
然后点击右键
图5
将鼠标移至“Run AS”,然后在点击“Run on Server”后会出现下图
图6
现在啥也别管,直接点击“Finish”按钮。
之后就是等待,稍安勿躁,启动会耗费大约一分钟左右的时间,接下来你会看见下图
图6
看见了上图你肯定会很不明白是咋回事,没关系,现在去看图2,
看见图2右下方的一排关于“Servers”、“History”、“Problems”、“Search”和“Console”了
吗?
现在你可以点击“Console”,看见的将会是下图
现在,你看见“系统参数加载完成......”这些字了吧?现在,恭喜你,你成功的启动了服务!。