HT45F23 Voice功能应用实例
HT45F23AHT45F43 烟感器与 PIR 应用范例

透镜 菲涅耳透镜(图 9)根据菲涅耳原理制成,把红外光线分成可见区和盲区,同时又有聚焦的 作用,使热释电人体红外传感器 (PIR) 灵敏度大大增加。菲涅耳透镜折射式和反射式两种 形式,其作用一是聚焦作用,将热释的红外信号折射(反射)在PIR上;二是将检测区内分 为若干个明区和暗区,使进入检测区的移动物体能以温度变化的形式在PIR上产生变化热释 红外信号,这样PIR就能产生变化电信号。 如果我们在热电器件接上适当的电阻,当器件受热时,电阻上就有电流流过,在两端得到 电压信号。 菲涅尔透镜作用有兩个:一是聚焦作用,即将热释红外信号折射(反射)在 化的形式在 PIR 上产生变化热释红外信号。 菲涅尔透镜,简单的說就是在透镜的一侧有等距的齿纹。通过这些齿纹,可以达到对指定光 谱范围的光带通(反射或者折射)的作用。传统的打磨光学器材的带通光学滤镜造价昂贵。菲 涅尔透镜可以极大的降低成本。典型的例子就是 PIR(被动红外线探测器) 。PIR 广泛的用 在警报器上。如果你拿一个看看,你会发现在每个 PIR 上都有个塑料的小帽子。这就是菲 涅尔透镜。小帽子的内部都刻上了齿纹。这种菲涅尔透镜可以将入射光的频率峰值限制到 10 微米左右(人体红外线辐射的峰值) 。成本相当的低。 PIR 上,第
3
HT45F23A/ HT45F43 烟感器与 PIR 应用范例
图4
独立型烟感器的流程控制图
4
HT45F23A/ HT45F43 烟感器与 PIR 应用范例
烟雾检测流程图 烟雾检测功能使用到了 HT45F23A 中的 OPA、ADC 等功能。烟雾检测使用红外发射和接收 电路配合迷宫腔实现,检测时利用接收到的红外线信号的强弱来判断空气中的烟雾颗粒浓 度,接收红外光信号分别经过 HT45F23A 中的两级放大器 OPA 进行转换与信号放大,再由 ADC 进行模拟/数字信号转换,提供给单片机判断。烟雾检测过程中,检测的间隔时间为 8 秒,对收集到的数据进行多次检测,以避免误测情况发生。检测到烟雾,系统进行相应的 报警处理。烟雾报警时,蜂鸣器报警和 LED 闪烁报警交替实现。蜂鸣器报警和 LED 闪 烁报警分别结束后,停止报警 0.5 秒,再依次进行蜂鸣器报警和 LED 闪烁报警,继续停 止报警 0.5 秒,如此重复动作。蜂鸣器报警声音共分 4 种,第一次蜂鸣器报警结束后,下 次报警换成了第二种报警声音,依次下去,直至 4 种报警声音全部实现后,再从第一种报 警声音开始,循环使用。烟雾报警过程中,若有按键按下或 5 分钟报警时间已到,停止报 警。
HT45F0027ACC功能与OPA使用
HT45F0027 ACC功能与OPA使用文件编码:AN0401S概述本文主要对使用HT45F0027 ACC功能与OPA使用方法提供参考,以帮助User能更快地使用HT45F0027进行相关产品的开发。
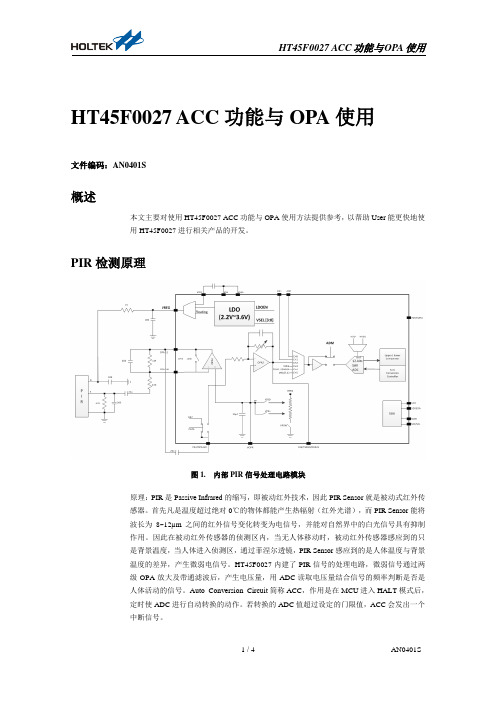
PIR检测原理图1. 内部PIR信号处理电路模块原理:PIR是Passive Infrared的缩写,即被动红外技术,因此PIR Sensor就是被动式红外传感器。
首先凡是温度超过绝对0℃的物体都能产生热辐射(红外光谱),而PIR Sensor能将波长为8~12µm之间的红外信号变化转变为电信号,并能对自然界中的白光信号具有抑制作用。
因此在被动红外传感器的侦测区内,当无人体移动时,被动红外传感器感应到的只是背景温度,当人体进入侦测区,通过菲涅尔透镜,PIR Sensor感应到的是人体温度与背景温度的差异,产生微弱电信号。
HT45F0027内建了PIR信号的处理电路,微弱信号通过两级OPA放大及带通滤波后,产生电压量,用ADC读取电压量结合信号的频率判断是否是人体活动的信号。
Auto Conversion Circuit简称ACC,作用是在MCU进入HALT模式后,定时使ADC进行自动转换的动作。
若转换的ADC值超过设定的门限值,ACC会发出一个中断信号。
OPA F/W 设定有关OPA 相关控制寄存器在Datasheet 中的Operational Amplifier 及LDO 章节,主要涉及到OPAC0、OPAC1及LDOC 寄存器。
OPA F/W 设定及方法a. 使能LDO ,设定VREG 来源于LDO ,设定LDO 输出的电压值。
b. 使能OPA1和OPA2,Switch 状态:VPSW Colse 、PA7S Close ,VPS[0..1]根据实际情况设定。
c. PA5功能选择为OPA2E ,观察PIR 信号波形(调试阶段使用),OPA2放大倍数根据实际情况设定。
程序范例INI_OPA:MOV A,11000101BMOV LDOC,A ;使能LDO并设定电压为2.7V,设定VREG电压由LDO提供MOV A,11110010BMOV OPAC0,A ;使能OPA1和OPA2并设定VREG=1/2VPSW,开关PA7S选择到OPA1EC连接到OPA2的输入MOV A,00110000BMOV OPAC1,A ;配置OPA2放大倍数为64x,开关PA5S选择到OPA2E方便调试观察PIR波形RETACC F/W设定有关ACC相关控制寄存器在Datasheet中的Auto Conversion Circuit章节,主要涉及到ACCC0、ACCC1、LULV、HULV、LLLV和HLLV。
HT46R23_电气电子资料

HT46R23/HT46C23A/D型八位单片机盛群知识产权政策专利权盛群半导体公司在全球各地区已核准和申请中之专利权至少有160件以上,享有绝对之合法权益。
与盛群公司MCU或其它产品有关的专利权并未被同意授权使用,任何经由不当手段侵害盛群公司专利权之公司、组织或个人,盛群将采取一切可能的法律行动,遏止侵权者不当的侵权行为,并追讨盛群公司因侵权行为所受之损失、或侵权者所得之不法利益。
商标权盛群之名称和标识、Holtek标识、HT-IDE、HT-ICE、Marvel Speech、 Music Micro、 Adlib Micro、 Magic V oice、 Green Dialer、 PagerPro、 Q-V oice、 Turbo V oice、 EasyV oice和 HandyWriter都是盛群半导体公司在台湾地区和其它国家的注册商标。
著作权Copyright 2005 by HOLTEK SEMICONDUCTOR INC.规格书中所出现的信息在出版当时相信是正确的,然而盛群对于规格内容的使用不负责任。
文中提到的应用其目的仅仅是用来做说明,盛群不保证或不表示这些应用没有更深入的修改就能适用,也不推荐它的产品使用在会由于故障或其它原因可能会对人身造成危害的地方。
盛群产品不授权使用于救生、维生器件或系统中做为关键器件。
盛群拥有不事先通知而修改产品的权利,对于最新的信息,请参考我们的网址; HT46R23/HT46C23技术相关信息· 工具信息· FAQs· 应用范例-HA0004S HT48 & HT46 MCU UART的软件实现方法-HA0005S HT48 & HT46 MCU用软件执行I2C总线的控制功能的方法-HA0013S HT48 & HT46 MCU LCM接口设计-HA0047S HT46 MCU的PWM的应用范例特性• 工作电压:f SYS=4MHz:2.2V~5.5Vf SYS=8MHz:3.3V~5.5V• 最多可有23个双向输入/输出口• 1个与输入/输出口共用引脚的外部中断输入• 16位可编程定时/计数器,具有溢出中断和7级预分频器• 内置晶体和RC振荡电路• 看门狗定时器• 4096×15程序存储器ROM• 192×8数据存储器RAM• 具有PFD功能,可用于发声• HALT和唤醒功能可降低功耗• 在V DD=5V,系统频率为8MHz时,指令周期为0.5µs• 8层硬件堆栈• 8通道10位解析度的A/D转换器• 2通道8位的PWM输出,与输入/输出口共用引脚• 位操作指令• 查表指令,表格内容字长15位• 63条指令• 指令执行时间为1或2个指令周期• 低电压复位功能• I2C总线(slave模式)• 24/28-pin SKDIP/SOP封装概述HT46R23/HT46C23是8位高性能精简指令集单片机,专门为需要A/D转换的产品而设计,例如传感器信号输入。
一种通过手机音量键调节音量的新方法[发明专利]
![一种通过手机音量键调节音量的新方法[发明专利]](https://img.taocdn.com/s3/m/11a541f6a300a6c30d229fb2.png)
专利名称:一种通过手机音量键调节音量的新方法专利类型:发明专利
发明人:孔喆
申请号:CN201710260873.X
申请日:20170413
公开号:CN108737628A
公开日:
20181102
专利内容由知识产权出版社提供
摘要:本发明是一种通过手机音量键调节手机不同模式音量的方法,其特征在于通过对音量键的长时间按住和点击式按动调节不同模式下的音量。
如;点击式短按可对应调节媒体音量,长时间按住对应调节铃声音量,或者点击式短按对应调节铃声音量,长时间按住调节媒体音量的调节方法。
本发明提供了一款使手机不同模式音量调节更方便的方法,所以通过上述方法可以将对不同模式音量的调节区别开来,使用户用起来更便捷。
申请人:孔喆
地址:266510 山东省青岛市黄岛区前湾港路579号
国籍:CN
更多信息请下载全文后查看。
基于语音识别的多功能智能型塑料垃圾桶设计
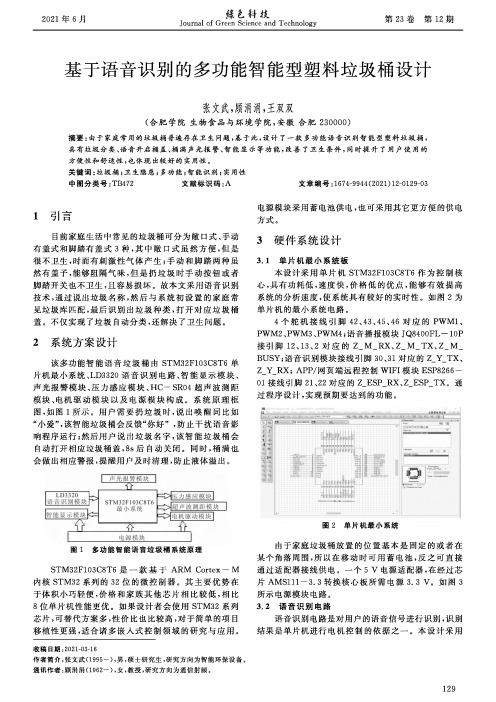
图5电阻应变式称重传感器工作原理
3.4超声波测距模块 测量剩余空间可用超声波测距技术。超声波测距
是一种检测速度快、方便、计算简单以及不受恶劣环境 影响的检测技术。本设计采用的是HC—SR04超微型 传感器,其模块具有性能稳定,测度距离精确 ,模块高精 度,盲区小特点。
口0]陈有卿,谢刚.新颖电子模块应用手册DM].北京:机械工业出 版社2003.
Design of Multi — functional Intelligent Plastic Trash Cans Based on Speech Recognition
Zhang Wenwu, Gu Juanjuan, Wang Shuangshuang
由于家庭垃圾桶放置的位置基本是固定的或者在 某个角落周围,所以在移动时可用蓄电池,反之可直接 通过适配器接线供电。一个5V电源适配器,在经过芯 片AMS111-3. 3转换核心板所需电源3.3 Vo如图3 所示电源模块电路。 3.2语音识别电路
语音识别电路是对用户的语音信号进行识别 ,识别 结果是单片机进行电机控制的依据之一。本设计采用
[7] 陈 龙,凌利,钟学洋,等.基于WiFi的新型智能垃圾桶设计[J]. 软件导刊,2018(9):171 〜174.
[8] 周慧瑁,许锦标.新型智能垃圾桶的设计方案[J].广东工业大学学 报,2006(3):85〜88.
[9] 马西秦,许振中.自动检测技术[M].北京:机械工业出版 社,2004.
尘土 陶瓷制品
海绵
有害垃圾 手机电池 纽扣电池
灯管 灯泡 过期药品 杀虫剂 消毒剂 老鼠药 水银体温计 墨盒 油漆桶 废旧笔芯
HT45R35在触控按键中的应用-使用组合语言
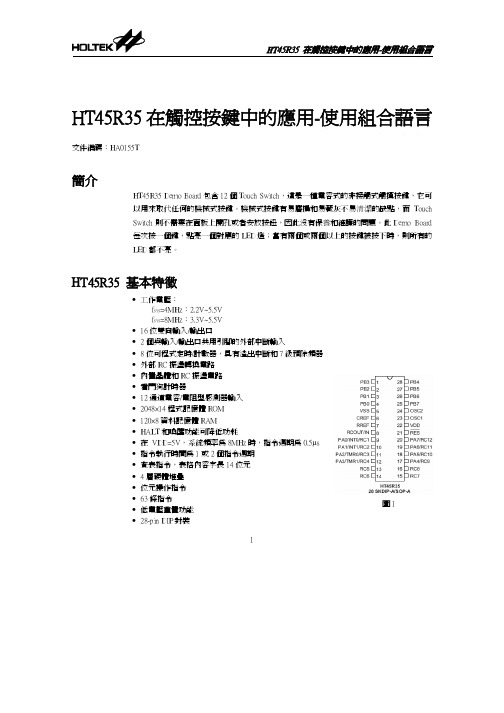
圖1
HT45R35 在觸控按鍵中的應用-使用組合語言
硬體方塊圖
LED 指示燈
電 源
HT45R35 觸摸按鍵 (Touch Switch)
圖2
方塊圖説明
• • • •
電源: 由電池提供 DC 3V/4.5V 給 Demo Board 使用 HT45R35: 控制 MCU LED 指示燈: 當有一個鍵被按下時,對應的 LED 便會點亮 觸摸按鍵(Touch Switch): 每個 RC 通道對應一個按鍵
軟件設計說明
程式通過單位元週期個數 (1000 個,由 Timer B 計量) 的時間長短 (由 Timer A 計量) 的變 化,即 Ttimer A 計數值的差值來判斷 Touch Switch 是否被按下,每一個 RC Pin 掃描一次的 時間約為 Timer B 計數 1000 個的時間,模擬時 RC 振盪的頻率是 715kHz (電阻值是 27K,電 容值是 10pF)。 靈敏度的調整:程式中檢測某按鍵是否被按下是根據 Timer A 計數差值 (偏移量) 來判斷 的。偏移量有一個範圍,最小值到最大值。調整靈敏度一般是指調整最小值,偏移量越小, 就越容易檢測到按鍵被按下。可以根據實際情況來調整偏移量的大小。 由於溫度等一些環境因素的變化,Timer A 計數值 (基準值) 會發生變化,因此我們需要實 時更新這個值。當 2 秒內無任何 Touch Switch 被按下時,才去更新各通道的基準值。 注意:開啟電源後,LED 燈會同時點亮 2 秒鐘,之後便可進行按鍵操作,一次只能按下一 個鍵,對應的 LED 點亮,若有兩個或者兩個以上按鍵被按下時,則所有的 LED 都不亮。
HT45R35 在觸控按鍵中的應用-使用組合語言
HT45R35 在觸控按鍵中的應用-使用組合語言
一款船用抗噪声无线通话设备的应用

一款船用抗噪声无线通话设备的应用摘要:目前,渔船各舱室的话音通信主要采用内通电话方式,该方式无法满足人员在轮机舱作业过程中的噪声防护要求,也不能实现人员在活动中的通信需求。
本文介绍了一款船用抗噪声无线通话设备(以下简称“通话设备”),该通话设备在保持渔船内通功能的基础上,可实现人员在噪声环境中作业时的噪声防护和移动话音通信联络,进一步拓展和提升了渔船内通电话的通信功能和作业指挥效率。
关键词:抗噪声无线通话1 概述经测试,渔船轮机舱噪声约为105dB,国家标准规定环境噪声超过80dB就应采取噪声防护措施。
人员长时间在高噪声环境下作业而不采取有效的噪声防护措施,会对听力造成较大损伤,且无法完成正常的通信交流。
船用抗噪声无线通话设备主要解决在噪声环境下工作人员之间的近距离通信联络,该通话设备是集无线通信技术、数字调制技术、抗噪声技术于一体的无线通话产品。
该设备采用高速率QPSK数字调制、扩频抗干扰(DS-SS)、时分全双工(TDD)和数字语音增强技术,具有话音保密性强,通信灵活,抗噪声性能优良,话音清晰度高等特点。
2 通话设备组成通话设备组成见表1。
表1 通话设备组成3通话设备主要功能特点具有抗噪声无线话音双工通信功能:系统基于高度集成的通信模块、DSP数字处理模块设计,采用时分双工(TDD)技术、时分多址(TDMA)技术、高速率(QPSK)调制技术、扩频抗干扰(DS-SS)编码技术、高保真线性语音编码(PCM)、噪声门限检测控发等基于软件的数字处理技术及超小型表面贴装工艺,实现通话器集多方双工通信、抗噪声于一体的头戴式设计,极大减小了通话器的体积、重量及功耗。
噪声防护采用密封性能优良的PU材料防护耳垫,具有优良的密封隔声性能,平均隔声量大于25dB,话筒采用抗噪声性能优良的二阶压差送话器,信噪比大于15dB,实现对轮机舱噪声的有效防护和抑制。
具有内话与通话设备通信功能:通过话音无线转接盒,可实现船上任意使用内话设备的人员与使用通话器人员之间的双工话音通信。
HOLTEK HT45F23 Voice 功能應用實
HT45F23 Voice功能應用實例文件編碼:HA0233T簡介Smoke Detector系列MCU HT45F2x內建有12-bit ADC、OPA & Comparator、12-bit DAC、串列介面SPI/I2C等功能。
本文以HT45F23為母體,介紹HT45F2x的Voice功能應用,包含DAC的使用及使用SPI介面與外掛Flash Memory提取語音資料。
Operation DeclarationVoice FunctionHT45F23語音控制暫存器控制DAC電路模組的開關,如果DAC電路沒有使能,DAH/DAL內的資料輸出都將是無效的。
DACEN位元寫入"1"將使能DAC電路模組,同時也將引導PB4引腳的DAC輸出,DACEN位元寫入"0"將禁用DAC電路模組,PB4引腳將當作普通I/O輸出。
HT45F23與Voice輸出相關的暫存器總共有三個:DAH、DAL和DACTRL。
DAH和DAL暫存器用於存放12位元語音輸出內容,其中DAH暫存器用於存放語音內容的高八位元,DAL暫存器存的高四位元用於存放語音內容的低四位元,DAL暫存器的低四位元未使用。
DAH和DAL暫存器DACTRL暫存器用於使能/禁止DAC輸出功能和調節輸出語音音量大小 -- 共八級可調音量,由VOL0 ~ VOL2三位元進行音量大小調節。
DACTRL暫存器S/W FlowchartHT45F23外掛Flash Memory語音輸出的一般操作步驟:1、初始化SPI介面及語音輸出暫存器DAL、DAH。
2、使能Flash Memory及語音功率放大電路。
3、DACEN位元寫入"1",啟用DAC電路。
4、通過SPI介面發送讀Flash命令,以一定的取樣頻率對Flash Memory語音進行取樣輸出,依次將取樣語音送入DAL、DAH語音輸出暫存器中將語音輸出。
合泰独立感烟探测器电路方案

2010/05/18-14
Holtek Semiconductor Inc.
Holtek HT45F23 Flash MCU 競爭力
Built-in Amp & Comparator Built-in Low Power System IRC (910KHz) Built-in Low Power 32K IRC 及 32K RTC 低工作電流 (Tinypower TM設計) Built-in Voice 介面 外部應用零件減少
2010/05/18-5
Holtek Semiconductor Inc.
HT45F23 Flash MCU 扼要規格-2
A/D 12 bit x 6 Timer 16 bit x 1 & 8 bit x 1 Time Base Function PWM 8 bit x 2 Stack x 6 SPI/I2C Interface Audio D/A x 1 16NSOP 封裝 (Siren 型警報器)
20SSOP 封裝 (Voice 型警報器)
2010/05/18-6
Holtek Semiconductor Inc.
HT45F23 Flash MCU 封裝
2010/05/18-7
Holtek Semiconductor Inc.
獨立型煙霧警報器應用-1 (Siren型/32K IRC)
2010/05/18-8
獨立型煙霧警報器方案推廣
*HT45F23
2010/05/18-1
Holtek Semiconductor Inc.
獨立型煙霧警報器 Holtek 方案
Siren 型警報器
HT45F23 16NSOP
TG-45UV中文说明书++20140521

菜单
菜单号
设置参数
菜单
菜单号
1
步进频率
STEP
MENU+1
STEP 1 20.5K
按MENU键,再 按 或 键选择
STEP 1 12.5K
2.5/5.0/6.25 /10.0/12.5/ 25.0KHZ
MENU
PTT/ EXIT
P23
参数确定
2
发射功率
TXP
MENU+2
TXP 2 HIGH
按MENU键,再 按 或 键选择
使用说明书
福建省信息化局(省无线电管理办公室)友情提醒
购买、使用本设备属于设置使用无线电台(站)的行为,必须依法办理设 台审批手续,领取无线电台执照。在使用设备过程中,应当按照电台执照核 定的项目工作。擅自设置使用无线电台(站)、干扰无线电业务、不按核定 项目工作以及其他违反无线电管理法规的行为,由无线电管理机构给予行政 处罚。严重的无线电违法行为,还可能触犯《刑法》第288条或《治安管理 处罚法》第28条,将被处以三年以下有期徒刑、拘役或者管制,并处或者单 处罚金的刑事处罚或者由公安机关处以拘留的行政处罚。
倒频功能 频率扫描 信道扫描 收音机自动搜索 信令搜索 光标“ ”转换 高低功率快速转换 遥晕、遥毙、遥活 个呼、组呼、群呼 亚音频表 亚音数码表 技术指标
47 47 48 48 49 49 49 50-51 51-54 55 56-57 58
整机配件
请小心从包装箱内取出对讲机。我们建议您在废弃包装材料之前确认一下箱内是否有下列物品。 若有任何物品在搬运中丢失或损坏,请立即向送货人提出索赔书。
CALL键(FM/报警键)
LCD图标解释
该符号指示当前为模拟亚音频 该符号指示当前为数字亚音频 表示发射频率为接收频率加上一个频差频率 表示发射频率为接收频率减去一个频差频率 表示当前工作的信道接收和发射频率不一致 双守候状态 声控发射功能 频率/信道模式下的接收和发射频率倒置 在信道工作在窄带方式下该符号出现 电池电量显示 键盘锁定 当前发射功率为低功率 指示当前工作频点;当前菜单设置 信号强度指示 指示信道编号 频率尾数指示
低阻音频信号无线发射装置[实用新型专利]
![低阻音频信号无线发射装置[实用新型专利]](https://img.taocdn.com/s3/m/e9e3abcd4b35eefdc9d3331f.png)
专利名称:低阻音频信号无线发射装置专利类型:实用新型专利
发明人:汪晓明
申请号:CN88202578
申请日:19880408
公开号:CN88202578U
公开日:
19881221
专利内容由知识产权出版社提供
摘要:本实用新型是一种将音频信号转换成调频信号的发射装置。
它是将电视机中的电视伴音和电子琴乐曲的音频信号通过调制变成调频信号发射出去,通过调频收录机接收进行高保真地转录、扩音。
解决了电视机、电子琴由于内部空间的限制,在音质上、音量上都不如普通录音机的问题。
申请人:汪晓明
地址:北京市丰台区长辛店朱家坟西平房113号
国籍:CN
更多信息请下载全文后查看。
一种香氛消音装置

专利名称:一种香氛消音装置专利类型:实用新型专利
发明人:韦献国,孟庆东
申请号:CN202121374003.3申请日:20210621
公开号:CN215723974U
公开日:
20220201
专利内容由知识产权出版社提供
摘要:本实用新型揭示了一种香氛消音装置,集成设于送风管道之中,包括壳体及其内并排而设且相隔断的消音腔和香氛单元,消音腔内置消音介质且通过一侧送风入口和另一侧送风出口连通送风管道,香氛单元通过雾化喷嘴穿接连通至消音腔并受控主动喷射雾化的香氛精油。
本装置集成消音箱及香氛机功能,功能齐全,较好地满足了对送风有增香需求的场所,尤其适用于酒店、机场等商务类场所,且本装置支持物联网智能家居接入,可实现智能化控制。
申请人:苏州清朗环保科技有限公司
地址:215000 江苏省苏州市工业园区新平街388号腾飞科技园12号楼1-2F-61
国籍:CN
代理机构:南京苏科专利代理有限责任公司
代理人:陈忠辉
更多信息请下载全文后查看。
峰力远程支持说明书
Phonak Remote SupportWhat is it?•Phonak Remote Support is an eSolution provided by Phonak for hearing clinics that wish to remotely connect to their clients.•Remote Support allows you to conveniently connect, assist and support your clients’ listening needs by allowing their hearing aids to be adjusted and optimised in real-time via the myPhonak app and Phonak Target.Requirements before getting started - Clinician✓ A PhonakPro account – Click here to create an account✓Remote Support needs to be enabled on this PhonakPro account - Click here for information✓ A computer with a webcam, microphone and speaker/headset system✓Ensure that you have internet access speed of 5Mbps or faster – How to check your internet speed✓Phonak Target 6.1.7 or newer installed✓ A previously completed hearing aid fitting session for the clientRequirements before getting started - Client✓Remote support requires supported hearing aids (wireless Marvel platform devices and Audeo B-Direct models) with the latest firmware (see page 11 for how to upgrade hearing aid firmware).✓Access to an email account, preferably on their smartphone✓Android (running version 6.0) or iPhone (running iOS 10.2 or newer) smartphone with Bluetooth 4.2 or newer –Check phone compatibility✓Access to relevant app store on their smartphone (including username and passwords for these app stores)Tip: If the client does not have a smartphone, or if their phone is not compatible with themyPhonak app, they may be able to use a friend or family member’s compatible phone (if thatfriend or family member is willing to help).Using Phonak Remote Support - Instructions for the clinicianStep 1. Program hearing devices during in-clinic, face-to-face appointment• A Remote support invite can be sent to your client via the Phonak Target software, as long as you have completed at least an initial fitting session in Target.•To create an initial fitting session, open Noah 4 (or Phonak Target standalone version if Noah 4 is not available), select client and load Phonak Target 6x.•Program the hearing aids in Phonak Target as appropriate, save and then close session. Note: If you are prompted to upgrade the hearing instrument firmware, please do so as it may be required for Remote Support to be available.•After you have completed an initial fitting session, it will now be possible to send the client an invitation to use Remote Support via Phonak Target.Step 2. Login to eSolutions and invite client to Remote Support•The client now needs an invitation to begin the process of Remote Support setup. The invitation is generally a one-time process and links them to you through a secure cloud server.•To invite a client to Remote Support, open up the most recently available fitting session from Noah 4 or Phonak Target.•The ‘Client & session’ screen in Phonak Target will open and appear as per below, showing the devices that were previously programmed:•Locate the PhonakPro login button, within the ‘eSolutions’ section. Please note: Depending on your screen size, this button may appear in a different location than what is shown here.•Enter your PhonakPro username and password to login:•For first time logins you may then receive a request to accept terms and conditions of Remote Support.Please click the PhonakPro account and accept the terms. Note: A new window will open and you may have to login again.•You may also receive a firmware update warning – if the devices have the latest firmware update, this warning can be dismissed.•Once you have logged in, click the invite button that will now be visible.•Type the cli ent’s email into the invitation. Note: It is recommended that the client use an email account that is accessible on the same phone they will use for their myPhonak app. However if this is not possible, they may receive the email on a different device.•The ‘Client status’ on your screen in Target will show that the email has been sent. We recommend making a note of the ‘Invite code’ which can be seen on the Phonak Target window:•The Client will then receive an email from Phonak eServices containing important instructions for them to follow in order to setup their myPhonak app.o If your client can access this email from their phone, load the email app they are using and open the email from Phonak eServices.o If your client cannot access this email on the phone, you will need to download myPhonak manually from their phone’s app store (Google Play store for Android devices, App store foriOS devices) and then manually add the invitation code one the app is installed andmyPhonak account is setup. For instructions on this process, click here.If the client can access email from their smartphone:•After loading the email, locate and tap‘Download app.’•The appropriate App store will load (Appstore for iOS devices, Google Play Store forAndroid devices) and direct the client to themyPhonak app.•Download and install the app.•The myPhonak app will require the hearingaid wearer to complete the pairing process,which will be explained by the app in a stepby step guide.•It’s important that the client accepts anypermission requests from the app includinglocation services, Bluetooth, camera andaudio.•When the pairing process is completed, theclient needs to return to the email.•Press the ‘S etup app’ button; this willtransfer an invitation code from the emailinto the myPhonak app to link the app to theclinician.•Should there be any difficulties intransferring the invitation code, please makea record of the code, which is visible at theend of the email. Click here for steps tomanually enter t he invitation code.At this point the client needs to setup a myPhonak account, which is done on the smartphone within the myPhonak app.Using Phonak Remote Support - Instructions for the clientSet up a myPhonak account•After the app is installed, load myPhonak from the app drawer/home screen on the client’s smartphone.•Select the menu options in the top right corner of the myPhonak app screen.•Select ‘My profile.’•Tap on ‘R egister’ to set up a new account.•The client will then need to create a new myPhonak account, preferably using the same email address that has been used for invitation purposes.•The myPhonak account needs to be activated via email prior to use.•This is completed by loading the client’s email and clicking on a link within a new email sent by Phonak. •The client is now ready to start a Remote Support session.•These steps should not have to be repeated unless any issues arise in future.•The clinician’s screen in Phonak Target will show client status as complete once all steps are done:Starting a Remote Support session•To begin a Remote Support session, return to the initial load screen of Phonak Target.•If you haven’t already, login to PhonakPro using your username and passwor d.•Click ‘Start Remote Support’.This can be done immediately after inviting, or any time thereafter, as long as the client’s hearing aids are paired to the myPhonak app and you are logged into both Target software and your PhonakPro account via the eSolutions section on the initial Phonak Target load screen.•Clicking ‘Start remote support’ triggers the following items:o A video webcam display will open on the computer with Phonak Target.o A notification will be sent to the hearing aid client letting them know their clinician is attempting to make contact. They will need to accept the call to connect the video link.The client can also navigate to Remote Support via the myPhonak app menu and select ‘Start’ toexpedite the process.•Once the video link is established, the clinician can open the fitting session and connect to the hearing aids remotely in the same way they would if connecting to the hearing aid via Noahlink wireless within the clinic. Important: Please be aware of certain limitations of Remote Support.Further information and troubleshooting advice can be accessed via PhonakPro or via our technical support team on 1800 809 321.Supplementary informationLimitations of Remote Support•Remote Support is designed to use the available internet connection and can be slower than connecting using local Noahlink Wireless or cable connections. Typical initial connections and device save processes can take up to one minute – however, once connected, adjustments should still be almost immediate. •Phonak Target has some features deactivated during a Remote Support session for client safety: o MPO cannot be increasedo AudiogramDirect cannot be completedo Feedback Tests cannot be completed•In order to check whether the receiver signal is working, you might consider activating a battery warning tone as a test stimulus – this can be accessed from the Device Options menu.•You cannot upgrade the firmware of a hearing aid remotely.How to upgrade firmware on instruments within the clinic•When connecting to the hearing aids locally, you may receive a prompt to update the firmware if an update is available. We strongly recommend this, as updates after September 2019 are required for Remote Support to work.•You can always manually update the firmware by loading Phonak Target and navigating to Trial & tools → Firmware update → Hearing aids → Update•Updates may be done via Noahlink Wireless or CS44 cables (if supported by the hearing instrument).How to enable Remote Support access in PhonakPro account•Not all accounts will automatically receive access to Remote Support.•Contact your clinic’s Account Manager for your Phonak account to enable access.•If you are the Account Manager, login to PhonakPro and navigate to ‘User Management’ in the top right corner.How to pair hearing aids to the myPhonak appThe app will provide comprehensive step-by-step instructions for your client; however, in case instructions are required, here is a guide:1.Open up the myPhonak app; you will see a screen prompting you to restart the hearing aids.2.Restart aids and select ‘Continue’; the app will search for the hearing aids. Once it finds the hearingaids, press the ‘Select’ tab to pair to the hearing aids to myPhonak app.3.Once the hearing aids are paired, the myPhonak app will open up to the default Remote Control screen.You can then navigate using the menu in the top right corner.How to manually enter invitation code•In situations where the invitation is not copied over from the invitation email into the app, or if the client has trouble accessing the invitation email on their smartphone, it is possible to manually transfer the invitation code onto the phone.•The invitation code is vital, as it links the clinician to the client – Remote Support is not possible without it.Locating invitation code•The invitation code is provided on the ‘Manage eSolutions’ screen within Phonak Target when initially inviting the client; it is can also be found at the bottom of the invitation email. We recommenddocumenting this on the client file in case this is needed in future.•On the client’s smartphone, loadmyPhonak and navigate to ‘MyInvites’ using the menu button.•Login if the client already has amyPhonak account set up; orregister the client for amyPhonak account if this is thefirst time they are setting up theapp.•Once logged in, the client will be able to ‘Add Invite’.•Using the keypad, the client can enter the nine-digit invitation code manually, which will link the client and clinician together and facilitate Remote Support activation.How to check internet speed is appropriate•We recommend both client and clinician have access to internet speeds 5Mbps or faster.•Phonak Target has an inbuilt speed check to confirm whether the clinic’s internet speed is fast enough. •Load Phonak Target and navigate to Setup menu → Internet → Test Internet Connection.•Target will confirm whether speed is adequate or if there are any issues connecting.。
越小越出色——雷柏无线音频发射器进阶

越小越出色——雷柏无线音频发射器进阶
佚名
【期刊名称】《《新潮电子》》
【年(卷),期】2011(000)005
【摘要】雷柏在2010年推出了一系列的无线音频产品.雷柏的无线音频技术也随着这一年多以来不断进步,进阶的标志无疑便是无线音频发射器。
细心的读者或许已经发现,雷柏的无线音频发射器越来越小.
【总页数】1页(P106-106)
【正文语种】中文
【中图分类】TN912
【相关文献】
1.音悦无限、芯无线——深入雷柏的无线音频世界 [J],
2.音悦无限、芯无线深入雷柏的无线音频世界 [J],
3.99元普及无线音频雷柏H1000 2.4GHz无线耳机 [J],
4.无线音频新秀雷柏H8000无线耳机 [J], 刘东
5.无线音频新秀雷柏H8000无线耳机 [J], 刘东
因版权原因,仅展示原文概要,查看原文内容请购买。
- 1、下载文档前请自行甄别文档内容的完整性,平台不提供额外的编辑、内容补充、找答案等附加服务。
- 2、"仅部分预览"的文档,不可在线预览部分如存在完整性等问题,可反馈申请退款(可完整预览的文档不适用该条件!)。
- 3、如文档侵犯您的权益,请联系客服反馈,我们会尽快为您处理(人工客服工作时间:9:00-18:30)。
6
19
P A 4 /A 1 E /T C 1
7 SPI1 8注意P 事A 5 / 项A 2 P / P F D
8 9
在设11 76 备进PP AA 入67 // AA
2 2
N /B Z
IED/ B LZ E
模式下,需注意的是,数据的发送和接收将依赖于
FSYSON
位,它位于
10 11
WD1 T5 C 14
如果配置选项禁止 CSEN 位,那么 CSEN 将不能影响 SPI 总线所有的控制。SIMC2 寄存器
的 WCOL 位用来在数据传送中提示写入冲突错误。当数据传送操作中出现写 SIMD 寄存器
的现象时,WCOL 位会提示数据冲突并且防止继续进行写操作。WCOL 位将通过硬件被置
位,但必须通过用户应用程序来清除为零。WCOL 位的全部功能可以通过配置选项来禁止
13
5
12
6
11
7
10
8
9
H T45F23 1 6 N S O P -A
VSS P A 2 /A 1 P /C 2 O U T P A 3 /A 1 N /IN T 0 P A 4 /A 1 E /T C 1 P A 5 /A 2 P /P F D P A 6 /A 2 N /B Z P A 7 /A 2 E /B Z P B 3 /A N 0 /S C S
HT45F23 Voice 功能应用实例
HT45F23 Voice 功能应用实例
文件编码:HA0233S
简介
Smoke Detector 系列 MCU HT45F2x 内建有 12-bit ADC、OPA & Comparator、12-bit DAC、 串行接口 SPI/I2C 等功能。本文以 HT45F23 为母体,介绍 HT45F2x 的 Voice 功能应用,包 含 DAC 的使用及使用 SPI 接口与外挂 Flash Memory 提取语音数据。
或打开。
3
HT45F23 Voice 功能应用实例
应用范例
结合以上 Voice 功能和 SIM (SPI)功能的介绍,做一个串行 SPI 通信方式提取 Flash Memory 内语音,并通过 HT45F23 DAC 输出的应用实例。
硬件模块图
硬件模块图说明: • 电源部分
采用 3V Battery 供电,HT45F23 在休眠模式功耗不到 1µA,Flash Memory 工作电压也在 2.7V ~ 3.6V 之间。 • Flash 语音提取 MCU 通过 SPI 接口提取 Flash Memory 内语音,DAC 转换后通过 AUD 端口将语音输出 至 AMP 音频功率放大器。 • 工作方式 MCU 通过 Key 输入动作,启用 SPI 串行通信读取 Flash Memory 内语音,并对 AUD 输出 语音,同时 Key 按键的动作也会对音量进行调节。
在无语音输入情况下是静音的,同时也节省了应用电路的功耗。 • 本应用中未在 IDEL 模式下进行 SPI 通讯,故 FSYSON 位的设定可忽略,建议使用中将
P C 6 /P W M 1 /C 2 P /S C O M 3 P C 5 /P W M 0 /C 1 N /S C O M 2 P C 4 /V R E F /V C A P /S C O M 1
P A 0 /C N P /S C O M 0 P C 3 /X T 2 P C 2 /X T 1
P C 1 /A N 5 /O S C 2 P C 0 /A N 4 /O S C 1
1
20
2
19
3
18
4
17
5
16
6
15
7
14
8
13
9
12
10
11
H T45F23 2 0 S S O P -A
VDD VSS P A 2 /A 1 P /C 2 O U T P A 3 /A 1 N /IN T 0 P A 4 /A 1 E /T C 1 P A 5 /A 2 P /P F D P A 6 /A 2 N /B Z P A 7 /A 2 E /B Z P B 0 /S D O /IN T 1 P B 1 /S D I/S D A
依次将采样语音送入 DAL、DAH 语音输出寄存器中将语音输出。 5、语音输出完毕,禁用 DAC 电路,断开语音功率放大电路及 SPI 通讯,DACEN 位写入
“0”。
2
HT45F23 Voice 功能应用实例
SIM (SPI) 功能
HT45F23 内置一个全双工串行通讯电路模块,其中包含四线制的 SPI 接口和二线制的 I2C 接口两种串行接口,有了这两种通讯接口使 MCU 与串行硬件外围设备如 Sensor、Flash Memory 及 EEPROM 等的通讯更加方便,SIM 接口引脚是和普通 I/O 引脚是共用的,因此 在使用串行接口时,必须设定好相应的选项。而 I2C 接口和 SPI 接口又共用一些相同的引 脚和寄存器,I2C 接口或者 SPI 接口的选择是通过 SIMC0 寄存器中的 SIM2 ~ SIM0 位的设 定来实现的。另外,当 SIM 使能时,SIM 共用引脚所需的上拉电阻是通过相应的上拉控制 寄存器来设定的。 HT45F23 SPI 串行引脚分布图 (已用虚线圈出) 如下:
P B 6 /A N 3 /R E S P B 5 /A N 2 /P IN T P B 4 /A N 1 /A U D /P C L K P B 3 /A N 0 /S C S
1
SPI 接口详细通讯说明请参考 Holtek 网站应用范例 -- HT66F40 使用 SIM SPI Mode 的用法 2 4 P A 1 /C 1 O U T /T C 0
VDD P A 1 /C 1 O U T /T C 0 P A 0 /C N P /S C O M 0
P C 3 /X T 2 P C 2 /X T 1 P C 1 /A N 5 /O S C 2 P C 0 /A N 4 /O S C 1 P B 6 /A N 3 /R E S
1
16
2
15
3
14
4
b7
b0
D 1 1 D 1 0 D 9 D 8 D 7 D 6 D 5 D 4 D A H R e g is te r
A u d io o u tp u t D ig ita l to A n a lo g D a ta H ig h R e g is te r
1
HT45F23 Voice 功能应用实例
SPI 配置选项
一些配置选项必须通过设备程序的设定来用作 SPI 接口功能。首先 SIM 功能必须使能,两
个硬件配置位选项:一个配置选项 SIM WCOL 用来在 SIMC2 寄存器里使能 WCOL 的操作
和写入冲突位。另一个配置选项 SIM CSEN 用来禁止或使能 SIMC0 寄存器中的 CSEN 位。
P A 1 /C 1 O U T /T C 0 P A 0 /C N P /S C O M 0
P C 3 /X T 2 P C 2 /X T 1 P C 1 /A N 5 /O S C 2 P C 0 /A N 4 /O S C 1 P B 6 /A N 3 /R E S P B 4 /A N 1 /A U D /P C L K P B 3 /A N 0 /S C S P B 2 /S C K /S C L
DACTRL 寄存器用于使能/禁止 DAC 输出功能和调节输出语音音量大小 -- 共八级可调音 量,由 VOL0 ~ VOL2 三位进行音量大小调节。 DACTRL 寄存器
S/W 流程图 HT45F23 外挂 Flash Memory 语音输出的一般操作步骤: 1、初始化 SPI 接口及语音输出寄存器 DAL、DAH。 2、使能 Flash Memory 及语音功率放大电路。 3、DACEN 位写入“1”,使能 DAC 电路。 4、通过 SPI 接口发送读 Flash 命令,以一定的采样频率对 Flash Memory 语音进行采样输出,
2 (HA2 3 019V9DSD )。
3
22 V S S
4 Dow2 1 nloaP dA 2:/ A 1hP tt/ Cp2 :O//UwT /china/tech/appnote/uc/pdf/ha0199s.pdf
5
2 0 P A 3 /A 1 N /IN T 0
HT45F23 Voice 功能应用实例
应用电路描述: • PA1 ------------------------------------ 按键输入端口 • PA0、PC0、PB6 -------------------- Flash 和 AMP 使能控制端 • PB4 ------------------------------------- Voice 信号输出端口 • PB0、PB1、PB2、PB3------------- SPI 通讯接口 每有一次按键输入,MCU 会被唤醒并调节一次语音音量,然后读 Flash -- SST25VF016B 内 语音,读取语音的同时将语音内容移位输出给 DAC 寄存器 DAH、DAL,通过 AUD 输出语 音信号至 AMP -- HT82V739 音频功率放大器,最后通过 SPEAKER 将语音送出。 本范例总共选取了四级音量调节:5 级、6 级、7 级、8 级,四次按键完成一个音量调节循 环,用户可根据需要自行设定。
工作原理
Voice 功能
HT45F23 语音控制寄存器控制 DAC 电路模块的开关,如果 DAC 电路没有使能,DAH/DAL 内的数据输出都将是无效的。DACEN 位写入“1”将使能 DAC 电路模块,同时也将 PB4 引脚作为 DAC 输出,DACEN 位写入“0”将禁用 DAC 电路模块,PB4 引脚将作为普通 I/O 输出。 HT45F23 与 Voice 输出相关的寄存器总共有三个:DAH、DAL 和 DACTRL。 DAH 和 DAL 寄存器用于存放 12 位语音输出内容,其中 DAH 寄存器用于存放语音内容的 高八位,DAL 寄存器存的高四位用于存放语音内容的低四位,DAL 寄存器的低四位未使用。
