Windows的命令行参考
windows操作系统命令提示符参考

windows操作系统命令提示符参考winver检查Windows版本dxdiag检查DirectX信息mem.exe显示内存使用情况Sndvol32音量控制程序sfc.exe系统文件检查器gpedit.msc 组策略regedit.exe 注册表Msconfig.exe 系统配置实用程序cmd.exe CMD命令提示符chkdsk.exe Chkdsk磁盘检查mem.exe显示内存使用情况gpedit.msc 组策略regedit.exe 注册表Msconfig.exe 系统配置实用程序cmd.exe CMD命令提示符services.msc 服务lusrmgr.msc 本地账户管理drwtsn32 系统医生cleanmgr 整理iexpress 木马捆绑工具,系统自带mmc 控制台dcpromo 活动目录安装ntbackup 系统备份和还原rononce -p 15秒关机taskmgr 任务管理器devmgmt.msc 设备管理器diskmgmt.msc NT的磁盘管理器compmgmt.msc 计算机管理winchat 局域网聊天dvdplay DVD播放器mplayer2 简易widnows media playermspaint 画图板nslookup 网络管理的工具syskey 系统加密,一旦加密就不能解开,保护windows xp系统的双重密码wupdmgr WIDNOWS UPDATEClipbrd 剪贴板查看器Odbcad32 ODBC数据源管理器Nslookup IP地址侦测器ASSOC 显示或修改文件扩展名关联。
AT 计划在计算机上运行的命令和程序。
ATTRIB 显示或更改文件属性。
BREAK 设置或清除扩展式CTRL+C 检查。
CACLS 显示或修改文件的访问控制列表(ACLs)。
CALL 从另一个批处理程序调用这一个。
CD 显示当前目录的名称或将其更改。
CHCP 显示或设置活动代码页数。
如何在Windows中打开CMD命令行
如何在Windows中打开CMD命令行在Windows操作系统中,CMD(Command Prompt)命令行是一种强大的工具,它可以让用户通过输入特定的命令来执行各种操作。
无论是初学者还是有经验的用户,都可以通过CMD命令行来完成各种任务,如文件操作、网络配置、系统管理等。
本文将介绍如何在Windows中打开CMD命令行,并简要介绍一些常用的CMD命令。
一、通过快捷方式打开CMD命令行1. 使用快捷键在Windows操作系统中,可以使用快捷键来快速打开CMD命令行。
按下Win键(Windows徽标键)+ R键,打开运行窗口。
在运行窗口中输入“cmd”并按下回车键,即可打开CMD命令行。
2. 使用开始菜单另一种打开CMD命令行的方法是通过开始菜单。
点击Windows开始菜单,找到“Windows 系统”文件夹,展开后可以看到CMD命令行的图标。
点击CMD图标,即可打开CMD命令行。
二、CMD命令行的基本使用打开CMD命令行后,用户可以通过输入各种命令来进行操作。
下面是一些常用的CMD命令示例:1. 目录操作- cd命令:用于切换当前目录。
例如,输入“cd C:\”可以切换到C盘根目录。
- dir命令:用于列出当前目录下的文件和文件夹。
例如,输入“dir”可以列出当前目录下的所有文件和文件夹。
2. 文件操作- copy命令:用于复制文件。
例如,输入“copy file1.txt file2.txt”可以将file1.txt复制为file2.txt。
- del命令:用于删除文件。
例如,输入“del file.txt”可以删除名为file.txt的文件。
3. 网络配置- ipconfig命令:用于查看和配置网络信息。
例如,输入“ipconfig /all”可以查看当前网络配置的详细信息。
4. 系统管理- tasklist命令:用于列出当前正在运行的进程。
例如,输入“tasklist”可以列出所有正在运行的进程。
查看硬盘序列号的方法
查看硬盘序列号的方法查看硬盘序列号是一项常见的操作,可以帮助我们确认硬盘的唯一标识,方便进行硬件管理和故障排查。
本文将介绍几种常用的方法来查看硬盘序列号,供读者参考使用。
方法一:使用Windows命令行1.打开命令提示符。
在Windows系统中,可以按下Win+R组合键,然后输入cmd,最后按下回车键即可打开命令行界面。
2.在命令行中输入wmic diskdrive get serialnumber命令,然后按下回车键执行。
3.等待片刻,系统将会返回硬盘序列号。
方法二:使用Windows设备管理器1.右键点击“我的电脑”或者“此电脑”,然后选择“属性”。
2.在左侧面板中,选择“设备管理器”。
3.展开“磁盘驱动器”选项。
4.找到你想要查看序列号的硬盘,右键点击该硬盘,选择“属性”。
5.在属性对话框中,切换到“详细信息”选项卡。
6.在下拉菜单中选择“硬件ID”,即可查看硬盘序列号。
方法三:使用Linux命令行1.打开终端。
在Linux系统中,可以使用Ctrl+Alt+T快捷键打开终端。
2.在终端中输入sudo hdparm -I /dev/sda命令。
其中,/dev/sda 是你想要查看序列号的硬盘路径,根据实际情况进行替换。
3.执行命令后,系统将会返回硬盘的详细信息,其中包括序列号。
方法四:使用Mac终端1.打开终端。
在Mac系统中,可以通过“应用程序”文件夹中的“实用工具”文件夹找到“终端”应用程序。
2.在终端中输入diskutil info /dev/disk0命令。
其中,/dev/disk0是你想要查看序列号的硬盘路径,根据实际情况进行替换。
3.执行命令后,系统将会返回硬盘的详细信息,其中包括序列号。
方法五:使用硬盘管理软件除了以上的命令行方法外,还可以使用一些专业的硬盘管理软件来查看硬盘序列号。
例如,CrystalDiskInfo是一款免费的硬盘信息监控工具,可以提供硬盘的详细信息,包括序列号。
批量创建文件夹并命名的方法
批量创建文件夹并命名的方法全文共四篇示例,供读者参考第一篇示例:随着科技的不断发展,现在我们的生活离不开电脑。
在工作和学习中,我们经常需要批量创建文件夹并命名,以便更好地管理和分类文件。
那么,如何快速方便地批量创建文件夹并命名呢?接下来,我将为大家介绍几种方法。
一、使用命令行1. 打开命令提示符。
在Windows系统中,可以按下Win+R组合键,然后输入cmd,按回车键打开命令提示符。
2. 进入需要创建文件夹的路径。
在命令提示符中,使用cd命令切换到需要创建文件夹的路径,比如cd D:\test。
3. 输入mkdir命令创建文件夹。
在命令提示符中输入mkdir 文件夹名称1 文件夹名称2 ...,其中文件夹名称1、文件夹名称2为要创建的文件夹名称,用空格隔开。
4. 批量命名文件夹。
在Windows系统中,可以使用ren命令对文件夹进行重命名,如:ren 文件夹1 新文件夹1、ren 文件夹2 新文件夹2。
通过命令行的方式,可以快速批量创建文件夹并命名,提高工作效率。
二、使用批处理文件1. 创建一个批处理文件。
在电脑的任意位置创建一个文本文件,修改文件后缀名为.bat,比如create_folders.bat。
2. 编辑批处理文件。
右键点击create_folders.bat文件,选择编辑,输入以下命令:@echo offmd 文件夹1md 文件夹2...3. 执行批处理文件。
双击运行create_folders.bat文件,程序会自动创建文件夹。
通过批处理文件的方式,可以一次性创建多个文件夹,并且可以根据实际需求进行修改。
三、使用第三方工具除了以上两种方法,还可以使用一些第三方工具来批量创建文件夹并命名,比如Bulk Rename Utility、Advanced Renamer等。
这些工具提供了更多功能和选项,可以更方便地对文件夹进行管理和操作。
在工作和学习中,我们经常需要对文件夹进行管理和分类,批量创建文件夹并命名是一项非常常见的操作。
写批处理必备的一些命令参数使用技巧
写批处理必备的一些命令参数使用技巧批处理是一种在Windows操作系统中用来批量处理一系列命令的脚本语言。
使用批处理可以实现自动化执行一系列操作,提高工作效率和减少重复性劳动。
以下是一些批处理中必备的命令参数使用技巧,供参考:1. echo命令echo命令用于在命令行中输出文字或变量的值。
使用echo命令时可以使用“>>”将输出内容追加到文件的末尾,或使用“>”将输出内容覆盖到文件中。
2. set命令set命令用于设置一个变量,也可以用于查看或删除已存在的变量。
例如,可以使用set命令将一个命令的输出结果赋值给一个变量,然后在后面的命令中使用该变量。
3. if命令if命令可以执行条件判断,根据不同的条件执行不同的操作。
常见的用法包括判断文件是否存在、判断变量的值等。
4. for命令for命令用于对一系列对象(如文件、变量列表等)进行循环操作。
常见的用法包括遍历目录中的文件、遍历数组等。
5. goto命令6. call命令call命令用于调用外部的命令或脚本,并在调用完成后返回到当前批处理中。
使用call命令可以将一个脚本文件拆分成多个子脚本,提高代码的复用性。
7. start命令start命令用于启动一个新的窗口来执行指定的命令或程序。
可以使用start命令来实现并行执行多个命令或程序。
8. shift命令shift命令用于移动批处理脚本中的参数位置。
使用shift命令可以在循环中逐个处理命令行参数,而不需要手动指定每个参数。
9. choice命令choice命令用于在命令行中提供多个选项供用户选择。
使用choice 命令可以实现交互式的批处理脚本。
11. setlocal和endlocal命令setlocal和endlocal命令用于创建和销毁一个局部环境变量。
使用setlocal命令可以在批处理脚本中创建一个局部环境,在其中定义的变量在脚本执行完毕后会自动销毁。
12. pushd和popd命令pushd和popd命令用于在命令行中切换当前目录。
批量修改多级文件夹内文件名称的方法
批量修改多级文件夹内文件名称的方法全文共四篇示例,供读者参考第一篇示例:批量修改多级文件夹内文件名称是一项常见的操作,尤其在需要对大量文件进行重命名时,手动一个一个修改文件名显然是非常繁琐且低效的。
我们需要利用一些工具或方法来批量修改多级文件夹内的文件名称。
下面将介绍一种比较常用的方法:1. 使用命令行工具在Windows系统中,我们可以使用命令行工具命令来批量修改文件夹内的文件名。
按下Win+R键组合打开“运行”窗口,输入“cmd”打开命令行窗口。
然后进入需要修改文件名的文件夹所在路径,可以使用“cd”命令切换目录,比如“cd D:\Files”,然后使用“ren”命令进行文件名修改,比如需要将文件名中的“old”替换为“new”,可以使用命令“ren *old* *new*”。
“*”表示任意字符,所以可以将包含“old”字符的文件名都修改为包含“new”字符的名称。
2. 使用批处理脚本如果需要对多级文件夹内的文件进行批量修改,可以使用批处理脚本来达到这一目的。
打开记事本或其他文本编辑器,输入以下代码:```@echo offsetlocal enabledelayedexpansionset "old=old"set "new=new"for /r %%i in (*.*) do (set "FileName=%%~nxi"set "NewName=!FileName:%old%=%new%!"ren "%%i" "!NewName!%%~xi")```将代码中的“old”替换为需要替换的字符,将“new”替换为替换后的字符。
将代码保存为bat文件,双击运行即可实现对多级文件夹内文件名的批量修改。
3. 使用专业软件除了使用命令行工具和批处理脚本外,也可以使用专业的文件管理软件来批量修改多级文件夹内文件名。
在windows命令行下关闭进程的命令
ntsd -c q -p PID
把最后那个PID,改成你要终止的进程的ID。如果你不知道进程的ID,任务管理器->进程选项卡->查看->选择列->勾上"PID(进程标识符)",然后就能看见了。
方法二:Windows xp下还有两个好东东tasklist和tskill
tskill命令的使用最为简单,C:\>tskill
TSKILL processid | processname [/SERVER:servername] [/ID:sessionid | /A] [/V]
processid 要结束的进程的 Process ID。
processname 要结束的进程名称。
tasklist能列出所有的进程,和相应的信息。
tskill能查杀进程,语法很简单:tskill + 程序名。
方法一:
ntsd命令
例子:
在"运行"中输入:ntsd -c q -pn 程序名字(在MS-Dos中的作用是一样的)
方法二:
个人意见,有一个非常重要的参数就是-v参数,我们可以通过它发现一个进程下面挂接了哪些连接库文件.有很多病毒,木马,或者恶意软件,都喜欢把自己做成动态库,然后注册到系统正常程序的加载库列表中,达到隐藏自己的目的.
首先我们需要设置一下ntsd的输出重定向,最好是重定向到一个文本文件,方便我们分析研究.
CPUTIME eq, ne, gt, lt, ge, le CPU 时间,格式为
hh:mm:ss。
hh - 时,
mm - 钟,ss - 秒
MEMUSAGE eq, ne, gt, lt, ge, le 内存使用,单位为 KB
在windows命令行上连接ftps服务器的简单命令 -回复

在windows命令行上连接ftps服务器的简单命令-回复在Windows命令行上连接FTPS服务器的简单命令FTPS是一种安全FTP(File Transfer Protocol)协议,它通过加密和身份验证来保护数据在服务器和客户端之间的传输。
在Windows命令行上连接FTPS服务器可以帮助用户安全地传输文件。
在本文中,我将一步一步地回答“在Windows命令行上连接FTPS服务器的简单命令”,以帮助您轻松连接到您的FTPS服务器。
步骤1:检查操作系统和FTP客户端的兼容性首先,您需要确保您的操作系统和FTP客户端与FTPS协议兼容。
Windows操作系统通常自带了一个命令行FTP客户端,名为“ftp.exe”,可以使用此客户端进行连接。
请注意,某些较旧版本的Windows可能不提供原生支持FTPS协议的命令行FTP客户端。
在这种情况下,您需要考虑安装或使用其他第三方FTP客户端,如FileZilla。
步骤2:打开命令提示符(Command Prompt)在Windows上连接FTPS服务器需要使用命令提示符(Command Prompt)。
要打开命令提示符,您可以按下“Windows键+R”组合键打开运行窗口,然后键入“cmd”并按下回车键。
或者,您可以在Windows 搜索栏中键入“cmd”并选择“命令提示符”或“Command Prompt”。
步骤3:输入FTP命令在命令提示符窗口中,键入以下命令:shellftp -s:filename host其中,“-s:filename”是一个可选参数,用于指定包含FTP命令的文本文件的路径。
您可以选择将FTP命令写入文件,然后通过指定文件路径的方式来执行这些命令。
这可以帮助您在连接中引用复杂的命令或执行批处理操作。
如果您不使用文件来存储FTP命令,则可以省略该参数。
“host”是您的FTPS服务器的主机名或IP地址。
请注意,在确定主机名或IP地址之前,您需要先了解您要连接的FTPS服务器的详细信息,例如服务器地址、端口以及身份验证凭据。
戴尔命令 配置版本3.1命令行界面参考指南说明书
Dell Command | ConfigureVersion 3.1 Command Line Interface Reference GuideNotes, cautions, and warningsNOTE: A NOTE indicates important information that helps you make better use of your computer.CAUTION: A CAUTION indicates either potential damage to hardware or loss of data and tells you how to avoid the problem.WARNING: A WARNING indicates a potential for property damage, personal injury, or death.Copyright © 2009 - 2015 Dell Inc. All rights reserved. This product is protected by U.S. and international copyright and intellectual property laws. Dell™ and the Dell logo are trademarks of Dell Inc. in the United States and/or other jurisdictions. All other marks and names mentioned herein may be trademarks of their respective companies.2015 - 12Rev. A01Contents1 Introduction (13)What’s new in this release (13)Supported systems and operating systems (14)2 Command line interface (15)Running Dell Command | Configure commands (15)Using the command prompt (15)Using a bootable image (15)Command syntax overview (16)Command line syntax (16)3 Dell Command | Configure options (19)General options (19)-h or --help (19)-i or --infile (20)-l or --logfile (21)No option (21)-o or --outfile (21)--propowntag (22)--version (22)BIOS options (22)--acpower (23)--activityled (23)--adddevice (23)--adjcacheprefetch (23)--admsetuplockout (24)--advbatterychargecfg (24)--agpaperturesize (25)--agpslot (25)--alarmresume (25)--amblightsen (25)--asfmode (25)--asset (26)--assignintr (26)--atgsystem (26)--audiomode (26)--autoon (27)--autoonhr (27)3--autoonmn (27)--backcamera (27)--batteryslicecfg (27)--bezelir (28)--bioscharacteristics (28)--bioscurlang (28)--bioslistinstalllang (29)--biosromsize (29)--biosver (29)--bisreq (29)--bitsmart (29)--blinkpsu1led (30)--blinkpsu2led (30)--blocks3 (30)--bltinfloppy (30)--bltinpntdevice (31)--bluetoothdevice (31)--bluetoothstealthmode (31)bootorder (31)--bootseqset (33)--bootspeed (34)--boottimevideo (34)--busratio (34)--camera (34)--cellularradio (35)--charger (35)--chasintrusion (35)--chassisintrustatus (35)--clearsel (36)--cmosdefaults (36)--completioncode (36)--controlwlanradio (36)--controlwwanradio (36)--coolnquiet (37)--cpucore (37)--cpucount (37)--cpuspeed (37)--cpuxdsupport (37)--cstatesctrl (38)--dbpm (38)--dbs (38)--deepsleepctrl (38)4--diskettereconfig (39)--displayclosestate (39)--dockdisplayport1vs (39)--dramprefetch (39)--drmt (40)--embideraid (40)--embideraid2 (40)--embnic1 (40)--embnic2 (40)--embsataraid (41)--embscsi1 (41)--embscsi2 (41)--embsdcard (41)--embvideoctrl (41)--energystarlogo (42)--esataport (42)--esataports (42)--expresscard (42)--expresscharge (42)--externalhotkey (43)--extendposttime (43)--extwlanled (43)--fanctrlovrd (43)--fanspeed (44)--fanstealthmode (44)--fastboot (44)--firstpowerondate (44)--flashcachemodule (45)--floppy (45)--fnlock (45)--fnlockmode (45)--forcepxe (46)--forcepxeonnextboot (46)--frontpanelerrdisplaymode (46)--fsbr (46)--fsboptimize (47)--genencryption (47)--gpsradio (47)--gpsstealthmode (47)--hdd1fanenable (48)--hdd2fanenable (48)--hdd3fanenable (48)5--hddacousticmode (48)--hddfailover (48)--hddinfo (49)--hddprotection (49)--hddpwd (49)--hdfreefallprotect (50)--hotdock (50)--htassist (50)--htkeywxanradio (50)--hwprefetcher (51)--hwswprefetch (51)--idecdrom (51)--infrareddevice (51)--infraredmode (51)--instanton (52)--integratedaudio (52)--integratedraid (52)--integratedsas (52)--integratedusbhub (52)--integratedvideosize (53)--internalminipci (53)--internalusb (53)--interrupt13hdma (53)--interwirelessuwb (53)--intlrapidstart (54)--intlsmartconnect (54)--ioat (54)--iptt (54)--irsttimer (55)--irmt (55)keyboardbacklightcolor (55)--keyboardbacklightonacpower (56)--keyboardclick (57)--keyboardillumination (57)--keypad (57)--lastbiosupdate (57)--latitudeon (57)--latitudeonflash (58)--lcdstealthmode (58)--ledstealthmode (58)--legacyorom (58)--limitcpuidvalue (59)6--logicproc (59)--lpt (59)--lptmode (59)--mediacard (60)--mediacardand1394 (60)--mem (60)--memdiagnostic (60)--memintleave (61)--memremap (61)memtest (61)--mfgdate (61)--microphone (61)--minicardssd (62)--minsizeofcontigmem (62)--minsizeofcontigmem (62)--minsizeofcontigmem (62)--mmioabove4gb (62)--mobilepowermgmt (63)--modulebaybatterycfg (63)--modulebaydevice (63)--monitortoggling (63)--mouse (63)--multicpucore (64)--multidisplay (64)--nfc (64)--nmibutton (64)--numlock (64)--onboard1394 (65)--onboardmodem (65)--onreader (65)--onscreenbuttons (65)--opticaldrivectrl (65)--optimus (66)--optionalbootsequence (66)--optionalhddfan (66)--oromkeyboardaccess (66)--oromuiprotection (66)--osmode (67)oswatchdogtimer (67)--ovrwrt (67)--ownerpwd (67)--passwordbypass (68)7--pccard (68)--pccardand1394 (68)--pci (68)--pcibuscount (69)--pcimmiospacesize (69)--pciresallocationratio (70)--pcisata (70)--pcislots (70)--pcmcia (70)--peakshiftbatterythreshold (70)--peakshiftcfg (71)--penmisindication (71)--penresumeon (72)--pntdevice (72)--postf12key (72)--postf2key (72)--posthelpdeskkey (72)--postmebxkey (73)--powerbutton (73)--powermgmt (73)--powerwarn (73)--primarybatterycfg (73)--primaryvideodeviceslot (74)--primidemast (74)--primideslav (74)--promptonerr (75)--pwdlock (75)--radiotransmission (75)--rdocknonvideodevices (75)--rearsingleusb (76)--rearusb (76)--remotebiosupdate (76)--ringeventresume (76)--rptkeyerr (76)--safeusb (77)--sata0 (77)--sata1 (77)--sata2 (77)--sata3 (77)--sata4 (78)--sata5 (78)--sata6 (78)8--sata7 (78)--satactrl (78)--satadipm (79)--scndidemaster (79)--scndideslave (79)--scsi3 (79)--secureboot (79)--serial1 (80)--serial2 (80)--serialcomm (80)--serrdmimsg (80)--setuppwd (81)--sfuenabled (81)--sideusb (81)--sma (81)--smartcardreader (82)--smartcpu (82)--smarterrors (82)--snoopfilter (82)--speaker (82)--speakersstealthmode (83)--speakervol (83)--speedstep (83)--splashscreen (83)--sriov (84)--standbystate (84)--stealthmode (84)--strongpwd (85)--surroundview (85)--svctag (85)--switchablegraphics (85)--sysbatcharger (85)--sysdefaults (86)--sysfanspeed (86)--sysid (86)--syslogoonirst (86)--sysname (87)--syspwd (87)--sysrev (87)--tabletbuttons (87)--tertidemast (88)tertideslav (88)9--tpm (88)--tpmactivation (88)--tpmppiacpi (89)--tpmppidpo (89)--tpmppipo (89)--trustexecution (89)--turbomode (89)--uartpowerdown (90)--uefinwstack (90)--universalconnect (90)--unmanagednic (90)--unobstrusivemode (91)usb (91)--usb30 (91)--usbctl (91)--usbemu (91)--usbemunousbboot (92)--usbflash (92)--usbport00 (92)--usbport01 (92)--usbport02 (92)--usbport03 (93)--usbport04 (93)--usbport05 (93)--usbport06 (93)--usbport07 (93)--usbport08 (93)--usbport09 (94)--usbport10 (94)--usbport11 (94)--usbport12 (94)--usbport13 (94)--usbport14 (95)--usbport15 (95)--usbport20 (95)--usbport21 (95)--usbport22 (95)--usbport23 (96)--usbports (96)--usbportsexternal (96)--usbportsfront (96)--usbpowershare (96)10--usbreardual (97)--usbreardual2stack (97)--usbrearquad (97)--usbwake (97)--uuid (97)--vaconfiglock (98)--valsetuppwd (98)--valsyspwd (98)--vaphysicalpresenceconfirm (98)--vgadacsnoop (98)--videoexpsn (99)--videomemsize (99)--virtualappliance (99)--virtualization (99)--vtfordirectio (99)--wakeonlan (100)--wakeonlanbootovrd (100)--watchdogtimer (100)--wificatcherchanges (101)--wifilocator (101)--wigigradiostealthmode (101)--wirelessadapter (101)--wirelessdevice (102)--wirelesslan (102)--wirelessuwb (102)--wirelesswitchbluetoothctrl (102)--wirelesswitchcellularctrl (103)--wirelesswitchchanges (103)--wirelesswitchnlanctrl (103)--wirelesswitchwigigctrl (103)--wlanstealthmode (104)--wswitchwlanwigigctrl (104)--wswitchgpsonwwanradio (104)--wwanstealthmode (105)--wxanradio (105)--wysep25access (105)Advanced System Management (105)ASM probes and options (105)Displaying the probe details (106)Setting the non-critical threshold values (106)PCI reporting (107)Completion code (108)114 Sample file formats (109)Sample Dell Command | Configure utility.ini file format (109)5 Messages and codes (111)Dell Command | Configure error codes and messages (111)121 IntroductionDell Command | Configure is a packaged software application that provides configuration capability to business client platforms. This product consists of a Command Line Interface (CLI) and Graphical User Interface (GUI) to configure various BIOS features. You can use Dell Command | Configure on Microsoft Windows Preinstallation Environment (Windows PE), Windows Vista, Windows 7, Windows 8, Windows 8.1, and Windows 10 operating systems, and Red Hat Enterprise Linux environments.NOTE: Dell Command | Configure was formerly Dell Client Configuration Toolkit (CCTK). After the CCTK version 2.2.1, CCTK is rebranded as Dell Command | Configure .What’s new in this releaseThe new features for this release include:•Support for Windows 10 operating system.•Support for Windows PE 10.0.•Support for new platforms•Ability to provide feedback on Dell Command | Configure from the GUI.•Support for the additional languages.•Ability to install the application in the supported languages using .mst files.•Support for an enhanced GUI for providing system, setup, and hard disk drive passwords while exporting the .exe file.•Support for configuring hard disk drive password using the GUI.•Support for configuring the options associated with the stealth mode feature including, bluetooth radio (--bluetoothstealthmode ), fan (--fanstealthmode), GPS (--gpsstealthmode ), LCD screen backlight (--lcdstealthmode), LEDs (--ledstealthmode), onboard speakers (--speakersstealthmode), WiGig radio (--wigigradiostealthmode), WLAN (and WiGig) radio (--wlanstealthmode), and WWAN (and WiGig) radio (--wwanstealthmode) options.•Support for delaying the time of action taken by the system. See, --extendposttime option.•Support for configuring the external WLAN indicator LED. See, --extwlanled option.•Support for configuring the Intel Ready Mode Technology. See, --irmt option.•Support for configuring the keyboard backlight color for the rugged systems.See, keyboardbacklightcolor option.•Support for configuring the primary video device slot for the rugged systems.See, --primaryvideodeviceslot option.•Support for configuring all the non-video devices (serial, audio, LAN, and USB ports) on a rugged dock. See, --rdocknonvideodevices option.•Support for configuring the USB ports 20, 21, 22, 23. See, --usbport20,--usbport21,--usbport22, and --usbport23 options.13•Support for configuring the effect of physical wireless switch on the GPS radio of the wireless WAN card. See, --wswitchgpsonwwanradio option.•Support for configuring the effect of physical wireless switch on wireless LAN and WiGig radio. See, --wswitchwlanwigigctrl option.Supported systems and operating systemsFor the list of business client systems and operating systems supported, see the Release Notes available in the Dell Command | Configure installation files or at /dellclientcommandsuitemanuals .142 Command line interfaceThis chapter provides a general overview of the Command Line Interface (CLI) utility. It explains how to run the commands and the syntax details of the command line options used to configure BIOS settings for client systems.Running Dell Command | Configure commandsYou can run the Dell Command | Configure commands in two ways:•Using the command prompt.For more information, see Using the command prompt.•Using a bootable image.For more information, see Using a bootable image.Using the command promptTo run Dell Command | Configure commands:1.Click Start → All Program → Dell → Command Configure → Dell Command Configure CommandPrompt.NOTE: If you are using a system running the Microsoft Windows Vista operating system or later, right-click Dell Command Configure Command Prompt, and select Run as administrator.2.Run the Dell Command | Configure commands.For more details on Dell Command | Configure commands, see Dell Command | Configure options. Using a bootable imageTo run Dell Command | Configure commands:1.Copy Dell Command | Configure with the International Organization for Standardization (ISO) imageto a Compact disc (CD). For more information, see Dell Command | Configure Installation Guide available at /dellclientcommandsuitemanuals.2.Boot the system that you want to configure from the CD.3.Run the Dell Command | Configure commands. For more details on Dell Command | Configurecommands, see Dell Command | Configure options.15Command syntax overviewSyntax refers to the way a command and its parameters are entered. Command Line Interface (CLI) commands can be arranged in any order in a command line instance as long as they conform to the basic command line syntax.Command line syntaxThe general usage models of the Dell Command | Configure utilities are as follows:CCTK --option1=[arg1]orcctk --option1=[arg1]...--option X=[arg X]NOTE: Some of the options in Dell Command | Configure are followed by an asterisk. You can use such options only for reporting purposes and cannot use the reporting options with set options.The following table lists the generic command line characters and arguments present in the command line options with a short description of these characters.Table 1. Command line characters and arguments16Case sensitivityCommand line options, pre-defined and user-defined arguments, and filenames given as arguments are all case-sensitive. Unless specified otherwise, enter all commands, options, arguments, and command line switches in lowercase letters.Command line option delimitersThe following table lists some examples of valid and invalid Dell Command | Configure command line options.Table 2. Valid and invalid command line optionsRead and write optionsYou cannot combine the options that specify read and write actions in a command line instance. The following table provides examples for read and write commands.17Table 3. Read and write optionsFile input and output commandsSpecify the input file using the -i=<filename> command, where <filename> is the name of the input file. Specify the output file input using the – o=<filename> command, where <filename> is the name of the output file.Log filesThe -l=<filename> or --logfile=<filename> option records information output on the command line to the specified log file.If the log file already exists, information is appended to the file. This allows multiple tools to use the same log file to record information. Use this option to record the output of a utility.The log duplicates all standard output and error information to the specified file. Each log file begins with a time stamp and utility name. For example:YYYY/MM/DD HH:MM:SS <utilname> - <output text>The following is an example of the logging behavior:2010/05/16 10:23:17 cctk - option1=on2010/05/16 10:23:17 cctk - option2=on2010/05/16 10:23:17 cctk - option3=offError checking and error messagesThe Dell Command | Configure utilities check your commands for correct syntax when you enter them. Unrecognized or invalid options and arguments result in a usage error message that displays the Dell Command | Configure utility name, version, and the list of Dell Command | Configure options.183 Dell Command | Configure optionsThis chapter provides an overview of the Dell Command | Configure options. It describes the general and BIOS options to configure settings for the client systems.Dell Command | Configure options can be divided into:•General options — Applicable to all systems.•BIOS options — Applicable only if the BIOS of the system supports.NOTE: If you are running Dell Command | Configure commands on systems running Windows Vista or later, run the commands with the administrator rights. Running the command displays a pop-up window where you can enter the administrator ID and password.NOTE: If you run Dell Command | Configure commands on systems running Windows Vista or later without administrator rights, the following error message is displayed: 'admin/root'privileges required to execute this application.General optionsThe following are the general options of Dell Command | Configure .NOTE: Some of the options in Dell Command | Configure are followed by an asterisk. These options do not accept any suboptions or arguments. The values associated with these options are reported by the Basic Input Output System (BIOS). You cannot modify these values.-h or --helpValid Argument none or <valid option name>Description Without an argument, this option displays general usage information for theutility. If the argument matches a valid option, the usage information of theoption is displayed. If the option has arguments, the arguments are displayed,separated by a | character. If the argument is supported on the system, a +symbol is displayed with the argument. If the option has suboptions, allsuboptions, valid arguments, and a description are listed. If the argument doesnot match a valid option, a usage error is given (and usage information isdisplayed).19Example C:\>cctk -h asfmodeasfmode: Sets the asf (alert standard format)mode. DASHand ASF 2.0 set enables LOM to have DASH and ASF 2.0functionality.Arguments: off+ | on+ | alertonly+-i or --infileValid Argument<filename>Description Directs the Command Configure utility to take input from an INI file. Theutility searches the file for a Command Configure heading identical to theutility name. An error is returned if the file or section is not found. If thesection is found, each name/value pair is applied to the system. The namesmust match a valid option, and the arguments must be in the proper formatfor the option. If an option is not available on a system and it is specified in afile, the utility ignores the option. If any errors are found in the format of thenames or values, that option is skipped. The remaining options are applied tothe system.If this option is used with other function command options, they are appliedin the order in which they appear on the command line, overriding anyprevious commands.In the INI file, bootorder is displayed as a list of devices with their short formsin the order they are assigned separated by commas.For example:bootorder=legacytype,+pcmcia,+hdd.1,-floppy,+cdrom,-hdd.2,+nic.1,-hdd.3,+nic.2A plus (+) symbol with the device name indicates that the device is enabledand a minus (-) symbol indicates that the device is disabled. You can enable ordisable the devices by changing the symbol displayed with the device shortname. These symbols are optional and if not present, the current status of thedevice is retained.NOTE: If the operating system is booted in the Unified ExtensibleFirmware Interface (UEFI) mode, then the bootorder type is shown asUEFI type.Change the boot order by changing the order of the list. You can also enterthe device number instead of the device name.NOTE: The bootorder option in the INI file is applied to a system basedon its active boot list. If the INI file is generated from a system with theactive boot list set as UEFI, and it is applied on a system with the activeboot list set as Legacy, the boot order is set only on devices that areavailable in the system. It is recommended that you apply the INI file on asystem with the same active boot list as of the system from where the INIfile is generated.Example C:\>cctk -i <c:cctk>/filename.ini20-l or --logfileValid Argument<filename>Description Logs the command line output to a time-stamped file. The utility eitherappends the information to an existing log file or creates a new file. The logfile contains the same information as the standard output, plus timestampinformation. Users should use this option instead of redirection for taskdiagnosis.Example C:\>cctk -l <c:/cctk>/logfileNo optionValid Argument NADescription If an option is not given, the Dell Command | Configure utility outputs usageinformation. The usage information is displayed in the format shown below. Example C:\>cctkUsage error.cctk Version 3.1.0 258 (Windows - Feb 25 2015,14:38:43)Copyright (c) 2014 Dell Inc.Usage: cctk --option[=argument]For more information about a particular command, use theoption '-h' followed by the command name.Example: cctk -h --asset-o or --outfileValid Argument<filename>Description Writes all BIOS options, that you can replicate to the BIOS of another system,to the specified filename. The file name you specify should have INI extensionand should be created in the default installation directory. The format of theoutput is in an INI format, with the utility name as the section header. If a filewith the same name already exists, the information is appended to the file. Ifthis option is used with other function commands, the commands are appliedin the order in which they appear. This option captures replicable BIOSoptions. The file is created in the directory where you run the Dell Command |Configure command.In the INI file, bootorder is displayed as a list of comma separated deviceshort forms in the order they are assigned. A plus (+) symbol with the devicename indicates that the device is enabled and a minus (-) symbol indicatesthat the device is disabled. You can change the boot order by changing theorder of the list. You can also enter the device number instead of the devicename.You can enable or disable the devices by changing the symbol displayed withthe device. These symbols are optional and if not present, the current statusof the device is retained.21NOTE: The bootorder option in the INI file is applied to a system basedon its active boot list. If the INI file is generated from a system with theactive boot list set as UEFI, and it is applied on a system with the activeboot list set as legacy, the boot order is set only on devices that areavailable in the system. It is recommended that you apply the INI file on asystem with the same active boot list as of the system from where the INIfile is generated.Example C:\>cctk -o <c:/cctk>/logfile--propowntagValid Argument NADescription Sets the Dell property ownership tag. If an option is not given, Dell Command| Configure reports the current property ownership tag.NOTE: The maximum length of property ownership tag is 80 charactersfor desktops and 48 characters for laptop.Example C:\>cctk --propowntag--versionValid Argument Read-onlyDescription Displays the version information, current time, and date for the utility. This is aread-only option.Example C:\>cctk --versionDell Command Configure Version 3.1.0 258 (Windows - Feb 252015, 14:38:43)Copyright (c) 2014 Dell Inc.BIOS optionsThe following list describes Dell Command | Configure options and arguments along with a description of their expected behavior. Options and arguments are case sensitive. All options and predefined arguments are lowercase unless stated otherwise.NOTE: Some of the following options or arguments may not be available on all systems due to the BIOS version or hardware feature set. Entering Dell Command | Configure on a command linewithout arguments display only those options that are valid for your system. For more details about the options, see No option.NOTE: If you configure a setup password and system password for the system, while changing a BIOS value, type the setup password.22--acpowerValid Argument off, last, onDescription Sets the behavior of the system after Alternating Current (AC) power is lost.•off — When AC power is restored, the system remains turned off.•on — When AC power is restored, the system turns on.•last — When the AC power is restored, the system returns to the state itwas in when the power was lost.Example C:\>cctk --acpower=offacpower=off--activityledValid Argument actled, wlan, disableDescription Sets the Network Activity Light Emitting Diode (LED) to any of the following:•actled — Sets the Activity LED controlled by an Advanced Configurationand Power Interface (ACPI) operating system and driver.•wlan — Sets the Activity LED as a wireless Local Area Network (LAN) radioon/off indicator.•disable — Sets the Activity LED to off.Example C:\>cctk --activityled=actledactivityled=actled--adddeviceValid Argument usbDescription Adds the specified device to the boot device list. At present, only the UniversalSerial Bus (USB) storage device is supported. This option is not valid on all thesystems. The USB storage device is added at the end of the boot order. If theUSB storage device is already added in the boot order list, the followingmessage is displayed while executing the option:USB device is alreadypresent in this machine.NOTE: The adddevice option is not supported on the systems with UEFI-based BIOS.Example C:\>cctk --adddevice=usb--adjcacheprefetchValid Argument enable, disableDescription Enables or disables the adjacent cache line prefetch.•enable — The processor fetches the cache line containing the currentlyrequested data, and pre-fetches the following cache line.23•disable —The processor fetches only the cache line containing thecurrently requested data.Example C:\>cctk --adjcacheprefetch=enableadjcacheprefetch=enable--admsetuplockoutValid Argument enable, disableDescription Enables or disables the admin setup lockout.•enable — If administrator password is set for the system, user can view thesetup screens only after entering the correct administrator password. Ifadministrator password is not set, user can view the setup screens.•disable — User can view the Setup screens without entering administratorpassword even if the administrator password is set in the system.Example C:\>cctk --admsetuplockout=enableadmsetuplockout=enable--advbatterychargecfgValid Argument enable, disableDescription Enables or disables the Advanced Battery charge mode. Advanced Batterycharge mode uses standard charging algorithm and other methods duringnon-working hours to maximize battery health. During working hours, expresscharge is used to charge the batteries faster. You can configure the days andthe time period during which the battery has to be charged. To enableadvanced battery charging, provide the day, start time, and the duration ofcharging (peak usage duration).NOTE: The value of hour must be in the range 0–23 and minute must be0,15, 30, or 45.Example To enable the advanced battery charging mode:C:\>cctk --advbatterychargecfg=enableadvbatterychargecfg=enableTo enable the advanced battery charging mode on specific days for a specificperiod:C:\>cctk --advbatterychargecfg=enable,mon-10:00/08:00,tue-13:45/06:00To disable the advanced battery charging mode:C:\>cctk --advbatterychargecfg=disableadvbatterychargecfg=disable24。
command命令
cmd是command的缩写.命令行在9x系统下输入command就可以打开命令行.而在NT系统上可以输入cmd来打开.操作顺序是:开始->运行->键入cmd或command在命令行里你可以看到你的系统版本,文件系统版本等等你可以敲入help查看帮助Cmd启动命令解释器Cmd.exe的新实例。
如果在不含参数的情况下使用,则cmd显示WindowsXP的版本和版权信息。
语法cmd[[{/c|/k}][/s][/q][/d][{/a|/u}][/t:fg][/e:{on|off}][/f:{on|off}][/v:{on|off}]string]参数/c执行string指定的命令,然后停止。
/k执行string指定的命令并继续。
/s修改位于/c或/k之后的string处理。
/q关闭回显。
/d禁用自动运行命令执行。
/a创建美国国家标准协会(ANSI)输出。
/u创建Unicode输出。
/t:fg设置前景f和背景g的颜色。
下表列出了可用作f和g的值的有效十六进制数字。
值颜色0黑色1蓝色2绿3湖蓝色4红5紫色6黄7白色8灰色9浅蓝色A浅绿色B浅水绿C浅红色D浅紫色E浅黄色F亮白色/e:on启用命令扩展。
/e:off禁用命令扩展。
/f:on启用文件和目录名完成。
/f:off禁用文件和目录名完成。
/v:on启用延迟的环境变量扩展。
/v:off禁用延迟的环境变量扩展。
string指定要执行的命令。
/?在命令提示符显示帮助。
注释使用多个命令可以在string中使用由&&分隔的多个命令,不过这些命令必须置于引号之中(例如,"command&&command&&command")。
处理引号如果指定了/c或/k,则在满足下述所有条件的情况下,cmd会处理string中的其余命令而将引号保留:未使用/s。
正确使用一对引号。
在引号内未使用任何特殊字符(例如:&<>()@^|}。
查询WIN7激活命令
``查询WIN7激活命令win7激活查询命令开始菜单 - 运行:1. slmgr.vbs -dli显示:操作系统版本、部分产品密钥、许可证状态2. slmgr.vbs -dlv显示:最为详尽的激活信息,包括:激活ID、安装ID、激活截止日期3. slmgr.vbs -xpr显示:是否彻底激活4. slmgr.vbs -ipk更换WIN7序列号5. slmgr.vbs -ato激活WIN7Windows 7,有三组“运行”和“命令提示符”命令,是应当必须知晓并加以运用的。
之所以这样说,是因为这些命令会明确告诉你——安装运行的操作系统:1、使用激活方式?2、是否彻底激活?3、激活到期时间?当然还有更多的“许可证”信息,包括:授权版本、激活ID、安装ID等等(一)slmgr.vbs -dli (运行命令)cscript C:\windows\system32\slmgr.vbs -dli (命令提示符命令)——-显示:操作系统版本、部分产品密钥、许可证状态?注:运行命令使用方式开始--运行--在输入框中键入slmgr.vbs -dli 然后确定即可如果在开始菜单中找不到运行这个选项,可以按下windows键的同时按住“R”键。
(二)slmgr.vbs -dlv (运行命令)cscript C:\windows\system32\slmgr.vbs -dlv (命令提示符命令)——-显示:最为详尽的激活信息,包括:激活ID、安装ID、激活截止日期?(三)slmgr.vbs -xpr (运行命令)cscript C:\windows\system32\slmgr.vbs -xpr (命令提示符命令) ——-显示:是否彻底激活下面的图片是我试验的结果:Win7激活信息查看技巧由于Win7采用了全新的状态激活机制,因此几乎每个在网络上下载安装Win7的用户都在担心自己使用的操作系统版本的激活情况,那么要怎样才能查看自己使用的Win7是否已经激活?是在试用状态呢?还是即将过期?本站特意整理了可以查看目前系统激活信息的四个命令行,供大家参考交流。
Windows server 2008 命令行

Windows server 2008 命令行1.1 文件管理11.1.1 append——指定打开文件11.1.2 assoc——文件名扩展关联21.1.3 attrib——文件属性 41.1.4 cipher——文件加密 51.1.5 comp——文件比较101.1.6 copy——文件复制111.1.7 robocopy——Windows的可靠文件复制131.1.8 del——删除文件221.1.9 expand——解压缩文件231.1.10 compact——压缩文件241.1.11 fc——文件比较251.1.12 find——查找271.1.13 findstr——搜索文本281.1.14 ftype——文件类型301.1.15 move——移动文件311.1.16 rename(ren)——文件重命名331.1.17 replace——替换文件341.2 文件夹管理361.2.1 chdir(cd)——改变目录361.2.2 dir——列出文件目录381.2.3 mkdir(md)——新建目录401.2.4 rmdir(rd)——删除文件夹411.2.5 tree——目录结构431.2.6 type——浏览文本441.2.7 verify——校验451.2.8 verifier——驱动程序检验461.2.9 where——位置47第2章磁盘管理492.1 磁盘分区与格式化492.1.1 硬盘分区492.1.2 磁盘格式化512.1.3 Windows Server 2008系统分区522.1.4 format——磁盘格式化532.1.5 chkntfs——NTFS分区检查552.1.6 convert——分区系统类型转换572.1.7 fsutil——文件系统管理582.2 磁盘优化692.2.1 chkdsk——磁盘检查692.2.2 defrag——磁盘碎片整理712.2.3 compact——NTFS压缩732.3 磁盘管理与卷标管理742.3.1 diskprt——磁盘和分区管理752.3.2 diskcopy——磁盘复制792.3.3 diskcomp——磁盘比较802.3.4 vssadmin——查看卷影副本812.3.5 subst——虚拟驱动器842.3.6 label——创建、修改或删除驱动器的卷标862.3.7 vol——卷标872.3.8 mountvol——设置装入点87第3章系统管理893.1 屏幕显示设置893.1.1 chcp——活动控制台代码页893.1.2 cls——清屏903.1.3 color——屏幕色彩913.1.4 prompt——提示符923.1.5 title——命令行窗口标题943.2 系统基本配置943.2.1 country——国家设置943.2.2 date——系统日期973.2.3 time——系统时间983.2.4 w32tm——时间服务983.2.5 cmd——命令行1013.2.6 doskey——命令行宏1023.2.7 exit——退出命令行1033.3 显示系统信息1033.3.1 driverquery——查看设备驱动程序1033.3.2 help——帮助1053.3.3 systeminfo——系统信息1053.3.4 ver——系统版本1063.4 系统配置管理1073.4.1 mem——显示内存分配1073.4.2 msiexec——Windows Installer服务1083.4.3 debug——调试1133.4.4 graftabl——启用扩展字符集1193.4.5 mode——系统设置1213.4.6 path——路径1253.4.7 reg——修改注册表子项1253.4.8 regedit——注册表编辑器1323.4.9 regsvr32——将dll文件注册为命令1323.4.10 schtasks——任务计划1323.5 任务管理1453.5.1 shutdown——关闭或重启计算机1453.5.2 start——运行1463.5.3 tapicfg——TAPI应用程序目录分区1473.5.4 taskkill——结束任务进程1493.5.5 tasklist——显示任务进程1513.6 存储的用户名和密码153第4章活动目录管理1554.1 域控制器的管理1554.1.1 adprep——域控制器准备工具1554.1.2 dcpromo——活动目录向导1584.2 活动目录对象的管理1594.2.1 dsquery——查找对象1594.2.2 dsget——显示对象1734.2.3 dsadd——添加对象1864.2.4 dsmod——修改对象1934.2.5 dsmove——移动对象2034.3 组策略的管理2044.3.1 gpresult——查看组策略2044.3.2 gpupdate——刷新组策略2064.3.3 ntdsutil——活动目录管理工具207第5章网络管理2105.1 网络测试工具2105.1.1 ping——IP连接测试2105.1.2 ipconfig——IP配置信息2135.1.3 arp——地址解析2155.1.4 route——路由2165.1.5 netstat——网络统计信息2175.2 网络登录与管理2195.2.1 hostname——主机名2195.2.2 rasdial——自动建立连接2205.2.3 telnet——远程管理2215.2.4 tlntadmn——远程管理Telnet Server 2225.2.5 tracerpt——设置跟踪程序2245.2.6 tracert——路由追踪2255.2.7 tftp——日常文件传输协议226 5.2.8 getmac——查看网卡MAC地址2275.2.9 nbtstat——NetBIOS统计数据2285.3 网络配置命令2305.3.1 set address——配置IP地址2305.3.2 add address——添加IP地址231 5.3.3 delete address——删除IP地址2325.3.4 show address——查看IP地址232 5.3.5 add dnsserver——添加DNS服务器2335.3.6 delete dnsserver——删除DNS 2345.3.7 show dnsserver——查看DNS 2345.3.8 set winsserver——设置WINS 2345.3.9 add winsserver——添加WINS 235 5.3.10 delete winsserver——删除WINS 2355.3.11 show winsserver——查看WINS 2355.3.12 show icmpstats——查看ICMP 2365.3.13 show interface——查看网络接口统计2365.3.14 show ipaddress——查看IP地址信息2375.3.15 show ipnettomedia——查看ARP缓存2385.3.16 show ipstats——查看IP统计2385.3.17 show joins——查看加入的IP多播组2385.3.18 show tcpconn——查看TCP连接信息2395.3.19 show tcpstats——显示TCP统计2395.3.20 show udpconn——查看UDP端口信息2405.3.21 show udpstats——显示UDP统计2405.3.22 show config——显示网络接口配置2415.3.23 show offload——查看任务2415.3.24 delete arpcache——删除ARP缓存2415.3.25 从命令提示符运行netsh命令2415.3.26 从netsh.exe命令提示符运行netsh 243第6章网络服务管理2496.1 网络服务2496.1.1 mmc——管理控制台2496.1.2 net——网络服务管理2506.1.3 runas——作为其他用户运行2726.1.4 sc——服务控制2746.1.5 waitfor——同步计算机2876.2 DHCP服务2886.2.1 netsh dhcp 2886.2.2 netsh dhcp server——配置DHCP服务290 6.2.3 netsh dhcp server scope——配置DHCP作用域301 6.2.4 netsh dhcp server mscope——DHCP多播域3056.3 DNS服务——nslookup 3056.4 文件服务3086.4.1 cacls——设置ACL 3086.4.2 openfiles——打开共享文件3106.4.3 pushd——存储当前目录3136.4.4 takeown——成为文件所有者3146.5 证书服务——Certre9 3156.6 终端服务3186.6.1 change——终端服务更改3186.6.2 cmstp——“连接管理器”服务配置3196.6.3 finger——查看登录用户信息3206.6.4 query——终端服务查询3206.6.5 reset session——重置会话323第7章系统诊断3247.1 relog——导出性能日志文件3247.2 typeperf——性能计数器3257.3 unlodctr——删除计数器3267.4 eventcreate——自定义事件3277.5 netsh子命令——netsh诊断命令3287.5.1 connect ieproxy——代理服务器连接3287.5.2 connect iphost——到远程主机的连接3297.5.3 connect mail——到OE服务器的连接3297.5.4 connect news——设置OE新闻服务器TCP/IP连接3297.5.5 dump——创建脚本3297.5.6 gui——启动诊断工具3297.5.7 ping adapter——验证与其他设备的连接3307.5.8 ping dhcp——验证与DHCP服务器的连接3307.5.9 ping dns——验证与DNS服务器的连接3317.5.10 ping gateway——验证与默认网关的连接3317.5.11 ping ip——验证与指定IP的连接3327.5.12 ping iphost——验证与远程或本地主机的连接3327.5.13 ping loopback——验证与环回地址的连接3327.5.14 ping mail——验证与邮件服务器的连接3327.5.15 ping news——验证与OE新闻服务器的连接3337.5.16 ping wins——验证与WINS服务器的连接3337.5.17 show adapter——显示网卡信息3337.5.18 show all——显示所有网络对象3347.5.19 show client——显示所有网络客户3347.5.20 show computer——显示管理接口3357.5.21 show dhcp——显示DHCP服务器3357.5.22 show dns——显示DNS服务器3367.5.23 show gateway——显示默认网关3367.5.24 show ieproxy——显示IE代理服务器3377.5.25 show ip——显示网卡IP地址信息3377.5.26 show mail——显示邮件服务器3387.5.27 show modem——显示调制解调器信息3387.5.28 show news——显示新闻服务器的配置信息3397.5.29 show os——显示操作系统信息3397.5.30 show test——显示对象的连接3397.5.31 show version——显示操作系统版本3407.5.32 show wins——查看WINS服务器3407.6 eventvwr——Windows 事件查看器3417.7 wevtutil——管理Windows事件343第8章故障恢复3498.1 bcdedit——配置数据存储编辑器3498.1.1 bcdedit命令简介3498.1.2 应用于存储的bcdedit命令选项3498.1.3 应用于存储项的bcdedit命令选项3518.1.4 应用于项目操作的bcdedit命令选项3558.1.5 控制输出的bcdedit命令选项3578.1.6 控制启动管理器的bcdedit命令选项3608.1.7 控制紧急管理服务的bcdedit命令选项3638.1.8 控制调试的bcdedit命令选项3658.2 系统文件的备份与恢复3688.2.1 安装备份工具3688.2.2 备份系统状态3698.2.3 恢复系统状态3708.3 pathping——显示丢失信息3718.4 recover——数据恢复3738.5 efc——扫描受保护的系统文件374第9章系统安全3769.1 Internet协议安全3769.1.1 add filter——添加筛选器到指定的筛选器列表3769.1.2 add filteraction——创建具有安全措施的筛选器操作3789.1.3 add filterlist——创建指定名称的空筛选器列表3799.1.4 add policy——创建IPSec策略3799.1.5 add rule——创建规则3809.1.6 delete all——删除所有IPSec策略、筛选器列表和筛选器操作3829.1.7 delete filter——删除筛选器3829.1.8 delete filteraction——删除筛选器操作3839.1.9 delete filterlist——删除筛选器列表3839.1.10 delete policy——删除IPSec 策略及所有关联规则3839.1.11 delete rule——删除规则3849.1.12 exportpolicy——导出IPSec策略信息3849.1.13 importpolicy——导入IPSec策略信息3859.1.14 set defaultrule——修改策略的默认响应规则3859.1.15 set filteraction——修改筛选器操作3869.1.16 set filterlist——修改筛选器列表3879.1.17 set policy——修改IPSec 策略3889.1.18 set store——设置当前IPSec策略的存储位置3899.1.19 set batch——设置批更新模式3899.1.20 set rule——更改规则3909.1.21 show all——显示所有IPSec策略配置信息3919.1.22 show filteraction——显示筛选器操作的配置信息3929.1.23 show filterlist——显示筛选器列表3939.1.24 show policy——显示IPSec 策略配置信息3939.1.25 show gpoassignedpolicy——显示组分配策略的详细信息3949.1.26 show rule——显示规则的详细信息3959.1.27 show store——显示当前策略存储类型3969.1.28 add mmpolicy——将主模式策略添加到SPD 3969.1.29 add qmpolicy——将快速模式策略添加到SPD 3979.1.30 add rule——添加一个规则和相关联的筛选器到SPD 3989.1.31 delete all——从SPD中删除所有策略4009.1.32 delete mmpolicy——SPD中删除主模式策略4009.1.33 delete qmpolicy——从SPD中删除快速模式策略4019.1.34 delete rule——从SPD中删除规则及与其相关联的筛选器4019.1.35 set config——设置IPSEC配置和启动时间行为4029.1.36 set mmpolicy——更改SPD中的主模式策略4049.1.37 set qmpolicy——更改SPD中的快速模式策略4059.1.38 set rule——修改SPD中的规则和相关联的筛选器4069.1.39 show config——显示IPsec配置4079.1.40 show all——显示SPD中所有IPSec策略及筛选器408 9.1.41 show mmfilter——从SPD中显示主模式筛选器详细信息409 9.1.42 show mmpolicy——从SPD中显示主模式策略详细信息4099.1.43 show mmsas——显示SPD中主模式安全关联4109.1.44 show qmfilter——从SPD中显示快速模式筛选器详细信息411 9.1.45 show qmpolicy——从SPD中显示快速模式策略详细信息4129.1.46 show qmsas——从SPD中显示快速模式安全关联4129.1.47 show rule——显示SPD中的规则详细信息4139.1.48 show stats——从SPD 中显示IPsec和IKE统计信息4149.2 ipxroute——IPX路由4149.3 lodctr——性能计数4159.4 logman——管理日志4179.5 secedit——安全配置4229.5.1 secedit /analyze 4229.5.2 secedit /configure 4249.5.3 secedit /export 4259.5.4 secedit /import 4269.5.5 secedit /validate 4279.5.6 secedit /generaterollback 4279.6 组策略管理工具4289.6.1 gpoTool——检查域控制器上组策略对象4289.6.2 gpresult——组策略结果检测工具4319.6.3 gpupdate——组策略刷新工具434第10章批处理和配置文件43610.1 批处理命令43610.1.1 break——检查Crtl+C 43610.1.2 call——调用子批处理43710.1.3 for——执行特定命令43810.1.4 goto——批处理定向44010.1.5 If——批处理条件44010.1.6 echo——回显44210.1.7 rem——注释44310.1.8 pause——暂停44310.1.9 start——运行44410.1.10 choice命令44510.1.11 shift——更改参数的位置44710.2 系统配置文件44810.2.1 buffers——磁盘缓冲区44810.2.2 device——将驱动程序加载到内存44910.2.3 devicehigh——加载驱动程序到高内存区44910.2.4 echoconfig——显示消息44910.2.5 endlocal——本地化操作45010.2.6 set——设置环境变量45010.2.7 setlocal——环境变量的本地化45210.3 管道和重定向45410.3.1 重定向操作符45410.3.2 ——管道操作符45710.3.3 at——制定计划45810.3.4 edit——文本编辑器46110.3.5 more——单屏输出46310.3.6 sort——排序46610.3.7 find——查找46910.4 其他批处理符号47110.4.1 @——隐藏本行内容47110.4.2 ^——前导字符47210.4.3 &——同一行中使用多个不同命令47210.4.4 &&——如果多个命令中的一个失败即中止后续命令47310.4.5 ]sysy[ ]sysy[——允许在字符串中包含空格47310.4.6 ,——代替空格47410.4.7 ;——隔开同一命令的不同目标47510.5 通配符47510.5.1 *——通配符命令47510.5.2 ?——通配符命令476。
windows操作系统命令提示符参考

Windows操作系统命令提示符参考winver检查Windows版本dxdiag检查DirectX信息Sndvol32音量控制程序sfc.exe系统文件检查器gpedit.msc 组策略regedit.exe 注册表Msconfig.exe 系统配置实用程序cmd.exe CMD命令提示符chkdsk.exe Chkdsk磁盘检查mem.exe显示内存使用情况services.msc 服务lusrmgr.msc 本地账户管理drwtsn32 系统医生cleanmgr 整理iexpress 木马捆绑工具,系统自带mmc 控制台dcpromo 活动目录安装ntbackup 系统备份和还原rononce -p 15秒关机taskmgr 任务管理器conf 启动netmeetingdevmgmt.msc 设备管理器diskmgmt.msc NT的磁盘管理器compmgmt.msc 计算机管理winchat 局域网聊天dvdplay DVD播放器mplayer2 简易widnows media playermspaint 画图板nslookup 网络管理的工具syskey 系统加密,一旦加密就不能解开,保护windows xp系统的双重密码wupdmgr WIDNOWS UPDATEClipbrd 剪贴板查看器Odbcad32 ODBC数据源管理器Nslookup IP地址侦测器ASSOC 显示或修改文件扩展名关联。
AT 计划在计算机上运行的命令和程序。
ATTRIB 显示或更改文件属性。
BREAK 设置或清除扩展式 CTRL+C 检查。
CACLS 显示或修改文件的访问控制列表(ACLs)。
CALL 从另一个批处理程序调用这一个。
CD 显示当前目录的名称或将其更改。
CHCP 显示或设置活动代码页数。
CHDIR 显示当前目录的名称或将其更改。
CHKDSK 检查磁盘并显示状态报告。
CHKNTFS 显示或修改启动时间磁盘检查。
cmd 调用命令打开另外cmd 数据返回
一、概述在计算机编程和系统管理中,使用命令行工具(cmd)来调用命令是一种非常常见的操作。
通过在cmd中输入特定的命令,可以实现对计算机系统的管理和控制,同时也可以获取相应的数据返回。
本文将探讨如何在cmd中调用命令并获取数据返回的方法。
二、cmd调用命令1. 打开cmd在Windows操作系统中,可以通过按下Win + R键,然后输入“cmd”来打开命令提示符窗口。
2. 输入命令在cmd中,可以输入各种命令来实现不同的功能,比如文件操作、进程管理、网络连接等。
输入“dir”命令可以显示当前目录的文件和文件夹列表;输入“ipconfig”命令可以显示网络配置信息。
3. 调用特定命令在cmd中,可以通过输入特定的命令来实现对计算机系统的控制和管理。
输入“tasklist”命令可以显示当前运行的进程列表,输入“shutdown”命令可以关闭计算机。
三、数据返回1. 命令输出当在cmd中输入命令并执行后,系统会返回相应的结果。
这些结果可以是文本信息、数据表格或者是其他格式的数据。
用户可以通过阅读这些结果来获取相关的信息和数据。
2. 重定向输出在cmd中,用户可以通过重定向输出的方式将命令的结果保存到文件中,或者通过管道的方式将结果传递给其他命令进行进一步处理。
可以使用“>”符号将结果保存到文件中,使用“|”符号将结果传递给其他命令。
3. 错误输出在执行命令时,有时也会出现错误信息。
这些错误信息可以帮助用户排查问题并进行故障排除。
在cmd中,错误信息通常会以红色文字显示,用户需要仔细阅读并进行处理。
四、如何处理数据返回1. 读取输出用户可以通过阅读命令的输出来获取相应的信息。
如果命令返回的是文本信息,用户可以直接阅读;如果返回的是数据表格,用户可以将其转化为可读的格式进行查看。
2. 存储输出如果用户需要将命令返回的结果保存下来,可以通过重定向输出的方式将结果保存到文本文件中,以便以后查看和分析。
3. 处理错误信息当命令返回错误信息时,用户需要仔细阅读错误信息并进行相应的处理。
cmd的返回值
cmd的返回值当我们在Windows操作系统中使用命令提示符(CMD)时,每次运行命令后,CMD会返回一个相应的返回值。
这个返回值可以用来判断命令执行的结果,以及在批处理脚本中实现条件判断和控制流程。
以下是一些常见的CMD返回值及其相关参考内容:1. 返回值为0当命令成功执行完成时,返回值通常为0。
这是最常见的返回值,表示命令执行成功。
例如,当我们使用dir命令查看目录内容时,如果目录存在且可访问,CMD会返回0。
参考内容:- 《Windows CMD命令行学习笔记》- 第2章:基本命令(目录)- 返回值为0的含义。
2. 返回值为非零整数当命令执行出现错误或异常时,CMD会返回一个非零整数。
不同的错误或异常会对应不同的返回值,可以通过返回值来判断错误类型,进行相应的处理。
例如,当我们使用type命令查看一个不存在的文件内容时,CMD会返回1。
参考内容:- 《Windows CMD命令行学习笔记》- 第2章:基本命令(文件)- 返回值为非零整数的含义。
3. 返回值为特定错误代码有一些特定的错误会有固定的错误代码返回。
例如,当我们使用xcopy命令复制文件时,如果源文件不存在,CMD会返回4。
这样,我们可以根据返回值来处理不同的错误情况。
参考内容:- 《Windows CMD命令行学习笔记》- 第3章:文件和目录操作- xcopy命令的返回值和错误代码。
4. 返回值为其他信息有些命令会返回其他信息,而不是简单的成功或失败的标志。
例如,当我们使用findstr命令搜索文本文件时,返回值为1表示找到匹配的内容,返回值为0表示未找到匹配的内容。
参考内容:- 《Windows CMD命令行学习笔记》- 第4章:文本处理- findstr命令的返回值和详细用法。
需要注意的是,以上的返回值仅为一般情况下的参考内容,不同的操作系统版本、命令版本和配置可能会有所差异。
因此,在实际使用过程中,建议查阅相关的官方文档或命令帮助文档来获取更准确的返回值信息。
退出文件夹的指令
退出文件夹的指令全文共四篇示例,供读者参考第一篇示例:在日常使用电脑或手机时,我们经常需要进入或退出文件夹来查看或管理文件。
退出文件夹是一个常见而简单的操作,但有时候可能会让一些用户感到困惑。
今天我们就来详细讨论一下退出文件夹的指令及操作方法。
我们需要明确一点,退出文件夹其实是一个非常简单的操作,只需要按下一个或几个特定的按键即可完成。
在Windows操作系统下,最常用的退出文件夹的指令就是使用“Alt + 上箭头”或“Alt + 左箭头”键。
当你在文件夹中浏览文件时,只需要按下这两个组合键中的任意一个,就可以快速退出当前文件夹返回到上一级目录。
通过这个简单的操作,你可以迅速地在不同的文件夹之间切换,提高工作效率。
除了使用键盘组合键外,你还可以通过鼠标右键单击来退出文件夹。
在文件夹中点击鼠标右键,会弹出一个菜单,在菜单中选择“返回”或“上一级”,就可以退出当前文件夹。
这种方法也非常简单直观,适合那些不太习惯使用键盘的用户。
在Mac操作系统下,退出文件夹的指令是使用“Command + 上箭头”或“Command + 左箭头”键。
这和Windows下的按键组合略有不同,但原理是相同的,都是操作系统为了方便用户在文件夹之间快速切换而设计的快捷键。
需要特别指出的是,退出文件夹并不会关闭文件夹窗口,只是让你返回到文件夹的上一级目录。
如果你想完全关闭文件夹窗口,可以使用“Alt + F4”或“Command + W”键,这个指令会直接关闭当前窗口,并退出文件夹中的浏览状态。
除了上述的快捷操作外,有些文件管理软件还提供了特定的退出文件夹功能按钮。
比如在Windows资源管理器中,会有一个“返回上一层”或“返回上级目录”的按钮,点击这个按钮就可以退出文件夹。
这样的设计为那些不太了解快捷键操作的用户提供了更直观的操作方式。
退出文件夹是一个非常简单的操作,只需要掌握一些基本的按键组合或操作步骤就可以轻松完成。
通过这样的操作,你可以更高效地管理文件和文件夹,提高工作效率。
windows下命令行方式配置IP
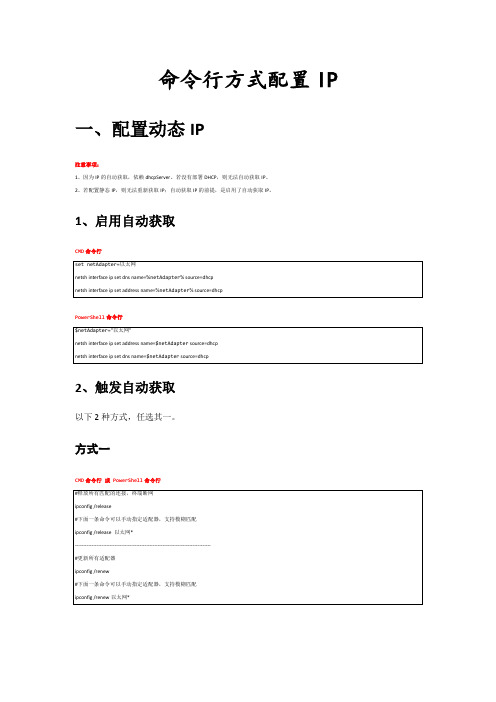
ipconfig /renew
#下面一条命令可以手动指定适配器,支持模糊匹配
ipconfig /renew以太网*
方式二
PowerShell命令行
#重启网卡方式,使其重新获取IP
If(Get-Command Get-NetAdapter -ErrorAction SilentlyContinue){
命令行方式配置IP
一、配置动态
注意事项:
1、因为IP的自动获取,依赖dhcpServer。若没有部署DHCP,则无法自动获取IP。
2、若配置静态IP,则无法重新获取IP;自动获取IP的前提,是启用了自动获取IP。
1
CMD命令行
set netAdapter=以太网
netsh interface ip set dns name=%netAdapter% source=dhcp
netsh interface ip set address name=%netAdapter% source=dhcp
PowerShell命令行
$netAdapter="以太网"
netsh interface ip set address name=$netAdaptersource=dhcp
netsh interface ip set dns name=$netAdaptersource=dhcp
Get-NetAdapter|?{$_.status -eq "up" -and (!$_.name.contains("VMware"))}|Restart-NetAdapter
}Else{
Get-WmiObject Win32_NetworkAdapter|?{$_.NetEnabled -eq $true -And (!$_.serviceName.contains("VMnetAdapter"))}|%{$_.disable();$_.enable()}
如何在命令行脚本中启动带参数的Windows服务
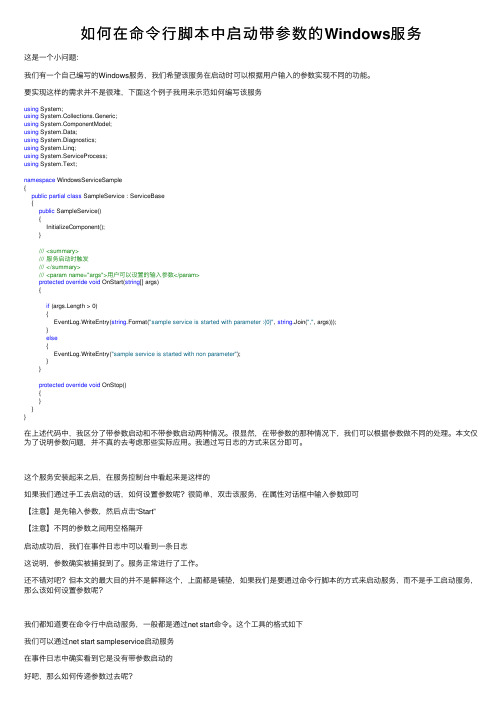
如何在命令⾏脚本中启动带参数的Windows服务这是⼀个⼩问题:我们有⼀个⾃⼰编写的Windows服务,我们希望该服务在启动时可以根据⽤户输⼊的参数实现不同的功能。
要实现这样的需求并不是很难,下⾯这个例⼦我⽤来⽰范如何编写该服务using System;using System.Collections.Generic;using ponentModel;using System.Data;using System.Diagnostics;using System.Linq;using System.ServiceProcess;using System.Text;namespace WindowsServiceSample{public partial class SampleService : ServiceBase{public SampleService(){InitializeComponent();}/// <summary>/// 服务启动时触发/// </summary>/// <param name="args">⽤户可以设置的输⼊参数</param>protected override void OnStart(string[] args){if (args.Length > 0){EventLog.WriteEntry(string.Format("sample service is started with parameter :{0}", string.Join(",", args)));}else{EventLog.WriteEntry("sample service is started with non parameter");}}protected override void OnStop(){}}}在上述代码中,我区分了带参数启动和不带参数启动两种情况。
windows下cmd命令行显示UTF8字符设置(CHCP命令)
windows下cmd命令⾏显⽰UTF8字符设置(CHCP命令)
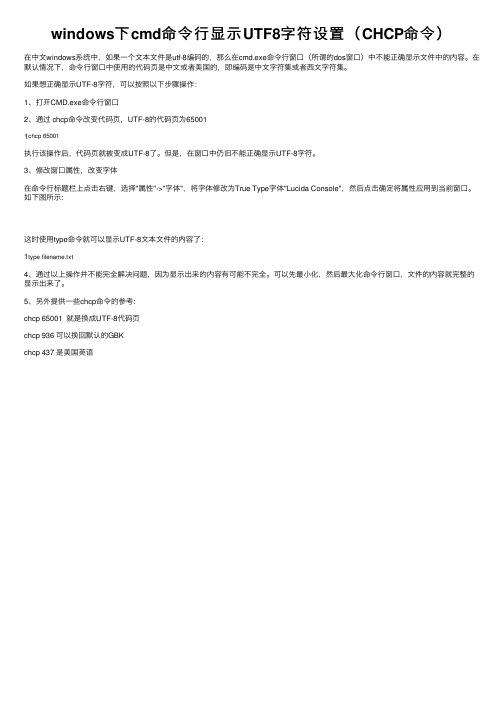
在中⽂windows系统中,如果⼀个⽂本⽂件是utf-8编码的,那么在cmd.exe命令⾏窗⼝(所谓的dos窗⼝)中不能正确显⽰⽂件中的内容。
在默认情况下,命令⾏窗⼝中使⽤的代码页是中⽂或者美国的,即编码是中⽂字符集或者西⽂字符集。
如果想正确显⽰UTF-8字符,可以按照以下步骤操作:
1、打开CMD.exe命令⾏窗⼝
2、通过 chcp命令改变代码页,UTF-8的代码页为65001
1chcp 65001
执⾏该操作后,代码页就被变成UTF-8了。
但是,在窗⼝中仍旧不能正确显⽰UTF-8字符。
3、修改窗⼝属性,改变字体
在命令⾏标题栏上点击右键,选择"属性"->"字体",将字体修改为True Type字体"Lucida Console",然后点击确定将属性应⽤到当前窗⼝。
如下图所⽰:
这时使⽤type命令就可以显⽰UTF-8⽂本⽂件的内容了:
1type filename.txt
4、通过以上操作并不能完全解决问题,因为显⽰出来的内容有可能不完全。
可以先最⼩化,然后最⼤化命令⾏窗⼝,⽂件的内容就完整的显⽰出来了。
5、另外提供⼀些chcp命令的参考:
chcp 65001 就是换成UTF-8代码页
chcp 936 可以换回默认的GBK
chcp 437 是美国英语。
在windows命令行批量ping局域网内IP
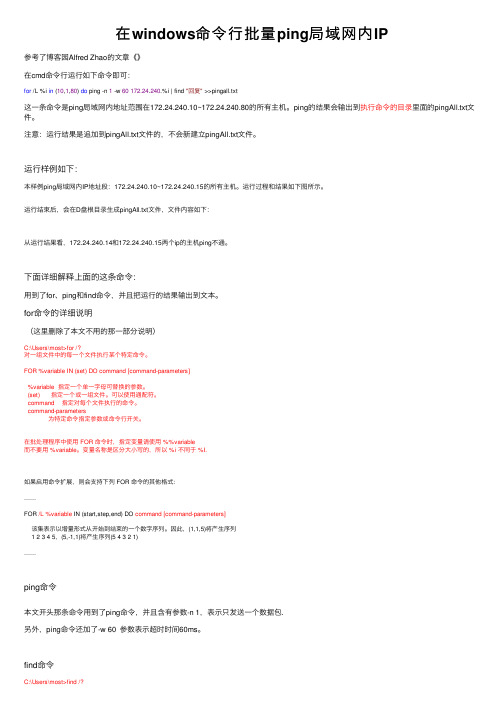
在windows命令⾏批量ping局域⽹内IP参考了博客园Alfred Zhao的⽂章《》在cmd命令⾏运⾏如下命令即可:for /L %i in (10,1,80) do ping -n 1 -w 60172.24.240.%i | find "回复" >>pingall.txt这⼀条命令是ping局域⽹内地址范围在172.24.240.10~172.24.240.80的所有主机。
ping的结果会输出到执⾏命令的⽬录⾥⾯的pingAll.txt⽂件。
注意:运⾏结果是追加到pingAll.txt⽂件的,不会新建⽴pingAll.txt⽂件。
运⾏样例如下:本样例ping局域⽹内IP地址段:172.24.240.10~172.24.240.15的所有主机。
运⾏过程和结果如下图所⽰。
运⾏结束后,会在D盘根⽬录⽣成pingAll.txt⽂件,⽂件内容如下:从运⾏结果看,172.24.240.14和172.24.240.15两个ip的主机ping不通。
下⾯详细解释上⾯的这条命令:⽤到了for、ping和find命令,并且把运⾏的结果输出到⽂本。
for命令的详细说明(这⾥删除了本⽂不⽤的那⼀部分说明)C:\Users\most>for /?对⼀组⽂件中的每⼀个⽂件执⾏某个特定命令。
FOR %variable IN (set) DO command [command-parameters]%variable 指定⼀个单⼀字母可替换的参数。
(set) 指定⼀个或⼀组⽂件。
可以使⽤通配符。
command 指定对每个⽂件执⾏的命令。
command-parameters为特定命令指定参数或命令⾏开关。
在批处理程序中使⽤ FOR 命令时,指定变量请使⽤ %%variable⽽不要⽤ %variable。
变量名称是区分⼤⼩写的,所以 %i 不同于 %I.如果启⽤命令扩展,则会⽀持下列 FOR 命令的其他格式:……FOR /L %variable IN (start,step,end) DO command [command-parameters]该集表⽰以增量形式从开始到结束的⼀个数字序列。
- 1、下载文档前请自行甄别文档内容的完整性,平台不提供额外的编辑、内容补充、找答案等附加服务。
- 2、"仅部分预览"的文档,不可在线预览部分如存在完整性等问题,可反馈申请退款(可完整预览的文档不适用该条件!)。
- 3、如文档侵犯您的权益,请联系客服反馈,我们会尽快为您处理(人工客服工作时间:9:00-18:30)。
c:\dos\defrag
goto end
:mem
mem
goto end
:end
echo good bye
此文件运行后,将显示 defrag,mem,end[D,M,E]? 用户可选择d m e ,然后if语句将作出判断,d表示执行标号为defrag的程序段,m表示执行标号为mem的程序段,e表示执行标号为end的程序段,每个程序段最后都以goto end将程序跳到end标号处,然后程序将显示good bye,文件结束。
会分析 myfile.txt 中的每一行,忽略以分号打头的那些行,将
每行中的第二个和第三个符号传递给 for 程序体;用逗号和/或
FOR /F ["options"] %variable IN (command) DO command
filenameset 为一个或多个文件名。继续到 filenameset 中的
下一个文件之前,每份文件都已被打开、读取并经过处理。
处理包括读取文件,将其分成一行行的文字,然后将每行
2.@ 命令
表示不显示@后面的命令,在入侵过程中(例如使用批处理来格式化敌人的硬盘)自然不能让对方看到你使用的命令啦。
Sample:@echo off
@echo Now initializing the program,please wait a minite...
@format X: /q/u/autoset (format 这个命令是不可以使用/y这个参数的,可喜的是微软留了个autoset这个参数给我们,效果和/y是一样的。)
6.Call 命令
从一个批处理程序调用另一个批处理程序,并且不终止父批处理程序。call 命令接受用作调用目标的标签。如果在脚本或批处理文件外使用 Call,它将不会在命令行起作用。
语法
call [[Drive:][Path] FileName [BatchParameters]] [:label [arguments]]
批处理文件是无格式的文本文件,它包含一条或多条命令。它的文件扩展名为 .bat 或 .cmd。在命令提示下键入批处理文件的名称,或者双击该批处理文件,系统就会调用Cmd.exe按照该文件中各个命令出现的顺序来逐个运行它们。使用批处理文件(也被称为批处理程序或脚本),可以简化日常或重复性任务。当然我们的这个版本的主要内容是介绍批处理在入侵中一些实际运用,例如我们后面要提到的用批处理文件来给系统打补丁、批量植入后门程序等。下面就开始我们批处理学习之旅吧。
该集表示以增量形式从开始到结束的一个数字序列。
因此,(1,1,5) 将产生序列 1 2 3 4 5,(5,-1,1) 将产生
序列 (5 4 3 2 1)。
FOR /F ["options"] %variable IN (file-set) DO command
FOR /F ["options"] %variable IN ("string") DO command
检查以 [drive:]path 为根的目录树,指向每个目录中的
FOR 语句。如果在 /R 后没有指定目录,则使用当前
目录。如果集仅为一个单点(.)字符,则枚举该目录树。
FOR /L %variable IN (start,step,end) DO command [command-para
Press any key to continue . . .
Sample:
@echo off
:begin
copy a:*.* d:\back
echo Please put a new disk into driver A
pause
goto begin
在这个例子中,驱动器 A 中磁盘上的所有文件均复制到d:\back中。显示的注释提示您将另一张磁盘放入驱动器 A 时,pause 命令会使程序挂起,以便您更换磁盘,然后按任意键继续处理。
FOR /F ["options"] %variable IN (command) DO command
或者,如果有 usebackq 选项:
FOR /F ["options"] %variable IN (file-set) DO command
FOR /F ["options"] %variable IN ("string") DO command
4.Rem 命令
注释命令,在C语言中相当与/*--------*/,它并不会被执行,只是起一个注释的作用,便于别人阅读和你自己日后修改。
Rem Message
Sample:@Rem Here is the description.
5.Pause 命令
运行 Pause 命令时,将显示下面的消息:
参数
[Drive:][Path] FileName
指定要调用的批处理程序的位置和名称。filename 参数必须具有 .bat 或 .cmd 扩展名。
7.start 命令
调用外部程序,所有的DOS命令和命令行程序都可以由start命令来调用。
入侵常用参数:
MIN 开始时窗口最小化
那么额外的变量将在最后一个符号解析之
分配并接受行的保留文本。
usebackq - 指定新语法已在下类情况中使用:
在作为命令执行一个后引号的字符串并且
引号字符为文字字符串命令并允许在 fi
中使用双引号扩起文件名称。
sample1:
FOR /F "eol=; tokens=2,3* delims=, " %i in (myfile.txt) do command
解析成零或更多的符号。然后用已找到的符号字符串变量值
调用 For 循环。以默认方式,/F 通过每个文件的每一行中分开
的第一个空白符号。跳过空白行。您可通过指定可选 "options"
参数替代默认解析操作。这个带引号的字符串包括一个或多个
指定不同解析选项的关键字。这些关键字为:
eol=c - 指一个行注释字符的结尾(就一个)
支持:
FOR /D %variable IN (set) DO command [command-parameters]
如果集中包含通配符,则指定与目录名匹配,而不与文件
名匹配。
FOR /R [[drive:]path] %variable IN (set) DO command [command-
skip=n - 指在文件开始时忽略的行数。
delims=xxx - 指分隔符集。这个替换了空格和跳格键的
默认分隔符集。
tokens=x,y,m-n - 指每行的哪一个符号被传递到每个迭代
的 for 本身。这会导致额外变量名称的
格式为一个范围。通过 nth 符号指定 m
符号字符串中的最后一个字符星号,
SEPARATE 在分开的空间内开始 16 位 Windows 程序
HIGH 在 HIGH 优先级类别开始应用程序
REALTIME 在 REALTIME 优先级类别开始应用程序
WAIT 启动应用程序并等候它结束
parameters 这些为传送到命令/程序的参数
执行的应用程序是 32-位 GUI 应用程序时,CMD.EXE 不等应用程序终止就返回命令提示。如果在命令脚本内执行,该新行为则不会发生。
Sample:
Sample.bat的内容如下:
@echo off
choice /c:dme defrag,mem,end
if errorlevel 3 goto defrag (应先判断数值最高的错误码)
if errorlevel 2 goto mem
if errotlevel 1 goto end
在批处理文件中使用 FOR 命令时,指定变量请使用 %%variable
for {%variable|%%variable} in (set) do command [ CommandLineOptions]
%variable 指定一个单一字母可替换的参数。
(set) 指定一个或一组文件。可以使用通配符。
9.If 命令
if 表示将判断是否符合规定的条件,从而决定执行不同的命令。 有三种格式:
1、if "参数" == "字符串" 待执行的命令
参数如果等于指定的字符串,则条件成立,运行命令,否则运行下一句。(注意是两个等号)
如if "%1"=="a" format a:
if {%1}=={} goto noparms
一.简单批处理内部命令简介
1.Echo 命令
打开回显或关闭请求回显功能,或显示消息。如果没有任何参数,echo 命令将显示当前回显设置。
语法
echo [{on|off}] [message]
Sample:@echo off / echo hello world
在实际应用中我们会把这条命令和重定向符号(也称为管道符号,一般用> >> ^)结合来实现输入一些命令到特定格式的文件中.这将在以后的例子中体现出来。
3.Goto 命令
指定跳转到标签,找到标签后,程序将处理从下一行开始的命令。
语法:goto label (label是参数,指定所要转向的批处理程序中的行。)
Sample:
if {%1}=={} goto noparms
