WS2005软件说明书
WSPS 05在油中水浸测传感器使用说明书

Instruction manualVersion 1.6Serial-no.: .................. Version valid from: 25.11.2015Indexpage 1.SAFETY INFORMATION 3 1.1.Dangers of maloperation (3)1.2.Conventional use (3)2.OPERATION AND INSTALLATION 4 2.1.General informations (4)2.2.Measuring principle (4)2.1.Sensor installation (5)2.2.Evaluating measurements (5)3.MAINTENANCE 63.1.Sensor cleaning (6)4.CALIBRATION 6 4.1.Water saturation (6)4.2.Integrated temperature sensor (6)5.APPENDIX 7 5.1.Technical Data (7)5.2.Dimensions (7)5.3.Pin assignment (8)5.4.Sensor characteristic (8)5.5.Application areas - compatibility (9)5.6.Trouble shooting (9)5.7.Shipment (9)1. Safety information1.1. Dangers of maloperationThe WSPS 05 underwent a safety and acceptance test based on IEC 1010-1/EN 61010 – 1 part 1. Integrated electronic and hydraulic elements serve protection purposes and ensure safe handling if used the conventional way. False operation or abuse, as well asinsensitivity for the device’s limits and safety instructions will result in immediate danger for the following:∙the operator’s health a nd life,∙the WSPS 05 and all systems it is connected to,∙the accuracy of the WSPS 05,∙the environment.This manual includes information and safety instructions, which guarantee safe handlingand support your devices unobjectionable condition.Therefore it is a necessity for all people who operate, install or maintain this device to mind this manual.1.2. Conventional useWith this WSPS 05 you have purchased an effective diagnostic system for the saturationlevel of water in oil. It operates very reliable and meets the requirements of daily use.The set is recommended and tested for the use with:Standard hydraulic oils: HL, HLPTriglyceride: HETGAircraft hydraulics: Mil H 5606Synthetic ester: HEESLubrication oils: CLPLimits:Maximum acceptable pressure at the sensor 25 bar (362,5 psi)Maximum oil temperature 90° C (194° F)Maximum acceptable flow rate at the sensor 2 m/s (6,5 ft/s)The WSPS 05 should always be operated with 12...30 V DC!2. Operation and installation2.1. General informationsWater in hydraulic- and lubricating oil is a fluid contamination, which has to be limitedurgently due to its negative effects on the characteristics of fluids. Among other effects, it does accelerate oil aging, it causes the failure of polarizing additives, it increases the acid number and it worsens filterability. Effects for a hydraulic or lubricating system are verymanifold and cause significantly increased wear, drastically increased risk of failure ofcomponents as well as malfunctions.Important for these effects of water is whether water present in the fluid is free oremulsified, not the total amount of water. Only free water does have the dangerouschemical or biological reactivity. Therefore the detection of the presence of free oremulsified water in a hydraulic or lubricating system is of great importance.2.2. Measuring principleThe WSPS 05 does utilize a capacitive sensor for measurements.It uses polymeric foil as dielectric for interelectrode capacitance.This foil is capable of absorbing water molecules due to its microporous structure.This absorption causes a change in capacity of this element, which is converted into theoutput signal between 4 and 20 mA.Measurements are the water saturation of the fluid in percent, which is direct proportional to the output signal of the sensor. (see also the characteristic of the sensor in chapter 5.4) In addition to that a temperature sensor is integrated to determine the exact temperature of the fluid while measuring.There is a difference to the measurement of the absolute water content with the Karl-Fischer-method. The Karl- Fischer-method determines the total amount of free andemulsified water in mg – water/ kg – oil.The WSPS 05 gives the saturation level of the fluid with water in percent.The indication 100 % means that the fluid is totally saturated.Saturation values depend on the temperature!A relation to the measured saturation values and the stated ppm (mg / kg) value accordingto Karl Fisher’s method is ascertained by the 100 % saturation curve (100% of saturation = f(T)) for the measured fluid and the fluid temperature measured at the same time with the saturation.2.1. Sensor installation∙The WSPS 05 is intended for inline measurements.o Therefore the sensor should be integrated at a circulating, respectively turbulent point of the hydraulic system in order to generate reliable measurements.o Please make sure that maximum limits for flow rate and pressure are not exceeded.o The time to reach balance on the sensor can vary and depends on a number of factors, such as the oil’s viscosity.∙Connect the provided cable to your monitoring and evaluation system. (see also pin assignment in chapter 5.3)∙Connect the sensor cable to the WSPS 05 by using the plug.The sensor is now ready for operation.2.2. Evaluating measurementsGreen range (0...70% saturation)The presence of free water is unlikely. The water solved in the oil is not a threat!Yellow range (70...90% saturation)The presence of free water in small amounts is probable. Additional measurements and actions to reduce the water content are suggested.Red range (90...100% saturation)Water is present in its free form. It is a threat and a potential danger of the hydraulic or lubricating system.Actions to reduce the water content in the fluid are urgently necessary!The calculation to mg/kg (ppm)– water content is only possible with the specificallysaturation characteristic.Saturation characteristics for specific oils are available upon request.3. Maintenance3.1. Sensor cleaningtime to time, especially if the sensor is beingused for different fluids.As cleaning fluid, clean petroleum benzinor even clean Isopropanol can be used.When cleaning the sensor, please removethe protective cap and proceed withextreme caution.4. Calibration4.1. Water saturationUpon delivery of the WSPS 05 is calibrated based on defined salt solutions.It is recommended to carry out an annual examination of the calibration by comparisonwith a hygrometer in air. In case of variations > 5%, the sensor is to be sent to themanufacturer for a new calibration.4.2. Integrated temperature sensorUpon delivery of the WSPS 05 the integrated temperature sensor is calibrated.An annual examination of the calibration at ambient temperature is recommended using a commercially available thermometer. If a new calibration is necessary (variation of the ratedvalue> 10%) the sensor must be sent to the manufacturer.5. Appendix5.1. Technical DataMeasuring range: Saturation level: 0 – 100 %Temperature: - 25...+ 100 °C / - 13 °F...212 °F Accuracy:Saturation level: ± 2 %Temperature: ± 0,4 %Operating pressure:0...25 bar / 0...362,5 psiFlow velocity:≤ 2 m/s / 6,6 ft/sAmbient temperature:- 25...+ 85 °C /- 13 °F...185 °FTemperature range of fluid: - 40...+ 90 °C /- 40 °F...194 °Ftemporary + 100 °C / 212 °FSurvival temperature:90 °C / 194 °FStorage temperature:-40…+100 °C/ -40 °F…212 °FPower supply:12...30 VDCAnalogue outputs: 2 x 4...20 mAProtection class:IP 65Screw thread: G ¾Ohmic resistance:5.2. Dimensions5.3. Pin assignmentWSPS 05 - SensorCable color (Connection cable):1: brown (+ 12...30 V DC )2: white (4...20 mA ) Saturation3: blue (+ 12...30 V DC )4: black (4...20 mA ) Temperature5.4. Sensor characteristic14321234mA+ 12...30 V DC0 V DC1 (3)WSPS 055.5. Application areas - compatibilityApplicable for:∙Hydraulic oils H, HL, HLP, and HV∙Gear oils C, CL, CLP∙Motor oils, Gas oils∙MIL-H-5606 E∙Vegetable oils (HTG, Triglyceride)∙Synthetic ester (HEES)5.6. Trouble shootingNo settings of the WSPS 05 are done by the operator.Malfunctions, which could be eliminated by one, are limited to cleaning the sensor andchecking cables for brakes.Any other case requires sending in the WSPS 05 sensor to Eaton Technology GmbH,Altlussheim branch in order to recover the functions.A brief description of the problem would expedite the trouble shooting and the repair process. To check your warranty or to answer questions by phone we need the serial number and the date of purchase of the instrument.5.7. ShipmentArticle no.:(1) Water sensor WSPS 05 337181(2) Sensor cable, L = 5 m 323961(3) Seal 308536(4) Instruction manual 337461North America — HQ70 Wood Ave., South, 2nd Floor Iselin, NJ 08830Toll Free: (800) 656-3344 (North America Only)Voice: (732) 767-4200ChinaNo. 3, Lane 280, Linhong Road Changning District, 200335 Shanghai, P.R. ChinaVoice: +86-21-5200-0099 Singapore4 Loyang Lane #04-01/02 Singapore 508914Voice: +65-6825-1668Europe/Africa/Middle EastFriedensstraße 41D-68804 Altlussheim, GermanyVoice: +49-6205-2094-0Auf der Heide 253947 Nettersheim, GermanyVoice: +49-2486-809-0An den Nahewiesen 2455450 Langenlonsheim, GermanyVoice: +49 6704 204-0BrazilAv. Julia Gaioli, 474 –Bonsucesso07251-500 – Guarulhos, BrazilVoice: +55 (11) 2465-8822For more information, please e-mail us at************************Visit us online /filtration for a completelist of Eaton´s filtration products.©2012 Eaton Corporation. All Rights Reserved.All trademarks and registered trademarks are the property of their respectiveowners. Litho USA.All information and recommendations appearing in this brochure concerning theuse of products described herein are based on tests believed to be reliable.However, it is the user’s responsibility to determine the suitability for his own useof such products. Since the actual use by others is beyond our control, noguarantee, expressed or implied, is made by Eaton as to the effects of such use orthe results to be obtained. Eaton assumes no liability arising out of the use byothers of such products. Nor is the information herein to be construed asabsolutely complete, since additional information may be necessary or desirablewhen particular or exceptional conditions or circumstances exist or because ofapplicable laws or government regulations.。
系统2005v2简明操作指南A

《中国共产党基本信息管理系统2005(v2.0)》简明操作指南市委工交工委组织人事处编印二○○八年八月目录- 1 -- 2 -§1概述与软件的安装卸载本讲义只简述《中国共产党基本信息管理系统2005(V2.0)》(以下简称v2.0系统)软件操作过程中需要特别注意的一些问题,软件的详细操作使用可以参阅系统提供的帮助文档。
帮助文档可以进入软件任何一个模块后点击菜单栏最右侧的【帮助】→【使用说明】。
对使用中遇到的一些棘手的技术问题,可以登录《系统2005》官方网站的论坛搜索相关贴子,或者列出详细症状发帖进行提问,会有技术人员回复解答。
官方网站网址为: ,点击【中国共产党基本信息管理系统】进入《系统2005》页面,在上方导航栏中点击【交流空间】进入论坛。
§1-1 概述v2.0系统是v1.0系统的升级版本。
v2.0系统总体风格与V1.0系统基本一致,软件由六个模块组成。
这六个模块为:§1-2 安装将v2.0系统安装光盘放入光驱中,在“我的电脑”中直接双击光驱中的“setup.exe ”执行安装程序,根据提示即可完成安装。
§1-3 修补程序安装用光盘安装的v2.0系统存在很多问题,需要进一步安装080328修补工具。
具体安装流程如图2所示。
§1-4 卸载方法1:桌面点击“开始”→“程序”→“中国共产党基本信息管理系统2005(V2.0)”→“卸载(V2.0)”菜单项进行卸载,按提示操作即可。
方法2:在“控制面板”中的“添加或删除程序”中选择“中国共产党基本信息管理系统2005(V2.0)”项,再点击“更改/删除”按钮进行卸载,按提示操作即可。
图1图2- 3 -重要提示: ①卸载前请先备份系统数据;②与v1.0系统不同,V2.0系统单机版卸载时数据库将与程序一起被卸载,无需另外卸载。
§2信息接收、备份与恢复§2-1 信息接收每次进行党内统计工作前,我们会将各单位在上次党内统计时核准通过的数据使用“信息返还”形式下发。
商贸通2005发版说明(doc 22页)

商贸通2005发版说明(doc 22页)[商贸通2005]发版说明目录:一、产品概述 (2)二、应用特征 (2)三、产品主要功能 (3)1、期初建帐 (3)2、编码档案 (3)3、采购业务 (4)(1)采购订货 (4)(2)采购入库 (5)(3)采购发票 (5)4、销售业务 (5)(1)销售报价业务 (6)(2)销售订货 (6)(3)销售发票 (7)5、库存业务 (7)(1)其他入库 (8)(2)其他出库 (8)(3)商品调拨 (8)(4)商品调价 (9)(5)组装拆卸 (9)(6)商品盘点 (10)(7)受托代销业务 (10)(8)委托代销业务 (10)(9)成本计算 (11)6、财务处理 (11)(1)收入业务 (11)(2)支出业务 (11)(3)制单 (12)(4)业务转账 (12)(5)报表查询 (12)四、加密控制 (17)五、系统特点 (18)六、系统配置 (18)七、产品安装说明 (19)八、使用注意事项 (21)一、产品概述“商贸通2005”商贸管理系统是一套小型商贸企业的信息管理系统。
它集采购、销售、调拨、库存各环节的资金流、物流业务管理和财务核算为一体,可广泛适用于商品流通领域中的小型商业、物资供销、服装批发、综合贸易公司等商贸企业,是一套真正的商贸管理软件,帮助企业“管好业务理好财”。
主要特点:易学、易用、稳定高效产品名称及版本号:商贸通2005二、应用特征1、功能完备,适用性强⏹体现:集购、销、调、存业务管理和简单财务核算为一体,全面满足小企业对“物流”和“资金流”的全面管理需要,并通过参数化设计,满足各类企业管理标准及管理项目的不同需求。
⏹实效:能够快速投入应用,发挥实际效用,为用户节约投运时间及相关人力、财力、物力。
2、智能化程度高,易操作⏹体现:采用组件开发技术,信息一次一处输入,可在多处多次使用,毋须重复输入,提供流程导航与操作向导。
⏹实效:系统界面统一美观,操作方法一致,便于用户学习掌握;支持全键盘操作,便于用户使用,即使不怎么懂计算机,照样可以操作自如。
WinCC flexible 2005 使用入门

7
WinCC flexible 使用入门 - 首次使用 使用入门 , 版本 05/2006
2 创建项目
2.2 创建 "OP77B_Mixing" 项目
创建 "OP77B_Mixing" 项目
1. 启动 WinCC flexible:
WinCC flexible 项目向导打开。当创建项目时,项目向导通过指导用户逐步地 完成组态设置来提供支持。项目向导具有各种常需组态的情况。通过选择提供 的情况完成组态设置。
11
WinCC flexible 使用入门 - 首次使用 使用入门 , 版本 05/2006
2 创建项目
7. 然后输入有关项目的信息:
12
WinCC flexible 使用入门 - 首次使用 使用入门 , 版本 05/2006
2.3 新的 "OP77B_Mixing" 项目
项目向导根据指定的信息创建新项目并在 WinCC flexible 中打开它。左侧是一 个树形结构,其中包含了所有可组态的元素:
3
WinCC flexible 使用入门 - 首次使用 使用入门 , 版本 05/2006
1 欢迎
下列组件用于使用入门 - 首次使用手册中的实例:
进行上述组态步骤只需用到组态计算机。 如果要将项目传送给 HMI 设备,则需要 OP 77B 设备或其他 170 系列的 HMI 设备。
VS2005使用说明

利用Visual 开发XSBase270应用程序说明
1、安装Visual ,最好采用全部安装
2、安装XSBase270开发平台的随机提供的SDK
3、打开VS2005(如图1)
图1
4、新建工程(File New->Project如图2),VS2005弹出创建新工程的对话框(图3),对于XSBase270开平台,选中“Smart Device”项(具体模板有基于MFC的MFC Smart Device Application、基于Win32的Win32Smart Device Project等),输入工程路径和工程名,按“OK”按钮
图2
图3
5、按“OK”按钮后,进入应用程序配置向导(如图4),按“next”,进入应用平台选择
图4应用程序配置向导
6、平台选择:选择所需要的SDK(如图5),选好后按“next”,进入应用类型选择
图5平台选择
7、应用程序类型选择:(“Use of MFC”选项最好选用静态库)、一直按“next”
8、最后生成的应用程序
9、通过ActiveSync连好开发板,按运行按钮或F5,程序进行编译并自动下载到目标平台中运行。
VSS2005配置说明文档

VSS2005安装说明(针对北京图信时代局域网配置)软件环境要求:服务器端:Visual.SourceSafe.2005+VSS.2005.LP.2052(VSS2005汉化包)客户端:Visual.SourceSafe.2005.Rar+Visual.Studio.2005(2008)/VS6.0英文企业版等文档适用范围:仅适用于局域网内的协作开发安装客户端和服务器:【注:安装包为ISO格式,请使用ISO软件或者RAR将Visual.SourceSafe.2005.ISO释放到硬盘上,安装即可】1.安装前的准备事项服务器端:(安装时选择第2项Full)因为Internet访问是通过Web Service实现的,所以安装前要先配置安装好IIS。
安装VSS2005可以自动安装.Net Framework2.0客户端:(安装时可选择第一项或者第2项Full)只有Visual Studio2005默认支持VSS的Internet访问,所以客户端还要安装VS200 5。
对于Visual Studio2008用户,需要安装3个补丁,防止出现Bug:|a.vs80-kb93980 8-x86-enu.exe|b.vs80-kb943847-x86-intl(VSS2005与VS2008兼容补丁).exe|c.vs80-k b943847-x86-intl.exe(安装包及其汉化和破解文件均保存于服务器)2.安装VSS2005安装VSS2005一路Next就OK了。
服务器和客户端都要安装。
1、启动Microsoft Visual SourceSafe Administrator2、新建VSS数据库一路Next,OK。
截图如下:工作守则(程序员注意事项):以下列出了各成员必须遵守的规范和规则:1.工作开始初次打开project时必须向服务器请求最新代码.2.当向project添加新项或编辑任何程序代码后,应立即check in project.以便其他成员可操作该project.3.不允许check out整个目录.不允许长时间check out project或solution.并且除非特别必要.不应同时check out过多的项.4.某工作步骤完成后,应Build整个project以检验当前工作.严禁不经过build而check in可能不通过的代码【附:VSS2005之Administrator功能及技巧.Pdf,(存于服务器)可以对VSS2005进行更进一步的配置,是有效的学习材料】。
VSS2005客户端安装使用手册
VSS2005客户端安装安装及配置撰写:温静静目录VSS2005客户端安装安装及配置 (1)1 VSS2005客户端安装 (2)1.1 VSS2005客户端安装步骤 (2)1.2 VSS中文汉化包安装步骤 (7)2 VSS客户端配置 (7)2.1 VSS客户端VS2008的配置 (7)2.2 VSS客户端连接服务器端数据库 (8)2.3 修改VSS客户端初次登录用户的密码 (15)2.3 VSS客户端设置工作目录 (17)2.4 VSS客户端下载文件—获取最新版本 (18)3 VSS客户端使用VS2008打开项目文件 (20)1 VSS2005客户端安装1.1 VSS2005客户端安装步骤第一步:将Visual SourceSafe 2005 安装包解压缩开。
软件下载路径\\server3\Soft\ Microsoft.Visual.SourceSafe.2005.iso 需要用虚拟光驱打开第二步:找到setup.exe 双击运行安装。
第三步:在弹出的界面中将复选框 I accept the terms of the License Agreement 选中,表示同意VSS的用户协议。
第四步:输入正确序列号,默认已经填写好了序列号,所以直接选择Next下一步。
第五步:这一步中需要选择安装特征,其中分为Default(默认)、Full(完整)和Custom(自定义)安装,一般我们选择Default默认安装就行了,在窗体右边选择安装路径,然后点Install(安装)。
注意:客户端安装则选择“Default”;安装文件最好放在D盘中;D:\Program Files\Microsoft Visual SourceSafe:第六步:进入这一步只需要等待,它会自动运行安装,总共需要安装三部分,分别是:.NET Framework 2.0; Document Explorer 2005和 Visual SourceSafe 2005。
VSS2005客户端操作手册
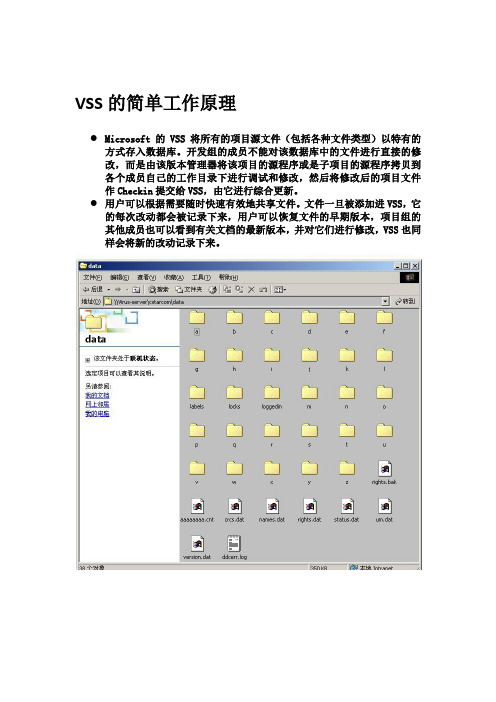
VSS的简单工作原理●Microsoft的VSS 将所有的项目源文件(包括各种文件类型)以特有的方式存入数据库。
开发组的成员不能对该数据库中的文件进行直接的修改,而是由该版本管理器将该项目的源程序或是子项目的源程序拷贝到各个成员自己的工作目录下进行调试和修改,然后将修改后的项目文件作Checkin提交给VSS,由它进行综合更新。
●用户可以根据需要随时快速有效地共享文件。
文件一旦被添加进VSS,它的每次改动都会被记录下来,用户可以恢复文件的早期版本,项目组的其他成员也可以看到有关文档的最新版本,并对它们进行修改,VSS也同样会将新的改动记录下来。
客户端基本操作●1、创建项目●2、添加文件/文件夹●3、签入/签出,撤销签出,查看文件●4、创建工作目录●5、修改/编辑文件●6、移动文件/文件夹●7、共享文件/文件夹●8、拆分文件●9、删除/恢复文件●10、给文件打标签(lable)●11、获取历史版本●12、获取最新版本●13 、修改密码●14、打开、关闭数据库客户端基本操作1●创建项目(File->Create Project)a.选中要创建新文件夹的项目(上级文件夹)b.在file菜单中选中creat project;c.写入要添加的文件夹的名称,同时也可以在comment栏中为新建的文件夹添加备注;d.点击OK。
客户端基本操作2●添加文件1.add命令添加文件a.选中你要添加文件的文件夹;b.在fil菜单中选中add files;c.在文件列表中选中要添加的文件;如果要添加多个文件,可以使用CTRL键或SHIFT键,同时选中多个文件;d.点击add,同时可以在comment栏为你添加的文件夹做一个简单备注;e.点击OK。
●添加文件夹a.选中你要添加文件夹的项目(上级文件夹);b.在file菜单中选中add files;c.在文件夹列表中选中要添加的文件夹;d.点击add,同时可以在comment栏为你添加的文件夹做一个简单备注;e.如果你要连同子文件夹一起添加,选择Recursive;f.点击OK。
vs2005-WM简体中文版指南
Window Mobile SmartPhone智能手机软件开发vs2005 简体中文版设置指南!上次更新了英文版本vs2005的抓图,因为还是很多朋友加我qq咨询问题,我还是有必要简单介绍一下vs2005下面的开发环境指南。
其实vs 2005简体中文版更加简单了!大家基本不用做任何设置!!!当然你还要安装mi crosoft activesync 4.1 简体中文版本。
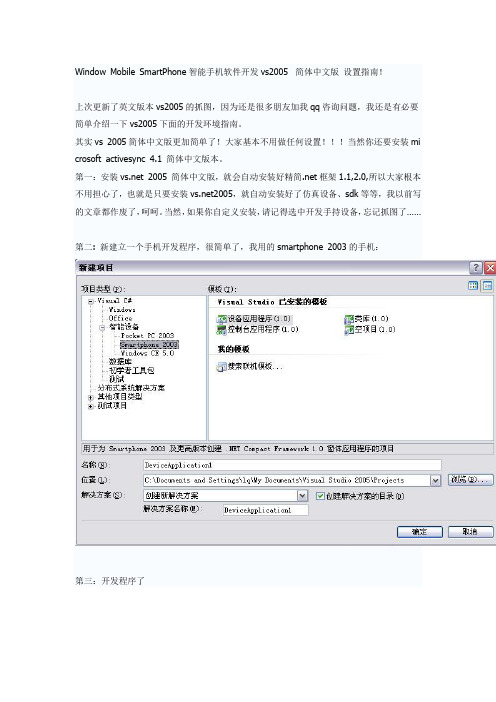
第一:安装 2005 简体中文版,就会自动安装好精简.net框架1.1,2.0,所以大家根本不用担心了,也就是只要安装2005,就自动安装好了仿真设备、sdk等等,我以前写的文章都作废了,呵呵。
当然,如果你自定义安装,请记得选中开发手持设备,忘记抓图了……第二: 新建立一个手机开发程序,很简单了,我用的smartphone 2003的手机:第三:开发程序了第四,运行就可以了,系统自动调用虚拟机,微软统一名词叫仿真器了。
第五:和同步工具连接,这样你的仿真器就完全和一个真的手机一样了第六:和同步程序连接微软也统一名词了,叫插入底座,奇怪的名字。
然后你就可以通过同步程序访问你的仿真手机了!!!装游戏都可以。
呵呵可以往手机上的程序也可以装到仿真机器上,比如进程管理阿,文件管理阿,呵呵比如安装一个保龄球游戏?微软作模拟器还是不错最后就是仿真手机上网,当然走网卡,以前我在英文版本介绍过。
仿真模拟机里面设置网络连接网卡这里和原来一样,你还是要安装vpc的驱动。
/mobility/windowsmobile/howto/windowsmobile5/install/defau lt.aspx#virtpcnetdrvr或直接从这里下载:/downloads/details.aspx?FamilyID=dc8332d6-565f-4a57-be8c-1d4718d3af65&displaylang=en微软收购vpc后一直在折腾,不知道什么时候定型哦,不过我也没有追踪这个项目这个虚拟网卡驱动也就类似vmware的虚拟网卡,微软推出也是非常着急,300多k的一个小软件:Virtual Machine Network Driver for Microsoft Device Emulator安装好了,你的网卡协议多了一个服务。
VSS2005使用手册(中文版)

VSS使用手册1. 安装客户端:首先我们在我们自己的机器上装好SourceSafe的客户端。
2. 设置用户名、密码和数据库路径:安装完客户端后,打开SourceSafe会提示输入:用户名、SourceSafe密码、数据库路径等信息3. 登录后,会出现4. 设置存放路径:点击你要下载的路径右击,选择“设置工作目录”5. 下载文件:选择完要存放的目录后,选择要下载的文件,右击选择“获取最新版本”6. 添加文件(签入文件):在VS2008里面新增你所在新增的文件(VssText.txt),右击“签入”,同进也将工程文件(XXX.csproj)一起签入,也可以选中“XXX”右击,选择“查看挂起的签入”可以看到你所有签出未签入的文件列表,然后将您要签入的文件选中后,点击“签入”就可以了7. 删除文件:选择所以删除的文件,右击选择“删除”,在删除的过程中会有相关提示,根据自己的需要选择,最后将工文件程“XXX.csproj”签入即可。
8. 签出文件(和查看文件“签出者”):设置签出时是否提示(如下图:)菜单路径:“工具->选项”,选择您要签出的文件右击“签出以进行编辑”;如果想回到原来的版本(撤消操作),右击“撤消签出”即可;如果在签出的时候有提示:“签出期间发生错误或用户取消。
某些文件可能尚未签出。
(文件被其他用户以独占方式签出)”时,则表示此文件已经被其他人签出,可以在工具栏右击选择“源代码管理”,选择“SourceSafe 属性”,在签出状态Tab 页,可以看到“签出者”9. 查看历史记录和查看版本之间的差异:选中您要查看的文件,右击“查看历史记录”,可看到这个文件的历史记录列表;查看版本之间的差异:按住“Ctrl”键,选中要对比的两个版本,点击“差异”,就可以看到两个版本差异的数据,。
VSS2005 日常使用说明

VSS2005 日常使用说明(一)1 VSS 概述版本控制是工作组软件开发中的重要方面,它能防止意外的文件丢失、允许反追踪到早期版本、并能对版本进行分支、合并和管理。
在软件开发和您需要比较两种版本的文件或找回早期版本的文件时,源代码的控制是非常有用的。
Visual SourceSafe 是一种源代码控制系统,它提供了完善的版本和配置管理功能,以及安全保护和跟踪检查功能。
VSS 通过将有关项目文档(包括文本文件、图象文件、二进制文件、声音文件、视屏文件)存入数据库进行项目研发管理工作。
用户可以根据需要随时快速有效地共享文件。
文件一旦被添加进VSS ,它的每次改动都会被记录下来,用户可以恢复文件的早期版本,项目组的其他成员也可以看到有关文档的最新版本,并对它们进行修改,VSS 也同样会将新的改动记录下来。
你还会发现,用VSS 来组织管理项目, 使得项目组间的沟通与合作更简易而且直观。
VSS 可以同 Visual Basic 、Visual C++ 、Visual J++ 、Visual InterDev 、Visual FoxPro 开发环境以及 Microsoft Office 应用程序集成在一起,提供了方便易用、面向项目的版本控制功能。
Visual SourceSafe 可以处理由各种开发语言、创作工具或应用程序所创建的任何文件类型。
在提倡文件再使用的今天,用户可以同时在文件和项目级进行工作。
Visual SourceSafe 面向项目的特性能更有效地管理工作组应用程序开发工作中的日常任务。
1 .1 VSS 中的文件当你要修改某个文档时,需要先从数据库中将它签出(check out ),或者告诉VSS 你要编辑该文档。
VSS 会将该文档的副本从数据库中拿到你的工作文件夹(working folder) 中,你就可以修改你的文档了。
如果其他用户再想对同一文档进行修改,VSS 会产生一个信息,告诉他,该文档已被签出(check out ),从而避免多人同时修改文档,以保证文档的安全性。
VSS2005安装教程和使用教程

VSS配置安装教程一、Vss安装第一步:将Visual SourceSafe2005安装包解压。
第二步:找到setup.exe双击运行。
第三步:在弹出的界面复选框中选中I accept the terms of the License Agreement,表示同意VSS的用户协议。
此处序列号已经默认填写好,直接点击Next即可。
第四步:选择安装特征,其中分为Default(默认)、Full(完整)和Custom(自定义)安装,一般我们选择Default默认安装即可。
在窗口右边点击Browse选择安装路径,然后点击Install。
第五步:这一步程序会自动运行安装,只需要等待。
第六步:然后出现下图所示,安装成功,选Finish完成安装。
二、服务器端配置(Vss2005)VSS administrator是一个服务器端的工具,用于管理VSS数据库、用户、组织属性、权限等。
1、创建DataBase步骤第一步:在Visual SourceSafe安装目录下,选择ssadmin运行服务器端并登陆,如下图。
第二步:在创建路径前,先你的电脑的盘下新建一个文件夹(database),并把文件夹设置为共享,而且必须将权限设成允许更改和读取,共享时设置为“everyone”并“添加”。
可以设置为“完全控制”看看。
第三步:选择File→New Databae,创建VSS数据库database,直接点击“下一步”。
第四步:点击Browse找到刚刚新建的文件夹database,点击“下一步”,如下图。
第五步:这一步是更改数据连接名,一般保持默认的文件夹名就好,直接点击“下一步”。
第六步:点击完成OK。
2、新建用户第一步:点击Tools→options,给用户登陆服务器数据库database权限和分配权限。
给用户配置权限时,最好开始只分配“Read”权限。
第二步:下面开始新建客户端的用户:选择Users下面的Add User,输入用户名和密码(密码可以设置为空),点击“OK”,添加用户成功。
VSS2005使用手册(中文版)

VSS2005使用手册(中文版) VSS2005使用手册(中文版)目录1:引言1.1 背景1.2 目的1.3 读者对象1.4 注意事项2:安装与配置2.1 硬件要求2.2 软件要求2.3 安装步骤2.4 配置项目库2.5 配置用户权限3:创建项目库3.1 新建项目库3.2 设定项目库权限 3.3 添加用户到项目库 3.4 设置项目库选项4:创建项目4.1 新建项目4.2 添加项目成员4.3 设定项目权限4.4 设置项目选项5:文件操作5.1 检出与检入文件 5.2 添加文件到项目库 5.3 删除文件5.4 文件比较与合并 5.5 文件历史记录6:分支与合并6.1 创建分支6.2 合并分支7:代码审查7.1 创建审查工作项 7.2 分配审查任务7.3 审查结果处理7.4 完成审查8:追踪与报告8.1 缺陷跟踪8.2 统计报告9:系统维护9.1 备份与恢复9.2 数据库维护9.3 网络配置9.4 安全性设置10:常见问题解答10:1 安装与配置问题 10:2 文件操作问题 10:3 分支与合并问题10:4 代码审查问题10:5 追踪与报告问题10:6 系统维护问题11:附件11.1 VSS2005安装文件11.2 项目库配置文件11.3 示例代码库附录:法律名词及注释- 修订:对法律文件或文件的文字改动。
- 著作权:对特定作品享有的法律对其使用和分发的限制。
- 商标:为特定商品或服务而设立的法律,以保护其在市场上的独特性。
- 版权:为特定作品而设立的法律,以保护其创作者对作品所享有的权益。
- 执照:特定活动或权利的法律许可证。
- 公司法:司法用于维护公司治理和规范公司活动的法律体系。
- 合同法:约束双方履行其在合同中所承诺行为的法律。
全文结束\。
Sqlserver版WS2005说明书
Sqlserver版WS2005说明书SQL是英文StructuredQueryLanguage的缩写,意思为结构化查询语言。
SQL语言的主要功能就是同各种数据库建立联系,进行沟通。
按照ANSI(美国国家标准协会)的规定,SQL被作为关系型数据库管理系统的标准语言。
SQL语句可以用来执行各种各样的操作,例如更新数据库中的数据,从数据库中提取数据等。
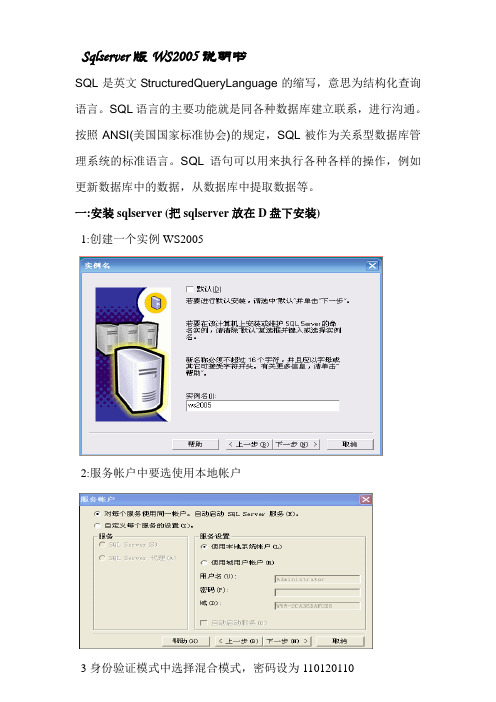
一:安装sqlserver (把sqlserver放在D盘下安装)1:创建一个实例WS20052:服务帐户中要选使用本地帐户3身份验证模式中选择混合模式,密码设为110120110B:启动服务管理器C:进入子站sqlserver “企业管理器”在“安全性”下新建一个登陆WS2005密码是110120110(名称是WS2005, 身份验证选择|sqlserver身份验证密码是110120110, 服务器角色选择前两项)D:运行DOS命令D:\ws2005\ws2005server –installE附加数据库进入sqlserver “企业管理器”附加数据库,首先附加 ws2005下user文件下的两个mdf文件WS2005_Equipment_Type.mdf WS2005_Equipment_Type.mdf接着附加Data下的数据库Ws2005_Cg2004_1.mdf ,Ws2005_Cg2004_2.mdfWs2005_Cg2004_3.mdf ……………F: 启动服务右键单击“我的电脑”选择“管理”----服务和程序管理------服务------ws2005微机防误与操作票专家系统轮询模块启动此服务(完成此些内容的操作,单机版的WS2005就可以使用了) 二:联网A: 先安装SQL2KSP4(sqlserver 补丁,主要作用是优化网络环境)1 首先要检查一下网线是否联好2 选择”网上邻居”设置好IP地址,子网掩码,默认网关3: 进入”网上邻居“高级”选项,关闭防火墙6: 检查网络物理连接: ping <服务器IP地址/服务器名称7: 检查SQL Server服务器工作状态: telnet <服务器IP地址> 1433 如果命令执行成功,可以看到屏幕一闪之后光标在左上角不停闪动,这说明SQL Server 服务器工作正常B: 测试一下主站和子站数据库是否能联通进入子站sqlserver “企业管理器”新建个sqlserver注册填上服务如:192.168.0.88\ws2005 使用sqlserve身份验证登陆名是Ws2005 密码是110120110(注:如果能够顺利建立一个此注册,并能看看到所建立注册电脑上的WS2005中的数据库就说明主站和子站数据库已联通)如果网络不通则在电脑的右下角出现一个黄色的图标,不停的发出水中冒汽泡的声音,并且显示”五防数据服务器不在线”。
Gentran Server for Windows - November 2005 商品说明书

Gentran:Server ® for Windows ®Gentran EAI ServerIntroductionInstallation CardThis card describes how to install your Gentran EAI Server version 5.1 components. This card contains the following topics:◗Before You Begin◗How to Download Gentran EAI Server from the ESD Portal◗How to Install Gentran EAI Server◗How to Upgrade Gentran EAI Server Components◗How to Remove Gentran EAI Server◗Related DocumentationBefore You Begin Gentran EAI Server Installation Card 2Before You BeginIntroduction This section describes requirements that you must meet before you begin the Gentran EAI Server installation.Pre-installation requirements The following are pre-installation requirements:◗Verify that Gentran:Server for Windows Version 5.1 is installed.ReferenceSee "How to Validate your Gentran:Server Installation" in the Post-installation Tasks chapter of the Distributed System Installation Guide or Single WorkstationInstallation Guide for additional information.◗Verify that you have successfully installed the XML Translation Option from the Options Pack CD.ReferenceSee the Options Pack Installation Card for more information.Gentran EAI Server Installation Card How to Download the EAI Server from the ESD Portal 3 How to Download the EAI Server from the ESD Portal Introduction These instructions contain procedures for downloading the Gentran EAI Servercomponents from the Electronic Software Distribution (ESD) Portal. Downloading theTo download the zipped file:Application FileStep Action1In the e-mail message you received from Sterling Commerce, click thelink to the Electronic Software Distribution Download Area.2In the Security Alert dialog box, click Yes.3On the Login page, type the following information:◗Sterling order number◗Company name◗Customer ID4Click Login, and the system displays the Download Area.5Locate Gentran:Server for Windows, version 5.1 and click Download.6In the File Download dialog box, click Save.7When the Save As dialog box opens, save the file to the C:\ drive.NoteIf Internet Explorer adds a number in brackets to the name of thedownloaded file (for example, gsw51[1]_eai_cd.zip), rename the file onthe Windows system before you transfer it to the system where it will beinstalled.8Right-click the zipped file icon, and extract (unzip) the file to an emptydirectory.NoteA folder named eai_cd is created.4How to Install Gentran EAI Server Gentran EAI Server Installation Card How to Install Gentran EAI ServerIntroduction This section describes how to install Gentran EAI Server components.Procedure Use this procedure to install Gentran EAI Server components from CD.RecommendationIf your Gentran:Server environment includes a controller and one or more remote clients,we recommend that you complete this installation procedure on the Gentran:Servercontroller first, followed by each Gentran:Server client.Step Action1If you are installing from CD-ROM, complete the following:a.Insert the Gentran EAI Server installation CD in the CD-ROM drive.b.If Autorun is disabled on this machine, select Run from the Startmenu and continue with c. Otherwise, continue with Step3.c.Browse to the CD-ROM drive and run setup.exe file on the disk toinitiate the installation.System ResponseSetup begins. The system displays the Welcome dialog. The installationwizard guides you through the installation process. Continue with Step3.NoteThe software may take several seconds to prepare the wizard.2If you are installing from the ESD Portal download, browse to the eai_cdfolder and run setup.exe.System ResponseSetup begins. The system displays the Welcome dialog. The installationwizard guides you through the installation process. Continue with Step3.3Click Next.System responseThe system asks you if you want to view the README.TXT file.4Click Yes to view the README file and then close it when finished.Gentran EAI Server Installation Card How to Install Gentran EAI Server 55Do one of the following:◗If the Installation Options dialog box is displayed, continue with Step 6.◗If a dialog box is displayed stating that setup cannot proceed until all services are stopped, click OK to acknowledge the message. ClickYes at each prompt to stop a specified service. Continue with Step 6.System ResponseThe system displays the Installation Options dialog box.6Are you installing Gentran EAI Server on this machine for the first time?◗If yes , continue with Step 7.◗If no (this is an upgrade or you want to remove Gentran EAI Server components from this machine), continue with either the How toUpgrade Gentran EAI Server Components on page 7 or How toRemove (Uninstall) Gentran EAI Server on page 10 in this card.7Are you installing Gentran EAI Server on a Gentran:Server controller(server)?◗If yes (you are installing on a controller), verify that Install a Gentran EAI Server to the server is selected and click Next .Continue with Step 8.NoteYou must install Gentran EAI Server on your controller machinesbefore installing on any client machines.◗If no (you are installing on a user interface client), verify that Add a client to an existing installation is selected and click Next . Continuewith Step 8.System ResponseThe system asks you if you have reviewed this installation card and if youwant to continue with the installation process. (Contd)StepActionHow to Install Gentran EAI Server Gentran EAI Server Installation Card68Click Yes .System ResponseOne of the following occurs:◗If this is a new install on a machine on which Gentran EAI Server has never been installed, then the Windows Logon dialog box isdisplayed.◗If this is a new install on a machine on which Gentran EAI Server was previously installed and then removed (thus the old database tablesstill reside on the machine), then a dialog box is displayed stating thatthe system has detected Gentran EAI Server application tables andthe upgrade will replace information in those tables and any data inthem will be lost. Click Yes to continue with the upgrade.9Complete the following:a.In the User ID box, type a Windows user ID preceded by either[period]\ if you are installing on a single workstation system or DOMAINNAME\ if you are installing in a distributed Gentran:Server environment.b.In the Password box, type the Windows password for that User ID.Type the password again in the Confirm box to validate the password.c.Click Next .System responseSetup informs you that it is ready to begin the installation. Setup installsthe Gentran EAI Server components in the Gentran:ServerGENSRVNT\Bin directory. When Gentran EAI Server is installed, thesystem restarts all associated services and displays an Information dialogbox that indicates installation is complete.10Click OK to complete the installation process and to exit Setup. (Contd)StepActionGentran EAI Server Installation Card How to Upgrade Gentran EAI Server Components 7 How to Upgrade Gentran EAI Server Components Introduction This section describes how to upgrade Gentran EAI Server components.Procedure Use this procedure to upgrade Gentran EAI Server components.WarningPrior to upgrading your Gentran EAI Server system, you must first back up yourGentranDatabase and Gentran:Server files.RecommendationIf your Gentran:Server environment includes a controller and one or more remote clients,we recommend that you complete this upgrade procedure on the Gentran:Server controllerfirst, followed by each Gentran:Server client.Step Action1If you are installing from CD-ROM, complete the following:a.Insert the Gentran EAI Server installation CD in the CD-ROM drive.b.If Autorun is disabled on this machine, select Run from the Startmenu and continue with c. Otherwise, continue with Step3.c.Browse to the CD-ROM drive and run setup.exe file on the disk toinitiate the installation.System ResponseSetup begins. The system displays the Welcome dialog. The installationwizard guides you through the installation process. Continue with Step3.NoteThe software may take several seconds to prepare the wizard.2If you are installing from the ESD Portal download, browse to the eai_cdfolder and run setup.exe.System ResponseSetup begins. The system displays the Welcome dialog. The installationwizard guides you through the installation process. Continue with Step3.3Click Next.System responseThe system asks you if you want to view the README.TXT file.4Click Yes to view the README file and then close it when finished.How to Upgrade Gentran EAI Server Components Gentran EAI Server Installation Card85Do one of the following:◗If the Installation Options dialog box is displayed, continue with Step 6.◗If a dialog box is displayed stating that setup cannot proceed until all services are stopped, click OK to acknowledge the message. ClickYes at each prompt to stop a specified service. Continue with Step 6.System ResponseThe system displays the Installation Options dialog box.6Select Upgrade your existing installation and click Next . Continue withStep 7.System ResponseThe system asks you if you have reviewed this installation card, backed upyour GentranDatabase, and backed up your Gentran:Server files, and ifyou want to continue with the installation process.7Click Yes .System ResponseThe system displays the Windows Logon dialog box.8Complete the following:a.In the User ID box, type a Windows user ID, preceded by either [period]\ if you are installing on a single workstation system or DOMAINNAME\ if you are installing in a distributed Gentran:Serverenvironment.b.In the Password box, type the Windows password for that User ID.Type the password again in the Confirm box to validate the password.c.Click Next .System responseThe system display the Database Logon dialog box.9Complete the following:a.In the User ID box, type your database administrator logon. b.Leave the Password and Confirm boxes blank and click Next .NoteFor the SQL Server User ID, you must use the SQL administrative loginwith administrative rights on the Gentran:Server database. Otherwise,only the user that created the database tables can use those tables.System ResponseThe system prompts you that it is ready to perform the upgrade and asksyou if you want to proceed. (Contd)StepActionGentran EAI Server Installation Card How to Upgrade Gentran EAI Server Components 9(Contd)Step Action10Click Yes.System responseSetup informs you that it is ready to begin the install. Setup installs theGentran EAI Server components in the Gentran:Server GENSRVNT\Bindirectory. When Gentran EAI Server is installed, the system restarts allassociated services and displays an Information dialog box that indicatesinstallation is complete.11Click OK to complete the installation process and to exit Setup.10How to Remove (Uninstall) Gentran EAI Server Gentran EAI Server Installation Card How to Remove (Uninstall) Gentran EAI ServerIntroduction This section describes how to remove (uninstall) Gentran EAI Server components. The uninstall process removes program files, services, registry entries, and the program group.It leaves the system data store intact, in case you still have data there.Procedure Use this procedure to remove Gentran EAI Server components.RecommendationDo not remove the Gentran EAI Server system on the primary Gentran system controllerunless you have already removed the Gentran EAI Server components from all othermachines in the system.Step Action1If you are installing from CD-ROM, complete the following:a.Insert the Gentran EAI Server installation CD in the CD-ROM drive.b.If Autorun is disabled on this machine, select Run from the Startmenu and continue with c. Otherwise, continue with Step3.c.Browse to the CD-ROM drive and run setup.exe file on the disk toinitiate the installation.System ResponseSetup begins. The system displays the Welcome dialog. The installationwizard guides you through the installation process. Continue with Step3.NoteThe software may take several seconds to prepare the wizard.2If you are installing from the ESD Portal download, browse to the eai_cdfolder and run setup.exe.System ResponseSetup begins. The system displays the Welcome dialog. The installationwizard guides you through the installation process. Continue with Step3.3Click Next.System responseThe system asks you if you want to view the README.TXT file.4Click Yes to view the README file and then close it when finished.Gentran EAI Server Installation Card How to Remove (Uninstall) Gentran EAI Server 115Do one of the following:◗If the Installation Options dialog box is displayed, continue with Step 6.◗If a dialog box is displayed stating that setup cannot proceed until all services are stopped, click OK to acknowledge the message. ClickYes at each prompt to stop a specified service. Continue with Step 6.System ResponseThe system displays the Installation Options dialog box.6Select Remove the Gentran EAI Server system and click Next .System ResponseThe system asks you if you want to continue with the uninstall process.7Click Yes .System ResponseSetup completely removes the Gentran EAI Server components. Theuninstall process removes program files, registry entries, and the programgroup. It leaves the system data store intact, in case you still have datathere. When the uninstall is complete, the system restarts all associatedservices and displays a dialog box that indicates the process is complete.8Click OK to exit Setup. (Contd)StepAction12Related Documentation Gentran EAI Server Installation Card Related DocumentationIntroduction These documents, which are available on the Gentran:Server Online DocumentationCD-ROM or from the ESD Portal download, provide additional sources of information:◗Gentran EAI Server User’s GuideThis guide provides detailed information about the Gentran EAI Server system.◗Gentran:Server for Windows User’s Guide and Administration GuideThese guides provide in-depth information about the Gentran:Server for Windowscore system.◗Gentran:Server for Windows Communications User’s GuideThis guide provides a high-level overview of the Gentran:Server for Windowscommunications subsystem. It also describes File System Gateway and mailboxconfiguration procedures, how to work with distribution lists and delivery agents,error messages, and how to track messages.◗Optional Component GuidesEach optional component that you purchase has its own documentation guide, whichcontains product-specific information and configuration instructions.Gentran EAI Server Installation Card Related Documentation 13Related Documentation Gentran EAI Server Installation Card144295-510-INST02-0000© Copyright 1995–2005. Sterling Commerce, Inc. ALL RIGHTS RESERVED.Gentran:Server is a registered trademark of Sterling Commerce. Windows,Microsoft, and MS-DOS are registered trademarks of Microsoft Corporation.Product names mentioned herein may be trademarks and/or registered trademarksof their respective companies.T hird Party SoftwarePortions of the Sterling Commerce Software may include products, or may be distributed on the same storage mediawith products, ("Third Party Software") offered by third parties ("Third Party Licensors").Warranty DisclaimerThis documentation and the Sterling Commerce Software which it describes are licensed either "AS IS" or with alimited warranty, as set forth in the Sterling Commerce license agreement. Other than any limited warranties provided,NO OTHER WARRANTY IS EXPRESSED AND NONE SHALL BE IMPLIED, INCLUDING THE WARRANTIESOF MERCHANTABILITY AND FITNESS FOR USE OR FOR A PARTICULAR PURPOSE. The applicable SterlingCommerce entity reserves the right to revise this publication from time to time and to make changes in the contenthereof without the obligation to notify any person or entity of such revisions or changes.The Third Party Software is provided 'AS IS' WITHOUT ANY WARRANTY AND ANY EXPRESSED OR IMPLIEDWARRANTIES, INCLUDING BUT NOT LIMITED TO, THE IMPLIED WARRANTIES OFMERCHANTABILITY , AND FITNESS FOR A PARTICULAR PURPOSE ARE DISCLAIMED. FURTHER, IFYOU ARE LOCATED OR ACCESSING THIS SOFTWARE IN THE UNITED STATES, ANY EXPRESS ORIMPLIED WARRANTY REGARDING TITLE OR NON-INFRINGEMENT ARE DISCLAIMED.。
VSS2005配置教程
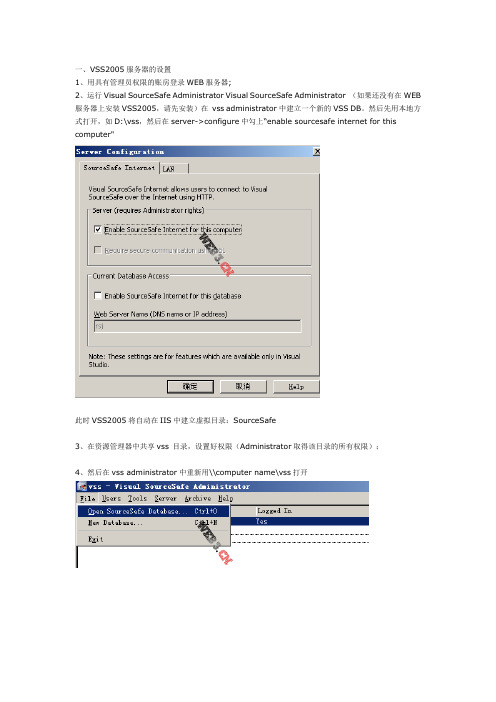
一、VSS2005服务器的设置1、用具有管理员权限的账房登录WEB服务器;2、运行Visual SourceSafe Administrator Visual SourceSafe Administrator (如果还没有在WEB 服务器上安装VSS2005,请先安装)在vss administrator中建立一个新的VSS DB。
然后先用本地方式打开,如D:\vss,然后在server->configure中勾上“enable sourcesafe internet for this computer"此时VSS2005将自动在IIS中建立虚拟目录:SourceSafe3、在资源管理器中共享vss 目录,设置好权限(Administrator取得该目录的所有权限);4、然后在vss administrator中重新用\\computer name\vss打开点击“Add...”按钮,选取第一项“Connect to an existing database”下一步,输入Web服务器下的Vss共享目录(这里要注意一点细节,如果输入IP地址很有可能在下一步会出现一点小问题,当然如果网络没有什么问题是可以的,俺建议还是使用点击“Browse...”从网上邻居上选择刚才共享的Vss目录)下一步,完成后打开数据库(因为需要通过INTERNET远程访问VSS,所以打开数据库时不能使用类似于D:\VSS之类的目录名,而应是\\机器名\VSS数据库所在的共享名,例如:\\MyServer\vss,要求数据库;),再进入server->configure菜单,再勾上“enable sourcesafe internet for this database"点击确定,此时VSS2005将自动又在在虚拟目录Sourcesafe下再建立两个虚拟目录:VssUpload_db1, VssDownload_db1中间会有一些提示,不管他,回答yes就是了。
VSS2005配置局域网以及使用方法

VSS2005配置局域网以及使用方法一、安装Vss2005:安装Microsoft Visual SourceSafe 2005(VSS2005)软件中的Setup.exe安装程序,Produck Key 在上级目录sn.txt中,即:KYTYH-TQKW6-VWPBQ-DKC8F-HWC4J,如图:点击“Next”,选择完全安装,如图:点击“Install”开始安装,安装过程中需要重启PC机,安装完毕弹出提示窗,如图:点击“Finish”,完成Vss安装。
二、Vss2005局域网配置:2.1服务器配置:1、首先打开服务器端(Microsoft Visual SourceSafe Administration),会自动登录admin账户,此账户默认没有密码,建议登录进去以后先添加admin账户密码User》change password修改密码,oldpassword 不用填,但以后修改密码就要填写了。
登陆后可能没有任何User,这时选择File-》Open SouceSafe Database按步骤创建Vss数据库后,就可出现用户了,具体步骤如下:选择File-》Open SouceSafe Database,如图:点击“下一步”,为你的数据库选择一个本地路径,如图:数据库的名称可以随便取,点击“下一步”单击“下一步”,选择VSS工作方式,第一项模式为同一个文件只能有一个人签出编辑,第二项模式为同一个文件可以有多人签出同时编辑,签入时合并,如图:点击“下一步”完成数据库创建如图:2.1.1设置数据库所在文件夹共享在资源管理器中选中Vss Admin中设置的数据库E:\Test,右击-》属性-》共享-》在网络上共享这个文件夹-》允许网络用户更改我的文件,如图:选择User-》Add User,如图:输入用户名wjx,密码,选择只读,单击“OK”添加用户完毕。
2.1.3设置客户端(用户)登陆方式选择Tools-》Options,取消选项客户端访问就需要使用帐号来登录了,如图:2.2客户端配置2.2.1客户端连接数据库首先打开客户端(Microsoft Visual SourceSafe),需要将客户端连接到服务器的数据库上的界面,如图:单击“下一步”,如图:选择即:连接一个已存在的数据库,单击“下一步”,如图:选择数据库路径,单击,如图:选择网上邻居\TH\XX\Test\Srcsafe.ini文件,单击“打开”弹出界面如图:单击“下一步”,弹出:单击“下一步”,弹出:单击“完成”,设置客户端数据库(将客户端数据库连接到服务器)完毕。
WinCC件使用说明

WinCC_flexible_2005 软件使用说明
一、软件安装
1.默认安装CD1中安装文件
2.默认安装SP1_for_WinCCflexible2005_CHINA_part1,将软件升级到SP1版
二、软件使用
1.新建工程
(1)打开WinCC_flexible_2005软件,点击“使用项目向导创建一个新项目”(2)选择“小型设备”点击下一步
(3)选择触摸屏型号、连接的控制器的型号及连接的端口
(4)点击下一步,按照提示完成新建工作
2.工程制作(做一个按钮和一个指示灯)
(1)选择工具框简单对象中的按钮,将按钮放到工程界面中
(2)双击按钮图标,设置按钮的属性
a选择常规,在文本框里输入按钮名称
b选择事件→单击,在右边函数设置框中设置函数
(3)选择工具框简单对象中的按钮,将按钮放到工程界面中
(4)双击按钮图标,设置按钮的属性
a选择属性→外观,设置所需要的填充颜色。
b选择动画→可见性→启用,设置变量、范围、对象状态。
3.工程下载
(1)触摸屏设置
打开触摸屏电源,进入触摸屏初始界面,点击“control panel”选择“Transfer”设
触摸屏与PC机的连接方式,“Channel1”为485通信方式。
“Channel2”可设置MPI、profibus、
ETHERNET、USB通信方式。
(2)用通信电缆连接触摸屏和PC
(3)点击工具栏中项目→传送→传送设置,设置通信方式。
点击“传送”,将工程下载到触摸屏中。
WG2005教程

MENTOR WG 2005 使用入门BY onefinger软件模块说明:DxDesigner 原理图输入及集成管理环境DxDesigner是原理图设计输入的完整解决方案,包括设计创建、设计定义和设计复用。
提供强大的原理图输入功能,实现PCB网表的自动转换,支持LMS(Library Management System)库管理系统, DxDesigner支持层次化分页式模块化设计,方便实现设计复用缩短设计周期;集成的仿真和高速电路分析环境。
DxDesigner的主要特点包括: 层次化设计输入管理以及设计复用提供原理图视图功能设计数据查询与交叉索引功能支持多属性编辑以及设计规则(包括物理规则和高速电气规则)传递集成的数字、模拟、数模混合仿真和高速电路分析环境集成的LMS库管理以及BOM清单生成集成的数据管理,支持团队设计,设计数据的检入、检出、锁定以及版本管理简单而便捷。
Library Manager 库管理工具Library Manager为开发和管理公司的设计库提供了一个中心位置,可确保设计库的一致性和集成性。
在Library Manager单一集成环境中,库管理员可创建、修改、维护原理图符号库、PCB封装库、焊盘库、IBIS库、以及包括板型在内的设计工艺库。
Library Manager 使管理员有能力对每一个终端、项目或预设计模板赋予相应的权限。
Library Manager有机结合了Mentor Graphics其它的设计工具如Expedition PCB。
在调用其他工具时,可启用Library Manager 相关工具模块。
同时,库管理员也可独立使用Library Manager以方便建库和维护。
Expedition PCB 设计及自动布线Expedition PCB为设计师提供了用于复杂PCB物理设计、分析和加工一整套可伸缩的工具,它将交互设计和自动布线有机地整合到一个设计环境中。
- 1、下载文档前请自行甄别文档内容的完整性,平台不提供额外的编辑、内容补充、找答案等附加服务。
- 2、"仅部分预览"的文档,不可在线预览部分如存在完整性等问题,可反馈申请退款(可完整预览的文档不适用该条件!)。
- 3、如文档侵犯您的权益,请联系客服反馈,我们会尽快为您处理(人工客服工作时间:9:00-18:30)。
WS2005微机防误闭锁与操作票专家系统一、系统入门本部分让使用者对系统有个大概的了解,并完成系统的安装、数据备份与恢复、系统启动等简单功能,所涉及的话题有一下几点1、系统主要功能和特点:通用性适用于各种电压等级(35kV~500kV)的变电站和发电厂,本系统可以单独使用,也可以与监控系统配合使用。
开操作票方式灵活多样系统提供“图形开票”、“手工开票”、“典型票调用”和“预存票调用”等多种开票方式,用户可以任意选择一种或者互相转换使用。
开放式系统设计、可维护性强系统除可以完成诸如设备编号定义、常用开票术语修改、操作票格式的定制、操作人员管理外等常规维护之外,还允许对系统的一次接线图、闭锁条件等进行修改。
历史数据检索功能系统可以按班组、开票人、开票时间、完成时间、完成情况等对已完成的操作票进行检索,也可对人员登录情况进行检索。
可实现设备状态实时反馈如果系统直接从监控系统、RTU接收遥信量,那么该系统便具备了现场设备状态的时实反馈功能。
2、系统运行环境:该系统可在Windows2000或WindowsXp下运行,要求计算机的基本配置为:CPU 奔腾1.5G以上内存256M以上显示器彩色显示器显示卡支持真彩色硬盘200M以上可用空间3、系统安装:将安装光盘放入光驱,运行微机防误闭锁与操作票专家系统.exe,出现如下窗口:按“下一个”按钮将出现安装目录选择窗口:安装完后安装程序提示完成安装。
①在安装本系统之前,应保证系统安装了正确的显示卡驱动程序,否则有可能导致本系统无法正常运行或死机。
4、数据备份与恢复:备份数据在系统调试或修改完成后应立即对系统数据进行备份,系统数据在系统安装路径的Data路径下,可将Data目录复制到其他存储器中即可。
恢复数据可将备份的Data目录复制到系统安装路径下覆盖原目录即可。
5、系统启动:双击桌面上的“操作票专家系统”快捷菜单或选择开始菜单中的“操作票专家系统”,便可启动本系统。
由于系统配置不同,该系统也可能在开机后直接启动。
系统进入后显示上次退出系统时所显示的那个站的一次设备接线图。
上图可分为三个区域,顶部为信息区,该区用来随时显示诸如操作票传票及回传情况、通讯情况等提示性信息,当无其它信息显示时将显示由用户自己确定的一行信息(一般为一次接线图名称)。
图的中部为一次设备接线图,它反映了设备的当前状态,当系统直接与RTU或与监控系统相连时能够瞬时反映设备状态的变化情况,此时系统可以作为现场设备状态的监视屏使用。
将鼠标移动到接线图上的某个设备上,系统会立即提示出鼠标所指向的设备的名称。
图的底部为状态行,它用来登录人、目前进行的操作、当前任务号、以及当前任务的操作项数等信息。
运行该系统后系统首先进入的是“未登录”状态,要使用本系统的开票等功能则必须用合法的用户身份登录。
将鼠标指向系统信息区右侧,此时该区域显示出川光电力科技公司的图标,单击该图标,出现系统登录和退出运行菜单选择弹出菜单中的“用户登录”,后便可进入用户登录窗口:在用户登录窗口中选择或直接输入用户名,在密码输入框内输入用户密码,在系统确认用户的合法身份后便可登录到系统,成功登录到系统后系统将显示出系统菜单和工具条:在登录过程中系统将自动记录登录人姓名及登录时间,登录成功后系统状态行中“操作人”栏将显示登录人姓名,状态行中的“操作”栏将显示“未选择”,此时登录人便可选择进行开票、操作票检索和系统维护等工作。
在登录过程中系统将自动记录登录人姓名及登录时间,登录成功后系统状态行中“操作人”栏将显示登录人姓名,状态行中的“操作”栏将显示“未选择”,此时登录人便可选择进行开票、操作票检索和系统维护等工作。
6、退出系统和结束系统运行退出系统:登录人在完成所进行的操作后应及时退出,以防止他人对系统造成破坏,如果其它用户需要使用本系统登录用户也应该首先退出。
单击工具条上的按钮或选择菜单“退出”登录用户便可退出。
用户退出并不是结束系统的运行,登录用户退出后系统仍然在继续运行,此时系统可视为现场设备状态的反馈屏。
①对于本系统的维护操作或其它重要操作系统将进行记录,包括记录操作人(登录人)信息,因此应注意不要将自己的密码泄露给他人,也不要使用其它人的密码登录。
②如果在用户列表中没有你的姓名,则说明系统中没有你的帐户,也就是说你不可以使用该系统,应首先要求系统管理员(我公司调试员或用户中的技术员)为你建立一个帐户。
结束系统运行:将鼠标指向计算机屏幕的右上角,此时该区域显示出川光电力科技公司的图标,状态行中的操作栏便显示“状态设置”,此时系统进入设备状态设置状态并立刻禁止工具条上进入其它状态的按钮和系统菜单,此时单击接线图上的某一设备,该设备的状态便转换到另一状态。
设置完毕后再次单击工具条上的“设置设备状态”按扭b. 加入一次设备操作将鼠标指向某一设备,如果该设备符合操作条件,该设备周围会出现一个边框并将操作内容提示出来,如果该设备的操作条件不满足,则该设备的周围不会有边框出现,也不会出现操作提示。
单击该设备,如果该设备符合操作条件则该项操作会追加到操作票中,此时,接线图上的设备状态显示成操作后的状态,如果被单击的设备操作条件不满足,则会出现下面的窗口来说明设备不可操作的原因:单击窗口中的“详细资料>>”按钮则可以看到操作该设备所应满足的条件:在一次操作的添加过程中系统会根据配置自动插入在该设备操作前后应进行的检查型操作或二次操作。
c. 加入提示项除在一次操作过程中自动加入的提示项外,用户可根据需要在一次设备操作前后插入其它提示性操作(非闭锁操作),方法是:将鼠标指向要操作的一次设备,单击鼠标右键来显示快捷菜单,此时有关该设备的常用提示信息就在菜单中显示出来,你只需要选择其中的一条或多条提示性操作即可。
如果快捷菜单中没有你需要的提示信息,可选择快捷菜单中的“增加提示项”,系统会显示提示项输入窗口:在窗口的列表中有系统记录的全部常用通用提示信息,如果列表中有你需要的信息可直接从中选取,如果没有你需要的信息可在输入框内直接输入所需的提示信息。
◆单击窗口中的“确认”按钮,所选择(输入)的提示项便增加到操作票中;如果单击提示项输入窗口中的“取消”按钮则取消本次提示项输入工作。
◆如果你希望保存输入的提示信息以便以后使用,则可在单击“确认”或“取消”按钮之前首先单击“保存术语”按钮,此时出现以下对话窗:选择“是(Y)”则被保存的提示信息仅与窗口中显示的设备有关,以后在图形开票的过程中如果操作到该设备则快捷菜单中将会出现该输入的提示信息;如果选择“否(N)”,则该输入的提示信息将做为通用提示信息予以保留,在以后的图形开票时提示信息输入窗口的历史记录中将会出现该输入提示项。
◆单击按钮“删除术语”来删除以前保存的不再需要的历史提示信息。
d. 加入二次操作除在一次操作过程中自动加入的二次操作外,用户可根据需要在开关操作前后插入没有自动加入的二次操作,方法是:在将鼠标指向要操作的开关,单击鼠标右键,选择弹出菜单中的“加入二次操作”,系统显示二次设备窗口并自动定位到所选线路的保护屏,并显示出二次设备窗口:窗口底部的几项是对二次设备的显示布局进行调整,可以调整二次图标的大小、图标之间的间距、选择是显示二次名称或编号、显示名称或编号所用字体和颜色等。
当选项“通过菜单选择操作”被选中时,如果鼠标移动到二次设备的图标上时,则会出现有关该二次设备的所有操作的菜单,从菜单中选择相应的操作即可。
如果该选项未被选中,则可通过单击的二次设备图标的方式将操作加入到操作票中。
◆“通过菜单选择操作”是考虑到二次操作的随意性而增加的选项,如果系统所记忆的二次设备状态总能与实际状态一致则不必使用该选项。
◆如果系统所记忆的二次设备状态总能与实际状态不一致,可以按住CTRL的同时点击鼠标左键进行设备状态的设定e. 操作票显示与回步如果在开票过程想查看正在开的操作票的内容,可单击系统工具条上的操作票显示按钮或选择系统“操作票”菜单中的票的“显示操作票”,在显示操作票的过程中仍然可以继续开票,操作票的显示内容也会随着开票内容的变化而刷新。
再次单击该按钮将关闭操作票显示窗口,另外系统也会根据需要自动关闭该窗口(例如在图形开票结束时)。
◆如果系统选项中的“自动显示操作票内容”被选中的话,则在图形开票的过程中操作票显示窗口会被自动打开。
如果想撤消已经加入的一次操作、二次操作或提示项,可单击工具条中的“回步”按扭g. 操作票预演由系统对刚刚开出的操作票逐项自动进行预演,在预演过程中系统会自动滚动屏幕把被操作设备移动到屏幕的可视部分。
预演完成后会重新回到该窗口。
在预演过程中可以按Esc 键中止模拟预演。
h. 预存操作票跟下面的存成典型票相似,不同的是它没有按电压等级分类,主要是用于临时保存操作票,如果操作票需要长期保存,应使用存成典型票。
i. 存成典型票操作票存成典型票,以便以后调用和复制。
如果在开始图形开票时没有输入任务名,即在统选项中没有设置“在图形开票时选择运行方式”,则系统会出现运行方式和任务名输入窗口:分别从电压等级、线路名称和运行方式中选择合适的内容,系统将自动生成一操作票名称(任务名),如果系统生成的操作票名称不符合你的要求的话,你可以直接在操作票名称输入框中输入操作票名称。
单击“确认”按钮完成本次典型票保存工作,单击“取消”按钮则取消存成典型票的操作。
如果电压等级列表中没有你需要的电压等级的话,可以通过下面方法进行修改:选择“系统维护”菜单下的“电压等级定义修改”出现如下窗体选择编号列,按着键盘的向下键,再最后一行的后面,会自动添加一行空行,可以输入相应得电压等级即可。
与修改电压等级方法相似,你可以根据需要修改运行方式和线路名称。
j. 操作票修改与打印*操作票修改利用手工开票窗口对开出的操作票进行修改,在操作票修改完成后做五防判断”菜单将被激活,传送操作票、打印操作票和保存操作票菜单将被禁止,只有当修改后的操作票通过五防判断后这些菜单才会重新被激活。
*打印操作票将操作票打印到打印机上,如果在打印操作票前还没有输入操作票名称,则系统会首先出现窗口要求输入操作票任务名称。
k. 作废操作票在操作票传送到通讯适配器和打印之前可作废本次图形开票或操作票调用;在操作票传送到电脑钥匙或打印后,该按钮变成退出按钮,操作票中所操作的设备状态变成不确定状态,在电脑钥匙回传或操作票回填后操作票中所操作的设备状态才恢复到确定状态。
在完成一张操作票的图形开票后,系统中所显示的设备状态是开票前的状态,系统状态行中的操作栏将显示“未选择”。
4、手工开票:a. 进入手工开票单击系统工具条上的手工开票按钮或选择“操作票”菜单中的“手工开票”,系统状态行中的操作栏显示“手工开票”并首先显示任务名称输入窗口,在任务输入窗口中选择一电压等级、线路和运行方式,输入任务名称(参见存成典型票),单击窗口中的确认按钮后系统便显示出手工开票窗口。
