PLUS招标参数(富士)
科达招投标软硬件技术参数V13

【科达招投标软硬件技术参数】[Fred]Version: 1.3 History2022/04/12 V1.0 Fred Doc creation2022/04/14 V1.1 Liu Yong Revised version2022/06/12 V1.2 Fred Revised version, smart pen added2022/06/13 V1.3 Fred Revised version, teacher terminal parameter added目录1 描述 (3)2 硬件系统 (3)2.1 智慧课堂平台服务器 (3)2.2 校园内网交换机 (3)2.3 教室AP (3)2.4 教室充电柜 (3)2.5 教师备授课系统终端 (4)2.6 学生学习系统终端 (5)2.7 学生智能手写笔终端 (6)2.8 教师授课学习终端终端 (6)3 软件系统功能和参数指标 (6)3.1 教师备授课系统 (6)3.2 学生学习系统 (7)3.3 安全管控系统 (8)3.4 教务管理系统 (8)3.5 数据采集统计系统 (8)3.6 第三方软件支持系统 (8)曼黯!描述以下为根据科达ESWI 智慧教育系统2.0 软硬件功能生产的参数指标和功能点,用于招投标方案的标书技术部份。
硬件系统2.1 智慧课堂平台服务器外型:2U 机架式处理器:配置E5-2620v4(2.1GHz/8c)/8GT20ML3内存:配置32GB DDR3 内存,20 个内存插槽,支持高级内存纠错、内存镜像、内存热备等高级功能;硬盘:配置4 块1000G SAT“插拔硬盘,最大支持24 个2.5 寸或者12 个3.5 寸SATA/SAS/SSD 硬盘,可内置2 小盘。
RAID 独立RAID 控制器,支持RAID0,1,3,5。
I/O 扩展槽:主板支持6 个PCI-E 插槽网络:配置双口千兆以太网控制器,支持虚拟化加速、网络加速、负载均衡、冗余等高级功能;电源:服务器专用电源;2.2 校园内网交换机24 个10/100/1000Base-T 支持PoE4 个独立千兆SFP 端口整机最大PoE 供电功率为370W,单端口最大PoE 供电功率为30W支持RIP 动态路由、静态路由、ARP 代理、DHCP 服务器、DHCP 中继、DHCP Snooping支持四元绑定、ARP/IP/DoS 防护、802.1X 认证支持VLAN、QoS、ACL、生成树、组播、IPv62.3 教室AP11AC 双频并发,无线发射功率线T 可调,自适宜信道,802.3af/at 标准PoE 供电频谱导航,胖瘦一体。
招标文件设置设备参数

一、项目概况1.1 项目名称:XXXX项目设备采购1.2 项目地点:XXXX1.3 项目概况:本项目旨在为XXXX项目提供高性能、可靠的设备,以满足项目生产需求。
本次招标范围包括但不限于以下设备:(1)设备A:型号为XXXX,数量为XXXX台;(2)设备B:型号为XXXX,数量为XXXX台;(3)设备C:型号为XXXX,数量为XXXX台。
二、设备参数2.1 设备A(1)技术参数:1)额定功率:XXXXW;2)电压:XXXXV;3)频率:XXXXHz;4)效率:≥XXXX%;5)噪声:≤XXXXdB;6)外形尺寸:XXXX×XXXX×XXXXmm;7)重量:≤XXXXkg。
(2)功能要求:1)具备XXXX功能;2)具备XXXX功能;3)具备XXXX功能。
2.2 设备B(1)技术参数:1)额定功率:XXXXW;2)电压:XXXXV;3)频率:XXXXHz;4)效率:≥XXXX%;5)噪声:≤XXXXdB;6)外形尺寸:XXXX×XXXX×XXXXmm;7)重量:≤XXXXkg。
(2)功能要求:1)具备XXXX功能;2)具备XXXX功能;3)具备XXXX功能。
2.3 设备C(1)技术参数:1)额定功率:XXXXW;2)电压:XXXXV;3)频率:XXXXHz;4)效率:≥XXXX%;5)噪声:≤XXXXdB;6)外形尺寸:XXXX×XXXX×XXXXmm;7)重量:≤XXXXkg。
(2)功能要求:1)具备XXXX功能;2)具备XXXX功能;3)具备XXXX功能。
三、招标要求3.1 投标人应具备以下条件:(1)具有独立法人资格,注册资金不低于XXXX万元;(2)具备良好的商业信誉和健全的财务会计制度;(3)具备相应的生产、销售和服务能力;(4)具备本次招标设备的生产许可证、产品合格证等相关证明材料;(5)具备类似项目的业绩。
3.2 投标文件要求:(1)投标文件应包含以下内容:1)投标函;2)法定代表人身份证明或授权委托书;3)企业法人营业执照副本;4)税务登记证副本;5)组织机构代码证副本;6)企业资质证书;7)类似项目业绩证明材料;8)设备生产许可证、产品合格证等相关证明材料;9)其他相关材料。
扫描仪参数
明基K 明基K708 明基T 明基T880 明基Q 明基Q808 明基6800 明基6800 明基M 明基M208 明基F 明基F208 明基F 明基F700 明基1800 明基1800
富士通S1500 富士通S 富士通5110c 富士通5110c 5110 富士通 6125LA 富士通 6225LA 富士通6130 6130C 富士通6130C 富士通 fi6230 富士通 fi6140 富士通 fi6140 富士 fi5530CII 富士通 fi6750S 富士通f 富士通f6670 富士通 fi6770 富士通 M4099D 富士通 fi4990c 虹光V2100 虹光 虹光V5100 虹光 虹光AV2600 虹光 虹光AV AV710 虹光AV710 虹光AV121 虹光 虹光AV122 虹光 虹光AV610U 虹光 虹光AV2600 AV26 虹光AV26 虹光AV710 虹光
虹光 AV210C2 虹光 AV220C2 虹光 AV830C+ 虹光 AV3200SU 虹光AV AV3300 虹光AV3300 虹光 AV3750SU 虹光 AV3850SU 虹光 AV8050U 虹光AV8350 虹光 虹光AV320 虹光 虹光FB2100 虹光 虹光 FB2080E 虹光FB 虹光 6080E 虹光FB 虹光 6000U 虹光 FB2600C 虹光AV710 虹光 虹光AV830C 虹光 柯达i1120 柯达 柯达i40 柯达 柯达i1210 柯达 柯达i1220 柯达 柯达I1310 柯达 柯达I1320 柯达 柯达i150 柯达 柯达i160 柯达 柯达i1410 柯达 柯达i1420 柯达 柯达i1440 柯达 柯达i610 柯达 柯达i620 柯达 柯达i640 柯达 柯达i660 柯达
X线机招标参数(表格)
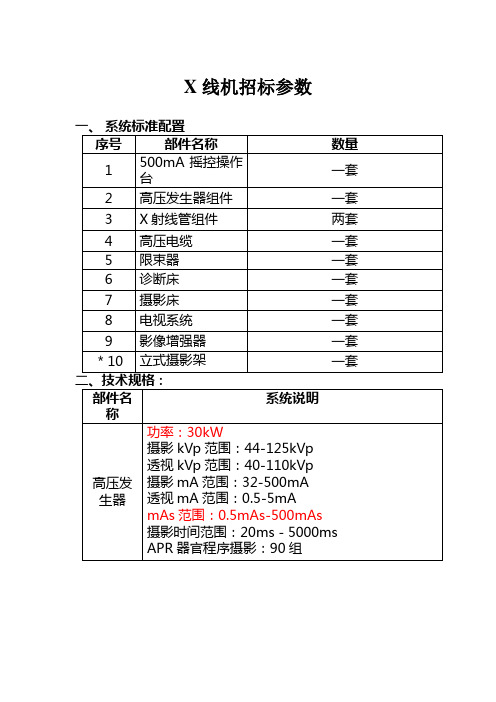
X线机招标参数1、电源电压:单相380V容量:30KVA频率:50HZ内阻:0.3Ω2、透视0.5-5mA 45-110KV连续可调3、摄影管电压:44-125KV 44档可调管电流:30mA-500mA 分档可调曝光时间:0.02S-5S 分23档可调a)诊断床b)床身移动范围:+90°-0-15°电动床面移动范围:头端300mm电动点片装置移动范围:纵向720mm电动横向250mm电动压迫器300mm电动摄影尺寸:8″×10″,10″×12″,11″×14″,14″×14″,可做全片、二分割、四分割摄影滤线器:密纹固定滤线栅,电磁锁止,栅密度N40,会聚比例f o70,栅比r10电动多页限束器c)摄影床d)摄影床支柱自回转±180°,每隔90°可选择定位,支柱沿床身纵向行程≥120cmX线球管装置绕臂转动,满足+120°-120°任意角度定位床面纵向移动±600mm床面横向移动±100mm滤线器摄影最大尺寸为14×17″,密纹固定滤线栅,电磁锁止,栅密度N40,会聚比例f o100,栅比r12可见光定位式手动多页限束器*配置旋转脚踏板e)X线管装置焦点:1×1mm²/2×2mm²f)电视系统①9″影像增强器23XZ4ST/A,中心分辨率54LP/cm②扫描体制:625行2:1隔行扫描,幅型比4:3,每秒图像数目25幅③摄像机:CCD,水平中心分辨率≥600TVL, 垂直中心分辨率≥400TVL,灰度等级>8级④数字处理:X线剂量指示,电子圆(4:3),伽玛校正、黑斑校正、数字降噪、末帧保持、8幅图像存储*⑤14″内置监视器:水平中心分辨率≥800TVL,垂直中心分辨率≥400TVL,灰度等级>8级,选配床边14″第二监视器及台车g)遥控系统①在控制台上遥控操作实现点片分割、压迫器运动、片匣运动、荧光屏架运动②在控制台上遥控操作实现床身、床面及限束器运动③可实现双向对讲,方便医生与患者交流四、其它要求*1、投标产品的生产厂家必须有CE认证或FDA认证。
DR招标参数

DR招标参数一、背景介绍在电力系统中,直流输电技术(Direct Current Transmission,简称DR)被广泛应用于长距离、大容量的电力输送。
为了确保DR设备的质量和性能,需要制定一套招标参数,以便供应商按照这些参数进行投标和生产。
二、招标参数1. 输电能力:DR设备的输电能力是衡量其性能的重要指标。
根据具体需求,招标文件中应明确要求供应商提供不同容量等级的DR设备。
2. 电压等级:根据输电路线的电压等级,招标文件应规定DR设备的额定电压范围,以保证设备与输电路线的匹配。
3. 效率要求:DR设备的效率直接影响输电系统的能耗和经济性。
招标文件中应要求供应商提供具体的效率要求,包括输电效率和转换效率等指标。
4. 控制方式:招标文件中应明确DR设备的控制方式,例如直接控制、远程控制等,以满足不同运行需求。
5. 绝缘水平:为确保DR设备的安全可靠性,招标文件应规定绝缘水平要求,包括耐受电压、绝缘电阻等指标。
6. 可靠性要求:DR设备在运行过程中需要具备良好的可靠性,以确保电力系统的稳定运行。
招标文件中应明确要求供应商提供具体的可靠性指标,如平均无故障时间(MTBF)等。
7. 环境适应性:DR设备通常安装在户外环境中,招标文件应要求供应商提供具备良好环境适应性的设备,如抗风、抗雷击等能力。
8. 安全性要求:招标文件中应明确DR设备的安全性要求,包括过电压保护、过电流保护等措施,以确保设备在异常情况下的安全运行。
9. 维护保养:招标文件中应要求供应商提供详细的维护保养手册和培训,以确保DR设备的长期稳定运行。
10. 技术支持:招标文件中应要求供应商提供技术支持,包括设备安装调试、故障排除等方面的支持。
三、招标文件编制要求1. 清晰明了:招标文件应以简明扼要的语言描述招标参数,避免使用过多的技术术语和专业名词。
2. 具体明确:招标文件中的参数要具体明确,以便供应商准确理解和满足要求。
3. 可量化:招标文件中的参数要能够量化,以便供应商进行性能评估和比较。
招标参数列表范本

招标内容及要求一.技术规格及功能要求
1、货物名称、主要技术参数、数量见招标货物一览表,本批招标为整体采购,投
标人必须对所有货物进行投标,不得将其中的内容拆分,拆分漏项报价无效。
2、中标人必须提供现场免费人员培训,以达到能独立操作、维护、保养及正常
使用为止。
3、投标人所提供的产品必须为全新货物,原厂包装,通过合法渠道获得,具有
一定的先进性和性能可靠性。
4、投标人所提供的产品性能必须符合招标文件中的技术规格及功能要求,必须
以招标文件中提供的技术指标为标准,招标项目规格带“★”技术要求必须完全满足,低于该标准按无效标处理。
5、本文所述技术要求,应视为保证涉及运行所需的最低要求,如有遗漏,投标人
应予以补充,否则一旦中标将视为投标人认同遗漏部分并免费提供。
6、投标人必须提供产品最新的彩页并加盖单位公章。
中标后,中标人应向采购人
提供技术资料(中文操作使用说明书、操作手册、安装维修手册和维修线路图)各一套。
7、货到安装调试验收完毕,质量三包、免费维护保修壹年以上及终身维护服务,
保修期过后对设备故障需要更换的配件将以成本价提供。
招标参数C92
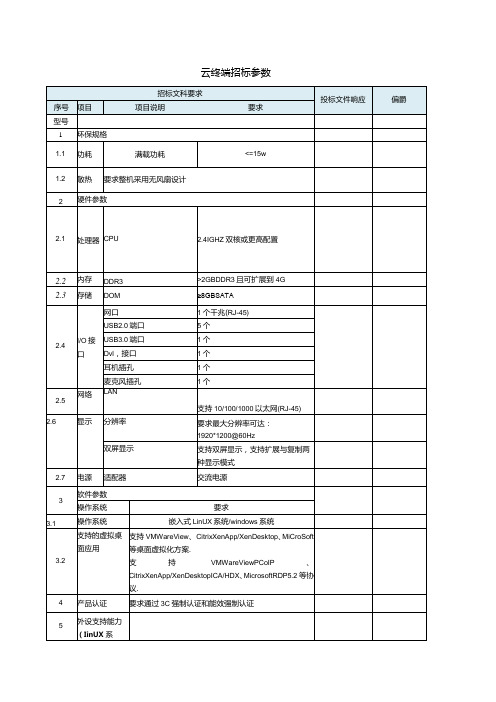
招标文科要求
投标文件响应
偏爵
序号
项目
项目说明
要求
型号
1
环保规格
1.1
功耗
满载功耗
<=15w
1.2
散热
要求整机采用无风扇设计
2
硬件参数
2.1
处理器
CPU
2.4IGHZ双核或更高配置
2.2
内存
DDR3
>2GBDDR3且可扩展到4G
2.3
存储
DOM
≥8GBSATA
2.4
I/O接口
网口
1个千兆(RJ-45)
USB2.0端口
5个
USB3.0端口
1个
Dvl,接口
1个
耳机插孔
1个
麦克风插孔
1个
2.5
网络
LAN
支持10/100/1000以太网(RJ-45)
2.6
显示
分辨率
要求最大分辨率可达:1920*1200@60Hz
双屏显示
支持双屏显示,支持扩展与复制两种显示模式
2.7
电源
适配器
交流电源
3
软件参数
操作系统
要求
4
产品认证
要求通过3C强制认证和能效强制认证
5
外设支持能力(IinUX系
统)
5.3
*USB外设支
持能力
在不同虚拟化平台的USB
外设支持能力
支持通过RDP、PCoIP.ICA/HDX协议连接虚拟桌面时使用连接到客户端的USB外设(如UKey、USB打印机等).
5.4
*摄像头支持能力
L要求支持WebCam技术
2、要求能够支持更多的HID类型的影像设备,且支持
投标产品技术参数
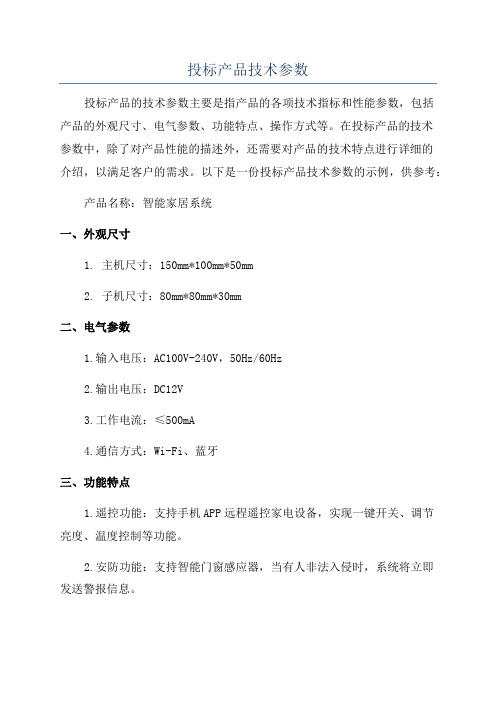
投标产品技术参数投标产品的技术参数主要是指产品的各项技术指标和性能参数,包括产品的外观尺寸、电气参数、功能特点、操作方式等。
在投标产品的技术参数中,除了对产品性能的描述外,还需要对产品的技术特点进行详细的介绍,以满足客户的需求。
以下是一份投标产品技术参数的示例,供参考:产品名称:智能家居系统一、外观尺寸1. 主机尺寸:150mm*100mm*50mm2. 子机尺寸:80mm*80mm*30mm二、电气参数1.输入电压:AC100V-240V,50Hz/60Hz2.输出电压:DC12V3.工作电流:≤500mA4.通信方式:Wi-Fi、蓝牙三、功能特点1.遥控功能:支持手机APP远程遥控家电设备,实现一键开关、调节亮度、温度控制等功能。
2.安防功能:支持智能门窗感应器,当有人非法入侵时,系统将立即发送警报信息。
3.能源管理:系统可以对家中用电设备进行定时开关控制,节约能源、提高效率。
4.智能场景:支持自定义场景设置,根据用户的需求自动调节家中的照明、温度、音响等设备。
5.数据统计:系统可以对家中用电设备的耗电量进行实时统计和分析,并生成报表,帮助用户更好地管理用电。
四、操作方式2.语音控制:支持语音控制功能,用户可以通过语音指令控制家中的设备开关和状态。
五、产品优势1.稳定可靠:产品采用先进的技术,确保系统的稳定性和可靠性。
2.兼容性强:产品兼容多种设备和平台,可以与其他智能家居设备集成使用。
3.易于安装:产品结构简单、安装方便,适用于各种家庭环境。
4.操作简单:通过手机APP和语音控制,用户可以轻松操作智能家居系统。
六、售后服务1.故障保修:产品提供免费保修服务,在保修期内,若发生故障可享受维修服务。
Horizon-Suite招标参数

具备大型桌面管理能力,至少支持5,000台以上虚拟桌面的能力
是
Horizon View解决方案可以提供10, 000虚拟桌面的管理能力。
支持预先在域环境是创建计算机帐号
是
防止在域权限管理严格的环境中不能自动创建计算机帐号
桌面连接服务器内置企业级数据库功能,无需购买第三方数据库软件
是
VMwareHorizon View连接服务器的配置数据均存储在微软ADAM数据库中,不需要采购第三方数据库,也不需要额外考虑数据库备份恢复方案
是
VMware ThinApp应用打包时提供权限设置与自定义消息内容设定功能
管理员可集中设定虚拟化应用程序个性化信息存放位置设定
是
VMware ThinApp应用程序打包时,管理员可以设定Sandbox位置。
管理员可直接将需要管理员权限运行的应用程序打包为普通用户权限使用
是
经过VMware ThinApp应用虚拟化后的应用,用户可以普通权限直接运行
在线与离线模式使用统一的管理界面与系统映像
是
VMwareHorizon View提供的在线与离线虚拟桌面使用统一的管理软件与系统映像
单一的管理和操作界面,方便管理,控制台不能超过2个。
是
VMwareHorizon View提供功能高度整合的简易操作平台,控制台只有2个。
提供单一的web控制台,集成桌面管理与Helpdesk管理功能
支持高速的双向音频重定向
是
PcoIP支持音频重定向,可针对 LAN 和 WAN 动态调整音频质量
支持通过非USB重定向的摄像头重定向技术
是
RTAV技术不需要在虚拟桌面安装摄像头驱动,即可重定向摄像头到虚拟桌面
富士智能2021产品选型手册说明书
产品参数
外观颜色 机箱 面板 外观尺寸 工作温度 工作湿度 电源电压 通讯方式 主控器 最优识别距离 最大识别⻆度 语音对讲
香槟金 1.5mm钣金喷塑工艺 防眩光AG玻璃 380*344*1500mm -25℃〜70℃ ≤95%,无凝露 AC220V±10%50Hz TCP/IP通讯 ⻋牌识别控制器+无刷道闸控制器 3~5M ⻋牌与⻋道夹⻆≤45° 对讲距离≤1米
01
PRODUCTION
INTRODUCTION
COMPANY
公司简介
COMPANY INTRODUCTION
富士智能 ,成立于2004年 ,是智能出入口管理设备供 应商 、出入口管理系统解决方案提供商 ,智慧生态 环境 解 决方案专业供应商。
富 士 智 能,坚 持 以 人 为 本 、以 质 量 求 生 存 、以 服 务 创 市 场的信念,⻓期致力于智慧社区、智慧写字楼、智慧商业综 合体 、智慧景区、智慧园区 、智慧 校园 等 智慧生态 环境建 设 ,持续为数十万场景守好⻔ 、把好关 、收好费 ,已经成为 出入口智能管理和智慧城市生态环境建设的重要实践者、 推动者和引领者。
306 mm
230 mm
w w w. f u j i c a . c o m . c n
09
智能停⻋场管理系统
全球智慧城市生态环境建设重要实践者和引领者
FJC-TZ286
“金刚”机器人无人值守智慧⻋场管家
智慧通行卓然出众
产品特点
采用高强度新合金科技材料打造,无惧岁月洗礼,品质坚若磐石 17英寸LCD高亮触摸屏可显示停⻋时⻓、收费信息等,闲时可播放 广 告 或物管通知,为物业增值创收的同时提高管理效率 全方位出入方式:动态二维码、⻋牌识别等多种出入方式,安全、高效、 顺畅通行 多样化缴费形式:支持使用微信/支付宝/聚合码等扫码( 主扫/被扫)缴 费出场,支持使用现金缴费出场,可通过微信扫码找零 支持电子发票 一键问询:⻋主可通过远程协助按钮一键发起远程服务请求,与服务中 心进行双向语音通话,迅速获取人性化服务 远程对讲:支持服务中心主动远程连接现场,为⻋主提供协助服务 ,从 而打造无人值守的工作环境,彻底取代值守岗亭,降低人力成本 具备出色的系统稳定性、扩展性及实用性,适用于各种高端停⻋场
招标参数模版
招标参数模版一、项目概述本项目拟采购一批新型办公设备,以提升办公效率和工作质量。
本文档旨在规范招标过程中的参数要求,确保招标方和供应商之间的沟通顺畅,确保最终采购的设备能够满足项目需求。
二、设备需求1. 设备类型:办公设备2. 设备数量:20台3. 设备种类:打印机、复印机、扫描仪、投影仪等4. 设备规格:- 打印机:支持黑白和彩色打印,打印速度不低于30页/分钟,支持双面打印,纸张容量不低于250张。
- 复印机:支持黑白和彩色复印,复印速度不低于40页/分钟,支持双面复印,纸张容量不低于500张。
- 扫描仪:支持高分辨率扫描,最低支持1200dpi,支持双面扫描,支持自动文档送纸器。
- 投影仪:支持高清投影,最低支持1080p分辨率,亮度不低于3000流明,支持多种接口连接。
三、技术要求1. 设备应具备稳定可靠的工作性能,连续工作时间不低于8小时。
2. 设备应具备良好的兼容性,能够与现有办公设备和软件系统无缝衔接。
3. 设备应具备较低的能耗,符合节能环保要求。
4. 设备应具备较低的噪音水平,不会对办公环境造成干扰。
5. 设备应具备良好的维修保养服务支持,供应商应提供充足的备件和及时的技术支持。
四、交付要求1. 供应商应按照合同约定的时间交付设备,并提供安装和调试服务。
2. 供应商应提供详细的设备操作说明书和维护手册,以便用户能够正确操作和维护设备。
3. 供应商应提供培训服务,对用户进行设备使用和维护的培训,确保用户能够熟练操作设备。
五、验收标准1. 设备外观应完好无损,无明显划痕或变形。
2. 设备功能应正常,各项功能操作正常可靠。
3. 设备应符合技术要求中的规格参数。
4. 设备应能够满足项目需求,提供的功能和性能能够满足办公工作的要求。
六、报价要求1. 供应商应提供详细的设备报价单,包括设备价格、数量、型号、规格等信息。
2. 报价单中应明确列出设备的配件、附件和售后服务等内容。
3. 供应商应提供合理的价格,并注明报价有效期。
富士伺服产品介绍
18.0
15.6
带制动器电机惯性力矩
惯性力矩[10-
0.37
0.29
0.62
0.48
1.71
1.61
4kg·m2]
© Fuji Electric Co., Ltd. All rights reserved.
电机尺寸与新增电机接口形式
电机总长缩短约15mm,并且支持IP67等级(GYB D7,□60,□80)
© Fuji Electric Co., Ltd. All rights reserved. 11
ALPHA5 Smart Plus 特长
© Fuji Electric Co., Ltd. All rights reserved. 12
ALPHA5 Smart Plus 特长
© Fuji Electric Co., Ltd. All rights reserved. 13
在保持安装法兰面及轴径不变的情况下,缩短了电机整体长度,并且增大了电机 惯量。
例:GYB D7 与 GYB D5 电机参数对比表
额定转矩[N·m] 额定转速[rpm] 最大转速[rpm] 最大转矩[N·m] 惯性力矩[104kg·m2]
GYB201D 7
0.637
1.91 0.33
GYB201D 5
VM03_PSYNC VM04_RSYNC
虚拟主轴 PTP 定位 2-轴直线差补 2-轴圆弧插补(圆心)(半径) 周期同步
间隔同步,诸如滚剪运动
VM05_FSYNC
间隔同步,诸如飞剪运动
VM06_CAM VM07_CAMPTN
电子凸轮控制 凸轮模式创建
• 基于SPH系列开发 ⁻ 扫描周期 4 ms 或更快 ⁻ 紧凑的程序和数据大小 ⁻ 对应脉冲输出
环幕系统招标参数
环幕系统招标参数一、项目背景环幕系统是一种用于展示多媒体内容的大型显示系统,广泛应用于会议、演出、展览等场合。
为了满足项目需求,现拟进行环幕系统的招标采购。
本文将详细介绍环幕系统招标参数,包括硬件要求、软件要求、功能要求、性能要求等。
二、硬件要求1.显示屏幕:屏幕尺寸不少于100平方米,分辨率不低于1920x1080像素,亮度不低于1000尼特,对比度不低于5000:1,刷新率不低于60Hz。
2.投影设备:投影设备数不少于4台,投影分辨率不低于1280x800像素,亮度不低于5000流明,对比度不低于5000:1,投影距离可调。
3.控制器:控制器数量不少于1台,支持多种输入信号接口,具备良好的稳定性和可靠性。
4.音响设备:音响设备数不少于8台,支持多种音频输入接口,具备清晰、高保真的音效输出能力。
5.其他辅助设备:包括服务器、电源设备、信号转换器等,具备良好的兼容性和稳定性。
三、软件要求1.操作系统:支持Windows、Mac OS等常见操作系统,具备良好的稳定性和兼容性。
2.管理软件:提供管理软件,支持远程控制、内容编辑、日程安排等功能,界面友好、操作简便。
3.播放软件:提供播放软件,支持多种媒体格式,具备良好的播放效果和流畅性。
4.互动软件:提供互动软件,支持触摸、手势等多种交互方式,具备良好的响应速度和准确性。
四、功能要求1.多媒体展示:支持图片、视频、音频等多种媒体内容的展示,具备良好的显示效果和流畅性。
2.分屏显示:支持多屏幕分屏显示,实现多种内容同时展示,具备灵活的布局和切换方式。
3.互动功能:支持触摸、手势等多种互动方式,实现用户与系统的互动操作,具备良好的响应速度和准确性。
4.远程控制:支持远程控制功能,实现对系统的远程管理和监控,具备稳定的网络连接和安全性。
5.日程安排:支持日程安排功能,实现内容的定时播放和切换,具备灵活的时间设置和预约功能。
五、性能要求1.稳定性:系统具备良好的稳定性,能够长时间运行且不出现崩溃、卡顿等问题。
摄像机 招标参数 模板
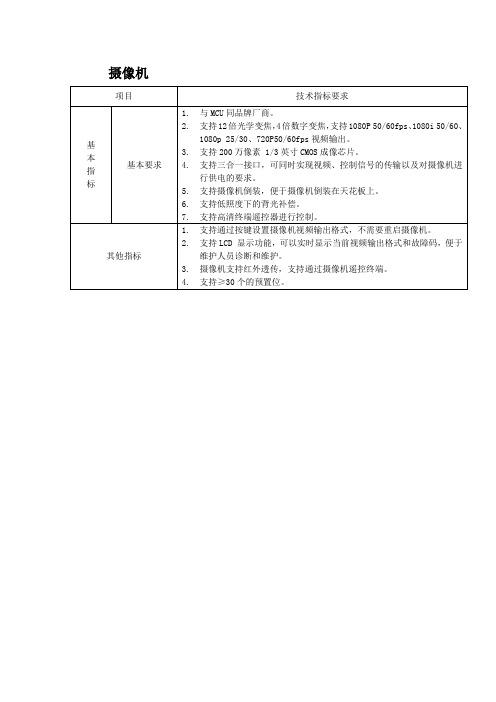
6.支持低照度下的背光补偿。
7.支持高清终端遥控器进行控制。
其他指标
1.支持通过按键设置摄像机视频输出格式,不需要重启摄像机。
2.支持LCD显示功能,可以实时显示当前视频输出格式和故障码,便于维护人员诊断和维护。
3.摄像机支持红外透传,支持通过摄像机遥控终端。
摄像机
项目
技术指标要求
基
本
指
标
基本要求1.ຫໍສະໝຸດ MCU同品牌厂商。2.支持12倍光学变焦,4倍数字变焦,支持1080P 50/60fps、1080i 50/60、1080p 25/30、720P50/60fps视频输出。
3.支持200万像素1/3英寸CMOS成像芯片。
4.支持三合一接口,可同时实现视频、控制信号的传输以及对摄像机进行供电的要求。
4.支持≥30个的预置位。
投标产品技术参数

投标产品技术参数本次投标的产品是XXXX,该产品具有以下技术参数:1.外观参数:- 尺寸:长x宽x高,具体尺寸为xxcm x xxcm x xxcm;- 重量:重量为xxkg;-外壳材料:采用高强度铝合金外壳,具有防水、防尘、耐腐蚀等特点;-外观颜色:可根据客户要求进行个性化定制。
2.显示参数:- 屏幕尺寸:采用xx英寸的液晶显示屏,具有高清晰度和良好的视角效果;- 分辨率:图像分辨率为xxxxx像素,显示效果清晰细腻;- 亮度:屏幕亮度为xxxx cd/m²;- 反应时间:短至xms的快速响应时间,图像切换流畅。
3.触控参数:-触控技术:采用先进的电容式触摸技术,支持多点触控;- 触控精度:触控精度高达xxxxdpi,反应及时准确;-触控方式:支持手指触控、手写触控、操作笔触控等多种操作方式。
4.硬件参数:- 主芯片:采用xx型号的高性能芯片,运算速度快,功耗低;-内存:配备xGB的内存,运行多任务时流畅且稳定;-存储:内置xGB的大容量存储空间,支持外接TF卡扩展;-通信接口:支持多种通信接口,如USB、HDMI、以太网等;-音频:内置音箱,支持播放多种音频格式;-摄像头:配备前置xMP和后置xMP高像素摄像头。
5.软件参数:- 操作系统:预装xxxxx操作系统,支持多国语言;-应用软件:预装多种常用应用软件,如办公软件、浏览器等;-远程管理:支持远程管理,可通过网络实现远程监控、升级等操作;-系统稳定性:系统具有良好的稳定性和兼容性,能够保证长时间稳定运行;-安全性:系统提供多层安全防护机制,保障数据和用户信息的安全。
以上是我们产品的技术参数,我们坚持以质量为本,秉承为客户提供最好的产品和服务的原则,相信我们的产品能够满足您的需求并取得成功。
感谢您的关注与支持!。
自助打印设备招标参数要求
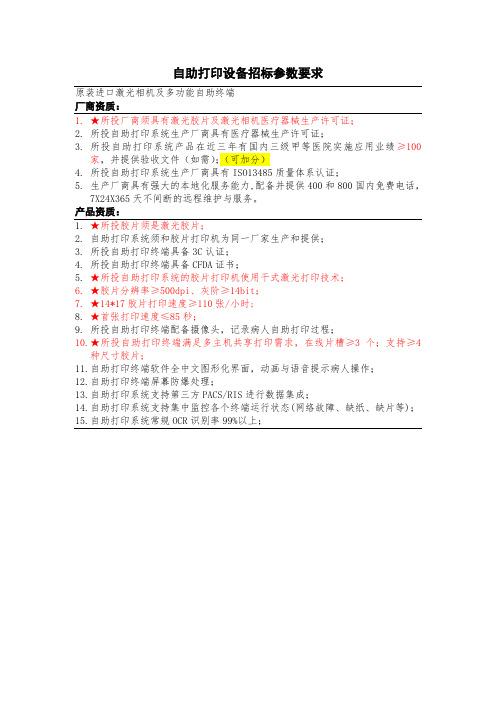
自助打印设备招标参数要求
原装进口激光相机及多功能自助终端
厂商资质:
1.★所投厂商须具有激光胶片及激光相机医疗器械生产许可证;
2.所投自助打印系统生产厂商具有医疗器械生产许可证;
3.所投自助打印系统产品在近三年有国内三级甲等医院实施应用业绩≥100
家,并提供验收文件(如需);(可加分)
4.所投自助打印系统生产厂商具有ISO13485质量体系认证;
5.生产厂商具有强大的本地化服务能力,配备并提供400和800国内免费电话,
7X24X365天不间断的远程维护与服务。
产品资质:
1.★所投胶片须是激光胶片;
2.自助打印系统须和胶片打印机为同一厂家生产和提供;
3.所投自助打印终端具备3C认证;
4.所投自助打印终端具备CFDA证书;
5.★所投自助打印系统的胶片打印机使用干式激光打印技术;
6.★胶片分辨率≥500dpi、灰阶≥14bit;
7.★14*17胶片打印速度≥110张/小时;
8.★首张打印速度≤85秒;
9.所投自助打印终端配备摄像头,记录病人自助打印过程;
10.★所投自助打印终端满足多主机共享打印需求,在线片槽≥3个;支持≥4
种尺寸胶片;
11.自助打印终端软件全中文图形化界面,动画与语音提示病人操作;
12.自助打印终端屏幕防爆处理;
13.自助打印系统支持第三方PACS/RIS进行数据集成;
14.自助打印系统支持集中监控各个终端运行状态(网络故障、缺纸、缺片等);
15.自助打印系统常规OCR识别率99%以上;
医用胶片自助打印系统技术参数。
韩国tap招标参数

韩国tap招标参数
韩国TAP(Trans-Asia Pipeline)招标参数是指在韩国进行
TAP项目招标时所需的相关规定和条件。
TAP项目是指跨亚洲管道项目,旨在建设一条从中亚地区输送天然气至韩国的管道。
在招标过
程中,通常会涉及一系列参数和条件,包括但不限于以下几个方面:
1. 技术要求,招标参数将详细规定对于TAP项目所需的技术规
格和要求,包括管道材料、工程设计、施工技术等方面的要求。
2. 资质要求,招标参数通常会要求参与投标的公司具备一定的
资质和经验,包括施工承包商、工程设计单位等的资质要求。
3. 合同条款,招标参数中会明确TAP项目的合同条款,包括工程量清单、支付方式、履约保证金、质量保证等方面的条款。
4. 工期要求,招标参数会规定TAP项目的工期要求,包括工程的开工日期、竣工日期等时间节点。
5. 成本预算,招标参数通常会要求投标方提交符合TAP项目成
本预算的报价,同时也会规定相关的投标文件和报价文件的要求和
格式。
此外,招标参数还可能涉及到环境保护、安全管理、监理要求等方面的规定。
总之,韩国TAP项目的招标参数是一个涉及多个方面的综合性文件,其目的是为了确保TAP项目的顺利实施和相关利益相关方的合法权益。
富士胶片 FDR Go Plus 移动系统快速使用指南说明书

PurposeThe document is a review of the basic operations of the FDR Go Plus system .Flat Panel Detector Lock The detectors can be locked in the storage bin during periods of inactivity. 1) Locking the Detectorsa) Place the detector in the assigned storage bin.i) Rear Slot: 24 x 30 cm ii) Middle Slot: 14 x 17 Inchesb) Move the Lever to the forward position. The bolt will slide forward,locking the detectors in place.c) Manual release of the detector lock is not possible.d) FPdLoc displays on the X-ray Control Panel when the locking mechanismis activated.2) Unlocking the Detectorsa) Depress the Registration Key and the assigned Password Numberat the same time.b) FPdLoc will disappear from the X-ray Control Panel and thelocking mechanism will retract, releasing the detectors.c) Depressing the Password Number key first and then the Registrationkey will cause failure of the detector lock. The detector lock will not retract.Start-Up Procedure1) Unplug the FDR Go Plus unit from the wall outleta) All status indictor lights on the X-ray Control Panel will turn OFF.2) Turn the Power Switch to the ON positiona) The Battery indicator on the X-ray Control Panel will activate .3) PID Securitya) If PID security is activated, enter the Password.b) Upon successful entry, the start-up process will continue.The system locks are released and the unit is ready for travel.FPD LocK LeverBattery Level4) Depress the DR Buttona) The DR Button will turn Blue when activated.b) The FDX Console software will automatically start.c) If security is activated, enter the Username and Password.d) The Status indicator lamp will illuminate when startup is complete.5) Tube WarmupTube warmup is a recommended procedure.a) Refer to Tube Warm-up procedure referenced in this document.Workflow1) Workflowa) Register a Patient study from the RIS screen.b) Select the required Exposure menu. The KV and mAs valueswill register on the X-ray Control panel.c) Prep for Exposure(1) X-Ray Prep:(a) Depress the Hand Switch to the first level.(i) The Blue flashing indicators on the X-ray Control Panel,Tube Column and Hand Switch will turn Green.(b) Ensure the Exposure Ready light is Green.d) Complete the Exposure(1) Depress the Hand Switch to the Final Level.(a) At the time of exposure, the X-Ray Exposure Lampwill illuminate and a beep will be heard.(b) The KV & mAs indicators will blink for (5) seconds.(c) The Dose value will display on the X-ray Control Panel.e) Study Completion and Distribution(1) Select the Exam Complete button to send the study to PACSStatus IndicatorDR ButtonShutdown Procedure1) Shut Down the FDX Console softwarea) The DR Button will turn OFF when the shutdown process is complete. b) Turn the Power switch to the OFF position and plug in the unit. c) System charging will initiate based on charging requirements.Charging Procedures1) FDR Go Plus ChargingThis section is a review of the available charging options.a) Automatic ChargingWhen the unit is connected to a wall outlet with the Key Switch set to the ON position, automatic charging of the system will occur. (1) Procedure:(a) Plug the unit into a wall outlet.(b) Automatic charging will start at the programmed time.(c) System charging is indicated by blinking charging indicatorson the tube column.(d) The battery indicator on the X-ray Control Panel will cyclebetween 1 & 5 bars until 90% charge level has been reached.b) Manual ChargingThis procedure is the most efficient method to restore the system to full charge. (1) Procedure:(a) Shut down the FDX Console and wait for the DR Button to turn OFF. (b) Set the Power switch to the OFF position. (c) Connect the unit to a wall outlet.(d) When charging is required, the following activity will occur:(i) Blue Status Indicators on the X-ray Control Panel and tubecolumn will start to blink.(ii) The Battery Indicator will continually cycle between 1 & 5 bars.(e) When the charge level of 90% or greater has been reached, the Battery level indicator will display (5) solid bars.Charging Indicator Battery Charge Level90% or higher2)DEVO II Detector Battery ChargingDetector batteries can be charged with a dedicated Battery Chargeror Docking Station.(1)Battery Charger(a)Insert the Battery into the charger.(b)If properly inserted, the battery charging indicatorswill turn green.(c)Charging Indicators:(i)Charging: Green status lights continually blink.(ii)Charged: (3) solid status lights are displayed.(2)Docking Station(a)Refer to the documentation supplied with the equipment.3) FDR Go Plus Charged Level Indicatorsa)Low Charge indicator(1)The CHRG(Low Battery Notification Lamp) will startto blink when the battery indicator is on the last bar.b)Charge Indicator (90%)(1)Battery Indicator displays (5) solid bars, indicating thebattery is 90% charged or higher.(2)All blinking status indicators are OFF.c)Full Charge Indicator (100%)(1)The Charging Lamp illuminates when the batterycharge level reaches 100%.d)No System Charge (Battery charge level displays no bars)If there are no visible battery level indicators, a Full systemcharge is recommended.The charging durations are as follows:(1)5 hours = 90% charge.(2)8 Hours = 100% charge.(3)Charging automatically stops after 10 continuous hours.4) Additional Radiography FunctionAfter the battery indicator stops blinking, if additional radiography is needed,approximately 10 more exposures are possible when radiography parametersare set to General Chest Radiography.1)Procedure:a)Turn the Key Switch to the OFF position.b)Turn the Key Switch back to the ON position while pressingthe User Setting button.c)When the LED is blinking on the battery indicator, Low BatteryRadiography is possible.d)When the system is charged and restarted, automatic connectionto the primary battery will occur.5) Auto-Power-off FunctionWhen the key switch is left in the ON position, the Auto-Power-Off function shutsdown several system components after a period of inactivity, conserving battery power.1)Process:a)When Auto-Power Off is initiated, [at]-[off] will display on the X-ray Control Paneluntil the shutdown process is complete.b)The status indicator lamp on the X-ray Control Panel and the status lights on the tubecolumn slowly light up blue, indicating the system is partially shut down.c)The battery indicator lamp on the X-ray Control Panel will be dim, no bars visible.6) Wake the system from the Auto-Power-Off StateThe Auto Power Off function results in a partial shutdown of system components.The unit can be restored to active status by activating one of the locking devicesor using the Key Switch.1)Activation options:Activation of the locks is accomplished by touching the designated Release locks.a)Brake Release Bar (Drive Handle).b) Arm Lock Release (Collimator).c)Collimator Release (Grip Handle).d)Arm Lock Release Lever.2) Key Switcha)Cycle the Key Switch between the ON and OFF positions.7) DR Long Time Radiography ModeUsing this option, techniques can be adjusted above the programmed range.a) Select a registered Exposure menu.b) Select and hold the mAs button for (3) continuous seconds.DR Long Time Radiography Mode is activated when the LED illuminates.c) Set the preferred KV and mAs parameters. d) Maximum available mAs: 320 mAs @ 40-65 KV. e) Maximum KV: 133KV @ 140 mAs.f)When registering a new menu, the DR Long Time Radiography Mode is disabled.The Green LED button is dim.8) Cassette Radiography ModeThis option is used to activate CR Cassette Radiography.1) Depress the Cassette Radiography Mode button for (3) seconds.The LED on the Cassette Radiography mode button illuminates and the system switches to Cassette Radiography mode.2) The following tabs automatically highlight:a) ************(defaultKV&mAsdisplay)b) Small Focal Spotc) Cassette Radiography Mode d)Key Pad # 1.d. Keypad #1c. CR Radiography modea. KV & mAsc. Small Focal Spot3) Adjust the KV & mAs parameters.4) Prep and complete the exposure.5) The system will return to normal operating mode upon selection of anExposure menu. The Green LED indicator will dim.9) System Travel ( Loss of Power)When system power is not available, system locks do not activate. restri In order to move the unit, the following procedure is required . 1) Procedure:a) Press the Emergency Stop Button.b) Press and hold the Emergency Release button.c) The unit can be safely moved by grasping the hand grip.d) When the Emergency Release button is released, systemlocks will activate, restricting movement of the system.10) Obstruction DetectorIf the Obstruction Detector is damaged, the obstruction detection function may remain ON (activated), restricting system movement. 1) Procedure:a) Turn the key to the OFF position.b) Turn the key switch back to the ON while pressing thecollimator lamp button.c) Continue to press the collimator lamp until the systemstarts up and emits a sound.d) The obstruction detector cancel function is disabled when thekey switch is turned to the OFF position .11) TUBE Warm-Up Procedurea) Switch the system to Cassette Radiography Mode by holding downthe cassette radiography mode button until the green LED illuminates.b) Press the Zero [0] button on the numeric keypad until the greenLED illuminates. The system will switch to Tube Warm-up mode.c) Tube Warmup Display:i) 50 - N1(1) 50: Initial KV displayii) N1: Determines the number of exposures.This is the default value when using Tube Warm-Up Procedure 1.EmergencyR eleased) [tUbeUP]a) System is configured for Tube Warm-up mode e)CR Radiography Mode Button: Active f) Zero [0] button: Activeg) Tube Warm-Up Procedure 1:When completing daily tube warm-up, Tube Warm-up Procedure 1 is the required warm-up protocol.Warmup exposures are taken until the KV for typical first exposure of the day is reached.h) Tube Warm-up Protocol:a) Close the collimator blades. b) Set the KV to 80.c) mAs: N1 ( do not modify) d) Make the 1st exposure.i) The KV display will blink for a few seconds and change to 90 KV. ii) Wait 60 seconds between exposures.e) Repeat the process until the desired KV is reached.f) Exit the tube warmup mode by pressing a Keypad number between [1] and [9]. g) The [tUbeUP] is cleared from the console display and the systemswitches to Cassette Radiography mode.h) Registering a menu will return the system to normal DR mode.f. Zero Button e. CR Radiography Moded. Tube Warm-up mode: Activated12) Dose Reduction ConceptsMinimizing Dose requires evaluation of pre-exposure technical parametersand post exposure results.1)Smart QAa)Automatic exposure alerts for examinations with reference valuesoutside of the programmed range2)“S” Value and Exposure Index Reference Chartsa)Use the reference ranges to adjust KV and mAs values to an optimal range3)ALARA: As Low As Reasonable Achievable4)Image Gently: Pediatric Dose Reduction Program5)Image Wisely: Adult Dose Reduction Program13) X-ray Control Panel1 Standby Indicator Lamp• Illuminates when system is ready for X-ray •2Radiography Ready Indicator Lamp• Activates during system Prep3 X-Ray Irradiation Indicator Lamp• This button will flash at the time of exposure4 Warning Indicator Lamp• Illuminates when the system does notfunction correctly.• Red warning indicator displays on console 5 Malfunction Indicator Lamp• Illuminates if system malfunctions6Focus Mode Button• Focal spot size controlled by exposure menu • Large Focus: LED Off• Small Focus: LED Illuminated7Display for Dose and other information• Displays Dose value after each exposure • Displays User Setting options• Displays info based on selected functions 8Information Button• Displays APR Code for the active menu • Press to view all User Setting options9KV Display/Tube Voltage• Adjust KV parameters• Adjusts User Setting default parameters •10mAs Display/Current-Time Product Button• Adjust mAs values• Adjusts User Setting parameters • Displays Error Codes11Collimator Lamp Button• Switches collimation Lamp On or OFF• Used is combination with the Key switch toactivate the Obstruction Detector Cancel Function12Travelling Warning Sound Button• Used to set the volume of the sound emittedduring x-ray exposure or when radiography preparation is finished13DR Long Time Radiography Mode Button• Switches system to DR Long time mode(LED Illuminated)• Normal Mode( Not Illuminated)14) S ystem Safety1) To move the unit, firmly grip the grip bar with both hands and thenmove forward .2) Do not move the system over any steps or bumps greater than 2 cm, orslopes steeper than 7 degrees, Always stop the system on a level surface and avoid sloped surfaces.3) Do not lay your hands on the bar retaining cover when holding the grip bar.If you hold the grip bar while laying your hand on the cover, a force may apply toward the rear, causing the mobile system to suddenly accelerate and move forward.14Added Filter Button• LED illuminates when added filter isinserted• No added filter: No LED• Added Filter 1: LED Illuminated • Added Filter 2: LED Blinking15Cassette Radiography ModeButton• Switches system to Cassette Radiography mode. ( LED Illuminated)• DR Radiography mode: (Not Illuminated)16User Settings Button• Switches the system to User Setting• When the keyless entry(option) is used, this button functions as the enter key17Registration Button• Registers anatomical programs and various settings• When Keyless entry( option), this button functions as the Enter Key 18 Keypad•Keypad for data entry19 Power Plug Connection Lamp• Illuminates when the power plug is connectedto a wall outlet 20Charging Lamp• Blinks when system is charging• Solid indicator when system is at 100 % FullCharge21 Battery Indicator• Indicates the Battery Charge Level22 Low Battery Notification• Charge indicator blinks when the batteryindicator is on the last bar15) S upport Documents1) Quick Guide on Console Workflow (FDX V11.0)a) This document is a detailed workflow manual for the FDX Console b) Document number: DOC-00380102) FDR Go Plus Operation Guide # M503-E076a) Detailed Operation manual for the FDR Go plus b) Document Number:3) FDR GO (Plus Version) Reference Guidea) Additional information on operation basics b) Document number: # 503-E07216) System Components 1) Back Panela) Note: Several of the slots and accessory components have openings in thebottom .Front Slot: Grid Middle Slot: 14 x 17 Rear Slot: 24 x 30 Flat Panel DetectorAccessory CompartmentCard ReaderPower CordKey Switch Emergency Stop Emergency Release Hand Switch LAN Connectionb)Inch Modec)Tube Column。
