MimioStudio软件安装须知
宿主安装
宿主安装:MAGIX samplitude pro X12.0.0.59安装方法:首先,下载完所有的文件后。
有可能所有的安装包都是“xxx.exe重命名”这种文件后缀,请把所有的“重命名”字样删除,仅保留.exe。
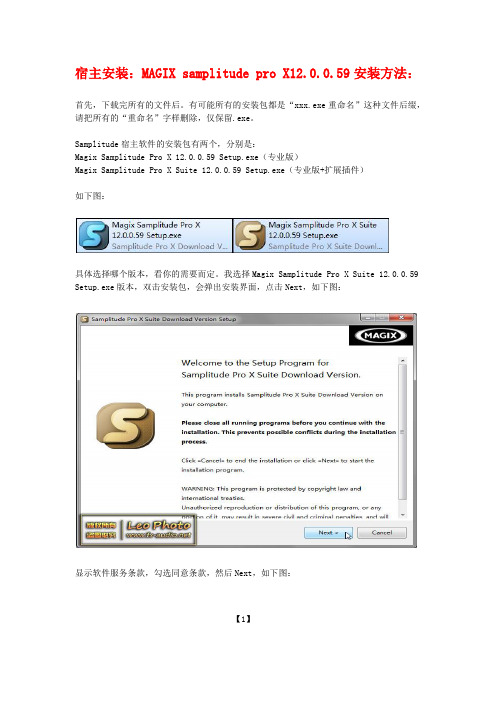
Samplitude宿主软件的安装包有两个,分别是:Magix Samplitude Pro X 12.0.0.59 Setup.exe(专业版)Magix Samplitude Pro X Suite 12.0.0.59 Setup.exe(专业版+扩展插件)如下图:具体选择哪个版本,看你的需要而定。
我选择Magix Samplitude Pro X Suite 12.0.0.59 Setup.exe版本,双击安装包,会弹出安装界面,点击Next,如下图:显示软件服务条款,勾选同意条款,然后Next,如下图:【1】接下来,可以选择安装方式(组件和安装目录)。
我选择Standard默认安装,按下Next 继续,如下图:确认无误后,点击Install开始安装,如下图:【2】等待一会儿,安装结束。
取消Start Samplitude Pro X Suite Download Version Now,按下Finish,如下图:【3】安装到这里就完成了,现在需要PJ软件。
找到下载的文件,双击Samplitude Pro X 120 Patch R2.exe,如下图:点击Patch 32bit可以PJ32位的Samplitude,如下图:自动弹出浏览器,选择安装目录中的Sam.exe,点击打开即可。
默认路径是C:\Program Files (x86)\MAGIX\Samplitude_Pro_X_Suite_Download_Version,如下图:【4】Windows 7 64位可以在此PJ64位的版本,点击Patch 64bit,如下图:自动弹出浏览器,选择安装目录中的Sam_x64.exe,点击打开就可以了。
Samplitude 7.0教程

第1章Samplitude 7.0电脑多轨录音人类的录音活动可以追溯到19世纪留声机的发明,而20世纪则出现了磁带录音机以及硬盘录音机。
在21世纪,以电脑为中心,使用电脑录音软件录制声音的手段已经成为最先进最常用的录音手段。
在电脑录音软件出现之前是硬盘录音机统治天下的年代,虽然电脑录音和硬盘录音机都是将声音以数字信号记录在以磁为介质的盘片上,但它们有着天壤之别,硬盘录音机与电脑录音对比如表1.1所示。
表1.1 硬盘录音机与电脑录音对比表从以上硬盘录音机与电脑录音对比表可以看出,电脑录音比传统的硬盘录音机有着很多优势,尤其体现在价格、操作性、功能、操作界面和音质方面,优势比较突出。
当然它也有一些缺点,比如电脑系统不稳定、对用户的知识有较高的要求,但这些劣势会随着科技水平的提高和用户自身的学习而减少。
电脑录音会成为今后录音科学的主流,而电脑录音又离不开电脑录音软件。
现今的电脑录音软件不仅可以录音,还可以胜任混音、音频编辑、效果处理、母带制作、刻录CD/DVD 等一系列工作,比较有代表性的电脑录音软件包括德国Magix公司的Samplitude系列、德国Steinberg公司的Nuendo系列、德国Emagic公司的Logic系列、美国DegiDesign公司的Pro Tools系列等,这里将以德国Magix公司的Samplitude电脑录音软件系列作为开篇讲解电脑音乐录音软件的使用技术。
Samplitude是德国Magix公司的拳头产品,秉承德国严谨精细的特点,有着专业的品质。
Samplitude从5.0版本开始进入专业录音师的视野,现在已经升级到7.0版本,如图1.1电脑音乐技术与实践所示。
其涉及范围从多轨混音,到音视频同步,甚至包含了简单的MIDI制作功能,可以说是一款非常强大而且全面的录音+混音软件。
从7.0版本开始,Samplitude被分为了两种版号:Samplitude Classic和Samplitude Professional,其中前者是后者的简化版本。
电脑MIDI软件安装教程
MIDI PC工作站软件安装教程一、工作站(PC系统)硬件最基本要求1、CPU:Intle 2.0G以上的多核心处理器2、主板: Intle芯片组。
3、内存:1G以上。
4、硬盘:160G以上。
5、显示卡:128M显存以上推荐使用NVIDIA专业图形卡。
6、显示器:19寸以上推荐使用21、5寸以上液晶分辨率支持1920*1080宽屏方便工作。
7、声卡:支持MME/WDM/ASIO/GSIF的专业卡。
例如PC卡、USB、火线(推荐)。
8、音响:专业的监听箱,如果没有可以考虑用高保真耳机。
二、工作站的系统安装1、windows xp sp2操作系统(最好原版的,不要GHOST的)。
2、以我的系统的分区为例:A、第一块160G硬盘:C盘20G(系统盘, D盘60G软件安装盘,E盘:70G工程盘)。
B、第二块盘为1000G的音色盘(F盘)。
3、安装必要软件:硬件驱动、虚拟光驱DAEMON Tools,常用播放器Media Player10,解压工具WINRAR等。
杀毒软件建议不装,除非你要把工作站上网玩游戏,因为很多工作站的软件注册机常被杀软误杀。
4、安装好系统和常用软件后,记得用GHOST备份系统,以防安装工作站的软件过程中出错。
三、工作站软件安装(按照下面的步骤)1、首先我们安装Steinberg CubaseSX 3—1.1.944 H2O版,其次安装Steinberg、虚拟贝斯,安装前先把CubaseSX3的H2O版模拟狗卸载并重启电脑,用虚拟光驱加载虚拟贝斯安装,最后安装虚拟贝斯破解文件重启电脑!OK。
2、接下来我们安装Gigastudio,运行Setup.exe 安装,重启电脑,开始-程序-TASCAM -GIGAstudio 3中的Giga Studio 3 License Manager ,点击: Register Product Now点击“下一步”把所有空填完:*CD处填为:730R-xxxxxxxx 下面的*和*Confirem处请填上两个一样的EMAIL地址,ZIP处的右边选一个国家。
PROII8.3安装说明(9.0也可用)
安装说明一、声明:1、本安装为盗版安装,仅供各位学习研究使用。
不得商用;2、在参考学习本说明前,请备份好资料。
如出现问题概不负责;3、本说明所涉及的软件及工具均来自互联网。
其所有权归著作者所有;4、如有错误或者不完善的地方,请联系本人。
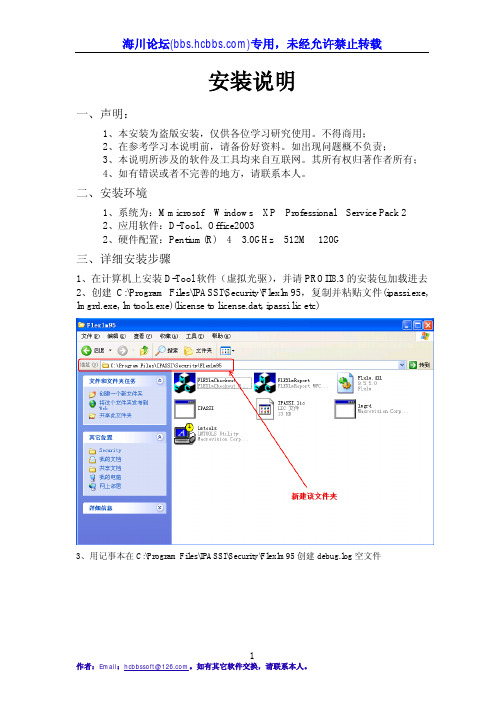
二、安装环境1、系统为:Mmicrosof Windows XP Professional Service Pack 22、应用软件:D-Tool、Office20032、硬件配置:Pentium(R) 4 3.0GHz 512M 120G三、详细安装步骤1、在计算机上安装D-Tool软件(虚拟光驱),并请PROII8.3的安装包加载进去2、创建C:\Program Files\IPASSI\Security\Flexlm95,复制并粘贴文件(ipassi.exe, lmgrd.exe, lmtools.exe)(license to license.dat, ipassi.lic etc)3、用记事本在C:\Program Files\IPASSI\Security\Flexlm95创建debug.log空文件为“zhangsan”;5、安装WinwowsInstaller6、安装WinwowsInstaller完成后,点击setup进行安装7、点击安装后,出现下面的界面,点击“install”8、等一会出现下图,点击Next;9、选择“I accept the terms in the license agreement”并点击Next;10、出现如下图所示时候,最好请勿改变安装路径,直接点击Next;11、选择Typical 并点击Next12、出现如下图所示的图片时,选择FLEXlm 9.5 在license servers 中输入“@zhangsan”zhangsan为第四步看到的名字,并点击Next;13、为了使用的方便,请按照按照下图所示进行选择,点击Next14、点击install;15、此时会出现如下图所示的DOS窗口,请不要关闭。
AdminStudio使用文档
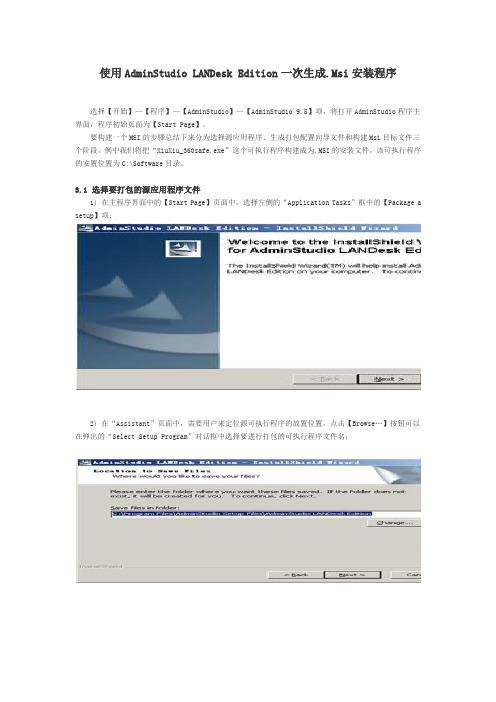
使用AdminStudio LANDesk Edition一次生成.Msi安装程序选择【开始】—【程序】—【AdminStudio】—【AdminStudio 9.5】项,将打开AdminStudio程序主界面,程序初始页面为【Start Page】。
要构建一个MSI的步骤总结下来分为选择源应用程序、生成打包配置向导文件和构建Msi目标文件三个阶段,例中我们将把“XiuXiu_360safe.exe”这个可执行程序构建成为.MSI的安装文件,该可执行程序的安置位置为C:\Software目录。
3.1 选择要打包的源应用程序文件1) 在主程序界面中的【Start Page】页面中,选择左侧的“Application Tasks”框中的【Package a setup】项;2) 在“Assistant”页面中,需要用户来定位源可执行程序的放置位置,点击【Browse…】按钮可以在弹出的“Select Setup Program”对话框中选择要进行打包的可执行程序文件名;3) 在“Package File:”框中选择了要打包的程序名后,在下方的“Product Information”部分会要求用户输入以下一些程序信息:Specify your product name:生成的Msi安装包的文件名称;Version number:输入该应用程序的版本(可以随意输入,但是为了管理程序方便建议还是输入正确的版本号);Command line Parameters(Optional):用于该可执行程序安装时所需要使用的命令行参数,此处为可选项。
4) 在“Repackaging Method”部分,由于是限制功能版,因此只能选择【Snapshot】单选框。
在“Selecta Repackaging Wizard output directory:”部分,点击右侧的【Browse…】按钮来选择输出的打包向导文件的安放目录;3.2 生成.Msi安装程序1) 当目录选择完成后,点击【Repackage】按钮;2) AdminStudio程序这时会弹出“Repackaging Wizard”对话框,在“Welcome to Repackaging Wizard”页面中,点击【下一步】;3) 在“Method Selection”页面中,由于是限制功能版本,因此无需配置直接点击【下一步】;4) 在“Snapshot Method”页面中,选择【Single Step】单选框,点击【下一步】;5) 在“Collect Product Information”页面中,查看用于打包的源安装文件的信息是否正确,并且输入要生成Msi文件的文件信息,完成输入后点击【下一步】;Product Name:程序名称;Version:生成Msi文件的定义版本(随意输入);Company Name:公司名称(随意输入)。
Mltisim 13.0安装激活详细教程

Mltisim 13.0安装激活详细教程1.双击NI_Circuit_Design_Suite_13_0.exe安装包进行文件自解压,步骤如下图所示。
2.点击Install Circuit Design Suite 13.0安装软件,按以下步骤进行。
如果你的电脑没有安装.NET Framwork 4.0需按以下步骤进行安装,如果你的电脑已经安装过就不会弹出.NET Framwork 4.0的安装提示。
注:软件安装路径不能含有中文!如新建文件夹、软件之类的……找到开始---程序---National Instruments---NI License Manager 并点击打开。
如下图显示是试用版,需要激活。
打开激活工具并按以下步骤激活软件鼠标右击,打开license文件详细路径我的详细路径是D:\Program Files\National Instruments\Shared\License Manager\ Licenses请根据你自己选择的安装路径查找Licenses的详细路径。
以下只是举例说明如何激活。
鼠标右键选择你需要激活的版本,也可以全部激活。
一般只激活Full Edition和Power Pro Edition两个版本即可,Base Edition功能没有这两者强大。
我是全部激活了。
3.汉化软件,步骤如下,请根据自己需要选择是否汉化。
注:汉化是官方提供的12.0版本汉化,汉化准确率高。
非本人汉化。
解压语言包,将Chinese 整个文件夹复制到D:\Program Files\National Instruments\Circuit Design Suite 13.0\stringfiles 文件夹下。
以上是我自己的软件安装路径,你如果有不同的地方请自行修改路径打开软件确认软件运行情况与汉化情况,一切OK。
慢慢享用吧!。
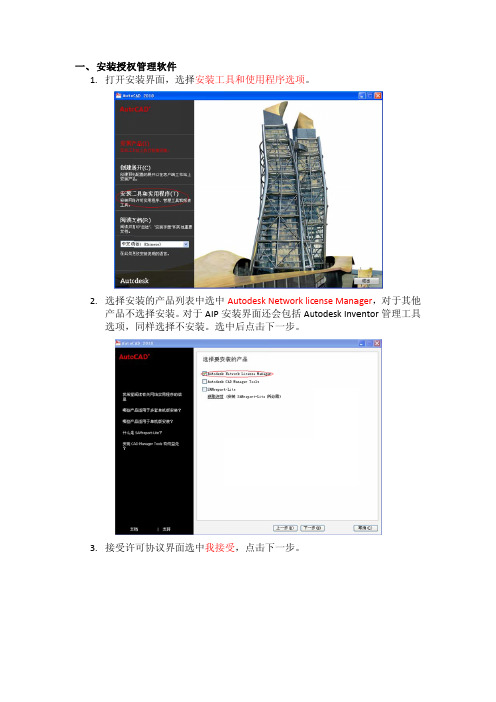
Autodesk服务器端安装说明
5、 在“Path to the license file”框中,输入指向设定好的许可证文件 的路径,或单击“Browse”以定位license文件。
6、 在“Path to the debug log file”框中,输入路径以创建调试日志, 或单击“Browse”以定位一个已经创建的日志文件。
9、 单击“Server Status”选项卡,点击“Perform Status Enquiry”在显 示窗口可以看到授权状态。
10、关闭LMTOOLS.exe,配置完成。 三、 客户端的安装
网络版客户端的安装于单机版基本一致,但安装时一定要注意 在出现以下 界面时一定要点“配置”按钮 选择“网络许可”。
3. 接受许可协议界面选中我接受,点击下一步。
4. 进入安装配置页面,点击配置按钮,对安装工具进行安装配置,包括安装 路径等选项,如果执行默认设置,直接点击安装即可。5. 完成ຫໍສະໝຸດ 装 LMTools 授权管理软件。
二、 配置网络授权 配置网络授权前的准备工作主要包括了三个部分: 第一、 对 license 文件进行备份和保存,客户如果拿到的 license 文件已 经是一个**.Lic 文件类型,无需对其进行特殊处理。如果客户拿 到的 license 是一邮件形式存在,授权前需要将 license 文件进行 特殊处理,具体方法为:新建 TXT 文件 → 打开 TXT 文件,将邮 件中 license 内容拷贝到 TXT 文件中 → 点击另存为,弹出另存 为界面。在文件名中将文件后缀改为**.lic,前缀用户可以自己 定义,保存类型中选中所有文件即可。 → 点击 保存。找到 C:\Program Files\Autodesk Network License Manager 文件夹, 在此文件夹新建文件夹命名为 license,将 license 文件备份到 此文件夹下即可。 第二、 找到 C:\Program Files\Autodesk Network License Manager 文 件夹,新建一个新的文件夹,命名为 Log(可以随便起)以便存 放日志文件。在新文件夹下新建 TXT 文件同时将文件后缀改为 **.log,前缀自己定义即可。 第三、 为了保证配置过程中顺利进行建议关掉防火墙,如果服务器不允 许关掉防火墙需要添加所需要的端口,具体添加方法为:打开控 制面版 → windows 防火墙 → 选择例外选项卡 → 选择 添加端口 → 在弹出面板中名称命名(例如)为 Autodesk1, 端口号为 2080,同样添加名称为(例如)Autodesk2,端口号为 27000 , 如 果 在 配 置 过 程 中 与 其 他 软 件 端 口 冲 突 , 选 择 27000-27009 其中任一端口进行添加进行配置。 1、 在“开始”→“(所有)程序” →“Autodesk” →“Network License Manager” 中找到网络许可管理器程序 LMTOOLS ,双击。 2、 在LMTOOLS程序的“Service/License File”选项卡中,选择 “Configuration Using Services”选项。
里诺使用方法
里诺使用方法
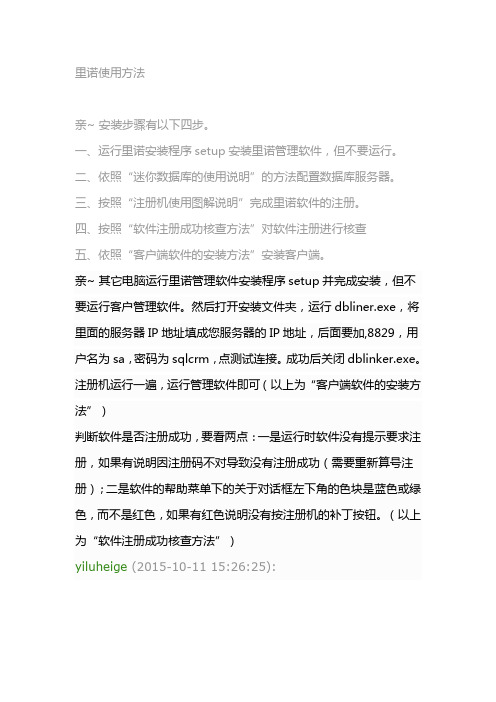
亲~ 安装步骤有以下四步。
一、运行里诺安装程序setup安装里诺管理软件,但不要运行。
二、依照“迷你数据库的使用说明”的方法配置数据库服务器。
三、按照“注册机使用图解说明”完成里诺软件的注册。
四、按照“软件注册成功核查方法”对软件注册进行核查
五、依照“客户端软件的安装方法”安装客户端。
亲~ 其它电脑运行里诺管理软件安装程序setup并完成安装,但不要运行客户管理软件。
然后打开安装文件夹,运行dbliner.exe,将里面的服务器IP地址填成您服务器的IP地址,后面要加,8829,用户名为sa,密码为sqlcrm,点测试连接。
成功后关闭dblinker.exe。
注册机运行一遍,运行管理软件即可(以上为“客户端软件的安装方法”)
判断软件是否注册成功,要看两点:一是运行时软件没有提示要求注册,如果有说明因注册码不对导致没有注册成功(需要重新算号注册);二是软件的帮助菜单下的关于对话框左下角的色块是蓝色或绿色,而不是红色,如果有红色说明没有按注册机的补丁按钮。
(以上为“软件注册成功核查方法”)
yiluheige(2015-10-11 15:26:25):。
天思软件安装说明
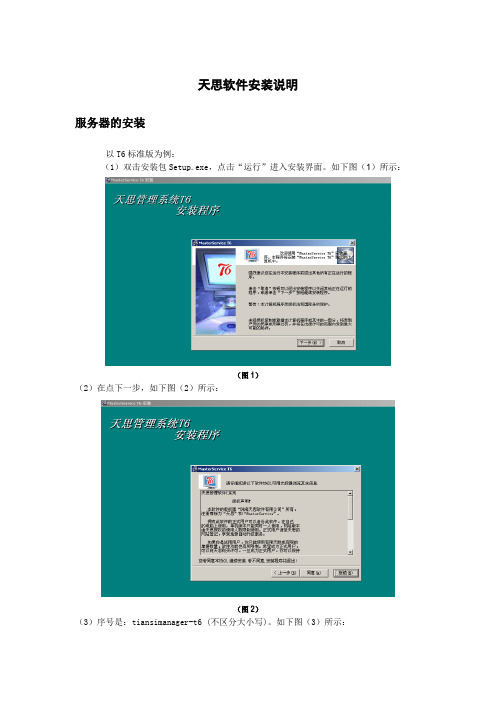
天思软件安装说明服务器的安装以T6标准版为例:(1)双击安装包Setup.exe,点击“运行”进入安装界面。
如下图(1)所示:(图1)(2)在点下一步,如下图(2)所示:(图2)(3)序号是:tiansimanager-t6 (不区分大小写)。
如下图(3)所示:(图3)(4)在点下一步,根据需求来选择“单机版”或“网络版”。
现以单机版为例:如下图(4)所示:(5)在点下一步,如下图(5)所示:(6)选择程序存放路径(建议修改路径,不要存放在系统文件盘符下),如下图(6)所示:(图6)(7)在系统从未安装T6时,我们应选择“完全安装”的安装类型,在安装时系统默认为“完全安装”。
如下图(7)所示:(8)在点下一步,如下图(8)所示:(9)在点下一步(N),如下图(9)所示:(10)在点下一步,如下图(10)所示:(图10)(11)等安装到100%时,大约花一两分钟左右,(安装容易且快速)。
单击“完成”,退出完成界面。
如下图(11)所示:(图11)服务器的数据库配置(1)数据库维护1、右击软件—属性—查找目标进入程序安装路径PROGRAM文件夹中,双击MgrAst.exe 后台应用程序,出现‘登陆控制服务器’对话框,写入需连接的数据库服务器地址、数据库登录用户名SA以及登录的数据库密码,点击连接,如下图所示。
(图12)注意:网络通讯协议多为TCP/IP,故建议此处,数据库服务器的地址尽量采用服务器在局域网内的固定IP地址;2、首次登陆MgrAst.exe后台工具,会要求为该工具登陆创建密码;(图13)3、进入系统登陆界面,在密码文本框中输入系统登陆密码,点击确定.在弹出框中选择’Yes’进行数据库创建。
(图14)4、点击开始进入系统执行阶段,如下图所示选择‘Yes to ALL’开始维护。
5、系统执行完成后弹出对话框显示数据库维护完毕,点击OK就可以了。
4.2.3软件注册(1)单击右击软件——属性——查找目标——Server(上一级文件)——SvrConf.exe进行设置。
台眾電腦 HostInsight SNMP4Server 軟體 安装及使用明手册

目錄目錄...........................................................................................................................................................................- 1 -版權聲明.......................................................................................................................................................................- 3 -商標聲明.......................................................................................................................................................................- 3 -如何使用本手冊...........................................................................................................................................................- 4 -第一章安裝HostInsight SNMP4Server系統.............................................................................................................- 5 -1-1 系統需求........................................................................................................................................................- 5 -1-2 光碟片內容....................................................................................................................................................- 6 -1-3安裝步驟.........................................................................................................................................................- 7 -1-3-1執行安裝程式於Windows作業系統.................................................................................................- 7 -1-3-2執行安裝程式於Linux作業系統....................................................................................................- 30 -1-4產品授權.......................................................................................................................................................- 32 -第二章HostInsight SNMP4Server系統使用說明.....................................................................................................- 33 -2-1 系統架構、目標功能說明..........................................................................................................................- 33 -2-1-1系統架構示意圖說明........................................................................................................................- 33 -2-1-2系統主要目標與功能說明................................................................................................................- 34 -2-2快速入門-基本操作步驟..............................................................................................................................- 35 -第三章HostInsight管理平台功能導覽.....................................................................................................................- 41 -3-1 主機管理......................................................................................................................................................- 41 -3-1-1 新增主機...........................................................................................................................................- 41 -3-1-2 主機列表...........................................................................................................................................- 45 -3-1-3 主機監視警戒值設定.......................................................................................................................- 46 -3-2 即時主機狀態..............................................................................................................................................- 49 -3-2-1 主機執行軟體資訊...........................................................................................................................- 49 -- 1 -3-2-2 安裝軟體資訊.................................................................................................................................- 53 -3-2-3 安裝硬體資訊...................................................................................................................................- 55 -3-2-4 安裝硬碟資訊...................................................................................................................................- 57 -3-2-5 網路狀態資訊...................................................................................................................................- 59 -3-2-6 Beacon管理....................................................................................................................................- 62 -3-3 異常資訊紀錄..............................................................................................................................................- 67 -3-3-1 即時異常資訊紀錄...........................................................................................................................- 67 -3-3-2 歷史異常資訊紀錄...........................................................................................................................- 70 -3-4 系統設定......................................................................................................................................................- 72 -3-4-1 群組管理...........................................................................................................................................- 72 -3-4-2 使用者管理.......................................................................................................................................- 76 -3-5 個人設定......................................................................................................................................................- 82 -3-6 圖表分析......................................................................................................................................................- 83 -3-7 產品註冊......................................................................................................................................................- 87 -第四章解除安裝HostInsight SNMP4Server系統...................................................................................................- 88 -4-1 解除安裝於Windows作業系統.................................................................................................................- 88 -4-1-1 解除安裝HostInsight SNMP4Server系統......................................................................................- 88 -4-1-2 解除安裝Tomcat伺服器.................................................................................................................- 90 -4-1-3 解除安裝MySQL資料庫................................................................................................................- 92 -4-1-4 解除安裝J2SE Runtime Environment運作環境............................................................................- 94 -4-2 解除安裝於Linux作業系統.......................................................................................................................- 95 -第五章附錄...............................................................................................................................................................- 96 -附錄A. 相關軟體官方網站連結...............................................................................................................................- 96 -附錄B. HostInsight SNMP4Server 常見問題問答集...............................................................................................- 97 -附錄C. 安裝Windows 作業系統之SNMP Agent...................................................................................................- 98 -- 2 -版權聲明本產品HostInsight SNMP4Server之軟體、手冊及說明書之版權均為台眾電腦股份有限公司所有,僅授權合法持有作正當用途之使用,除了備份之外,其他所有的權利本公司均予以保留。
MMI站软件安装手册
XDPS 系统 MMI 站软件安装前言手册用途本手册详细讲述了 XDPS 系统人机接口站(MMI 站)的操作系统和 XDPS3.0 系统软件的安装过程及注意事项。
手册内容第一章 第二章 第三章 第四章 介绍软件安装流程 操作系统安装步骤 XDPS3.0 系统软件的安装过步骤 常见问题及解决方案手册的阅读对象XDPS 系统的使用、维护、管理人员 XDPS 系统的工程项目开发人员 XDPS 系统开发、技术改造的研发人员相关手册《XDPS 硬件手册》 《XDPS 网络手册》新华控制工程有限公司XDPS 系统 MMI 站软件安装目第1章 1 2录版本 3.0简介............................................................................................................................. 1 简介简介 ..................................................................................................................................... 1 安装准备 ............................................................................................................................. 2 中文 WINDOWS2000 PROFESSIONAL 安装 ...................................................... 3第2章 1 2 3 4 5 6 7 8简介 ..................................................................................................................................... 3 计算机启动引导顺序设置 ................................................................................................. 3 中文 WINDOWS2000 PROFESSIONAL 安装 .......................................................................... 4 网络安装 ........................................................................................................................... 16 中文 WINDOWS2000 SP4 安装 ......................................................................................... 22 显卡驱动程序安装 ........................................................................................................... 24 磁盘管理 ........................................................................................................................... 26 中文 MICROSOFT OFFICE 2000 安装 ................................................................................ 28 XDPS 系统程序安装概述 ................................................................................... 30第3章 1 2 3MMI 软件安装条件.......................................................................................................... 30 安装 XDPS 系统软件 3.0 版 ............................................................................................ 30 XNET.INI 配置文件设置 ................................................................................................. 34 常见问题及解决方案............................................................................................... 39 常见问题及解决方案第4章 1 2 3 4网卡 ................................................................................................................................... 39 网络状态 ........................................................................................................................... 39 NETWIN 软件 .................................................................................................................. 40 显示器黑屏 ....................................................................................................................... 41新华控制工程有限公司XDPS 系统 MMI 站软件安装第1章 简介 章1 简介这本手册主要讲述了 XDPS 系统的工程师站、操作员站和历史站系统软件的安 装过程及常见问题。
Mimio studio软件安装须知
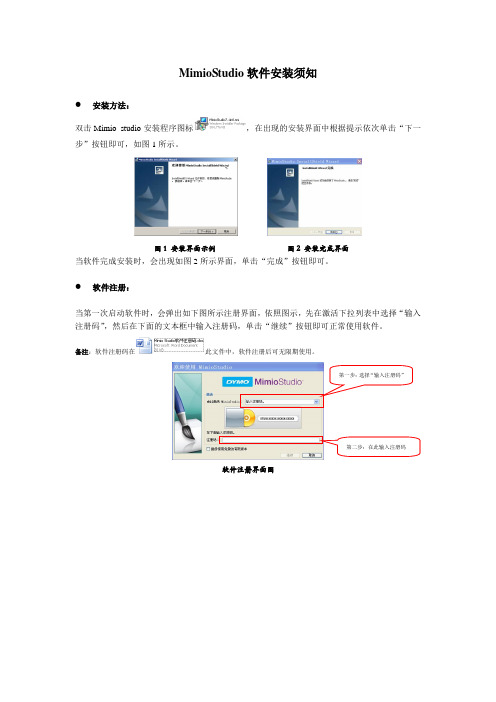
MimioStudio软件安装须知●安装方法:
双击Mimio studio
安装程序图标,在出现的安装界面中根据提示依次单击“下一
步”按钮即可,如图1所示。
图1 安装界面示例图2 安装完成界面
当软件完成安装时,会出现如图2所示界面,单击“完成”按钮即可。
●软件注册:
当第一次启动软件时,会弹出如下图所示注册界面,依照图示,先在激活下拉列表中选择“输入注册码”,然后在下面的文本框中输入注册码,单击“继续”按钮即可正常使用软件。
备注:软件注册码在此文件中,软件注册后可无限期使用。
软件注册界面图第一步:选择“输入注册码”
第二步:在此输入注册码。
openstudio使用手册

openstudio使用手册OpenStudio是一款用于建筑能源模拟的开放源代码软件,它提供了一套全面的工具和功能,帮助用户在建筑设计过程中优化能源效率和减少对环境的影响。
本文将介绍OpenStudio的使用手册,包括软件的安装、基本操作、模型创建、参数设置和结果分析等方面。
一、安装OpenStudio2. 按照安装向导的指示完成OpenStudio的安装。
二、OpenStudio的基本操作3.使用“组件”工具栏上的工具添加模型的组件,如窗户、门、空调设备等。
4.设置建筑物的材料属性,如热传导系数和太阳吸收系数等。
5.定义建筑物的空间和空调区域,将模型分割为不同的部分。
6.定义模型的空间装饰,并设置其他参数,如设备使用时间、照明水平等。
三、OpenStudio模型的创建2.在“分区”选项卡中设置建筑物的分区。
可以手动创建分区或根据已有的文件进行导入。
3.根据具体需求,可以在模型中添加其他的物体和系统组件,如空调系统、太阳能电池板等。
四、参数设置1.使用“属性”选项卡设置建筑物的属性,如建筑类型、用途和能源标准等。
2.在“材料和构件”选项卡中设置建筑材料的属性,如厚度、传热系数等。
3.在“空间”选项卡中设置空间的属性,如朝向、体积和高度等。
4.在“系统”选项卡中设置空调系统、照明系统和电器的相关参数。
五、结果分析1.点击“模拟”按钮开始进行能源模拟。
2. 完成模拟后,可以查看模拟结果。
OpenStudio提供了丰富的图表和图形界面,帮助用户直观地分析结果。
3.通过结果分析,用户可以了解建筑的能源消耗情况,优化建筑设计以提高能源效率。
总结:OpenStudio是一款功能强大的建筑能源模拟软件,它具有丰富的功能和易于使用的界面,可以辅助用户优化建筑能源效率。
通过按照安装和使用手册的指导,用户可以轻松地进行模型的创建、参数设置和结果分析等操作。
OpenStudio对于建筑能源管理者、设计师和研究人员来说是一款非常有用的工具,有助于提高建筑设计的可持续性和能源效率。
MAUI Studio安装手册说明书

MAUI Studio安装手册概要本文档介绍如何下载、安装和注册MAUI Studio软件。
简介MAUI® Studio软件可以将力科示波器的高级用户界面体验带到您的PC 上。
可以将力科示波器上保存的波形、设置和LabNotebook文件导入软件中,进行查看和分析,就像在示波器上操作一样。
注册完成后,免费的MAUI Studio软件默认将模拟HDO4000A示波器的GUI和功能。
MAUI Studio + Bundle Upgrade可以模拟任何一款力科示波器的GUI和功能,支持更高带宽和更多软件选件,并且在2020年全年免费提供。
PC配置要求:操作系统: x64 Windows®10 Pro operating system处理器: Intel®CoreTM i7 Processor or better, 2.4 GHz or higher内存: 4 GB RAM or better硬盘: 至少2 GB的可用空间显示器分辨率: 最低 1280x780 pixel display, 推荐1920x1080注意:主机PC必须连接互联网才能下载和注册MAUI Studio软件。
下载软件1. 从PC进入链接:/mauistudio2.点击Download Software,按照提示,将安装文件保存到PC主机上安装软件1. 在PC上, 双击安装文件图标2. 查看并接受最终用户许可协议3. 按照安装程序提示并安装XStream DSO组件,注意要同时选择安装WavePulser组件4. 安装程序完成后,单击完成并继续注册以激活它。
Teledyne LeCroy MAUI Studio注册软件需要注册才能激活MAUI Studio软件,需要安装与主机PC匹配的许可证文件,该许可证文件包含对应的MAUI功能,PC必须连接Internet才能完成注册过程。
1. 启动MAUI Studio软件,可以通过桌面图标或者从Windows开始菜单LeCroy > Start DSO启动,您应该会看到“激活MAUI Studio许可证”的对话框,保持打开状态,直到完成注册。
Developer Studio安装指南说明书

Developer Studio Installation Guide Version 11.2October 2015Developer Studio Installation GuideProduct version: 11.2Release date: 10-22-15Copyright © 2003, 2016, Oracle and/or its affiliates. All rights reserved.This software and related documentation are provided under a license agreement containing restrictions on use and disclosure and are protected by intellectual property laws. Except as expressly permitted in your license agreement or allowed by law, you may not use, copy, reproduce, translate, broadcast, modify, license, transmit, distribute, exhibit, perform, publish, or display any part, in any form, or by any means. Reverse engineering, disassembly, or decompilation of this software, unless required by law for interoperability, is prohibited.The information contained herein is subject to change without notice and is not warranted to be error-free. If you find any errors, please report them to us in writing.If this is software or related documentation that is delivered to the U.S. Government or anyone licensing it on behalf of the U.S. Government, the following notice is applicable:U.S. GOVERNMENT END USERS: Oracle programs, including any operating system, integrated software, any programs installed on the hardware, and/or documentation, delivered to U.S. Government end users are "commercial computer software" pursuant to the applicable Federal Acquisition Regulation and agency-specific supplemental regulations. As such, use, duplication, disclosure, modification, and adaptation of the programs, including any operating system, integrated software, any programs installed on the hardware, and/or documentation, shall be subject to license terms and license restrictions applicable to the programs. No other rights are granted to the U.S. Government.This software or hardware is developed for general use in a variety of information management applications. It is not developed or intended for use in any inherently dangerous applications, including applications that may create a risk of personal injury. If you use this software or hardware in dangerous applications, then you shall be responsible to take all appropriate fail-safe, backup, redundancy, and other measures to ensure its safe use. Oracle Corporation and its affiliates disclaim any liability for any damages caused by use of this software or hardware in dangerous applications.Oracle and Java are registered trademarks of Oracle and/or its affiliates. Other names may be trademarks of their respective owners.Intel and Intel Xeon are trademarks or registered trademarks of Intel Corporation. All SPARC trademarks are used under license and are trademarks or registered trademarks of SPARC International, Inc. AMD, Opteron, the AMD logo, and the AMD Opteron logo are trademarks or registered trademarks of Advanced Micro Devices. UNIX is a registered trademark of The Open Group.This software or hardware and documentation may provide access to or information about content, products, and services from third parties. Oracle Corporation and its affiliates are not responsible for and expressly disclaim all warranties of any kind with respect to third-party content, products, and services unless otherwise set forth in an applicable agreement between you and Oracle. Oracle Corporation andits affiliates will not be responsible for any loss, costs, or damages incurred due to your access to or use of third-party content, products, or services, except as set forth in an applicable agreement between you and Oracle.Documentation AccessibilityFor information about Oracle's commitment to accessibility, visit the Oracle Accessibility Program website at /pls/ topic/lookup?ctx=acc&id=docacc.Access to Oracle SupportOracle customers that have purchased support have access to electronic support through My Oracle Support. For information, visit http:// /pls/topic/lookup?ctx=acc&id=info or visit /pls/topic/lookup?ctx=acc&id=trs if you are hearing impaired.Table of ContentsPreface (v)About this guide (v)Who should use this guide (v)Conventions used in this guide (vi)Contacting Oracle Support (vi)1. Installation for Endeca Developer Studio (1)Before you install (1)About Developer Studio (1)System requirements (2)Required reading (2)Installing Endeca Developer Studio (3)Installation steps (3)Silent installation steps for Windows (3)2. Changing the Developer Studio configuration (5)Pipeline paths in an Endeca Application Controller environment (5)About temporal properties (5)Configuring Developer Studio for the use of Duration and Time property types (6)3. Uninstalling Developer Studio (9)Steps to uninstall Developer Studio on Windows (9)Developer Studio Installation Guide iiiiv Developer Studio Installation GuidePrefaceOracle Commerce Guided Search is the most effective way for your customers to dynamically explore yourstorefront and find relevant and desired items quickly. An industry-leading faceted search and GuidedNavigation solution, Guided Search enables businesses to influence customers in each step of their searchexperience. At the core of Guided Search is the MDEX Engine™, a hybrid search-analytical database specificallydesigned for high-performance exploration and discovery. The Oracle Commerce Content Acquisition Systemprovides a set of extensible mechanisms to bring both structured data and unstructured content into the MDEXEngine from a variety of source systems. The Oracle Commerce Assembler dynamically assembles content fromany resource and seamlessly combines it into results that can be rendered for display.Oracle Commerce Experience Manager enables non-technical users to create, manage, and deliver targeted,relevant content to customers. With Experience Manager, you can combine unlimited variations of virtualproduct and customer data into personalized assortments of relevant products, promotions, and other contentand display it to buyers in response to any search or facet refinement. Out-of-the-box templates and experiencecartridges are provided for the most common use cases; technical teams can also use a software developer's kitto create custom cartridges.About this guideThis guide contains installation instructions for setting up Developer Studio on Windows.This guide assumes that you have read the Oracle Endeca Commerce Getting Started Guide. This guide coversinstallation of Endeca Developer Studio; for information about installing other Endeca components, refer to theappropriate Installation Guide. Endeca Developer Studio is a Windows-only application.Who should use this guideThis guide is intended for developers who are building applications using Oracle Endeca Guided Search, as wellas for system administrators managing Endeca applications.Preface vConventions used in this guideThis guide uses the following typographical conventions:Code examples, inline references to code elements, file names, and user input are set in monospace font. In thecase of long lines of code, or when inline monospace text occurs at the end of a line, the following symbol isused to show that the content continues on to the next line: ¬When copying and pasting such examples, ensure that any occurrences of the symbol and the correspondingline break are deleted and any remaining space is closed up.Contacting Oracle SupportOracle Support provides registered users with answers to implementation questions, product and solution help,and important news and updates about Guided Search software.You can contact Oracle Support through the My Oracle Support site at https://.vi Preface1Installation for Endeca Developer StudioThis section contains instructions for installing Developer Studio.Related links•Before you install (page 1)•Installing Endeca Developer Studio (page 3)Before you installThis section provides an overview of Endeca Developer Studio, system requirements, and other information youneed to know before installing.About Developer StudioDeveloper Studio is a Windows application that you use to define all aspects of your instance configurationincluding pipeline components, Endeca properties and dimensions, precedence rules, dynamic business rules,and user profiles.With Developer Studio, you can define:•Pipeline components for tasks such as loading, standardizing, joining, mapping, and exporting data.•Endeca properties and property attributes such as sort and rollup.•Dimensions and dimension values, including dimension hierarchy.•Precedence rules among dimensions that provide better control over your implementation's navigation flow.•Search configurations, including which properties and dimensions are available for search.•Dynamic business rules that allow you to promote certain records on your Web site using data-drivenbusiness logic. Dynamic business rules are used to implement merchandising and content spotlighting.1 Installation for Endeca Developer Studio1•User profiles that tailor the content returned to an end-user based upon pre-configured rules.Developer Studio uses a project file, with an .esp extension, that contains pointers to the XML files that supportan instance configuration.System requirementsDeveloper Studio is only available for Windows and has the following hardware requirements:Minimum hardware requirements:•x86 or x64 compatible processor, minimum 1.8 Ghz•At least 1 GB of RAM, depending on the size of the application data set•80 GB hard driveRecommended hardware requirements:•x86 or x64 3.0+ Ghz processor; Oracle recommends Intel Xeon, AMD Opteron, or Intel Dual Core Pentium (x86only) processors• 2 GB of RAM or more, depending on the size of the application data set•One 80 GB hard drive per CPU, minimum 10,000 RPM spindle speed•Gigabit ethernetThe Endeca Developer Studio software installs to approximately 50 MB. Because multiple versions of DeveloperStudio can be stored, a large hard drive is recommended.Required readingBefore installing, Oracle recommends that you read the following documents for important information aboutthe release.Getting Started GuideThe Oracle Commerce Guided Search Getting Started Guide gives an overview of Oracle Commerce Guided Searchcomponents and includes information about configuration scenarios. After installing all the components in yourOracle Commerce Guided Search deployment, read this guide for information on verifying your installation. Youcan download the Oracle Commerce Guided Search Getting Started Guide from the Oracle Technology Network. Release NotesRefer to the release notes for information about known issues for this release. You can download the OracleCommerce Guided Search and Experience Manager Release Notes from the Oracle Technology Network. Migration GuideRefer to the Oracle Commerce Platform Services Migration Guide for information about migrating yourimplementation from a previous version of Oracle Commerce Guided Search software.2 1 Installation for Endeca Developer StudioInstalling Endeca Developer StudioThis section describes the installation procedure.Installation stepsDeveloper Studio is available on the Oracle Software Delivery Cloud.To install Developer Studio:1.In your local environment, locate the Developer Studio installer that you downloaded from the OracleSoftware Delivery Cloud.2.Extract the Endeca Developer Studio package to a local directory.3.Double-click the installer file: OCdevstudio<version>-<OS>_<BUILD>.exe4.Click Next to begin the installation wizard.5.On the Copyright and legal screen, click Next.6.In the License Agreement screen, select I accept the terms in the license agreement, then click Next.7.In the Destination Folder screen, either accept the default location or click Change and browse to thedirectory where you want to install the Endeca software. Oracle recommends that you accept the defaultlocation (C:\Endeca\DeveloperStudio). When you have finished, click Next.NoteIf you do not use the default location, and you are installing more than one Endeca product on thesame machine, ensure that you install each product to a separate location.8.In the Ready to Install the Program screen, click Install.9.When the installation is complete, click Finish.Silent installation steps for WindowsThe silent installer is useful if you want to add the installation of Developer Studio to your own install script, orpush out the installation on multiple machines.The silent installer is not interactive and is available for Windows only.To launch the silent installer:1.Open a command prompt and navigate to the directory where you downloaded the installer.2.Issue the following command:dstd_version_arch-OS.exe /s /v" /qn INSTALLDIR=\"C:\Endeca\DeveloperStudio\""You can replace C:\Endeca\DeveloperStudio\with the location to which you want to install.1 Installation for Endeca Developer Studio34 1 Installation for Endeca Developer Studio2Changing the Developer Studio configurationThis section describes tasks for configuring Developer Studio. For complete information on the pipelinedevelopment and instance configuration tasks that you can perform in Developer Studio, see the EndecaDeveloper Studio Help.Related links•Pipeline paths in an Endeca Application Controller environment (page 5)•About temporal properties (page 5)Pipeline paths in an Endeca Application Controller environmentWhen using a Pipeline.epx file in an environment controlled by the Endeca Application Controller, pipelinepaths for incoming data are treated as follows:•Relative paths in the pipeline are resolved in relation to the directory path you entered in the IncomingDirectory field for hosts, components and scripts on the EAC Administration page in Oracle EndecaWorkbench.•Absolute paths are not changed and are used exactly as specified.About temporal propertiesTime and date properties are defined like other property types in Endeca Developer Studio.The Property editor provides three temporal property types:•DateTime values represent a time of day on a given date2 Changing the Developer Studio configuration5•Duration values represent a length of time•Time values represent a time of dayThe DateTime property type is available by default in Developer Studio. The Duration and Time property typesare not supported in the default version of Developer Studio.Configuring Developer Studio for the use of Duration and Time property types Developer Studio is configured through the EStudio.ini file, located in the conf directory of the DeveloperStudio installation.Settings in this file are read at startup. The EStudio.ini file accepts two configuration options, latitude andclassicForge, each of which may be set to 0 (zero) or 1.To Configure Developer Studio for Duration and Time properties:1.Navigate to Developer Studio's conf directory.For example:C:\Endeca\DeveloperStudio\<version>\conf2.Open EStudio.ini in a text editor.Edit the file so that it contains the following settings:3.4.Copy the entire contents of the directory template\Basic Pipeline to the directory template\_Latitude\Basic Pipeline, overwriting existing files.5.Open the Project.esp file in the template\_Latitude\Basic Pipeline directory in a text editor. Just, which is located near the end of the file, add the following line:above the line </STUDIO_PROJECT>6.Save and close the file.7.Create a Latitude directory in the help directory of Developer Studio.A sample path for this directory might be:8.Copy the contents of the help\basic directory to the new Latitude directory.unch Developer Studio and open your project file.6 2 Changing the Developer Studio configuration10.In the Project Explorer, double-click on Properties.11.Create a new property or edit an existing property.In the Type drop-down list, the Duration and Time property types are now available.NoteOnce you have added properties with a Duration or Time type, the project cannot be opened by aDeveloper Studio instance with the default configuration.2 Changing the Developer Studio configuration78 2 Changing the Developer Studio configuration3Uninstalling Developer StudioThis section contains the procedures for uninstalling the Developer Studio package.Related links•Steps to uninstall Developer Studio on Windows (page 9)Steps to uninstall Developer Studio on WindowsFollow these steps to uninstall Developer Studio from your Windows machine.Before you begin the uninstall process, back up files that you want to retain from the Developer Studio directory.To uninstall Developer Studio from your Windows machine:1.From the Windows Control Panel, select Add or Remove Programs.2.Select Endeca Developer Studio from the list of installed software.3.Click Remove and follow the prompts.3 Uninstalling Developer Studio910 3 Uninstalling Developer Studio。
MIMICS软件试用安装与激活
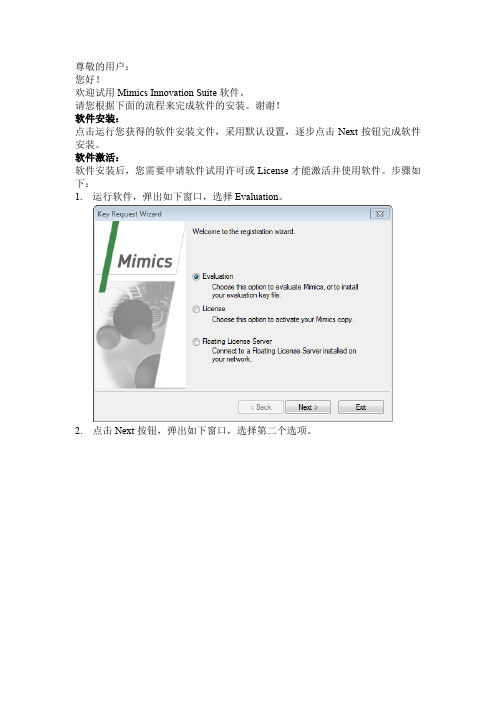
尊敬的用户:
您好!
欢迎试用Mimics Innovation Suite软件。
请您根据下面的流程来完成软件的安装。
谢谢!
软件安装:
点击运行您获得的软件安装文件,采用默认设置,逐步点击Next按钮完成软件安装。
软件激活:
软件安装后,您需要申请软件试用许可或License才能激活并使用软件。
步骤如下:
1.运行软件,弹出如下窗口,选择Evaluation。
2.点击Next按钮,弹出如下窗口,选择第二个选项。
3.点击Next,弹出如下窗口。
4.拷贝System ID发给与您联系的Materialise工程师,工程师会尽快为您申请
软件试用的License Key file。
5.收到License Key file后,点击上图的Browse按钮导入License Key file即可
激化软件。
如果在软件试用的过程中,有任何问题,请联系Materialise工程师。
MIMIC专题MIMIC数据库的安装
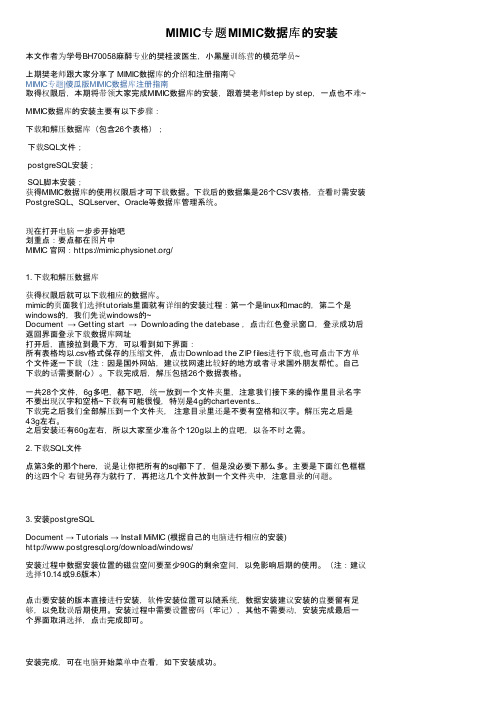
MIMIC专题MIMIC数据库的安装本文作者为学号BH70058麻醉专业的樊桂波医生,小黑屋训练营的模范学员~上期樊老师跟大家分享了 MIMIC数据库的介绍和注册指南MIMIC专题|傻瓜版MIMIC数据库注册指南取得权限后,本期将带领大家完成MIMIC数据库的安装,跟着樊老师step by step,一点也不难~ MIMIC数据库的安装主要有以下步骤:下载和解压数据库(包含26个表格);下载SQL文件;postgreSQL安装;SQL脚本安装;获得MIMIC数据库的使用权限后才可下载数据。
下载后的数据集是26个CSV表格,查看时需安装PostgreSQL、SQLserver、Oracle等数据库管理系统。
现在打开电脑一步步开始吧划重点:要点都在图片中MIMIC 官网:https:///1. 下载和解压数据库获得权限后就可以下载相应的数据库。
mimic的页面我们选择tutorials里面就有详细的安装过程:第一个是linux和mac的,第二个是windows的,我们先说windows的~Document → Getting start → Downloading the datebase ,点击红色登录窗口,登录成功后返回界面登录下载数据库网址打开后,直接拉到最下方,可以看到如下界面:所有表格均以.csv格式保存的压缩文件,点击Download the ZIP files进行下载,也可点击下方单个文件逐一下载(注:因是国外网站,建议找网速比较好的地方或者寻求国外朋友帮忙。
自己下载的话需要耐心)。
下载完成后,解压包括26个数据表格。
一共28个文件,6g多吧,都下吧,统一放到一个文件夹里,注意我们接下来的操作里目录名字不要出现汉字和空格~下载有可能很慢,特别是4g的chartevents...下载完之后我们全部解压到一个文件夹,注意目录里还是不要有空格和汉字。
解压完之后是43g左右。
之后安装还有60g左右,所以大家至少准备个120g以上的盘吧,以备不时之需。
Mimics科研版20.0安装说明

1、双击安装程序,出现如下界面,点击“Next”,继续安装!
2、接着出现如下界面,勾选“I accept....”,然后点击“Next”即可!
3、接着出现如下界面,勾选“Europe-Africa”即可,然后点击“Next”继续!
4、出现如下界面,选择“Complete”,然后点击“Next”继续!
6、出现如下界面,接着点击“Next”继续即可!
8、安装进程开始了,不要动!
9、如果点算计有360,会提示程序安装,这个时候一律勾选“允许程序运行”即可!
10、安装进程完成,会出现如下界面,选择“Finish”即可!
11、最后计算机会提示你重新启动,点击“Yes”,重新启动计算机即可!
12、这个时候,在桌面上会出现两个图标,一个是mimics 20.0,另外一个是3-matic 12.0,插入U盾,就可以使用了!!!。
Micro Focus Silk Test 15.0 Silk4J Web Edition安装指南说
Installation GuideMicro Focus575 Anton Blvd., Suite 510Costa Mesa, CA 92626Copyright © Micro Focus 2014. All rights reserved. Portions Copyright © 1992-2009 BorlandSoftware Corporation (a Micro Focus company).MICRO FOCUS, the Micro Focus logo, and Micro Focus product names are trademarks orregistered trademarks of Micro Focus IP Development Limited or its subsidiaries or affiliatedcompanies in the United States, United Kingdom, and other countries.BORLAND, the Borland logo, and Borland product names are trademarks or registeredtrademarks of Borland Software Corporation or its subsidiaries or affiliated companies in theUnited States, United Kingdom, and other countries.All other marks are the property of their respective owners.2013-12-10iiContentsIntroduction (4)System Requirements and Prerequisites (4)Hardware Requirements (4)Tested Software (4)Administrator Privileges (5)Items Included with Silk4J Web Edition (5)Licensing Information (6)Installing Silk Test (7)Installation Prerequisites (7)Resetting the TEMP Environment Variable (7)Installing Silk4J (7)Installing the Silk4J Eclipse Plug-in Manually (8)Uninstalling Silk Test (9)Contents | 3IntroductionThis Help provides all the information you need to install and uninstall Silk Test. It describes hardware andsoftware requirements and details the various setup options.System Requirements and PrerequisitesThe following section identifies the system requirements for installing and running Silk Test.Hardware RequirementsWe recommend the following hardware requirements:Tested SoftwareThis section lists the software with which Silk Test 15.0 has been tested.Operating SystemsSilk Test 15.0 has been tested with the following operating systems:•Microsoft Windows XP SP3•Microsoft Windows Vista SP2•Microsoft Windows 7•Microsoft Windows 7 SP1•Microsoft Windows 8•Microsoft Windows 8.1Web ApplicationsFor the Open Agent, Silk Test 15.0 has been tested with the following browsers and Web technologies:4 | IntroductionSilk4JYou can integrate Silk4J in Eclipse 3.7.2 or later. Version 4.3.1 is shipped with Silk Test.Administrator PrivilegesYou must have local administrator privileges to install Silk Test.Items Included with Silk4J Web EditionWhen you install Silk4J, the following items are available:•Silk4J•Product Notification Service - This application resides in the system tray and will check for updates at a configurable interval.•Online Help topicsAccess the help from within each product from the Help menu.•Release NotesFor information about new features, supported platforms and versions, known issues, and work-arounds, refer to the Silk4J Web Edition Release Notes, available from Release Notes.•Online tutorials from /productdoc.aspxYou must have Adobe Acrobat Reader™ to view PDF documents.•Sample applications that you can access online•Adobe Flex sample applicationsAccess Flex sample applications at /flex/SilkTest15.0/index.html.•Insurance Company Web applicationYou can access the Web application at: /InsuranceWebExtJS/.Introduction | 5Licensing InformationUnless you are using a trial version, Silk Test requires a license.The licensing model is based on the client that you are using and the applications that you want to be ableto test. The available licensing modes support the following application types:Note: To use a Full or a Premium license, you require a different setup package. The information inthis document applies only to the Web Edition of Silk4J. For a detailed overview of the capabilities ofthe Full and Premium offering, see Release Notes.6 | Licensing InformationInstalling Silk TestThis section explains the setup options that are available when installing Silk Test.Installation PrerequisitesBefore installing Silk Test, verify the following information:•Your user account possesses local administrator privileges.Resetting the TEMP Environment VariableIf your Windows TEMP environment variable does not point to a valid directory, an error message isdisplayed. To successfully install Silk Test, your TEMP environment variable must point to a valid directory.1.Choose Start > Settings > Control Panel.2.Double-click System.3.Click the Advanced tab, and then click Environment Variables.4.Under User Variables or System Variables, double-click the TEMP variable.5.Enter a valid directory, and then click OK.6.Restart the Silk Test installation by double-clicking the EXE file.Installing Silk4JThe Silk4J Eclipse plug-in enables you to create Java based test scripts directly in your Eclipseenvironment. Silk4J is automatically installed when you choose a standard or complete installation. If youchoose a basic or custom installation, you can install Silk4J at a later time. When you install Silk4J, SilkTest Recorder and the Open Agent are also installed. Silk Test Recorder enables you to record tests ratherthan manually coding them. The Open Agent is required to run Silk4J and Silk Test Recorder.1.Locate and double-click the Silk Test executable file.If you have a Silk Test CD, insert your CD. If the setup program does not start automatically, manuallystart the Silk Test setup program by choosing Start > Run and entering <cddrive>:\setup.exe.Note: If your Windows TEMP environment variable does not point to a valid directory, an errormessage is displayed. To successfully install Silk Test, your TEMP environment variable mustpoint to a valid directory.The InstallAnywhere wizard opens.2.If a previous version of Silk Test is installed, click Uninstall and then click Next to remove all installedfeatures.You must uninstall any earlier versions before you install a new version.3.Click Next. The License Agreement opens.4.Read the license agreement carefully. If you accept the terms of the agreement, click I accept theterms of the License Agreement.5.Click Next. The Choose Install Folder page opens.6.To change the default installation directory, perform the following steps:Installing Silk Test | 7a)Click Choose. The Browse For Folder dialog box opens.b)Specify the folder in which you want to install Silk Test, and then click OK to return to the ChooseInstall Folder page.The location displays in the Where Would You Like to Install? text box.7.Click Next. The Welcome to Silk4J page opens.8.Specify whether you want to install a new Eclipse environment when you install Silk4J.a)Click one of the following option buttons:•Download Eclipse (92MB) and install Silk4J – To install Silk4J and an Eclipse 3.7.2environment, click this option.•Install Silk4J and use an existing Eclipse environment – To use an existing Eclipseenvironment with Silk4J, click this option. Click Browse and navigate to the Eclipse environmentthat you want to use.•Install Silk4J manually – To install Silk4J into an Eclipse environment manually, click thisoption. A folder named dropins is created in the Silk Test installation directory. Copy this folderinto a valid Eclipse directory to use Silk4J.b)Click Next.When installation completes, access the Eclipse environment by choosing Start > Programs > Silk >Silk Test > Clients > Silk4J. For instructions for using the plug-in, refer to the online help within theplug-in.9.Specify whether you want to create Windows firewall exceptions.Note: This step is only available for Windows XP, Windows Vista, Windows 7, and WindowsServer 2008.a)Click one of the following option buttons:•Yes – To have setup create firewall exceptions for all Silk Test executable files. As a result, you are not prompted to block or allow the executable files when you launch them.•No – To be prompted when you launch the Silk Test executable file.b)Click Next.10.Review the provided information and perform one of the following steps:•To change any settings, click Previous to return to the appropriate page.•If you are satisfied with the settings, click Install to start the installation process.Tip: If a message appears stating that there is not enough space while files are copying, redefinethe TEMP area to a drive that contains more space. The installer uses the TEMP area forunzipping files. For example, if your TEMP area is d:\temp and you are installing to e:\SilkTest, the E drive may contain enough space for the installation, but the D drive is thelimiting factor.11.Click Done.12.Restart Eclipse if it was running when you performed the Silk4J installation.When installation completes, access the Eclipse environment by clicking Start > Programs > Silk >Silk Test > Clients > Silk4J. For instructions for using the plug-in, refer to the online help within theplug-in.Installing the Silk4J Eclipse Plug-in ManuallyThe Silk4J Eclipse plug-in enables you to create Java-based test scripts directly in your Eclipseenvironment. You can install the Silk4J Eclipse plug-in when you install Silk Test using the Silk Testinstallation wizard.Use this procedure:8 | Installing Silk Test•If you upgrade your version of Eclipse after you install the Silk4J plug-in.•If you chose the Install Silk4J manually option during installation.•If you did not install the Silk4J Eclipse plug-in when you installed Silk Test, and you want to install it manually.1.Perform one of the following steps:•If you chose the Install Silk4J Manually option during installation, locate the dropins folder in the Silk Test installation directory.By default the location is C:\Program Files\Silk\Silk Test\dropins.•Create a dropins folder in the Silk Test installation directory and then create a Silk4J.link file that contains the following text:path=<Silk Test Install Directory>/ng/Silk4JFor example, you might add:path=C:/Program Files/Silk/Silk Test/ng/Silk4JNote: The path requires forward slashes.2.Copy the Silk4J.link file and paste it into the Eclipse dropins folder.For example, if your Eclipse environment is installed at C:\Eclipse, copy the Silk4J.link file to C:\Eclipse\dropins.3.Restart Eclipse if it was running when you performed the Silk4J installation.When installation completes, access the Eclipse environment by clicking Start > Programs > Silk >Silk Test > Clients > Silk4J. For instructions for using the plug-in, refer to the online help within theplug-in.Tip: If you encounter problems starting Silk4J, start Eclipse with the parameter -clean one time.Uninstalling Silk TestWhen you install a new version of Silk Test, the wizard prompts you to uninstall any existing versions ofSilk Test. You can also uninstall Silk Test from the programs menu at any time.1.Click Start > Programs > Silk > Silk Test > Administration > Silk Test Uninstall. TheInstallAnywhere wizard opens the Uninstall Silk Test <version> page.2.To remove all files from the installation directory, check the Remove all files check box.If you check this check box, the following items or folders are removed:•The Access database and samples•The contents of [AppDATA]/Silk/Silk TestFor example, on Windows 7 this directory is located at: C:\Users\[username]\AppData\Roaming\Silk\Silk Test•The contents of [commonAppData]/Silk/Silk TestFor example, on Windows 7 this directory is located at: C:\ProgramData\Silk Test•The contents of [commonAppData]/Silk/Silk Test WorkbenchFor example, on Windows 7 this directory is located at: C:\ProgramData\Silk TestWorkbench3.Click Uninstall. If any files were not removed, a list of the files is provided.4.Click Done.Installing Silk Test | 9IndexAadmin permissionsrequired 5administrator privilegesrequired 5EEclipse plug-in 7, 8GGreen Mountain Outpost (GMO) application location 5Iinstallingoverview 4process overview 7Silk4J 7, 8Insurance Company Web applicationlocation 5Llicensingavailable license types 6 Ooverviewinstalling 4items installed 5Ssample applicationslocation 5Silk4Jinstalling manually 8TTEMP environment variable 7 UuninstallingSilkTest 910 | Index。
- 1、下载文档前请自行甄别文档内容的完整性,平台不提供额外的编辑、内容补充、找答案等附加服务。
- 2、"仅部分预览"的文档,不可在线预览部分如存在完整性等问题,可反馈申请退款(可完整预览的文档不适用该条件!)。
- 3、如文档侵犯您的权益,请联系客服反馈,我们会尽快为您处理(人工客服工作时间:9:00-18:30)。
MimioStudio 软件安装须知
● 安装方法:
双击MimioStudio 安装程序图标
,在出现的安装界面中根据提示依次
单击“下一步”按钮即可,如图1所示。
图1 安装界面示例 图2 安装完成界面
当软件完成安装时,会出现如图2所示界面,单击“完成”按钮即可。
● 软件注册:
当第一次启动软件时,会弹出如下图所示注册界面,依照图示,先在激活下拉列表中选择“输入注册码”,然后在下面的文本框中输入注册码,单击“继续”按钮即可正常使用软件。
软件注册后可无限期使用。
软件注册界面图
备注:MimioStudio 软件注册码: STU50-M9P3V-3JOXO-M6N3M
● 软件最低系统要求
∙Pentium II 、750 MHz 处理器的Microsoft Windows®兼容电脑
∙Microsoft Windows XP SP2、Microsoft Vista®或Microsoft Windows 7 操作系统 ∙最低512 MB RAM( 推荐采用1 GB RAM)
∙250 MB 可用磁盘空间
∙光驱或者可供下载软件的Internet 连接
∙可用USB 端口
第一步:选择“输入注册码”
第二步:在此输入注册码。