VS安装使用说明书
中星微 VS-IPC1002 快速安装使用指南
中星微网络摄像机VS-IPC1002快速安装使用指南感谢您选购中星微网络摄像机,VS-IPC1002是本公司最新设计生产的高性能网络摄像机,针对中小企业办公和家庭上网需要,该摄像机不仅包含了稳定的网络连通性和强大的用户管理功能,具有良好的可靠性和兼容性,而且功能齐全,性能优越,安装操作简单,用户不需要任何专业技巧即可方便快速地将摄像机连接到宽带网上。
本手册将帮助您实现在局域网内或在家庭ADSL环境下快速安装和使用VS-IPC1002摄像机,更多详细说明,请参阅机器包装盒内配套光盘上的《产品使用说明书》。
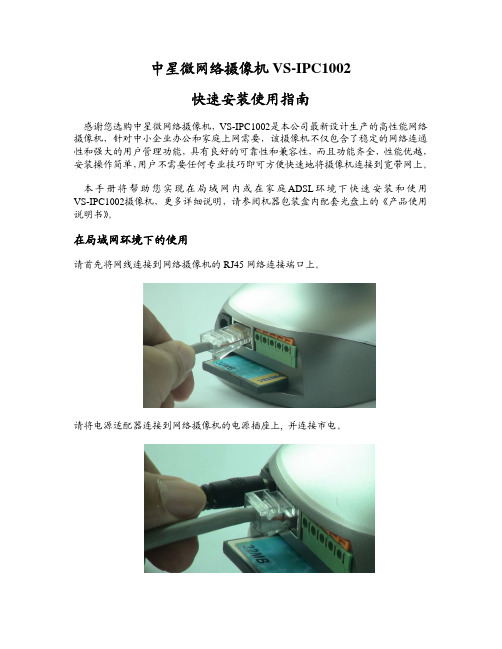
在局域网环境下的使用请首先将网线连接到网络摄像机的RJ45网络连接端口上。
请将电源适配器连接到网络摄像机的电源插座上, 并连接市电。
请启动您的电脑,确保您的电脑已经正确接入局域网。
点击您电脑的“开始”菜单,选择“运行”,然后输入command (适用于Windows 95/98/ME) 或者cmd (适用于Windows 2000/XP) 并点击“确定”,在窗口内输入ipconfig 后按“回车键”,以察看您的网络基本设置:请将IP Address, Subnet Mask, Default Gateway等信息记录下来,您在后面的设置中需要用到这些信息。
请将机器包装盒内的配套光盘放入计算机光驱中,找到其中的网络摄像机配置工具“Vilar设置精灵.exe”,该工具为绿色软件,无需安装,将其拷贝到您的电脑上,直接用鼠标双击,运行该软件,将会出现以下界面:主要显示窗口里有网络摄像机存在表示您的电脑已经搜索到局域网内的网络摄像机,您可以点击“刷新”来查找您的局域网内是否有新的网络摄像机连接。
如果您的局域网内有多台网络摄像机,您可以通过上图中主要显示窗口中的“序列号”来判断哪台摄像机是您所购买的产品,本手册的封底有您的网络摄像机的产品序列号。
如果显示的网络摄像机的当前IP与您的电脑的IP 地址在不同的网段,您需要先修改网络摄像机的IP地址,请选择您要修改IP地址的网络摄像机,点击“设定IP地址”:请将您记录的局域网参数Subnet Mask(子网掩码), Default Gateway(网关地址)信息填上,IP Address(IP 地址)的前三段请按照记录的您的电脑的网络设置填写,最后一段填写与您的电脑的IP地址不同的数(也许您需要联系您的网络系统管理员以确定使用怎样的值作为您的网络摄像机的IP地址的最后一段)。
VS2010全新操作软件说明书

VS2010全新操作软件说明书———功能更强大与操作简单并无冲突欢迎使用VS2010全新操作软件,目前该软件支持的控制卡型号有VSA系列、VSD卡、VS-mini卡、VSC++卡,暂时不支持VSB卡,请勿在VSB卡上更新VS2010软件。
在VSA系列的控制卡中,也仅支持标签颜色为白底红字的控制卡,如果错误的更新了VS2010软件将对控制卡造成不可恢复的损坏,请您谨慎使用。
目录第一部分 VS2010全新软件简介 (3)一、VS2010全新软件概述 (3)二、VS2010全新软件的运行环境及组件介绍 (4)三、VS2010操作界面简介 (5)四、软件主要功能列表 (6)五、菜单功能介绍 (6)1.文件 (6)2.编辑 (7)3.视图 (7)4.节目 (7)5.预览 (7)6.工程 (7)7.控制卡 (7)8.远程 (8)10.帮助 (8)六、快捷工具栏介绍 (8)七、对象工具箱介绍 (8)八、节目对象和属性介绍 (9)九、编辑区介绍 (9)十、系统状态栏介绍 (10)总结 (10)第二章对象的使用和编辑 (10)一、名词解释............................................ 错误!未定义书签。
二、什么是对象 (11)1.编辑对象 (11)2.显示对象 (11)三、对象与属性 (11)四、属性的编辑与对象的操作 (11)五、我们使用的对象 (12)1.编辑类对象 (12)节目和对象 (12)2.显示类对象 (13)文本文字 (13)内码文字 (14)RTF文字 (14)图片显示............................................ 错误!未定义书签。
文字节目单 (14)数字时钟 (15)模拟时钟 (15)动画 (15)表格 (15)天气信息 (15)倒计时 (16)第三章显示屏的管理 (16)一、管理的概念: (16)二、默认的环境 (16)三、发送节目 (16)四、下载节目 (16)五、工程的建立与导出 ................................. 错误!未定义书签。
使用手冊 V 1.00 InstaShow VS20 2说明书

使用手冊V 1.00 InstaShow™VS20版權版權所有 © 2023,BenQ Corporation。
所有權利受到保護。
未獲 BenQ Corporation 書面同意之前,不得將本出版品的任何部份以電子、機械、電磁、光學、化學、人工或其它任何方式重製、傳送、改寫、儲存於檢索系統,或翻譯成任何語言或電腦語言。
免責聲明對於本文之任何明示或暗示內容,BenQ Corporation 不做任何聲明或保證,亦明確拒絕提供任何保證、可交易性、或針對任何特定目的之適用性。
此外,BenQ Corporation 保留隨時修改或變更手冊內容之權利,且無須通知任何人士。
本使用手冊致力向客戶提供最新最精確的資訊,因此所有內容會不時修改而不另行通知。
如需本手冊的最新版,請造訪。
本指南的圖解及圖示僅供參考。
專利如需 BenQ 投影機專利項目的詳細資料,請造訪 /。
超連結與第三方網站相關聲明對於本產品所連結,且受協力廠商維護和控管之網站或類似資源內容,BenQ 概不負責。
提供上述網站或類似資源之連結,並不代表 BenQ 以明示或暗示方式針對其內容提供任何保證或聲明。
本產品預先安裝之所有協力廠商內容或服務皆採「原狀」提供。
對於協力廠商提供之內容或服務,BenQ 不提供任何明示或暗示保證。
對於協力廠商所提供內容或服務之精確性、有效性、更新性、合法性或完整性,BenQ 不提供任何擔保或保證。
無論在任何情況下,BenQ 對於協力廠商提供之內容或服務(包括其疏失)皆概不負責。
協力廠商提供之服務可能會暫時或永久終止。
BenQ 不擔保或保證協力廠商提供之所有內容或服務皆隨時可用,且對於這些內容和服務之終止概不負責。
此外,您在協力廠商營運之網站或類似資源所從事的任何交易,皆與 BenQ 無關。
如有任何問題、疑問或爭議,您應自行聯絡內容或服務供應商。
BenQ ecoFACTSBenQ has been dedicated to the design and development of greener product as part of its aspiration to realize the ideal of the “Bringing Enjoyment 'N Quality to Life” corporate vision with the ultimate goal to achieve a low-carbon society. Besides meeting international regulatory requirement and standards pertaining to environmental management, BenQ has spared no efforts in pushing our initiatives further to incorporate life cycle design in the aspects of material selection, manufacturing, packaging, transportation, using and disposal of the products. BenQ ecoFACTS label lists key eco-friendly design highlights of each product, hoping to ensure that consumers make informed green choices at purchase. Check out BenQ's CSR Website at / for more details on BenQ's environmental commitments and achievements.目錄版權 (2)免責聲明 (2)專利 (2)超連結與第三方網站相關聲明 (2)BenQ ecoFACTS (3)介紹 (6)產品功能 (7)包裝內容 (8)產品規格 (9)介紹 (11)Button (11)Host (11)Button 和 Host 的 LED 指示燈 (12)安裝 (14)環境檢查 (14)組裝 Host (15)設定 Host (15)將 Host 裝設至天花板 (15)將 Host 裝設至天花板安裝工具組上 (16)將 Host 放在桌上 (16)定位 Host 接收天線 (19)天花板安裝 (19)天花板安裝工具組安裝 (19)桌上放置 (20)連接 HDMI 纜線和電源 (21)組裝變壓器 (21)連接 HDMI 纜線 (22)透過電源變壓器獲得電源 (22)LAN 連線 (23)Wi-Fi 連線 (23)切換到 Button HDMI 纜線 (24)設定 Button 並開啟電源 (25)配對 Button 和 Host (27)將 Host 放在桌上時 (27)將 Buttons 和 USB 連接線收放在收納盒中 (30)重設 Host (30)重設 Button (31)啟用網路待機模式 (32)開始和停止投影 (33)準備就緒 (33)開始投影 (33)閒置投影 (34)分割畫面投影 (35)開始分割畫面投影 (35)從分割畫面切換到全螢幕投影 (36)操作行動裝置進行投影 (36)觸控返回 (37)在混合式會議中使用 InstaShow (38)設定視訊會議 (38)使用外接網路攝影機 (42)使用單一 InstaShow Button 作為麥克風 (44)使用多個 InstaShow Buttons 作為麥克風 (45)將另一個 WPS 連接到 Host (46)網頁管理 (47)存取網頁管理介面 (47)透過直接連線登入網頁管理介面 (47)透過區域網路登入網頁管理介面 (50)透過無線網路登入網頁管理介面 (50)入門 (52)頂端指令按鈕 (52)主欄 (52)資訊 (53)WAN (56)無線網路 (57)週邊裝置設定 (59)配對中 (62)顯示器 (64)進階設定 (65)排程中 (67)工具 (68)法律聲明 (80)疑難排解 (81)錯誤代碼 (83)介紹Instashow VS20 是無線會議解決方案,支援貴組織的 BYOM(自帶會議)。
VS2010使用说明书
VS2010全新操作软件说明书———功能更强大与操作简单并无冲突欢迎使用VS2010全新操作软件,目前该软件支持的控制卡型号有VSA系列、VSD卡、VS-mini卡、VSC++卡,暂时不支持VSB卡,请勿在VSB卡上更新VS2010软件。
在VSA系列的控制卡中,也仅支持标签颜色为白底红字的控制卡,如果错误的更新了VS2010软件将对控制卡造成不可恢复的损坏,请您谨慎使用。
目录第一部分 VS2010全新软件简介 (3)一、VS2010全新软件概述 (3)二、VS2010全新软件的运行环境及组件介绍 (4)三、VS2010操作界面简介 (5)四、软件主要功能列表 (6)五、菜单功能介绍 (6)1.文件 (6)2.编辑 (7)3.视图 (7)4.节目 (7)5.预览 (7)6.工程 (7)7.控制卡 (7)8.远程 (8)10.帮助 (8)六、快捷工具栏介绍 (8)七、对象工具箱介绍 (8)八、节目对象和属性介绍 (9)九、编辑区介绍 (9)十、系统状态栏介绍 (10)总结 (10)第二章对象的使用和编辑 (10)一、名词解释............................................. 错误!未定义书签。
二、什么是对象 (11)1.编辑对象 (11)2.显示对象 (11)三、对象与属性 (11)四、属性的编辑与对象的操作 (11)五、我们使用的对象 (12)1.编辑类对象 (12)节目和对象 (12)2.显示类对象 (13)文本文字 (13)内码文字 (14)RTF文字 (14)图片显示............................................. 错误!未定义书签。
文字节目单 (14)数字时钟 (15)模拟时钟 (15)动画 (15)表格 (15)天气信息 (15)倒计时 (16)第三章显示屏的管理 (16)一、管理的概念: (16)二、默认的环境 (16)三、发送节目 (16)四、下载节目 (16)五、工程的建立与导出 .................................. 错误!未定义书签。
VS500中文说明书V1.3

6.1 基本运行参数组 ……………………………………………………………………………………… 30 6.2 初级应用参数组 ……………………………………………………………………………………….34 6.3 模拟输入输出参数组 …………………………………………………………………………………..37 6.4 数字输入输出参数组 ……………………………………………………………………………………39 6.5 辅助运行参数组 ………………………………………………………………………………………..42 6.6 多段速控制参数组 …………………………………………………………………………………….46 6.7 高级运行参数组 …………………………………………………………………………………………4.8 6.8 摆频运行参数组 …………………………………………………………………………………………49 6.9 PID 控制参数组 ……………………………………………………………………………………… 51 6.10 通信功能参数组 ………………………………………………………………………………………53
4 变频器的操作及简单运行 …………………………………………………………………………………14 4.1 操作面板 …………………………………………………………………………………………………1.4. 4.2 面板基本功能及操作方法 ………………………………………………………………………………15 4.3 状态监控参数一览表 ………………………………………………………………………………… 18 4.4 变频器的简单运行 …………………………………………………………………………………….19
Eaton EFGVS软件:Eaton消防站点监控和图形可视化软件许可安装指南说明书

DISCLAIMER OF WARRANTIES AND LIMITATIONOF LIABILITYThe information, recommendations, descriptions and safety notations in this document are based on Eaton Corporation’s (“Eaton”) experience and judgment and may not cover all contingencies. If further information is required, an Eaton sales office should be consulted. Sale of the product shown in this literature is subjectto the terms and conditions outlined in appropriate Eaton selling policies or other contractual agreement between Eaton and the purchaser.THERE ARE NO UNDERSTANDINGS, AGREEMENTS, WARRANTIES, EXPRESSED OR IMPLIED, INCLUDING WARRANTIES OF FITNESS FOR A PARTICULAR PURPOSE OR MERCHANTABILITY, OTHER THAN THOSE SPECIFICALL Y SET OUT IN ANY EXISTING CONTRACT BETWEEN THE PARTIES. ANY SUCH CONTRACT STATES THE ENTIRE OBLIGATION OF EATON. THE CONTENTS OF THIS DOCUMENT SHALL NOT BECOME PART OF OR MODIFY ANY CONTRACT BETWEEN THE PARTIES.In no event will Eaton be responsible to the purchaser or user in contract, in tort (including negligence), strict liability or other-wise for any special, indirect, incidental or consequential damage or loss whatsoever, including but not limited to damage or loss of use of equipment, plant or power system, cost of capital, loss of power, additional expenses in the use of existing power facilities, or claims against the purchaser or user by its customers resulting from the use of the information, recommendations and descriptions contained here in. The information contained in this manual is subject to change without notice.EFGVS License installation guide Contents1. INITIAL KEY INSTALLATION (4)1.1 Obtain your Authentication Key (4)1.2 Contact Eaton (4)1.3 Installing your License Key (5)2. CHECKING YOUR EXISTING LICENSE (6)3. UPDATING YOUR LICENSE (7)Material code DescriptionEF-SITEMONITOR Monitoring software license without graphical visualisation maps including an EC0232interfaceEFGVS1-2Graphical visualisation software license 1-2 panels including an EC0232 interface EFGVS3-6Graphical visualisation software license up to 6 panels including an EC0232 interface EFGVS7-10Graphical visualisation software license up to 10 panels including an EC0232 interface EFGVS11-PLUS Graphical visualisation software license above 10 panels including an EC0232 interface EFGVS7-10-TCPIP Graphical visualisation software license up to 10 panels with TCP/IP InterlinkEFGVS11-PLUS-TCPIP Graphical visualization software license above 10 panels with TCP/IP Interlink EFGVS-DESIGN Graphical visualisation designer software license - no panel connectivityEFGVS-PREMIUMDESGN Graphical visualisation premium designer software license including an EC0232 interfaceEFGVS License installation guide1. Initial key installation1.1. Obtain your authentication keyAfter downloading the software from the Eaton website (/ fire-community), when you first run the Designer, Viewer or Site Monitor software variant, you will be prompted for a license key. The popup window will resemblethe following:Send to EatonAn important element here is the Authentication Key, which is an alpha-numeric sequence required by the Eaton employee to produce your eventual license key. This key is linked to a given computer and is automatically generated bythe computer.Before you contact Eaton, please ensure you have this key available, either written down on paper or displayed on your computer screen nearby. It should be noted that, every time you load the software, this key will change. This is normal and any of the Authentication Keys produced will still be acceptable by Eaton, providing they come from the same computer, were produced recently and that you pass other verification.1.2. Contact EatonThe next step is to contact Eaton to get a Site Reference and a License Key provided for the computer on which the software is installed. We suggest you send an email message to MVDO-Fire-T******************** with your license key request, including the Authentication Key mentioned in section 2.In order to accelerate the process, you should also provide the following information:•Y our company name and customer ID reference (on the order acknowledgment)•Y our company address •The order reference•The order date (format YYYY -MM-DD)•The order code(s) for the license(s) you have purchased with the quantity for each reference if several.•Site/Project nameIf your request is urgent, you can place a phone call to +44 (0)1302 303350.otee:N Note: If you have any question related to this section please contact your local Eaton representative who can liaise with our central technical support team. They will insure that your software license key is generated rapidly.1.3. Installing your license keyOnce you have received your actual License Key and Site Reference, you should enter them as shown below:Please ensure you enter the site reference and license key precisely in the same format you were provided. We recommend these are copied and pasted (from the email message) into the software if possible. Remember, it is OK if the Authentication Key is different from the one you sent to Eaton.When done, please click on Register and Continue . The software will now load and can be used.Received back from EatonClick when theKey is acceptedEFGVS License installation guide2. Checking your existing licenseIf you want to check the status of your existing license, you can do this by selecting the About option in the Help drop down menu. This is available in all three applications (Designer, Viewer and Site Monitor) and in the same location. On this screen, you will see your current license key along with other details about your license. Any time you contact Eaton regarding your current license, you will be asked for your license key. If you need to send your license key by email, you can selectthe key with your mouse like normal text and then copy and paste it into an email.EFGVS License installation guide3. Updating your LicenseIf your license expires, you will be automatically prompted for a new license key. However, if you request a new license key, or are issued with a new license, you can change your existing license key by selecting the Update License option in the Help drop down menu. This is available in all three applications (Designer, Viewer and Site Monitor) and in the same location. Similar to the method of installing your first license key, you will be provided a Site Reference and License Key by Eaton. Generally, you will need to provide Eaton with your current license key, soplease refer to the previous section on how to achieve this.Send to Eaton if requiredReceived back from EatonClick when theKey is acceptedEFGVS License installation guideEatonEMEA Headquarters Route de la Longeraie 7 1110 Morges, Switzerland Eaton.eu© 2017 EatonAll Rights ReservedPrinted in UKPublication No. IB152003EN/CSSC-302 Pub Reference: PR214-212-500-01 May 2017Eaton is a registered trademark. All trademarks are propertyof their respective owners.。
Galaxy VS 电池断路器套件 安装手册 GVSBBK20K80H 2018 08说明书

由于各种标准、规范和设计不时变更,请索取对本出版物中给出的信息的确认。
目录
电池断路器套件
重要安全说明- 请妥善保存这些说明 .....................................................5
规格 ............................................................................................................10
电池断路器套件 GVSBBK20K80H 规格 .....................................................10 跳闸设置 .................................................................................................10 建议的线缆规格 ....................................................................................... 11 扭矩规格 ................................................................................................. 11 环境........................................................................................................ 11
空间人数传感器VS121用户手册说明书

空间人数传感器VS121用户手册安全须知为保护产品并确保安全操作,请遵守本使用手册。
如果产品使用不当或者不按手册要求使用,本公司概不负责。
严禁拆卸和改装本产品。
为避免火灾和触电危险,请在安装前远离雨水和潮湿的地方。
请勿直接触摸处理器等发热部件,以免烫伤。
请勿将产品放置在不符合工作温度、湿度等条件的环境中使用,远离冷源、热源和明火。
请勿将产品放置于高强度电磁辐射附近。
请勿使产品受到外部撞击或震动。
请确保产品安装牢固。
请确保电源插头已牢固地插入电源插座。
请用软布擦拭镜头,去除指印、灰尘等;顽固的污渍可以用软布蘸过少量洗涤剂清洁,然后用干布将表面擦干。
产品符合性声明VS121符合CE,FCC和RoHS的基本要求和其他相关规定。
版权所有©2011-2023星纵物联保留所有权利。
如需帮助,请联系星纵物联技术支持:邮箱:*********************电话:************传真:************地址:厦门市集美区软件园三期C09栋文档修订记录日期版本描述2021.5.18V1.0第一版2021.12.30V1.1更新品牌Logo2022.1.24V1.2 1.支持过线检测统计2.支持D2D通信3.新增人数统计功能的启用禁用开关4.新增人数统计的防抖延时功能5.周期上报增加最大值6.支持网关通过LoRa®下发修改设备配置2022.4.11V1.3新增识别算法切换2022.7.7V2.0 1.升级Web配置页面2.新增安装指导与画线指导3.检测区域增加至16个2022.12.14V2.1 1.支持分区域人数上报2.新增隐私遮挡功能3.新增LoRaWAN®单通道模式4.Wi-Fi SSID支持设置不广播5.视频流增加蒙版模糊处理6.更新D2D功能描述7.删除自动重启功能8.删除LoRaWAN®V1.1.0版本2023.3.20V2.2 1.新增过滤掉头计数功能2.新增激活页面可选Blur/Normal模式2023.4.21V2.3新增安装高度建议(高安装版)目录一、产品简介 (6)1.1产品介绍 (6)1.2产品亮点 (6)二、产品结构介绍 (6)2.1包装清单 (6)2.2外观概览 (7)2.3按键说明 (7)2.4产品尺寸 (7)三、安装指导 (8)3.1推荐高度 (8)3.2照度要求 (8)3.3推荐安装(针对过线人数统计) (9)3.4其他影响准确率的因素 (10)四、安装步骤 (10)五、登录配置页 (11)六、产品配置 (12)6.1实时视频 (12)6.2IoT人数统计 (13)6.2.1区域人数统计 (13)6.2.2过线检测统计 (15)6.2.3LoRa® (16)6.2.4Wi-Fi (19)6.2.5识别算法 (21)6.2.6隐私遮挡 (21)6.3系统信息 (22)6.3.1用户管理 (22)6.3.2安全服务 (23)6.3.3系统信息 (24)6.3.4系统维护 (24)6.3.5关于 (25)七、数据通信协议 (25)7.1设备信息 (25)7.2传感器数据 (26)7.3下行指令 (28)一、产品简介1.1产品介绍VS121是一款智能小巧的空间人数传感器,产品基于AI 视觉算法,通过人体特征分析,精准识别人体目标,可用于区域空间内人数统计或过线人数统计。
VS使用说明书

VS使用说明书VS 全新操作软件说明书———功能更强大与操作简单并无冲突欢迎使用VS 全新操作软件,当前该软件支持的控制卡型号有VSA系列、VSD卡、VS-mini卡、VSC++卡,暂时不支持VSB卡,请勿在VSB卡上更新VS 软件。
在VSA系列的控制卡中,也仅支持标签颜色为白底红字的控制卡,如果错误的更新了VS 软件将对控制卡造成不可恢复的损坏,请您谨慎使用。
目录第一部分 VS 全新软件简介 (3)一、VS 全新软件概述 (3)二、VS 全新软件的运行环境及组件介绍 (4)三、VS 操作界面简介 (5)四、软件主要功能列表......................................... 错误!未定义书签。
五、菜单功能介绍 (6)1.文件 (6)2.编辑 (7)3.视图 (7)5.预览 (7)6.工程 (7)7.控制卡 (7)8.远程 (8)9.工具 (8)10.帮助 (8)六、快捷工具栏介绍 (8)七、对象工具箱介绍............................................. 错误!未定义书签。
八、节目对象和属性介绍 (9)九、编辑区介绍 (9)十、系统状态栏介绍 (10)总结 (10)第二章对象的使用和编辑 ...................................... 错误!未定义书签。
一、名词解释 ........................................................ 错误!未定义书签。
二、什么是对象..................................................... 错误!未定义书签。
1.编辑对象....................................................... 错误!未定义书签。
2.显示对象....................................................... 错误!未定义书签。
爱色丽 VS3200 分光光度仪用户手册说明书
MetaVue™VS3200 分光光度仪用户手册CE 声明爱色丽有限公司特此宣布,此型号符合 2014/30/EU (EMC)、2014/35/EU (LVD) 和RoHS 2011/65/EU 等指令的基本要求以及其他相关规定。
美国联邦通讯委员会通告注意:本设备经测试,证明符合依据 FCC 规则第 15 部分对 A 类数字设备的限制。
这些限制旨在对商业环境下运行的设备提供合理保护,免受有害干扰。
本设备生成、使用并可能放射射频能量;因此,如未按照操作手册安装和使用,可能会对无线电通信产生有害干扰。
在住宅区操作本设备可能产生有害干扰,此时将要求用户自付费用来纠正干扰。
加拿大工业符合性声明本 A 类数字设备符合加拿大 ICES-003 要求。
Cet appareil numérique de la classe A est conforme à la norme NMB-003 du Canada.设备信息以不同于爱色丽有限公司指定方式使用本设备可能会损坏其设计完整性并导致不安全。
警告:本仪器不得用于有爆炸性危险的环境中。
处置说明:请在指定收集点处置废弃电气电子设备 (WEEE),便于对此类设备的回收利用。
专有权通告本手册所含信息是爱色丽有限公司专有的版权信息。
发布此信息并不意味着您有就本文所述的安装、操作或维护本仪器之外其他任何目的而复制或使用信息的任何权利。
未经爱色丽有限公司授权官员事先书面许可,不得以任何形式或通过任何手段——电子、电磁、机械、光学、手动或其他方式——将本手册任何部分复制、抄录或翻译成任何语言或计算机语言。
专利:“© 2017 爱色丽有限公司。
保留所有权利”X-Rite® 是爱色丽有限公司的注册商标。
提及的其他所有徽标、品牌名称和产品名称是其各自所有者的财产。
保修信息爱色丽保证本产品自爱色丽装运日期起十二 (12) 个月内(除非强制性法律规定更长期限)无材料和工艺缺陷。
VS2010使用说明书

VS2010全新操作软件说明书———功能更强大与操作简单并无冲突欢迎使用VS2010全新操作软件,目前该软件支持的控制卡型号有VSA系列、VSD卡、VS-mini卡、VSC++卡,暂时不支持VSB卡,请勿在VSB卡上更新VS2010软件。
在VSA系列的控制卡中,也仅支持标签颜色为白底红字的控制卡,如果错误的更新了VS2010软件将对控制卡造成不可恢复的损坏,请您谨慎使用。
目录第一部分 VS2010全新软件简介 (3)一、VS2010全新软件概述 (3)二、VS2010全新软件的运行环境及组件介绍 (4)三、VS2010操作界面简介 (5)四、软件主要功能列表 (6)五、菜单功能介绍 (6)1.文件 (6)2.编辑 (7)3.视图 (7)4.节目 (7)5.预览 (7)6.工程 (7)7.控制卡 (7)8.远程 (8)10.帮助 (8)六、快捷工具栏介绍 (8)七、对象工具箱介绍 (8)八、节目对象和属性介绍 (9)九、编辑区介绍 (9)十、系统状态栏介绍 (10)总结 (10)第二章对象的使用和编辑 (10)一、名词解释............................................. 错误!未定义书签。
二、什么是对象 (11)1.编辑对象 (11)2.显示对象 (11)三、对象与属性 (11)四、属性的编辑与对象的操作 (11)五、我们使用的对象 (12)1.编辑类对象 (12)节目和对象 (12)2.显示类对象 (13)文本文字 (13)内码文字 (14)RTF文字 (14)图片显示............................................. 错误!未定义书签。
文字节目单 (14)数字时钟 (15)模拟时钟 (15)动画 (15)表格 (15)天气信息 (15)倒计时 (16)第三章显示屏的管理 (16)一、管理的概念: (16)二、默认的环境 (16)三、发送节目 (16)四、下载节目 (16)五、工程的建立与导出 .................................. 错误!未定义书签。
VS2010使用手册
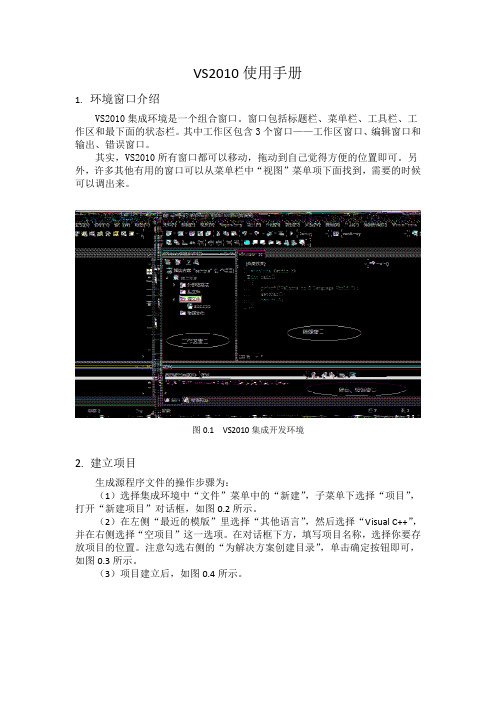
VS2010使用手册1.环境窗口介绍VS2010集成环境是一个组合窗口。
窗口包括标题栏、菜单栏、工具栏、工作区和最下面的状态栏。
其中工作区包含3个窗口——工作区窗口、编辑窗口和输出、错误窗口。
其实,VS2010所有窗口都可以移动,拖动到自己觉得方便的位置即可。
另外,许多其他有用的窗口可以从菜单栏中“视图”菜单项下面找到,需要的时候可以调出来。
图0.1 VS2010集成开发环境2.建立项目生成源程序文件的操作步骤为:(1)选择集成环境中“文件”菜单中的“新建”,子菜单下选择“项目”,打开“新建项目”对话框,如图0.2所示。
(2)在左侧“最近的模版”里选择“其他语言”,然后选择“Visual C++”,并在右侧选择“空项目”这一选项。
在对话框下方,填写项目名称,选择你要存放项目的位置。
注意勾选右侧的“为解决方案创建目录”,单击确定按钮即可,如图0.3所示。
(3)项目建立后,如图0.4所示。
图0.2 新建C源程序图0.3 建立VisualC++空项目3.建立并编辑C源程序(1)在左侧工作区中“源文件”上右键,弹出的菜单中选择“添加”,而后选择“新建项”,打开“添加新项”对话框,如图0.5所示。
(2)在“添加新项”对话框中,选择C++文件(.cpp),并在下方输入源文件的文件名。
输入abc,不带后缀的话,文件自动加上后缀为cpp,表示C++源文件。
由于C++向下兼容C语言,这样即可。
若想仅添加C源文件,需要输入abc.c。
如图0.6所示。
图0.4 空项目界面图0.5 新建项(3)单击“添加”按钮,abc.cpp添加就会添加成功,出现在左侧的工作区窗口。
双击该文件,在右侧“编辑窗口”即可开始C程序的编写。
如图0.7所示。
编写的时候,需要保存文件,按下Ctrl+S快捷键进行保存。
图0.6 新建源文件图0.7 编辑C源程序4.编译C源程序单击主菜单栏中的“生成(B)”,在其下拉菜单中选择“编译”,或者右键需要编译的文件,选择“编译”菜单项,则开始编译程序,如图0.8所示。
Visual Studio Code 使用指南说明书

Table of ContentsAbout1 Chapter 1: Getting started with vscode2 Remarks2 Versions2 Examples4 Installation or Setup5 On Windows5 On Mac5 On Linux5 Debian and Ubuntu based distributions5 RHEL, Fedora and CentOS based distributions6 openSUSE and SLE based distributions6 AUR package for Arch Linux7 First Steps (C++): HelloWorld.cpp7 First program (C++): Hello World.cpp9 Chapter 2: Multiple projects set up16 Remarks16 Examples16 Referencing local projects16 Solution structure17 Credits19AboutYou can share this PDF with anyone you feel could benefit from it, downloaded the latest version from: vscodeIt is an unofficial and free vscode ebook created for educational purposes. All the content is extracted from Stack Overflow Documentation, which is written by many hardworking individuals at Stack Overflow. It is neither affiliated with Stack Overflow nor official vscode.The content is released under Creative Commons BY-SA, and the list of contributors to each chapter are provided in the credits section at the end of this book. Images may be copyright of their respective owners unless otherwise specified. All trademarks and registered trademarks are the property of their respective company owners.Use the content presented in this book at your own risk; it is not guaranteed to be correct nor accurate, please send your feedback and corrections to ********************Chapter 1: Getting started with vscode RemarksThis section provides an overview of what vscode is, and why a developer might want to use it. It should also mention any large subjects within vscode, and link out to the related topics. Sincethe Documentation for vscode is new, you may need to create initial versions of those relatedtopics.VersionsExamplesInstallation or SetupOn Windows•Download the Visual Studio Code installer for Windows.Once it is downloaded, run the installer (VSCodeSetup-version.exe). This will only take a •minute.By default, VS Code is installed under C:\Program Files (x86)\Microsoft VS Code for a 64-bit machine.Note: .NET Framework 4.5.2 is required for VS Code. If you are using Windows 7, please make sure .NET Framework 4.5.2 is installed.Tip: Setup will optionally add Visual Studio Code to your %PATH%, so from the console you can type 'code .' to open VS Code on that folder. You will need to restart your console after the installation for the change to the %PATH% environmental variable to take effect.On Mac•Download Visual Studio Code for Mac.•Double-click on the downloaded archive to expand the contents.Drag Visual Studio Code.app to the Applications folder, making it available in the•Launchpad.•Add VS Code to your Dock by right-clicking on the icon and choosing Options, Keep in Dock. You can also run VS Code from the terminal by typing 'code' after adding it to the path:•Launch VS Code.•Open the Command Palette (Ctrl+Shift+P) and type 'shell command' to find the ShellCommand: Install 'code' command in PATH command.Restart the terminal for the new $PATH value to take effect. You'll be able to type 'code .' in any folder to start editing files in that folder.Note: If you still have the old code alias in your .bash_profile (or equivalent) from an early VS Code version, remove it and replace it by executing the Shell Command: Install 'code' command in PATH command.On LinuxDebian and Ubuntu based distributionsThe easiest way to install for Debian/Ubuntu based distributions is to download and install the .debpackage (64-bit) either through the graphical software center if it's available or through thecommand line with:sudo dpkg -i <file>.debsudo apt-get install -f # Install dependenciesInstalling the .deb package will automatically install the apt repository and signing key to enableauto-updating using the regular system mechanism. Note that 32-bit and .tar.gz binaries are also available on the download page.The repository and key can also be installed manually with the following script:curl https:///keys/microsoft.asc | gpg --dearmor > microsoft.gpgsudo mv microsoft.gpg /etc/apt/trusted.gpg.d/microsoft.gpgsudo sh -c 'echo "deb [arch=amd64] https:///repos/vscode stable main" >/etc/apt/sources.list.d/vscode.list'Then update the package cache and install the package using:sudo apt-get updatesudo apt-get install code # or code-insiders for insiders buildRHEL, Fedora and CentOS based distributionsWe currently ship the stable 64-bit VS Code in a yum repository, the following script will install thekey and repository:sudo rpm --import https:///keys/microsoft.ascsudo sh -c 'echo -e "[code]\nname=Visual StudioCode\nbaseurl=https:///yumrepos/vscode\nenabled=1\ngpgcheck=1\ngpgkey=https://pac > /etc/yum.repos.d/vscode.repo'Then update the package cache and install the package using dnf (Fedora 22 and above):dnf check-updatesudo dnf install codeOr on older versions using yum:yum check-updatesudo yum install codeopenSUSE and SLE based distributionsThe yum repository above also works for openSUSE and SLE based systems, the following scriptwill install the key and repository:sudo rpm --import https:///keys/microsoft.ascsudo sh -c 'echo -e "[code]\nname=Visual StudioCode\nbaseurl=https:///yumrepos/vscode\nenabled=1\ntype=rpm-md\ngpgcheck=1\ngpgkey=https:///keys/microsoft.asc" >/etc/zypp/repos.d/vscode.repo'Then update the package cache and install the package using:sudo zypper refreshsudo zypper install codeAUR package for Arch LinuxThere is a community maintained Arch User Repository (AUR) package for VS Code.Installing .rpm package manually The .rpm package (64-bit) can also be manually downloaded and installed, however auto-updating won't work unless the repository above is installed. Once downloaded it can be installed using your package manager, for example with dnf:sudo dnf install <file>.rpmNote that 32-bit and .tar.gz binaries are are also available on the download page.First Steps (C++): HelloWorld.cppThe first program one typically writes in any language is the "hello world" script. This example demonstrates how to write this program and debug it using Visual Studio Code (I'll refer to Visual Studio Code as VS Code from now on).Create The ProjectStep 1 will be to create a new project. This can be done in a number of ways. The first way is directly from the user interface.Open VS Code program. You will be greeted with the standard welcome screen (note the1.images are taken while working on a Mac, but they should be similar to your installation):. This will open a new editing window where we can begin constructing our script. Go ahead and save this file (you can use the menu File > Save to do this). For this example we will call the file HelloWorld.cpp and place it in a new directory which we will call VSC_HelloWorld/.3.Write the program. This should be fairly straight forward, but feel free to copy the following into the file:#include <iostream>int main() {std::cout << "Hello world!" << std::endl;return 0;}Run the CodeNext we want to run the script and check its output. There are a number of ways to do this. The simplest is to open a terminal, and navigate to the directory that we created. You can now compile the script and run it with gcc by typing:$ g++ HelloWorld.cpp -o helloworld$ ./helloworldHello World!Yay, the program worked! But this isn't really what we want. It would be much better if we could run the program from within VSCode itself. We're in luck though! VSCode has a built in terminal which we can access via the menu "View" > "Integrated Terminal". This will open a terminal in the bottom half of the window from which you can navigate to the VSC_HelloWorld directory and run the above commands.Typically we do this by executing a Run Task. From the menu select "Tasks" > "Run Task...". You'll notice you get a small popup near the top of the window with an error message (something along the lines ofFirst program (C++): Hello World.cppThis example introduces you to the basic functionality of VS Code by demonstrating how to write a "hello world" program in C++. Before continuing, make sure you have the "ms-vscode.cpptools" extension installed.Initialize the ProjectThe first step is to create a new project. To do this, load the VS Code program. You should be greeted with the typical welcome screen:" from the welcome screen. This will open a new file window. Go ahead and save the file ("File" > " Save") into a new directory. You can name the directory anything you want, but this example will call the directory "VSC_HelloWorld" and the file "HelloWorld.cpp".Now write the actual program (feel free to copy the below text):#include <iostream>int main(){// Output the hello world textstd::cout << "Hello world!" << std::endl;return 0;}Great! You'll also notice that because you've installed the "ms-vscode.cpptools" extension you also have pretty code-highlighting. Now let's move on to running the code.Running the Script (basic)We can run "HelloWorld.cpp" from within VS Code itself. The simplest way to run such a program is to open the integrated terminal ("View" > "Integrated Terminal"). This opens a terminal window in the lower portion of the view. From inside this terminal we can navigate to our created directory, build, and execute the script we've written.Here we've used the following commands to compile and run the code:$ g++ HelloWorld.cpp -o hellowold$ ./hellowoldNotice that we get the expected Hello World! output.Running the Script (slightly more advanced)Great, but we can use VS Code directly to build and execute the code as well. For this, we first need to turn the "VSC_HelloWorld" directory into a workspace. This can be done by:Opening the Explorer menu (top most item on the vertical menu on the far left)1.2.Select the Open Folder button3.Select the "VSC_HelloWorld" directory we've been working in.Note: If you open a directory within VS Code (using "File" > "Open..." for example) you will already be in a workspace.The Explorer menu now displays the contents of the directory.Next we want to define the actual tasks which we want VS Code to run. To do this, select "Tasks" > "Configure Default Build Task". In the drop down menu, select "Other". This opens a new file called "tasks.json" which contains some default values for a task. We need to change these values. Update this file to contain the following and save it:{"version": "2.0.0","tasks": [{"taskName": "build","type": "shell","command": "g++ HelloWorld.cpp -o helloworld"},{"taskName": "run","type": "shell","command": "${workspaceRoot}/helloworld"}]}Note that the above also creates a hidden .vscode directory within our working directory. This is where VS Code puts configuration files including any project specific settings files. You can find out more about Tasks here.In the above example, ${workspaceRoot} references the top level directory of our workspace, which is our "VSC_HelloWorld" directory. Now, to build the project from inside the method select "Tasks " > "Run Build Task..." and select our created "build" task and "Continue without scanning the task output" from the drop down menus that show up. Then we can run the executable using " Tasks" > "Run Task..." and selecting the "run" task we created. If you have the integrated terminal open, you'll notice that the "Hello World!" text will be printed there.It is possible that the terminal may close before you are able to view the output. If this happens you can insert a line of code like this int i; std::cin >> i; just before the return statement at the end of the main() function. You can then end the script by typing any number and pressing<Enter>.And that's it! You can now start writing and running your C++ scripts from within VS Code.Read Getting started with vscode online: https:///vscode/topic/4489/getting-started-with-vscodeChapter 2: Multiple projects set upRemarksUnit tests project set up currently can be found hereExamplesReferencing local projectsThere is no such things as .sln and .proj files.Instead of them folders are being used in Visual Studio Code.Each project folder should have a seperate project.json file./MyProject.CoreSourceFile.csproject.json/MyProject.Web/Controllers/Viewsproject.jsonTo reference MyProject.Core from MyProject.Web project edit MyProject.Web\project.json file and add the dependency:// MyProject.Web/project.json{"dependencies": {"MyProject.Core": {"target": "project"},...}"buildOptions": {"emitEntryPoint": true}}The line "emitEntryPoint": true says that MyProject.Web is a start project for the solution. MyProject.Core should have this flag disabled in its project.json file:// MyProject.Core/project.json{..."buildOptions": {"emitEntryPoint": false}}Build the project (Mac: +Shift+B, Windows: Ctrl+Shift+B) and each project should have own \bin and \obj folders with new .dll files.Solution structureIt is very common to group projects, for example, place test projects under the /test folder and source projects under the /src folder. Add global.json file and make similar structure:global.json/src//MyProject.Core/SourceFile.csproject.json/MyProject.Web//Controllers/Viewsproject.json/test//MyProject.Core.UnitTests/SourceFileTest.csproject.json/MyProject.Web.UnitTests//Controllers/Viewsproject.jsonEdit empty global.json file and specify project groups:{"projects":["src", "test"]}VS Code uses tasks.json to run tasks (e.g. building a solution) and launch.json for starting a project (e.g. debugging). If you cannot find these files try to start debugging by pressing F5 and ignore errors, VS Code will generate under the root folder .vscode folder with the files.Edit launch.json file and specify the path to your start up library, change MyProject.Web with your project name:{"configurations": [{..."program":"${workspaceRoot}/src/MyProject.Web/bin/Debug/netcoreapp1.0/MyProject.Web.dll","args": [],"cwd": "${workspaceRoot}/src/Washita.Web",...}}Edit tasks.json file and specify the path to your start up library, change MyProject.Web with your project name:{"tasks": [{"taskName": "build","args": ["${workspaceRoot}/src/MyProject.Web"],"isBuildCommand": true,"problemMatcher": "$msCompile"}]}Now you should be able to build and debug .NET source files.However Intellisense will disappear due the multiple project configuration. To fix it open any .cs file and switch to the appropriate project (project.json) by choosing Select project in the bottom right corner:Read Multiple projects set up online: https:///vscode/topic/7717/multiple-projects-set-upCreditshttps:///19。
vs1真空断路器说明书-平高电气ZN63A-12户内安装说明书

ZN639(VS)-12户内高压交流真空断路器陕西平高智能电气有限公司专业生产真空断路器的厂家,如VS1真空断路器,ZW32真空断路器,ZW8真空断路器,ZW20真空断路器,ZW7真空断路器,ZN85真空断路器,ZN28真空断路器等,各种高压真空断路器系列产品。
陕西平高智能是一家专业生产、销售、研发为一体的大型企业,是国内最具规模、技术水平最高、出口量最大的高压真空断路器生产企业。
拥有完整、科学的质量管理体系。
聘用一批正规院校毕业的高技能、高素质人才,重金聘请行业高级工程师坐镇,引进德国最先进设备和产品,使得平高智能电气产品设计具备国际领先水平。
陕西平高智能电电气有限公司,始终坚持;以专业的技术,一流的质量,诚信可靠的宗旨,高质量的产品,良好的诚信,优质的服务,产品畅销全国近三十多个省、市、自治区以及远销新加波、奥大利亚等国家。
陕西平高智能电气,竭诚与海内外客户双赢合作,共同发展!! 共创未来!!-vs1-12系列户内高压断路器安装详细说明书陕西平高智能电气有限公司-免费供应ZN63A(VS1) 型户内交流高压真空断路器以下简称断路器是三相交流额定电压的户内开关设备,可供工矿企业,发电厂及变电站作电气设施的控制和保护之用,并适用于频繁操作的场所。
断路器符合《交流高压断路器》,855-1996《3.6-40.5kV户内交流高压真空断路器》,DL403-91,《10-35KV户内交流高压断路器订货技术条件》标准要求,并符合IEC56(87出版物)的相关要求。
断路器采用操动机构与断路器本体一体式设计,既可做为固定安装单元,也可配用专用推进机构,组成手车单元使用。
2. 型号及含义3. 使用条件3.1 环境温度不高于+40℃,不低于—15℃(允许在-30℃时储运);3.2 海拔高度不超过1000m;3.2 相对温度:日平均值不大于95%,月平均值不大于90%,饱和蒸汽压日平均值不大于2.2×10Mpa,平均值不大于1.8×10 Mpa;3.4 地震热度不超过8度;3.5 没有火灾,爆炸危险,严重污秽,化学腐蚀以及剧烈震动的场所。
VS7 无缝切换器 用户手册说明书

版权所有©2019 西安诺瓦星云科技股份有限公司。
保留一切权利。
非经本公司书面许可,任何单位和个人不得擅自摘抄、复制本文档内容的部分或全部,并不得以任何形式传播。
商标声明是诺瓦科技的注册商标。
声明欢迎您选用西安诺瓦星云科技股份有限公司(以下简称诺瓦科技)的产品,如果本文档为您了解和使用产品带来帮助和便利,我们深感欣慰。
我们在编写文档时力求精确可靠,随时可能对内容进行修改或变更,恕不另行通知。
如果您在使用中遇到任何问题,或者有好的建议,请按照文档提供的联系方式联系我们。
对您在使用中遇到的问题,我们会尽力给予支持,对您提出的建议,我们衷心感谢并会尽快评估采纳。
目录1产品概述 (1)产品简介 (1)产品特性 (1)2外观说明 (3)前面板 (3)后面板 (4)产品尺寸 (5)3应用场景 (6)4液晶屏菜单操作 (7)操作说明 (7)主界面 (7)屏体配置 (9)4.3.2 输出模式 (9)4.3.3 屏体结构 (9)4.3.4 输出设置 (10)4.3.5 输出接口配置 (10)窗口设置 (11)4.4.1 窗口分屏模板 (11)4.4.2 BKG配置 (11)4.4.3 窗口配置 (12)场景设置 (13)输入设置 (14)画面控制 (14)测试画面 (14)预监选择 (15)高级设置 (16)4.10.1 同步模式 (16)4.10.2 Fn键设置 (16)4.10.3 返回主界面时长 (17)4.10.4 工厂复位 (17)4.10.5 HDCP开关 (17)4.10.6 硬件版本 (17)4.10.7 设备自检 (17)4.10.8 关于我们 (17)通讯设置 (18)语言设置 (19)5 V-CAN控制 (20)6常见问题 (21)7规格参数 (22)1 产品概述产品简介VS7是由诺瓦科技自主研发的集视频处理,画面拼接,特效切换和多画面显示的高性能无缝切换器。
VS7具备强大的视频信号接收和处理能力,支持4K×2K@30Hz视频输入,并最大可同时支持7路输入和5个独立窗口,并由4路DVI拼接输出,单机最大带载可达8KK。
VSV系列断路器说明书

质量/Mass:
0-0.3s-CO-180s-C0
31.5kA 4s
80kA kV
320 kg
注意! 请严格遵守使用规程和正确地操作规范!
WARNING!
Please abserve the instruction manual and follow the rules of good engineering practical.
制造厂商 Manufactured by
河南森源电气股份有限公司 HENAN SENYUAN ELECTRICE CO.,LTD.
1179
300
948 1149 1180 1214
图 1 VSV-40.5P(G) 高原型户内高压交流真空断路器手车式外形及安装尺寸 Fig. 1 Trolley type VSV-40.5P(G) outline dimensions
河 南 森 源 电 气
河 南 森 源 电 气
河 南 森 源 电 气
河 南 森 源 电 气
河 南 森 源 电 气
河 南 森 源 电 气
森源电气
气
1511.5
■ 外形尺寸 / Outline dimensions
额定电流(A) / Rated current 配静触头 / Fixed contact
473南
河
42
河 南 森 源 电 气
河 南 森 源 电 气
河 南 森 源 电 气
河 南 森 源 电 气
河 南 森 源 电 气
河 南 森 源 电 气
河 南 森 源 电 气
河 南 森 源 电 气
河 南 森 源 电 气
河 南 森 源 电 气
河 南 森 源 电 气
vs全新操作软件说明书
VS2010全新操作软件说明书———功能更强大与操作简单并无冲突欢迎使用VS2010全新操作软件,目前该软件支持得控制卡型号有VSA系列、VSD卡、VS-mini卡、VSC++卡,暂时不支持VSB卡,请勿在VSB卡上更新VS2010软件。
在VSA 系列得控制卡中,也仅支持标签颜色为白底红字得控制卡,如果错误得更新了VS2010软件将对控制卡造成不可恢复得损坏,请您谨慎使用。
目录第一部分VS2010全新软件简介3一、VS2010全新软件概述3二、VS2010全新软件得运行环境及组件介绍4三、VS2010操作界面简介5四、软件主要功能列表4五、菜单功能介绍61、文件62、编辑73、视图74、节目75、预览76、工程77、控制卡78、远程89、工具810、帮助8六、快捷工具栏介绍8七、对象工具箱介绍5八、节目对象与属性介绍9九、编辑区介绍9十、系统状态栏介绍10总结10第二章对象得使用与编辑6一、名词解释错误!未定义书签。
二、什么就是对象71、编辑对象72、显示对象7三、对象与属性7四、属性得编辑与对象得操作11五、我们使用得对象121、编辑类对象12节目与对象122、显示类对象13文本文字13内码文字14RTF文字14图片显示错误!未定义书签。
文字节目单14数字时钟15模拟时钟15动画15表格15天气信息15正计时16倒计时16第三章显示屏得管理10一、管理得概念:10二、默认得环境10三、发送节目10四、下载节目10五、工程得建立与导出错误!未定义书签。
六、校正显示屏得时钟11七、自动开关显示屏得设置11八、自动亮度调整得设置11九、自动发送功能使用11十、临时调整显示屏得亮度12十一、广域网控制简介错误!未定义书签。
第四章技术支持与服务错误!未定义书签。
第一部分VS2010全新软件简介一、VS2010全新软件概述VS2010全新软件就是一款具有超强功能得异步LED显示屏操作软件,具有行业领先得技术优势,加上合理得设计思路,真正做到了功能强大与操作简单不相互冲突。
CABINET VENT (VS-CV) 安装说明书

C ABINET V ENT (VS-CV)I NSTALLATION I NSTRUCTIONS1. D etermine an appropriate location for the unit. The units are typically installed on the sides or the back of a cabinet or enclosure and typically higher in the cabinet where amplifiers and receivers are located. Ensure that no shelves or equipment will obstruct the unit once installed.2. D rill a 3 1/8” (79mm) or 3 1/4” (80mm) hole once the proper position has been determined.3. D etermine if it is best for the unit to draw air from the cabinet (exhaust), or push air in (intake) - by default the unit draws air out of the cabinet or enclosure and is appropriate for most applications. It may be preferable to blow air into the cabinet and straight onto the equipment if the cabinet is not fully enclosed or there are several openings that cannot be blocked in the enclosure. See instructions below on how to reverse the direction of the fan.4. S lide the unit into the hole and secure with 4 screws. It is recommended to pre-drill pilot holes for the screws in wood and is required for metal.5. D etermine the best route to run the power supply for connecting tothe fan unit and secure.6. C onnect the Fan Unit power wire to a Universal Power Supplyensuring that polarity is correct – see diagram. The fan can be runfull time or powered by a switched power outlet on the back of theamplifier, receiver, or another switching power unit.7. A djust the voltage on the Power Supply and operate between 4.5and 9VDC for normal applications or 9 to 12VDC for moredemanding situations. The unit will be audible with these settings.Adjust so the units operate quietly but if running at lower voltagesand if powering multiple units with one power supply, ensure the unitrestarts when power is disconnected and then reconnected.Notes¾This unit can also be used with any Cool Components Inc. TemperatureController to provide control based on the temperature in the cabinet orenclosure.¾For good measure, the shelving in cabinets should be designed as in thediagram to the right. This provides for easier wiring management and airflow.Fan Reversal Instructions1. Pull the fan from the bracket using a flat tip screwdriver under one side ofthe fan and gently pry the fan upwards until the mounts release. Do not force it, the mounts will release by applying minimal force. (Figure 1)2. Repeat this procedure on the opposite side of the fan to release the remaining mounts. (Figure 2)3. Check desired direction of airflow which is indicated by an arrow on the side of the fan. (Figure 3) Also notethe desired position of the power wire (default is downward). Now place the fan over the fan mounts.4. Install the fan by pulling the mounts though the fan mounting holes until the mount is properly seated (pullsthrough the fan to reach the ‘stop’). (Figure 4)5. Once the fan is attached, you may trim the rubber fan mounts if desired. This will however prohibit anyreversal of the fan in the future.Figure 1: Pry Fan from Mount Figure 2: Remove both sides Figure 3: Check airflow direction Figure 4: Reattach fanV ERY I MPORTANTOur products are intended to increase air flow around components which includes individual components as well as cabinets, enclosures, and other areas where equipment is present.It is important to follow all manufacturer recommendations for appropriate clearances around components and not create a situation where equipment can potentially be damaged from heat accumulations.Cool Components, Inc. will not be responsible for components that are damaged under any circumstance including failure of the cooling products. It is the installer’s responsibility to ensure products are installed in a manner where damage will not occur even if the cooling products fail.Unit Not Working?Do not Return Damaged or Defective Products to Point of Purchase. If the unit arrived non-functional or damaged, we will resolve the issue quickly and hassle-free. Proof of Purchase may be required. Contact us on the web at: /warrantyWarranty InformationThis unit is guaranteed to be free of defects for a period of one year from the date of purchase. This warranty excludes damage caused by misuse or for applications other than the intended use of the products.FeedbackWe truly value feedback on this and all of our products. We strive to provide the best products possible so it is important that we learn from our customers. If you have any ideas or suggestions that could improve this or any of our other products, please let us know. Thank you in advance for sharing your experience. Please send feedback to ***************************。
VS2010使用说明书

VS2010全新操作软件说明书———功能更强大与操作简单并无冲突欢迎使用VS2010全新操作软件,目前该软件支持的控制卡型号有VSA系列、VSD卡、VS-mini卡、VSC++卡,暂时不支持VSB卡,请勿在VSB卡上更新VS2010软件。
在VSA系列的控制卡中,也仅支持标签颜色为白底红字的控制卡,如果错误的更新了VS2010软件将对控制卡造成不可恢复的损坏,请您谨慎使用。
目录第一部分 VS2010全新软件简介 (3)一、VS2010全新软件概述 (3)二、VS2010全新软件的运行环境及组件介绍 (4)三、VS2010操作界面简介 (5)四、软件主要功能列表 (6)五、菜单功能介绍 (6)1.文件 (6)2.编辑 (7)3.视图 (7)4.节目 (7)5.预览 (7)6.工程 (7)7.控制卡 (7)8.远程 (8)10.帮助 (8)六、快捷工具栏介绍 (8)七、对象工具箱介绍 (8)八、节目对象和属性介绍 (9)九、编辑区介绍 (9)十、系统状态栏介绍 (10)总结 (10)第二章对象的使用和编辑 (10)一、名词解释 (11)二、什么是对象 (11)1.编辑对象 (11)2.显示对象 (11)三、对象与属性 (11)四、属性的编辑与对象的操作 (11)五、我们使用的对象 (12)1.编辑类对象 (12)节目和对象 (12)2.显示类对象 (13)文本文字 (13)码文字 (14)RTF文字 (14)图片显示 (14)文字节目单 (14)数字时钟 (15)模拟时钟 (15)动画 (15)表格 (15)天气信息 (15)倒计时 (16)第三章显示屏的管理 (16)一、管理的概念: (16)二、默认的环境 (16)三、发送节目 (17)四、下载节目 (17)五、工程的建立与导出 (18)六、校正显示屏的时钟 (18)七、自动开关显示屏的设置 (18)八、自动亮度调整的设置 (18)九、自动发送功能使用 (18)十、临时调整显示屏的亮度 (19)十一、广域网控制简介 (19)第四章技术支持和服务 (20)第一部分 VS2010全新软件简介一、VS2010全新软件概述VS2010全新软件是一款具有超强功能的异步LED显示屏操作软件,具有行业领先的技术优势,加上合理的设计思路,真正做到了功能强大与操作简单不相互冲突。
- 1、下载文档前请自行甄别文档内容的完整性,平台不提供额外的编辑、内容补充、找答案等附加服务。
- 2、"仅部分预览"的文档,不可在线预览部分如存在完整性等问题,可反馈申请退款(可完整预览的文档不适用该条件!)。
- 3、如文档侵犯您的权益,请联系客服反馈,我们会尽快为您处理(人工客服工作时间:9:00-18:30)。
6 额定短路开断电流 7 额定短时耐受电流 8 额定短路持续时间 9 额定峰值耐受电流 10 额定短路关合电流 11 二次回路工频耐受电压(1min) 12 额定单个/背对背电容器组开断电流 13 额定电容器组关合涌流 14 分闸时间(额定电压) 15 合闸时间(额定电压)
单位 kV
Hz A
kA
s kA
图 10
。11。
锦州锦开电器集团有限责任公司
6.5.2 断路器内部电气接线原理图(固定 式)
及以下等级运行时可不必去除,额定电流 1600A 及以上等级运行时必须去除。
。3。
锦州锦开电器集团有限责任公司
图1
1 储能到位切换用微动开关 2销 3 限位杆 4 滑块 5 拐臂 6 储能传动轮
7 储能轴
13 手动储能传动蜗轮
8 滚轮
14 电机传动链轮
9 储能保持掣子 15 电机输出轴
10 合闸弹簧 16 储能电机
次
mm V
V W s mm
ms
m/s
mm μΩ
手车式(含触臂) μΩ
33 触头合闸接触压力
N
34 额定操作顺序
*注:额定电流为 4000A 需强制风冷
20000 20000 50(40kA 为 30)
3 AC110/220 DC110/220
AC110/220 DC110/220
70(40kA 为 100)
≤15
11±1
3.5±1
≤2(一次相间距 275mm 时为≤3)
≤2
0.9~1.5
0.4~0.8
≤3
≤50(630A)
≤45(1250A)
≤35(1600~2000A) ≤25(2500A 以上)
≤60(630A)
≤55(1250A)
≤45(1600~2000A) ≤35(2500A 以上)
2400±200(20kA、25kA)
图3
图4
。7。
锦州锦开电器集团有限责任公司
6.4 外形尺寸图 6.4.1 手车式 VS1(800)(一次相间距为 210mm)外形尺寸:
图5
额定电流(A)
630
1250
额定短路开断电流(kA) 20,25,31.5
20,25,31.5,40
配合静触头尺寸(mm)
Φ35
Φ49
6.4.2 手车式 VS1(1000)(一次相间距为 275mm)外形尺寸:
c) 海拔高度:不超过 1000m;
d) 地震烈度不超过 8 度;
e) 使用场所无滴水,无易燃和爆炸危险,无化学腐蚀性气体以及无剧烈震动。
5. 主要规格及技术参数
主要规格及技术参数见表 1
序号 1 2 3 4 5
项目 额定电压 额定短时工频耐受电压(1min) 额定雷电冲击耐受电压(峰值) 额定频率 额定电流
36 传动连板 37 主轴传动拐臂 38 合闸保持掣子 39 连板 40 分闸电磁铁
41 半轴 42 手动分闸顶杆 22 凸轮 44 分合指示牌连板
。5。
锦州锦开电器集团有限责任公司
6.2 操动机构(参见图 1、图 2) 操动机构为弹簧储能操动机构,断路器框架内装有合闸单元,由一个或数个脱扣 电磁铁组成的分闸单元,辅助开关,指示装置等部件;前方设有合、分按钮,手动 储能操作孔,弹簧储能状态指示牌,合分指示牌等。 6.2.1 储能 断路器合闸所需能量由合闸簧储能提供。储能既可由外部电源驱动电机完成,也 可以使用储能手柄手动完成。 储能操作:由固定在框架上的储能电机 16 进行,或者将储能手柄插入手动储能 孔中按箭头方向摇动进行。电动储能时由电机输出轴 15 带动链轮传动系统(14,23, 18),手动储能时通过蜗轮、蜗杆(11,13)带动链轮传动系统。链轮 23 传动时, 销 2 推动轮 6 上的滑块 4 时储能轴 7 跟随转动并通过拐臂 5 和 21 拉伸合闸弹簧进行 储能。到达储能位置时,框架上的限位杆 3 压下滑块 4 使储能轴与链轮传动系统脱 开,储能保持掣子 9 顶住滚轮 8 保持储能位置,同时储能轴上连板 24 带动储能指示 牌 25 翻转显示“已储能”标记并切换辅助开关切断储能电机供电电源,此时断路器 处于合闸准备状态。 6.2.2 合闸 在合闸操作中,不论用手按下“合闸”按钮或远方操作使合闸电磁铁动作,均可 使储能保持轴 19 转动,使掣子 9 松开滚轮 8,合闸弹簧收缩同时通过拐臂 5、21 使 储能轴 7 和轴上的凸轮 22 转动,凸轮又驱动连杆机构(34,36,37,38,39)带动 绝缘拉杆 33 和动触头进入合闸位置,并压缩触头弹簧 32,保持触头所需接触压力。 合闸动作完成后合闸保持掣子 38 与半轴 41 保持合闸位置,同时储能指示牌、储 能辅助开关复位,电机供电回路接通。若外接电源也接通则再次进入储能状态,连 杆 44 拉动合/分指示牌,显示出“合”的标记,传动连杆拉动主辅助开关切换。 注:当断路器已处于合闸状态或选用闭锁装置而未使闭锁装置解锁及手车式断路 器在推进推出过程中,均不能进行合闸操作。 6.2.3 分闸 既可按“分闸”按钮,也可靠接通外部电源使分闸脱扣电磁铁或过流脱扣电磁铁 动作使合闸保持掣子 38 与半轴 41 解锁而实现分闸操作。由触头弹簧 32 和分闸簧 35
3. 产品依据标准
额定短路开断电流 kA 额定电流值 A 额定电压值 kV 产品设计序号 森源电器 SenYuan Electrical 真空断路器 Vacuum Circuit-breaker
断路器符合 GB1984-89《交流高压断路器》、JB3855-1996《3.6~40.5kV 户内交
流高压真空断路器》、DL/T403-2000《12kV~40.5kV 户内高压真空断路器订货技术
V A kA ms
630 1250
20 20
50 50
数值
12
42
75
50
630 1250 1600 1250 1600
1250 2000 2500 2000 2500
3150 4000* 3150 4000*
25
31.5
40
25
31.5
40
4
63
80
100
63
80
100
2000
630/400(40kA 为 800/400)
图7
额定电流(A)
630
额定短路开断电流(kA) 20,25,31.5
1250 20,25,31.5,40
6.4.4 固定式 VS1(一次相间距为 275mm)外形尺寸:
1600 31.5,40
额定电流(A) 额定短路开断电流(kA)
1600
*注:4000A 需强制风冷
图8
2000
2500
31.5,40
锦州锦开电器集团有限责任公司
1. 概述
VS1(ZN63A)型户内高压真空断路器(以下简称断路器)是用于 12kV 电力系统
的户内开关设备,作为电网设备、工矿企业电动设备的保护和控制单元。由于真空
断路器的特殊优越性,尤其适用于要求额定工作电流的频繁操作,或多次开断短路
电流的场所。
断路器采用操动机构与断路器本体一体式设计,既可做为固定安装单元,也可
1600 31.5,40
Φ55
图6
额定电流(A) 额定短路开断电流(kA) 配合静触头尺寸(mm)
1600
2000
31.5,40 31.5,40
Φ79
*注:4000A 需强制风冷
。8。
2500 31.5,40
3150 31.5,40
Φ109
4000* 40
锦州锦开电器集团有限责任公司
6.4.3 固定式 VS1(一次相间距为 210mm)外形在合闸位置时主回路电流路径:(参见图 2) 上出线座 27 经固定在灭弧室上的上支架 26 到真空灭弧室内部静触头,经动触 头及与其联接的导电夹、软连接,至下支架 30 到下出线座 31。 断路器出厂时各电流等级均装有防尘绝缘筒盖,在实际使用中,额定电流 1250A
。6。
锦州锦开电器集团有限责任公司
储存的能量使灭弧室 28 动静触头分离。在分闸过程后段,由液压缓冲器吸收分闸过 程剩余能量并限定分闸位置。
由连杆 44 拉动合/分指示牌显示出“分”标记,同时拉动计数器,实现计数器计 数,由传动连杆拉动主辅助开关切换。
6.3 防误联锁 断路器能提供完善的防误操作功能。(参见图 3、图 4) 6.3.1 断路器合闸操作完成后,合闸联锁弯板 1 向下运动扣住合闸保持轴上的合 闸弯板 2,在断路器未分闸时将不能再次合闸。 6.3.2 断路器在合闸结束后,如合闸电信号未及时去除,断路器内部防跳控制回 路将切断合闸回路防止多次重合闸。(可选) 6.3.3 手车式断路器在未到试验位置或工作位置时,由联锁弯板 3 扣住合闸弯板 2 上的销 4,同时切断合闸回路,防止断路器处于合闸状态进入负荷区。(图 3) 6.3.4 手车式断路器在工作位置或试验位置合闸后,有滚轮 5 压推进机构锁板 6, 手车将无法移动,防止在合闸状态推进或拉出负荷区。(图 4) 6.3.5 如果选用电气合闸闭锁,在未使闭锁装置解锁情况下阻止合闸操作。 注:合闸闭锁装置功率为 4.8W, 工作电压范围为 0.8~1.1 倍额定电压。
配用专用推进机构,组成手车单元使用。
2. 型号的表达方式
VS1-12/ □-□ │││ │ │ │ │││ │ │ │ │││ │ │ │ │││ │ │ └─ │││ │ └─── │││ └───── ││└─────── │└──────── └─────────
3150
。9。
4000* 40
图9
。10。
锦州锦开电器集团有限责任公司
6.5 断路器内部电气接线原理图 6.5.1 断路器内部电气接线原理图 (手车式) 图示为 VS1 处于试验位置、分闸、未 储能状态。