ProSafe 千兆智能网管交换机(GS108TV2 产品介绍
NETGEAR ProSAFE 智能交换机安装指南说明书
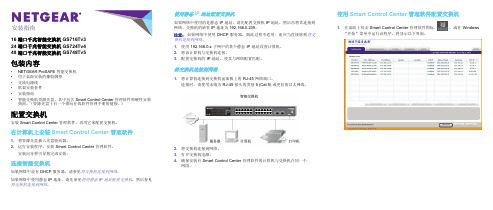
安装指南16端口千兆智能交换机 GS716Tv324端口千兆智能交换机 GS724Tv448端口千兆智能交换机 GS748Tv5包装内容•NETGEAR ProSAFE 智能交换机•用于桌面安装的橡胶脚垫•交流电源线•机架安装套件•安装指南•智能交换机资源光盘,其中包含 Smart Control Center 管理软件和硬件安装指南。
(资源光盘上有一个指向在线软件管理手册的链接。
)配置交换机安装 Smart Control Center 管理软件,再用它来配置交换机。
在计算机上安装 Smart Control Center 管理软件1.将资源光盘插入光盘驱动器。
2.运行安装程序,安装 Smart Control Center 管理软件。
安装向导将引导您完成安装。
连接智能交换机如果网络中设有 DHCP 服务器,请参见将交换机连接到网络。
如果网络中使用静态 IP 地址,请先参见使用静态 IP 地址配置交换机,然后参见将交换机连接到网络。
使用静态 IP 地址配置交换机如果网络中使用的是静态 IP 地址,请先配置交换机 IP 地址,然后再将其连接到网络。
交换机的缺省 IP 地址为 192.168.0.239。
注意:如果网络中使用 DHCP 服务器,则此过程不适用;而应当直接转到将交换机连接到网络。
1.使用 192.168.0.x 子网中的某个静态 IP 地址设置计算机。
2.将该计算机与交换机连接。
3.配置交换机的 IP 地址,使其与网络配置匹配。
将交换机连接到网络1.将计算机连接到交换机前面板上的 RJ-45 网络端口。
连接时,请使用末端为 RJ-45 接头的类别 5 (Cat 5) 或更佳的以太网线。
2.将交换机连接到网络。
3.打开交换机电源。
4.确保安装有 Smart Control Center 管理软件的计算机与交换机在同一个网段。
使用 Smart Control Center 管理软件配置交换机1.在桌面上双击 Smart Control Center 管理软件图标,或在 Windows“开始”菜单中运行该程序,将显示以下界面。
ProSafe 千兆智能网管交换机(GS724Tv4 产品介绍

NETGEAR ®新一代ProSAFE 千兆智能网管交换机提供高性能和高可用性的强大L2和L2+功能。
他们专为面向未来 的不断增长且更智能的通讯和应用需求的边缘网络而设计,提供了更强的可靠性,提升网络效率的同时降低了运营成 本,并简化了网络管理。
此系列有三款产品,分别是:16口,24口和48口千兆智能网管交换机。
GS716T 和GS724T 带有2个专用的千兆 SFP 端口可用于光纤连接,而GS748T 带有2个SFP 复用端口和2个SFP 专用端口,所有交换机均增加了可同时连 接使用的端口数量。
NETGEAR 新一代千兆智能交换机为商业企业市场带来了最为优化的极具性价比的解决方案。
亮点为融合网络而设计✓ 无阻塞千兆速度吞吐量✓ 自动语音VLAN 为部署VoIP 带来快速与便利✓ 自动视频VLAN ,与自动语音VLAN 一样,为IP 视频监控的部署带来便利 ✓ 静态路由,使内网流量更加有序高效 ✓ IGMP 、MLD snooping ,提供高级组播过滤 使用NETGEAR 部署一个面向未来的网络✓ 可靠的,无阻塞的性能,16K MAC 地址,256条VLANs ,100条ACL 条目,32条静态路由,与512个组播组 ✓ 广泛的IPv6管理支持,QoS 和ACL,确保投资保护与平滑过渡到IPv6网络✓ 专用的SFP 端口替代原来的复用端口,提供了更多连接端口,提供了更优性价比和可用性 ✓ EEE 高效节能以太网 (IEEE802.3az) 为未来更多的 EEE 终端设备进入市场提供节能支持 ✓ 高级IPv4/IPv6入向QoS 流量过滤与优先级✓ 动态VLAN 分配,提供方便的用户身份认证和无区域界限访问网络 ✓ 组播VLAN 注册用于消除不必要的组播流量,提供网络利用率 简易的网络部署✓ VoIP 自动语音VLAN 为VoIP 部署带来便利 ✓ 为IP 视频监控而设的自动视频✓ ACL 向导,一个简易的为网络接入控制设计的设置指引✓ 智能控制中心SCC ,一个强大的发现、部署、监控和升级网络中多台交换机的管理软件 ✓ 网管软件(NMS300)支持部署和管理所有NETGEAR 的商用产品 大IT ,更是智能IT✓ 可通过网页图形界面或智能管理软件SCC 对多设备进行部署管理 ✓ 基于标准的技术,确保在同一网络内的多种设备的互操作性P roSafe ® 千兆智能网管交换机(GS724Tv4)产品介绍P roSafe® 千兆智能网管交换机(GS724Tv4)产品介绍技术规格。
GS108PE简单网管交换机

ProSafe○R8端口带PoE千兆简单网管交换机GS108PE语音/视频流区分优先级支持创建多个网络组(端口VLAN)支持网线检测功能支持网络流量监控支持环路侦测和广播风暴控制1-4号端口支持PoE功能关键特性∙千兆接入,提供了QoS,VLAN和网络监控等功能∙在即插即用基础上的简单网络架设∙支持PoE∙环路侦测和广播风暴控制∙NETGEAR绿色环保,节能特性∙支持VLAN∙QoS区分流量优先级∙自动DoS保护∙网络监控和带宽控制∙通过Cable Test检测网络连通性∙最多可为4台无线AP或其他PoE受电设备供电∙环路侦测超越简单即插即用连通性的更多二层应用现代,成长型商业用户日益增长的业务需求更多地依赖于网络。
公司将更多的应用和需求放置在网络上。
简单的即插即用交换机已不能适应VoIP电话和IP照相机等应用。
加之,基于因特网的应用程序(如Hotmail,Google日历等)将网络提升到一个商用需求层次。
然而,公司又不希望投入更多的资金和培训专员来维护复杂的网管交换机。
NETGEAR新推出的ProSafe 简单网管交换机提供了简单易用的可见性和简单的配置以满足用户日益增长的需求。
为更深入了解网络行为,这款交换机提供了网络监控功能。
另外,这款交换机还提供了线缆检测功能以排查网络连接故障,并能定位故障端口所在位置。
为优化网络流量,可设置基于端口和802.1p协议的优先级,以保证低延时流量的优先应用。
这款交换机还支持VLAN功能,提高网络安全性。
较之非网管交换机,这款产品提供了网络监控和简单的二层功能,向最终用户提供了更大的价值。
另外,这款GS108PE带有环保标识,支持绿色以太网节能技术。
GS108PE采用坚固的金属外壳,低噪音的风扇设计使其运行非常安静。
绿色环保∙较之非绿色版本节能60%∙自动待机模式和线缆长度侦测功能—即端口未连接时,自动待机模式节省能源;网线短于10米时,更低的传输功率∙包装中至少80%的可回收资源ProSafe 8端口带PoE千兆简单网管交换机GS108PE的主要技术规范如下表:。
明星产品介绍之-GS108Tv2 PPT
旧宿舍升级前
旧宿舍升级后
宿舍A
GSM7224P
GS108Tv2
宿舍A
宿舍B
宿舍B宿舍N宿舍N来自GS108Tv2卖点三句话
全功能的二层智能交换机
具备独特的低功耗POE受电功能
无数量限制的交换机统一管理 (NETGEAR SCC集群管理平台)
友商产品对比
4. 多样化VLAN(语音、访客VLAN); 5. 服务质量(QoS、CoS); 6. 高级安全功能(802.1X、ACL); 7. 管理方式(Web, SNMPv1, v2c,v3 以及集群管理)
GS108Tv2
产品订货号: GS108T-200AUS
独特功能——PoE受 电
• 技术:802.3af PoE-PD
Welcome to
NETGEAR 特色产品介绍
GS108Tv2
GS108Tv2特性概览
产品类别:
1. 交换机 / 全千兆交换机 / 智能网管交换机 / PoE受电交换机
产品特性
1. 8个10/100/1000Mbps网络接口; 2. 16Gbps背板带宽(无阻塞);
3. 支持PoE受电(6w超低功耗);
• 场景:小区、楼宇等应用的最佳接入方案
6W超低功 耗降低POE 交换机投入
无需电源
POE交换机 GS724TP
GS108Tv2
高级功能——Guest VLAN
Internet
用
户
身
GS108Tv2
份
智
能
识
别
员工电脑
内部服务器
ProSafe GS108v3 8端口Gigabit Ethernet交换机说明书
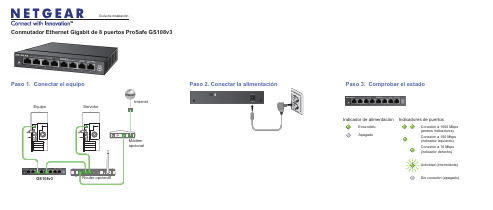
Conmutador Ethernet Gigabit de 8 puertos ProSafe GS108v3Paso 2. Conectar la alimentación Paso 3. Comprobar el estadoMódemopcionalPaso 1. Conectar el equipoGS108v3Router opcionalEquipoServidorInternetEncendido ApagadoIndicador de alimentaciónActividad (intermitente)Sin conexión (apagado)Conexión a 1000 Mbps (ambos indicadores)Conexión a 10 Mbps (indicador derecho)Indicadores de puertosConexión a 100 Mbps (indicador izquierdo)Guía de instalaciónSeptiembre de 2012Este símbolo se ha colocado conforme a la directiva 2002/96 de la UE sobre Residuos de Aparatos Eléctricos y Electrónicos (la Directiva RAEE). Si se tuviera que desechar este producto dentro de la Unión Europea, se tratará y se reciclará de conformidad con lo dispuesto en las leyes locales pertinentes, en aplicación de la directiva RAEE.NETGEAR, el logotipo de NETGEAR y Connect with Innovation son marcas comerciales o marcas comerciales registradas de NETGEAR, Inc. o sus filiales en Estados Unidos y otros países. La información contenida en el documento puede sufrir modificaciones sin previo aviso. El resto de marcas y nombres de productos son marcas comerciales o marcas comerciales registradas de sus respectivos titulares. © NETGEAR, Inc. Todos los derechos reservados.Sólo para uso en interior en todos los países de la UE y Suiza.Para la declaración de conformidad de la UE completa, visite /app/answers/detail/a_id/11621/.Condiciones : Con el fin de mejorar el diseño interno, el funcionamiento y la fiabilidad, NETGEAR se reserva el derecho de realizar modificaciones del producto descrito en el presente documento sin previo aviso. NETGEAR no asume responsabilidad alguna derivada del uso o la aplicación de los productos o circuitos descritos en el presente documento.EspecificacionesEspecificaciones DescripciónInterfaz de redConector RJ-45 para 10BASE-T, 100BASE-TX o 1000BASE-TCable de red Cable Ethernet categoría 5e (Cat 5e) o superior Puertos8Fuente de alimentación *****************Consumo de energía 5W máx.Peso0,522Kg (1,15 libras)Dimensiones(anchura x profundidad x altura)158 mm x 105mm x 27 mm 6,2 pulg. x 4,1 pulg. x 1,1 pulg.Temperatura de funcionamiento 0–50° C (32–122° F)Humedad de funcionamientoHumedad relativa 10%–90%, no condensadaCumplimiento con las normas electromagnéticas CE Clase B, FCC Clase B, VCCI Clase B, C-Tick Clase B Normativas de seguridadMarca CEServicio técnicoUna vez instalado el dispositivo, busque el número de serie en la etiqueta del producto y regístrelo en https:// .Debe registrar su producto antes de poder usar el soporte telefónico de NETGEAR. NETGEAR recomienda registrar su producto en su sitio web NETGEAR. Para actualizaciones del producto y soporte web, visite .。
NETGEAR ProSAFE 网管交换机 M7100 安装与初始配置指南说明书

NETGEAR ProSAFE 网管交换机M7100安装交换机准备一处符合安装、接入、电源和环境要求的安装位置。
有关这些要求的更多信息,请参见资源光盘上的硬件安装指南。
¾要安装交换机:1. 按照以下其中一种方法安装交换机:• 在平坦表面上。
将随交换机提供的橡胶脚垫放在交换机底部的四个凹槽下。
• 在机架中。
使用随交换机提供的机架安装工具,根据硬件安装指南中的安装说明进行操作。
2. 接上交流电源。
电源 LED 灯呈黄色闪烁时,表示其正在进行上电自检 (POST)。
当交换机完成上电自检后,LED 灯变为绿色。
交换机开始工作。
• 如果上电自检失败,电源 LED 灯将保持为黄色。
有关更多信息,请参见硬件安装指南的故障诊断部分。
• 如果电源 LED 灯不亮,请检查电源线是否连接好,电源是否有电。
如果此操作无法解决问题,请参见硬件安装指南的故障诊断部分以了解更多信息。
3. 连接设备到交换机。
• 对于 1000 Mbps 的铜制端口,请使用超五类 (Cat5e) 线。
• 对于 1000 Mbps 的光纤端口,请使用 NETGEAR AGM731F 或AGM732F。
• 对于 10 Gbps 的铜制端口,请使用 6A 类 (Cat6a) 线。
• 对于 10 Gbps 的光纤端口,请使用 NETGEAR AXM761、AXM762或 AXM763。
注意:光纤 SFP 模块单独提供。
有关安装 SFP 模块的更多信息,请参见硬件安装指南。
进行初始配置您可以通过交换机的 Web 管理界面或通过控制端口使用命令行界面(CLI) 管理交换机。
本指南说明了如何使用 Web 管理界面配置交换机。
本指南还说明了如何使用 CLI 配置交换机从 DHCP服务器处动态获取IP 地址或使用 ezconfig 为其配置静态 IP地址。
有关 CLI 管理的更多信息,请参见资源光盘上的 CLI 参考手册和软件管理指南。
使用 Web 管理界面配置交换机,请根据您的 Windows 计算机设置,采用以下其中一个步骤:• 计算机配置为 DHCP 客户端模式,网络中无 DHCP 服务器。
ProSafe百兆智能网管交换机(FS750T2产品介绍
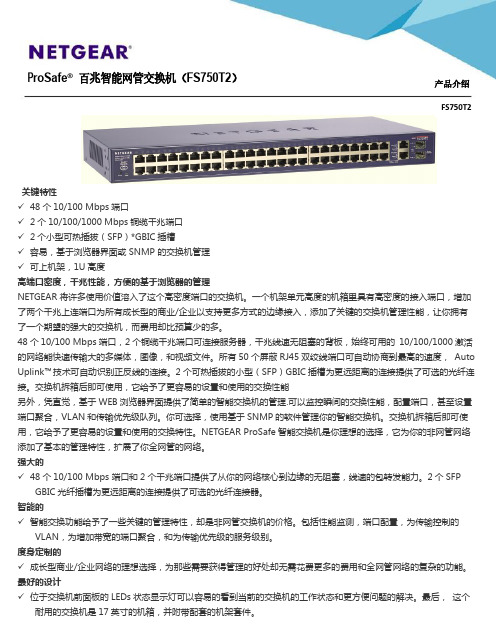
关键特性✓ 48个10/100 Mbps 端口✓ 2个10/100/1000 Mbps 铜缆千兆端口✓2个小型可热插拔(SFP )*GBIC 插槽✓ 容易,基于浏览器界面或 SNMP 的交换机管理✓ 可上机架,1U 高度高端口密度,千兆性能,方便的基于浏览器的管理 NETGEAR 将许多使用价值溶入了这个高密度端口的交换机。
一个机架单元高度的机箱里具有高密度的接入端口,增加 了两个千兆上连端口为所有成长型的商业/企业以支持更多方式的边缘接入,添加了关键的交换机管理性能,让你拥有 了一个期望的强大的交换机,而费用却比预算少的多。
48个10/100 Mbps 端口,2个铜缆千兆端口可连接服务器,千兆线速无阻塞的背板,始终可用的 10/100/1000激活 的网络能快速传输大的多媒体,图像,和视频文件。
所有50个屏蔽RJ45双绞线端口可自动协商到最高的速度, Auto Uplink ™技术可自动识别正反线的连接。
2个可热插拔的小型(SFP )GBIC 插槽为更远距离的连接提供了可选的光纤连 接。
交换机拆箱后即可使用,它给予了更容易的设置和使用的交换性能另外,凭直觉,基于WEB 浏览器界面提供了简单的智能交换机的管理.可以监控瞬间的交换性能,配置端口,甚至设置 端口聚合,VLAN 和传输优先级队列。
你可选择,使用基于SNMP 的软件管理你的智能交换机。
交换机拆箱后即可使 用,它给予了更容易的设置和使用的交换特性。
NETGEAR ProSafe 智能交换机是你理想的选择,它为你的非网管网络 添加了基本的管理特性,扩展了你全网管的网络。
强大的✓ 48个10/100 Mbps 端口和2个千兆端口提供了从你的网络核心到边缘的无阻塞,线速的包转发能力。
2个SFP GBIC 光纤插槽为更远距离的连接提供了可选的光纤连接器。
智能的✓ 智能交换功能给予了一些关键的管理特性,却是非网管交换机的价格。
包括性能监测,端口配置,为传输控制的 VLAN ,为增加带宽的端口聚合,和为传输优先级的服务级别。
ProSafe 8-Ports 10 100 1000MB 模块式交换机 GS108P 用户手册说明
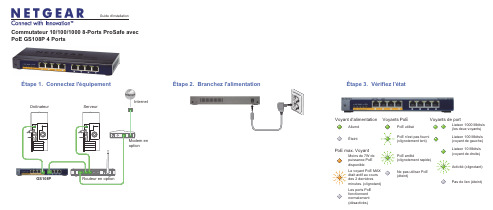
Guide d'installationÉtape 3. Vérifiez l'étatCommutateur 10/100/1000 8-Ports ProSafe avec PoE GS108P 4 Ports GS108PÉtape 2. Branchez l'alimentation Modem en optionÉtape 1. Connectez l'équipementRouteur en optionOrdinateurServeurInternetÉteintAlluméVoyant d'alimentationVoyants de portActivité (clignotant)Pas de lien (éteint)Liaison 1000 Mbits/s (les deux voyants)Liaison 10 Mbits/s (voyant de droite)Liaison 100 Mbits/s (voyant de gauche)Voyants PoEPoE max. VoyantLes ports PoE fonctionnent normalement (désactivés)Le voyant PoE MAX était actif au cours des 2 dernières minutes. (clignotant)PoE utiliséNe pas utiliser PoE (éteint)PoE n'est pas fourni (clignotement lent)PoE arrêté(clignotement rapide)Moins de 7W de puissance PoE disponibleSeptembre 2012Ce symbole a été apposé conformément à la directive européenne 2002/96 sur la mise au rebut des équipements électriques et électroniques (directive WEEE - Waste Electrical and ElectronicEquipment). En cas de mise au rebut de ce produit dans un État membre de l'Union européenne, il doit être traité et recyclé conformément à cette directive.NETGEAR, le logo NETGEAR et Connect with Innovation sont des marques commerciales et/ou des marques déposées de NETGEAR, Inc. et/ou des filiales de NETGEAR aux Etats-Unis et/ou dans d'autres pays. Les informations sont sujettes à changement sans préavis. Les autres marques et noms de produits sont desmarques commerciales ou des marques déposées de leurs détenteurs respectifs. © NETGEAR, Inc. Tous droits réservés.Pour une utilisation en intérieur dans tous les pays de l'UE et la Suisse.Pour consulter la déclaration de conformité complète, rendez-vous sur le site /app/answers/detail/a_id/11621/.Conditions : NETGEAR se réserve le droit d'apporter des modifications aux produits décrits dans ce document sans préavis afin d'en améliorer la conception, les fonctions opérationnelles et/ou la fiabilité. NETGEAR décline toute responsabilité quant aux conséquences de l'utilisation des produits ou des configurations de circuits décrits dans le présent document.SpécificationsSpécification DescriptionInterface réseau Connecteur RJ-45 pour 10BASE-T, 100BASE-TX, ou 1000BASE-TCâble réseau Catégorie 5e (Cat 5e) ou meilleur câble Ethernet Ports8Adaptateur secteur Entrée CC 48V @ 1,25 A Consommation de courant60WBudget d'alimentation PoE 50W max. tous les ports PoE (1-4), 15,4 W max. par port PoE Poids 0,716 kg (1,7 lb)Dimensions (L × P × H)235 mm x 102 mm x 27 mm 9,3 po. x 4,1 po. x 1,1 po.Température de fonctionnement 0-50 ° C (32-122 ° F)Humidité de fonctionnement 10% -90% d'humidité relative, sans condensationConformitéélectromagnétique CE Classe B, FCC Classe B, VCCI Classe B, C-Tick Classe B, CCC Homologations de sécuritéMarquage CE, CB, CCCSupport techniqueAprès l'installation de votre périphérique, notez le numéro de série inscrit surl'étiquette de votre produit. Il vous sera nécessaire pour enregistrer votre produit à l'adresse https:// .Vous devez enregistrer votre produit avant de pouvoir utiliser l'assistancetéléphonique de NETGEAR. NETGEAR vous recommande d'enregistrer votre produit sur le site Web de NETGEAR. Pour obtenir des mises à jour de produits et accéder au support Web, visitez .。
ProSafe 16端口千兆交换机GS116v2安装指南说明书
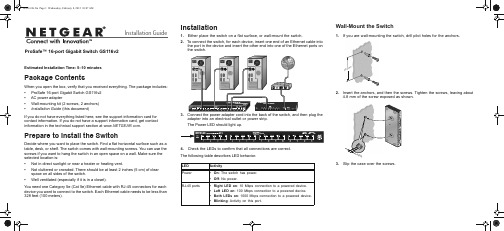
Installation GuideProSafe™ 16-port Gigabit Switch GS116v2Estimated Installation Time: 5–10 minutesPackage ContentsWhen you open the box, verify that you received everything. The package includes:• ProSafe 16-port Gigabit Switch GS116v2• AC power adapter• Wall-mounting kit (2 screws, 2 anchors)• Installation Guide (this document)If you do not have everything listed here, see the support information card for contact information. If you do not have a support information card, get contact information in the technical support section at .Prepare to Install the SwitchDecide where you want to place the switch. Find a flat horizontal surface such as a table, desk, or shelf. The switch comes with wall-mounting screws. You can use the screws if you want to hang the switch in an open space on a wall. Make sure the selected location is:• Not in direct sunlight or near a heater or heating vent.• Not cluttered or crowded. There should be at least 2 inches (5 cm) of clearspace on all sides of the switch.• Well ventilated (especially if it is in a closet).You need one Category 5e (Cat 5e) Ethernet cable with RJ-45 connectors for each device you want to connect to the switch. Each Ethernet cable needs to be less than 328 feet (100 meters).Installation1. Either place the switch on a flat surface, or wall-mount the switch.2. To connect the switch, for each device, insert one end of an Ethernet cable intothe port in the device and insert the other end into one of the Ethernet ports onthe switch.3.Connect the power adapter cord into the back of the switch, and then plug theadapter into an electrical outlet or power strip.The Power LED should light up.4. Check the LEDs to confirm that all connections are correct.The following table describes LED behavior.Wall-Mount the Switch1. If you are wall-mounting the switch, drill pilot holes for the anchors.2. Insert the anchors, and then the screws. Tighten the screws, leaving about4.8 mm of the screw exposed as shown.3. Slip the case over the screws.4.8 m mFebrurary 2012This symbol was placed in accordance with the European Union Directive 2002/96 on the Waste Electrical and Electronic Equipment (the WEEE Directive). If disposed of within the European Union, this product should be treated and recycled in accordance with the laws of your jurisdiction implementing the WEEE Directive.NETGEAR, the NETGEAR logo, and Connect with Innovation are trademarks and/or registered trademarks of NETGEAR, Inc. and/or its subsidiaries in the United States and/or other countries. Information is subject to change without notice. Other brand and product names are registered trademarks or trademarks of theirrespective holders. © 2012 NETGEAR, Inc. All rights reserved.Troubleshooting with the LEDsThe LEDs can help you troubleshoot the hardware.Power LED Is OffThe switch has no power. Make sure that:• The power cord is correctly connected to the switch.• The power adapter is correctly connected to a functioning power outlet. If youare using a power strip, make sure the power strip is turned on. If the socket is controlled by a light switch, make sure the switch is in the on position.• You are using the NETGEAR power adapter supplied with your switch.Port LED Is Off or Stays OnThere is a hardware connection problem.• Make sure the cable connectors are securely plugged in at the switch and thedevice.• Make sure the connected device is turned on.• If the Ethernet cable is connected to an NIC or other Ethernet adapter, makesure the card or adapter is installed correctly and is working.• Make sure the cable is less than 328 feet (100 meters).Technical SupportThank you for selecting NETGEAR products.After installing your device, locate the serial number on the label of your product,and use it to register your product at /register . Registration is required to use our telephone support service. Also go to for product updates, additional documentation, and support.For complete DoC go to the NETGEAR EU Declarations of Conformity website at/app/answers/detail/a_id/11621/.。
博达交换机产品及应用李安

S2528GX
24 个 千 兆 SFP 光 口 , 4 个 10/100/1000M光电复用口 1个Console口 背板带宽:56Gbps 支持802.1w/802.1d/802.1s
S2548GX
44个千兆SFP光口,4个 10/100/1000M 光电复用口 1个console口 背板带宽:96Gbps 支持802.1w/802.1d/802.1s
博达交换机产品及应用李安
博达网络
推荐产品-S2226H
v 概述: S2226H为新一代的24百兆+2千兆二层半交换机,
v 描述:
拥有24个百兆电口,2个千兆光电复用口,无需扩展板来扩展千兆接口。 功能方面,支持IPv6特性的功能(ACL),支持灵活QinQ,支持防御arp欺骗 功能6tp-EI的优势:价格会有优势,支持IPv6特性等
博达交换机产品及应用李安
博达二层半交换机
S2208/S2208POE/S2216/S2216POE/ S2226/S2228/S2228F/
S2228POE/S2448C
主要特性: 支持L2~L4访问控制列表; 支持DHCP-Snooping功能; 支持灵活QinQ功能; 支持防ARP欺骗功能; 支持IPv6功能(硬件支持ACL)
博达交换机产品及应用李安
博达网络
产品特性
多种路由策略- 支持RIP v1/v2、OSPFv2、BEIGRP、BGPv4等多种动态路由协议
卓越的硬件性能- S3512GX具有48G背板带宽,3524/3524GX具有64G背板带宽
智能转发策略- 具有对“红码病毒”和“冲击波病毒”攻击完全的防御 能力 高安全可靠性- 提供电源热冗余,增加系统可靠性
S2008/S2008EMI、S2116/S2116EMI、 S2108/S2108POE、S2224H
ProSafe千兆智能网管交换机(GS510TP产品介绍

NETGEAR ®的ProSafe ® 8端口千兆二层智能交换机是由八个PoE 端口组合而成,为校园环境,仓库,商业楼宇提供 了安全和灵活的接入层聚合:无线接入点,IP 电话,闭路电视和视频监控。
概述 以太网供电(Power-over-Ethernet ,PoE
)技术给各种规模的商业网络部署简易性与高投资保护。
随着越来越多的设 备要求通过以太网线路获取电源供应,以太网供电(PoE )交换机便是对应这种高需求的终端设备的最佳解决方案。
传统 的PoE 交换机通常都是具有高密度端口的,但是这种交换机对于小规模的商业部署来说是不够灵活的,并且是浪费资 源的,用户通常都会剩下很多很多的端口没有被使用。
NETGEAR ®的ProSafe ® GS510TP 可以提供一种紧凑的解决 方案来完美匹配这种特殊区域的低密度网络需求或者是您网络的扩展需求,GS510TP 提供8个PoE 端口来连接您的 PoE 终端设备,然后使用两个专门的千兆光纤接口来上联更长距离的上联交换机;另外,使用GS510TP 上的PoE + 特性,GS510TP 能够给那些高电源消耗的终端设备提供高达30w 每个接口的足够的电源支持。
GS510TP 是一个能够 优化各种商用网络具备高效特性的套装。
同时GS510TP 也具备一些综合性的特性,例如增强型的VLAN 与QoS ,访问控制列表(ACL ),802.1x 端口接入身份 验证,流量控制和IGMP snooping 。
P roSafe ® 千兆智能网管交换机(GS510TP )
产品介绍
P roSafe®千兆智能网管交换机(GS510TP)产品介绍
技术规格。
NETGEAR GS108Tv2 8端口 ги格比智能开关数据表说明书

Power up Your Small Network with Gigabit SpeedsThe NETGEAR® family of Gigabit Smart Switches is purposely designed for SMB customers with high performance, SMB-oriented features and easy management. With 8 10/100/1000 Mbps ports, each capable of powering 2000 Mbps of data throughput in full-duplex mode per port, the GS108T is an ideal solution for extending network connections into conference room, labs, lobbies anddepartment workgroups. It enables SMB networks to support Voice over IP (VoIP), streaming media, multicasting, security, and many other bandwidth-intensive applications like ERP and large file transfers.The GS108T comes with a comprehensive set of L2 features, such as access control lists (ACL), 802.1x port authentication (MD5), enhanced QoS, rate limiting and IGMP snooping among others to provide a small or medium-sized business with a network that is geared for growth while ensuring performance and reliability.In addition, the Port 1 of GS108T is a PD port. It can not only obtain its power from an external AC power adapter as any other switch does, but also from a PoE source to pass the power through. This gives an SMB flexibility when installing the switch in places where a power outlet is not present.The GS108T comes with both an intuitive Web-browser GUI interface and Smart Control Center (Windows PC required), which offer simple Smart Switchmanagement, making it a snap to monitor switch performance, configure ports,even set up port trunks, VLANs, and traffic prioritization. Alternatively, you can use SNMP-based software to manage your Smart Switch. NETGEAR Smart Switches are ideal for adding basic management to your unmanaged networks or extending your managed networks.HighlightsIntelligent • The GS108T provides cost-efficient solutions that enable SMB customers to better manage their network.Included are performance monitoring, port configuration, VLAN for traffic control, link aggregation for increased bandwidth, IGMP snooping for facilitating multicast applications, and Class ofService (CoS) for traffic prioritization.Ideal Advanced Security • These Gigabit Smart Switches have advanced features that provide more robust security to SMBs. These include: 802.1x for authentication (MD5), ACL filtering to permit or deny traffic based on MAC or IP addresses single pane-of-glass viewAdvanced Quality of Service• Priority queuing ensures that high- priority traffic gets deliveredefficiently, even during congestion from high-traffic bursts. Companiesimplementing network telephony or video conferencing, for example, need to be able to prioritize such voice and video traffic and other real-time applications over less latency-sensitive traffic to ensure reliability and quality. The ability to prioritize traffic ensures quality of latency-sensitive services and applications despite increasing traffic loads. The Gigabit Smart Switch provides an extensive set of QoS features: 802.1p-based prioritization, Layer 3-based prioritization, RatelimitingConnectsto optional power adapter (located on back)Connects to printersDual Band Wireless-NAccess Point Example ApplicationNetwork Protocol and Standards Compatibility GS108Tv2IEEE 802.3i 10BASE-T YesIEEE 802.3u 100BASE-TX YesIEEE 802.3ab 1000BASE-T YesIEEE 802.3x full-duplex flow control YesPower SupplyPower consumption: 6W maximum YesNetwork Ports8 10/100/1000Mbps auto sensing Gigabit Ethernet YesPhysical SpecificationsDimensions (W x D x H)158 x 105 x 27mm (6.2 x 4.1 x 1.1in)Weight 0.56kg (1.23 lb)Performance SpecificationsForwarding modes Store-and-forwardBandwidth16Gbps full duplexNetwork latency Less than 15μs for 64-byte frames in store-and-forward mode for1000 Mbps to 1000 Mbps transmissionBuffer memory 512KB embedded memory per unitAddress database size4k media access control (MAC) addresses per system Mean time between failures (MTBF)275,533 hours (~32 years)Acoustic noise0dBElectromagnetic EmissionsCE mark, commercialFCC Part 15 Class BVCCI Class BC-TickEnvironmental SpecificationsOperating T emperatureSwitch: 32° to 122°F (0° to 50°C) Adapter: 32° to 104°F (0° to 40°C)Storage T emperature -4° to 158°F (-20° to 70°C)Operating Humidity 90% maximum relative humidity, non-condensing Storage humidity95% maximum relative humidity, non-condensingOperating altitude10,000ft (3,000m) maximumStorage altitude10,000ft (3,000m) maximumStatus LEDsPer port Link/activity, speedPer device PowerPower Adapter12V, 1.0A power adapter, localized to country of saleAlternatively, unit can be powered by IEEE 802.3af PSE via Ethernet port1Electromagnetic Immunity GS108Tv2EN 55024SafetyCE mark, commercialcUL IEC 950/EN 60950CB Administrative Switch ManagementIEEE 802.1Q Static VLAN (64 groups, Static)YesProtected ports YesIEEE 802.1p Class of Service (CoS)YesPort-based QoS YesDSCP-based QoS YesDiffServ YesIEEE 802.3ad Link Aggregation (manual or LACP)YesIEEE 802.1w Rapid Spanning Tree Protocol (RSTP)YesIEEE 802.1s Multiple Spanning Trees Protocol (MSTP)YesIEEE 802.1ab Link Layer Discovery Protocol (LLDP)YesLLDP-MED YesSNMP v1, v2c, v3RFC 1213 MIB II YesRFC 1643 Ethernet Interface MIB YesRFC 1493 Bridge MIB YesRMON group 1, 2, 3, 9Auto voice VLAN YesDHCP Filtering YesAuto denial-of-service (DoS) protection YesHTTP and HTTPS YesPing and traceroute YesGreen features Power saving by cable length (<10 m) Power saving when link down YesRFC 2131 DHCP client YesDHCP filtering YesIEEE 802.1x with Guest VLAN YesJumbo frame support YesPort-based security by locked MAC addresses YesMAC and IP-based ACL YesStorm control for broadcast, multicast and unknownYesunicast packetsIGMP snooping v1/v2YesAdministrative Switch Management GS108Tv2 Port-based egress rate limiting Yes SNTP YesPort mirroring support (Many to one)Yes Web-based configuration Yes Configuration backup/restore Yes Password access control Yes TACACS+ and RADIUS support Yes Syslog Yes Firmware upgradeable Yes Warranty and SupportHardware Limited Warranty Limited Lifetime* Limited Lifetime* 24x7 Online Chat T echnical Support90 days (24/7) Live Phone T echnical SupportNext Business Day (NBD) Hardware ReplacementProSUPPORT OnCall 24x7, Category S1** Service PackagesCategory S1 PMB0S11 (1 yr) PMB0S31 (3 yr) PMB0S51 (5 yr)Package ContentsAll models 8-port Gigabit Smart Switch (GS108T v2)Power adapterRubber footpadsWallmount kitInstallation guideOrdering InformationGS108T-200NAS North AmericaGS108T-200AUS Australia & AsiaGS108T-200GES Europe GeneralGS108T-200UKS United KingdomGS108T-200JPS Japan¹ IEEE 802.3af PoE capable devices.*This product comes with a limited warranty that is valid only if purchased from a NETGEAR authorized reseller, and covers unmodified hardware, fans and internal power supplies – not software or external power supplies, and requires product registration at https:///business/registration within 90 days of purchase; see https:///about/warranty for details. Intended for indoor use only.**The NETGEAR OnCall 24x7 contract provides unlimited phone, chat and email technical support for your networking product.NETGEAR, the NETGEAR Logo, and ProSUPPORT are trademarks of NETGEAR, Inc. in the United States and/or other countries. Other brand names mentioned herein are for identification purposes only and may be trademarks of their respective holder(s).NETGEAR,Inc.350E.PlumeriaDrive,SanJose,CA95134-1911USA,1-888-NETGEAR(638-4327),E-mail:****************,D-GS108Tv2-19Jan21。
千兆PoE智能交换机GS110TP说明文档说明书
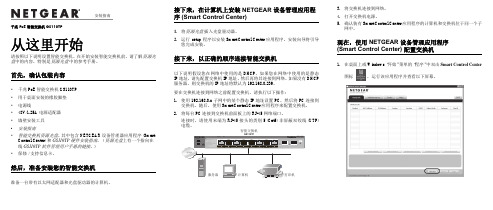
千兆 PoE 智能交换机 GS110TP从这里开始请按照以下说明设置智能交换机。
在开始安装智能交换机前,请了解资源光盘中的内容,特别是资源光盘中的参考手册。
首先,确认包装内容•千兆 PoE 智能交换机 GS110TP•用于桌面安装的橡胶脚垫•电源线•48V/1.25A 电源适配器•墙壁安装工具•安装指南•智能交换机资源光盘,其中包含 NETGEAR 设备管理器应用程序 (Smart Control Center) 和GS110TP 硬件安装指南。
(资源光盘上有一个指向在线GS110TP软件管理用户手册的链接。
)•保修/支持信息卡。
然后,准备安装您的智能交换机准备一台带有以太网适配器和光盘驱动器的计算机。
接下来,在计算机上安装 NETGEAR 设备管理应用程序 (Smart Control Center)1.将资源光盘插入光盘驱动器。
2.运行setup程序以安装 Smart Control Center 应用程序。
安装向导将引导您完成安装。
接下来,以正确的顺序连接智能交换机以下说明假设您在网络中使用的是 DHCP。
如果您在网络中使用的是静态IP 地址,请先配置交换机 IP 地址,然后再将其连接到网络。
如果没有 DHCP服务器,则交换机的 IP 地址将默认为 192.168.0.239。
要在交换机连接到网络之前配置交换机,请执行以下操作:1.使用 192.168.0.x 子网中的某个静态 IP 地址设置 PC,然后将 PC 连接到交换机。
随后,使用 Smart Control Center 应用程序来配置交换机。
2.将每台 PC 连接到交换机前面板上的 RJ-45 网络端口。
连接时,请使用末端为 RJ-45 接头的类别 5 (Cat5) 非屏蔽双绞线 (UTP)3.将交换机连接到网络。
4.打开交换机电源。
5.确认装有 Smart Control Center 应用程序的计算机和交换机位于同一个子网中。
ProSafe千兆智能网管交换机(GS108TV2)
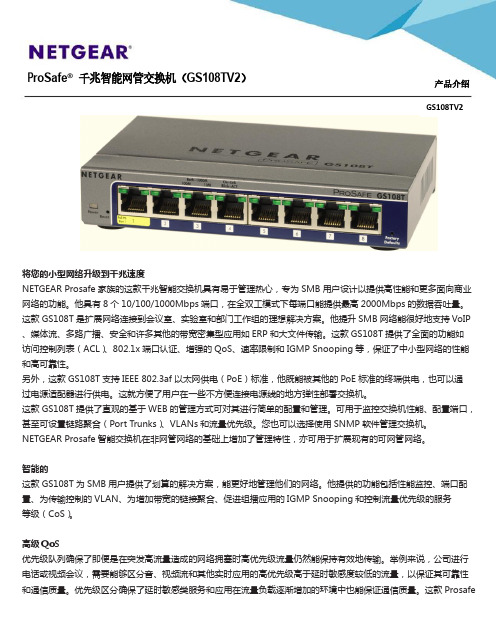
将您的小型网络升级到千兆速度 NETGEAR Prosafe 家族的这款千兆智能交换机具有易于管理热心,专为SMB 用户设计以提供高性能和更多面向商业 网络的功能。
他具有8个10/100/1000Mbps 端口,在全双工模式下每端口能提供最高2000Mbps 的数据吞吐量。
这款GS108T 是扩展网络连接到会议室、实验室和部门工作组的理想解决方案。
他提升SMB 网络能很好地支持VoIP 、媒体流、多路广播、安全和许多其他的带宽密集型应用如ERP 和大文件传输。
这款GS108T 提供了全面的功能如 访问控制列表(ACL )、802.1x 端口认证、增强的QoS 、速率限制和IGMP Snooping 等,保证了中小型网络的性能 和高可靠性。
另外,这款GS108T 支持IEEE 802.3af 以太网供电(PoE )标准,他既能被其他的PoE 标准的终端供电,也可以通 过电源适配器进行供电。
这就方便了用户在一些不方便连接电源线的地方弹性部署交换机。
这款GS108T 提供了直观的基于WEB 的管理方式可对其进行简单的配置和管理。
可用于监控交换机性能、配置端口, 甚至可设置链路聚合(Port Trunks )、VLANs 和流量优先级。
您也可以选择使用SNMP 软件管理交换机。
NETGEAR Prosafe 智能交换机在非网管网络的基础上增加了管理特性,亦可用于扩展现有的可网管网络。
智能的这款GS108T 为SMB 用户提供了划算的解决方案,能更好地管理他们的网络。
他提供的功能包括性能监控、端口配 置、为传输控制的VLAN 、为增加带宽的链接聚合、促进组播应用的IGMP Snooping 和控制流量优先级的服务 等级(CoS )。
高级 QoS优先级队列确保了即便是在突发高流量造成的网络拥塞时高优先级流量仍然能保持有效地传输。
举例来说,公司进行 电话或视频会议,需要能够区分音、视频流和其他实时应用的高优先级高于延时敏感度较低的流量,以保证其可靠性 和通信质量。
ProSAFE千兆PoEPoE+智能交换机
Page 2 of 8
ProSAFE® 千兆PoE/PoE+智能交换机
特性一览
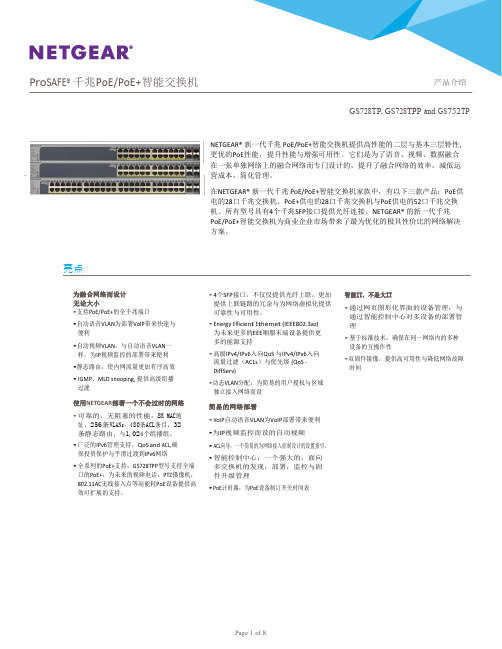
产品介绍 GS728TP, GS728TPP and GS752TP
硬件特性 24/ 48 千兆端口全PoE 8个IEEE 802.3at PoE+端口 4 个SFP 光纤上联
优势
支持高密度的VoIP,安全监控与无线AP部署,为未来扩展提供坚强后盾,不再面对缺乏PoE端口的困 境。
IPv4 / IPv6 组播过滤
IGMP and MLD Snooping
Auto-VoIP Yes
EEE (802.3az) Auto-EEE Yes
VLANs
Static, Voice Video, MAC, P rotocol-based, Private VLANs
融合
LLDP-MED, RADIUS, 802.1X,
型号
模式
GS728TP
机架式
GS728TPP 机架式
GS752TP 机架式
前端
后端
10/100/ 1000Base-T
RJ45端口
100/1000X 光纤 SFP端
口
PoE 802.3af PoE+ 802.3at
电源供 应
(EPS连接
48 PoE 802.3af
前8端口 PoE+
•动态VLAN分配,为简易的用户授权与区域 独立接入网络而设
简易的网络部署
• VoIP自动语音VLAN为VoIP部署带来便利
•为IP视频监控而设的自动视频
• ACL向导,一个简易的为网络接入控制设计的设置指引,
• 智能控制中心,一个强大的,面向 多交换机的发现,部署,监控与固 件升级管理
网抄-8-口PoE PoE+千兆无管理交换机GS108PP说明书

February 2018NETGEAR, Inc.350 East Plumeria Drive San Jose, CA 95134, USA8-Port PoE/PoE+ Gigabit Unmanaged SwitchGS108PPPackage Content• Switch• Power adapter (localized to the country of sale)• Wall installation kit• Rubber feet• Rack-mount kit• Installation guide Step 1. Connect the equipment.Step 2. Connect to power.PoE+ access pointsPoE VoIP phoneLED Status PoE ConsiderationsThe switch prioritizes the PoE and PoE+ power that it supplies in ascending portorder (from port 1 to port 8), with a total power budget of 123 Watts. If thepower requirements for the attached powered devices (PDs) exceed the totalpower budget of the switch, the PD on the highest-numbered port is disabledto make sure that the PDs that are connected to the higher-priority, lowernumbered ports are supported first.Just because a PD is listed as an 802.3at PoE powered device does notnecessarily mean that it requires the maximum power limit of the specification.Many PDs require less power, allowing all eight PoE ports to be activesimultaneously.The following table describes the PoE classes and switch allocations.Power LED Left Port LEDs Right PoE LEDsOn1000 Mbps link PoE in useOff100 or 10 Mbps linkPoE halted (see PoETroubleshooting)Activity (blinking)No PoE use (off)No link (off)PoE Max LEDThe maximum PoE power that the switch can deliver to all attached powered devices (PDs) is123 watts total, with a maximum power to each port of 30 watts. (For more information, seePoE Considerations.)The PoE Max LED indicates the status of the PoE power that the switch can deliver to allattached PDs, as follows:Solid amber. Less than 7W of PoE power is available on the switch.Blinking amber. The PoE Max LED was lit solid in the previous two minutes.Sufficient (more than 7W of) PoE power is available on the switch (the LED is off).NETGEAR INTL LTDBuilding 3, University Technology CentreCurraheen Road, Cork, Ireland© NETGEAR, Inc., NETGEAR and the NETGEAR Logo are trademarks of NETGEAR, Inc. Any non-NETGEAR trademarks are used for reference purposes only.SupportThank you for purchasing this NETGEAR product. You can visit/support to register your product, get help, access the latest downloads and user manuals, and join our community. We recommend that you use only official NETGEAR support resources.Si ce produit est vendu au Canada, vous pouvez accéder à ce document en français canadien à /other/.(If this product is sold in Canada, you can access this document in Canadian French at /other/.)For the current EU Declaration of Conformity, visit /11621.For regulatory compliance information, visit /about/regulatory/.See the regulatory compliance document before connecting the power supply.Attach the Switch to a WallTo attach the switch to a wall, you need the wall-mount screws that are supplied with the switch.¾To attach the switch to a wall:1. Locate the two mount holes on the bottom panel of the switch.2. Mark and drill two mounting holes in the wall where you want to mount theswitch.The two mounting holes must be at a precise distance of 4.27 in. (108.4 mm) from each other.3. Insert the supplied anchors into the wall and tighten the supplied screws witha No. 2 Phillips screwdriver.Leave about 0.125 in. (4 mm) of each screw protruding from the wall so that you can insert the screws into the holes on the bottom panel.Install the Switch in a RackTo install the switch in a rack, you need the rack-mount brackets and screws that are supplied with the switch. ¾To install the switch in a rack:1. Attach the supplied mounting brackets to the side of the switch.Insert the screws provided in the product package through each bracket and into the bracket mounting holes in the switch.2. Tighten the screws with a No. 2 Phillips screwdriver to secure each bracket.3. Align the mounting holes in the brackets with the holes in the rack, and inserttwo pan-head screws with nylon washers through each bracket and into the rack.4. Tighten the screws with a No. 2 Phillips screwdriver to secure mountingbrackets to the rack.PoE TroubleshootingHere are some tips for correcting PoE problems that might occur:• Make sure that the PoE Max LED is off. If the PoE Max LED is solid amber,disconnect one or more PoE devices to prevent PoE oversubscription. Start by disconnecting the device from the highest-numbered port.• Make sure that the Ethernet cables are plugged in correctly. For eachpowered device (PD) that is connected to the switch, the corresponding right port LED on the switch lights solid green. If the right port LED lights solid amber, a PoE fault occurred and PoE halted because of one of the conditionsthat are listed in the following table.Cables and SpeedsThe following table describes the network cables that you can use for the switch connections and the speeds that these cables can support, up to 328 feet (100meters).Specifications。
ProSAFEPlus8-端口千兆交换机GS108Ev3安装指引-Netgear

1. 双击 ProSAFE Plus Utility 图标。 配置主页上会显示管理软件在局域网中发现的简单网管交换机的列表。
2. 从交换机列表中选择您想要配置的交换机。 3. 系统提示时,请输入密码。
默认密码为 password。 4. 使用管理软件配置交换机。
简单网管 (Plus) 交换机的功能介绍,请参阅 ProSAFE Plus Switch Utility User Guide。可以通过该管理软件帮助选项卡上的链接以及资源光盘访问该用户 指南。
客服热线:400-830-3815 中文技术支持站点: 网件社区:
NETGEAR, Inc. 350 East Plumeria Drive San Jose, CA 95134, USA
8
16
2
-
USB 电源
每个端口最大 10W
-
总计最大 15W
电源
100–240 VAC 50/60Hz,最大 1.0A 100–240 VAC 50/60Hz,最大 0.5A
功耗
最大 20.14W
最大 8.36W
重量
0.43 千克(0.94 磅)
1.3 千克(2.64 磅)
尺寸
305 毫米 x 65 毫米 x 36 毫米
2. 交换机通电,并使用以太网线将您的电脑连接至交换机。 3. 如果在联网的情况下配置交换机,请用另一根以太网线将交换机连接到
网络。 4. 打开 Web 浏览器并输入交换机的 IP 地址。
如果交换机处于离线状态或在没有 DHCP 服务器的情况下连接到网络, 请使用其默认 IP 地址:http://192.168.0.239。如果交换机连接到有 DHCP 服务器的网络中,请使用 DHCP 服务器分配给该交换机的 IP 地址。 如果无法确定交换机的 IP 地址,则可以使用 ProSAFE 简单网管交换机管理 软件。
GS108P非网管交换机
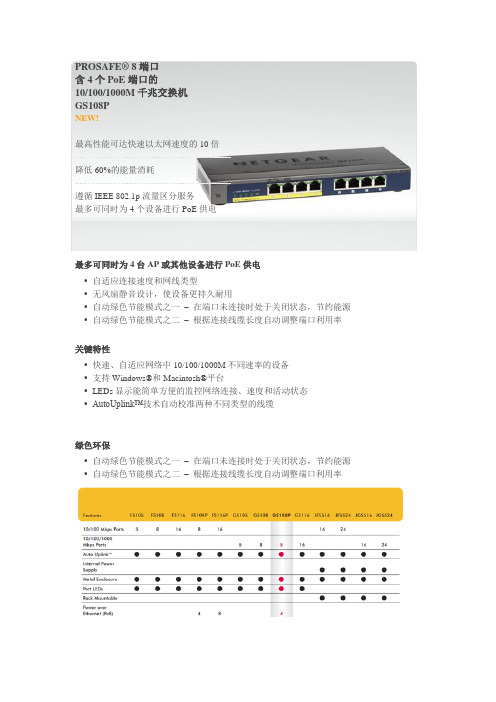
PROSAFE® 8端口
含4个PoE端口的
10/100/1000M千兆交换机
GS108P
NEW!
最高性能可达快速以太网速度的10倍
降低60%的能量消耗
遵循IEEE 802.1p流量区分服务
最多可同时为4个设备进行PoE供电
最多可同时为4台AP或其他设备进行PoE供电
•自适应连接速度和网线类型
•无风扇静音设计,使设备更持久耐用
•自动绿色节能模式之一–在端口未连接时处于关闭状态,节约能源•自动绿色节能模式之二–根据连接线缆长度自动调整端口利用率
关键特性
•快速、自适应网络中10/100/1000M不同速率的设备
•支持Windows®和Macintosh®平台
•LEDs显示能简单方便的监控网络连接、速度和活动状态•AutoUplink™技术自动校准两种不同类型的线缆
绿色环保
•自动绿色节能模式之一–在端口未连接时处于关闭状态,节约能源•自动绿色节能模式之二–根据连接线缆长度自动调整端口利用率。
- 1、下载文档前请自行甄别文档内容的完整性,平台不提供额外的编辑、内容补充、找答案等附加服务。
- 2、"仅部分预览"的文档,不可在线预览部分如存在完整性等问题,可反馈申请退款(可完整预览的文档不适用该条件!)。
- 3、如文档侵犯您的权益,请联系客服反馈,我们会尽快为您处理(人工客服工作时间:9:00-18:30)。
将您的小型网络升级到千兆速度 NETGEAR Prosafe 家族的这款千兆智能交换机具有易于管理热心,专为SMB 用户设计以提供高性能和更多面向商业 网络的功能。
他具有8个10/100/1000Mbps 端口,在全双工模式下每端口能提供最高2000Mbps 的数据吞吐量。
这款GS108T 是扩展网络连接到会议室、实验室和部门工作组的理想解决方案。
他提升SMB 网络能很好地支持VoIP 、媒体流、多路广播、安全和许多其他的带宽密集型应用如ERP 和大文件传输。
这款GS108T 提供了全面的功能如 访问控制列表(ACL )、802.1x 端口认证、增强的QoS 、速率限制和IGMP Snooping 等,保证了中小型网络的性能 和高可靠性。
另外,这款GS108T 支持IEEE 802.3af 以太网供电(PoE )标准,他既能被其他的PoE 标准的终端供电,也可以通 过电源适配器进行供电。
这就方便了用户在一些不方便连接电源线的地方弹性部署交换机。
这款GS108T 提供了直观的基于WEB 的管理方式可对其进行简单的配置和管理。
可用于监控交换机性能、配置端口, 甚至可设置链路聚合(Port Trunks )、VLANs 和流量优先级。
您也可以选择使用SNMP 软件管理交换机。
NETGEAR Prosafe 智能交换机在非网管网络的基础上增加了管理特性,亦可用于扩展现有的可网管网络。
智能的
这款GS108T 为SMB 用户提供了划算的解决方案,能更好地管理他们的网络。
他提供的功能包括性能监控、端口配 置、为传输控制的VLAN 、为增加带宽的链接聚合、促进组播应用的IGMP Snooping 和控制流量优先级的服务 等级(CoS )。
高级 QoS
优先级队列确保了即便是在突发高流量造成的网络拥塞时高优先级流量仍然能保持有效地传输。
举例来说,公司进行 电话或视频会议,需要能够区分音、视频流和其他实时应用的高优先级高于延时敏感度较低的流量,以保证其可靠性 和通信质量。
优先级区分确保了延时敏感类服务和应用在流量负载逐渐增加的环境中也能保证通信质量。
这款Prosafe
P roSafe ® 千兆智能网管交换机(GS108TV2)
产品介绍
千兆智能交换机提供了广泛的QoS功能:
✓基于802.1p的优先级区分
✓基于L3的优先级区分
✓速率限制
增强的安全功能
这款千兆智能交换机为SMB用户提供了更丰富的高级的安全功能,包括:✓802.1x安全认证
✓基于MAC/IP地址的ACL过滤功能可控制(允许或拒绝)访问
NETGEAR 绿色环保特性
✓高达60%的节能
✓端口在无连接状态会自动进入待机模式,降低功耗
✓端口连接网线的长度短于10米时将自动调节交换机输出功率
P roSafe®千兆智能网管交换机(GS108TV2)产品介绍
技术规格:。