MaxEnt2
外来入侵害虫橄榄果蝇Bactrocera oleae在中国的适生区预测

Ta l Envr n n a a iblsus d i t n il be1 io me tlv ra e e n poe ta dsrbu in prdito it i to e c in
2 方
法
2. GARP 1
宜 生 境 ,结 合 地 理 信 息 系 统 GS从 而 模 拟 出橄 榄 果 蝇 在 中 国 的潜 在 地 理 分 布 区 。该 研 究 在 理 论 上 为 掌 握 橄 榄 果 I 蝇 的扩 散 趋 势 和 监 测 范 围提 供 指 导 。研 究 结 果 表 明 ,G R A P模 型 预 测 我 国南 方 大 部 分 地 区 为 橄 榄 果 蝇 的 适 生 区 ; MA E T模 型 的 预 测 结 果 显 示 我 国西 南 三 省 云 贵 川 以 及 广 西 为 橄 榄 果 蝇 的适 生 区 。综 合 分 析 ,我 国 云 南 、四 川 XN
和贵州 的部分地 区为橄榄果蝇 的高度适生 区,对 于此地 区应该加强 对该 虫的检疫 控制。
关 键 词 :橄榄果蝇 ;G R ;M X N ; A P A E T 生态位模型 ;适生性分析 ;中 国
中图分 类号 :Q 6. 98 1
文献 标 志码 :A
文章 编 号 :02 — 59(0 1 l 08 — 4 59 67 21 )o 一 09 0
=
年 平 均 温
—
A n a M a e p r ue n ul enT m ea r t
, 、 、
昼 夜 温差 月 平 均 值 MenDu a R ne ( a fm n l a i l ag Meno ot y n r h
西门子MAXUM II操作简易技术手册

西门子MAXUM II在线色谱简易操作技术手册R evision 2006-12-12 PI&PA Technical Service Center目录1、概述2、色谱一词的由来与相关的基本概念3、西门子MAXUM II色谱分析仪的特点4、MMI操作详述5、Maxum System Manager应用详述6、Maxum EZChrom应用详述7、Maxum Utilities应用详述8、如何调校西门子MAXUM II色谱分析仪9、西门子MAXUM II色谱分析仪的故障分析10、分析系统调试的具体步骤及每步所能达到的指标11、分析系统开车前对自身及外界条件的要求第 1 页共48 页1、概述这套西门子MAXUM II色谱分析仪操作技术手册是由西门子(上海)分析仪器工程有限公司的技术服务人员根据西门子在线色谱分析仪的技术资料编制的。
其目的是为了方便用户的技术人员与岗位操作人员能够对西门子MAXUM II色谱分析仪有比快捷方便的了解并提高对色谱的操控能力。
编者本着源于实践、用于实践的原则,根据用户现场的实际情况,尽可能做到让读者从不了解到了解,从不精通到精通。
手册适用4.0版本的数据库系统,手册内提到的技术相关问题全部来源于西门子编制的MAXUM II色谱分析仪说明书,如有疏漏与错误请查阅西门子发行的正规说明书或询问西门子的相关技术人员。
2、色谱一词的由来与相关的基本概念●什么是色谱一个俄罗斯植物学家茨维特,在1906年发明了色谱并命名了许多术语。
他把碳酸钙粉末装进一根玻璃管里形成一根“(色谱)柱”,然后把一小体积的树叶色素的石油醚溶液加在柱子上,用石油醚冲洗柱子。
各种色素以不同的速度移动并彼此分离开来。
碳酸钙粉末被茨维特称为固定相,而石油醚则是流动相。
流动相推动样品通过柱子,而固定相阻碍样品中组分的移动。
样品组分通过基于它们与固定相的不同作用而造成的差速移动而被分离。
他们与固定相间的作用可以是吸附、分配、离子交换、分子排阻等。
max2器件中文手册

maxent参数
maxent参数MaxEnt参数是一种在自然语言处理中常用的机器学习算法,它可以用来进行文本分类、信息抽取、命名实体识别等任务。
本文将以人类的视角,从情感和个人经历的角度出发,介绍MaxEnt参数的应用和相关经验。
1. 引言在我曾经的一次工作经历中,我有幸接触到了MaxEnt参数,并亲自应用它来解决一个重要的文本分类问题。
在这篇文章中,我将分享我的经验和感受,希望能给读者带来一些启示和帮助。
2. MaxEnt参数的背景和原理MaxEnt参数是一种概率模型,它通过最大熵原理来选择最符合实际情况的概率分布。
在文本分类中,我们可以将每个文本看作是一个特征向量,而每个特征表示文本中的某个属性或关键词。
通过训练数据,MaxEnt参数可以学习到一个概率模型,用来预测新的文本的分类。
3. MaxEnt参数在情感分析中的应用情感分析是一种常见的自然语言处理任务,它可以判断文本中的情感倾向,比如积极、消极或中性。
我曾经使用MaxEnt参数来进行情感分析,通过训练数据,模型可以学习到不同情感类别的特征,从而对新的文本进行情感判断。
4. MaxEnt参数在个人经历中的应用除了情感分析,MaxEnt参数还可以应用于个人经历的分析。
我曾经使用MaxEnt参数来分析一组人的个人经历文本,通过训练数据,模型可以学习到不同经历之间的共性和差异,从而为每个人的个人经历做出预测和分析。
5. MaxEnt参数的优缺点和改进方向虽然MaxEnt参数在文本分类和分析中有着广泛的应用,但它也存在一些不足之处。
比如,它在处理大规模数据时可能会遇到计算和存储的问题。
此外,MaxEnt参数在训练过程中也需要大量的标注数据,这对于某些特定领域的任务可能会有一定限制。
为了解决这些问题,研究人员一直在努力改进MaxEnt参数,并提出了一些新的模型和算法。
6. 总结和展望通过我的工作经历和实践,我深刻体会到MaxEnt参数在文本分类和分析中的重要性和价值。
Magento 2 Shipment Tracking扩展安装与使用指南说明书

Shipment Tracking for Magento 2Setup &User GuideAbout this documentThis document offers the basic knowledge for installing and using the ShipTracker extension for Magento 2.This document is copyrighted © 2018 – 2021 Athanasios Terzis / .The document is licensed under the terms of Creative Commons Attribution-NoDerivatives 4.0. license [https:///licenses/by-nd/4.0/] .This license allows for redistribution, commercial and non-commercial, as long as it is passed along unchanged and in whole, with credit to the copyright holder. If you require another use, please email the author in order to acquire such a license and the source to this document.About ShipTrackerThe ShipTracker extension offers automated shipment tracking based on the tracking codes which are saved in the Magento shop (Sales > Shipments). This happens by using 3rd party APIs, for shipment tracking.Also notifies the customer/recipient with an email, every time there is a change in the status of the shipment (Info Received, In Transit, Out for Delivery, Delivered, Failed Attempt, etc.).CompatibilityMagento Open Source 2.2.x, Magento Open Source 2.3.x, Magento Open Source 2.4.xInstallationAfter downloading the package, please do the following:1.Extract/Unpack the zip file.2.Upload the extracted folder in your magento's root folder.3.Enable the module and update the database schema.In the terminal use the following commands:Enable the moduleUpdate the databaseDeploy static filesConfigurationGo to Stores > Configuration > Breakdesigns Extensions > ShipTrackerWeb API1. Select the service you are going to use as Web API.An active account with adequate credits is required, for the extension to work.2. Enter your API KeyThe Web Api services, provide an API key, to their users, for accessing their API.To get your API Key, you better address to your service's documentation and support.•How to get AfterShip Api Key•How to get TrackingMore Api Key3. Set the period/days that you want a shipment, to be monitored (Shipments Monitoring Period). The maximum limit is 60 days.4. If your shop is already in production and has orders and shipments, you better limit our module to monitor shipments (POST new shipments) created before some days, instead of monitoring all of them. This will spare credits and resources to your Web API service, for shipments that are possibly already delivered. For that you can use the setting, New Shipments Lookup PeriodEmailsWith these settings you can determine, when and which notification emails will be send to the customer/recipient.All the email templates, can be customized and overwritten as any email template in magento. For more details on that topic, please read Customize email templates using the Magento Admin. If you create your own customized email templates, you have to come back in this section and select your preferred template.UsageCheck the CarriersNow the module should normally perform most of it's tasks.Though there are cases that require some action.Go to ShipTracker > Carriers and click on the Sync Carriers button.*This page shows the carriers installed in the shop and is used as an interface between the shop's carriers and the web API’s carriers.This is the 1st call to the Web Api, hence it's a good chance to check if the configuration isproper and your web api account is functional. If there is any problem, you will get an error message.If you did not get any error, check if the used carrier codes are validated by the web API.What the validation process does, is to check if the carrier codes used in your shop, are the same as those used by the web tracking API service.If a code is not valid, you need to edit the carrier and set a valid carrie code, that will be used for the communication with the API.Before doing that you better visit the website of your selected web api (AfterShip, TrackingMore, etc.), to learn what are the codes they use for your carriers that seem invalid.You can easily determine a carrier code from the urls of the demo tracking pages relatedwith a carrier, provided by your web api service.e.g. https:///elta-courier/PS205923435GR indicates that the code for theHellenic Post is elta-courier.Beyond setting a web api code, you can edit a carrier to fill in information like a website, a telephone and a logo. These information will be used both in the notification emails and in the tracking page, provided to the user.Add Custom Carriers (Optional)In some cases, you may want to use carriers in your trackings without having the respected carrier modules installed in your shop.In such cases, you can create those custom carriers in ShipTracker. This way you can use them inyour trackings (Shipments>Orders).Go to ShipTracker > Carriers and click the Add Custom Carrier button.Then you have to fill in the respected formThe 2 most important fieldshere are:•Code > The carrier codethat used in your shop(as saved in the table sales_shipment_track)•Web Api Code > The carrier code that the web api uses for that carrier (see previous chapter).TrackingsThis is the page that the shop's admin can use to get informed about the status of a shipment.The Update Trackings button, can be used for deliberate/manual update of the trackings. Themodule automatically sends and fetches information about the trackings every 15minutes through cron jobs. Also the sending of notification emails is automated as well.DetailsBy clicking the details link, you can find details such as the Itinerary/History of the Shipment or the notifications sent to the recipient.I need more helpIf you got stuck and you need more help you can use our support services.If you purchased the extension from the Magento Marketplace, you can ask for support at********************************Support is only offered for the time period after the purchase, referred in the product’s page. After that period, the extension needs to be purchased again, to receive support.。
Maxent简要使用教程

Maxent简要使用教程在AT&T Labs-Research、普林斯顿大学、生物多样性和生物技术研究中心以及美国自然历史博物馆的支持下,本教程由Steven Phillips,Miro Dudik和Rob Schapire撰写,基本介绍了如何使用MaxEnt程序对物种的地理分布进行最大熵建模。
有关最大熵建模背后的理论以及此处使用的数据和统计分析的主要类型的详细说明,请参见Steven J. Phillips, Robert P. Anderson and Robert E. Schapire, Maximum entropy modeling of species geographicdistributions. Ecological Modelling, V ol 190/3-4 pp 231-259, 2006.Two additional papers describing more recently-added features of the Maxent software are:Steven J. Phillips and Miroslav Dudik, Modeling of species distributions with Maxent: new extensions and acomprehensive evaluation. Ecography, V ol 31, pp 161-175, 2008.Steven J. Phillips, et al. Opening the black box: an open-source release of Maxent. Ecography, In press, 2017 .我们使用的环境数据包括南美的气候和海拔数据以及潜在的植被层。
我们的物种样本是褐喉三趾树懒(Bradypus variegatus)。
这些数据来自2001年的Anderson&Handley分类法修订版(/reference/84876),和Phillips 的2006年论文中。
Maxent简要使用教程
Maxent简要使用教程在AT&T Labs-Research、普林斯顿大学、生物多样性和生物技术研究中心以及美国自然历史博物馆的支持下,本教程由Steven Phillips,Miro Dudik和Rob Schapire撰写,基本介绍了如何使用MaxEnt程序对物种的地理分布进行最大熵建模。
有关最大熵建模背后的理论以及此处使用的数据和统计分析的主要类型的详细说明,请参见Steven J. Phillips, Robert P. Anderson and Robert E. Schapire, Maximum entropy modeling of species geographicdistributions. Ecological Modelling, V ol 190/3-4 pp 231-259, 2006.Two additional papers describing more recently-added features of the Maxent software are:Steven J. Phillips and Miroslav Dudik, Modeling of species distributions with Maxent: new extensions and acomprehensive evaluation. Ecography, V ol 31, pp 161-175, 2008.Steven J. Phillips, et al. Opening the black box: an open-source release of Maxent. Ecography, In press, 2017 .我们使用的环境数据包括南美的气候和海拔数据以及潜在的植被层。
我们的物种样本是褐喉三趾树懒(Bradypus variegatus)。
这些数据来自2001年的Anderson&Handley分类法修订版(/reference/84876),和Phillips 的2006年论文中。
maxent模型的原理
maxent模型的原理宝子,今天咱来唠唠这个Maxent模型的原理呀。
Maxent模型呢,就像是一个超级聪明的小侦探,在找东西的时候可有一套了。
你可以把它想象成是在一个超级大的迷宫里找宝藏。
这个宝藏呢,就是我们想要预测的物种分布或者其他一些现象的分布情况。
那这个迷宫是啥呢?其实就是各种各样的环境变量啦,就像迷宫里的一道道墙、一个个岔路口一样。
比如说气温呀,降水呀,海拔高度呀,这些都是环境变量。
Maxent模型就把这些环境变量当作是自己探索的线索。
这个模型呀,它有个很有趣的想法。
它觉得呢,在所有可能的情况里,有一种情况是最有可能发生的,就像在一堆沙子里找一颗最特别的小石子一样。
它是基于最大熵原理来工作的。
熵呢,简单说就是一种混乱度或者不确定性的度量。
Maxent模型想要在满足我们已知的一些条件下,让这个系统的熵最大。
比如说,我们知道某个物种在一些地方出现了,这些地方的环境变量的值我们也知道,就像我们知道宝藏在迷宫里的某几个小角落周围一样。
Maxent模型就会根据这些已知的信息,然后在整个大的环境变量空间里,找到一种分布情况,这种分布情况是最不确定的,但又能符合我们已知的那些物种出现的地方的条件。
这就好比是,我们知道宝藏在某几个角落附近,那模型就会在整个迷宫里推测出一个最有可能藏着宝藏的大的区域,这个区域的推测是在满足我们已知线索的情况下,最宽泛、最不确定,但又最合理的。
而且哦,Maxent模型还很会利用这些环境变量之间的关系呢。
它不会孤立地看待每个环境变量,就像我们看一个人的时候,不会只看他的一个特点,而是把他的性格、外貌、行为等各个方面综合起来看一样。
它会考虑到气温和降水之间可能有联系,海拔高度和植被类型之间也有联系,然后把这些关系都融合到自己对物种分布或者现象分布的推测当中。
再说说这个模型的训练过程吧。
就像是一个小徒弟在跟着师傅学习怎么找宝藏。
我们给它很多已知的例子,就是那些物种出现的地点和对应的环境变量的值。
MaxEnt模型参数设置对其所模拟物种地理分布和生态位的影响——以茶翅蝽为例

MaxEnt模型参数设置对其所模拟物种地理分布和生态位的影响——以茶翅蝽为例朱耿平;原雪姣;范靖宇;王梦琳【摘要】[目的]生态位模型被广泛应用于入侵生物学和保护生物学研究,现有建模工具中,MaxEnt是最流行和运用最广泛的生态位模型.然而最近研究表明,基于MaxEnt模型的默认参数构建模型时,模型倾向于过度拟合,并非一定为最佳模型,尤其是在处理一些分布点较少的物种.[方法]以茶翅蝽为例,通过设置不同的特征参数、调控倍频以及背景拟不存在点数分别构建茶翅蝽的本土模型,然后将其转入入侵地来验证和比较模型,通过检测模型预测的物种对环境因子的响应曲线、潜在分布在生态空间中的生态位映射以及潜在分布的空间差异性,探讨3种参数设置对MaxEnt模型模拟物种分布和生态位的影响.[结果]在茶翅蝽的案例分析中,特征参数的设置对MaxEnt模型所模拟的潜在分布和生态位的影响最大,调控倍频的影响次之,背景拟不存在点数的影响最小.与其他特征相比,基于特征H和T的模型其响应曲线较为曲折;随着调控倍频的增加,响应曲线变得圆滑.[结论]在构建MaxEnt模型时,需要从生态空间中考虑物种的生态需求,分析模型参数对预测物种分布和生态位可能造成的影响.【期刊名称】《生物安全学报》【年(卷),期】2018(027)002【总页数】6页(P118-123)【关键词】生态位模型;MaxEnt模型;特征参数;调控倍频;背景拟不存在点数【作者】朱耿平;原雪姣;范靖宇;王梦琳【作者单位】天津师范大学生命科学学院,天津市动植物抗性重点实验室,天津300387;天津师范大学生命科学学院,天津市动植物抗性重点实验室,天津300387;天津师范大学生命科学学院,天津市动植物抗性重点实验室,天津300387;天津师范大学生命科学学院,天津市动植物抗性重点实验室,天津300387【正文语种】中文近年来,生态位模型被广泛应用于入侵生物学、保护生物学、全球气候变化对物种分布的影响,谱系生物地理学及传染病空间传播研究等多个领域(朱耿平等,2013)。
Zalora集成Magento2用户指南说明书

Zalora Integration for Magento 2 User Guideby CedCommerce Products Documentation1. Overview (3)2. How to Install Zalora Magento 2 Integration (3)3. Configuration Settings (3)4. Manage Apps (10)5. Manage Profiles (14)5.1. Add a New Profile (14)5.2. Edit Existing Profile (17)5.3. Upload Products to Profile (20)5.4. Delete a Profile (21)5.5. Submit Bulk Actions on Profiles (23)6. Manage Zalora Products (24)7. Manage Orders (26)8. View Failed Orders (29)9. Cron Logs (30)10. Manage Feed (32)11. Attribute Value Mapping (34)12. Currency Mapping (35)13. Category (37)14. Attribute (38)15. Help and Support (39)1. OverviewZalora, founded in 2012 is the fastest growing ecommerce marketplace in the Asian region. It is presentin Singapore, Indonesia, Malaysia & Brunei, the Philippines, Hong Kong, and Taiwan regions. Zalora is the favorite fashion destination of the people in this region. The top-selling products on Zalora are Tops, Dresses, Bags, Shoes, Outerwear. In the year 2013, Zalora launched its app ad presently it has over 10 million downloads.Zalora Integration for Magento 2 is a multichannel integration that provides an interface to connect your Magento store to the Zalora marketplace. The extension enables you to smoothly upload products on the Zalora and sell hassle-free. It also enables the merchants to synchronize the price, inventory, and other product details at regular intervals of time.Key Features of Zalora Integration for Magento 2Bulk Product Upload: Enables the sellers to upload products in bulk on the Zalora marketplace in just a single click saving their time and efforts.Product Category Mapping: This extension follows many to one category mapping technique allowing sellers to map many categories of Magento store to a single category of Zalora marketplace.Automatic Synchronisation: There is the automatic synchronization of the product listing, order,inventory, price in real-time at regular intervals of time.Cron Management: With the help of the crons, the order status and inventory are updated automatically every 15 minutes.Feed Management: Whenever any order is created then this feature of the extension creates feeds for that particular order making it easier for the sellers to check the errors if any.Automated Shipment: The sellers can automate the shipment of the orders and their status throughvarious processes of shipment.2. How to Install Zalora Magento 2 IntegrationTo install the extension1.Log in to the FTP, and then go to Magento 2 root folder (generally present under the public_html folder).2.Create a new folder named code under the app folder; under code folder, create a folder named Ced.3.Now you have to extract two files:Firstly, extract the vendor/cedcommerce/seller-center-sdk-php in the vendor/cedcommerce/*Secondly, extract the Ced/Zalora, Ced/Integrator in the app/code/Ced/*4.After extracting the above package, we move on to adding the SDK mapping.Go to the main composer.json filePerform the following 2 actions in autoload-ps4 node:a.“RocketLabs\\SellerCenterSdk\\Core\\”: “vendor/cedcommerce/seller-center-sdk-php/src/RocketLabs/SellerCenterSdk/Core/”,b.“RocketLabs\\SellerCenterSdk\\Endpoint\\”: “vendor/cedcommerce/seller-center-sdk-php/src/RocketLabs/SellerCenterSdk/Endpoint/”5.Now run the following upgrade command in cmdcomposer dumpbin/magento setup:upgradebin/magento setup:di:compilebin/magento setup:static-content:deploy -fbin/magento indexer:reindexbin/magento c:f3. Configuration SettingsTo Set up the Configuration Settings,1.Go to the Magento 2 admin panel.2.On the left navigation bar, click on the Zalora Integration menu.The appears as shown below:3.Click on Configuration.The Zalora Configuration page appears as shown below:4.In the right panel, click the Zalora Developer Settings tab.The Zalora Developer Settings tab is expanded and the relevant fields appear as shown in the followingfigure:5.In the Zalora Settings, do the following steps:In the Debug, select Yes if you want to create the logs.6.Scroll down and click on Zalora Product Settings, the section is expanded as shown below:Click on Zalora Price Settings, the section is expanded as shown below:In the Product Price, list, select one of the following options:Increase by Fixed Price: If selected, then the Modify by Fix Price field appears.Increase by Fixed Percentage: If selected, then the Modify by Percentage Price field appears.Enter the numeric value to increase the price of the Zalora, product price by theentered value % of Magento 2 price.For Example,Magento 2 price + 5% of Magento 2 price.Magento 2 Price = 100Select Increase By Fixed Percentage optionModify by Percentage Price = 5100 + 5% of 100 = 100 + 5 = 105Thus, Zalora Product Price = 105Decrease by Fixed Price: If selected, then the Modify by Fix Price field appears.Decrease by Fixed Percentage: If selected, then the Modifyby Percentage Price field appears.Enter the numeric value to decrease the price of the Zalora product price by theentered value % of Magento 2 priceFor Example,Magento 2 price – 5% of Magento 2 price.Magento 2 Price = 100Select Decrease By Fixed Percentage optionModify by Fix Price = 5100 – 5% of 100 = 100 – 5 = 95Thus, Zalora Product Price = 95In Include Taxes, select Yes to add taxes to the product price to be sent to Zalora.In Parent Values In Case Of Configurable Product, choose the attribute values that will be fetched from the configurable product.Click on Zalora Inventory Settings, the section is expanded as shown below:Under Zalando Inventory Settings, do the following steps:In the Set Inventory on Basis of Threshold list, select Enable option if required to set the inventory based on a threshold.Note: Only when the admin selects Enable, other fields appear. Threshold Inventory is the minimum count of an item that the store owner wants to keep in stock.In the Inventory Threshold Value box, enter the required value.In the Send Inventory for Lesser Than Threshold Case box, enter the required value.In the Send Inventory for Greater Than Threshold Case box, enter the required value. Click on Zalora Product Upload Settings, the section is expanded as shown below:Under Zalora Product Upload Setting s, do the following steps:In Zalora Attribute Id, products that have this Attribute and its value are 1 those products will be displayed in the Zalora Product grid.In Zalora Markdown Discount, select the markdown discount which will send the discount amount if added to a product.Now scroll down and click on Zalora Product Update Settings, the section is expanded as shown below:Under Zalora Product Upload Settings, do the following steps:In Select the attribute that you want to update on Zalora, choose the attribute to updateon the Zalora marketplace.8.Now scroll down and click on Zalora Order Settings, the section is expanded as:9.Under Zalora Order Settings, do the following steps:In the Zalora Order Id Prefix, enter the unique prefix id for your Zalora orders.In Auto Invoice Imported Order, select Enable to automatically Import from Zalora in any case ofsuccessful import.In Notification Email, enter the email id on which you want to receive the notifications.In Auto Cancel Failed Order, select Enable to automatically cancel the failed orders.In Enable Notification, select Enable to receive the notifications.10.Now scroll down and click on Image Upload Settings, the section is expanded as shown below:11.Under Image Upload Settings, do the following steps:In Status, select Enable, to change the image upload status.In Host, enter the host URL.In Username, enter the username for login.In Password, enter the password.In Location, enter the path where the image is stored.12.Now click on the section Zalora Cron Settings, the section is expanded as:13.Under this Zalora Cron Settings, do the following stepsIn the Order Cron list, select the Enable option to enable the fetch order cron.In Order cron Expression, select the duration at which you want the order cron to run.In Inventory|Price Cron, select Enable to sync Inventory and Price.In Inventory Price Updating Expression, select the duration in which you want inventory andprice to be synced.In Product Feed Update, select Enable to update the product feeds.In Product Feed Update Expression, select the duration in which you want the feeds to beupdated.In Product Photo Update, select Enable to update the product photo.In Product Photo Update Expression, select the duration to run this cron.In Product Update Cron, select Enable to update products.In Product Update Expression, select the duration at which you want to update the products.In Sync Updated Configurable Products, select Enable to synchronise the configurableproducts.In Sync Updated Configurable Products Expression, select the duration at which you want tosync the configurable products.14.Click the Save Config button to save the entered values and information.The configuration will be saved.4. Manage AppsTo Manage Apps,1.Go to the Magento 2 admin panel.2.On the left navigation bar, click on the Zalora Integration menu.The appears as shown below:3.Click on Manage Apps.The Sellercenter Accounts page appears as shown in the following figure:4.To add a new account, click on the Add New Account button in the top right corner.You will be redirected to a new page:5.Under Account Infomation, do the following steps:In Account Version, the version of the store will be selected.In Account Name, enter the name of the account.In Marketplace, select the marketplace.In Account Type, select the type of Account, i.e., Sandbox or Live.In Sellercenter Product Attribute, select the attribute.For Username and API Key, follow the below steps-Go to your Zalora Seller panel and under Settings click on Integration Management.You will be redirected to the following page:Now Copy the User Id, and API Key from here and paste them into the Magento AdminPanel.6.Click on Store, the section is expanded as shown below:7.In Default Store, select the store view.8.Click on the Save button.New Account will be created and shown on the Manage Account grid.To Edit Existing Apps,1.On the Manage Apps page, under the Actions column, click on the Edit button.2.After clicking on Edit you will be redirected to the Account page.3.You can edit the required information and then click on the Save button.The details will be saved.To Perform Actions in Bulk-1.In the Manage Apps page, select the desired accounts you want to perform the Actions.2.Then click on Actions on the left side of the page:3.Click on Delete Apps.The selected apps will be deleted in bulk.5. Manage ProfilesAdmin can do the following tasks:Add a new profileEdit the existing profileUpload profile products to ZaloraDeleting profilesBulk Action on the Selected Profiles5.1. Add a New ProfileTo Add New Profile,1.Go to the Magento 2 admin panel.2.On the left navigation bar, click on the Zalora Integration menu.The appears as shown below:3.Click on Manage Profiles.The Manage Profile page appears as shown in the following figure:4.Click on the Add New ProfileThe Select Account page appears as shown in the following figure:5.Select the account for which you want to add a new profile. Click on Edit and you will be redirected to theAdd New Profile Page.6.Under Information, do the following steps:a.In Profile Status, select Yes to enable the status of the profile.b.In Profile Name, enter the name for the profile.c.In Account, select the account for the profile.7.Scroll down to Mappings Sections.8.Now map the Zalora attributes with the Magento attributes. You may also add attributes by clicking on theAdd Attribute button.9.Scroll down to Products section and make the required changes here.10.Click Save on the top right side of the page.The profile will be saved.5.2. Edit Existing ProfileTo edit the existing profile1.Go to the Magento 2 admin panel.2.On the left navigation bar, click on the Zalora Integration menu.The appears as shown below:3.Click on Manage Profiles.The Manage Profile page appears as shown in the following figure:4.Scroll down to the required profile row.5.In the Action column of the respective row, click the Edit button as highlighted in the above image.The profile editing page appears as shown in the following figure:6.Click the required section, and then make the changes as per requirement in the respective section.7.Click the Save button.The edited profile is saved and the success message appears on the Manage Profile page.5.3. Upload Products to ProfileTo Upload Products,1.Go to the Magento 2 admin panel.2.On the left navigation bar, click on the Zalora Integration menu.The appears as shown below:3.Click on Manage Profiles.The Manage Profile page appears as shown in the following figure:4.Scroll down to the required profile row.5.In the Action column of the respective row, click the Upload button as highlighted in the above image.You will be navigated to the Zalora Product Listing page from where you may take necessary actions.6.Choose the product you wish to upload.5.4. Delete a ProfileTo Delete Profiles,1.Go to the Magento 2 admin panel.2.On the left navigation bar, click on the Zalora Integration menu.The appears as shown below:3.Click on Manage Profiles.The Manage Profile page appears as shown in the following figure:4.On this page, all the available profiles are listed.5.To delete a profile, click the Delete sign as highlighted in the above image.6.A box will appear asking you to confirm your action of deleting a profile.7.Click OK.The profile will be deleted.5.5. Submit Bulk Actions on ProfilesTo perform actions in bulk,1.Go to the Magento 2 admin panel.2.On the left navigation bar, click on the Zalora Integration menu.The appears as shown below:3.Click on Manage Profiles.The Manage Profile page appears as shown in the following figure:4.Click the Arrow button next to the Actions field.The Actions list appears as shown in the above image.5.Select the profiles you want to delete, and click the Delete option.The selected profiles are deleted.6.Click on Disable, to disable the profile.The selected profiles are disabled.7.To enable the profile, click on Enable.The selected profiles are enabled.8.To create duplicate profiles, click on Duplicate The Profile.The duplicate profiles will be created.6. Manage Zalora ProductsTo View Products details,1.Go to the Magento 2 admin panel.2.On the left navigation bar, click on the Zalora Integration menu.The appears as shown below:3.Click on Manage Products.The Zalora Products Listing page appears as shown in the following figure:4.Scroll down to the required product row to edit the product or view the existing Zalora product details.5.In the Action column of the respective row, click the Edit icon.The product editing page appears.6.Enter the required information or edit the values in the required fields, and then click the Save button.The changes are saved and the success message appears on the Zalora Product Listing page.To Perform Bulk Actions,1.In the Actions list, click the arrow button.A list appears as shown in the figure:2.Under Actions, you can perform the following tasks in bulk:To upload products in bulk click on Upload Product(s).To update the products, click on Update Products(s).To update the images of the products, click on Update Images.To disable the products, click on Disable Product(s).To enable the products, click on Enable Product(s).7. Manage OrdersTo manage orders,1.Go to the Magento 2 admin panel.2.On the left navigation bar, click on the Zalora Integration menu.The appears as shown below:3.Click on Manage Orders.The Manage Zalora Orders page appears as shown in the following figure:4.Click the Import Orders button.If the order is imported successfully then, a new record is found in the Orders Grid table.5.To view the details of the order, click on the View icon under Actions.6.The orders detail page will appear as shown below:7.To edit any order detail, click on the Edit icon under the Actions column.8.You will be directed to the order details page where you can do the required edits in that particular order.9.To delete an order, click on the Delete icon under the Actions column.10.The selected order will be deleted.8. View Failed OrdersTo View Failed Orders,1.Go to the Magento 2 admin panel.2.On the left navigation bar, click on the Zalora Integration menu.The appears as shown below:3.Click on Failed Orders.The Failed Orders page will appear as shown below:4.The failed orders along with the reason for failure are displayed in the grid.9. Cron LogsTo View Cron logs,1.Go to the Magento 2 admin panel.2.On the left navigation bar, click on the Zalora Integration menu.The appears as shown below:3.Click on Cron.The Zalora Cron page appears as shown in the following figure:4.The running crons details will be displayed.10. Manage FeedTo view Zalora Feeds,1.Go to the Magento 2 admin panel.2.On the left navigation bar, click on the Zalora Integration menu.The appears as shown below:3.Click on Feed.The Feed page appears as shown in the following figure:4.You can view all the feeds on this page.11. Attribute Value MappingTo map attributes,1.Go to the Magento 2 admin panel.2.On the left navigation bar, click on the Zalora Integration menu.The appears as shown below:3.Click on Attribute Value Mapping.The page appears as shown below:4.To add a new mapping, click on Add New Mapping.5.Map the Zalora attributes with the Magento attributes.12. Currency MappingTo map currency,1.Go to the Magento 2 admin panel.2.On the left navigation bar, click on the Zalora Integration menu.The appears as shown below:3.Click on Currency Mapping.The Zalora Currency Mapping page appears as shown below:4.Click on Add Currency.The New Currency Page appears as shown below:5.Map the Magento Price with the price that you want to send to Zalora.13. CategoryTo manage category,1.Go to the Magento 2 admin panel.2.On the left navigation bar, click on the Zalora Integration menu.The appears as shown below:3.Click on Category.The Category page appears as shown below:4.Select the required account and the category to view.14. AttributeTo manage attributes,1.Go to the Magento 2 admin panel.2.On the left navigation bar, click on the Zalora Integration menu.The appears as shown below:3.Click on Attribute.The Attribute page appears as shown below:4.Select the required Zalora category attributes.15. Help and SupportTo view Help and Support1.Go to the Magento 2 admin panel.2.On the left navigation bar, click on the Zalora Integration menu.The appears as shown below:3.Click Help and Support.The Zalora Help and Support page appears as shown in the following:4.On this page, the admin has the option to contact us via call, by sending an email, or by getting connectedwith us on Skype.41 / 41。
Magento 2 安装指南和手册说明书
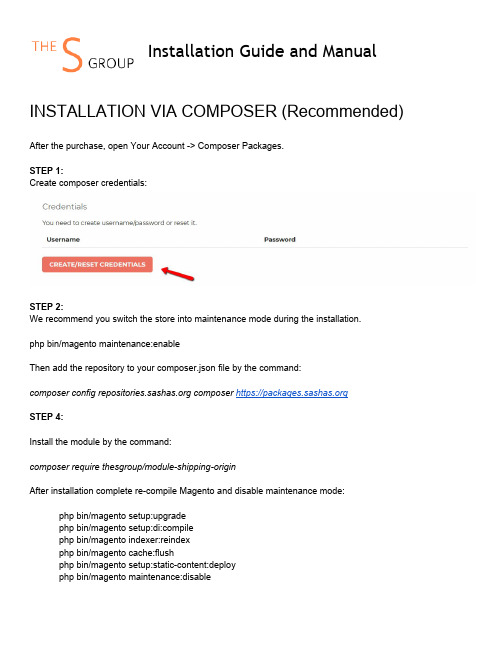
Installation Guide and Manual INSTALLATION VIA COMPOSER (Recommended)After the purchase, open Your Account -> Composer Packages.STEP 1:Create composer credentials:STEP 2:We recommend you switch the store into maintenance mode during the installation.php bin/magento maintenance:enableThen add the repository to your composer.json file by the command:composer config composer h ttps://STEP 4:Install the module by the command:composer require thesgroup/module-shipping-originAfter installation complete re-compile Magento and disable maintenance mode:php bin/magento setup:upgradephp bin/magento setup:di:compilephp bin/magento indexer:reindexphp bin/magento cache:flushphp bin/magento setup:static-content:deployphp bin/magento maintenance:disableINSTALLATION VIA ZIPSTEP 1:Files packaged in a zip archive, to extract files from the archive. Extract files in any folder.STEP 2:Copy files from folder to the Magento root app/code/TheSGroup/ModuleName folder.STEP 3:Login to your website ssh console and switch to site owner user (In case if you Magento file owner is not the same as current user)STEP 4:Execute following commands:php bin/magento maintenance:enablephp bin/magento setup:upgradephp bin/magento setup:di:compilephp bin/magento indexer:reindexphp bin/magento cache:flushphp bin/magento setup:static-content:deployphp bin/magento maintenance:disableUNINSTALL THE MODULEExecute following commands:php bin/magento maintenance:enablecomposer remove thesgroup/module-webpayphp bin/magento setup:upgradephp bin/magento cache:flushphp bin/magento maintenance:disableCONFIGURATIONIn order for the module to work properly, you will need to do the following:1.Add a custom inventory stock (The default stock will not work with the module)2.Add inventory sources with correct addresses. (The default inventory source will not work with themodule)3.Assign Inventory sources to inventory stock4.Assign products to new inventory sources and update qty per inventory source.The d efault i nventory source and inventory stock will not be used by the module because Magento leverages them as default fallback source of inventory and in the case where one product has two sources where one is default M agento will always use default source.In the case where you already have inventory stock or inventory source other than the d efault, you can use it.1. Add Inventory StockAt the admin panel go to the Sources -> Inventory -> Stocks and click Add New Stock button:Fill out the required fields and click the Save & Continue button. When you already have a new stock other than Default you can use it instead of making a new one.2. Add Inventory SourcesAt the admin panel go to Stores -> Inventory -> Sources and click Add New Source button. Fill out the form and click the Save & Continue button. Make sure that all fields at the Address Data fieldset have the correct information, this section would be sent to shipping carriers for rate estimation.In the case where you already have inventory sources other than the default, you can use them.3. Assign Inventory Sources to Inventory StockAt the admin panel go to Stores -> Inventory -> Stocks. Select a recently added stock (Do not use Default Stock) and Click Edit Button. At the source fieldset click “Assign Sources” button and select sources (Do not select default source) then sort them by priority. The shipping rates will use stock based on the priority of sources.When all sources added click Save & Continue button.4. Update Qty of products for new Inventory SourcesAt the admin panel and go to the Catalog -> Products to view the product grid.You will need to update all products to use one of newly added inventory sources instead of the default source. This can be done by mass actions where you will need to Unassign Default inventory source and Assign a new inventory source for selected products.Also, you can change inventory source at the product level. For this select a product and click Edit button to view Product Edit form. Then at the Sources fieldset click assign Sources button and set qty for each inventory source.Once products assigned to inventory sources you will see them at the admin product grid:FAQ-How can I extract files from the archive?You may use WinRAR for this purpose: h ttp:///download.htm -Is there any log file generated?The module generates log file when Magento runs in developer mode. The log file saved at the var/log/shipping.origin.log。
maxent 环境变量结果解读

有关“maxent 环境变量结果解读”的文章,需要从简到繁、由浅入深地探讨这一主题。
我们需要了解什么是maxent,它是什么样的工具,以及它所涉及的环境变量。
我们可以深入探讨maxent 环境变量结果的解读及其意义。
在文章中,我将提及主题文字“maxent”和“环境变量结果”多次,以确保内容的连贯性和深度。
在深入探讨maxent 环境变量结果的解读之前,我们需要先了解maxent模型是什么以及它的应用背景。
Maxent模型是一种用于对物种分布进行建模和预测的统计工具,它基于最大熵原理,通过考虑多种环境变量的影响,来预测物种在不同地理空间的分布情况。
环境变量在maxent模型中起着至关重要的作用,它们可以包括地形、气候、土壤等各种地理和生态因素,对物种分布产生影响。
当我们使用maxent模型进行建模和预测时,我们会得到一系列环境变量的结果。
这些结果需要进行解读,以便我们能够理解不同环境因素对物种分布的影响程度,并为保护和管理生物多样性提供依据。
在解读maxent环境变量结果时,需要注意以下几个方面:1. 理解环境变量的重要性:分析maxent模型输出的环境变量结果时,需要理解每个环境变量对于物种分布的重要性。
通过对结果的解读,可以发现哪些环境变量对物种的分布有着重要影响,从而为后续的管理和保护提供指导。
2. 比较不同环境变量的影响:maxent模型输出的环境变量结果可以用于比较不同环境因素对物种分布的影响。
通过对比不同环境变量的结果,可以识别出哪些环境因素对物种的分布起着决定性作用,以及它们之间的相互关系。
3. 理解结果的不确定性:在解读maxent环境变量结果时,也需要考虑结果的不确定性。
环境变量结果可能受到数据质量、模型参数等因素的影响,因此需要对结果的可靠性进行评估,以避免片面的解读。
maxent环境变量结果的解读需要结合模型的原理和应用背景,全面分析各个环境因素的影响,理解结果的不确定性,以及为生物多样性保护和管理提供具体建议。
maxent环境响应曲线制作原理

maxent环境响应曲线制作原理MaxEnt(Maximum Entropy)环境响应曲线制作原理是基于最大熵原理和统计学原理的。
最大熵原理认为,在已知一些约束条件(例如,已知某个环境条件下的生物分布数据)的情况下,应该选择最均匀的概率分布。
因此,制作环境响应曲线的目标是选择满足所有已知约束条件并且最均匀的概率分布。
制作环境响应曲线的步骤如下:
1. 收集环境条件和生物分布数据:在不同的环境条件下,记录对应的生物分布数据。
2. 对环境条件进行离散化:将连续的环境条件变量转化为离散值,以便于后续计算。
3. 确定约束条件:根据已知的生物分布数据,建立约束条件,例如,某个环境条件下的概率分布的均值等。
4. 确定概率分布形式:选择合适的概率分布形式,一般使用指数分布族。
5. 利用最大熵原理进行最优化:使用最大熵原理以及已知约束条件,求解出满足约束条件并且最均匀的概率分布。
这可以通过最大熵模型的最优化算法,如牛顿法或梯度下降法来实现。
6. 绘制环境响应曲线:将得到的概率分布与环境条件进行关联,即可得到环境响应曲线。
需要注意的是,制作环境响应曲线的质量和精度受到多个因素的影响,包括所选择的环境条件、约束条件的合适性、概率分布形式和最优化算法的选择等。
因此,在进行制作环境响应曲线时,需要认真考虑这些方面,并进行适当的调整和优化。
Magento 2 用户手册说明书
1
Table Of Contents
Installation...................................………………………………………..3
Option 1: Magento 2 install extension using COMMAND LINE .........…………..…..3 Option 2: Magento 2 install extension manually ………………………………….......4
2
Installation:
There are two ways of installing extension2) Manually install extension.
Option 1: Magento 2 install extension using COMMAND LINE (Recommended). Follow below steps to install extension from the command line.
Step 1: Download the extension and unzip it. Step 2: Upload it to code directory in your magento installation’s app directory.
If code directory does not exists then create. Step 3: Disable the cache under System → Cache Management. Step 4: Enter the following at the command line:
乐罗美林Magento2集成用户手册说明书

Leroy Merlin Integration for Magento 2 User Manualby CedCommerce Products Documentation1. Overview (3)2. Extension Installation (3)3. Configuration Settings (4)4. Manage Profile (10)4.1. Add New Profile (10)4.2. Edit Existing Profile (13)4.3. Submit Actions in Bulk on Profiles (15)5. Manage Products (17)6. Manage Orders (19)7. View Failed Orders (21)8. Leroy Merlin Feed (22)9. Cron Logs (24)10. Activity Logs (25)11. Help and Support (26)1. OverviewLeroy Merlin marketplace a French marketplace famous for home and gardening equipment. It serves in countries like Europe, Asia, Africa, and South America. Leroy Merlin has a customer base of 300 million household customers with a turnover in 2015 of 17.9 billion euros and 3.6% annual growth.Leroy Merlin integration for Magento 2 interacts with the Leroy Merlin stores to integrate the synchronized product listing between the Magento store and the Leroy Merlin marketplace, and hence, saves your time from listing products one-by-one.Key Features:Profile Based Product Upload: The integration facilitates you to create a profile and map the category and attributes to the Magento store. Then, after assigning the products to the profile, you can easilyupload products on Leroy Merlin.Synchronised Inventory: You need not update the inventory every time manually; instead it issynchronized automatically at regular intervals of time. Also, inventory status and inventory stock areupdated.Bulk Upload System: You have the flexibility to upload any number of products on the Leroy Merlinmarketplace using the bulk product upload feature.Notifications: You will receive emails immediately when a new order is created.Rejected Products Notification: If any product gets rejected from the Leroy Merlin due to invalid data, then its information is fetched from the automatic synchronized requests along with the error due to which it is rejected.Real-Time Synchronisation: Easily access real-time reports of order and inventory data to reduce errors and prevent over and under-selling.Streamline Order Processing: Automate the entire sales and purchase of the order process end-to-end with this extension. It also aggregates high volumes of orders from all channels.Product Management: Create products manually with this integration, upload items via CSV or import data from other marketplaces and also easily fix data issues2. Extension InstallationTo install the extension,1.1. Upload and Extract the Leroy Merlin package file inside the app/code/Ced/ directory and add the belowline in Magento root composer.json file autoload psr-4(please check the screenshot)“LeroymerlinSdk\\”: “app/code/Ced/Leroymerlin/leroymerlin-sdk/src/”2.Run the below command from Magento root-composer dumpphp bin/magento setup:upgradephp bin/magento setup:di:compilephp bin/magento setup:static-content:deploy -fphp bin/magento index:reindexphp bin/magento cache:cleanphp bin/magento cache:flush3. Configuration SettingsTo set up the configuration settings,1.Go to the Magento 2 Admin panel.2.On the left navigation bar, click the Leroy Merlin Integration menu.The menu appears as shown in the following figure:3.Click on Configuration.The Configuration page appears as shown in the following figure:4.In the right panel, click the Leroy Merlin Seller/Developer Settings tab.The Leroy Merlin Seller/Developer Settings tab is expanded and the relevant fields appear as shown inthe following figure:5.Under Leroy Merlin Seller/Developer Settings, do the following steps:In the Enabled list, select the Yes option.In the Mode list, select the LIVE option.In the Default Service Url list, select the Live API URL option.In the Api Key box, enter the API Key value copied from the Leroy Merlin seller account.In the Select Store list, select the required store.In Debug Mode, select Yes if you want the log to be created.6.Scroll down to the Leroy Merlin Product Settings tab, and then click the tab.The Leroy Merlin Product Settings tab is expanded and the expanded section appears as shown in the following figure:7.Under Leroy Merlin Products Settings, do the following steps:Click the Leroy Merlin Price Settings tab.The Leroy Merlin Price Settings tab is expanded and the section appears as shown in thefollowing figure:Under Leroy Merlin Price Settings, do the following step:In the Product Price list, select one of the following options:Increase by Fixed Price: If selected, then the Modify by Fix Price field appears.Increase by Fixed Percentage: If selected, then the Modify by Percentage Pricefield appears.Enter the numeric value to increase the price of the Leroy Merlin, product price bythe entered value % of Magento 2 price.For Example,Magento 2 price + 5% of Magento 2 price.Magento 2 Price = 100Select Increase By Fixed Percentage optionModify by Percentage Price = 5100 + 5% of 100 = 100 + 5 = 105Thus, Leroy Merlin Product Price = 105Decrease by Fixed Price: If selected, then the Modify by Fix Price field appears.Decrease by Fixed Percentage: If selected, then the Modifyby Percentage Pricefield appears.Enter the numeric value to decrease the price of the Leroy Merlin product price by the entered value % of Magento 2 priceFor Example,Magento 2 price – 5% of Magento 2 price.Magento 2 Price = 100Select Decrease By Fixed Percentage optionModify by Fix Price = 5100 – 5% of 100 = 100 – 5 = 95Thus, Leroy Merlin Product Price = 95Click the Leroy Merlin Inventory Settings tab.The Leroy Merlin Inventory Settings tab is expanded and the section appears as shown in the following figure:Under the Leroy Merlin Inventory Settings tab, do the following steps:In the Set Inventory on Basis of Threshold list, select the Enable option ifrequired to set the inventory based on a threshold.Note: Only when the admin selects Enable, the other fields appear. Threshold Inventory is the minimum count of an item that the store owner wants tokeep in stock.In the Inventory Threshold Value box, enter the required value.In the Send Inventory for Lesser Than Threshold Case box, enter the requiredvalue.In the Send Inventory for Greater Than Threshold Case box, enter the required value.In Use MSI, select Yes if you want to use multiple inventories.Click on Other Product Settings. The tab is expanded as:Under Other Product Settings do the following steps:In Attributes to Skip Validation, select the attributes from the list for skippingvalidation.In Parents Product Info., select the attributes to configure from parent product.In Merge Parent Product Images, select Yes to merge parent images.In Upload Config as Simple, select Yes if you want to upload simple products.8.Scroll down to the Leroy Merlin Order Settings tab, and then click the tab.The tab is expanded and the section appears as shown in the following figure:9.Under Leroy Merlin Order Settings, do the following steps:In the Leroy Merlin Order Id Prefix box, enter the required order Id prefix.In the Order Notification Email box, enter the required email Id.In Auto Accept Order, select Yes to accept orders automatically.In Hold Order Until Shipping, select Yes to hold till it is shipped.In the Enable Default Customer list, select the Yes option to enable the default customer.In Default Customer Email, enter the mail id of the customer.In Refund Order on Leroy Merlin, select Yes for the order refund.In Refund Reason For Leroymerlin, select the reason for orders refund.In Carrier Mapping, map the Magento carrier with Leroymerlin Carrier and tracking carrier.10.. Scroll down to the Leroy Merlin Cron Settings tab, and then click the tab.The tab is expanded and the section appears as:11.Under Leroy Merlin Cron Settings, do the following steps:In Order Cron, select Enable to enable the order to fetch through crons.In Order Sync Cron, select enable for syncing orders.In Inventory/Price Cron, select Enable to sync inventory and price.In Feed Cron, select Enable to sync feed.In Full Offer Sync Cron, select Enable to sync the full offer.In Order Shipment Cron, select Enable to ship Magento orders automatically.12.Click the Save Config button to save the entered values.4. Manage ProfileTo manage profile, you can perform the following actions:Add a new profileEdit Existing profileSubmit Actions in bulk4.1. Add New ProfileTo add a new profile,1.Go to the Magento 2 Admin panel.2.On the left navigation bar, click the Leroy Merlin Integration menu.The menu appears as shown in the following figure:3.Click Profile Manager.The Manage Profile page appears as shown in the following figure:The Add New Profile page appears as shown in the following figure:5.In the right panel, under General Information, do the following steps:In the Profile Code box, enter a profile code.Note: It is only for the internal use. Use the unique profile code with no spaces. Start with small letters.In the Profile Name box, enter the name of the profile.Note: Use the unique name to identify the profile.In the Profile Status list, select Enabled to enable the profile.Note: The Disabled option disables the profile6.In the left navigation panel, click the Store Categories menu. In the right panel, the section appearswhere you need to select store categories as shown in the following figure:7.Click on L eroy Merlin Category from the left menu and the section will appear as:8.Select the category and depending on it child categories will appear further from where you may choosethe needed ones.9.Click the Save button.The profile gets created and listed on the Manage Profile page4.2. Edit Existing ProfileTo edit the existing profile,1.Go to the Magento 2 Admin panel.2.On the left navigation bar, click the Leroy Merlin Integration menu.The menu appears as shown in the following figure:3.Click Profile Manager.The Manage Profile page appears as shown in the following figure:4.Scroll down to the required profile row.5.In the Action column of the respective row, click the Edit link.6.The profile editing page appears.Do the required changes and click on Save.4.3. Submit Actions in Bulk on ProfilesTo submit the selected action on the selected profiles in Bulk,1.Go to the Magento 2 Admin panel.2.On the left navigation bar, click the Leroy Merlin Integration menu.The menu appears as shown in the following figure:3.Click Profile Manager.The Manage Profile page appears as shown in the following figure:4.On this page, all the available profiles are listed.5.To delete the selected profiles, do the following steps:Select the profiles those are no more required.Click the Arrow button next to the Actions field.The Actions list appear as shown in the following figure:Click the Delete option.A confirmation dialog box appears.Click the OK button.The selected profiles are deleted.To disable the selected profiles, do the following steps:Select the required profiles.Click the Arrow button next to the Actions field.The Actions list appear as shown in the following figure:Click the Disable option.The selected profiles are disabled.To enable the selected profiles, do the following steps:Select the required profiles.Click the Arrow button next to the Actions field.The Actions list appear as shown in the following figure:Click the Enable option.The selected profiles are enabled.5. Manage ProductsTo manage products,1.Go to the Magento 2 Admin panel.2.On the left navigation bar, click the Leroy Merlin Integration menu.The menu appears as shown in the following figure:3.Click on Product Listing.The Product Listing page appears as shown below:4.To edit a product, click on the Edit button in the Actions column.You can now do the required edit in the product details.5.To validate a product, click on the Validate button in the Actions column.The selected product will be validated.To submit bulk actions on products,1.In the Actions list, click the arrow button.A list appears as shown in the figure:2.Select the checkboxes associated with the required products.3.To validate products, click on the Validate Products. Selected Products will be validated.4.To upload products, click on Upload Product(s), selected products will be uploaded.5.To update the inventory and price, click on Update Inventory & Price. The price and inventory will beupdated for selected products.6.To upload products with offers, click on Upload Product with Offer, the selected products will beuploaded along with offers.7.To mark products as inactive, click on Inactive(OutOfStock) on Leroymerlin.6. Manage OrdersTo fetch and view new orders,1.Go to the Magento 2 Admin panel.2.On the left navigation bar, click the Leroy Merlin Integration menu.The menu appears as shown in the following figure:3.Click Order Listing.The Order List page appears as shown in the following figure:4.Click the Fetch Leroy Merlin Orders button.If the order is imported successfully then, a new record is found in the Orders Grid table.Note:Orders are automatically imported through CRON in every 10 minutes.Whenever the latest orders are imported from Leroy Merlin, a Notification appears inthe notification area of the Admin panel for those orders and they are Auto-Acknowledged as soonas they are imported in the Magento 2 store admin panel.If no Order is imported, then check the Failed orders listed on the Leroy Merlin Failed Orderpage.Order is auto-rejected on Leroy Merlin in the following conditions:When Leroy Merlin Product SKU does not exist in Magento 2 store.When Product is Out of Stock in Magento 2 store.When a product is disabled in Magento 2 store.To perform Actions in bulk on Orders,1.To delete orders, select the orders and then click on Delete Orders under the Actions menu.The selected orders will be deleted.2.To synchronise orders, select the orders and then click on Sync Orders under the Actions menu.The selected orders will be acknowledged.3.To mark orders as shipped, select the orders and then click on Mark as Shipped under theActions menu.The selected orders will be marked shipped.7. View Failed OrdersTo view failed orders,1.Go to the Magento 2 Admin panel.2.On the left navigation bar, click the Leroy Merlin Integration menu.The menu appears as shown in the following figure:3.Click Failed Orders.The Failed Order page appears as shown in the following figure:4.This page displays the failed orders with the order id and the reason for the failure.8. Leroy Merlin FeedTo view and manage the product feeds,1.Go to the Magento 2 Admin panel.2.On the left navigation bar, click the Leroy Merlin Integration menu.The menu appears as shown in the following figure:3.Click Feeds.The Feeds page appears as shown in the following figure:4.The page displays the Leroy Merlin feeds.9. Cron LogsTo view Cron Details,1.Go to the Magento 2 Admin panel.2.On the left navigation bar, click the Leroy Merlin Integration menu.The menu appears as shown in the following figure:3.Click Cron Logs.The Cron page appears as shown in the following figure:4.To delete all the cron logs, click the Truncate button.10. Activity LogsTo view Activity details,1.Go to the Magento 2 Admin panel.2.On the left navigation bar, click the Leroy Merlin Integration menu.The menu appears as shown in the following figure:3.Click on Activity Logs.The Activity Log grid appears as:4.The activity details are displayed on this page along with the message.11. Help and SupportTo view Help and Support,1.Go to the Magento 2 Admin panel.2.On the left navigation bar, click the Leroy Merlin Integration menu.The menu appears as shown in the following figure:3.Click Help and Support.The Help and Support page appears as shown in the following:4.You can connect with us via Call, Ticket, Email or Skype chat for any assistance.。
maxent模型里环境图层坐标系
maxent模型里环境图层坐标系文件准备Samples文件.csv格式通常为三列,分别为“物种”、“经度”、“纬度”Tips:默认情况下会删除重复项(同一网格单元中同一物种的多个记录),可以通过设置取消Environmental layers(栅格)文件.asc格式必须具有相同的地理边界和单元格大小运行示例1、导入Samples(csv格式)、Environmental layers(asc 格式/也可以直接选择包含asc文件的文件夹)2、勾选3、设置结果存储路径-Output direcy4、Setting 中 Random percentage 设置为25,即随机留出25%的样本用于检验5、单击Run<randomly set aside 25% of the sample records for ing>• 每次在相同的数据集上运行Maxent时,都会使用相同的随机样本,除非在Settings选择了“Random seed”选项。
• 一个或多个物种的测试数据可以在一个单独的文件中提供,方法是在Settings指定“Test sample file”的名称。
• 支持四种模式的输出: raw, cumulative,logistic,Cloglog. 默认为Cloglog • logistic给出了存在概率在0~1之间的估计<The default output is logistic, which is the easiest to conceptualize: it gives an estimate between 0 and 1 of probability of presence.>结果解释模型拟合评价指标 gain• 与deviance相似• g ain随着模型的运行由0沿渐近线逐渐增加• 在这个过程中,maxent形成一个概率分布,从均匀分布开始逐渐提高对数据的拟合程度• gain为存在样本的平均对数概率,可减去一个常数使均匀分布gain为0(?) • gain在模型运行结束时表示,在存在样本周围的集中程度如何• 若gain为2,表示模型对存在样本判断正确的平均可能性高于随机模型exp(2)≈7.4倍< It starts at 0 and increases towards an asymptote during the run. During this process, Maxent is generating a probability distribution over pixels in the grid, starting from the uniform distribution and repeatedly improving the fit to the data. The gainis defined as the erage log probability of the presence samples, minus a constant that makes the uniform distribution he zero gain.At the end of the run, the gain indicates how closely the model is concentrated around the presence samples; for example, if the gain is 2, it means that the erage likelihood of the presence samples is exp(2) ≈ 7.4 times higher than that of a random background pixel.>这个图暂时不会解释,感觉是描述训练集与测试集模型的错误率,但x/y轴的含义都看不明白。
FME 扩展产品询问 - Magento 2 用户指南 - 版本 1.0说明书

FME E XTENSIONSP RODUCT I NQUIRY –E XTENSION FOR M AGENTO 2U SER G UIDE -V ERSION 1.0SUPPORT@I NTENDED A UDIENCEThe content of this document is designed to facilitate the users -managers, supervisors and others of Product Inquiry Extension forMagento 2. A step by step instruction has been added to thisdocument to help users to install the extension on Magento 2.This extension will only work on Magento 2. As a safe practice alwaysbackup your files and database before installing any extension onMagento. If you are looking for someone to install the extension wecan do it for you as well. Just go to the following link and let supportknow the order id to expedite the installation process.Go to: /magento-extension-installation.htmlOnce you have installed please see the User Guide to help youunderstand on how to use the extension to its full capacity. If you stillhave questions feel free to contact us on our website.If you have any custom requirements feel free to touch base with. Justemail *************************with the description of therequirements and they will get back to you with estimates.For further help or support, feel free to reach us @T ABLE OF C ONTENTSI NTENDED A UDIENCE (2)U SER G UIDE (4)H OW C AN A DMINS V IEW/E DIT RFQ S (4)D ISCLAIMER (6)S UPPORT (6)C USTOMIZATION (6)N EED A N EW C USTOM E XTENSION? (7)U SER G UIDEAfter installation of extension, make sure the setup is upgraded and static-contents are deployed. Login to admin panel and flush your Magento cache storage.H OW C AN A DMINS V IEW/E DIT RFQ SAt the back end, go to Quick RFQ from the left bar. You can go there from, FME EXTENSIONS > Quick RFQ. Here you will find the list of all the RFQs submitted by your customers. You can Edit then from the highlighted area.Here you will find all the information that your customers are submitted on the front end RFQ form. Admins can edit the information and change the status as per their requirement.NOTE:Admins can enable product RFQ from product sheet at the back office. The field is an attribute for they can enable it for products in bulk.D ISCLAIMERIt is highly recommended to back up your server files anddatabase before installing this module.No responsibility will be taken for any adverse effects occurringduring installation.It is recommended you install on a test server initially to carryout your own testing.S UPPORTYou can also find Step by Step guide on this extension by visitingProduct Inquiry product page on our website. If you need moreinformation or have any questions or problems, please refer toour support helpdesk:You can log a ticket and a support technician can assist youfurther.If you are still struggling with your extension, submit a request via*************************C USTOMIZATIONIf you have requirements that are not covered by our extensionand you need to have our extension customized, feel free to emailus with detailed requirements at *************************You can also fill out a Request for Quote form here and we canget back to you with a quote:/quickrfqN EED A N EW C USTOM E XTENSION?We can build a new extension based on your customrequirements if needed. Feel free to email us at**********************。
FME扩展Layaway和部分付款Magento2用户指南说明书
FME E XTENSIONSE XTENSION FOR M AGENTO 2U SER G UIDEI NTENDED A UDIENCEThe content of this document is designed to facilitate the users -managers, supervisors, and others of Layaway & Partial PaymentExtension for Magento 2. A step by step instruction has been added tothis document to help users to install the extension on Magento 2.This extension will only work on Magento 2. As a safe practice alwaysbackup your files and database before installing any extension onMagento. If you are looking for someone to install the extension, we cando it for you as well. Just go to the following link and let support knowthe order id to expedite the installation process.Once you have installed please see the User Guide to help youunderstand how to use the extension to its full capacity. If you still havequestions, feel free to contact us on our website.T ABLE OF C ONTENTSI NTENDED A UDIENCE (2)T ABLE OF C ONTENTS (3)U SER G UIDE (4)H OW T O C ONFIGURE T HE E XTENSION (4)H OW T O C ONFIGURE A P RODUCT S PECIFIC L AYAWAY P LAN (9)H OW T O P LACE L AYAWAY O RDER F ROM B ACKEND (11)D ISCLAIMER (13)U SER G UIDEAfter installation of the extension, make sure the setup is upgraded and static-contents are deployed. Login to the admin panel and flush your Magento cache storage.H OW T O C ONFIGURE T HE E XTENSION (G LOBAL L AYAWAY P LAN)At the back end, go to STORES>Configurations.Here You can find the following settings. Provide values here to create a global layaway plan.G ENERAL•Enabled: Option to Enable/Disable the module•Enable Layaway For All Products: Select ‘Yes’ or ‘No’ to Enable/Disable the layaway for all products (Note: Not valid for the products disabled individually)•By-Pass Login/Registration Request on Add to Cart with Layaway: Select ‘Yes’ or ‘No’ to Enable/Disable the by-pass login (Note: Allow Guests to checkout with Layaway only if you can manage the payments manually, otherwise there is no way to collect installments from guests)•Allowed Payment Methods: Choose the payment methods from the activated payment methods:o No Payment Information Requiredo Check/Money Ordero PayPal Billing AgreementG LOBAL C ONFIGURATIONS•Apply Calculation: Choose calculation method:o Apply on Order Totalo Apply on Product Price•Down Payment Calculation Type: Choose the calculation type of down payment: o Percentage Priceo Fixed Price•Price/Percentage For Down Payment (As Above Setting): Enter the price/percentage value for the down payment•Calculate the Deposit Before Discount (If Any): Select ‘Yes’ or ‘No’ to calculate the deposit before the discount•Layaway Fee Charge Mode: Choose the layaway fee charge mode:o Per Product in Carto Per Order•Layaway Fee to Charge: Enter the value for layaway fee charge•Maximum No. of Installments: Enter a number for maximum no. of installments. Empty or zero means no limit.•Maximum Installment Period Unit: Choose the period unit for maximum installment.Customers will have to finish all the installments within this period.o No Limito Dayo Weeko Montho Yearo Fixed DateL ABELS•Layaway: Enter a label for layaway e.g. Installment•Layaway Remaining: Enter a label for remaining layaway e.g. Installments Remaining •Installment: Enter a label for installment e.g. Installment•Layaway Fee: Enter a label for layaway fee e.g. Layaway Fee•Product Page Dropdown Label: Enter a label for product page dropdown menu e.g. Do you want to pay with installments?L AYAWAY R EMINDER E MAIL C ONFIGURATIONS•Enable Auto Reminders: Select ‘Yes’ or ‘No’ to Enable/Disable the auto-reminders for layaway•Interval Between Auto Reminders (in days): Enter a number to set the interval between auto-reminders. In the case of Empty or 0, the system will consider 15 days as default.•Enter Sender's Email: Enter an email address for the sender•Reminder Email Template: Choose an email template for layaway remindersH OW T O C ONFIGURE A P RODUCT S PECIFIC L AYAWAY P LANAt the back end, go to CATALOG>Products.Here you will find all the products in a grid. Click on the Edit button or click on the Add Product button to continue.Here on the product page, you will find the layaway options. Under the "Layaway" heading, you can configure the down payment, no. of installment & other details of the layaway plan. You can use the options here or use the ones in the configurations.L AYAWAY•Enable Installment: Option to Enable/Disable installments for this product•Is the Product Available Only for Installment: Option to Enable/Disable t he product’s availability only for installment or not?•Enter Percent of the Product Price to be Paid at First time: Enter a Percent of the Product Price to be paid for the first time•Maximum Period for Installment: Enter the maximum period to pay installment•Installment Period Unit: Choose the period unit for maximum installment. Customers will have to finish all the installments within this period.o No Limito Dayo Weeko Montho Yearo Fixed Date•Installment Period: Enter a number/value for the installment periodL AYAWAY F EE C ONFIGURATION•Enter Installments Fee for the Product: Enter the amount of Installments Fee for this ProductH OW T O P LACE L AYAWAY O RDER F ROM B ACKENDAt the back end, go to SALES>Orders.Here you will find all the orders in a grid. Click on the View button or click on the Create New Order button to continue.Now select a Customer by clicking on the name or other fields against a particular customer.Now scroll down to th e ’Installments Orders’ se ction. Specify the type of order as: •Normal Order•Layaway Order•Installment OrderAfter choosing the order type, click on the ’Update Layaway Information’ button.Note:Please make sure to click this button once before placing an order, if you are going to place Layaway or Installment Order, mainly for Layaway Order, after any change, the order totals may not be correct unless you click this button.F RONTEND V IEWLayaway sample product with a drop-down option for the customer to either order with full payment or layaway plan.D ISCLAIMERIt is highly recommended to back up your server files and databasebefore installing this module.No responsibility will be taken for any adverse effects occurring duringinstallation.It is recommended you install on a test server initially to carry out yourown testing.。
maxent 最大熵模型 正则化系数

maxent 最大熵模型正则化系数最大熵模型是一种常用的概率模型,它在自然语言处理、信息检索、机器学习等领域有着广泛的应用。
在最大熵模型中,正则化系数起到了重要的作用,它用于平衡模型的拟合程度和复杂度,以提高模型的泛化能力。
我们来了解一下最大熵模型的基本概念。
最大熵模型是一种基于最大熵原理的统计模型,它假设模型的不确定性应该最大化,即模型应该在满足已知约束的情况下,尽可能均匀地分布概率。
最大熵模型的训练目标是使模型的熵达到最大,即最大化模型的不确定性。
为了解决模型的过拟合问题,最大熵模型引入了正则化项,正则化系数就是用来控制正则化项的权重。
正则化项通常是模型参数的范数,它可以限制模型的复杂度,防止模型对训练数据过度拟合。
正则化系数越大,正则化项的影响就越大,模型的拟合程度就越低;反之,正则化系数越小,模型的拟合程度就越高。
在最大熵模型中,正则化系数的选择是一个关键问题。
如果正则化系数选择过大,模型的拟合程度会过低,导致模型的预测能力弱;如果正则化系数选择过小,模型的拟合程度会过高,导致模型对训练数据过拟合,泛化能力较差。
因此,正则化系数的选择需要根据具体问题和数据集来进行调整。
在实际应用中,有多种方法可以确定正则化系数的取值。
一种常用的方法是使用交叉验证,将数据集划分为训练集和验证集,通过在不同的正则化系数上训练模型并在验证集上评估性能,选择使性能最优的正则化系数。
另一种常用的方法是使用正则化路径,即在一系列正则化系数上训练模型,并观察模型参数的变化情况,选择适合的正则化系数。
除了选择正则化系数,最大熵模型还有一些其他的优化方法可以提高模型的性能。
例如,可以使用不同的特征函数来表示模型的约束条件,通过增加更多的特征函数来提高模型的拟合能力。
此外,还可以使用不同的优化算法来训练模型,如改进的迭代尺度法、拟牛顿法等。
最大熵模型的正则化系数是调整模型拟合程度和复杂度的重要参数。
合理选择正则化系数可以提高模型的泛化能力,避免过拟合和欠拟合问题。
Amasty Customer Group Auto Assign for Magento 2说明书

See the way the Customer Group Auto Assign for Magento 2 extension works.Guide for Customer Group Auto Assign for Magento 2Change customer groups automatically with Customer Group Auto Assign extension for Magento 2. Use simple group switching rules to cut operating expenses and save time.Manage customer groups based on custom rulesUse simple rules based on customer and order attributesSchedule the rules processing frequency with integrated Cron functionalityDefine rules processing order via prioritizationEasily manage all group-switching rules in one placeNEW | Show customer group status in the customer's accountGeneral SettingsTo configure the General settings of the extension, please go to Stores → Configuration → Amasty Extensions → Customer Group Assign.In this tab you can activate/deactivate the module and set the schedule to timely change customer groups as the integrated Cron functionality allows to switch groups automatically.Enabled - set to Yes to enable the module.Customer Groups Update Schedule - specify rule processing frequency in a Crontab format. Read more about cron expressions here.Rules GridTo create custom rules and manage customer groups automatically, go to Customers → Amasty Customer Group Auto Assign → Rules.Easily operate all group-switching rules on a handy grid. See Rule Name, Destination Group, Priority and Status in one place.To change rule configuration, click Edit in the Action column.Delete the rules separately or in bulk via Actions dropdown menu.To set up a new custom rule, hit the Add New Rule button.Rule CreatingSee how to set up customer group rules in our video guide!General SettingsRule Name - specify the title for the rule that will be displayed on the backend.Enabled - set to Yes to activate the rule.Priority - define the priority of rule execution. The lowest number is executed first. Destination Group - choose the customer group to which the customers will be assigned if they meet the necessary conditions.To view all existing customer groups, go to Customers → Customer Groups.Edit the necessary group by simply clicking it or create a new one via Add New Customer Group button.ConditionsIn this tab configure group-switching rule conditions based on customer or order attributes.With the condition tree, you are able to create as many conditions and their combinations as you want by clicking the green icon and choosing the necessary attribute from the dropdown menu.In case you want to set several independent conditions and you need any of them for the rule to be applied, change ‘All’ value to ‘Any’.Two main groups of attributes are acceptable: customer attributes and order attributes.The list of customer attributes includes customer and account information, shipping andbilling address details, personal data and etc.For example, you can group customers by city, region or country. With the extension it is also possible to automatically move your clients registered for a particular time to a separate group and provide them with some special discounts or offers.Order attributes include the average order value, the number of completed orders, total salesamount, and ordered products by condition.For example, you can move customers whose total sales amount exceeds $3 000 and the number of completed orders is greater than 30 to the “VIP” group offering 30% discount for all future orders.Click the Save button.To avoid common mistakes while setting the conditions, check this post.NEW | Customer Group SettingsGroup Name - specify the group name based on your sales strategies and loyalty programs.Tax Class - specify the tax class.Show Customer Group on Storefront - enable the option to display customer group status in thecustomer account:See Amasty Special Promotions Pro for Magento 2 extension to increase your store average order value.Find out how to install the Customer Group Auto Assign for Magento 2 via Composer.。
- 1、下载文档前请自行甄别文档内容的完整性,平台不提供额外的编辑、内容补充、找答案等附加服务。
- 2、"仅部分预览"的文档,不可在线预览部分如存在完整性等问题,可反馈申请退款(可完整预览的文档不适用该条件!)。
- 3、如文档侵犯您的权益,请联系客服反馈,我们会尽快为您处理(人工客服工作时间:9:00-18:30)。
x , y X Y
1 p x, y log px | y
H ( X | Y ) H ( XY ) H (Y ) H(X |Y ) H(X )
Conditional Entropy
H(X |Y ) H(X )
• Condition Reduces Entropy (C.R.E.) • 知识(Y)减少不确定性(X) • 证明(略)。用文氏图说明:
H X log 5 1.46 H (Y ) log 3
称硬币(cont.)
• Why??? H X log X log 5 H Y log Y log 3
H X log 5 1.46 H (Y ) log 3
• 为什么用log? • “表达能力”与“不确定度”的关系?
最大熵模型 与 自然语言处理 MaxEnt Model & NLP
laputa c-liu01@ NLP Group, AI Lab, Tsinghua Univ.
Topics
• NLP与随机过程的关系(背景) • 最大熵模型的介绍(熵的定义、最大熵 模型) • 最大熵模型的解决(非线性规划、对偶 问题、最大似然率) • 特征选取问题 • 应用实例 • 总结与启发
NLP与随机过程
问题:
• p(yi=a|x1x2…xn y1y2…yi-1)怎么求? • yi与x1x2…xn y1y2…yi-1的关系?
x1x2…xn x1x2…xn y1 x1x2…xn y1 y2 x1x2…xn y1 y2 y3 …
p(y1=a|x1x2…xn) p(y2=a|x1x2…xn y1) p(y3=a|x1x2…xn y1 y2) p(y4=a|x1x2…xn y1 y2 y3)
k
What’s Entropy?
• 定义:
1 H X p x xi log p x xi i 1
k
• X的具体内容跟信息量无关,我们只关 心概率分布,于是H(X)可以写成:
1 H X px log px xX
熵的性质
0 H X log X
称硬币-Version.2
因为第一个、第二个硬币是假硬币的概率 是三分之一,比其他硬币的概率大,我们 首先“怀疑”这两个。第一次可以把这两 个做比较。成功的概率是三分之二。失败 的概率是三分之一。如果失败了,第二次 称剩下的三个。所以,期望值是:
1 log 9 4 1 1 log 3 3 9 log 3 3 3 3 log 3
• 第一个等号在X为确定值的时候成立 (没有变化的可能) • 第二个等号在X均匀分布的时候成立。
熵的性质
• 证明:
1 H X p x log px xX x : 1 p x 0 1 1 1即 log 0 px px 1 p x log 0 px 1 p x log 0 px xX H X 0
称硬币(cont.)
为什么用log? • 假设一个Y的表达能力是H(Y)。显然,H(Y) 与Y的具体内容无关,只与|Y|有关。 • 两个Y(就是:y1y2)的表达能力是多少? • y1可以表达三种情况,y2可以表达三种情 况。两个并列,一共有:3*3=9种情况 (乘法原理)。因此:
H y1 H y2 H (Y ) H (Y ) H (Y Y ) 注意: Y Y Y Y
1 log k p x xi px xi log c i 1
1 px xi log px x i 1 i log c
k
一般地,我们令c为2(二进制表示),于是,X 的信息量为:
1 H X p x xi log p x xi i 1
X (X&Y) I: Complete Knowledge Space Y
已知与未知的关系
对待已知事物和未知事物的原则: • 承认已知事物(知识); • 对未知事物不做任何假设,没有任何偏 见
已知与未知的关系—例子
已知: “学习”可能是动词,也可能是名词。可以被标为主语、 谓语、宾语、定语…… 令x1表示“学习”被标为名词, x2表示“学习”被标为动 词。 令y1表示“学习”被标为主语, y2表示被标为谓语, y3表示 4 宾语, y4表示定语。得到下面的表示:
Y X
n
称硬币(cont.)
x X ,2,3,4,5 1 • Let: x是假硬币的序号: • Let: Yi是第i次使用天平所得到的结果:
yi Y ..3 1 其中 : 1表示 ; 2表示 ; 3表示
• • • •
用y1 y2… yn表达x。即设计编码:x-> y1 y2… yn H X的“总不确定度”是: X log X log 5 H Y log Y log 3 Y的“表达能力”是: 至少要多少个Y才能准确表示X?
称硬币-Version.2
假设有5个硬币:1,2,3,…5,其中一个是假的,比其他的 硬币轻。已知第一个硬币是假硬币的概率是三分之一; 第二个硬币是假硬币的概率也是三分之一,其他硬币是 假硬币的概率都是九分之一。 有一个天平,天平每次能比较两堆硬币,得出的结果可能 是以下三种之一: • 左边比右边轻 • 右边比左边轻 • 两边同样重 假设使用天平n次找到假硬币。问n的期望值至少是多少? (不再是小学生问题:P)
NLP与随机过程
问题:
• p(yi=a|x1x2…xn y1y2…yi-1)怎么求? • yi与x1x2…xn y1y2…yi-1的关系? 一个直观的解决:
p( yi a, x1.. xn y1.. yn ) p( yi a | x1.. xn y1.. yn ) p( x1.. xn y1.. yn )
0 H(X )
熵的性质
• 证明:
H ( X ) log X
详细证明略。 求条件极值就可以证明了(求偏导数,条 件是:所有的概率之和为1) 结论:均匀分布的时候,熵最大
Conditional Entropy
• 有两个变量:x,y。它们不是独立的。已 知y,x的不确定度又是多少呢?
H X | Y
3 1/9
4 1/9
5 1/9
1 log 9 4 1 1 log 3 3 9 log 3 3 3 3 log 3
称硬币-Version.3,4,…∞
更广泛地:如果一个随机变量x的可能取值为 X={x1, x2,…, xk}。要用n位y: y1y2…yn表示(每 位y有c种取值)n的期望值至少为:
已知与未知的关系—例子
i 1 已知: “学习”可能是动词,也可能是名词。可以被标为主语、 谓语、宾语、定语…… “学习”被标为定语的可能性很小,只有0.05
p( x1 ) p( x2 ) 1
p( y ) 1
i
4
我们引入这个新的知识:
p( y4 ) 0.05
除此之外,仍然坚持无偏见原则: p( x1 ) p( x2 ) 0.5
NLP与随机过程
NLP:已知一段文字:x1x2…xn(n个词) 标注词性y1y2…yn 标注过程: 已知:x1x2…xn 求:y1 已知:x1x2…xn y1 求:已知:x1x2…xn y1 y2 求:y3 已知:x1x2…xn y1 y2 y3 求:y4 …
NLP与随机过程
yi可能有多种取值,yi被标注为a的概率有多少? 随机过程:一个随机变量的序列。 x1x2…xn x1x2…xn y1 x1x2…xn y1 y2 x1x2…xn y1 y2 y3 … p(y1=a|x1x2…xn) p(y2=a|x1x2…xn y1) p(y3=a|x1x2…xn y1 y2) p(y4=a|x1x2…xn y1 y2 y3)
1 ? 2 3 ? 5 1/3
1 1/3
2 1/3
3 1/9
4 1/9
5 1/9
用反证法可以证明,这个是最小值。 (假设第一个和第二个硬币中有一个要称两次的话……)
称硬币-Version.2
《数据结构》:Huffman编码问题。
1 ? 2 1 1/3 1 / 9 1 / 9 1 / 9 1 / 9 2 1/3 1 / 9 1 / 9 3 ? 5 1/3
p( y ) 1
i i 1
称硬币-Version.2
《数据结构》:Huffman编码问题。
1 1/3
2 1/3
3 1/9
4 1/9
5 1/9
称硬币-Version.2
《数据结构》:Huffman编码问题。
3 ? 5 1/3
1 1/3
2 1/3
3 1/9
4 1/9
5 1/9
称硬币-Version.2
《数据结构》:Huffman编码问题。
称硬币(cont.)
“表达能力”与“不确定度”的关系? log 5 H X
H (Y )
log 3
1.46
• 都表达了一个变量所能变化的程度。在这个变 量是用来表示别的变量的时候,这个程度是表 达能力。在这个变量是被表示变量的时候,这 个程度是不确定度。而这个可变化程度,就是 一个变量的熵(Entropy)。 • 显然:熵与变量本身含义无关,仅与变量的可 能取值范围有关。
问题again!
• (x1x2…xn y1y2…yi-1)?
What’s Entropy?
An Example: • 假设有5个硬币:1,2,3,4,5,其中一个是假的,比其 他的硬币轻。有一个天平,天平每次能比较两堆硬币, 得出的结果可能是以下三种之一: • 左边比右边轻 • 右边比左边轻 • 两边同样重 问:至少要使用天平多少次才能保证找到假硬币? (某年小学生数学竞赛题目:P)