打印机维修手册:Epson Stylus Photo PX650_TX650_TX659_PX660_Artisan635_E
打印机维修手册:StylusPHOTO2100_2200_A
DANGER
Signals a precaution which, if ignored, could result in serious or fatal personal injury. Great caution should be exercised in performing procedures preceded by DANGER Headings.
3. WHEN PERFORMING TESTING AS DICTATED WITHIN THIS MANUAL, DO NOT CONNECT THE UNIT TO A POWER SOURCE UNTIL INSTRUCTED TO DO SO. WHEN THE POWER SUPPLY CABLE MUST BE CONNECTED, USE EXTREME CAUTION IN WORKING ON POWER SUPPLY AND OTHER ELECTRONIC COMPONENTS.
The contents of this manual are subject to change without notice. All effort have been made to ensure the accuracy of the contents of this manual. However, should any errors be detected, SEIKO EPSON would greatly
DANGER
1. ALWAYS DISCONNECT THE PRODUCT FROM THE POWER SOURCE AND PERIPHERAL DEVICES PERFORMING ANY MAINTENANCE OR REPAIR PROCEDURES.
打印机维修手册:Stylus_Photo_R1900_R2880_R2000

Copyright © 2011 SEIKO EPSON CORPORATION. Imaging & Information CS Quality Assurance Department
Confidential
PRECAUTIONS
Precautionary notations throughout the text are categorized relative to 1)Personal injury and 2) damage to equipment.
The contents of this manual are subject to change without notice. All effort have been made to ensure the accuracy of the contents of this manual. However, should any errors be detected, SEIKO EPSON would greatly appreciate being
SERVICE MANUAL
Color InBiblioteka jet PrinterEPSON Stylus Photo R1900/R2880/R2000
Confidential
SEIJ07010
Notice:
All rights reserved. No part of this manual may be reproduced, stored in a retrieval system, or transmitted in any form or by any means, electronic, mechanical, photocopying, recording, or otherwise, without the prior written permission of SEIKO EPSON CORPORATION.
喷墨打印机维修案例

ww 排除。
例 8:惠普 HP 680 C 型喷墨打印机不能进行”打印阅览”操作 故障分析: 经检查打印机驱动程序未安装 故障检修:正确安装打印机 驱动程序后试机,故障排除。
例 9 惠普 HP Deskjet 695 C 型喷墨打印机打印时一条总对起 故障分析: 可能是打印模式选择问题,在打印时,有 3 种模式: 最佳模式 正常模式 经
维修总结:由于字车座与转换杠(701 lever change)间的触点有轻微磨损,致使字车 座复 位时,字车座无法接字 车座故障也就消除。
论坛 网站
OA 例 7:惠普 HP 670C 型喷墨打印机打印时有“咔咔”声 故障分析:打开机盖,观察发现墨盒底架下的滑动杆已粘上油墨污迹,将此擦洗干净,试
. 机发现故障消失,使用一段时间,重现故障。经进一步检查发现导轨的右侧根部污染,打印机 w 在使用过程中导轨上的润滑油与空气中的灰尘形成油垢,长期积累使字车移动阻力加大。
/退纸键来清洗彩色打印头。清洗后再打印,发现其打印质量未能好转,说明墨盒过期或损 坏,更换墨盒后,工作正常,故障排除。
例 6 :EPSON MJ—1500K 型喷墨打印机开机后面板上的彩色墨劲指示灯亮 故障分析:椐用户说,在关机情况下自行取下墨盒,并换新墨盒,由于该打印机使用计
算器对墨水容量进行检测,所以在关机状态下更换新墨盒并未被打印机认可。 故障检修:打开电源,在“pause”灯亮的情况下,按住(AIT)键,可看见“pause”
t (2) 喷墨头拆卸方法 第一步:拆下打印机的上盖。 e 第二步:用一字起子在喷墨头下面把白色锁块往外拔开后,将字车移动到更换墨盒 n 位置(一般情况下,打印机关闭后字车自动移动到墨头清洗位置处,防护 帽紧紧的戴在喷墨头表面,并用滑动锁固定。) . 第 三 步: 从 字车 上分 别 掀开 黑色 和 彩色 墨盒 的淡 蓝 色塑 料卡 扣 后取 出黑 色 (S020187)和彩色墨盒(S020193)。 N 第四步:分别拆下黑色和彩色墨盒卡扣。 H 第五步:拆下喷头压板上的一颗螺钉后取出喷头压板。 第六步:用手轻轻拉动喷头的上部,使其后面的塑料卡扣与字车架分离后再往上提 C 起整个喷头。 第七步:拔下位于喷头上部后面的电路 板的连接电缆,取出喷头。
爱普生打印机维修手册全集(三)3...
爱普生打印机维修手册全集(三)3...爱普生打印机维修手册全集(三)3DLQ-3500K:一、前面进单页纸后又退出解决方法:将Firmware 内容重新写入主板,正常。
操作步骤:1、从网上下载Firmware 文件并解压缩2、按字体 + 高速 + 切纸 + 纸张来源 + 开机3、在DOS 下执行下面语句COPY IPL4600.MOT PRNCOPY K03125.MOT PRN传输完毕后关机。
注意:更换主板后除写Firmware 外,还必须进行调整。
将α(头值)和β(机架)值输入,否则有可能出现打印空白。
LQ-1600K3+:一、打印文档或表格时发生错位。
故障分析:⑴ 按常规清洁字车组件,之后进行BI-D 调整,BI-D 调整的打印样张均正常后,联机打印WORD 文档,发现故障并未排除;⑵ 接下来就试着更换字车电机,故障依旧;⑶ 更换字车组件(字车导轴,字车托架)后,故障依旧;⑷ 用排除法,肯定是机械的问题,发现跟字车移动有关的只剩下色带驱动组件(含字车同步带)了,试更换之,问题终于排除了。
维修总结:该故障是由于字车同步带的松紧度不佳造成的,使得打印头左右移动时的定位不准,引起打印错位了。
二、打印错位,但WIN98 / DOS 状态下屏幕打印正常。
故障分析:⑴ 首先更换主板,故障依旧;⑵ 更换打印机端口,但使用SPP、EPP 端口,不能联机打印,只有ECP 可以打印;⑶ 把打印机换到另一电脑打印正常,看来是软件故障;首先杀毒,无病毒,再重装WIN98,联机打印正常。
三、工作一段时间后,面板灯全闪;并且有时一开机(打印头刚向左移动几公分)面板灯即开始闪烁。
故障分析:⑴ 首先检查头缆是否接触不良,有无变形,或是某一脚变成**线了,发现均正常;⑵ 检查打印头热敏电阻端的有无虚焊,接触不良,正常;⑶ 依次更换机械、主板后,故障依旧;⑷ 从另一台好的LQ-1600K3+机子上拆主板试打,正常,故障排除了;⑸ 主板上只有监控芯片没换了,试换后,OK。
打印机维修手册:StylusPhotoRX600_RX610_RX620_RX630_C

PRECAUTIONS
SERVICE MANUAL
Scanner • Printer • Copier
EPSON Stylus PHOTO RX600/610 , RX620/630
SEOT03006
Notice:
All rights reserved. No part of this manual may be reproduced, stored in a retrieval system, or transmitted in any form or by any means, electronic, mechanical, photocopying, recording, or otherwise, without the prior written permission of SEIKO EPSON CORPORATIONEPSON PRODUCT SHOULD BE PERFORMED ONLY BY AN EPSON CERTIFIED REPAIR TECHNICIAN. 2. MAKE CERTAIN THAT THE SOURCE VOLTAGES IS THE SAME AS THE RATED VOLTAGE, LISTED ON THE SERIAL NUMBER/RATING
Precautionary notations throughout the text are categorized relative to 1)Personal injury and 2) damage to equipment.
650C维修手册

●蜂鸣器
● 1.现象:遥控无效,
测试:按###至触发遥控界面,触发任意遥控后,无声音提示。
维修办法:使用示波器测量如下管脚图1,同时触发遥控器,看波形是否如下图2,若不是则更换模块U21,更换是先用烙铁加热一段,拔起一点,在加热另一端拔起,直至拆下!
图1
图2
若模块工作正常,则测试如下图3U11的6管脚,按遥控器,看波形是否规则如图4,若不正常则更换U11,此种现象较少!
●2现象:遥控管脚断裂
维修办法:将管脚对正焊盘,在断裂处补锡,直接将模块进行2次焊接
● 3.现象:HOOK键不良
维修办法:直接拆除,更换,注意拆除过程中焊盘掉落!
● 4.现象:按键有声音而报警器警笛声音不响
测试:###后出现的声音,或通电打开外壳触发防拆开关的声音!
维修办法:首先看U13是否插反,若没有则通电打开防拆开关,测试示波器测9100芯片6管脚图5,看是否输出如下波形图6
图5
图6
若无此波形,测试8管脚是否有电压,若没有电压则直接加电压3.6V,看是否有图6输出,若没有更换U13,若有图6输出则更换T12
5.现象:无任何声音, 或免提无回音
测试:按键等都没有声音
维修:此种维修模拟开关U8。
行打简易维修手册

普印力(PRINTRONIX)行式打印机简易维修手册深圳市中航信息科技产业有限公司目录1、清洁维护----------------------------------------------32、调整间隙----------------------------------------------43、主要配件的区分--------------------------------------54、主板和对应程序--------------------------------------75、L C D报错-----------------------------------------------86、常见报错---------------------------------------------147、I M B操作方法----------------------------------------158、数据采集---------------------------------------------169、行打W I N D O W S下速度调整-----------------------1710、P7色带寿命终结点的更改-------------------------1811、控制面板的其他功能-------------------------------1912、P7参数表--------------------------------------------20注意:内部资料不得外传2 / 24深圳市中航信息科技产业有限公司 王殿志3 / 241、清洁部分色带导向轴:掩膜和打印针:主板的清洁:有吸尘器的话就用吸尘器清理干净,如没有最好把主板拆下来清理。
机器内部纸屑定期清除、色带传感器走纸传感器都要定期清洁。
4 / 242、调整部分压纸杆间隙调整梭头相位调整调整的条件:1、 维修时移动或重新安装梭头2、 长时间打印3、 长时间打印窄行纸P7000 V6的新梭头要调紧一点深圳市中航信息科技产业有限公司 王殿志5 / 243、主要配件的区分PSA3内存 PSA 闪存PSA 内存PSA3闪存PSA3安全保护器PSA 安全保护多了个给梭头供电的插座、网卡集成6 / 24深圳市中航信息科技产业有限公司 王殿志7 / 244、主板和对应程序根据机器的具体情况选择正确的主板K A 的机器要选用C M X 或C F X 主板;P S A 的机器只能选用C F X 主板,注意P 5X 03H 和P 5X 06H 的机器有两种型号主板;P S A 3的机器要选用P P C 主板,要注意原主板是单插槽还是双插槽主板,否则闪存容量可能不够。
埃森普(Epson)印刷机(Printer)安装指南说明书

Epson Stylus Pro 7800 Install GuideUsing the Epson with KCPSJim ReadInstalling the Epson Stylus Pro Printer DriverDownload the latest driver from Epson’s website () and install according to their instructions. Verify that the Windows printer driver is working by printing from Photoshop or Paint. Setting Up a Printer in KCPS for the Epson Stylus Pro PrinterThe Epson Stylus Pro 7800 is supported as a Windows printer using Epson’s print driver.Log in to the KCPS Administration functions and go to Printing-Setup.Setting up the KCPS PrinterSet up a Windows printer for each print size that will be printed by the Epson 7880 printer.1.Open the Printer Setup window and click the “Windows printer” option from the list.2.Next, you’ll need to assign a printer name that is appropriate such as “Epson 16x20”.3.Click Next.4.Assign a Config File for this printer and give it a matching name such as “Epson 16x20”.5.Click Page Setup. Do not make changes here. Changes made in the printer’s page setup will bereflected here.6.From Page Setup, click Properties. Choose the media settings that are right for the paper.Key SettingsMode Settings - Mode (Color Management)Good results can be obtained if you do not use a color profile in KCPS thus delivering an sRGB image to the Epson driver and enabling Automatic color correction using Epson Standard (sRGB) correction in the driver. To use an ICC profile in KCPS for color correction, click Custom Mode and select No Color Adjustment from the drop-down menu.Size and ExpansionBelow are recommended settings to print a 16x24 on 24” roll paper:User Defined Paper SizePaper Size Name24x16Fix Aspect Ratio Not SpecifyPaper Width24.00Paper Height16.1 (this is 16 + 0.1”)Unit inchExpansionAuto Expand selectedAmount of Enlargement Standard (applies ~1.5% overspill on a 16x24)Configure the custom size and save it. Standard Auto Expansion provides adequate overspill.Set up KCPS to deliver a 16x24 image to the driver with this configuration and it will scale the image up about 1.5% to ensure there are no slivers of white along the edges of the roll and provide about 0.05“ at top and bottom so that the trim process will not leave any white slivers. This is similar to how minilabs ensure that the full print area is covered by the image.To set up other size prints, make the paper width exactly the desired size and the height 0.1” larger than the size desired. If 0.1” does not give enough tolerance for the trimming process, this can be increased to as much as 0.25” by adding more to the height of the print. The Epson print driver applies a sliding scale to the overspill percentage based on the size of the image. If the image width is less than the roll width the driver will place the image to one side of the roll and print the overspill on the opposite side to allow for the trim on that side.Setting Auto Expand to Retain Size turns the overspill feature off. This is useful when printing a grid of smaller images or a print with graphic elements near the edges of the image. Without the scaling each image within a grid will be the exact size intended and will not be cropped at the edges of the print.Setting the Amount of Expansion to Min will decrease the amount of scaling applied. A couple of sample 8x10’s showed 3% scaling on the Standard setting and 1.5% scaling on the Min setting.Auto ExpandThe Auto Expand feature is intended to cover any white slivers on the edges of the print by applying an overspill. Select Retain Size to turn this feature off. When printing on a roll of paper Auto Expand will fill in any sliver of white between the edge of the print and the edge of the roll and this cannot be achieved without the use of this feature. However, Auto Expand may not do exactly what you would expect. Consider a 16x24 poster printed on a 24” roll of paper; if this is printed using Retain Size there will probably be a sliver of white along one side or the other of the roll. Print it again with Auto Expand set to the Standard amount of enlargement and the Epson software will first scale the image up by 1.5% then crop the short dimension to exactly 16” and then print. The overspill in the long dimension will cover the white sliver but there will be no extra image in the short dimension to make trimming the image easier. This overspill in the short dimension can be added by changing the user defined paper size height by an amount up to 1.5% of the height or 0.24” on the 16x24 example. (Note: adding this amount to the Page Height will not trigger the Epson software to scale the image to fill a 16.24x24 before adding the 1.5% for overspill.) Adding less to the height has no effect other than to decrease the amount of overspill printed. Knowing that the Epson driver applies different percentages of overspill to different size prints lends understanding to Epson’s recommendation to add 0.1” to the height of any print size.When making prints that do not use the full width of the roll, the Epson software prints the image to one side of the roll (presumably to eliminate a cut when trimming the print). Without the use of Auto Expand there may be a sliver of white between the edge of the print and the edge of the paper. Turn Auto Expand on and the sliver will be taken care of plus the overspill is printed on the opposite side of the print.The white dashed lines represent the overspill. The height of the image is 16” without the overspill.Epson recommends printing the image 0.1” higher than the finished size but up to 0.24” can be used.The size of the finishedprint is 16”x20” after the overspill has been trimmed.Click the Page Layout tab.Choose Landscape.Leave all other settings at their defaults.Queue NameSet up a Queue for this printer and give it a matching name like “Epson 16x20”. Paper WidthUse the maximum paper width of 24 inches.ICC ProfileSelect the appropriate color space for your workflow.。
佳能维修必备技术手册
8声
小车马达错
闪烁 12 次
8声
进纸马达错
闪烁 13 次
8声
多方面硬件错
闪烁 14 次
8声
10、EEPROM 重置:1、先按住 RESUME 键,再按 POWER 键开机。
2、POWER 灯在闪时,双击 RESUME 键。
3、POWER 灯不闪时,按 RESUME 键选择相应的次数。
(二次为重新维修数据,三次为重新设置废墨仓.)
A3
1440*720
BCI-30eBK 1130*2 页/墨盒、160 个喷嘴 BCI-31e (BCI-3eC/3eM/3eY)分别为(1650/630/480/370*3) 页每个墨水盒、BCI-32ephoto 跟 BCI-31e 一样,(每种颜色 48 个喷嘴) 双墨盒系统:(BCI-30e+BC-31e、BCI-31e+BC-32ePHOTO)
废墨警告错
亮
响6声
BJ 墨盒过热错
亮
响7声
(用户不可排除故障)
打印位置校正错
闪烁 2 次
8声
原始位置错
闪烁 3 次
8声
清洁错
闪烁 4 次
8声
送纸器错
闪烁 5 次ຫໍສະໝຸດ 8声打印机温度错闪烁 6 次
8声
废墨满错
闪烁 7 次
8声
EEPROM 错
闪烁 9 次
8声
ROM 错
闪烁 10 次
8声
RAM 错
闪烁 11 次
CANON BJC-6500
1、最大幅面: 2、分辩率: 3、所用墨水盒:
页每个墨水盒、
4、打印速度:
5、操作系统: 6、打印缓存:
EPSON 打印机维修手册
另一种造成字车异常的情况是字车电机缺相,判断方法是用手拖动字车,感觉比正常情况
过轻或过重都不正常。
再一种是HP 传感器造成的字车异常,只需更换传感器即可解决问题。
打印头故障维修
断针是打印头比较常见的故障,其原因主要有:
1、 打印强度大,打印量大,自然是造成断针的主要原因;
字体+切纸+电源
LQ-2600K
字体 + 切纸 + 电源
DLQ-1000K:
Line Feed + Form Feed + Micro Adjust↓ + 电源
DLQ-3000K:
清EEPROM:Selec Type + Paper Select + Pause + 电源
DLQ-3500K:
LF/FF + Load/Eject + Pause + 电源
喷墨
COLOR
切换 + 字体 + 进/退纸 + 暂停+电源
COLOR II
切换+暂停+进纸+彩清洗+电源
COLOR 300
进纸+清洗+电源, 再按清洗10 秒
COLOR 400/440/460
EPSON 打印机维修手册
EPL-1220:
1、计算机中选择打印机“属性”中的“可选设定值”项;
2、同时按住键盘的ALT+CTRL+SHIFT+“W”键,然后用点击鼠标左键,参考下图;
屏幕出现是否进行EEPROM 初始的对话框,选择“YES“,操作完成。
EPL-1610K
打印机维修手册:StylusPhoto_1400_1410_1430W_1500W_Artisan 1430

WARNING
Signals a precaution which, if ignored, could result in damage to equipment.
The precautionary measures itemized below should always be observed when performing repair/maintenance procedures.
2. MAKE CERTAIN THAT THE SOURCE VOLTAGE IS THE SAME AS THE RATED VOLTAGE, LISTED ON THE SERIAL NUMBER/RATING PLATE. IF THE EPSON PRODUCT HAS A PRIMARY AC RATING DIFFERENT FROM AVAILABLE POWER SOURCE, DO NOT CONNECT IT TO THE POWER SOURCE.
4. WHEN DISASSEMBLING OR ASSEMBLING A PRODUCT, MAKE SURE TO WEAR GLOVES TO AVOID INJURIES FROM METAL PARTS WITH SHARP EDGES.
EPSON 打印机维修手册
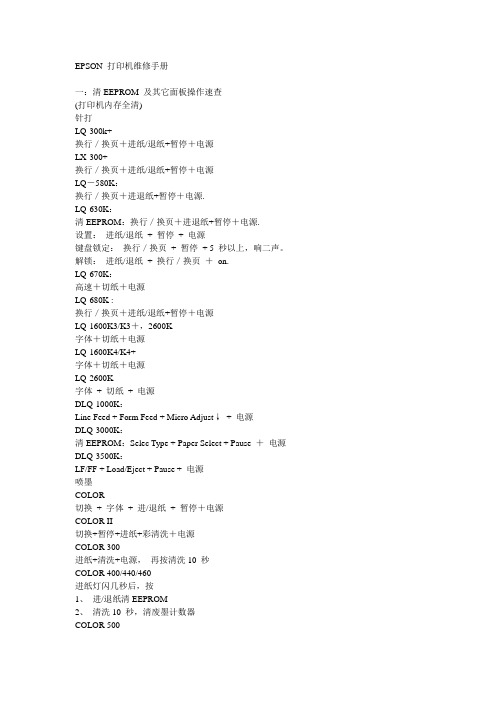
EPSON 打印机维修手册一:清EEPROM 及其它面板操作速查(打印机内存全清)针打LQ-300k+换行/换页+进纸/退纸+暂停+电源LX-300+换行/换页+进纸/退纸+暂停+电源LQ-580K:换行/换页+进退纸+暂停+电源.LQ-630K:清EEPROM:换行/换页+进退纸+暂停+电源.设置:进纸/退纸+ 暂停+ 电源键盘锁定:换行/换页+ 暂停+ 5 秒以上,响二声。
解锁:进纸/退纸+ 换行/换页+on.LQ-670K:高速+切纸+电源LQ-680K :换行/换页+进纸/退纸+暂停+电源LQ-1600K3/K3+,2600K字体+切纸+电源LQ-1600K4/K4+字体+切纸+电源LQ-2600K字体+ 切纸+ 电源DLQ-1000K:Line Feed + Form Feed + Micro Adjust↓+ 电源DLQ-3000K:清EEPROM:Selec Type + Paper Select + Pause +电源DLQ-3500K:LF/FF + Load/Eject + Pause + 电源喷墨COLOR切换+ 字体+ 进/退纸+ 暂停+电源COLOR II切换+暂停+进纸+彩清洗+电源COLOR 300进纸+清洗+电源,再按清洗10 秒COLOR 400/440/460进纸灯闪几秒后,按1、进/退纸清EEPROM2、清洗10 秒,清废墨计数器COLOR 500进纸+ 黑头清洗+ 彩头清洗+ on ,再按进纸键3 秒COLOR 600/640/66O/670进纸+清洗+电源缺纸灯闪5 秒后,再按1、进/退纸清EEPROM 及timer IC2、清洗10 秒,清废墨计数器COLOR 800/850初始化:进纸+黑头清洗+彩头清洗+ON,松手再按彩头清洗10 秒COLOR 1520K切换+进/退纸+换行/换页+微调↑+ 电源COLOR 3000暂停+ 换行/换页+ 微调↓+ 电源SP870/1270进/退纸+ 清洗+ on 然后按1、/退纸清EEPROM 及timer IC2、清洗10 秒,清废墨计数器SP 950:Paper + Roll paper + on 1. Paper (EEPROM)SP 2100/2200Paper + Roll paper + on 1. Paper (EEPROM)MJ-510进/退纸+ 清洗+ on 松手后再按进/退纸10 秒至进纸灯和缺墨灯闪MJ-850切换+ 暂停+ 电源, 再按进/退纸至省墨灯与暂停灯闪烁再按切换MJ-1000切换+ 省墨/压缩+ 进/退纸+ 暂停+ 电源MJ-1500K/K+切换+微调↓+暂停+换行/换页+ON激光机EPL-5600:Item+1+Continue+On Line+开机EPL-5700:按切换键+操作继续键+联机键+开机EPL-5700L:操作同EPL-1220(参见1220 图示)EPL-5800:按切换键+操作继续键+联机键+开机EPL-5800L:驱动+ 属性→可选设定值Alt + Ctrl + Shift + W + 鼠标左键EPL-5900&EPL-6100:按住Start/Stop + Job Cancel + Information + 电源,直到联机和错误指示灯同时亮.EPL-5900L&EPL-6100L:1、计算机中选择打印机“属性”中的“可选设定值”项;2、时按住键盘的ALT+CTRL+SHIFT+“W”键,然后用鼠标点击屏幕中“可选设定值”项的任意空白区域,参考EPL-1220 图示;3、屏幕出现是否进行EEPROM 初始化的对话框,选择“YES“,操作完成。
- 1、下载文档前请自行甄别文档内容的完整性,平台不提供额外的编辑、内容补充、找答案等附加服务。
- 2、"仅部分预览"的文档,不可在线预览部分如存在完整性等问题,可反馈申请退款(可完整预览的文档不适用该条件!)。
- 3、如文档侵犯您的权益,请联系客服反馈,我们会尽快为您处理(人工客服工作时间:9:00-18:30)。
Color Inkjet Printer
Epson Stylus Photo PX650/TX650/TX659 Epson Stylus Photo PX660 Epson Stylus Photo PX660 Premium Artisan 635
Confidential
3. WHEN PERFORMING TESTING AS DICTATED WITHIN THIS MANUAL, DO NOT CONNECT THE UNIT TO A POWER SOURCE UNTIL INSTRUCTED TO DO SO. WHEN THE POWER SUPPLY CABLE MUST BE CONNECTED, USE EXTREME CAUTION IN WORKING ON POWER SUPPLY AND OTHER ELECTRONIC COMPONENTS.
The contents of this manual are subject to change without notice. All effort have been made to ensure the accuracy of the contents of this manual. However, should any errors be detected, SEIKO EPSON would greatly appreciate being
informed of them. The above not withstanding SEIKO EPSON CORPORATION can assume no responsibility for any errors in this manual or the consequences thereof.
DANGER
Signals a precaution which, if ignored, could result in serious or fatal personal injury. Great caution should be exercised in performing procedures preceded by DANGER Headings.
4. WHEN DISASSEMBLING OR ASSEMBLING A PRODUCT, MAKE SURE TO WEAR GLOVES TO AVOID INJURIER FROM METAL PARTS WITH SHARP EDGES.
WARNING
1. REPAIRS ON EPSON PRODUCT SHOULD BE PERFORMED ONLY BY AN EPSON CERTIFIED REPAIR TECHNICIAN. 2. MAKE CERTAIN THAT THE SOURCE VOLTAGES IS THE SAME AS THE RATED VOLTAGE, LISTED ON THE SERIAL NUMBER/RATING PLATE. IF THE
SEMF09010
Notice:
All rights reserved. No part of this manual may be reproduced, stored in a retrieval system, or transmitted in any form or by any means, electronic, mechanical, photocopying, recording, or otherwise, without the prior written permission of SEIKO EPSON CORPORATION.
Copyright © 2011 SEIKO EPSON CORPORATION. I & I CS QUALITY ASSURANCE DEPARTMENT
Confidential
PRECAUTIONS
Precautionary notations throughout the text are categorized relative to 1) Personal injury and 2) damage to equipment.
DANGER
1. ALWAYS DISCONNECT THE PRODUCT FROM THE POWER SOURCE AND PERIPHERAL DEVICES PERFORMING ANY MAINTENANCE OR REPAIR PROCEDURES.
2. NO WORK SHOULD BE PERFORMED ON THE UNIT BY PERSONS UNFAMILIAR WITH BASIC SAFETY MEASURES AS DICTATED FOR ALL ELECTRONICS TECHNICIANS IN THEIR LINE OF WORK.
EPSON is a registered trademark of SEIKO EPSON CORPORATION.
General Notice:
Other product names used herein are for identification purpose only and may be trademarks or registered trademarks of their respective owners. EPSON disclaims any and all rights in those marks.
WARNING
Signals a precaution which, if ignored, could result in damage to equipment.
The precautionary measures itemized below should always be observed when performing repair/maintenance procedures.
