JUNIPER双机热备配置
Juniper网络安全防火墙配置手册

Juniper网络安全防火墙设备快速安装手册V1.02009-7目录第一章前言 (4)1.1、J UNIPER防火墙配置概述 (4)1.2、J UNIPER防火墙管理配置的基本信息 (4)1.3、J UNIPER防火墙的常用功能 (5)第二章软件操作 (5)2.1、防火墙配置文件的导出和导入 (5)2.1.1、配置文件的导出 (5)2.1.2、配置文件的导入 (6)2.2、防火墙软件(S CREEN OS)更新 (7)2.3、防火墙恢复密码及出厂配置的方法 (8)2.4、防火墙重启 (8)第三章 NS-5000系列(NS5200/NS5400) (9)3.1、NS-5000结构 (9)3.2、硬件组件故障检查 (10)3.3、设备组件更换 (11)第四章 JUNIPER防火墙部署模式及基本配置 (11)4.1、NAT模式 (11)4.2、R OUTE路由模式 (12)4.3、透明模式 (13)4.4、NAT/R OUTE模式下的基本配置 (14)4.4.1、NS-5200/5400 NAT/Route模式下的基本配置 (14)4.5、透明模式下的基本配置 (16)第五章 JUNIPER防火墙常用功能的配置 (17)5.1、MIP的配置 (17)5.1.1、使用Web浏览器方式配置MIP (18)5.1.2、使用命令行方式配置MIP (19)5.2、VIP的配置 (20)5.2.1、使用Web浏览器方式配置VIP (20)5.2.2、使用命令行方式配置VIP (21)5.3、DIP的配置 (21)5.3.1、使用Web浏览器方式配置DIP (22)5.3.2、使用命令行方式配置DIP (23)5.4、聚合接口(AGGREGATE)的配置 (24)第六章 JUNIPER防火墙双机的配置 (25)6.1、使用W EB浏览器方式配置 (25)6.2、使用命令行方式配置 (27)第七章 JUNIPER防火墙的维护命令 (28)7.1登录J UNIPER防火墙的方式 (28)7.2查看设备相关日志和工作状态 (29)7.3检查设备CPU的占有率 (37)7.3.1 原因分析 (37)7.3.2采取的措施 (37)7.4检查内存占有率 (38)7.4.1 原因分析 (38)7.4.2 采取的措施 (38)7.5双机异常 (38)7.5.1原因分析 (38)7.5.2采取的措施 (39)7.6故障处理工具 (39)7.6.1 Debug (40)7.6.2 Snoop (40)第八章JUNIPER防火墙的配置优化 (41)8.1ALG优化 (41)8.2防火墙数据包处理性能优化 (41)8.3日志优化 (41)8.4关闭双机会话同步 (42)第九章移动W AP网关配置案例 (42)附录、JUNIPER防火墙的一些概念 (51)第一章前言我们制作本安装手册的目的是使维护Juniper网络安全防火墙设备(在本安装手册中简称为“Juniper防火墙”)的NSN公司相关技术人员,可以通过此安装手册完成对Juniper防火墙基本功能的实现、应用和排错。
JuniperSRX高端防火墙简明配置手册

Juniper SRX防火墙简明配置手册目录一、 JUNOS 操作系统介绍 (3)1.1层次化配置结构 (3)1.2 JunOS 配置管理 (4)1.3 SRX 主要配置内容 (4)二、 SRX 防火墙配置说明 (5)2.1初始安装 (5)2.1.1登陆 (5)2.1.2设置 root 用户口令 (9)2.1.3JSRP 初始化配置 (9)2.1.4设置远程登陆管理用户 (14)2.1.5远程管理 SRX相关配置 (15)2.1.6ZONE 及相关接口的配置 (15)2.2 Policy (16)2.3 NAT (17)2.3.1Interface based NAT (18)2.3.2Pool based Source NAT (18)2.3.3Pool base destination NAT (19)2.3.4Pool base Static NAT (20)2.4 IPSEC VPN (21)2.5 Application and ALG (22)三、 SRX 防火墙常规操作与维护 (22)3.1单机设备关机 (22)3.2单机设备重启 (23)3.3单机操作系统升级 (23)3.4双机模式下主备 SRX 关机 (23)3.5双机模式下主备设备重启 (24)3.6双机模式下操作系统升级 (24)3.7双机转发平面主备切换及切换后恢复 (25)3.8双机控制平面主备切换及切换后恢复 (25)3.9双机模式下更换备SRX (25)3.10双机模式下更换主SRX (26)3.11双机模式更换电源 (27)3.12双机模式更换故障板卡 (27)3.13配置备份及还原方法 (27)3.14密码修改方法 (28)3.15磁盘文件清理方法 (28)3.16密码恢复 (28)3.17常用监控维护命令 (29)四、 SRX 防火墙介绍 (31)Juniper SRX防火墙简明配置手册SRX系列防火墙是 Juniper 公司基于 JUNOS操作系统的安全系列产品,JUNOS集成了路由、交换、安全性和一系列丰富的网络服务。
Juniper--Juniper的基本配置
set interfaces se-0/0/3 unit 0 family inet address 10.0.16.1/24
set interfaces lo0 unit 0 family inet address 192.168.13.1/32
Wrote 433 lines of configuration to 'configuration-march02'
#察看保存过的文件用run file list命令
aviva@router1# run file list
/var/home/aviva:
.ssh/
configuration-march02
#配置fxp0 unit 0的接口地址,fxp0代表管理接口,unit 0代表子接口,inet代表是ipv4地址。
root@# set system backup-router 192.168.15.2
#backup-router是本路由器的直连路由器,在路由器启动的时候,
#JUNOS路由软件(routing protocol process, RPD)没有立即启动,
}
file interactive-commands {
interactive-commands any;
}
}
}
interfaces {
fxp0 {
unit 0 {
family inet {
address 10.1.1.1/24;
}
}
}
}
下面一种是interface视图,不同视图下,用show命令show出来的结果是不一样的。
juniper防火墙双机配置案例

概述juniper防火墙的双机具有高冗余性和安全性,便于管理,分为三种组网模式:layer3的A/P组网模式layer3的full-mesh的A/P组网模式layer3的full-mesh的A/A组网模式其中layer3A/P模式对环境要求最低,是业界广为流行的配置。
但是,其利用率不高,同一时间只有一台防火墙处理网络流量,一侧链路和设备出现故障时提供冗余切换。
配置要求硬件和软件版本相同,接口编号相同,放入HA的接口要统一。
配置时只需清空备的那一台,然后将HA、manger ip 、MGT端口ip,及个性化配置即可。
两台防火墙用e4口连接。
配置主防火墙unset interface e4 ip//清空e4口的ip地址set interface e4 zone ha//将e4口和HA区域绑定//-----配置NSRP----set nsrp cluster id 1//设置cluster组号set nsrp vsd id 0//设置虚拟安全数据库的组号0set nsrp vsd-group id 0 priority 50//设置nsrp主设备的优先级(优先级数值越大,优先级越小)set nsrp rto syn//设置配置同步set nsrp vsd-group id 0 monitor interface ethernet3set nsrp vsd-group id 0 monitor interface ethernet1//设置防火墙监控的端口//只有当备份防火墙配置之后,主设备上才能检测到备防火墙的状态(get nsrp)set nsrp vsd-group hb-interval 200//设置心跳信息每隔200秒发送问候信息set nsrp vsd-group hb-threshold 3//设置心跳信息总共发出3次问候信息save//保存配置备防火墙unset all//恢复出厂设置set interface e4 zone ha//将e4和ha区域绑定set nsrp cluster id 1//设置cluster组号set nsrp vsd id 0//设置vsd组号set nsrp vsd-group id 0 priority 100//设置nsrp主设备的优先级(优先级数值越大,优先级越小)set nsrp rto syn//设置配置同步set nsrp vsd-group id 0 monitor interface ethernet3set nsrp vsd-group id 0 monitor interface ethernet1//设置防火墙监控的端口set nsrp vsd-group hb-interval 200//设置心跳信息每隔200秒发送问候信息set nsrp vsd-group hb-threshold 3//设置心跳信息总共发出3次问候信息save //保存同步配置在备机上操作exec nsrp sync global-config check-sum//将两台设备的配置进行校检,如有不同,备份的设备将会在重启后把主设备上的配置导入备份主机中exec nsrp sync global-config save//如有不同,备份的设备将会在重启后把主设备上的配置导入备份主机中。
Juniper常用配置
Juniper常用配置Juniper 常用配置一、基本操作1、登录设备系统初始化用户名是roo t,密码是空。
在用户模式下输入configure或者是edit可以进入配置模式。
2、设置用户名:set host-name EX4200。
3、配置模式下运行用户模式命令,则需要在命令前面加一个run,如:run show interface 。
4、在show 后面使用管道符号加上display set将其转换成set 格式命令show protocols ospf | display set 。
5、在需要让配置生效需要使用commit命令,在commit之前使用commit check来对配置进行语法检查。
如果提交之后,可以使用rollback进行回滚,rollback 1回滚上一次提前之前的配置,rollback 2则是回滚上 2 次提交之前的配置。
6、交换机重启:request system reboot7、交换机关机:request system halt二、交换机基本操作2.1 设置root密码交换机初始化用户名是root 是没有密码的,在进行commit 之前必须修改root 密码。
明文修改方式只是输入的时候是明文,在交换机中还是以密文的方式存放的。
实例:明文修改方式:lab@EX4200-1# top[edit]lab@EX4200-1# edit system[edit system]lab@EX4200-1# set root-authentication plain-text-password2.2 设置删除主机名实例:#"设置主机名为EX4200"lab@EX4200-1# edit system[edit system]lab@EX4200-1# set host-name EX4200#”删除命令”#lab@EX4200-1# edit system[edit system]lab@EX4200-1# delete host-name EX42002.3 开启Telnet登陆服务说明:在默认缺省配置下,EX 交换机只是开放了http 远程登陆方式,因此如果想通过telnet登陆到交换机上,必须在系统中打开telnet 服务。
防火墙双机热备配置及组网指导
防火墙双机热备配置及组网指导防火墙双机热备,主要是提供冗余备份的功能,在网络发生故障的时候避免业务出现中断。
防火墙双机热备组网根据防火墙的模式,分路由模式下的双机热备组网和透明模式下的双机热备组网,下面分别根据防火墙的不同模式下的组网提供组网说明及典型配置。
1 1:防火墙双机热备命令行说明防火墙的双机热备的配置主要涉及到HRP的配置,VGMP的配置,以及VRRP的配置,防火墙的双机热备组网配置需要根据现网的业务和用户的需求来进行调整,下面就防火墙的双机热备配置涉及到的命令行做一个解释说明。
1.1 1.1 HRP命令行配置说明HRP是华为的冗余备份协议, Eudemon 防火墙使用此协议进行备份组网,达到链路状态备份的目的,从而保证在设备发生故障的时候业务正常。
HRP协议是华为自己开发的协议,主要是在VGMP协议的基础上进行扩展得到的;VGMP是华为的私有协议,主要是用来管理VRRP的,VGMP也是华为的私有协议,是在VRRP的基础上进行扩展得到的。
不管是VGMP的报文,还是HRP的报文,都是VRRP的报文,只是防火墙在识别这些报文的时候能根据自己定义的字段能判断出是VGMP的报文,HRP的报文,或者是普通的VRRP的报文.在Eudemon防火墙上,hrp的作用主要是备份防火墙的会话表,备份防火墙的servermap表,备份防火墙的黑名单,备份防火墙的配置,以及备份ASPF模块中的公私网地址映射表和上层会话表等.两台防火墙正确配置VRRP,VGMP,以及HRP之后,将会形成主备关系,这个时候防火墙的命令行上会自动显示防火墙状态是主还是备,如果命令行上有HRP_M的标识,表示此防火墙和另外一台防火墙进行协商之后抢占为主防火墙,如果命令行上有HRP_S的标识,表示此防火墙和另外一台防火墙进行协商之后抢占为备防火墙。
防火墙的主备状态只能在两台防火墙之间进行协商,并且协商状态稳定之后一定是一台为主状态另外一台为备状态,不可能出现两台都为主状态或者都是备状态的。
天融信防火墙双机热备配置说明
天融信防火墙双机热备配置说明一、防火墙的接口设置:ifconfig 'eth0' 10.1.3.4 255.255.255.0 内网接口//接内网交换机ifconfig 'eth4' 211.141.203.74 255.255.255.0 外网接口口//上接F5ifconfig 'eth5' 211.141.203.76 255.255.255.240 服务器区//接服务器区交换机ifconfig 'eth6' 192.168.1.250 255.255.255.0 防火墙同步接口//主备防火墙间同步接口互连二、按需配置好主防火墙三、配置双击热备过程:1、配置主防火墙的双机设置,并使之处于工作状态:system -n 'work' //给主防火墙取名为worksystem -i 0 //配置主防火墙的设备号为0system -h backup working 3 //配置主防火墙为双机热备方式并处于工作状态system ssp on //在主防火墙上打开状态同步协议2、在从防火墙上清空所有配置:restore config //恢复防火墙出厂默认值ifconfig eth6 off //清空防火墙所有接口地址(默认出厂只有eth6有地址)3、配置从防火墙的双机设置,并使之处于备用状态:system -n 'standby' //给从防火墙取名为standbysystem -i 1 //配置从防火墙的设备号为1system -h backup standby 3 //配置从防火墙为双机热备方式并处于备用状态system ssp on //在从防火墙上打开状态同步协议4、把主防火墙和从防火墙的所有接口按照要求接到相应的设备5、在主防火墙执行同步命令,将主防火墙的所有配置同步到从防火墙上:writep //同步命令。
Juniper防火墙简单配置说明
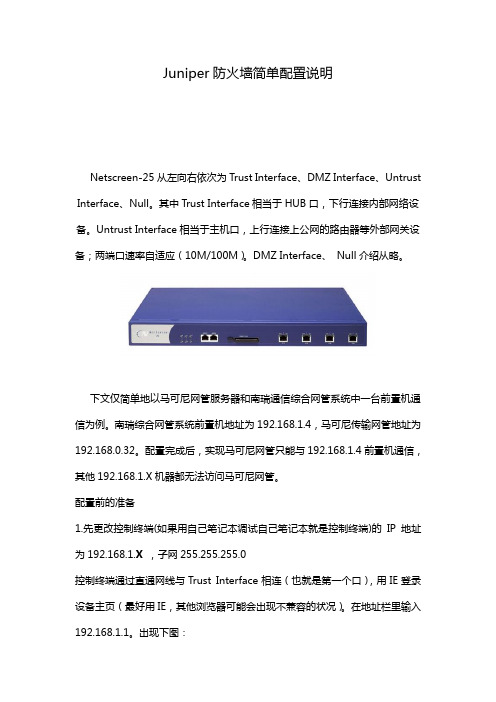
Juniper防火墙简单配置说明Netscreen-25从左向右依次为Trust Interface、DMZ Interface、Untrust Interface、Null。
其中Trust Interface相当于HUB口,下行连接内部网络设备。
Untrust Interface相当于主机口,上行连接上公网的路由器等外部网关设备;两端口速率自适应(10M/100M)。
DMZ Interface、 Null介绍从略。
下文仅简单地以马可尼网管服务器和南瑞通信综合网管系统中一台前置机通信为例。
南瑞综合网管系统前置机地址为192.168.1.4,马可尼传输网管地址为192.168.0.32。
配置完成后,实现马可尼网管只能与192.168.1.4前置机通信,其他192.168.1.X机器都无法访问马可尼网管。
配置前的准备1.先更改控制终端(如果用自己笔记本调试自己笔记本就是控制终端)的IP地址为192.168.1.X,子网255.255.255.0控制终端通过直通网线与Trust Interface相连(也就是第一个口),用IE登录设备主页(最好用IE,其他浏览器可能会出现不兼容的状况)。
在地址栏里输入192.168.1.1。
出现下图:跳跃过初始化防火墙步骤. 选择第三行,点击next.输入缺省登陆帐号: netscreen 密码:netscreen登陆后出现主页面展开左边资源树,单击Interface后,出现下图界面。
首先配置ethernet1口(即第一个口)的IP和子网掩码。
单击上图ethernet1行中的Edit,出现下图:Netscreen-25防火墙默认第一个口为Trust区,即信任区。
选择Static IP输入ethernet1端口的配置地址192.168.1.243/24后点击Apply 后单击OK。
如果不点击OK,设备重启配置则无效。
用同样方法配置第三个口Untrust区,即非信任区。
设置IP为192.168.0.243/24设置完成后点击OK,保存设置。
Juniper防火墙灾备切换解决方案

Juniper防火墙灾备切换解决方案目录现状描述............................................................................................................错误!未定义书签。
灾备切换方案....................................................................................................错误!未定义书签。
总结 ...................................................................................................................错误!未定义书签。
现状描述IDC现有Juniper SSG550防火墙两台做NSRP双机热备, IDC主要提供DMZ服务器应用访问。
为了使应用能够得到冗余保障,灾备中心拥有一套相同的系统。
为了顺利的切换应用,需要事先准备应急切换方案。
灾备切换方案方案描述1).相同的配置,当部分应用挂掉时,通过修改路由(需要通过策略路由控制)和MIP策略的方式切换。
修改的MIP策略需要事先加好并disable。
2).当整个Internet挂掉后,通过运营商BGP选路切换,需要部分应用通过修改路由(需要通过策略路由控制)和MIP策略的方式切换;修改的MIP策略需要事先加好并disable。
3).MIP策略需要修改目标Zone和添加DIP,同一条策略需要同时设置MIP和DIP。
4).该方案中配置可以互导,定期的手工导出防火墙配置来进行两边配置的同步工作。
路由设置由于INSIDE区域之间有一条专线,所以,当故障发生时,可以将原本通过MPSL走的路由切换至INSIDE。
由于SSG防火墙默认会根据MPSL接口的IP生成一条接口路由,接口路由的优先级高于静态路由,所以,需要事先添加策略路由指向INSIDE,在不需要切换的时候不启用该路由。
Juniper 防火墙HA配置详解_双主(L3 路由器模式)

Juniper HA 双主(L3)模式配置实际环境中防火墙做双主是不太可能实现全互联结构,juniper防火墙标配都是4个物理以太网端口,全互联架构需要防火墙增加额外的以太网接口(这样会增加用户成本),或者在物理接口上使用子接口(这样配置的复杂性增加许多),最主要的是用户的网络中大多没有像全互联模式那样多的设备。
因此双主多数实现在相对冗余的网络环境中。
具体实际环境如下:FW-A FW-B核心-1核心-2E1/1E1/2E1/2E1/1E1/4E1/4HATRUNKZone:Untrust Zone:UntrustZone:trustE1/3E1/3Zone:trust服务器交换机服务器服务器172.16.40.254172.17.2.3172.17.2.1172.17.2.2172.17.1.251172.17.1.252172.17.1.253172.17.1.254防火墙A上执行的命令set hostname ISG1000-Aset interface mgt ip 172.16.12.1/24set interface "ethernet1/4" zone "HA"set interface "loopback.1" zone "Trust"set interface loopback.1 ip 172.255.255.251/32set interface loopback.1 routeset router-id 172.255.255.251 \必须web页面设置set nsrp cluster id 1set nsrp rto-mirror syncset nsrp rto-mirror session ageout-ackunset nsrp vsd-group id 0set nsrp vsd-group id 1 priority 1set nsrp vsd-group id 1 preemptset nsrp vsd-group id 1 preempt hold-down 10set nsrp vsd-group id 2 priority 255set nsrp vsd-group id 2 preempt hold-down 10set source-routing enable \可选设置,命令无法执行时,在web页面设置set sibr-routing enable \可选设置,命令无法执行时,在web页面设置set adv-inact-interface \可选设置,命令无法执行时,在web页面设置•••••••••••••••••••••••••••••••••••••••••••••••••••防火墙B上执行的命令set hostname ISG1000-Bset interface mgt ip 172.16.12.2/24set interface "ethernet1/4" zone "HA"set interface "loopback.1" zone "Trust"set interface loopback.1 ip 172.255.255.252/32set interface loopback.1 routeset router-id 172.255.255.252 \命令无法执行时,在web页面设置set nsrp cluster id 1set nsrp rto-mirror syncset nsrp rto-mirror session ageout-ackset nsrp rto-mirror session non-vsiunset nsrp vsd-group id 0set nsrp vsd-group id 1 priority 255set nsrp vsd-group id 1 preempt hold-down 10set nsrp vsd-group id 2 priority 1set nsrp vsd-group id 2 preemptset nsrp vsd-group id 2 preempt hold-down 10set nsrp secondary-path ethernet1/2set nsrp vsd-group id 1 monitor zone Trustset nsrp vsd-group id 2 monitor zone Trustset nsrp ha-link probeset source-routing enable \可选设置,命令无法执行时,在web页面设置set sibr-routing enable \可选设置,命令无法执行时,在web页面设置set adv-inact-interface \可选设置,命令无法执行时,在web页面设置任意一个防火墙上执行的命令即可set interface id 64 "redundant1" zone "Untrust"set interface "ethernet1/3" zone "Trust"set interface ethernet1/2 group redundant1set interface ethernet1/1 group redundant1set interface ethernet1/3:1 ip 172.17.2.1/24set interface ethernet1/3:1 routeset interface ethernet1/3:2 ip 172.17.2.2/24set interface ethernet1/3:2 routeset interface redundant1:1 ip 172.17.1.251/28set interface redundant1:1 routeset interface redundant1:2 ip 172.17.1.252/28set interface redundant1:2 routeset interface ethernet1/3:1 ip manageableset interface ethernet1/3:2 ip manageableset interface loopback.1 ip manageableset interface redundant1:1 ip manageableset interface redundant1:2 ip manageableset policy id 1 name "trunt-to-untrust" from "Trust" to "Untrust" "Any" "Any" "ANY" permit set policy id 2 name "untrust-to-trust" from "Untrust" to "Trust" "Any" "Any" "ANY" permitset protocol ospf \命令无法执行时,在web页面设置set enable \命令无法执行时,在web页面设置set area 0.0.0.0 range 172.17.1.240 255.255.255.240 advertiseset area 0.0.0.0 range 172.17.2.0 255.255.255.0 advertiseset interface ethernet1/3:1 protocol ospf area 0.0.0.0set interface ethernet1/3:1 protocol ospf enableset interface ethernet1/3:1 protocol ospf priority 0set interface ethernet1/3:1 protocol ospf cost 1set interface ethernet1/3:2 protocol ospf area 0.0.0.0set interface ethernet1/3:2 protocol ospf enableset interface ethernet1/3:2 protocol ospf priority 0set interface ethernet1/3:2 protocol ospf cost 1set interface redundant1:1 protocol ospf area 0.0.0.0set interface redundant1:1 protocol ospf enableset interface redundant1:1 protocol ospf priority 0set interface redundant1:1 protocol ospf cost 1set interface redundant1:1 manage pingset interface redundant1:1 manage sshset interface redundant1:1 manage telnetset interface redundant1:1 manage webset interface redundant1:2 protocol ospf area 0.0.0.0set interface redundant1:2 protocol ospf enableset interface redundant1:2 protocol ospf priority 0set interface redundant1:2 protocol ospf cost 1set interface redundant1:2 manage pingset interface redundant1:2 manage sshset interface redundant1:2 manage telnetset interface redundant1:2 manage webset admin user "admin" password "用户自定义" privilege "all" \可选项,再建立一个管理员帐号___________________________________________________________最后 A 和 B 都必须执行的命令set interface loopback.1 protocol ospf area 0.0.0.0set interface loopback.1 protocol ospf enableset interface loopback.1 protocol ospf cost 1。
JUNIPER双机热备配置

JUNIPER双机热备配置unset key protection enableset clock timezone 0set vrouter trust-vr sharableset vrouter "untrust-vr"exitset vrouter "trust-vr"unset auto-route-exportexitset alg appleichat enableunset alg appleichat re-assembly enableset alg sctp enableset auth-server "Local" id 0set auth-server "Local" server-name "Local" set auth default auth server "Local"set auth radius accounting port 1646set admin name "netscreen"set admin password "nM9dBJrVGrCEc3RGssLAgHAtesLken" set admin auth web timeout 10set admin auth server "Local"set admin format dosset zone "Trust" vrouter "trust-vr"set zone "Untrust" vrouter "trust-vr"set zone "DMZ" vrouter "trust-vr"set zone "VLAN" vrouter "trust-vr"set zone "Untrust-Tun" vrouter "trust-vr"set zone "Trust" tcp-rstset zone "Untrust" blockunset zone "Untrust" tcp-rstset zone "MGT" blockunset zone "V1-Trust" tcp-rstunset zone "V1-Untrust" tcp-rstset zone "DMZ" tcp-rstunset zone "V1-DMZ" tcp-rstunset zone "VLAN" tcp-rstset zone "Trust" screen icmp-floodset zone "Trust" screen udp-floodset zone "Trust" screen winnukeset zone "Trust" screen port-scanset zone "Trust" screen ip-sweepset zone "Trust" screen tear-dropset zone "Trust" screen syn-floodset zone "Trust" screen ip-spoofingset zone "Trust" screen ping-deathset zone "Trust" screen landset zone "Trust" screen icmp-fragmentset zone "Trust" screen icmp-largeset zone "Trust" screen syn-ack-ack-proxyset zone "Trust" screen icmp-idset zone "Trust" screen tcp-sweepset zone "Trust" screen udp-sweepset zone "Untrust" screen icmp-floodset zone "Untrust" screen udp-floodset zone "Untrust" screen tear-dropset zone "Untrust" screen syn-floodset zone "Untrust" screen ping-deathset zone "Untrust" screen ip-filter-srcset zone "Untrust" screen landset zone "V1-Untrust" screen tear-dropset zone "V1-Untrust" screen syn-floodset zone "V1-Untrust" screen ping-deathset zone "V1-Untrust" screen ip-filter-srcset zone "V1-Untrust" screen landset interface id 80 "redundant1" zone "Untrust" set interface "ethernet0/0" zone "MGT"set interface "ethernet0/1" zone "Trust"set interface "ethernet0/2" zone "Trust"set interface "ethernet0/8" zone "HA"set interface "ethernet0/9" zone "HA"set interface ethernet0/3 group redundant1set interface ethernet0/0 ip 192.168.1.1/24set interface ethernet0/0 natunset interface vlan1 ipset interface ethernet0/1 ip 10.31.0.9/29set interface ethernet0/1 natset interface ethernet0/2 ip 10.31.0.25/29set interface ethernet0/2 natset interface redundant1 ip 10.31.0.4/29set interface redundant1 routeunset interface vlan1 bypass-others-ipsecunset interface vlan1 bypass-non-ipset interface redundant1 manage-ip 10.31.0.5set interface ethernet0/1 ip manageableset interface ethernet0/2 ip manageableset interface redundant1 ip manageableunset interface ethernet0/1 manage sshunset interface ethernet0/1 manage telnetunset interface ethernet0/1 manage snmp unset interface ethernet0/1 manage sslunset interface ethernet0/1 manage webunset interface ethernet0/2 manage sshunset interface ethernet0/2 manage telnetunset interface ethernet0/2 manage snmpunset interface ethernet0/2 manage sslunset interface ethernet0/2 manage webset interface ethernet0/3 manage pingset interface redundant1 manage pingunset flow no-tcp-seq-checkset flow tcp-syn-checkunset flow tcp-syn-bit-checkset flow reverse-route clear-text preferset flow reverse-route tunnel alwaysset pki authority default scep mode "auto"set pki x509 default cert-path partialset nsrp cluster id 1set nsrp cluster name tyhyqhset nsrp rto-mirror syncset nsrp rto-mirror routeset nsrp vsd-group id 0 priority 100set nsrp monitor interface ethernet0/1set nsrp monitor interface ethernet0/2set nsrp monitor interface ethernet0/3set crypto-policyexitset ike respond-bad-spi 1set ike ikev2 ike-sa-soft-lifetime 60unset ike ikeid-enumerationunset ike dos-protectionunset ipsec access-session enableset ipsec access-session maximum 5000set ipsec access-session upper-threshold 0set ipsec access-session lower-threshold 0set ipsec access-session dead-p2-sa-timeout 0unset ipsec access-session log-errorunset ipsec access-session info-exch-connectedunset ipsec access-session use-error-logset vrouter "untrust-vr"exitset vrouter "trust-vr"exitset url protocol websenseexitset policy id 1 from "Trust" to "Untrust" "Any" "Any" "ANY" permit logset policy id 1exitset nsmgmt bulkcli reboot-timeout 60set ssh version v2set config lock timeout 5unset license-key auto-updateset telnet client enableset snmp port listen 161set snmp port trap 162set vrouter "untrust-vr"exitset vrouter "trust-vr"unset add-default-routeset route 0.0.0.0/0 interface redundant1 gateway 10.31.0.1set route 10.31.1.0/24 interface ethernet0/1 gateway 10.31.0.13set route 10.31.2.0/24 interface ethernet0/2 gateway 10.31.0.26set route 10.31.1.0/24 interface ethernet0/2 gateway 10.31.0.26 metric 10set route 10.31.2.0/24 interface ethernet0/1 gateway 10.31.0.13 metric 10exitset vrouter "untrust-vr"exitset vrouter "trust-vr"exit。
juniper双击热备

JUNIPER HA双机热备(NSRP)一、NSRP工作原理NSRP(NetScreen Redundant Protocol)是Juniper公司基于VRRP 协议规范自行开发的设备冗余协议。
防火墙作为企业核心网络中的关键设备,需要为所有进出网络的信息流提供安全保护,为满足客户不间断业务访问需求,要求防火墙设备必须具备高可靠性,能够在设备、链路及互连设备出现故障的情况下,提供网络访问路径无缝切换。
NSRP 冗余协议提供复杂网络环境下的冗余路径保护机制。
NSRP主要功能有:1、在高可用群组成员之间同步配置信息;2、提供活动会话同步功能,以保证发生路径切换情况下不会中断网络连接;3、采用高效的故障切换算法,能够在短短几秒内迅速完成故障检测和状态切换。
NSRP集群两种工作模式:一、Active/Passive模式:通过对一个冗余集群中的两台安全设备进行电缆连接和配置,使其中一台设备作为主用设备,另一台作为备用设备。
主用设备负责处理所有网络信息流,备用设备处于在线备份状态。
主设备将其网络和配置命令及当前会话信息传播到备用设备,备用设备始终保持与主用设备配置信息和会话连接信息的同步,并跟踪主用设备状态,一旦主设备出现故障,备份设备将在极短时间内晋升为主设备并接管信息流处理。
二、Active/Active模式:在NSRP中创建两个虚拟安全设备 (VSD) 组,每个组都具有自己的虚拟安全接口(VSI),通过VSI接口与网络进行通信。
设备A充当VSD组1的主设备和VSD 组2的备份设备。
设备B充当VSD 组2的主设备和VSD组1的备份设备。
Active/Active模式中两台防火墙同时进行信息流的处理并彼此互为备份。
在双主动模式中不存在任何单一故障点。
如下图所示,通过调整防火墙上下行路由/交换设备到网络的路由指向,HostA通过左侧路径访问ServerA,HostB通过右侧路径访问ServerB,网络中任一设备或链路出现故障时,NSRP集群均能够做出正确的路径切换。
Juniper Srx650防火墙透明模式双机配置--原创
Juniper Srx650防火墙透明模式双机配置目录一、网络拓扑图 (2)二、详细配置 (3)1. 前期准备 (3)2. 配置Cluster id和Node id (3)3. 指定Control Port (3)4. 指定Fabric Link Port (4)5. 配置系统参数 (5)6. 配置Redundancy Group (5)7. 每个机箱的个性化配置 (6)8. 配置桥接域和集成路由桥接口 (6)9. 配置Redundant Ethernet Interface (7)10. 配置Interface Monitoring(必须配置,否则RETH接口) (8)11. 配置接口归属安全区域 (9)12. 配置安全访问策略 (9)13. 配置缺省访问路由 (10)14. 生成紧急配置文件(消除面板告警) (10)15. 配置长连接服务 (10)三、JSRP日常维护命令 (14)1. 手工切换JSRP Master,将RG1 原backup 切换成为Master (14)2. 手工恢复JSRP 状态,按优先级重新确定主备关系(高值优先) (14)3. 查看cluster interface (14)4. 查看cluster 状态、节点状态、主备关系 (14)5. 取消cluster 配置 (14)6. 恢复处于disabled状态的node (14)四、密码恢复 (15)五、在线升级JSRP 软件版本(SRX 650/240/210) (16)1.配置FTP server (16)2.通过FTP服务器,下载OS更新文件到本地 (16)3.备份原FLASH文件 (17)4. 确认当前配置和新软件版本兼容 (17)5. 确认哪个是主设备 (17)6. 升级备份设备 (18)7. 将系统切换到升级后的备用系统 (19)8. 检查系统业务是否正常。
(20)9. 确认业务正常后,继续升级另一个node (20)10. 确认HA工作正常 (20)11. 完成后,进行观察设备及业务是否正常 (20)六、注意点 (21)一、网络拓扑图二、详细配置1.前期准备a)开机,连接设备console接口b)CLI into command line,以root用户登录,初始配置root用户密码为空,设置root用户密码c)首先将防火墙版本升级到V11.1以上版本(从V11.1版本SRX Branch系列才支持透明模式)d)升级完毕后,加载工厂缺省配置,删除所有涉及三层配置(DHCP,三层接口),Commit changese)连接SRX650-OA-1的ge-0/0/1接口和SRX650-OA-2的ge-0/0/1接口。
Juniper交换机配置手册
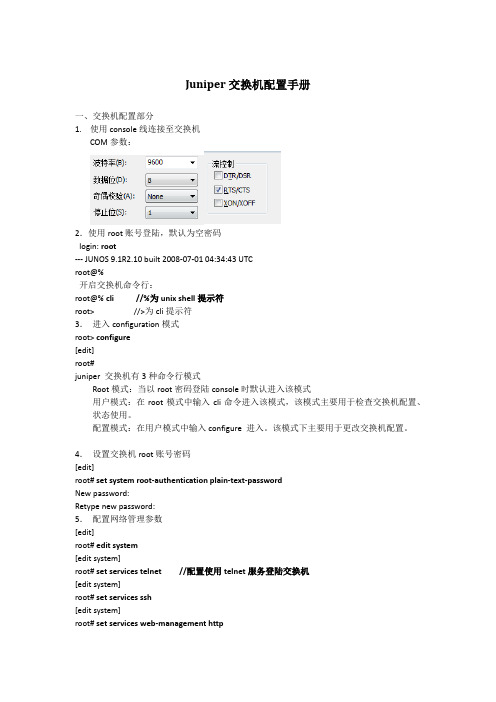
Juniper交换机配置手册一、交换机配置部分1.使用console线连接至交换机COM参数:2.使用root账号登陆,默认为空密码login: root--- JUNOS 9.1R2.10 built 2008-07-01 04:34:43 UTCroot@%开启交换机命令行:root@% cli //%为unix shell提示符root> //>为cli提示符3.进入configuration模式root> configure[edit]root#juniper 交换机有3种命令行模式Root模式:当以root密码登陆console时默认进入该模式用户模式:在root模式中输入cli命令进入该模式,该模式主要用于检查交换机配置、状态使用。
配置模式:在用户模式中输入configure 进入。
该模式下主要用于更改交换机配置。
4.设置交换机root账号密码[edit]root# set system root-authentication plain-text-passwordNew password:Retype new password:5.配置网络管理参数[edit]root# edit system[edit system]root# set services telnet //配置使用telnet服务登陆交换机[edit system]root# set services ssh[edit system]root# set services web-management http[edit system]root# commit and-quitcommit completeExiting configuration moderoot@switch>6.配置其他管理员账号密码,以添加一个admin账号为例[edit]Set system login user admin class super-user authentication plain-text-passwordNew password:Retype new password:7.提交配置文件使配置生效[edit]commit8. 配置VLAN,三层VLAN虚拟地址及VLAN接口以配置valn10 为例,下面为配置命令:[edit]set vlans vlan_10vlan-id10set vlans vlan_10 l3-interface vlan.10set interface vlan unit10family inet address192.192.0.167/24将接口划入到VLAN中set interface ge-0/0/10 unit 0 family ethernet-switching vlan members vlan_10 将接口配置成trunk 方法Set interface ge-0/0/23 unit 0 family ethernet-switching port-mode trunk vlan members all //将ge-0/0/23接口配置成为VLAN,并允许所有VLAN数据通过9. 配置链路捆绑具体命令如下:set chassis aggregated-devices ethernet device-count 5 //配置链路聚合端口数目为5个(ae0-ae4)set interface ae0 aggregated-ether-options lacp active //配置ae0接口链路聚合的模式set interface ae0 unit 0 family ethernet-switching port mode trunk vlan members all //配置ae0 为trunk并允许所有VLAN通过delete interface ge-0/0/4 //删除ge-0/0/4的默认配置delete interface ge-1/0/4set interface ge-0/0/4 ether-options 802.3ad ae0 //将ge-0/0/4接口绑定至ae0 set interface ge-1/0/4 ether-option 802.3ad ae0对端二层交换机配置使用相同方法ae接口后链路捆绑即生效10.配置路由添加一条默认路由至JUNIPER ISG1000set routing-options static route 0.0.0.0/0 next-hop 100.1.1.1;在hillstone防火墙上VPN切换时将分支点网段路由指向hillstone 5020Set routing-options static route 192.150.1.0/24 next-hop 100.1.2.1 //这条路由必须在切换VPN时添加,在切换前添加会造成VPN无法访问。
juniper交换机配置指南(汇编)

juniper交换机配置指南开机后:login: rootLast login: Fri Jan 17 22:21:55 on ttyd0--- JUNOS 7.2R3.3 built 2002-03-23 02:44:36 UTCTerminal type? [vt100] <enter>root@%注意使用root用户登录的情况下,输入帐号/密码以后,默认是进入shell模式的(而只有root用户帐号有这个现象),要输入cli命令进入用户模式:root@% cliroot>配置模式用户模式下输入configure命令进入配置模式,配置模式下可以对设备进行各种参数的配置root> configure[edit]root#设置root用户密码命令:set system root-authentication plain-text-password路由器初始化root用户是没有密码的,在第一次进行配置的时候必须要配置root密码才能commit成功。
密码采用字母+数字方式。
Example:lab@M7i_GZ# set system root-authentication plain-text-password精品文档New password:Retype new password:添加系统用户命令:set system login user juniper uid 2000 <-设置用户名为juniper用户id为2000set system login user juniper class super-user <-设置juniper用户为超级用户set system login user juniper authentication plain-text-password <-设置juniper用户的密码设置主机名命令:set system host-name M7i_GZ <-设置主机名为M7i_GZ开启系统telnet服务命令:set system services telnet说明:系统默认是没有打开telnet功能的,只有打开telnet服务之后才能从网络上登陆到路由器。
juniper主要设备参数

核心交换机
指标项
技术参数
基本要求
电源风扇冗余,支持冗余引擎,冗余交换矩阵
整机槽位数量不少于8个
单槽位支持千兆接口数量不少于40个
单槽位支持万兆接口数量不少于32个
单槽位支持2个100G接口和8个10G接口
单机箱背板交换容量≥3.8Tbps
处理能力
单机箱交换性能≥2100Mpps,提供计算方法,必须是目前满足
物理机箱虚拟化数量≥4,支持远距离机箱虚拟化。
模块化操作系统
为了路由器操作系统的稳定可靠,必须支持模块化操作系统,并且操作系统的各个模块运行在各自的保护内存里;
功能性要求
MAC地址
MAC地址数量≥8000
链路汇聚
链路聚合≥32组,每组≥8端口;支持GE、10GE端口汇聚
ARP
支持ARP条目数≥2000
必须支持丰富的业务模块扩展如:防火墙模块,入侵检测模块,网络流量分析模块,网络应用分析模块、内容交换模块,无线管理模块等。
12
*接口配置要求
13
链路聚合
PAgP和802.3ad、FEC、GEC、UDLD
14
*业务板配置要求
万兆业务板转发条目不少于256K,ACL条目至少为64K,IPV4转发速率不低于60Mpps。
24口交换机≥41Mpps(交换机支持并提供28个端口同时工作)
可靠性要求
链路冗余
支持快速以太网、千兆以太网通道技术,802.3ad端口捆绑标准。
机箱虚拟化之后可提供跨机箱的端口聚合功能。
机箱虚拟化
支持多台物理设备虚拟化成一台逻辑设备进行统一管理、配置、监控,支持虚拟化状态检测,保证物理设备虚拟化之后的稳定性和可靠性。
JuniperSRX防火墙HA双机配置步骤
JuniperSRX防火墙HA双机配置步骤JSRP要求两台设备在软件版本、硬件型号、板卡数量、插槽位置及端口使用方面严格一一对应。
由于SR某是转发与控制层面完全分裂架构,JSRP需要控制层面(配置同步)和数据层面(Seion同步)两个平面的互联,建议控制和数据层面互联链路使用光纤链路直连(部分平台强制要求光纤链路直连)。
整个JSRP配置过程包括如下7个步骤配置Cluterid和Nodeid(对应ScreenOSNSRP的cluterid并需手工指定设备使用节点id)指定ControlPort(指定控制层面使用接口,用于配置同步及心跳)指定FabricLinkPort(指定数据层面使用接口,主要eion等RTO同步)配置RedundancyGroup(类似NSRP的VSDgroup,优先级与抢占等配置)每个机箱的个性化配置(单机无需同步的个性化配置,如主机名、带外管理口IP地址等)配置RedundantEthernetInterface(类似NSRP的Redundant冗余接口)配置InterfaceMonitoring(类似NSRPinterfacemonitor,是RG数据层面切换依据)1.1.配置Cluterid和NodeidSR某在启用JSRP之后,组成Cluter的两台机箱会被抽象成一台逻辑的机箱,cluterid和nodeid将会被存放在EEPROM内,每个机箱内部的各个业务引擎通讯用的TNP地址都需要重新分配,因此设备需要重启生效。
注意,这一步两个node都需要配置。
配置命令:SR某5800Ar某5800a>etchaiclutercluter-id1node0reboot//注1:注意该命令需在operational模式下输入//注2:CluterID取值范围为1–15,当CluterID=0时会unetcluter配置,成为单机SR某5800Br某5800b>etchaiclutercluter-id1node1reboot1.2.指定ControlPort这一步只对SR某5K有效(两个node都需要配置),因为SR某3K的ControlPort是固化的,无需指定。
juniper防火墙简单配置(Juniper firewall simple configuration)
juniper防火墙简单配置(Juniper firewall simple configuration)取消重点保护使设置时钟的时区7设置时钟DST重复启动2 0 3日02:00结束平日1 0 11 02:00vrouter信任虚拟共享设置设置“不信任vrouter VR”出口集vrouter信任VR”设置自动路径导出出口集appleichat使ALG不appleichat重新装配使ALG集ALG SCTP使认证服务器设置“本地”ID 0认证服务器设置“本地”服务器名称“地方”认证服务器设置“本地”ID 1认证服务器设置“本地”服务器名称“地方”设置默认的认证服务器认证的“地方”设置认证RADIUS记帐端口1646设置管理员名称”txbfhq”设置管理员密码”npd4p / ryerllc51dfsub2fgt96d5on”设置管理访问尝试1集失败960管理员访问锁设置管理员认证网络超时0设置管理认证服务器的“本地”设置管理员认证远程根设置管理格式设置区的“信任”vrouter信任VR”设置区的“不信任”的vrouter信任VR”集区dmz vrouter信任VR”集区”vrouter VLAN”“信任VR”设置区的“不信任”的信任vrouter屯“VR”设置区的“信任”的TCP RST不带“不信任”的块不带“不信任”的TCP RST集区”管理”模块不带“V1信任“TCP RST不带“V1不信任”的TCP RST不带“DMZ”TCP RST不带“v1-dmz”TCP RST不带“VLAN”TCP RST设置区的“信任”屏幕IP欺骗基于区不带“不信任”的屏幕的泪滴不带“不信任”的屏幕SYN洪水不带“不信任”的屏幕平死不带“不信任”的屏幕的IP筛选器SRC 不带“不信任”的屏幕的土地设置区的“不信任”的屏幕区基于IP欺骗集区V1不信任”的屏幕的泪滴集区V1不信任”的屏幕SYN洪水集区V1不信任”的屏幕平死集区V1不信任”屏幕的IP筛选器SRC集区V1不信任”屏幕的土地集区dmz屏幕报警不降集区“DMZ”屏幕上的隧道集区dmz屏幕ICMP洪水集区dmz屏幕泛滥集区dmz屏幕WinNuke集区dmz屏幕端口扫描集区dmz屏幕IP扫描集区“DMZ”屏幕的泪滴集区dmz屏幕SYN洪水集区dmz屏幕IP欺骗集区dmz屏平死集区“DMZ”屏幕的IP筛选器SRC 集区“DMZ”屏幕的土地集区“DMZ”屏幕的SYN片段集区dmz屏幕TCP没有国旗集区dmz筛选未知协议集区dmz屏幕IP不坏的选择集区“DMZ”屏幕的IP记录路由集区“DMZ”屏幕选择IP时间戳集区dmz屏幕IP安全选择集区dmz屏幕IP松散的src路径集区dmz屏幕IP严格的src路径集区“DMZ”屏幕选择IP流集区dmz屏幕ICMP片段集区dmz ICMP大屏幕集区dmz屏幕同翅集区dmz屏翅无确认集区dmz屏幕限制会话的源IP集区dmz屏幕SYN ACK ACK代理集区dmz屏幕块碎片集区dmz屏幕限制会话的IP目标集区dmz屏幕组件块拉链集区dmz屏幕组件块罐集区dmz屏幕组件块EXE集区dmz屏幕组件阻止ActiveX集区dmz屏幕ICMP ID集区dmz屏幕TCP扫描集区dmz屏幕UDP扫描集区dmz屏幕IP欺骗下降RPF路由设置界面“Ethernet0 / 0区”“信任”设置界面“Ethernet0 / 1“区”非军事区”设置界面“Ethernet0 / 2区”“不信任”设置界面“Ethernet0 / 3“区”V1空”设置IP 10.0.3.9/24接口Ethernet0 / 0设置NAT接口Ethernet0 / 0设置接口VLAN1的IP设置IP 192.168.2.1/24接口Ethernet0 / 1 设置NAT接口Ethernet0 / 1设置IP 218.89.188.50/24接口Ethernet0 / 2 设置NAT接口Ethernet0 / 2设置接口VLAN1绕过其他IPSec设置接口VLAN1旁路非IP设置接口Ethernet0 / 0 IP管理设置接口Ethernet0 / 1 IP管理设置接口Ethernet0 / 2 IP管理设置接口Ethernet0 / 1管理SSH设置管理Telnet接口Ethernet0 / 1设置管理SNMP接口Ethernet0 / 1设置接口Ethernet0 / 1管理SSL设置接口Ethernet0 / 1管理网络设置接口Ethernet0 / 2管理平设置接口Ethernet0 / 2管理SSH设置管理Telnet接口Ethernet0 / 2设置管理SNMP接口Ethernet0 / 2设置接口Ethernet0 / 2管理SSL设置接口Ethernet0 / 2管理网络设置接口Ethernet0接口IP 8079 / 1 VIP“http”218.89.189.232设置接口Ethernet0接口IP 8080 / 1 VIP“http”218.89.188.50设置接口Ethernet0接口IP 8077 / 1 VIP“http”10.0.3.10设置接口Ethernet0接口IP 8078 / 1 VIP“http”10.0.3.9设置界面“Ethernet0 / 2“218.89.188.50主机子网掩码255.255.255.255 10.0.3.10 MIP VR”信任VR”设置流量没有TCP序列检查设置流SYN校验设置流TCP SYN位检查设置流量反向路径清晰的文本选择设置流量反向路由隧道总是设置默认的权限模式PKI SCEP“自动”设置默认路径部分PKI X509证书设置地址的“信任”“10.0.3.1 / 24“10.0.3.1 255.255.255.0设置地址的“信任”“218.89.189.1 / 24“218.89.189.1 255.255.255.0设置地址“DMZ”“123”192.168.2.3 255.255.255.255设置地址“DMZ”kbx”10.0.3.10 255.255.255.0设置地址“DMZ”oda1”1.2.1.8 255.255.255.255设置地址“DMZ”oda2”1.2.1.8 255.255.255.255设置用户“恒源祥”UID 3设置用户“恒源祥”型奥特湾设置用户“恒源祥”密码“rvx4ldt9nz8bftsee1cajiiyq + nq9j3hyq = =“设置用户“恒源祥”“启用”设置用户“DW”UID 4设置用户“DW”型奥特湾设置用户“DW”密码“jbbrzotvn7ma6ssjcacxvyrw9jnjo3uwmg = =“设置用户“DW”“启用”设置用户的“kbx UID 1设置用户的“kbx”型奥特湾设置用户的“kbx“密码”sbofmfycngvprksk1mcvhzgdovnjbjd5rq = =“设置用户的“kbx”“启用”设置密码策略出口设置IKE响应不良SPI 1集艾克IKEv2 IKE SA软寿命60撤消艾克ikeid枚举撤消艾克DOS保护设置访问会话启用IPSec集IPSec接入会话最大5000集IPSec接入会话上限0集IPSec接入会议门槛降低0集IPSec接入会话dead-p2-sa-timeout 0 设置IPSec接入会话日志错误设置IPSec接入会话信息交换连接设置IPSec接入会话使用错误日志设置“不信任vrouter VR”出口集vrouter信任VR”出口设置URL协议Websense出口将策略ID从“信任”设置为“信任”、“任何”、“任何”、“任何”允许日志。
双机热备配置步骤

双机热备配置步骤设备清单服务器两台IBM X3650 M3 和IBM X3650磁盘矩阵一台IBM DS3200SAS HBA卡8个SAS线缆4条一安装服务器系统为两台服务器安装Microsoft Windows Server 2003 Enterprise 版本操作系统,安装步骤:1 将IBM的引导盘放入光驱中,重启电脑,直到出现选择使用本引导盘的语言界面(注意:此时语言为ServerGuide引导程序语言,与所要安装操作系统无关),选择English。
选择键盘布局以及国家或地区画面,在这里全部选择United States,然后点击NEXT;3. 出现许可协议界面,阅读许可协议内容,点击“I accept”继续即可;中文用户可以在Language选项中选择Chinese 阅读中文协议4. 查看概述以了解ServerGuide 功能,请在使用前仔细查看相关使用说明,点击“NEXT”继续;5. 在这里可以选择您要安装的操作系统,选择Microsoft Windows Server 2003 Enterprise 然后后点击NEXT;6.当出现清除硬盘信息界面时,请根据情况选择选择跳过或者清除,点击NEXT(注:如果有需要保留已有的阵列信息,请选择“Skip this task”,但硬盘上的数据和分区仍然会被清除掉);(此处选择清除硬盘分区及恢复阵列信息到默认状态)7.点击Next 进入ServeRaid阵列控制器配置界面这里建议选择RAID1方式配置,点击Next。
接着可以选择阵列级别.(点击Advanced Settings可进入高级设置)确认配置好阵列后,选择Next8.进入如下界面进行分区和文件系统类型选择,在分区时注意不要小于3G的容量,建议设置20486M:(此时所输入的数值为系统分区的容量,即C盘容量;剩余空间在系统磁盘管理中以未划分状态出现)然后进行格式化。
9. 下面开始设置win2003安装的相关配置:在下面界面上输入用户名,计算机名和序列号,注意Product ID* 要输入WIN2003操作系统光盘的序列号:(注:带*号的为必填项目);10.选择服务器的网络设置;11.选择网卡的设置,可以按系统默认的网卡类型先进行安装,待操作系统安装好后可以进行更改;12. 选择WIN2003系统的license数量;13. 进入操作系统语言和国家设置界面,在时区项选择(GMT+08:00)Beijing, Chongqing, Hong Kong, Urumqi,在主要语言项选择Chinese (PRC);在第二语言项选择“Simplified Chinese”项。
- 1、下载文档前请自行甄别文档内容的完整性,平台不提供额外的编辑、内容补充、找答案等附加服务。
- 2、"仅部分预览"的文档,不可在线预览部分如存在完整性等问题,可反馈申请退款(可完整预览的文档不适用该条件!)。
- 3、如文档侵犯您的权益,请联系客服反馈,我们会尽快为您处理(人工客服工作时间:9:00-18:30)。
JUNIPER双机热备配置unset key protection enableset clock timezone 0set vrouter trust-vr sharableset vrouter "untrust-vr"exitset vrouter "trust-vr"unset auto-route-exportexitset alg appleichat enableunset alg appleichat re-assembly enableset alg sctp enableset auth-server "Local" id 0set auth-server "Local" server-name "Local" set auth default auth server "Local"set auth radius accounting port 1646set admin name "netscreen"set admin password "nM9dBJrVGrCEc3RGssLAgHAtesLken" set admin auth web timeout 10set admin auth server "Local"set admin format dosset zone "Trust" vrouter "trust-vr"set zone "Untrust" vrouter "trust-vr"set zone "DMZ" vrouter "trust-vr"set zone "VLAN" vrouter "trust-vr"set zone "Untrust-Tun" vrouter "trust-vr"set zone "Trust" tcp-rstset zone "Untrust" blockunset zone "Untrust" tcp-rstset zone "MGT" blockunset zone "V1-Trust" tcp-rstunset zone "V1-Untrust" tcp-rstset zone "DMZ" tcp-rstunset zone "V1-DMZ" tcp-rstunset zone "VLAN" tcp-rstset zone "Trust" screen icmp-floodset zone "Trust" screen udp-floodset zone "Trust" screen winnukeset zone "Trust" screen port-scanset zone "Trust" screen ip-sweepset zone "Trust" screen tear-dropset zone "Trust" screen syn-floodset zone "Trust" screen ip-spoofingset zone "Trust" screen ping-deathset zone "Trust" screen landset zone "Trust" screen icmp-fragmentset zone "Trust" screen icmp-largeset zone "Trust" screen syn-ack-ack-proxyset zone "Trust" screen icmp-idset zone "Trust" screen tcp-sweepset zone "Trust" screen udp-sweepset zone "Untrust" screen icmp-floodset zone "Untrust" screen udp-floodset zone "Untrust" screen tear-dropset zone "Untrust" screen syn-floodset zone "Untrust" screen ping-deathset zone "Untrust" screen ip-filter-srcset zone "Untrust" screen landset zone "V1-Untrust" screen tear-dropset zone "V1-Untrust" screen syn-floodset zone "V1-Untrust" screen ping-deathset zone "V1-Untrust" screen ip-filter-srcset zone "V1-Untrust" screen landset interface id 80 "redundant1" zone "Untrust" set interface "ethernet0/0" zone "MGT"set interface "ethernet0/1" zone "Trust"set interface "ethernet0/2" zone "Trust"set interface "ethernet0/8" zone "HA"set interface "ethernet0/9" zone "HA"set interface ethernet0/3 group redundant1set interface ethernet0/0 ip 192.168.1.1/24set interface ethernet0/0 natunset interface vlan1 ipset interface ethernet0/1 ip 10.31.0.9/29set interface ethernet0/1 natset interface ethernet0/2 ip 10.31.0.25/29set interface ethernet0/2 natset interface redundant1 ip 10.31.0.4/29set interface redundant1 routeunset interface vlan1 bypass-others-ipsecunset interface vlan1 bypass-non-ipset interface redundant1 manage-ip 10.31.0.5set interface ethernet0/1 ip manageableset interface ethernet0/2 ip manageableset interface redundant1 ip manageableunset interface ethernet0/1 manage sshunset interface ethernet0/1 manage telnetunset interface ethernet0/1 manage snmp unset interface ethernet0/1 manage sslunset interface ethernet0/1 manage webunset interface ethernet0/2 manage sshunset interface ethernet0/2 manage telnetunset interface ethernet0/2 manage snmpunset interface ethernet0/2 manage sslunset interface ethernet0/2 manage webset interface ethernet0/3 manage pingset interface redundant1 manage pingunset flow no-tcp-seq-checkset flow tcp-syn-checkunset flow tcp-syn-bit-checkset flow reverse-route clear-text preferset flow reverse-route tunnel alwaysset pki authority default scep mode "auto"set pki x509 default cert-path partialset nsrp cluster id 1set nsrp cluster name tyhyqhset nsrp rto-mirror syncset nsrp rto-mirror routeset nsrp vsd-group id 0 priority 100set nsrp monitor interface ethernet0/1set nsrp monitor interface ethernet0/2set nsrp monitor interface ethernet0/3set crypto-policyexitset ike respond-bad-spi 1set ike ikev2 ike-sa-soft-lifetime 60unset ike ikeid-enumerationunset ike dos-protectionunset ipsec access-session enableset ipsec access-session maximum 5000set ipsec access-session upper-threshold 0set ipsec access-session lower-threshold 0set ipsec access-session dead-p2-sa-timeout 0unset ipsec access-session log-errorunset ipsec access-session info-exch-connectedunset ipsec access-session use-error-logset vrouter "untrust-vr"exitset vrouter "trust-vr"exitset url protocol websenseexitset policy id 1 from "Trust" to "Untrust" "Any" "Any" "ANY" permit logset policy id 1exitset nsmgmt bulkcli reboot-timeout 60set ssh version v2set config lock timeout 5unset license-key auto-updateset telnet client enableset snmp port listen 161set snmp port trap 162set vrouter "untrust-vr"exitset vrouter "trust-vr"unset add-default-routeset route 0.0.0.0/0 interface redundant1 gateway 10.31.0.1set route 10.31.1.0/24 interface ethernet0/1 gateway 10.31.0.13set route 10.31.2.0/24 interface ethernet0/2 gateway 10.31.0.26set route 10.31.1.0/24 interface ethernet0/2 gateway 10.31.0.26 metric 10set route 10.31.2.0/24 interface ethernet0/1 gateway 10.31.0.13 metric 10exitset vrouter "untrust-vr"exitset vrouter "trust-vr"exit。
