SOLARIS10 双机系统配置
Solaris 10 操作系统说明书
Enterprises are under tremendous pressure to do more with less, roll out new businessservices faster, fit more servers into the same space, and comply with new regulations, all while their budgets are shrinking and headcount is frozen. Can an operating system really help you address these issues and turn IT into a business advantage? The answer is yes, with the Solaris™ Operating System.The Solaris OS is the strategic platform for today’s demanding enterprise. It’s the only open operating system that has delivered proven results, running everything from mission-critical enterprise databases to high performance Web farms, from large-scale SMP systems to industry-standard x86 systems from HP, IBM, Dell, and Sun.For customers facing challenging business and technical requirements — such as lowering costs, simplifying system administration, and maintaining high service levels — the Solaris 10 OS is the ideal cross-platform choice. Its innovative, built-in features deliver break-through virtualization and utilization, high availability, advanced security, and industry leading performance to meet these stringent requirements — all at a great price.Ten things to know about the Solaris OS1. Great productThe constant demonstrated innovation within the Solaris OS pays off by delivering benefits that can save companies time, hardware costs, power and cooling, while preserving investments in software and training. In short: innovation matters, because it saves you money.2. Great priceSolaris 10 support pricing is 20% to 50% lower than equivalent support from other open OS vendors. No-cost end user licensing lowers barriers to entry, while overall efficiency lowers costs of operation.3. Open sourceThe Solaris OS code base is the foundation of the OpenSolaris™ open source community (visit ). In addition, the Solaris OS includes the leading Web 2.0 open source packages, ready to run and optimized for the over 1,000 x64 and SPARC system platforms supported by Solaris 10.4. Application compatibility — guaranteed The Solaris OS delivers binary compatibility from release to release and source compati-bility between SPARC® and x86 processors; with the Solaris Application Guarantee backing it, it’s something you can count on. And for the ultimate in conversion ease, use Solaris 8 and Solaris 9 Containers on Solaris 10, a “Physical to Virtual”way to quickly and easily run your existing application environ-ments on the latest SPARC systems.5. One Solaris — same features on hundreds of systemsWith a single source code base, the Solaris OS runs on x86 and SPARC and processor-based systems — and delivers the same features on all platforms. You can develop and optimize applications on the Solaris OS for use on over 1000 system models from leading vendors such as Sun, HP, IBM, and Dell.<HighlightsThe Solaris™ Operating Systemmeets and exceeds expectations for:•Virtualization: Optimize resourceutilization to deliver predictableservice levels with SolarisContainers•Networking: Attain near-wirespeedthroughput with the open, program-mable Solaris networking stack•Security: Implement a securefoundation for deploying serviceswith Solaris leading-edge securityfeatures•Availability: Increase uptime withPredictive Self Healing6. Designed to run securely all the timeThe leading-edge security features in the Solaris 10 OS help you reduce the risk of intrusions, secure your applications and data, assign the minimum set of privileges and roles needed by users and applications, and control access to data based on its sensitivity label. Solaris 10 has been inde-pendently evaluated at EAL4+ at three Protection Profiles, one of the highest levels of Common Criteria certifications.7. Designed for observabilitySolaris Dynamic Tracing (DTrace) technology makes it fast and easy to identify perform-ance bottlenecks, especially on production systems. System administrators can use this to troubleshoot even the most difficult problems in minutes instead of days; devel-opers can use it to optimize applications, with significant performance gains possible — real-world use has yielded increases up to 50 times previous performance.8. Designed for virtualizationSolaris 10 has powerful virtualization features built in at no additional charge. With Solaris Containers, you can maintain a one application per virtual server deploy-ment model while consolidating dozens or even hundreds of applications onto one server and OS instance. Share hardware resources while maintaining predictable service levels; increase utilization rates, cut system and licensing costs while gaining the ability to quickly provision and move workloads from system to system. Logical Domains and Xen-based paravirtualization support add even more virtualization flexibility.9.Designed for high availabilityPredictive Self Healing is a key feature in the Solaris 10 OS that helps you increase system and service availability. It automati-cally detects, diagnoses, and isolates system and software faults before they cause downtime. And it spans the full range from diagnosis to recovery on SPARC, AMD Opteron™ and Athlon, and Intel® Xeon®and Core Duo processor-based systems.10.Designed for performanceThe Solaris 10 OS has set over 244 priceperformance records since its release,unleashing even more power from existingapplications. Download the latest Sun™Studio compilers and developer tools tobring even greater performance to yourapplications.For business, industry, and developersThe Solaris 10 OS offers the technology, flexi-bility, and versatility you need to get down tobusiness immediately, whether you’re a smalldeveloper, a large enterprise, or anything inbetween.OpenSolaris participation and OS releaseMore than an open source project, OpenSolarisis also a community, a Web site for collabora-tion — and now provides a supported, leadingedge release every six months. The OpenSolarisrelease is available at , andSolaris source code, downloads, developertools, mailing lists, user groups, and events areall available at . OpenSolaristechnology features a single source base forSPARC and x86 platforms. It includes the keyinnovations delivered in the Solaris 10 OS, aswell as providing access to new technologiesas they’re being developed. The OpenSolarisproject and release provide a low-risk optionfor evaluating emerging OS technologies, plusan excellent opportunity to participate inshaping the direction of the Solaris OS.Development toolsDevelopers need integrated, ready-to-use toolsthat are compatible with all the environmentsin which they must deploy applications. Withthat in mind, Sun includes popular softwaretools from the free and open source world andcomplements them with access to key Sundeveloper technologies like the Sun Studiocompilers and tools and unique Solaris 10utilities such as DTrace.Solaris 10 technologiesWith the Solaris OS, you get compelling newfeatures that your applications can take advan-tage of immediately with few, if any, changes.Binary and source compatibility with previousreleases also helps make it easier to move toSolaris 10 from earlier releases of Solaris.DTraceSystem administrators, integrators, and devel-opers can use the dynamic instrumentation andtracing capabilities in the Solaris OS to see what’sreally going on in the system. Solaris DTracecan be safely used on production systems —without modifying applications. It is a powerfultool that gives a comprehensive view of theentire system, from kernel to application, eventhose running in a Java™ Virtual Machine. Thislevel of insight reduces the time for diagnosingproblems from days and weeks to minutes andhours and ultimately reduces the time to fixthose problems.Solaris ContainersSolaris Containers is an OS-level virtualizationtechnology built into the Solaris 10 OS. Usingflexible, software-defined boundaries to isolatesoftware applications and services, this break-through approach allows multiple privateexecution environments to be created withina single instance of the Solaris OS. Each envi-ronment has its own identity, including adiscrete network stack, separate from theunderlying hardware, so it behaves as if it’srunning on its own system — making consoli-dation simple, safe, and secure.By dynamically controlling application andresource priorities, businesses can define andachieve predictable service levels. Systemadministrators can easily meet changingrequirements by quickly provisioning newSolaris Containers or moving them from systemto system or disk to disk within the same systemas capacity or configuration needs change.Containers can be patched in parallel, increasing speed by up to 300% on systems with multiple containers configured. This also raises the bar on the number of contain-ers that can be realistically run on a system. Containers also offer the ability to emulate other environments, prior Solaris releases, such as Solaris 8 and Solaris 9, as well as support for Linux applications.In addition to Solaris Containers, Sun also offers Logical Domains (LDoms), a hardware partitioning technology that allows multiple instances of the Solaris OS to run on a single Sun CoolThreads™ server.Solaris ZFSThe Solaris ZFS file system is designed from the ground up to deliver a general-purpose file system that spans from the desktop to the datacenter. Anyone who has ever lost important files, run out of space on a partition, spent weekends adding new storage to servers, tried to grow or shrink a file system, or experienced data corruption knows the limitations of tradi-tional file systems and volume managers. Solaris ZFS addresses these challenges efficiently and with minimal manual intervention.Predictive Self HealingPredictive Self Healing is an innovative capability in the Solaris 10 OS that automatically diagnoses, isolates, and helps you recover from many hardware and application faults. As a result, business-critical applications and essential system services can continue uninterrupted in the event of software failures, major hardware component failures, and even software config-uration problems.• Solaris Fault Manager continuously monitorsdata relating to hardware and softwareerrors. It automatically and silently detectsand diagnoses the underlying problem andcan automatically take the faulty componentoffline on SPARC, Intel Xeon, and AMD Opteronprocessor based systems. Easy-to-understanddiagnostic messages link to articles in Sun’sknowledge base to help clearly guide admin-istrators through corrective tasks requiringhuman intervention.• Solaris Service Manager (SMF) creates astandardized control mechanism for applica-tion services by turning them into first-classobjects that administrators can observe andmanage in a uniform way. These servicescan automatically be restarted if they’reaccidentally terminated by an administrator,fail as the result of a software programmingerror, or interrupted by an underlyinghardware problem.PerformanceOptimizing performance and efficiency inSolaris 10 is the result of many factors: under-lying technologies, system configuration andutilization, tools, applications, and systemtuning. An enhanced networking stack mini-mizes latency and offers improved networkperformance for most applications out ofthe box.With DTrace, you can delve deeply into today’scomplex systems when troubleshooting systemicproblems or diagnosing performance bottlenecks— in real time and on the fly. Additional built-in technologies that help deliver increasedapplication performance include:• High-performance networking stack• Filesystem performance• Tools and libraries• Multiple page-size support (MPSS)• Memory placement optimization (MPO)SecuritySecurity is more than a mix of technologies;it’s an ongoing discipline. Sun understandsthis and continues its 20-year commitment toenhancing security in the Solaris OS. SolarisUser and Process Rights Management plusSolaris Containers enable the secure hostingof hundreds of applications and multiplecustomers on the same system. Administratorscan use features such as Secure by Default tominimize and harden the Solaris OS even more.Additionally, Solaris Trusted Extensions providestrue multi-level security for the first time in acommercial-grade OS, running all your existingapplications and supported on over 1,000different system models.• Verify your system’s integrity by employingSolaris Secure Execution and file verificationfeatures• Reduce risk by granting only the privilegesneeded for users and processes• Simplify administration and increase privacyand performance by using the standards-based Solaris Cryptographic Framework• Secure your system using dynamic serviceprofiles, including a built-in, reduced-exposurenetwork services profile• Control access to data based on its sensitivitylevel by using the labeled security technologyin Solaris Trusted ExtensionsNetworkingExponential growth in Web connectivity, services,and applications is generating a critical needfor increased network performance. With theSolaris 10 OS, Sun meets current and futurenetworking challenges by significantly improvingnetwork performance without requiring changesto existing applications. The Solaris 10 OS speedsapplication performance via the Network Layer7 Cache and enhanced TCP/IP and UDP/IPperformance. The latest networking techno-logies, such as 10-Gigabit Ethernet and hardwareoff-loading, are all supported out of the box.Additionally, the Solaris 10 OS supports current IPv6 specifications, high availability, streaming, and Voice over IP (VoIP) networking through extended routing and protocol support —meeting the carrier-grade needs of a growing customer base.Platform choiceThe Solaris 10 OS is optimized for Sun and third-party systems running 64-bit SPARC, AMD, and Intel processors. This makes it possible to create horizontally and vertically scaled infra-structures and offers the flexibility to easily add compute resources. The OS runs on hardware ranging from laptops and single-board computers to datacenter and grid installations, while serving applications ranging from military command-and-control systems to telecommunications switch gear and stock trading.InteroperabilityThe Solaris 10 OS provides interoperability from the desktop to the datacenter across a range of hardware systems, operating platforms, and technologies, making it the ideal platform for today’s heterogeneous compute environments. Not only does it interoperate with both Linux and Microsoft Windows, it also supports popular open source applications and open standards such as Universal Description, Discovery, and Integration (UDDI); Simple Object Access Protocol (SOAP); Web Services Description Language (WSDL); and eXtensible Markup Language (XML).• Source and binary compatibility for Linux applications and interoperability with Microsoft Windows systems• Includes Perl, PHP, and other widely used scripting languages• Includes Apache, Samba, sendmail, IP Filter, BIND, and other popular open source software • Supports Java application development and deployment with the Java Platform, Enterprise Edition (Java EE) and Java Platform, Standard Edition (Java SE)• Includes authentication support for LDAP-based directory servers and Kerberos-based infrastructures© 2009 Sun Microsystems, Inc. All rights reserved. Sun, Sun Microsystems, Solaris, OpenSolaris, Java , and CoolThreads are trademarks or registered trademarks of Sun Microsystems, Inc. or its subsidiaries in the United States and other countries. All SPARC trademarks are used under license and are trademarks or registered trademarks of SPARC International, Inc. in the US and other countries. Products bearing SPARC trademarks are based upon an architecture developed by Sun Microsystems, Inc. AMD, Opteron, the AMD logo, the AMD Opteron logo are trademarks or registered trademarks of Advanced Micro Devices. Intel® Xeon® is a trademark or registered trademark of Intel Corporation or its subsidiaries in the United States and other countries. Information subject to change without notice. SunWIN #420130 Lit. #SWDS12147-4 09/09 Sun Microsystems, Inc.4150 Network Circle, Santa Clara, CA 95054 USA Phone1-650-960-1300 or 1-800-555-9SUN Web 。
SOLARIS10系统配置文件

梯调系统配置文件一、Solaris 10安装说明将Solaris 10操作系统安装光盘(DVD版)放入光驱,在OK提示符下(# halt , 或按stop+A出现),键入boot cdrom。
1、在“Select a Language”窗口下,选择6:Simplified Chinese2、在“欢迎”窗口下,点击“下一步”3、在“网络连接”窗口下,选择“联网的”,点击“下一步”4、在“配置多个网络接口”窗口下,选择ce0、ce1,点击“下一步”5、在“主网络接口”窗口下,选择ce0,点击“下一步”6、在“ce0的DHCP”窗口下,选择“否”,点击“下一步”7、在“ce0的主机名”窗口下,输入主机名,点击“下一步”8、在“ce0的IP地址”窗口下,输入IP地址,点击“下一步”9、在“ce0的网络掩码”窗口下,输入255.255.255.0,点击“下一步”10、在“ce0的IPV6”窗口下,选择“否”,点击“下一步”11、在“ce0的缺省路由”窗口下,选择“无”,点击“下一步”12、在“ce1的DHCP”窗口下,选择“否”,点击“下一步”13、在“ce1的主机名”窗口下,输入主机名,点击“下一步”14、在“ce1的IP地址”窗口下,输入IP地址,点击“下一步”15、在“ce1的网络掩码”窗口下,输入255.255.255.0,点击“下一步”16、在“ce1的IPV6”窗口下,选择“否”,点击“下一步”17、在“ce1的缺省路由”窗口下,选择“无”,点击“下一步”18、在“Kerberos”窗口下,选择“否”,点击“下一步”19、在“名称服务”窗口下,选择“无”,点击“下一步”20、在“时区”窗口下,选择“地区性的洲/国家/地区”, 点击“下一步”21、在“洲与国家”窗口下,点击“亚洲”选择“中国”,点击“下一步”22、在“日期和时间”窗口下,输入正确时间,点击“下一步”23、在“超级用户(root)口令”窗口下,输入超级用户口令点击“下一步”24、在“确认信息”窗口下,选择“确认”25、在“欢迎”窗口下,点击“下一步”26、在“安装选项”窗口下,点击“下一步”27、在“指定媒体”窗口下,选择“CD/DVD”,点击“下一步”28、正在初始化…29、在“许可证”窗口下,选择“接受”,击“下一步”30、在“选择升级安装或初始安装”窗口下,选择“初始安装”,击“下一步”31、在“选择安装类型”窗口下,选择“自定义安装”,点击“下一步”32、在“选择软件语言环境”窗口下,选择“亚洲,中文(zh)”点击“下一步”33、在“选择系统语言环境”窗口下,选择“亚洲,中文(zh)”点击“下一步”34、在“选择附带软件”窗口下,选择“Solaris 10 Extra Value Software 87.3MB”,点击“下一步”35、在“附加产品”窗口下,选择“无”,点击“下一步”36、在“选择Solaris 软件组”窗口下,选择“整个郡组以及OEM”的“缺省包”,点击“下一步”37、在“选择磁盘”窗口下,点击“下一步”38、在“保存数据”窗口下,选择“否”,点击“下一步”39、在“分布文件系统”窗口下,选择“修改”选择“确定”,点击“下一步”31、在“准备安装”窗口下,点击“立即安装”32、重新引导后,出现“Do you need to override the system’s default NFS version 4 domain name (yes/no)?[no]:输入“no”,回车33、输入用户名:root34、输入密码:xxxx35、选择其中一个:选择“公用桌面环境”36、安装完毕二、Sun Fire V240磁盘镜像在安装系统时,到划分硬盘分区那一步时,给硬盘预留一部分的空间,可以是200MB。
Solaris安全配置规范

Solaris操作系统安全配置规范2011年3月第1章概述1.1适用范围适用于中国电信使用SOLARIS操作系统的设备。
本规范明确了安全配置的基本要求,可作为编制设备入网测试、安全验收、安全检查规范等文档的参考。
由于版本不同,配置操作有所不同,本规范以SOLARIS 8/10为例,给出参考配置操作。
第2章安全配置要求2.1账号编号:1要求内容应按照不同的用户分配不同的账号。
操作指南1、参考配置操作为用户创建账号:#useradd username #创建账号#passwd username #设置密码修改权限:#chmod 750 directory #其中750为设置的权限,可根据实际情况设置相应的权限,directory是要更改权限的目录)使用该命令为不同的用户分配不同的账号,设置不同的口令及权限信息等。
2、补充操作说明检测方法1、判定条件能够登录成功并且可以进行常用操作;2、检测操作使用不同的账号进行登录并进行一些常用操作;3、补充说明编号:2要求内容应删除或锁定与设备运行、维护等工作无关的账号。
操作指南1、参考配置操作删除用户:#userdel username;锁定用户:1)修改/etc/shadow文件,用户名后加*LK*2)将/etc/passwd文件中的shell域设置成/bin/false3)#passwd -l username只有具备超级用户权限的使用者方可使用,#passwd -l username锁定用户,用#passwd –d username解锁后原有密码失效,登录需输入新密码,修改/etc/shadow能保留原有密码。
2、补充操作说明需要锁定的用户:listen,gdm,webservd,nobody,nobody4、noaccess。
检测方法1、判定条件被删除或锁定的账号无法登录成功;2、检测操作使用删除或锁定的与工作无关的账号登录系统;3、补充说明需要锁定的用户:listen,gdm,webservd,nobody,nobody4、noaccess。
solaris10配置一网卡多IP
1.配置一块网卡多IP,且子网相同。
需要绑定192.168.2.133到网卡①Ifconfig -a 查看该主机的网卡信息,得到如下信息,e1000g0为网卡名,且IP 地址为192.168.3.11,bash-3.00# ifconfig -alo0: flags=2001000849<UP,LOOPBACK,RUNNING,MULTICAST,IPv4,VIRTUAL> mtu 8232 index 1inet 127.0.0.1 netmask ff000000e1000g0: flags=1000843<UP,BROADCAST,RUNNING,MULTICAST,IPv4> mtu 1500 index 2inet 192.168.3.11 netmask ffffff00 broadcast 192.168.3.255ether 0:c:29:cd:5b:1d②/etc下添加文件hostname.e1000g0:1,并添加主机名为test③修改/etc/hosts文件,将192.168.2.133 test 添加到hosts文件中。
④启用网卡ifconfig e1000g0:1 plumbIfconfig el000g0:1 192.168.2.133 netmask 255.255.255.0 up⑤测试ping 192.168.2.133Ifconfig -abash-3.00# ifconfig -alo0: flags=2001000849<UP,LOOPBACK,RUNNING,MULTICAST,IPv4,VIRTUAL> mtu 8232 index 1inet 127.0.0.1 netmask ff000000e1000g0: flags=1000843<UP,BROADCAST,RUNNING,MULTICAST,IPv4> mtu 1500 index 2inet 192.168.3.11 netmask ffffff00 broadcast 192.168.3.255ether 0:c:29:cd:5b:1de1000g0:1: flags=1000843<UP,BROADCAST,RUNNING,MULTICAST,IPv4> mtu 1500 index 2inet 192.168.2.133 netmask ffffff00 broadcast 192.168.2.255⑥重启之后,该网卡仍然有效。
Solaris10安装和基本配置

Solaris10安装与基本配置一.分区信息/ 5Gswap 2G/usr 8G/opt 1G/var 2G/export/home 2G/data 剩下的都分给/data二.Solaris10安装(console)1.启动机器,将CD/DVD放入光驱,直到显示ok后,输入boot cdrom。
2.语言选择,选择0Select a Language0. English1. French2. German3. Italian4. Japanese5. Korean6. Simplified Chinese7. Spanish8. Swedish9. Traditional ChinesePlease make a choice (0 - 9), or press h or ? for help: 03.终端选择,选择3What type of terminal are you using?1) ANSI Standard CRT2) DEC VT523) DEC VT1004) Heathkit 195) Lear Siegler ADM316) PC Console7) Sun Command Tool8) Sun Workstation9) Televideo 91010) Televideo 92511) Wyse Model 5012) X Terminal Emulator (xterms)13) OtherType the number of your choice and press Return:34.信息提示,F2继续Completing system identification...in.rdisc: No interfaces up- The Solaris Installation Program ---------------------------------------------The Solaris installation program is divided into a series of short sections where you'll be prompted to provide information for the installation. At the end of each section, you'll be able to change the selections you've made before continuing.About navigation...- The mouse cannot be used- If your keyboard does not have function keys, or they do notrespond, press ESC; the legend at the bottom of the screenwill change to show the ESC keys to use for navigation.-------------------------------------------------------------------------------- F2_Continue F6_Help5.开始配置系统信息,F2继续- Identify This System ---------------------------------------------------------On the next screens, you must identify this system as networked ornon-networked, and set the default time zone and date/time.If this system is networked, the software will try to find the information it needs to identify your system; you will be prompted to supply any information it cannot find.> To begin identifying this system, press F2.-------------------------------------------------------------------------------- F2_Continue F6_Help6.网络连接设置,是否连接网络,选择Y es,F2继续- Network Connectivity ---------------------------------------------------------Specify Yes if the system is connected to the network by one of the Solaris or vendor network/communication Ethernet cards that are supported on the Solaris CD. See your hardware documentation for the current list of supported cards.Specify No if the system is connected to a network/communication card that is not supported on the Solaris CD, and follow the instructions listed under Help.Networked---------[X] Yes[ ] No-------------------------------------------------------------------------------- F2_Continue F6_Help7.选择要配置网络接口,下面是有两块网卡的情况,F2继续- Configure Multiple Network Interfaces ----------------------------------------Multiple network interfaces have been detected on this system. Specify all of the network interfaces you want to configure.Note: You must choose at least one interface to configure.Network interfaces------------------[X] eri0[ ] hme0-------------------------------------------------------------------------------- F2_Continue F6_Help8.选择主网络接口,F2继续- Primary Network Interface ----------------------------------------------------On this screen you must specify which of the following network adapters is the system's primary network interface. Usually the correct choice is the lowest number. However, do not guess; ask your system administrator if you're not sure.> To make a selection, use the arrow keys to highlight the option andpress Return to mark it [X].Primary network interface-------------------------[X] eri0[ ] hme0-------------------------------------------------------------------------------- F2_Continue F6_Help9.开始配置主网络接口,DHCP配置,选择No,F2继续- DHCP for eri0 ----------------------------------------------------------------Specify whether or not this network interface should use DHCP to configure itself. Choose Yes if DHCP is to be used, or No if the network interface is to be configured manually.NOTE: DHCP support will not be enabled, if selected, until after the system reboots.Use DHCP for eri0-----------------[ ] Yes[X] No-------------------------------------------------------------------------------- F2_Continue F6_Help10.Host Name配置,输入rsdns-mn1,F2继续- Host Name for eri0 -----------------------------------------------------------Enter the host name which identifies this system on the network. The name must be unique within your domain; creating a duplicate host name will cause problems on the network after you install Solaris.A host name must have at least one character; it can contain letters,digits, and minus signs (-).Host name for eri0 rsdns-mn1-------------------------------------------------------------------------------- F2_Continue F6_Help11.配置IP地址,输入完后F2继续- IP Address for eri0 ----------------------------------------------------------Enter the Internet Protocol (IP) address for this network interface. Itmust be unique and follow your site's address conventions, or asystem/network failure could result.IP addresses contain four sets of numbers separated by periods (for example 129.200.9.1).IP address for eri0 192.168.0.112-------------------------------------------------------------------------------- F2_Continue F6_Help12.选择子网系统,选择Yes,F2继续- Subnet for eri0 --------------------------------------------------------------On this screen you must specify whether this system is part of a subnet. If you specify incorrectly, the system will have problems communicating on the network after you reboot.> To make a selection, use the arrow keys to highlight the option andpress Return to mark it [X].System part of a subnet-----------------------[X] Yes[ ] No-------------------------------------------------------------------------------- F2_Continue F6_Help13.配置子网掩码,如果使用默认的,F2继续- Netmask for eri0 -------------------------------------------------------------On this screen you must specify the netmask of your subnet. A default netmask is shown; do not accept the default unless you are sure it iscorrect for your subnet. A netmask must contain four sets of numbers separated by periods (for example 255.255.255.0).Netmask for eri0 255.255.255.0--------------------------------------------------------------------------------F2_Continue F6_Help14.IPv6安装,选择No,F2之后需要等待一下- IPv6 for eri0 ----------------------------------------------------------------Specify whether or not you want to enable IPv6, the next generation Internet Protocol, on this network interface. Enabling IPv6 will have no effect ifthis machine is not on a network that provides IPv6 service. IPv4 servicewill not be affected if IPv6 is enabled.> To make a selection, use the arrow keys to highlight the option andpress Return to mark it [X].Enable IPv6 for eri0--------------------[ ] Yes[X] No--------------------------------------------------------------------------------F2_Continue F6_Help15.配置路由信息,可以选择None,也可以是Specify one指定一个,F2继续- Set the Default Route for eri0 -----------------------------------------------To specify the default route, you can let the software try to detect oneupon reboot, you can specify the IP address of the router, or you can choose None. Choose None if you do not have a router on your subnet.> To make a selection, use the arrow keys to select your choice and pressReturn to mark it [X].Default Route for eri0--------------------------[ ] Detect one upon reboot[X] Specify one[ ] None--------------------------------------------------------------------------------F2_Continue F6_Help16.如果上一步选择Specify one,输入路由地址,F2继续- Default Route IP Address for eri0 --------------------------------------------Enter the IP address of the default route. This entry will be placed in the/etc/defaultrouter file and will be the default route after you reboot(example 129.146.89.225).Router IP Address for eri0 192.168.0.1--------------------------------------------------------------------------------F2_Continue F6_Help17.显示主网卡配置信息,想变更按F4,否则F2继续- Confirm Information for eri0 -------------------------------------------------> Confirm the following information. If it is correct, press F2;to change any information, press F4.Networked: YesPrimary network interface: eri0Secondary network interfaces: hme0Use DHCP: NoHost name: rsdns-mn1IP address: 192.168.0.112System part of a subnet: YesNetmask: 255.255.255.0Enable IPv6: NoDefault Route: Specify oneRouter IP Address: 192.168.0.1--------------------------------------------------------------------------------F2_Continue F4_Change F6_Help18.如果有第二块网卡,接下来要进行第二块网卡的配置,过程与第一块相同,配置结果如下,如果没有跳转到步骤22- Confirm Information for hme0 -------------------------------------------------> Confirm the following information. If it is correct, press F2;to change any information, press F4.Use DHCP: NoHost name: rsdns-mn1IP address: 192.168.0.113System part of a subnet: YesNetmask: 255.255.255.0Enable IPv6: NoDefault Route: Specify oneRouter IP Address: 192.168.0.1-------------------------------------------------------------------------------- F2_Continue F4_Change F6_Help19.一些错误提示,F2即可从新配置- System Identification Error --------------------------------------------------The hostname rsdns-mn1 is already specified for interface eri0. Please enter a different hostname.> Press F2 to dismiss this message.-------------------------------------------------------------------------------- F2_OK F6_Help20.如果有第二块网卡,也可以选择先不配置,选No,F2继续- Network Connectivity for hme0 ------------------------------------------------Specify Yes if you would like to specify the network parameters for this network interface.Specify No if this interface is not connected to the network.Networked---------[ ] Yes[X] No-------------------------------------------------------------------------------- F2_Continue F6_Help21.信息确认,F2继续- Confirm Information for hme0 -------------------------------------------------> Confirm the following information. If it is correct, press F2;to change any information, press F4.Networked: No-------------------------------------------------------------------------------- Esc-2_Continue Esc-4_Change Esc-6_Help22.选择安全机制,选择No,F2继续- Configure Security Policy: ---------------------------------------------------Specify Yes if the system will use the Kerberos security mechanism.Specify No if this system will use standard UNIX security.Configure Kerberos Security---------------------------[ ] Yes[X] No-------------------------------------------------------------------------------- Esc-2_Continue Esc-6_Help23.信息确认,F2继续- Confirm Information ----------------------------------------------------------> Confirm the following information. If it is correct, press F2;to change any information, press F4.Configure Kerberos Security: No-------------------------------------------------------------------------------- Esc-2_Continue Esc-4_Change Esc-6_Help24.名字服务安装,选择None,F2继续- Name Service -----------------------------------------------------------------On this screen you must provide name service information. Select the name service that will be used by this system, or None if your system will either not use a name service at all, or if it will use a name service not listed here.> To make a selection, use the arrow keys to highlight the optionand press Return to mark it [X].Name service------------[ ] NIS+[ ] NIS[ ] DNS[ ] LDAP[X] None-------------------------------------------------------------------------------- Esc-2_Continue Esc-6_Help25.信息确认,F2继续- Confirm Information ----------------------------------------------------------> Confirm the following information. If it is correct, press F2;to change any information, press F4.Name service: None-------------------------------------------------------------------------------- Esc-2_Continue Esc-4_Change Esc-6_Help26.选择时区,选择Asia,F2继续- Time Zone --------------------------------------------------------------------On this screen you must specify your default time zone. You can specify a time zone in three ways: select one of the continents or oceans from the list, select other - offset from GMT, or other - specify time zone file.> To make a selection, use the arrow keys to highlight the option andpress Return to mark it [X].Continents and Oceans----------------------------------- [ ] Africa| [ ] Americas| [ ] Antarctica| [ ] Arctic Ocean| [X] Asia| [ ] Atlantic Ocean| [ ] Australia| [ ] Europev [ ] Indian Ocean-------------------------------------------------------------------------------- Esc-2_Continue Esc-6_Help27.选择国家或地域,选择China,F2继续- Country or Region ------------------------------------------------------------> To make a selection, use the arrow keys to highlight the option and press Return to mark it [X].Countries and Regions------------------------^ [ ] Bhutan| [ ] Brunei| [ ] Cambodia| [X] China| [ ] Cyprus| [ ] East Timor| [ ] Georgia| [ ] Hong Kong| [ ] India| [ ] Indonesia| [ ] Iran| [ ] Iraqv [ ] Israel-------------------------------------------------------------------------------- Esc-2_Continue Esc-6_Help28.配置时间和日期,F2继续- Date and Time ----------------------------------------------------------------> Accept the default date and time or enternew values.Date and time: 2007-06-14 13:21Year (4 digits) : 2007Month (1-12) : 06Day (1-31) : 14Hour (0-23) : 13Minute (0-59) : 33-------------------------------------------------------------------------------- Esc-2_Continue Esc-6_Help29.信息确认,F2继续- Confirm Information ----------------------------------------------------------> Confirm the following information. If it is correct, press F2;to change any information, press F4.Time zone: PRCDate and time: 2007-06-14 13:33:00-------------------------------------------------------------------------------- Esc-2_Continue Esc-4_Change Esc-6_Help30.Root口令配置,输入两遍后,F2继续- Root Password ----------------------------------------------------------------Please enter the root password for this system.The root password may contain alphanumeric and special characters. For security, the password will not be displayed on the screen as you type it.> If you do not want a root password, leave both entries blank.Root password: ********Root password: ********> Press F2 to go to the next screen.-------------------------------------------------------------------------------- Esc-2_Continue Esc-6_Help31.一些系统运行信息,不用理会,会自动转到步骤32System identification is completed.System identification complete.Starting Solaris installation program...Executing JumpStart preinstall phase...Searching for SolStart directory...Checking rules.ok file...Using begin script: install_beginUsing finish script: patch_finishExecuting SolStart preinstall phase...Executing begin script "install_begin"...Begin script install_begin execution completed.32.选择安装模式,F2_Standard继续- Solaris Interactive Installation ---------------------------------------------On the following screens, you can accept the defaults or you can customizehow Solaris software will be installed by:- Selecting the type of Solaris software to install- Selecting disks to hold software you've selected- Selecting unbundled products to be installed with Solaris- Specifying how file systems are laid out on the disksAfter completing these tasks, a summary of your selections (called aprofile) will be displayed.There are two ways to install your Solaris software:- "Standard" installs your system from a standard Solaris Distribution.Selecting "Standard" allows you to choose between initial installand upgrade, if your system is upgradable.- "Flash" installs your system from one or more Flash Archives.--------------------------------------------------------------------------------F2_Standard F4_Flash F5_Exit F6_Help33.是否自动弹出CD/DVD,选择Automatically eject CD/DVD,F2继续- Eject a CD/DVD Automatically? ------------------------------------------------During the installation of Solaris software, you may be using one or moreCDs/DVDs. You can choose to have the system eject each CD/DVD automatically after it is installed or you can choose to manually eject each CD/DVD.[X] Automatically eject CD/DVD[ ] Manually eject CD/DVD--------------------------------------------------------------------------------F2_Continue F3_Go Back F5_Exit34.安装完成后是否自动重新引导系统,选择Auto Reboot,F2继续- Reboot After Installation? ---------------------------------------------------After Solaris software is installed, the system must be rebooted. You canchoose to have the system automatically reboot, or you can choose tomanually reboot the system if you want to run scripts or do othercustomizations before the reboot. You can manually reboot a system by usingthe reboot(1M) command.[X] Auto Reboot[ ] Manual Reboot--------------------------------------------------------------------------------F2_Continue F3_Go Back F5_Exit35.系统初始化,不需要手工干预,自动转到步骤36- Initializing -----------------------------------------------------------------The system is being initialized.36.License确认,F2_Accept License继续- License ----------------------------------------------------------------------^ AGREEMENT. IF YOU HA VE SEPARA TEL Y AGREED TO LICENSE TERMS| ("MASTER TERMS") FOR YOUR LICENSE TO THIS SOFTWARE, THEN SECTIONS| 1-6 OF THIS AGREEMENT ("SUPPLEMENTAL LICENSE TERMS") SHALL| SUPPLEMENT AND SUPERSEDE THE MASTER TERMS IN RELATION TO THIS | SOFTWARE.|| 1. Definitions.|| (a) "Entitlement" means the collective set of applicable documents| authorized by Sun evidencing your obligation to pay associated fees| (if any) for the license, associated Services, and the authorized| scope of use of Software under this Agreement.|| (b) "Licensed Unit" means the unit of measure by which your use of| Software and/or Service is licensed, as described in your Entitlement.|| (c) "Permitted Use" means the licensed Software use(s) authorized in| this Agreement as specified in your Entitlement. The Permitted Usev for any bundled Sun software not specified in your Entitlement will--------------------------------------------------------------------------------F2_Accept License F5_Exit37.选择字符集,下面是选择了所有中文字符集,F2继续- Select Geographic Regions ----------------------------------------------------Select the geographic regions for which support should be installed.[ ] Japanese UTF-8 (ja_JP.UTF-8)[ ] Korean EUC[ ] Korean UTF-8[X] Simplified Chinese EUC[X] Simplified Chinese GB18030[X] Simplified Chinese GBK[X] Simplified Chinese UTF-8[ ] Thai TIS620[ ] Thai UTF-8[X] Traditional Chinese (Hong Kong) BIG5+HKSCS[X] Traditional Chinese (Hong Kong) UTF-8[X] Traditional Chinese BIG5[X] Traditional Chinese EUC[X] Traditional Chinese UTF-8> [ ] Eastern Europe> [ ] Northern EuropeLocale is selected. Press Return to deselect--------------------------------------------------------------------------------F2_Continue F3_Go Back F5_Exit F6_Help38.选择系统语言环境,选择POSIXC,F2继续- Select System Locale ---------------------------------------------------------Select the initial locale to be used after the system has been installed.[X] POSIX C ( C )Asia[ ] Simplified Chinese EUC ( zh )[ ] Simplified Chinese GB18030 ( zh_CN.GB18030 )[ ] Simplified Chinese GBK ( zh.GBK )[ ] Simplified Chinese UTF-8 ( zh.UTF-8 )[ ] Traditional Chinese (Hong Kong) BIG5+HKSCS ( zh_HK.BIG5HK ) [ ] Traditional Chinese (Hong Kong) UTF-8 ( zh_HK.UTF-8 )[ ] Traditional Chinese BIG5 ( zh_TW.BIG5 )[ ] Traditional Chinese EUC ( zh_TW )[ ] Traditional Chinese UTF-8 ( zh_TW.UTF-8 )--------------------------------------------------------------------------------F2_Continue F3_Go Back F5_Exit F6_Help39.选择产品,选择Solaris Software Companion,F2继续- Select Products --------------------------------------------------------------Select the products you would like to install.> [ ] Solaris 10 Extra Value Software................. 0.00 MB> [ ] Solaris 10 Documentation........................ 0.00 MB> [ ] Java Enterprise System.......................... 0.00 MB> [X] Solaris Software Companion...................... 1798.83 MBPress Return to show components--------------------------------------------------------------------------------F2_Continue F3_Go Back F4_Product Info F5_Exit F6_Help40.附加产品选择,选择None,F2继续- Additional Products ----------------------------------------------------------To scan for additional products, select the location you wish to scan.Products found at the selected location that are in a Web Start Readyinstall form will be added to the Products list.Web Start Ready product scan location:[X] None[ ] CD/DVD[ ] Network File System--------------------------------------------------------------------------------F2_Continue F3_Go Back F5_Exit41.选择软件,选择Entire Distribution plus OEM support,F2继续- Select Software --------------------------------------------------------------Select the Solaris software to install on the system.NOTE: After selecting a software group, you can add or remove software by customizing it. However, this requires understanding of software dependencies and how Solaris software is packaged.[X] Entire Distribution plus OEM support ....... 8413.00 MB[ ] Entire Distribution ........................ 8368.00 MB[ ] Developer System Support ................... 8231.00 MB[ ] End User System Support .................... 7140.00 MB[ ] Core System Support ........................ 3464.00 MB[ ] Reduced Networking Core System Support ..... 3422.00 MB--------------------------------------------------------------------------------F2_Continue F3_Go Back F4_Customize F5_Exit F6_Help42.选择硬盘,F2继续- Select Disks -----------------------------------------------------------------On this screen you must select the disks for installing Solaris software.Start by looking at the Suggested Minimum field; this value is theapproximate space needed to install the software you've selected. Keepselecting disks until the Total Selected value exceeds the Suggested Minimumvalue.NOTE: ** denotes current boot diskDisk Device Available Space===================================================================== [X] c1t0d0 34730 MB (F4 to edit)Total Selected: 34730 MBSuggested Minimum: 6716 MB--------------------------------------------------------------------------------F2_Continue F3_Go Back F4_Edit F5_Exit F6_Help43.格式化,F2继续- Preserve Data? ---------------------------------------------------------------Do you want to preserve existing data? At least one of the disks you'veselected for installing Solaris software has file systems or unnamed slicesthat you may want to save.--------------------------------------------------------------------------------F2_Continue F3_Go Back F4_Preserve F5_Exit F6_Help44.是否采用自动文件系统布局,选择F4_Manual Layout(手动)- Automatically Layout File Systems? -------------------------------------------Do you want to use auto-layout to automatically layout file systems?Manually laying out file systems requires advanced system administrationskills.--------------------------------------------------------------------------------F2_Auto Layout F3_Go Back F4_Manual Layout F5_Exit F6_Help45.文件系统和磁盘布局,选择F4_Customize(手动配置)- File System and Disk Layout --------------------------------------------------The summary below is your current file system and disk layout, based on theinformation you've supplied.NOTE: If you choose to customize, you should understand file systems, theirintended purpose on the disk, and how changing them may affect the operationof the system.File sys/Mnt point Disk/Slice Size====================================================================== overlap c1t0d0s2 34730 MB--------------------------------------------------------------------------------F2_Continue F3_Go Back F4_Customize F5_Exit F6_Help46.按照分区信息手工配置文件系统及磁盘大小,F2继续- Customize Disk: c1t0d0 -------------------------------------------------------Entry: Recommended: MB Minimum: MB====================================================================== Slice Mount Point Size (MB)0 \ 01 02 overlap 347303 04 05 06 07 0======================================================================Capacity: 34730 MBAllocated: 0 MBFree: 34730 MB--------------------------------------------------------------------------------F2_OK F4_Options F5_Cancel F6_Help47.最终的分区结果显示,F2继续- File System and Disk Layout --------------------------------------------------The summary below is your current file system and disk layout, based on theinformation you've supplied.NOTE: If you choose to customize, you should understand file systems, theirintended purpose on the disk, and how changing them may affect the operationof the system.File sys/Mnt point Disk/Slice Size====================================================================== / c1t0d0s0 5000 MB swap c1t0d0s1 2048 MB overlap c1t0d0s2 34730 MB /usr c1t0d0s3 8001 MB /opt c1t0d0s4 1024 MB /var c1t0d0s5 2048 MB /export/home c1t0d0s6 2048 MB/data c1t0d0s7 14559 MB--------------------------------------------------------------------------------F2_Continue F3_Go Back F4_Customize F5_Exit F6_Help48.信息提示,F2继续- Warning ----------------------------------------------------------------------Review your file systems. The list below shows the recommended Solaris filesystems with their Minimum and Suggested space. If your file systems arebelow the Minimum, there might not be enough file system space to installSolaris software.NOTE: Some file systems may include other file systems. For example, (/)root might include /var.File System Minimum Suggested Configured-------------------------------------------------------------/ 144.00 MB 168.00 MB 5000.00 MB/opt 2124.00 MB 2497.00 MB 1024.00 MB/usr 3687.00 MB 4337.00 MB 8001.00 MB/usr/openwin 657.07 MB 772.89 MB 0.00 MB/var 113.00 MB 133.00 MB 2048.00 MB--------------------------------------------------------------------------------F2_OK F5_Cancel49.挂载远程文件系统,F2继续- Mount Remote File Systems? ---------------------------------------------------Do you want to mount software from a remote file server? This may benecessary if you had to remove software because of disk space problems.--------------------------------------------------------------------------------F2_Continue F3_Go Back F4_Remote Mounts F5_Exit F6_Help50.显示安装配置信息,想更改按F4,否则F2开始安装- Profile ----------------------------------------------------------------------The information shown below is your profile for installing Solaris software.It reflects the choices you've made on previous screens.======================================================================- Installation Option: Initial| Boot Device: c1t0d0| Client Services: None|| Locales: Simplified Chinese EUC| Simplified Chinese GB18030| Simplified Chinese GBK| Simplified Chinese UTF-8| Traditional Chinese (Hong Kong) BIG| Traditional Chinese (Hong Kong) UTF| Traditional Chinese BIG5| Traditional Chinese EUC| Traditional Chinese UTF-8v System Locale: C ( C )。
Solaris 10 IPMP 负载均衡配置过程
Solairs10环境下IPMP配置2010年05月26日星期三 11:32方法简述:启用服务器上的两个网口分别配置物理IP地址,通过配置文件启用一个主用的浮动地址,这个主用的IP地址可工作于这两个网口之上,当主用的IP所在网口发生故障时,系统可自动将主用IP切换到另外一个网口上,从而保证了业务的正常进行。
详细配置方法:修改系统配置文件,涉及到3个/etc下的文件,按照下面的格式进行修改:假设服务器两个网口的别名分别为e1000g0和e1000g1文件一:/etc/hosts172.16.31.71 capitek172.16.31.76 capitek_1172.16.31.77 capitek_2文件二:/etc/hostname.e1000g0capitek group capiteknafo upaddif capitek_1 -failover deprecated up文件三:/etc/hostname.e1000g1capitek_2 group capiteknafo -failover deprecated up修改完成后重新启动服务器,即可生效。
重启完成后,IP状态如下:root@sunT5220 # ifconfig -alo0: flags=2001000849<UP,LOOPBACK,RUNNING,MULTICAST,IPv4,VIRTUAL> mtu 8232 index 1inet 127.0.0.1 netmask ff000000e1000g0: flags=1000843<UP,BROADCAST,RUNNING,MULTICAST,IPv4> mtu 1500 index 2inet 172.16.31.71 netmask ffff0000 broadcast 172.16.255.255 groupname capiteknafoether 0:21:28:1:29:32e1000g0:1:flags=9040843<UP,BROADCAST,RUNNING,MULTICAST,DEPRECATED,IPv4,NOFAILOV ER> mtu 1500 index 2inet 172.16.31.76 netmask ffff0000 broadcast 172.16.255.255e1000g1:flags=9040843<UP,BROADCAST,RUNNING,MULTICAST,DEPRECATED,IPv4,NOFAILOV ER> mtu 1500 index 3inet 172.16.31.77 netmask ffff0000 broadcast 172.16.255.255 groupname capiteknafoether 0:21:28:1:29:33当拔掉capitek所在网口的网线后,71的地址会自动切换到另外一个网口上,大约需要20秒左右的时间。
Solaris 10系统 NFS 的安装配置819-1245
用于网络文件系统(NFS)的SunCluster数据服务指南(适用于Solaris OS)Sun Microsystems,Inc.4150Network CircleSanta Clara,CA95054U.S.A.文件号码:819–1245–102004年9月,修订版A版权所有2004Sun Microsystems,Inc.4150Network Circle,Santa Clara,CA95054U.S.A.保留所有权利。
本产品或文档受版权保护,并按照限制其使用、复制、发行和反汇编的许可证进行分发。
未经Sun及其许可方的事先书面许可,不得以任何形式、任何手段复制本产品或文档的任何部分。
第三方软件,包括字体技术,均已从Sun供应商处获得版权和使用许可。
本产品的某些部分可能是从Berkeley BSD系统衍生出来的,并获得了加利福尼亚大学的许可。
UNIX是X/Open Company,Ltd.在美国和其他国家/地区独家许可的注册商标。
Sun、Sun Microsystems、Sun徽标、、AnswerBook、AnswerBook2和Solaris是Sun Microsystems,Inc.在美国和其他国家/地区的商标或注册商标。
所有SPARC商标的使用均已获得许可,它们是SPARC International,Inc.在美国和其他国家/地区的商标或注册商标。
标有SPARC商标的产品均基于由Sun Microsystems,Inc.开发的体系结构。
OPEN LOOK和Sun™图形用户界面是Sun Microsystems,Inc.为其用户和许可证持有者开发的。
Sun感谢Xerox在研究和开发可视或图形用户界面的概念方面为计算机行业所做的开拓性贡献。
Sun已从Xerox获得了对Xerox图形用户界面的非独占性许可证,该许可证还适用于实现OPEN LOOK GUI 和在其他方面遵守Sun书面许可协议的Sun许可证持有者。
SUN-Solaris10网络安装

网络安装solaris10操作系统1、安装环境:要求:Sun Blade 2500做服务器端,通过网络安装的方式给Sun Ultra 45 重新安装操作系统,安装以后ip地址和主机名不变。
、安装步骤:2、安装步骤:2.1、收集客户端信息:客户机进入OK模式:通过相应的命令查询信息2.1.1、查询网络连接:在ok模式下查询网卡的信息,查看连接交换机的网卡的连接状态,图中标红所示的网卡连接状态正常,显示为Link UP状态:ok show-netsa) /pci@1e,600000/pci@0/pci@9/pci@0,2/pci@2/network@3b) /pci@1e,600000/pci@0/pci@9/pci@0,2/pci@2/network@2c) /pci@1e,600000/pci@0/pci@9/pci@0,2/pci@2/network@1d) /pci@1e,600000/pci@0/pci@9/pci@0,2/pci@2/network@0e) /pci@1e,600000/pci@0/pci@2/pci@0/network@4,1f) /pci@1e,600000/pci@0/pci@2/pci@0/network@4q) NO SELECTIONvalid choice: a...f, q to quit qok quitok select /pci@1e,600000/pci@0/pci@9/pci@0,2/pci@2/network@3/pci@1e,600000/pci@0/pci@9/pci@0,2/pci@2/network@3: link down/pci@1e,600000/pci@0/pci@9/pci@0,2/pci@2/network@3: link downCan't open deviceok select /pci@1e,600000/pci@0/pci@9/pci@0,2/pci@2/network@2/pci@1e,600000/pci@0/pci@9/pci@0,2/pci@2/network@2: link down/pci@1e,600000/pci@0/pci@9/pci@0,2/pci@2/network@2: link downCan't open deviceok select /pci@1e,600000/pci@0/pci@9/pci@0,2/pci@2/network@1/pci@1e,600000/pci@0/pci@9/pci@0,2/pci@2/network@1: link down/pci@1e,600000/pci@0/pci@9/pci@0,2/pci@2/network@1: link downCan't open deviceok select /pci@1e,600000/pci@0/pci@9/pci@0,2/pci@2/network@0/pci@1e,600000/pci@0/pci@9/pci@0,2/pci@2/network@0: 1000 Mbps full duplex link up2.1.2、获取网卡MAC地址:当网卡连接正常时,通过图中标红的命令查看相应网口的Mak地址:ok select /pci@1e,600000/pci@0/pci@9/pci@0,2/pci@2/network@0/pci@1e,600000/pci@0/pci@9/pci@0,2/pci@2/network@0: 1000 Mbps full duplex link upok cd /pci@1e,600000/pci@0/pci@9/pci@0,2/pci@2/network@0ok .propertiesmac-address 00 14 4f d7 4f b4link-clock autoduplex autospeed autoassigned-addresses 820d0010 00000000 00e00000 00000000 00200000820d0030 00000000 00d00000 00000000 00100000d-fru-len 00000000d-fru-off 0000e800d-fru-dev eeproms-fru-len 00000800s-fru-off 0000e000s-fru-dev eepromcompatible pci100b,35.30pci100b,35pciclass,020000pciclass,0200pci108e,abbareg 000d0000 00000000 00000000 00000000 00000000020d0010 00000000 00000000 00000000 00200000020d0030 00000000 00000000 00000000 00100000address-bits 00000030max-frame-size 00004000network-interface-type2.2、服务器端的配置:2.2.1、上传并挂载镜像:1.将要安装的系统镜像上传至/export/home/manager目录下2.挂载镜像到新建的目录/mnt/iso上:bash-3.2# lofiadm -a /export/home/manager/sol-10-u6-1008-sparc-dvd.iso /dev/lofi/1bash-3.2# mount -F hsfs -o ro /dev/lofi/1 /mnt/iso/2.2.2、创建安装目录并共享:通过如下方式创建安装服务并通过修改/etc/dfs/dfstab文件共享安装目录bash-3.2# cd /mnt/iso/Solaris_10/Tools/bash-3.2# ./setup_install_server /export/Solaris_install/Verifying target directory...Calculating the required disk space for the Solaris_10 productCalculating space required for the installation boot imageCopying the CD image to disk...Copying Install Boot Image hierarchy...Install Server setup completebash-3.2# vi /etc/dfs/dfstab"/etc/dfs/dfstab" 13 lines, 512 characters# Place share(1M) commands here for automatic execution# on entering init state 3.# Issue the command 'svcadm enable network/nfs/server' to# run the NFS daemon processes and the share commands, after adding# the very first entry to this file.## share [-F fstype] [ -o options] [-d "<text>"] <pathname> [resource]# .e.g,# share -F nfs -o rw=engineering -d "home dirs" /export/home2 share -F nfs -o ro,anon=0 -d "install server directory" /export/Solaris_install"/etc/dfs/dfstab" 13 lines, 512 charactersbash-3.2#bash-3.2# shareallbash-3.2# share-/export/Solaris_install ro,anon=0 "install server directory" 2.2.3.、修改配置文件:1.修改/etc/hosts文件,在文件中加入客户机需要配置的的主机名和IP:bash-3.2# cat /etc/hosts## Internet host table#::1 localhost127.0.0.1 localhost10.233.23.145 test-jumps loghost10.233.23.143 xz-test12.修改/etc/ethers文件,没有则创建,在文件中添加客户机网口的Mac 地址和主机名:bash-3.2# cat /etc/ethers0:14:4f:f:db:50 xz-test1bash-3.2#2.2.4、启动tftp 服务:1.修改配置文件/etc/inet/inetd.conf件去掉如图标红行的注释:bash-3.2# cat /etc/inet/inetd.conf## Copyright 2004 Sun Microsystems, Inc. All rights reserved.# Use is subject to license terms.##ident "@(#)inetd.conf 1.56 04/10/21 SMI"## Legacy configuration file for inetd(1M). See inetd.conf(4).## This file is no longer directly used to configure inetd.# The Solaris services which were formerly configured using this file# are now configured in the Service Management Facility (see smf(5))# using inetadm(1M).## Any records remaining in this file after installation or upgrade,# or later created by installing additional software, must be converted# to smf(5) services and imported into the smf repository using# inetconv(1M), otherwise the service will not be available. Once# a service has been converted using inetconv, further changes made to# its entry here are not reflected in the service.### CacheFS daemon. Provided only as a basis for conversion by inetconv(1M).#100235/1 tli rpc/ticotsord wait root /usr/lib/fs/cachefs/cachefsd cachefsd# TFTPD - tftp server (primarily used for booting)tftp dgram udp6 wait root /usr/sbin/in.tftpd in.tftpd -s /tftpboot2.然后将tftp服务加入svcs管理中,并启动tftp服务bash-3.2# inetconv -i /etc/inet/inetd.conf 1>/dev/null 2>&1bash-3.2# svcadm enable svc:/network/tftp/udp6:defaultbash-3.2# netstat -a | grep tftp*.tftp Idle*.tftp Idlebash-3.2#2.2.5、添加客户机启动参数、1.添加客户机启动文件bash-3.2# cd /export/Solaris_install/Solaris_10/Tools/bash-3.2# ./add_install_client -e 0:14:4f:f:db:50 xz-test1 sun4usaving original /etc/dfs/dfstab in /etc/dfs/dfstab.origAdding "share -F nfs -o ro,anon=0 /mnt/iso" to /etc/dfs/dfstabmaking /tftpbootenabling network/rarp serviceenabling network/rpc/bootparams serviceupdating /etc/bootparamscopying boot file to /tftpboot/inetboot.SUN4U.Solaris_10-1bash-3.2#./add_install_client -i ip地址 -e mac地址-s10.233.23.45:/export/s10dvdsparc 主机名 sun4u主机名为自定义,但必须添加在安装服务器的/etc/hosts文件中2.检测生成的启动文件/etc/bootparams和/tftpboot/信息bash-3.2# cd /etcbash-3.2# more bootparamsxz-test1 root=test-jumps:/mnt/iso/Solaris_10/Tools/Boot install=test-jumps:/mnt/iso boottype=:in rootopts=:rsize=8192bash-3.2# cd /tftpboot/bash-3.2# ls0AE9178F inetboot.SUN4U.Solaris_10-1 tftpboot0AE9178F.SUN4U rm.10.233.23.1432.3、客户机网络启动安装系统ok boot /pci@1e,600000/pci@0/pci@9/pci@0,2/pci@2/network@0Boot device: /pci@1e,600000/pci@0/pci@9/pci@0,2/pci@2/network@0 File and args:/pci@1e,600000/pci@0/pci@9/pci@0,2/pci@2/network@0: 1000 Mbps full duplex link upRequesting Internet Address for 0:14:4f:d7:4f:b4Requesting Internet Address for 0:14:4f:d7:4f:b4Requesting Internet Address for 0:14:4f:d7:4f:b4Requesting Internet Address for 0:14:4f:d7:4f:b4Requesting Internet Address for 0:14:4f:d7:4f:b4Requesting Internet Address for 0:14:4f:d7:4f:b4/pci@1e,600000/pci@0/pci@9/pci@0,2/pci@2/network@0: 1000 Mbps full duplex link upRequesting Internet address for 0:14:4f:d7:4f:b4SunOS Release 5.10 Version Generic_147147-26 64-bitCopyright (c) 1983, 2013, Oracle and/or its affiliates. All rights reserved. WARNING: i2c_0 failed to add interrupt.WARNING: i2c_0 operating in POLL MODE onlyWARNING: i2c_1 failed to add interrupt.WARNING: i2c_1 operating in POLL MODE onlyWARNING: i2c_0 failed to add interruptWARNING: Failed to open device(/pci@1f,700000:devctl), rv(19)WARNING: ppm_init_cb: ppm domain domain_pciegfx will be offline.Configuring devices.Using RPC Bootparams for network configuration information.Attempting to configure interface bge1...Skipped interface bge1Attempting to configure interface bge0...Skipped interface bge0Attempting to configure interface ce3...Skipped interface ce3Attempting to configure interface ce2...Skipped interface ce2Attempting to configure interface ce1...Skipped interface ce1Attempting to configure interface ce0...Configured interface ce0svc:/system/filesystem/local:default: WARNING: /usr/sbin/zfs mount -a failed: one or more file systems failed to mountSetting up Java. Please wait...Serial console, reverting to text installBeginning system identification...Searching for configuration file(s)...Search complete.Discovering additional network configuration...Select a Language0. English1. Brazilian Portuguese2. French3. German4. Italian5. Japanese6. Korean7. Simplified Chinese8. Spanish9. Swedish10. Traditional ChinesePlease make a choice (0 - 10), or press h or ? for help: 7。
solaris10配置apathe与tomcat

时间:2009-08-10 11:41 来源:未知作者:adminCSDN IE QQ百度我挖Google POCO Yahoo新浪365Key天极和讯博拉Live奇客鲜果收客饭否叽歪挖客核心提示:默认情况下,solaris安装了apache、apache2,但是apache里集成了tomcat4和tomcat5.5,只需要简单的配置一下即可应用。
而对于apache2则需要另外单独安装tomcat所需要的软件包。
配置系统集成了tomcat的apache: solaris10默认安装情况下: apache主目录在:/默认情况下,solaris安装了apache、apache2,但是apache里集成了tomcat4和tomcat5.5,只需要简单的配置一下即可应用。
而对于apache2则需要另外单独安装tomcat所需要的软件包。
配置系统集成了tomcat的apache:solaris10默认安装情况下:apache主目录在:/usr/apachetomcat主目录在:/usr/apache/tomcat和/var/apache/tomcatapache配置文件在:/etc/apache/httpd.conftomcat配置文件在:/etc/apache/tomcat.conf1.编辑 /etc/profile 文件在'export LOGNAME PATH ' 的上一行增加以下几行:2.修改httpd.conf文件默认是不存在的,需要从/etc/apache/httpd.conf-example复制一份重命名为/etc/apache/httpd.conf,主要修改以下内容:1.ServerName "your server's ip address"2.DocumentRoot "/var/apache/tomcat/webapps/ROOT"3.DirectoryIndex index.html index.jsp index.htm在此文件的末尾,有一被注释掉的行是:#include /etc/apache/tomcat.conf,把这行的注释符号去掉,因为这是与tomcat集成的关键。
网络安装Solaris 10
网络安装Solaris 10
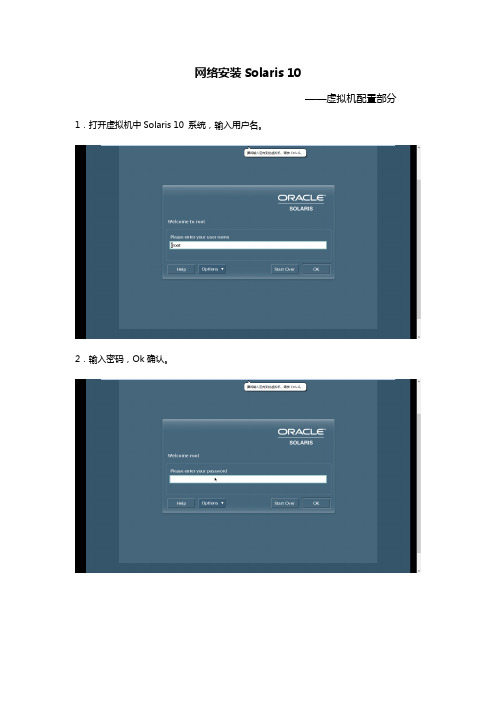
——虚拟机配置部分1.打开虚拟机中Solaris 10 系统,输入用户名。
2.输入密码,Ok确认。
3.进入系统后,打开终端。
4.输入bash,后输入vi /etc/hosts,进入hosts。
并查看本虚拟机IP为192.168.1.1
5.将虚拟机网络连接改为“桥接模式”。
6.将笔记本电脑的以太网IP地址改为:192.168.1.2(与虚拟机IP为一个网段)
7.添加服务器IP地址及用户名。
(IP地址与虚拟机及本机IP为一个网段)
8.在虚拟机设置中,将Solaris 10 Sparc版本挂载到CD中。
9.关闭并重启虚拟机CD,使挂载生效。
10.转到CD目录下,输入ls命令,查看是否挂载成功。
11. 开启服务器root远程管理,输入vi /etc/ssh/sshd_config修改ssh配置文件,将PermitRootLogin参数改为yes。
(用vi修改文件前,需进行文件备份,以便恢复初始设置)
12.修改ftp配置,输入vi /etc/ftpd/ftpusers,在root前加#,开启root用户的ftp权限。
13.输入vi /etc/fault/login,将CONSOLE=/dev/console注释掉,关闭默认控制台为0号串口。
14.转到cdrom/cdrom0/Solaris_10/Tools目录,
输入指令./add_install_client –e 服务器网口mac地址-i 服务器IP地址用户名sun4u
15.打开CRT界面,在OK下输入boot net即可进入安装程序。
Solaris 10x86 操作系统安装配置
安装
节点 1 和 2:安装 Solaris OS 5.10
1 安装操作系统 2 安装时,网络设置:
节点 1:ent0 和 ent1 设置如下: eth0: IP 地址:143.168.1.31 网络掩码: 255.255.0.0 默认网关:143.168.1.1 eth1: IP 地址:172.16.1.31 网络掩码: 255.255.0.0
在节点 1 和 2:UDP 参数设置
1 UDP 参数设置:
# ndd /dev/udp udp_xmit_hiwat # ndd /dev/udp udp_recv_hiwat
2 # ndd -set /dev/udp udp_xmit_hiwat 65536
# ndd -set /dev/udp udp_recv_hiwat 65536
节点 1 和 2:设置用户等价性
1 因为此操作要用网络。所以在配置网络后进行。 使用 rsh 方法: [root@solrac1 /]# touch /etc/hosts.equiv [root@solrac1 /]# chmod 600 /etc/hosts.equiv [root@solrac1 /]# chown root:root /etc/hosts.equiv
在节点 1 和 2:修改内核参数
1 set noexec_user_stack=1 set semsys:seminfo_semmni=100 set semsys:seminfo_semmns=1024 set semsys:seminfo_semmsl=256 set semsys:seminfo_semvmx=32767 set shmsys:shminfo_shmmax=4294967295 set shmsys:shminfo_shmmin=1 set shmsys:shminfo_shmmni=100 set shmsys:shminfo_shmseg=10
Solaris 10系统管理

第15章 Solaris 10 日志管理
第16章 Solaris 10
系统备份与 恢复
第17章 Solaris 10 资源管理与 系统性能的 监控
14.1了解Solaris 10 TCP/IP配置文件 14.2 Solaris 10卡配置 14.3 Solaris 10络配置实例 14.4为Solaris配置络管理工具 14.5 Solaris 10桌面与Windows操作系统桌面的远程连接 14.6 Solaris 10络连接故障检测方法
目录分析
第1章 UNIX 和Solaris
10概述
第2章 Solaris 10 安装
第3章 Solaris 10
高级安装简 介
第4章 Solaris 10 系统的引导 和关闭
1.1 UNIX的历史 1.2 Solaris的历史 1.3 Solaris信息
2.1安装前的准备工作 2.2 Solaris 10安装概述 2.3 Solaris 10安装步骤
Solaris 10系统管理
读书笔记模板
01 思维导图
03 目录分析 作者介绍 06 精彩摘录
思维导图
关键字分析思维导图
领域
工具
管理
管理
系统
文件系统
管理工具
系统管 理
管理员
工作
第章
网络
作者
命令
用户
使用
方法
简介
配置
内容摘要
本书从系统管理员的角度分别介绍了Solaris 10系统的安装、Solaris 10桌面管理和基本系统管理、络配 置、安全管理、开发环境配置等几个方面的内容。作者尽可能详细地描述了Solaris的相关概念、功能、命令, 并着重介绍了Solaris 10的许多新特征。由于作者从事络安全领域的工作,因此对系统管理员最为关心的系统安 全性花费了较大篇幅进行讨论。
Solaris 10 IPMP 配置
Solaris 10 IPMP 配置使用IPMP实现网卡负载(网卡负载就是需要两张网卡共用一个IP地址实现网卡灾备功能)。
修/etc/hosts、/etc /hostname.bge0、/etc/hostname.bge1、 /etc/defaultrouter、/etc/netmasks 五个文件,具体配置如下:使用Solaris 10 的IPMP实现网卡负载均衡功能,网卡负载均衡即使用两个或两个以上的网卡共用一个IP地址,实现网卡灾备的功能。
在本例中实现此项功能需要配置/etc/hosts、/etc/hostname.vmxnet0、/etc/hostname.vmxnet1、 /etc/defaultrouter、/etc/netmasks 等五个文件。
以下过程为配置过程:1.验证系统的版本# uname -aSunOS Solaris10 5.10 Generic_118855-33 i86pc i386 i86pc或# cat /etc/releaseSolaris 10 11/06 s10x_u3wos_10 X86Copyright 2006 Sun Microsystems, Inc. All Rights Reserved.Use is subject to license terms.Assembled 14 November 20062.修改EPROM中的 local -mac -address?= 的参数值,设置网卡使用自身的MAC地址,重启后生效。
#eeprom local-mac-address?=true注意:此命令在解除 ipmp 时是否需要更改3.设置子网掩码# vi /etc/netmasks192.1.1.0 255.255.255.04.编辑 /etc/hosts 文件# vi /etc/hosts## Internet host table#127.0.0.1 localhost192.1.1.200 Solaris10 #此地址为将要虚拟出来用于服务的IP地址########configure for ipmp################192.1.1.201 Solaris10-test1 #test ip 1 #此地址为 vmxnet0 的实际地址192.1.1.202 Solaris10-test2 #test ip 2 #此地址为 vmxnet1 的实际地址##########################################5.编辑 /etc/hostname.vmxnet0# vi /etc/hostname.vmxnet0Solaris10 netmask + broadcast + group fzu1 up addif Solaris10-test1 netmask + broadcast + deprecated - failover up注意: Solaris10为系统主机名Solaris10-test1用于本次测试的ip地址fzu1为本次测试的 IPMP 的组名以上命令解释:Solaris10 用于本案例的主机名称netmask+ 子网掩码由文件 /etc/netmasks 和 /etc/hostname.vmxnet0 计算的出broadcast+ 广播地址由文件 /etc/netmasks 和 /etc/hostname.vmxnet0 计算的出group fzu1 设置本案例中的 IPMP 组名为 fzu1addif Solaris10-test1 增加一个以 Solaris10-test1 的子接口deprecated 标志此为一个测试用端口并不用于服务-failover 标志此逻辑接口不用于故障切换up 标志此逻辑接口启动6.编辑 /etc/hostname.vmxnet1# vi /etc/hostname.vmxnet1Solaris10-test2 netmask + broadcast + group fzu1 deprecated - failover up注意: Solaris10为系统主机名Solaris10-test1用于本次测试的ip地址fzu1为本次测试的 IPMP 的组名以上命令解释:Solaris10-test2 设置一个用于本案例的 Solaris10-test2 的子接口netmask+ 子网掩码由文件 /etc/netmasks 和 /etc/hostname.vmxnet1 计算的出broadcast+ 广播地址由文件 /etc/netmasks 和 /etc/hostname.vmxnet1 计算的出group fzu1 设置本案例中的 IPMP 组名为 fzu1deprecated 标志此为一个测试用端口并不用于服务-failover 标志此逻辑接口不用于故障切换?是否不应该使用 -failover 而使用failover呢??up 标志此逻辑接口启动8.设置 /etc/defaultrouter# vi /etc/defaultrouter192.1.1.253#默认网关,IPMP会通过ping网关来检测主网卡是否正常,ping不通网关会进行切换网卡7.测试使用如下命令强行使网卡切换#if_mpadm -d pcn2下重新启用网卡#if_mpadm -r pcn2可以观察到网卡地址的切换,现象如下:root:/#ifconfig -alo0: flags=2001000849<UP,LOOPBACK,RUNNING,MULTICAST,IPv4,VIRTUAL> mtu 8232 index 1inet 127.0.0.1 netmask ff000000vmxnet0: flags=1000843<UP,BROADCAST,RUNNING,MULTICAST,IPv4> mtu 1500 index 2 inet 192.1.1.200 netmask ffffff00 broadcast 192.1.1.255groupname fzu1ether 0:c:29:b3:21:d3vmxnet0:1: flags=1040842<BROADCAST,RUNNING,MULTICAST,DEPRECATED,IPv4> mtu 1500 index 2inet 192.1.1.201 netmask ffffff00 broadcast 192.1.1.255vmxnet1: flags=1040842<BROADCAST,RUNNING,MULTICAST,DEPRECATED,IPv4> mtu 1500 index 3inet 192.1.1.202 netmask ffffff00 broadcast 192.1.1.255groupname fzu1ether 0:c:29:b3:21:ddroot:/#if_mpadm -d vmxnet0root:/#ifconfig -alo0: flags=2001000849<UP,LOOPBACK,RUNNING,MULTICAST,IPv4,VIRTUAL> mtu 8232 index 1inet 127.0.0.1 netmask ff000000vmxnet0:flags=89000842<BROADCAST,RUNNING,MULTICAST,IPv4,NOFAILOVER,OFFLINE> mtu 0 index 2 inet 0.0.0.0 netmask 0groupname fzu1ether 0:c:29:b3:21:d3vmxnet1: flags=1040842<BROADCAST,RUNNING,MULTICAST,DEPRECATED,IPv4> mtu 1500 index 3inet 192.1.1.202 netmask ffffff00 broadcast 192.1.1.255groupname fzu1ether 0:c:29:b3:21:ddvmxnet1:1: flags=1000843<UP,BROADCAST,RUNNING,MULTICAST,IPv4> mtu 1500 index 3inet 192.1.1.200 netmask ffffff00 broadcast 192.1.1.255vmxnet1:2: flags=1040842<BROADCAST,RUNNING,MULTICAST,DEPRECATED,IPv4> mtu 1500 index 3inet 192.1.1.201 netmask ffffff00 broadcast 192.1.1.255root:/#if_mpadm -r vmxnet0root:/#ifconfig -alo0: flags=2001000849<UP,LOOPBACK,RUNNING,MULTICAST,IPv4,VIRTUAL> mtu 8232 index 1inet 127.0.0.1 netmask ff000000vmxnet0: flags=1000843<UP,BROADCAST,RUNNING,MULTICAST,IPv4> mtu 1500 index 2 inet 192.1.1.200 netmask ffffff00 broadcast 192.1.1.255groupname fzu1ether 0:c:29:b3:21:d3vmxnet0:1: flags=1040842<BROADCAST,RUNNING,MULTICAST,DEPRECATED,IPv4> mtu 1500 index 2inet 192.1.1.201 netmask ffffff00 broadcast 192.1.1.255vmxnet1: flags=1040842<BROADCAST,RUNNING,MULTICAST,DEPRECATED,IPv4> mtu 1500 index 3inet 192.1.1.202 netmask ffffff00 broadcast 192.1.1.255groupname fzu1ether 0:c:29:b3:21:dd。
Solaris下双机的安装、配置及测试(一)
一环境说明操作系统:Solaris9数据库:Oracle9i数据库服务器:Sun V490 2台机器名称:sundata01 sundata02网卡:ce0 ce1二网络环境交换机:switch1 switch2三安装准备说明1、2台sun机器作为数据库服务器做双机(HA),数据库在其中一台down掉后可以自动切换到另外一台,不至于影响业务。
2、ce1作为心跳网卡使用(建议有2块网卡作为心跳网卡使用,我这里因为只有2快网卡,所以ce1为心跳网卡,ce0既作心跳网卡又作业务网卡使用)3、2台机器的ce0网卡分别通过网线连接到switch1和switch2(即sundata01的ce0网卡通过网线连接到switch1上,sundata02的ce0网卡通过网线连接到switch2上)4、用对等线作为心跳线连接2台机器的ce1网卡5、配置2台机器的/etc/hosts文件********************sundata01**********************bash-2.05#hostnamebash-2.05#sundata01bash-2.05#vi /etc/hosts127.0.0.1 localhost192.168.0.11 sundata01 loghost192.168.0.12 sundata12192.168.0.13 sundata02192.168.0.14 sundata1410.10.10.1 xt-110.10.10.2 xt-2**********************sundata02***********************bash-2.05#hostnamebash-2.05#sundata02bash-2.05#vi /etc/hosts127.0.0.1 localhost192.168.0.13 sundata02 loghost192.168.0.14 sundata14192.168.0.11 sundata01192.168.0.12 sundata1210.10.10.1 xt-110.10.10.2 xt-2说明:192.168.0.11 sundata01网卡ce0的ip地址10.10.10.1 sundata01网卡ce1的心跳地址192.168.0.12 sundata02网卡ce0的ip地址10.10.10.2 sundata02网卡ce1的心跳地址192.168.0.13 sundata01和sundata02对外的服务地址192.168.0.14 sundata01和sundata02对外的服务地址6、设置2台机器的信任关系,分别在2台机器的/目录下创建.rhosts文件,并把2台做双机的机器的hostname增加到此文件中,如下***********************************sundata01************************* bash-2.05#cdbash-2.05#vi .rhostssundata01sundata02***********************************sundata02************************* bash-2.05#cdbash-2.05#vi .rhostssundata01sundata027、测试下信任关系是否建立成功。
Solaris-10-学习配置双网卡双网关

目录Solaris 10 配置双网卡双网关出口 (1)1一、环境描述 (1)2二、Solaris 10 双网卡配置 (1)Solaris 10 配置双网卡双网关出口经常有一些朋友问如何在Solaris 10配置双网,并设置两个网关出口,下面我就把Solaris 10 双网卡双网关的配置帖出来给大家参考一下。
1一、环境描述+-----------+ +-------------+|| | Rourer1||| CE0:172.16.0.8→ | 172.16.0.1| ------>172.16.0.0/16||+-------------+| Solsris |||+-------------+| | CE1:192.168.0.8→| Rourer1|||| 192.168.0.1|------->互联网(0)+-----+-----++-------------+如上图所示,Solaris 10机器有CE0和CE1两张网卡,分配给CE0的IP地址为172.16.0.8/24网关172.16.0.1访问172.16.0.0 255.255.0.0的网段;分配给CE1的ip地址为192.168.0.8/24网关为192.168.0.1 访问互联网的资源。
2二、Solaris 10 双网卡配置2.1双网卡的IP地址配置############修改/etc/hosts文件###################### Internet host table#127.0.0.1 localhost172.16.0.8 intranet loghost192.168.0.8 internet loghost# intranet计算机名对应IP为172.16.0.8# internet计算机名对应IP为192.168.0.8#/etc/hosts和/etc/inet/ipnodes文件相同################################################################修改/etc/inet/ipnodes文件################### Internet host table#127.0.0.1 localhost172.16.0.8 intranet loghost192.168.0.8 internet loghost# intranet计算机名对应IP为172.16.0.8# internet计算机名对应IP为192.168.0.8#/etc/hosts和/etc/inet/ipnodes文件相同#############################################################修改/etc/hostname.ce0文件###################intranet#在/etc/hostname.ce0填入计算机名:intranet,标识ce0网卡配置172.16.0.8的IP地址###############################################################修改/etc/hostname.ce1文件####################internet#在/etc/hostname.ce1填入计算机名internet标识ce1网卡配置192.168.0.8的IP 地址###########################################################/etc/netmasks################################## The netmasks file associates Internet Protocol (IP) address# masks with IP network numbers.## network-number netmask## The term network-number refers to a number obtained from the Internet Network# Information Center.## Both the network-number and the netmasks are specified in# "decimal dot" notation, e.g:## 128.32.0.0 255.255.255.0#172.16.0.0 255.255.255.0192.168.0.0 255.255.255.0#配置IP地址的掩码##################################################2.2双网卡出口路由配置A、默认路由配置#######/etc/defaultrouter############################## 192.168.0.8#配置默认路由为192.168.0.8##################################################由于solaris只能配置一个默认路由,因此必须按照如下方法设置静态路由。
Oracle Solaris 10配置上网和修改主机名称
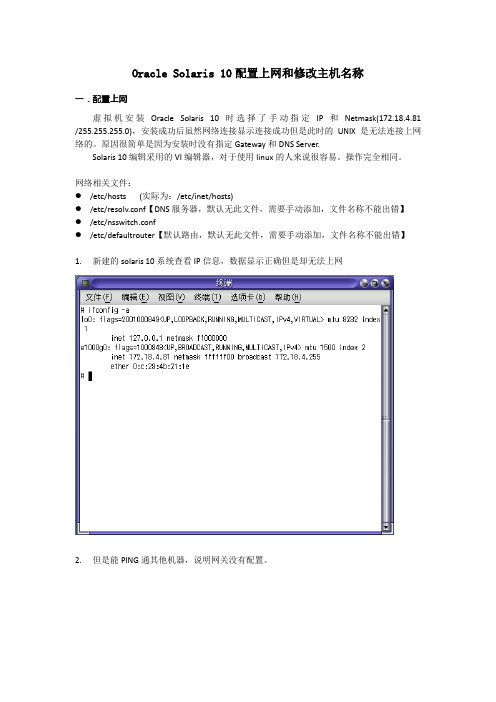
Oracle Solaris 10配置上网和修改主机名称一.配置上网虚拟机安装Oracle Solaris 10时选择了手动指定IP和Netmask(172.18.4.81 /255.255.255.0),安装成功后虽然网络连接显示连接成功但是此时的UNIX是无法连接上网络的。
原因很简单是因为安装时没有指定Gateway和DNS Server.Solaris 10编辑采用的VI编辑器,对于使用linux的人来说很容易。
操作完全相同。
网络相关文件:●/etc/hosts(实际为:/etc/inet/hosts)●/etc/resolv.conf【DNS服务器,默认无此文件,需要手动添加,文件名称不能出错】●/etc/nsswitch.conf●/etc/defaultrouter【默认路由,默认无此文件,需要手动添加,文件名称不能出错】1.新建的solaris 10系统查看IP信息,数据显示正确但是却无法上网2.但是能PING通其他机器,说明网关没有配置。
3.查看相关文件(/etc/hosts),由结果可以看出‘/etc/hosts’文件只是‘/etc/inet/hosts’文件的一个软链接。
具体查看【linux软链接和硬链接】,这里不描述!4.查看该文件,显示了主机的IP和名称信息5.创建resolv.conf,加入DNS Server。
【#vi /etc/resolv.conf】。
加入如下DNS信息。
6.修改nsswitch.conf。
【hosts :file dns】其实只添加了dns7.添加defaultrouter。
【#vi /etc/defaultrouter】输入网关即可:172.18.4.2548.修改完毕所有的文件保存即可生效,不需要重启【重启命令:init 6】,打开浏览器后即可正常上网!二.设置主机名称修改主机名称实际来说没什么意义,但是为了后来的SNMP获取信息的验证,修改主机名称才变得有意义主机名称修改很简单只需要修改4个文件即可:●/etc/nodename【默认已经填写,修改】●/etc/hostname.** 【具体因系统不同而不同,我的机器:hostsname.e1000g0】默认已经填写,修改●/etc/inet/hosts 【只需修改IP后面显示的名称即可,loghost不需要修改】●/etc/hosts 【只需修改IP后面显示的名称即可,loghost不需要修改】●/etc/inet/ipnodes【只需修改IP后面显示的名称即可,loghost不需要修改】(PS:ipnodes文件的位置因机器不同而不同,很多机器的ipnodes文件存在与‘/etc/ipnodes’。
- 1、下载文档前请自行甄别文档内容的完整性,平台不提供额外的编辑、内容补充、找答案等附加服务。
- 2、"仅部分预览"的文档,不可在线预览部分如存在完整性等问题,可反馈申请退款(可完整预览的文档不适用该条件!)。
- 3、如文档侵犯您的权益,请联系客服反馈,我们会尽快为您处理(人工客服工作时间:9:00-18:30)。
#ping 10.71.100.210
#ping 10.71.100.211
如果网络不通请检查网卡及网络是否物理隔断。
11.2
本节主要介绍双机系统的配置过程,INFOX GW系统采用双机主备组网方式。
----结束
启动资源组成功后,双机系统已经运行起来,执行如下命令,可查看双机资源组状态。
root@infox01#scstat -g
执行结果:
-- Resource Groups and Resources --
Group Name Resources
Resources:infox_rgserver_ipinfox_appinfoxdg_rs datadg_rsoracle_svr oracle_lsnr
数据库和应用合设情况下,/clustershell/appora/sun_sc3.1目录下文件:
sun_sc3.1
sun_sc3.1/etc
sun_sc3.1/etc/HW.smc
sun_sc3.1/bin
sun_sc3.1/bin/gethostnames
sun_sc3.1/bin/smgw_mon_start.ksh
scrgadm -a -jinfoxdg_rs-ginfox-rg -t SUNW.HAStoragePlus:2 -x GlobalDevicePaths="infox" -x FileSystemMountPoints='/export/home/infoxshare,' -y Resource_dependencies=server_ip
e1000g2: flags=1008843<UP,BROADCAST,RUNNING,MULTICAST,PRIVATE,IPv4> mtu 1500 index 3
inet 172.16.1.2 netmask ffffff80 broadcast 172.16.1.127
ether 0:14:4f:6a:fa:6e
e1000g0: flags=1000843<UP,BROADCAST,RUNNING,MULTICAST,IPv4> mtu 1500 index 2
inet 10.71.100.165netmask ffffff00 broadcast 10.71.100.255
groupname sc_ipmp0
#scrgadm-a -t HW.smgw
#scrgadm-a-jinfox_app-ginfox-rg-t HW.smgw
步骤 9
scswitch-Z -ginfox-rg
或者指定资源组切换到指定主机上启动:
scswitch-z -ginfox-rg–hinfox01
scswitch-z -ginfox-rg –hinfox02
sun_sc3.1/bin/monitor.sh
sun_sc3.1/README.smgw
----结束
编辑sun_sc3.1目录下相关文件的时候,对于如下加粗处需要根据实际情况修改,其它配置可使用默认值。
配置双机脚本的步骤如下。
Oracle数据库与短消息网关各应用模块运行于一套双机。
−编辑sun_sc3.1/bin目录下的start.sh、stop.sh、monitor.sh。
注册oradg资源:
scrgadm-a -jdatadg_rs-ginfox-rg -t SUNW.HAStoragePlus:2 -xGlobalDevicePaths="datadg" –Resource_dependencies=server_ip
参数“GlobalDevicePaths”对应的是需要注册的dg名。
-- Resource Groups --
Group Name Node Name State
---------- --------- -----
Group:infox_rginfox01Online
Group:infox_rginfox02Offline
-- Resources --
Resource Name Node Name State Status Message
11.2.1
执行如下操作将sun_sc3.1目录拷贝到infox用户目录下。
步骤 1
如果应用和数据库合设
infox>cd /export/home/infox
infox>cp -r ./clustershell/appora/sun_sc3.1/export/home/infox
步骤 2
smc>find sun_sc3.1
Resource: service_ipinfox01Online Online - LogicalHostname online.
Resource: service_ipinfox02Offline Offline - LogicalHostname offline.
Resource:infox_appinfox01Online Online
步骤 8
scrgadm-a -j oracle_lsnr-ginfox-rg-t SUNW.oracle_listener -x ORACLE_HOME=/opt/oracle/product/11-y Resource_dependencies=datadg_rs
注册资源
注册INFOX APP业务资源
-r-xr-xr-x 1 root bin 3336 Jul 19 2005SUNW.oracle_rac_server -> /opt/SUNWscor/oracle_server/etc/SUNW.oracle_rac_server
检查Oracle数据库在两个节点上,是否可以手动启动。
11.1.2
在infox01上执行如下命令,查看网卡的service_ip是否生效。
root@infox01#ifconfig -a
执行结果:
lo0: flags=2001000849<UP,LOOPBACK,RUNNING,MULTICAST,IPv4,VIRTUAL> mtu 8232 index 1
inet 127.0.0.1 netmask ff000000
11
关于本章
本章描述内容如下表所示。
标题
内容
11.1配置准备
介绍了在配置双机前的一些准备工作。
11.2配置双机
介绍了配置双机的过程和步骤。
11.3配置检验
介绍了检查双机配置的过程和步骤。
11.1
本节主要介绍双机系统配置准备工作。
11.1.1
在双机中,执行如下命令,查看需要使用的Data Service是否已安装。
ether 0:14:4f:6a:fa:6c
e1000g0:1: flags=1040843<UP,BROADCAST,RUNNING,MULTICAST,DEPRECATED,IPv4> mtu 1500 index 2
inet 10.71.100.210netmask ffffff00 broadcast 10.71.100.255
Resource: oracle_svrinfox02Offline Offline
Resource: oracle_lsnrinfox01Online Online
Resource: oracle_lsnrinfox02Offline Offline
以上是配置appora时的双机状态,配置app时的资源是service_ip、smc_app、smc_hadgs。配置ora时的资源是service_ip、oracle_svr、oracle_lsnr。后面的操作描述以appora为样例,app、ora操作都与其一致,只显示的资源不同而已。
root@infox01#ls -al /usr/cluster/lib/rgm/rtreg
执行结果:
-r-xr-xr-x 1 root bin 2855 Jul 19 2005 SUNW.HAStorage
-r-xr-xr-x 1 root bin 4836Jul 19 2005SUNW.HAStoragePlus
RT_BASEDIR=/export/home/infox/sun_sc3.1/bin;
在建立HW.smgw资源类型的链接之前,请先检查是否存在HW.smgw文件。如果有请执行如下命令删除该文件。
root@infox01#rm/usr/cluster/lib/rgm/rtreg/HW.smgw
分别在两个节点上执行如下命令,建立HW.smc资源类型的链接。
sun_sc3.1/bin/smgw_mon_stop.ksh
sun_sc3.1/bin/smgw_svc_start.ksh
sun_sc3.1/bin/smgw_svc_stop.ksh
sun_sc3.1/bin/smgw_probe.ksh
sun_sc3.1/bin/stop.sh
sun_sc3.1/bin/start.sh
步骤 3
scrgadm-a -L -ginfox-rg-lserver_ip
步骤 4
scrgadm-a -t SUNW.HAStoragePlus:2
步骤 5
scrgadm-a -t SUNW.oracle_server
scrgadm-a -t SUNW.oracle_listener
步骤 6
注册infoxdg资源:
e1000g3: flags=1000803<UP,BROADCAST,MULTICAST,IPv4> mtu 1500 index 6
