佳能扫描仪说明书
Canon DR-C225W II 扫描仪说明书
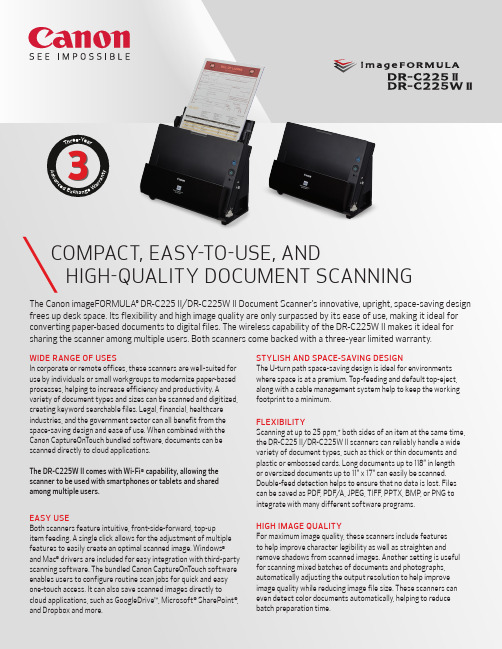
SPECIFICATIONS Type:Office Document Scanner Document Feeding :Automatic or Manual Document Size (U-Turn Path)Width: 2.0” – 8.5” Length: 2.12” – 14.0”Document Size (Straight Path)Width: 2.0” – 8.5” Length:2.12” – 14.0”Long Document Mode Up to 118.1"Folio Mode Up to 11” x 17"Document Weight:U-Turn Path: 14 – 34 lb. Bond Straight Path: 11 – 58 lb. Bond Feeder Capacity: Up to 30 Sheets Grayscale: 8-bit Color:24-bitScanning Element: One-Line Contact Image Sensor (CMOS)Light Source: RGB LEDScanning Modes: C olor, Grayscale, Black and White Color Dropout: RGB Optical Resolution: Up to 600 dpiOutput Resolution:100/150/200/240/300/400/600 dpiMax. Scanning Speeds *Simplex DuplexBW/Grayscale /Color Up to 25 ppm Up to 50 ipmInterface:DR-C225 II USB 2.0DR-C225W II USB 2.0 or Wi-Fi®Dimensions (H x W x D): 8.7’’ x 11.8’’ x 6.1’’ (with trays closed)Weight:DR-C225 II 5.95 lb.DR-C225W II6.17 l b.As an ENERGY STAR Partner, Canon U.S.A., Inc. has certified this model as meeting the ENERGY STAR energy efficiency criteria through an EPA recognized certification body. ENERGY STAR and the ENERGY STAR mark are registered U.S. marks. Canon is a registered trademark of Canon Inc. in the United States and may also be a registered trademark or trademark in other countries. imageFORMULA and CapturePerfect are registeredtrademarks of Canon Electronics, Inc. Microsoft, Sharepoint and Windows are either registered trademarks or trademarks of Microsoft Corporation in the United States and/or other countries. Mac is a registered trademark of Apple Inc. Wi-Fi is a registered trademark of the Wi-Fi Alliance. The name EPEAT is a registered trademark of EPEAT Inc. The EPEAT logo is a trademark of EPEAT Inc. Subscription to a third party cloud service is required for certain software, and is subject to third party cloud service providers terms and conditions. Neither Canon Inc. nor Canon U.S.A., Inc. represents or warrant any third-party product or feature referenced hereunder. All other referenced product names and marks are trademarks of their respective owners. The bundled software contains multiple components, some of which are manufactured by third parties. To the extent that such third party offerings come with limited warranties, such limited warranties are hereby passed to the purchaser, and Canon shall have no obligation or any liability with respect to such third-party offerings. Specifications and availability subject to change without notice. Not responsible for typographical errors.©2020 Canon U.S.A., Inc. All rights reserved.0320-DR-C225II/C225WIIB-PDF-IH* E xamples based on typical settings, rated in pages/images per minute with letter-sized documents, portrait-feeding direction, up to 200 dpi. Actual processing speeds may vary based on PC performance and application. **T he facts and product statistics about ErP Lot 6, EU RoHS and WEEE were obtained from Canon Electronics Inc. as of 2018. ***Calculations based on scanning speed and assumed daily time of use.Power Consumption:DR-C225 II 12.7 W or Less (Energy Saving Mode: 1.7 W or Less)DR-C225W II 15.6 W or Less (Energy Saving Mode: 4.3 W or Less)Suggested Daily Volume: Approx. 1,500 Scans ***Supported Microsoft Windows OS:W indows ® 7/8/8.1/10 Service Pack 1 or later (32-bit/64-bit) or later, Windows ® Server 2008 R2 2012/R2 2016 Service Pack 1 or later Supported MAC OS: 10.11 (DR-C225 II only), 10.12, 10.13Bundled Windows Software:I SIS/TWAIN Driver; Canon CaptureOnTouch, Downloadable Windows Software :Nuance eCopy PDF Pro Office, Cardiris Bundled MAC Software: T WAIN Driver; Canon CaptureOnTouch Downloadable Mac Software: CardirisOptions: Exchange Roller Kit, Flatbed Scanner Unit 102, Flatbed Scanner Unit 201, eCarePAK Extended Service Other Features:A utomatic Color Detection, Automatic Page SizeDetection, Automatic Resolution Setting, Background Smoothing, Character Emphasis, Color Dropout/Red Color Enhance, Deskew, Duplex, Edge Emphasis, Face-Up Feeding, Folio Mode, Image Rotation, Long Document Mode, Moiré Reduction, MultiStream, Pre-Scan, Prevent Bleed-Through/RemoveBackground, Shadow Cropping / Removal, Simplex, Skip Blank Page, Text Enhancement, Text Orientation Recognition, Three-Dimensional Color Correction, Ultrasonic Double-Feed Detection, User PreferencesItem Number:DR-C225 II 3258C002AA DR-C225W II 3259C002AAENVIRONMENT IN MINDThe DR-C225 II and DR-C225W II scanners are registered EPEAT silver and meet ENERGY STAR® guidelines for energy efficiency. They also comply with the ErP Lot 6 directive for energy consumption and the EU RoHS and WEEE directivesfor the reduction of hazardous substances and waste products.**CUSTOMER CAREFor investment protection, eCarePAK options are available to extend service beyond the initial three-year advancedexchange warranty period. This helps save on costs associated with post-purchase maintenance and helps maximize uptime throughout the product life.。
Canon 佳能彩色图像扫描仪 说明书

佳能彩色图像扫描仪CanoScan N670U/N676U/N1240U 快速入门指南警告当您使用本产品时,应该注意以下法律事项。
•扫描钞票(货币)、政府债券和公共证明等文件将构成违法行为而被检控。
•根据法律,您可能需要得到扫描内容的版权或其它法律权利的拥有人的授权。
如果您对扫描内容抱有任何疑问,请事先向法律顾问进行咨询。
•CanoScan和ScanGear为Canon公司的商标。
•Adobe® Acrobat®和Photoshop®为Adobe Systems Incorporated的商标。
•Macintosh、Power Macintosh和Mac OS为Apple Computer公司在美国及其它国家的注册商标。
•Microsoft和Windows为微软公司在美国及其它国家的注册商标。
•OmniPage SE为ScanSoft,Inc.的商标。
•上述未有提及的名称和产品为其各自公司的商标或注册商标。
版权©2001 Canon公司。
版权所有,翻印必究。
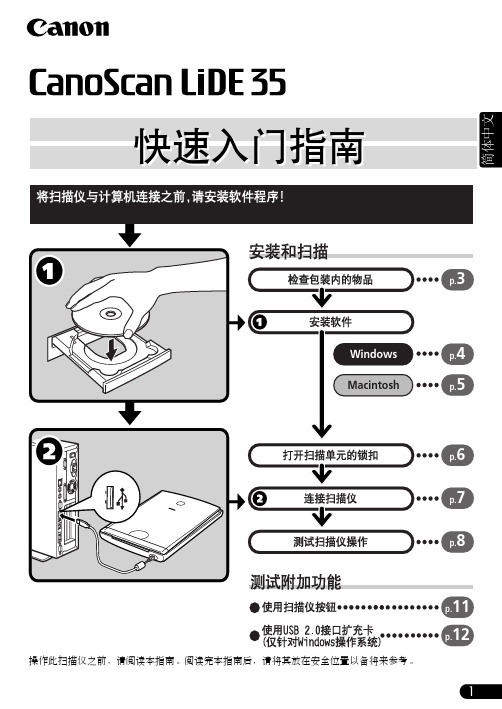
确认包装内的物品扫描仪及配件软件和文件• CanoScan 安装光盘包含软件程序、PDF 手册、故障排除指南等。
• Adobe Photoshop 光盘(仅CanoScan N1240U 附带)• 快速入门指南(本指南)• 附加文件打开扫描仪的锁扣在连接电脑前,先将扫描仪解锁。
若没有解锁,可能会出现故障或其它问题。
1.卸下扫描仪的封条。
2.轻轻地翻起扫描仪。
3.把锁扣开关推到开锁标记。
4.把扫描仪翻回到水平位置。
扫描仪USB 接口电线确保已关闭电脑与其它连接装置的电源。
使用附属的USB 接口电线将扫描仪连接至电脑。
• 本扫描仪没有电源开关。
打开电脑电源开关则立即接通电源。
进入下一页。
跳至第6页。
• 若不作注解,本手册使用的Windows 和Macintosh 通用屏幕图像取自Windows 平台。
• 本手册屏幕图像使用的扫描仪为N1240U 。
佳能MF4700系列打印机扫描仪器使用教程

佳能MF4700系列打印机扫描仪器使用教程
————————————————————————————————作者: ————————————————————————————————日期:
ﻩ
1、扫描仪准备
①按扫描按钮,确认扫描按钮旁绿灯亮,看显示屏上有“计算机”,点击右侧“ok”按键
②显示扫描选项,ok按钮周边的上下键可以选择,这里选择“彩色扫描”,点击“ok”键
③屏幕显示正在扫描,蓝色条在<取消>上,不用管,等待计算机的操作。
2、计算机准备
①在左侧功能区找到“扫描”,打开,点击下面两种方式都能打开
②选择文件类型,图片、PDF等都行
③点击下面“显示详细信息”,可以设置分辨率、保存位置等
④点击下方“扫描”按钮,扫描仪开始工作,扫描完成后,自动保存在设置的文件夹中,扫描完成。
注意事项:
打印机上扫描仪准备好后电脑长时间不操作,打印机会显示错误,点一下“ok”键即可取消。
佳能 CanoScan LiDE 700F 扫描仪 快速说明书
快速安装指南 使用说明书Q T 52204V 01在使用本产品之前,请务必先仔细阅读本使用说明书。
请务必妥善保管好本书,以便日后能随时查阅。
请在充分理解内容的基础上,正确使用。
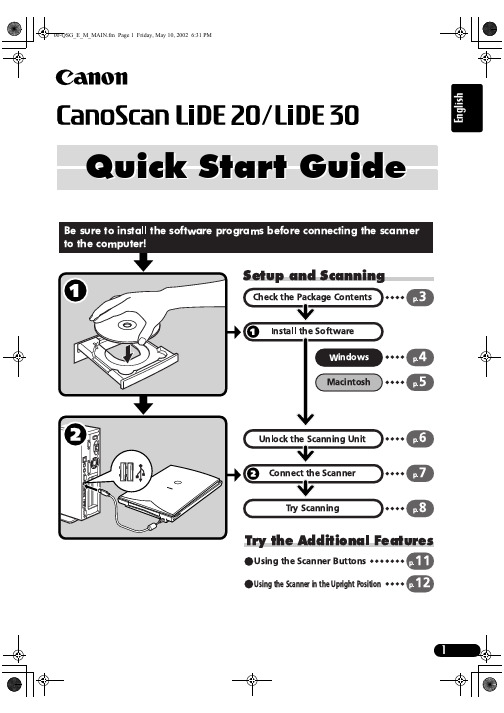
扫描仪快速安装指南操作本扫描仪之前请阅读本指南。
阅读完本指南后,请将其妥善保管以备日后参考。
目录安全注意事项............................2使用扫描仪按钮. (10)包装内的物品............................4使用MP Navigator EX扫描 (11)安装软件................................5扫描胶片. (12)准备扫描仪..............................8放置扫描仪.. (16)测试扫描................................9规格.. (17)1安全注意事项2安全注意事项使用扫描仪和附件前请阅读并留意以下注意事项。
指示有关操作的警告事项,若未正确地执行,可能导致死亡或人身伤害。
为了能安全地使用扫描仪,请务必留意这些警告。
指示有关操作的注意事项,若未正确地执行,可能导致人身伤害或财产损失。
为了能安全地使用扫描仪,请务必留意这些注意。
关于放置位置•请勿将扫描仪放置在易燃液体(如酒精或稀释剂等)附近。
如果内部电器部件与易燃液体接触,可能会导致火灾或电击。
•请勿将扫描仪放置于摇晃的架子、不稳固的表面或经常振动的表面上。
如果扫描仪掉落,可能会造成伤害。
•安装支架时,请仔细阅读本指南以正确放置扫描仪。
除非必要,请始终保持文档盖板关闭。
错误地安装支架可能使扫描仪侧翻并造成伤害。
•请勿将扫描仪推入狭窄的橱柜内或在其上放置桌布或将其放在厚垫上。
若扫描仪发热,则可能会导致火灾或电击。
关于电源•请勿将重物放置于USB 电缆线上,或是拉拽、过度弯曲、扭曲电源线或将其打结。
受损的电线可能会导致火灾或电击。
•务必完全插入USB 电缆线。
佳能MF4700系列打印机扫描仪器使用教程

佳能MF4700系列打印机扫描仪器使用教程
1、扫描仪准备
①按扫描按钮,确认扫描按钮旁绿灯亮,看显示屏上有“计算机”,点击右侧“ok”按键
②显示扫描选项,ok按钮周边的上下键可以选择,这里选择“彩色扫描”,点击“ok”键
③屏幕显示正在扫描,蓝色条在<取消>上,不用管,等待计算机的操作。
2、计算机准备
①在左侧功能区找到“扫描”,打开,点击下面两种方式都能打开
②选择文件类型,图片、PDF等都行
③点击下面“显示详细信息”,可以设置分辨率、保存位置等
④点击下方“扫描”按钮,扫描仪开始工作,扫描完成后,自动保存在设置的文件夹中,扫描完成。
注意事项: 打印机上扫描仪准备好后电脑长时间不操作,打印机会显示错误,点一下“ok ”键即可取消。
Canon Canoscan llide 35扫描仪 快速说明书
7 选择 目标 您可以选择 打印 或 图像显示 选择 打印 后 输出分辨率被设定为 300 dpi 选择 图 像显示 后 则被设定为 150 dpi 本例中选择 打印
测试扫描仪操作
9
简体中文
测试扫描仪操作
8 选择 输出尺寸 可以从下列选项进行选择 如果您在步骤 7 中选择 打印 可变大小 / 4"x6" / A4 / Letter / 自定义设置 如果您在步骤 7 中选择 图像显示 可变大小 / 640 x 480 / 800 x 600 / 1024 x 768 / 1600 x 1200 / 2048 x 1536 / 自定义设置
ArcSoft PhotoStudio (35 MB / 20 MB) - 图像编辑程序 可使您从扫描仪载入图像 对图像进行编辑和修饰 并添加一些特殊效果和增强特色
RosettaStone(30 MB)(Windows)/ScanSoft OmniPage SE(80 MB)(Macintosh)- OCR( 光学字符辨识 ) 程序
PhotoStudio 启动
8
PhotoStudio 启动
3 单击 文件 菜单并选择 选择资源 选择您扫描仪的型号并单击 选定 按钮 或 确定 按钮 对于 Macintosh
对于 Windows
• 第一次进行此设定后 第二次开始就不需对相 同的扫描仪进行此设定了
• 如果您选择不同的扫描仪或数码相机 则将需 要重新设定
PDF Portable Document Format 文档是一 种文件格式 可以用 Adobe Acrobat Reader/ Adobe Reader 等应用程序进行显示和打印 利 用扫描仪上的 FILE 按钮或 CanoScan Toolbox 中的文件按钮 您可以方便地用您的图像创建 PDF 文件 您也可以制作多页面的 PDF 文件并 创建文本可搜索性的 PDF 文件
佳能 canoscan D646U彩色图像扫描仪 快速说明书

佳能彩色图像扫描仪CanoScan D646U 快速入门指南警告当您使用这产品时,应该注意以下法律事项:•扫描某些文件,如钞票、政府债券和公共证书可能违法而被检控。
•根据法例,您可能需要得到别人授权,通过版权及法律权利,才可扫描该项目。
如果您对扫描项目存在任何怀疑,应事先征询法律意见。
•CanoScan, ScanGear 和 Canon Plug-in Module 为佳能公司的商标。
•Adobe®和 Acrobat®为Adobe Systems Incorporated的商标。
•Macintosh, Power Macintosh 和 Mac OS 为Apple Computer, Inc.在美国及其它国家注册的商标。
•iMac 为Apple Computer, Inc.商标。
•Microsoft 和 Windows 为微软公司在美国和其它国家的注册商标。
•OmniPage SE 为ScanSoft, Inc.商标。
•上述未有提及的名称和产品为它们各自公司的商标或注册商标。
版权©2001 佳能公司。
版权所有,翻印必究。
D646U 快速入门指南11.确认包装内的物品扫描单元及配件软件和文件• CanoScan CanoScan安装光盘安装光盘包含软件程序,PDF手册,故障排除指南等。
• 快速入门指南(本指南)• 附加文件2.打开扫描单元的锁扣在插入交流电适配器前在插入交流电适配器前, , , 先将扫描仪解锁,若没有解锁先将扫描仪解锁,若没有解锁先将扫描仪解锁,若没有解锁, , , 可能会令扫描仪不能操作或导致其可能会令扫描仪不能操作或导致其他问题。
1.卸下扫描仪前端的封口。
2.轻轻地翻过扫描仪。
3.把锁扣开关推到开锁标记。
4.把扫描仪翻回水平位置。
扫描单元交流电源适配器USB接口电线D646U 快速入门指南23.连接扫描仪确保已关闭计算机及其他装置的电源。
1.使用提供的使用提供的USB USB USB接口电缆连接扫描仪到计算机。
佳能iR2525i扫描指南
1-2
系统要求
使用网络扫描仪前
用计算机从扫描仪接收数据,需要在计算机上安装扫描仪驱动程序(Color Network ScanGear)。另外, 需要通过 ScanGear Tool 选择扫描仪。 扫描仪驱动程序使用与打印机驱动程序相同的 User Software CD-ROM 安装。
1-1
系统要求
使用扫描仪驱动程序需要以下系统环境。
软件:
w 操作系统:
Windows XP Windows Server 2003 Windows Vista Windows Server 2008 Windows 7
w 应用程序:
兼容 TWAIN 的应用程序 (Adobe Acrobat、Microsoft Office 2000 及更高版本的 Microsoft Word/Excel/ PowerPoint 等 )
扫描基本操作
将扫描仪切换到在线和离线 ..................................................................................................................... 2-2 从稿台玻璃扫描 ............................................................................................................................................. 2-3 从输送器扫描 .................................................................................................................................................. 2-6 查看联机帮助 .................................................................................................................................................. 2-9
佳能 CanoScan 5600F 扫描仪 说明书

扫描仪快速安装指南使用说明书在使用本产品之前,请务必先仔细阅读本使用说明书。
请务必妥善保管好本书,以便日后能随时查阅。
请在充分理解内容的基础上,正确使用。
1操作此扫描仪之前请阅读本指南。
阅读完本指南后,请将其妥善保管以备日后参考。
包装内的物品扫描仪和附件文档•《快速安装指南》(本文档)•附加文档安装光盘•软件程序-ScanGear(扫描仪驱动程序)-MP Navigator EX (实用程序软件)-Solution Menu (面板式菜单软件)-ArcSoft PhotoStudio (图像编辑软件)•电子手册-《扫描指南》(电子手册)(用于ScanGear 、MP Navigator EX 和故障排除)-用于捆绑应用程序的手册*在本指南中,使用Windows Vista 操作系统屏幕截图作为所有操作系统共同的图解说明。
目录包装内的物品............................1使用MP Navigator EX 扫描...............7安装软件................................2扫描胶片...............................8准备扫描仪..............................4规格...................................11测试扫描................................5安全注意事项 (13)使用扫描仪按钮 (6)快速安装指南扫描仪USB 电缆线胶片固定板(用于35毫米胶片条/幻灯片)电源线安装软件2安装软件1将安装光盘装入驱动器。
对于Macintosh 操作系统:请双击[安装(Setup)]图标。
在验证对话框中输入管理员ID 和密码。
对于Windows 2000/XP 和Macintosh 操作系统,跳过步骤2并转到步骤3。
2对于Windows Vista 操作系统,出现自动播放对话框时,运行安装程序,然后出现用户帐户控制对话框时,单击[继续]以继续安装。
CANON 扫描仪 CANOSCAN D1250U2F 说明书
佳能彩色图像扫描仪CanoScan D1250U2F快速入门指南•CanoScan 和 ScanGear 为佳能公司的商标。
•Adobe ®、 Acrobat ® 和 Photoshop ®为 Adobe Systems Incorporated 的商标。
•Microsoft 和 Windows 为微软公司在美国和其它国家的注册商标。
•上述未有提及的名称和产品为它们各自公司的商标或注册商标。
在本指南中屏幕图像取自Windows XP ,其说明为各操作系统通用。
Windows XP 的屏幕图像可能与实际屏幕图像有所不同。
警告当您使用这产品时,应该注意以下法律事项:•扫描某些文件,如钞票、政府债券和公共证书可能违法而被检控。
•根据法例,您可能需要得到别人授权,通过版权及法律权利,才可扫描该项目。
如果您对扫描项目存在任何怀疑,应事先徵询法律意见。
应将电源插座安装在扫描仪近处,便于接插。
只有使用扫描仪附带的铁氧体磁芯屏蔽电缆线才能符合EMC 标准的技术要求。
概要1D1250U2F 快速入门指南D1250U2F 快速入门指南2安全注意事项请您在使用此扫描仪前,仔细阅读以下注意事项。
有关摆放位置警告切勿把扫描仪放近易燃液体,如含酒精物料或稀释液。
若内部电子零件与易燃液体接触,可能会导致火警或电击。
•切勿把以下物品放在扫描仪上。
若内部电子零件与这些物品接触,可能会导致火警或电击。
-金属物件,如项炼-盛放液体容器,如杯,花瓶及花盆如果以上物品或液体进入扫描仪,请立即拔出AC 适配器,与零售店或者佳能客户支持中心联系。
注意切勿把扫描仪放置在以下处所。
可能会引起火警或电击。
- 极端潮湿之处- 阳光直接照射之处- 高温之处- 明火附近•切勿把扫描仪放在摇晃的支架,不稳定平面或经常受到震荡的平面上。
如果扫描仪掉落,可能会造成伤害。
•切勿把重的物品放在扫描仪上。
物品可能会掉落,并造成伤害。
有关电源供应警告•切勿损毁、毁坏或修改AC 适配器。
Canon DR-2580C 文稿扫描仪 说明书

1. 文稿 ................................................ 18 2. 准备托盘 ............................................ 20
为取得本软件的使用权,您同意遵守本协议的条款和条件。 1. 许可授权:佳能授予您个人的、非独占的、仅在单台计算机上使用软件的权利。只要能够保证在任何时候仅在一台计算机使 用软件,您可以将软件物理上从一台计算机转移到另一台计算机。 除非本协议有明确说明,您不得将软件转让、转许、出卖、出租、租赁、借贷或转让给第三者,或者未经有关政府的必要的许 可将软件从其取得地送出或带入其它国家,或者拷贝、复制、翻译或转换软件和附属文件的程序语言。 除非适用法律明确许可,您不得对软件变更、修改、反汇编、反编译或进行逆向工程,您不得让第三者实施上述行为。 2. 备份:您可以仅为备份之用将本软件复制一份,或者将软件复制到您的计算机的永久性存储设备 (如硬盘)中,而把原盘作 为备份。除非适用法律明确许可,采用其它任何方式复制软件均为违反本协议。您必须在备份软件中复制并保留版权声明。 3. 支持和更新:佳能、佳能的附属公司、其经销商或代理商不负责为您维护软件或帮助您使用软件。同时,也不提供软件的升 级版本、修改或支持等。 4. 有限保证及免责声明:佳能、佳能的附属公司、其经销商或代理商不保证软件不间断的运行、无错误或错误纠正。因此,软 件是在 “现在状态”的基础上向您许可提供的,无任何形式的保证。对存有软件的光盘自购买日起 90 日内 (凭发票为据)在正常使用的 情况下保证无材料或制造缺陷。本有限保证不适用任何意外、滥用、错误使用、或非您本人使用而引起的光盘损坏。 佳能、佳能的附属公司、其经销商或代理商对软件及其附属文件的适销性或针对特殊用途的适用性均不提供默视保证。 佳能、佳能的附属公司、其经销商或代理商对由于软件及其附属文件、或使用软件及其附属文件而引起或造成的必然或偶然的 损失 (如利润损失、费用支出等)不承担责任。 佳能、佳能的附属公司、其经销商或代理商无义务保护用户免受由于有第三者就软件或其附属文件或使用软件或附属文件侵犯 其知识产权而提起的投诉或诉讼的损失。 以上所述就是佳能所承担的全部责任及您拥有的有关软件及其附属文件的独有补救方法。 5. 期限:本协议于打开密封光盘包时开始生效,并保持有效直至终止。您可以通过销毁本软件及其备份来终止本协议书。如果 您未能遵守本协议书条款,本协议书将自行终止。在协议书终止时,佳能除行使其法定权利外,您必须立即销毁本软件及其备份。 6. 美国政府限制权利声明:本软件以限制权利的方式提供。使用、复制、或公开软件受到下述规定限制:DFARs 252.227-7103 中 (c) (1) (ii) 关于技术数据和计算机软件权利条款的章节,或者 FAR 52.227-19 中 (c) (1) 和 (2) 关于商用计算机软件限制权利条款的章节。 7. 可分离性:如果本协议任何条款被任何有管辖权的法院或法庭宣布或查明不合法,该条款在该法院或法庭的管辖范围内将视 为无效,但其它条款依然保持全部约束力和效力。 8. 承认:打开密封光盘包,则表示您已阅读并理解本协议的条款和条件。您也同意本协议是您与佳能之间就本主题的全面的和 排他的一致协议声明,它取代您与佳能之间就本主题事宜的所有口头或书面的意向或以往的协议及任何往来信息。本协议任何修订在没有 佳能授权代表签字的情况下均为无效。 如果您对本协议有任何疑问,或者出于任何原因您想要和佳能联系,请写信至佳能在当地的附属公司。
Canon DS-520 扫描仪用户指南说明书
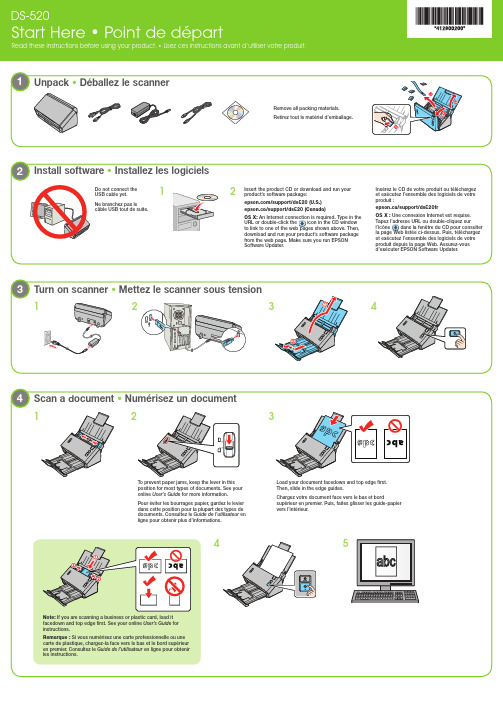
An Internet connection is required. Type in the URL or double-click the icon in the CD window to link to one of the web pages shown above. Then, Tapez l’adresse URL ou double-cliquez sur l’icône dans la fenêtre du CD pour consulter la page Web listée ci-dessus. Puis, téléchargezEPSON is a registered trademark and EPSON Exceed Your Vision is a registered logomark of Seiko Epson Corporation.Mac and OS X are trademarks of Apple Inc., registered in the U.S. and other countries.General Notice: Other product names used herein are for identification purposes only and may be trademarks of their respective owners. Epson disclaims any and all rights in those marks. This information is subject to change without notice.EPSON est une marque déposée et EPSON Exceed Your Vision est un logotype déposé de Seiko Epson Corporation.Mac et OS X sont des marques de commerce d’Apple Inc., déposées aux États-Unis et dans d’autres pays.Avis général : Les autres noms de produit figurant dans le présent document ne sont cités qu’à titre d’identification et peuvent être des marques de commerce de leurs propriétaires respectifs. Epson renonce à tous les droits associés à ces marques.L’information contenue dans le présent document peut être modifiée sans préavis.© 2014 Epson America, Inc., 7/14P rinted in XXXXXX CPD-41787P ays d’impression : XXXXXX Double-click the icon on your desktop or Apps screen to access the online Double-click the icon in Double-cliquez sur l’icône sur le bureau ou sur l’écran Applications afin Guide de l’utilisateur en ligne.Double-cliquez sur l’icône dans le dossier Guide de l’utilisateur en ligne.Navigate to the Apps screen and select Click or EPSON Software Updater Cliquez sur ou EPSON Software Updater FrançaisEnglish lick Manage Job from the toolbar, then click Add in the Job Management window.Specify desired Job Settings such as image quality and destination, then click OK .liquez sur Gérer le travail à partir de la barre d’outils, puis cliquez sur la fenêtre Liste des travaux. Spécifiez les Paramètres des travaux souhaités tels que la Clickor Applications Cliquez surou。
CanoScanLiDE100 扫描器用户指南
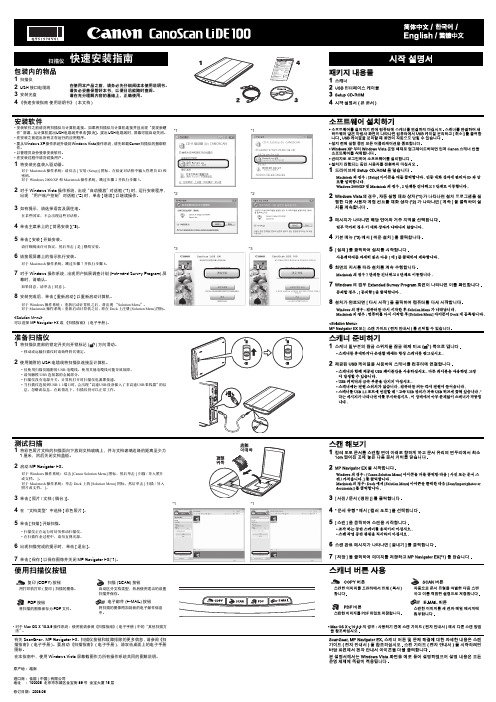
5 Click [Install] to start installation.
*3
*3
Carefully read the License Agreement, and then click [Yes] to proceed.
6 Follow the on-screen instructions to perform the installation.
*2
*2
dialog box (*2) appears.
3 If prompted, select your language and place of residence.
In some countries, these dialog boxes will not appear.
4 Click [Easy Install] on the main menu (*3).
document glass at least 1 cm away from the edges of the document glass, and then close the document cover.
2 Start MP Navigator EX.
For Windows: Double-click the [Canon Solution Menu] icon, then click [Scan/import photos or documents.]. For Macintosh: Click the [Solution Menu] icon in the Dock, then click [Scan/import photos or documents.].
2 对于 Windows Vista 操作系统,出现“自动播放”对话框 (*1) 时,运行安装程序,
佳能扫描仪图解
佳能扫描仪图解佳能扫描仪图解2、点击“开始”菜单——>控制面板——>打印机和其它硬件——>扫描仪和照相机——>双击扫描仪名称——>弹出的“扫描仪和照相机向导”中点击“下一步”——>根据实际扫描的文件类型选择“图片类型”3、“彩色照片”(如果你扫描的黑白文字信息建议你选择“黑白照片或文字”,这样做会使扫描出来的信息更加清晰可辨;如果是相片请选择“彩色相片”)——>点击“预览”(等待扫描预览)——>点击“下一步”——>输入“照片名称”、保存图片的格式(通常为JPG)、选择保存该扫描图片的存放位置,点击下一步——>等待扫描结束生成图片,选择“什么都不做。
我已处理完这些照片”点击下一步——>扫描完成。
4、现在你可以打开该扫描图片,查看是否扫描完整!注意事项如果想要扫描彩色照片,请在扫描文件类型中选择“彩色照片”,只有这样扫描出来的图片才有色彩;当你想要扫描黑白文字的.普通文档时,可以选择“黑白照片或文字”,这样可以提高扫描速度,提高效率,同时扫描出来的图片将是黑白的;扫描仪的使用方法其实就是上述两个步骤,为了确保扫描图片清晰可见,请保持被扫描文件的清晰、平整。
产品概览佳能(CANON) | 更多扫描仪产品类型:馈纸式ADF+平板扫描光源:LED接口类型:高速USB2.0 扫描方式:CMOS标准分辨率:100×100dpi/150×150dpi/200×200dpi/240×240dpi/300×300dpi /400×400dpi/600×600dpi/1200×1200dpi/2400×2400dpi 扫描速度:20ppm/36ipm网友评分:0.0 参数报价图片点评评测论坛经销商。
佳能DR280C扫描仪参数设置及操作说明
佳能DR280C扫描仪参数设置及操作说明佳能DR-2580C 扫描仪参数设置及操作说明一、农省行指定扫描仪的默认参数设置和基本功能农行使用扫描仪默认参数为:200dpi 的分辨率、黑白模式、删除空百页、自动裁减、自动纠编、自动识别图像方向、最佳压缩比。
二、首次使用扫描仪时的软、硬件安装及配置(一)安装驱动将佳能DR-2580C 扫描仪驱动光盘放入光驱后,光盘将自动运行。
选择典型安装选择安装点击 Next 按钮点击 Yes 按钮点击 Finish 完成驱动的安装(二)安装佳能DR-2580C 硬件检查包装清单。
包装中有机器,数据线,电源线,驱动光盘,说明书,滚轮等。
去除包装材料并安装滚轴按住出纸托盘,除去橙色胶带打开送纸托盘,按压OPEN 按钮安装滚轴装置打开上部装置,除去保护膜安装减速滚轴关闭上部装置连接好电源线和电脑数据线,打开机身电源开关。
安装平板单元1、先将平板背面的扫描光头锁开关打开打开后盖,除去保护膜,再关闭后盖2、将扫描仪主机部分平放到平板上并平推至卡槽固定3、将平板末端的卡钩装置上推至扫描仪主机后的链接部分,完成固定。
4、将扫描仪平板的数据线与主机相连(三)安装佳能信贷扫描软件。
(1)双击“佳能信贷扫描软件安装程序(2)安装界面,如下图: 安装程序会提示您先安装必须的组件,点击“安装”按钮继续,等待组件安装完成。
(3)组件安装完成后,安装界面如下图:(4)点击下一步,直至出现安装完成界面,点击“关闭”按钮退出安装程序,如下图:三、日常使用时的扫描仪操作客户经理首次对佳能DR-2580C进行完扫描仪软硬件的安装后,日常即可进行扫描仪的使用,无需再行配置。
扫描仪日常使用步骤如下图所示:佳能信贷扫描软件界面概览。
工具栏按钮介绍:新建文档打开已有PDF文档保存当前文档选择使用自动进纸器或者平板进行扫描使用推荐设置则将扫描仪参数设置。
佳能扫描仪说明书
佳能扫描仪说明书篇一:扫描仪的使用方法与技巧扫描仪使用方法与技巧不少用户在购买扫描仪后,常常会发现扫描图片的品质不太理想,实际上,出现这种情况,主要的还是与用户使用扫描仪的技巧密切相关。
准备工作要做好普通用户在使用扫描仪之前,很有必要对扫描仪的基本原理做个初步的了解,这样将大大有助于正确合理地使用扫描仪。
扫描仪获取图像的方式是将光线照射到待扫描的图片或文档上,光线反射后由感光元件——CCD(Charge Coupled Device,电荷耦合元件)或CISr)接收,由于图像色彩深浅不一,致使反射光强度也各不相同,感光元件可以接收各种强度的光,并转换为二进制的数字信号,最后由控制扫描的软件将这些数据还原为显示器上可以看到的图像.为了将图像客观真实地反映出来,必须保证光线能够平稳地照到待扫描的稿件上,笔者建议大家在扫描前可以先打开扫描仪预热5至10分钟,使机器内的灯管达到均匀发光状态,这样可以确保光线平均照到稿件每一处。
此外,不要因扫描仪的倾斜或抖动影响到扫描品质,用户应尽量找一处比较平坦、稳定的地方放置,一些用户为节约办公空间而直接将扫描仪置于机箱上方的做法万万不可取。
现在,佳能公司的N系列扫描仪都实现了直立扫描,配有专用扫描仪支架,有效的节约了办公空间。
此外,扫描前仔细检查玻璃上方是否有污渍,若有一定要用软布擦拭干净,以免影响扫描效果。
预扫步骤不可少为了节约扫描时间,一些用户贪图方便,常常忽略预扫步骤。
其实,在正式扫描前,预扫功能是非常必要的,它是保证扫描效果的第一道关卡。
通过预扫有两方面的好处,一是在通过预扫后的图像我们可以直接确定自已所需要招描的区域,以减少扫描后对图像的处理工序;二是可通过观察预扫后的图像,我们大致可以看到图像的色彩、效果等,如不满意可对扫描参数重新进行设定、调整之后再进行扫描。
限于扫描仪的工作原理,扫描得到的图像或多或少会出现失真或变形。
因此,好的原稿对得到高品质的扫描效果是格外重要的,而品质不佳的原稿,即使通过软件处理可以改善扫描效果,但终究属亡羊补牢的做法。
Canon_CanoScan_9000F_Manual
6 对于 Windows,请仔细阅读请允许所有安装向导进程屏
幕,然后单击下一步。
7 请按照屏幕上的指示执行安装。
对于 Macintosh,跳过步骤 8 并转到步骤 9。
6
8 对于 Windows,出现 Extended Survey Program 屏幕
时,请确认信息。
如果同意,请单击同意。
9 安装完成时,按照屏幕上的说明操作。
3 启动 MP Navigator EX。
对于 Windows:双击 Canon Solution Menu 图
标,然后单击扫描 / 导入照片或文档。
对于 Macintosh:单击 Dock 中的 Solution Menu 图标,然后单击扫描 / 导入照片或文档。
4 单击照片 / 文档 ( 稿台 )(*1)。
警告
本产品会放射低水平的磁通量。如果使用心脏起搏器并感到异常,请远离本产品并向医生咨询。
关于放置位置
警告
• 请勿将扫描仪放置在易燃液体 ( 如酒精或稀释剂等 ) 附近。如果内部电器部件与易燃液体接触,可能会 导致火灾或电击。
注意
• 请勿将扫描仪放置在高湿度、阳光直射、高温和接近火源的地方。可能会导致火灾或电击。 • 请勿将扫描仪放置于摇晃的架子、不稳固或经常振动的表面上。如果扫描仪掉落,可能会造成伤害。 • 请勿将扫描仪推入狭窄的橱柜内或在其上放置桌布或将其放在厚垫上。如果扫描仪发热,可能会导致
佳能CanoScan扫描仪快速入门指南说明书
Quick Start GuideGuide to the Manuals•CanoScan and ScanGear are trademarks of Canon Inc.•Adobe ® and Acrobat ® are trademarks of Adobe Systems Incorporated.•Microsoft and Windows are registered trademarks of Microsoft Corporation in the U.S. and other countries.•Macintosh, Power Macintosh and Mac OS are trademarks of Apple Computer, Inc., registered in the U.S. and other countries.•ScanSoft and OmniPage are trademarks of ScanSoft, Inc.•Other names and products not mentioned above may be trademarks or registered trademarks of their respective companies.In this guide the screen shots are taken with Windows XP in the explanation common to all operating systems.Use of a shielded cable with the ferrite core(s) provided with the scanner is necessary to comply with the technical requirements of the EMC Directive.WarningWhen you use this product, you should pay attention to the following legal issues:•Scanning of certain documents, such as bank notes (bank bills), government bonds and public certificates, may be prohibited by law and may result in criminal and/or civil liability.•You may be required under law to obtain authorization from a person possessing copyrights or other legal rights to the item being scanned.If you are uncertain of the legality of scanning any particular item, you should consult your legal adviser in advance.Check the Package ContentsScanner and AccessoriesDocuments and Software Programs•Quick Start Guide (this guide)•Additional documents•CanoScan Setup Utility CD-ROMScanGear CS (25 MB / 5 MB) - Scanner DriverIt allows you to scan and load images from the scanner.CanoScan Toolbox (5 MB / 3 MB) - Scanning Utility ProgramIt enables you to scan images and copy (print), attach images to e-mail messages or save images with simple steps. It also works with the scanner buttons.ArcSoft PhotoStudio (30 MB / 19 MB) - Image Editing ProgramIt allows you to load images from the scanner, edit and retouch them, and apply special effects and enhancements.ArcSoft PhotoBase (75 MB / 5 MB) - Photo Album ProgramIt allows you to create and edit image albums, perform image searches and create slide shows.ScanSoft OmniPage SE (65 MB / 48 MB) - OCR (Optical Character Recognition) Program It converts characters scanned from a book, magazine or newspaper into text data for editing or digital transmission.Adobe Acrobat Reader (24 MB / 24 MB) - Electronic Manual Viewer Program (PDF manual)Electronic manuals for the above software programs (HTML (5 MB) and PDF manuals)ScannerUSB Interface CableInstall the Software (Windows)1Turn the computer on.2Place the CanoScan Setup Utility CD-ROM in the drive.After you select your language, the CanoScan Setup Utility main menu will display.3Click [Install the Software].Read the SOFTWARE USER LICENSE AGREEMENT. Click [Yes] if you accept the terms.The [Install] window will display.4Click [Start Installation].You will install six software programs and the Scanning Guide (HTML format manual).5The installation procedure will start.Follow the on-screen message prompts and click [Yes] or [Next] to continue the installation.6When the installation is complete, click [Yes].The computer will restart.7After Windows restarts, remove the CD-ROM fromthe drive and store it in a safe place.Continue on P . 6.If the "Found New Hardware Wizard" or"Add New Hardware Wizard" appears, click [Cancel].E Install the Software (Macintosh)1Turn the computer on.2Place the CanoScan Setup Utility CD-ROM in thedrive.After you select your language, the CanoScan Setup Utilitymain menu will display.3Click [Install the Software].Read the SOFTWARE USER LICENSE AGREEMENT. Click [Yes] ifyou accept the terms.The [Install] window will display.4Click [Start Installation].You will install six software programs and the Scanning Guide(HTML format manual).5The installation procedure will start.Follow the on-screen message prompts and click [Yes], [Next] or[Install] to continue the installation.6When the installation is complete, click [Yes].The computer will restart.7After restarting, remove the CD-ROM from the driveand store it in a safe place.If the “...Would you like to look for the softwareon the Internet?” appears, click [Cancel].If no window displays, double-click the CD-ROMicon, then the Setup icon.Unlock the Scanning Unit1Peel the caution seal on the front of the scanner.2Gently turn the scanner over.34Return the scanner to a horizontal position.1Peel the caution seal on the back of the scanner.2Connect the scanner to the computer with the supplied USB interface cable.The following steps explain how to scan with ArcSoft PhotoStudio.Alignment MarkTopBottom2Select [Start], [Programs] or [AllPrograms], [ArcSoft PhotoStudio] and[PhotoStudio 5].PhotoStudio will start.3Select this scanner.a.Click the [File] menu and select [Select Source].b.Highlight the scanner name and click [OK].This step is required only for the first time.Windows2Double-click the [Applications (Mac OS9)] folder and [PhotoStudio] folders andthe [PhotoStudio] icon.PhotoStudio will start.3Select this scanner.a.Click the [File] menu and select [SelectSource].b.Highlight the driver name and click [OK].This step is required only for the first time.Macintosh4Click the Acquire icon or click the[File] menu and select [Acquire].ScanGear CS will start.4Click the Acquire icon or click the[File] menu and select [Import...].ScanGear CS will start.Macintosh5Select "Type of original".You can select "Photo", "Magazine", "Newspaper" or"Document".•Photo: Color, 300 dpi•Magazine: Color, 150 dpi•Newspaper: Black and White, 300 dpi•Document: Grayscale, 300 dpi6Click [Preview].After calibration, the preview scan will start and graduallydisplay the image.The image is automatically cropped in the original size.If you want to trim the image further, drag the mouse diago-nally to select the area.Try ScanningTry Scanning7Click [Scan].The final scan will start.8Click or (close box) in the ScanGear CSwindow to close it.The scanned image will appear in the PhotoStudio window. 9Save the scanned image.Click the [File] menu and select [Save As]. Select the folderwhere you wish to store the image file, enter a file name,select a file type (JPG format is recommended) and click [Save]. 10Click or (close box) in the PhotoStudio window to close it.Using the Scanner ButtonsYou can use the three convenient buttons on the front of the scanner to scan and perform related tasks easily with a single touch of the button. Place an item on the scanner before pressing a button .SCAN ButtonTo open the scanned image in the PhotoBase window:1Press the [SCAN] button.2The scanner will scan the item.3The scanned image will appear in thePhotoBase window.COPY ButtonTo print (copy) the scanned image with a printer:1Press the [COPY] button.2The scanner will scan the item.3The scanned image will print.•The printer driver should be installed and the printer should be on-line to use this function.E-MAIL ButtonTo e-mail the scanned image as an attached file:1Press the [E-MAIL] button.2The scanner will scan the item.3The [E-mail software selection] dialog will appear. Select an option from the list and click [OK].This step is required only for the first scan.4The e-mail software will start and the scanned image will be attached in a new message window.5Enter the receiver’s address and title, write a message, confirm the required settings, and send the message.•The e-mail software such as Outlook Express, Microsoft Outlook, Eudora or NetscapeMessenger should be installed and enabled. With certain e-mail programs, you should enable MAPI function (for Windows).Using the Scanner in the Upright Position Installing the StandPositioning an ItemRemoving the StandSystem InformationThis form should be used to record the operating environment for the purchased scanner.If any problems occur with the scanner, you will need this information when you contact our Customer Support Help Desk. Be sure to record the information and store it in a safe location.•This information is also required to request a repair under warranty. Make sure you record the information and store it in a safe location.•Guaranteed servicing for this equipment will expire five years after production ceases.• About the Computer UsedDate of Purchase:Dealer Tel:Dealer Address:Scanner Model:CanoScanLiDE 20LiDE 30Serial Number (on the back of the equipment):Manufacturer:Model:CPU: Clock Speed:MHzMemory Capacity (RAM):MB Space Available:MBHard Disk Capacity:MB OS: WindowsXP Me 2000 98MacintoshOS 9.0OS 9.1OS 9.2OS X v10.1Monitor Type:Monitor Size:inchesPrinter:Manufacturer:Type of Printer:Printer Resolutions:Installed Virus Protection Program:Installed Compression Program:On-Board Expansion Cards:Attached Peripherals:Connected Network System:Specifications*1Transfer time to computer is not included.*2 Calibration processing time is not included.• Specifications are subject to change without notice.CanoScan LiDE 20CanoScan LiDE 30Scanner Type FlatbedScanning Element CIS (Contact Image Sensor)Light Source 3-color (RGB) LEDOptical Resolution 600 x 1200 dpi1200 x 2400 dpiSelectable Resolution 25 - 9600 dpi (ScanGear CS)Scanning Bit DepthColor 16 bit input / 8 bit output for each color (RGB)Grayscale 16 bit input/8 bit outputScanning Speed *1Color16 msec/line (600 dpi)16 msec/line (600 dpi)32 msec/line (1200 dpi)Grayscale 5.3 msec/line (600 dpi) 5.3 msec/line (600 dpi)10.6 msec/line (1200 dpi)B&W5.3 msec/line (600 dpi)5.3 msec/line (600 dpi)10.6 msec/line (1200 dpi)Preview Speed *215 sec (approx.)InterfaceUSB 1.1Maximum Document Size A4/Letter: 216 x 297mm (8.5 x 11.7 in.)Scanner Buttons 3 buttons: SCAN, COPY, E-MAILOperating Range T emperature 5° to 35° C (41° to 95° F)Humidity10% to 90% RH (without condensation formation)Power Requirements Supplied via USB portPower ConsumptionIn operation: 2.5 watts maximum Stand-by: 1.25 wattsMaximum Exterior Dimensions 256 x 383 x 34mm (10.1 x 15.1 x 1.3 in.)WeightApproximately 1.5 kg (3.3 lbs.)。
Canon DS-30000 和 DS-32000 扫描仪使用说明书

DS-30000DS-32000>or > Document Capture Pro Epson Software Cliquez sur > Cliquez sur ou > Epson SoftwareEPSON is a registered trademark and EPSON Exceed Your Vision is a registered logomark of Seiko Epson Corporation.Mac is a trademark of Apple Inc., registered in the U.S. and other countries.Windows is a registered trademark of Microsoft Corporation in the United States and/or other countries.General Notice: Other product names used herein are for identification purposes only and may be trademarks of their respective owners. Epson disclaims any and all rights in those marks.This information is subject to change without notice.EPSON est une marque déposée et EPSON Exceed Your Vision est un logotype déposé de Seiko Epson Corporation.Mac est une marque de commerce d’Apple Inc., enregistrée aux États-Unis et dans d’autres pays.Windows est une marque déposée de Microsoft Corporation aux États-Unis et/ou dans d’autres pays.Avis général : Les autres noms de produit figurant dans le présent document ne sont cités qu’à des fins d’identification et peuvent être des marques de commerce de leurs propriétaires respectifs. Epson renonce à tous les droits associés à ces marques.L’information contenue dans le présent document peut être modifiée sans préavis.CPD-58202© 2019 Epson America, Inc., 10/19Aide pour le logiciel du scannerCliquez sur le bouton Aide ou ? sur l’écran du logiciel.Guide de l’utilisateurDouble-cliquez sur l’icôneGuide Epson DS-30000_DS-32000 sur le bureau (ou dans le dossier Applications/Epson Software/Guide sur un Mac).Soutien technique EpsonSoutien InternetVisitez www.epson.ca/support et effectuez une recherche de votre produit afin de télécharger des logiciels et des utilitaires, voir les manuels, consulter la FAQ et des conseils de dépannage et communiquer avec Epson.Parler à un représentant du soutienComposez le 905 709-3839, de 6 h à 20 h, heure duPacifique, du lundi au vendredi, et de 7 h à 16 h, heure du Pacifique, le samedi.Les heures et les jours de soutien sont modifiables sans préavis. Des frais d’interurbain peuvent s’appliquer.。
- 1、下载文档前请自行甄别文档内容的完整性,平台不提供额外的编辑、内容补充、找答案等附加服务。
- 2、"仅部分预览"的文档,不可在线预览部分如存在完整性等问题,可反馈申请退款(可完整预览的文档不适用该条件!)。
- 3、如文档侵犯您的权益,请联系客服反馈,我们会尽快为您处理(人工客服工作时间:9:00-18:30)。
佳能扫描仪说明书
篇一:扫描仪的使用方法与技巧
扫描仪使用方法与技巧
不少用户在购买扫描仪后,常常会发现扫描图片的品
质不太理想,实际上,出现这种情况,主要的还是与用户使
用扫描仪的技巧密切相关。
准备工作要做好
普通用户在使用扫描仪之前,很有必要对扫描仪的基
本原理做个初步的了解,这样将大大有助于正确合理地使用
扫描仪。
扫描仪获取图像的方式是将光线照射到待扫描的
图片或文档上,光线反射后由感光元件——CCD(Charge Coupled Device,电荷耦合元件)或CISr)接收,由于图像
色彩深浅不一,致使反射光强度也各不相同,感光元件可以
接收各种强度的光,并转换为二进制的数字信号,最后由控
制扫描的软件将这些数据还原为显示器上可以看到的图像.
为了将图像客观真实地反映出来,必须保证光线能够
平稳地照到待扫描的稿件上,笔者建议大家在扫描前可以先
打开扫描仪预热5至10分钟,使机器内的灯管达到均匀发
光状态,这样可以确保光线平均照到稿件每一处。
此外,不
要因扫描仪的倾斜或抖动影响到扫描品质,用户应尽量找一
处比较平坦、稳定的地方放置,一些用户为节约办公空间
而直接将扫描仪置于机箱上方的做法万万不可取。
现在,佳
能公司的N系列扫描仪都实现了直立扫描,配有专用扫描仪支架,有效的节约了办公空间。
此外,扫描前仔细检查玻璃上方是否有污渍,若有一定要用软布擦拭干净,以免影响扫描效果。
预扫步骤不可少
为了节约扫描时间,一些用户贪图方便,常常忽略预扫步骤。
其实,在正式扫描前,预扫功能是非常必要的,它是保证扫描效果的第一道关卡。
通过预扫有两方面的好处,一是在通过预扫后的图像我们可以直接确定自已所需要招描的区域,以减少扫描后对图像的处理工序;二是可通过观察预扫后的图像,我们大致可以看到图像的色彩、效果等,如不满意可对扫描参数重新进行设定、调整之后再进行扫描。
限于扫描仪的工作原理,扫描得到的图像或多或少会出现失真或变形。
因此,好的原稿对得到高品质的扫描效果是格外重要的,而品质不佳的原稿,即使通过软件处理可以改善扫描效果,但终究属亡羊补牢的做法。
至于那些污损严重的图像,无论如何处理也无法得到期待的效果,因此,一定要尽量使用品质出色的原稿扫描。
对一些尺寸较小的稿件,应尽量放置在扫描仪中央,这样可以减少变形的产生。
使用多大的分辨率
很多用户在使用扫描仪时,常常会产生采用多大分辨
率扫描的疑问。
其实,这还得由用户的实际应用需求决定。
分辨率越高意味着可以获得更多的图像细节,更清晰的效果,更完美的色彩还原力,但同时也意味着扫描得到的图像文件增大而且不易处理。
对应用较多的Internet而言,网站上的图片分辨率通常在75dpi左右,这意味着使用100dpi 分辨率进行扫描已绰绰有余,而用于印刷的图片的分辨率一般为300至400dpi,因此要想将作品通过扫
描印刷出版,至少需要用到300dpi以上的分辨率,当然若能使用600dpi则更佳。
如果想将扫描后的作品通过打印机打印出来,则必须综合考虑打印机的分辨率才能决定。
根据实际使用经验,一台打印分辨率为1440dpi的打印机,大约只需以360dpi分辨率扫描图像即可得到不错的打印效果。
这是因为打印机与扫描仪的工作原理和分辨率的含义完全不同的缘故。
应用广泛的OCR
相信不少朋友购买扫描仪很大部分用途是为了减少文字输入工作量,提高工作效率。
因此,OCR就成了扫描仪最常被使用的功能之一。
通过软件识别扫描文档上的汉字、英文,甚为方便且有效。
因此,除了掌握正确的扫描方法外,选择合适的OCR软件也极为重要。
目前常用的OCR软件大多是与扫描仪捆绑销售的,比如佳能扫描仪的RosettaStone、Omnipage等。
尽管OCR软件可以自动识别汉字,但要达到高
效准确也需要众多应用技巧。
首先,扫描文档时需使用黑白模式,同时也要注意这种模式下的Threshold值,这是决定何种程度的黑色可被扫描仪视为黑点,这样可以简便地将文字的黑与背景干扰的黑分辨出来,如果调整得当,可加快扫描速度。
这个值的调整可以在扫描图像的色调值(tone value)统计直方图(Histogram)中,先区分出两个或以上的波峰,然后将Threshold在两者之间调整,便能找到具备不错区分效果的位置。
如果认为这种方式较麻烦,还有另一个简便方法,通过文字大小来决定分辨率。
一般来说,200或300dpi的分辨率可以得到相当不错的效果。
如果待扫描的文字比报刊文字还要小,可以将分辨率提高,从而得到可放大的扫描文档,提升识别率。
当用户需要扫描厚度较大的杂志时,若直接扫描,难免会发生内文因无法完全摊开而导致部分文字不清晰及扭曲失真的情况,这样的结果是OCR软件无法正确识别的,大大降低识别率。
怎么办呢?用户不妨在扫描前,将图书拆成一页页的单张,然后再进行扫描。
对于一般的报纸,由于本身即是单张形式,因此不存在上述问题,但由于报纸面积通常较大,无法一次扫描,因此预扫时事先框选扫描范围,一次扫描一块区域,这样的辨识效果会大大提高。
透射稿及其它印刷品
除了扫描普通的反射稿外,用户有时也需扫描透射稿。
透射稿包括幻灯片、负片两种。
由于一般的扫描仪是针对反射稿扫描设计,因此在扫描透射稿时建议使用具有胶片扫描功能的及专用胶片扫描仪。
篇二:佳能打印机如何扫描
Canon iR2318/2320 UFRII LT如何扫描
扫描仪使用方法如下:
1. 把要扫描的文件放在茶水间的佳能打印机Canon iR2318/2320 UFRII LT稿台或者输送器(单面/双面),一般放在玻璃稿台上(少量扫描)
2. 在打印机上按“扫描”按钮,打印机屏上显示“扫描在线,扫描就绪”
3.打开电脑桌面
4.如图
,提前下载ACDsee 3.1,且安装好。
选择“稿台”
扫描中
扫描完毕
篇三:佳能DR-2580C扫描仪参数设置及操作说明
佳能DR-2580C扫描仪参数设置及操作说明
一、农省行指定扫描仪的默认参数设置和基本功能
农行使用扫描仪默认参数为:200dpi的分辨率、黑白模
式、删除空百页、自动裁减、自动纠编、自动识别图像方向、最佳压缩比。
二、首次使用扫描仪时的软、硬件安装及配置(一)安装驱动
将佳能DR-2580C扫描仪驱动光盘放入光驱后,光盘将自动运行。
选择典型安装
选择安装
点击 Next 按钮
点击 Yes 按钮
点击 Finish 完成驱动的安装
(二)安装佳能DR-2580C硬件
检查包装清单。
包装中有机器,数据线,电源线,驱动光盘,说明书,滚轮等。
去除包装材料并安装滚轴
打开后盖,除去保护膜,再
按住出纸托盘,除去橙色胶带
关闭后盖
打开送纸托盘,按压OPEN按钮打开上部装置,除去保护膜
安装滚轴装置
安装减速滚轴关闭上部装置
连接好电源线和电脑数据线,打开机身电源开关。
安装平板单元
1、先将平板背面的扫描光头锁开关打开
2、将扫描仪主机部分平放到平板上并平推至卡槽固定
3、将平板末端的卡钩装置上推至扫描仪主机后的链接部分,完成固定。
4、将扫描仪平板的数据线与主机相连。