联想“开始使用Windows10”的用户指南(中文版)
联想笔记本电脑用户指南说明书
设置指南
初始设置
本指南中的插图仅供参考。
Printed in China
PN: SP40W32819
概述
1. 屏幕
2. 摄像头指示灯
3. 麦克风
4. 无线天线
5. 摄像头盖滑块
6. 组合音频插孔
7. 4 合 1 SD 卡插槽
8. 键盘
9. 数字小键盘
10. 触摸板
11. 通风槽12. USB(3.1 Gen 2)Type-A 接口
(Always-on)
13. USB(3.1 Gen 2)Type-A 接口
14. Novo 按钮孔
15. Thunderbolt TM 3 接口
16. 充电指示灯
17. 电源指示灯
18. 电源按钮/指纹读取器
19. Thunderbolt 3 接口
20. 摄像头
请阅读《用户指南》中的 USB 传输速率声明。
要访问《用户指南》,请参阅《安全与保修指南》。
第一版(2019 年 8 月)
© Copyright Lenovo 2019.
有限权利声明:如果数据或软件依照美国总务署(GSA)合同提供,则其使用、复制或披露将受到
GS-35F-05925 号合同的约束。
减量、重用和回收。
联想 IdeaPad 系列用户手册
打开 Novo 按钮菜单 . . . . . . . . . . 12 与计算机交互 . . . . . . . . . . . . . . 13
• 宽:359.3 毫米(14.1 英寸) • 深:235 毫米(9.3 英寸) • 厚:17.9 毫米(0.7 英寸) 对于 16 英寸型号:
• 宽:359.2 毫米(14.1 英寸) • 深:257 毫米(10.1 英寸) • 厚:17.9 毫米(0.7 英寸) • 输入:100 V 到 240 V 交流电,50 Hz 到 60 Hz • 输出:20 V 直流电,3.25 A • 功率:65 W • 容量:47 Wh • 芯数:3 注:电池容量为典型值或平均值,根据特定实验环境测定。其他环境中获得的数据 可能会有所不同,但不会低于额定容量(见产品标签)。
智能功能 . . . . . . . . . . . . . . . . 17 多维手势(触摸屏/触摸板)(适用于特定型 号) . . . . . . . . . . . . . . . . . 17 超分辨率(适用于特定型号) . . . . . . . 17 护眼模式 . . . . . . . . . . . . . . . 17 智能降噪 . . . . . . . . . . . . . . . 17 Smart Appearance . . . . . . . . . . . 17
机器类型(MT) 82XL 82XN 83EQ 82XA 83EL 82X6 82XM 82XQ 83ER 82XB、83D7 83EM 82X7 82XR 83ES 83EN 82X8
Windows 10操作系统教程说明书
About the T utorialWindows 10 is the latest OS version from Microsoft. This tutorial gives you all the in-depth information on this new operating system and its procedures, right from what all hardware and other system components are required to install this OS in your system, to its advanced features and other uses.Windows 10 combines the features from its two previous versions for making it further user friendly for desktops as well as laptops and mobile devices. This is an introductory tutorial that explains all the fundamentals of Windows 10.AudienceThis tutorial has been designed for all those readers who want to learn the features of Windows 10. It is especially going to be useful for all those professionals who are required to install and use this operating system to perform various duties in their respective organizations.PrerequisitesWe assume the readers of this tutorial have a practical experience of handling a Windows based Laptop or Desktop. In addition, it is going to help if the readers have a basic knowledge of how to install and use an operating system.Disclaimer & CopyrightCopyright 2018 by Tutorials Point (I) Pvt. Ltd.All the content and graphics published in this e-book are the property of Tutorials Point (I) Pvt. Ltd. The user of this e-book is prohibited to reuse, retain, copy, distribute or republish any contents or a part of contents of this e-book in any manner without written consent of the publisher.We strive to update the contents of our website and tutorials as timely and as precisely as possible, however, the contents may contain inaccuracies or errors. Tutorials Point (I) Pvt. Ltd. provides no guarantee regarding the accuracy, timeliness or completeness of our website or its contents including this tutorial. If you discover any errors on our websiteorinthistutorial,******************************************T able of ContentsAbout the Tutorial (1)Audience (2)Prerequisites (2)Disclaimer & Copyright (2)Table of Contents (3)1.WINDOWS 10 – OVERVIEW (7)2.WINDOWS 10 – INSTALLATION (8)System Requirements (8)Upgrade (8)Clean Install (12)3.WINDOWS 10 – GETTING STARTED (14)4.WINDOWS 10 – GUI BASICS (16)Windows (16)Icons (17)Desktop Background (18)5.WINDOWS 10 – NAVIGATION (20)Start Menu (20)File Explorer (21)Virtual Desktops (22)6.WINDOWS 10 – START MENU (23)Left Pane (24)Search Box (25)Right Pane (27)Pin an Application to the Taskbar (29)8.WINDOWS 10 – TABLET MODE (32)How to Activate the Tablet Mode? (32)9.WINDOWS 10 – FILE EXPLORER (34)The File Explorer Ribbon (35)10.WINDOWS 10 – CORTANA (37)Activating Cortana (38)Personalizing Cortana (40)11.WINDOWS 10 – NOTIFICATIONS (42)Customizing Notifications (43)12.WINDOWS 10 – QUICK ACTIONS (44)Customizing Quick Actions (44)13.WINDOWS 10 – CLOUD (46)Using OneDrive (47)14.WINDOWS 10 – UNIVERSAL APPS (49)15.WINDOWS 10 – MULTIPLE DESKTOPS (50)16.WINDOWS 10 – USERS MANAGEMENT (51)17.WINDOWS 10 – SECURITY (54)User Account Control (54)Windows Defender (57)Windows Firewall (58)18.WINDOWS 10 – PARENTAL CONTROL (60)20.WINDOWS 10 – WEB BROWSING (68)Adding a Web Page to your Favorites (69)Reviewing Browsing History (70)21.WINDOWS 10 – NETWORKING (71)Wired Connection (Ethernet) (71)Wireless Connection (Wi-Fi) (72)22.WINDOWS 10 – VIRTULIZATION (74)Pre-requisites in Windows 10 (74)Enabling Virtualization in the BIOS (76)Setting Up Hyper-V (78)Using Hyper-V to Create a Virtual Machine (80)23.WINDOWS 10 – REMOTE ACCESS (84)Allowing Remote Access to your Computer (84)Use Remote Desktop to access another Computer (86)24.WINDOWS 10 – BACKUP & RECOVERY (88)File History (88)Backup & Restore (Windows 7) (90)Creating a System Image (93)Resetting the PC (95)Advanced Options (96)25.WINDOWS 10 – PROJECT SPARTAN (98)26.WINDOWS 10 – APPS MANAGEMENT (99)Uninstalling Applications (100)Uninstalling an Application from the Settings window (102)Uninstalling Applications from the Control Panel (104)27.WINDOWS 10 – EMAIL MANAGEMENT (106)Configuring the Mail App (106)28.WINDOWS 10 – KEYBOARD SHORTCUTS (109)Window Snapping (109)29.WINDOWS 10 – SYSTEM TRAY (111)30.WINDOWS 10 – MEDIA MANAGEMENT (113)Media Applications (114)31.WINDOWS 10 – FAVORITE SETTINGS (116)Unpin your Favorite Settings (119)32.WINDOWS 10 – SHORTCUTS (120)Creating a Shortcut (120)33.WINDOWS 10 – PHONES (123)Windows 101.W INDOWS 10 – OVERVIEWWindows 10 is the most recent version of the operating system from Microsoft. Officially it was released in 2015 and was initially offered free of charge to legitimate users of Windows 7 and Windows 8.1. This new version combines features from those two previous installments to suit the users in a better way for both desktop/laptop computers as well as mobile devices.The most notable change in Windows 10 is that Microsoft replaced the Start screen tiles from Windows 8, and brought back the Start Menu. They also removed the vertical toolbars (or “charms”) that appeared from the sides of the screen. These changes make this Windows version easier to use for users of both desktop/laptops and mobile devices.Windows 102.W INDOWS 10 – INSTALLATIONThere are two approaches you can take for installing Windows 10 in your computer: Upgrade or a Clean Install.Typically, when you upgrade your operating system, all your documents and applications remain unchanged, whereas with a clean install you would be starting again from scratch. But one important thing to verify first is if your computer has the necessary hardware to support Windows 10.System RequirementsAlthough most computers nowadays probably have the necessary requirements for Windows 10. It will certainly be useful to know them in case you want to upgrade from an older system.The main requirements are:∙ A processor (CPU) with a clock rate of at least 1GHz.∙At least 1 to 2GB of memory (RAM), but Microsoft recommends 4GB.∙At least 16GB space in your hard disk.One important thing to note is that the installation process itself will verify your computer hardware and let you know if it qualifies for a Windows 10 upgrade or not. If not, then you will need to upgrade your hardware.UpgradeIf your computer qualifies for a Windows 10 upgrade, then you can follow these steps to perform the upgrade:Step 1: Look for the Windows 10 notification in the lower-right corner of the screen. This is a one-year-only offer that Microsoft is extending to valid users of Windows 7 and Windows 8.1.Step 2: By clicking on the notification, it will start the download and installation process of Windows 10 in your system.The download required for the upgrade is quite large, so make sure you have a stable Internet connection and continuous power for your computer to avoid interruptions during the process.Step 3: After the download is complete, it will prompt you to accept Microsoft’s license terms.Step 4: After agreeing to the terms, it will ask if you want to install the upgrade at that moment or schedule it for later.Since the upgrade process can take approximately 2 hours, it will be helpful to schedule it for a time, that will be more suitable to you.Step 5: Once the upgrade starts, the system will perform a series of tasks, during which you will see the following screen.During this time, your computer will reboot a couple of times, so don’t worry. The process itself will take you through the steps to complete the upgrade.Step 6: As the upgrade approaches its end, it will ask you to configure some basic Windows settings. You can choose to use Express settings, which will apply the most common or recommended settings, or you can choose to customize the settings as you please.Step 7: After the upgrade finishes, you’ll see the Windows welcome screen.Clean InstallIf your computer has an older operating system like Windows XP or Vista, you won’t be able to upgrade for free. In these cases, you’ll need to buy a boxed copy of Windows 10 to have a valid license for the installation. Windows 10 will have a starting price of $119.End of ebook previewIf you liked what you saw…Buy it from our store @ https://。
联想“开始使用Windows 10”的用户指南

Starting to use Windows10First Edition(July2015)©Copyright Lenovo2015.LIMITED AND RESTRICTED RIGHTS NOTICE:If data or software is delivered pursuant a General Services Administration“GSA”contract,use,reproduction,or disclosure is subject to restrictions set forth in Contract No.GS-35F-05925.ContentsPurpose of the publication (iii)Chapter1.“Unpack”Windows (OOBE) (1)What is OOBE (1)What actions to be performed during OOBE (1)You are the administrator (1)What to do next (1)Check activation status (1)Use or install security software (1)Make a system backup (2)Chapter2.Microsoft account brings many benefits (3)What is it (3)The benefits (3)Sign in with a Microsoft account (3)Create a local account and sign in (3)Create a Microsoft account (3)Switch to a Microsoft account (4)Add other user accounts (4)Add a Microsoft account (4)Add a local account (4)Change account type (5)Chapter3.The Start menu and the Action Center (7)The return of the Start menu (7)The power button (7)Locate apps (7)Pin apps to Start or the taskbar.......7The Action Center.. (7)Enable Tablet mode (8)Enable airplane mode (8)Chapter4.OneDrive extends yourlocal storage (9)What is it (9)Access your OneDrive through a Web browser (9)Local OneDrive folder (9)Access local OneDrive folder (9)Choose what to be synced (9)Move local OneDrive folder (9)Turn off syncing (10)Chapter5.Windows Store makesgetting apps easier (11)Install apps from the Store (11)Install apps on another computer (11)Chapter6.Restore Windows (13)Appendix A.Inapplicable informationin your product documentation (15)Term list (15)Shut down the computer or put the computer tosleep mode (15)Appendix B.ENERGY STAR information (17)Trademarks (17)©Copyright Lenovo2015iii Starting to use Windows10Purpose of the publicationWindows®10is the state-of-the-art operating system from Microsoft.Lenovo is glad to provide computer products with Windows10preinstalled.The operating system is a very important part of a personal computer.Your experience with your computer will be at its best if you’re comfortable with the operating system installed on it.With that in mind,we have provided this publication to get you up and running with Windows10.Once you feel more confident with the basics,you may refer to information provided by Microsoft to explore more advanced features of Windows10.If there are conflicts between information provided by Lenovo and Microsoft regarding Windows10,the information provided by Microsoft prevails.©Copyright Lenovo2015iiiiv Starting to use Windows10Chapter1.“Unpack”Windows(OOBE)What is OOBEIf your Lenovo computer is preinstalled with any version of a Windows operating system,you’ll need to “unpack”Windows the first time you start your computer.It is similar to unpacking the package of a hardware product.This process is also referred to as OOBE,or out-of-box experience.What actions to be performed during OOBEThe following table lists the most important actions you will perform during OOBE and shows whetherthey are required or optional.Action Required?Accept Microsoft and Lenovo license agreements YesLog in with a local or Microsoft account YesSign up for a Microsoft account OptionalConnect to the Internet Optional if you decide to log in with a local account Choose time zone Optional.You may change the setting any time later.You are the administratorLocal or Microsoft account,the user account you use for login during OOBE will become the Administrator of the operating system.As the Administrator,you can change security settings,install apps,create other accounts,and make changes that may affect others.For security concerns,we recommend that you create and use a Standard User account after OOBE.Refer to“Add other user accounts”on page4for instruction on adding a user account.What to do nextCheck activation statusActivation of Windows is required.If your computer is connected to the Internet,your copy of Windows10should be activated automatically.Step1.Right-click on the Start button and select Control Panel.Step2.Click System and Security➙System.You can verify activation status for the copy of Windows10 on your computer under Windows activation.Use or install security softwareTo help protect your computer from viruses and other attacks,install or use security software(antivirus software and firewall).Your Lenovo computer may include preinstalled security software for your convenience.The preinstalled security software includes a trial period during which time you can use it for free.You have to purchase a license if you want to continue to use it when the trial period expires.©Copyright Lenovo20151Important:If you want to install different security software,be sure to remove the product already installed on your computer.It can cause problems to have two different antivirus products installed at the same time.Make a system backupWhen you have finish setting up Windows and installed most frequently used software,we recommend that you make a system backup using the Lenovo OneKey Recovery system.Note:The Lenovo OneKey Recovery system is not available on all Lenovo computer products.Step1.Click Start➙All apps.Step2.Locate the Lenovo OneKey Recovery system and select it.Step3.Click System Backup.Step4.Choose a location to save the backup image file and click Next.Note:Choose a location on a different disk or partition from where Windows10is installed.Forexample,an external hard disk drive or the partition with drive letter“D.”In case of system problems,you can use the Lenovo OneKey Recovery system to restore Windows to the backup status.For details,refer to“Lenovo OneKey Recovery system”in the product User Guide.2Starting to use Windows10Chapter2.Microsoft account brings many benefitsWhat is itIt is a pair of user name and associating password that you use to sign into Microsoft software and services. If you use Microsoft services like OneDrive,,Xbox Live,Office365,and Skype,you might already have one.If you don't have one,be assured that creating one is easy and free.The benefitsThere are two main benefits of using a Microsoft account:•Sign in only once.If you use a Microsoft account to sign into Windows10,you don’t need to sign in again to use OneDrive,Skype,,and other Microsoft services.•You're connected to all your devices.If you use your Microsoft account to sign into multiple Windows-based devices,all the personalized settings will go with you.Sign in with a Microsoft accountIf you already have a Microsoft account,you can use it to sign into Windows10during OOBE.If you don’t have one,you can click Sign up to create one.Create a local account and sign inIf you don’t have a Microsoft account and you don’t want to create one during OOBE,you may create a local account to sign into Windows10.Note:If you use a local account to sign into Windows10,you cannot install apps from the Windows Store. You also have to sign in separately to use other Microsoft services.Create a Microsoft accountIf you don’t have a Microsoft account,you can create one during or after OOBE.The user name for the Microsoft account must be a valid e-mail address.•To create a Microsoft account during OOBE,select Sign up on the log in page.•To create a Microsoft account after OOBE,go to Microsoft’s sign-up page at /account. Either way,you’ll be directed to Microsoft’s sign-up page for a Microsoft account.On the page,you’re required to enter your e-mail address as the user name and set a password.You also need to fill in some personal information.Before the account is created,you need to check your inbox for a message from the Microsoft account team.Follow the instructions in the message to finish setting up your account.If you don’t have an e-mail address,click get a new email address.This way,you will get a Microsoft account and a Microsoft-hosted inbox at the same time.Note:The rationale for using an e-mail address as the user name is that it ensures each Microsoft account is unique.©Copyright Lenovo20153Switch to a Microsoft accountIf you sign in with a local account during OOBE,you can choose to switch to a Microsoft account anytime after OOBE.Step1.Click Start➙Apps➙Settings➙Accounts.Step2.Click Sign in with a Microsoft account.Note:Internet connection is required the first time you sign into a device with a Microsoft account.Add other user accountsFor security concerns,you may need to create a Standard User account for use after OOBE;or if someone else needs to use your computer,you can add a user account for that person.The added user account can be a Microsoft account or a local account.Note:If you want to add other user accounts,your account type must be Administrator.Step1.Click Start➙All apps➙Settings➙Accounts.Step2.Click Family&other users then select Add someone else to this PC.Step3.From here,you can add a Microsoft account or a local account to your computer.Add a Microsoft accountIf the person who wants to use your computer has a Microsoft account,you can add his or her Microsoft account to your computer.Note:To add a Microsoft account to your computer,your computer must be connected to the Internet. plete the first two steps listed in“Add other user accounts”on page4.If your computer is connected to the Internet,you’ll be prompted to enter the user name(an e-mail address)of theMicrosoft account you want to add to your computer.Step2.Type the email address and click Next.The email address will be sent to Microsoft for verification.This might take several minutes.Step3.Click Finish to complete adding the Microsoft account.The person should now be able to sign into your computer with his or her Microsoft account.Note:If the email address you entered is not an existing Microsoft account,you’ll be prompted to create a Microsoft account using the email address.Add a local accountIf your computer is not connected to the Internet,you can add a local account for the person who wantsto use your computer.plete the first two steps listed in“Add other user accounts”on page4.Step2.Create a user name and password for the account.Step3.Click Finish to complete adding the account.4Starting to use Windows10Change account typeBy default,the user account added after OOBE is a Standard User account.If you’re the Administrator,you can change a Standard User account to Administrator.Step1.Click Start➙All apps➙Settings➙Accounts.Step2.Click Family&other users.Step3.Under Other users,click the user name of the account you want to change then click Change account type.Step4.Change the account type in the pull-down menu.Important:Be extremely careful when granting administrator permission.An Administratoraccount can change security settings,delete important system files,and make changes thatmay affect others.Chapter2.Microsoft account brings many benefits56Starting to use Windows10Chapter3.The Start menu and the Action CenterThere are two places worth mentioning about the main user interface of Windows10.One is the Start menu in the lower left corner and the other is the Action Center in the lower-right corner.The return of the Start menuIf you click the Start button in the lower-left corner,you’ll notice that the Start menu is back with Windows 10.The Start menu not only brings back convenience,but also it is more powerful.The power buttonThe power button is in the Start menu.Click it and you can choose to shut down or restart the computer, or put the computer into sleep mode.Locate appsApps that you use frequently will be displayed under Most used in the Start menu.If you cannot find an app there,click All apps and locate it through the alphabetically ordered apps list.Pin apps to Start or the taskbarIf you use an app frequently,you can pin it to Start or to the taskbar.Step1.Locate the app under Most used or All apps.Step2.Right-click on the app name then select Pin to Start or Pin to taskbar.The Action CenterOn the far right of the taskbar is the notification area.Click the Action Center icon in the notification area and the Action Center is displayed.©Copyright Lenovo20157From the Action Center,you may examine important notifications from Windows and your apps.More conveniently,you can change common settings quickly.Enable Tablet modeStep1.Click the Action Center icon in the notification area.Step2.Click Tablet mode.Enable airplane modeWhen airplane mode is enabled,all radio from your computer is turned off.Step1.Click the Action Center icon in the notification area.Step2.Click Airplane mode.8Starting to use Windows10Chapter4.OneDrive extends your local storageWhat is itOneDrive refers to the online storage provided to you by Microsoft.By creating a Microsoft account,you get a portion of free online storage at the same time.Note:Currently,you get15GB of free online storage.You may purchase additional storage space if you need it.Access your OneDrive through a Web browserIf you signed into Windows10using a local account,you can access your OneDrive through a Web browser. Step1.Click Microsoft Edge on the taskbar.Step2.Type https:///and press Enter.Step3.Click Sign in to sign in with your account.Local OneDrive folderBy default,a local folder has been created for syncing files with your OneDrive.It is called the OneDrive folder and its default location is C:\Users\[ACCOUNT_NAME]\OneDrive.Note:[ACCOUNT_NAME]is your user name.Access local OneDrive folderStep1.Click the File Explorer icon on the taskbar.Step2.Click OneDrive on the left pane.Files in your OneDrive folder are synced with your OneDrive,so you can work with local files when you’re disconnected.They are automatically synced to OneDrive when Internet connection is available.Choose what to be syncedBy default,all files and folders are synced between OneDrive in the cloud and the Onedrive folder on your local storage.This means your local OneDrive folder takes more and more storage overtime when filesare added to your OneDrive.If you want to save local storage,explicitly specify the files and folders you want to keep in sync.Step1.Right-click the OneDrive icon in the notification area.Step2.Select Settings➙Choose folders.Step3.Check the files and folders you want to keep in sync.Move local OneDrive folderIf you want to save space on your system partition,you can move the OneDrive folder to another partition. Step1.Click the File Explorer icon on the taskbar.©Copyright Lenovo20159Step2.On the left pane,right-click OneDrive and select Properties.Step3.Click the Location tab and select Move.Step4.Pick or create a folder on another partition and click Select folder.Step5.Click Yes.Turn off syncingBy default,your PC settings and preferences are saved as a file on OneDrive and will be synced with any computer you sign into with your Microsoft account.You can turn off syncing for all or individual settings on the computer you use.Step1.Click Start➙All apps➙Settings➙Accounts➙Sync your settings.Step2.Click the toggle button for Sync settings to turn off all syncing;or click the buttons under Individual sync settings to turn off syncing for individual settings.10Starting to use Windows10Chapter5.Windows Store makes getting apps easierWindows10comes with many built-in apps for your convenience,for example Music,Photos,and News. But of course those aren’t enough.You can find tons of apps in the Windows Store.To go to Windows Store,click Start➙Store.Install apps from the StoreStep1.Search and find the app you want to download.Step2.Click the name of the app to open the product information page.Step3.If it is a free app,click Install;if it is a paid app,click Buy to purchase the app before installing it on your computer.Note:You must sign in with your Microsoft account to install apps from the Windows Store.Install apps on another computerAll of the apps you've installed from the Windows Store are listed in the My apps section of the Store.You can see which of your apps are installed on the different computers you use,and can install apps directly from there.©Copyright Lenovo20151112Starting to use Windows10Chapter6.Restore WindowsIf you feel Windows isn't performing as well as it once did,and you don't know why,you can restore Windows to its initial status.Step1.Click Start➙All apps➙Settings➙Update&security.Step2.Click Recovery.Step3.Under Reset this PC,click Get started.Step4.If you want to keep personal files,select Keep my files.If you have backed up your personal files,click Remove everything.©Copyright Lenovo20151314Starting to use Windows10Appendix A.Inapplicable information in your product documentationSome of your product documentation may include information based on a previous version of Windows,for example,Windows7or Windows8.1/8.This appendix points you to information in your product documentation that might not be applicable to Windows10.Term listWhile your computer is preinstalled with Windows10,the information and instructions included in the product documentation may be based on a previous version of Windows.(for example,Windows7or Windows 8.1/8)This is because the product documentation was developed before Windows10was available.The following table lists terms in your product documentation that might be a hint of inapplicability. Information and instructions containing these terms may not be applicable to computers preinstalled with Windows10.Terms DescriptionWindows7or Windows8.1/8Refer to this publication or information provided by Microsoft for information andinstructions that are applicable to Windows10.Charms or charms bar Charms or charms bar is not available inWindows10.Most charms-relatedoperations can be found in the Start menu or the Action Center.Refer to Chapter3“The Start menu and the Action Center”on page7.Start screen In Windows10,clicking the Start button displays the Start menu.If you want todisplay the Start menu full screen,enable Tablet mode in the Action Center.Referto“Enable Tablet mode”on page8for instructions.Help and Support If you want information and instructions from Microsoft,Refer to the built-in GetStarted app.Shut down the computer or put the computer to sleep modeIf your product documentation was developed based on Windows8.1/8,it may instruct you to shut down the computer by way of Charms➙Settings➙Shut down.In Windows10,shutting down the computer is much easier.Step1.Click the Start button.Step2.Click Power then select Shut down or Sleep.©Copyright Lenovo20151516Starting to use Windows10Appendix B.ENERGY STAR informationENERGY STAR®is a joint program of the U.S.Environmental Protection Agency and the U.S.Departmentof Energy aimed at saving money and protecting the environment through energy efficient products and practices.Lenovo is proud to offer our customers products with the ENERGY STAR qualified designation.Lenovo computers with the ENERGY STAR mark affixed have been designed and tested to conform to the ENERGY STAR program requirements for computers.By using ENERGY STAR qualified products and taking advantage of the power-management featuresof your computer,you can help reduce the consumption of electricity.Reduced electrical consumption can contribute to potential financial savings,a cleaner environment,and the reduction of greenhouse gas emissions.For more information about ENERGY STAR,go to:Lenovo encourages you to make efficient use of energy an integral part of your day-to-day operations.To help in this endeavor,Lenovo has preset the following power-management features to take effect when your computer has been inactive for a specified length of time:Table1.Operating system power-saving settingsPower plan:balanced(plugged into ac power)•Turn off the display:After10minutes•Put the computer to sleep:After30minutes•Advanced power settings:–Turn off hard disk drives:After20minutesTo awaken your computer from sleep mode,press any key on your keyboard.TrademarksLenovo and OneKey are trademarks of Lenovo in the United States,other countries,or both.Microsoft,Windows,Outlook,OneNote,OneDrive,Office365,Skype,and Xbox Live are either registered trademarks or trademarks of Microsoft Corporation in the United States and/or other countries.Other company,product,or service names may be trademarks or service marks of others.©Copyright Lenovo201517。
Windows 10 桌面作業系統大量授權參考指南说明书
Windows 10Windows 10 桌面作業系統大量授權參考指南目錄Windows 10 版本和相關產品 (3)Windows 10 版本 (3)Windows 桌面方案透過大量授權方案提供 (3)Windows 10 專業版升級授權 (4)Windows 10 企業版升級授權 (4)Windows 10 教育版升級 (擁有軟體保證) (5)合格的作業系統 (6)Windows 即服務:Windows 10 安全性和功能更新 (7)各個授權產品項目的分支選項 (9)Windows 軟體保證和 Windows 虛擬桌面存取 (VDA) (9)Windows 軟體保證和 Windows VDA 的權益 (9)以裝置為單位的 Windows 軟體保證和 Windows VDA 授權 (11)以使用者為單位的 Windows 軟體保證和 Windows VDA 授權 (11)透過 Windows 軟體保證和 Windows VDA 取得的 Windows 企業版存取權限 (14)Windows 企業版的永久使用權 (14)Microsoft Desktop Optimization Pack (15)Windows To Go 權限 (15)Windows 10 降級使用權 (16)大量啟用 (17)透過金鑰管理服務和多重啟用金鑰進行啟用程序 (17)透過 Microsoft Active Directory 進行啟用程序 (17)Get Genuine Windows Agreement (18)大量授權方案提供的 Windows 授權 (19)大量授權方案提供的 Windows 桌面產品選項 (19)如何透過大量授權取得授權 (20)完整套件產品Windows 10 桌面作業系統大量授權參考指南Windows 10 教育版升級Windows 10 教育版僅供大量授權方案的學術客戶使用。
Windows 10 教育版包含Windows 10 企業版的各項功能,可因應現代教育機構在進階安全性以及全方位裝置控管方面的需求。
Windows 10使用指南
Windows 10使用指南Windows 10是微软公司最新推出的操作系统,它具有许多新的功能和改进,旨在提供更好的用户体验和更高的工作效率。
本文将为您提供一份详尽的Windows 10使用指南,帮助您快速上手并充分利用该操作系统的各种功能。
一、安装和设置1. 系统要求:在安装Windows 10之前,确保您的计算机满足最低系统要求,如处理器、内存和存储空间等。
2. 下载和安装:您可以从微软官方网站下载Windows 10的安装程序,并按照提示进行安装。
确保在安装过程中选择适合您的设置选项。
3. 设置个性化选项:在安装完成后,系统将引导您进行一系列个性化设置,如选择语言、时区、键盘布局等。
根据您的喜好进行选择,并确保您的设置与您的需求相匹配。
二、开始菜单和任务栏1. 开始菜单:Windows 10中的开始菜单与以往版本有所不同,它包含了常用的应用程序、设置和文件夹。
您可以通过单击开始按钮或按下Windows键来打开开始菜单。
2. 磁贴:开始菜单中的磁贴可以让您快速访问和启动应用程序。
您可以通过右键单击磁贴来调整其大小和位置,以满足您的个性化需求。
3. 任务栏:任务栏位于屏幕底部,它包含了快速启动栏、系统托盘和通知中心。
您可以通过拖动和调整来自定义任务栏的布局和显示方式。
三、文件资源管理器1. 文件资源管理器:Windows 10中的文件资源管理器是您管理和浏览文件和文件夹的主要工具。
您可以通过单击任务栏上的文件夹图标来打开文件资源管理器。
2. 导航窗格:文件资源管理器的导航窗格位于左侧,它显示了您的计算机、快速访问和最近访问的文件夹。
您可以通过单击这些选项来快速访问您的文件和文件夹。
3. 操作文件和文件夹:在文件资源管理器中,您可以执行各种操作,如复制、粘贴、删除和重命名文件和文件夹。
您还可以使用搜索功能来快速查找您的文件。
四、桌面和多任务处理1. 桌面:Windows 10的桌面是您工作和访问文件的主要区域。
联想Windows10用户指南(中文版)

开始使用Windows10第一版(2015年七月)©Copyright联想2015.目录出版物的目的 (iii)第1章“取出”Windows(“开箱”体验) (1)什么是Windows“开箱”体验 (1)“开箱”体验过程的操作 (1)您是操作系统的管理员 (1)下一步该做什么 (1)查看激活状态 (1)使用或者安装安全软件 (1)做一个系统备份 (2)第2章微软账户优势明显 (3)微软账户是什么 (3)使用微软账户的好处 (3)使用微软账户登陆Windows10 (3)创建并使用本地账户登陆Windows10 (3)创建一个微软账户 (3)切换到微软账户 (4)添加其他账户 (4)添加一个微软账户 (4)添加一个本地账户 (4)更改账户类型 (4)第3章开始菜单和操作中心 (7)开始菜单的回归 (7)电源按钮 (7)找到应用 (7)将应用固定到开始菜单或任务栏....7操作中心. (7)启用平板模式 (8)启用飞行模式 (8)第4章OneDrive扩展您的本地存储 (9)OneDrive是什么 (9)使用网络浏览器访问您的OneDrive网络存储空间 (9)本地OneDrive文件夹 (9)访问本地OneDrive文件夹 (9)指定需要同步的文件和文件夹 (9)移动本地OneDrive文件夹 (10)关闭设置的同步 (10)第5章Windows应用商店让获取应用更加容易 (11)从商店下载、安装应用 (11)在其他计算机上安装应用 (11)第6章恢复Windows (13)附录A部分产品说明书中的不适用于Windows10的信息 (15)术语表 (15)关闭计算机或将其置于睡眠状态 (15)附录B能源之星信息 (17)商标使用声明 (17)©Copyright Lenovo2015iii开始使用Windows10出版物的目的Windows®10是微软最新的操作系统。
Windows 10操作系统基础运用

5.新建文件夹
在Windows系统中个性化的管理,其中文件夹是其中的一部分,文件夹可以帮助用户分类的文件, 比如图片类型、文档类型、歌曲类型等等。那创建新建文件夹是怎么操作的,下面演示为例。
6.重名文件和文件夹
为了方便自己编辑的文件可以对文件的名称进行重名,其实文件夹也与文件的重名基本是一样的 操作,下面由我把重名的方法如下:
3.窗口的操作
窗口是Windows系统中主要工作界面之一,当我们启动某个应用程序或打开一个文档后windows将 切换相应的窗口,下面以此电脑窗口为例。
4.对话框的操作
对话框是用户与系统进行对话的主要部分,用户根据系统对话框提示的信息,选择对话框中的选 项或需要的相应的操作,比如磁盘的属性对话框。
当要关机的时候是怎么操作退出Windows的,在关闭之前先要保存相应的文档或程序即可关闭,下面退出 window的方法如下:
① 首先把光标放在Windows任务栏上的“开始”按钮;
② 此时展开菜单列表中单击“电源”按钮;
③ 然而再显示电源菜单列表单击“关机”选项即可。
● 2.鼠标的操作
● 在windows环境中,鼠标是必不可少的辅助设备,使用鼠标的时候先移动光标指向某个windows 的对象,需要做一些相应的操作,比如单击、双击、移动或拖动并右键单击的快捷键。而单击一 般指定选择对象的,如需要双击的情况通常为启动该程序或打开窗口、文件夹。拖动通常用于移 动、复制对象或对窗口滚动条与文档的标尺操作。
Windows 10系统基础 操作教程
了解ห้องสมุดไป่ตู้indows 10操作系统的运用
● 1.启动Windows与退出 ● 2.鼠标的操作 ● 3.窗口的操作 ● 4.对话框的操作 ● 5.新建文件夹 ● 6.重命名文件和文件夹
笔记本装win10教程
笔记本装win10教程笔记本装Win10教程现在许多笔记本电脑都预装有操作系统,但如果我们需要重新安装或升级系统,或者使用全新的Win10操作系统,就需要按照以下步骤来进行安装。
1. 准备在开始安装之前,我们需要准备以下材料和工具:- 笔记本电脑- Win10安装盘或U盘- 空白U盘(如果使用U盘安装)- 可靠的网络连接2. 备份数据在进行系统安装之前,我们必须备份重要的数据,以免丢失。
可以将数据备份到外部硬盘、云存储或其他移动存储设备中。
3. 设置启动顺序在开始安装之前,我们需要确保笔记本电脑的启动顺序设置为从光盘/DVD-ROM或U盘启动。
我们可以在BIOS设置中找到启动顺序选项,并将光盘或U盘设置为第一启动选项。
4. 插入安装盘或U盘将Win10安装盘或制作好的U盘插入电脑。
如果使用U盘进行安装,则在插入U盘之前,确保其中没有任何重要数据或文件。
5. 重启电脑重新启动电脑,并在开机时按下相应的按键(通常是F12、ESC或Delete键)进入启动选项菜单。
6. 选择启动设备从启动选项菜单中选择光盘/DVD-ROM或U盘作为启动设备。
7. 进入Win10安装界面根据电脑型号和厂商的不同,可能会看到不同的启动界面。
通常,我们需要按照屏幕上的提示,一直按下“下一步”按钮,直到进入Win10安装界面。
8. 安装Win10在Win10安装界面中,我们将看到安装向导。
根据需要的语言、时区、键盘布局等进行选择,然后点击“下一步”按钮。
9. 授权协议阅读并接受Win10的授权协议,然后点击“下一步”。
10. 选择安装类型在安装类型选项中,选择“自定义”(高级)选项。
这将允许我们选择安装的磁盘分区。
11. 创建/选择分区如果我们需要创建一个新的分区,可以使用Windows安装向导提供的分区工具。
如果已经拥有要安装Win10的分区,可以直接选择该分区,并点击“下一步”。
12. 开始安装点击“下一步”后,Win10将开始安装到所选的磁盘分区中。
联想用户手册
目录第1章联想用户服务注册第2章成长引擎联想功能键盘介绍主窗口介绍金蝶友商网新东方e企学吧成长引擎的其他应用第3章安全中心概述安全登录管理私密文件柜管理文件粉碎机第4章节能中心电源管理概述电源方案电源计划第5章联想拯救系统概述一键杀毒文件拯救一键恢复驱动与软件安装第6章扬天万利卡第7章常见问题与解答第1章联想用户服务注册注1. 本手册仅为用户快速入门提供指导,如需详细的帮助信息请参阅软件自带的帮助文件。
2. 本手册中所有图形界面仅供参考,请您以实际购买机型软件界面为准。
联想用户服务注册是将您的客户信息注册到联想的客户服务中心服务器上,可以减少您未来电话咨询时在线等候的时间,使您获得更快捷、周到的服务。
1. 连接上Internet网络,首次开机将会自动弹出如图1-1所示的联想用户服务注册主界面,请您根据提示进行联想用户服务注册。
图1-1 联想用户服务注册主界面注意1. 您可以通过单击【开始】→【所有程序】→【联想应用】→【联想用户服务注册】进入联想用户服务注册主界面,您也可以通过【成长引擎】单击扬天应用图标→【帮助】→【联想用户服务注册】进入联想用户服务注册主界面。
2. 为保证您顺利注册,请您在注册时确保Internet网络连接正常。
3. 如果您的机型选配了万利卡,在您进行用户服务注册时,可以插上万利卡同时实现万利卡的注册。
2. 在联想用户服务注册主界面上,单击“立即注册”,您将进入如图1-2所示的注册信息界面。
图1-2 注册信息界面3. 请根据提示输入单位、姓名、联系电话和电子信箱各项信息,单击“我接受该软件中的所有条款”,阅读该软件最终用户许可协议,然后勾选“我接受该软件协议中的所有条款”,单击“确认”,进入联想用户服务注册的确认界面。
注意请您务必填写真实有效的邮箱信息,否则无法接收验证邮件,以及后期服务使用中相关的服务密码等。
4. 检查您所填写的各项信息,如果所填信息有误,单击“修改”,将返回注册信息界面重新填写。
联想电脑使用说明书
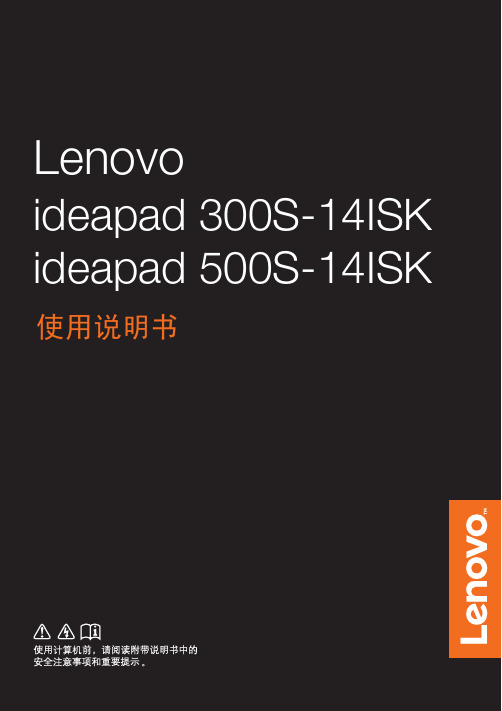
注释:如果 USB 设备使用电源线,请先将该设备连接至电源,然后再连接至计算机。否则, 系统可能会无法识别该设备。
7
第 1 章 认识您的计算机
为了达到这个目标联想预设以下电源管理功能如果计算机在特定时间内未运行这些预设值会自动生26附录a产品特殊声明若要将计算机从睡眠模式中唤醒请按键盘上的任意键
Lenovo
ideapad 300S-14ISK ideapad 500S-14ISK
Փ⫼䇈ᯢк
⊼䞞 • Փ⫼ᴀѻકПࠡˈ䇋ܜ䯙䇏lj㘨ᛇᅝܼঞ䗮⫼ֵᙃᣛफNJDŽ • ᴀᣛफЁⱘᶤѯ䇈ᯢ؛䆒ᙼ᠔Փ⫼ⱘᰃ Windows® 10DŽབᵰᙼՓ⫼ⱘᰃ݊
连接 USB 设备。
注释:详细信息,请参见第 7 页的 “连接 USB 设备”。
d 记忆卡插槽
将记忆卡 (未提供)插入此处。
注释:详细信息,请参见第 8 页的 “使用记忆卡 (未提供)”。
e 组合音频插孔
连接头戴式耳机 (带话筒)。
注释: • 组合音频插孔不支持传统麦克风。 • 因行业标准不同,连接第三方头戴式耳机或第三方头戴式耳机 (带话筒)时,可能不支
: 设为静音 / 取消静音。 : 降低音量。
: 调高音量。
: 关闭当前活动的窗口。
:
刷新桌面或当前活动的 窗口。
: 启用 / 禁用触控板。
: 启用 / 禁用飞行模式。
:
显示所有当前活动的应用 程序。
:
打开 / 关闭 LCD 显示屏 的背光灯。
:
在计算机和外接设备之间 切换显示。
windows10笔记本使用手册
w i n d o w s10笔记本使用手册(总25页)--本页仅作为文档封面,使用时请直接删除即可----内页可以根据需求调整合适字体及大小--笔记本电脑用户使用手册(标准版)Notebook PC User’s Manual敬告尊敬的用户:感谢您购买和使用我司的产品,为了您的安全和利益,请您在使用产品前仔细阅读本产品说明书及随机附带的全部资料。
如果您未按照产品说明书操作和使用产品,而导致任何的人身伤害、财产或其他损失,我司将不承担责任。
关于本产品说明书:说明书版权属于我司所有;说明书提及的商标、字号属于它们各自的权利拥有者;说明书内容如同实际产品不一致,以实际产品为准。
如果您对说明书的任何内容或条款存在不明或异议,请在购机后七日内向我司提出书面异议,否则视为您已经同意、理解并接受说明书的全部内容。
目录认识您的计算机 .......................................................................................................................... 错误!未定义书签。
简介..................................................................................................................................... 错误!未定义书签。
部件介绍 ............................................................................................................................. 错误!未定义书签。
开始使用Windows 10 ............................................................................................................... 错误!未定义书签。
windows10的基本操作内容与步骤
Windows10的基本操作内容与步骤1.概述W i nd ow s10作为当前最为流行的操作系统之一,为用户提供了许多强大的功能和灵活的操作方式。
本文将介绍W in do ws10的一些基本操作内容与步骤,帮助用户更好地了解和使用该操作系统。
2.开机与关机2.1开机要开机,首先需要确保计算机已经连接到电源,并且电源已经打开。
接下来,按下电源按钮,计算机将开始启动。
在启动过程中,系统会进行一系列自检和加载操作系统的步骤。
当屏幕出现W in do ws10的启动画面后,就表示计算机已经成功开机。
2.2关机要关机,可以通过点击开始菜单,并选择“关机”选项来进行操作。
在关机菜单中,用户可以选择直接关机、重新启动或进入睡眠模式等选项。
选择关机后,系统会依次关闭正在运行的程序和服务,并最终关闭计算机。
3.用户界面W i nd ow s10采用了全新的用户界面设计,提供了更加简洁和直观的操作方式。
3.1开始菜单开始菜单是W in do ws10的核心功能之一,可以通过点击任务栏左下角的W in do ws图标来打开。
开始菜单中包含了各种常用的应用程序、设置选项和文件夹快捷方式等。
用户可以通过在开始菜单中进行搜索、固定常用程序和自定义布局等方式,来快速访问和启动各种功能和应用程序。
3.2任务栏任务栏位于桌面底部,提供了许多常用的快捷方式和系统工具。
在任务栏上可以固定应用程序、查看已打开的窗口、调整音量和网络设置等。
用户还可以通过任务栏上的通知区域来查看系统通知和快速访问常用的系统功能。
3.3桌面桌面是Wi nd ow s10的主要工作区域,用户可以在桌面上放置各种文件、文件夹和快捷方式等。
通过鼠标右键点击桌面,可以打开上下文菜单,用户可以通过该菜单来调整桌面背景、显示图标等个性化设置。
4.文件管理W i nd ow s10提供了强大而直观的文件管理功能,使用户可以轻松管理和组织文件和文件夹。
4.1文件资源管理器文件资源管理器是Wi n do ws10中用于管理文件和文件夹的主要工具。
联想电脑使用说明书

电池正在充电。当电池电量 到 20% 时,闪烁颜色将变 为白色。
电池电量在 20% 到 80% 之 间,正在继续充电。电池电 量到达 80% 时,指示灯停止 闪烁,但充电过程将继续直 至电池充满电。
电源打开。
计算机在睡眠状态。
电源切断。
6
第 1 章 认识您的计算机 连接 USB 设备
注释:您可以通过按 F6 (
) 启用 / 禁用触控板。
g NFC 感应区域
此区域支持近场通信 (NFC, Near Field Communication,), 结合银联的专有客户端软件,可以实现银联迷你付功能 (仅限特定型号)。
2
使用键盘 热键 按特定的热键可立即进入相应的系统设置。
第 1 章 认识您的计算机
使用记忆卡 (未提供) 本计算机支持下列类型的记忆卡: • Secure Digital (SD) 卡 • Secure Digital High Capacity (SDHC) 卡 • SD eXtended Capacity (SDXC) 卡 • MultiMediaCard (MMC)
注释: • 每次仅在插槽中插入一张记忆卡。 • 本读卡器不支持 SDIO 设备 (如 SDIO 蓝牙通讯卡等)。
Lenovo
ideapad 300S-14ISK ideapad 500S-14ISK
Փ⫼䇈ᯢк
⊼䞞 • Փ⫼ᴀѻકПࠡˈ䇋ܜ䯙䇏lj㘨ᛇᅝܼঞ䗮⫼ֵᙃᣛफNJDŽ • ᴀᣛफЁⱘᶤѯ䇈ᯢ؛䆒ᙼ᠔Փ⫼ⱘᰃ Windows® 10DŽབᵰᙼՓ⫼ⱘᰃ݊
ᅗ Windows ᪡㋏㒳ˈᶤѯ᪡ৃ㛑Ӯ᳝ϡৠDŽབᵰᙼՓ⫼ⱘᰃ݊ᅗ᪡ ㋏㒳ˈ߭ᶤѯ᪡ৃ㛑ϡ䗖ড়ᙼDŽ • 䇈ᯢкᦣ䗄ⱘᰃ᭄ᴎൟⱘ䗮⫼ࡳ㛑DŽᙼⱘ䅵ㅫᴎৃ㛑≵᳝݊Ёᶤѯ ࡳ㛑ˈ㗙䇈ᯢкЁ≵᳝ҟ㒡ᙼⱘ䅵ㅫᴎϞⱘᶤѯࡳ㛑DŽ • བ㸠ᷛ⊼ˈᴀ䇈ᯢкՓ⫼ⱘᦦᴎൟЎ Lenovo ideapad 300S-14ISKDŽ • ᴀ䇈ᯢкЁⱘᦦৃ㛑Ϣᅲ䰙ѻકϡৠDŽ䇋ҹᅲ⠽ЎޚDŽ
联想 ThinkVision V21-10用户指南

ThinkVision V21-10用户指南机型:65D8产品编号F17210FV065D8-HCT3-CT第一版(2015年4月)© 版权所有 Lenovo 2015。
LENOVO 产品、数据、计算机软件、及服务基于专项资金开发,作为 48 C.F.R. 2.101 定义的商品销售给政府机构,并授予政府机构有限的受限制的使用、复制和公开权利。
受限制的有限权利声明:如果产品、数据、计算机软件、或服务按照总务管理器“GSA”合约交付,则其使用、复制、或公开须遵循在合约号 GS-35F-05925 中制定的限制。
目录安全事项 (iii)一般安全原则 (iii)第 1 章. 开始使用 ..............................................................................................................................................................................................................1-1物品清单 ............................................................................................................................................................................................................................................. 1-1使用注意事项 ................................................................................................................................................................................................................................... 1-1产品概述 ............................................................................................................................................................................................................................................. 1-2调整倾斜度 .................................................................................................................................................................................................................................. 1-2显示器控制 .................................................................................................................................................................................................................................. 1-2线缆锁槽 ....................................................................................................................................................................................................................................... 1-2设置显示器 ........................................................................................................................................................................................................................................ 1-3连接和打开显示器电源 .......................................................................................................................................................................................................... 1-3注册您的选件 ................................................................................................................................................................................................................................... 1-6第 2 章. 调整和使用显示器 .......................................................................................................................................................................................2-1舒适和辅助功能 .............................................................................................................................................................................................................................. 2-1安排您的工作区域 ................................................................................................................................................................................................................... 2-1放置显示器 .................................................................................................................................................................................................................................. 2-1关于健康工作习惯的小技巧 ................................................................................................................................................................................................ 2-2辅助功能信息 ............................................................................................................................................................................................................................. 2-2调整显示器图像 .............................................................................................................................................................................................................................. 2-3使用直接访问控件 ................................................................................................................................................................................................................... 2-3使用On-Screen Display (OSD,屏幕显示)控件 ...................................................................................................................................................... 2-4选择受支持的显示模式 .......................................................................................................................................................................................................... 2-7了解电源管理 ................................................................................................................................................................................................................................... 2-8保养显示器 ........................................................................................................................................................................................................................................ 2-9卸下显示器底座 .............................................................................................................................................................................................................................. 2-9壁挂(可选) ..................................................................................................................................................................................................................................... 2-10第 3 章. 参考信息 ..............................................................................................................................................................................................................3-1显示器规格 ........................................................................................................................................................................................................................................ 3-1故障排除 ............................................................................................................................................................................................................................................. 3-3手动图像设置 ............................................................................................................................................................................................................................. 3-4手动安装显示器驱动程序 ..................................................................................................................................................................................................... 3-5在 Windows 7 系统中安装显示器驱动程序 ............................................................................................................................................................. 3-5在 Windows 8/8.1 系统中安装显示器驱动程序 ...................................................................................................................................................... 3-6在 Windows 10 系统中安装显示器驱动程序 .......................................................................................................................................................... 3-7获得进一步帮助.................................................................................................................................................................................................................... 3-7服务信息 ............................................................................................................................................................................................................................................. 3-8产品编号 ....................................................................................................................................................................................................................................... 3-8客户责任 ....................................................................................................................................................................................................................................... 3-8维修部件 ....................................................................................................................................................................................................................................... 3-8附录 A. 服务和支持 ...................................................................................................................................................................... A-1电话技术支持 ...................................................................................................................................................................................................................................A-1附录 B. 声明 ..................................................................................................................................................................................... B-1回收信息 ............................................................................................................................................................................................................................................. B-2商标 ...................................................................................................................................................................................................................................................... B-2附录C. 有害物质...............................................................................................................................................................................C-1能效等级 ............................................................................................................................................................................................................................................. C-1《废弃电器电子产品回收处理管理条例》提示性说明 ................................................................................................................................................. C-1中国环境标志产品认证提示性说明 ........................................................................................................................................................................................ C-1安全事项一般安全原则有关安全使用计算机方面的提示,请转到:/safetyBefore installing this product, read the Safety Information.第 1 章. 开始使用本用户指南为用户提供详细的操作说明。
Windows 10产品手册

“开始”菜单
熟悉的“开始”菜单以更好用并可扩展的形式回归,可以一键单击访问用户使用最多的功能和文件。您可 以快速访问最常用的应用和 PC 设置,还可以添加更多喜爱的动态磁贴。
1
第1页
无论 论您使用 Windows s 7 或 Windows 8,全新“开始”菜单 , 菜单都很熟悉。
Hale Waihona Puke 您的应用 — 触手可及 在“开始”菜单左侧您会看 看到: 最常用 — 您每天使用的 的应用,将居于最 最前面位置。 建议/最近添加 最 — 在这 这里,您可以从当 当前应用集里发现 现新应用。您还可 可以查找从 Win ndows 应 用商店安装 装的任何新应用,这样便于立即访 访问或将其固定到 到“开始”屏幕上 上。 所在位置 置 — 访问“文件 件资源管理器”、“设置”和“电 电源”的最快方式。 所有应用 用 — 所有已安装 装应用的列表,按 按字母顺序排列,便于浏览。 将您喜爱的 的内容固定到“开 开始”屏幕上 如果您想要 要快速访问最重要 要的内容 — 无论 论是喜爱的应用、程序、文件夹、人脉或网站 — 可以将其 固定到“开 开始”屏幕上。 在“开始” 菜单上,长按 按(或右击)您 您想要固定的应用 用并选择“固定到 到‘开始’屏幕 幕”。您还
熟悉、实时更新
Windows 10 是您熟悉的 Windows,外加众多全新功能,保持最新状态、与时俱进。 Windows 10 友好、熟悉、易于使用。为了让您获得无缝、新鲜、甚至超前的科技体验,它使用自动更新 帮助您获得最新特性和安全保护。无论您身在何处,无论您使用什么设备,OneDrive 在线存储都支持您保 存、访问并共享内容。 这就是 Windows,它可以与您现有的绝大多数硬件和软件良好兼容。
可以拖拽“ “最常用”或“所 所有应用”里的应 应用并将其固定为 为磁贴。 利用动态磁 磁贴获得实时更新 新 新邮件、您 您的下一个约会或 或周末天气:动态 态磁贴在您的“开 开始”屏幕上提供应用的实时更 更新,这样
联想E43-80 Windows 10说明书
指示灯状态 开启 关 连接外接显示设备。
意义 电源打开。 电源切断。
将计算机连接至以太网络。
e HDMI 端口
连接 HDMI 输入设备,如电视机或外接显示器。
f USB 3.0 端口 (仅限特 连接 USB 设备。 定型号)
注释:
• 当电池电量大于 20% 时,带
标记的 USB 端口支持关机状态下为外接 USB 设备充电。
ϔ⠜˄2017ᑈ9᳜˅ © ⠜ᴗ᠔᳝ 㘨ᛇ 2017DŽ
目录
第 1 章 认识您的计算机............................................................................. 1 正视图............................................................................................................................ 1 左视图............................................................................................................................ 5 右视图............................................................................................................................ 8 底视图..........................................................................................................................10
Windows10高效使用指南手册
Windows10高效使用指南手册这些年2T使用windows 10 系统,相比前面几个版本变化还是蛮大的。
对与windows 10 系统总结了一点经验,分享给大家。
Windows10安装要不要升级Windows10?相比Win7,Win10做出了大幅改进,拥有了大量全新功能,最明显的改变就是开机启动时间。
相比Win8而言,很多细节的改进让Win10的使用体验得到了大幅提升,总的来说非常值得升级到Win10,如果是因为工作原因的限制,那么不建议升级。
选择32位还是64位?毫无疑问是64位好,32位系统内存使用最大为2.92GB可用,也就是说那怕你装了16GB的内存,能用的内存最多也就2.92GB,一些软件已经开始只支持64位,不支持32位了,比如知名的视频编辑软件Adobe After Effect。
如果你电脑配置一般,那么就装32位。
附Windows10中文简体原版纯净官方镜像Version 1703(目前最新):64位, 32位。
Windows10安装方法1、如果你是升级或者覆盖安装,点击下载后的.iso文件即可一键安装。
(安装前注意将资料备份到非系统盘,系统盘将会被格式化)2、如果你是全新安装,可以使用U盘制作 WindowsPE 来引导安装。
3、激活方法:目前最好的激活方式是 KMS Tools,同时还能一键安装激活Office2016系列软件。
4、安装完成后的第一件事就是卸截Windows10预装的一些你用不上的应用,你也可以使用10AppsManager来帮助卸载。
高效的使用方法已经过了折腾电脑的年纪,类似动态桌面,Dock工具栏,桌面浮窗这些花里胡哨软件一概不用,更喜欢那些朴实无华高效率的使用方法,只做一些简单的美化,比如使用软件 StartIsBack 来使任务栏变成透明,使用软件 TrueLaunchBar 来使任务栏居中。
下面就讲讲我认为的Windows10高效使用方法。
1、开始菜单从Win8开始,微软就将开始菜单和磁贴融合在一起,磁贴功能十分便捷,利于这一原生功能,我将所有可能会到的软件都放到了磁贴上,省去了使用各类启动软件。
- 1、下载文档前请自行甄别文档内容的完整性,平台不提供额外的编辑、内容补充、找答案等附加服务。
- 2、"仅部分预览"的文档,不可在线预览部分如存在完整性等问题,可反馈申请退款(可完整预览的文档不适用该条件!)。
- 3、如文档侵犯您的权益,请联系客服反馈,我们会尽快为您处理(人工客服工作时间:9:00-18:30)。
开始使用Windows 10出品意图Windows®10是微软公司最新版本的操作系统。
联想非常高兴能够推出预装了Windows 10的电脑。
这款操作系统是个人电脑(PC)非常重要的一部分。
如果您的电脑上的操作系统用起来很棒,那么您的(用户)体验也会非常爽。
基于以上考虑,我们出品了这份用户指南。
如果您已经了解了基础性的内容,那么可以去微软的官网获取更多更深的内容。
假设联想提供的有关Windows 10的信息与微软提供的有冲突,那么以微软官方的为准。
第一章“取出”Windows(OOBE)什么是OOBE?如果你的联想电脑上预装了任意版本的Windows,那么在第一次开机的时候都需要先“取出”Windows。
这与开箱取出硬件产品差不多。
这一过程被称为OOBE,或者是开箱体验(out-of-box)。
OOBE的过程中需要做些什么事情下面的表格列出了在OOBE过程中需要做些什么事情,其中清楚地展示了哪些是必须做的哪些是可以选择的您就是管理员您在OOBE过程中使用的本地账号或微软账号都会成为系统的管理员账号。
作为管理员,您可以改变安全设置、安装应用、创建账号并因为做出改变而影响到其他账号。
出于安全考虑,我们强烈建议您在OOBE之后创建并使用标准的用户账号。
至于“如何添加用户账号”详见后文。
接下来该做些什么检查激活状态Windows是必须要激活的。
如果你的电脑连接了互联网,那么会自动激活电脑上的Windows 10.。
第一步:右键单击选择“开始”按钮,选择“控制面板”第二步:点击“系统与安全”→“系统”。
你可以在“Windows激活”中核实你的电脑里的Windows 10的激活状态。
使用或安装安全软件为了保护您的电脑免于病毒(的损害)或者其他方式的攻击,请使用或安装安全软件(杀毒软件或防火墙)。
出于保护的目的,您的联想电脑上可能已经预装了安全软件(一般是McAfee—译者注)。
预装的安全软件有一段时间的免费试用期,过期以后您需要花钱购买使用许可。
温馨提示:如果您想要安装其他(品牌)的安全软件,请先卸载电脑上已有的。
如果电脑上同时安装有多个不同的安全软件,可能会因为互相冲突而造成各种问题。
创建系统备份当您完成Windows的设置并安装好了常用软件,我们强烈建议您使用联想的“一键还原”来创建系统备份(其实一键还原只能备份部分重要系统文件,建议大家使用Windows自带的备份工具来操作—译者注)。
提示:一键还原并不适用于所有的联想电脑产品第一步:点击“开始”→“所有应用”;第二步:找到并选择“联想一键还原”;第三步:点击“系统备份”;第四步:选择一个路径(位置)来存储系统备份的镜像文件,点击“下一步”。
提示:最好选择与安装了Windows 10不同的磁盘或磁盘分区(也就是说不要选择存储在系统盘—译者注)。
比如存储在其他外置硬盘上(比如移动硬盘—译者注)或者“本地磁盘(D)“。
假如出现了系统问题,您可以使用“联想一键还原“来把系统恢复到备份时的状态。
具体的细节,请参考”联想一键还原“的用户指南。
第二章微软账号带给您的好处什么是微软账号微软账号和相关密码用于登录微软公司的软件或服务。
如果您使用OneDrive (微软云盘)、(微软邮件在线系统)、Xbox Live(微软Xbox游戏机在线系统)、Office 365(微软办公软件订阅服务)以及Skype(微软免费可视通话软件)之类的微软服务,您必须已经拥有微软账号,如果没有请创建一个。
请放心,创建账号很简单并且是免费的。
好处使用微软账号有两大主要的好处●只需要登录一次。
当您在登录Windows 10的时候如果已经登录了微软账号,那么当您在使用OneDrive、Skype、或者是其他微软服务的时候就不需要再次登录了。
●您与您的所有设备都将连接在一起。
如果您使用微软账号登录多个基于Windows的设备,那么您的个性化设置都会(在各个设备上,按照您之前的设置)自动完成。
使用微软账号登录如果您已经拥有微软账号,那么可以在OOBE的过程中登录Windows 10。
如果没有的话,你可以点击“创建“来创建一个。
创建本地账号并登录如果您没有微软账号也不想在OOBE的过程中创建它,您可以创建一个本地账号用于登录Windows 10。
提示:如果您使用本地账号登录了Windows 10,那么您将无法从Windows Store(Windows应用商店)里面下载安装应用(貌似大家早已养成了从网上直接下载安装应用的习惯—译者注)。
并且当您使用其他的微软服务的时候也需要单独登录。
创建一个微软账号如果您没有微软账号,那么可以在OOBE之后创建一个。
账号的用户名必须是有效的电子邮箱地址。
●在OOBE的过程中创建微软账号,请在登录页面选择“创建“;●在OOBE之后创建微软账号,请去微软的官网/account创建。
不管怎样您都将被定位到微软账号的登录页面。
在该页面上,您将按要求输入您的电子邮箱地址作为用户名并设置密码。
当然了,您也需要填写一些个人信息。
在完成创建账号之前,请先到您的电子邮箱的收件箱里检查一些微软账号小组发送给您的确认邮件。
按照(确认邮件)信息里面的相关说明完成账号的创建。
如果您没有电子邮箱地址,请点击“创建一个新的电子邮箱“,按照这个方法,您将同时获得微软账号以及微软电子邮箱。
提示:理论上来说,您创建微软账号所使用的电子邮箱地址,是用来确保每一个微软账号都是唯一的(也就是说每个微软账号都应不同—译者注)。
切换为微软账号如果您在OOBE的过程中登录了本地账号,那么在此之后的任意时间您都可以选择切换为微软账号。
第一步:点击“开始“→”应用“→”设置“→”账号“;第二步:点击“使用微软账号登录“。
提示:当您第一次使用微软账号进行登录的时候请确保设备已连接互联网。
添加其他用户账号出于安全考虑,在OOBE之后您可能需要创建一个标准的用户账号;如果其他人也需要使用您的电脑,您可以为他们创建一个普通用户账号。
这个账号可以是微软账号也可以是本地账号。
提示:如果您想要创建一个普通用户账号,您现在的用户类型必须是管理员账号。
第一步:点击“开始“→”“所有应用”→“设置”→“用户”;第二步:点击“家庭及其他用户”,之后选择“为这台电脑添加其他人”;第三步:从这里,您可以给您的电脑添加一个微软账号或是本地账号了。
添加微软账号如果想要使用您的电脑的用户拥有微软账号,那么您可以在您的电脑上添加他/她的微软账号。
提示:在您的电脑上添加微软账号,请确保您的电脑已经连接上了互联网。
第一步:首先完成之前“添加其他用户账号”里面提到的前两部。
如果您的电脑已经连接了互联网,系统会提示您输入想要添加到电脑上的那个微软账号的用户名(电子邮箱地址);第二步:输入邮箱地址并点击“下一步”。
该邮箱地址会被发送到微软用于核实,这可能会花费几分钟的时间。
第三步:点击“完成”来完成微软账号的创建。
这时您的朋友可以用他/她的微软账号来登录您的电脑了。
提示:如果您所输入的电子邮箱地址并不存在,系统将提示您使用刚刚输入的电子邮箱地址来创建一个微软账号。
添加本地账号如果您的电脑并没有连接互联网,你可以为想要使用您的电脑的朋友添加一个本地账号。
第一步:首先完成“添加其他用户账号”里面提到的前两步;第二步:为该账号创建用户名和密码;第三步:点击“完成”完成添加。
修改账户类型默认情况下,在OOBE之后添加的用户账号属于标准用户账号。
如果你是管理员,可以把标准用户账号修改为管理员账号。
第一步:点击“开始”→“所有应用”→“设置”→“账号”;第二步:点击“家庭以及其他用户”;第三步:处于其他用户时,点击您想要修改的账号的用户名,然后点击“修改账号类型”;第四步:在下拉菜单中修改账号类型。
温馨提示:在授权(其他账号)管理员权限时需要特别注意,(因为)管理员账号可以修改安全设置,删除重要的系统文件,并对其他账号造成影响。
第三章开始菜单和操作中心在Windows 10的主用户界面(UI)中有两处重要的地方需要说明。
一处是左下角的开始菜单,而另一处则是右下角的操作中心。
开始菜单的回归如果您点击左下角的开始按钮,会发现开始菜单随着Windows 10 一起回归了。
开始菜单不仅带回了便捷,也更加强大。
电源按键您可以在开始菜单中找到电影按键。
点击它你可以选择关闭或者重启电脑,或者让电脑进入休眠模式。
找到应用您经常使用的应用会在开始菜单中的常用应用里显示,如果您在那里找不到某个应用的话,请点击“所有应用”,就可以在按字母顺序排列的应用列表里找到它。
将应用锁定在开始菜单或任务栏如果您经常使用某个应用,可以把它固定在开始菜单或任务栏中。
第一步:在“最常用”应用或“所有应用”里查找;第二步:右键点击某应用名并选择固定到开始菜单或任务栏。
操作中心在任务栏的最右侧是通知区域。
在通知区域里点击“操作中心”图标它就会出现。
在操作中心里,你可以检查来自Windows和所有应用的通知。
更为便捷的是,您可以快速修改通用设置。
启用平板模式第一步:点击通知区域里的操作中心图标;第二步:点击“平板模式”。
启用飞行模式当飞行模式启用以后,您的电脑的所有无线连接都将被关闭。
第一步:点击通知区域里的操作中心图标;第二步:点击“飞行模式”。
第四章OneDrive扩展您的本地存储OneDrive是什么OneDrive是由微软公司提供给您的在线存储服务。
在创建微软账号的同时,您将获得一个免费的在线存储空间。
提示:目前您能获得15GB的免费在线存储空间。
如果有需要的话您可以通过付费来获得更大的存储空间。
通过网页浏览器访问您的OneDrive如果您使用本地账号登录Windows 10,您可以通过网页浏览器来访问OneDrive。
第一步:点击任务栏上的Microsoft Edge浏览器;第二步:输入https:///并敲回车键;第三步:点击“登录”以登录您的账号。
本地OneDrive文件夹默认情况下,OneDrive会创建一个本地文件夹来同步文件。
这个叫做OneDrive 文件夹的默认存储位置为C:\Users\[ACCOUNT_NAME]\OneDrive。
提示:[ACCOUNT_NAME]代表您的用户名访问OneDrive的本地文件夹第一步:点击任务栏上的“文件浏览器”图标;第二步:点击左侧窗口上的OneDrive图标。
您的OneDrive文件夹里的文件是与OneDrive所同步的,所以当您断开连接时也可以处理本地文件。
当互联网连接可用时,它们又会与OneDrive自动同步。
选择需要同步的文件默认情况下,所有您的本地的文件和文件夹都可以通过云服务与OneDrive里的文件夹进行同步。
这意味着当OneDrive里面添加的文件越来越多的时候,您的本地的OneDrive文件夹也会占据越来越多的存储空间。
