AIX命令手册
IBM-AIX命令详解(DOC)

AIX常用命令AIX系统的设备有四种状态:Undefined(未定义):表示系统无法识别该设备,也就是系统找不到该设备。
Defined(定义):表示系统可以识别设备,但是系统不能使用它。
Available(可用):表示该设备在系统中可以使用,用户也可以使用。
Stopped(停用):表示设备不能被使用,但操作系统通过驱动程序可以识别它。
-------------------------------------------------------------------------------一、查看错误记录1、显示错误:errpt2、显示详细的错误信息:errpt -a 或errpt -a|more3、清空错误记录信息:errclear 0二、查看文件系统df -g 【以G为单位检查】或df -k 【以K为单位检查】三、查看系统中的设备及其特征lsdev -C显示的设备都已经安装在系统中。
lsdev -P显示系统预定义设备数据库中的所有设备,即系统能支持的设备。
【举例】1、查看硬盘: lsdev –Cc disk2、看磁带机: lsdev –Cc tape3、查看适配卡: lsdev –Cc adapter4、处理器个数:lsdev –C|grep proc【grep:强大的文本搜索工具,并把匹配的行打印出来(类似于find)】5、查看预定义设备对象类中的所有设备,并具有列头:lsdev -P -H6、要列出预定义设备对象类中的受支持的设备类,输入:lsdev -P -r class7、要列出其名称以字母‘hdi’开头的所有设备:lsdev -l hdi*8、要列出所有子pci0 总线,请输入:lsdev -p pci09、要列出其名称包含在文件/tmp/f 中的设备,输入:cat /tmp/f | lsdev -l -四、显示系统的配置信息、诊断信息和重要产品数据(VPD)信息lscfg -vp获取所有已配置硬件设备的详细信息【举例】1、查看硬盘信息: lscfg –vl hdiskx x表示数字2、查看网卡信息: lscfg –vl entx x表示数字3、查看磁带机: lscfg –vl rmtx x表示数字4、要在每一行显示带有设备描述的系统配置:lscfg -s5、要显示由逻辑名ent0 指定的特定设备的VPD:lscfg -v -l ent06、要显示不带有VPD 的逻辑名hdisk(或proc)所指定设备的名称、位置和描述:lscfg -l hdisk(或proc)\*7、要将开放固件设备树中相应节点的VPD 显示到ent0 设备中:lscfg -vp -l ent0五、查看硬件属性lsattr:用于读取指定设备的配置属性,部分属性可更改lsattr –El获取已配置设备的属性信息。
IBM_AIX小机命令手册

?EXCLUDE files:如果选择yes,将使得文件/etc/exclude.rootvg文件中列出的文件和目录不被备份。
?Make BOOTABLE backup:是否生成可启动备份,一般取默认值——yes。
?EXPAND /tmp if needed:是否在需要时自动扩展/tmp文件系统。强烈建议选yes。
内存大小: lsattr –El mem0
? 磁盘 lspv
? 交换分区 lsps –a
? 软件 lslpp –l 文件包名字
? 用户 who
关机命令:
–shutdown
一分钟后关机
–shutdown +2
二分钟后关机
–shutdown –Fr
关机重启(-r)
–或者创建一个CD-ROM文件系统并进行加载
?smit cdrfs
?mount /cdrom
?卸载cdrom
– unmount /cdrom
二、备份与恢复
rootvg备份 — mksysb
●只备份rootvg
●只备份已挂接的文件系统
●以备份格式创建可启动磁带
●保存rootvg中的换页空间设备定义
●tar (tape archive)
◇适用范围广
◇非常适合在不同UNIX平台间传送文件
◇可恢复空目录(-d选项)
◇不支持AIX访问控制列表(ACL,属于扩展inode内容)
●cpio(copy input to output)
◇适用范围广
◇符号链接较多时可能不能正常工作
?ls 显示目录中的内容(文件名)
#ls –a 列出当前目录中的所有文件
IBM AIX命令手册:IBM MQ管理、安装和卸载说明书

Summary of AIX commands to administrate MQhttps:///support/pages/node/6407842Date last updated: 17-Jun-2021Angel Rivera –*************.comIBM MQ Support+++ Objective +++T o provide the most common AIX commands to administrate, install and uninstall MQ.The organization of the sections is based on what will be the commands to start the installation of MQ from scratch:- ensuring that you have a supported version of AIX: uname, oslevel- create the group “mqm” (mkgroup) and the user “mqm” (mkuser),- unpack the .Z or tar.gz file downloaded from IBM Passport Advantage or IBM Fix Central: gunzip, uncompress, zcat, tar- install/uninstall via installp- querying filesets via lslpp- create (mkusil), list (lsusil), remove (rmusil) a USIL, and- specifying USILs (-R ALL or -R /usr/mqm92) with installp and lslpp++ Update from 17-Jun-2021The AIX command “install -r” that is discussed in this chapter will REJECT all the fix packs installed in the server. If you have only 1 fix pack or if you want to delete at the same time all the fix packs, then the procedure in this chapter is fine.But if you have multiples fix packs and you want to uninstall ONL Y the LATEST one, then you need to use another procedure, which is documented in the article:https:///support/pages/node/6464857Uninstalling only the latest fix pack for MQ in AIX and leaving behind other previous fix packs+++ Related tutorials +++https:///support/pages/node/6405792Customization of an AIX server for using MQ+ Customization of Putty for using Function Key F3 with smitty+ Creating groups and userids+ Downloading, customizing and using the sample scripts+ Customization of bash login for root+ Customization of set-mq-xxx scripts in /usr/local/bin to reflect MQ installations+ Customize the bash login for user "mqm" or the normal user "fulanohttps:///support/pages/node/6407850Installing in AIX - MQ 9.0.0.1 LTS, applying Fix Pack 9.0.0.11, Uninstalling MQChapter 1: How to get the installation imagesChapter 2: Create userid "mqm" and group "mqmChapter 3: Installation of MQ 9.0.0.1 (Installation1 in /usr/mqm)Chapter 4: Setting the environment for MQChapter 5: Creating a test queue manager, quick verification testChapter 6: Installation of the Fix Pack 9.0.0.11Chapter 7: Uninstallation of the Fix Pack 9.0.0.11Chapter 8: Uninstallation of the base 9.0.0.1Chapter 9: Appendices showing full output from installp for the scenarioshttps:///support/pages/node/6415777Upgrading in AIX from MQ 9.0.0.1 to MQ 9.1.0.0 LTSChapter 1: How to get the installation imagesChapter 2: T ake a backup of the queue manager data and recovery logsChapter 3: Uninstalling MQ 9.0Chapter 4: Installing MQ 9.1.0.0 LTSChapter 5: Running setmqenv to use MQ 9.1 commandsChapter 6: Creating a queue manager under 9.1Chapter 7: Upgrading an existing queue manager to MQ 9.1https:///support/pages/node/6415921Installing in AIX - MQ 9.2 LTS to coexist with MQ 9.1 LTS, including applying Fix Packs 9.1.0.7 and 9.2.0.1 Chapter 1: How to get the installation imagesChapter 2: Creating USIL and installing MQ 9.2 side-by-side to MQ 9.1Chapter 3: Need to run setmqenv to use MQ 9.1 or MQ 9.2 commandsChapter 4: Creating a queue manager under MQ 9.2Chapter 5: Migrating an MQ 9.1 queue manager to MQ 9.2Chapter 6: Installing Fix Pack 9.1.0.7 in Installation1 (default location)Chapter 7: Installing Fix Pack 9.2.0.1 in Installation2 (USIL /usr/mqm92)Chapter 8: Uninstallation of MQ 9.2Chapter 9: Deleting the USIL /opt/mqm92https:///support/pages/node/6429607Life cycle for a USIL in AIX for non-default installations of MQ++ Displaying version of operating systemDisplaying the platform and hostname+ROOT+ aglet: /downloads# uname -aAIX aglet 2 7 00F944604C00Displaying the version (high lievel)# oslevel7.2.0.0Displaying the detailed version# oslevel -s7200-05-01-2038+++ Creating group ‘mqm’ and user ‘mqm’The following steps show how to create:- a group “mqm” (gid 202),- a user “mqm” (userid 205),- under /home/mqmLogin as user: rootCreate a group called “mqm” with groupid of 202:mkgroup -'A' id='202' mqmCreate a user also called “mqm” with userid of 205 and who belongs to group “mqm”: mkuser id='205' pgrp='mqm' home='/home/mqm' mqmYou can assign the password:passwd mqmYou can use the command “id” to find out the ids and the group membership:$ id mqmuid=205(mqm) gid=202(mqm) groups=1(staff)+++ How to unpack tar.Z and tar.gz filesWhen you download MQ files from IBM Passport Advantage or IBM Fix Central, there are 2 possible suffixes for the file names:tar.Ztar.gzThe tar options are:-x T o extract members from the archive into the file system.-v T o be verbose about the operation being performed.-f FileArchive T o use the specified file archive as the tar archive.The rest of this section provides more details on how to unpack the files.a) Suffix: tar.ZThe most common ways to unpack this type of files are:a.1) One (1) long compound command (it preserves the file tar.Z)zcat MQ_V9.0_F_AIX_EIMAGE.tar.Z | tar -xvf -The output of zcat is sent to the standard output file (i.e., stdout).This allows the user to decompress the compressed tar file (leaving the compressed file unchanged), and then to expand the tar file to the current directory.The "f -" tar command line option tells the tar command to read its input from the standard input file (i.e., stdin).a.2) T wo (2) simpler commands (the tar.Z is uncompressed, leaving a .tar file) Decompress the file tar.Z by issuing:uncompress MQ_V9.0_F_AIX_EIMAGE.tarThen unpack the file:tar -xvf MQ_V9.0_F_AIX_EIMAGE.tarb) Suffix: tar.gzb.1) One (1) long compound command (it preserves the file tar.gz)gunzip -c IBM_MQ_9.1_AIX.tar.gz | tar -xvf -A common convention is to use the "-c" command line option on the gunzip command so that instead of replacing the tar.gz, the output of the command is sent to the standard output file (i.e., stdout). This allows the user to decompress the compressed tar file (leaving the compressed file unchanged), and expand the tar file to the current directory. The "f -" tar command line option tells the tar command to read its input from the standard input file (i.e., stdin).b.2) T wo (2) simpler commands (the tar.gz is uncompressed, leaving a .tar file) Decompress the file tar.gz by issuing:gunzip IBM_MQ_9.1_AIX.tar.gzThen unpack the file:tar -xvf IBM_MQ_9.1_AIX.tar+++ Creating a USIL to install in a non-default location, such as /usr/mqm92+ Create a dedicated installation directory and designate it as a USILLogin as userid root to create the USIL- Create directory for the USIL.This directory will be designated to be a USIL in a step mentioned later on.# mkdir /usr/mqm92- List the subdirectories that will have the MQ code.Note that /usr/mqm is the default location for Installation1 (in this case,it already has MQ 9.1)# ls -dl /usr/mq*dr-xr-xr-x 20 mqm mqm 4096 Jan 27 07:34 /usr/mqmdrwxr-xr-x 2 root system 256 Jan 27 09:17 /usr/mqm92- So far, we do not have any USI Ls. Let’s verify by issuing the following command:# lsusil(empty)- Make the newly created directory a USIL.Note that the directory will be known as: INSTALL_ROOT_PATH# mkusil -R /usr/mqm92 -c 'MQ 9.2' -Xmkusil: Return Status = SUCCESSWhere:-R /usr/mqm92 => usil location-c comment-X Expands the space needed automatically.- List the USILs and note the new one:# lsusilINSTALL PATH = /usr/mqm92COMMENTS = MQ 9.2- Proceed to use the USIL with installp and lslpp.- If you uninstall MQ from the USIL and if you decide to not use the USIL anymore, then delete it.Please keep in mind that rmusil does not delete the directory structure for the USIL! # rmusil -R /usr/mqm92rmusil: Return Status = SUCCESS- List the USILs (it should show no USILs)# lsusil(empty)- Remove the directory structure that was associated with the USIL:# rm -fr /usr/mqm92+++ Using installp to install and uninstallAfter using “tar -xvf” to unpack the base code to install, you need to go to the newly created directory “MQServer”# cd MQServer++ Install the base code:T o install the base code in the default location /usr/mqm:# installp -acgXYd . all- T o install the base code in a non-default location such as /usr/mqm92# installp -R /usr/mqm92 -acgXYd . allWhere “-R usil” is the path of the User Specified Installation Location (USIL) specified when the product was installed.++ Install the fix pack code on top of an existing installation:T o install the fix pack code in the default location /usr/mqm:# installp -agXYd . all- T o install the fix pack code in a non-default location# installp -R /usr/mqm92 -agXYd . allWhere “-R usil” is the path of the User Specified Installation Location (USIL) specified when the product was installed.++ Reject ALL the Updates (uninstall all the Fix Packs)From the default location:# installp -r "mqm*"From a USIL:# installp -R /usr/mqm92 -r "mqm*"++ Update from 17-Jun-2021The AIX command “install -r” that is discussed in this chapter will REJECT all th e fix packs installed in the server. If you have only 1 fix pack or if you want to delete at the same time all the fix packs, then the procedure in this chapter is fine.But if you have multiples fix packs and you want to uninstall ONL Y the LATEST one, then you need to use another procedure, which is documented in the article:https:///support/pages/node/6464857Uninstalling only the latest fix pack for MQ in AIX and leaving behind other previous fix packs++ Uninstalling the base code:T o uninstall or modify IBM MQ by using installp, enter one of the following commands:- T o uninstall an installation in the default location /usr/mqm:installp -u mqm- T o uninstall an installation in a non-default location:installp -R /usr/mqm92 -u mqmWhere “-R usil” is the path of the User Specified Installation Location (USIL) specified when the product was installed.+++ Using lslpp to list the MQ filesetsa) This is the most comprehensive command to list all the installed MQ filesets ACROSS the different USILs and including the normal location of /usr/mqm.The following shows the output when MQ is not installed at all and there are no USILs. Note that ALL is in UPPERCASE!# lslpp -R ALL -la "mqm.*"+-----------------------------------------------------------------------------+INSTALL ROOT PATH = /+-----------------------------------------------------------------------------+lslpp: 0504-132 Fileset mqm.* not installed.If there are no USILs, then this is the command.In this case, no MQ filesets are installed.# lslpp -la "mqm.*"lslpp: 0504-132 Fileset mqm.* not installed.b) Listing the file sets from the default location /usr/mqm# lslpp -la "mqm*"Fileset Level State Description----------------------------------------------------------------------------Path: /usr/lib/objreposmqm.amqp.rte 9.0.0.1 COMMITTED IBM MQ AMQP Service9.0.0.11 APPLIED IBM MQ AMQP Servicemqm.ams.rte 9.0.0.1 COMMITTED IBM MQ Advanced MessageSecurity9.0.0.11 APPLIED IBM MQ Advanced MessageSecurityc) Listing the file sets for the USIL# lslpp -R /usr/mqm92 -la "mqm*"Fileset Level State Description----------------------------------------------------------------------------Path: /usr/mqm92/usr/lib/objreposmqm.amqp.rte 9.2.0.0 COMMITTED IBM MQ AMQP Servicemqm.ams.rte 9.2.0.0 COMMITTED IBM MQ Advanced - AdvancedMessage Securitymqm.base.runtime 9.2.0.0 COMMITTED IBM MQ Runtime for Client andServerServer+++ References+++ AIX 7.1 documentationhttps:///support/knowledgecenter/en/ssw_aix_71/m_commands/mkusil.htmlAIX 7.1 / Commands / m /mkusil Command.Creates or attaches a new user-specified installation location (USIL) instance.Syntaxmkusil -R RelocatePath -c Comments [-XFa]DescriptionThe mkusil command creates or attaches a new USIL instance.A user-specified installation location (USIL) is a tracked, relocated installation path that is created by the administrator. The location is tracked by the system and can be used as an alternate installation path for packages that use relocation of file sets or software. Multiple instances or versions of the same software package can be installed on a single system by delegating each installation to a separate USIL.An existing USIL instance can be attached or detached from any given system.Each USIL instance maintains its own set of Software Vital Product Data (SWVPD) in three installp parts:InstallRoot/etc/objreposInstallRoot/usr/lib/objreposInstallRoot/usr/share/lib/objrepos++ Information about the flags for the AIX command: installpThe flags for installp mentioned in the online manual for MQ indicate to apply, commit, expand file system, agree with license, using the .toc (table of contents) file and filesets in the current directory:installp -acgXYd . allhttps:///support/knowledgecenter/en/ssw_aix_72/i_commands/installp.htm lAIX 7.2 / Commands / i /installp CommandPurposeInstalls available software products in a compatible installation package.Flags:-R path Indicates a user-specified installation location.-a Applies one or more software products or updates. This is the default action. This flag can be used with the -c flag to apply and commit a software product update when installed.-c Commits all specified updates that are currently applied but not committed. When an update is committed all other software products it is dependent on must also be committed (unless they are already in the committed state). The specified software product is dependent on any software product that is a prerequisite or corequisite of the specified product. If the requisite software products are not in the committed state, the commit fails and error messages are displayed. The -g flag can be used to automatically commit requisite software product updates.-g When used to install or commit, this flag automatically installs or commits, respectively, any software products or updates that are requisites of the specified software product. When used to remove or reject software, this flag automatically removes or rejects dependents of the specified software.-X Attempts to expand any file systems where there is insufficient space to do the installation. This option expands file systems based on current available space and size estimates that are provided by the software product package. Note that it is possible to exhaust available disk space during an installation even if the -X flag is specified, especially if other files are being created or expanded in the same file systems during an installation. Also note that any remote file systems cannot be expanded.-Y Agrees to required software license agreements for software to be installed. This flag is only valid with the -a flag.-d Device Specifies where the installation media can be found.Notice that "d ." means: current directory-r Rejects all specified software updates that are currently applied but not committed. When a software update is rejected any other software product that is dependent on it (that is, those software products that have the specified software product as a requisite) must also be rejected. The -g flag can be used to reject automatically dependent software updates.-u Removes the specified software product and any of its installed updates from the system. The product can be in either the committed or broken state.https:///support/knowledgecenter/ssw_aix_72/l_commands/lslpp.htmlAIX 7.2 /lslpp Command-R { path | ALL } Indicates a user-specified installation location.-a Displays all the information about filesets specified when combined with other flags. This flag shows all updates when combined with the -l flag and all history when combined with the -h flag.-l (lowercase L) Displays the name, most recent level, state, and description of the specified fileset.++ MQ Documentationhttps:///support/knowledgecenter/SSFKSJ_9.2.0/com.ibm.mq.ins.doc/q008600_.htm IBM MQ 9.2.x / Installing and uninstalling IBM MQ / Installing and uninstalling IBM MQ on AIX /Installing IBM MQ server on AIX.You must install the second version of the product in a location that is not the default. To create the non-default installation location you must use the mkusil command, which is available only from the command line..Install the whole product in a non-default location using the -R flag:installp -R USIL_Directory -acgXYd . allhttps:///support/knowledgecenter/SSFKSJ_9.2.0/com.ibm.mq.mig.doc/q008 010_.htmlIBM MQ 9.2.x / IBM MQ / Maintaining and migrating / Applying maintenance to IBM MQ / Applying and removing maintenance on UNIX and Linux /Applying maintenance level updates on AIX (Installation of Fix Packs)*** Note: The components will be either COMMITTED or APPLIED depending on the options chosen when applying the fix pack.https:///support/knowledgecenter/SSFKSJ_9.2.0/com.ibm.mq.mig.doc/q008 020_.htmlIBM MQ 9.2.x / IBM MQ / Maintaining and migrating / Applying maintenance to IBM MQ / Applying and removing maintenance on AIX and Linux /Reverting to the previous maintenance level on AIXT o back out ALL maintenance updates, as the user root, issue the command:installp [ -R usil ] -r "mqm*"https:///support/knowledgecenter/SSFKSJ_9.2.0/com.ibm.mq.ins.doc/q0094 20_.htmlIBM MQ 9.2.x / IBM MQ / Installing and uninstalling / Installing and uninstalling IBM MQ on AIX /Uninstalling or modifying IBM MQ on AIXT o uninstall an installation in the default location /usr/mqm:installp -u mqm+++ end。
AIX最实用 命令

AIX常用命令
1 topas命令,可以看到aix系统的使用情况,aix查看cup使用率。
2. 磁盘空间
df -g 在命令行中,输入aix命令:df -g,可以看到当前aix系统的磁盘空间使用情况,即可以查看aix磁盘空间。
df命令后面的参数-g,是表示后面显示的磁盘空间
大小以G计算并显示
df -h 统计磁盘的使用率
df -k 文件系统空间使用情况
查看空间
lspv :查看系统硬盘
lspv hdisk# :查看硬盘hdisk#的空间分配情况
lsvg :查看系统VG
lsvg vg_name : 查看VG的空间分配情况
lsvg -l vg_name: 查看VG中LV分配情况以及对应的文件系统
df -k :查看文件系统使用情况。
目录操作
文件操作
安全操作
编程操作
进程操作
时间操作
网络与通信操作
Korn Shell 命令
其它命令。
AIX操作系统基本命令

AIX操作系统基本命令系统的进入和退出login: 输入用户名(例如:user01)password: 输入用户口令若用户名及口令均正确,则用户将登陆成功。
此时系统会出现命令提示符$或#,即表示可接收用户输入的操作系统命令。
退出系统:或 exit或logout。
例:#(or$)exit#(or$)Ctrl^D注,#为ROOT用户的命令提示符,$为一般用户passwordpassword命令用于建立或修改用户的密码。
如:#passwordpasswd: —输入旧口令new passwd: —输入新口令re-enter new paswd: —重新输入新口令mkdir、rm、mv和cdmkdir:用于创建目录$ mkdir oracle$ lsoracle$rm:用于删除文件或目录(rm –r 删除目录时目录内有内容,用-r一起删除)$ rm -r oracle$ ls$mv:用于改变文件或目录名$ mkdir ll$ lsll$ mkdir kk$ lskk ll$ mv ll kk$ lskk$ cd kk$ lsll$cd:用于进入系统某一级目录中去$ cd /$ pwd/$ cd /home/oracle$ pwd/home/oracle$ls功能:显示目录中的内容,列出当前目录中所有文件的文件名参数说明:a:列出目录中所有文件d:列出所有子目录l:列出长格式文件信息举例:ls –a:列出当前目录中的所有文件$ ls -a#UNTITLED# .dt createdbscripts oracle. .dtprofile dead_letter smit.log.. .profile ll smit.script.TTauthority .sh_history make.log websm.log.Xauthority afiedt.buf mbox websm.script$ls –l:显示文件的详细信息$ ls -ltotal 295-rw-r--r-- 1 201 dba 3 Sep 01 15:24 #UNTITLED#-rw-r--r-- 1 201 dba 51 Jul 08 18:18 afiedt.buf drwxrwxr-x 2 201 dba 512 May 08 11:49 createdbscripts drwx------ 2 201 dba 512 Jun 19 09:27 dead_letter drwxr-xr-x 2 201 dba 512 Sep 22 10:17 ll-rw-r--r-- 1 201 dba 95987 Apr 18 14:51 make.log-rw------- 1 201 dba 11174 Sep 17 09:15 mboxdrwxr-xr-x 3 201 dba 512 Sep 22 10:21 oracle-rw-r--r-- 1 201 dba 8971 Sep 20 11:08 smit.log-rw-r--r-- 1 201 dba 5437 Sep 20 11:08 smit.script-rw-r--r-- 1 201 system 1682 Sep 02 15:18 websm.log-rw-r--r-- 1 201 system 21441 Sep 02 15:10 websm.script $date功能:显示当前日期和时间,超级用户可以进行修改举例:$ dateMon Sep 22 10:28:26 BEIST 2003$wc功能:计算文件中的行数、字数和字符数参数说明:c:计算字符数l:计算行数w:计算字数举例:# wc profile13 53 381 profile| | |行数字数字符数$ wc smit.log422 1162 8971 smit.log$who功能:列出当前系统注册的用户举例:$who am i-- 列出当前系统使用者身份$ whooracle lft0 Sep 22 09:05oracle pts/0 Sep 22 10:17 (192.168.100.79)oracle pts/4 Sep 22 09:05 (:0.0)$ who am ioracle pts/0 Sep 22 10:17 (192.168.100.79)$finger显示当前登陆到系统中的用户的信息举例:# fingerLogin Name TTY Idle When Site I nfooracle ??? *l0 2:02 Mon 09:05 oracle ??? p4 1:59 Mon 09:05root ??? p0 Mon 11:06# finger oracleLogin name: oracleDirectory: /usr/oracle/ora90 Shell: /usr/bin/kshOn since Sep 22 09:05:35 on lft0, 2 hours 2 minutes Idle Time(messages off)On since Sep 22 09:05:41 on pts/4, 1 hour 59 minutes Idle Timefrom :0.0No Plan.#ps功能:显示后台进程的有关信息。
aix 常用命令
aix 常用命令AIX常用命令AIX(Advanced Interactive eXecutive)是IBM公司的一款UNIX操作系统,广泛应用于企业级服务器系统中。
本文将介绍AIX 常用命令,帮助读者更好地理解和使用该操作系统。
一、系统管理命令1. whoami:查询当前登录用户的用户名;2. hostname:查看主机名;3. uname -a:显示系统的各种信息,如内核版本、硬件平台等;4. uptime:查看系统的运行时间和负载情况;5. date:显示当前日期和时间;6. topas:实时监控系统性能,包括CPU利用率、内存使用情况等;7. lparstat -i:显示LPAR(Logical Partition)信息,包括分区的配置和资源利用情况;8. lsdev:列出设备列表;9. errpt:查看系统错误日志,用于排查故障;10. ps -ef:显示当前系统的进程列表;11. mksysb:创建系统备份;12. bootlist:设置系统启动顺序。
二、文件和目录管理命令1. ls:列出当前目录下的文件和子目录;2. pwd:显示当前工作目录的路径;3. cd:切换工作目录;4. mkdir:创建新的目录;5. rm:删除文件或目录;6. cp:复制文件或目录;7. mv:移动文件或目录;8. find:按照指定条件查找文件;9. du:查看目录或文件的磁盘使用情况;10. df:显示文件系统的使用情况;11. cat:查看文件内容;12. vi:编辑文本文件。
三、用户和权限管理命令1. useradd:创建新用户;2. userdel:删除用户;3. passwd:修改用户密码;4. chuser:修改用户属性;5. chown:修改文件或目录的所有者;6. chmod:修改文件或目录的权限;7. chgrp:修改文件或目录的所属组;8. groups:查看用户所属的组;9. su:切换用户身份;10. visudo:编辑sudoers文件,配置用户的sudo权限。
AIX命令
AIX基础命令软件管理Smit install_update ——软件升级Smit install_latest ——软件安装Smit maintain_software ——维护软件Smit commit ——conmimit 软件包Smit reject ——reject软件包Smit remove ——remove软件包Smit list_installed ——显示已安装的软件包Installp -p 预览安装(预览这个LPP所要安装的空间信息,实际是没有安装的)-c commit一个处于apply的软件包(删除以前版本)-r reject一个处于apply的软件包(回滚以前版本)-l 显示软件包格式-C 清除软件包-u 卸载软件包例如:installp –ug –V2 –f uninstall.list-u 卸载 -g 为相关的软件包 -V为显示卸载状态–f为指定软件包指定卸载以uninstall。
List相关的所有软件包Lslpp -l ——显示安装的软件包-f ——查看某个软件相关的软件包Instfix (必须为ROOT用户)Lppchk -c X11 ——显示组成X11的所有文件系统命令Smit system ——系统环境管理Smit mlang ——系统语言环境管理Shutdown –Fr ——重新启动系统Alog –f /tmp/aaa.log –o ——列出日志文件的内容Bootinfo –s hdisk0 ——显示磁盘大小-r ——显示实际内存容量-y ——显示机器是32位还是64位Hostname ——显示主机名Whoimi ——显示当前用户Who ——显示当前登录的用户和IP用户切换命令Su ——切换用户命令Su –——带‚-‛表示将切换的用户环境也一起切换过去文件压缩、解压缩Tar –cvf ——创建tar包Tar –xvf ——解压tar包压缩倍率一般为1:16用户管理命令Lsuser –f root ——显示root用户的详细信息,-f并且以列的方式排列Smitty security ——用户管理界面Smitty users ——用户管理Smitty lsuser ——查看用户列表Smitty mkuser ——创建用户列表Smitty chuser ——修改用户属性Lsuser hu1 ——显示hu1这个用户的详细信息-f hu1 ——以列的方式显示用户详细信息Mkuser 创建用户-a hu1 ——创建用户并设置用户为管理员(只有ROOT用户可以使用此命令)Chuser 变更用户属性组管理命令Smitty groups ——组管理界面Smitty lsgroup ——查看组列表Smitty mkgroup ——创建组Smitty chgroup ——修改组属性Smitty rmgroup ——删除组Lsgroup –c ——查看组用户属性Lsgroup –f ——查看用户属性–f 并且以每行的形式显示查看用户登录历史命令Last ——显示所有用户的登录、退出历史记录Last root ——显示root用户的登录、退出历史记录Last reboot ——显示系统启动、重启的时间权限更改命令u为用户权限,g为组权限,o为其他权限r为读权限 w 为写权选 x 为执行权限Chmod o+r hu1 ——更改文件hu1的其他权限,权限分为 u g oChown root hu1 ——为文件hu1添加用户所属者为rootChgrp staff hu1 ——将hu1目录的所有权改为staffChgrf –R staff ——hu1现在hu1文件和其子文件的所有权改为staff存储管理Cfgmgr 刷新设备(如果有设备不显示,可刷新操作)Cfgmgr –v ——查看最新添加的设备Lspv 查看磁盘的序列号和磁盘的名称还有磁盘的状态activeLspv –l hdisk1 ——查看hdisk1下的LV还有PP使用情况和挂载点Chdev –l hdisk1 –a pv=yes ——添加hdisk1位PVChdev -l hdisk19 -a pv=yes ——重新获取PVIDChdev -l hdisk19 -a pv=clear ——清除pvidBootinfo –s hdisk0 ——查看 hdisk0磁盘的大小LsvgLsvg –o ——查看当前已经激活的VGLsvg –p rootvg ——查看rootvg中的pp使用率Lsvg –l rootvg ——查看rootvg下面所有Lv使用情况和OPEN状态,还有挂载点Chvg –a –n huvg ——设置huvg不开机自动启动Lslv –l hulvLslv –m hu1 ——查看VG hu1中的lp在哪个PV hdisk中Migratelp hu1/1 hdisk0 ——将1盘的第一个lp转到0盘上Migratepv –l hulv hdisk1 hdisk2 ——把hdisk1中的hulv转移到hdisk2上(必须同一VG)Lsfs 查看当前系统的文件系统和类型,是否自动开启和挂载点Lsps –a ——查看所有换页空间的大小、所在磁盘、使用率、是否自动开启、类型 -s ——查看换页空间使用率Smit pv 打开PV(磁盘)管理界面Smit lvm 创建LVM管理Smit vg 打开VG管理界面Smit mkvg 打开创建VG界面Smit lv 打开LV管理界面Smit mklv 打开创建LV界面Smit psSmit mkps 创建ps换页空间Swapon /dev/paging00 ——激活换页空间Swapoff /dev/paging00 ——关闭换页空间Swapon –a ——激活所有换页空间Chps –s 16 paging00 ——增加换页空间paging00的大小4GB(一个PP256M)Smit fsSmit mkfs 创建fs文件系统df –g ——查看磁盘文件系统使用率以G为单位chfs –a size=+2G /hufs ——扩容fs 2G到hufschfs –a size=-2G /hufs ——缩容fs 2G (一般不这么操作)Smit mount 挂载文件系统界面Smit umount 系在文件系统界面Extendvg hu1 hdisk5 ——添加PV到VGReducedvg hu1 hdisk5 ——从VG将PV移除Exportvg huvg ——导出VG(删除huvg中的ODM库信息)Importvg –y huvg hdisk2 ——导入VG 将huvg的ODM库信息导入到hdisk2磁盘中Varyoffvg huvg ——停止VG (一般停止VG以后才可以对VG做出一些别的操作)Varyonvg huvg ——激活VGRmdev –l hdisk1 ——关闭hdisk1磁盘,使其处于defined状态Mkdev –l hdisk1 ——开启hdisk1磁盘Rmdev –rl hdisk1 ——彻底删除hdisk1磁盘【一般先umountVG,,然后停止varyoffVG,最后移除export VG】系统资源查询命令Jobs ——查看系统后台运行的程序Lssrc –a ——查看所有服务子系统–s ——查看服务是否开启-t ——查看带超级进程的服务是否开启,如Telnet的超级进程为inetd-g tcpip ——查看带群组的服务Ps –ef ——显示主要进程,pid、 ppid、启动时间、运行时间Ps aux ——显示系统的资源使用率pid、内存、cpu、启动时间、运行时间df –g ——查看磁盘文件系统使用率以G为单位du –ms /etc ——查看ETC文件的大小/etc/* ——查看etc文件下每个文件的大小(单位:M)例如:du –ms/etc/* | sort –r n | head –n 5 ——查看/etc目录下,并将前五的文件从大到小排列sar 1 2 ——查看CPU和内粗你的使用情况sar – d 1 2 ——查看硬盘的使用情况topas ——查看系统性能最常用的命令,这个是实时变化的,不能用作命令输出svmon ——比较全面内存和换页空间的使用情况vmsata ——内存使用情况errpt ——查询系统故障日志 TP类的和PH类的优先处理-a ——列出日志的详细情况Errclear ——0 清除所有日志-d S 10 ——清除10天前的所有软件错误日志iostat ——查询I/O状态、CPU使用率、硬盘使用率diag ——系统自带硬件检测软件设备管理Smit devices ——查看管理菜单Smit type ——增加设备Lsdev –Cc disk ——查看所有的硬盘设备,查看是否连接了共享存储Lsdev –Pc disk ——查看所有的disk设备Lsdev –Cc adapter ——查看网卡、等适配器设备Lsdev –l hdisk0 ——查看磁盘hdisk0的状态Lsatter –El ent0 ——查看网卡ent0设备的详细信息Lscfg –vl hdisk0 ——查看hdisk0磁盘的定位码信息Lsdev –p pci0 ——查看一个设备的子设备Lsdev –C –l hdisk0 ——查看一个设备的父设备Startsrc -s ——启动进程Stopsrc -s ——停止进程Refresh –s ——重启进程Lssrc –g ——查询服务状态Mkdvdev –vdev cd0 –vadapter vhost0 ——移动逻辑光驱任务计划Crontab –e ——编辑任务计划Crontab –l ——查看当前所有crontabCrontab –r ——删除crontabAt –l ——显示当前的作业At –r job ——取消作业At now +2 mins 2分钟后执行此命令Batch 当系统cpu空闲时执行此计划任务(一般不用)备份与恢复Smit mksysb 创建ROOTVG映像备份界面Mksysb –i –e /dev/rmt0 创建镜像备份–i 在磁带生成新的image.data文件–e备份将不备份/etc/exclude.rootvg中包含的文件Smit lsmksysb ——校验备份Smit restmksysb ——恢复单个文件Smit savevg ——备份非rootvg 文件或目录Smit restvg ——非rootvg数据的恢复Smit backfile ——备份文件或者目录Smit restfile ——恢复文件或者目录backup -0 -u -f /dev/rmt0 / 备份 / 文件系统0代表备份级别(完整备份)–u表示更新/etc/dumppadates文件Tar –cvf /backup/leo.tar /home/leo ——创建打包备份(小于2GB)将/home/leo打包备份Tar –xvf /backup/leo.tar ——恢复打包备份网络管理Netstat –in ——查询IP-r nIpconfig ——查询IP-l 查询所有可用网络接口-a 查询所有信息Chdev –l inet0 –a hostname=boot ——将本机的主机名永久变更为boot例如:Chdev –l ent0 –a netaddr=‘192.168.10.1’–a netmask=255.255.255.0命令添加IP和掩码NFS服务器Smit mknfsexp ——创建NFS配置界面①手动修改 /etc/exports文件,添加IP信息如: /hu –ow 表示让hu这个文件只读属性②Exportfs –a ——使配置文件内容生效③Startsrc –g nfs ——启动nfs服务Showmount –a ——查看本机当前的挂载的文件-e ——查看共享着那些文件Nfsstat –a ——查看nfs的通信状况。
aix常用操作命令

#alt_rootvg_op -W -d hdisk1 --唤醒克隆盘,此后即可对克隆盘进行修改,但不能继续执行引导操作
#alt_rootvg_op -S -t hdisk1 --使其再次休眠
#alt_rootvg_op -v old_rootvg -d hdisk1 --重新设置卷组名为old_rootvg
2.3 使用命令进行克隆
#alt_disk_copy -d hdisk0 --将rootvg克隆到hdisk0
#alt_rootvg_op -X old_rootvg --清除原始的rootvg(old_rotvg)
#alt_rootvg_op -X altinst_rootvg --清除原始的rootvg(altinst_rootvg)
#errpt -aj 864D2CE3 | more --显示指定错误号的详细信息
#errclear -d S 0 --删除所有软件类错误
#errclear 0 --删除所有信息
#diag -d sysplanar0 -v -e --查看指定设备的硬件错误信息
7. AIX任务调度相关
4.2 使用smitty配置网络接口TCP/IP
#smitty tcoip -> minimum configuration & startup -> available network interfaces
5. 用户、组、文件权限相关
5.1 用户相关
#mkuser oracle --创建用户
#last root console | more --查看root用户从控制台登录和退出的相关信息
IBM-AIX小型机常用指令
IBM-AIX小型机常用指令1. 小型机系统软件安装:1.放入AIX 5L光盘到服务器中,修改bootlist用光盘引导,可两台机同时安装。
#bootlist -m normal hdisk1 cd2.重启后,按提示new paging space=1024M3.smitty easy_install,在file bundle中选安装server,装完后再选CDE,APP-DEV主要是这三个,最好把file bundle全装完。
4.smitty chjfs修改一下文件系统的大小。
5.smitty tcpip,smitty chinet设主机名,IP地址。
smitty hacmp--- Cluster Configuration--- Cluster Topology--- Configure Networks改双机的IP信息6.smitty ssaraid做磁盘阵列。
7.启动双机smitty clstart(或clstop)8.查看或更改双机互备信息smitty hacmp9.备份到磁带[1]把文件备份到磁带上:tar -cv /dev/rmt1 [filename]smitty lvm中savevg,恢复用restvg -f /dev/rmt1 hdisk2[2]查看磁带上的内容tar -tvf /dev/rmt1[3]恢复磁带内容到当前缺省目录下tar -xvf /dev/rmt1[4]定义磁带压缩模式(20G/40G)smitty tape2. 主机投用后,smitty hacmp投入双机先在主机上通过smitty hacmpy 启动主机上的双机,启动后再在副机上通过smitty hacmpy 启动副机上的双机。
监视双机运行状态:tail -f /tmp/hacmp.out3. 双机启动后启动主机上的数据库a) 切换到oracle用户下#su – oracleb) 启动机器上的所需的数据库,dbstart批处理文件在oracle/OraHome1/bin/ 路径下$dbstart4. 磁带备份:1. 数据库冷备份,此时所有的数据库要停下。
Aix命令大全

Aix命令⼤全AIX服务器系统命令简介在AIX操作系统上有很多的命令。
这⾥介绍⼀些系统级的命令,它将有助于回答⼀些常见问题。
⼤家以此做参考,并补充修改。
以下命令在AIX 5.1上测试通过。
正⽂以下命令在AIX 5.1上测试通过。
· 关于内核显⽰AIX系统内核是32位还是64位:bootinfo -K如何改变内核模式(32位或64位)/unix⽂件连接到⼀个可引导的映像。
通过命令ls -l /unix查看:/unix -> /usr/lib/boot/unix_up # 32 bit uniprocessor kernel/unix -> /usr/lib/boot/unix_mp # 32 bit multiprocessor kernel/unix -> /usr/lib/boot/unix_64 # 64 bit multiprocessor kernel在AIX系统安装时,缺省安装的内核是32位。
可以⽤如下命令更改内核模式:ln -sf /usr/lib/boot/unix_64 /unixln -sf /usr/lib/boot/unix_64 /usr/lib/boot/unixbosboot -ad /dev/hdiskxxshutdown -r注意:/dev/hdiskxx是指引导逻辑卷/dev/hd5所在的硬盘。
可通过下⾯命令来查看xx是⼏:lslv -m hd5· 关于硬件显⽰机器硬件是32位还是64位:bootinfo -y查看机器的物理内存是多少:bootinfo -r或lsattr -El sys0 -a realmem查看机器是否⽀持64位内核(是否64位硬件)/usr/sbin/bootinfo -p如果返回32,则表⽰硬件是32位的;如果返回的是chrp,则表⽰硬件是64位的机器。
显⽰当前磁带设备rmt0的属性:lsattr -l rmt0 -E显⽰缺省的磁带设备rmt0的属性:lsattr -l rmt0 -D显⽰终端设备tty0的登录属性:lsattr -l tty0 -a login -R显⽰系统级属性:lsattr -E -l sys0查看当前系统有多少CPU:lscfg | grep proc查看当前系统有多少硬盘⽽且是否被使⽤:查看当前系统的详细配置:lscfg -pv也可以显⽰某⼀设备的配置:lscfg -vl rmt0查看当前系统的芯⽚名称、系统名、节点名、型号等:uname -p # 显⽰芯⽚名称,例如:powerpcuname -r # 显⽰操作系统的发⾏号uname -s # 显⽰系统名,例如:AIXuname -n # 显⽰节点名uname -a # 显⽰系统名、节点名、版本、机器IDuname -M # 显⽰型号,例如:IBM,7046-B50uname -v # 显⽰操作系统版本uname -m # 显⽰机器ID· 关于AIX查看AIX的版本、发⾏号、ML(Maintenance Level)级别:oslevel -r或lslpp -h bos.rte如何改变⽂件系统⼤⼩,例如:将/usr⽂件系统增加1000000字节:chfs -a size=+1000000 /usr如何使⽤CD:mount -V cdrfs -o ro /dev/cd0 /cdrom查看本机的IP地址:Ifconfig -a或host Fully_Qualified_Host_Name例如:host 查找哪⼀个⽂件集(fileset)包含特定的⽂件,例如:查找/usr/bin/vmstat属于哪⼀个⽂件集。
AIX基本操作命令

一、Aix简介Aix是Unix操作系统的版本之一,主要应用在IBM RISC 6000系列小型机上。
其他的Unix ,如SUN的Solaris ,HP Unix以及Linux等等。
目前Aix系统的版本有Aix 4.x Aix5.x等。
它们之间只是版本不同,但内核都是一样的,操作命令机本上也相同。
版本高的会新增一些命令,都是向下兼容的。
二、Aix使用入门对于大多数用户来说,对于Aix的访问都是通过telnet的方法来登录到RS6000上,当然是以不同的身份了。
把本地机器作为RS6000的一个终端,来完成对R S6000的操作。
这实际上是Unix的一大特点,Unix本身就是设计成一个多任务、多用户的并发系统。
2.1登录(login)2.1.1 RS6000的登录许多用户可以同时使用Unix系统,为了让系统知道用户是谁以及可以使用什么资源,用户在使用之前必须向系统表明自己的身份。
另外,U nix认为用户是通过终端或在PC上运行方针软件与其通讯。
Unix系统和用户终端之间必须建立传输信息的连接。
通常把建立通讯连接和表明用户身份的过程称为登录( login) .2.1.1.1 RS6000的开机直接按Power键。
RS6000启动、自检。
包括对硬件的自检,系统的初始化。
2.1.1.2登录默认的情况下,系统会进入Xwindows环境下,也就是所谓的CDE环境(Common Desktop Environment)即公共桌面环境。
这样Aix启动后将直接显示CDE注册界面,输入用户名和口令后即进入CDE操作环境。
通常在RISC6000端都是以r oot身份(管理员身份)登录的。
2.1.2客户端的登录客户端主要是通过执行telnet命令,并且输入合法的用户名和密码,登录到服务器端。
比如:在客户端执行telnet 192.168.0.161 (假设为RS6000的IP) ,会出现如下的登录提示:AIX Version 4(C) Copyrights by IBM and by others 1982, 1996.login:然后输入用户名,如:long ,回车后,会出现输入密码的提示:long's Password:2.1.3成功登录之后成功登录之后,系统将显示一些消息,如上一次用户登录的时间、有关系统信息的消息(称为当日消息),以及一些通知用户是否有mail 的消息。
aix常用命令

aix常用命令AIX常用命令一、介绍AIX(Advanced Interactive eXecutive)是IBM公司开发的一种UNIX操作系统。
它具有稳定性高、可靠性强的特点,被广泛应用于企业级服务器和大型计算机系统中。
本文将介绍AIX常用命令,帮助读者更好地了解和使用AIX系统。
二、文件和目录操作命令1. ls命令:用于列出指定目录下的文件和子目录。
可以使用-l参数以长格式显示文件详细信息,也可以使用-a参数显示所有文件(包括隐藏文件)。
2. cd命令:用于切换当前工作目录。
可以使用绝对路径或相对路径进行切换。
3. pwd命令:用于显示当前工作目录的路径。
4. mkdir命令:用于创建新的目录。
可以使用-p参数创建多级目录。
5. rmdir命令:用于删除空的目录。
6. cp命令:用于复制文件或目录。
可以使用-r参数递归复制整个目录。
7. mv命令:用于移动文件或目录,也可以用于对文件或目录重命名。
8. rm命令:用于删除文件或目录。
可以使用-r参数递归删除整个目录。
三、文件内容查看和编辑命令1. cat命令:用于查看文件的内容。
可以一次显示整个文件,也可以使用-n参数显示行号。
2. more命令:用于分页显示文件的内容。
可以使用空格键向下翻页,使用q键退出查看。
3. less命令:与more命令类似,但可以向上翻页和搜索内容。
4. head命令:用于显示文件的前几行,默认显示前10行。
5. tail命令:用于显示文件的后几行,默认显示最后10行。
6. vi命令:用于编辑文件。
可以进行插入、删除、修改等操作。
四、进程管理命令1. ps命令:用于查看当前系统的进程信息。
可以使用aux参数显示所有进程的详细信息。
2. top命令:实时显示系统的进程状态和资源占用情况。
可以使用q键退出。
3. kill命令:用于终止指定的进程。
可以使用进程ID或进程名称进行终止。
4. bg命令:将一个在后台暂停的进程变为继续执行。
AIX系统常用命令)

AIX 5L Version 5.3 可在当前受支持的所有基于共用硬件参考平台(Common Hardware Reference Platform,CHRP)的 POWER 硬件上运行。
如何知道我的计算机是否基于 CHRP?
运行prtconf命令。如果是 CHRP 计算机,则字符串chrp会出现在 Model Architecture 行上。
/unix -> /usr/lib/boot/unix_up # 32 bit uniprocessor kernel /unix -> /usr/lib/boot/unix_mp # 32 bit multiprocessor kernel/unix -> /usr/lib/boot/unix_64 # 64 bit multiprocessor kernel
b) 要将文件移动到另一个目录,且不改变名字,请输入:# mv chap3 manual按下 Enter 键。
该命令将 chap3 移动到 manual/chap3.用 mv 命令重命名文件可以使用 mv 命令改变文件的名字而不将其移动到另一目录。
c) 要重命名文件,请输入:# mv appendix apndx.a按下 Enter 键。
lslv -m hd5
注意:
在 AIX 5.2 中,缺省安装的是 32 位内核。在 AIX 5.3 中,缺省情况下会在 64 位硬件上安装 64 位内核,在 32 位硬件上安装 32 位内核。
硬件
如何知道我的计算机是否能够运行 AIX 5L Version 5.3?
该命令将 appendix 文件重命名为 apndx.a.如果名为 apndx.a 的文件已存在,则旧的内容被 appendix 文件的内容替换。
AIX操作系统主要命令介绍

Unix(AIX)常用命令[语法]:ls [-RadCxmlnogrtucpFbqisf1] [目录或文件......][说明]:ls 命令列出指定目录下的文件,缺省目录为当前目录./,缺省输出顺序为纵向按字符顺序排列。
-R 递归地列出每个子目录的内容-a 列出所有文件,包括第一个字符为“.”的隐藏文件-d 若后面参数是目录,则只列出目录名而不列出目录内容,常与-l选项连用以显示目录状态。
-C 输出时多列显示-x 横向按字符顺序排列-m 输出按流式格式横向排列,文件名之间用逗号(,)分隔-l 长列表输出,显示文件详细信息,每行一个文件,从左至右依次是:文件存取模式链接数文件主文件组文件字节数上次修改时间其中文件存取模式用10个字母表示,从左至右的意义如下:第一个字母表示文件种类,可以是以下几种情况:d 为目录文件l 为链接b 为块文件c 为字符型文件p 为命名管道(FIFO)- 为普通文件后面9个字母分别表示文件主、同组用户、其他用户对文件的权力,用r表示可读,w 表示可写,x 表示可执行。
如果是设备文件,则在文件字节数处显示:主设备从设备。
-n 与-l选项相同,只是文件主用数字(即UID)显示,文件组用数字(即GID)表示-o 与-l选项相同,只是不显示文件组-g 与-l选项相同,只是不显示文件主-r 逆序排列-t 按时间顺序排列而非按名字-u 显示时间时使用上次访问时间而非上次修改时间-c 显示时间时使用上次修改i节点时间而非上次修改时间-p 若所列文件是目录文件,则在其后显示斜杠(/)-F 在目录文件后加’/’,在可执行文件后加’*’-b 文件名中若有非打印字符,则用八进制显示该字符-q 文件名中的打印字符用’?’表示-i 显示节点号-s 显示文件长度时使用块长度而非字节长度-f 将后面的参数解释为目录并列出其中的每一项-1 每行仅列一项[例子]:ls 列出当前目录下的文件ls -al /bin 以长列表的形式列出目录/bin 下的所有文件,包括隐藏文件1.2 pwd[语法]: pwd[说明]:本命令用于显示当前的工作目录[例子]:pwd 显示出当前的工作目录1.3 cd[语法]: cd [目录][说明]:本命令用于改变当前的工作目录,无参数时使用环境变量$HOME 作为其参数,$HOME 一般为注册时进入的路径。
IBM小型机AIX基本操作命令文档

IBM小型机AIX基本操作命令文档
一、文件操作
1.ls 显示文件列表
语法:ls [-l,-a,-d,-t,-F] [文件或目录]
-l以长列表模式显示文件或目录的详细信息
-a显示文件夹中所有文件和目录,包括以.开头的文件
-d显示目录本身
-t按时间排序显示文件
-F显示文件类型
2.cd 切换目录
语法:cd [路径]
将当前目录改变到路径 path:cd .. 回到上一级目录;cd / 返回到根目录;cd 切换到当前用户的宿主目录
3.mkdir 创建目录
语法:mkdir [-p] [路径]
-p递归建立所有的目录,若中间目录不存在则创建
例:mkdir -p /tmp/dir1/dir2/dir3
4.rm 删除文件或目录
语法:rm [-i,-f] [文件或目录]
-i交互模式,每删除一个文件或目录前都会要求用户确认
-f强制删除模式,不需要交互,但有可能会错误的删除文件
注:rm 默认只能删除普通文件,不能删除目录。
必须使用 -r 参数才能够递归删除目录
5.touch 更改文件时间
语法:touch [文件名]
此命令可以更改指定文件创建时间和最后修改时间,但不影响文件内容
6.cp 复制文件
语法:cp [-i,-R,-f] [源文件] [目标文件]
-i交互模式,每次复制前都会要求用户确认
-R递归模式,复制目录时会将其中的所有文件复制
-f强制复制模式,不需要交互,但有可能会错误的复制文件。
AIX基本命令

一文件命令:1. 查看文件cat 、more 、less 、vicat:显示全部内容ctrl+F(下翻)ctrl+B(上翻)ctrl+U(慢慢翻)vi:查看并编辑2.新建文件touchtouch > charity '新建一个名为charity的空文件touch “charity”3.编辑文件echo 、viecho:给文件加内容, echo "内容" > 文件名, Echo "My English name is charity" > charityvi:编辑修改文件内容,按ESC键可以在命令模式与编辑模式间切换(目前编辑较困难,某些命令会自动在命令模式与编辑模式间切换),命令:vi 文件名:io:新增一行并自动转换为编辑模式;r:修改光标所在字符;s:修改当前字符并自动转换到编辑模式;c+w:对一个单词进行修改;x:删除当前字符,n+x: 删除光标后n个字符后的字符;dd:删除当前行,n+dd 删除第n行;u:撤销,相当于windows的ctrl+z;yy:复制当前行;p:粘贴;shift+4:到行尾;shift+6:到行首;j:下一行;k:上一行;h:左移;l:右移;:w:保存;:wq:保存退出;:q!:强制退出;:x:保存退出;:set nu:给文件加行数,:set number;:set nonu:去掉行号;n+G:跳到第n行;G:跳到最后一行;1+G:跳到首行;:n|:显示第n行的内容;4.在文件中查找并替换、删除内容/ 、? 、>/:查找文件内容,/charity 查找charity,"n"查找下一个,"N"查找上一个?:查找文件内容,从下往上找,?charity;:1,$s/KK/charity/g:替换,将KK替换为charity,"/g"表示全部替换,不加"g"只替换一个;:s/^m/ /g:删除^m以空格替代;:1,$s/^m/ /g 替代全部,"1,$"表示从第一行到最后一行;>:删除文件内容,> 文件名'慎用,没有提示是否确定的5.重命名文件/文件夹mvmv charity charity1 命名文件/文件夹charity为charity16.改变文件属性chmodchmod 777 <文件名> 给文件赋予最大权限,如果安装文件时权限不够时使用7.安装文件make install8.执行文件 ./ <文件名> '怀疑是执行文件9.查找文件findfind . -name charity 查找文件名为charity的文件,返回路径find y? 查询yfind y* 查询以y开头的文件10.查看文件头、尾head 、tailhead -n:显示文件的前n行;tail -1:显示最后一行;tail -f:动态显示文件尾,查看日志文件等...11.复制文件cp dir/ 将文件charity复制到dir中12.文件打包与解压tar cvf dir.tar dir1:将dir1打包为dir.tartar xvf dir.tar dir1:将dir.tar解压为dir1 ‘猜的二文件夹相关命令1.新建文件夹mkdirmkdir charity 新建名为charity的文件夹2.修改文件夹mvmv charity charity1 修改文件夹名为charity13.删除文件夹rmdirrmdir:删除空文件夹;rmdir -rf 或rmdir -r:删除文件或文件夹4.查找文件夹5.复制文件夹cpcp -r charity dir/ 将charity中所有文件复制到dir中,charity仍然保留6.查看文件夹中文件lsls -rtl 根据时间升序排序ls -l 根据名称排序"-"开头表示普通文件;"d"开头表示文件夹;"."开头表示隐藏文件7.文件大小查看df -g:-g表示以G为单位查看三文件目录相关命令1.进入对应目录cd 测试/charity/201007072.返回上一级目录cd ..3.返回当前用户根目录cd4.返回root用户根目录cd /5.查看当前路径pwd四系统性能相关命令1.系统进程ps:查看当前进程;ps -ef:查看所有进程;ps -ef|grep java:查看java应用系统进程,weblogickill -9 <进程号> 杀进程2.查看CPU topas:相当于windows资源管理器;3.查看内存vmstat -l:查看系统内存4.电脑属性查看iostat5.weblogic属组查看isuser weblogic 'weblogic中pgrp表示属组6.改改变文件属组chown weblogic:bea yy ,bea属组,yy文件名7.查看登录用户who:查看所有登录用户;whoami:查看当前用户;8.查看操作系统uname9.看id uid10.切换用户su -informix五FTP访问传送文件1.从服务器上获得文件1.1 进入本地将要存放文件的目录1.2 FTP 192.168.0.1 ’进入ftp服务器并输入密码1.3 cd 测试/charity/20100707 ‘进入服务器存放文件的目录1.4 bin 转换为二进制1.5 get charity.war1.6 bye ‘返回本地1.7 jar xvf *.war ’解压1.a get取文件,mget取文件夹(mget取文件夹时只取文件夹里的文件不取文件夹本身且默认每个文件一一提醒):prompt off ,关闭mget提示prompt on ,开启mget提示1.b lcd e:\charity 本地操作系统中进入E盘charity文件夹,可以更换文件get的目的路径2.传文件到服务器上2.1 进入本地待放文件的文件夹;2.2 ftp 192.168.0.1 进入ftp服务器;2.3 put d:/wenj.txt ’将本地D盘下的文件wenj.txt放到FTP服务器上。
aix系统中查看并编辑文件的指令
aix系统中查看并编辑文件的指令一、查看文件的指令在aix系统中,我们可以使用以下命令来查看文件的内容:1. cat命令cat命令是一个非常常用的命令,用于显示文件的内容。
我们可以使用以下命令来查看文件内容:```cat 文件名```例如,如果要查看名为test.txt的文件内容,可以输入以下命令:```cat test.txt```cat命令会将文件的内容直接输出到终端。
2. more命令more命令也是一个常用的命令,用于分页显示文件的内容。
当文件内容较多时,使用more命令可以方便地逐页查看文件内容。
我们可以使用以下命令来使用more命令查看文件内容:```more 文件名```例如,如果要查看名为test.txt的文件内容,可以输入以下命令:```more test.txt```more命令会将文件的内容分页显示,并在底部提示输入命令以进行翻页或退出。
3. less命令less命令也可以用于查看文件内容,与more命令类似,但提供了更多的功能和交互方式。
使用less命令可以方便地向前或向后翻页、搜索内容等。
我们可以使用以下命令来使用less命令查看文件内容:```less 文件名```例如,如果要查看名为test.txt的文件内容,可以输入以下命令:```less test.txt```less命令会将文件的内容以一页一页的形式显示,并在底部提示输入命令以进行翻页或搜索等操作。
二、编辑文件的指令在aix系统中,我们可以使用以下命令来编辑文件的内容:1. vi命令vi命令是一个功能强大的文本编辑器,几乎可以在所有的Unix和Linux系统中使用。
我们可以使用以下命令来编辑文件:```vi 文件名```例如,如果要编辑名为test.txt的文件,可以输入以下命令:```vi test.txt```vi命令会打开文件并进入编辑模式,可以对文件进行修改、添加或删除内容。
在编辑模式下,可以使用不同的命令进行相关操作,如插入、删除、保存等。
aix系统命令

aix系统命令AIX(Advanced Interactive eXecutive)是 IBM开发的一套 UNIX 操作系统。
而AIX 命令是对AIX系统进行管理和操作的命令。
下面就让店铺给大家分享一些aix的常用命令和进阶命令吧。
aix常用命令查看交换区信息:lsps -a 显示交换区的分布信息lsps -s 显示交换区的使用信息slibclean 清除处理程序遗留的旧分页信息smit mkps 建立交换区空间信息swapon -a 启动所有的分页空间/etc/swapspaces 存放分页空间表格信息显示卷信息:lsvg 显示卷的名称lsvg -l rootvg 显示rootvg卷的详细信息mount卷的方法:varyonvg datavg 加载datavg卷mount /dev/data1 加载datavg下的一个data1卷mount光盘mount -rv cdrfs /dev/cd0 /cdrom裸设备类型:raw,jfs jfs可以转变成文件系统,而raw则不行smit快速路径名称:(smit:图形方式,smitty:字符方式)dev 设备管理diag 诊断jfs 定期档案管理系统lvm 逻辑卷册系统管理员管理nfs NFS管理sinstallp 软件安装及维护spooler 列印队列管理system 系统管理tcpip TCP/IP管理USER 使用者管理clstart,clstop:启动和停止clusterlssrc -g cluser:查看cluser的状态查看已安装的软件信息:ls -aF /usr/lpp (lpp:Licensed Program Products)查看安装媒体内容:installp -q -d /dev/cdrom -l查看操作系统补丁instfix -a查看错误日志信息:errpt -a有关TCP/IP的命令网路卡:smit chgenet,chgtok,chgfddi,opschange,mktty:adptr架构快速路径smit mkinet,ppp:slip与ppp快速路径ifconfig:config界面位址:/etc/hosts 静态主机表/etc/resolv.conf 位址解析的名称服务器/etc/named.boot 名称服务器架构/etc/named. c a 根名称服务器快取 (去掉空格)/etc/named.data 位址列表/etc/named.rev 反转指标列表nslookup 查询名称服务器资讯网络路由:route 管理路由netstat -rn 列出定义的路由routed 路由(daekmin rip)gated 路由(daekmin rip、egp、hello) /etc/gateways 已知网关/etc/networks 已知网路服务:/etc/services/etc/inetd.confTCP/IP群组子系统:/etc/rc.n e t (去掉空格)startsrc -g tcpip 启动全部的tcpip子系统startsrc -s inetd 启动主要internet除错:iptrace 启动封包追踪ipreport 追踪结果格式化输出netstat 网络统计ping 检查是否可以到达查看HACMP,外部硬盘信息:lscfg -vlsdev -Cc adapter对等机器信息:/etc/.rhosts/etc/hosts.equiv/etc/hosts查看内存/etc/lsattr -El mem0显示以 KB 为单位的实际内存bootinfo -r或lsattr -El sys0 -a realmem查看SWAP空间lsps -l查看操作系统文件系统lslpp -l [fileset_name]查看系统内核,进程,硬盘等性能前几位topas要显示内核启用的是 32 位还是 64 位:bootinfo -K显示硬件 32 位还是 64 位:bootinfo -y显示系统上的处理器数量lscfg | grep proc显示系统上的硬盘数量,可输入以下命令:lspv系统的详细配置lscfgaxi进阶命令如何知道自己在运行单处理器还是多处理器内核?/unix 是指向已启动内核的符号链接。
AIX常用命令详解中文版
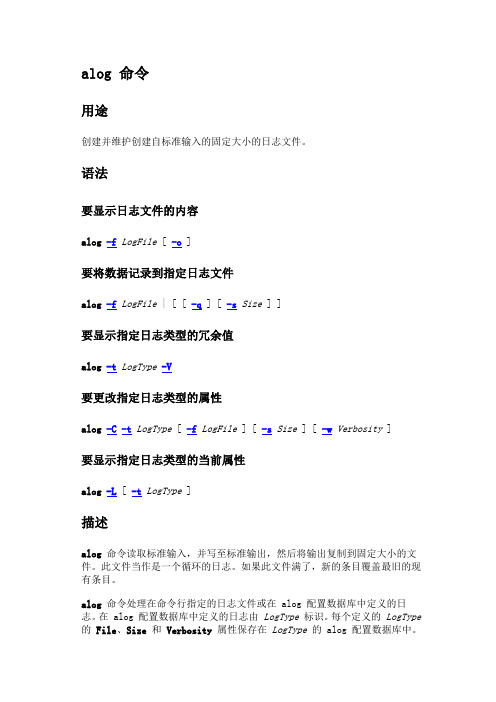
alog 命令用途创建并维护创建自标准输入的固定大小的日志文件。
语法要显示日志文件的内容alog-f LogFile [ -o ]要将数据记录到指定日志文件alog-f LogFile | [ [ -q ] [ -s Size ] ]要显示指定日志类型的冗余值alog-t LogType-V要更改指定日志类型的属性alog-C-t LogType [ -f LogFile ] [ -s Size ] [ -w Verbosity ]要显示指定日志类型的当前属性alog-L [ -t LogType ]描述alog命令读取标准输入,并写至标准输出,然后将输出复制到固定大小的文件。
此文件当作是一个循环的日志。
如果此文件满了,新的条目覆盖最旧的现有条目。
alog命令处理在命令行指定的日志文件或在 alog 配置数据库中定义的日志。
在 alog 配置数据库中定义的日志由LogType标识。
每个定义的LogType 的File、Size和Verbosity属性保存在LogType的 alog 配置数据库中。
可以使用odmadd命令将一个新的LogType添加到 alog 配置数据库。
可以使用alog命令更改在 alog 配置数据库中定义的LogType的属性。
标志-C更改指定LogType的属性。
请将-C标志与-f、-s和-w标志一起使用来更改指定LogType的File、Size和Verbosity属性。
-t LogType标志是必需的。
如果使用-C标志,alog命令不会将标准输入复制到标准输出或一个日志文件中。
当使用-C标志来修改控制台日志类型的属性时,控制台日志文件也将得到修改,且控制台设备驱动程序将更新以使用新的值。
这是alog -C的常规操作的一种背离,用于适应控制台日志文件中的特殊格式。
注:您必须具有root 用户权限才能更改alog属性。
-f LogFile指定日志文件的名称。
如果指定的LogFile不存在,则创建一个。
- 1、下载文档前请自行甄别文档内容的完整性,平台不提供额外的编辑、内容补充、找答案等附加服务。
- 2、"仅部分预览"的文档,不可在线预览部分如存在完整性等问题,可反馈申请退款(可完整预览的文档不适用该条件!)。
- 3、如文档侵犯您的权益,请联系客服反馈,我们会尽快为您处理(人工客服工作时间:9:00-18:30)。
系统的配置PV(physical volume)物理卷:普通的直接访问的存储设备,有固定的和可移动的之分,代表性的就是硬盘。
VG(volume group)卷组:AIX中最大的存储单位,一个卷组由一组物理硬盘组成,也就是由一个或多个物理卷组成。
PP(physical partition)物理分区:是把物理卷划分成连续的大小相等的存储单位,一个卷组中的物理分区大小都相等。
LP(logical partition)逻辑分区:适映射物理分区的逻辑单位,一个逻辑分区可以对应一个也可以对应多个物理分区。
LV(logical volume)逻辑卷:是指卷组中由多个逻辑分区组成的集合,逻辑卷中的逻辑分区是连续的,但是对应的物理分区是不连续的,可以在一个磁盘上,也可以在不同的磁盘上。
FS(file system)文件系统:是指在AIX系统中面向用户的存储空间。
一个逻辑卷只能创建一个文件系统,也就是说一个文件系统对应一个逻辑卷,如果删除逻辑卷也将删除文件系统。
配置hd6 #smitty chps#lsvg rootvg(PP)#lsps –a(size)(特定的值—size)/pp=128—当前所用的值修改时区时间#smitty chtz_date关机重启#shutdown -Fr重启#shutdown -F关机修改网关#smitty route编辑limits #vi /etc/security/limits编辑hosts #vi /etc/hosts切换用户#su tianhao修改TCP/IP #smitty tcpip安装软件#smitty installp 安装数据库软件包PerfTools补丁bos.adt, bos.data,,pat,bos.cifs_fs, rsct.basic,bos.dosu (pat.basic,pat.clients,rsct.opt.storagem,bos.clvm)为HA补丁查看系统版本#Oslevel –r #oslevel –s图形界面#smit easy_install 安装文件X11 DT 安装包CDE启动图形界面#cd /etc #./rc.dt安装HACMP(doc ha ha nfs不安装)#lslpp -l |grep cluster版本修改系统最大进程数#smitty chgsys语言环境#smit mlang 安装文件zh_cn gb18030中文添加文件系统#smitty jfs2修改文件系统#chfs –a size=10G /usr df –g chfs –a size=2G / (/home /usr /var /tmp /dev /etc /其他)文件系统lsvg rootvg 活动空间free配置AIO #smit chgaio available 数据库恢复PVID # chdev –l hdisk1 –a pv=yes系统环境#smit system启动终端#VT100 内存位置2749查看配置#prtconf 硬件配置#lsdevAIX镜像比如系统装安装在hdisk0盘上,用hdisk1做一个hdisk0的系统盘镜像,具体过程如下:1 extendvg rootvg hdisk12 mirrorvg rootvg hdisk13 bosboot -ad hdisk04 r 0=15 Bosboot –ad hdisk16 bootlist -m normal hdisk0 hdisk1用lsvg -l rootvglslv -m hd5看看镜像内容是否同步取消镜像:1、chvg -Qy rootvg 起用rootvg的quorum设置2、unmirrorvg rootvg hdisk1 取消镜像3、reducevg rootvg hdisk1 把hdisk1从rootvg中剔除清除警告灯#diag -task select-Identify and Attention Indicators-Set System Attention Indicator to NORMAL Enter选中F7执行使用root用户登陆系统,执行“diag”命令,回车继续;1、选择“T ask Selection”,回车继续;2、选择“Identify and Attention Indicators”,回车继续;3、选择“Set System Attention Indicator to Normal”,回车,“Set SystemAttention Indicator to Normal”前面出现“+”号,表示选定此项;4、按“F7”提交。
以上步骤可以熄灭小型机橙色告警灯查看HBA卡号#lscfg -vl fcs0 查看网卡#lscfg –vl ent0查看网络IP#netstat –in查看HA是否启动#lssrc –a | grep cluster #lssrc –s clstrmgrES 启动HA进程:/usr/bin/startsrc -s clcomdES查看进程是否启动:lssrc –g cluster查看主机名#hostname检查心跳主机1 cat /etc/hosts > /dev/tty0 主机2 cat < /dev/tty0AIX删除#rmdev -dl hdiskX 删除系统所对应的阵列盘#rmdev -dl dar 删除阵列柜#rmdev -dl dac 删除控制器#rmdev -Rdl fcs 删除光纤卡#cfgmgr –v 重新识别网络心跳#Smitty etherchannel磁带备份#smit mksysb #tctl -f /dev/rmt0 rewind(重绕磁带)查看硬盘: #lsdev –Cc disk查看磁带机#lsdev –Cc tape查看适配卡#lsdev –Cc adapter处理器个数#lsdev –C|grep proc查看硬盘属性#lsattr –El hdisk1查看网卡属性#lsattr –El ent0查看磁带机属性# lsattr –El rmt0内存大小#lsattr –El mem0查看硬盘信息#lscfg –vl hdisk0查看网卡信息#lscfg –vl ent0查看磁带机信息#lscfg –vl rmt0重命名#mv修改pdisk变Hdisk Change/show sas pdisk statusDelete an array candidate pdisk and format to 512 byte sectors 恢复inittab激活CPU System operating mode normal Boot to system server firmware standby创建L V #smitty mklv LV大小(特定的值—PP大小)查看硬件故障errpt -dH查看故障详细信息errpt -aj 错误信息ID清空错误日志:errclear 0清空临时目录:snap -r收集错误信息:snap -gbc会在/tmp/ibmsupt/下生成一个压缩文件:snap.pax.Z查看微码lsmcode修改系统日期:date 021*******对于使用 CST 时区的系统,这项输入设置日期和时间为:CST 1990 年 2 月 17 日 14:25:00 星期六设置图形化启动终端:export DISPLA Y=IP:0.0mount光驱:# mount -rv cdrfs /dev/cd0 /mnt/cdromfind /dev/ -user oracle –name ‘r*’–print>db_raw.conf打开aix的图形终端:运行/etc/rc.dtDB2客户端catalog服务器:db2 catalog tcpip node nodename remote win_ip_addr server servicename/portnumberdb2 catalog db dbname at node nodename创建数据库:db2 create db erpexgbk using codeset gbk territory cn collate using system pagesize 32 k执行sql脚本db2 -tvf sql文件名.sqldb2 list tablespaces show detailDOS文件转换成UNIX文件格式(其中^M是同时Ctrl+V+M按出来的,表示回车。
)dos格式文件传输到unix系统时,会在每行的结尾多一个^M,当然也有可能看不到,但是在vi的时候,会在下面显示此文件的格式,比如"dos.txt" [dos] 120L, 2532C 字样,表示是一个[dos]格式文件,如果是MAC系统的,会显示[MAC],因为文件格式的原因有时会导致我们的unix程序,或者shell程序出现错误,那么需要把这些dos文件格式转换成unix格式,方法是:A. 在命令行提示符下,使用sed 命令$sed 's/$/^M' aix_file > win_file ----AIX --> windows$sed 's/^M$/$/' win_file > aix_file ----windows -->AIXB. 使用vi 编辑器, 在:提示符中键入:: %s/$/^M/g --------------------------AIX -->windows:%s/^M$//g ---------------------Windows --> AIXC. 使用AIX 中的dosread 和doswrite 命令(需安装bos.dosutil 软件包)# doswrite -a win_file --------AIX -->windows# dosread -a aix_file -------- windows -->AIXD. 使用ftp 实用程序传文件时,按文本方式传文件, 可实现文本格式间的转换.这个其实是最方便的了,不过一般用一些ftp软件传输的时候默认不是文本方式这个在设置的时候要注意一下,用win自己的ftp就没有一点问题,ftp上去,然后直接put就okVI替换字符串:1、 :1,$ s/str1/str2/g 或 :g/str1/s//str2/g用字符串 str2 替换正文中所有出现的字符串 str12、 :.,$ s/str1/str2/g 用字符串 str2 替换正文当前行到末尾所有出现的字符串 str13、可以使用 # 作为分隔符,此时中间出现的 / 不会作为分隔符:s#str1/#str2/# 替换当前行第一个 str1/ 为 str2/如何在Windows 2008中为SQL Server开放防火墙端口@echo ========= SQL Server Ports ===================@echo Enabling SQLServer default instance port 1433netsh firewall set portopening TCP 1433 "SQLServer"@echo Enabling Dedicated Admin Connection port 1434netsh firewall set portopening TCP 1434 "SQL Admin Connection"@echo Enabling conventional SQL Server Service Broker port 4022 netsh firewall set portopening TCP 4022 "SQL Service Broker"@echo Enabling Transact-SQL Debugger/RPC port 135netsh firewall set portopening TCP 135 "SQL Debugger/RPC"@echo ========= Analysis Services Ports ==============@echo Enabling SSAS Default Instance port 2383netsh firewall set portopening TCP 2383 "Analysis Services"@echo Enabling SQL Server Browser Service port 2382netsh firewall set portopening TCP 2382 "SQL Browser"@echo ========= Misc Applications ==============@echo Enabling HTTP port 80netsh firewall set portopening TCP 80 "HTTP"@echo Enabling SSL port 443netsh firewall set portopening TCP 443 "SSL"@echo Enabling port for SQL Server Browser Service's 'Browse' Button netsh firewall set portopening UDP 1434 "SQL Browser"@echo Allowing multicast broadcast response on UDP (Browser Service Enumerations OK)netsh firewall set multicastbroadcastresponse ENABLE。
