Solaris11.3安装指南(原创)
Oracle Solaris 11 安装与部署快速参考说明书
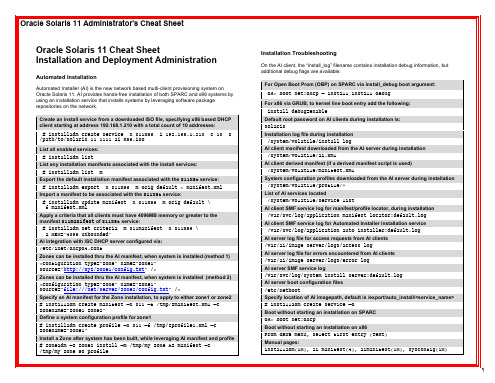
Oracle Solaris 11 Cheat Sheet Installation and Deployment Administration
Automated Installation
Automated Installer (AI) is the new network based multi-client provisioning system on Oracle Solaris 11. AI provides hands-free installation of both SPARC and x86 systems by using an installation service that installs systems by leveraging software package repositories on the network.
# installadm create-profile –n s11service –f sc_profile.xml –c MAC=00:11:22:33:44:55 List what system configuration profiles are associated with a service, and for which criteria (if any) # installadm list –n s11service –p List all non-default system configuration profiles associated with any of the install services:
Default root password on AI clients during installation is: solaris Installation log file during installation
solaris安装步骤日志

如果系统通过 Solaris 或供应商提供的网络/通信以太网网卡(受 Solaris CD
支持)连接到网络,就指定“是”。在硬件文档里查看当前支持的网卡的列表。
如果系统连接的是一个 Solaris CD
不支持的网络/通信卡,就指定“否”,并执行帮助程序
1) ANSI 标准 CRT
2) DEC VT52
3) DEC VT100
4) Heathkit 19
5) Lear Siegler ADM31
Probing system devices
Probing memory
Probing I/O buses
Sun Fire V240, No Keyboard
Copyright 1998-2004 Sun Microsystems, Inc. All rights reserved.
Testing /pci@1e,600000/isa@7/serial@0,3f8
Probing system devices
Probing memory
Probing I/O buses
Probing system devices
Select a Language
0. English
1. French
2. German
3. Italian
4. Japanese
5. Korean
6. Simplified Chinese
7. Spanish
Attempting to configure interface bge0...
Skipped interface bge0
Setting up Java. Please wait...
solaris系统安装、EIS安装、磁盘镜像及恢复

E.I.S 安装过程文档华胜天成:惠建雄1.安装一些软件包过程:重启系统后,把E.I.S.one放入光驱,然后执行# cd /cdrom/ cdrom0/ sun/ install# ./setup-standard.shRunning setup-standard with EIS-CD Vn 28-DEC-04===============================================******************************************************* You are using a EIS-CD that is > 40 days old! ** Please ensure that you use the most recent version *******************************************************Creating /var/sun for scripts, log files etc...Loading /opt/sun/bin...Setting up /.profile...Is the power saving daemon to be disabled? [y/n]: y/etc/power.conf has been modified.Sun keyboard Power button to be disabled? [y/n]: y/usr/openwin/lib/speckeysd.map has been modified.Are the buttons & dials to be disabled? [y/n]: yFile /etc/rc2.d/S89bdconfig has been renamed to /etc/rc2.d/noS89bdconfigAre remote root logins to be allowed? [y/n]: y/etc/default/login has been modified.One or more SAN Foundation Suite Packages are not installed.*********************************************************** * EIS strongly recommends ALWAYS adding the SFS packages. ** ** You must add the SAN 4.x/SFS packages if: ** - A SAN (Storage Area Network) will be attached OR ** - Veritas Volume Manager VxVM will be used OR ** - The server is a V880, V480, V280... ** ** The 4 JNI packages will NOT be installed! ** If they are required please install manually (/tmp). ** ** Do NOT add these packages for desktops, SSPs or SCs. ************************************************************Do you wish to add the SFS packages? [y/n]: ySFK unpackedInstalling package SUNWsan处理软件包范例<SUNWsan>来自</tmp/SFK382>SAN Foundation Kit(sparc) 1.0Copyright 2001 Sun Microsystems, Inc. All rights reserved.使用</>作为包的基本目录## 正在处理软件包信息.## 正在处理系统信息.2软件包路径名已经正确地安装## 检查磁盘空间需求## 检查同已经安装的软件包之间的冲突.下列文件已经被安装到系统中,并正在被其它的软件包所使用: /etc/init.d <只改动属性>/etc/rc3.d <只改动属性>你是否要安装这些有冲突的文件[y,n,?,q]## 检查setuid/setgid程序。
Solaris系统安装步骤
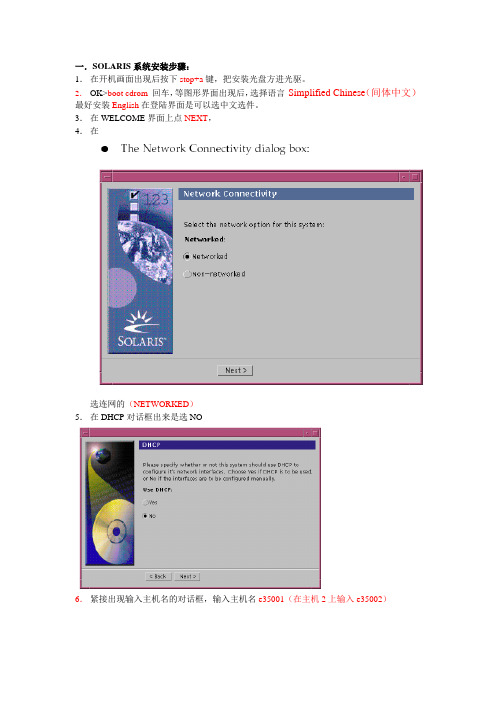
一.SOLARIS系统安装步骤:1.在开机画面出现后按下stop+a键,把安装光盘方进光驱。
2.OK>boot cdrom回车,等图形界面出现后,选择语言Simplified Chinese(间体中文)最好安装English在登陆界面是可以选中文选件。
3.在WELCOME界面上点NEXT,4.在选连网的(NETWORKED)5.在DHCP对话框出来是选NO6.紧接出现输入主机名的对话框,输入主机名e35001(在主机2上输入e35002)7.在IP地址的地方输入IP地址,10.35.55.17(在2号机器上输入10.35.55.18)8.在子网掩码对话框里输入255255.255.1289.在IPV6的IP协议框里选默认的版本即可,回车。
10.在如下的名称对话框里选NO。
11.接着选择时区,选东亚,中华人民共和国12.设置日期(默认即可)13.设置密码14.在电源管理对话框里,按NEXT ,(默认选择)15.在代理服务对话框里,根据实际的情况填写。
如果是直接连接到INTERNET 16.接着上一个确认的对话框如下,仔细检查一下,如果没有问题,点确认:17.接着会提示你放如第一张安装光盘18.选择安装方式。
自定义安装19.选择64位安装方式20.选择安装方式:完全安装(ENTIRE SOLARIS SOFTWARE GROUP PLUS OEM)21.选择DISKS,添加:22.在下面的分区框里,选择硬盘分区(MODIFY)23.输入分区打小:0 / 3000m1swap 2000m3/var 2000m4 /usr 2000m5 /opt 3000m6/oracle 4500m7150m24.然后点确认,开始安装。
24.中途会提示更换安装光盘,更换光盘,确认即可。
二.VERITAS voluemanager卷管理软件的安装。
1.把安装光盘放入光驱到安装目录用pkgadd –d . 回车即可。
solaris操作系统安装手册(AMS cluster环境)
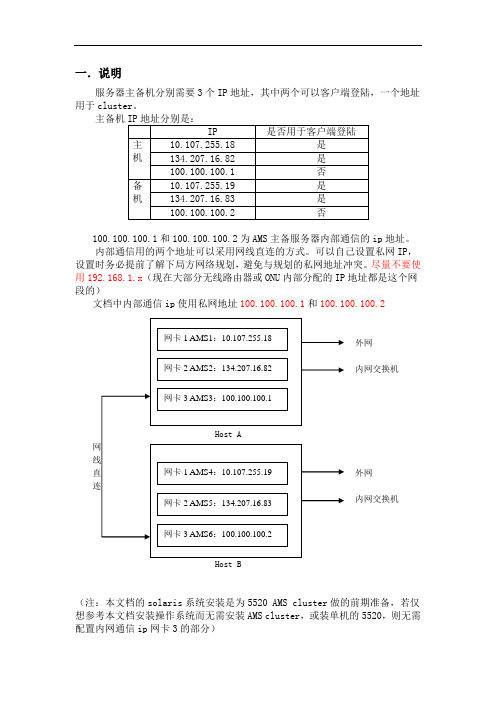
一.说明服务器主备机分别需要3个IP地址,其中两个可以客户端登陆,一个地址用于cluster。
主备机100.100.100.1和100.100.100.2为AMS主备服务器内部通信的ip地址。
内部通信用的两个地址可以采用网线直连的方式。
可以自己设置私网IP,设置时务必提前了解下局方网络规划,避免与规划的私网地址冲突。
尽量不要使用192.168.1.x(现在大部分无线路由器或ONU内部分配的IP地址都是这个网段的)文档中内部通信ip使用私网地址100.100.100.1和100.100.100.2外网内网交换机外网内网交换机Host B(注:本文档的solaris系统安装是为5520 AMS cluster做的前期准备,若仅想参考本文档安装操作系统而无需安装AMS cluster,或装单机的5520,则无需配置内网通信ip网卡3的部分)二.安装solaris系统5520AMS Cluster需要的Solaris安装与单机版稍有不同,磁盘分区是主要区别,请注意。
2.1在光驱放入SOLARIS 10 X86安装光盘,打开电源,服务器自检。
注意:对于没有显示器的HP Proliant服务器安装solaris,请参照文档《HP ProLiant 服务器无显示器安装步骤.doc》HP ProLiant服务器无显示器安装步2.2自检完完成后,从Solaris安装光盘启动,选择solaris并回车。
2.3出现图示信息,选择“1”,开始安装。
2.4选择US-English,按“F2”继续。
2.5按回车继续。
2.6鼠标点击一下空白处,按回车继续。
2.7选择安装过程所用语音,选“0”并回车。
2.8点击Next。
2.9选择networked,点击Next。
2.10按CTRL键,同时需要的网卡,钦州需要设置3个IP,所以按住ctrl同时选择e1000g0 ,e1000g1,e1000g2,并点击Next。
2.11对第一块网卡进行设置,选e1000g0,点击Next。
Oracle Solaris 11.3 发行说明说明书

有关 Oracle 对可访问性的承诺,请访问 Oracle Accessibility Program 网站 /pls/topic/lookup?ctx=acc&id=docacc。
获得 Oracle 支持
购买了支持服务的 Oracle 客户可通过 My Oracle Support 获得电子支持。有关信息,请访问 /pls/topic/lookup?ctx=acc&id=info;如果您 听力受损,请访问 /pls/topic/lookup?ctx=acc&id=trs。
2 安装问题 ......................................................................................................... 19 安装 Oracle Solaris 11.3 过程中的问题 ............................................................ 19 自动化安装程序无法在具有大内存、小磁盘空间分配的系统上安装 (15741363) ........................................................................................... 19 在使用双路引导磁盘时,自动化安装程序无法匹配目标磁盘 (15735929) ........................................................................................... 20 SPARC:64 位:自动化安装程序由于无标签的双路径 FC 引导磁盘而失 败 (15656484) ...................................................................................... 21
Solaris11.3+suncluster4.3+VirtualBox
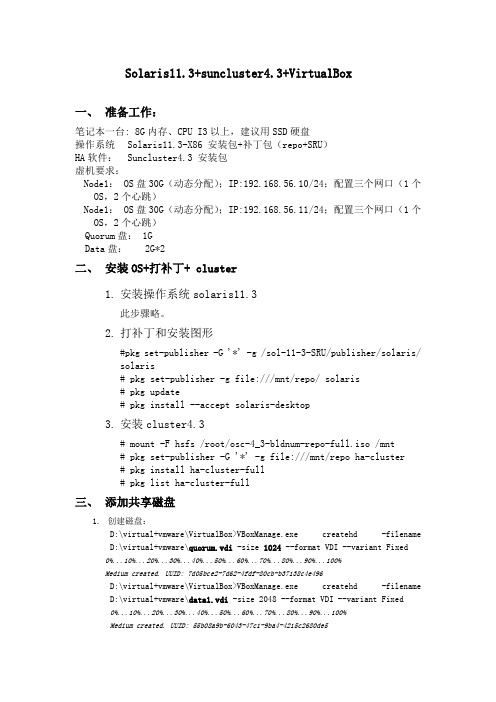
Solaris11.3+suncluster4.3+VirtualBox一、准备工作:笔记本一台:8G内存、CPU I3以上,建议用SSD硬盘操作系统Solaris11.3-X86 安装包+补丁包(repo+SRU)HA软件:Suncluster4.3安装包虚机要求:Node1:OS盘30G(动态分配);IP:192.168.56.10/24;配置三个网口(1个OS,2个心跳)Node1:OS盘30G(动态分配);IP:192.168.56.11/24;配置三个网口(1个OS,2个心跳)Quorum盘: 1GData盘:2G*2二、安装OS+打补丁+cluster1.安装操作系统solaris11.3此步骤略。
2.打补丁和安装图形#pkg set-publisher -G '*' -g /sol-11-3-SRU/publisher/solaris/solaris# pkg set-publisher -g file:///mnt/repo/ solaris# pkg update# pkg install --accept solaris-desktop3.安装cluster4.3# mount -F hsfs /root/osc-4_3-bldnum-repo-full.iso /mnt# pkg set-publisher -G '*' -g file:///mnt/repo ha-cluster# pkg install ha-cluster-full# pkg list ha-cluster-full三、添加共享磁盘1.创建磁盘:D:\virtual+vmware\VirtualBox>VBoxManage.exe createhd -filename D:\virtual+vmware\quorum.vdi -size 1024 --format VDI --variant Fixed0%...10%...20%...30%...40%...50%...60%...70%...80%...90%...100%Medium created. UUID: 7d05bce2-7d62-4fdf-80cb-b37138c4e496D:\virtual+vmware\VirtualBox>VBoxManage.exe createhd -filename D:\virtual+vmware\data1.vdi -size 2048 --format VDI --variant Fixed0%...10%...20%...30%...40%...50%...60%...70%...80%...90%...100%Medium created. UUID: 55b08a9b-6043-47c1-9ba4-4215c2680de5D:\virtual+vmware\VirtualBox>VBoxManage.exe createhd -filename D:\virtual+vmware\data2.vdi -size 2048 --format VDI --variant Fixed0%...10%...20%...30%...40%...50%...60%...70%...80%...90%...100%Medium created. UUID: 51d55226-ac4f-4eed-b2ab-567d9c9053122.把磁盘添加到虚拟机里node1、node2:D:\virtual+vmware\VirtualBox>VBoxManage.exe storageattach solaris-node2 --storagectl "SATA" --port 1 --device 0 --type hdd --medium D:\virtual+vmware\quorum.vdi --mtype shareableD:\virtual+vmware\VirtualBox>VBoxManage.exe storageattach solaris-node2 --storagectl "SATA" --port 2 --device 0 --type hdd --medium D:\virtual+vmware\data1.vdi --mtype shareableD:\virtual+vmware\VirtualBox>VBoxManage.exe storageattach solaris-node2 --storagectl "SATA" --port 3 --device 0 --type hdd --medium D:\virtual+vmware\data2.vdi --mtype shareableD:\virtual+vmware\VirtualBox>VBoxManage.exe storageattach solaris-node1 --storagectl "SATA" --port 1 --device 0 --type hdd --medium D:\virtual+vmware\quorum.vdi --mtype shareableD:\virtual+vmware\VirtualBox>VBoxManage.exe storageattach solaris-node1 --storagectl "SATA" --port 2 --device 0 --type hdd --medium D:\virtual+vmware\data1.vdi --mtype shareableD:\virtual+vmware\VirtualBox>VBoxManage.exe storageattach solaris-node1 --storagectl "SATA" --port 3 --device 0 --type hdd --medium D:\virtual+vmware\data2.vdi --mtype shareable3.磁盘共享:D:\virtual+vmware\VirtualBox>VBoxManage.exe modifyhd d:\virtual+vmware\quorum.vdi --type shareableD:\virtual+vmware\VirtualBox>VBoxManage.exe modifyhd d:\virtual+vmware\data1.vdi --type shareableD:\virtual+vmware\VirtualBox>VBoxManage.exe modifyhd d:\virtual+vmware\data2.vdi --type shareable四、配置集群:1.初始化配置# scinstall*** Main Menu ***Please select from one of the following (*) options:* 1) Create a new cluster or add a cluster node2) Configure a cluster to be JumpStarted from this install server3) Manage a dual-partition upgrade4) Upgrade this cluster node* 5) Print release information for this cluster node* ?) Help with menu options* q) QuitOption: 1*** New Cluster and Cluster Node Menu ***Please select from any one of the following options:1) Create a new cluster2) Create just the first node of a new cluster on this machine3) Add this machine as a node in an existing cluster?) Help with menu optionsq) Return to the Main MenuOption: 2*** Establish Just the First Node of a New Cluster ***This option is used to establish a new cluster using this machine as the first node in that cluster.Before you select this option, the Oracle Solaris Cluster framework software must already be installed. Use the Oracle Solaris Cluster installation media or the IPS packaging system to install Oracle Solaris Cluster software.Press Control-d at any time to return to the Main Menu.Do you want to continue (yes/no) [yes]?>>> Typical or Custom Mode <<<This tool supports two modes of operation, Typical mode and Custom.For most clusters, you can use Typical mode. However, you might need to select the Custom mode option if not all of the Typical defaultscan be applied to your cluster.For more information about the differences between Typical and Custom modes, select the Help option from the menu.Please select from one of the following options:1) Typical2) Custom?) Helpq) Return to the Main MenuOption [1]: 2>>> Cluster Name <<<Each cluster has a name assigned to it. The name can be made up of any characters other than whitespace. Each cluster name should be unique within the namespace of your enterprise.What is the name of the cluster you want to establish? yx_cluster >>> Check <<<This step allows you to run cluster check to verify that certain basic hardware and software pre-configuration requirements have been met. If cluster check detects potential problems with configuring this machineas a cluster node, a report of violated checks is prepared andavailable for display on the screen.Do you want to run cluster check (yes/no) [no]?>>> Cluster Nodes <<<This Oracle Solaris Cluster release supports a total of up to 16nodes.Please list the names of the other nodes planned for the initialcluster configuration. List one node name per line. When finished,type Control-D:Node name (Control-D to finish): node1Node name (Control-D to finish): node2Node name (Control-D to finish): ^DThis is the complete list of nodes:node1node2Is it correct (yes/no) [yes]?>>> Authenticating Requests to Add Nodes <<<Once the first node establishes itself as a single node cluster, other nodes attempting to add themselves to the cluster configuration must be found on the list of nodes you just provided. You can modify thislist by using claccess(1CL) or other tools once the cluster has been established.By default, nodes are not securely authenticated as they attempt to add themselves to the cluster configuration. This is generally considered adequate, since nodes which are not physically connected to the private cluster interconnect will never be able to actually jointhe cluster. However, DES authentication is available. If DES authentication is selected, you must configure all necessary encryption keys before any node will be allowed to join the cluster (seekeyserv(1M), publickey(4)).Do you need to use DES authentication (yes/no) [no]?>>> Minimum Number of Private Networks <<<Each cluster is typically configured with at least two private networks. Configuring a cluster with just one private interconnect provides less availability and will require the cluster to spend moretime in automatic recovery if that private interconnect fails.Should this cluster use at least two private networks (yes/no) [yes]? >>> Point-to-Point Cables <<<The two nodes of a two-node cluster may use a directly-connected interconnect. That is, no cluster switches are configured. However, when there are greater than two nodes, this interactive form of scinstall assumes that there will be exactly one switch for eachprivate network.Does this two-node cluster use switches (yes/no) [yes]? no >>> Cluster Transport Adapters and Cables <<<Transport adapters are the adapters that attach to the private cluster interconnect.Select the first cluster transport adapter:1) net02) net14) net115) net36) net47) net58) net69) net710) net9n) Next >Option: 9Adapter "net5" is an Ethernet adapter.Searching for any unexpected network traffic on "net5" ... doneVerification completed. No traffic was detected over a 10 second sample period.The "dlpi" transport type will be set for this cluster.Select the second cluster transport adapter:1) net02) net14) net115) net36) net47) net58) net69) net710) net9n) Next >Option: 3Adapter "net11" is an Ethernet adapter.Searching for any unexpected network traffic on "net11" ... doneVerification completed. No traffic was detected over a 10 secondsample period.The "dlpi" transport type will be set for this cluster.>>> Network Address for the Cluster Transport <<<The cluster transport uses a default network address of 172.16.0.0. Ifthis IP address is already in use elsewhere within your enterprise,specify another address from the range of recommended privateaddresses (see RFC 1918 for details).The default netmask is 255.255.240.0. You can select another netmask,as long as it minimally masks all bits that are given in the networkaddress.The default private netmask and network address result in an IPaddress range that supports a cluster with a maximum of 64 nodes, 10private networks, and 12 virtual clusters.Is it okay to accept the default network address (yes/no) [yes]?Is it okay to accept the default netmask (yes/no) [yes]?Plumbing network address 172.16.0.0 on adapter bge0 >>NOT DUPLICATE ... done Plumbing network address 172.16.0.0 on adapter bge1 >> NOT DUPLICATE ... done>>> Global Devices File System <<<Each node in the cluster must have a local file system mounted on/global/.CFDEVices/node@<nodeID> before it can successfully participateas a cluster member. Since the "nodeID" is not assigned untilscinstall is run, scinstall will set this up for you.You must supply the name of either an already-mounted file system or araw disk partition which scinstall can use to create the globalCFDEVices file system. This file system or partition should be at least512 MB in size.Alternatively, you can use a loopback file (lofi), with a new filesystem, and mount it on /global/.CFDEVices/node@<nodeid>.If an already-mounted file system is used, the file system must be empty. If a raw disk partition is used, a new file system will becreated for you.If the lofi method is used, scinstall creates a new 100 MB file system from a lofiCFDEVice by using the file /.globalCFDEVices. The lofi method is typically preferred, since it does not require the allocation of a dedicated disk slice.The default is to use /globalCFDEVices.Is it okay to use this default (yes/no) [yes]?>>> Set Global Fencing <<<Fencing is a mechanism that a cluster uses to protect data integrity when the cluster interconnect between nodes is lost. By default,fencing is turned on for global fencing, and each disk uses the global fencing setting. This screen allows you to turn off the globalfencing.Most of the time, leave fencing turned on. However, turn off fencing when at least one of the following conditions is true: 1) Your shared storageCFDEVices, such as Serial Advanced Technology Attachment (SATA) disks, do not support SCSI; 2) You want to allow systems outside your cluster to access storage CFDEVices attached to your cluster; 3) Sun Microsystems has not qualified the SCSI persistent group reservation (PGR) support for your shared storage CFDEVices.If you choose to turn off global fencing now, after your clusterstarts you can still use the cluster(1CL) command to turn on global fencing.Do you want to turn off global fencing (yes/no) [no]?>>> Quorum Configuration <<<Every two-node cluster requires at least one quorum CFDEVice. By default, scinstall selects and configures a shared disk quorum CFDEVice for you.This screen allows you to disable the automatic selection and configuration of a quorum CFDEVice.You have chosen to turn on the global fencing. If your shared storage CFDEVices do not support SCSI, such as Serial Advanced TechnologyAttachment (SATA) disks, or if your shared disks do not supportSCSI-2, you must disable this feature.If you disable automatic quorum CFDEVice selection now, or if you intendto use a quorum CFDEVice that is not a shared disk, you must instead useclsetup(1M) to manually configure quorum once both nodes have joinedthe cluster for the first time.Do you want to disable automatic quorum CFDEVice selection (yes/no) [no]? yes>>> Automatic Reboot <<<Once scinstall has successfully initialized the Oracle Solaris Clustersoftware for this machine, the machine must be rebooted. After thereboot, this machine will be established as the first node in the newcluster.Do you want scinstall to reboot for you (yes/no) [yes]?>>> Confirmation <<<Your responses indicate the following options to scinstall:scinstall -i \-C sap-cluster \-F \-T node=Node1,node=Node2,authtype=sys \-wnetaddr=172.16.0.0,netmask=255.255.240.0,maxnodes=32,maxprivatenets=10,numvirtualclusters=12, numxipvirtualclusters=3 \-A trtype=dlpi,name=net7 -A trtype=dlpi,name=net11 \-B type=direct \-P task=security,state=SECUREAre these the options you want to use (yes/no) [yes]?Do you want to continue with this configuration step (yes/no) [yes]?Initializing cluster name to "sap-cluster" ... doneInitializing authentication options ... doneInitializing configuration for adapter "net7" ... doneInitializing configuration for adapter "net11" ... doneInitializing private network address options ... doneSetting the node ID for "node1" ... done (id=1)Checking for global CFDEVices global file system ... doneUpdating vfstab ... doneVerifying that NTP is configured ... doneInitializing NTP configuration ... doneUpdating nsswitch.conf ... doneAdding cluster node entries to /etc/inet/hosts ... doneConfiguring IP multipathing groups ...doneEnsure that the EEPROM parameter "local-mac-address?" is set to "true" ... doneEnsure network routing is disabled ... doneNetwork routing has been disabled on this node by creating /etc/notrouter. Having a cluster node act as a router is not supported by Oracle Solaris Cluster. Please do not re-enable network routing.Log file - /var/cluster/logs/install/scinstall.log.1686Rebooting ...节点2-node2root@Node2 # scinstall*** Main Menu ***Please select from one of the following (*) options:* 1) Create a new cluster or add a cluster node2) Configure a cluster to be JumpStarted from this install server3) Manage a dual-partition upgrade4) Upgrade this cluster node* 5) Print release information for this cluster node* ?) Help with menu options* q) QuitOption: 1*** New Cluster and Cluster Node Menu ***Please select from any one of the following options:1) Create a new cluster2) Create just the first node of a new cluster on this machine3) Add this machine as a node in an existing cluster?) Help with menu optionsq) Return to the Main MenuOption: 3*** Add a Node to an Existing Cluster ***This option is used to add this machine as a node in an already established cluster. If this is a new cluster, there may only be asingle node which has established itself in the new cluster.Before you select this option, the Oracle Solaris Cluster framework software must already be installed. Use the Oracle Solaris Cluster installation media or the IPS packaging system to install Oracle Solaris Cluster software.Press Control-d at any time to return to the Main Menu.Do you want to continue (yes/no) [yes]?>>> Typical or Custom Mode <<<This tool supports two modes of operation, Typical mode and Custom.For most clusters, you can use Typical mode. However, you might need to select the Custom mode option if not all of the Typical defaultscan be applied to your cluster.For more information about the differences between Typical and Custom modes, select the Help option from the menu.Please select from one of the following options:1) Typical2) Custom?) Helpq) Return to the Main MenuOption [1]: 2>>> Sponsoring Node <<<For any machine to join a cluster, it must identify a node in thatcluster willing to "sponsor" its membership in the cluster. When configuring a new cluster, this "sponsor" node is typically the firstnode used to build the new cluster. However, if the cluster is already established, the "sponsoring" node can be any node in that cluster.Already established clusters can keep a list of hosts which are ableto configure themselves as new cluster members. This machine should be in the join list of any cluster which it tries to join. If the listdoes not include this machine, you may need to add it by using claccess(1CL) or other tools.And, if the target cluster uses DES to authenticate new machines attempting to configure themselves as new cluster members, the necessary encryption keys must be configured before any attempt to join.What is the name of the sponsoring node? Node1 1>>> Cluster Name <<<Each cluster has a name assigned to it. When adding a node to the cluster, you must identify the name of the cluster you are attemptingto join. A sanity check is performed to verify that the "sponsoring"node is a member of that cluster.What is the name of the cluster you want to join? crm-clusterAttempting to contact "Node1" ... doneCluster name "crmjkdb_cluster" is correct.Press Enter to continue:>>> Check <<<This step allows you to run cluster check to verify that certain basic hardware and software pre-configuration requirements have been met. If cluster check detects potential problems with configuring this machineas a cluster node, a report of violated checks is prepared andavailable for display on the screen.Do you want to run cluster check (yes/no) [no]?>>>Autodiscovery of Cluster Transport <<<If you are using Ethernet or Infiniband adapters as the cluster transport adapters, autodiscovery is the best method for configuringthe cluster transport.Do you want to use autodiscovery (yes/no) [yes]?Probing ......................The following connection was discovered:Node1:bge1 -Node1:bge1Probes were sent out from all transport adapters configured forcluster node "Node1". But, they were only received on less than 2of the network adapters on this machine ("Node1"). This may be dueto any number of reasons, including improper cabling, an improper configuration for "Node1", or a switch which was confused by theprobes.You can either attempt to correct the problem and try the probes again or manually configure the transport. To correct the problem mightinvolve re-cabling, changing the configuration for "Node1", orfixing hardware. You must configure the transport manually toconfigure tagged VLAN adapters and non tagged VLAN adapters on the same private interconnect VLAN.Do you want to try again (yes/no) [yes]?Probing .........The following connections were discovered:Node1:net3 -Node1:net3Node1:net7 -Node1:net7Is it okay to configure these connections (yes/no) [yes]?>>> Global Devices File System <<<Each node in the cluster must have a local file system mounted on/global/.CFDEVices/node@<nodeID> before it can successfully participate as a cluster member. Since the "nodeID" is not assigned untilscinstall is run, scinstall will set this up for you.You must supply the name of either an already-mounted file system or a raw disk partition which scinstall can use to create the globalCFDEVices file system. This file system or partition should be at least 512 MB in size.Alternatively, you can use a loopback file (lofi), with a new file system, and mount it on /global/.CFDEVices/node@<nodeid>.If an already-mounted file system is used, the file system must be empty. If a raw disk partition is used, a new file system will becreated for you.If the lofi method is used, scinstall creates a new 100 MB file system from a lofiCFDEVice by using the file /.globalCFDEVices. The lofi methodis typically preferred, since it does not require the allocation of a dedicated disk slice.The default is to use /globalCFDEVices.Is it okay to use this default (yes/no) [yes]?>>> Automatic Reboot <<<Once scinstall has successfully initialized the Oracle Solaris Cluster software for this machine, the machine must be rebooted. The rebootwill cause this machine to join the cluster for the first time.Do you want scinstall to reboot for you (yes/no) [yes]?>>> Confirmation <<<Your responses indicate the following options to scinstall:scinstall -i \-C crmjkdb_cluster \-N Node1 \-A trtype=dlpi,name=bge0 -A trtype=dlpi,name=bge1 \-B type=direct \-m endpoint=:bge0,endpoint=Node1:bge0 \-m endpoint=:bge1,endpoint=Node1:bge1Are these the options you want to use (yes/no) [yes]?Do you want to continue with this configuration step (yes/no) [yes]?Checking CFDEVice to use for global CFDEVices file system ... doneAdding node "Node1" to the cluster configuration ... doneAdding adapter "bge0" to the cluster configuration ... doneAdding adapter "bge1" to the cluster configuration ... doneAdding cable to the cluster configuration ... doneAdding cable to the cluster configuration ... doneCopying the config from "Node1" ... doneCopying the postconfig file from "Node1" if it exists ... doneNo postconfig file found on "Node1", continuingSetting the node ID for "Node1" ... done (id=2)Verifying the major number for the "did" driver with "Node1" ... doneChecking for global CFDEVices global file system ... doneUpdating vfstab ... doneVerifying that NTP is configured ... doneInitializing NTP configuration ... doneUpdating nsswitch.conf ... doneAdding cluster node entries to /etc/inet/hosts ... doneConfiguring IP multipathing groups ...doneEnsure that the EEPROM parameter "local-mac-address?" is set to "true" ... doneEnsure network routing is disabled ... doneNetwork routing has been disabled on this node by creating /etc/notrouter. Having a cluster node act as a router is not supported by Oracle Solaris Cluster. Please do not re-enable network routing.Updating file ("ntp.conf.cluster") on node node1 ... doneUpdating file ("hosts") on node Node1 ... doneLog file - /var/cluster/logs/install/scinstall.log.1561Rebooting ...2.注册服务:# scrgadm -a -t SUNW.HAStoragePlus# scrgadm -a -t SUNW.gds:6注:这些服务只需在一个节点上操作即可#scrgadm –pv 检查是否安装3.添加仲裁# devfsadm -C# scdidadm -C# scdidadm -r# scdiadm -ui# clquorum add d7# scconf -c -q reset4.创建资源组及IP资源# clsetup*** Main Menu ***Please select from one of the following options:1) Quorum2) Resource groups3) Data Services4) Cluster interconnect5) Device groups and volumes6) Private hostnames7) New nodes8) Zone Cluster9) Other cluster tasks?) Help with menu optionsq) QuitOption:Option: 2*** Resource Group Menu ***Please select from one of the following options:1) Create a resource group2) Add a network resource to a resource group3) Add a data service resource to a resource group4) Resource type registration5) Online/Offline or Switchover a resource group6) Suspend/Resume recovery for a resource group7) Enable/Disable a resource8) Change properties of a resource group9) Change properties of a resource10) Remove a resource from a resource group11) Remove a resource group12) Clear the stop_failed error flag from a resource?) Helps) Show current statusq) Return to the main menuOption: 1>>> Create a Resource Group <<<Use this option to create a new resource group. You can also use this option to create new resources for the new group.A resource group is a container into which you can place resources of various types, such as network and data service resources. The cluster uses resource groups to manage its resource types. There are two types of resource groups, failover and scalable.Only failover resource groups may contain network resources. A network resource is either a LogicalHostname or SharedAddress resource.It is important to remember that each scalable resource group depends upon one or more failover resource groups which contains one or more SharedAddress network resources.Is it okay to continue (yes/no) [yes]?Select the type of resource group you want to add:1) Failover Group2) Scalable GroupOption: 1What is the name of the group you want to add? data-rgDo you want to add an optional description (yes/no) [yes]? noBecause this cluster has two nodes, the new resource group will be configured to be hosted by both cluster nodes.At this time, you may select one node to be the preferred node for hosting this group. Or, you may allow the system to select a preferred node on an arbitrary basis.Do you want to specify a preferred node (yes/no) [yes]?Select the preferred node or zone for hosting this group:1) Node12) Node2Option: 1Some types of resources (for example, HA for NFS) require the use of an area in a global file system for storing configuration data. If anyof the resources that will be added to this group require such support, you can specify the full directory path name now.Do you want to specify such a directory now (yes/no) [no]?Is it okay to proceed with the update (yes/no) [yes]?/usr/cluster/bin/clresourcegroupcreate -n Node1,Node2 data-rgCommand completed successfully.Press Enter to continue: Jun 10 19:37:30 Node1 cl_runtime: NOTICE: Received non-interrupt heartbeat on Node1:net7 - Node2:net7.Do you want to add any network resources now (yes/no) [yes]?Select the type of network resource you want to add:1) LogicalHostname2) SharedAddressOption: 1If a failover resource group contains LogicalHostname resources, the most common configuration is to have one LogicalHostname resource for each subnet.How many LogicalHostname resources would you like to create [1]?Each network resource manages a list of one or more logical hostnames for a single subnet. This is true whether the resource is aLogicalHostname or SharedAddress resource type. The most commonconfiguration is to assign a single logical hostname to each networkresource for each subnet. Therefore, clsetup(1M) only supports thisconfiguration. If you need to support more than one hostname for agiven subnet, add the additional support using clresourcegroup(1M). Before clsetup(1M) can create a network resource for any logical hostname, that hostname must be specified in the hosts(4) file on eachnode in the cluster. In addition, the required network adapters mustbe actively available on each of the nodes.What logical hostname do you want to add? CFSAPIs it okay to proceed with the update (yes/no) [yes]?/usr/cluster/bin/clreslogicalhostname create -g data-rg -p R_description="LogicalHostname resource for CFSAP" CFSAPclreslogicalhostname: Failed to retrieve netmask for the given hostname(s)/IP(s). Will try again when the resource being brought online.Command completed successfully.Press Enter to continue:Do you want to add any additional network resources (yes/no) [no]?Do you want to add any data service resources now (yes/no) [yes]? noDo you want to manage and bring this resource group online now (yes/no) [yes]?/usr/cluster/bin/clresourcegroup online -M data-rgCommand completed successfully.Press Enter to continue:*** Resource Group Menu ***Please select from one of the following options:1) Create a resource group2) Add a network resource to a resource group3) Add a data service resource to a resource group4) Resource type registration5) Online/Offline or Switchover a resource group6) Suspend/Resume recovery for a resource group7) Enable/Disable a resource。
Solaris操作系统的系统要求与安装指南说明书

Requirementss The2GB memory option(256MB DIMMS)require that the system flash PROM software be3.2.24or compatible versions before installingmemory modules.s Currently,for Solaris2.5.1operating environments,configurations are limited to a maximum total memory of56GB,configurations thatexceed56GB for this version are not supported.Solaris2.6operating environments,together with patch105181-19,support a maximumconfiguration of60GB.There is no limitation for systems runningSolaris7or8operating environments(maximum achievableconfiguration is60GB).s Do not mix different densities(8or32or128or256Mbytes)in a bank.s To install the Solaris2.6operating environment,use the"Operating Environment Installation CD(part number704-7076-10)February2000"that comes with your system(not required for installing Solaris2.5.1, Solaris7or Solaris8operating environments).For Solaris2.5.1operating environments the/usr/platform/sun4u/ sbin/prtdiag command displays erroneous memory capacity e software patch104595-09(available at:http:// )to correct this problem.Suggestions for Maximum Performances If there is more than one CPU/Memory board,install one bank of DIMMs on each board first.Then install the second bank on any board.It does not matter whether the first bank is bank0or bank1.s Begin with the largest density banks first(256Mbyte DIMMs),continue with medium density banks(32or128Mbyte DIMMs),and finish with the smallest density banks(8Mbyte DIMMs).It may be necessary to move some banks to meet this guideline.s If there are remaining banks,fill the second banks on the boards in the same order as the first banks.Removing the CPU/Memory BoardCaution–If the message:NOTICE:Hot Plug not supportedin this system is displayed during boot,do NOT attempt toremove or install a board while the system is powered on.If your system supports the hot-plug feature,a board is in low-power mode and ready for removal if one of the following is true:s All three status LEDs are off.s If the Service()LED is lit,and the Power ()LED and theRunning()LED are off.Caution–Use a padded ESD mat to prevent breakage of partsmounted on the bottom of the e a grounding wriststrap to prevent static damage.Start here if the board is already in the system.1.If the board is in low-power mode,skip this step and go to Step2.If the board is not in low-power mode,halt the system and turn offpower before proceeding.2.With a Phillips#1screwdriver,turn the two quarter-turn lockingscrews to the unlocked position().3.Pull the ends of both extraction levers toward you,then pull theboard out of the card cage.Do not let the components on the board catch on any surroundingsurfaces as you pull the board.Caution–The heatsinks on the board may be hot.Handle withcare.4.Place the board on a padded ESD mat to prevent breakage of partsmounted on the bottom of the board.Installing DIMMsInstall a set of DIMMS as a complete bank of eight DIMMS.There are twobanks,interleaved as shown in the following figure.The socket numbers(Jxx00and Jxx01)are marked on the board.1.Open the DIMM socket by pressing down on the ejector levers atboth ends of the socket.2.Align the two notches at the bottom of the DIMM with the two tabsin the socket.3.Push the DIMM firmlydown into the socket.4.Lock the DIMM in place by pushing both ejector levers into theupright position.Installing the CPU/Memory Board1.If youare installing a new board,refer to the Sun Enterprise serversystem reference manual that came with your system for rules forselecting a board slot.2.Open the extraction levers by pulling the ends of both levers towardyou.3.Insert the board in the card cage slot.!!Extraction leversQuarter-turnBank 1J3801J3701J3601J3501J3401J3301J3201J3101Bank 0J3800J3700J3600J3500J3400J3300J3200J3100sFor a 4-slot or 5-slot card cage,orient the board with the component side to the right.sFor a 16-slot or 8-slot card cage (diagram follows):Front slot installation,orient the board with the component side down.Rear slot installation,orient the board with the component side up.4.Push the board into the card cage,then simultaneously press both extraction levers to seat the board on the centerplane.Caution –Do not press on the board front panel to seat it—doing so will damage the connector pins.Caution –When inserting a board into slot 4or slot 10of a16-slot card cage,lift the board slightly to avoid damage to the centerplane connectors.Pushing both levers simultaneously avoids twisting the board and bending the connector pins.5.With a Phillips #1screwdriver,turn the two quarter-turn locking screws to the locked position ().Rear viewFront view!!Sun ™ Enterprise ™6x 00/5x 00/4x 00/3x 00 Systems DIMM Installation GuideCaution –The heatsinks on the board can bedamaged by incorrect handling.Do not touch the heatsinks while installing or moving the board.Hold the board only by the edges.If a heatsink is loose or broken,obtain a replacement board.Caution –The heatsinks on the board can bedamaged by improper packaging.When storing or shipping the board,ensure that the heatsinks have sufficient protection.Note –Make sure the DIMM and connector are freeof dust and debris.If necessary,gently clean them using the dry,stiff brush supplied.!!Part Number: 802-5032-15Revision A of January 2000Accessing Sun Documentation OnlineThe sm web site enables you to access Sun technicaldocumentation on the Web.You can browse the archive or search for a specific book title or subject at:Sun Welcomes Your CommentsWe are interested in improving our documentation and welcome your comments and suggestions.You can email your comments to us at:*******************Please include the part number (802-5032-14)of the document in the subject line of your email.Copyright 2000 Sun Microsystems, Inc. All rights reserved. Use is subject to license terms. Third-party software, including font technology, is copyrighted and licensed from Sun suppliers. Sun, SunMicrosystems, the Sun Logo, SunDocs, and Solaris are trademarks or registered trademarks of Sun Microsystems, Inc. in the U.S. and other countries.RESTRICTED RIGHTS : Use, duplication, ordisclosure by the U.S. Government is subject to restrictions of FAR 52.227-14(g)(2)(6/87) and FAR 52.227-19(6/87), or DFAR 252.227-7015(b)(6/95) and DFAR 227.7202-3(a).Copyright 2000 Sun Microsystems, Inc. Tous droits réservés. Distribué par des licences qui enrestreignent l’utilization. Le logiciel détenu par des tiers, et qui comprend la technologie relative aux polices de caractères, est protégé par un copyright et licencié par des fournisseurs de Sun. Sun, SunMicrosystems,le logo Sun,SunDocs,et Solaris sont des marques de fabrique ou des marques déposées de Sun Microsystems, Inc. aux Etats-Unit et dans d’autres pay.Sun Microsystems Computer Company •901San Antonio Road •Palo Alto,CA 94303-4900USA •650960-1300•Fax 650969-91316.Reboot the system now or schedule a later time to reboot when system disruption will be minimized.The system cannot use the new board until the system is rebooted.7.If the system is running,look for a system message similar to the following example.This example is for a CPU/Memory board in slot 5:NOTICE: CPU Board Hotplugged into Slot 5NOTICE: Board 5 is ready to remove。
Solaris网络服务器安装与配置

Solaris网络服务器安装与配置
9
域名解析器配置文件 /etc/named/resolv.conf
;domain指示域名; nameserver指示名字服务器 domain ;只有自己是名字服务器才有下面的第一行 nameserver 127.0.0.1 nameserver 166.111.7.200 nameserver 166.111.4.5
2013-7-10
Solaris网络服务器安装与配置
10
匿名FTP服务器
为了设置匿名FTP服务器,需要将下面的入口加 到文件/etc/passwd中:
ftp:x:30000:30000:Anonymous FTP:/export/ftp:/nosuchshell
在这个例子中,我们使用/export/ftp作为FTP服务 器的根目录,并且使用一个不存在的文件 /nosuchshell作为ftp用户的shell程序,这样可以 防止ftp用户使用telnet登录。另外,还需要在文 件/etc/shadow中加入下面的入口: ftp:NP:6445::::::
2013-7-10
Solaris网络服务器安装与配置
5
根域名服务器记录文件 /etc/named/named.ca
;This file holds the information on root name servers needed ; to initialize cache of Internet domain name servers ; . 99999999 IN NS . . 99999999 A 166.111.4.5 . 99999999 IN NS . . 99999999 A 166.111.8.250 . 99999999 NS . . 99999999 A 198.41.0.4 . 99999999 NS . . 99999999 A 128.9.0.107 . 99999999 NS . . 99999999 A 192.33.4.12 . 99999999 NS .
Solaris安全操作指南

如果系统需要DHCP或NIS,则需要将系统接入网络,注意接入网络的时间要尽可能短,如果配置DHCP或NIS完毕,请暂时将网络再次断开。下一步是选择IP或DHCP,这里会询问是否安装IPv6,除非必要,否则禁用。同时,SUN的建议是安装所需要的所有服务,因为服务安全的,但是不要采用这个选项。后期在配置服务和网络的时候会证明前者的做法是会带来安全问题的,因为在默认安装后,系统将开放RPC、aotumount、NFS等可能不必要且有潜在危险的服务。
断开网络连接
请确定网络是断开,即网线没有接入网络中。如果用户希望自动配置NIS服务,则需要网络处于连通状态,但是这样做会带来一些安全隐患,因为在安装期间,RPC服务处于启动状态,存在潜在的安全威胁。建议在系统处于安全保护状态下,才将系统联入网络。
Openboot口令和安全
请首先插入CD。为了防止无关人员执行EEPROM上的命令,请在OK提示符下,使用命令"setenv"设置EEPROM的安全模式为”command”,并设置相应的口令,要求口令至少为8位,必须有字母、数字和标点,不能使用名字、完整的英文单词或生日作为口令。下面是一个示例:
Openboot口令和安全
请首先插入CD。为了防止无关人员执行EEPROM上的命令,请在OK提示符下,使用命令"setenv"设置EEPROM的安全模式为”command”,并设置相应的口令,要求口令至少为8位,必须有字母、数字和标点,不能使用名字、完整的英文单词或生日作为口令。下面是一个示例:
ok setenv security-mode command
security-mode = command
第一章 Solaris系统安全安装
Solaris11.3安装指南(原创)

Solaris11.3安装指南---文本安装一、 OracleSolaris安装方法除了AI以外,所有这些安装方法都可用于安装单个系统。
AI可用于通过网络安装单个系统或多个系统1.LiveMedia图形安装程序的正式名称为“Live Media”,LiveMedia ISO映像上的安装程序仅适用于x86平台。
这意味着 Oracle Solaris 将被引导到 RAM 中,不会对现有操作系统造成任何影响。
加载安装安装程序后,您就可以随意体验 Oracle Solaris,然后确定是否确实要将其安装到系统中(类似于window安装系统中的PM系统)。
Live Media 不适合长期使用。
例如,关闭系统后,您对系统的所有更改都将丢失。
因此,接下来您需要在系统上安装Oracle Solaris。
通过Live Media 在桌面上放置的 Install Oracle Solaris 图标,您可以轻松进行安装。
2.文本安装文本安装介质包含更适用于通用服务器的一组软件。
文本安装程序可以在现有的OracleSolarisx86分区或SPARC分片上执行安装。
或者,文本安装程序可以使用整个磁盘。
如果选择了整个磁盘选项,则会创建分区或分片涵盖目标设备。
不论发生何种情况,安装都会覆盖目标分区或分片上的任何内容。
如果使用文本安装程序,以后可能需要安装附加的软件包3.AI安装可以从CD、DVD 或USB 设备引导AI 映像以仅启动该系统的无人参与安装。
AI 清单提供安装指令。
要安装的系统必须可访问网络。
要完成安装,将从Internet 上或本地网络上的 IPS 系统信息库检索软件包二、使用文本安装程序1.准备工作●介质下载:/technetwork/cn/server-storage/solaris11/downloads/install-2245079-zhs.html●确保有适当的设备驱动程序安装 Oracle Solaris OS 之前,请先确定您的系统设备是否受支持。
Solaris系统安装步骤
Solaris系统安装步骤使用Browser方式安装1.开机,放入光盘2.在OK后键入:boot cdrom - browser系统出现以下提示:Configuring the /devices directoreConfiguring the /dev directore....显示主机的ID号,SERIAL#,ETHERNET ADDRESS等信息3.显示Installation Program对话窗口,选择“继续”系统询问各种信息:语言版本:中文主机名:pppuser是否连网:是IP地址:169.169.66.5是否子网的一部分:是网络掩码:255.255.255.0Name Services:OTHER时区:中国时间:...系统console出现System identification is completed4.开始安装SOLARIS系统系统类型:STANDALONE安装软件内容:EntireSolaris Software选择安装的内容包括:AminSuite 2.3&AutoClient2.1,Mail Server,Web Server,Solstice Sysmon1.45.将系统目前的硬盘加入使用automatically layout 后改变各分区大小例如:/ -----100M/usr --420M/tmp--128M/opt---200M/var---500M/home--500M改变后系统问:mount romote file system? 回答bypass然后continue6.系统开始安装软件,并询问安装完毕是否自动启动,回答reboot7.系统进入安装阶段,安装完毕,装入CD :Software Supplement Solaris2.6(Sysmon),继续安装装入CD :Solaris Server Intranet Extension,继续安装8.重新启动:9.系统安装结束。
solaris安装

X-Window终端窗口中完成,当然,步骤和以前还是一样的。依次是:
网络设定
主机信息设定
再运行一次服务诊断命令:
========================================================================
# svcs -x -v
========================================================================
一点Tips: Solaris 10是越来越大,包含的东西也越来越多,很多命令都放在了不同的目录中,
为了方便使用,安装完成后可以先进行一下系统命令查找路径的初始化设定,修改/etc/profile
文件,在最后添加上如下两行,例如我的:
PATH=/sbin:/usr/sbin:/usr/bin:/opt/SUNWspro/bin:/usr/ccs/bin:/usr/X11/bin:\
略,要培养一下广大SA们的动手能力。没有sshd,传文件多不方便,于是我只好手工把sshd翻
出来启动... 说到这里我又想骂... btbt的Solaris 10,sshd竟然不在标准目录下,而是放
在了/usr/lib/ssh/sshd下,害得我还find /usr -name sshd -print了一下才找到。
boot -m verbose
========================================================================
Solaris 操作系统安装基本规则
北京地区Solaris系统安装统一要求主机安装系统时,不要使用新机器自解压安装的系统,一定要使用系统盘自己来安装。
不同的主机需要的系统发行版本不同,在安装前需要准备好一 Solaris系统配置1.1 网络在用户没有做出规定时。
给出两个网段,设置网络如下:192.168.10.1/255.255.255.0标准的私网网段10.20.88.1/255.255.0.0与公司的同网段,便于在公司内部装机时调试1.2 主机名主机名的使用注意如下规则:z第一强调的是主机名不要使用像root,oracle这样的名字,感觉不专业,另外也不能有localhost,unknown这样直接回车导致的主机名z主机名最好不要大于8个字符z主机名不要采用非字母和数字,比如"-"和"_"之类的字符z主机名最好都采用小写z常用词建议的缩写:solaris-sol; redhat-rh,rhel,rhas; windows-winxp,win2k3;oracle-ora;linux-lnxtest-tst;1.3 root用户密码密码采用6个数字“1”,即“111111”,不要用”root”或者”123”。
方便大家互相使用二 Solaris系统分区2.1 分区的分类目前分区种类为VTOC和EFI两种类型VTOC分区类型包含8个分区,分区编号0-7。
其中2号分区代表整个硬盘容量,适用于小于1TB。
多数启动盘使用的都是VTOC的分区类型EFI分区类型包含9个分区,适用于大于1TB,分区编号0-6和8。
其中8号为保留分区,不修改,另外2号分区也不再代表整个硬盘容量。
这种分区使用较少2.2 标准分区的建立如果是自己练习,一般为系统配置10GB左右的空间即可,如果需要练习Oracle等软件,建议增加第二硬盘作练习。
在外安装时,用户没有做出说明时,设立3个分区 0-/ 1-swap 6-/disk1。
一般不需要单独建立/usr,/var ,/opt这些分区,除非有特殊需要0号分区是根分区,设置为10GB。
solaris的安装
[quote]原帖由"oldt"]列位老大,麻烦写的详细些,在这里小弟谢过了[/quote 发表:首先找一台pc机,然后通过9针的那个串口将两台机子连上,(服务器上串口为serialmgt),先不要开服务器,先打开“开始”——“程序”——“附件”——“通讯”——“超级中端”。
如果没有在控制面板中点添加/删除在windows安装中双击通讯点“超级终端”安装,完了以后打开“超级终端”加入一个名字随便一个图标点确定,在点击确定,点“还原默认值”,当点确定时同时打开服务器,接着连续点击键盘敲Ctrl+Pause Break,当显示出{1} OK时就可以了。
2、将Solaris9系统盘Software 1/2插入DVD/CD-ROM,并在OK提示符下输入以下命令:OK boot cdrom这时,服务器从光盘上开始引导系统3、等待一会,,系统出现如下提示:Select a Language0. English1. French2. German3. Italian4. Japanese5. Korean6. Simplified Chinese7. Spanish8. Swedish9. Traditional ChinesePlease make a choice (0 - 9), or press h or ? for help:这是选择语言,请注意,在这里一定要选择0. English输入0后按回车键;4、出现如下提示:Select a Locale0. English (C - 7-bit ASCII)1. Albania (ISO8859-2)2. Australia (ISO8859-1)3. Belgium-Flemish (ISO8859-1)4. Belgium-Flemish (ISO8859-15 - Euro)5. Bosnia (ISO8859-2)6. Brazil (ISO8859-1)7. Brazil (UTF-8. Bulgaria (ISO8859-5)9. Canada-English (ISO8859-1)10. Catalan, Spain (ISO8859-1)11. Catalan, Spain (ISO8859-15 - Euro)12. Croatia (ISO8859-2)13. Czech Republic (ISO8859-2)14. Denmark (ISO8859-1)15. Denmark (ISO8859-15 - Euro)16. Egypt (ISO8859-6)17. Egypt (UTF-18. Estonia (ISO8859-15)Press Return to show more choices.Please make a choice (0 - 59), or press h or ? for help:输入0后按回车键;5、如果服务器接了键盘和显示器,跳过这一步;如果是在终端上安装Solaris9,这时会出现如下提示:What type of terminal are you using?1) ANSI Standard CRT2) DEC VT523) DEC VT1004) Heathkit 195) Lear Siegler ADM316) PC Console7) Sun Command ToolSun Workstation9) Televideo 91010) Televideo 92511) Wyse Model 5012) X Terminal Emulator (xterms)13) CDE Terminal Emulator (dtterm)14) OtherType the number of your choice and press Return:这是选择终端类型,我们选择3) DEC VT100输入3后按回车键;6、出现如下提示:q The Solaris Installation Program qqqqqqqqqqqqqqqqqqqqqqqqqqqqqqqqqqqqqqqqqqqqqThe Solaris installation program is divided into a series of short sectionswhere you'll be prompted to provide information for the installation. Atthe end of each section, you'll be able to change the selections you'vemade before continuing.About navigation...- The mouse cannot be used- If your keyboard does not have function keys, or they do notrespond, press ESC; the legend at the bottom of the screenwill change to show the ESC keys to use for navigation. qqqqqqqqqqqqqqqqqqqqqqqqqqqqqqqqqqqqqqqqqqqqqqqqqqqqqqqqqqqqqqqqqqqqqqqqqqqqqqqq F2_Continue F6_Help该提示告诉安装人员,Solaris的安装分为好几部分,每一部分后面都需要你进行确认,如果发现有错,可以更改你先前输入的信息按F2键继续安装;7、出现如下提示:q Identify This System qqqqqqqqqqqqqqqqqqqqqqqqqqqqqqqqqqqqqqqqqqqqqqqqqqqqqqqqqOn the next screens, you must identify this system as networked ornon-networked, and set the default time zone and date/time.If this system is networked, the software will try to find the informationit needs to identify your system; you will be prompted to supply anyinformation it cannot find.>; To begin identifying this system, press F2. qqqqqqqqqqqqqqqqqqqqqqqqqqqqqqqqqqqqqqqqqqqqqqqqqqqqqqqqqqqqqqqqqqqqqqqqqqqqqqqq F2_Continue F6_Help该提示告诉安装人员,要开始定义系统的名字,网络及掩码,时区及时间按F2键继续安装;8、出现如下提示:q Network Connectivity qqqqqqqqqqqqqqqqqqqqqqqqqqqqqqqqqqqqqqqqqqqqqqqqqqqqqqqqqSpecify Yes if the system is connected to the network by one of the Solarisor vendor network/communication Ethernet cards that are supported on theSolaris CD. See your hardware documentation for the current list ofsupported cards.Specify No if the system is connected to a network/communication card thatis not supported on the Solaris CD, and follow the instructions listed underHelp.Networkedqqqqqqqqq[X] Yes[ ] Noqqqqqqqqqqqqqqqqqqqqqqqqqqqqqqqqqqqqqqqqqqqqqqqqqqqqqqqqqqqqqqqqqqqqqqqqqqqqqqqq F2_Continue F6_Help安装程序提示系统是否连接了网络?使用上下箭头键移动,在合适的位置停止后,按空格键,选中该选项;在我们的安装中,需要网络功能,因此按F2键继续安装;9、出现如下提示:q DHCP qqqqqqqqqqqqqqqqqqqqqqqqqqqqqqqqqqqqqqqqqqqqqqqqqqqqqqqqqqqqqqqqqqqqqqqqqOn this screen you must specify whether or not this system should use DHCPfor network interface configuration. Choose Yes if DHCP is to be used, orNo if the interfaces are to be configured manually.NOTE: DHCP support will not be enabled, if selected, until after the systemreboots.Use DHCPqqqqqqqq[ ] Yes[X] Noqqqqqqqqqqqqqqqqqqqqqqqqqqqqqqqqqqqqqqqqqqqqqqqqqqqqqqqqqqqqqqqqqqqqqqqqqqqqqqqq F2_Continue F6_Help选择主网卡(Primary Network Interface)在我们的安装例子中,使用上下箭头键移动光标,移动到eri0处,按空格键选中该网卡,按F2键继续安装;11、出现提示:q Host Name qqqqqqqqqqqqqqqqqqqqqqqqqqqqqqqqqqqqqqqqqqqqqqqqqqqqqqqqqqqqqqqqqqqqOn this screen you must enter your host name, which identifies this systemon the network. The name must be unique within your domain; creating aduplicate host name will cause problems on the network after you installSolaris.A host name must be at least two characters; it can contain letters, digits,and minus signs (-).Host name:rac1qqqqqqqqqqqqqqqqqqqqqqqqqqqqqqqqqqqqqqqqqqqqqqqqqqqqqqqqqqqqqqqqqqqqqqqqqqqqqqqq F2_Continue F6_Help输入主机名,本例中,我们输入主机名rac1后按F2键继续安装;12、出现提示:q IP Address qqqqqqqqqqqqqqqqqqqqqqqqqqqqqqqqqqqqqqqqqqqqqqqqqqqqqqqqqqqqqqqqqqqOn this screen you must enter the Internet Protocol (IP) address for thissystem. It must be unique and follow your site's address conventions, or asystem/network failure could result.IP addresses contain four sets of numbers separated by periods (for example129.200.9.1).IP address:192.168.0.1qqqqqqqqqqqqqqqqqqqqqqqqqqqqqqqqqqqqqqqqqqqqqqqqqqqqqqqqqqqqqqqqqqqqqqqqqqqqqqqq F2_Continue F6_Help提示输入主机的IP地址,本例中,输入192.168.0.1后按F2键继续安装;13、出现提示:q Subnets qqqqqqqqqqqqqqqqqqqqqqqqqqqqqqqqqqqqqqqqqqqqqqqqqqqqqqqqqqqqqqqqqqqqqqOn this screen you must specify whether this system is part of a subnet. Ifyou specify incorrectly, the system will have problems communicating on the>; To make a selection, use the arrow keys to highlight the option andpress Return to mark it [X].System part of a subnetqqqqqqqqqqqqqqqqqqqqqqq[X] Yes[ ] No qqqqqqqqqqqqqqqqqqqqqqqqqqqqqqqqqqqqqqqqqqqqqqqqqqqqqqqqqqqqqqqqqqqqqqqqqqqqqqqq F2_Continue F6_Help提示主机的网络是否采用子网掩码的方法,本例中,要采用子网掩码的方法,因此按F2键继续安装;14、出现提示:q Netmask qqqqqqqqqqqqqqqqqqqqqqqqqqqqqqqqqqqqqqqqqqqqqqqqqqqqqqqqqqqqqqqqqqqqqqOn this screen you must specify the netmask of your subnet. A defaultnetmask is shown; do not accept the default unless you are sure it iscorrect for your subnet. A netmask must contain four sets of numbersseparated by periods (for example 255.255.255.0).Netmask: 255.255.255.0qqqqqqqqqqqqqqqqqqqqqqqqqqqqqqqqqqqqqqqqqqqqqqqqqqqqqqqqqqqqqqqqqqqqqqqqqqqqqqqq F2_Continue F6_Help提示你输入主机的子网掩码,本例中,输入255.255.255.0后,按F2键继续安装;15、出现提示:q IPv6 qqqqqqqqqqqqqqqqqqqqqqqqqqqqqqqqqqqqqqqqqqqqqqqqqqqqqqqqqqqqqqqqqqqqqqqqqOn this screen you should specify whether or not IPv6, the next generationInternet Protocol, will be enabled on this machine. Enabling IPv6 will haveno effect if this machine is not on a network that provides IPv6 service.IPv4 service will not be affected if IPv6 is enabled.press Return to mark it [X].Enable IPv6qqqqqqqqqqq[ ] Yes[X] Noqqqqqqqqqqqqqqqqqqqqqqqqqqqqqqqqqqqqqqqqqqqqqqqqqqqqqqqqqqqqqqqqqqqqqqqqqqqqqqqq F2_Continue F6_Help提示你是否采用IPv6技术?本例中,不采用IPv6技术,按F2键继续安装;16、等待一会,出现提示:q Set the Default Route qqqqqqqqqqqqqqqqqqqqqqqqqqqqqqqqqqqqqqqqqqqqqqqqqqqqqqqqTo specify the default route, you can let the software try to detect oneupon reboot, you can specify the IP address of the router, or you can chooseNone. Choose None if you do not have a router on your subnet.>; To make a selection, use the arrow keys to select your choice and pressReturn to mark it [X].Default Routeqqqqqqqqqqqqqqqqqqqqqqqqqq[X] Detect one upon reboot[ ] Specify one[ ] Noneqqqqqqqqqqqqqqqqqqqqqqqqqqqqqqqqqqqqqqqqqqqqqqqqqqqqqqqqqqqqqqqqqqqqqqqqqqqqqqqq F2_Continue F6_Help提示你设置缺省网关,本例中,我们选择None,现在不设置缺省网关,以后在设置,使用上下箭头,移动光标到[ ] None位置后,按空格键选中,然后按F2键继续安装;17、出现如下提示:q Confirm Information qqqqqqqqqqqqqqqqqqqqqqqqqqqqqqqqqqqqqqqqqqqqqqqqqqqqqqqqqq>; Confirm the following information. If it is correct, press F2;to change any information, press F4.Networked: YesUse DHCP: NoPrimary network interface: ce0Host name: rac1IP address: 192.168.0.1System part of a subnet: YesNetmask: 255.255.255.0Enable IPv6: NoDefault Route: Noneqqqqqqqqqqqqqqqqqqqqqqqqqqqqqqqqqqqqqqqqqqqqqqqqqqqqqqqqqqqqqqqqqqqqqqqqqqqqqqqq F2_Continue F4_Change F6_Help提示你确认上面输入的信息,如果上述的输入信息有错,可以按F4键后重新输入;如果正确,按F2键后继续安装;18、出现提示:q Configure Security Policy: qqqqqqqqqqqqqqqqqqqqqqqqqqqqqqqqqqqqqqqqqqqqqqqqqqqSpecify Yes if the system will use the Kerberos security mechanism.Specify No if this system will use standard UNIX security.Configure Kerberos Securityqqqqqqqqqqqqqqqqqqqqqqqqqqq[ ] Yes[X] Noqqqqqqqqqqqqqqqqqqqqqqqqqqqqqqqqqqqqqqqqqqqqqqqqqqqqqqqqqqqqqqqqqqqqqqqqqqqqqqqq F2_Continue F6_Help配置安全策略,本例中,我们选择No,因此按F2键继续安装;19、出现提示:q Confirm Information qqqqqqqqqqqqqqqqqqqqqqqqqqqqqqqqqqqqqqqqqqqqqqqqqqqqqqqqqq>; Confirm the following information. If it is correct, press F2;to change any information, press F4.Configure Kerberos Security: Noqqqqqqqqqqqqqqqqqqqqqqqqqqqqqqqqqqqqqqqqqqqqqqqqqqqqqqqqqqqqqqqqqqqqqqqqqqqqqqqq F2_Continue F4_Change F6_Help确认刚才输入的信息,如果刚才输入的信息有错,按F4键重新输入;如果正确,按F2键继续安装;20、出现提示:q Name Service qqqqqqqqqqqqqqqqqqqqqqqqqqqqqqqqqqqqqqqqqqqqqqqqqqqqqqqqqqqqqqqqqOn this screen you must provide name service information. Select the nameservice that will be used by this system, or None if your system will eithernot use a name service at all, or if it will use a name service not listedhere.>; To make a selection, use the arrow keys to highlight the optionand press Return to mark it [X].Name serviceqqqqqqqqqqqq[X] NIS+[ ] NIS[ ] LDAP[ ] Noneqqqqqqqqqqqqqqqqqqqqqqqqqqqqqqqqqqqqqqqqqqqqqqqqqqqqqqqqqqqqqqqqqqqqqqqqqqqqqqqq F2_Continue F6_Help配置名字服务,本例中,我们选择None(不采用任何名字服务)。
网络安装Solaris标准版本
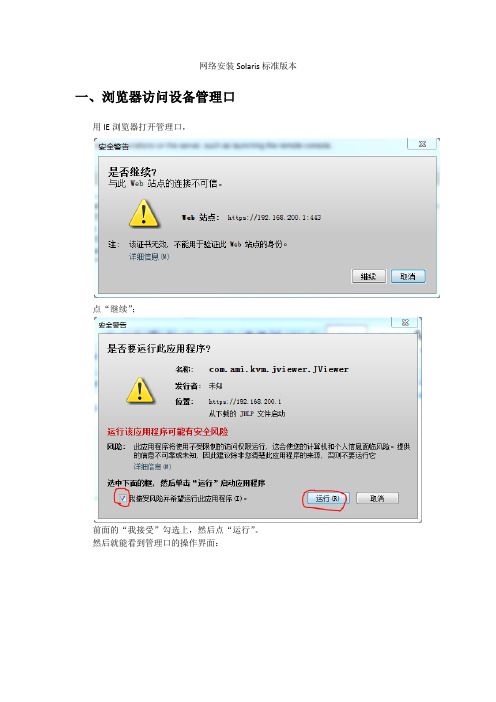
网络安装Solaris标准版本一、浏览器访问设备管理口用IE浏览器打开管理口,点“继续”;前面的“我接受”勾选上,然后点“运行”。
然后就能看到管理口的操作界面:二、将网络安装服务设置为标准版安装用IE打开192.168.8.248放大的图:三、通过管理口重启设备,进入安装程序在页面上点“Remote Control”->“Power Control”->重启系统:四、在管理窗口进入启动设置上一步点击“Preform Action”后,系统进入启动流程,则点开管理窗口,在启动开始的前一两分钟一直按F12键,系统会进入网络启动,等待大约两三分钟可以看到下面的界面,表示已经进入到远程网络安装:等待启动超时或直接按回车键进入网络安装。
如果不想一直按F12的话,也可以在启动时按Del键进入BIOS的Setup界面,如下图所示:然后修改默认的启动源为Network,不过这样改完之后,等安装完成后,还需要再进入BIOS再把启动选项修改回从硬盘启动。
五、安装过程下面的选1,默认的:键盘选择,选英文:按F2继续。
以下没有特别说明的都根据屏幕提示按回车或按F2继续。
选择语言,默认选英语,输入1并继续。
网络接口默认选igb0:Kerberos安全机制,选默认No.域名服务选None:时区选Asia,国家选China;设置root密码:可以选择安装完成后手动重启系统,也可以选自动重启。
选全新安装,F4_Initial:区域选North America,不用中文,不需要选中国:文件系统选UFS。
软件选Entire Distribution:然后继续。
选择磁盘,注意一定要选择你要安装的磁盘,不要选错了把其它的磁盘内容覆盖了。
用上下键将光标移到你需要安装的磁盘编号前,然后按空格选定,选定后的磁盘前的方括号里会打上叉,如上图所示。
然后继续。
选F2_Auto Layout自动选择磁盘分区:下图为自动分好的磁盘结构划分:继续。
201204 Solaris 11 SAN和多路径配置

技术文档模板(v 120410)作者王卫锋审核分类Solaris 子类Solaris 11更新时间2012-4-10关键字Solaris 11,SAN,MPxIO摘要Oracle发布了最新Solaris 11操作系统,SAN存储和多路径的配置方法也有了些许变化;主要适用环境Solaris 11,Sun SAN存储版本说明拟制/修改责任人拟制/修改日期修改内容/理由版本号V120410 王卫锋2012-4-10 新建目录版本说明 (2)1 系统和软硬件环境说明 (4)2安装多路径软件包 (4)3 多路径功能简介 (4)4 Solaris I/O多路径概述 (6)4.1 光纤通道软件功能 (6)4.2 SAS软件功能 (7)4.3 Solaris I/O多路径功能 (7)5 配置Solaris I/O 多路径功能 (8)5.1配置多路径I/O 功能 (8)5.2 多路径注意事项: (9)5.3启用和禁用多路径 (9)5.3.1如何启用多路径 (10)5.3.2如何禁用多路径 (10)5.4配置第三方存储设备 (11)5.4.1如何配置第三方设备 (11)5.4.2如何禁用第三方设备 (12)5.5显示设备名称更改 (13)5.6配置自动故障恢复 (13)5.6.1如何配置自动故障恢复 (14)6. 管理多路径设备(mpathadm ) (14)6.1管理多路径设备 (14)6.1.1如何显示多路径支持信息 (14)6.1.2如何显示特定启动器端口的属性 (15)6.1.3如何显示特定LUN信息 (16)6.1.4如何显示与特定目标端口相关联的所有LUN (18)6.1.5如何显示特定名称的LUN (20)6.1.6如何为特定多路径支持配置自动故障恢复 (22)6.1.7如何故障转移LUN (23)6.1.8如何启用LUN 路径 (26)6.1.9如何禁用LUN 路径 (28)1 系统和软硬件环境说明硬件环境:Oracle SPARC或x86服务器,Sun SAN存储软件环境:Oracle Solaris 11 SPARC或x86平台2安装多路径软件包# pkg install system/storage/multipath-utilities# pkg info system/storage/multipath-utilitiesName: system/storage/multipath-utilitiesSummary: Solaris Multipathing CLIDescription: Path Administration Utility for a Solaris Multipathing deviceCategory: Applications/System UtilitiesState: InstalledPublisher: solarisVersion: 0.5.11Build Release: 5.11Branch: 0.175.0.0.0.0.0Packaging Date: Tue Sep 27 01:40:01 2011Size: 77.29 kBFMRI: pkg://solaris/system/storage/multipath-utilities@0.5.11,5.11-0.175.0.0.0.0.0:20110927T014001Z3 多路径功能简介■多路径设备的名称-在系统上安装了Oracle Solaris 11 发行版并启用了Solaris I/O多路径后,多路径设备名称以c0 开头。
Oracle Solaris 11 packaging和装配指南说明书

IPS – Packaging for Oracle Solaris 11Bart SmaaldersSolaris Core TechnologyLISA 2011The following is intended to outline our general product direction. It is intended for information purposes only, and may not be incorporated into any contract. It is not a commitment to deliver any material, code, or functionality, and should not be relied upon in making purchasing decisions.The development, release, and timing of any features or functionality described for Oracle’s products remains at the sole discretion of Oracle.Rationale for change●Packaging & Patching problems were #1 customer complaint in all of Solaris.●Customer uptime requirements demanded rethinking how software is managed.●Solaris growth made pure media based distributions impractical.●Increased use of virtualization and Zones demanded more flexible installation and packaging mechanisms.●Patch creation overhead made limited business options for Solaris.Design Concepts●Best practice is the default practice.●Minimize planned and unplanned downtime.●Integrate the facilities in Solaris to deliver a better experience.●Automate everything possible.●Use software repositories, local or remote, for software installation – and make them easy to move, replicate and share.●Make software installation cryptographically secure/auditable.●Make software minimization work.●Include all the tools needed to build Solaris distribution as part of Solaris – and have developers use same installation/update tools that customers do.Design Concepts, cont.● Avoid side-band meta-data – all the meta-data for a package belongs in the package.●Drive system behavior with data, not scripts... and make sure that information is as high level as practical.●Support higher-level objects directly in packages.Install, packaging and patching – an integrated design. Simplified architecture+ Improved automaFon+ Improved safety+ Improved flexibility+ Improved integraFon= BeGer user experience•No longer a collection of independent partsBoot Environments•ZFS Boot Environments Benefits–No initial investment–Updates are applied to a file system clone, no interruption–Reboot into upgraded environment when you’re ready–Trivial roll-back if failure occurs–Integrated, enforced best practice for safety •Fast reboot reduces maintenance windows•Excellent for recovery purposes•Maintains mirrored root during upgrade operations.•Zones also use boot environments, one or more per global zone boot environment per zone.•Managed by beadm(1M) command.AcFve BEAcFve BE New BEAcFve BE Updated BEOracle Solaris 11 Lifecycle ManagementImproved updates with IPS•4X Faster upgrades typical•Create ZFS boot environment to safely apply updates•Full dependency check of packages, crypto verified, auditable•Reboot updated ZFS boot environmentNew Security Patch6:00: pkg update6:00‐6:02: Dependency checks, patch/update planning6:02‐6:04: New boot environment created, updates downloaded and applied6:04‐6:06: rebootup and running again Maintenance window: 6-7pmImage Packaging System •Networked package repositories •Cryptographically verified•Complete set of tools •Package, version, and distribute your internal applications•Easy to pilot and automate•Best practice is the default practice •Can’t stray off track•Change Management Built for the EnterpriseLightning fast updatesKey IPS features●IPS is biased toward networked software distribution; CD/DVDs are supported, along w/ archive files. Client supports multiple repositories from different vendors.●Packaging & patching are now one and the same; no more patchids/versions. Packages are now versioned instead.●Package variants are used to provide multiple architecture packages and define what gets installed in local zones; debug kernels are also available if needed.●Constraint based system calculates best solution to package dependency graph using SAT solver; several new dependency types are included that reflect actual software dependencies.●Installation of additional required packages is automatic, simple and fast.●Incompatible packages are avoided.●Packages are cryptographically signed & verifiable; packages can be signed by customers as well for internal authorizations.Key IPS features, cont.●Updates compute “meta-patch” transitioning system from original to desired state; pkg then downloads and installs only changed files.●Since individual packages contain actual functional dependencies, creating custom sets of packages is simple and straightforward. Software minimization is explicitly supported.●No more scripting during package installation/removal.●Self-assembly is the new paradigm for software components.●Facets provide supported mechanism to permit elision of optional package components: localizations, documentation, etc●Complete set of package publication tools, including automated dependency analysis, package lint, automated annotations/addition of metadata, etc.Publication model●Compile your software and install into desired directory layout.●Use pkgsend generate to produce manifest of delivered filesystem components.●Use pkgmogrify to remove undesired components, add metadata, users, groups, manual dependencies, etc.●Use pkgdepend to analyze software for dependencies, resolve against repo or system to add to your package.●Use pkglint to double check package construction details●Publish into a local file-based repository with pkgsend publish.●Optionally, use pkgsign to sign as-delivered manifests.●Install and test.Usage model with Solaris●Solaris releases consist of minor releases (three to four years apart), with (likely yearly) updates in between, and (monthly) SRUs (Support Repository Updates) in between those.●Default behavior is to keep all parts of Solaris at same level as was tested by Oracle.●Pkg update by default takes one's system forward to latest bits available; this can be constrained either by dependencies in user installed packages or via the pkg freeze command.●Pkg freeze will freeze at any desired degree of specificity – minor release, update or sru.●Some components can be “unlocked” (using facets to hide constraints) so they can either newer or older than base system; this makes it easy to run the latest Firefox (or lock on the one that is supported by the plugins you need).Resources●Man pages● Pkg(5) offerls useful overview●Developer guide – very handy for both admin and developers ●Google for “IPS Developer Guide”●Some good tips for managing repositories●/cd/E23824_01/html/E21803/index.html ●/barts●***************************Summary & QuestionsSummary & Takeaways● New packaging system:● Designed to streamline software maintenance.● Designed to facilitate automation, virtualization.● Reduces planned and unplanned downtime. ●The best practice is the default practice.。
Oracle Solaris 11 操作系统更新指南说明书
Oracle® Enterprise Manager Ops CenterUpdating Y our Oracle Solaris 11 Operating System12c Release 3 (12.3.0.0.0)E60020-01June 2015This guide provides an end-to-end example for how to use Oracle Enterprise ManagerOps Center.IntroductionOracle Solaris 11 uses a different update mechanism than earlier versions of theoperating system. Oracle Solaris 11 uses packages to update the operating system andany non-global zones. The packages are part of an Image Packaging System (IPS) thatis integrated with the ZFS file system. The ZFS integration automatically creates analternate boot environment every time an operating system is installed or updated.You can quickly and easily create an alternate boot environment when needed, andmanage existing boot environments. Creating an alternate boot environment providesa safe method of testing an update before deploying it to your live environment.The global zone is the default operating system and has control over all the processes.A global zone always exists even when no other zones are configured. The global zoneis used for systemwide administrative control. Non-global zones, or simply zones, areconfigured inside the global zone.You can patch zones that run on a supported configuration. When you update theglobal zone or the Oracle Solaris 11 operating system, depending on the IPS packagesetting, the non-global zones are also updated. If the package setting is to update thenon-global zones, then the non-global zones are also updated.A boot environment is created, whenever you update or make any changes to OracleSolaris 11 operating system.This example describes how you can update a boot environment by creating severalprofiles and plans and include them in a larger deployment plan to consistently applyupdates to Oracle Solaris 11 operating system.You will create a boot environment profile for Oracle Solaris 11 operating system, aprofile for updating Oracle Solaris 11, create a deployment plan for updating OracleSolaris 11 operating system, and then apply the deployment plan.See Related Articles and Resources for links to related information and articles.What You Will NeedYou will need the following to update an Oracle Solaris 11 operating system:■The operating system that is being updated must be agent-managed.■Enterprise Controller and a Proxy Controller installed on an Oracle Solaris 11operating system.■Oracle Solaris 11 Software Update Library must have latest packages.■An Update Admin and a Plan/Profile Admin role to create a Profile.Updating an Oracle Solaris 11 Operating SystemComplete the following actions to update your Oracle Solaris 11 operating system:■Create a Profile for Boot Environment for Oracle Solaris11 Operating System ■Create a Profile for Updating Oracle Solaris 11 Operating System■Create a Deployment Plan for Updating Oracle Solaris 11 Operating System ■Apply the Deployment Plan for Updating Oracle Solaris 11 Operating SystemCreate a Profile for Boot Environment for Oracle Solaris11 Operating SystemThe steps to create a profile for boot environment for Oracle Solaris 11 operating system are:1.Click Plan Management, then expand Profiles and Policies. Click BootEnvironments option.2.Click Create Profile from the Actions pane to start the Create Profile for BootEnvironments wizard. Enter the following information.■Name: Enter the name of the profile■Description: (Optional) Enter the description of the profile■Subtype: Select Solaris 11 for the subtype3.Click Next to specify the boot environment parameters. Enter the followinginformation.■BE Policy: Select Create a New Boot Environment when needed■Boot Environment Name: Select Auto-generate a unique Boot Environment name.Click Next to display the summary for the boot environment profile.4.Click Finish to create the profile for boot environment for Oracle Solaris 11operating system.After the profile is created, you can view the profile for the boot environment for Oracle Solaris 11 operating system in the center pane.Create a Profile for Updating Oracle Solaris 11 Operating SystemThe steps to create a profile for updating an Oracle Solaris 11 operating system are:1.Click Plan Management in the Navigation pane.2.Click Update Profiles under Profiles and Policies hierarchy.3.Click New Profile in the Actions pane to start the Create OS Update Profilewizard. Enter the following information.■Name: Enter the name of the profile■Type: Enter the type as Solaris 11■Description: (Optional) Enter the description of the profileUse the Search Criteria to search the category you want to upgrade. Click Upgrade icon.Click Create OS Update Profile to create the profile.After the profile is created, you can view the profile in the center pane.Create a Deployment Plan for Updating Oracle Solaris 11 Operating System The steps to create a deployment plan for updating an Oracle Solaris 11 operating system are.1.In the Navigation pane, under Plan Management, expand Deployment Plans.Click Update Solaris 11 OS option.2.Click Create Plan from Template in the Actions Pane.3.Enter a plan name and the plan description. Select the Failure Policy as Stop atfailure.4.Each step has a drop-down menu of available actions in the Associated Profiles /Deployment Plan field. On the Update OS step, select the profile that you have just defined, and then click Save.5.The created deployment plan now appears under the Deployment Plan branch ofPlan Management drawer of Navigation pane.Apply the Deployment Plan for Updating Oracle Solaris 11 Operating SystemAfter you create the deployment plan, you must select the target asset to run the deployment plan.1.Click Plan Management, then expand Deployment plans. Click Update Solaris 11OS.2.Select the deployment plan that you just created and click Apply DeploymentPlan in the Actions pane.The Select Target Assets window is displayed.3.Select the target assets and click Add to Target List. Select Apply the plan withminimal interaction and click Next.plan. Click Next.Mode and click Next to skip the Pre Install Script.6.Click Next to display the Create a Boot Environment Summary.7.Click Next to view the Update OS Summary.8.Click Next to Schedule the job. Select Now to execute the deployment plan on theselected target and click Apply.The job runs to execute the deployment plan.You can view the boot environment in the center pane.What’s Next?You can update an alternate boot environment by deploying a Software Deployment / Update deployment plan and selecting the alternate boot environment as the target. Related Articles and ResourcesFor more information on updating your Oracle Solaris 11 operating systems, see the following:The following chapters in the Oracle Enterprise Manager Configure Reference and Oracle Enterprise Manager Operate Reference contain more information:■Asset Management■Hardware Management■OS Provisioning■Oracle Enterprise Manager Ops Center Concepts Guide■Oracle Solaris 11 documentation at/technetwork/documentation/solaris-11-192991.html■For end-to-end examples, see the workflows and how to documentation in the library. For deployment tasks, go to /cd/E59957_01/nav/deploy.htm and for operate tasks go to/cd/E59957_01/nav/operate.htm. Documentation AccessibilityFor information about Oracle's commitment to accessibility, visit the Oracle Accessibility Program website at/pls/topic/lookup?ctx=acc&id=docacc.Access to Oracle SupportOracle customers that have purchased support have access to electronic support through My Oracle Support. For information, visit/pls/topic/lookup?ctx=acc&id=info or visit/pls/topic/lookup?ctx=acc&id=trs if you are hearing impaired.Oracle Enterprise Manager Ops Center Updating Your Oracle Solaris 11 Operating System , 12c Release 3 (12.3.0.0.0)E60020-01Copyright © 2007, 2015, Oracle and/or its affiliates. All rights reserved.This software and related documentation are provided under a license agreement containing restrictions on use and disclosure and are protected by intellectual property laws. Except as expressly permitted in your license agreement or allowed by law, you may not use, copy, reproduce, translate, broadcast, modify, license, transmit, distribute, exhibit, perform, publish, or display any part, in any form, or by any means. Reverse engineering, disassembly, or decompilation of this software, unless required by law for interoperability, is prohibited.The information contained herein is subject to change without notice and is not warranted to be error-free. If you find any errors, please report them to us in writing.If this is software or related documentation that is delivered to the U.S. Government or anyone licensing it on behalf of the U.S. Government, then the following notice is applicable:U.S. GOVERNMENT END USERS: Oracle programs, including any operating system, integrated software, any programs installed on the hardware, and/or documentation, delivered to U.S. Government end users are "commercial computer software" pursuant to the applicable Federal Acquisition Regulation and agency-specific supplemental regulations. As such, use, duplication, disclosure, modification, and adaptation of the programs, including any operating system, integrated software, any programs installed on the hardware, and/or documentation, shall be subject to license terms and license restrictions applicable to the programs. No other rights are granted to the U.S. Government.This software or hardware is developed for general use in a variety of information management applications. It is not developed or intended for use in any inherently dangerous applications, including applications that may create a risk of personal injury. If you use this software or hardware in dangerous applications, then you shall be responsible to take all appropriate fail-safe, backup, redundancy, and other measures to ensure its safe use. Oracle Corporation and its affiliates disclaim any liability for any damages caused by use of this software or hardware in dangerous applications. Oracle and Java are registered trademarks of Oracle and/or its affiliates. Other names may be trademarks of their respective owners.Intel and Intel Xeon are trademarks or registered trademarks of Intel Corporation. All SPARC trademarks are used under license and are trademarks or registered trademarks of SPARC International, Inc. AMD, Opteron, the AMD logo, and the AMD Opteron logo are trademarks or registered trademarks of Advanced Micro Devices. UNIX is a registered trademark of The Open Group.This software or hardware and documentation may provide access to or information about content, products, and services from third parties. Oracle Corporation and its affiliates are not responsible for and expressly disclaim all warranties of any kind with respect to third-party content, products, and services unless otherwise set forth in an applicable agreement between you and Oracle. Oracle Corporation and its affiliates will not be responsible for any loss, costs, or damages incurred due to your access to or use of third-party content, products, or services, except as set forth in an applicable agreement between you and Oracle.。
- 1、下载文档前请自行甄别文档内容的完整性,平台不提供额外的编辑、内容补充、找答案等附加服务。
- 2、"仅部分预览"的文档,不可在线预览部分如存在完整性等问题,可反馈申请退款(可完整预览的文档不适用该条件!)。
- 3、如文档侵犯您的权益,请联系客服反馈,我们会尽快为您处理(人工客服工作时间:9:00-18:30)。
Solaris11.3安装指南
---文本安装一、 OracleSolaris安装方法
除了AI以外,所有这些安装方法都可用于安装单个系统。
AI可用于通过网络安装单个系统或多个系统
1.LiveMedia
图形安装程序的正式名称为“Live Media”,LiveMedia ISO映像上的安装程序仅适用于x86平台。
这意味着 Oracle Solaris 将被引导到 RAM 中,不会对现有操作系统造成任何影响。
加载安装安装程序后,您就可以随意体验 Oracle Solaris,然后确定是否确实要将其安装到系统中(类似于window安装系统中的PM系统)。
Live Media 不适合长期使用。
例如,关闭系统后,您对系统的所有更改都将丢失。
因此,接下来您需要在系统上安装Oracle Solaris。
通过Live Media 在桌面上放置的 Install Oracle Solaris 图标,您可以轻松进行安装。
2.文本安装
文本安装介质包含更适用于通用服务器的一组软件。
文本安装程序可以在现有的OracleSolarisx86分区或SPARC分片上执行安装。
或者,文本安装程序可以使用整个磁盘。
如果选择了整个磁盘选项,则会创建分区或分片涵盖目标设备。
不论发生何种情况,安装都会覆盖目标分区或分片上的任何内容。
如果使用文本安装程序,以后可能需要安装附加的软件包
3.AI安装
可以从CD、DVD 或USB 设备引导AI 映像以仅启动该系统的无人参与安装。
AI 清单提供安装指令。
要安装的系统必须可访问网络。
要完成安装,将从Internet 上或本地网络上的 IPS 系统信息库检索软件包
二、使用文本安装程序
1.准备工作
●介质下载:
/technetwork/cn/server-storage/solaris11/downloads/install-2245079-zhs.html
●确保有适当的设备驱动程序
安装 Oracle Solaris OS 之前,请先确定您的系统设备是否受支持。
请查看/webfolder/technetwork/hcl/index.html 中的硬件兼容性列表(HardwareCompatibility List, HCL)。
HCL 提供了经认证或报告能与 Oracle Solaris 操作系统一起
工作的硬件的信息。
2.安装过程
选择键盘和语言,默认键盘选项为“27”
默认语言为“3”
●选项“1”为系统安装
●选项“2”为安装驱动程序
●选项“3”可以执行配置网络接口的步骤(比如配置IP信息等),配置完成
后,按 Ctrl-D 组合键退出 shell(要使用 iSCSI 磁盘搜索或者要通过使用 IPoIB 的 iSCSI 设备引导选择此项)
在 "Discovery Selection"(搜索选择)面板中,选择要在其上安装系统的磁盘的搜索方法
●Local Disks(本地磁盘)-这是已连接到计算机的磁盘的缺省选项,包括内
部和外部硬盘。
●iSCSI-如果您希望安装程序搜索可使用 iSCSI 标准通过网络访问的远程磁盘,请选择该选项。
在 "Disks"(磁盘)面板中,选择要在其上安装操作系统的磁盘。
如果列出了多个目标磁盘,请选择其中一个磁盘或接受缺省磁盘。
在 "Partitions"(分区)面板中,选择将操作系统安装在整个磁盘上还是安装在磁盘的某部分上(注:在 SPARC 安装期间,面板会提示输入有关分片(而不是分区)的信息)。
●Use the entire disk(使用整个磁盘)
●Use a GPT partition(使用 GPT 分区)
如果选择“Use a GPT partition”在 "Partition Selection"(分区选择)面板中,修改分区布局。
在完成安装面板过程中的任何时间,都可以恢复到原始设置。
安装到整个磁盘或者未格式化的磁盘上时,安装程序使用 GPT 格式。
不过,缺省情况下,现有 GPT 分区或 DOS 分区将保留并显示在此安装程序中,所以可以保留现有分区并安装到现有分区中
注意事项:
●如果磁盘包含现有 DOS 分区,则至多显示四个 DOS 主分区。
如果存
在 DOS 扩展分区,则还会按扩展分区内的磁盘布局顺序显示其逻辑
分区。
仅允许存在一个Solaris 分区,并且必须将该 Solaris 分区
用于安装。
Solaris 分区可以是扩展分区内的逻辑分区。
●如果磁盘包含现有 GPT 分区,将显示这些 GPT 分区。
最多支持 7
个 GPT 分区。
安装期间可以创建一个或多个 Solaris 分区,但是您
必须选择一个 Solaris 分区作为安装目标。
如果有多个现有Solaris
GPT 分区,缺省情况下将选择第一个合适的Solaris GPT 分区作为安
装目标。
在 "System Identity"(系统标识)面板中,提供计算机名称以在网络上标识该系统。
在 "Network"(网络)面板中,指定如何配置有线以太网网络连接。
●要指定在安装期间不配置网络,请选择 "None"(无)
●要使用 DHCP 配置网络连接,请选择 "Automatically"(自动)。
●要提供网络规范,请选择 "Manually"(手动)并按以下方式继续执行
a.如果有多个接口,则选择要配置的连接。
b.在 "Manually Configure"(手动配置)面板中,键入连接设置或接受由安装程序检测到并提供的缺省信息
c.在 "DNS Name Service"(DNS 名称服务)面板中,如果选择让系统使用DNS名称服务
➢在 "DNS Server Addresses"(DNS 服务器地址)面板中,为 DNS 服务器键入至少一个 IP 地址。
➢在 "DNS Search List"(DNS 搜索列表)面板中,至少提供一个执行 DNS查询时要搜索的域名
d.在 "Alternate Name Service"(备用名称服务)面板中,指定系统应该使用LDAP 名称服务、NIS 名称服务还是不使用任何服务
➢如果在上一步选择了 DNS,则应将 LDAP 或 NIS 设置为 DNS 之外的替代名称服务。
➢如果在上一步未选择 DNS,则应将 LDAP 或 NIS 设置为唯一的名称服务。
➢如果在没有 LDAP 配置文件的系统中配置 LDAP,请选择 None (无),而不是选择 LDAP。
然后,在安装完成后手动配置 LDAP ➢如果未选择任何网络命名服务,则可以使用标准名称源文件(如/etc/hosts)解析网络名称(参考nsswitch.conf(4) 手册页)。
e.在 "Domain Name"(域名)面板中,提供系统针对备用名称服务而驻留的域(如果已选择)。
此处"Alternate Name Service"(备用名称服务)面板中选择“None”
在 "Time Zone"(时区)面板中,选择区域、位置和时区
在 "Locale"(语言环境)面板中选择语言和语言地区。
在下一个面板中设置日期和时间。
选择键盘布局
在 "User"(用户)面板中创建帐户。
不需要创建用户帐户,但是必须创建root 口令
在 "Support - Registration"(支持 - 注册)面板中,确定是否或如何使用 OracleConfiguration Manager 或启动 Oracle 自动服务请求
在 "Support - Network Configuration"(支持 - 网络配置)面板中,选择 OCM 和 ASR的访问方法。
●No proxy(无代理)
●Proxy(代理)-下一个面板提示输入代理主机名、端口号、用户名和
口令(如果使用安全代理)
●Aggregation Hubs(聚合集线器)-下一个面板提示输入 OCM 集线器
URL 和 ASR管理器 URL
查看 "Installation Summary"(安装摘要)面板中的规范。
如有必要,在启动安装之前返回并进行任何所需的更改。
使用提供的规范安装系统
通过 "Installation Results"(安装结果)面板,可以访问您可以查看的安装日志
至此系统安装完成。
