Dell 备份和恢复管理器Backup and Recovery Manager使用详细指南
戴尔电脑使用说明书.pdf_1700878216.8561718
Locate Dell apps in Windows 8.1 Mencari Lokasi aplikasi Dell di Windows 8.1 Windows 8.1 يف Dell تاقيبطت ناكم ددحRegister My Device Register your computer Daftarkan komputer Anda رتويبمكلا ليجستDell Backup and Recovery Backup, recover, repair, or restore your computer Cadangkan, kembalikan ke kondisi normal, perbaiki, atau pulihkan komputer Andaكب صاخلا رتويبمكلل ةداعتسلاا وأ حلاصلإا وأ دادرتسلاا وأ يطايتحلاا خسنلاDell Data Protection | Protected WorkspaceProtect your computer and data from advanced malware attacksLindungi komputer dan data Anda dari serangan malware canggihةمدقتملا ةراضلا جماربلا تامجه نم تانايبلاو رتويبمكلا ةيامحDellSupportAssistCheck and update your computerPeriksa dan perbarui komputer Andaهثيدحتو كب صاخلا رتويبمكلا نم ققحتلا1Connect the power adapter andpress the power buttonSambungkan adaptor daya dan tekan tombol dayaليغشتلا رز ىلع طغضلاو رايتلا ئياهم ليصوت2Finish operating system setupTuntaskan penataan sistem operasiليغشتلا ماظن دادعإ ءاهنإEnable security and updatesAktifkan keamanan dan pembaruanتاثيدحتلاو ناملأا نيكمتConnect to your networkSambungkan ke jaringan Andaةكبشلاب ليصوتلاNOTE: If you are connecting to a secured wireless network, enter the password for thewireless network access when prompted.CATATAN: Jika Anda menghubungkan ke jaringan nirkabel aman, masukkan kata sandiuntuk akses jaringan nirkabel tersebut saat diminta..كتبلاطم دنع ةيكلسلالا ةكبشلا لوصول رورملا ةملك لخدأ ،ةنمؤم ةيكلسلا ةكبشب كلاصتا ةلاح يفSign in to your Microsoft accountor create a local accountMasuk ke akun Microsoft Anda atau buatakun lokalءاشنإب مق وأ Microsoft باسح ىلإ لوخدلا ليجست بمقيلحم باسحWindows 8.1Set up password for WindowsAtur kata sandi untuk WindowsWindows ماظنل رورملا ةملك دادعإConnect to your networkSambungkan ke jaringan Andaةكبشلاب ليصوتلاwireless network access when prompted.Jika Anda menghubungkan ke jaringan nirkabel aman, masukkan kata sandiuntuk akses jaringan nirkabel tersebut saat diminta..كتبلاطم دنع ةيكلسلالا ةكبشلا لوصول رورملا ةملك لخدأ ،ةنمؤم ةيكلسلا ةكبشب كلاصتا ةلاح يفProtect your computerLindungi komputer Andaرتويبمكلا ةيامحWindows 7UbuntuFollow the instructions on the screen to finish setup.Ikuti petunjuk pada layar untuk menyelesaikan pengaturan..دادعلإا ةيلمع ءاهنلإ ةشاشلا ىلع رهظت يتلا تاداشرلإا عبتاFeaturesFitur | تازيملا1. Microphone2. Camera3. Camera-status light4. Microphone5. Security-cable slot6. Power button7. USB 3.0 connector8. Power-status light9. Wireless-status light 10. Battery-status light 11. Hard-drive activity light 12. Headset connector 13. SD-card reader14. Speakers15. Touchpad16. USB 3.0 connector 17. Mini DisplayPort connector 18. HDMI connector 19. RJ45 connector 20. Power connector 21. Network-status Light1. Mikrofon2. Kamera3. Lampu status kamera4. Mikrofon5. Slot kabel pengaman6. Tombol daya7. Konektor USB 3.08. Lampu status daya9. Lampu status nirkabel 10. Lampu status baterai 11. Lampu aktivitas hard disk 12. Konektor headset 13. Pembaca kartu SD 14. Speaker15. Panel sentuh 16. Konektor USB 3.017. Konektor mini DisplayPort 18. Konektor HDMI 19. Konektor RJ4520. Konektor daya 21. Lampu status jaringan1 .نوفوركيملا2.اريماكلا3.اريماكلا ةلاح حابصم4 .نوفوركيملا5 .ناملأا لبك ةحتف6 .ليغشتلا رز7 .USB 3.0 لصوم8.ةقاطلا ةلاح حابصم9.يكلسلالا لاصتلاا ةلاح حابصم10.ةيراطبلا ةلاح حابصم11.ةتباثلا صارقلأا كرحم طاشن حابصم12 .سأرلا ةعامس لصوم13.SD ةقاطب ئراق14.تاعامسلا15 .سمللا ةحول16.USB 3.0 لصوم17.رغصملا DisplayPort لصوم18 .HDMI لصوم19 .RJ45 لصوم20 .رايتلا لصوم21.ةكبشلا ةلاح حابصمPrinted in China.2015-08Product support and manuals Manual dan dukungan produk لئلادلاو جتنملا معد/support/support/manuals /support/windows /support/linuxContact DellH ubungi Dell | D ell ـب لاصتلاا/contactdellRegulatory and safetyRegulasi dan keselamatan | ةيميظنتلا تاسرامملاو ناملأا تاسرامم/regulatory_compliance Regulatory modelModel regulatori | يميظنتلا ليدوملاP47G Regulatory typeJenis regulatori | يميظنتلا عونلاP47G002Computer modelModel komputer | رتويبمكلا ليدومLatitude -3350© 2015 Microsoft Corporation.© 2015 Canonical Ltd.。
Dell-备份和恢复管理器Backup-and-Recovery-Manager使用详细指南

Dell 备份和恢复管理器Backup and Recovery Manager 使用详细指南文章摘要: Dell ™Backup and Recovery Manager (Dell ™备份和恢复管理器) 是一种简单的备份和恢复的工具,他可以创建和管理备份,以及在发生故障时恢复系统和数据。
使用此程序能执行以下操作:•您可能没有随机配置Windows 7系统安装光盘,请第一时间通过DBRM 刻录成Windows 7的系统安装光盘(此功能仅能操作一次,使用其他任何备份后,该选项消失)。
•Win7/Vista 系统, 可以将工厂镜像分区备份到U 盘/移动硬盘/DVD 光盘,当系统出现故障可以直接通过Usb 设备/DVD 启动恢复到出厂模式。
•您可以将Windows 系统分区(C 盘)备份为可引导的恢复 DVD ,U 盘或移动硬盘; •能将各分区的数据备份到硬盘,DVD ,USB 设备上。
如果您备份了系统也备份了各分区的文件,即使发生灾难性硬盘故障,您也可以将系统和文件完全恢复过来。
出厂镜像和数据建议不要选择备份在同一个存储设备上。
• 创建可引导的 Dell 硬件诊断程序 CD 。
出厂如果没有配置Dell 诊断光盘,借助DBRM 实现直接刻录。
警告:如果在笔记本上进行备份或恢复,Dell 强烈建议您使用 AC 电源而不是电池运行,以免中途掉电导致数据丢失。
警告:不论您是台式机或笔记本,建议禁用电源管理设置(如休眠和待机),以免导致备份和恢复进程中断。
警告:由于Dell 恢复工具下的创建系统介质只能操作一次,请拿到机器后,首先创建系统光盘。
警告:重新格式化主硬盘或删除硬盘的WRE 分区(Win7的恢复分区)将导致Dell 出厂映像丢失。
从而导致无法在恢复系统选项中使用Dell出厂映像。
警告:要使用 Dell 备份和恢复管理器,您必须具有Windows 的管理员权限。
目录•文件备份和恢复 •备份系统 •恢复系统 •Dell 恢复工具 • Dell 系统恢复分区WRE 的应用(Win7和Vista )•支持的操作系统•常见问与答文件备份和恢复备份文件恢复文件选择文件备份和恢复,可以对文件进行备份和恢复。
Dell-备份和恢复管理器Backup-and-Recovery-Manager使用详细指南

Dell 备份和恢复管理器Backup and Recovery Manager 使用详细指南 文章摘要: Dell™Backup and Recovery Manager (Dell™备份和恢复管理器) 是一种简单的备份和恢复的工具,他可以创建和管理备份,以及在发生故障时恢复系统和数据。
使用此程序能执行以下操作:•您可能没有随机配置Windows 7系统安装光盘,请第一时间通过DBRM 刻录成Windows 7的系统安装光盘(此功能仅能操作一次,使用其他任何备份后,该选项消失)。
• Win7/Vista 系统, 可以将工厂镜像分区备份到U 盘/移动硬盘/DVD 光盘,当系统出现故障可以直接通过Usb 设备/DVD 启动恢复到出厂模式。
•您可以将Windows 系统分区(C 盘)备份为可引导的恢复 DVD ,U 盘或移动硬盘; •能将各分区的数据备份到硬盘,DVD ,USB 设备上。
如果您备份了系统也备份了各分区的文件,即使发生灾难性硬盘故障,您也可以将系统和文件完全恢复过来。
出厂镜像和数据建议不要选择备份在同一个存储设备上。
• 创建可引导的 Dell 硬件诊断程序 CD 。
出厂如果没有配置Dell 诊断光盘,借助DBRM 实现直接刻录。
警告:如果在笔记本上进行备份或恢复,Dell 强烈建议您使用 AC 电源而不是电池运行,以免中途掉电导致数据丢失。
警告:不论您是台式机或笔记本,建议禁用电源管理设置(如休眠和待机),以免导致备份和恢复进程中断。
警告:由于Dell 恢复工具下的创建系统介质只能操作一次,请拿到机器后,首先创建系统光盘。
警告:重新格式化主硬盘或删除硬盘的WRE 分区(Win7的恢复分区)将导致Dell 出厂映像丢失。
从而导致无法在恢复系统选项中使用Dell 出厂映像。
警告:要使用 Dell 备份和恢复管理器,您必须具有Windows 的管理员权限。
目录•文件备份和恢复 •备份系统 •恢复系统 •Dell 恢复工具 • Dell 系统恢复分区WRE 的应用(Win7和Vista )•支持的操作系统•常见问与答文件备份和恢复备份文件恢复文件选择文件备份和恢复,可以对文件进行备份和恢复。
dell 电脑win8改win7系统
想要让电脑预装的Windows 8 Pro操作系统变回更加熟悉的Windows 7 Professional吗?一起学习如何从Windows 8 Pro降级到Windows 7 Professional如果不备份正版win8系统,按照以下步骤就可以了。
1、开机按F2(或其它F键),进入BIOS2、在BIOS 的Boot菜单下,将Secure Boot 改为Disabled3、将Boot List Option 改为Legacy,设置启动顺序,按F10保存后,重启。
4、按F12 U盘启动进入win8pe,运行分区工具,删除分区,在“硬盘”菜单里面“转换分区表类型为mbr格式”,然后在win8下分区安装系统。
注意:win7pe会蓝屏。
详情参考:目录:1. 免责声明2. 开始之前3. 创建Windows 8恢复介质4. 将关键驱动程序下载到USB 闪存盘5. 在戴尔BIOS 中禁用安全启动6. 安装Windows 77. 从USB驱动器更新关键驱动程序 8. 从戴尔支持网站更新所有驱动程序本文档中的说明专为购买了预装Windows 8 Pro 的计算机并希望将操作系统降级为Windows 7 Professional 的客户提供。
Microsoft 不为其它Windows 8版本的客户提供降级路径,戴尔可能不会为出厂安装Windows 8 Pro 的计算机上的Windows 7 Professional 提供旧驱动程序支持。
为在此系统上实现Windows 7降级,此系统上的BIOS设置已更改为引导至传统BIOS模式。
如果未在安装前将BIOS设置更改为本机UEFI模式引导,Windows8 Pro可以安装;但是,以下Windows8 Pro功能将不起作用,因为它们依赖本机UEFI模式引导:∙安全启动∙无缝启动体验∙Bitlocker网络解锁- 用于具有可信平台模块(TPM)的系统∙eDrive支持以下系统支持从Windows 8 Pro降级到Windows 7 Professional:把计算机从Windows 8 Pro降级到Windows 7 Professional将需要以下材料:∙最多四(4)张可写DVD(DVD+R或DVD-R)或一个16GB USB闪存盘∙Windows 7 Professional安装介质(DVD或USB闪存盘)∙用于关键驱动程序的USB闪存盘(64MB或更大)开始将计算机降级到Windows 7 Professional之前,请务必为Windows 8 Pro创建恢复介质,以防将来要恢复出厂安装的操作系统。
戴尔售后服务_0809

不负责内容
以上服务均要求机器在保修期内 Global Marketing
Dell Backup and Recovery Manager
戴尔备份与恢复管理器是一种简单的备份和恢复工具,它可以创建和管理备份,以及在发
生故障时恢复系统及数据。
使用此程序能执行以下操作: • 您可能没有随机配置Win7系统安装光盘,请第一时间通过DVDRW刻录成Win7的系统安装光 盘(此功能仅能操作一次,使用其他任何备份后,该选项消失)。
Global Marketing
戴尔商定工作日上门服务(NBD)
支持流程— 4个支持级别 戴尔的NBD服务含有以下标准支持服务;如有必要,还将外加工程师上门支持。 1. 30天起步阶段协助— 在您的系统交付之后为期30天的关键时期内,戴尔将通过 标准的电话支持程序解决您在安装优化、配置以及使用方法方面出现的若干问题,为 您提供无需任何额外费用的支持。该支持程序适用于工厂预装的操作系统和台式机/ 笔记本电脑等应用。 2. 24/7综合在线支持— 戴尔的标准支持网站提供故障诊断信息、问题诊断工具和 资源下载等在线协助。
客户拨打戴尔 技术支持热线
平均78%的客户均 能通过电话解决 问题 更快的恢 复系统运行!!
工程师通过 电话或者Connect 为客户诊断
问题获得解决
问题需通过上门方式解决
准时且一次正 确解决率为98%!!
下一或者下二工作 日派遣一名戴尔认 证技术人员上门维 修或者更换零部件
问题获得解决
結户送至维修站的有限保修,戴尔Inhome Service 上门服务提供给客户更直接, 快速, 准确的响应
戴尔服务
中国大陆培训
Services Offering Offsite
如何备份和恢复计算机操作系统

如何备份和恢复计算机操作系统备份和恢复计算机操作系统是每个计算机用户都应该重视的任务。
操作系统是计算机的核心组成部分,其中存储了用户的数据、设置和配置,因此在遭遇硬件故障、病毒感染或其他系统崩溃情况下,备份和恢复操作系统可以帮助用户快速恢复数据和系统设置,避免重建系统的繁琐过程。
本文将介绍如何备份和恢复计算机操作系统,以及常见的备份方法和工具。
备份操作系统的方法多种多样,根据不同的需求和用户喜好,可以选择合适的方法进行备份。
下面介绍几种常见的备份方式。
1. 备份到外部硬盘或移动存储设备备份到外部硬盘或移动存储设备是最常见的备份方法之一。
用户可以使用USB连接设备将计算机与外部存储设备相连,然后选择要备份的文件和系统设置,将其复制到外部设备上。
这种方法简便易行,适用于小规模备份和个人用户。
2. 使用系统自带的备份工具大多数操作系统都自带备份工具,用户可以利用这些工具进行系统备份。
例如,Windows系统提供了"备份和还原"功能,允许用户定期备份操作系统和文件,并在需要时恢复到先前的状态。
类似地,Mac系统也提供了Time Machine备份工具,用户可以根据需求设置备份计划,并随时进行系统还原。
3. 使用第三方备份软件除了系统自带的备份工具外,用户还可以选择使用第三方备份软件进行备份和恢复操作系统。
这些软件通常提供更多的功能和选项,能够满足各种不同的备份需求。
例如,Acronis True Image、EaseUS Todo Backup等备份软件都提供了全面的系统备份和还原功能,并支持创建系统镜像、增量备份、时间轴恢复等高级功能。
除了备份操作系统,用户还应该了解和掌握系统恢复的方法。
当计算机遭遇崩溃、感染病毒或出现其他问题时,用户可以按照以下步骤进行系统恢复。
1. 使用系统恢复盘或安装介质如果操作系统无法启动或出现严重错误,用户可以使用系统恢复盘或操作系统安装介质进行修复和还原。
recovery manager使用手册
恢复管理器(Recovery Manager)使用手册1. 介绍恢复管理器(Recovery Manager)是Oracle数据库的一个关键组件,它负责数据库的备份和恢复。
在数据库管理中,备份和恢复是非常重要的工作,它们可以保证数据库的安全性和可靠性。
本文将深入探讨恢复管理器的使用手册,帮助读者更好地了解和掌握数据库备份和恢复的技能。
2. 恢复管理器的基本概念在深入了解恢复管理器的具体使用方法之前,首先需要明确一些基本概念。
恢复管理器通过备份和恢复文件来保护数据库,它可以创建全量备份、增量备份和归档日志备份,同时支持不同的恢复策略和场景。
在使用恢复管理器之前,需要对数据库备份和恢复的基本原理有一定的理解,包括备份集、恢复集、备份件、恢复目录等概念。
3. 恢复管理器的使用流程恢复管理器的基本使用流程包括备份和恢复两个阶段。
在备份阶段,可以创建全量备份和增量备份,同时可以将备份文件存储到磁盘或者磁带等介质中。
在恢复阶段,可以根据需要选择恢复到某个时间点或者某个恢复集,同时可以应用归档日志进行恢复。
在实际操作中,恢复管理器提供了丰富的命令和选项,可以灵活地满足不同场景下的备份和恢复需求。
4. 恢复管理器的高级功能除了基本的备份和恢复功能外,恢复管理器还提供了许多高级功能,如备份优化、备份集复制、备份集压缩、备份集加密等。
这些功能可以提升备份效率和节省存储空间,同时可以加强备份文件的安全性。
在实际使用中,可以根据具体需求来选择是否使用这些高级功能,以达到更好的备份和恢复效果。
5. 个人观点和总结作为数据库管理人员,掌握恢复管理器的使用技巧是非常重要的。
通过合理地制定备份和恢复策略,可以保证数据库的安全和可靠性。
恢复管理器作为Oracle数据库的重要组件,其强大的功能和灵活的选项可以满足不同场景下的备份和恢复需求。
我建议对于数据库管理人员来说,深入学习和掌握恢复管理器的使用方法,将会极大地提升工作效率和数据库安全性。
win8 系统修复

如果出厂预装了win8,需要恢复原厂系统,可以通过调用Dell backup and Recovery进入恢复(相当于Dell Datasafe Local),调用方式:
✧如果能进入win8系统:(以下有图解)
⏹点击“开始”中的Recovery图标
⏹设置—电源--(按住shift键点击重启)--疑难解答--Dell backup and Recovery
⏹设置—更改电脑设置-常规—高级启动—立即重启--疑难解答--Dell backup and
Recovery
✧如果不能进入win8系统:
⏹多次非法关机,自动进入高级启动菜单(相当于F8的功能)--疑难解答--Dell backup
and Recovery
恢复过程中笔记本的充电器和电池必须要接着
恢复系统会把C盘的东西格式化,如果可以开机的话,要C 盘和桌面的东西,先做好备份
接下重启之后就跟第一次拿到电脑一样了。
Best Regards
陈志斌
Zhibin_c
技术支持网站:/114
技术支持官方微博:@戴尔技术支持。
如何使用隐藏分区中的Dell BackUp and Recovery还原系统

如何使用隐藏分区中的Dell BackUp and Recovery还原系统如果出厂预装了win8,需要恢复原厂系统,可以通过调用Dell backup and Recovery 进入恢复(相当于Dell Datasafe Local),具体有三种方法,个别选项有不一样,详细步骤如下:一.如果能进入win8系统,在所有程序里面启动Dell BackUp and Recovery1.点击“开始”中的Dell BackUp and Recovery图标2.选择Dell BackUp and Recovery“恢复”3.选择Dell Backup and Recovery恢复里的“是的,继续”4.选择出厂的时间,然后点击下一步。
5.选择是继续执行6.选择“进行系统恢复“,然后点击下一步。
7.如果系统盘里面没有个人的数据,选择“不,删除我的个人文件“,然后点击下一步8.恢复完成点重新启动,这个过程大概10到15分钟。
二. 如果能进入win8系统,在设置里面启动Dell BackUp and Recovery1.设置—电源--(按住shift键点击重启)--疑难解答--Dell Backup and Recovery2.选择“恢复您的计算机”里出厂映像时间,然后点击下一步3.如果备份的数据中没有下面罗列的(照片,音频,文档等)请点击高级项目,否则跳过改设置,直接点击下一步4. 点击高级项目,出现下面界面5. 如果系统盘里面没有个人的数据,选择“不,删除我的个人文件”,然后下一步三.如果能进入win8系统,在电脑设置高级启动里掉用Dell BackUp and Recovery1.设置—常规—高级启动—立即重启--疑难解答--Dell backup and Recovery2.后面步骤与一和二方法相同。
给你的DELL本本重建Recovery分区

给你的DELL本本重建Recovery分区,恢复F8(恢复到出厂设置)功能[原创]引用地址:/thread-706761-1-1.htmlQUOTE:说明:本文仅适合安装Vista的电脑,但不限于Dell品牌电脑。
其他安装Vista的组装电脑也能轻松实现。
前言:大家知道,预装Vista的Dell本本都有一个F8修复功能(图1),供用户在Vista系统出现问题时,用户可以利用这个功能进行启动修复(图2)或恢复到DELL出厂状态(同时还有一个隐藏的Recovery分区)。
但厂方的分区常常不适合我们的需要,很多本友拿到本本后都重新分区并重新安装系统,但这样官方的这个恢复功能也同时丢失了。
本文目的就是修复这个功能(虽然DELL的这个恢复工具其实并不怎么好)。
图1好,废话少说。
我们开始,先做准备工作:一.需要工具:1. Vista安装光盘(或ISO):从中提取WinRE.wim和boot.sdi.2. ImageX:见附件。
其实这些也可以从windows aik中获得(windowsaik 下载地址:/download/9/c/1/9c123325-7ff1-41 7f-bd65-349dd97e2f1e/vista_6000.16386.061101-2205-3-LRMAIK_CN .img)3. Dell恢复工具,见附件。
这个也可以用其他工具代替,譬如Ghost。
制作过程(以下操作,除创建C盘映像在WinRE环境中操作外,其余都在Vista环境下操作):一:制作WinRE.wim和boot.sdi(从安装光盘制作)。
1. 在硬盘上(譬如D盘)建立以下2个目录D:\winre_imageD:\winre_mount2. 用Imagex命令将Windows PE映像文件复制到硬盘上将下载得到的Imagex解压到硬盘的任意地方(譬如D:\imagex),执行以下命令:D:\imagex\imagex.exe /export /boot E:\sources\boot.wim 2 D:\winre_image\winre.wim "windows Recovery Environment"(上面命令假设安装光盘在E盘)而boot.sdi直接从Vista安装光盘拷贝即可。
DELL恢复出厂设置
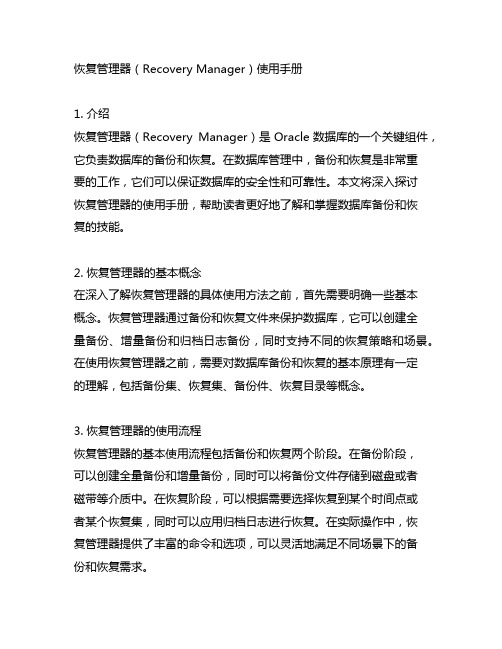
Dell电脑Win7重装系统后如何用Recovery分区有Factory.wim文件恢复出厂设置公司现在有一台Dell 电脑,预装的Win7 Home 32位系统,现在我们需要恢复系统,但现在安装光盘找不到了,电脑系统的Recovery分区有Factory.wim文件。
我就用Win7 Pro 64位光盘安装了系统,并从Dell公司网站下载了Backup & Recovery Manager,但是我发现“恢复系统”选项是灰色,不可选。
如何才能给恢复出厂设置呢?一、Dell Backup and Recovery Manager识别Backup.wim需要两个文件来配置,分别放在R:\DellBackups和磁盘根目录下。
①ResSys.ini文件是放在根目录下的文件,内容为:[出厂映像]ImageIndex=1Date=2010/10/1Time=00:00Location=R:\DellBackupsFilename=Backup.wimMediaType=HDDDvdNumber=0DTG=20101001000000[Backups]1=出厂映像把上述内容复制到记事本,保存为ResSys.ini②catalog.ini放在DellBackups下内容为:[Backups]20101001000000[20101001000000]20101001000000=1同样把上述内容复制到记事本保存为catalog.iniU盘下建立文件夹Dell,把两个文件放进去备用。
二、安装windows 分区:使用windows 7光盘安装盘启动安装,进入磁盘分区时按下shift+F10来启动Diskpat进行分区。
分区步骤如下:输入diskpart调动Diskpart工具,select disk 0clean (清除磁盘内容)划分隐藏的Recovery分区:create partition primary size=15360 (划分恢复分区为15G)format quick fs=ntfs label=Recovery (格式化分区并命名为Recovery)assign letter=R (分配盘符为R)set id=27 (设置为隐藏)划分windows的系统保留分区:create partition primary size=100format quick fs=ntfs label=Systemassign letter=Sactive (活动分区)划分安装操作系统的分区:create partition primary size=51200format quick fs=ntfs label=OSassign letter=C完成后连续输入两个EXIT来退出Diskpart,回到磁盘分区界面,刷新一下就看到分区了,下面安装系统。
Dell PowerVault DL4000 备份到磁盘设备 用户指南说明书

Dell PowerVault DL4000 Backup To Disk Appliance 用户指南 - 适用于容量许可证注、小心和警告注: “注”表示可以帮助您更好地使用计算机的重要信息。
小心: “小心”表示可能会损坏硬件或导致数据丢失,并说明如何避免此类问题。
警告: “警告”表示可能会造成财产损失、人身伤害甚至死亡。
© 2013 Dell Inc. 保留所有权利。
本文中使用的商标: Dell™、Dell 徽标、Dell Boomi™、Dell Precision™、 OptiPlex™、Latitude™、PowerEdge™、PowerVault™、PowerConnect™、OpenManage™、EqualLogic™、Compellent™、KACE™、FlexAddress™、Force10™、Venue™和 Vostro™是 Dell Inc. 的商标。
Intel®、Pentium®、Xeon®、Core®和 Celeron®是 Intel Corporation 在美国和其他国家或地区的注册商标。
AMD®和 AMD Opteron™、AMD Phenom™以及 AMD Sempron™是 Advanced Micro Devices, Inc.的注册商标或商标。
Microsoft®、Windows®、Windows Server®、Internet Explorer®、MS-DOS®、Windows Vista®和 Active Directory®是 Microsoft Corporation 在美国和/或其他国家或地区的商标或注册商标。
Red Hat®和 Red Hat® Enterprise Linux®是 Red Hat、Inc. 在美国和/或其他国家或地区的注册商标。
重建DELL Recovery分区(win7)的出厂状态

重建DELL Recovery分区(win7)的出厂状态很多朋友买了DELL的电脑,由于出厂分区不适合自己需要而重装系统,造成Recovery分区消失无法恢复,本人也有过这样的经历。
如何重建分区并制作恢复出厂状态,其实只要有Dell Backup and Recovery Manager就能搞定。
下面就重建分区,制作DELL出产状态的步骤逐一作解释:一、准备工1、Windows AIK 3.02、Dell Backup and Recovery Manager(视系统版本,下载与之相匹配版本64bit或32bit)下载地址:ftp:///二、使用Windows AIK 3.0制作带ImageX的winPE3.0(略)三、制作OEM未解包状态按照符合自己需要的分区使用系统光盘或USB安装win7系统(硬盘安装没有oem信息),预留10G左右的空间以备制作Recovery。
进入系统后右键点击我的电脑-管理-本地用户和组-用户,在Administrator下右键-属性-账户已禁用前的勾去掉。
注销用户,以Administrator登陆,在控制面板里找到“用户账户”,进去原来自己建立的账户全删除,文件也删除,只要不是系统默认自带的账户都删除!在Administrator完成以下工作:1、安装驱动程序和必要的软件、并更新系统到最新状态。
为了保持系统纯洁,不要安装任何系统优化软件。
2、格式化D盘,并命名为“Recovery”,把下载的dellbackups.rar里的文件解压到D盘根目录。
3、安装并运行Dell Backup and Recovery Manager,出现“Dell备份和回复管理器”窗口后关掉它。
4、如果你使用的是DSL宽带接入并且已经建立了宽带连接,请打开网络和共享中心,右边找到“更改适配器设置”-右键“宽带连接”-删除。
回到“网络和共享中心”-双击“未识别的网络”前的那条长椅-合并或删除网络设置-宽带连接-删除。
dell_DataSafe_Local_Backup备份系统的详细解析
用dell DataSafe Local Backup基础版备份系统的详细解析测试电脑:戴尔灵越15R一、对出厂设置进行备份及还原一般刚入手一台电脑时都会对其做原始备份,也就是创建恢复介质。
步骤很简单,打开dell DataSafe Local Backup 然后选择“备份”—“创建恢复介质”—选择“光盘”或者“USB 闪存盘”。
然后根据提示即可完成创建。
本人创建的是光盘。
用此恢复介质进行系统恢复时有两种选择:1、恢复出厂设置;2、还原我的计算机方法:插入光盘后重启,按F12选择光盘启动即可进入恢复界面,选择“使用系统恢复光盘继续”—选择“选择其他系统备份和更多选项”1、恢复出厂设置:选择“出厂恢复—删除数据并重新设置所有分区”。
此项将格式化所有硬盘,删除所有数据,重新分区,重新安装系统。
包括重装恢复分区recovery、dell DataSafe Local Backup引导分区OEM、重新安装所有出厂软件。
总之电脑将恢复成出厂时的状态,恢复完成后电脑将从“首次使用win7系统”开始。
2、还原我的计算机:选择“还原我的计算机”—选择“出厂映像”。
此选项会恢复出厂时的操作系统。
对硬盘分区状态及除C盘外的其他磁盘不做改变。
二、对DIY后的系统进行备份及还原现在很多笔记本预装的都是家庭版,使用不方便,一般都会升级到旗舰版,然后安装所需软件,如果有一天系统出问题了,用dell DataSafe Local Backup基础版还原系统后又变成了家庭版,还要升级,安装自己所需的软件,很麻烦。
虽然dell DataSafe Local Backup升级到高级版可以还原到任何时间点,但是升级需要花银子。
接下来我给大家介绍一个用dell DataSafe Local Backup基础版制作属于自己的系统备份的方法。
可以用这个备份还原到自己希望的状系统态。
原理是将dell datasafe local backup 本来带有的出厂状态删除后替换成我们自己保存的状态1、制作备份:所需工具:imagex.exe。
RMAN基本概念
RMAN基本概念RMAN基本概念【官⽅⽂档】Backup and Recovery Reference ---> Backup and Recovery User's Guide1 RMAN介绍1.1 RMAN功能Recovery Manager,是备份和恢复数据库的管理⼯具由server process进⾏备份和恢复rman备份的⽂件种类 datafile(database、tablespace、datafile) controlfile、spfile(智能备份spfile,不可备份pfile) archivelog在归档模式下⽀持⾮⼀致性备份(热备)⾮归档⽅式的RMAN只能冷备,并在mount下做⾮归档⽅式的RMAN恢复只能还原最后⼀次备份1.2 RMAN特点不备份数据⽂件中未分配的块以及未使⽤的块,节省时间空间不备份临时表空间可以实现增量备份⽀持多通道并⾏⼯作可以备份ASM⽂件1.3 RMAN架构1)可连接三类数据库:target database(备份的⽬标库),duplicate database(复制数据库),catalogdatabase(⽬录数据库)2)存储设备:disk、tape(sbt磁带机)存放备份⽂件的设备3)channel:⽬标库和存储设备之间备份恢复通道(服务进程)默认最少启动⼀个channel,可同时启动多个channel并发操作4)server process:⽤于备份和恢复的进程5)rman的元数据:记录备份的信息(放在⽬标库的controlfile⾥)6)catalog database:集中管理、存放多个库的备份的元数据metadata,还可以存储备份脚本7)MML:media manage layer介质管理层:⽤于管理磁带机的库⽂件或驱动2 环境准备2.1 数据库归档模式2.2 设置快速恢复区fast recovery areamkdir /u01/flash_recovery_areaalter system set db_recovery_file_dest_size=4G;alter system set db_recovery_file_dest='/u01/flash_recovery_area';show parameter db_recovery_file_dest3 连接⽅法3.1 本地连接RMAN⼯具和target database在同⼀台服务器rman target /3.2 远程连接RMAN客户端通过ORACLE_NET连接target database,需在target database启动监听,在client配置tnsnames.ora rman target sys/oracle@orclrman target sys/oracle@192.168.9.10:1521/orcl4 RMAN的命令格式4.1 交互式(也叫stand alone⽅式)⼀条⼀条命令执⾏并等待其反馈: RMAN> shutdown immediate; RMAN> startup force mount; RMAN> alter database open; RMAN> sql 'alter system switch logfile'; RMAN> sql 'alter database datafile 4 offline'; RMAN> sql 'select * from scott.emp'; select 不显⽰结果4.2 批处理⽅式(也叫job⽅式)将⼀批命令放在run{}中执⾏: RMAN> run { shutdown immediate; startup mount; allocate channel c1 type disk; 分配通道必须写在run{}中,c1为⾃定义的通道名称,不能单独执⾏命令 allocate channel c2 type disk; backup database format '/u01/backup/rman/db_%d_%T_%U.bak'; alter database open; release channel c1; 释放通道必须写在run{}中,不能单独执⾏命令 release channel c2; }5 配置RMAN的环境查看RMAN所有的全局环境配置show all;5.1 【保留策略】retention policy第⼀⾏:CONFIGURE RETENTION POLICY TO REDUNDANCY 1; # default保留策略:⽤来决定哪些备份是有效的,⽽哪些备份是淘汰的保留策略决定了备份是否为obsoleteobsolete有“淘汰、过时”的意思,RMAN还原备份时不会选择obsolete的备份1)冗余度策略redundancy,给定⾄少需要保留最近的N份备份,更早的备份会被obsolete例如,如果有3个备份,⽽冗余数是2,那么最早的那个备份(即第1个备份)将被废弃2)恢复窗⼝策略recovery window,指定⼀个时间窗⼝,此策略将保证必须能恢复此时间段内任⼀个时刻的数据obsolete和expired的区别: obsolete过时的,根据保留策略,restore时不使⽤,可以删除,但依然有效 expired过期的,⽆效的5.1.1 recovery window恢复窗⼝⾄少有⼀个备份能恢复到sysdate-7的时间点上,之前的备份将标记为obsoleteCONFIGURE RETENTION POLICY TO recovery window of7 days;5.1.2 reduadancy冗余度CONFIGURE RETENTION POLICY TO redundancy 2;5.1.3 不使⽤保留策略CONFIGURE RETENTION POLICY TO none;不会将备份标记为obsolete状态5.1.4 清除、恢复默认配置CONFIGURE RETENTION POLICY clear;5.1.5 保留策略实验:redundancy 1设置备份保留策略为:冗余度 1,连续备份2次同⼀个数据⽂件,查看是否有obsolete的备份创建存放 rman 备份⽬录mkdir /u01/backup/rmanls -ld /u01/backup/rman列出构成数据库的数据⽂件report schema;备份users01.dbf数据⽂件backup datafile 7 format '/u01/backup/rman/users_%d_%T_%U.bak';列出obsolete备份report obsolete;再次备份users表空间backup tablespace users format '/u01/backup/rman/users_%d_%T_%U.bak';列出obsolete备份report obsolete;删除过时备份delete obsolete;再次列出obsolete备份report obsolete;查看备份列表list backup;也可以删除未obsolete的指定备份集list backup;delete backupset 3;list backup;5.2 【备份优化】backup optimization第⼆⾏:CONFIGURE BACKUP OPTIMIZATION OFF; # default如果优化设置打开,针对归档⽇志,只读或脱机表空间的数据⽂件,因为这些⽂件是不会变化的,备份集运⾏⼀个优化算法,全库备份时跳过重复的备份⽂件备份优化选项依赖于RETENTION POLICY策略,如果启⽤优化,在已有⾜够相同⽂件副本的情况下(r+1),RMAN将不创建额外的⽂件副本5.2.1 开启备份优化选项CONFIGURE BACKUP OPTIMIZATION on;5.2.2 将users表空间设置为只读alter tablespace users read only;select tablespace_name,status from dba_tablespaces;5.2.3 做三次全库备份注意第3次全备时,users表空间不备份,redundancy为1,保留2份backup database format '/u01/backup/rman/db_%d_%T_%U.bak';backup database format '/u01/backup/rman/db_%d_%T_%U.bak';backup database format '/u01/backup/rman/db_%d_%T_%U.bak';list backup;5.2.4 将users表空间恢复为可读写alter tablespace users read write;5.3 默认设备第三⾏:CONFIGURE DEFAULT DEVICE TYPE TO DISK; # default设备类型有两种,可以是磁盘(DISK),或者磁带(STB),默认为磁盘5.4 【控制⽂件⾃动备份】第四⾏:CONFIGURE CONTROLFILE AUTOBACKUP ON; # default设置控制⽂件⾃动备份off:默认情况下,在备份system表空间时,会备份controlfile和spfileon:①在做任何⽂件的备份时,都会⾃动备份controlfile和spfile ②数据库的物理结构发⽣变化时,也⾃动备份controlfile(延迟创建)默认off时,备份users表空间时不备份controlfile和spfile5.5 控制⽂件⾃动备份路径、名称第五⾏:CONFIGURE CONTROLFILE AUTOBACKUP FORMAT FOR DEVICE TYPE DISK TO '%F'; #default 给出控制⽂件⾃动备份的路径和命名⽅式,缺省是‘%F’,控制⽂件⾃动备份将放⼊db_recovery_file_dest⽬录下,也可以指定到其他地⽅,如:CONFIGURE CONTROLFILE AUTOBACKUP FORMAT FOR DEVICE TYPE DISK TO '/u01/backup/rman/%F';关于%:%告诉RMAN要使⽤的格式模板,以便备份⽂件的命名引⽤预定的格式 %d 数据库名称 %u ⼀个⼋个字符的名称代表备份集与创建时间 %p 该备份集中的备份⽚号,从1开始到创建的⽂件数 %c 备份⽚的拷贝数 %U 系统获取的⼀个唯⼀的⽂件名 %T 年⽉⽇格式(YYYYMMDD) 第四⾏和第五⾏的环境变量是有关系。
Backup and Recovery Strategies

2Backup and Recovery StrategiesThis chapter offers guidelines and considerations for developing an effective backup and recovery strategy.This section includes the following topics:∙Data Recovery Strategy Determines Backup Strategy∙Planning Data Recovery Strategy∙Planning Backup Strategy∙Validating Your Data Recovery StrategyData Recovery Strategy Determines Backup StrategyTo decide on backup strategies, start with your data recovery requirements and your data recovery strategy. Each type of data recovery will require that you take certain types of backup.Failures can run the gamut from user error, datafile block corruption and media failure to situations like the complete loss of a data center. How quickly you can resume normal operation of your database is a function of what kinds of restore and recovery techniques you include in your planning. Each restore and recovery technique will impose requirements on your backup strategy, including which features of the Oracle database you use to take, store and manage your backups.When thinking about recovery strategies, ask yourself questions like these:∙If a disk failed and destroyed some of the database files, such as datafiles or redo logs, how would you recover the lost files? As described in "Planning a Response to Media Failure: Restore and Media Recovery", you should be able to handle the loss of datafiles, control files, and online redo logs.∙If a logic error in an application or a user error caused the loss of important data from one or several tables or tablespaces, how could you recover that data, and what would happen to databaseupdates since the error? Could you determine the cause of the error, to prevent it from happening again? As described in "Planning aResponse to User Error: Point-in-Time Recovery and FlashbackFeatures", techniques available to you include point-in-timerecovery of the whole database or one or more tablespaces, importing data from earlier logical exports with one of the data importutilities, and using the Oracle database's flashback features.∙If the instance alert log indicates that one or more tables contains corrupt blocks, how can you repair the corruption? Does thetablespace have to remain available during the repair? As described in "Planning a Response to Datafile Block Corruption: Block Media Recovery", the RMAN BLOCKRECOVER command can help you in thissituation. Also, troubleshoot recovery with the SQL*Plus RECOVER ...TEST command.∙If the entire data center is destroyed, can you perform disaster recovery? Assume that all you have is an archive tape containing backups. How would you recover the database? How long would that recovery take?∙If you were not available to recover your database, could someone else recover it in your absence? Are your recovery proceduressufficiently automated and documented?With these needs in mind, decide how you can take advantage of features related to backup and recovery, and look at how each feature meets some requirement of your backup strategy. For example:∙Using Recovery Manager simplifies most backup and recovery operations compared to user-managed backup and recovery. Itautomates management of most backup files, including the deletion of backups and archived redo logs from disk or tape when no longer needed to meet recovery goals. It provides detailed reporting on backup activities, can verify that your available backups can be used to recover your database. Finally, RMAN makes possible many recovery techniques not available if you are using user-managedbackup and recovery, such as incremental backups.∙Flashback Database will help you restore a database to a previous time much faster than media recovery. However, you must decide in advance to keep flashback logs, and keeping flashback logs requires that you configure a flash recovery area.∙Block media recovery may be better than datafile media recovery if availability is critical. While block media recovery is possible even if you do not base your backup and recovery strategy on RMAN, RMAN-based block media recovery can be performed more quickly and with less effort.Once you decide which features to use in your recovery strategy, you can plan your backup strategy, answering the following questions, among others:∙How and where will you store your recovery-related files? Will you use a flash recovery area? Will you use an ASM disk group? Will you store backups on tape or other offline storage, or only on disk?∙At what intervals will you take scheduled backups? And what form of physical backups will you take in each situation?∙What situations require you to take a database backup outside of the regular schedule? Sometimes you must take an unscheduled backup to ensure that you can recover your data, such as after an OPENRESETLOGS or after changes to your database such as NOLOGGINGoperations that do not appear in the redo log. You may also have business requirements that require backups for auditing purposes or other reasons not related to database recovery.∙How can you validate your backups, to ensure that you can recover your database when necessary?∙How do you manage records of your backups?∙Do you have detailed recovery plans that cover each type of failure?How do your DBAs can execute these plans in a crisis? Can scripts be written to automate execution of these plans in a crisis?∙Can you apply Oracle database availability technologies, such as Data Guard or Real Application Clusters, to improve availability during a database failure? How does using these availabilitytechnologies affect your backup and recovery strategy?These are of course only a few of the considerations you should take into account. Available resources (hardware, media, staff, budget, and so on) will also be factors in your decision.Planning Data Recovery StrategyYour data recovery strategy should include responses to any number of database failure scenarios. The key to an effective, efficient strategy is envisioning failure modes, matching Oracle database recovery techniques and tools to the failure modes in which they are useful, and then making sure you incorporate the necessary backup types to support those recovery techniques.To help match failure modes to recovery techniques that can help resolve them, refer to the following sections:∙Planning a Response to User Error: Point-in-Time Recovery and Flashback Features∙Planning a Response to Media Failure: Restore and Media Recovery ∙Planning a Response to Datafile Block Corruption: Block Media RecoveryPlanning a Response to User Error: Point-in-Time Recovery and Flashback FeaturesYour backup and recovery strategy should enable you to handle situations in which a user or application makes unwanted changes to database data, such as deleting the contents of a table or making incorrect updates during a batch run. The goal in such a case will be to restore the affected parts of your database to their state before the user error.Depending on the situation, your appropriate response will be one of the following:∙If you have performed a logical backup by exporting the contents of the affected tables, sometimes you can import the data back into the table. This technique presumes that you are regularly exporting logical backups of your data, and that any changes between exports are unimportant.∙You can perform point-in-time recovery, bringing one tablespace or the whole database back to its state before the time of the error.In either case, you need backups from before the time of the error, plus the redo logs from the time of the backup to the time of the error.Note:Oracle's Flashback Technology provides faster and lessdisruptive alternatives to media recovery in manycircumstances.∙Oracle Flashback Database is a physical-levelrecovery mechanism similar to media recovery, butgenerally faster and not requiring the restore ofdata from backup.∙Oracle Flashback Table and Oracle Flashback Dropwork at the logical level, undoing unwanted changesto tables, including reversing the effects of DROPTABLE statements.∙Oracle Flashback Query and Oracle Flashback VersionQuery are useful in viewing past contents of tablesand investigating how and when logical corruptionsaffected your database.Information about these features is collected in OracleDatabase Backup and Recovery Advanced User's Guide. Thisdocument will allude to such features where they can behelpful and provide pointers for more information.Familiarize yourself with these features before planningyour backup and recovery strategy, because you may findthat they can be quite valuable and require limitedadvanced planning.Planning a Response to Media Failure: Restore and Media RecoveryA media failure occurs when a problem external to the database prevents Oracle from reading from or writing to a file during database operations. Typical media failures include physical failures, such as head crashes, and the overwriting, deletion or corruption of a database file. Media failures are less common than user or application errors, but your backup and recovery strategy should prepare for them.The type of media failure determines the recovery technique to use. For example, the strategy you use to recover from a corrupted datafile is different from the strategy for recovering from the loss of the control file.Example: Online Redo Log RecoveryThe method of recovery from loss of all members of an online log group depends on a number of factors, such as:∙The state of the database (open, crashed, closed consistently, and so on)∙Whether the lost redo log group was current∙Whether the lost redo log group was archivedFor example:∙If you lose the current group, and the database is not closed consistently (either it is open, or it has crashed), then you will have to restore an old backup and perform point-in-time recovery,followed by OPEN RESETLOGS. You will lose all transactions that were in the lost log. You should take a new full database backupimmediately after the OPEN RESETLOGS. Backups from before the OPEN RESETLOGS will not be recoverable because of the lost log.∙If you lose the current redo log group, and if the database is closed consistently, then you can perform OPEN RESETLOGS with notransaction loss. However, you should take a new full databasebackup. Backups from before the OPEN RESETLOGS will not berecoverable because of the lost log.∙If you lose a noncurrent redo log group, then you can use the ALTER DATABASE CLEAR LOGFILE statement to re-create all members in the group. No transactions are lost. If the lost redo log group was archived before it was lost, then nothing further is required.Otherwise, you should immediately take a new full backup of your database. Backups from before the log was lost will not berecoverable because of the lost log.Planning a Response to Datafile Block Corruption: Block Media RecoveryIf a small number of blocks within one or more datafiles are corrupt, you can perform block media recovery instead of restoring the datafiles from backup and performing complete media recovery of those files. The Recovery Manager BLOCKRECOVER command can be used to restore and recover specified data blocks while the database is open and the corrupted datafile is online.See Also:Oracle Database Backup and Recovery Advanced User's Guideto learn how to perform block media recovery with RMAN. Planning Backup StrategyYour plans for data recovery strategies are the basis of your plans for backup strategy. This discussion describes general guidelines that can help you decide when to perform database backups, which parts of a database you should back up, what tools Oracle provides for those backups, and how to configure your database to improve its robustness and make backup and recovery easier. Of course, the specifics of your strategy must balance the needs of your restore strategy with questions of cost, resources, personnel and other factors.Protecting Your Redundancy SetThe set of files needed to recover an Oracle database from the failure of any of its files--a datafile, control file, or online redo log--is called the redundancy set. The redundancy set should contain:∙The last backup of the control file and all the datafiles∙All archived redo logs generated after the last backup was taken ∙Duplicates of the online redo log files, generated by Oracle database multiplexing, operating system mirroring, or both ∙Duplicates of the current control file, generated by Oracle database multiplexing, operating system mirroring, or both ∙Copies of configuration files such as the server parameter file, tnsnames.ora, and listener.oraThe first rule of protecting your redundancy set is:The set of disks or other media that contain the redundancy set for your database should be separate from the disks that contain the datafiles, online redo logs, and control files.This practice ensures that the failure of a disk that contains a datafile does not also cause the loss of the backups or redo logs needed to recover the datafile. Consequently, a minimal production-level database requires at least two disk drives: one to hold the files in the redundancy set and one to hold the database files. Ideally, separate the redundancy set from the primary files in every way possible: on separate volumes, separate file systems, and separate RAID devices. Keeping the redundancy set separate from the primary files ensures that you will not lose committed transactions in a disk failure.The simplest way to manage your redundancy set is to use a flash recovery area, on a separate device from the working set files. Allrecovery-related files will be stored in a single location on disk, disk space usage is managed automatically, backups required to meet your data recovery requirements are never deleted from disk while they are still needed, and recovery time is minimized without compromising the completeness of the redundancy set.Whether or not you use a flash recovery area, Oracle Corporation recommends following these guidelines:∙Multiplex the online redo log files and current control file at the database level. (For instance, configure the database to write its online logs to two or more destinations, so that each write is a separate operation carried out by the database, rather than byoperating system-level or hardware-level redundancy.) If youmultiplex at the database level, then an I/O failure or lost write should only corrupt one of the copies.Ideally, the multiplexed files should be on different disks mounted under different disk controllers. The flash recovery area is anexcellent location for one copy of these files.You can also mirror the online redo logs and current control file at the operating system or hardware level, but this is not asubstitute for multiplexing at the database level.∙If running in ARCHIVELOG mode, archive the redo logs to multiple locations, ideally on different disks. If you are using a flashrecovery area, use it as one of the archiving locations.∙Use operating system or hardware mirroring for the control file.All copies of the control file multiplexed at the database level must be available at all times, or the instance will crash. If you use operating system or hardware mirroring for your control file, your database can continue to operate even if one copy of the control file mirrored at the operating system level is unavailable due toa disk failure.∙Use operating system or hardware mirroring for the primary datafiles if possible, to avoid having to perform media recovery for simple disk failures.∙Keep at least one copy of the entire redundancy set--including the most recent backup--on disk. The flash recovery area is the ideal location for the redundancy set.∙If the target database is stored on a RAID device, then store the redundancy set on a set of disks that are not in the same RAID device.∙If you store the redundancy set on tape, then maintain at least two copies of the data to protect against the risk of tape failure. Also, if you have more than one copy of the same data, then considerkeeping backups from different points in time. In this way, if one backup or split mirror was done when the database was corrupted, then you have an older backup when the database was not corrupted.Deciding Between ARCHIVELOG and NOARCHIVELOG ModeThe redo logs of your database provide a complete record of changes to the datafiles of your database (with a few exceptions, such as direct path loads).You can run your database in one of two modes: ARCHIVELOG mode or NOARCHIVELOG mode. In ARCHIVELOG mode, a used online redo log group must be copied to one or more archive destinations before it can be reused.Archiving the redo log preserves all transactions stored in that log, so that they can be used in recovery operations later. In NOARCHIVELOG mode, the online redo log groups are simply overwritten when the log is re-used. All information about transactions recorded in that redo log group is lost.Implications of Running in NOARCHIVELOG ModeRunning your database in NOARCHIVELOG mode imposes severe limitations on your backup and recovery strategy.∙You cannot perform online backups of your database. You must shut your database down cleanly before you can take a backup inNOARCHIVELOG mode.∙You cannot use any data recovery techniques that require the archived redo logs. These include complete and point-in-time media recovery, as described in "Forms of Data Recovery", and moreadvanced recovery techniques such as point-in-time recovery ofindividual tablespaces and Flashback Database (described in Oracle Database Backup and Recovery Advanced User's Guide.).If you are running in NOARCHIVELOG mode and you must recover from damage to datafiles due to disk failure, you have two main options for recovery:∙Drop all objects that have any extents located in the affected files, and then drop the files. The remainder of the database is intact, but all data in the affected files is lost.∙Restore the entire database from the most recent backup, and lose all changes to the database since the backup. (Recovering changes since the backup would require performing media recovery, whichuses the archived redo logs.)Implications of Running in ARCHIVELOG ModeFor most applications, running in ARCHIVELOG mode is preferable to running in NOARCHIVELOG mode because you have more flexible recovery options after a data loss. There are, however, associated costs of running in ARCHIVELOG mode:∙Space must be set aside for archiving destinations, locations on disk where the archived redo logs will be stored. These can become quite large in databases with large numbers of updates.∙The stored archived redo logs must be managed. To limit the disk space used by archived redo logs, archived redo logs can be moved to tape for longer-term storage, and older logs no longer neededto meet your recoverability goals should be deleted. (RMAN canautomate most of the management of archived redo logs, by recording the location and contents of all archived redo logs, making it easy to move archived logs to tape, and identifying and deleting redo logs no longer required to meet your recoverability objectives.) Some performance overhead is associated with the background processes ARC0 through ARC n which copy filled online redo logs to the archiving destinations.When performance requirements are extreme or disk space limitations are severe, it may be preferable to run in NOARCHIVELOG mode in spite of the restrictions imposed.Deciding Whether to Use a Flash Recovery AreaIt is recommended that you take advantage of the flash recovery area to store as many backup and recovery-related fileas as possible, including disk backups and archived redo logs.Some features of Oracle database backup and recovery, such as Oracle Flashback Database, require the use of a flash recovery area. In such cases, you must create a flash recovery area, though you do not have to use it to store all recovery-related files.Even when its use is not required, however, the flash recovery area offers a number of advantages over other on-disk backup storage methods. Backups moved to tape from the flash recovery area are retained on disk until space is needed for other required files, reducing the need to restore backups from tape. At the same time, obsolete files no longer needed to meet your recoverability goals and files backed up to tape become eligible for deletion and are deleted when space is needed, eliminating the need for DBA intervention to clear out old files.See Also:"Setting Up a Flash Recovery Area for RMAN"for more aboutthe uses and benefits of the flash recovery area.Choosing a Backup Retention PolicyYour backup retention policy is the rule you set regarding which backups must be retained (whether on disk or other backup media) to meet your recovery and other requirements.Backup retention policy can be based on redundancy or a recovery window. In a redundancy-based retention policy, you specify a number n such that you always keep at least n distinct backups of each file in your database. In a recovery window-based retention policy, you specify a time interval in the past (for example, one week, or one month) and keep all backups required to let you perform point-in-time recovery to any point during that window.A backup no longer needed to satisfy the backup retention policy is said to be obsolete.Implementing Backup Retention Policy with RMANRMAN automates the implementation of a backup retention policy, using the following commands:∙CONFIGURE RETENTION POLICY command lets you set the retention policy that will apply to all of your database files by default.∙REPORT OBSOLETE command lets you list backups currently on disk that are obsolete under the retention policy. You can also specifyparameters to see which files would be obsolete under differentretention policies.∙DELETE OBSOLETE command deletes the files which REPORT OBSOLETE would list as obsolete.∙CHANGE... KEEP lets you set a separate retention policy for specific backups, such as long-term backups kept for archival purposes. You can specify that a given backup must be kept until a future time, or even specify that a backup be kept forever. CHANGE... NOKEEP is used to let the retention policy apply to a backup previouslyprotected by CHANGE... KEEP.If you use a flash recovery area to store your backups, the database will delete obsolete backups automatically as disk space is needed for newer backups, archived logs and other files. For backups stored on disk outside a flash recovery area and for backups stored on tape, you should periodically run the DELETE OBSOLETE command to remove obsolete backups.Recovery Window-Based Backup Retention PolicyA recovery window-based retention policy lets you guarantee that you can perform point-in-time recovery to any point in the past, up to a number of days that you specify. The earliest point in time to which you can recover your database under your retention policy is known as the point of recoverability. All backups required for recovery or point-in-time recovery back to that time will be retained.Note that this will generally require that you keep backups older than the beginning of the recovery window. A point-in-time recovery to the beginning of the recovery window would require a restore from this backup, and then applying all changes between the backup time and the point of recoverability. For example, you might configure a recovery window of three days:RMAN> CONFIGURE RETENTION POLICY TO RECOVERY WINDOW OF 3 DAYS;If your last full database backup was six days ago, RMAN will keep the six-day-old backup, and all redo logs required to roll the database forward to the beginning of the recovery window three days ago, in addition to any backups and redo logs needed to recover the database to all points in time within the three day window.A recovery window-based backup retention policy provides the most certain recoverability for your data. The disadvantage is that more careful disk space planning is required, since it may not be obvious how many backups of datafiles and archived logs must be retained to guarantee the recovery window.Redundancy-Based Backup Retention PolicyA redundancy-based backup retention policy determines whether a backup is obsolete based on how many backups of a file are currently on disk. You might configure a redundancy level of 3:RMAN> CONFIGURE RETENTION POLICY TO REDUNDANCY 3;In this case, RMAN keeps three backups of each database file, and all redo logs required to recover all retained datafile backups to the current time. Any older backups will be considered obsolete.Assume, for instance, that you make backups of a datafile every day, starting on a Monday. On Thursday, you make your fourth backup of the datafile, and the backup from Monday becomes obsolete because you have the backups from Tuesday, Wednesday and Thursday. On Friday, the backup from Tuesday becomes obsolete, because you have the backups from Wednesday, Thursday and Friday.Archiving Older BackupsThere are several reasons to keep older backups of datafiles and archived logs:∙An older backup of datafiles and archived logs is necessary for performing point-in-time recovery to a time before your most recent backup.∙If your most recent backup is corrupt, you can still recover your database using an older backup and the complete set of archived logs since that older backup.∙You may want to keep a copy of the database for archival purposes.To perform point-in-time recovery to a given target time earlier than your current point of recoverability, then you need a database backup that completed before the target time, as well as all of the archived logs created between the time the backup was started and the target time. For example, if you take full database backups starting at 1:00 AM on February 1 (at SCN 10000) and on February 14 (at SCN 20000), and if you decide on February 28 to use point-in-time recovery to bring your database to its state at 9:00AM February 7 (SCN 13500), then you must use the February 1 backup, plus all redo logs containing changes from between the beginning of the creation of the backup (SCN 10000) and 9:00AM February 7 (SCN 13500).Note that point-in-time recovery to a time between backups is not an option for a database operating in NOARCHIVELOG mode. You can only restore your entire database from a consistent whole database backup, and re-open the database as of the time of that backup. You will lose all changes since the backup was taken.Determining Backup FrequencyFrequent backups are essential for any recovery scheme. Base the frequency of backups on the rate or frequency of database changes such as:∙Addition and deletion of tables∙Insertions and deletions of rows in existing tables∙Updates to data within tablesThe more frequently your database is updated, the more often you should perform database backups. The scenario in "Backup Scripts When Blocks Change Frequently" backs up the database every week.If database updates are relatively infrequent, then you can make whole database backups infrequently and supplement them with incremental backups (which will be relatively small because few blocks have changed).。
如何使用Dell_BackUp and Recovery创建好的恢复介质来恢复系统

如何使用Dell BackUp and Recovery创建好的恢复介质来恢复系统
如何使用DVD刻录盘和U盘恢复系统镜像,步骤如下
1.插入交流电适配器,提前插入DVD备份刻录盘到光驱或连接U盘USB接口
2.启动电脑在戴尔的Logo界面按两下F12进入boot menu菜单,选择CD/DVD驱动器或USB storage device。
很快你可能会看到press a key to boot from CD/DVD的信息,马上按任意键开始引导启动
3.选择从System Recovery Disc来运行,然后点击下一步
4.选择“从您的USB系统恢复取得运行程序”,然后点击下一步
5.选择恢复您的计算机里的“出厂映像时间”,然后点击下一步
6.选择“原厂翻新”恢复系统分区,然后点击下一步
7. 如果系统盘里面没有个人的数据,选择“不,删除我的个人文件“,然后下一步。
使用Dell BackUp and Recovery创建系统恢复介质

如何使用Dell BackUp and Recovery创建系统恢复介质
前面提到,我们一般出厂都安装了系统镜像分区,建议拿到电脑尽快使用U盘(至少8G 或是16G)或是DVD刻录盘(至少准备三张DVD普通刻录盘)备份系统镜像。
避免系统镜像分区破坏,可能出现无法正常备份和恢复的问题。
下面具体介绍一下如何使用U盘来备份系统镜像,DVD刻录盘备份也是类似的方法:
1、点击Recovery Media或是恢复介质
2、在创建恢复介质之前请先插入U盘,恢复介质选择USB闪存盘
3.系统会自动检测到U盘
4.系统自动创建媒体介质
5.创建恢复分区后U盘显示的图标以及使用的容量。
- 1、下载文档前请自行甄别文档内容的完整性,平台不提供额外的编辑、内容补充、找答案等附加服务。
- 2、"仅部分预览"的文档,不可在线预览部分如存在完整性等问题,可反馈申请退款(可完整预览的文档不适用该条件!)。
- 3、如文档侵犯您的权益,请联系客服反馈,我们会尽快为您处理(人工客服工作时间:9:00-18:30)。
Dell 备份和恢复管理器Backup and Recovery Manager 使用详细指南 文章摘要: Dell™Backup and Recovery Manager (Dell™备份和恢复管理器) 是一种简单的备份和恢复的工具,他可以创建和管理备份,以及在发生故障时恢复系统和数据。
使用此程序能执行以下操作:•您可能没有随机配置Windows 7系统安装光盘,请第一时间通过DBRM 刻录成Windows 7的系统安装光盘(此功能仅能操作一次,使用其他任何备份后,该选项消失)。
• Win7/Vista 系统, 可以将工厂镜像分区备份到U 盘/移动硬盘/DVD 光盘,当系统出现故障可以直接通过Usb 设备/DVD 启动恢复到出厂模式。
•您可以将Windows 系统分区(C 盘)备份为可引导的恢复 DVD ,U 盘或移动硬盘; •能将各分区的数据备份到硬盘,DVD ,USB 设备上。
如果您备份了系统也备份了各分区的文件,即使发生灾难性硬盘故障,您也可以将系统和文件完全恢复过来。
出厂镜像和数据建议不要选择备份在同一个存储设备上。
• 创建可引导的 Dell 硬件诊断程序 CD 。
出厂如果没有配置Dell 诊断光盘,借助DBRM 实现直接刻录。
警告:如果在笔记本上进行备份或恢复,Dell 强烈建议您使用 AC 电源而不是电池运行,以免中途掉电导致数据丢失。
警告:不论您是台式机或笔记本,建议禁用电源管理设置(如休眠和待机),以免导致备份和恢复进程中断。
警告:由于Dell 恢复工具下的创建系统介质只能操作一次,请拿到机器后,首先创建系统光盘。
警告:重新格式化主硬盘或删除硬盘的WRE 分区(Win7的恢复分区)将导致Dell 出厂映像丢失。
从而导致无法在恢复系统选项中使用Dell 出厂映像。
警告:要使用 Dell 备份和恢复管理器,您必须具有Windows 的管理员权限。
目录•文件备份和恢复 •备份系统 •恢复系统 •Dell 恢复工具 • Dell 系统恢复分区WRE 的应用(Win7和Vista )•支持的操作系统•常见问与答文件备份和恢复备份文件恢复文件选择文件备份和恢复,可以对文件进行备份和恢复。
备份文件1.单击备份文件...。
出现“设备备份-正在启动Windows备份”。
2.请“选择要保存备份的位置”。
您可以将备份到移动硬盘、DVD、或者保存在网络上。
3.在”您希望备份哪些内容“,选择“让Windows选择”,或者“让我选择”;点击“下一步”继续。
Windows 选择默认备份:库,桌面和Windows文件夹中的数据文件。
并且创建一个系统映像。
让我选择:可以自行选择库和文件夹以及要备份的文件。
如果已经做过Dell恢复工具“创建磁盘”,在此处可以不用选择“包括驱动器Recovery,OS(C:)的系统镜像。
4.点击“保存设置并运行备份”。
我们也可以点击上图的“更改计划”,来设置定期备份系统文件。
备份开始,自动转到Windows 7的备份和还原界面。
我们可以在“Windows 7的备份和还原界面”查看到当前备份的进度。
备份完成后,在该界面会提示备份完成。
恢复文件1.单击恢复文件...。
2.在“您想还原什么”窗口,选择“文件来自最新备份”,或者“文件来自较旧备份”。
3.单击“下一步”。
在“选择要恢复的文件和文件夹”窗口,选择要恢复的文件和文件夹。
•要添加一些文件,请单击添加文件... 按钮,浏览到每个文件的位置,然后选中文件依次添加到列表中。
•要添加文件夹及其内容,请单击添加文件夹...按钮,浏览到每个文件的位置,然后选中文件夹依次添加到列表中。
4.单击“下一步”即可完成文件的恢复。
返回目录备份系统执行系统备份时,只会对Windows的C:分区进行备份。
保存在C:分区上的所有内容都将备份。
注:外部移动硬盘、其它内置硬盘或主硬盘上的其它分区均不在系统备份范围中。
如果需要备份这些驱动器中的信息,则必须使用 Dell 备份和恢复管理器中的文件备份和恢复工具。
注:DVD 备份光盘应存放在阴凉处。
需长期备份数据时不建议采用 U 盘。
使用外部移动硬盘备份是最方便、性能最佳而且非常稳定的方式。
备份系统选择该项可以创建系统的完整备份,包括系统盘上数据、应用软件、驱动程序、等等。
管理备份选择该项可导出、重命名、或删除现有的备份信息。
备份系统1.单击备份系统...。
在“指定详细信息”窗口。
2.为备份键入名称。
3.选择保存备份的位置(DVD、外部驱动器/棒),请选点击右转箭头,然后从下拉式菜单中选择设备。
4.单击启动。
4.系统将自动重启。
请保存所有文件。
">警告: 为避免数据丢失,请关闭任何打开的文件和应用程序,然后再启动备份。
系统将自动重启进入 Windows 恢复环境以创建备份。
备份时间根据您C分区大小会有差异。
敬请耐心等待。
进程完成时,系统将再次重启并进入Windows 操作系统。
管理备份单击管理备份....出现管理备份窗口。
导出备份1.从下拉式菜单中选择要导出的备份,然后单击导出。
出现 Windows 保存在对话框。
2.键入一个新文件名或选择一个要导出的现存文件,然后单击保存。
o如果键入了一个新文件名,就会出现导出备份窗口。
o如果选定了现存文件,就会出现附加到文件确认窗口。
单击添加把要导出的文件附加到现存文件中,或单击改写,替换现存文件。
出现导出备份窗口。
3.单击保存。
删除备份1.从菜单中选择要删除的备份,然后单击删除。
用红字显示出要删除的文件名。
2.要确认删除,请选中“是,我要删除以上系统备份”。
“我明白此操作是永久的并且不能撤销。
”警告: 备份删除不能被撤销。
进行到下一步骤之前,请确保选中要删除的备份正确无误。
3.单击删除备份。
重命名备份1.从菜单中选择要重命名的备份,然后单击重命名。
用红色显示要重命名的文件名称。
2.为备份输入新名称。
3.单击保存。
返回目录恢复系统执行系统恢复时,只会对原Windows的C:分区进行覆盖。
在主硬盘上的其它分区不会进行任何覆盖或更改。
在 DVD 光盘上创建的系统备份是可引导的,在系统崩溃后,直接使用DVD光盘引导来恢复备份前的系统和程序。
系统恢复后,可再将文件数据恢复到其它分区。
警告: 要使用先前创建的备份恢复系统,您的系统及其数据将被改写。
Dell 建议运行恢复进程之前,备份要保留的现存数据。
1.在恢复系统界面,您可以选择您已经备份好的系统,购买10GWRE用户也可以选择Dell Factory Image(Dell出厂镜像)。
2.单击“下一步”。
3.请阅读注意事项,以确认您要使用选中的备份文件改写系统,并且明白恢复进程不能中断或撤销。
4.单击启动。
显示进度条,表示恢复操作在进行中。
备份创建完成时,系统自动重启。
5.单击完成。
返回目录Dell 恢复工具Dell 恢复介质:使用这一工具创建可引导恢复 DVD 或 USB 设备,包括Windows 恢复环境,并能包括工厂预安装的映像。
工厂预安装映像包括操作系统以及 Dell 随之安装的应用程序和驱动程序。
操作系统和应用程序介质:使用该工具,可以创建全新安装的系统安装光盘。
您可以通过单击 Dell 恢复工具按钮进入 Dell 恢复工具窗口。
注:根据 Microsoft 终端用户许可协议,您仅能制作一份合法的操作系统DVD 备份副本。
Dell 备份和恢复管理器创建操作系统DVD的备份副本后,Dell 恢复工具上的 OS Media(操作系统介质)选项将不再可用。
警告:为防止无法创建操作系统DVD备份副本,Dell 强烈建议备份操作开始后,切勿异常终止或中断操作系统介质备份进程。
另外在最新出厂的机器安装的是最新DBRM版本,开机后将会有提示备份的提醒窗口弹出:1.任务栏自动弹出提示:Dell备份和恢复管理器是一个帮助您创建备份的基本工具,是一旦发生故障时的恢复工具。
点击任务栏处,将进入Dell备份和恢复管理器界面。
点击该任务栏提示,系统将弹出“立即创建磁盘”的窗口提示。
请点击“立即创建磁盘”,按提示信息创建Dell 出厂镜像或操作系统介质。
点击红色“您的系统可能未随机包括操作系统介质。
立即创建!";或点击“立即创建磁盘”,都将自动启动DBRM界面,点击";继续“,窗口自动跳到Dell恢复工具界面。
我们可以根据情况选择做系统光盘的刻录,或原装出厂镜像的备份。
Dell 恢复工具-Dell 恢复介质点击“ 创建一个恢复磁盘或设置”,我们可以“选择要使用的设备类型”,如“DVD”或“外部存储设备”;以及选择要备份的内容,是仅用恢复工具,还是备份“出厂镜像和恢复工具”。
如果选择备份到外部存储设备,请注意保存U盘或移动硬盘上的数据,并勾选“移除我所有的数据并重新格式化我的USB设备”,点击“下一步”。
不勾选该项,将无法备份到USB设备。
推荐使用4G-8G的U盘;如果确实需要使用大容量Usb移动硬盘,请备份好数据;一旦将Dell 出厂镜像备份到U盘,建议不要再在此设备上备份数据,防止破坏备份文件导致无法正常恢复。
Dell 恢复工具-操作系统和应用程序介质点击“ 创建操作系统和应用程序介质”,我们可以刻录出一张完整的Windows7 系统安装光盘;您可能随机没有配置出厂系统安装光盘,点击该选项,即可实现。
有关刻录OS光盘的详细界面,请参考:/cn/zh/forum/thread.asp?fid=25&tid=288215更多详细的备份镜像和备份系统界面,请参考:o如何使用Dell备份与恢复管理器将操作系统备份到U盘?o如何使用Dell备份与恢复管理器将操作系统备份到刻录光盘?返回目录Dell WRE的使用戴尔WinRE(系统恢复分区)早期分2G和10G。
2G仅能进行简单的Vista启动故障的修复(启动修复); 10G是Dell出厂映象(Dell Factory Image Restory),通过选择该项,可以方便快捷的还原到戴尔电脑出厂时状态。
目前Windows7的系统恢复分区是15G左右,且该分区是隐藏分区。
请不要去破坏该分区。
即使不借助Dell备份和恢复管理器,我们也可以开机按F8,修复计算机来实现恢复出厂的状态。
下面是Dell恢复分区的使用,Dell备份和恢复管理器已经内嵌到该恢复分区的使用界面。
1.在开机界面按F8键,进入Vista高级启动选项,选择“修复计算机”,回车。
2.保留默认键盘布局“中文(简体)-美式键盘” ;这里请输入系统管理员密码,如果没有设置管理员账户,默认是Administrator。
3.选择“Dell 备份和恢复管理器”选项。
如果已经用Dell 备份和恢复管理器制造了备份,那这里会出现让您选择需要恢复的备份名字,请加以选择。