Maxtor硬盘
Maxtor OneTouch USB 网络硬盘与 Linksys 网络存储链接用户手册说明书
Getting the most from yourMaxtor OneTouch TM USB hard driveand Linksys Network Storage LinkShare your OneTouch drive with everyone on your network.With the Linksys Network Storage Link, you can now use your MaxtorOneTouch USB hard drive as a network hard drive.This document shows you how to install everything and get up andrunning as quickly as possible.What are the benefits of a network drive?Share informationKeep your files, photos or MP3s in one central location. Every PC or selected users on your network can access the information.Save moneyNo need to keep a PC or server turned on all the time for files to be available–your network hard drive is always accessible.Protect your valuable dataWith the included Retrospect®Express® backup software, you can schedule automated backups to your network hard drive.Before you install – please read!Not Hot-Swappable – Make sure that the Network Storage Link is turned OFF before you connect or disconnect your Maxtor OneTouch Drive!Drive Format – When using the OneTouch drive as a network drive, it must be connected to the Network Storage Link ONLY, as it is formatted using a non-Windows file system.The OneTouch drive may NOT be connected directly to a Windows system withoutreformatting. Warning: Reformatting will erase all of your data.OneTouch Button – The OneTouch button currently does not work with the NetworkStorage Link. You may use the included Retrospect Express backup software, however, for automated backup of your files on one computer. (See page 6 for more information.)USB Only – The Network Storage Link is not compatible with FireWire. You may ONLYuse a USB-compatible OneTouch drive.Windows Only – The Network Storage Link currently supports Windows 98SE, ME, 2000, and XP only.Installing the Network Storage Link and OneTouch Drive Connecting the Network Storage Link to Your Network1. Connect one end of an Ethernet cable tothe Ethernet port on the back of theNetwork Storage Link.2. Connect the other end of the Ethernetcable to your router.Figure 1. Connecting the Ethernet cable Connecting the OneTouch Drive to the Network Storage Link Important – Make sure that the Network Storage Link is turned OFF before you connector disconnect your Maxtor OneTouch drive!3. Connect one end of the included USBcable to your OneTouch drive.4. Connect the other end of the USBcable to the Disk 1 port on the NetworkStorage Link.Note: You can only connect up to twoFigure 2. Connecting the USB cable drives. Do NOT connect additional drivesusing a USB hub.Powering Up the OneTouch Drive5. Connect the round female connector fromthe power adaptor to the drive’s powerconnector6. Connect the two-pin female connector onthe power cord to the power adaptor.Figure 3. Connecting the power7. Connect the standard 3-pin electrical plug to an AC power outlet (preferably asurge-protected outlet).8. Turn on the OneTouch drive using the switch on its back panel.Powering Up the Network Storage Link9. Connect one end of the power adaptor to the back of the Network Storage Link.10. Connect the other end of the power adaptor to an AC power outlet (preferably asurge-protected outlet).11. Turn on the Network Storage Link by pressing its front panel button.The Network Storage Link may take up to three minutes to completely power up.During this time, the Ready/Status light will flash. When the Ready/Status light stops flashing and remains solid green, the Network Storage Link is ready for use.Note: For more information about the lights on the Network Storage Link, see Chapter 3:“Connecting the Storage Link,” in the Linksys User Guide.Installing the Linksys Software12. Insert the Setup Wizard CD into your computer.The Linksys Main Menu screen should appear after a few seconds.Note: If the main menu does not appear, see Chapter 4: “Setting Up the Storage Link,” in the Linksys User Guide.13. Click Setup.The Linksys software will search for the Network Storage Link connected to your network.When your Network Storage Link is found, the message: “Network Storage Link(s) Have Been Found!” will appear at the top of the screen and an icon and the name of your Storage Link will appear in the Selection Column.On the right side of the screen, you will see the IP Address of your Network Storage Link.14. Write down this IP Address. You will need it later to use your networked OneTouch drive. Note: If your Network Storage Link is not found, try clicking Search Again. If it is still not found, see Appendix A: “Troubleshooting” in the Linksys User Guide.Once your Storage Link is found, the next step is to format your OneTouch drive.Keep the Linksys setup screen open and proceed to the next section.Formatting the OneTouch Drive15. On the left side of the Linksys setupscreen, double-click the icon for your NetworkStorage Link.Figure 4. Network Storage Link IconA web browser will open and the Home page for your Network Storage Link will appear.Note: If your web browser does not automatically open, follow the steps in Chapter 6:”Configuring the Storage Link,” in the Linksys User Guide.Note: If you receive a “page cannot be displayed” message, you may need to change the IP address (URL) of your Network Storage Link. See Chapter 4: “Setting Up the Storage Link,” in the Linksys User Guide, for information about changing the Network Storage Link’s settings. If you change the IP address of your Network Storage Link, be sure to write down the new number,as you will need it to use your networked OneTouch drive after formatting.16. Click Administration.A window will open, asking you to enter your user name and password.17. Enter admin for both user name and password and click OK.The LAN page will appear.18. Click Advanced.The Groups page will appear.19. Click Disk.The Disk page will appear.20. Click Format Disk 1.Note: If your drive is connected to the Disk 2 port on the Network Storage Link, click Format Disk 2.The formatting process may take 15 to 30 minutes, depending on the size of your OneTouch Drive.Once it is finished, the message: “Formatted” will appear.21. Close your web browser and click No at the bottom of the Linksys Setup Screen. Note: For more information about the Linksys Web Utility, see Chapter 6: “Configuring the Storage Link,” in the Linksys User Guide.Using Your Networked OneTouch DriveTo use your networked OneTouch Drive, follow these steps:1. On the desktop, right-click the icon for yourcomputer and choose Map Network Drive.Figure 5. Mapping a Network DriveThe Map Network Drive windowwill appear.2. In the Folder (or Path) box enter theIP address of your Network StorageLink,followed by Disk 1 using thisformat:\\IP address\Disk 1.For example: \\192.168.1.77\Disk 1Note: Make sure there is a spacebetween “Disk” and “1” in the IP address.Note: If you changed the IP address inFigure 6. Entering IP Address of Network Storage Linkthe “Formatting the OneTouch Drive”section on page 3, be sure to enter thataddress here.Note: Reconnect at logon is automatically selected. This means that every time you logon in the future, you will automatically be connected to your OneTouch drive. You will find it alongside your computer’s main disks (C and D, for example) in the My Computer window.3. Click Finish.Windows will search the available networks for your Network Storage Link and a window will open displaying the contents of the Disk 1 directory on your OneTouch drive.Note: Two directories are automatically created for you on your OneTouch Drive. The Admin 1 directory is set up for only the administrator to use and will require a User ID and Password to be entered by any user accessing it from a computer other than the administrator’s. The Disk 1 directory, however, does not require a User ID or Password. You may create password-protected directories for additional users. See Chapter 6: “Configuring the Storage Link” in the Linksys User Guide for more information.Your OneTouch drive is now ready for use as a networked drive. You may drag and drop files to it, just like a normal hard drive.Network Backup SoftwareYour OneTouch drive includes Retrospect Express backup software, for easy, automated backup of your important files. If you would like to backup files from a computer on your network, follow the steps outlined in the next section.Note: You may only install the Retrospect Express software on one computer. However, you may purchase additional copies of Retrospect by going to: .Retrospect Software Installation:1. Go to Chapter 2: ‘Installing Your Drive’ in the Maxtor OneTouch User’s Guide.2. Find the Installing the Software section for your operating system.Your options are: Windows 2000 and XP or Windows 98SE and ME3. Follow the installation steps, choosing the Full Installation option.Note: When you have completed the software installation, do not proceed to the “Connecting the Drive” or “Setting up the Maxtor OneTouch Feature” sections.For step-by-step directions on how to back up your entire computer system using Retrospect, see the following section.Automated Network Backup Using Retrospect1. Open Retrospect.2. On the left side of the screen, click the + signnext to Automate and then click EasyScript.The EasyScript welcome windowwill appear.3. Click Next.The next window will ask you to choose yourbackup media.4. Select Disks and click Next.Figure 7. EasyScriptThe next window will ask you how many backup sets you want.5. Select I want one Backup Set for everything and click Next.The next window will ask you how often you would like to back up.6. Choose either Once a week or Every weekday and click Next.If you chose Once a week, you will choose the day and the start time.If you chose Every weekday, you will choose only the start time.7. Make your choice(s) and click Next.The Backup Summary window will appear showing the backup options you have chosen. The Start the first backup now checkbox is checked, which means your first backup will start when you click Finish.Note: It is recommended that you start your first backup now, because you will choose the source and destination of your backup, the first time you do it. If you choose not to start your first backup now, you will need to be at your computer for the first scheduled backup to choose the source and destination of your backup.8. Click Finish.If you chose the “Start the first backup now” option, Retrospect will scan your drive and the Backup Set window will appear. You will now choose the disk where your backup files willbe stored.9. Double-click My Network Places.The Adding Network Volume window will appear.10. Click Advanced.A window will open, asking you to enter the UNC path for the volume.11. Enter the IP address of your Network Storage Link,followed by Disk 1 usingthis format:\\IP address\Disk 1. For example: \\192.168.1.77\Disk 1Note: If you changed the IP address in the “Formatting Your Drive” section on page 3, be sure to enter that address here.12. Click OK.Disk 1 will now appear under My Network Places in the Backup Set window.13. Select Disk 1 and click Proceed.The Add New Member window will appear to confirm your backup destination.14. Click OK.The backup will now start.Note: Your entire computer system (including all of its drives) will automatically be backed up. Depending on the size of your system and the speed of your network, this process may take as much as several hours. For example, on a home wireless network of less than 10 megabits per second, a 10 gigabyte backup would take over three hours.If you wish to change the specific items that are backed up or learn how to restore files from a backup, see the Retrospect online help in the Retrospect Express software.When the backup is finished, you will see the message: “Execution completed successfully.”Congratulations. You have completed your first backup. Future backups will take place automatically on the days and times that you selected, as long as the computer, OneTouch drive and Network Storage Link are turned on.。
常见品牌硬盘编号识别及规格参数
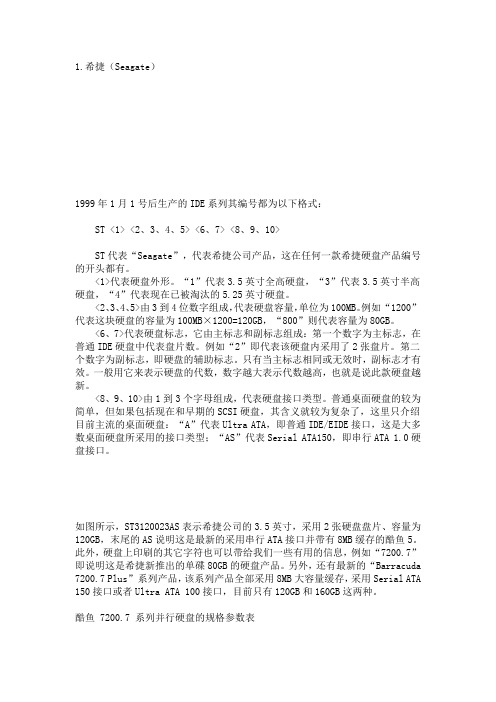
1.希捷(Seagate)1999年1月1号后生产的IDE系列其编号都为以下格式:ST <1> <2、3、4、5> <6、7> <8、9、10>ST代表“Seagate”,代表希捷公司产品,这在任何一款希捷硬盘产品编号的开头都有。
<1>代表硬盘外形。
“1”代表3.5英寸全高硬盘,“3”代表3.5英寸半高硬盘,“4”代表现在已被淘汰的5.25英寸硬盘。
<2、3、4、5>由3到4位数字组成,代表硬盘容量,单位为100MB。
例如“1200”代表这块硬盘的容量为100MB×1200=120GB,“800”则代表容量为80GB。
<6、7>代表硬盘标志,它由主标志和副标志组成:第一个数字为主标志,在普通IDE硬盘中代表盘片数。
例如“2”即代表该硬盘内采用了2张盘片。
第二个数字为副标志,即硬盘的辅助标志。
只有当主标志相同或无效时,副标志才有效。
一般用它来表示硬盘的代数,数字越大表示代数越高,也就是说此款硬盘越新。
<8、9、10>由1到3个字母组成,代表硬盘接口类型。
普通桌面硬盘的较为简单,但如果包括现在和早期的SCSI硬盘,其含义就较为复杂了,这里只介绍目前主流的桌面硬盘:“A”代表Ultra ATA,即普通IDE/EIDE接口,这是大多数桌面硬盘所采用的接口类型;“AS”代表Serial ATA150,即串行ATA 1.0硬盘接口。
如图所示,ST3120023AS表示希捷公司的3.5英寸,采用2张硬盘盘片、容量为120GB,末尾的AS说明这是最新的采用串行ATA接口并带有8MB缓存的酷鱼5。
此外,硬盘上印刷的其它字符也可以带给我们一些有用的信息,例如“7200.7”即说明这是希捷新推出的单碟80GB的硬盘产品。
另外,还有最新的“Barracuda 7200.7 Plus”系列产品,该系列产品全部采用8MB大容量缓存,采用Serial ATA 150接口或者Ultra ATA 100接口,目前只有120GB和160GB这两种。
迈拓(Maxtor)的编号识别及质保
迈拓(Maxtor)的编号识别及质保迈拓硬盘的性能也许对于大家而言已是相当了解,高性能高价格曾经是对迈拓硬盘的客观评价,但如今不同了,在市场的激烈的竞争下,迈拓硬盘也走入低价的行列,目前迈拓的硬盘价格已是十分的合理,部分产品极具性价比,值得选购。
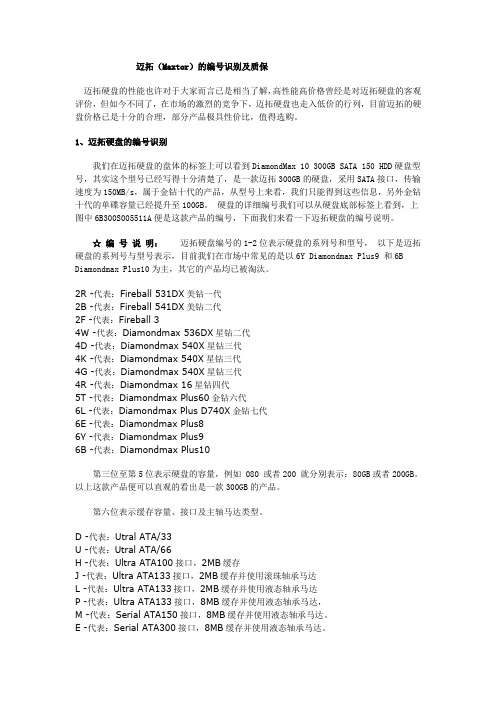
1、迈拓硬盘的编号识别我们在迈拓硬盘的盘体的标签上可以看到DiamondMax 10 300GB SATA 150 HDD硬盘型号,其实这个型号已经写得十分清楚了,是一款迈拓300GB的硬盘,采用SATA接口,传输速度为150MB/s,属于金钻十代的产品,从型号上来看,我们只能得到这些信息,另外金钻十代的单碟容量已经提升至100GB。
硬盘的详细编号我们可以从硬盘底部标签上看到,上图中6B300S005511A便是这款产品的编号,下面我们来看一下迈拓硬盘的编号说明。
☆编号说明:迈拓硬盘编号的1-2位表示硬盘的系列号和型号,以下是迈拓硬盘的系列号与型号表示,目前我们在市场中常见的是以6Y Diamondmax Plus9 和6B Diamondmax Plus10为主,其它的产品均已被淘汰。
2R -代表:Fireball 531DX美钻一代2B -代表:Fireball 541DX美钻二代2F -代表:Fireball 34W -代表:Diamondmax 536DX星钻二代4D -代表:Diamondmax 540X星钻三代4K -代表:Diamondmax 540X星钻三代4G -代表:Diamondmax 540X星钻三代4R -代表:Diamondmax 16星钻四代5T -代表:Diamondmax Plus60金钻六代6L -代表:Diamondmax Plus D740X金钻七代6E -代表:Diamondmax Plus86Y -代表:Diamondmax Plus96B -代表:Diamondmax Plus10第三位至第5位表示硬盘的容量,例如 080 或者200 就分别表示:80GB或者200GB。
5大厂商硬盘编号解读
一、希捷(Seagate)Seagate硬盘的编号比较简单,其识别方法为:“st+硬盘尺寸+容量+主标识+副标识+接口类型”。
为了另大家容易理解,简单的表示形式为:st“X,XXXX,XX,XXX”,也就是说其硬盘编号可以分为四部分。
首先,“st”代表的是“Seagate”,也就是说是希捷公司的产品。
然后第一部分的“X”是表示其硬盘外形和尺寸。
“1”表示3.5英寸,厚度为41mm的全高硬盘;“3”表示3.5英寸,厚度为25mm的半高硬盘;“4”表示5.25英寸,厚度为82mm的硬盘;“5”表示尺寸为3.5英寸,厚度为19mm的硬盘;“9”表示为尺寸2.5英寸的硬盘。
第二部分的四个“X”是表示硬盘的容量,通常由3到4位数字组成,单位是GB。
如:“1600”就是表示这硬盘的容量为160GB,而“400”或者“800”就表示其容量为40GB或者80GB了。
第三部分的两个“X”为硬盘标志,由主标志和副标志所组成。
前一个数字是主标志,在Seagate的IDE硬盘中都是指硬盘的碟片数,如数字“2”则表示该硬盘采用了2张盘片。
而在Seagate的SCSI硬盘中,其主标识则是指硬盘的转速了。
有了主标识当然就会有副标识了,而后一个数字就是副标识。
它是只有当主标识相同或者无效时,副标识才有意义。
它一般代表硬盘的性能和代数,当数字越大,表示的代数越高,性能越好,此款硬盘也就越新。
第三部分的三个“X”主要由1到3个字母所组成,表示硬盘接口类型等。
一般的桌面IDE硬盘较为简单,但如果包括了现在和早期的SCSI硬盘的话,其含义就变得较为复杂了。
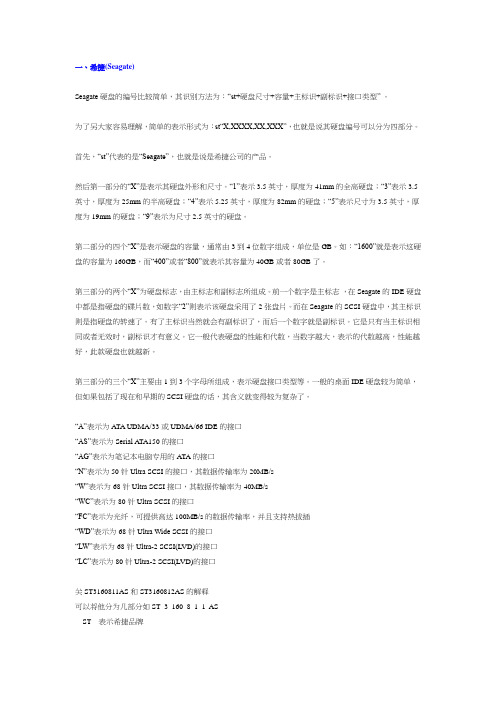
“A”表示为ATA UDMA/33或UDMA/66 IDE的接口“AS”表示为Serial A TA150的接口“AG”表示为笔记本电脑专用的ATA的接口“N”表示为50针Ultra SCSI的接口,其数据传输率为20MB/s“W”表示为68针Ultra SCSI接口,其数据传输率为40MB/s“WC”表示为80针Ultra SCSI的接口“FC”表示为光纤,可提供高达100MB/s的数据传输率,并且支持热拔插“WD”表示为68针Ultra Wide SCSI的接口“LW”表示为68针Ultra-2 SCSI(LVD)的接口“LC”表示为80针Ultra-2 SCSI(LVD)的接口关ST3160811AS 和ST3160812AS的解释可以将他分为几部分如 ST 3 160 8 1 1 ASST 表示希捷品牌3 表示3.5英寸160 表示容量即:160G8 表示 8M 缓存,若为2则表示2M 缓存1 表示单碟,若为2 表示双碟1 表示一代产品。
硬盘编号识别
一、Maxtor(迈拓)硬盘编号迈拓硬盘以低噪音、低震动、低发热等诸多特点,其总代理蓝德电子提供全国联保,购买时认准LAND的标志。
它编号多为:系列号+此系列硬盘最大容量+首位+容量+接口类型+碟头数。
XX---XXX---X----X第一部分第二部分第三部分第四部分第一部分表示产品系列型号3(40GB或以下)或9(40GB以上)——星钻一代2R——Fireball 531DX美钻一代2B——Fireball 541DX美钻二代2F——Fireball 34W——Diamondmax 536DX星钻二代4D、4K、4G——Diamondmax 540X星钻三代4R——Diamondmax 16星钻四代5T——Diamondmax Plus60金钻六代6L——Diamondmax Plus D740X金钻七代6E——Diamondmax Plus86Y——Diamondmax Plus9第二部分表示容量,单位是GB第三部分表示缓存容量、接口及主轴马达类型D——Utral ATA/33U——Utral ATA/66H——Ultra ATA100接口、2MB缓存J——Ultra ATA133接口、2MB缓存并使用滚珠轴承马达(Ball Bearing Motor)L——Ultra ATA133接口、2MB缓存并使用液态轴承马达(Fluid Dynamic Bearing Motor)P——Ultra ATA133接口、8MB缓存并使用液态轴承马达,M——串行ATA/150接口(Serial ATA/150)、8MB缓存并使用液态轴承马达。
第四部分表示使用的磁头数,也就是记录面数量,由此也能推算出单碟容量。
此外,首位没有什么大用处,只是说明一段时间罢了。
它的单碟容量=2×硬盘总容量/磁头数。
二、IBM的新编号规则如下1、Ultrastar 73LZX后的SCSI硬盘和Deskstar 60GXP后的IDE硬盘IC FF H CAP IF xx SP-XIC:IBM公司FF:外形尺寸,35表示3.5英寸(88.9毫米),25表示2.5英寸(63.5毫米)H:高度,L代表1英寸(25.4毫米),T代表0.49英寸(12.5毫米),N代表0.37英寸(9.5毫米)CAP:容量,单位为GBIF:接口类型AV——ATA接口UW——Ultra160 SCSI 68-pin Wide UC——Ultra160 SCSI 80-pin SCAXW——Ultra320 SCSI 68-pin WideXC——Ultra320 SCSI 80-pin SCAF2——FC-AL-2(2 Gbit)XX:特定编码,表示产品系列型号ER表示Deskstar 60GXP系列VA表示Deskstar 120GXP系列V2表示Deskstar 180GXP。
几大硬盘品牌介绍
2、GMR(Giant MR)超磁阻磁头
——GMR磁头与MR磁头一样,是利用特殊材料的电阻值随磁场变化的原理来读取盘片上的数据,但是GMR磁头使用了磁阻效应更好的材料和多层薄膜结构,比MR磁头更为敏感,相同的磁场变化能引起更大的电阻值变化,从而可以实现更高的存储密度,现有的MR磁头的盘片密度为3Gbit-5Gbit/in2(千兆位每平方英寸),而GMR磁头可达10Gbit-40Gbit/in2以上。
四、IBM
说起IBM公司恐怕无人不知无人不晓,这位蓝色巨人已经有太多的传奇了,当年第一块硬盘就是IBM最先制造出来的;IBM硬盘最先使用了GMR(巨磁阻磁头);IBM硬盘最先把单碟容量提高到10G、15G、20G……;IBM硬盘是目前唯一能在盘体内装下5张盘片的硬盘;IBM是唯一把7200转5400转硬盘盘片分开生产的硬盘厂商……目前IBM硬盘的主流产品有5400转、512K缓存的40GV系列和7200转、2M缓存的75GXP系列,前者是单碟20G的,后者是单碟15G的,在传输速度方面要比其他品牌略胜一筹,而且价格也并不贵。IBM硬盘的优势在于技术先进,很多先进的技术往往都是IBM硬盘率先采用,其性价比也很不错,例如75GXP 45G也仅仅1400元左右,相当超值。尤其值得一提的是IBM硬盘的超频性能也很不俗,仅次于昆腾,而且国外对于超频往往都更看好IBM硬盘,其超频性能由此可见一斑。缺点在于缺少面向低端市场的小容量硬盘,最小也是15G的,因此失去了部分低端市场。
图3 Servo孔的作用是
向硬盘盘片写入伺服信号
2、硬盘内部结构
(1)内部结构:(见图4)。它由磁头、盘片、主轴、电机、接口及其他附件组成,其中磁头盘片组件是构成硬盘的核心,它封装在硬盘的净化腔体内,包括有浮动磁头组件、磁头驱动机构、盘片、主轴驱动装置及前主轴部件如轴承和马达等。硬盘在工作时,通过马达的转动将用户需要存取的资料所在的扇区带到磁头下方,马达的转速越快,用户存取数据的时间也就越短。
详细图解双硬盘如何设置启动顺序

• 4、按F10,单击“OK”保存设置并重新启动。 电脑已从SATA硬盘启动。
友情提示:
• 主板不同,BIOS选项有所差别。 • 寻找相似项即可。 • 多尝试——爱拼才会赢。
• 老一代的IDE硬盘,如上图中的迈拓,只有三种跳线设 置:Master(主盘)、Slave(从盘)、Cable Select (由硬盘数据线位置决定)。
• 下一页重点说说Cable Select。
不加跳线帽, 即设置为从盘。
Cable Select(由硬盘数据线位置决定)
• 当硬盘的跳线设置成“Cable Select”时,硬盘的主从关 系将由其连接到数据线上的位置而决定。在学习硬盘时我 们已经知道,此类数据线用来连接主板的那端叫作 “System”,中间的那端叫“Drive1”,另外一端则叫 “Drive 0”。
多次经验表明如果在一条ide线上接两个设备时按2的方法设置或是一条ide线上只接1个硬盘时按1的方法设置就有可能出现各种不可理喻的怪问第二种情况双sata硬盘两个sata硬盘共存不分主从不用为跳线所烦
详细 图解Байду номын сангаас
双硬盘 如何设置启动顺序
第一种情况 双IDE硬盘
Maxtor(迈拓)
WD(西部数据)
• 根据硬盘上贴的说明图,把接在IDE数据线中间的硬盘 设置为从盘,接在IDE数据线端口的硬盘设置为主盘。
• 新一代硬盘普遍象西数 WD400一样,有4种跳线设 置。区别是新的IDE硬盘有 两种Master(主盘)跳线方 法(旧的只有一种):
1、Master w/ Slave Present 2、Single or Master • 前一种Master是指一条IDE
数据线上挂两个设备,这个 硬盘作为主盘使用;后一种 是在一条IDE线上只接这只 硬盘时使用。多次经验表明, 如果在一条IDE线上接两个 设备时按2的方法设置,或 是一条IDE线上只接1个硬盘 时按1的方法设置,就有可 能出现各种不可理喻的怪问 题。
硬盘跳线设置图解指导说明
硬盘跳线还没有统一的标准,因此看一下主流硬盘的具体跳线说明。
通常可以在硬盘的电路板上、硬盘正面或IDE接口旁边上找到跳线说明图示:(1)Seagate(希捷)硬盘;(2)Western Digital(西部数据)硬盘;(3)Maxtor(迈拓)硬盘;(4)IBM硬盘硬盘上的跳线是比较简单的,其跳线位置多在硬盘后面,如硬盘后面跳线图所示。
其跳线在数据线接口和电源线接口之间,白色的键帽清晰可见。
而硬盘表面和这个“之间”的位置对应的电路板的一面,都有关于跳线设置的说明,如硬盘电路板上跳线说明图。
虽然不同的品牌的硬盘跳线有所不同,但因为硬盘属于IDE接口设备,所以一般都分为三种跳线设置,它们分别是“Master”、“Slave”、“Cable Select”(简称CS)。
“Master”(主)表示主盘,是一个IDE通道上第一个被系统检测的设备,一个主板通常有两个IDE设备通道,而一个通道上最多能连接两个IDE设备,它们有主从之分。
“Slave”(从)表示从盘,是一个IDE通道上第二个被系统检测的设备。
“Cable Select”(线缆选择)表示使用特殊的硬盘数据线连接主板,跳线就决定了硬盘的主从位置。
真正支持这种功能的数据线市场很少见到。
80针数据线实际上已经不理睬硬盘上的任何跳线设置,其黑色一端必须接主板IDE接口,蓝色端连接主设备,灰色的一端连接从设备,你的硬盘使用什么样的跳线都不起作用。
这样的线适合今天的支持DMA66/100/133接口的硬盘。
如果硬盘跳线设置错误,会导致一个IDE通道上的两个设备冲突,多不能使电脑正常引导,但不会导致硬件损伤。
一般只有在一个通道上的两个设备的设置相同时才会引起冲突,比如都设置成主盘或都设置成从盘了。
同一个通道上两个设备设置没有冲突,一个为主,一个为从,但不兼容的事情发生的还是不多。
因为硬盘跳线还没有统一的标准,因此看一下主流硬盘的具体跳线说明。
通常可以在硬盘的电路板上、硬盘正面或IDE接口旁边上找到跳线说明图示。
硬盘编号
硬盘编号一、Maxtor(迈拓)硬盘编号迈拓硬盘以低噪音、低震动、低发热等诸多特点,其总代理蓝德电子提供全国联保,购买时认准LAND的标志。
它编号多为:系列号+此系列硬盘最大容量+首位+容量+接口类型+碟头数。
XX---XXX---X----X第一部分第二部分第三部分第四部分第一部分表示产品系列型号3(40GB或以下)或9(40GB以上)——星钻一代2R——Fireball 531DX美钻一代2B——Fireball 541DX美钻二代2F——Fireball 34W——Diamondmax 536DX星钻二代4D、4K、4G——Diamondmax 540X星钻三代4R——Diamondmax 16星钻四代5T——Diamondmax Plus60金钻六代6L——Diamondmax Plus D740X金钻七代6E——Diamondmax Plus86Y——Diamondmax Plus9第二部分表示容量,单位是GB第三部分表示缓存容量、接口及主轴马达类型D——Utral ATA/33U——Utral ATA/66H——Ultra ATA100接口、2MB缓存J——Ultra ATA133接口、2MB缓存并使用滚珠轴承马达(Ball Bearing Motor)L——Ultra ATA133接口、2MB缓存并使用液态轴承马达(Fluid Dynamic Bearing Motor)P——Ultra ATA133接口、8MB缓存并使用液态轴承马达,M——串行ATA/150接口(Serial ATA/150)、8MB缓存并使用液态轴承马达。
第四部分表示使用的磁头数,也就是记录面数量,由此也能推算出单碟容量。
此外,首位没有什么大用处,只是说明一段时间罢了。
它的单碟容量=2×硬盘总容量/磁头数。
二、IBM的新编号规则如下1、Ultrastar 73LZX后的SCSI硬盘和Deskstar 60GXP后的IDE硬盘IC FF H CAP IF xx SP-XIC:IBM公司FF:外形尺寸,35表示3.5英寸(88.9毫米),25表示2.5英寸(63.5毫米)H:高度,L代表1英寸(25.4毫米),T代表0.49英寸(12.5毫米),N代表0.37英寸(9.5毫米)CAP:容量,单位为GBIF:接口类型A V——ATA接口UW——Ultra160 SCSI 68-pin WideUC——Ultra160 SCSI 80-pin SCA XW——Ultra320 SCSI 68-pin WideXC——Ultra320 SCSI 80-pin SCA F2——FC-AL-2(2 Gbit)XX:特定编码,表示产品系列型号ER表示Deskstar 60GXP系列V A表示Deskstar 120GXP系列V2表示Deskstar 180GXP。
希捷迈拓西数日立三星 硬盘编号的含义
希捷/迈拓/西数/日立/三星硬盘编号的含义希捷/迈拓/西数/日立/三星硬盘编号的含义:希捷(Seagate)市面上的希捷硬盘编号形式如下:ST <1><2、3、4、5><6、7><8、9、10>“ST”代表“Seagate”,中文意思即希捷。
这在任何一款希捷硬盘产品编号的开头都有。
<1>代表硬盘外形。
“1”代表3.5英寸全高硬盘,“3”代表3.5英寸半高硬盘,“4”代表现在已被淘汰的5.25英寸硬盘。
<2、3、4、5>由3到4位数字组成,代表硬盘容量,单位为100MB。
例如“1200”代表这块硬盘的容量为1200×100MB=120GB,“800”则代表容量为80GB。
<6、7>代表硬盘标志,它由主标志和副标志组成:第一个数字为主标志,在普通IDE硬盘中代表盘片数。
例如“2”即代表该硬盘内采用了2张盘片。
第二个数字为副标志,即硬盘的辅助标志。
只有当主标志相同或无效时,副标志才有效。
一般用它来表示硬盘的代数,数字越大表示代数越高,也就是说此款硬盘越新。
<8、9、10>由1到3个字母组成,代表硬盘接口类型。
普通桌面硬盘的较为简单,但如果包括现在和早期的SCSI硬盘,其含义就较为复杂了,这里只介绍目前主流的桌面硬盘:“A”代表Ultra ATA,即普通IDE/EIDE接口,这是大多数桌面硬盘所采用的接口类型;“AS”代表Serial A TA150,即串行ATA 1.0硬盘接口。
给大家举个例子:从某块硬盘上标示的“ST3120022A”编号,我们就可以知道该硬盘是希捷公司生产的3.5英寸半高、采用2张硬盘盘片、总容量为120GB的Ultra ATA接口硬盘。
此外,硬盘上印刷的其它字符也可以带给我们一些有用的信息,例如“7200.7”即说明这是希捷新推出的单碟80GB的硬盘产品。
另外,还有最新的“Barracuda 7200.7 Plus”系列产品。
该系列产品全部采用8MB大容量缓存,采用Serial A TA 150接口或者Ultra A TA 100接口,目前只有120GB 和160GB这两种。
西数 迈拓硬盘跳线说明(附图)
西数迈拓硬盘跳线说明(附跳线图说明)[电脑硬件]终于把原来有问题的硬盘挂上了。
主盘用的是 maxtor 5T020H2 ,硬盘面板上没有跳线说明。
郁闷。
开始挂上原来用的盘,系统找不到boot,一想肯定是跳线有问题。
下面找资料,虽然没有找对型号的跳线图说明,可总算找到了点提示。
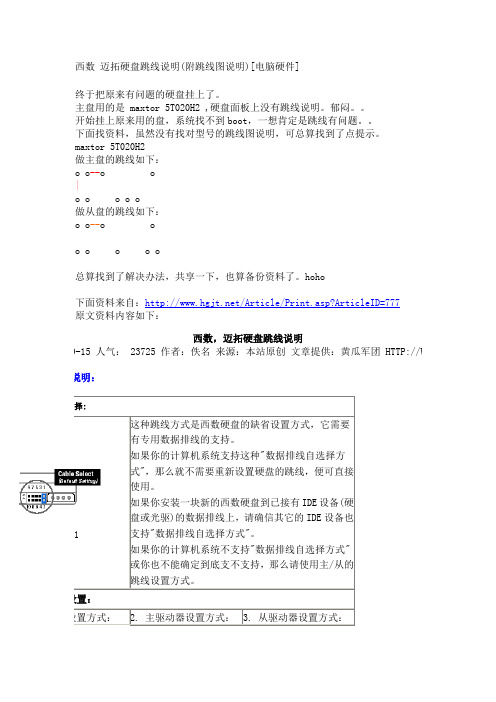
maxtor 5T020H2做主盘的跳线如下:o o--o o|o o o o o做从盘的跳线如下:o o--o oo o o o o总算找到了解决办法,共享一下,也算备份资料了。
hoho下面资料来自:/Article/Print.asp?ArticleID=777原文资料内容如下:西数,迈拓硬盘跳线说明4-9-15 人气: 23725 作者:佚名来源:本站原创文章提供:黄瓜军团 HTTP://WWW 线说明:说明:1.若您将西数硬盘作为主盘使用,我们强烈推荐您使用"图2"的设置方法。
2.我们建议您不要使用"图1"的设置方法,您若将西数硬盘作为主盘,请使用"图2"的设置方式,若将西数硬盘作为从盘,请使用"图4"的设置方式。
关于Maxtor硬盘跳线>>> 星钻、金钻跳线图注:星钻三代D540X—4K 、金钻PLUS 8和金钻七代D740X—6L不属于此范围。
跳线图如下:左边是数据线接口,右边是电源线接口。
横着插的跳线帽不起作用,拔掉也可以。
除了主盘限制容量的跳线需两个跳线帽,其他情况一个帽就够了。
一般情况下:主盘跳线:跳J50从盘跳线:主板无法识别大硬盘时:先设置如下跳线,然后运行MaxBlast软件对硬盘分区格式化。
主盘跳线(限制容量):这种情况必须要两个跳线帽,跳J50和J46。
从盘跳线(限制容量):使用MaxBlast 3软件时,请不要用此跳线。
>>>美钻和金钻PLUS 8跳线图跳线图如下:左边是数据线接口,右边是电源线接口。
maxtor硬盘 指令
maxtor硬盘指令
- shift+F3: 选择硬盘。
- Scan 或 F4:对硬盘表面进行扫描测试。
- Erase:高级擦除(速度较慢),又叫擦零。
- Fasterase:快速擦除。
- PWD:加密。
- Unlock:解锁。
- ID:硬盘参数检测。
- Makebad:创建坏道。
- Remap:修复xx。
- Erase Delays:修复弱道。
- Clrmbr:装不进系统时可用此命令。
- Dispwd:去掉密码,前提是要用Unlock后,而且还要知道密码。
- Hpa:砍LBA值,只能从后往前砍,0:表示暂时砍掉;1:表示永久砍掉。
- Nhpa:恢复被砍的LBA值。
这些指令可以帮助用户管理和维护Maxtor硬盘,但在使用这些指令时,建议先了解相关的操作说明和注意事项,以免误操作导致数据丢失或硬盘损坏。
移动硬盘品牌
1 三星Samsung (世界500强企业,中国驰名商标,1938年韩国,移动硬盘十大品牌,三星集团)
2 纽曼Newsmy (于1996年北京,数码行业旗舰民族企业,十大移动硬盘品牌,北京纽曼公司)
3 联想Lenovo (世界500强,中国驰名商标,中国名牌,全球第四大PC厂商,联想集团)
4 忆捷Eaget (全球移动存储品牌,誉为移动存储专家,1998年深圳,忆捷科技有限公司)
5 迈拓Maxtor (世界上最大的硬盘存储产品供应商之一,1982年美国,希捷旗下品牌)
6 明基Benq (全球IT产业的领导者和解决方案提供商,成立于1984年台湾,世界品牌)
7 爱国者aigo (1993年北京,中国驰名商标,高新技术企业,北京华旗资讯科技发展有限公司)
8 希捷Seagate (世界最大的独立存储设备制造公司,1979年美国,全球领导品牌)
9 西部数据WD (移动硬盘十大品牌,1970年美国,数据存储业的领头羊,西部数据有限公司)
10 旅之星Travelstar (十大移动硬盘品牌,高新技术企业,北京旅之星业新技术有限公司)
3.原装的和组装议多花几十块钱买原装的划算~
迈拓Maxtor的编号识别及质保
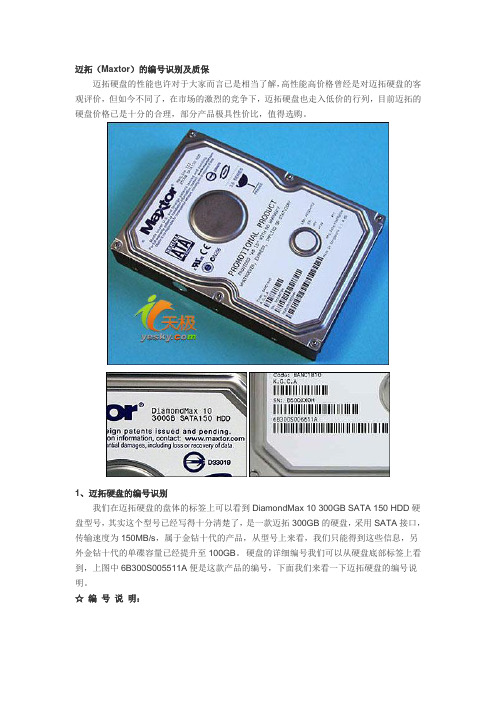
迈拓(Maxtor)的编号识别及质保迈拓硬盘的性能也许对于大家而言已是相当了解,高性能高价格曾经是对迈拓硬盘的客观评价,但如今不同了,在市场的激烈的竞争下,迈拓硬盘也走入低价的行列,目前迈拓的硬盘价格已是十分的合理,部分产品极具性价比,值得选购。
1、迈拓硬盘的编号识别我们在迈拓硬盘的盘体的标签上可以看到DiamondMax 10 300GB SATA 150 HDD硬盘型号,其实这个型号已经写得十分清楚了,是一款迈拓300GB的硬盘,采用SATA接口,传输速度为150MB/s,属于金钻十代的产品,从型号上来看,我们只能得到这些信息,另外金钻十代的单碟容量已经提升至100GB。
硬盘的详细编号我们可以从硬盘底部标签上看到,上图中6B300S005511A便是这款产品的编号,下面我们来看一下迈拓硬盘的编号说明。
☆编号说明:迈拓硬盘编号的1-2位表示硬盘的系列号和型号,以下是迈拓硬盘的系列号与型号表示,目前我们在市场中常见的是以6Y Diamondmax Plus9 和6B Diamondmax Plus10为主,其它的产品均已被淘汰。
2R -代表:Fireball 531DX美钻一代2B -代表:Fireball 541DX美钻二代2F -代表:Fireball 34W -代表:Diamondmax 536DX星钻二代4D -代表:Diamondmax 540X星钻三代4K -代表:Diamondmax 540X星钻三代4G -代表:Diamondmax 540X星钻三代4R -代表:Diamondmax 16星钻四代5T -代表:Diamondmax Plus60金钻六代6L -代表:Diamondmax Plus D740X金钻七代6E -代表:Diamondmax Plus86Y -代表:Diamondmax Plus96B -代表:Diamondmax Plus10第三位至第5位表示硬盘的容量,例如080 或者200 就分别表示:80GB或者200GB。
五大品牌硬盘编号识别大法
迈拓(Maxtor)是韩国现代电子美国公司的一个独立子公司,2001年由于并购了昆腾而名噪一时。
以前该公司的产品也覆盖了IDE与SCSI两个方面,但由于SCSI方面的产品缺乏竟争力而最终放弃了这个高端市场从而主攻IDE硬盘,所以Maxtor公司应该是如今硬盘厂商中最专一的了。
因为主要精力都集中在IDE硬盘领域,拥有专一与较领先的技术经验,所以在桌面硬盘零售市场一度创造辉煌,亦因此其在零售硬盘市场的影响力比较大,产品口碑也较十分不错。
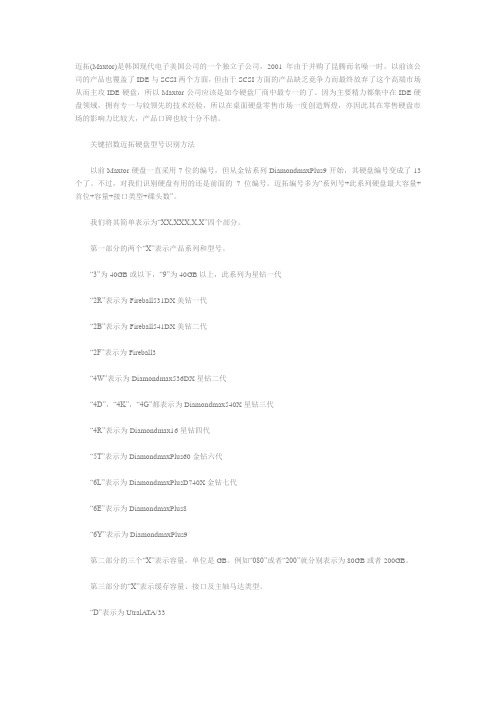
关键招数迈拓硬盘型号识别方法以前Maxtor硬盘一直采用7位的编号,但从金钻系列DiamondmaxPlus9开始,其硬盘编号变成了13个了。
不过,对我们识别硬盘有用的还是前面的7位编号。
迈拓编号多为“系列号+此系列硬盘最大容量+首位+容量+接口类型+碟头数”。
我们将其简单表示为“XX,XXX,X,X”四个部分。
第一部分的两个“X”表示产品系列和型号。
“3”为40GB或以下,“9”为40GB以上,此系列为星钻一代“2R”表示为Fireball531DX美钻一代“2B”表示为Fireball541DX美钻二代“2F”表示为Fireball3“4W”表示为Diamondmax536DX星钻二代“4D”,“4K”,“4G”都表示为Diamondmax540X星钻三代“4R”表示为Diamondmax16星钻四代“5T”表示为DiamondmaxPlus60金钻六代“6L”表示为DiamondmaxPlusD740X金钻七代“6E”表示为DiamondmaxPlus8“6Y”表示为DiamondmaxPlus9第二部分的三个“X”表示容量,单位是GB。
例如“080”或者“200”就分别表示为80GB或者200GB。
第三部分的“X”表示缓存容量、接口及主轴马达类型。
“D”表示为UtralATA/33“U”表示为UtralATA/66“H”表示为UltraATA100接口,2MB缓存“J”表示为UltraA TA133接口,2MB缓存并使用滚珠轴承马达(BallBearingMotor)“L”表示为UltraATA133接口,2MB缓存并使用液态轴承马达(FluidDynamicBearingMotor)“P”表示为UltraA TA133接口,8MB缓存并使用液态轴承马达,“M”表示为SerialATA150接口,8MB缓存并使用液态轴承马达。
Maxtor外部硬盘用户手riteria 说明书
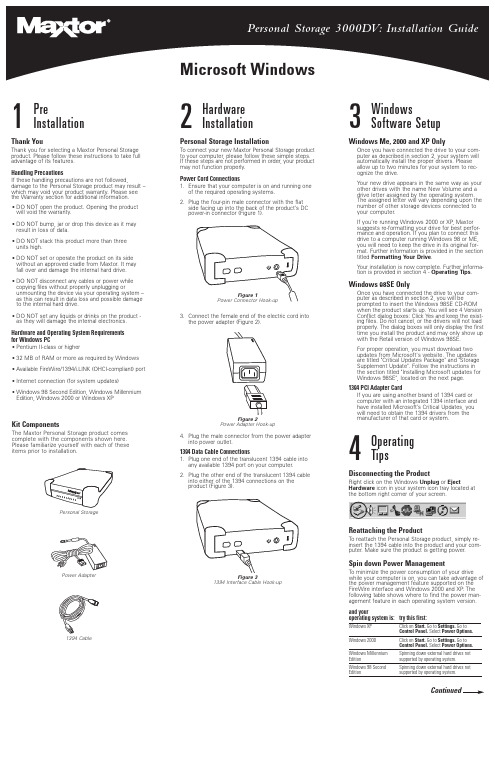
3Windows Software SetupWindows Me, 2000 and XP OnlyOnce you have connected the drive to your com-puter as described in section 2, your system will automatically install the proper drivers. Please allow up to two minutes for your system to rec-ognize the drive.Your new drive appears in the same way as your other drives with the name New Volume and a drive letter assigned by the operating system.The assigned letter will vary depending upon the number of other storage devices connected to your computer.If you’re running Windows 2000 or XP , Maxtor suggests re-formatting your drive for best perfor-mance and operation. If you plan to connect this drive to a computer running Windows 98 or ME,you will need to keep the drive in its original for-mat. Further information is provided in the section titled Formatting Your Drive .Your installation is now complete. Further informa-tion is provided in section 4 - Operating Tips .Windows 98SE OnlyOnce you have connected the drive to your com-puter as described in section 2, you will beprompted to insert the Windows 98SE CD-ROM when the product starts up. Y ou will see 4 Version Conflict dialog boxes: Click Y es and keep the exist-ing files. Do not cancel, or the drivers will not load properly. The dialog boxes will only display the first time you install the product and may only show up with the Retail version of Windows 98SE.For proper operation, you must download two updates from Microsoft's website. The updates are titled "Critical Updates Package" and "Storage Supplement Update". Follow the instructions in the section titled "Installing Microsoft updates for Windows 98SE", located on the next page.1394 PCI Adapter CardIf you are using another brand of 1394 card or computer with an integrated 1394 interface and have installed Microsoft’s Critical Updates, you will need to obtain the 1394 drivers from the manufacturer of that card or system.1PreInstallationThank YouThank you for selecting a Maxtor Personal Storage product. Please follow these instructions to take full advantage of its features.Handling PrecautionsIf these handling precautions are not followed,damage to the Personal Storage product may result –which may void your product warranty. Please see the Warranty section for additional information.•DO NOT open the product. Opening the product will void the warranty.•DO NOT bump, jar or drop this device as it may result in loss of data.•DO NOT stack this product more than three units high.•DO NOT set or operate the product on its side without an approved cradle from Maxtor. It may fall over and damage the internal hard drive.•DO NOT disconnect any cables or power while copying files without properly unplugging orunmounting the device via your operating system –as this can result in data loss and possible damage to the internal hard drive.•DO NOT set any liquids or drinks on the product -as they will damage the internal electronics.Hardware and Operating System Requirements for Windows PC•Pentium II-class or higher•32 MB of RAM or more as required by Windows •Available FireWire/1394/i.LINK (OHCI-compliant) port •Internet connection (for system updates)•Windows 98 Second Edition, Windows Millennium Edition, Windows 2000 or Windows XPKit ComponentsThe Maxtor Personal Storage product comes complete with the components shown here.Please familiarize yourself with each of these items prior to installation.Personal StoragePower Adapter1394 Cable2Hardware InstallationPersonal Storage InstallationTo connect your new Maxtor Personal Storage product to your computer, please follow these simple steps.If these steps are not performed in order, your product may not function properly.Power Cord Connections1.Ensure that your computer is on and running oneof the required operating systems.2.Plug the four-pin male connector with the flatside facing up into the back of the product’s DC power-in connector (Figure 1).3.Connect the female end of the electric cord intothe power adapter (Figure 2).4.Plug the male connector from the power adapterinto power outlet.1394 Data Cable Connections1.Plug one end of the translucent 1394 cable intoany available 1394 port on your computer.2.Plug the other end of the translucent 1394 cableinto either of the 1394 connections on the product (Figure 3).Figure 31394 Interface Cable Hook-upFigure 2Power Adapter Hook-upFigure 1Power Connector Hook-up4Operating TipsDisconnecting the ProductRight click on the Windows Unplug or EjectHardware icon in your system icon tray located at the bottom right corner of your screen.Reattaching the ProductTo reattach the Personal Storage product, simply re-insert the 1394 cable into the product and your com-puter. Make sure the product is getting power.Spin down Power ManagementTo minimize the power consumption of your drive while your computer is on, you can take advantage of the power management feature supported on the FireWire interface and Windows 2000 and XP . The following table shows where to find the power man-agement feature in each operating system version.and youroperating system is:try this first:Windows XPClick on Start.Go to Settings.Go to Control Panel. Select Power Options.Windows 2000Click on Start.Go to Settings.Go to Control Panel. Select Power Options.Windows Millennium Spinning down external hard drives not Editionsupported by operating system.Windows 98 Second Spinning down external hard drives not Editionsupported by operating system.Continued4Operating Tips cont.Spin down Power Management cont.The power management feature sets the drive to automatically use less power after a predetermined period of time of inactivity. This is sometimes referred to as spin down since the drive’s internal mechanical disks stop spinning. When the drive is in the spin down mode, the green power light will remain on and the amber activity light will be off.When your computer is powered off, you can choose to do one of the following:• Leave the drive plugged in all the time. The device is designed to run with the power on at all times.• Plug the drive’s power supply into a power strip with an on/off switch so you can turn your drive’s power off to further conserve power.Make sure you remove the drive from your computer through the operating system before you disconnect it or turn off the drive’s power. Shutting off the drive’s power while your computer is running can cause the loss or corruption of data.Installing Microsoft updates for Windows 98SE(Windows 98SE only)Your system must be connected to the internet and have a 1394 interface installed (built-in or plug-in interface card) to install these two updates.• Click on the Start button located on your Windows toolbar.• Select the Windows Update option from thismenu. (This will launch your Internet browser to the appropriate Microsoft web site for your Operating System in the language that you are using).• Click on the Product Updates link from this Microsoft web site. This option will examine your system and prompt you to download the necessary updates.A new web page will appear titled Select Software .There should be a checkmark next to the option titled Critical Updates Package .Click on the Download button near the top of this web page. On the next web page, click Start Download . Accept the license agreement thatappears next. Your system will download the update and install it. Restart (reboot) your system whenprompted to do so.A window will display Windows 98 Setup – Updating System Settings .To install Microsoft's Storage Supplement, go to the web site: /windows98 and search for "1394." You should see an article titled "Windows 98 Second Edition 1394 Storage Supplement : [Windows 98, 1394, storage]."Click on the link and follow the instructions to down-load and install the file. Restart (reboot) your system when prompted to do so.Your system is now updated for proper operation with your 1394 external disk drive.Formatting Your DriveOptional for Windows 98/2000/Me/XPY our Maxtor Personal Storage 3000 drive was format-ted at the factory with the Windows FAT32 file system.This file system is compatible with Mac OS 9 and recent versions of the Windows operating system.The FAT32 file system limits any file to a maximum size of 4 GB. If you are running Windows 98 or Me,consider upgrading to Windows 2000 or XP to take advantage of the NTFS file system.If you are running either the Windows 2000 or XP operating system, consider reformatting your drive to the NTFS file system. The NTFS file system provides several advantages, including support for very large files. See the following section titled: Formatting Your Drive with NTFS.Your new drive will display a drive capacity that is slightly less than the capacity stated on the box. This is normal. For a complete explanation, see the sec-tion titled: My computer shows less drive capacity than on the drive box label.Formatting Your Drive with NTFSThis section describes how to format your drive with the NTFS file system for Windows 2000 or XP .Formatting the drive destroys all data contained on that drive. Make a backup copy of all your data before formatting your drive.To format the drive for NTFS1.Select Start ➔Settings ➔Control Panel .2.Double-click Administrative Tools .3.Double-click Computer Management .4.Double-click Disk Management (located underthe Storage icon).5.Right-click on the icon for your new drive in thewindow that appears.FAT32 should be listed in the column labeled File System .6.Select Format from the menu.7.Select NTFS in the File System field.8.Click OK when you are ready to format your drive.Formatting time varies based on your system speed, and the drive’s capacity.My computer shows less drive capacity than on the box labelHard Drive Manufacturer Capacity DefinitionsThe listed capacity is an unformatted (raw) capacity.After partitioning and formatting, actual storagecapacities may vary depending on the operating system and configuration. Maxtor adheres to the National Institute of Standards and Technology (NIST:) definition of Megabyte and Gigabyte.Examples:•1 MB = One Million Bytes •1 GB = One Billion BytesOperating System and BIOS Capacity DefinitionsStorage devices are marketed and sold in terms of decimal (base 10) capacity. In decimal terms, one Gigabyte (GB) is equal to one billion bytes. Most BIOS’s follow this definition as well. However, many operating systems use the binary (base 2) numbering system. That would be two to the thirtieth power, or 1,073,741,824 bytes equals one-Gigabyte.According to the NIST standard, an 80 GB hard drive would contain eighty billion bytes. 80,000,000,000bytes divided by 1,000,000,000 bytes equals eighty decimal Gigabytes. In binary terms, 80,000,000,000bytes would be divided by 1,073,741,824 for a total of 74.5 binary GB. However, there are still 80 billion bytes on the drive in either case.To display the correct capacity of your drive:• Right-click the My Computer icon and select Explore . This opens a new window listing all the disk drives on your system.• Right-click on the external hard drive and select Properties . An information dialog box appears displaying the drive’s capacity in total bytes.5Product RegistrationTake Advantage of the Benefits!By registering your new Personal Storage product,you’ll have the option to receive product updates,special offers,and important information about other data storage solutions from Maxtor.Simply point your web browser to: – go to the product registration page, and complete the short questionnaire.Maxtor’s warranty obligations are limited to the terms set forth:Maxtor warrants only to the original consumer purchaser that new Maxtor Personal Storage products will be free from defects in material and workmanship for 1 year from the date of original purchase.For a replacement Personal Storage product, the warranty on the replacement device is the remainder of the warranty on the original device or 90 days, whichever is longer. If you discover a defect, Maxtor will, at its option, repair or replace the product at no charge to you, provided you return it during the warrantyperiod, with transportation charges prepaid, to Maxtor in Ireland,Singapore or the USA.Personal Storage products must be properly packaged in Maxtor packaging or Maxtor approved packaging to obtain warranty ser-vice. Before returning a Maxtor product, please contact Maxtor at: +353 1 204 1111 (in Europe) or 1-800-2MAXTOR (in U.S.) to obtain a Return Material Authorization (RMA) number. A copy of the receipt or a bill of sale bearing the appropriate Maxtor serial number and model number may be required for warranty service.The warranty applies only to the Maxtor products that can be identified by the Maxtor trademark, trade name, serial number or logo affixed to them. Maxtor does not warrant any product that is not manufactured by, for or with permission from Maxtor.This warranty is not applicable to: Abuse, unreasonable use,mistreatment, or neglect; Damage caused during installation of the Product; Damage caused by the equipment or system with which the product is used; Damage caused by modification or repair not made or authorized by Maxtor; Product whose Maxtor Serial Number has been removed or defaced; Damage caused by liquids in the product case; Damage to the products’ inter-face or power connectors; Damage caused by use of non-Maxtor packaging; Damage caused by improper or improperly used packaging; Products that are determined to be stolen.THIS WARRANTY AND REMEDIES SET FORTH ABOVE ARE EXCLUSIVE AND IN LIEU OF ALL OTHERS, WHETHER ORAL OR WRITTEN, EXPRESSED OR IMPLIED. MAXTOR SPECIFI-CALLY DISCLAIMS ANY AND ALL IMPLIED WARRANTIES,INCLUDING, WITHOUT LIMITATION, WARRANTIES OF MER-CHANTABILITY AND FITNESS FOR A PARTICULAR PURPOSE AND AGAINST INFRINGEMENT. ADDITIONALLY , MAXTOR DOES NOT WARRANT THAT THE PERSONAL STORAGEINSTALLATION SOFTWARE DISTRIBUTED IN THE PERSONAL STORAGE KIT WILL MEET YOUR REQUIREMENTS NOR THE PERFORMANCE OR RESULTS THAT THE OPERATION OF THE PROGRAM WILL BE UNINTERRUPTED OR ERROR FREE.No Maxtor dealer, agent or employee is authorized to make any modification, extension or addition to this warranty.MAXTOR IS NOT RESPONSIBLE FOR SPECIAL, INCIDENTAL,INDIRECT OR CONSEQUENTIAL DAMAGES RESULTINGFROM ANY BREACH OF WARRANTY , OR UNDER ANY OTHER LEGAL THEORY , INCLUDING BUT NOT LIMITED TO LOSS OF DATA, LOSS OF PROFITS, DOWNTIME, GOODWILL, DAMAGE OR REPLACEMENT OF EQUIPMENT AND PROPERTY , AND ANY COSTS OF RECOVERING, PROGRAMMING OR REPRO-DUCING ANY PROGRAM OR DATA STORED IN OR USEDWITH MAXTOR DISK DRIVES OR MAXTOR PERSONAL STOR-AGE PRODUCTS CONTAINING MAXTOR DISK DRIVES or any software product distributed therewith.Some states/jurisdictions do not allow the exclusion or limitation of incidental or consequential damages or exclusions of implied warranties, so the above limitations or exclusions may not apply to you. This warranty gives you specific legal rights, and you may also have other rights that vary from jurisdiction to jurisdiction.Maxtor may make changes or improvements in the product(s)described in this publication at any time and without notice.This product tested to comply with FCC standards for home or office use.Copyright © 2002 Maxtor Corporation. All rights reserved.Printed in the U.S.A. 9/02. Maxtor ®is a registered trademark of Maxtor Corporation. Other brands or products are trademarks or registered trademarks of their respective holders.Maxtor p/n: 20201100/ANotes on using your drive with the Windows operating systemNote 1:On disks larger than 64GB (Windows 98SE),both the FDISK and FORMAT utilities perform their functions properly, but they display an incorrect disk size on the screen. A similar problem has been observed with Windows ME at larger disk sizes(starting above 99GB). Further information is available on Microsoft’s support web site at:/support/kb articles/Q263/0/44.ASP/support/kb/articles/Q263/0/45.ASPNote 2:The FDISK utility may not run properly after an external disk drive has been disconnected and reconnected. It is recommended the user reboot the computer before running FDISK.Note 3:Neither the ScanDisk nor Defrag utilities will operate on drive partitions larger than 127GB. Further information is available on Microsoft’s support web site at:/support/kb/articles/Q184/0/06.ASPThird party utilities, including Norton System Works 2000 and 2002, can be used to replace the function-ality of the ScanDisk and Defrag utilities.Windows 98SEWindows ME Windows 2000, XP File System:FAT32, NTFS FAT32 Operates properly withpartition up to 160GB FAT32 operates properly with partition up to 160GB FAT32 and NTFS operate properly with partition up to 160GB FDISK,FORMATFDISK and FORMAT – two known bugs,see Notes 1 and 2FDISK and FORMAT – one known bug, see Note 1NTFS operatesproperly with partition up to 160GB Cannot format partition >32GB in FAT32Defrag and ScanDiskDefrag and ScanDisk limited to partition <127GB, see Note 3Operates properly with partition up to 160GB Operates properly with partition up to 160GBProduct Warranty。
怎样认识硬盘型号?
怎样认识硬盘型号?目前,市场上的硬盘品牌既有大家熟悉的昆腾(Quantum)、希捷(Seagate)、迈拓(Maxtor)三大“老字号”,又有人们不那么面熟的三星(Samsung)、富士通(Fujitsu)、西部数据(Western Digital)、JTS、IBM、日电(NEC)。
而这些硬盘的型号则不胜枚举,令人眼花缭乱。
其实,这些型号均有一定的规律,表示一些特定的含义。
一般说来,可以从其型号来了解硬盘的性能指标。
掌握了这一点,在选购硬盘时,就方便得多。
以下举例说明,供朋友们参考。
一、MAXTOR(迈拓)迈拓的硬盘型号都是用“xxxxxA(AP)/D/S×”几位数字和符号共同组成。
第一个数字为“7”或“8”,表示“70000”或者“80000”系列,其后四个数字“xxxx”表示以“MB”为单位的容量。
“A”或“AP”均表示硬盘接口为ATA,“D”为ULTRA ATA,“S”为SCSI,末尾的数字“×”表示数据读写面数,即“×/2”张盘片数。
例如水晶一代的CrystalMAX72700AP为70000系列,容量为2700MB(2.7GB)、ATA接口;钻石一代的DiamondMAX82560A4,即80000系列,容量为2560MB(2.56GB)、ATA接口、4个数据读写面(即2张盘片)。
而钻石三代的DiamondMAX 82560D2则为80000系列,容量为2560MB(2.56GB)、ULTRA ATA接口、2个数据读写面(即一张盘片)。
二、SEAGATE(希捷)希捷的硬盘型号由“STxxxxxA/AG/W/N”这几个数字和字符共同组成,ST即为Seagate,ST后的第一个数字表示某系列,该数字有1、3、5、9等,其后的4个数字表示容量、单位是MB,末尾英文字符则表示其接口标准,其中,A为ATA、AG为笔记本电脑专用的ATA接口硬盘、W为ULTRA Wide SCSI,其数据传输率为40MB每秒、N为ULTRANarrow SCSI,其数据传输率为20MB每秒。
实战MaxBoost:入户套提升硬盘60%的性能

实战MaxBoost:入户套提升硬盘60%的性能近日,著名的硬盘制造商迈拓(Maxtor)发布了一款名为MaxBoost 的硬盘驱动,迈拓官方称其能够大幅提升自家生产的硬盘性能,最大可以提升约60%!这可是让人激动的消息!在硬盘性能逐渐成为系统性能瓶颈的今天,如果采用软件方式的MaxBoost 真的能够起到如此大的作用,称其为重要技术突破也不为过。
根据迈拓官方的资料说明,MaxBoost 实际上是一款硬盘驱动程序,它替换了Windows2000/XP 的底层硬盘驱动程序,能够针对不同的应用软件而自动在系统内存中设置一个大小适当的缓存,在硬盘读写数据前起到预读和缓冲作用,利用高速的系统内存并辅以一种不肯公布技术细节的“高级算法”,从而有效地提升硬盘读写速度,达到提升应用程序和系统速度的目的。
在拿到MaxBoost 驱动及其官方资料的那一刻,我不由得产生了一个大疑问,一款软件就能够带来这么大的改变么?看来只有进行“实战”才能看清软件的本质。
目前MaxBoost 的版本为2.1.0.7,属于Beta 版,试用期到2004 年6 月30 号结束,而从安装时算起,MaxBoost 只可使用60 天,过期后,将自动屏蔽加速功能。
我们先来看看这款驱动的系统要求:由于不能使用在除迈拓和昆腾外的其他品牌硬盘上,所以如果你有多个硬盘,那就只能把迈拓或昆腾硬盘设为主盘,才能使用MaxBoost。
小提示
我们提醒使用nForce 系列芯片组的主板用户注意,nForce 系列驱动中的SW 驱动跟MaxBoost 有冲突,所以安装了SW 驱动的用户,MaxBoost 将无法检测到你的硬盘。
比如ForceWare 驱动3.13 版中就带了SW 驱动,想要使用MaxBoost 的用户,安装3.13 版时注意不要安装。
- 1、下载文档前请自行甄别文档内容的完整性,平台不提供额外的编辑、内容补充、找答案等附加服务。
- 2、"仅部分预览"的文档,不可在线预览部分如存在完整性等问题,可反馈申请退款(可完整预览的文档不适用该条件!)。
- 3、如文档侵犯您的权益,请联系客服反馈,我们会尽快为您处理(人工客服工作时间:9:00-18:30)。
目 录
1. 用 途 ................................................................................................................................................................................................. 5 2. 修理 MAXTOR 硬盘的基本选项 ..................................................................................................................................................... 5 3. 启动准备 ........................................................................................................................................................................................... 5 4. MAXTOR 硬盘的构架 ..................................................................................................................................................................... 5 4.1. 硬盘的 firmware 固件 ............................................................................................................................................................... 5 4.2. 识别 firmware 固件版本............................................................................................................................................................ 7 4.3. 系统数据模块 ............................................................................................................................................................................ 8 4.4. 适配数据 .................................................................................................................................................................................. 11 4.5. 备用系统区 .............................................................................................................................................................................. 12 4.6. Maxtor 硬盘的译码表 .............................................................................................................................................................. 13 5. PC3000 程序启动 ............................................................................................................................................................................. 13 6. 程序功能 ......................................................................................................................................................................................... 16 6.1. 《Tests 测试》菜单................................................................................................................................................................. 16 6.1.1. Utility status 程序状态 ...................................................................................................................................................... 16 6.1.2. Service information 系统信息 ........................................................................................................................................... 17 6.1.3. Surface test 表面测试 ........................................................................................................................................................ 20 6.1.4. Defect list 缺陷表 .............................................................................................................................................................. 21 6.1.5. Clear S.M.A.R.T. 复位 S.M.A.R.T. .................................................................................................................................. 22 6.2. 《Tools 工具》菜单 ................................................................................................................................................................ 22 6.2.1. Utility extensions 程序扩展 .............................................................................................................................................. 22 7. 故障诊断 ......................................................................................................................................................................................... 27 8. 软件修复 ......................................................................................................................................................................................... 30 8.1. 对系统区工作 .......................................................................................................................................................................... 31 8.2. 缺陷重定位 ........................................................................................................
