TunelabPro使用说明书样本
Tune软件操作说明-LTQ Series
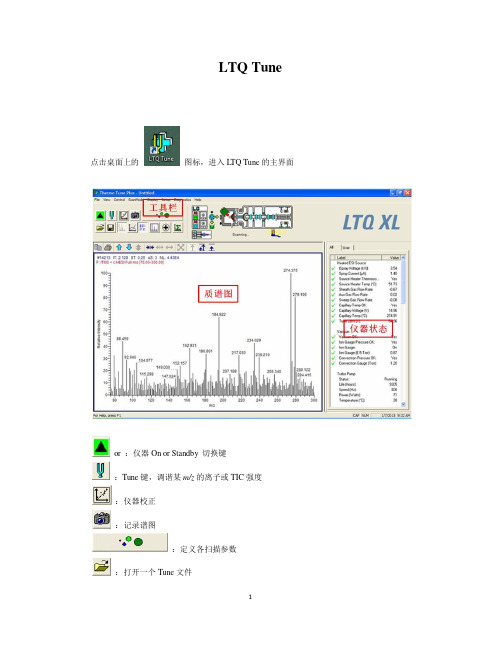
LTQ Tune点击桌面上的图标,进入L TQ Tune的主界面or :仪器On or Standby 切换键:Tune键,调谐某m/z的离子或TIC强度:仪器校正:记录谱图:定义各扫描参数:打开一个Tune文件:保存当前的参数为Tune文件:显示曲线:Profile和Centroid 图的切换:正负离子检测模式的切换:图谱平均:LC的设置(U 3000由DC MSLink设置,Accela液相可由此键设置泵的参数):注射泵的开启及参数设置:质谱仪上六通阀的切换:质谱仪硬件各参数设置(注意:做实验时只需要修改离子源区参数,其他参数可不用修改)采集样品谱图1.连接管路,注射器吸取样品溶液后,将注射器安装至注射泵;2.打开扫描:点击,使该键切换为,仪器开始扫描;3.打开注射泵,点击,出现右图界面:选择“On”“Flow Rate”中键入流速在“Type”中选择注射器的类型“Volume”中下拉选择注射器的容量点击“OK”4.点击,设置需要采集的离子模式;5.点击,设置离子源区各参数,点击“Apply”,如下图:Heater Temp:加热温度Sheath Gas Flow Rate:鞘气流速Aux Gas Flow Rate:辅助气流速Sweep Gas Flow Rate:吹扫气流速I Spray Voltage:喷雾电压Capillary Temp:离子传输管的温度Capillary Voltage:离子传输管的电压Tube Lens:Tube Lens电压6.定义扫描模式,点击,进入如下界面:全扫描(Full Scan):Mass Range:选择质量范围,选NormalScan Rate:选择扫描速率,选NormalScan Type:选择扫描类型,选Full设置扫描范围:First Mass:扫描起始质荷比Last Mass:扫描末端质荷比设置好后点击“Apply”,应用设置的参数点击“OK”,关闭此设置参数窗口选择离子扫描(SIM):Mass Range:选择质量范围,选NormalScan Rate:选择扫描速率,选NormalScan Type:选择扫描类型,选SIM设置扫描范围:Center Mass:中心质荷比Width:扫描窗口宽度设置好后点击“Apply”,应用设置的参数点击“OK”,关闭此设置参数窗口多级质谱扫描(MS n):Mass Range:选择质量范围,选NormalScan Rate:选择扫描速率,选NormalScan Type:选择扫描类型,选Full做二级质谱(MS2),在n为2这一行中,“Parent Mass”中输入母离子的质荷比,“Act.Type”中选择碰撞模式CID,“Iso. Width”中输入提取母离子的隔离宽度,“Normalized Collision Energy”中输入碰撞能量;做三级质谱(MS3),在n为3这一行中,“Parent Mass”中输入三级母离子(二级子离子)的质荷比,“Act. Type”中选择碰撞模式CID,“Iso. Width”中输入提取三级母离子的隔离宽度,“Normalized Collision Energy”中输入碰撞能量;若还要做更多级质谱,以此类推。
Tunelab_pro教程(可编辑)

Tunelab_pro教程(可编辑)安装与注册1.索取注册号:在PC机上运行“算号器”Key Generator,在“用户名”栏填上你的英语(拼音)名字、点击“确定”,这时“序列号”一栏即可出现与你输入名字相配套的“注册号”。
将“名字”和“注册号”用纸笔记录下来备用。
2.安装系统:运行tunelab_pro_setup.exe。
注意装文过程中界面除系统配置文件之外的一些附加文件(很有用的文件)安装路径及目录的提示,若不加更改的话,这些附加文件将会被默认安装到你PC机“我的文档”里。
3.注册:安装完成后,桌面上即有TuneLabPro的快捷方式,点击它、启动该系统。
点击左上第一行菜单栏的Help项,在下拉菜单中先“Enter License Infomation”,在出对话框的上面一行填上你的“名字”,下面一行填上索取到的“注册号”,然后点OK、再点确认,这时tunelab会自动退出,当再次启动系统时你的名字就会显示在主界面右的上角,以示注册成功。
tunelab 界面介绍然后说一下标准界面上所有的显示的意义(红色字体)A:相差显示,如果钢琴发出的声音偏低,则黑色块往左移动。
反之则往右移动B:所调的音的显示,如果你在调C1,则可以通过键入字母c,1,软件就会显示到C1了。
如果是#C1,则按大写C,1以此类推。
往旁边的音移动,可以通过按左右键来切换。
软件也有自动切换功能。
C:精度显示,这是一个白色小色带,如果钢琴的误差在1cent之外,则全白。
如果进入1cent范围之内,则色块会从外向内变灰。
灰色满了,也就是正好到位了。
D:光谱显示,道理同A,中间的红线为基准,左低右高。
一般在调中低音区的时候,看A区比较方便,而在调试最高的那几个音的时候,看D得显示则快捷多了。
校准步骤:首先,你需要有一个可靠的440赫兹的频率发生器(TuneLab使用交流群的“共享”里的‘UFO-频率发生器’即可下载到PC里、打开运行将界面频率值改设为440Hz并使其发响即可使用)。
Tune 软件操作说明-TSQ Quantum series
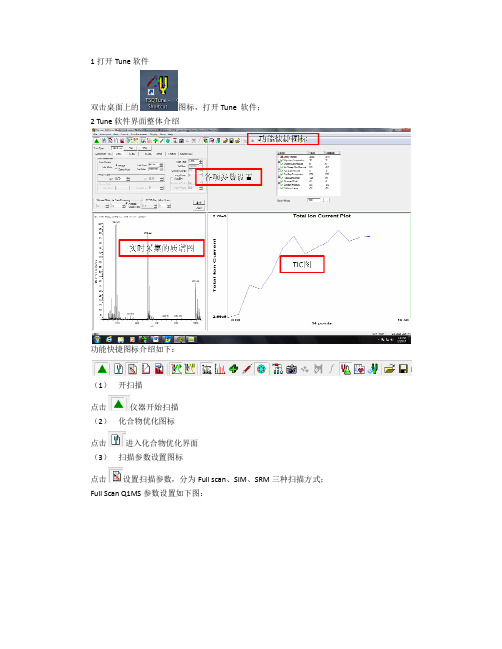
1 打开 Tune 软件双击桌面上的图标,打开 Tune 软件;2 Tune 软件界面整体介绍功能快捷图标介绍如下:(1) 开扫描 点击 仪器开始扫描(2) 化合物优化图标 点击 进入化合物优化界面(3) 扫描参数设置图标 点击 设置扫描参数,分为 Full scan、SIM、SRM 三种扫描方式;Full Scan Q1MS 参数设置如下图:Entry Mode 可选择 FM/LM(分别输入扫描范围起止的质荷比)或者 Center Mass(输入 center mass 和 scan width 一般用 20,表示以 center mass 为中心正负 10amu 的扫描范 围) b) Scan Time:扫描时间输入 1s c) Peak Width Q1:选择 0.7 d) Data Processing:选择 Average,输入 10 Full Scan Q3MS 参数设置如下图(具体设置同 Full Scan Q1MS) : a)MS/MS Parent 参数设置如下图:a) Entry Mode 可选择 FM/LM(分别输入扫描范围起止的质荷比)或者 Center Mass(输入 center mass 和 scan width 一般用 20, 表示以 center mass 为中心正负 10amu 的扫描范围) b) Scan Time:扫描时间输入 1 或 0.5s c) Peak Width Q1:选择 0.7 d) Charge State:输入 1e) Product Mass 输入要检测的子离子碎片的质荷比 f) Collision Energy:输入碰撞能量,一般用 25~35 g) Q2 CID Gas:输入 1.5 MS/MS Product 参数设置如下图:a) Entry Mode 可选择 FM/LM(分别输入扫描范围起止的质荷比)或者 Center Mass(输入 center mass 和 scan width 一般用 20, 表示以 center mass 为中心正负 10amu 的扫描范围) b) Scan Time:扫描时间输入 1 或 0.5s c) Peak Width Q1:选择 0.7 d) Charge State/Product Ion:输入 1 e) Parent Mass 输入要检测的母离子的质荷比 f) Collision Energy:输入碰撞能量,一般用 25~35 g) Q2 CID Gas:输入 1.5 h) Energy Ramp:输入 10~15 MS/MS Neutral Loss 参数设置如下图:a) Entry Mode 可选择 FM/LM(分别输入扫描范围起止的质荷比)或者 Center Mass(输入 center mass 和 scan width 一般用 20, 表示以 center mass 为中心正负 10amu 的扫描范围) b) Scan Time:扫描时间输入 1 或 0.5s c) Peak Width Q1:选择 0.7 d) Charge State/Product Ion:输入 1e) Neutral Loss Mass 输入中性丢失的分子量 f) Collision Energy:输入碰撞能量,一般用 25~35 g) Q2 CID Gas:输入 1.5 SIM 参数设置如下图:a) b) c) d) e)Scan Width:输入 2.0 Scan Time:扫描时间输入 1 或 0.5s Peak Width Q1:选择 0.7 Use Tuned Tube Lens Value:打钩 Mass:输入要检测的离子的质荷比SRM 参数设置如下图:a) b) c) d)Scan Width:输入 0.01 Scan Time:扫描时间输入 0.1s Peak Width Q1:选择 0.7 在表格中输入母离子质荷比、子离子质荷比、碰撞能量和 tube lens(4) 质量轴校正图标 (5) 仪器参数诊断图标 (6) TIC 图扫描图标 (7) TIC 图暂停扫描图标 (8) 谱图平均及噪音过滤图标 ,具体设置如下图:average 是指的谱图平均,Chrom Filter 指的是过滤电噪音,这两个参数可都用 10 (9) 谱图采集方式设置 Centriod (10) 正负扫描模式设置 (11) 注射泵开关 点击 打开注射泵,点击菜单栏 Setup 中的 Syringe Pump & Sample Loop 进入流速更改界 分为 Profile 和 Centriod 两种,一般一级用 Profile,二级用面,Flow Rate:5ul/min;Syringe Type:Hamliton;Volume:500ul。
安捷伦高效液相色谱仪操作说明之欧阳治创编

安捷伦高效液相色谱仪操作说明一、校枪及样品处理1. 校枪仪器:两个小烧杯、分析天平、移液枪1000μL、100μL步骤:打开分析天平预热,一只烧杯放到称量盘上调零,一只装入纯水。
将移液枪1000μL、100μL调至950μL、50μL,分别吸取纯水称质量,如偏大或偏小,调节移液枪直至准确到0.001g。
(如枪使用过久或气密性不好,可以准备一个小烧杯装入纯水,每次先轻轻沾湿枪口,甩掉水或在用卫生纸吸取口上的水,再插上枪头使用。
)注意慢吸慢放,不要挂珠。
2. 样品处理:用1.5mL离心管取0.5mL发酵液,取出样品后,首现在离心机上离心(13000rap/min 3min)。
然后将样品稀释20倍,取950μL纯水、50μL发酵液于离心管中。
混匀后在离心机上离心(13000rap/min 3min)。
准备自动进样瓶(瓶中放上内衬管),取200μL待测液盖紧盖子。
按顺序放到自动进样盘中。
二、开机1、仪器各组件将在线脱气器、泵:四元、进样器:自动进样器(六通阀)、柱温箱、检测器:示差折光检测器开关打开。
打开计算机,进入Windows XP 画面,并运行CAC Server程序,打开色谱仪各组件电源,待显示已联上各组件的信息及各模块自检完成后,双击Instrument 1 Online ,图标打开工作站。
化学工作站自动与1200LC通讯。
流动相:将流动相(一般不主张使用偏酸、偏碱的流动相)放入溶剂瓶中,打开冲洗阀,设流速为2ml/min,单击确定,再依次单击泵→控制,选中启动,单击确定,则系统开始冲洗,至管路无气泡为止,切换管路反复操作至所需管路均无气泡。
在“控制”选项中选“关闭”,关闭泵,关闭冲洗阀。
单击泵下面瓶图标,输入溶剂的实际体积和瓶体积。
每次四元泵开始前,要打开冲洗阀阀门以5ml/min的流速冲洗10分钟,使脱气机与泵之间的流动相从冲洗阀流出,以免隔夜的流动相损伤色谱柱。
每次进样检测前,要用流动相冲洗色谱柱30分钟,达到柱温前20min流速设为0.2ml/min,达柱温后再改为0.6ml/min。
TUNEL说明书

TUNEL说明书1 介绍TUNEL是提供单细胞水平细胞凋亡的稳定系统,能够迅速、快捷、精确的检测出凋亡细胞。
该试剂盒可以通过测定核DNA片段检测组织切片和培养细胞的凋亡细胞。
多数高等真核生物的细胞都通过启动自身的细胞自杀程序实现程序性死亡或细胞凋亡。
凋亡在发育、内环境稳定和一些疾病中具有重要作用。
凋亡具有某些特定的形态学特征,包括细胞膜起泡,细胞核和细胞质固缩,染色质浓缩,并且不发生局部炎症反应。
细胞死亡与此相反,它的特点是细胞肿胀,染色质絮凝,细胞膜完整性破坏,细胞溶解和产生及局部炎症反应。
凋亡过程中,内源性Ca2+、Mg2+依赖性核酸内切酶被激活,DNA被降解而形成末端为3’-OH、含180~200碱基对的不同倍数的核苷酸片段。
TUNEL 可用于多种细胞凋亡的检测,已经经过验证的应用范围: Vibratome® 神经组织切片, Jurkat 细胞, HL-60细胞这本技术小册子包括检测组织切片和茴香霉素诱导的HL-60细胞的细胞凋亡。
检测原理: DeadEnd™ Colorimetric TUNEL 系统使用改良的TUNEL (TdT-mediated dUTP Nick-End Labeling)对凋亡细胞的断裂DNA进行末端标记。
使用末端脱氧核苷转移酶(TdT)将生物素标记的核苷被掺入到DNA的3′-OH末端。
然后,辣根过氧化物酶标记的链霉亲和素(Streptavidin HRP)结合在上述生物素标记的核苷上,可以通过过氧化物酶的底物——过氧化氢和稳定的显色剂氨基联苯胺(DAB)检测到。
用这种程序,凋亡细胞的核被染成深棕色。
2 产品内容G7361平衡缓冲液(G327B)——4.8ml末端脱氧核苷酰酶酸转移酶(M828B)——20ul抗生物素蛋白链菌素辣根过氧化物酶(G714A)——40ul生物素化的核苷混合物(G715A)——20ul蛋白酶K(V302A)——10mgG7362塑料盖玻片(G326B)——2020X SSC(G329B)——20mlDAB 20X 色原体(G716A)——200ul20X DAB底物缓冲液(G717A)——200ul20X过氧化氢(G718A)——200ul储存条件: 将平衡缓冲液, TdT酶, 生物素标记的核苷混合物和蛋白酶K 储存于–20°C。
听力筛查中文说明书
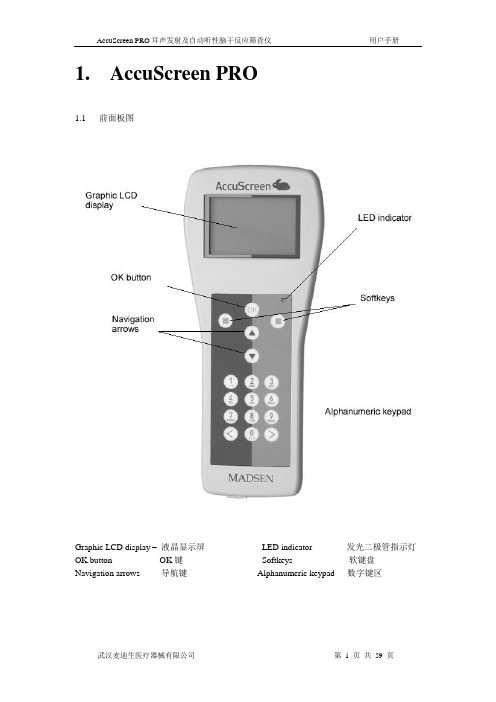
1. AccuScreen PRO1.1 前面板图Graphic LCD display –液晶显示屏LED indicator -- 发光二极管指示灯OK button -- OK键Softkeys -- 软键盘Navigation arrows -- 导航键Alphanumeric keypad -- 数字键区Infrared window –红外线窗口ABR socket -- ABR插孔Probe socket -- 探头插孔1.3 底部图Connector to PC and Label Printer –连电脑、标签打印机的数据接口Label with serial number –产品系列号标签Rechargeable NiMH battery pack –可充电的镍氢电池1.5 显示及控制面板1.5.1按键、文本信息及功能按键文本信息显示功能开机OK 激活所选开始测试左边软按键(MENU)菜单回到主菜单(SKIP)跳过跳过测试右边软按键(OFF)关机关机(BACK)回来回到上一菜单(SELECT)选择选择日期/时间(STOP)停止不再继续测试向上导航键向上滚动选择菜单升高日期/时间菜单中的数值向下导航键向下滚动选择菜单降低日期/时间菜单中的数值导航键按导航键的箭头▲或▼在屏幕上来选择所需的项目。
按OK键通过黑色条高亮来激活菜单,并确认所选的项目。
软按键(■)当前的功能会显示在屏幕的底部。
注意:应避免锐器划伤操作键区,如有损伤,将不能保证机器能正常使用。
输入数据您可通过数字键盘输入数字和字母,例如,您可添加新的病人。
您还用导航键来前后上下选择。
3.6探头Acoustic filter disc –滤音片Probe tip –探针Probe body –探头主体Test cavity –测试耦合腔2. 测试之前2.1安全我们需按照本手册里的注意警告信息来安全操作本机器。
同时也应遵循当地的法律法规。
TunelabPro使用说明书

初次使用此软件的朋友,看了猫版的介绍,再加上这个指南文件,上手应当很轻松了。
献给部分英文比我还糟的朋友,呵呵Using this tutorial 如何使用此指南This tutorial is meant to be used as a step-by—step guide to certain operations in TuneLab Pro。
本指南将一步一步的指导您在TuneLab Pro中的操作。
Many of these operations involve the keyboard。
有相当一部分操作涉及到键盘的使用。
However, the keys that you press when this tutorial is displayed do not always go to TuneLab Pro.然而,当此帮助页面显示时,您按下键盘键并不总是能够回到TuneLab Pro操作界面。
In fact, every time you call this tutorial and every time you click in it,the tutorial acquire s the ”focus" of the keyboard.实际上,每当您查看本指南或者在本指南显示的区域内操作鼠标时,焦点总是被当前的指南页面获得的. To make the keys go to TuneLa b Pro,you need to give the focus back to TuneLab Pro. 要想使用键盘来控制Tune Lab Pro的操作,您需要使焦点回到TuneLab Pro界面中. You can do that by clicking anywhere inside the TuneLab Pro window. 您可使用鼠标点击TuneLab Pro窗口来实现。
美谱达一系列软件说明书

2. 安装 ........................................................................................................................................... 2 2.1 系统配置 ............................................................................................................................... 2 2.2 安装 ....................................................................................................................................... 2 2.3 卸载 ....................................................................................................................................... 2 2.4 运行 ....................................................................................................................................... 3 2.5 设置通讯口 ........................................................................................................................... 3 2.6 设置用户信息 ....................................................................................................................... 3 2.7 设置数据格式 ....................................................................................................................... 4 2.8 设置界面风格 ....................................................................................................................... 4 2.1 联机 ....................................................................................................................................... 4
马丁酷音色彩抖动器说明书
Martinic ColorsoundTremoloUser ManualEnglish (US)Version 1.1.0Table of ContentsIntroduction3 A Brief History3 Our Colorsound Tremolo3 Free Trial3 Installation4 System Requirements4 Windows Installation4 Mac Installation6 Loading Colorsound Tremolo8 Getting Around9 Using the controls (plus fine-tuning and value entry)9 FX view and Settings view9 Martinic Additions10 Tempo sync11 Stereo width control11 Input drive and output volume12 1974 and 1996 modes12 Default Presets13 Feature List13IntroductionThank you for purchasing or trying Martinic Colorsound Tremolo.Colorsound Tremolo is a virtual effect plugin that aims to recreate the tremolo effects from two different iterations of the popular stomp box.A Brief HistoryIn the 1970s, brothers Larry and Joe Macari of Sola Sound developed the Colorsound Tremolo, modeled after the tremolo of a VOX® AC30 tube amp, using only 4 transistors.Our Colorsound TremoloMartinic Colorsound Tremolo is modeled closely on the original tremolo, offering the same features (and flaws) to perfectly preserve the character of the original effect.Free TrialBefore purchasing a license, you are allowed to try Colorsound Tremolo free of charge for up to 30 days for testing purposes and in non-published work.When Colorsound Tremolo runs in demo mode, once every minute the user interface will display Trial Version in red, and white noise is added to the output signal.InstallationSystem RequirementsColorsound Tremolo is available as a VST 2.4, AU (Audio Units), or CLAP (CLever Audio Plugin) effect plug-in, which means it needs to run inside VST, AU, or CLAP hosting software, e.g. Ableton Live, Cubase, GarageBand, Logic Pro, REAPER, Studio One, etc.Although Colorsound Tremolo should be able to run at any sample rate the host provides, a rate of at least 44.1 kHz is recommended.Colorsound Tremolo is designed to run on Windows 7 or newer, or Mac OS X 10.9(Mavericks) or newer.Windows InstallationTo install Colorsound Tremolo on Windows, download the Windows 32/64-bit VST/CLAP installer, and save it on your computer (e.g. in your Downloads folder).Navigate to this folder, locate the installer and double-click on it, and then click on the Next button to start the installation process.Carefully read the license, and then click on the I Agree button to continue. Next select which versions of the plugin you want to install. Select Customize GUI Scale to manually override the scaling factor of the plugin in a later screen. Optionally you can select License Key if you have purchased a license. Click on the Next button to continue.Optionally change the install location, and again click on the Next button. Then select your VST2 32-bit and/or 64-bit plugin folder, and optionally select your license key file (if youhave purchased a license), confirming each selection by clicking on the Next button.If you have previously chosen to customize the GUI scale, you will be able to select different options before selecting Next to begin installation.Now wait for the installation to complete (this should take only a few seconds), click on the Close button, and you are ready.Mac InstallationTo install Colorsound Tremolo on Mac OS X or macOS download the Mac 64-bit VST/AU installer disk image (DMG), and save it on your computer (e.g. in your Downloads folder).If you have purchased a license, then you should copy your license key file to the same folder in which you have saved the installer disk image (DMG), so it can be installed along with the plug-in(s).Navigate to the folder in which you have saved the installer, locate the installer disk image (DMG) and double-click on it, and then double-click on the Colorsound Tremolo Installer.pkg icon. Click on the Continue button to confirm that the installation package will run a program, and then click on Continue (in the bottom right corner of the installation window) to start the installation process.Carefully read the license, click on the Continue button, and then click on Agree. Next select which versions of the plug-in you want to install (it is recommended that you install both the VST2 and AU versions, just to be sure), optionally select License Key if you have purchased a license, and click on the Continue button. Optionally change the install location, and then click on the Install button.Now wait for the installation to complete (this should take only a few seconds), click on the Close button, and you are ready.Loading Colorsound TremoloLaunch your host, and create an audio track or load a project to which you want to add Colorsound Tremolo. Please refer to the documentation of your hosting software on how to do this.Note: Most hosts will list Colorsound Tremolo as Martinic Colorsound Tremolo, but some may list it as Colorsound Tremolo or ColorsoundTremolo.Colorsound Tremolo is primarily meant to be used as an “insert” effect, which is also the way in which it was originally used. However, it can also be used as a “bus” effect.The plugin is exclusively a stereo plugin, which means that Apple Logic users will have to switch the preferred track from Mono to Stereo by clicking on the ◯ symbol of the track, to be able to load the Colorsound Tremolo:Getting AroundUsing the controls (plus fine-tuning and value entry)You can adjust controls by clicking and dragging them up or down using the mouse. To fine-tune a parameter to a more exact value, hover your cursor over it, hold the Ctrl key (Mac and Windows), and scroll the mouse wheel. You can also right-click on a knob to enter a value using the computer keyboard.Double-clicking a knob or fader will reset it to its default value.FX view and Settings viewThe Colorsound Tremolo can be used in either FX view or Settings view.FX view allows you to control some of the Colorsound Tremolo’s parameters, as you would on a physical version of the device.Settings view provides an abstracted set of controls for the plugin, giving you control over every parameter on the Colorsound Tremolo. Here you can access all the controls, including master volume, Drive volume, Width and tempo sync of the tremolo speed.Colorsound Tremolo is a stereo effect, so it is applied to both the left and right channels. When the switch is off the effect is bypassed. Note that this is likely not the same as bypassing Colorsound Tremolo in your hosting software, because the input signal is still fed into the effect, meaning that you can turn it on again at any time, smoothly and without any pops or clicks.Martinic AdditionsMartinic Colorsound Tremolo includes Tempo sync, Stereo width, Drive volume and Output volume controls, which were not present on the original tremolo.You can adjust these knobs by dragging them up/down using the mouse, or you can use the mouse wheel. You can also right-click on a knob to enter a value using the computer keyboard. When you double-click on a knob, its value will be reset to its default.Tempo syncThe Sync toggle switch synchronizes the Colorsound Tremolo to the tempo of your DAW and switches the Speed knobs from a number to predetermined time signatures.Stereo width controlThe Width knob allows you to control the stereo width, going from mono (0%) to full stereo (100%). This will make left and right channels bounce one after the other.Input drive and output volumeThe Drive knob allows you to control the subtle saturation inherent to the Colorsound Tremolo, going from -60dB to +24dB.The Volume knob is an overall output control. It allows you to compensate the volume loss that happens when the Colorsound Tremolo is "On". It ranges from -36dB to +24dB.1974 and 1996 modesThe Martinic Colorsound Tremolo can operate in 1974 or 1996 mode by double clicking on the desired pedal in the FX view or by switching the Model in the Settings view. The 1996 model was a revived version of the successful original, but was manufactured using updated internal components, though some people preferred the sound of one over the other.Default PresetsColorsound Tremolo comes with 16 default presets. These include 1974 and 1996 presets, which are modeled on the two incarnations of the original stomp box.In the VST version of the plugin, the top bar allows you to select between the Default Presets that will be shown in your DAW. You can navigate between these 16 spaces using the left and right arrow keys either side of the name.If you have a DAW that uses the AU plugin format, the above selection method will be unavailable but the default presets can be selected through your DAW’s interface and will be read-only.Feature ListAccurate emulation of original Colorsound Tremolo effectIncludes two different models: 1974 and 1996Extended LFO speed range from 0.01 to 20 HzOptional LFO host tempo sync from 16 bars to 1/64 noteStereo input/output with stereo width controlDrive control that adds subtle saturationOutput volume controlIncludes 16 presetsNo battery requiredVOX® is a registered trademark of Korg Europe Limited. Note that Korg does not endorse Martinic Colorsound Tremolo, nor is Korg in any way associated or affiliated with Martinic.© 2022 - 2023 Martinic。
威尔逊 Baiardo Tune Pro 球拍调谐器操作手册说明书

BAIARDO TUNE PRO操作手册感谢购买 WILSON BAIARDO TUNE PRO 。
Baiardo Tune Pro 是一款突破性的球拍诊断器,具有尖端技术、简洁设计和超高效率,是适用于全球各种类型球拍的调谐器。
主要功能包括:• 可测量重量、平衡、挥重、杆身弯曲、线床硬度、拍面挠度、水平弯曲和垂直弯曲,涵盖 7 项球拍运动: 网球、羽毛球、壁球、短柄墙球、笼式网球、匹克球和平台网球• 可同时测量重量和平衡• 首台可测量垂直弯曲的机器• 使用预测软件精确进行球拍定制• 易于校准,确保准确性和可重复性• 可保存多达 6 项球拍配置资料本手册提供了有关组装和使用 Baiardo Tune Pro 机器的基本信息。
要了解更多信息,请访问 /baiardo 。
谨上Baiardo 开发团队•BAIARDO TUNE PRO警告和注意事项 (4)组装机器 (4)零部件说明 (5)启动 (6)启动机器 (6)用户界面 (6)切换语言 (7)启动诊断 (7)基本操作提醒 (8)密码 (8)选择新密码 (8)基础构件 (9)执行器头部 (9)执行器端头 (9)称重传感器 (10)支杆 (10)手柄限制装置 (11)拍柄对齐凸轮 (12)挥重夹具 (12)垂直弯曲固定器 (13)匹克球拍面挠度固定器 (13)羽毛球杆身弯曲固定器 (13)操作机器 (14)常规触摸屏操作 (14)选择运动 (15)设置测试 (15)重量和平衡 (16)挥重测试 (17)线床硬度 (18)水平弯曲测试 (19)垂直弯曲测试 (20)羽毛球杆身弯曲测试 (21)匹克球拍面挠度 (22)测试说明 (23)保存测试 (23)调谐模式 (24)什么是调谐模式? (24)设置调谐模式 (24)使用实时调谐模式 (25)使用计算模式 (26)校准 (27)重量和平衡 (27)校准:挥重 (28)更换装置进行挥重校准 (28)校准:RA (29)维修、维护和故障排除 (30)保修须知 (31)保修范围 (31)获取保修服务和零部件 (31)BAIARDO TUNE PRO 产品规格 (32)警告和注意事项请保存此类说明。
Tunelab 调律软件
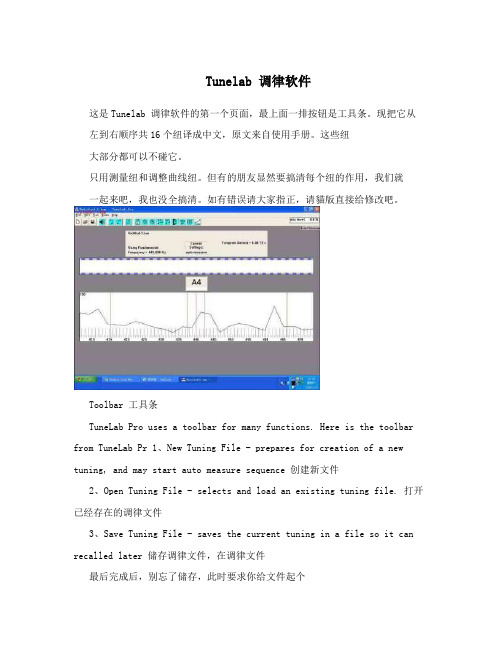
Tunelab 调律软件这是Tunelab 调律软件的第一个页面,最上面一排按钮是工具条。
现把它从左到右顺序共16个纽译成中文,原文来自使用手册。
这些纽大部分都可以不碰它。
只用测量纽和调整曲线纽。
但有的朋友显然要搞清每个纽的作用,我们就一起来吧,我也没全搞清。
如有错误请大家指正,请貓版直接给修改吧。
Toolbar 工具条TuneLab Pro uses a toolbar for many functions. Here is the toolbar from TuneLab Pr 1、New Tuning File - prepares for creation of a new tuning, and may start auto measure sequence 创建新文件2、Open Tuning File - selects and load an existing tuning file. 打开已经存在的调律文件3、Save Tuning File - saves the current tuning in a file so it can recalled later 储存调律文件,在调律文件最后完成后,别忘了储存,此时要求你给文件起个名字。
toggles the sound generation mode 4、Sound On/Off -on and off 音频发生器,开/关,让它处于关。
5、Note Lower - switches to the next lowest note. (on the keyboard also works.) 向低音移动6、Note Higher - switches to the next higher note. ( on the keyboard also works.) 向高音移动7、Zero Offset - clears the offset to zero. (Z on the keyboard also works.) 清除偏调为零(别动它)8、Lock Mode - begins locking onto the note by automatically adjusting the offset (“.” also works.)锁定模式,(别动它)9、Zoom Out Spectrum Display - zooms out to show a wider range (“-” also works.) 缩小图形10、Zoom In Spectrum Display - zooms in to show a narrower range (“+” or“=” also works.) 放大图形11、Auto Note Switch, Both Direction - enables auto note switching in both directions 双向音移动开关12、Auto Note Switch, One Direction - enables auto note switching in just one direction 单向音移动开关13、Measure Inharmonicity - measures inharmonicity or current pitch in over-pull(pitch raise) mode (M)测量不和谐度,这是制作调律文件的最重要的第一步。
Lab.gruppen Installation Amplifier 产品说明说明书
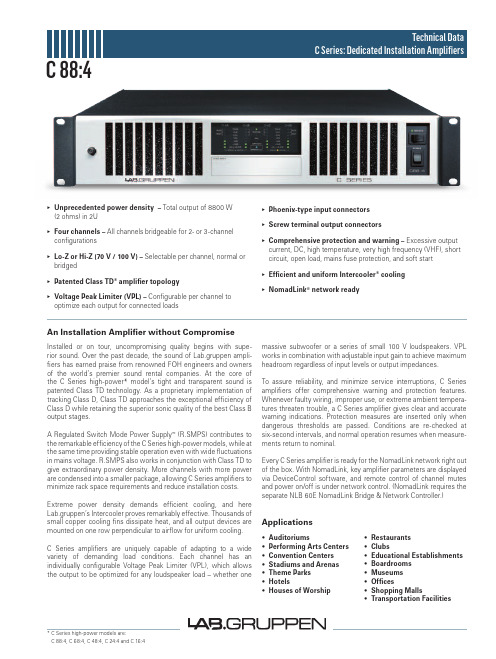
▸▸Unprecedented power density –▸Total▸output▸of▸8800▸W▸(2▸ohms)▸in▸2U▸▸▸Four channels –▸All▸channels▸bridgeable▸for▸2-▸or▸3-channel▸configurations▸▸Lo-Z or Hi-Z (70 V / 100 V) –▸Selectable▸per▸channel,▸normal▸or▸bridged▸▸Patented Class TD® amplifier topology▸▸Voltage Peak Limiter (VPL) –▸Configurable▸per▸channel▸to▸optimize▸each▸output▸for▸connected▸loads ▸▸Phoenix-type input connectors▸▸Screw terminal output connectors▸▸Comprehensive protection and warning –▸Excessive▸output▸current,▸DC,▸high▸temperature,▸very▸high▸frequency▸(VHF),▸short▸circuit,▸open▸load,▸mains▸fuse▸protection,▸and▸soft▸start▸▸Efficient and uniform Intercooler® cooling▸▸NomadLink® network readyAn Installation Amplifier without CompromiseInstalled▸or▸on▸tour,▸uncompromising▸quality▸begins▸with▸supe-rior▸sound.▸Over▸the▸past▸decade,▸the▸sound▸of▸Lab.gruppen▸ampli-▸fiers▸has▸earned▸praise▸from▸renowned▸FOH▸engineers▸and▸owners▸▸of▸the▸world’s▸premier▸sound▸rental▸companies.▸At▸the▸core▸of▸▸the▸C▸Series▸high-power*▸model’s▸tight▸and▸transparent▸sound▸is▸patented▸Class▸TD▸technology.▸As▸a▸proprietary▸implementation▸of▸tracking▸Class▸D,▸Class▸TD▸approaches▸the▸exceptional▸efficiency▸of▸Class▸D▸while▸retaining▸the▸superior▸sonic▸quality▸of▸the▸best▸Class▸B▸output▸stages.▸A▸Regulated▸Switch▸Mode▸Power▸Supply™▸(R.SMPS)▸contributes▸to▸the▸remarkable▸efficiency▸of▸the▸C▸Series▸high-power▸models,▸while▸at▸the▸same▸time▸providing▸stable▸operation▸even▸with▸wide▸fluctuations▸in▸mains▸voltage.▸R.SMPS▸also▸works▸in▸conjunction▸with▸Class▸TD▸to▸give▸extraordinary▸power▸density.▸More▸channels▸with▸more▸power▸are▸condensed▸into▸a▸smaller▸package,▸allowing▸C▸Series▸amplifiers▸to▸minimize▸rack▸space▸requirements▸and▸reduce▸installation▸costs. Extreme▸power▸density▸demands▸efficient▸cooling,▸and▸here▸▸Lab.gruppen’s▸Intercooler▸proves▸remarkably▸effective.▸Thousands▸of▸small▸copper▸cooling▸fins▸dissipate▸heat,▸and▸all▸output▸devices▸are▸mounted▸on▸one▸row▸perpendicular▸to▸airflow▸for▸uniform▸cooling.C▸Series▸amplifiers▸are▸uniquely▸capable▸of▸adapting▸to▸a▸wide▸variety▸of▸demanding▸load▸conditions.▸Each▸channel▸has▸an▸▸individually▸configurable▸Voltage▸Peak▸Limiter▸(VPL),▸which▸allows▸the▸output▸to▸be▸optimized▸for▸any▸loudspeaker▸load▸–▸whether▸one▸massive▸subwoofer▸or▸a▸series▸of▸small▸100▸V▸loudspeakers.▸VPL▸works▸in▸combination▸with▸adjustable▸input▸gain▸to▸achieve▸maximum▸headroom▸regardless▸of▸input▸levels▸or▸output▸impedances.To▸assure▸reliability,▸and▸minimize▸service▸interruptions,▸C▸Series▸amplifiers▸offer▸comprehensive▸warning▸and▸protection▸features.▸Whenever▸faulty▸wiring,▸improper▸use,▸or▸extreme▸ambient▸tempera-tures▸threaten▸trouble,▸a▸C▸Series▸amplifier▸gives▸clear▸and▸accurate▸warning▸indications.▸Protection▸measures▸are▸inserted▸only▸when▸dangerous▸thresholds▸are▸passed.▸Conditions▸are▸re-checked▸at▸six-second▸intervals,▸and▸normal▸operation▸resumes▸when▸measure-ments▸return▸to▸nominal.Every▸C▸Series▸amplifier▸is▸ready▸for▸the▸NomadLink▸network▸right▸out▸of▸the▸box.▸With▸NomadLink,▸key▸amplifier▸parameters▸are▸displayed▸via▸DeviceControl▸software,▸and▸remote▸control▸of▸channel▸mutes▸and▸power▸on/off▸is▸under▸network▸control.▸(NomadLink▸requires▸the▸separate▸NLB▸60E▸NomadLink▸Bridge▸&▸Network▸Controller.)•Auditoriums•Performing Arts Centers•Convention Centers•Stadiums and Arenas•Theme Parks•Hotels•Houses of Worship•Restaurants•Clubs•Educational Establishments•Boardrooms•Museums•Offices•Shopping Malls•Transportation Facilities Applications*▸C▸Series▸high-power▸models▸are:▸▸▸C▸88:4,▸C▸68:4,▸C▸48:4,▸C▸24:4▸and▸C▸16:4 C 88:4L a b .g r u p p e n a b ▸ S w e d e ni n t e r n a t i o n a L c o n t a c t ▸ i n f o @L a b g r u p p e n .c o m | u S & c a n a d a c o n t a c t ▸ i n f o @t c g -a m e r i c a S .c o mw w w .l a b g r u p p e n .c o mItem no. TDS-C884_V3GeneralNumber▸of▸channels4Peak▸total▸output▸all▸channels▸driven 8800▸W Peak▸output▸voltage▸per▸channel 141▸VMax.▸output▸current▸per▸channel 35.5▸Arms Max. Output Power 16 ohms 8 ohms 4 ohms 2 ohms 70 Vrms/100 Vrms peak Per▸ch.▸(all▸ch.’s▸driven)625▸W 1250▸W 2100▸W 2200▸W 2200▸W Bridged▸per▸ch.2500▸W4200▸W4600▸Wn.r▸4)n.r▸4)Performance with Gain: 35 dB and VPL: 141 V THD▸20▸Hz▸-▸20▸kHz▸for▸1▸W<0.1%THD▸at▸1▸kHz▸and▸1▸dB▸below▸clipping <0.05%Signal▸To▸Noise▸Ratio>112▸dBA Channel▸separation▸(Crosstalk)▸at▸1▸kHz>70▸dBFrequency▸response▸(1▸W▸into▸8▸ohms)▸+0/-3▸dB 6.8▸Hz▸-▸34▸kHz Input▸impedance20▸kOhm Input▸Common▸Mode▸Rejection,▸CMR 50▸dB Output▸impedance▸@▸100▸Hz30▸mOhmVoltage Peak Limiter (VPL), max. peak output VPL,▸selectable▸per▸ch.▸3)141,▸118,▸100,▸85,▸71,▸59,▸50,▸42▸VVPL,▸when▸bridged▸3)▸1)282,▸236,▸200,▸170,▸142,▸118,▸100,▸84▸V Voltage▸Peak▸Limiter▸mode▸(per▸ch.)Hard▸/▸SoftGain and LevelAmplifier▸gain▸selectable▸(all▸channels)▸1)▸–▸rear-panel▸switches 23,▸26,▸29,▸32,▸35,▸38,▸41,▸44▸dBDefault▸gain35▸dBLevel▸adjustment▸(per▸ch.)Front-panel▸potentiometer,▸21▸position▸detented▸from▸-inf▸to▸0▸dB,▸hidden▸behind▸security▸panel/dust▸filter▸grilleConnectors and switches Input▸connectors▸(per▸ch.)3-pin▸Phoenix,▸electronically▸balanced Output▸connectors▸(per▸ch.)Barrier▸strip▸2-pole▸screw▸terminalsOutput▸bridge▸mode A+B▸and/or▸C+D,▸inputs▸A▸and▸C▸are▸input▸source NomadLink▸network On▸board,▸2▸x▸RJ45▸connectorsIntelligent▸fans▸(on/off)Y es,▸depending▸on▸presence▸of▸output▸signal Power▸on/off▸and▸Remote▸enable▸on/off Individual▸switches▸on▸front-panelCoolingTwo▸fans,▸front-to-rear▸airflow,▸temperature▸controlled▸speedFront-panel indicators Common NomadLink ▸▸Network;▸Power▸Average▸Limiter▸(PAL)▸2);▸Power▸on▸Per▸channelSignal▸present▸/▸High-impedance;▸-10▸dB▸and▸-4▸dB▸output▸signal;▸Voltage▸Peak▸Limiter▸(VPL);▸Current▸Peak▸Limiter▸(CPL);▸Very▸High▸Frequency▸(VHF);▸High▸Temperature;▸Fault;▸MutePowerOperating▸voltage,▸230▸V▸/▸115▸V▸nominal 130▸-265▸/▸65-135▸V▸5)Minimum▸power-up▸voltage,▸230▸V▸/▸115▸V 171▸V▸/▸85▸V Power▸Average▸Limiter▸(PAL)▸2)YesSoft▸start▸/▸Inrush▸Current▸Draw Yes▸/▸max.▸5▸AMains▸connector 230▸V▸CE:▸16▸A,▸CEE7;▸115▸V▸ETL:▸30▸A▸Twist▸Lock Dimensions (W/H/D)W:▸483▸mm▸(19”),▸H:▸88▸mm▸(2▸U),▸D:▸343▸mm▸(13.5”)Weight 12▸kg▸(26.4▸lbs.)FinishBlack▸painted▸steel▸chassis▸with▸gray▸painted▸steel▸front ApprovalsCE,▸ANSI/UL▸60065▸(ETL),▸CSA▸C22.2▸NO.▸60065,▸FCC▸▸Note 1):▸Automatic▸-6▸dB▸gain▸compensation▸when▸bridging▸channels.▸Ch.’s▸A+B▸and/or▸C+D,▸can▸be▸bridged▸individually.▸Note 2):▸PAL▸can▸reduce▸the▸maximum▸output▸power▸to▸keep▸the▸power▸supply▸operating▸safely,▸and/or▸to▸prevent▸excessive▸current▸draw▸tripping▸the▸mains▸breaker.▸▸▸▸▸▸▸Refer▸to▸Operation▸Manual.▸Note 3):▸For▸sine▸waves,▸peak▸voltage▸output▸values▸translate▸to▸Vrms▸with▸the▸formula▸V/1.41▸=▸Vrms.▸E.g.▸100▸V▸peak▸equals▸app.▸70▸Vrms.▸▸▸▸Hence,▸outputs▸can▸be▸set▸for▸high-impedance▸loads▸without▸requiring▸a▸transformer.Note 4):▸Regarding▸n.r.▸(not▸recommended)▸notes:▸The▸amplifier▸will▸be▸fully▸operational▸in▸bridge-mode▸into▸2▸ohm▸and▸high▸impedance▸(Hi-Z)▸loads,▸but▸due▸to▸physical▸constraints▸▸▸▸▸▸in▸the▸construction,▸the▸max.▸output▸power▸will▸not▸be▸significanty▸higher▸than▸running▸individual▸channels▸and▸therefore▸this▸mode▸of▸operation▸is▸not▸recommended.Note 5):▸Separate▸230▸V▸or▸115▸V▸versions▸available.▸Not▸selectable▸on▸the▸amplifier.All specifications are subject to change without notice.Specifications C 88:4。
翻译好的 罗氏公司Tunel试剂盒操作说明书 (2)
罗氏(R o c h e)公司T u n e l试剂盒操作说明书(Insitucelldeathdetectionkit-POD法)一、原理:TUNEL(TdT-mediateddUTPnickendlabeling)细胞凋亡检测试剂盒是用来检测组织细胞在凋亡早期过程中细胞核DNA的断裂情况。
其原理是荧光素(fluorescein)标记的dUTP在脱氧核糖核苷酸末端转移酶(TdTEnzyme)的作用下,可以连接到凋亡细胞中断裂DNA的3’-OH末端,并与连接辣根过氧化酶(HRP,horse-radishperoxidase)的荧光素抗体特异性结合,后者又与HRP底物二氨基联苯胺(DAB)反应产生很强的颜色反应(呈深棕色),特异准确地定位正在凋亡的细胞,因而在光学显微镜下即可观察凋亡细胞;由于正常的或正在增殖的细胞几乎没有DNA断裂,因而没有3‘-OH形成,很少能够被染色。
本试剂盒适用于组织样本(石蜡包埋、冰冻和超薄切片)和细胞样本(细胞涂片)在单细胞水平上的凋亡原位检测。
还可应用于抗肿瘤药的药效评价,以及通过双色法确定细胞死亡类型和分化阶段。
二、器材与试剂器材:光学显微镜及其成像系统、小型染色缸、湿盒(塑料饭盒与纱布)、塑料盖玻片或封口膜、吸管、各种规格的加样器及枪头等;试剂:试剂盒含:1号(蓝盖)EnzymeSolution酶溶液:TdT10×、2号(紫盖)LabelSolution标记液:荧光素标记的dUTP1×、3号(棕瓶)Converter-POD:标记荧光素抗体的HRP;自备试剂:PBS、双蒸水、二甲苯、梯度乙醇(100、95、90、80、70%)、DAB工作液(临用前配制,5μl20×DAB+1μL30%H2O2+94μlPBS)、ProteinaseK工作液(10-20μg/mlin10mMTris/HCl,pH7.4-8)或细胞通透液(0.1%TritonX-100溶于0.1%柠檬酸钠,临用前配制)、苏木素或甲基绿、DNase1(3000U/ml–3U/mlin50mMTris-HCl,pH7.5,10mMMgCl2,1mg/mlBSA)等。
Tunelab_pro教程(可编辑)
Tunelab_pro教程(可编辑)安装与注册1.索取注册号:在PC机上运行“算号器”Key Generator,在“用户名”栏填上你的英语(拼音)名字、点击“确定”,这时“序列号”一栏即可出现与你输入名字相配套的“注册号”。
将“名字”和“注册号”用纸笔记录下来备用。
2.安装系统:运行tunelab_pro_setup.exe。
注意装文过程中界面除系统配置文件之外的一些附加文件(很有用的文件)安装路径及目录的提示,若不加更改的话,这些附加文件将会被默认安装到你PC机“我的文档”里。
3.注册:安装完成后,桌面上即有TuneLabPro的快捷方式,点击它、启动该系统。
点击左上第一行菜单栏的Help项,在下拉菜单中先“Enter License Infomation”,在出对话框的上面一行填上你的“名字”,下面一行填上索取到的“注册号”,然后点OK、再点确认,这时tunelab会自动退出,当再次启动系统时你的名字就会显示在主界面右的上角,以示注册成功。
tunelab 界面介绍然后说一下标准界面上所有的显示的意义(红色字体)A:相差显示,如果钢琴发出的声音偏低,则黑色块往左移动。
反之则往右移动B:所调的音的显示,如果你在调C1,则可以通过键入字母c,1,软件就会显示到C1了。
如果是#C1,则按大写C,1以此类推。
往旁边的音移动,可以通过按左右键来切换。
软件也有自动切换功能。
C:精度显示,这是一个白色小色带,如果钢琴的误差在1cent之外,则全白。
如果进入1cent范围之内,则色块会从外向内变灰。
灰色满了,也就是正好到位了。
D:光谱显示,道理同A,中间的红线为基准,左低右高。
一般在调中低音区的时候,看A区比较方便,而在调试最高的那几个音的时候,看D得显示则快捷多了。
校准步骤:首先,你需要有一个可靠的440赫兹的频率发生器(TuneLab使用交流群的“共享”里的‘UFO-频率发生器’即可下载到PC里、打开运行将界面频率值改设为440Hz并使其发响即可使用)。
VOX STOMLAB IIG 中文说明书

1
2
3 4
1. INPUT插孔 连接吉它至此插孔。
5
2. OUTPUT/PHONES插孔 连接此插孔至吉他放大器、调音台、录音机或耳机。 3.POWER按键 按下并按住此按键1秒会开启或关闭电源。 4.DC 9V插孔 您可以连接选购的AC适配器至此插孔。
基本连接
请务必在连接线缆前先关闭所有设备的电源。如果 您在连接线缆时不遵守注意事项,可能损坏吉他放 大器或扬声器系统或导致其它故障。 1. 使用线缆连接StompLab的OUTPUT/PHONES插孔 至您的吉他放大器、调音台或录音机。 连接线缆或开启电源时请务必降低放大器或调音 台的音量,使您不再听到噪音。
注意 注意
安装
安装电池
请勿混合使用新电池和旧电池或不同类型的电池。 1. 从橡胶支脚取下4个固定底盖的螺丝。 2. 请务必按照正确的极性(“+”和 “-”标记)插入5号电池,然后关闭底盖。
如果使用耳机,请将它们插入OUTPUT/PHONES 插孔。 如果使用选购的AC适配器,请将它连接至背面 板的DC9V电源插孔,然后将适配器插入AC插座 开启电源。
PEDAL AMP/DRIVE (Lo - Hi) VOLUME PEDAL MODULATION CABINET
C
C#
D
D#
E
F
F#
G
G#
A
A#
B
3. 如果您的吉他音高过高,调音表#LED灯会亮起。 如果您的吉他音高过低,调音表 LED灯会亮起。 若非以上两种情况,LED灯的亮度会表示音高的偏 离程度。 音高准确时,调音表中央LED灯会亮起。 矫正调音表 您可以调节内置调音表的参考音高(钢琴的中央频率 A)。您可以在438Hz-445Hz的范围内矫正此参考音 高。 注意会 当您关闭电源后, 矫正设置会被删除, StompLab
VOX ToneLab 说明书

使用说明书注意事项不当使用位置在以下位置使用本机可能造成故障。
• 阳光直射的位置• 极热、极冷、极潮湿的地方• 尘垢过多的场所• 振动过多的场所• 靠近磁场的位置电源应将指定的AC/AC电源线连至电压正确的交流电源,不应连至非本机设计电压的电源。
与其他电器的介面本机可能会对邻近的收音机、电视机造成干扰。
应在较远离收音机、电视机的位置操作本机。
小心使用不应对开关等控件过度用力,以免损坏。
小心保养机身外部沾污时应以干布拭抹,不应使用苯、香蕉水、清洁剂或易燃溶剂等液体清洗。
保存本说明书本说明书阅读后应予保存以便日后参阅。
确保异物不进入设备绝对不可将有液体的容器放在本机之上。
一旦有异物进入本机内部时,应拔除AC/AC电源,再联系就近的Korg或购买本机的分店。
THE FCC REGULATION WARNING (for U.S.A.)This equipment has been tested and found to comply with the limits for a Class B digital device, pur-suant to Part 15 of the FCC Rules. These limits are designed to provide reasonable protectionagainst harmful interference in a residential installation. This equipment generates, uses, and can radiate radio frequency energy and, if not installed and used in accordance with the instructions, may cause harmful interference to radio communications. However, there is no guarantee that interfer-ence will not occur in a particular installation. If this equipment does cause harmful interference to radio or television reception, which can be determined by turning the equipment off and on, the user is encouraged to try to correct the interference by one or more of the following measures:•Reorient or relocate the receiving antenna.•Increase the separation between the equipment and receiver.•Connect the equipment into an outlet on a circuit different from that to which the receiver isconnected.•Consult the dealer or an experienced radio/TV technician for help.Unauthorized changes or modification to this system can void the user’s authority to operate thisequipment.CE mark for European Harmonized StandardsCE mark which is attached to our company’s products of AC mains operated apparatus until Decem-ber 31, 1996 means it conforms to EMC Directive (89/336/EEC) and CE mark Directive (93/68/EEC).And, CE mark which is attached after January 1, 1997 means it conforms to EMC Directive (89/336/ EEC), CE mark Directive (93/68/EEC) and Low Voltage Directive (73/23/EEC).Also, CE mark which is attached to our company’s products of Battery operated apparatus means it conforms to EMC Directive (89/336/EEC) and CE mark Directive (93/68/EEC).数据处理操作不当或故障可引致记忆内容丢失,建议将重要数据储存至磁盘。
Tune软件操作说明-Q-Exactive series

1 打开 Tune 软件 2 界面及图标介绍 界面及图标介绍(1)ON、Standby、Off,启动扫描时选择 On,待机选择是 Standby(2)打开 tune 方法(3) (4)保存 tune 方法 六通阀的切换,只用 a,1 是 waste,2 是 inject(5) (6)质谱注射泵,可以更改流速 三个灯都为绿色是正常状态,第 1 灯:指示仪器通讯是否正常,第 2个灯:指示仪器硬件状态是否正常,第 3 个灯:指示仪器的性能状态是否正常。
典型的变黄 原因有:校正过期。
建议重新校正,校正完成之后可恢复绿色。
将鼠标放在上述的灯上即可 显示变黄的信息提示。
3Instrument control 各项参数3.1 Scan parameters(1) Scan type:分为 Full MS-SIM 和 AIF-MS/MS; Full MS:一级全扫,要求 Last mass≤15*first mass SIM:当 full mass 的扫描范围小于 50 个质量数时,自动变为 SIM。
AIF:所有的离子全部碎裂,没有母离子的选择性,现在软件无法识别二级子离子是由哪个 母离子产生的,所以暂时不用这种方法。
MS/MS:设定 center/width,或者 scan range,这里设置的是母离子的质荷比; (2) Scan range:参考 scan type,scan type 中设置的是 full scan 时,这里设置全扫的质荷 比范围,如果 scan type 中选择的是 MS/MS,此处应设置子离子的扫描范围。
(3) Fragmentation:分为 source CID 和 NCE,一般做 full scan 时此项是关闭状态 Source CID:源内裂解,主要用于打开二聚体等非共价结合的键。
NCE:归一化碰撞能量。
仪器校正后,每个特定质荷比的离子都有一个对应将其打碎的能量 值,做小分子设为 35; (4) Resolution:分辨率代表仪器将不同质量数离子分开的能力,QE 可以达到 14 万,最 低分辨率为 1750。
- 1、下载文档前请自行甄别文档内容的完整性,平台不提供额外的编辑、内容补充、找答案等附加服务。
- 2、"仅部分预览"的文档,不可在线预览部分如存在完整性等问题,可反馈申请退款(可完整预览的文档不适用该条件!)。
- 3、如文档侵犯您的权益,请联系客服反馈,我们会尽快为您处理(人工客服工作时间:9:00-18:30)。
初次使用此软件的朋友, 看了猫版的介绍, 再加上这个指南文件, 上手应当很轻松了。
献给部分英文比我还糟的朋友, 呵呵Using this tutorial 如何使用此指南This tutorial is meant to be used as a step-by-step guide to certain operations in TuneLab Pro. 本指南将一步一步的指导您在TuneLab Pro中的操作. Many of these operations involve the keyboard.有相当一部分操作涉及到键盘的使用。
However, the keys that you pr ess when this tutorial is displayed do not always go to TuneLab Pr o.然而, 当此帮助页面显示时, 您按下键盘键并不总是能够回到Tu neLab Pro操作界面。
In fact, every time you call this tutorial and every time you click in it, the tutorial acquires the "focus" of the keyboard.实际上, 每当您查看本指南或者在本指南显示的区域内操作鼠标时, 焦点总是被当前的指南页面获得的。
To make the keys go to TuneLab Pro, you need to give the focus back to TuneLab Pro. 要想使用键盘来控制TuneLab Pro的操作, 您需要使焦点回到TuneLab Pro界面中。
You can do that by clicking anywhere insid e the TuneLab Pro window. 您可使用鼠标点击TuneLab Pro窗口来实现。
Remember to do that whenever the instructions in this tut orial call for using the keyboard.当执行本指南中使用键盘的操作时, 记得上述的提示。
The contents list shows the tutorial topics. 目录列出本指导的主题。
Some topics require several pages. 部分主题包含了几页的内容。
These topics can be viewed by using the "--Next--" link at the bottom of a topic. 可使用页面底部的NEXT链接来进行翻页查看。
If this help window gets in the way of some part of the Tune Lab Pro screen, then you can click and drag the title bar of the tut orial window to move it out of the way. You can even resize the help window by dragging at the borders.若此帮助窗口遮挡了Tune Lab Pro主窗口, 您移动此窗口或拖拽边框改变大小。
Although this tutorial is focused primarily on how to do certain thi ngs, you can also find out why we do these things.尽管此指南已覆盖了大部分的主要操作内容, 您仍能够进一步得到这些内容的解释。
Click on the links in the text that say "(Why?)" and learn more about the operation being described.点击文本中的”Why”以得到更多的操作描述。
These topics show only the simplest way to do the operations show n. For more in-depth coverage of any topic, see the Help Topics i n the Help menu in TuneLab Pro.本指南仅指出了所列举操作的最简单的方式, 要得到理为详尽的帮助主题, 请参阅主程序的帮助菜单。
-----Selecting notes-----选择音uMake sure the keyboard caps lock is off (Why?). 确认键盘的cap s lock在关闭状态( If you select notes by pressing upper case versi ons of A-G, you will get the sharp version of these notes. To mak e sure you get the naturals, use only lower case.如果为大写状态, 您会选择带#的音) Press the B key.按B键, No te how the current note is now B. 注意当前音显示是B, The octav e number after the B remains unchanged. 八度序号数没有变化。
P ress the 3 key.按3键, Note how the current note is now B3.注意当前音显示为B3。
uPress the right arrow key several times. 按几下右方向键, Note h ow the current note goes up one note at a time. 可注意到当前音每次上行一个。
Press the left arrow key. Note how the current note goes down one note at a time.按左方向键, 可看到当前音每次下行一个。
uPress the Pg-Up or Pg-Dn keys. Note how the octave number goe s up or down one octave at a time.八度序数每次上行或下行一个。
uHold the shift key and press the right arrow key to enable automa tic note switching (Why?You enable auto note switching so that yo u can operate TuneLab Pro without touching the computer. 设置为自动切换方式您能够不用接触计算机来操作TuneLab Pro。
TuneLab Pro listens to the notes you play and when it hears that you are playing the next note in the scale it will automatically switch to tha t note. TuneLab Pro监听您所弹奏的音, 如果它听到您所弹音在下一个音的频率范围, 它将自动切换到下一个音。
There are three di fferent versions of auto note switching - auto up, auto down, and a uto both. 有三种自动切换方式, 自动上, 自动下, 全自动。
These modes can be enabled by holding the shift key and pressing the rig ht arrow, the left arrow, or the left and right arrows together. 能够按SHIFT+右, 左, 左右同时来进行切换。
Auto note switching is d isabled by holding the shift key and pressing the down arrow. 退出自动切换模式只须按SHIFT+下方向键。
You can see the current s tate of auto note switching by noting which auto note toolbar butto ns are pushed in at the top of the screen. 您能够看到屏幕上端的音切换方式显示工具栏上的按钮呈弹起状态。
).按住SHIFT键按右方向键, 设置自动切换方式。
uSelect note B3.选择B3uPlay note C4 on the piano. 弹奏C4, Note how the current note a utomatically switches to C4.当前设置显示当前音自动切换到C4。
uHold the shift key and press the down arrow key to turn off auto matic note switching. 按SHIFT+↓关闭自动切换状态。
Tuning with the spectrum display调音的频谱显示uSelect note A4.选择A4uPress the "+" key to select the zoomed-in view of the spectrum di splay.按+键选择放大查看模式。
uPlay A4 on a piano.弹奏钢琴A4, The spectrum display should s how a graph with a peak somewhere in the middle. 频谱图的曲线中部会出现一个波峰, If the peak is to the left of the red line the n the note on the piano is flat.如果波峰在红线的左侧, 钢琴的A4音偏低。
If the peak is to the right of the red line then the note is sharp. 如果在红线右侧, 则偏高。