FISHMAN PRESYS BLEND 301中文说明
斑马鱼(Zebrafish)半胱氨酸蛋白酶3(Casp-3)ELISA试剂盒说明书

本试剂盒只能用于科学研究,不得用于医学诊断斑马鱼(Zebrafish)半胱氨酸蛋白酶3(Casp-3)ELISA检测试剂盒使用说明书检测原理试剂盒采用双抗体一步夹心法酶联免疫吸附试验(ELISA)。
往预先包被半胱氨酸蛋白酶3(Casp-3)抗体的包被微孔中,依次加入标本、标准品、HRP标记的检测抗体,经过温育并彻底洗涤。
用底物TMB显色,TMB在过氧化物酶的催化下转化成蓝色,并在酸的作用下转化成最终的黄色。
颜色的深浅和样品中的半胱氨酸蛋白酶3(Casp-3)呈正相关。
用酶标仪在450nm波长下测定吸光度(OD值),计算样品浓度。
样品收集、处理及保存方法1.血清:使用不含热原和内毒素的试管,操作过程中避免任何细胞刺激,收集血液后,3000转离心10分钟将血清和红细胞迅速小心地分离。
2.血浆:EDTA、柠檬酸盐或肝素抗凝。
3000转离心30分钟取上清。
3.细胞上清液:3000转离心10分钟去除颗粒和聚合物。
4.组织匀浆:将组织加入适量生理盐水捣碎。
3000转离心10分钟取上清。
5.保存:如果样本收集后不及时检测,请按一次用量分装,冻存于-20℃,避免反复冻融,在室温下解冻并确保样品均匀地充分解冻。
自备物品1.酶标仪(450nm)2.高精度加样器及枪头:0.5-10uL、2-20uL、20-200uL、200-1000uL3.37℃恒温箱操作注意事项1.试剂盒保存在2-8℃,使用前室温平衡20分钟。
从冰箱取出的浓缩洗涤液会有结晶,这属于正常现象,水浴加热使结晶完全溶解后再使用。
2.实验中不用的板条应立即放回自封袋中,密封(低温干燥)保存。
3.浓度为0的S0号标准品即可视为阴性对照或者空白;按照说明书操作时样本已经稀释5倍,最终结果乘以5才是样本实际浓度。
4.严格按照说明书中标明的时间、加液量及顺序进行温育操作。
5.所有液体组分使用前充分摇匀。
试剂盒组成名称96孔配置48孔配置备注微孔酶标板12孔×8条12孔×4条无标准品0.3mL*6管0.3mL*6管无样本稀释液6mL3mL无检测抗体-HRP10mL5mL无20×洗涤缓冲液25mL15mL按说明书进行稀释底物A6mL3mL无底物B6mL3mL无终止液6mL3mL无封板膜2张2张无说明书1份1份无自封袋1个1个无注:标准品(S0-S5)浓度依次为:0、3、6、12、24、48pmol/L试剂的准备20×洗涤缓冲液的稀释:蒸馏水按1:20稀释,即1份的20×洗涤缓冲液加19份的蒸馏水。
西顿森产品指南说明书

OBJECTIVES • Students will demonstrate a beginning understanding of the roles of John Hancock, Paul Revere, George Washington, Benjamin Franklin, and Thomas Jefferson in the American Revolution. • Students will create a biographical poster depicting the life of one of the five historical figures in the story.
OTHER WESTON WOODS PRODUCTIONS ABOUT AMERICAN HISTORY INCLUDE: And Then What Happened, Paul Revere? by Jean Fritz, ill. by Margot Tomes George Washington’s Mother, by Jean Fritz, ill. by DyAnne DiSalvo-Ryan The Journey of the One and Only Declaration of Independence, by Judith St. george, ill. by Will Hillenbrand Shh! We're Writing The Constitution, by Jean Fritz, ill. by Tomie dePaola So You Want To Be President? by Judith St. George, ill. by David Small What’s the Big Idea, Ben Franklin? by Jean Fritz, ill. by Margot Tomes Why Don’t You Get A Horse, Sam Adams? by Jean Fritz, ill. by Trina Schart Hyman Will You Sign Here, John Hancock? by Jean Fritz, ill. by Trina Schart Hyman
Soundiron Ambius 3 Expanse 1 用户手册说明书

Found installer for: [EXs name]
Space required: [nnn] MB SSD1: [disk name] [nnn] GB available
10. Press Install to continue with the installation, or press Cancel to stop without installing. An “are you sure?” message will appear to confirm the installation.
Global “0–3: KSC Auto‐Load” on page 762 Global “0–4: Sample Management” on page 765 Disk mode menu command “Load .PCG” on page 829 Disk mode menu command “Load .KSC” on page 838
7. Open the folder containing the EXs data from step 2.
8. Select the file whose name ends in .exsins. The “exsins” suffix stands for “EXS INStaller.” For instance, an installer file might be named “EXs10.exsins.” When an .exsins file is selected, the Load button changes to read Install. Only one EXs can be installed at a time. If Multiple Select is On, Install will be disabled.
北海道三维金枪鱼鱼油乳

北海道三维金枪鱼鱼油每10毫升含维生素A620单位,维生素D365单位,维生素C15.4毫克。
含有重要的OMEGA-3脂肪酸,EPA和DHA,帮助毛发生长色素沉淀健康皮肤。
维生素A和维生素D是犬猫生长发育的必需物质,针对胎儿、离乳犬的发育、上皮组织的完整性、视力、血钙和磷的恒定,骨骼、牙的生长发育、有助治疗关节疾病、佝偻病软骨病,控制泪痕分泌。
产品介绍含有重要的omega-3 脂肪酸,EPA 和DHA,帮助毛发生长色素沉淀健康皮肤。
维生素A和D是犬只生长发育的必需物质,尤其对胎儿、离乳犬的发育、上皮组织的完整性、视力、血钙和磷的恒定,骨骼、牙的生长发育、有助治疗关节疾病、佝偻病软骨病,控制泪腺分泌。
基本成分:深海海域的金枪鱼油的基本成分是Omega-3系列不饱和脂肪EPA和DHA。
EPA 具有降低血液黏度,化解血管壁内多余的脂肪,降低甘油三脂及胆固醇(LDL)浓度,达到清理血栓、降低血脂、预防和改善心脑血管疾病的作用,被国际上公认为“血管清道夫”。
在深海鱼类体内富含有另外一种不饱和脂肪酸DHA 是大脑细胞生成的物质基础,缺乏DHA将造成大脑发育障碍。
DHA对光线刺激十分重要,在大脑及视网膜等组织中DHA含量高,是脑部,眼部,各种神经系统及体质防御系统的重要组成部分,对脑部及眼睛发育有非常密切的关系。
对胎儿,幼犬,成年犬和全年龄阶段猫都是不可缺乏的物质,尤其对胎儿和老年犬特别有帮助。
由于犬猫无法自行合成DHA,必须从食物中摄取而来,胎儿可以通过母犬食用的DHA得到吸取,老年犬增加DHA和EPA的吸取,可以有效降低老年病比如关节疾病的发生。
科学搭配多鱼配方:三种鱼类的综合营养提纯。
金枪鱼的鱼肉中脂肪酸大多为不饱和脂肪酸,所含氨基酸齐全,8种氨基酸均有,金枪鱼中含的DHA是鱼中之最,金枪鱼还含有大量的EPA;三文鱼具有最高的营养价值,享有“水中珍品”的美称;鳕鱼肝油中这些营养成分的比例,正是每日所需药量的最佳比例。
FISHMAN ACOUSTIC MATRIX PROFESSIONAL系列产品说明书

T h a n ky o u f o r y o u rp u r c h a s eo f aF I SHMANp r o d u c t.P l e a s er e a d t h e s e i n s t r u c t i o n sc a r e f u l l y.I f y o uh a v ea n yq u e s t i o n so rp r o b l ems,c o n t a c t o u rPRODUCTI NFORMAT I ONL I NEa t978-988-9665.THETRANSDUCERT h eACOUST I CMA TR I Xp i c k u p i sma d ew i t hau n i q u ec o-p o l yme rs e n s i n gma t e r i a l a v a i l ab l ee x c l u s i v e l yf r omF i s hma n.T h i sma t e r i a le x h i b i t sas e n s i t i v i t ya n dd y n am i c r a n g e t h a t f a r s u r p a s s e sa l l o t h e rk n ownma t e r i a l s.T h eACOUST I CMA TR I Xt r a n s d u c e r i samu l t i-l a y e r c o n f i g u r a t i o no fc o n t i n u o u ss t r i p so f s e n s i n gma t e r i a l t h a t a r e f u l l yEM I s h i e l d e d.T h i sc o n t i n u o u ss t r i pd e s i g na l l ow s i t t os e n s e t h emo t i o no f t h ee n t i r es a d d l er a t h e r t h a nsma l l s e c t i o n so f i t(a s i s t h ec a s ew i t ht r a d i t i o n a l c e r am i cb a s e d t r a n s d uc e r s);p r o v id i n gs u p e r bs t r i n gb a l-a n c e.T h e i n c r e d i b l ysma l l s i z ea n dc o n v e n i e n t u nde r t h es a d d l ed e s i g no ft h e t r a n s d u c e rh e l p sp r e s e r v e t h eb e a u t ya n ds t r u c t u r a l i n t e g r i t yo fy o u r i n s t r ume n t.THEPREAMPT h e f o u r-b a n de q u a l i z e r/p r e amp i s t h eb r a i no f t h eACOUST I CMA TR I XPROFESS I ONA Ls y s t em.T h i s l ow-p r o f i l e“s l i d e r”u n i t f e a-t u r e sBASS,TREB L E,M I DRANGEa n dBR I L L I ANCEc o n t r o l sa swe l l a sa“s e t i t a n d f o r g e t i t”SUB-BASSe n e r g y t r i mc o n t r o l l o c a t e do n t h eb ac ko f t h ep r e amp.T h i s i n t e r n a l t r i mf e a t u r ec a nb eu s e d t oa d j u s t t h eamo u n t o f s o u n d h o l er e s o n a n c eo r“b o t t om”s o t h a t t h ep r e ampw i l l f u n c t i o na t o p t i mump e r f o r ma n c e l e v e l s i ng u i t a r so f v a r y i n gb o d ys i z e s.O t h e r f e a t u r e s i n c l u d eab a t t e r y f u nc t i o n i nd i-c a t i n gL EDa n daPHASESW I TCH.SMARTSWI TCHI f y o u p l a n t om i x t h eACOUST I CMA TR I Xw i t ha no n b o a r dm i n ie l e c t r e t m i c r o p h o n e t h r o u g h t h eF i s hma nB l e n d e rS y s t em(r o u t e dt h r o u g has i n g l es t e r e o i n s t r ume n t c a b l e),y o um u s t f i r s t i n s t a l l aF i s hma nSMARTSW I TCH.Ca l l F i s hma na t978-988-9665f o rm o r ei n f o r ma t i o n.P I EZOI NSTALLAT IONI f y o ua r en ewt ou n d e r s a d d l ep i e z o i n s t a l l a t i o n s,ac omp r e h e n s i v eg u i d e,“T h eF i n e rPo i n t so fP i e z oI n s t a l l a t i o n”b yK e nP a r k e r,i sa v a i l ab l e f r omF i s hma n.EXCEPTION:Pickups in guitars with a very steep string break angle(25° or more), will generally perform well, even if the saddle slot depthmeasures more than 50% of the total saddle height.COMPENSATED SADDLESWe do not recommend compensating the saddle under the "B" string.Doing so may twist the saddle and cause uneven pickup response.PREPARE THE SADDLE SLOT1.Rout a .125" (3.2 mm) wide saddle slotfor the Acoustic Matrix Wide Formatpickup.ORRout a .09375" (2.3 mm) wideslot for the Acoustic MatrixNarrow Format pickup.2.Be certain that the bottom of the slot is FLAT.Deepen an existing slot only enough to obtain a clean, flat surface.LOCATE THE WIRE HOLE1.Locate the center of the wire hole no less than .100" (2.5 mm) fromthe closest string.2.Mark the location where the wire will enter the saddle slot.Centerthe mark between the walls (width) of the slot.3.Drill a .09375" hole.4.Clear wood chips and foreign materials from the saddle slot.5.Carefully insert (do not bend) the pickup.PREPARE THE SADDLEWe recommend synthetic materials such as Micarta or Corian asexcellent saddle materials for the Acoustic anic materialssuch as bone or ivory are not as consistent and may result in poorstring balance.1.Prepare a .125" wide saddle (.09375" for Narrow Format) The bot-tom of the saddle must be FLAT.2.Remove only enough material from the width of the saddle to pro-vide a sliding fit in the slot.To test the fit, the saddle should slideeasily in the slot, but should not fall out when overturned.To main-tain your current action, the new saddle must be .053" shorter inheight (.043" for Narrow Format pickups) than your current saddle.NOTE:The overall length of the Matrix pickup is 2.700" (68.58mm).We recommend a saddle slot length of at least 2.875" (73mm).The actual sensing area of the pickup is 2.670" long and can accom-modate string spacings of up to 2.500" (63.5 mm).Poor string bal-ance may result with string spacings greater than this.DO NOT trim the end of the pickups length as ground hum will occur.Custom pickup lengths are available from Fishman.MECHANICAL FACTORS AFFECTINGPICKUP PERFORMANCEBREAK ANGLEThere must be an adequateamount of downbearing pres-sure on the pickup in orderfor it to perform optimally.when there is a 20° (minimum) break angle across the saddle.A pickup in a Guitar with less than a 20° break angle will often havestring balance problems as well as poor tone.For such instruments,an adequate break angle can be realized by "ramping" the string slotsor (in extreme cases) raising the saddle height and resetting the neckangle.THE 50/50 RULEFor adequate coupling between string, saddle and pickup, we recom-mend that the saddle slot depth (with pickup installed) should equal nomore than 50% of the total height of the saddle.ADJUSTING FOR TOO DEEP A SADDLE SLOTIf the slot (with pickup installed) measures more than 50% of the totalsaddle height, the pickup performance will often suffer.To correct fortoo deep a slot, place a wood shim under the pickup.Determine theproper thickness of the shim by subtracting 1/2 of the total saddleheight from the slot depth (with pickup installed).Then, remove anamount of material equal to the thickness of the shim from the bottomof the saddle.WARN I NGI NST A L L A T I ONBYAQUA L I F I EDPROFESS I ONA LREP A I RMANI SSTRONGL YRECOMMENDED.F I SHMANTRANSDUCERSW I L LNOTBERESPONS I B L EFORANYDAMAGESTOYOURI NSTRU-MENTDUETOI MPROPERI NST A L L A T I ON.NOTE:A l wa y sh a n d l e t h ep i c k u pw i t hc a r e.M i s h a n d l i n gma y r e s u l ti ng r o u n dh umo r i n t e r m i t t e n t s i g n a l.F i s hma nT r a n s d u c e r sw i l l n o tb er e s p o n s i b l e f o ra n yd ama g e s t h a tma yo c c u rd ue t om i s u s eo rp o o r i n s t a l l a t i o n.PARTS LIST•Slider Bezel• Preamp•Acoustic Matrix Pickup•1/4" Stereo Jack, with hardware•4-40 Screws (4), 3/16" length, withStar Washers•4-40 Screws (4), 7/16" length•1/4" Aluminum Hex Standoffs (4),9/16" length•3/16" Brass Hex Jack Screws (4),1/2" length•(3) Adhesive-backed PlasticWire Guides• Preamp Cutout Template•(5) Slider Knobs•Back Plate with Battery ClipTOOLS•Caliper•Router with 1/8" (3 mm)(or .9375" Plunging Cutterfor Narrow Format)•400 Grit Sandpaper or Scraper•Flex Shaft Tool with 1" (25.4 mm)Diameter Saw Blade or Routerwith 1/4" (6.30 mm) cutter.•Soldering Iron (30 watt max)•Rosin Core Solder• Wire Strippers•#1 Phillips Screwdriver•Variable Speed Drill• Center Punch• 1/8" Twist Drill•15/32" Spade Bit Drill•1/2" Open End Wrench•3/32" Allen WrenchWIDE FORMATWidth:.125" (3.2 mm)Height:.053" (1.35 mm)Length: 2.650" (67.3 mm)Sensing Area: 2.670" (67.8 mm)Max.recommended string spacing:2.500" (63.5 mm)NARROW FORMATWidth:.09375" (2.4 mm)Height:.043" (1.1 mm)Length: 2.650" (67.3 mm)Sensing Area: 2.670" (67.8 mm)Max.recommended string spacing:2.500" (63.5 mm)PICKUP DIMENSIONSa complete stop before removing it from the hole.The jack should protrude at least 5/16" and no more than 11/32" out-side of the body for proper fit.After fitting the small dress washer and nut over the end of the jack, insert the 3/32" allen wrench through the cross drilled hole on the end of the jack.Tighten the nut with the 1/2"open end wrench while holding the jack in place with the allen wrench.Thread and hand tighten the the strap button.NOTE:With the strap button in place, the end of the jack should protrude slightly to allow proper plug fit.MOUNT THE PREAMPThe hardware supplied will accommodate guitars with laminated sides that are between .100" and .175" thick.If your guitar has sides less than .100" thick, the slider knobs will not fit in the bezel properly.To make up the difference, use #4-40 washers to shim the preamp inside the instrument or contact Fishman for longer standoffs.1.Fasten the 3/16" brass hex screws and the 1/4" hex standoffs tothe preamp as shown.Note that the mounting holes on the volume control side of the circuit board are slotted to allow for fitting the preamp to the curved surface of the guitar side.2.Temporarily fit the preamp and bezel together on the guitar, withthe standoffs finger tight.Fasten the bezel with the #4-40 1/2"screws to check the standoff alignment.Align the standoffs if nec-essary.Remove the preamp from the guitar.Tighten the aligned standoffs secure.3.Mount the backplate to the preamp with the 3/16" #4-40 screws.Install the battery and string up the guitar.4.Plug the guitar into an amplifier and set all the slider's tone con-trols to their center positions.On the back of the preamp, there is a recessed Sub-Bass control which is preset at the factory to full boost.This can be used to roll-off the amount of “bottom end”which can cause feedback (especially in larger dreadnought-style guitars).Turn the trim pot counter clockwise for less bass.5.Re-install the preamp into the guitar.Be sure that the low batteryLED lines up with the corresponding hole in the bezel.6.Attach the adhesive backed plastic wire guides to the sides or thekerfing of the instrument.7.Insert a 9 Volt Alkaline battery into the battery clip.IMPORTANT:Although the supplied battery holder should provide adequate capacity to grip the battery at all times, we strongly recom-mend removal of the battery when shipping your instrument.FAILURE TO REMOVE BATTERY COULD RESULT IN DAMAGE TO YOURINSTRUMENT.Fishman will not be held responsible for any such dam-age as a result of shipping or handling.OPERATIONThe output jack of the Acoustic Matrix Professional System is also the power switch for the battery.When a cable is first plugged into this jack, the BATT/LOW LED will flash momentarily to indicate that the power is on.When the battery power is low, this light will remain lit.Be sure to unplug the output jack when not in useto avoid battery drain.Adjust the volume of the preamp and your amplifier as ing your ears as a guide, set the PHASE switch for proper phase relationship with the sound source (amps, monitors, etc.).This relationship is most audible at louder volumes and will change from room to room and with your position on stage.PREPARE THE ENDPIN BLOCKTOOLS• Masking Tape• Variable Speed Drill • Center Punch• 1/8" Twist Drill• 15/32" Spade Bit Drill • 1/2" Open End Wrench• 3/32" Allen Wrenchendpin in place.1.Apply masking tape around the endblock area to protect the instru-ment.2.Locate an X-Acto saw blade 1/16" away from the body and saw offthe endpin.3.Centerpunch a guide hole in the center of the trimmed endpin.4.Drill a 1/8" pilot hole through the endblock.5.Line up a 15/32" Spade bit in the pilot hole and begin drilling.Maintain a perpendicular plunge in relation to the e steady (but not heavy) pressure, especially as the drill exits inside the guitar.IMPORTANT:To avoid damage to the instrument, let the drill come toTROUBLESHOOTING。
惠普生鱼油软胶囊

惠普生牌鱼油软胶囊鱼油:中老年人心脑健康首选鱼类中的ω-3 不饱和脂肪酸存在于鱼油中,主要是二十碳五烯酸(EPA)和二十二碳六烯酸(DHA)。
EPA:能降低血清胆固醇,抑制血液中的中性脂肪上升,调节血脂,改变脂蛋白中脂肪酸的组成。
DHA:具健脑作用,DHA是人脑的主要组成成分之一,占人脑脂质的10%左右,在与学习记忆有关的海马中约占25%。
EPA和DHA对于降低血液粘度,增加血液流动性,软化血管,以及防治心血管疾病发生具有显著作用。
——摘自《中国营养师》产品说明名称:鱼油软胶囊规格:1000mg×100粒/瓶;1000mg×300粒/瓶批准文号:国食健字G2*******产地:中国生产日期:见瓶底保质期:24个月存储方法:密封、置阴凉干燥处。
不适宜人群:少年儿童、孕妇、乳母营养成分:每粒含二十碳五烯酸(EPA)180mg含二十二碳六烯酸(DHA)120mg服用方法:每日2次,每次1粒,早餐后及晚餐后半小时服用,此时人的新陈代谢和肠胃蠕动为最佳状态,此时鱼油吸收率最佳。
科学提示:鱼油软胶囊与大豆磷脂软胶囊搭配服用效果更好。
本品不能代替药物;本品添加了营养素,与同类营养素补充剂同时食用不宜超过推荐量。
鱼油的神奇发现以吃动物脂肪而很少吃蔬菜和水果的爱斯基摩人很少患心血管、高血压等心脑血管疾病,而同样的情况也发生在日本渔民身上,经过十多年的研究,终于找到原因在于爱斯基摩人、日本渔民经常吃海鱼,而这些海鱼含有神奇的物质,那就是EPA、DHA。
这两种物质的发现给医学和营养学带来了重大突破。
我国居民DHA和EPA摄入总量之现状由于长期以来的饮食习惯,及对脂肪酸的认知程度不足,导致了中国人DHA和EPA总摄入量严重缺乏。
按照卫生部组织开展实施的《中国居民营养与健康状况调查》(CNHS-2002)中公开的数据,以及会编资料《Ω-3长链多不饱和脂肪酸健康作用及我国居民摄入状况》的数据显示,我国居民膳食特别是EPA和DHA的摄入量明显偏低。
剩余电流式电气火灾监控探测器 快速使用指南说明书

剩余电流式电气火灾监控探测器快速使用指南 V1.0.0浙江大华技术股份有限公司法律声明版权声明© 2018 浙江大华技术股份有限公司。
版权所有。
在未经浙江大华技术股份有限公司(下称“大华”)事先书面许可的情况下,任何人不能以任何形式复制、传递、分发或存储本文档中的任何内容。
本文档描述的产品中,可能包含大华及可能存在的第三人享有版权的软件。
除非获得相关权利人的许可,否则,任何人不能以任何形式对前述软件进行复制、分发、修改、摘录、反编译、反汇编、解密、反向工程、出租、转让、分许可等侵犯软件版权的行为。
商标声明●、、、是浙江大华技术股份有限公司的商标或注册商标。
●HDMI标识、HDMI和High-Definition Multimedia Interface 是HDMI Licensing LLC的商标或注册商标。
本产品已经获得HDMI Licensing LLC授权使用HDMI技术。
●VGA是IBM公司的商标。
●Windows标识和Windows是微软公司的商标或注册商标。
●在本文档中可能提及的其他商标或公司的名称,由其各自所有者拥有。
责任声明●在适用法律允许的范围内,在任何情况下,本公司都不对因本文档中相关内容及描述的产品而产生任何特殊的、附随的、间接的、继发性的损害进行赔偿,也不对任何利润、数据、商誉、文档丢失或预期节约的损失进行赔偿。
●本文档中描述的产品均“按照现状”提供,除非适用法律要求,本公司对文档中的所有内容不提供任何明示或暗示的保证,包括但不限于适销性、质量满意度、适合特定目的、不侵犯第三方权利等保证。
出口管制合规声明大华遵守适用的出口管制法律法规,并且贯彻执行与硬件、软件、技术的出口、再出口及转让相关的要求。
就本手册所描述的产品,请您全面理解并严格遵守国内外适用的出口管制法律法规。
隐私保护提醒您安装了我们的产品,您可能会采集人脸、指纹、车牌、邮箱、电话、GPS等个人信息。
在使用产品过程中,您需要遵守所在地区或国家的隐私保护法律法规要求,保障他人的合法权益。
GLM戈莱美家用美版超声刀说明书范例

家用美版超声刀使用说明书目录1、产品概述 (1)2、技术原理 (2)3、仪器优势 (3)4、治疗功效 (4)5、仪器参数 (4)6、产品图示 (5)7、搭配产品 (5)8、操作步骤 (6)9、注意事项 (10)10、使用禁忌 (10)11、问题处理 (11)12、仪器维护 (12)13、装箱清单 (13)14、保修卡 (14)一、产品概述欢迎使用戈莱美最新家用美版超声刀,它是一款由戈莱美公司与美国迈伦医学美容研究机构联合研发出来的新一代家用祛皱抗衰王牌仪器。
不仅继承了大型超声刀效果明显、安全无创、深层提拉、无恢复期等特点,还拥有小型便携、操作简便,使用安全、体验舒适等特点,将目前只能去美容机构才能体验的超声刀美容项目通过家用美版超声刀,使人们在家里也能安全舒适的体验最先进的超声刀美容技术。
使用仪器前,请详细阅读本手册并且严格遵从手册里面的指引操作本仪器。
二、技术原理超声刀在医学上的应用已经超过了50年,其作用安全有效,医学上能用来消除生物体内病变组织,早期用于肿瘤治疗体系,后来发现对皮肤改善和消除脂肪有卓越功效,进而引入医疗美容领域。
家用美版超声刀是以高频率聚焦式超声波(High Intensity Focused Ultrasound; HIFU),将超声波聚焦于一个个单一能量点,以产生高能量,作用在肌肉腱膜系统(SMAS; Superficial Musculo-Aponeurotic System),让SMAS层产生收缩,进而在皮肤深层刺激胶原蛋白分子的重组和再生。
同时因能量是掠过表皮,所以完全不用担心表皮受伤,还可使皮肤得到迅速提拉、紧致轮廓、快速抚平皱纹的功效!SMAS筋膜层是什么?如果我们把脸部肌肤比作一栋房子,筋膜层就是支撑楼房的地基,筋膜韧带就像一根根的柱子,一旦地基不够稳健,出现移位、倾倒,楼房也就随之瓦崩。
同理,皮肤筋膜要是老化、失去支撑力,皱纹、松垮也就随之而来。
筋膜层作为支撑脸部轮廓的支柱,是皮肤弹韧紧致的根基,因而皮肤下垂老化关键原因在于「筋膜层老化」,想要提升年轻轮廓,办法是拉紧皮下的筋膜层,非手术中只有超声刀能做到。
健康怡生鳕鱼肝油、鲨鱼肝油、欧米伽3浓缩鱼油等鱼油系列

天然高效
不像市场上其他产品, 冰岛鱼油天然营养物 质含量较高,不添加防腐剂和其他化学替代成 分。 偏好天然滋补的消费者会喜欢其质量品 质.
纯绿色科技生产
• 我们的工厂采用纯绿色科技: 生产中使用地热水和地热能. • 从海洋捕鱼到加工包装,全程掌控,确保了新鲜度和高品质. • 高品质源自严格的质量体系和工艺领先的设备. • 品保部6名专职科学家确保了严格测试 和生产全程监控.
• 领先的工艺能把所有的金属和毒素去除至不可检测到的 水平 . • 按批号定期送至第三方实验室 检测毒素水平 及测试产品 性能. • 遵照GMP 和 ISO 9001 的规定. • 遵守主要药典对鱼油的规定.
港至港、仓至仓的全程控制
怡之航物流的雷克雅未克仓库
我们同 恰之航物流 (冰岛船运公司) 深度合作全 程监控冰岛到美国工厂的运输流程。
国 际 认 证 证 书
1. 名称:原产地证 2. 发证单位:美国佛罗里达 州IRASEMA B. CORTINA公 证公司 3. 日期:2/18/2013 4. 备注:中国政府规定的进 出口规范文件
国 际 认 证 证 书
1. GMP认证 2. 发证单位:冰岛 药监局 3. 发证时间: 11/29/2010
1 Health Ease 鲨鱼肝油纯由冰岛深海鲨 鱼肝脏提炼,原装美国进口。含有角鲨烯、 烷氧基甘油等重要成分,是高品质的鱼肝 油制品。 2 符合欧洲和美国制药级标准。 3 严格通过国际七大认证:IFOS国际鱼油 标准认证、HACCP卫生认证、100%无汞 认证、ISO9001质量体系认证、冰岛捕鱼 责任证书、冰岛药监局GMP认证、BRC认 证。 4 本品通过美国加州56法案,确保产品多 绿联苯检测为零。
他 命 )
HealthEase D 欧 米 伽 3 鱼 油 胶 囊 ( 含 维
鲤鱼卵黄蛋白原ELISA试剂盒说明书

鲤鱼卵黄蛋白原ELISA试剂盒说明书供应商:上海乔羽生物有限公司鲤鱼卵黄蛋白原ELISA试剂盒说明书保存条件:2-8℃低温保存保质期:6个月,所有试剂盒均提供最新批次。
试剂盒成分:酶标板,试剂,标准品等。
ELISA试剂盒检测范围:人、绵羊、小鼠、大鼠、猪、兔、山羊、牛、马、猪、其它动物细胞因子、植物细胞因子、骨代谢、细胞凋亡、激素内分泌、活性多肽、肝纤维化、自身抗体、血栓与止血、肿瘤、自身抗体科研Elisa检测试剂盒。
鲤鱼卵黄蛋白原ELISA试剂盒说明书The principle of ELISA technology:Based on immunological reaction, the efficient catalysis and enzyme specific reaction of antigen and antibody to substrate combination.1 enzyme labeled antigen or antibody immobilized antigen or antibody.2 combined with the solid phase carrier surface antigen or antibody maintained its immunological activity.3 enzyme labeled antibody or antigen retains its immunological activity, enzyme activity and retention.4 of the tested specimens with solid carrier surface antigen or antibody response. Adding the enzyme labeled antigen or antibody combined with the solid phase carrier through reaction.The 5 solid phase enzyme and the amount of samples tested was a certain proportion of the amount of substance.6 adding the substrate of the enzyme reaction, the substrate catalyzed by the enzyme as a colored product, the product of the amount of samples were directly related to the amount of substance, so it can be qualitative or quantitative analysis according to the depth of color. The determination method of high sensitivity (pg-ng/ml level), and good repeatability鲤鱼卵黄蛋白原ELISA试剂盒说明书Matters needing attention:1 kit from the cold storage environment should be removed at room temperature for 15-30 minutes after the use of the enzyme labeled package is not used up after the plate, the plate should be stored in a sealed bag.2 washing buffer will crystallization, heated the water solubilization dilution, washing does not affect the results.3 each step sample should be used, and often to check its accuracy, in order to avoid the test error. A sample within 5 mins, ifthenumberofsampleismuch, recommend to use volley like.4 please make the standard curve at the same time, it is better to do the hole. Such as samples to be measured matter content is too high (the sample od high standard product the first hole hole OD), please first sample dilution multiples (n times) were measured and calculated please then multiplied by the total dilution ratio (n * * 5).5 closure plate membrane only a one-time use, to avoid cross contamination.6 substrate please avoid light preservation.7 in strict accordance with the instructions of the operation, the results of the test must be determined in accordance with the enzyme standard instrument readings.8 all samples, washing liquid and all kinds of waste should be treated as infectious agents.9 different batches of this reagent can not be mixed.10 if there is a difference between the specification and the English specification.鲤鱼卵黄蛋白原ELISA试剂盒说明书ELISA技术原理:以免疫学反应为基础,将抗原、抗体的特异性反应与酶对底物的高效催化作用相结合起来.1. 抗原或抗体的固相化及抗原或抗体的酶标记。
奥林匹亚产品说明书

PORCELAINAll items shown in this document are part of Olympia’s stocking program. For special orders, please contact your Olympia Tile Sales Representative.30 x 60 cm (12 x 24)Matte RF.PS.STT.1224.MT Polished RF.PS.STT.1224.PL 75 x 75 cm (30 x 30)Polished RF.PS.STT.3030.PL30 x 60 cm (12 x 24)Matte RF.PS.BOT.1224.MT Polished RF.PS.BOT.1224.PL 75 x 75 cm (30 x 30)Polished RF.PS.BOT.3030.PLSTATUARIO (White)BOTTICINOAll items shown in this document are part of Olympia’s stocking program. For special orders, please contact your Olympia Tile Sales Representative.30 x 60 cm (12 x 24)Matte RF.PS.MCB.1224.MT Polished RF.PS.MCB.1224.PL 75 x 75 cm (30 x 30)Polished RF.PS.MCB.3030.PL30 x 60 cm (12 x 24)Matte RF.PS.IPO.1224.MT Polished RF.PS.IPO.1224.PL 75 x 75 cm (30 x 30)Polished RF.PS.IPO.3030.PLMACAUBASIMPEROAll items shown in this document are part of Olympia’s stocking program. For special orders, please contact your Olympia Tile Sales Representative.30 x 60 cm (12 x 24)Matte RF.PS.ACD.1224.MT Polished RF.PS.ACD.1224.PL 75 x 75 cm (30 x 30)Polished RF.PS.ACD.3030.PL30 x 60 cm (12 x 24)Matte RF.PS.PUL.1224.MT Polished RF.PS.PUL.1224.PL 75 x 75 cm (30 x 30)Polished RF.PS.PUL.3030.PLARCADIA (Taupe)PULPIS (Brown)Technical data is supplied by the manufacturer and is subject to change at any time. Olympia does not provide warranties as to thespecifications of any product.Water Absorption ISO 10545-3< 0.5%ConformsPrestigio Series Tests Performed -- Results ConformColour VariationMemberMember of Canada Green BuildingCouncilMember of U.S. Green BuildingCouncilFor information concerning LEED, please contact our Sales RepresentativeExamples of Recommended ApplicationsResidentialCommercialIndoorOutdoorWallFloorDistributors of America (CTDA)The Terrazzo, Tile, and Marble Association ofCanadaMarble Institute of AmericaTaskGrout Sealing MORE™ Grout, Ceramic &Porcelain Sealer Ready to use Commercial: 1-3 Years Residential: 5-8 YearsDaily Maintenance MORE™ Stone and TileCleaner 1 : 128 Ratio Daily Deep Cleaning MORE™ Alkaline Cleaner 1 : 4 Ratio As Needed Grout Haze- CementitiousMORE™ Acidic Cleaner 1 : 4 Ratio As Needed Grout Haze - Epoxy / UrethaneMORE™ Coating Stripper*Ready to useAs Needed* Always test in an inconspicuous area to make sure the product is achieving the desired results and is not damaging the finish of the surface.SURFACE PREPARATION (If Required)• Floor levelling: 59 Flex Flo / 5900 Flex Flo Plus Self Levelling Underlayment • Waterproofing: WP900 Waterproof Membrane• Crack Isolation/Uncoupling: Flexilastic 1000 Crack Isolation Membrane / FlexMat Uncoupling Membrane* For a complete listing of FLEXTILE products and accessories including Sound Control, In‐Floor Heating, and further setting options, please visit ARCADIA (Taupe)MACAUBASIt is Olympia Tile’s policy to stock all items for sale. Should you require additional sizes, finishes or colours, Olympia has a Special Order Department to help find exactly what you are looking for. Please contact your Olympia Tile Sales Representative for more details. Note that minimum order quantities and longer lead times apply to all special order items.Colour may vary slightly from images shown. It is highly recommended to view physical samples of tile prior to purchase. Note that shade variations between tiles is characteristic and adds to the inherent beauty of the product. Please visit a showroom near you or request a sample from your Olympia Tile Sales Representative.Prestigio Series: Board MEF-136 / Folder FL-777。
(转载小丑鱼)海水鱼药品用量详情(鱼湛、TDC、海化白点水、大白片、OX、黄粉等)

(转载小丑鱼)海水鱼药品用量详情(鱼湛、TDC、海化白点水、大白片、OX、黄粉等)海水鱼大部分都是野生鱼,本身就带有自然界进化而来的抗体,所以最重要的是不要乱下药,看着鱼鱼身上一个半个白点就高声尖叫,好像天塌下来一样,开始对鱼鱼用什么AV国的,德国的,米国的,台湾的,山寨的鱼药一阵猛攻,鱼鱼不被毒死已被你吓死了。
为嘛到你缸里就疾病缠身呢?首先应从你缸的系统着手检查,滤材是否阶段性清理?水最近换了没?水质指标具体数值掌握了吗?排除外界因素后,看看鱼鱼有无好转,否则就得治疗了。
其次我认为更加最重要的是不要乱用抗生素!尤其是人用的抗生素,进而制造出超级细菌!给鱼泡完抗生素的水,不要直接倒入下水道,请放到阳光下暴晒一周,让药分解完后再倒掉,为嘛这样你懂得。
抗生素治疗至少一周,否则很容易引起抗药性!以下是本人总结分享的海水鱼检疫使用到的各种药品的用量明细,希望能够给到大家一些帮助。
(如有不同意见,欢迎大家跟帖讨论!~)1.下错药:判断疾病通常通过肉眼观察,因为我们并没有相关设备,也非本专业.只能通过互联网与翻帖子才能'基本判断'来确诊.2.综合症:有些病真的不是咱能治疗的.比如:细菌感染浮头大小白点烂肉氨中毒,你说咱怎么治?后者就是各种药物混合下,药物浓度没掌握好,鱼很可能没有医好,反而到治死了(毒死了).3.药物混合: 翻以前的帖子,有说黄粉不能与TDC同时使用的.我用过,鱼没药死.治疗好了.但是可能向这位前辈说的,有毒性吧? 或者目前后遗症没体现,但是前辈既然说了,那就要避免.我不是本专业,只提供参考吧.但是鱼湛与OX一起按推荐剂量下,我相信没有不死的...因为两种药物都含铜(具体是螯合铜还是啥铜的,咱不知道),如果你想在治疗鱼儿疾病方面深入.那最好配合有检测铜含量的测试计或者相关设备.OX论坛上有经验贴,可以搜索.药性比较温和,鱼湛听前辈总结说要按推荐剂量的一半下.4.剂量症状: 为何1 1的来说? 明明按照药品说明上标识的推荐安全剂量下了药,为何病情没有得到缓解,反而加重,或者直接就挂了?前者是药物剂量不够,后者是病情已经到了病入膏肓的阶段.除非特有经验,下重药.这种东西是靠经验的.咱只能请教-请教-再请教=继续踏着鱼骨头往前走.小结:看准病症再下药;浮头黑鳃氨中毒;蹭身冲水寄生虫;溃疡烂肉是细菌;软硬菜花水质找;涨腹拖便肠不好;虫类晚期先降温;早期反要先升温;判断类型再下药;飞碟要用淡水泡;大小白点下铜药;早期治疗效果好;检疫环节莫跳过;时间到了入主缸;翻动底沙自找事;没事找抽勤折腾;水质不好莫怪鱼;疾病轻重看状态;老鱼有病先推断;无图无文无真相;药品名称:OJI俗名:烂肉水药品简介:无色透明,白点原虫、烂肉治疗剂且是唯一可与P.S.B光合成硝化细菌共用的杀菌剂。
美国专业左握式 стра托卡斯特 产品说明书
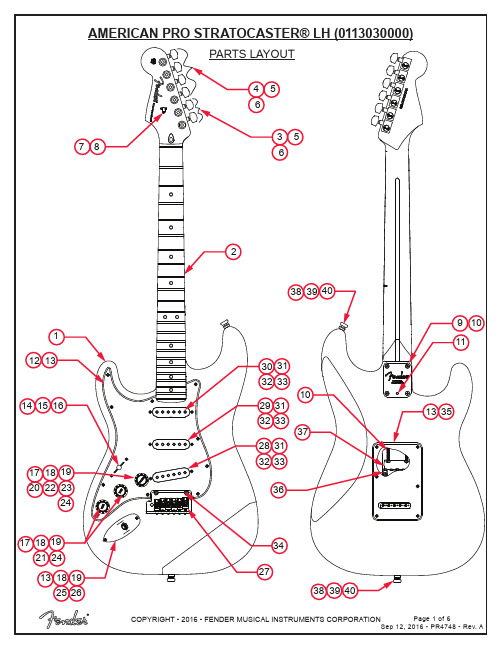
PARTS LAYOUT2105171213143736101516383940131718192024222317181913181925262124283233465368911273431293233313032333135383940PARTS LISTREF#DESCRIPTION PARTNUMBER 1BODY AM PRO STRAT LH 3TS0048702500 1BODY AM PRO STRAT LH OWT0056239505 1BODY AM PRO STRAT LH BLK0056239506 2NECK ASSY AM PRO STRAT LH RW7709884000 2NECK ASSY AM PRO STRAT LH MPL7709885000 3KEY 2-PIN MTG TALL LH 0073119000 4KEY 2-PIN MTG SHORT LH0073120000 5KEY WASHER 0053106049 6KEY BUSHING 0058820049 7STRING TREE W/HARDWARE0994911000 8SCREW SMAB 3 X 3/8 RHP STL NI0011357049 9NECK PLATE CORONA CA TILT W/HARDWARE0991445100 10SCREW SMA 8 X 1-3/4 OHP NI0015636049 11SET SCREW 1/4-20 X 3/8 OP NI HEX0031571000 12PICKGUARD STRAT AM STD LH P/B/P0056199000 12PICKGUARD STRAT AM STD LH MG/BLK/MG0055320000 13SCREW SMAB 4 X 1/2 OHP NI0015578049 145-WAY SELECTOR SWITCH0991367000 15SCREW MA 6-32 X 5/8 RH NI0994925000 16KNOB PICKUP SWITCH VINT AGED WHITE0994938000 17CONTROL 250K 10% R-AUDIO SPLIT SHAFT0063892000 18NUT HEX 3/8-32 X 3/320016352049 19WASHER LCK INTNL 3/8 X 500 X .02 NI0022384049 20CAPACITOR CD 1200pF 1000V 10%0065862000 21CAPACITOR MPF RDL .022MF 250 V 10%0024832049 22RES CF 1/4W 20K 5%0029006001 23RES CF 1/4W 150K 5%0024999001 24KNOBS STRAT 1-VOL 2-TONE AGED WHITE 0991369000 25FERRULE JACK CHROME 0991940000 26JACK PHONE OPEN CIRCUIT 110021956049 27BRIDGE ASSY AM PRO STRAT LH7709951000 27A BRIDGE PLATE TREM AM PRO STRAT LH CHROME7709900000*=NOT PICTURED IN DIAGRAMREF#DESCRIPTION PARTNUMBER 27B BLOCK TREMOLO AM DLX STRAT LH SILVER MET0077091000 27C BRIDGE SECTION ASSY NI AS STRAT SHORT0075123101 27D BRIDGE SECTION ASSY NI AS STRAT TALL0075123102 27E SPRING BRIDGE #1932 0019281049 27F SCREW M 4-40 X 5/8 RHP NI0015693049 27G SCREW M 8-32 X 3/8 FHP NI 0019656049 27H SPRING CLIP ULTRA0036531000 27I BUSHING NYL NAT .31 OD X .191 ID X .87 L7710005000 27J SET SCREW 10-32 X 3/16 HEX SKT FP BLX 0036615049 28PICKUP AM PRO SHAW BRIDGE LH AGED WHITE7709879000 29PICKUP AM PRO SHAW MIDDLE LH AGED WHITE7709891000 30PICKUP AM PRO SHAW NECK LH AGED WHITE7709893000 31PICKUP COVERS STRAT VINTAGE AGED WHITE0053824049 32TUBING LATEX CUT .300 X 1/8 ID X 1/4 OD0994916000 33SCREW TF 6-32 X 3/4 RHP STL NI0099346000 34BRIDGE PIVOT POST ASSY0093273000 35BACK COVER STRAT STD W/SLOT LH MG/BLK/MG0055322000 35BACK COVER STRAT STD W/SLOT LH P/B/P0056214000 36SPRING TREMOLO TENSION BLX 0018671049 37TREM CLAW SPRING TENSION ZINC0010272100 38STRAP BUTTONS CHROME W/HARDWARE0063267049 39FELT WASHERS WHITE0994930000 39FELT WASHER BLACK0994929000 40WOOD SCREW 6 X 1 OHP NI0016188049 *CASE AM ELITE GUITAR7710537000 *TRMOLO ARM AM PRO STRAT RH POLISHED SS7709929000 *TREMOLO ARM KNOB VINT AGED WHITE0994933000 *WRENCH HEX KEY 1/80023811049 *WRENCH HEX KEY .0500018531049 *WRENCH HEX KEY 1/160021109049 *WRENCH HEX KEY 3/320018622000*=NOT PICTURED IN DIAGRAMWIRING ASSEMBLY1200p F1200p FVOLUME CONTROL5-WAY SWITCHTONE 1CONTROLBLACK & WHITE WIRES FROM OUTPUTBLACK WIRE TO TREM CLAWGROUND LUG TO BODY CAVITYTONE 2 CONTROLCAPACITOR .022µFNECK PICKUPMIDDLE PICKUPBRIDGE PICKUPCAPACITOR 1200pFRESISTOR 20K ΩSHRINK TUBE CAPACITOR LEGSRESISTOR 150K ΩSWITCH AND CONTROL FUNCTION43215TONE CONTROLOF 5-WAY SWITCHINDICATES POSITION 5-WAYSWITCH POSITIONPICKUP IS OFFPICKUP IS ON 1BRIDGE PICKUP5 WAY SWITCH POSITIONNECK PICKUPMIDDLE PICKUPT1T1 & T2T2T2T2MASTER VOLUME 5-WAY SWITCHTONE 1 (T1)TONE 2 (T2)NECK PICKUP MIDDLE PICKUPBRIDGE PICKUPADDITIONAL SPECIFICATION DETAIL.054”.094”2-7/16”.820”.920”10-32THREAD.050” HEXØ.375”1/8” HEXSTAGGERED TUNING MACHINE SET W/HDWR P/N 0990820100OUTER SHAFT DIAMETER .394”TUNING MACHINE THRU-HOLEINNER DIAMETER .404”LOGO: AMERICAN PRO STRAT LHAPPLIED UNDER THE FINISHTRUSS ROD NUT P/N 0994943000TRUSS ROD ADJUSTMENT WRENCH:1/8” HEX KEY P/N 0023811049SADDLE HEIGHT ADJUSMENT WRENCH:.050” HEX KEY P/N 0018531049SHORT: P/N 0075536000TALL: P/N 00753840001ST FRET PROFILE12TH FRET PROFILENECK PROFILE: MODERN DEEP “C”FRET SIZE: JUMBO NARROW(FRET DIMENSIONS ARE BEFORE INSTALLATION)Ø.404”Ø.394”PLEASE NOTE: AS EACH NECK IS SANDED & FINISHED BY HAND, THICKNESS DIMENSIONS MAY VARY SLIGHTLY FROMTHOSE SHOWN.SADDLE HEIGHT ADJUSTMENT SCREWS:PICKUP SPECIFICATIONSNECKMIDDLE BRIDGEDC RESISTANCE 6.1 - 6.7KΩ6.4 -7.0KΩ6.4 - 7.0KΩMAGNETS ALNICO 2 & 3BEVELEDALNICO 5 & 2BEVELEDALNICO 5BEVELEDPOLARITY SOUTHNORTHSOUTHPOSITION。
諾和諾德 Flexpen

2021-03-18使用手冊®專為諾和諾德 Flexpen ® 設計專為禮來 Kwikpen ® 設計專為賽諾菲 Solostar ® 設計嵌入式軟體3.7版或更高版本Mallya 胰島素紀錄器幫助您掌握您的胰島素劑量CCAI21LP027AT4 (0273694-KWKP)CCAI21LP027BT6 (0273778-FLXP) CCAI21LP0270T2 (0273777-SLST)目錄1.基本概述 (2)2.MALLYA 相容性 – 分子與濃度 (2)3.裝置介紹和環境 (3)3.1裝置介紹 (3)MALLYA 特性 (3)系統基本性能(重要操作) (3)MALLYA 零組件參考 (3)3.2主要元件的重量和大小 (4)4.安全資訊 (4)4.1裝置和包裝上的符號說明 (4)4.2警告與注意事項 (5)4.3電路安全 (6)4.4標準/法規和分類依從性 (7)4.5MALLYA 筆夾與筆蓋 (7)4.6運輸和保存條件 (8)4.7使用條件 (8)4.8丟棄方式 (8)5.拆開包裝並安裝 MALLYA(充電/校正/組裝/配對) (9)5.1拆開 MALLYA 及其配件的包裝 (9)包裝內含物 (9)拆開包裝 (9)5.2充電並校正您的 MALLYA (10)為您的 MALLYA 充電 (10)校正您的 MALLYA (11)5.3將您的 MALLYA 組裝到胰島素筆上 (12)將筆夾連接至胰島素筆 (12)將筆蓋連接至筆 (12)5.4在非配對模式或配對模式下操作 (13)6.操作說明 (14)6.1安全測試 - 排空 (14)6.2胰島素注射 (15)相容的APP。
篩選資訊 (15)7.使用後說明:將 MALLYA 從筆上卸下 (16)8.疑難排解 (17)8.1MALLYA 疑難排解:燈號及聲音訊號 (17)8.2重置說明 (19)9.維護與檢查 (19)9.1MALLYA 裝置使用壽命 (19)9.2清潔您的 MALLYA (19)9.3維護防水、防塵和耐光 (20)10.技術規格與性能 (21)10.1電路額定值 (21)10.2材料 (21)10.3準確度 (21)11.電磁相容性 (22)11.1一般注意事項和警告 (22)11.2電磁放射 (22)11.3電磁耐受性 (23)11.4無線電模組規格 (24)12.免責聲明 (24)圖表列表表 1 - 使用手冊 (IFU) 中使用的符號 (2)表 2 - 縮寫列表 (2)表 3 - MALLYA 相容性 - 分子和濃度 (2)表 4 - MALLYA 零組件編號 (3)表 5 - 操作所需零組件 (4)表 6 - 主要元件的重量和大小 (4)表 7 - 裝置和其包裝上的符號 (4)表 8 - 裝置和其包裝上的符號(續) (5)表 9 - 主要標準與分類 (7)表 10 - MALLYA 筆夾和筆蓋 (7)表 11 - 運輸和儲存條件 (8)表 12 - 使用條件 (8)表 13 - 包裝內含物 (9)表 14 - 疑難排解 – 燈號和聲音訊號 (17)表 15 - MALLYA 電路資訊 (21)表 16 - 電池充電資訊 (21)表 17 – 材料 (21)表 18 - 測試台上的準確度 (21)表 19 - 顯示值的外部因素和準確度 (21)表 20 - 電磁輻射 (22)表 21 -耐受能力 (23)表 22 -無線電模組規格 (24)手冊中使用符號符號 含義 解釋警告操作不當可能導致使用者、患者嚴重傷害*1 或死亡注意事項 操作不當可能會導致人身傷害*2 或財物受損*3注意事項維修/清潔之前,請斷開裝置的電源注意操作的重要資訊表 1 - 使用手冊 (IFU)中使用的符號*1 嚴重傷害是指造成後續併發症或需要住院或長期門診治療的觸電或中毒事件。
菲利普全面剃须和护肤系统用户手册说明书
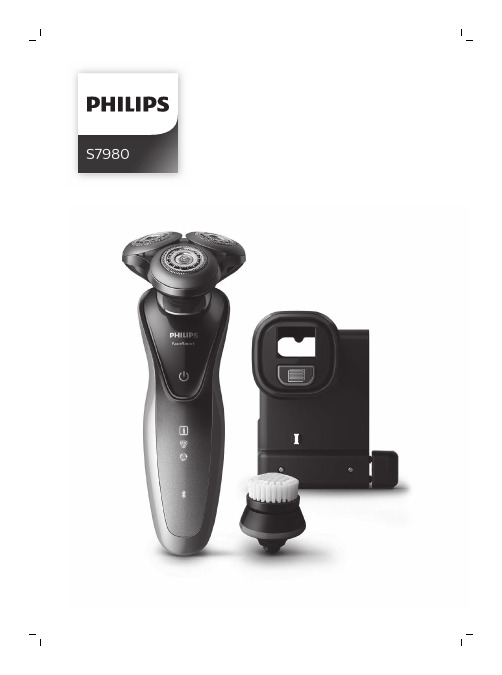
S7980English 6简体中文 35IntroductionCongratulations on your purchase and welcome to Philips! To fully benefit from the support that Philips offers, register your product at/welcome or via the SkinAnalyst app.Introducing Philips’ first ever complete shaving and skincare system. Assess and measure thecondition of your skin, personalize your FaceSmart shaving and cleansing settings, and best of all,receive daily skincare advice tailored to you.General description (Fig. 1)1Protection cap for cleansing brush2Cleansing brush3Cleansing brush base4Shaving unit5On/off button6Handle7Socket for small plug8SkinAnalyst sensor9Notification symbol10Shaving unit detector11Cleansing brush detector12Cleaning reminder13Bluetooth® symbol14Travel lock symbol15Battery charge indicator16Pouch17Supply unit (adapter)6EnglishRead this important information carefully before you use the shaver, the Skinanalyst sensor and save it for future reference. The accessories supplied may vary for different products.Danger-Keep the supply unit dry.Warning -To charge the battery, only use the detachable supply unit (type HQ8505) provided with the shaver.-The supply unit contains a transformer. Do not cut off the supply unit to replace it with another plug, as this causes a hazardous situation.-The shaver and SkinAnalyst sensor can be used by children aged from 8 years and above and persons with reduced physical, sensory or mental capabilities or lack of experience and knowledge if they have been given supervision or instruction concerning use of bothappliances in a safe way and understand the hazards involved. Children shall not play with the shaver. Cleaning and user maintenance shall not be made by children without supervision.-Always unplug the shaver before you clean it under the tap.-Always check the shaver and SkinAnalyst sensor before you use it. Do not use it if it is damaged, as this may cause injury. Always replace a damaged part with one of the original type.7English-Do not open the shaver to replace the rechargeable battery.Caution -Never use water hotter than 80°C to rinse the shaver.-Never rinse the SkinAnalyst sensor under the tap.-Only use the shaver and the SkinAnalyst sensor for its intended purpose as shown in the user manual.-For hygienic reasons, the shaver should only be used by one person.-Never use compressed air, scouring pads,abrasive cleaning agents or aggressive liquids such as petrol or acetone to clean the shaver.-Water may drip from the socket at the bottom of the shaver when you rinse it. This is normal and not dangerous because all electronics are enclosed in a sealed power unit inside the shaver.-Do not use the supply unit in or near wallsockets that contain an electric air freshener to prevent irreparable damage to the supply unit.-Keep your iPhone away from water and moist environments.-The shortwave radio frequency signals of a Bluetooth shaver may impair the operation of other electronic and medical devices.8English-Do not use the shaver in medical facilities,aircraft, refuelling points, close to automatic doors, automatic fire alarms or otherautomatically controlled devices.-Switch off Bluetooth where it is prohibited.-Keep this shaver at least 20 cm frompacemakers and other medical devices. Radio waves may impair the operation of pacemakers and other medical devices.Electromagnetic fields (EMF)-This Philips shaver complies with all shaver standards and regulations regarding exposure to electromagnetic fields.General-This shaver is waterproof. It is suitable for use in the bath or shower and for cleaning under the tap. For safety reasons, the shaver cantherefore only be used without cord.-The shaver is suitable for mains voltages ranging from 100 to 240 volts.-The supply unit transforms 100-240 volts to a safe low voltage of less than 24 volts.-The frequency band in which the shaver operates is 2.4 GHz.-The maximum radio frequency power radiated in the frequency band in which the shaver operates is <10dBm.9EnglishThe displayThe shaver is equipped with a notification symbol.This symbol lights up when important advice isavailable in the app. Go to the app to obtain thisadvice. It reminds you to unplug the shaver beforeyou switch it on and to clean it for optimalperformance. It also reminds you to replace theshaving heads every two years or the cleansingbrush every three months.Attachment detection featureWhen you have paired your iPhone with theshaver, the attachment detection feature isactivated. Every time you switch on the shaver, thisfeature automatically recognizes the attachment(shaving unit/cleansing brush) that is attached tothe shaver handle and adapts the settingsaccordingly. Unpairing of your iPhone and theshaver deactivates this feature.Make sure your shaver is connected to youriPhone. The SkinAnalyst app also offers thepossibility to (de)activate the Attachmentdetection feature. You can do this by going to Myprofile, My shaver and switching off the Autoattachment detection. You can then manuallyselect the brush attachment, by switching on theshaver and press and hold the on/off button forone second.10EnglishShaving unit detectorThe shaving unit detector lights up to indicate thatthe shaving unit has been attached to the handle.Cleansing brush detectorThe cleansing brush detector lights up to indicatethat the cleansing brush has been detected.When you switch off the shaver, the cleaningreminder flashes to remind you to clean theshaver. Clean the shaver and the attachments aftereach use for optimal performance.The shaver is equipped with Bluetooth 4.0 toconnect your shaver to the app on your iPhone.Bluetooth is automatically activated when youswitch on the shaver for the first time. You can onlydeactivate it by switching on the travel lock. Travel lockYou can lock the shaver when you are going totravel. The travel lock prevents the shaver frombeing switched on by accident. The travel lock alsodeactivates Bluetooth.Activating the travel lock1Press the on/off button for 3 seconds to enterthe travel lock mode.While you activate the travel lock, the travel locksymbol flashes. When the travel lock is activated,the travel lock symbol lights up continuously.Deactivating the travel lock1Press the on/off button for 3 seconds.The travel lock symbol flashes and then goes out.The shaver is now ready for use and Bluetooth isactivated again.ChargingBattery charge indicatorCharging takes approx. 1 hour.Quick charge: When the battery is empty and youconnect the shaver to the wall socket, the batterycharge indicator flashes quickly. When the shavercontains enough energy for one shaving orcleansing session, the battery charge indicatorstarts flashing slowly..While the shaver continues to charge, the battery charge indicator flashes slowly until the battery is fully charged.When the battery is fully charged, the batterycharge indicator lights up blue continuously.Note: The shaver can only be used without cord.Note: When the battery is full, the display switchesoff automatically after 30 minutes. If you press theon/off button during charging, the notificationsymbol lights up blue to remind you that you haveto disconnect the shaver from the wall socket.When the battery is almost empty, the batterycharge indicator flashes orange.When the battery is completely empty, the batterycharge indicator flashes orange quickly. ChargingCharging takes approx. 1 hour.Charge the shaver before first use and when thedisplay indicates that the battery is almost empty.Note: You can charge the shaver after every use.This will not harm the battery.Charging with the supply unit1Make sure the shaver is switched off.2Insert the small plug into the shaver and put the supply unit in the wall socket.3After charging, remove the supply unit from the wall socket and pull the small plug out of theshaver.Preparing for usePairing the shaver and your iPhoneFor this shaver a special app is available. You candownload the SkinAnalyst app from the App store.By using the app, your skincare and shavingroutine will be personalized. The app gives youexpert advice based on your skin, shaving method,local weather conditions, etc. to support your dailyskincare and shaving routine.Note: The app is available for iPhone 6, iPhone 6Plus, iPhone 6S and iPhone 6S Plus equipped withiOS9 or higher.To create a secure and safe connection, first theshaver and your iPhone need to be paired once.1Download the SkinAnalyst app from the Appstore.2Make sure Bluetooth on your iPhone isswitched on.Open the app on your iPhone.Follow the instructions in the app. After youhave filled in the skin assessment, the app asksyou to pair your iPhone with the shaver.Switch on the shaver. Bluetooth is activatedautomatically.6In the app, the pop-up message 'press pair'appears. When your iPhone and the shaverhave been paired successfully, the Bluetoothsymbol flashes briefly and then goes out. If thisdoes not happen, please see 'Troubleshooting'.7Once the shaver and the app have been paired,the shaver automatically selects the rightpersonal settings depending on the attachmentyou have clicked on. During shaving orcleansing, you can open the app to see thesettings you are using and the duration of theshaving or cleansing session.Note: When you use the shaver, keep youriPhone and shaver within transmission range(no more than 5 meters from each other, in thesame room).Using the shaverUsing the SkinAnalyst sensor1Open the app before measuring your skin.2If you have an iPhone case, first remove the case from your iPhone.3Pull the clamp of the SkinAnalyst sensor outwards and gently place your iPhone into the holder with its camera pointing towards theopening on the inside of the holder. Be careful when you attach or remove the SkinAnalystsensor to prevent scratches on your iPhone.Note: The SkinAnalyst sensor can only be used on iPhone 6, iPhone 6 Plus, iPhone 6S andiPhone 6S Plus equipped with iOS9 or higher.4Insert the jack plug of the SkinAnalyst sensorinto your iPhone.Note: Keep the SkinAnalyst sensor placed onthe skin during measurement to avoid flashinginto your eyes.-Do not look into the sensor before and afterskin measurement.-When you take a picture of the skin, pleaseposition the sensor flat onto your skin so toensure it can take a clear picture of your skin. Connecting with the shaver1Make sure Bluetooth on your iPhone isswitched on.5Keep your iPhone and shaver close to each other in order to stay connected.Caution: Do not use your iPhone in moistsurroundings. Moisture and water can damage your iPhone.1To switch on the shaver, press the on/off button once.2To switch off the shaver, press the on/off button once.In order to benefit optimally from the treatments, you have to synchronize your treatments regularly. The shaver can store up to 15 shaves and/or cleansing treatments, so make sure you synchronize the shaver at least once after every 15 treatments. As an extra reminder, the notification symbol flashes every 9 treatments, without a connection between the shaver and the app, to tell you to connect with the app.1Open the app and make sure you are close to the shaver.2The app connects with the shaver automaticallyand synchronizes your last shaves or cleansing treatments.Using the attachmentsNote: Attach the cleansing brush on the cleansingbrush base first, before you place it on the shaver.Removing or attaching the attachments1Make sure the shaver is switched off.directly after shaving to prevent skin irritation. Forbetter shaving results, use the cleansing brushTracker and change the cleansing brush settings. You can adjust the settings and choose between four settings depending on your personal cleansing needs: sensitive, dry, normal or oily. Using the shaving unitNote: This shaver can only be used without cord. Skin adaptation periodYour first shaves may not bring you the result you expect and your skin may even become slightly irritated. This is normal. Your skin and beard need time to adapt to any new shaving system. We advise you to follow the advice provided by the app and shave regularly (at least 3 times a week) with this shaver for a period of 4 weeks to allow your skin to adapt to the new shaver.Dry shaving1Switch on the shaver.2Move the shaving heads over your skin in circular movements to catch all hairs growing in different directions. Make sure each shavinghead is fully in contact with the skin. Exertgentle pressure for a close, comfortable shave.Note: Do not press too hard, this can cause skin irritation.3Clean the shaver after use.Wet shavingYou can also use this shaver on a wet face with shaving foam or shaving gel.To shave with shaving foam or shaving gel, follow the steps below:1Apply some water to your skin.2Apply shaving foam or shaving gel to your skin.3Rinse the shaving unit under the tap to ensure that the shaving unit glides smoothly over your skin.4Switch on the shaver.5Move the shaving heads over your skin in circular movements to catch all hairs growing in different directions. Make sure each shavinghead is fully in contact with the skin. Exertgentle pressure for a close, comfortable shave.Note: Do not press too hard, this can cause skin irritation.Note: Rinse the shaving unit regularly to ensure that it continues to glide smoothly over yourskin.6Dry your face.7Clean the shaver after use.Note: Make sure you rinse all foam or shavinggel off the shaver.Shave settingsThe app has a feature that allows you topersonalize your shave settings. Go to the UsageTracker and change the shaving settings. You canadjust the settings and choose between threesettings depending on your personal shavingneeds: extra sensitive (xs), sensitive (s) and normal(n).Unpairing your shaver and iPhonePairing allows a connection between 1 shaver and 1iPhone. To remove this connection (e.g. when youhave a new iPhone 6, 6 Plus, 6S or 6S Plusequipped with iOS9 or higher), follow the stepsbelow:1Remove pairing from the app: open the app ->Go to the menu in the app -> Select 'Appsettings' and press 'Remove pairing from app'.2Unpair the shaver: press and hold the on/offbutton on the handle for approx. 10 seconds toremove the bond between shaver and app.Note: The unpairing of the shaver is successfulwhen the Bluetooth and notification symbolflash simultaneously (approx. 4 seconds).3Unpair your iPhone: choose Settings -> General-> Bluetooth -> Select the device by pressing (i)-> and press 'forget devices'.Cleaning and maintenanceIf the shaver and the app are paired, the cleaningreminder on the shaver lights up after each shaveas an extra reminder to tell you to clean theshaver.Cleaning the shaving unit under the tapClean the shaving unit after every shave for7Attach the shaving head holder to the bottom part of the shaving unit (‘click’).Clean the cleansing brush every time you have used it.1Switch off the shaver.2Detach the brush head from the attachment holder.3Clean the parts thoroughly with warm water and soap.4Dry the cleansing brush with a towel.Detach your iPhone from the SkinAnalystsensor.-Put the protection cap on the cleansing brushPut the protection cap on the SkinAnalystsensor to protect it from dirt accumulation.Replacement Replacing the shaving headsAs an extra reminder, the notification symbol also lights up when the shaving heads should be replaced. This advice is also available in the app. For maximum shaving performance, we advise you to replace the shaving heads every two years. Replace damaged shaving heads immediately. Always replace the shaving heads with original Philips shaving heads (see 'Ordering accessories'). 1Switch off the shaver.2Pull the shaving head holder off the bottompart of the shaving unit.3Turn the retaining rings anticlockwise and remove them. Place them aside in a safe place. 4Remove the shaving heads from the shavinghead holder.Discard the used shaving heads immediately to avoid mixing them with the new shaving heads.The brush head should be replaced every 3months or earlier if the brush hairs are deformed or damaged. As an extra reminder, the notification symbol also lights up when the brush head should be replaced. This advice is also available in theapp.Ordering accessoriesTo buy accessories or spare parts, visit/service or go to yourPhilips dealer. You can also contact the PhilipsConsumer Care Center in your country (see theinternational warranty leaflet for contact details).The following accessories and spare parts areavailable:-SH70 Philips shaving heads-HQ110 Philips shaving head cleaning spray-RQ560/RQ563 Philips cleansing brush-HQ8505 supply unitNote: The availability of the accessories may differby country.Recycling-Do not throw away the product with the normalhousehold waste at the end of its life, but handit in at an official collection point for recycling.By doing this, you help to preserve theenvironment.-This product contains a built-in rechargeablebattery which shall not be disposed of withnormal household waste. Please take yourproduct to an official collection point or aPhilips service center to have a professionalremove the rechargeable battery.-Follow your country’s rules for the separatecollection of electrical and electronic productsand rechargeable batteries. Correct disposalhelps prevent negative consequences for theenvironment and human health. Removing the rechargeable batteryBend the hooks aside and remove the powerunit.Warranty and supportIf you need information or support, please visit/support or read theinternational warranty leaflet. TroubleshootingThis chapter summarizes the most commonproblems you could encounter with the shaver,SkinAnalyst sensor and its accessories. If you areunable to solve the problem with the informationbelow, visit /support for a list offrequently asked questions or contact theConsumer Care Center in your country. Problem Possible cause SolutionI cannot connect the shaver to the app.You have notdownloaded the app.Download theSkinAnalyst app.The app is availablefor iPhone 6, iPhone6 Plus, iPhone 6Sand iPhone 6S Plusequipped with iOS9or higher.Your shaver is notswitched on.Make sure the shaveris switched on.You have not openedthe app.Make sure you openthe app.your iPhone cannotfind the shaver.The shaver isavailable for iPhone6, iPhone 6 Plus,iPhone 6S andiPhone 6S Plusequipped with iOS9or higher.Problem Possible cause SolutionBluetooth is not switched on.Make sure Bluetooth is enabled on the shaver and your iPhone.The shaver is not charged.Make sure the shaver is charged.I want to use the shaver without the app.You can also use the shaver without the app. However, only when you use the app together with the shaver, the app is able to provide tips and advice based on your usage. With the app you can set your shave settings. The app also reminds you when you need to replace the shaving heads, to clean the shaver, etc.I cannot change the shavesettings/cleansing brush settings on the shaver.Make sure there is a good connection between the shaver and your iPhone.You can select the attachment (shaving unit/cleansing brush) on the shaver. In the app, you can change the settings per attachment (shaving unit:normal/sensitive/extra sensitive, cleansing brush: dry skin/normal skin/oily skin/sensitive skin).31EnglishProblem Possible cause Solution The shaver does not shave as well as it used to.The shaving headsare damaged or worn.Replace the shaving heads (see 'Replacing the shaving heads').Hairs or dirt obstruct the shaving heads.Clean the shaving heads in the regular way or clean them thoroughly.To clean the shaving heads thoroughly,remove the shaving heads from the shaving head holder one by one (see 'Replacing the shaving heads'). Then separate the cutter from its guard and rinse each matching set under the tap.After rinsing, place the cutter back into its corresponding guard. Finally, put the shaving heads back into the shaving head holder (see 'Replacing the shaving heads').The cleansing brush does not clean as well as it used to.The cleansing brush is damaged or worn.Replace the cleansing brush (see 'Replacing the cleansing brush').32EnglishProblem Possible cause SolutionThe shaver doesn't detect the right attachment.The attachment isheavily polluted ordamaged.Try to clean theattachment (see'Cleaning andmaintenance'); if theissue persists, switchoff the detectionfeature from the appand select theattachment manuallyby pressing theon/off button for onesecond while theshaver is switchedon.The shaver does not work when I press the on/off button.The shaver is stillattached to the wallsocket. For safetyreasons, the shavercan only be usedwithout cord.Unplug the shaverand press the on/offbutton to switch onthe shaver.The rechargeablebattery is empty.Recharge the battery.The travel lock isactivated.Press the on/offbutton for 3 secondsto deactivate thetravel lock.The shaving unit issoiled or damaged tosuch an extent thatthe motor cannot run.Clean the shavingheads thoroughly orreplace them. Alsosee 'Hairs or dirtobstruct the shavingheads' for a detaileddescription of how toclean the shavingheads thoroughly.The shaver switches off when I select a different brush program.You cannot changethe brush programduring cleansing.Switch off the shaverbefore you select adifferent brushprogram.33EnglishProblem Possible cause Solution I get an error in the app during skin measurement.You did not place the SkinAnalyst sensor flat on your skin.Place the SkinAnalyst sensor flat on your skin.You did not insert the plug of the SkinAnalyst sensor into your phone properly.Remove the plug ofthe SkinAnalystsensor from yourphone and insert the plug into your phone again.Your phone did not recognize the SkinAnalyst sensor.Make sure that:-the cover/case of your iPhone is detached.-the camera lens of your iPhone is clean-the SkinAnalyst sensor is correctly attached to your iPhoneYour phone did not recognize the SkinAnalyst sensor.Make sure that yourvolume limit settings are reset to default settings (go to Settings > Music >Volume limit > slide to the max).Water is leaking from the bottom of the shaver.During cleaning,water may collect between the inner body and the outer shell of the shaver.This is normal and not dangerousbecause allelectronics are enclosed in a sealed power unit inside the shaver.34English说明感谢您的惠顾,欢迎光临飞利浦! 为了让您能充分享受飞利浦提供的支持,请在 /welcome 上或通过 SkinAnalyst 应用程序注册您的产品。
吉利特敏感肌剃须油用胶囊说明书

1. IDENTIFICATIONProduct NameGillette Foamy Sensitive Skin Shave Foam Product ID:98683124_RET_NG Product Type:Finished Product - Consumer (Retail) Use Only Recommended UsePersonal Beauty Care Product Manufacturer The Procter & Gamble CompanySharon Woods Innovation Center11510 Reed Hartman HighwayCincinnati OH 45241+1 513 626-2500Procter & Gamble Inc.P.O. Box 355, Station AToronto, ON M5W 1C5Professional Products: 1-800-465-2945; Retail Products: 1-800-465-2945E-mail AddressEmergency Telephone Transportation (24 HR)CHEMTREC - 1-800-424-9300(U.S./ Canada) or 1-703-527-3887Mexico toll free in country: 800-681-95312. HAZARD IDENTIFICATION"Consumer Products", as defined by the US Consumer Product Safety Act and which are used as intended (typical consumer duration and frequency), are exempt from the OSHA Hazard Communication Standard (29 CFR 1910.1200). This SDS is being provided as a courtesy to help assist in the safe handling and proper use of the product.This product is classifed under 29CFR 1910.1200(d) and the Canadian Hazardous Products Regulation as follows:.Skin corrosion/irritationCategory 2Eye Damage / IrritationCategory 2B Issuing Date: 29-Jun-2015Revision Date: 29-Jun-2015Hazard StatementsCauses skin irritation Causes eye irritationSAFETY DATA SHEETVersion 1.1Hazard pictograms Signal WordWARNING3. COMPOSITION/INFORMATION ON INGREDIENTSIngredients are listed according to 29CFR 1910.1200 Appendix D and the Canadian Hazardous Products Regulation 4. FIRST AID MEASURESFirst aid measures for different exposure routesEye contact IF IN EYES: Rinse cautiously with water for several minutes. Remove contact lenses, ifpresent and easy to do. Continue rinsing. If eye irritation persists: Get medicaladvice/attention.Skin contact IF ON SKIN: Wash with plenty of soap and water. If skin irritation or rash occurs: Getmedical advice/attention. Remove and wash contaminated clothing before re-use.Ingestion Not an expected route of exposure. If swallowed:. Clean mouth with water and afterwardsdrink plenty of water.Inhalation None under normal use.Most important symptoms/effects,acute and delayedMAY CAUSE SKIN IRRITATION. May cause eye irritation.Indication of immediate medical attention and special treatment needed, if necessaryNotes to Physician Treat symptomatically.5. FIRE-FIGHTING MEASURESPrecautionary Statements -Storage NonePrecautionary Statements -PreventionWear protective gloves Wash hands thoroughly after handling Precautionary Statements -Disposal NoneHazards not otherwise classified(HNOC)None Precautionary Statements -Response IF ON SKIN: Wash with plenty of soap and water If skin irritation or rash occurs: Get medical advice/attentionTake off contaminated clothing and wash before re-useIF IN EYES: Rinse cautiously with water for several minutes. Remove contact lenses, ifpresent and easy to do. Continue rinsingIf eye irritation persists: Get medical advice/attentionSuitable extinguishing media Use extinguishing measures that are appropriate to local circumstances and thesurrounding environment.Unsuitable Extinguishing Media None.Special hazard None known.Special protective equipment for fire-fighters As in any fire, wear self-contained breathing apparatus pressure-demand, MSHA/NIOSH (approved or equivalent) and full protective gear.Specific hazards arising from thechemicalNone.6. ACCIDENTAL RELEASE MEASURESPersonal precautions, protective equipment and emergency proceduresPersonal precautions Avoid breathing vapors or mists. Wear protective gloves/clothing and eye/face protection. Advice for emergency responders Use personal protective equipment as required.Methods and materials for containment and cleaning upMethods for containment No information available.Methods for cleaning up Do not puncture or incinerate cans.7. HANDLING AND STORAGEPrecautions for safe handlingAdvice on safe handling Handle in accordance with good industrial hygiene and safety practice.Conditions for safe storage, including any incompatibilitiesStorage Conditions Keep containers tightly closed in a dry, cool and well-ventilated place.Incompatible products None known.Aerosol Classification Level18. EXPOSURE CONTROLS/PERSONAL PROTECTIONControl parametersExposure Guidelines Exposure guidelines are not relevant when product is used as intended in a householdsetting.Exposure controlsEngineering Measures No information availablePersonal Protective EquipmentEye Protection Manufacturing Sites:Safety glasses with side-shieldsDistribution, Workplace and Household Settings:No special protective equipment requiredHand Protection Manufacturing Sites:We a r p r o t e c t i v e n a t u r a l r u b b e r , n i t r i l e r u b b e r , N e o p r e n e ™ o r P V C g l o v e sPlease observe the instructions regarding permeability and breakthrough time which areprovided by the supplier of the gloves. Also take into consideration the specific localconditions under which the product is used, such as the danger of cuts, abrasionDistribution, Workplace and Household Settings:Protective glovesSkin and Body ProtectionNo special protective equipment required Respiratory Protection No special protective equipment required9. PHYSICAL AND CHEMICAL PROPERTIES Physical State @20°CAerosol Appearancewhite Foam Odorcharacteristic Odor threshold No information availableVOC Content (%)Products comply with US state and federal regulations for VOC content in consumer products.10. STABILITY AND REACTIVITYReactivityNone under normal use conditions.StabilityStable under normal conditions.Hazardous polymerizationHazardous polymerization does not occur.Hazardous ReactionsNone under normal processing.Conditions to AvoidNone under normal processing.Materials to avoid None in particular.Hazardous Decomposition Products None under normal use.11. TOXICOLOGICAL INFORMATIONProduct InformationInformation on likely routes of exposureInhalation Intentional misuse by deliberately concentrating and inhaling contents may be harmful orfatal.No information available NoteWater solubilityFlash pointNo information available Solubility in other solventsAerosol - Not Applicable No information available Partition coefficient: n-octanol/water No information availablepH valueAutoignition temperatureEvaporation rateNo information available .Decomposition temperatureNo information available No information available .Viscosity of ProductNo information available 8.2 - 8.5Flammability (solid, gas)Property No information available Flammability Limits in AirMelting/freezing pointUpper flammability limitNo information available No information available Lower Flammability LimitNo information available Values Vapor pressure46Boiling point/boiling rangeVapor densityNo information available No information available Relative densitySkin contact Irritating to skin.Ingestion No known effect.Eye contact Avoid contact with eyes. Irritating to eyes.Delayed and immediate effects as well as chronic effects from short and long-term exposure Acute toxicity No known effect.Skin corrosion/irritation Irritating to skin.Serious eye damage/eye irritation Irritating to eyes.Skin sensitization No known effect.Respiratory sensitization No known effect.Germ cell mutagenicity No known effect.Neurological Effects No known effect.Reproductive toxicity No known effect.Developmental toxicity No known effect.Teratogenicity No known effect.STOT - single exposure No known effect.STOT - repeated exposure No known effect.Target Organ Effects No known effect.Aspiration hazard No known effect.Carcinogenicity No known effect.12. ECOLOGICAL INFORMATION EcotoxicityThe product is not expected to be hazardous to the environment.Persistence and degradability No information available.Bioaccumulative potential No information available.Mobility No information available.Other adverse effects No information available.13. DISPOSAL CONSIDERATIONSWaste treatmentWaste from Residues / Unused Products Aerosol cans, when disposed as waste, are regulated as D003 reactive hazardous waste in some States because of their potential to explode when heated. Check with your State environmental agency for guidance.Contaminated packaging Disposal should be in accordance with applicable regional, national and local laws andregulations.California Hazardous Waste Codes(non-household setting)33114. TRANSPORT INFORMATIONDOTUN no UN1950UN Proper shipping name Aerosols, non-flammableDescription UN1950, Aerosols, non-flammable, 2.2, Ltd. Qty.Hazard Class 2.2Emergency Response GuideNumber126IMDGUN Number UN1950UN Proper shipping name Aerosols, non-flammableDescription UN1950, Aerosols, non-flammable, 2.2, Ltd. Qty.Transport hazard class(es) 2.2Special precautions for user63,190, 277, 327, 344, 959EmS-No F-D, S-UIATAUN no UN1950UN Proper shipping name Aerosols, non-flammableDescription UN1950, Aerosols, non-flammable, 2.2, Ltd. Qty.Hazard Class 2.2ERG Code2LSpecial precautions for user A145, A167, A98, A802IATA comment Can also be shipped as ID8000 Consumer Commodity15. REGULATORY INFORMATIONU.S. Federal RegulationsSARA 313Not applicable for consumer useCERCLANot applicable for consumer useFood and Drug Administration (FDA)The product described in this Safety Data Sheet is regulated under the Federal Food, Drug, and Cosmetics Act and is safe to use as per directions on container, box or accompanying literature (where applicable)Clean Air Act, Section 112 Hazardous Air Pollutants (HAPs) (see 40 CFR 61)Not applicable for consumer useClean Water ActNot applicable for consumer useCalifornia Proposition 65This product is not subject to warning labeling under California Proposition 65.U.S. State Regulations (RTK)Not applicable for consumer useInternational InventoriesUnited StatesProduct is a personal care product and regulated under FDA.CanadaThis product is in compliance with CEPA for import by P&G.LegendTSCA - United States Toxic Substances Control Act Section 8(b) InventoryCEPA - Canadian Environmental Protection ActPerfumes contained with the products comply with appropriate IFRA guidance.16. OTHER INFORMATIONIssuing Date:29-Jun-2015Revision Date:29-Jun-2015DisclaimerThe information provided in this Safety Data Sheet is correct to the best of our knowledge, information and belief at the date of its publication. The information given is designed only as a guidance for safe handling, use, processing, storage, transportation, disposal and release and is not to be considered a warranty or quality specification. The information relates only to the specific material designated and may not be valid for such material used in combination with any other materials or in any process, unless specified in the textEnd of SDS。
- 1、下载文档前请自行甄别文档内容的完整性,平台不提供额外的编辑、内容补充、找答案等附加服务。
- 2、"仅部分预览"的文档,不可在线预览部分如存在完整性等问题,可反馈申请退款(可完整预览的文档不适用该条件!)。
- 3、如文档侵犯您的权益,请联系客服反馈,我们会尽快为您处理(人工客服工作时间:9:00-18:30)。
FISHMAN PRESYS BLEND 301拾音器中文说明Fishman presys blend国内吉他爱好者一般称之为301,这款拾音器价格适中,效果能满足大多数吉他爱好者们的需要,因此在国内比较受追捧,也有不少的吉他上面使用的这款拾音器。
今天我们就给大家介绍一下这款拾音器的使用,这是由原文的英文说明书翻译改动而来的。
虽然是301拾音器的说明,但是拾音器都是大同小异,你可以举一反三,用在别的拾音器上。
拾音器调制快速上手
1,控制旋钮的基本设置。
将volume,mic blend 和notch这三个旋钮设置为关闭状态,然后再将bass,middle, 和treble 这三个旋钮调节到正中心位置。
2,接通电源。
将拾音器与音箱或者功放用一条1/4英寸大小的乐器连接线连接起来。
当看到电池指示灯(batt)快速闪动的时候,则表示电源已经正常接通了。
3,正式启动。
将volume 旋钮增大,同时根据你所喜欢的音响效果,适当调整bass,middle 和treble这三个旋钮。
4,与麦克风的混合。
将mic blend旋钮调大,可以让内置麦克风(与拾音器)进行混合。
拾音器控制旋钮功能介绍
Volume(音量):为了获得干琴的清音效果,我们需要将volume这个旋钮尽可能地增大,前提是不能大到失真或者导致声音产生回馈。
Bass(低频):将这个旋钮增大,可以让我们的吉他音色更加饱和,厚实。
Middle(中频):将middle旋钮向左调小,然后将音量增大,可以获得一种被“挖空”了的平滑的音色效果。
另外,你也可以将middle旋钮向右边调大(默认是正中心位置),可以让吉他的中音区听起来像被什么东西“紧紧咬住不放”的那种结实的音响效果。
Treble(高频):调节这个旋钮,可以让你的吉他音色在多乐器的混合演奏中不至于被“淹没”掉。
(调节这个旋钮),可以削减吉他音色的圆润度,同时也可以适当控制音响效果。
Notch(滤波器):调节notch 这个滤波器控制旋钮,可以移除掉那些很低端,嘈杂的声音回馈。
试着增大音量旋钮,直到声音产生回馈,然后再慢慢地向右拧动notch这个旋钮,直到声音回馈慢慢被消除掉为止。
Phase(相位):使用phase切换开关,可以改善低音量时的低频响应速率,同时也可以减轻高音量时的声音回馈现象。
Mic Blend(麦克风调节):这一个旋钮的控制决定着内置麦克风与你的拾音器信号这两者之间的平衡效果。
从中心开始向左调节该旋钮,可以获得更多的拾音器的音色;反过来,从中心开始向右边调节该旋钮,则可以得到更多的麦克风音色。
在高音量的设置前提下,混入少量的麦克风效果,可以很好地防止声音回馈现象的出现。
Mic Trim(麦克风削减):在前级箱体的侧面,有一个专用的麦克风音量控制。
将mic blend旋钮调到正中心位置,然后用一个有槽的小螺丝刀适当调整mic trim,直到让麦克风和拾音器的平衡效果达到自己满意为止。
Tuner(校音器):对照下面所示的几种“亮灯”情况来给你的乐器进行校音:
Battery(电池):当“batt”电池指示灯静止不动的时候,则是在提示你需要更换电池了。
为了更好地省电,不使用的时候,请断掉乐器的电源,关掉校音器。
更换电池时,首先需要转动位于Fishman标志上方的闩锁,打开前级箱体,然后再进行更换。
安装新电池的时候,一定要确保电池的正负极性,切勿装反。
下面我们给出一些厂家的参数设置供你参考,不同的吉他、不同的音箱出来的声音都是有很大的差别的,所以这些参数设置,也只是供你参考,你更需要用耳朵来精细的分辨声音。
参考设置一:指弹及独奏模式,使用这个设置可以获得结实的低音和透亮的高音,比较适合Fingstyle风格的演奏。
插图:设置参数-1
参考设置二:挖掉中频过高的中频常常会让人感觉声音发硬、动态不足,这种挖掉中频的设置,可能正是你需要的声音
插图:设置参数-2
参考设置三:扫弦音色扫弦需要比较均衡的高频和低频,这样出来的声响效果才比较统一。
插图:设置参数-3
参考设置四:在乐队中的调试一把吉他的弹奏,和你要在乐队中与别的乐器配合,均衡的调节是不一样的,在这种情况下,一般需要衰减低音,增大高音。
如果吉他的低音太重,容易产生回授,也会干扰别的低音乐器,如贝司。
插图:设置参数-4。