AI 系列人工智能调节器使用说明书(上)
人工智能设备使用说明书
人工智能设备使用说明书尊敬的用户:感谢您选择我们的人工智能设备。
为了确保您能够正确、安全地使用设备,本使用说明书将为您提供详细的使用指南和注意事项,请您仔细阅读。
一、设备介绍1. 设备外观:本设备为小型智能机器人,外观精致、结构简单、色彩鲜艳。
2. 产品构成:包含智能主机、操作面板、摄像头模块、传感器模块等核心部件,以及电源线、数据线等配套器件。
二、准备工作1. 电源:将电源线插入设备背部的电源插口,并接通电源。
2. 连接网络:使用数据线将设备与无线网络连接,确保设备正常工作。
三、基本操作1. 启动设备:按下设备背部的电源按钮,听到启动音后,表示设备已成功启动。
2. 声控功能:设备支持声控操作,在使用中请清晰、明确地发出操作指令,以确保设备能够准确识别并执行您的要求。
3. 触摸操作:操作面板上设有多个触摸区域,根据您需要的操作,轻触相应区域即可实现。
四、主要功能1. 人机对话:本设备通过智能语音识别技术,能够准确识别您的语音指令,并根据您的需求给出相应的答复和建议。
2. 语音助手:设备搭载了人工智能助手,能够为您提供日历管理、天气查询、音乐播放等各类服务。
3. 家居控制:设备支持智能家居控制,可连接您的智能家居设备,通过声音控制,实现灯光调节、窗帘控制等功能。
4. 娱乐功能:设备内置了丰富的儿童教育内容和音乐库,可以为孩子们提供娱乐和学习的机会。
五、注意事项1. 安装场所:请将设备放置在平整、稳固的桌面上,确保设备的稳定性和安全性。
2. 网络环境:确保设备与无线网络的稳定连接,以确保设备的正常使用和数据传输。
3. 使用环境:请避免将设备暴露在高温、潮湿等极端环境下,以免损坏设备。
4. 防护措施:请勿私自拆卸设备,以避免触电或损坏设备,并请勿将设备与水源、易燃物品等接触。
六、故障排除1. 无法启动:检查电源是否插好,并确保电源正常供电。
2. 语音识别异常:请确保使用环境安静,并清楚、准确地发出语音指令。
智能调节器使用说明书
SIC-03型━━━━━━━━━━━━━━━━━组合型智能调节器智能调节器安装使用说明书━━━━━━━━━━━━━━━━━大连工业大学━━━━━━━━━━━━━━━━━大连工业大学一、概述一、概述本型号调节器是基于MCU(微型工业处理器)的新一代调节器,硬件设计上采用最新的微处理器技术及IC技术。
软件设计上采用成熟、可靠的控制算法,全部程序采用汇编语言实现,效率高、速度快。
显示功能完善:测量值、设定值、两参数在前面板同时以光柱和数码管两种形式显示,光柱用于以百分数形式显示两参数,数码管用于以工程量形式显示两参数;输出值以数字形式显示,阀位值以光柱形式显示,所有操作过程中关心的参数:测量值、设定值、输出值、阀位值、自动/手动控制方式、内/外给定方式、正/反作用方式在调节器的前面板上同时显示,不必按键选择显示,方便对控制过程的监控。
操作简单:仅通过前面板上四个按键,可实现对设定参数、实时参数的监测,其中,需要经常整定的PID参数、手动/自动切换操作,专门设计了简洁的操作方法,方便操作。
支持RS-485总线,有专门的通讯协议,方便构成现场总线测控系统。
二、主要功能与技术指标主要功能:1.自动/手动双向无平衡无扰动。
2.积分、微分作用可切除。
3.重要参数:被控变量给定值与测量值以数字形式与光柱形式同时显示;被控变量的工程量与满量程百分数同时显示;被控变量给定值、测量值、调节器输出值、阀位值、自动/手动状态、内/外给定形式、正/反作用方式同时在仪器的前面板上显示,不用任何操作,可完全了解调节器的工作情况。
4.支持RS-485通讯技术,方便构成局域控制网络。
5.当被控变量测量信号出现故障(小于2mA)时,阀位可保持在原有位置或自动切换到预置位置上。
主要技术指标:⒈输入信号⑴来自现场变送器的 4~20mA 电流信号或配电器输出的1~5V电压信号,两种信号可通过按键选择。
⑵外给定信号:4~20mA 电流信号。
⑶阀位信号:4~20mA 电流信号。
AI人工智能工业调节器ANL-PID-807概要
AI人工智能工业调节器ANL-PID-807一、概述●人性化设计的操作方法,非常方便易学,并且不同功能档次的仪表操作相互兼容。
●包含国际上同类仪表的几乎所有功能,通用性强,技术成熟可靠。
●提供多个型号,无论是要求功能强大,还是要求价格经济,都能获得满意的选择。
●全球通用的85-264VAC 输入范围开关电源或24VDC 电源供电,具备多种外型尺寸供客户选择。
●输入采用数字校正系统,内置常用热电偶和热电阻非线性校正表格,测量精确稳定。
●采用先进的人工智能调节算法,无超调,具备自整定(AT)功能。
●采用先进的模块化结构,提供丰富的输出规格,能广泛满足各种应用场合的需要,维护方便。
●具备符合要求的抗干扰性能。
二、详细说明●输入规格(一台仪表即可兼容):热电偶:K、S、R、E、J、T、B、N热电阻:Cu50、Pt100线性电压:0-5V、1-5V、0-1V、0-100mV、0-20mV 等线性电流(需外接分流电阻):0-10mA、0-20mA、4-20mA 等扩充规格:在保留上述输入规格基础上,允许用户指定一种额外输入规格(可能需要提供分度表)●测量范围:K: -100-1372 S: -30-1700 R: -30-1700 T : -200-400E: -30-1000 J: -30-1200 B: -30-1820 N: -30-1300Pt100: -200-800 cu50: -50-150线性输入:-1999-+9999 由用户定义●测量精度:0.5 级●响应时间:≤0.5 秒(设置数字滤波参数dL=0 时)注:仪表对B 分度号热电偶在0-600℃范围时可进行测量,但测量精度无法达到0.2 级,在600-1800℃范围可保证0.5 级测量精度。
●调节方式:位式调节方式(回差可调)人工智能调节,包含模糊逻辑PID 调节及参数自整定功能的先进控制算法●输出规格(模块化):继电器触点开关输出(常开+常闭):264VAC/1A 或30VDC/1A可控硅无触点开关输出(常开或常闭):85-264VAC/0.2A(持续),2A(20mS 瞬时,重复周期大于5S)SSR 电压输出:12VDC/30mA (用于驱动SSR 固态继电器)可控硅触发输出:可触发5-500A 的双向可控硅、2 个单向可控硅方并连接或可控硅功率模块线性电流输出:0-10mA 或4-20mA 可定义(输出电压≥11V)●报警功能:00:无报警01:上偏差报警02:下偏差报警03:上绝对值报警04:下绝对值报警05:区间内报警06:区间外报警●报警输出:2 路继电器输出●手动功能:自动/手动双向无扰动切换●电源:85-264VAC/50-60Hz●电源消耗:≤5W●环境温度:0-50℃●面板尺寸:96×96mm、72×72mm、48×48mm、96×48mm 可选●开口尺寸:92×92mm、152×76mm、76×152mm、45×92mm、92×45mm三、产品特点AI 系列仪表采用的AI 人工智能调节方式,是采用模糊规则进行PID 调节的一种新型算法,与一般PID 调节器相比,它能在降低超调的同时又提高了响应速度。
AI 系列人工智能调节器使用说明书(下)
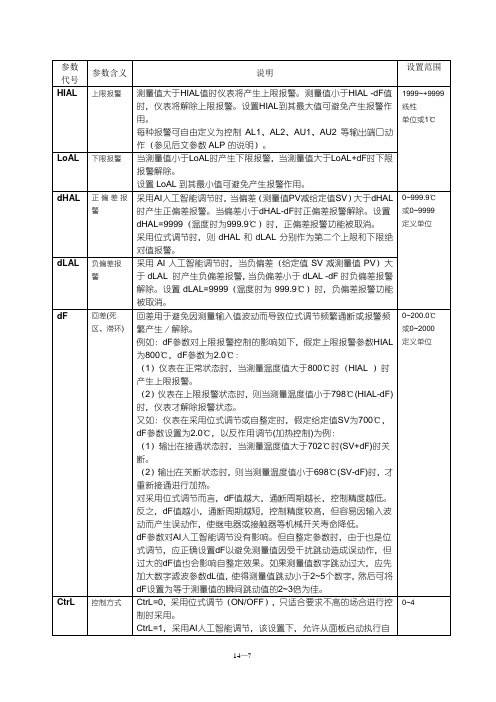
温度变送器/程序发生器功能:若设置CtrL=0而OPt参数(见后文)又将主输出定义为电流输出(OPt=1、2或4分别表示为0~10mA、0~20mA或4~20mA输出),则对于AI-708/808仪表将把PV值变送为电流信号从OUTP位置输出,而对于AI-708P/808P则将把SV值变送为电流信号从OUTP位置输出,成为程序发生器。可以用dIL、dIH参数设置要变送值的下限或上限。新一代X3/X5电流输出模块精度为0.2级,加上测量误差,综合变送精度约0.3~0.4级精度。
P=1000÷每秒测量值升高值(测量值单位是0.1℃或1个定义单位)
如仪表以100%功率加热并假定没有散热时,电炉每秒升1℃,则:
P=1000÷10=100
P值类似PID调节器的比例带,但变化相反。P值越大,比例、微分作用成正比增强,而P值越小,比例、微分作用相应减弱。P参数与积分作用无关。
当CtrL=4时:P参数设置将增大10倍,以上的例子中应设置P=1000。
8 WRe3-WRe2531 0~1V
9 WRe5-WRe2632 0.2~1V
10客户自定义33 1~5V电压输入
12 F2辐射高温温度计34 0~5V电压输入
15 4~20mA(在MIO安装I4)35 -20 ~ +20mV
16 0~20mA(在MIO安装I4)36 -100 ~ +100m V
AI708系列智能调节仪操作说明书
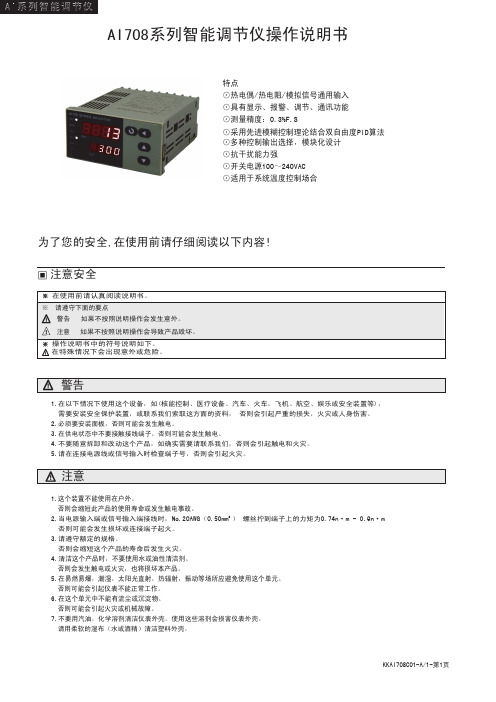
AI708系列智能调节仪操作说明书特点⊙热电偶/热电阻/模拟信号通用输入⊙具有显示、报警、调节、通讯功能⊙测量精度:0.3%F.S⊙采用先进模糊控制理论结合双自由度PID算法⊙多种控制输出选择,模块化设计⊙抗干扰能力强⊙开关电源100~240VAC ⊙适用于系统温度控制场合注意安全1.在以下情况下使用这个设备,如(核能控制、医疗设备、汽车、火车,飞机、航空、娱乐或安全装置等), 需要安装安全保护装置,或联系我们索取这方面的资料, 否则会引起严重的损失,火灾或人身伤害。
2.必须要安装面板,否则可能会发生触电。
3.在供电状态中不要接触接线端子,否则可能会发生触电。
4.不要随意拆卸和改动这个产品,如确实需要请联系我们,否则会引起触电和火灾。
5.请在连接电源线或信号输入时检查端子号,否则会引起火灾。
1.这个装置不能使用在户外。
否则会缩短此产品的使用寿命或发生触电事故。
2.当电源输入端或信号输入端接线时,No.20AWG(0.50mm ) 螺丝拧到端子上的力矩为0.74n·m - 0.9n·m 否则可能会发生损坏或连接端子起火。
3.请遵守额定的规格。
否则会缩短这个产品的寿命后发生火灾。
4.清洁这个产品时,不要使用水或油性清洁剂。
否则会发生触电或火灾,也将损坏本产品。
5.在易燃易爆,潮湿,太阳光直射,热辐射,振动等场所应避免使用这个单元。
否则可能会引起仪表不能正常工作。
6.在这个单元中不能有流尘或沉淀物。
否则可能会引起火灾或机械故障。
7.不要用汽油,化学溶剂清洁仪表外壳。
使用这些溶剂会损害仪表外壳。
请用柔软的湿布(水或酒精)清洁塑料外壳。
为了您的安全,在使用前请仔细阅读以下内容!2一、仪表型号报警功能:C:表示两路报警输出 B:表示一路报警输出 (不启用加热冷却控制时多一路报警)外形尺寸(mm):4:48W×48H 6:48W×96H 7:72W×72H 8:96W×48H 9:96W×96HAI708系列智能调节仪环境湿度 45-85%RH环境温度 0-50℃整机电流 <30mA(220VAC)工作电压 100~240VAC □□AI708□二、常规型号说明输出功能:R:继电器输出 D:4~20mA电流输出 S:逻辑输出1.整机参数□输入及通讯:10:表示一路输入无通讯功能18:表示一路输入带RS485通讯(订货需注明)三、主要技术参数测量精度 0.3%FS±3digits 25℃控制方式 ON/OFF控制,PID加热控制,PID制冷控制,PID加热冷却控制通讯功能 RS485通讯接口 MODBUS RTU协议面板防护等级 IP65温度漂移 ≤0.01%FS/℃耐压隔离电源端、继电器触点及信号端相互之间 ≥2000VDC16:80W×160H 80:160W×80H型号主控输出1(注1)主控输出2(注2)报警点数(注3)通讯 AI708-4-RB 10 继电器输出 继电器输出 1 无 AI708-4-DB 10 继电器输出 1 无 AI708-4-SB 10 逻辑输出 继电器输出 1无 AI708-4-RB 18 继电器输出 继电器输出 1 RS485 AI708-4-DB 18 继电器输出 1 RS48548*48尺寸型号AI708-4-SB 18逻辑输出 继电器输出 1 RS485 AI708-□-R C10 继电器输出 继电器输出 2 无 AI708-□-D C10 继电器输出 2 无 AI708-□-S C10 逻辑输出 继电器输出 2 无 AI708-□-R C18 继电器输出 继电器输出 2 RS485 AI708-□-D C18 继电器输出 2 RS485 其他尺寸型号AI708-□-S C18逻辑输出继电器输出2RS485注1:主控输出1:4-20m A 电流输出负载600Ωm ax 。
AI 系列人工智能调节器使用说明书
2
B 面板160×80mm(宽×高),横式,开口152×76mm,插入深度为100mm C (C3带50段2级亮度光柱)面板80×160mm(宽×高),竖式,开口76×152mm,插入深度为100mm D 面板72×72mm,开口68×68mm,插入深度为95mm E 面板48×96mm(宽×高),开口45×92mm,插入深度为100mm E5 无显示面板,采用DIN导轨安装方式,48×96×110mm(宽×高×深) F 面板96×48mm(宽×高),开口92×45mm,插入深度为100mm ③表示仪表辅助输入(MIO)安装的模块,N表示没有安装,下同 I4 可扩充0~20mA或4~20mA电流信号输入,并且内置24VDC电源输出,可直接连接二线制变送器 I5 开关量输入模块,可在外部连接一开关,开关断开时给定值SV=SP1,开关闭合时SV=SP2 V24/12/V10/U5 分别为24V、12V、10V及5VDC电源输出模块,最大电流50mA,可供外部传感器等使用 ④表示仪表主输出(OUTP)安装的模块,用于仪表调节输出或SV/PV的变送输出 L1 单路继电器输出模块,250VAC/2A,采用优质国产继电器 L2 小体积单路继电器输出模块,250VAC/1A,采用进口品牌继电器 L4 单路继电器输出模块,250VAC/2A,采用进口品牌继电器 L5 双路进口品牌继电器常开触点输出模块,OP1及OP2分别控制阀门电机的正/反转。 K1 “烧不坏”单路可控硅过零触发输出模块,可触发5~500A双向或二个反并联的单向可控硅 K3 “烧不坏”三路可控硅过零触发输出模块,每路可触发5~500A双向或二个反并联的单向可控硅 K5 “烧不坏”单路可控硅移相触发输出模块,适合200~240VAC电网 K6 “烧不坏”单相可控硅移相触发输出模块,适合340~415VAC电网范围使用 X3 光电隔离型线性电流输出模块,支持0~20mA及4~20mA输出,占用仪表内部12VDC电源
杭州联测自动化技术有限公司 1 人工智能温控器 调节仪 使用说明书 U-HSX5300-LCCN1
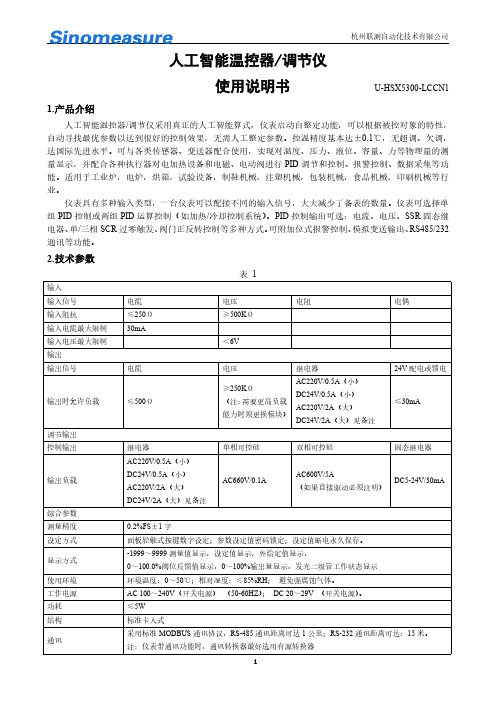
使用说明书U-HSX5300-LCCN1 1.产品介绍人工智能温控器/调节仪采用真正的人工智能算式,仪表启动自整定功能,可以根据被控对象的特性,自动寻找最优参数以达到很好的控制效果,无需人工整定参数。
控温精度基本达±0.1℃,无超调、欠调,达国际先进水平。
可与各类传感器、变送器配合使用,实现对温度、压力、液位、容量、力等物理量的测量显示,并配合各种执行器对电加热设备和电磁、电动阀进行PID调节和控制、报警控制、数据采集等功能。
适用于工业炉,电炉,烘箱,试验设备,制鞋机械,注塑机械,包装机械,食品机械,印刷机械等行业。
仪表具有多种输入类型,一台仪表可以配接不同的输入信号,大大减少了备表的数量。
仪表可选择单组PID控制或两组PID运算控制(如加热/冷却控制系统)。
PID控制输出可选:电流、电压、SSR固态继电器、单/三相SCR过零触发、阀门正反转控制等多种方式。
可附加位式报警控制、模拟变送输出、RS485/232通讯等功能。
2.技术参数表1输入输入信号电流电压电阻电偶输入阻抗≤250Ω≥500KΩ输入电流最大限制30mA输入电压最大限制<6V输出输出信号电流电压继电器24V配电或馈电输出时允许负载≤500Ω≥250KΩ(注:需要更高负载能力时须更换模块)AC220V/0.5A(小)DC24V/0.5A(小)AC220V/2A(大)DC24V/2A(大)见备注≤30mA调节输出控制输出继电器单相可控硅双相可控硅固态继电器输出负载AC220V/0.5A(小)DC24V/0.5A(小)AC220V/2A(大)DC24V/2A(大)见备注AC660V/0.1AAC600V/5A(如果直接驱动必须注明)DC5-24V/30mA综合参数测量精度0.2%FS±1字设定方式面板轻触式按键数字设定;参数设定值密码锁定;设定值断电永久保存。
显示方式-1999~9999测量值显示,设定值显示,外给定值显示,0~100.0%阀位反馈值显示,0~100%输出量显示,发光二级管工作状态显示使用环境环境温度:0~50℃;相对湿度:≤85%RH;避免强腐蚀气体。
AI 系列人工智能调节器使用说明书(上)

AI 系列人工智能调节器使用说明书1. 概叙1.1 主要特点●输入采用数字校正系统,内置常用热电偶和热电阻非线性校正表格,测量精度高达0.2级。
●采用先进的AI人工智能调节算法,无超调,具备自整定(AT)功能。
●采用先进的模块化结构,提供丰富的输出规格,能广泛满足各种应用场合的需要,交货迅速且维护方便。
●人性化设计的操作方法,易学易用。
●全球通用的100~240VAC输入范围开关电源或24VDC电源供电,并具备多种外型尺寸供客户选择。
●通过新的2000版ISO9001质量认证,品质可靠。
●产品经第三方权威机构检测获得CE认证标志,抗干扰性能符合在严酷工业条件下电磁兼容(EMC)的要求。
1.2 技术规格●输入规格(一台仪表即可兼容):热电偶:K、S、R、T、E、J、B、N、WRe3-WRe25、WRe5-WRe26热电阻:Cu50、Pt100线性电压:0~5V、1~5V、0~1V、0~100mV、0~60mV、0~20mV等;0~10V(需在MIO位置安装I31模块)线性电流(需外接精密电阻分流或在MIO位置安装I4模块):0~20mA、4~20mA等线性电阻:0~80欧、0~400欧(可用于测量远传电阻压力表)●测量范围:K(-100~+1300℃)、S(0~1700℃)、R(0~1700℃)、T(-200~+390℃)、E(0~1000℃)、J(0~1200℃)B(600~1800℃)、N(0~1300℃)、WRe3-WRe25(0~2300℃)、WRe5-WRe26(0~2300℃)Cu50(-50~+150℃) 、Pt100(-200~+800℃)线性输入:-9990~+30000由用户定义●测量精度:0.2级(0.2%FS±0.1℃)●分辨率:0.1℃(当测量温度大于999.9℃时自动转换为按1℃显示),可选择按1℃显示●温度漂移:≤0.01%FS/℃(典型值约50ppm/℃)●响应时间:≤0.3秒(设置数字滤波参数dL=0时)●调节方式:位式调节方式(回差可调)AI人工智能调节,包含模糊逻辑PID调节及参数自整定功能的先进控制算法●输出规格(模块化):继电器触点开关输出(常开+常闭):250VAC/1A 或30VDC/1A可控硅无触点开关输出(常开或常闭):100~240VAC/0.2A(持续),2A(20mS瞬时,重复周期大于5S)SSR 电压输出:12VDC/30mA (用于驱动SSR固态继电器)可控硅触发输出:可触发5~500A的双向可控硅、2个单向可控硅反并联连接或可控硅功率模块线电流输出:0~10mA或4~20mA 可定义(安装X模块时输出电压≥10.5V;X4模块输出电压≥7V)●电磁兼容:IEC61000-4-4(电快速瞬变脉冲群),±4KV/5KHz;IEC61000-4-5(浪涌),4KV●隔离耐压:电源端、继电器触点及信号端相互之间≥2300VDC;相互隔离的弱电信号端之间≥600VDC●电源:100~240VAC,-15%,+10% / 50~60Hz;或24VDC/AC,-15%,+10%●电源消耗:≤5W●使用环境:温度-10 ~ +60℃;湿度≤90%RH●面板尺寸:96×96mm、160×80mm、80×160mm、48×96mm、96×48mm、72×72mm●开口尺寸:92×92mm、152×76mm、76×152mm、45×92mm、92×45mm、68×68mm●插入深度:≤100mm1.3 仪表接线仪表后盖端子排布如图:注①:线性电压量程在1V以下的由19、18端输入,0~5V及1~5V的信号由17、18端输入。
AI-719型人工智能调节器使用说明书(V7.0)

使用说明书1 概述1.1 主要特点●输入可自由选择热电偶、热电阻、电压、电流并可扩充输入及自定义非线性校正表格,测量精确稳定。
●采用先进的AI人工智能PID调节算法,无超调,具备自整定(AT)功能。
●具备手动/自动无扰动切换功能及上电软启动功能。
●可使用宇电公司新一代14位分辨率0.2%高精度电流输出模块X3/X5,比旧产品提高了电流输出精度。
●采样速率比上一代产品提高一倍,最小控制周期短至0.24秒,提高了对快速变化对象的控制精度。
●采用先进的模块化结构,提供丰富的输出规格,能广泛满足各种应用场合的需要,交货迅速且维护方便。
●人性化设计的操作方法,易学易用;并允许编辑现场参数及自设定密码,“定制”自己的仪表。
●全球通用的100~240VAC输入范围开关电源或24VDC电源供电,具备℃/℉单位选择功能。
●“发烧”级硬件设计,大量采用钽电容或陶瓷电容替代电解电容,具备比同级产品更低的电源消耗、更高的可靠性、稳定性及更宽广的温度使用范围;其电源及I/O端子均通过4KV/5KHz的群脉冲抗干扰实验测试。
●通过ISO9001质量认证和CE认证,在质量、抗干扰能力及安全标准方面达到国际水准。
注意事项●仪表在使用前应根据其输入、输出规格及功能要求来正确设置参数。
只有配置好参数的仪表才能投入使用。
11.2 型号定义AI-719/709仪表硬件采用了先进的模块化设计,具备5个功能模块插座:辅助输入、主输出、报警、辅助输出及通讯。
模块可以与仪表一起购买也可以分别购买,自由组合。
仪表的输入方式可自由设置为常用各种热电偶、热电阻和线性电压(电流)。
AI-719型仪表型号共由8部分组成,例如:AI-719 A N X3 L5 N S4 — 24VDC①②③④⑤⑥⑦⑧这表示一台仪表:①基本功能为AI-719型;②面板尺寸为A型(96×96mm);③辅助输入(MIO)没有安装模块;④主输出(OUTP)安装X3线性电流输出模块;⑤报警(ALM)安装L5双路继电器触点输出模块;⑥辅助输出(AUX)没有安装模块;⑦通讯(COMM)装有自带隔离电源的光电隔离型RS485通讯接口S4;⑧仪表供电电源为24VDC电源。
AI系列人工智能温控器调节器V7.0英文说明书

AI SERIES ARTIFICIAL INTELLIGENCE INDUSTRIAL CONTROLLEROperation InstructionVer. 7.0(Ideal for accurate controls of temperature, pressure, flow, level, humidity etc.)CONTENTS1.SUMMARY (1)1.1M AIN F EATURES1 1.2O RDERING C ODE D EFINITION3 1.3M ODULES81.3.1 Sockets of modules 81.3.2 Further descriptions about module applications 9 1.4DIN R AIL M OUNTED I NSTRUMENTS 11 1.5TECHNICAL SPECIFICATION 13 1.6R EAR T ERMINAL L AYOUT AND W IRING 161.7S ELECT THERMOCOUPLE REFERENCE JUNCTION COMPENSATION MODE BY USING DIFFERENT WIRING MODE 202.DISPLAYS AND OPERATIONS (24)2.1F RONT P ANEL D ESCRIPTION 24 2.2D ISPLAY S TATUS25 2.3O PERATION D ESCRIPTION272.3.1 Display status switch 272.3.2 SetSetting 27 ValueSetting 282.3.3 Parameter2.4A UTO T UNING28 2.5P ROGRAM OPERATION (FOR AI-708P/808P ONLY) 322.5.1 Setup program 322.5.2 Run/Hold 322.5.3 StoP 332.5.4 Display and modify the running StEP NO. (StEP) of the program 333.PARAMETERS AND SETTINGS (34)3.1P ARAMETER L OCK (L OC) AND F IELD P ARAMETERS 34 3.2T HE F ULL P ARAMETER T ABLE 35 3.3A DDITIONAL R EMARKS OF S PECIAL F UNCTIONS 523.3.1 Alarm blocking at the beginning of power on 52switch 533.3.2 Setpoints3.3.3 Sectional power restriction 533.3.4 User defined non-linear table 544.FURTHER DESCRIPTION FOR THE OPERATION OF AI-708P/808P SERIES INSTRUMENT (57)4.1M AIN FUNCTION57 4.2C ONCEPTS AND FUNCTIONS 58 4.3P ROGRAMMING AND OPERATION 631. SUMMARY1.1 Main Features●Adopt digital calibration technology for input measurement with input measurement accuracy0.2% F.S., non-linear calibration tables for standard thermocouples and RTDs are available in theinstrument.●Adopt advanced AI artificial intelligence control algorithm, no overshoot and with the function ofauto tuning and self-adaptation.●Adopt advanced modular structure, conveniently providing plentiful output options, can satisfy therequirements of various applications, and make quick delivery and conveniences the maintenance of the instrument.●Friendly and customized operating interface leads to easy learning and simple manipulation.Any parameter can be promoted to immediate operator access in Field Parameter Table or password protected in Full Parameter Table.●With universal power supply of 100-240VAC or 24VDC and various installation dimensions forusers to choose.● High quality and performance hardware design, using high performance tantalum capacitor orceramic capacitor. Compared to competing models, it consumes less electricity, experiences less temperature shifting, provides higher stability and reliability, and can work in a wider range of1temperature.● ISO9001 and CE certified, complying with EMC requirement, achieving world class level ofquality, anti-interference ability and safety.POINTS FOR ATTENTION●This manual introduces AI-708/708P/808/808P model ARTIFICIAL INTELLIGENCE INDUSTRIALCONTROLLER of Version 7.0. Certain functions introduced by this manual are probably not applicable for the instrument of other version. After power on, the instrument model and software version will be displayed. User should pay attention to the difference between different versions when using the instrument. Please read this manual carefully in order to use the instrument correctly and make it to its full use.●Please correctly set parameters according to input / output specification and function. Onlycorrectly wired instruments with parameters correctly set can be put into use.●Compared to Version 6.5 or earlier versions, some important changes are:1. New rear terminal layout.2. New display panel with 10 LED indication lights.3. Heating/refrigerating dual output function, and both outputs can be either current or timeproportional output.24. Alarm applies single lateral deadband;5. support up to 4 channel alarm or event outputs;6. Quicker sampling speed and quicker valve control.1.2 Ordering Code DefinitionAdvanced modularized hardware design is utilized for AI series instruments. There are maximum five module sockets: multi-function input/output (MIO), main output (OUTP), alarm (ALM), auxiliary output (AUX) and communication (COMM). The input specification can be freely set to thermocouple, RTD, or linear current/voltage.The ordering code of AI-508 series instrument is made up of 9 parts. For example: AI-808 A N X3 L5 N S4 — 24VDC①②③④⑤⑥⑦⑧It shows that the model of this instrument is AI-808, front panel dimension is 96×96mm, no module is installed in MIO (Multi-function I/O) socket, X3 linear current output module is installed in OUTP (main output), ALM (alarm) is L5 (dual relay contact output module), no module is installed in AUX (auxiliary output), a RS485 communication interface with photoelectric isolation is installed, and the power supply of the instrument is 24VDC.The following is the meanings of the 8 parts:3① Shows the model of the instrumentAI-708High accuracy controller with measurement accuracy 0.2%F.S. It adopts artificial intelligent control technology, and has the functions of control, alarm, retransmissionand communication.AI-708P Add 30+20 segment program control to AI-708.AI-808Add valve control and manual/auto control with bumpless switch to AI-708.AI-808P Add 30+20 segment program control to AI-808.② Shows the front panel dimension.Model Front Panel(width xheight)Cut-out(width xheight)DepthBehindMountingSurfaceRemarksA(A2)96x96mm 92x92mm 100mm A2 has a light bar with 25 segments and 4 levels of luminosity.B 160X80mm 152x76mm100mmC(C3)80x160mm 76x152mm 100mm C3 has a light bar with 50 segments and 2 levels of luminosityD 72x72mm 68x68mm 95mmE 48x96mm 45x92mm 100mm4E5 48x96x110(width xheight xdepth)E5 is no panel trail mounted. It can beinstalled on DIN trail and programmedby connecting to external display.F 96x48mm 92x45mm 100mm③~ ⑦ shows the module types installed on the following sockets: MIO (multipleinput/output), OUTP (main output), ALM (alarm), AUX (auxiliary output), COMM( communication).( “√” means the module allowed to be installed on the according socket)Module Module Descriptions MIO OUTP ALM AUX COMM N no module installed √√√√√I4 4-20mA/0-20mA analogue input interface, providing a24VDC/24mA power supply for a two-wire transmitter. √I5 2 on-off switch signal inputs. Allow to switch setpoint between SP1 and SP2 by an external switch.√V5/V10/ V12/V24Isolated 5V, 10V, 12V or 24V DC output with maximum current 50mA.(use instrument’s internal 24V isolated power)√L1 1 relay contact (NO+NC) output.(big volume, 30VDC/2A, 250VAC/2A) √√√5L2 1 relay contact (NO+NC) output.(small volume, 30VDC/1A, 250VAC/1A) √√√L4 1 relay contact (NO+ NC) output.(small volume , 30VDC/2A, 250VAC/2A) √√√L5 2 relay contact (NO) outputs. (30VDC/2A, 250VAC/2A) √√√K1 Single-phase thyristor zero crossing trigger output module(can trigger one loop of a TRIAC or a pair of inverse parallelSCR with current of 5~500A)√√K3 Three-phase thyristor zero crossing trigger output module(can trigger 3-phase circuit; each channel can triggerTRIAC or a pair of inverse parallel SCR with current of5-500A)√K5 Single-phase thyristor phase-shift trigger output module(can trigger one loop of TRIAC or a pair of inverse parallelSCR with current of 5-500A), suitable for 200~240VACpower supply.√K6 Single-phase thyristor phase-shift trigger output module,suitable for 340~415VAC power supply.√X3 0~20/4~20mA linear current output module.(Use internal 12VDV power of the instrument) √√√X5 0~20/4~20mA linear current output module.(With its own isolated power) √√√6W1 TRIAC no contact normal open output.(100~240VAC/0.2A)√√W2 TRIAC no contact normal closed output.(100~240VAC/0.2A)√G SSR voltage outputs (12VDC/30mA) √√S Photoelectric isolated RS485 communication module(use instrument’s internal 12V isolated power)√S4 Photoelectric isolated RS485 communication modulewith its own photoelectric isolated power√R RS232 communication interface(use instrument’s internal 12V isolated power) √⑧ shows the power supply of the instrument. If left blank, the power of the instrument is100-240VAC. "24VDC" means the power supply of 20-32V DC or AC power supply.Note 1: The instrument applies the technology of automatic zero and digital calibration, and is free of maintenance. If the error exceeds certain range, generally, cleaning and drying the inside of the instrument can fix it. If not, send the instrument back to the factory to examine and repair.Note 2: Free repair and maintenance will be given in 36 months since the delivery. In order to get7full and correct repair, write the phenomena and causes of the malfunction of the instrument.1.3 Modules1.3.1 Sockets of modulesAI-7 series instruments have five sockets for modules to be installed (D dimension instruments have 3 sockets: OUTP, AUX and COMM/AL1). By installing different modules, the controller can meet the requirements of different functions and output types.Multiple function Input/Output (MIO): can input signal from 2-wire transmitter or 4-20mA signal by installing I4 (current input) module. If a I2 (on-off signal input) module is installed, the instrument can switch between setpoints SV1 and SV2 by an external switch. Cooperating with OUTP and installing a K3 module can realize three-phase thyristor zero cross triggering output.Main output (OUTP): is commonly used as control output such as on-off control, standard PID control, and AI PID control. It can be also used as retransmission output of process value (PV) or setpoint (SV). Installing L1 or L4 modular can realize relay contact output; installing X3 or X5 module can realize 0-20mA/4-20mA/0-10mA linear current output; installing G module can realize SSR voltage output; installing W1 or W2 module can implement TRIAC no contact switch output. Alarm (ALM): is commonly used to be alarm output. Support 1 normal open + normal close relay output (AL1) by installing L1 or L2 module or 2 normal open relay outputs (AL1+AL2) by installing L5 module.8Auxiliary output (AUX): In a heating/refrigerating dual output system, module X3, X5, L1, L4, G, W1, W2 can be installed for the second control output. It can also output alarm by installing L1, L2 or L5 module, or be used for communicating with computer by installing R module (RS232C interface).Communication Interface (COMM): Module S or S4 can be installed in for communicating with computer (RS485 communication interface), and it can also be used as power supply for external sensor when equipped with a voltage output module.1.3.2 Further descriptions about module applicationsElectric isolation of the modules: There are a group of 24V and a group 12V power supply built in the instrument and isolated to the main circuit. The 24V power commonly supplies voltage output module, such as V24/V12/V10, I2 and I4. The 12V power is commonly supplies output or communication module. Generally, the relay contact output and TRIAC no contact discrete output are self insulated from the other circuit, no matter whether other modules are installed or not. SSR voltage output do not need to be insulated from input circuit, because SSR itself has isolation function. Therefore, only the electric isolation between the communication interface and the current output should be considered. Those modules, for example, S (RS485 communication interface), R (RS232 communication interface) and X3 (linear current output), all9need the 12V power supply. If more than one of the above modules are installed, in order to be electric isolated, only one of them can be module without electric isolation, the other modules should be S4 or X4, which has its own isolated power supply. For example, if an X module is installed in OUTP (main output) socket, and an S or X module is installed in COMM (communication interface) socket, then OUTP and COMM can not be electric isolated, so S or X should be replaced with S4 or X4.Three-phase thyristor zero crossing trigger output module K3: Module K3 takes OUTP and MIO sockets. When K3 is installed, installing I5 on COMM socket and setting parameter “bAud”to 1 can also switch the value of setpoint.Voltage output module: The voltage output modules like V24, \/10 or V12 are often used for supplying power for external transducer or feedback resistance of transmitter. These modules can be installed in any socket. To standardize the wiring, it is recommended to be installed in the first idle socket in the order of MIO, AUX, and COMM.No contact triac switch module : W1 and W2 are new types of no contact switch module which apply the advanced technology of “burn proof” and zero crossing conduction. It can replace the relay contact switch. Compared to the relay contact output module, W1 and W2 have longer life and lower interference. They can largely lower the interference spark of the equipment, and greatly improve the stability and reliability of the system. Since the driver element is TRIAC, it is10suitable for controlling 100-240VAC (not for DC power) with current up to 80A. For the current larger than 80A, an intermediate relay is needed.Relay Switch Module : the relay modules are widely used in industrial control. However, they are the only modules with life time limit and volume limit and have much electromagnetic interference. It is important to choose a suitable relay module. To control equipments with 220VAC supply, such as contactor and electromagnetic valve, W1 module is recommended. To control DC or AC below 100V, users can only use relay module. L2 module is small, and both its normal open and normal close terminals have the function of varistor spark absorption, but the capacity is small. It is suitable for alarm output. L1 and L5 have big volume and big capacity.In the 48mm dimension instrument (for example, D2, E, F and E5), only one of L1 or L5 can be installed. L5 has dual output, can be used to support two loops of alarm, for example, AL1+AL2.If you don’t like mechanical switch, you can choose G5 (dual SSR voltage driver) and connect with external SSR instead.1.4 DIN Rail Mounted InstrumentsDIN rail mounted instrument (dimension E5) has no display window. It is often operated by communicating with host computer through a RS485 communication interface.The address and baud rate parameters can be set by the instrument’s internal switch. There is11a switch of 10 bits behind the front cover of the instrument. The bit 1~7 is a binary number from 0 to 100 indicating the communication address. The eighth bit indicates baud rate, “0” means baud rate is set to 9600, and “1” for 19200. The other two bits is spare for future use. The updated parameters won’t be active until the instrument power on again.E5 dimension instrument has one LED indication light. When the instrument is communicating with the host computer, the light flashes with light on time different to light off time. When the instrument hasn’t received signal from the host computer for 6 seconds, the indication light should flash with the same light on time and light off time. The flash frequency can tell the work status of the instrument:T hat the on-off period is as long as 1.6 second means no communication and no alarm (it can be treated as normal);T he light flashing with period 0.6 second means no communication and general error occurs.T he light quickly flashing with period 0.3 second means no communication and severe error such as input over range occurs.T he light keeping off means the instrument power off or damaged; the light keep on (longer than 8 seconds) means the instrument is on but is damaged.12T he parameters of E5 dimension instrument can also be set by connecting ADP1 display to the 1394 socket.Note: The 1394 socket of the instrument only supports Yudian ADP1 display.1.5 TECHNICAL SPECIFICATIONInput type: (Any of below specifications can be selected by parameter “Sn”) Thermocouple: K, S, R, T, E, J, N, WRe3-WRe25, WRe5-WRe26Resistance temperature detector: Cu50, Pt100Linear voltage: 0~5V, 1~5V, 0~1V, 0~100mV, 0~60mV, 0~20mV, etc.; 0~10V if module I31 is installed on MIO socket.Linear current (external connect to precise shunt resist or install I4 module on MIO): 0~20mA, 4~20mA, etc.Linear resistance : 0~80ohm, 0~400ohm.Optional: apart from the above-mentioned Input type, an additional type can be provided upon request. (Graduation index is needed)Instrument Input rangeK(-100~1300℃), S(0~1700℃), R(0~1700℃), T(-200~+390℃), E(0~1000℃), J(0~1200℃),13B(600~1800℃), N(0~1300℃), WRe3-WRe25(0~2300℃), WRe5-WRe26(0~2300℃)Cu50(-50~+150℃), Pt100(-200~+800℃)Linear Input: -9990~30000 defined by user.Measurement accuracy : 0.2%FS ± 0.1℃Resolution : 0.1℃(automatically change to 1℃when the temperature is high than 999.9℃) or 1℃ selectableTemperature drift :≤0.01%FS /℃(typical value is 50ppm/℃)Response time : ≤0.3s ( when digital filter parameter dL=0)Control mode:On-off control mode (deadband adjustable)AI MPT with auto tuning, adopting fuzzy logic PID algorithm.Output mode (modularized)Relay output (NO+NC): 250VAC/2A or 30VDC/1ATRIAC no contact discrete output (NO or NC): 100~240VAC/0.2A (continuous), 2A (20mS instantaneous, repeat period≥5s)SSR Voltage output: 12VDC/30mA (used to drive SSR).Thyristor zero crossing trigger output: can trigger TRIAC of 5~500A, a pair of inverse paralleled SCRs or SCR power module.14Linear current output: 0~20mA, 4~20mA (The output voltage of X module ≥10.5V; and that of X3 module ≥10.5V.)Electromagnetic compatibility (EMC) : ±4KV/5KHz according to IEC61000-4-4; 4KV according to IEC61000-4-5.Isolation withstanding voltage : between power, relay contact or signal terminal ≥2300VDC;between isolated electroweak terminals ≥600VDCPower supply : 100~240VAC, -15%, +10% / 50-60Hz; 120~240VDC; or 24VDC/AC, -15%, +10%.Power consumption:≤5WOperating Ambient : temperature -10~60℃; humidity ≤90%RHFront panel dimension: 96×96mm, 160×80mm, 80×160mm, 48×96mm, 96×48mm, 48×48mm, 72×72mmPanel cutout dimension: 92×92mm, 152×76mm, 76×152mm, 45×92mm, 92×45mm, 45×45mm, 68×68mmDepth behind mounting surface: 100mm15161.6 Rear Terminal Layout and WiringWiring graph for instruments except D and D2 dimension.(K1/K3)(K3) (K3) The graph suits for upright instruments with dimension A, C or EFor instruments with dimension F, just clockwise rotate the graph 90 degree,and the numbers of the terminals keep the same.Note 1: For linear voltage input, if the range is below 1V, connect to terminals 19 and 18. 0~5V or 1~5V signal can be inputted from terminals 17 and 18.Note 2: 4~20mA linear current signal can be transformed to 1~5V voltage signal by connecting a 250 ohm resistor, and then be inputted from terminals 17 and 18. If I4 module is installed in MIO socket, 4~20mA signal can be inputted from terminals 14+ and 15-, and 2-wire transmitter can be inputted from terminals 16+ and 14-.Note 3: The compensation wires for different kinds of thermocouple are different, and should be directly connect to the terminals. When the internal auto compensation mode is used, connecting the common wire between the compensation wire and the terminals will cause measurement error.Wiring graph of D dimension instruments (72×72mm)Note 1: Linear voltage signal of range below 1mV should be inputted from terminals 13 and 12, and signal of 0~5V and 1~5V should be inputted from terminals 11 and 12.(K1)17Note 2: 4~20mA linear current signal can be converted to 1~5V voltage signal by connecting a 250 ohm resistor and inputted from terminals 11 and 12.Note 3: S or S4 module can be installed in COMM socket for communication. If relay, TRIAC no contact switch, or SSR driver voltage output module is installed in COMM, it can be used as alarm output. If I2 module is installed in COMM and parameter “bAud” is set to 1, then on-off signal can be inputted, and SV1 and SV2 can be switched by connecting a switch between terminals 3 and 4.18Wiring graph of thyristor trigger output is as below (suitable for module K1, K3, K5 and K6):ThyristorThyristor triggerNote 1: According to the voltage and current of load, choose suitable varistor to protect the thyristor. Capacitor resistor absorber is needed for inductance load or phase-shift trigger output.19Note 2: SCR power module is recommended. A power module includes two SCRs, is similar to the above dashed square.Note 3: Phase-shift trigger module K5 only supports 200~240VAC power, and K6 supports 340~415VAC.1.7 Select thermocouple reference junction compensation mode by using different wiring modeReference junction compensation is needed junction for thermocouple input. AI instrument supply good reference junction compensation for thermocouple input through 4 different compensation modes selective using software configuration and different external wiring.Internal automatic compensation: this is the default mode, and can satisfy a lot of industrial application. But because temperature sensor is installed inside the instrument or at wiring terminals, and may be easily affected by the heat generated in the instrument and by compensating lead wire connection and surroundings, measurement error may be produced up to 2—4℃ sometimes.Compensation with Cu50 copper resistor sensor externally connected: the compensation precision is high. In the application in which high measurement precision is needed, you can buy20a Cu50 copper resistor and had better prepare an external wiring box, and then put the copperresistor together with thermocouple reference junction far away from exothermic object.Compensation error is less then 0.5℃for this mode.Thermostat compensation: If we replace Cu50 by an accurate resistor, thermostat compensation is available. For example, an resistance of 60Ωis installed, we can get the compensate temperature of 46.6℃by looking up into the Cu50 graduation index, and then put the thermocouple reference junction into thermostat of 46.6℃. The compensation precision is higher than copper resistor compensation.Ice point compensation: It is necessary to put thermocouple reference junction (where thermocouple lead wire connect with common lead wire) into ice-water mixture the compensation precision is very high, with reference junction compensation error less than 0.1℃if ice point and compensation lead wire is guaranteed.21Wiring diagrams for the above compensation modes:Corresponding wiring diagram of the instrumentcompensating cable(1) Internal automatic compensationconnected(compensating cable directly connected toinstrument’s terminals)ThermocoupleThermocouple(2) Automatic compensation mode by externally connected copper resistance Note: wiring box should be well way from the heat generating object.2223Thermocouple(4)ice point compensation modeCommon cableCompensating cableThermocouple60ohm resistor(3) fixed temperature compensation modeNote : the temperture of thermostat should be controlled at 46.6℃2. DISPLAYS AND OPERATIONS2.1 Front Panel Description① Upper display window, displays PV, parametercode, etc.② Lower display window, displays SV, parametervalue, or alarm③ Setup key, for accessing parameter table andconforming parameter modification.④ Data shift key, and auto/manual control switch.⑤ Data decrease key⑥ Data increase key⑦ 10 LED indicators.⑤242.2 DisplayStatus25Note: Not all models have the above display status. AI-708 has status ① and ⑤; AI-808 has ①, ② and ⑤; AI-708P has ①, ③, ④, ⑤ and ⑥; and AI-808P has all above status.Basic display status : When power on, the upper display window of the instrument shows theprocess value (PV), and the lower window shows the setpoint (SV). For AI-808/808P, pressingcan switch between status ① and ②. Status ① and ②are called basic display status.When the input signal is out of the measurable range (for example, the thermocouple or RTD circuit is break, or input specification sets wrong), the lower display window will alternately display “orAL” and the high limit or the low limit of PV, and the instrument will automatically stop control and set output to 0.If the lower display window alternately display “HIAL”, “LoAL”, “HdAL” or “LdAL”, it means high limit alarm, low limit alarm, deviation high alarm, and deviation low alarm occurs. The alarm display can also be turned off by setting parameter “cF”.For program type instruments AI-708P/808P, the lower display may alternately display between SV and “StoP”, “HoLd”, or “rdy” which means the program control is stop, pause and ready.There are 8 indication light on the front pannel. Light “MAN” on means manual output status, and off means auto control status. “PRG” on indicates program control status, flashing means that the program is in that status of hold or ready, and off means the program stops. MIO, OP1, OP2, AL1, AL2, AU1 and AU2 respectiviely indicate I/O operation of the corresponding module. For example,26That the COMM indicator is lighting means that the instrument is communicating with computer.When current module X or X4 is installed on OUTP socket, the brightness of OP1 and OP2 indicates the magnitude of the current. When K5 single phase shifting module is installed on OUTP sockets, OP2 on indicates that the external power is on, and the brightness of OP1 shows the magnitude of phase-shifting trigger output.2.3 Operation Description2.3.1 Display status switchkey can switch between different display status. AI-808 can switch between status ① and ②; ①, ③ and ④ for AI-708P; and ①, ②, ③ and ④for AI-808P.2.3.2 Set Value SettingIn basic display status, if the parameter lock “Loc” isn't locked, we can set setpoint (SV) bypressingkey to increase the value,anddecreasing or inscreasing value gets quick. The range of setpoint is between the parameter SPL and SPH. The default range is 0~400.272.3.3 Parameter Settingescape auomatically from the parameter table if no key is pressed within 30 seconds, and the change of the last parameter will not be saved.In Field Parameter Table, press till the last field parameter “Loc” appears. Setting Loc=808and then press can access System Parameter Table.Tuning2.4 AutoWhen artificial intelligence MPt control or standard PID control is chosen (CtrL=2), the Arrayparameter M5, P, and t can be obtained by running auto-tuning. In basicfor 2 seconds until “At” flashes in lower window, and the instrument executes on-off control. After 2 cycles of on-off action, the instrument will obtain the values of MPt control parameters. If you want toChange “At” from “on” to “oFF”, press to confirm, then the auto tuning process will be cancelled.28After the auto tuning is finished, the instrument will set parameter CtrL to 3 (factory set is 1) or 4, andkey on front panel. This will avoid repeat auto tuning by mistake.If the setpoint value is different, the parameter obtained from auto tuning will not always the same. So if you want to execute auto tuning, you must adjust setpoint to an often-used value first (For AI-708P/808P, set the value of the current program step to the often-used value), and then start up auto tuning function. Parameter CtI and dF have influence on the accuracy of auto-tuning. Theoretically, the smaller for these two parameters setting value, the higher for the precision of auto tuning. But dF parameter value should be large enough to prevent the instrument from error action around setpoint due to the oscillation of input. Normally, parameters are recommended to be CtI=0-2, dF=0.3 (dF=0.8 for AI-708T).On the basis of disturbance caused by on-off control, oscillation period, amplitude and waveform are analyzed to calculate optimum control parameters. The auto tuning for AI series instrument will gratify for 90% users. Due to the complexity of the automatic process, parameters calculated by auto tuning are probably not the optimal values on some special occasion (mentioned as follows).An electric furnace heated up by stages, and the stages may interact each other, then the value of parameter M5 may on the high side of its optimal value.Long lagged process.29。
AI808智能调节器介绍
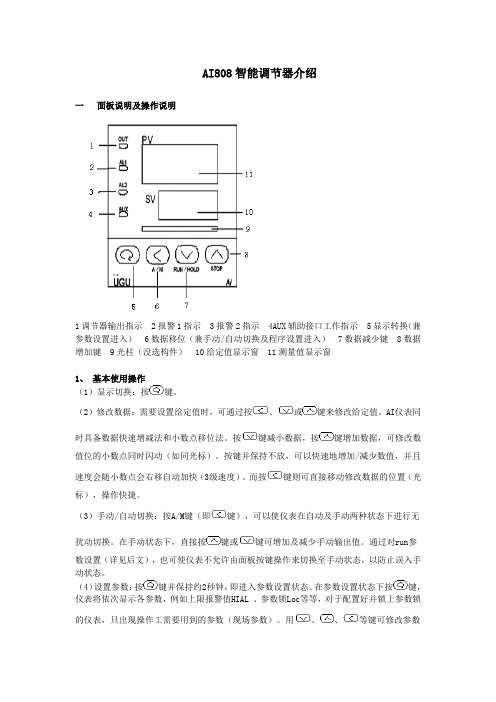
AI808智能调节器介绍一面板说明及操作说明1调节器输出指示 2报警1指示 3报警2指示 4AUX辅助接口工作指示 5显示转换(兼参数设置进入) 6数据移位(兼手动/自动切换及程序设置进入) 7数据减少键 8数据增加键 9光柱(没选构件) 10给定值显示窗 11测量值显示窗1、基本使用操作(1)显示切换:按键。
(2)修改数据:需要设置给定值时,可通过按、或键来修改给定值。
AI仪表同时具备数据快速增减法和小数点移位法。
按键减小数据,按键增加数据,可修改数值位的小数点同时闪动(如同光标)。
按键并保持不放,可以快速地增加/减少数值,并且速度会随小数点会右移自动加快(3级速度)。
而按键则可直接移动修改数据的位置(光标),操作快捷。
(3)手动/自动切换:按A/M键(即键),可以使仪表在自动及手动两种状态下进行无扰动切换。
在手动状态下,直接按键或键可增加及减少手动输出值。
通过对run参数设置(详见后文),也可使仪表不允许由面板按键操作来切换至手动状态,以防止误入手动状态。
(4)设置参数:按键并保持约2秒钟,即进入参数设置状态。
在参数设置状态下按键,仪表将依次显示各参数,例如上限报警值HIAL 、参数锁Loc等等,对于配置好并锁上参数锁的仪表,只出现操作工需要用到的参数(现场参数)。
用、、等键可修改参数值。
按键并保持不放,可返回显示上一参数。
先按键不放接着再按键可退出设置参数状态。
如果没有按键操作,约30秒钟后会自动退出设置参数状态。
如果参数被锁上(后文介绍),则只能显示被EP参数定义的现场参数(可由用户定义的,工作现场经常需要使用的参数及程序),而无法看到其它的参数。
不过,至少能看到Loc参数显示出来。
2、AI 人工智能调节及自整定(AT)操作AI人工智能调节算法是采用模糊规则进行PID调节的一种新型算法,在误差大时,运用模糊算法进行调节,以消除PID饱和积分现象,当误差趋小时,采用改进后的PID 算法进行调节,并能在调节中自动学习和记忆被控对象的部分特征以使效果最优化。
电气自动化技术《实训9 AI系列人工智能调节仪的认识及参数设置》
实训AI系列人工智能调节仪的认识及参数设置一、实验目的1〕熟悉AI系列人工智能调节仪的各组成局部及其功能。
2〕能对AI系列人工智能调节仪进行简单操作,并能进行参数设置。
二、实验装置THSA-1型过控综合自动化控制系统实验平台,SA-12挂箱。
三、实验原理AI系列人工智能调节仪是国内数字显示仪表中的典型代表,内部采用高性能ASIC芯片和先进的模块化结构,适合温度、压力、流量、液位、湿度等的精确控制,通用性强,功能强大。
采用85~264V AC输入范围的开关电源或DC 24V电源供电,输入采用数字校正系统,内置常用热电偶及热电阻非线性校正表格,测量精确稳定。
采用先进的AI人工智能调节算法,无超调,具备自整定〔AT〕功能。
1.主要技术参数〔1〕输入参数有多种信号输入方式。
1〕热电偶:K、S、R、E、J、T、B、N。
2〕热电阻:Cu50、Pt100。
3〕线性电压:0~5V,1~5V,0~1V,0~100mV,0~20mV等。
4〕线性电流〔需要外接分流电阻〕:0~10mA,0~20mA,4~20mA等。
还可在保存上述输入规格根底上,允许用户指定一种额外输入规格。
〔2〕测量范围1〕热电偶:K〔-50~+1300℃〕、S〔-50~+1700℃〕、R 〔-50~+1650℃〕、T〔-200~+350℃〕、E〔0~+800℃〕、J〔0~+1000℃〕、B〔0~+1800℃〕、N〔0~+1300℃〕。
2〕热电阻:Cu50〔-50~+150℃〕、Pt100〔-200~+600℃〕。
3〕线性输入:-1999~+9999由用户定义。
〔3〕测量精度0.2级〔热电阻、线性电压、线性电流及热电偶输入且采用铜电阻补偿或冰点补偿冷端时〕;0.2%FS±2.0℃〔热电偶输入且采用仪表内部元件测温补偿冷端时〕。
〔4〕分辨率0.1℃〔当测量温度大于999.9℃时,自动转换为按1℃显示〕。
〔5〕响应时间<0.3s〔设置数字滤波参数dL=0时〕。
AI-37028 37048 人工智能温度控制器 工业调节器 产品说明书

AI-37028/37048人工智能温度控制器/工业调节器产品说明书AI-3700系列人工智能温度控制器/工业调节器 AI-37028/37048目 录1、产品概述 ..................................................................... - 1 -2、主要技术指标 ................................................................. - 2 -2.1、仪表尺寸 ............................................................. - 2 -2.2、显示功能 ............................................................. - 2 -2.3、存储功能 ............................................................. - 2 -2.4、仪表输入 ............................................................. - 2 -2.5、仪表输出 ............................................................. - 2 -2.6、通讯功能 ............................................................. - 2 -2.7、控制功能 ............................................................. - 3 -2.8、综合参数 ............................................................. - 3 -3、仪表型号定义及模块使用 ....................................................... - 3 -3.1、型号定义 ............................................................. - 3 -3.2、模块使用 ............................................................. - 4 -4、仪表安装 ..................................................................... - 5 -4.1、产品外观 ............................................................. - 5 -4.2、安装尺寸图 ........................................................... - 5 -4.3、挂钩安装示意图 ....................................................... - 5 -5、仪表接线 ..................................................................... - 6 -5.1、接口形式 ............................................................. - 6 -5.2、接线方式 ............................................................. - 6 -5.3、电源接线 ............................................................. - 6 -5.4、通讯接线 ............................................................. - 6 -5.5、输入输出接线 ......................................................... - 6 -6、操作说明 ..................................................................... - 7 -6.1、首次操作说明 ......................................................... - 7 -6.2、显示画面界面操作说明 ................................................. - 8 -6.3、操作画面界面操作说明 ................................................. - 9 -6.4、实时趋势界面操作说明 ................................................ - 10 -6.5、历史趋势界面操作说明 ................................................ - 11 -6.6、数据报表界面操作说明 ................................................ - 12 -6.7、报警信息界面操作说明 ................................................ - 14 -6.8、系统设置界面操作说明 ................................................ - 15 -7、 扩展应用 ................................................................... - 18 -7.1、扩展说明 ............................................................ - 18 -7.2、工程组态 ............................................................ - 18 -7.3、工程下载 ............................................................ - 18 -8、附录 ........................................................................ - 19 -8.1、系统参数说明 ........................................................ - 19 -8.2、自整定操作 .......................................................... - 21 -8.3、以太网访问 .......................................................... - 21 -● 在使用本产品前,请仔细阅读此说明书,正确使用,并妥善保管,以便随时参考。
智能仪表说明书
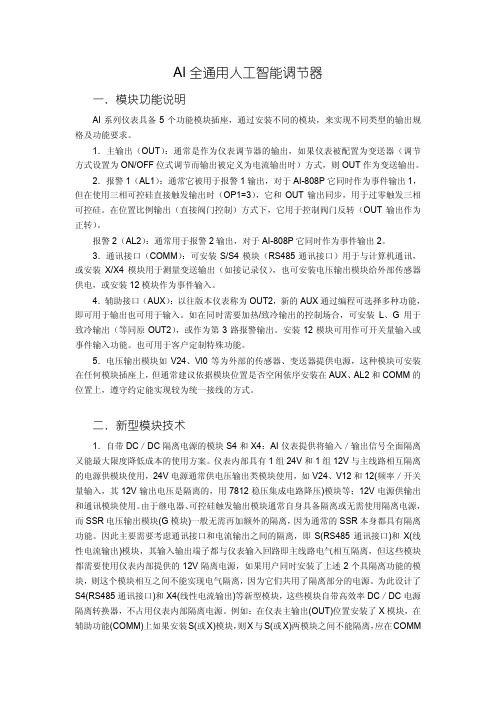
模块输出电压≥7V) 3.报警功能:上限、下限、正偏差、负偏差等 4 种方式,最多可输出 3 路,有上电免
除报警选择功能 4.手动功能:自动/手动双向干扰自动切换(仅 AI-808/808P 系列具备此功能) 5.电源:100-240VAC,-15%,+10%/50-60Hz; 电源消耗:≤5W 6.环境温度:0-50℃ 7.面板尺寸:96×96mm、160×80mm、80×160 mm、72×72mm、 48×96mm、96×48mm、48×48mm 8.开口尺寸:92×92mm、152×76mm、76×152 mm、68×68mm、 45×92mm、92×45mm、45×45mm
0.2%FS±2.0℃(热电偶输入且采用仪表内部元件测温补偿冷端时) 0.3 级(仅 AI-708T 型) (7)响应时间:≤0.5 秒(设置数字滤波参数 Dl=0 时) 注:仪表对 B 分度号热电偶在 0-600℃范围时可以进行测量,但测量精度无法达到 0.2 级,在 600-1800℃范围可保证 0.2 级测量精度。 (8)调节方式: 位式调节方式(回差可调) AI 人工智能调节,包含模糊逻辑 PID 调节及参数自整定功能的先进控制算法 2.输出规格(模块化): (1)继电器触点开关输出(常开+常闭):250V AC/1A 或 30V DC/1A (2)可控硅无触点开关输出(常开或常闭):100-240VAC/0.2A(持续),2A(20ms 瞬时,重复周期大于 5s) (3)SSR 电压输出:12VDC/30mA(用于驱动 SSR 固态继电器) (4)可控硅触发输出:可触发 5-500A 的双向可控硅、2 个单向可控硅反并联连接或 可控硅功率模块 (5)线性电流输出:0-10mA 或 4-20mA 可定义(安装 X 模块时输出电压≥10.5V;X4
AI-808型人工智能调节器
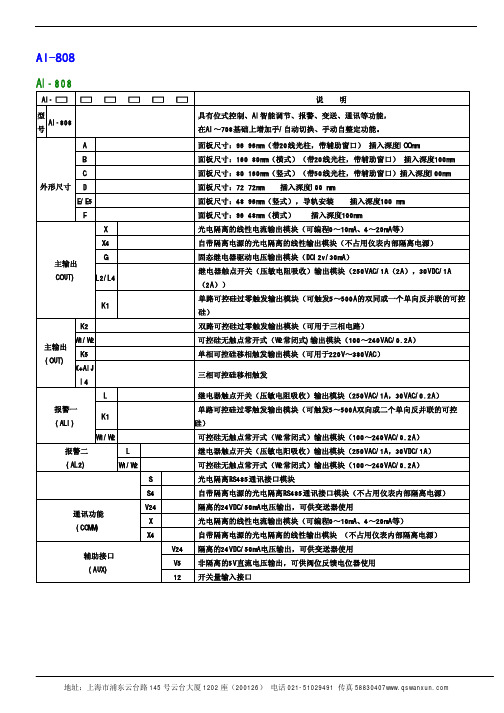
AI-808型人工智能调节器AI-808型人工智能调节器型谱表AI-□ □ □ □ □ □说 明 型号 AI-808 具有位式控制、AI 智能调节、报警、变送、通讯等功能, 在AI ~708基础上增加手/自动切换、手动自整定功能。
A 面板尺寸:96 96mm (带20线光柱,带辅助窗口) 插入深度lOOmmB 面板尺寸:160 80mm (横式)(带20线光柱,带辅助窗口) 插入深度100mmC 面板尺寸:80 160mm (竖式)(带50线光柱,带辅助窗口)插入深度l00mmD 面板尺寸:72 72mm 插入深度l00 mmE/E5 面板尺寸:48 96mm (竖式),导轨安装 插入深度100 mm外形尺寸 F 面板尺寸:96 48mm (横式) 插入深度100mmX 光电隔离的线性电流输出模块(可编程0~10mA 、4~20mA 等)X4 自带隔离电源的光电隔离的线性输出模块(不占用仪表内部隔离电源)G 固态继电器驱动电压输出模块(DCl2v/30mA ) L2/L4 继电器触点开关(压敏电阻吸收)输出模块(250VAC/1A (2A ),30VDC/1A(2A ))主输出COUT) K1 单路可控硅过零触发输出模块(可触发5~500A 的双同或一个单向反并联的可控硅)K2双路可控硅过零触发输出模块(可用于三相电路) W1/W2 可控硅无触点常开式(W2常闭式)输出模块(100~240VAC/0.2A ) K5单相可控硅移相触发输出模块(可用于220V ~380VAC ) 主输出(OUT) X+AIJl4三相可控硅移相触发 L继电器触点开关(压敏电阻吸收)输出模块(250VAC/1A ,30VAC/0.2A ) K1单路可控硅过零触发输出模块(可触发5~500A 双向或二个单向反并联的可控硅) 报警一(ALl) W1/W2可控硅无触点常开式(W2常闭式)输出模块(100~240VAC/0.2A ) L 继电器触点开关(压敏电阳吸收)输出模块(250VAC/1A ,30VDC/1A ) 报警二(AL2)W1/W2 可控硅无触点常开式(W2常闭式)输出模块(100~240VAC/0.2A ) S光电隔离RS485通讯接口模块 S4自带隔离电源的光电隔离RS485通讯接口模块(不占用仪表内部隔离电源) V24隔离的24VDC/50mA 电压输出,可供变送器使用 X光电隔离的线性电流输出模块(可编程0~10mA 、4~20mA 等) 通讯功能 (COMM) X4自带隔离电源的光电隔离的线性输出模块 (不占用仪表内部隔离电源) V24隔离的24VDC/50mA 电压输出,可供变送器使用 V5非隔离的5V 直流电压输出,可供阀位反馈电位器使用 辅助接口 (AUX)12 开关量输入接口一、概述●本系列仪表采用了国际先进技术,输入采用数字校正系统,内置常用的热电偶和热电阻非线性校正表格。
宇电AI V7.0人工智能工业调节器使用说明书

1
1 概叙
1.1 主要特点
●输入采用数字校正系统,内置常用热电偶和热电阻非线性校正表格,测量精度高达0.2级。 ●采用先进的AI人工智能调节算法,无超调,具备自整定(AT)功能。 ●采用先进的模块化结构,提供丰富的输出规格,能广泛满足各种应用场合的需要,交货迅速且维护方便。 ●人性化设计的操作方法,易学易用。 ●全球通用的100~240VAC输入范围开关电源或24VDC电源供电,并具备多种外型尺寸供客户选择。 ●通过新的2000版ISO9001质量认证,品质可靠。 ●产品经第三方权威机构检测获得CE认证标志,抗干扰性能符合在严酷工业条件下电磁兼容(EMC)的要求。
2
1.2 型号定义
AI系列仪表硬件采用了先进的模块化设计,具备5个功能模块插座:辅助输入、主输出、报警、辅助输出及通 讯。模块可以与仪表一起购买也可以分别购买,自由组合。仪表的输入方式可自由设置为常用各种热电偶、热电阻和 线性电压(电流)。AI系列人工智能调节仪表共由8部分组成,例如:
AI-808 A N X3 L5 N S4 — 24VDC
4
X5 自带隔离电源的光电隔离型线性电流输出模块,支持0~20mA及4~20mA输出,不占用仪表内部12VDC电源 W1 可控硅无触点常开式开关输出模块,容量为100~240VAC/0.2A,具备“烧不坏”特点 W2 可控硅无触点常闭式开关输出模块,容量为100~240VAC/0.2A,具备“烧不坏”特点 G 固态继电器(SSR)电压输出模块,规格为12VDC/30mA ⑤表示仪表报警(ALM)安装的模块(用于仪表AL1及AL2报警输出) L1/L2/L4 单路继电器输出模块,可支持AL1一路报警 L5 双路继电器常开触点输出模块,支持AL1及AL2二路报警 ⑥表示仪表辅助输出(AUX)安装的模块(用于仪表AU1、AU2报警或调节辅助输出) L1/L2/L4 单路继电器输出模块,可支持AU1一路报警或作为加热/冷却输出的辅助输出 L5 双路继电器常开触点输出模块,支持AU1及AU2二路报警 G 固态继电器(SSR)电压输出模块,规格为12VDC/30mA W1 可控硅无触点常开式开关输出模块,容量为100~240VAC/0.2A,具备“烧不坏”特点 K1 “烧不坏”单路可控硅过零触发输出模块,可触发5~500A双向或二个反并联的单向可控硅 X3 光电隔离型线性电流输出模块,支持0~20mA及4~20mA输出,占用仪表内部12VDC电源 X5 自带隔离电源的光电隔离型线性电流输出模块,支持0~20mA及4~20mA输出,不占用仪表内部12VDC电源 R 光电隔离的RS232C通讯接口,使用仪表内部12VDC电源 ⑦表示仪表通讯(COMM)安装的模块 X3 光电隔离型线性电流输出模块,支持变送输出,占用仪表内部12VDC电源 X5 自带隔离电源的光电隔离型线性电流输出模块,支持变送输出,不占用仪表内部12VDC电源 S 光电隔离的RS485通讯模块,使用仪表内部12VDC电源
AI-808P操作说明
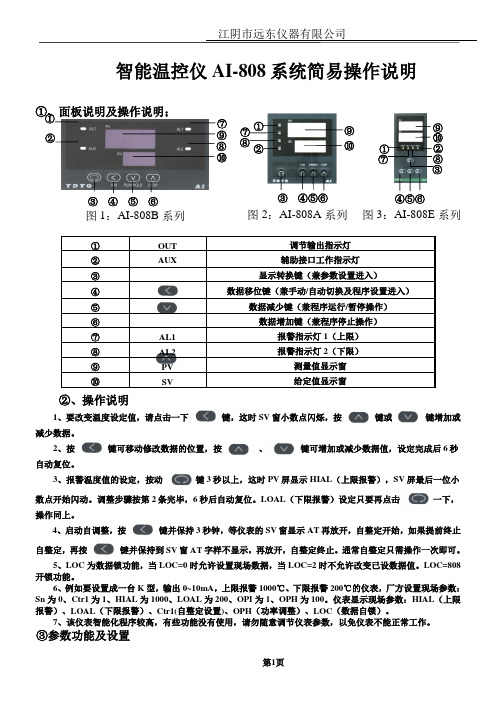
江阴市远东仪器有限公司智能温控仪AI-808系统简易操作说明①、面板说明及操作说明;②、操作说明1、要改变温度设定值,请点击一下键,这时SV 窗小数点闪烁,按键或键增加或减少数据。
2、按键可移动修改数据的位置,按、键可增加或减少数据值,设定完成后6秒自动复位。
3、报警温度值的设定,按动键3秒以上,这时PV 屏显示HIAL (上限报警),SV 屏最后一位小数点开始闪动。
调整步骤按第2条完毕,6秒后自动复位。
LOAL (下限报警)设定只要再点击一下,操作同上。
4、启动自调整,按键并保持3秒钟,等仪表的SV 窗显示AT 再放开,自整定开始,如果提前终止自整定,再按键并保持到SV 窗AT 字样不显示,再放开,自整定终止。
通常自整定只需操作一次即可。
5、LOC 为数据锁功能,当LOC=0时允许设置现场数据,当LOC=2时不允许改变已设数据值。
LOC=808开锁功能。
6、例如要设置成一台K 型,输出0~10mA ,上限报警1000℃、下限报警200℃的仪表,厂方设置现场参数:Sn 为0、Ctr1为1、HIAL 为1000、LOAL 为200、OPI 为1、OPH 为100。
仪表显示现场参数:HIAL (上限报警)、LOAL (下限报警)、Ctr1(自整定设置)、OPH (功率调整)、LOC (数据自锁)。
7、该仪表智能化程序较高,有些功能没有使用,请勿随意调节仪表参数,以免仪表不能正常工作。
③参数功能及设置① OUT 调节输出指示灯 ② AUX 辅助接口工作指示灯 ③显示转换键(兼参数设置进入)④ 数据移位键(兼手动/自动切换及程序设置进入)⑤数据减少键(兼程序运行/暂停操作) ⑥ 数据增加键(兼程序停止操作)⑦ AL1 报警指示灯1(上限) ⑧ AL2 报警指示灯2(下限)⑨ PV 测量值显示窗 ⑩SV 给定值显示窗① ② ⑦ ⑧ ⑨ ⑩ ③ ④ ⑤ ⑥① ⑦ ⑧ ②③ ④⑤⑥ ⑨ ⑩⑨ ⑩ ③④⑤⑥① ⑦② ⑧ 图1:AI-808B 系列图2:AI-808A 系列 图3:AI-808E 系列④输入规格选择参数Sn⑤仪表维修和保存:仪表因制造质量发生故障由本厂负责全面保修,因使用不当而造成损坏的则本厂酌收修理成本费,本厂仪表终身维修,仪表应在包装齐全的情况下存放在干燥不通风,无腐蚀性气体的场合。
- 1、下载文档前请自行甄别文档内容的完整性,平台不提供额外的编辑、内容补充、找答案等附加服务。
- 2、"仅部分预览"的文档,不可在线预览部分如存在完整性等问题,可反馈申请退款(可完整预览的文档不适用该条件!)。
- 3、如文档侵犯您的权益,请联系客服反馈,我们会尽快为您处理(人工客服工作时间:9:00-18:30)。
AI 系列人工智能调节器使用说明书1. 概叙1.1 主要特点●输入采用数字校正系统,内置常用热电偶和热电阻非线性校正表格,测量精度高达0.2级。
●采用先进的AI人工智能调节算法,无超调,具备自整定(AT)功能。
●采用先进的模块化结构,提供丰富的输出规格,能广泛满足各种应用场合的需要,交货迅速且维护方便。
●人性化设计的操作方法,易学易用。
●全球通用的100~240VAC输入范围开关电源或24VDC电源供电,并具备多种外型尺寸供客户选择。
●通过新的2000版ISO9001质量认证,品质可靠。
●产品经第三方权威机构检测获得CE认证标志,抗干扰性能符合在严酷工业条件下电磁兼容(EMC)的要求。
1.2 技术规格●输入规格(一台仪表即可兼容):热电偶:K、S、R、T、E、J、B、N、WRe3-WRe25、WRe5-WRe26热电阻:Cu50、Pt100线性电压:0~5V、1~5V、0~1V、0~100mV、0~60mV、0~20mV等;0~10V(需在MIO位置安装I31模块)线性电流(需外接精密电阻分流或在MIO位置安装I4模块):0~20mA、4~20mA等线性电阻:0~80欧、0~400欧(可用于测量远传电阻压力表)●测量范围:K(-100~+1300℃)、S(0~1700℃)、R(0~1700℃)、T(-200~+390℃)、E(0~1000℃)、J(0~1200℃)B(600~1800℃)、N(0~1300℃)、WRe3-WRe25(0~2300℃)、WRe5-WRe26(0~2300℃)Cu50(-50~+150℃) 、Pt100(-200~+800℃)线性输入:-9990~+30000由用户定义●测量精度:0.2级(0.2%FS±0.1℃)●分辨率:0.1℃(当测量温度大于999.9℃时自动转换为按1℃显示),可选择按1℃显示●温度漂移:≤0.01%FS/℃(典型值约50ppm/℃)●响应时间:≤0.3秒(设置数字滤波参数dL=0时)●调节方式:位式调节方式(回差可调)AI人工智能调节,包含模糊逻辑PID调节及参数自整定功能的先进控制算法●输出规格(模块化):继电器触点开关输出(常开+常闭):250VAC/1A 或30VDC/1A可控硅无触点开关输出(常开或常闭):100~240VAC/0.2A(持续),2A(20mS瞬时,重复周期大于5S)SSR 电压输出:12VDC/30mA (用于驱动SSR固态继电器)可控硅触发输出:可触发5~500A的双向可控硅、2个单向可控硅反并联连接或可控硅功率模块线电流输出:0~10mA或4~20mA 可定义(安装X模块时输出电压≥10.5V;X4模块输出电压≥7V)●电磁兼容:IEC61000-4-4(电快速瞬变脉冲群),±4KV/5KHz;IEC61000-4-5(浪涌),4KV●隔离耐压:电源端、继电器触点及信号端相互之间≥2300VDC;相互隔离的弱电信号端之间≥600VDC●电源:100~240VAC,-15%,+10% / 50~60Hz;或24VDC/AC,-15%,+10%●电源消耗:≤5W●使用环境:温度-10 ~ +60℃;湿度≤90%RH●面板尺寸:96×96mm、160×80mm、80×160mm、48×96mm、96×48mm、72×72mm●开口尺寸:92×92mm、152×76mm、76×152mm、45×92mm、92×45mm、68×68mm●插入深度:≤100mm1.3 仪表接线仪表后盖端子排布如图:注①:线性电压量程在1V以下的由19、18端输入,0~5V及1~5V的信号由17、18端输入。
注②4~20mA线性电流输入可用250 欧电阻变为1~5V电压信号,然后从17、18端输入;也可在MIO位置安装I4模块后,从14+ 、15- 端输入或直接从16+14-接二线制变送器。
注③不同分度号的热电偶采用的热电偶补偿导线不同,采用内部自动补偿模式时,补偿导线应直接接到仪表后盖的接线端子上,中间不能转成普通导线,否则会产生测量误差。
可控硅触发输出接线图(适合K1、K3、K5、K6 模块)注①:根据负载的电压及电流大小选择压敏电阻以保护可控硅,负载为感性或采用移相触发时必须加阻容吸收。
注②:推荐使用可控硅功率模块,一个功率模块内部包含2个单向可控硅,如图中虚线部分。
注③:采用K5型移相触发输出模块时,交流电源范围缩小为200~240VAC,采用K6型移相触发输出模块时,交流电源范围为340~415 VAC。
利用接线方式选择热电偶冷端自动补偿模式:采用热电偶作为输入信号时,根据热电偶测温原理,需要对热电偶冷端进行温度补偿,AI仪表可测量仪表后部接线端附近温度对热电偶冷端进行自动补偿,但由于测量元件的误差、仪表本身发热及仪表附近其它热源等原因,常导致自动补偿方式偏差较大,最坏时可能达2~4℃。
故对测量温度精度要求较高时,可外置一只接线盒,将Cu50铜电阻(需另行购买)及热电偶冷端都放在一起并远离各种发热物体,这样由补偿造成的测量不一致性可小于0.5 ℃。
由于Cu50铜电阻本身误差原因可能造成室温有少许误差,可用Sc参数加以修正。
将外接的铜电阻改为精密固定电阻,还可实现恒温槽补偿功能。
例如外接60欧固定电阻,查Cu50分度表可得补偿温度为46.6℃,此时将热偶冷端放置在控制温度为46.6℃的恒温槽中也可获得精确补偿,其补偿精度优于铜电阻。
如果将外接的电阻改为短路线,可实现冰点补偿,此时要求将热电偶冷端(热电偶或补偿导线与普通导线连接处)放置在冰水混合物(0℃)内,其补偿精度可高可达0.1℃以上。
2种补偿模式接线图如下:2. 显示及操作2.1 面板说明①上显示窗②下显示窗③设置键④数据移位(兼手动/自动切换)⑤数据减少键⑥数据增加键⑦10 个LED 指示灯,其中MAN灯灭表示自动控制状态,亮表示手动输出状态;PRG表示仪表处于程序控制状态;M2、OP1、OP2、AL1、AL2、AU1、AU2等等分别对应模块输入输出动作;COM 灯亮表示正与上位机进行通讯。
2.2 显示状态注意:不是所有型号仪表都有以上图形描述的显示状态,依据功能不同,AI-708只有①、⑤两种状态,AI-808有①、②、⑤三种显示状态,AI-708P有①、③、④、⑤、⑥五种状态,而AI-808P则具备以上所有显示状态。
PV),下显示窗口显示给定值(SV)。
对于AI-808/808P型仪表,按键可切换到显示状态②,此时下显示窗显示输出值。
状态①、②同为仪表的基本状态,在基本状态下,SV 窗口能用交替显示的字符来表示系统某些状态,如下:闪动显示“orAL”:表示输入的测量信号超出量程(因传感器规格设置错误、输入断线或短路均可能引起)。
此时仪表将自动停止控制,并将输出设置为0。
闪动显示“HIAL”、“LoAL”、“dHAL”或“dLAL”:分别表示发生了上限报警、下限报警、正偏差报警和负偏差报警。
报警闪动的功能是可以关闭的(参看cF参数的设置),将报警作为控制时,可关闭报警字符闪动功能以避免过多的闪动。
闪动显示“StoP”,“HoLd”和“rdy”:分别表示程序处于停止状态、暂停状态和准备状态,该显示仅适用于AI-708P/808P程序型仪表,当程序正常运行时(run状态),无闪动字符。
仪表面板上还有10个LED指示灯,其含义分别如下:PRG灯,对于AI-708P/808P 此灯亮表示程序运行(run),闪动表示程序处于暂停(Hold)或准备(rdy)状态,灭表示处于停止状态。
MAN灯,手动调节指示等,当AI-808/808P处于手动状态下时该灯亮;COM,当仪表与上位机通讯时,此灯闪动;MIO、OP1、OP2、AL1、AL2、AU1、AU2分别表示对应的MIO、OUTP、ALM及AUX等模快动作与否的指示。
当OUTP安装X或X4线性电流输出模块时,OP1/OP2在线性电流输出时通过亮/暗变化反映输出电流的大小。
当OUTP安装K5单相移相可控硅触发模块时,OP2亮表示外部电源接通,OP1通过亮/暗变化反映移相触发输出大小。
2.3显示切换:按键可以切换不同的显示状态。
AI-808可在①、②两种状态下切换,AI-708P AI-808P可在①、②、③、④等四种状态下切换,AI-708只有显示状态①,无需切换。
修改数据:如果参数锁没有锁上,仪表下显示窗显示的数值除AI-808/808P的自动输出值及AI-708P/808P的已运行时间和给定值不可直接修改外,其余数据均可通过按、或键来修改下显示窗口显示的数值。
例如:需要设置给定值时(型),可将仪表切换到显示状态①,即可通过按、或键来修改给定值。
AI仪表同时具备数据快速增减法和小数点移位法。
按键减小数据,按键增加数据,可修改数值位的小数点同时闪动(如同光标)。
按键并保持不放,可以快速地增加/减少数值,并且速度会随小数点会右移自动加快(3级速度)。
而按键则可直接移动修改数据的位置(光标),操作快捷。
手动/自动切换:仅适用AI-808/808P)在显示状态②下,按A/M键(即键),可以使仪表在自动及手动两种状态下进行无扰动切换。
在显示状态②且仪表处于手动状态下,直接按或键,可增加及减少手动输出值。
通过对run参数设置(详见后文),也可使仪表不允许由面板按键操作来切换至手动状态,以防止误入手动状态。
设置参数:在基本状态(显示状态①或②)下按2秒钟,即进入键,仪表将依次显示各参数,例如上限报警值HIAL、参数锁Loc等等,对于配置好并锁上参数锁的仪表,只出现操作工需要用到的参数(现场参数)。
用、、值。
按键并保持不放,可返回显示上一参数。
先按键不放接着再按键可退出设置参数状态。
如果没有按键操作,约30如果参数被锁上(后文介绍),则只能显示被EP参数定义的现场参数(可由用户定义的工作现场经常需要使用的参数及程序),而无法看到其它的参数。
不过,至少能看到Loc参数显示出来。
2.4 AI 人工智能调节及自整定(AT)操作AI人工智能调节算法是采用模糊规则进行PID 调节的一种新型算法,在误差大时,运用模糊算法进行调节,以消除PID 饱和积分现象,当误差趋小时,采用改进后的PID 算法进行调节,并能在调节中自动学习和记忆被控对象的部分特征以使效果最优化。
具有无超调、高精度、参数确定简单、对复杂对象也能获得较好的控制效果等特点。
AI系列调节仪表还具备参数自整定功能,AI人工智能调节方式初次使用时,可启动自整定功能来协助确定M 5、P、t等控制参数。
初次启动自整定时,可将仪表切换到显示状态①下,按键并保持约2秒钟,此时仪表下显示器将闪动显示“At”字样,表明仪表已进入自整定状态。
