HttpClient学习
异步httpclient(httpasyncclient)的使用与总结

异步httpclient(httpasyncclient)的使⽤与总结参考:1. 前⾔应⽤层的⽹络模型有同步与异步。
同步意味当前线程是阻塞的,只有本次请求完成后才能进⾏下⼀次请求;异步意味着所有的请求可以同时塞⼊缓冲区,不阻塞当前的线程;httpclient在4.x之后开始提供基于nio的异步版本httpasyncclient,httpasyncclient借助了Java并发库和nio进⾏封装(虽说NIO是同步⾮阻塞IO,但是HttpAsyncClient提供了回调的机制,与netty类似,所以可以模拟类似于AIO的效果),其调⽤⽅式⾮常便捷,但是其中也有许多需要注意的地⽅。
2. pom⽂件本⽂依赖4.1.2,当前最新的客户端版本是4.1.3maven repository 地址<dependency><groupId>org.apache.httpcomponents</groupId><artifactId>httpclient</artifactId><version>4.5.2</version></dependency><dependency><groupId>org.apache.httpcomponents</groupId><artifactId>httpcore</artifactId><version>4.4.5</version></dependency><dependency><groupId>org.apache.httpcomponents</groupId><artifactId>httpcore-nio</artifactId><version>4.4.5</version></dependency><dependency><groupId>org.apache.httpcomponents</groupId><artifactId>httpasyncclient</artifactId><version>4.1.2</version></dependency>12345678910111213141516171819202122233. 简单的实例public class TestHttpClient {public static void main(String[] args){RequestConfig requestConfig = RequestConfig.custom().setConnectTimeout(50000).setSocketTimeout(50000).setConnectionRequestTimeout(1000).build();//配置io线程IOReactorConfig ioReactorConfig = IOReactorConfig.custom().setIoThreadCount(Runtime.getRuntime().availableProcessors()).setSoKeepAlive(true).build();//设置连接池⼤⼩ConnectingIOReactor ioReactor=null;try {ioReactor = new DefaultConnectingIOReactor(ioReactorConfig);} catch (IOReactorException e) {e.printStackTrace();}PoolingNHttpClientConnectionManager connManager = new PoolingNHttpClientConnectionManager(ioReactor); connManager.setMaxTotal(100);connManager.setDefaultMaxPerRoute(100);final CloseableHttpAsyncClient client = HttpAsyncClients.custom().setConnectionManager(connManager).setDefaultRequestConfig(requestConfig).build();//构造请求String url = "http://127.0.0.1:9200/_bulk";HttpPost httpPost = new HttpPost(url);StringEntity entity = null;try {String a = "{ \"index\": { \"_index\": \"test\", \"_type\": \"test\"} }\n" +"{\"name\": \"上海\",\"age\":33}\n";entity = new StringEntity(a);} catch (UnsupportedEncodingException e) {e.printStackTrace();}httpPost.setEntity(entity);//startclient.start();//异步请求client.execute(httpPost, new Back());while(true){try {TimeUnit.SECONDS.sleep(1);} catch (InterruptedException e) {e.printStackTrace();}}}static class Back implements FutureCallback<HttpResponse>{private long start = System.currentTimeMillis();Back(){}public void completed(HttpResponse httpResponse) {try {System.out.println("cost is:"+(System.currentTimeMillis()-start)+":"+EntityUtils.toString(httpResponse.getEntity())); } catch (IOException e) {e.printStackTrace();}}public void failed(Exception e) {System.err.println(" cost is:"+(System.currentTimeMillis()-start)+":"+e);}public void cancelled() {2 3 4 5 6 7 8 9 10 11 12 13 14 15 16 17 18 19 20 21 22 23 24 25 26 27 28 29 30 31 32 33 34 35 36 37 38 39 40 41 42 43 44 45 46 47 48 49 50 51 52 53 54 55 56 57 58 59 60 61 62 63 64 65 66717273747576777879808182834. ⼏个重要的参数4.1 TimeOut(3个)的设置ConnectTimeout : 连接超时,连接建⽴时间,三次握⼿完成时间。
HttpClient(五)--模拟表单上传文件

HttpClient(五)--模拟表单上传⽂件1.maven依赖<dependency><groupId>org.apache.httpcomponents</groupId><artifactId>httpclient</artifactId><version>4.5.2</version></dependency><dependency><groupId>org.apache.httpcomponents</groupId><artifactId>httpmime</artifactId><version>4.5.2</version></dependency>2.代码实现import java.io.File;import java.io.IOException;import org.apache.http.HttpEntity;import org.apache.http.HttpResponse;import org.apache.http.client.ClientProtocolException;import org.apache.http.client.HttpClient;import org.apache.http.client.config.RequestConfig;import org.apache.http.client.methods.HttpPost;import org.apache.http.entity.mime.MultipartEntityBuilder;import org.apache.http.impl.client.HttpClients;import org.apache.http.util.EntityUtils;public class HttpClientUpload {public static void main(String[] args) {// 将 fileUrl 上传到 url中,上传成功后,返回下载地址String url = "http://127.0.0.1:8080/Joe/upload";String fileUrl = "C:/abc.txt";try {System.out.println(post(url, "file", new File(fileUrl)));} catch (Exception e) {e.printStackTrace();}}/*** post:(上传).** @author Joe Date:2017年9⽉11⽇下午5:37:46* @param serverUrl* @param fileParamName* @param file* @return* @throws ClientProtocolException* @throws IOException*/public static String post(String serverUrl, String fileParamName, File file)throws ClientProtocolException, IOException {HttpPost httpPost = new HttpPost(serverUrl);MultipartEntityBuilder builder = MultipartEntityBuilder.create();// 上传的⽂件builder.addBinaryBody(fileParamName, file);HttpEntity httpEntity = builder.build();httpPost.setEntity(httpEntity);// 请求获取数据的超时时间、设置从connect// Manager获取Connection超时时间(因为⽬前版本是可以共享连接池的)、设置连接超时时间RequestConfig requestConfig = RequestConfig.custom().setSocketTimeout(10000).setConnectionRequestTimeout(3000) .setConnectTimeout(10000).build();httpPost.setConfig(requestConfig);HttpClient httpClient = HttpClients.createDefault();HttpResponse response = httpClient.execute(httpPost);return EntityUtils.toString(response.getEntity());}}。
HttpClient源码分析

HttpClient源码分析/*** 此接⼝仅代表HTTP请求执⾏的最基本约定。
* 它对请求执⾏过程没有任何限制或特定的细节,并将状态管理、⾝份验证和重定向处理的细节留给单个实现。
*/public interface HttpClient {HttpResponse execute(HttpUriRequest request);}/*** ⽤于提供创建{@link CloseableHttpClient}实例⼯⼚⽅法.*/public class HttpClients {public static CloseableHttpClient createDefault() {return HttpClientBuilder.create().build();}}/*** HTTP消息包括从客户机到服务器的请求和从服务器到客户机的响应。
* HTTP-message = Request | Response ; HTTP/1.1 messages** {@link HttpRequest} and {@link HttpResponse} 接⼝继承{@link HttpMessage }*/public interface HttpMessage {}/*** 从客户机到服务器的请求消息包括,* 在该消息的第⼀⾏中,要应⽤于该资源的⽅法、资源的标识符以及正在使⽤的协议版本。
* method uri http/1.1*/public interface HttpRequest extends HttpMessage {RequestLine getRequestLine(); // 获取请求⾏}/*** 在接收和解释请求消息后,服务器⽤HTTP响应消息响应。
* 设置/获取状态⾏、状态码、原因短语、实体、locale*/public interface HttpResponse extends HttpMessage {}/*** Extended version of the {@link HttpRequest} interface that provides convenience methods to access request properties such as request URI and method type. * {@link HttpRequest}接⼝的扩展版本,提供访问请求属性(如请求URI和⽅法类型)的⽅便⽅法。
C 使用libcurl做HttpClient

C++使用libcurl做HttpClient当使用C++做HTTP客户端时,目前通用的做法就是使用libcurl。
其官方网站的地址是http://curl.haxx.se/,该网站主要提供了Curl和libcurl。
Curl是命令行工具,用于完成FTP, FTPS, HTTP, HTTPS, GOPHER, TELNET, DICT, FILE 以及LDAP的命令的请求及接收回馈。
libcurl提供给开发者,用于使用C++跨平台的开发各种网络协议的请求及响应。
里面的文档非常齐全,不过都是英文的。
本文提供最简单的demo使用libcurl开发HttpClient。
主要包括同步的HTTP GET、HTTP POST、HTTPS GET、HTTPS POST。
下载libcurl包,如果使用Linux平台,建议下载源文件编译;如果使用Windows平台,建议下载Win32 - MSVC,下载地址是:http://curl.haxx.se/download.html#ifndef __HTTP_CURL_H__ #define __HTTP_CURL_H__ #include class CHttpClient { public:CHttpClient(void); ~CHttpClient(void); public:/** * @brief HTTP POST请求* @param strUrl 输入参数,请求的Url地址,如: *@param strPost 输入参数,使用如下格式para1=val1?2=val2&… * @param strResponse 输出参数,返回的内容* @return 返回是否Post成功*/ int Post(const std::string & strUrl, const std::string & strPost, std::string & strResponse); /** *@brief HTTP GET请求* @param strUrl 输入参数,请求的Url地址,如: * @param strResponse 输出参数,返回的内容* @return 返回是否Post成功*/ int Get(const std::string & strUrl, std::string & strResponse); /** * @brief HTTPS POST请求,无证书版本* @param strUrl 输入参数,请求的Url地址,如:https:// * @param strPost 输入参数,使用如下格式para1=val1?2=val2&…* @param strResponse 输出参数,返回的内容*@param pCaPath 输入参数,为CA证书的路径.如果输入为NULL,则不验证服务器端证书的有效性. * @return 返回是否Post成功*/ int Posts(const std::string & strUrl, const std::string & strPost, std::string & strResponse, const char * pCaPath = NULL); /** * @brief HTTPS GET请求,无证书版本* @param strUrl 输入参数,请求的Url地址,如:https:// *@param strResponse 输出参数,返回的内容*@param pCaPath 输入参数,为CA证书的路径.如果输入为NULL,则不验证服务器端证书的有效性. * @return 返回是否Post成功*/ int Gets(const std::string & strUrl, std::string & strResponse, const char * pCaPath = NULL); public: void SetDebug(bool bDebug); private: bool m_bDebug; }; #endif [cpp] view plaincopy#include "httpclient.h" #include "curl/curl.h"#include CHttpClient::CHttpClient(void) :m_bDebug(false) { } CHttpClient::~CHttpClient(void) { } static int OnDebug(CURL *, curl_infotype itype, char * pData, size_t size, void *) { if(itype == CURLINFO_TEXT){ //printf("[TEXT]%s\n", pData); }else if(itype == CURLINFO_HEADER_IN){ printf("[HEADER_IN]%s\n", pData); } else if(itype == CURLINFO_HEADER_OUT){ printf("[HEADER_OUT]%s\n", pData); } else if(itype == CURLINFO_DATA_IN){ printf("[DATA_IN]%s\n", pData); }else if(itype == CURLINFO_DATA_OUT){ printf("[DATA_OUT]%s\n", pData); } return 0; } static size_t OnWriteData(void* buffer, size_tsize, size_t nmemb, void* lpVoid) { std::string* str = dynamic_caststd::string*>((std::string *)lpVoid);if( NULL == str || NULL == buffer ) { return -1; } char* pData = (char*)buffer;str->append(pData, size * nmemb); return nmemb; } int CHttpClient::Post(const std::string & strUrl, const std::string & strPost, std::string & strResponse){ CURLcode res; CURL* curl = curl_easy_init(); if(NULL == curl) { returnCURLE_FAILED_INIT; } if(m_bDebug){ curl_easy_setopt(curl, CURLOPT_VERBOSE, 1); curl_easy_setopt(curl,CURLOPT_DEBUGFUNCTION, OnDebug); }curl_easy_setopt(curl, CURLOPT_URL, strUrl.c_str());curl_easy_setopt(curl, CURLOPT_POST, 1);curl_easy_setopt(curl, CURLOPT_POSTFIELDS, strPost.c_str()); curl_easy_setopt(curl,CURLOPT_READFUNCTION, NULL);curl_easy_setopt(curl, CURLOPT_WRITEFUNCTION, OnWriteData); curl_easy_setopt(curl,CURLOPT_WRITEDATA, (void *)&strResponse);curl_easy_setopt(curl, CURLOPT_NOSIGNAL, 1);curl_easy_setopt(curl, CURLOPT_CONNECTTIMEOUT, 3); curl_easy_setopt(curl, CURLOPT_TIMEOUT, 3); res = curl_easy_perform(curl);curl_easy_cleanup(curl); return res; } int CHttpClient::Get(const std::string & strUrl, std::string & strResponse) { CURLcode res; CURL* curl = curl_easy_init(); if(NULL == curl){ return CURLE_FAILED_INIT; }if(m_bDebug) { curl_easy_setopt(curl, CURLOPT_VERBOSE, 1);curl_easy_setopt(curl, CURLOPT_DEBUGFUNCTION, OnDebug); } pre name="code" class="cpp">curl_easy_setopt(curl, CURLOPT_URL, strUrl.c_str());curl_easy_setopt(curl, CURLOPT_READFUNCTION, NULL); curl_easy_setopt(curl,CURLOPT_WRITEFUNCTION, OnWriteData);curl_easy_setopt(curl, CURLOPT_WRITEDATA, (void *)&strResponse); /** * 当多个线程都使用超时处理的时候,同时主线程中有sleep或是wait等操作。
javahttpclient设置超时时间和代理的方法
javahttpclient设置超时时间和代理的⽅法设置超时时间设置HttpClient的超时时间,⾮常有必要性,因为httpclient 默认超时时间很长,⾃⼰可以测试⼀下是多久,设置超时时间否则会影响⾃⼰系统的业务逻辑,例如阻塞系统,影响系统的吞吐量,占⽤线程数。
httpclient 4.4版本之后将这些设置封装到 RequestConfig 对象⾥,其中 setConnectTimeout 是设置连接到⽬标 URL 的等待时长,超过这个时间还没连上就抛出连接超时;setConnectionRequestTimeout 是从connect Manager(连接池)获取连接的等待时长,这个版本是共享连接池的;setSocketTimeout 是连接到⽬标URL 之后等待返回响应的时长,即超过这个时间就放弃本次调⽤并抛出SocketTimeoutException:Read Time Outpublic static RequestConfig getRequestConfig(){RequestConfig requestConfig = RequestConfig.custom().setConnectTimeout(10000).setSocketTimeout(10000).setConnectionRequestTimeout(6000).build(); return requestConfig;}设置代理有时候我们线上访问外部第三⽅的接⼝的时候,不想暴露真实机器的IP,或者我们的机器不能访问外⽹的时候,我们可以通过代理服务器来访问,代理服务器充当内⽹与外⽹链接的中间⼈。
httpclient 4.4后设置代理的 IP、端⼝被封装到 RequestConfig 对象⾥,通过 HttpHost 对象封装代理的 IP、端⼝和协议。
这⾥需要注意的⼀点是,如果你的⽬标 URL 是 HTTP 协议的,那么你的代理也应该是 HTTP 协议的,如下 HttpHost 的构造⽅法可以指定代理服务的协议,不传默认为 HTTP。
httpclient4 中文版帮助文档

httpclient4 中文版帮助文档,最新官方版翻译版前言超文本传输协议(HTTP)也许是当今互联网上使用的最重要的协议了。
Web服务,有网络功能的设备和网络计算的发展,都持续扩展了HTTP协议的角色,超越了用户使用的Web 浏览器范畴,同时,也增加了需要HTTP协议支持的应用程序的数量。
尽管包提供了基本通过HTTP访问资源的功能,但它没有提供全面的灵活性和其它很多应用程序需要的功能。
HttpClient就是寻求弥补这项空白的组件,通过提供一个有效的,保持更新的,功能丰富的软件包来实现客户端最新的HTTP标准和建议。
为扩展而设计,同时为基本的HTTP协议提供强大的支持,HttpClient组件也许就是构建HTTP客户端应用程序,比如web浏览器,web服务端,利用或扩展HTTP协议进行分布式通信的系统的开发人员的关注点。
1. HttpClient的范围基于HttpCore[/httpcomponents-core/index.html]的客户端HTTP运输实现库基于经典(阻塞)I/O内容无关2. 什么是HttpClient不能做的HttpClient 不是一个浏览器。
它是一个客户端的HTTP通信实现库。
HttpClient的目标是发送和接收HTTP报文。
HttpClient不会去缓存内容,执行嵌入在HTML页面中的javascript 代码,猜测内容类型,重新格式化请求/重定向URI,或者其它和HTTP运输无关的功能。
第一章基础1.1 执行请求HttpClient 最重要的功能是执行HTTP方法。
一个HTTP方法的执行包含一个或多个HTTP请求/HTTP响应交换,通常由HttpClient的内部来处理。
而期望用户提供一个要执行的请求对象,而HttpClient期望传输请求到目标服务器并返回对应的响应对象,或者当执行不成功时抛出异常。
很自然地,HttpClient API的主要切入点就是定义描述上述规约的HttpClient接口。
Feign使用HttpClient和OkHttp方式
Feign使⽤HttpClient和OkHttp⽅式⽬录使⽤HttpClient和OkHttp使⽤HttpClient使⽤OkHttpOpenFeign替换为OkHttppom中引⼊feign-okhttp在application.yml中配置okhttp使⽤HttpClient和OkHttp在Feign中,Client是⼀个⾮常重要的组件,Feign最终发送Request请求以及接收Response响应都是由Client组件来完成的。
Client在Feign源码中是⼀个接⼝,在默认情况下,Client的实现类是Client.Default。
Client.Default是由HttpURLConnection来实现⽹络请求的。
另外,Client还⽀持HttpClient和OkHttp来进⾏⽹络请求。
⾸先查看FeignRibbonClient的⾃动配置类FeignRibbonClientAutoConfiguration,该类在程序启动的时候注⼊⼀些Bean,其中注⼊了⼀个BeanName为feignClient的Client类型的Bean。
在省缺配置BeanName为FeignClient的Bean的情况下,会⾃动注⼊Client.Default这个对象,跟踪Client.Default源码,Client.Default使⽤的⽹络请求框架是HttpURLConnection,代码如下:public static class Default implements Client {private final SSLSocketFactory sslContextFactory;private final HostnameVerifier hostnameVerifier;public Default(SSLSocketFactory sslContextFactory, HostnameVerifier hostnameVerifier) {this.sslContextFactory = sslContextFactory;this.hostnameVerifier = hostnameVerifier;}public Response execute(Request request, Options options) throws IOException {HttpURLConnection connection = this.convertAndSend(request, options);return this.convertResponse(connection, request);}......//代码省略}这种情况下,由于缺乏连接池的⽀持,在达到⼀定流量的后服务肯定会出问题。
HttpClient学习总结

一、HttpClient 功能简介●实现了所有HTTP 的方法(GET,POST,PUT,HEAD,OPTIONS,TRACE)●支持自动转向●支持HTTPS 协议●透明地穿过HTTP代理建立连接●通过CONNECT方法,利用通过建立穿过HTTP代理的HTTPS连接●利用本地Java socket,透明地穿过SOCKS(版本5和4)代理建立连接●支持利用Basic、Digest和NTLM加密的认证●支持用于上传大文件的Multi-Part表单POST方法●插件式安全socket实现,易于使用第三方的解决方案●连接管理,支持多线程应用,支持设定单个主机总连接和最高连接数量,自动检测和关闭失效的连接●直接将请求信息流送到服务器的端口●直接读取从服务器的端口送出的应答信息●支持HTTP/1.0中用KeepAlive和HTTP/1.1中用persistance设置的持久连接●直接访问由服务器送出的应答代码和头部信息●可设置连接超时时间●HttpMethods 实现Command Pattern,以允许并行请求或高效连接复用●遵循the Apache Software License协议,源码免费可得二、环境搭建1.HttpClient 3.1 所需的基本jar包:commons-httpclient-3.1.jar,下载地址:/dist/httpcomponents/commons-httpclient/binary/;commons-logging.jar,下载地址:/logging/download_logging.cgi;commons-codec.jar,下载地址:/codec/download_codec.cgi;2.HttpClient 4所需的基本jar包:下载地址:/downloads.cgi;最新版本为4.1.2,且官方不再升级HttpClient3。
三、HttpClient 3.x 基本功能的使用1.使用 HttpClient 需要以下 6 个步骤:●创建HttpClient 的实例●创建某种连接方法的实例,在这里是GetMethod。
WebApi异步请求(HttpClient)
WebApi异步请求(HttpClient)还是那⼏句话:学⽆⽌境,精益求精⼗年河东,⼗年河西,莫欺少年穷学历代表你的过去,能⼒代表你的现在,学习代表你的将来废话不多说,直接进⼊正题:今天公司总部要求各个分公司把短信接⼝对接上,所谓的短信接⼝其实就是GET或者Post请求,接到这个任务感觉好Easy。
但是真正写起来,你会发现各种各样的问题,⽐如请求报401错误,报400错误,报..等等各种意想不到的错误!总之,在这个过程中尝试了三个⽅法:第⼀个⽅法如下(由于第⼀个⽅法封装的⽐较多,在此仅仅截图),如下:⼩矩形内得POST⽅法,结果发现报400错误。
紧接着我⼜尝试了第⼆种⽅法(这种⽅法⽐较简单,⼀般的POST请求都可以完成)第⼆种⽅法如下(2014年微信公众号开发中,好多请求我都⽤的这个⽅法):public static string GetPage(string posturl, string postData){//WX_SendNews news = new WX_SendNews();//posturl: news.Posturl;//postData:news.PostData;System.IO.Stream outstream = null;Stream instream = null;StreamReader sr = null;HttpWebResponse response = null;HttpWebRequest request = null;Encoding encoding = Encoding.UTF8;byte[] data = encoding.GetBytes(postData);// 准备请求...try{// 设置参数request = WebRequest.Create(posturl) as HttpWebRequest;CookieContainer cookieContainer = new CookieContainer();request.CookieContainer = cookieContainer;request.AllowAutoRedirect = true;request.Method = "POST";request.ContentType = "application/x-www-form-urlencoded";request.ContentLength = data.Length;outstream = request.GetRequestStream();outstream.Write(data, 0, data.Length);outstream.Close();//发送请求并获取相应回应数据response = request.GetResponse() as HttpWebResponse;//直到request.GetResponse()程序才开始向⽬标⽹页发送Post请求instream = response.GetResponseStream();sr = new StreamReader(instream, encoding);//返回结果⽹页(html)代码string content = sr.ReadToEnd();string err = string.Empty;return content;}catch (Exception ex){string err = ex.Message;return string.Empty;}}View Code结果这个⽅法报401错误。
.NETCore中使用HttpClient的正确姿势
.NETCore中使⽤HttpClient的正确姿势前⾔为了更⽅便在服务端调⽤ HTTP 请求,微软在 .NET Framework 4.x 的时候引⼊了 HttpClient。
但 HttpClient 有很多严重问题,⼀直饱受诟病,⽐如 InfoQ 的这篇⽂章,吐槽了 HttpClient 不能⽴即关闭连接、性能消耗严重等的问题。
Http协议的重要性相信不⽤我多说了,HttpClient相⽐传统JDK⾃带的URLConnection,增加了易⽤性和灵活性,它不仅是客户端发送Http请求变得容易,⽽且也⽅便了开发⼈员测试接⼝(基于Http协议的),即提⾼了开发的效率,也⽅便提⾼代码的健壮性。
因此熟练掌握HttpClient是很重要的必修内容,掌握HttpClient后,相信对于Http协议的了解会更加深⼊。
.NET Core 2.1 开始引⼊的 HttpClientFactory 解决了 HttpClient 的所有痛点。
有了 HttpClientFactory,我们不需要关⼼如何创建 HttpClient,⼜如何释放它。
通过它可以创建具有特定业务的 HttpClient,⽽且可以很友好的和 DI 容器结合使⽤,更为灵活。
下⾯以 Core 为例介绍 HttpClient 新的三种正确使⽤⽅式。
⼀、直接使⽤⽅式不管是哪种⽅式,都要先注册服务,对于 Core 应⽤则是在 Startup.cs ⽂件的 ConfigureServices 添加如果代码:services.AddHttpClient();然后在 Controller 中通过构造注⼊的试获得 IHttpClientFactory,然后通过它来创建 HttpClient 对象。
⽰例代码:public class ValuesController : BaseController{private readonly IHttpClientFactory _httpClientFactory;public ValuesController(IHttpClientFactory httpClientFactory){_httpClientFactory = httpClientFactory;}[HttpGet]public async Task<ActionResult> Get(){var client = _httpClientFactory.CreateClient();client.BaseAddress = new Uri("");string result = await client.GetStringAsync("/");return Ok(result);}}这种使⽤⽅式适合⼀次性的 HTTP 请求调⽤,弊端是如果多次都要请求 github 的接⼝,那就得写很多重复代码配置HttpClient。
Android-25_网络通信(2)—HttpClient
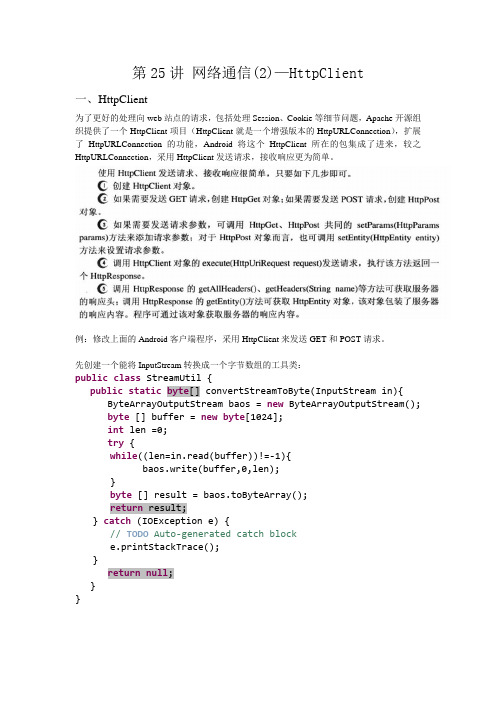
第25讲网络通信(2)—HttpClient一、HttpClient为了更好的处理向web站点的请求,包括处理Session、Cookie等细节问题,Apache开源组织提供了一个HttpClient项目(HttpClient就是一个增强版本的HttpURLConnection),扩展了HttpURLConnection的功能,Android将这个HttpClient所在的包集成了进来,较之HttpURLConnection,采用HttpClient发送请求,接收响应更为简单。
例:修改上面的Android客户端程序,采用HttpClient来发送GET和POST请求。
先创建一个能将InputStream转换成一个字节数组的工具类:public class StreamUtil {public static byte[] convertStreamToByte(InputStream in){ ByteArrayOutputStream baos = new ByteArrayOutputStream();byte [] buffer = new byte[1024];int len =0;try {while((len=in.read(buffer))!=-1){baos.write(buffer,0,len);}byte [] result = baos.toByteArray();return result;} catch (IOException e) {// TODO Auto-generated catch blocke.printStackTrace();}return null;}}(1)发送GET请求public int login_HttpClient_Get(String username ,String password){ String baseURL ="http://192.168.101.62:8080/LoginDemoServer/servlet/LoginServlet";String path = baseURL+"?username="+username+"&password="+password;try {HttpClient client = new DefaultHttpClient(); //创建一个浏览器的客户端HttpGet httpGet = new HttpGet(path); //创建一个请求对象HttpResponse httpResponse = client.execute(httpGet); //将请求发送出去if(httpResponse.getStatusLine().getStatusCode()==200){Log.i("test", "网络连接成功,采用HttpClient的get请求");//进一步判断,返回回来的字符串是InputStream in =httpResponse.getEntity().getContent(); //得到服务器响应的输入流byte buffer[] = StreamUtil.convertStreamToByte(in);String result = new String(buffer).trim(); //.trim()去掉字符串前后空格换行等无用的字符Log.i("test", result+"--------------");if(result.equals("success")){Log.i("test", "登陆成功");return LOGINSUCCESS;}else{Log.i("test", "用户名密码错误");return LOGINFAILURE;}}else{//连接失败Log.i("test", "网络连接失败");return NETFAILURE;}} catch (Exception e) {// TODO Auto-generated catch blocke.printStackTrace();}return 0;}(2)发送Post请求public int login_HttpClient_Post(String username ,String password){ String baseURL ="http://192.168.101.62:8080/LoginDemoServer/servlet/LoginServlet";HttpClient client = new DefaultHttpClient(); //创建一个浏览器的客户端HttpPost httpPost = new HttpPost(baseURL);try {username=new String(username.getBytes("utf8"),"iso8859-1");password=new String(password.getBytes("utf8"),"iso8859-1");} catch (UnsupportedEncodingException e1) {// TODO Auto-generated catch blocke1.printStackTrace();}if(httpResponse.getStatusLine().getStatusCode()==200){Log.i("test", "网络连接成功,采用HttpClient的post请求");InputStream in =httpResponse.getEntity().getContent(); //得到服务器响应的输入流byte buffer[] = StreamUtil.convertStreamToByte(in);String result = new String(buffer).trim(); //.trim()去掉字符串前后空格换行等无用的字符Log.i("test", result+"--------------");if(result.equals("success")){Log.i("test", "登陆成功");return LOGINSUCCESS;}else{Log.i("test", "用户名密码错误");return LOGINFAILURE;}}else{//连接失败Log.i("test", "网络连接失败");return NETFAILURE;}} catch (Exception e) {// TODO Auto-generated catch blocke.printStackTrace();}return 0;}二、数据提交的乱码处理---使用HttpClient(1)Post请求:发送时:在Android端,先将需要发送的文字:username=new String(username.getBytes("utf8"),"iso8859-1");values.add(new BasicNameValuePair("username",username)); //将转码后的字符串加入到Post 请求的参数中去。
HttpClient详细使用示例详解

HttpClient详细使⽤⽰例详解⽬录进⼊正题详细使⽤⽰例HttpClient 是Apache Jakarta Common 下的⼦项⽬,可以⽤来提供⾼效的、最新的、功能丰富的⽀持 HTTP 协议的客户端编程⼯具包,并且它⽀持 HTTP 协议最新的版本和建议。
HTTP 协议可能是现在 Internet 上使⽤得最多、最重要的协议了,越来越多的 Java 应⽤程序需要直接通过 HTTP 协议来访问⽹络资源。
虽然在 JDK 的 java net包中已经提供了访问 HTTP 协议的基本功能,但是对于⼤部分应⽤程序来说,JDK 库本⾝提供的功能还不够丰富和灵活。
HttpClient 是 Apache Jakarta Common 下的⼦项⽬,⽤来提供⾼效的、最新的、功能丰富的⽀持 HTTP 协议的客户端编程⼯具包,并且它⽀持 HTTP 协议最新的版本和建议。
HTTP和浏览器有点像,但却不是浏览器。
很多⼈觉得既然HttpClient是⼀个HTTP客户端编程⼯具,很多⼈把他当做浏览器来理解,但是其实HttpClient不是浏览器,它是⼀个HTTP通信库,因此它只提供⼀个通⽤浏览器应⽤程序所期望的功能⼦集,最根本的区别是HttpClient中没有⽤户界⾯,浏览器需要⼀个渲染引擎来显⽰页⾯,并解释⽤户输⼊,例如⿏标点击显⽰页⾯上的某处,有⼀个布局引擎,计算如何显⽰HTML页⾯,包括级联样式表和图像。
javascript解释器运⾏嵌⼊HTML页⾯或从HTML页⾯引⽤的javascript代码。
来⾃⽤户界⾯的事件被传递到javascript解释器进⾏处理。
除此之外,还有⽤于插件的接⼝,可以处理Applet,嵌⼊式媒体对象(如pdf⽂件,Quicktime电影和Flash动画)或ActiveX控件(可以执⾏任何操作)。
HttpClient只能以编程的⽅式通过其API⽤于传输和接受HTTP消息。
HttpClient的主要功能:实现了所有 HTTP 的⽅法(GET、POST、PUT、HEAD、DELETE、HEAD、OPTIONS 等)⽀持 HTTPS 协议⽀持代理服务器(Nginx等)等⽀持⾃动(跳转)转向……进⼊正题环境说明:JDK1.8、SpringBoot准备环节第⼀步:在pom.xml中引⼊HttpClient的依赖第⼆步:引⼊fastjson依赖注:本⼈引⼊此依赖的⽬的是,在后续⽰例中,会⽤到“将对象转化为json字符串的功能”,也可以引其他有此功能的依赖。
HttpClient 4.3教程(转载)

HttpClient提供URIBuilder工具类来简化URIs的创建和修改过程。
1. URI uri = new URIBuilder()2. .setScheme("http")3. .setHost("")4. .setPath("/search")5. .setParameter("q", "httpclient")6. .setParameter("btnG", "Google Search")7. .setParameter("aq", "f")8. .setParameter("oq", "")9. .build();10. HttpGet httpget = new HttpGet(uri);11. System.out.println(httpget.getURI());上述代码会在控制台输出:1. /search?q=httpclient&btnG=Google+Search&aq=f&oq=1.1.2. HTTP响应服务器收到客户端的http请求后,就会对其进行解析,然后把响应发给客户端,这个响应就是HTTP response.HTTP响应第一行是协议版本,之后是数字状态码和相关联的文本段。
1. HttpResponse response = new BasicHttpResponse(HttpVersion.HTTP_1_1,2. HttpStatus.SC_OK, "OK");3.4. System.out.println(response.getProtocolVersion());5. System.out.println(response.getStatusLine().getStatusCode());6. System.out.println(response.getStatusLine().getReasonPhrase());7. System.out.println(response.getStatusLine().toString());上述代码会在控制台输出:1. HTTP/1.12. 2003. OK4. HTTP/1.1 200 OK1.1.3. 消息头一个Http消息可以包含一系列的消息头,用来对http消息进行描述,比如消息长度,消息类型等等。
使用HttpClient上传文件及传递参数

for (int i = 0; i < lstFilePath.Count; i++) {
int start = lstFilePath[i].LastIndexOf('\\'); string name = lstFilePath[i].Substring(start + 1); var fileContent = new ByteArrayContent(File.ReadAllBytes(lstFilePath[i])); fileContent.Headers.ContentDisposition = new ContentDispositionHeaderValue("attachment") {
unexpectedendofjsoninput请尝试刷新页面或更换浏览器重试
使用 HttpClient上传文件及传递参数
/// <summary> /// 使用HttpClient上传文件及传递参数 /// </summary> /// <param name="url"></param> /// <param name="postParameters"></param> /// <param name="lstFilePath"></param> /// <returns></returns> public static async Task<string> HttpPostAsync(string url, NameValueCollection postParameters, List<string> lstFilePath = null) {
C#客户端HttpClient请求认证及数据传输
C#客户端HttpClient请求认证及数据传输⽬录⼀,授权认证1. 基础认证⽰例2. JWT 认证⽰例3. Cookie ⽰例⼆,请求类型三,数据传输1. Query2. Header3. 表单4. JSON5. 上传⽂件⼀,授权认证客户端请求服务器时,需要通过授权认证许可,⽅能获取服务器资源,⽬前⽐较常见的认证⽅式有 Basic 、JWT、Cookie。
HttpClient 是 C# 中的 HTTP/HTTPS 客户端,⽤于发送 HTTP 请求和接收来⾃通过 URI 确认的资源的 HTTP 响应。
下⾯以具体代码做⽰范。
1. 基础认证⽰例// Basic基础认证public async Task Basic(string user, string password, string url){// 如果认证页⾯是 https 的,请参考⼀下 jwt 认证的 HttpClientHandler// 创建 clientHttpClient client = new HttpClient();// 创建⾝份认证// using .Http.Headers;AuthenticationHeaderValue authentication = new AuthenticationHeaderValue("Basic",Convert.ToBase64String(Encoding.UTF8.GetBytes($"{user}:{password}")));client.DefaultRequestHeaders.Authorization = authentication;byte[] response = await client.GetByteArrayAsync(url);client.Dispose();}可以看到 Basic 认证的安全程度⾮常低,多⽤于路由器和嵌⼊式设备,⽽且往往不会使⽤ HTTPS。
AndroidStudioOkHttpClient使用教程详解

AndroidStudioOkHttpClient使⽤教程详解本次来记录下OkHttpClient的使⽤,OkHttpClient是⽤来完成android 客户端对服务端请求的⼯具。
⾸先记住,使⽤⽹络的时候⼀定要加⼊权限,加⼊到AndroidMainfest.xml中<uses-permission android:name="android.permission.INTERNET" />在初次使⽤的时候会出现报错。
cannot resolve symbol OkHttpClient这⾥需要引⼊implementation 'com.squareup.okhttp3:okhttp:3.0.1'然后刷新下项⽬就可以了。
代码:package com.example.administrator.testclient;import com.squareup.*;import java.io.IOException;import okhttp3.FormBody;import okhttp3.MediaType;import okhttp3.OkHttpClient;import okhttp3.Request;import okhttp3.RequestBody;import okhttp3.Response;public class BaseHttpClient {public static final MediaType MEDIA_TYPE_MARKDOWN= MediaType.parse("text/x-markdown; charset=utf-8");// 01. 定义okhttpprivate final OkHttpClient client = new OkHttpClient();public BaseHttpClient(){//client.connectTimeoutMillis();}/*** 发送⼀个表单请求* @throws Exception*/public void SendForm() throws Exception {RequestBody formBody = new FormBody.Builder().add("search", "Jurassic Park").build();Request request = new Request.Builder().url("https:///w/index.php").post(formBody).build();Response response = client.newCall(request).execute();if (!response.isSuccessful())throw new IOException("Unexpected code " + response);System.out.println(response.body().string());}/**POST 请求* 发送⼀个string请求* @throws Exception*/public void SendPostString() throws Exception {String postBody = ""+ "Releases\n"+ "--------\n"+ "\n"+ " * _1.0_ May 6, 2013\n"+ " * _1.1_ June 15, 2013\n"+ " * _1.2_ August 11, 2013\n";Request request = new Request.Builder().url("https:///markdown/raw").post(RequestBody.create(MEDIA_TYPE_MARKDOWN, postBody)).build();Response response = client.newCall(request).execute();if (!response.isSuccessful())throw new IOException("Unexpected code " + response);System.out.println(response.body().string());}/**POST 请求* 发送⼀个From请求* @throws Exception*/public void SendPostFrom() throws Exception {RequestBody body = new FormBody.Builder().add("name", "sy")//添加参数体.add("age", "18").build();Request request = new Request.Builder().post(body) //请求参数.url("http://123.207.70.54:8080/SpringMvc/hello").build();Response response = client.newCall(request).execute();if (!response.isSuccessful())throw new IOException("Unexpected code " + response);}/**Get请求* 发送⼀个From请求* @throws Exception*/public void SendGetFrom() throws Exception {Request request = new Request.Builder().get() //请求参数.url("http://123.207.70.54:8080/SpringMvc/hello").build();Response response = client.newCall(request).execute();if (!response.isSuccessful())throw new IOException("Unexpected code " + response);}}测试发现,上⾯的⽤不了,下⾯放⼀个测试通过的⽅法:public void getDatasyncFactory(){new Thread(new Runnable() {@Overridepublic void run() {try {OkHttpClient client = new OkHttpClient();//创建OkHttpClient对象Request request = new Request.Builder().url("http://123.207.70.54:8080/SpringMvc/hello")//请求接⼝。
httpclient使用详解

httpclient使用详解Http协议的重要性相信不用我多说了,HttpClient相比传统JDK自带的URLConnection,增加了易用性和灵活性(具体区别,日后我们再讨论),它不仅是客户端发送Http请求变得容易,而且也方便了开发人员测试接口(基于Http协议的),即提高了开发的效率,也方便提高代码的健壮性。
因此熟练掌握HttpClient是很重要的必修内容,掌握HttpClient后,相信对于Http协议的了解会更加深入。
一、简介HttpClient是Apache Jakarta Common下的子项目,用来提供高效的、最新的、功能丰富的支持HTTP协议的客户端编程工具包,并且它支持HTTP协议最新的版本和建议。
HttpClient已经应用在很多的项目中,比如Apache Jakarta上很著名的另外两个开源项目Cactus和HTMLUnit都使用了HttpClient。
下载地址: /downloads.cgi二、特性1. 基于标准、纯净的Java语言。
实现了Http1.0和Http1.12. 以可扩展的面向对象的结构实现了Http全部的方法(GET, POST, PUT, DELETE, HEAD, OPTIONS, and TRACE)。
3. 支持HTTPS协议。
4. 通过Http代理建立透明的连接。
5. 利用CONNECT方法通过Http代理建立隧道的https连接。
6. Basic, Digest, NTLMv1, NTLMv2, NTLM2 Session, SNPNEGO/Kerberos认证方案。
7. 插件式的自定义认证方案。
8. 便携可靠的套接字工厂使它更容易的使用第三方解决方案。
9. 连接管理器支持多线程应用。
支持设置最大连接数,同时支持设置每个主机的最大连接数,发现并关闭过期的连接。
10. 自动处理Set-Cookie中的Cookie。
11. 插件式的自定义Cookie策略。
关于Http持久连接和HttpClient连接池的深入理解
关于Http持久连接和HttpClient连接池的深⼊理解⼀、背景HTTP协议是⽆状态的协议,即每⼀次请求都是互相独⽴的。
因此它的最初实现是,每⼀个http请求都会打开⼀个tcp socket连接,当交互完毕后会关闭这个连接。
HTTP协议是全双⼯的协议,所以建⽴连接与断开连接是要经过三次握⼿与四次挥⼿的。
显然在这种设计中,每次发送Http请求都会消耗很多的额外资源,即连接的建⽴与销毁。
于是,HTTP协议的也进⾏了发展,通过持久连接的⽅法来进⾏socket连接复⽤。
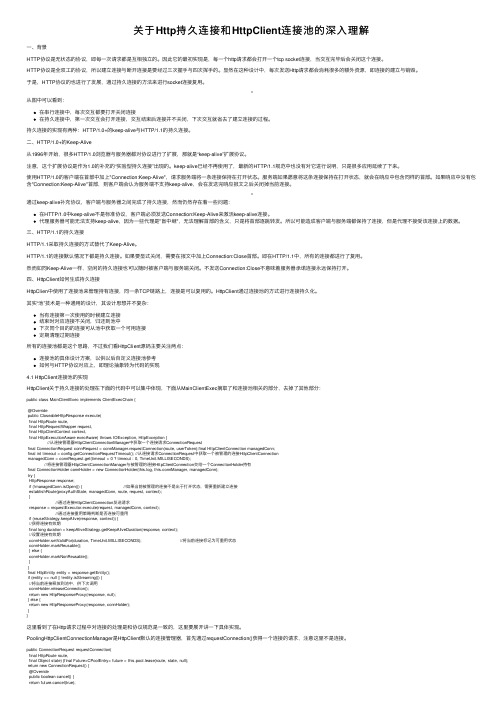
从图中可以看到:在串⾏连接中,每次交互都要打开关闭连接在持久连接中,第⼀次交互会打开连接,交互结束后连接并不关闭,下次交互就省去了建⽴连接的过程。
持久连接的实现有两种:HTTP/1.0+的keep-alive与HTTP/1.1的持久连接。
⼆、HTTP/1.0+的Keep-Alive从1996年开始,很多HTTP/1.0浏览器与服务器都对协议进⾏了扩展,那就是“keep-alive”扩展协议。
注意,这个扩展协议是作为1.0的补充的“实验型持久连接”出现的。
keep-alive已经不再使⽤了,最新的HTTP/1.1规范中也没有对它进⾏说明,只是很多应⽤延续了下来。
使⽤HTTP/1.0的客户端在⾸部中加上"Connection:Keep-Alive",请求服务端将⼀条连接保持在打开状态。
服务端如果愿意将这条连接保持在打开状态,就会在响应中包含同样的⾸部。
如果响应中没有包含"Connection:Keep-Alive"⾸部,则客户端会认为服务端不⽀持keep-alive,会在发送完响应报⽂之后关闭掉当前连接。
通过keep-alive补充协议,客户端与服务器之间完成了持久连接,然⽽仍然存在着⼀些问题:在HTTP/1.0中keep-alive不是标准协议,客户端必须发送Connection:Keep-Alive来激活keep-alive连接。
Java调用HttpHttps接口(4)--HttpClient调用HttpHttps接口

Java调⽤HttpHttps接⼝(4)--HttpClient调⽤HttpHttps接⼝HttpClient是Apache HttpComponents项⽬下的⼀个组件,是Commons-HttpClient的升级版,两者api调⽤写法也很类似。
⽂中所使⽤到的软件版本:Java 1.8.0_191、HttpClient 4.5.10。
1、服务端参见2、调⽤Http接⼝2.1、GET请求public static void get() {String requestPath = "http://localhost:8080/demo/httptest/getUser?userId=1000&userName=李⽩";CloseableHttpClient httpClient = HttpClients.createDefault();try {HttpGet get = new HttpGet(requestPath);CloseableHttpResponse response = httpClient.execute(get);System.out.println("GET返回状态:" + response.getStatusLine());HttpEntity responseEntity = response.getEntity();System.out.println("GET返回结果:" + EntityUtils.toString(responseEntity));//流畅api调⽤String result = Request.Get(requestPath).execute().returnContent().asString(Charset.forName("utf-8"));System.out.println("GET fluent返回结果:" + result);} catch (Exception e) {e.printStackTrace();} finally {close(httpClient);}}2.2、POST请求(发送键值对数据)public static void post() {String requestPath = "http://localhost:8080/demo/httptest/getUser";CloseableHttpClient httpClient = HttpClients.createDefault();try {HttpPost post = new HttpPost(requestPath);List<NameValuePair> list = new ArrayList<NameValuePair>();list.add(new BasicNameValuePair("userId", "1000"));list.add(new BasicNameValuePair("userName", "李⽩"));post.setEntity(new UrlEncodedFormEntity(list, "utf-8"));CloseableHttpResponse response = httpClient.execute(post);System.out.println("POST返回状态:" + response.getStatusLine());HttpEntity responseEntity = response.getEntity();System.out.println("POST返回结果:" + EntityUtils.toString(responseEntity));//流畅api调⽤String result = Request.Post(requestPath).bodyForm(Form.form().add("userId", "1000").add("userName", "李⽩").build(), Charset.forName("utf-8")).execute().returnContent().asString(Charset.forName("utf-8"));System.out.println("POST fluent返回结果:" + result);} catch (Exception e) {e.printStackTrace();} finally {close(httpClient);}}2.3、POST请求(发送JSON数据)public static void post2() {String requestPath = "http://localhost:8080/demo/httptest/addUser";CloseableHttpClient httpClient = HttpClients.createDefault();try {HttpPost post = new HttpPost(requestPath);post.setHeader("Content-type", "application/json");String param = "{\"userId\": \"1001\",\"userName\":\"杜甫\"}";post.setEntity(new StringEntity(param, "utf-8"));CloseableHttpResponse response = httpClient.execute(post);System.out.println("POST json返回状态:" + response.getStatusLine());HttpEntity responseEntity = response.getEntity();System.out.println("POST josn返回结果:" + EntityUtils.toString(responseEntity));//流畅api调⽤String result = Request.Post(requestPath).addHeader("Content-type", "application/json").bodyString(param, ContentType.APPLICATION_JSON).execute().returnContent().asString(Charset.forName("utf-8"));System.out.println("POST json fluent返回结果:" + result);} catch (Exception e) {e.printStackTrace();} finally {close(httpClient);}}2.4、上传⽂件public static void upload() {String requestPath = "http://localhost:8080/demo/httptest/upload";CloseableHttpClient httpClient = HttpClients.createDefault();try {HttpPost post = new HttpPost(requestPath);FileInputStream fileInputStream = new FileInputStream("d:/a.jpg");post.setEntity(new InputStreamEntity(fileInputStream));CloseableHttpResponse response = httpClient.execute(post);System.out.println("upload返回状态:" + response.getStatusLine());HttpEntity responseEntity = response.getEntity();System.out.println("upload返回结果:" + EntityUtils.toString(responseEntity));//流畅api调⽤String result = Request.Post(requestPath).bodyStream(new FileInputStream("d:/a.jpg")).execute().returnContent().asString(Charset.forName("utf-8"));System.out.println("upload fluent返回结果:" + result);} catch (Exception e) {e.printStackTrace();} finally {close(httpClient);}}2.5、上传⽂件及发送键值对数据public static void multi() {String requestPath = "http://localhost:8080/demo/httptest/multi";CloseableHttpClient httpClient = HttpClients.createDefault();try {HttpPost post = new HttpPost(requestPath);FileBody file = new FileBody(new File("d:/a.jpg"));HttpEntity requestEntity = MultipartEntityBuilder.create().addPart("file", file).addPart("param1", new StringBody("参数1", ContentType.create(ContentType.TEXT_PLAIN.getMimeType(), "utf-8"))) .addPart("param2", new StringBody("参数2", ContentType.create(ContentType.TEXT_PLAIN.getMimeType(), "utf-8"))) .build();post.setEntity(requestEntity);CloseableHttpResponse response = httpClient.execute(post);System.out.println("multi返回状态:" + response.getStatusLine());HttpEntity responseEntity = response.getEntity();System.out.println("multi返回结果:" + EntityUtils.toString(responseEntity));//流畅api调⽤String result = Request.Post(requestPath).body(MultipartEntityBuilder.create().addPart("file", file).addPart("param1", new StringBody("参数1", ContentType.create(ContentType.TEXT_PLAIN.getMimeType(), "utf-8"))) .addPart("param2", new StringBody("参数2", ContentType.create(ContentType.TEXT_PLAIN.getMimeType(), "utf-8"))) .build()).execute().returnContent().asString(Charset.forName("utf-8"));System.out.println("multi fluent返回结果:" + result);} catch (Exception e) {e.printStackTrace();} finally {close(httpClient);}}2.6、完整例⼦package com.inspur.demo.http.client;import java.io.File;import java.io.FileInputStream;import java.io.IOException;import java.nio.charset.Charset;import java.util.ArrayList;import java.util.List;import org.apache.http.HttpEntity;import ValuePair;import org.apache.http.client.entity.UrlEncodedFormEntity;import org.apache.http.client.fluent.Form;import org.apache.http.client.fluent.Request;import org.apache.http.client.methods.CloseableHttpResponse;import org.apache.http.client.methods.HttpGet;import org.apache.http.client.methods.HttpPost;import org.apache.http.entity.ContentType;import org.apache.http.entity.InputStreamEntity;import org.apache.http.entity.StringEntity;import org.apache.http.entity.mime.MultipartEntityBuilder;import org.apache.http.entity.mime.content.FileBody;import org.apache.http.entity.mime.content.StringBody;import org.apache.http.impl.client.CloseableHttpClient;import org.apache.http.impl.client.HttpClients;import org.apache.http.message.BasicNameValuePair;import org.apache.http.util.EntityUtils;/*** 通过HttpClient调⽤Http接⼝*/public class HttpClientCase {/*** GET请求*/public static void get() {String requestPath = "http://localhost:8080/demo/httptest/getUser?userId=1000&userName=李⽩";CloseableHttpClient httpClient = HttpClients.createDefault();try {HttpGet get = new HttpGet(requestPath);CloseableHttpResponse response = httpClient.execute(get);System.out.println("GET返回状态:" + response.getStatusLine());HttpEntity responseEntity = response.getEntity();System.out.println("GET返回结果:" + EntityUtils.toString(responseEntity));//流畅api调⽤String result = Request.Get(requestPath).execute().returnContent().asString(Charset.forName("utf-8"));System.out.println("GET fluent返回结果:" + result);} catch (Exception e) {e.printStackTrace();} finally {close(httpClient);}}/*** POST请求(发送键值对数据)*/public static void post() {String requestPath = "http://localhost:8080/demo/httptest/getUser";CloseableHttpClient httpClient = HttpClients.createDefault();try {HttpPost post = new HttpPost(requestPath);List<NameValuePair> list = new ArrayList<NameValuePair>();list.add(new BasicNameValuePair("userId", "1000"));list.add(new BasicNameValuePair("userName", "李⽩"));post.setEntity(new UrlEncodedFormEntity(list, "utf-8"));CloseableHttpResponse response = httpClient.execute(post);System.out.println("POST返回状态:" + response.getStatusLine());HttpEntity responseEntity = response.getEntity();System.out.println("POST返回结果:" + EntityUtils.toString(responseEntity));//流畅api调⽤String result = Request.Post(requestPath).bodyForm(Form.form().add("userId", "1000").add("userName", "李⽩").build(), Charset.forName("utf-8")) .execute().returnContent().asString(Charset.forName("utf-8"));System.out.println("POST fluent返回结果:" + result);} catch (Exception e) {e.printStackTrace();} finally {close(httpClient);}}/*** POST请求(发送json数据)*/public static void post2() {String requestPath = "http://localhost:8080/demo/httptest/addUser";CloseableHttpClient httpClient = HttpClients.createDefault();try {HttpPost post = new HttpPost(requestPath);post.setHeader("Content-type", "application/json");String param = "{\"userId\": \"1001\",\"userName\":\"杜甫\"}";post.setEntity(new StringEntity(param, "utf-8"));CloseableHttpResponse response = httpClient.execute(post);System.out.println("POST json返回状态:" + response.getStatusLine());HttpEntity responseEntity = response.getEntity();System.out.println("POST josn返回结果:" + EntityUtils.toString(responseEntity));//流畅api调⽤String result = Request.Post(requestPath).addHeader("Content-type", "application/json").bodyString(param, ContentType.APPLICATION_JSON).execute().returnContent().asString(Charset.forName("utf-8"));System.out.println("POST json fluent返回结果:" + result);} catch (Exception e) {e.printStackTrace();} finally {close(httpClient);}}/*** 上传⽂件*/public static void upload() {String requestPath = "http://localhost:8080/demo/httptest/upload";CloseableHttpClient httpClient = HttpClients.createDefault();try {HttpPost post = new HttpPost(requestPath);FileInputStream fileInputStream = new FileInputStream("d:/a.jpg");post.setEntity(new InputStreamEntity(fileInputStream));CloseableHttpResponse response = httpClient.execute(post);System.out.println("upload返回状态:" + response.getStatusLine());HttpEntity responseEntity = response.getEntity();System.out.println("upload返回结果:" + EntityUtils.toString(responseEntity));//流畅api调⽤String result = Request.Post(requestPath).bodyStream(new FileInputStream("d:/a.jpg")).execute().returnContent().asString(Charset.forName("utf-8"));System.out.println("upload fluent返回结果:" + result);} catch (Exception e) {e.printStackTrace();} finally {close(httpClient);}}/*** 上传⽂件及发送键值对数据*/public static void multi() {String requestPath = "http://localhost:8080/demo/httptest/multi";CloseableHttpClient httpClient = HttpClients.createDefault();try {HttpPost post = new HttpPost(requestPath);FileBody file = new FileBody(new File("d:/a.jpg"));HttpEntity requestEntity = MultipartEntityBuilder.create().addPart("file", file).addPart("param1", new StringBody("参数1", ContentType.create(ContentType.TEXT_PLAIN.getMimeType(), "utf-8"))) .addPart("param2", new StringBody("参数2", ContentType.create(ContentType.TEXT_PLAIN.getMimeType(), "utf-8"))) .build();post.setEntity(requestEntity);CloseableHttpResponse response = httpClient.execute(post);System.out.println("multi返回状态:" + response.getStatusLine());HttpEntity responseEntity = response.getEntity();System.out.println("multi返回结果:" + EntityUtils.toString(responseEntity));//流畅api调⽤String result = Request.Post(requestPath).body(MultipartEntityBuilder.create().addPart("file", file).addPart("param1", new StringBody("参数1", ContentType.create(ContentType.TEXT_PLAIN.getMimeType(), "utf-8"))) .addPart("param2", new StringBody("参数2", ContentType.create(ContentType.TEXT_PLAIN.getMimeType(), "utf-8"))).build()).execute().returnContent().asString(Charset.forName("utf-8"));System.out.println("multi fluent返回结果:" + result);} catch (Exception e) {e.printStackTrace();} finally {close(httpClient);}}private static void close(CloseableHttpClient httpClient) {try {if (httpClient != null) {httpClient.close();}} catch (IOException e) {e.printStackTrace();}}public static void main(String[] args) {get();post();post2();upload();multi();}}View Code3、调⽤Https接⼝与调⽤Http接⼝不⼀样的部分主要在设置ssl部分,其ssl的设置与HttpsURLConnection很相似(参见);下⾯⽤GET请求来演⽰ssl的设置,其他调⽤⽅式类似。
详解Idea中HTTPClient请求测试工具的使用
详解Idea中HTTPClient请求测试⼯具的使⽤前⾔:以前在本地测试⼀些接⼝,我都是使⽤postman,偶然发了Idea⾃带的请求测试⼯具HTTP Client,我就开始使⽤HTTP Client 了,但是在某些下载流类接⼝的测试中,还是要使⽤postman,但是普通的接⼝HTTP Client已经⾜够满⾜的需求。
正⽂:使⽤HTTP Client的Idea版本最好在2018以上,不然体验感不是很好。
下⾯,我将介绍⼀下,这个怎么使⽤。
1.使⽤⼊⼝:⽅式⼀:在Controller类中,⽅法旁边有⼀个⼩三⾓,如果不要携带任何参数,就可以直接点击Run HTTP Request,如果需要携带参数,点击Open in HTTP Request Editor,进⾏配置⽂件编辑(Idea 2018 以下版⾯没有此三⾓按钮)。
⽅式⼆:点击Tool,再点击HTTP Client,再点击 Test RESTful Web Service,进⼊到REST Client 窗⼝。
2.使⽤:点击Open in HTTP Request Editor,进⼊以.http结尾的配置⽂件。
使⽤⼀:Get请求,Url携带参数:使⽤⼆:Get请求,Url携带参数,并且携带Header:使⽤三: Post请求,Body中有数据,并且携带Header:application/x-www-form-urlencodedapplication/json使⽤四:根据环境变量选择执⾏参数:环境变量配置⽂件:私有的环境配置⽂件,建议不要提交Git:使⽤五:模拟登陆,获取access_token,并保存为全局变量,然后其他接⼝测试可以使⽤:使⽤六:上传⽂件:POST http://localhost:9091/uploadAccept: */*Cache-Control: no-cacheContent-Type: multipart/form-data; boundary=WebAppBoundary--WebAppBoundaryContent-Disposition: form-data; name="file"; filename="test_A.xlsx"Content-Type: application/vnd.openxmlformats-officedocument.spreadsheetml.sheet# ⽂件上传路径< C:\Users\Desktop\test_A.xlsx--WebAppBoundary--以上就是详解Idea中HTTP Client请求测试⼯具的使⽤的详细内容,更多关于Idea中HTTP Client使⽤的资料请关注其它相关⽂章!。
- 1、下载文档前请自行甄别文档内容的完整性,平台不提供额外的编辑、内容补充、找答案等附加服务。
- 2、"仅部分预览"的文档,不可在线预览部分如存在完整性等问题,可反馈申请退款(可完整预览的文档不适用该条件!)。
- 3、如文档侵犯您的权益,请联系客服反馈,我们会尽快为您处理(人工客服工作时间:9:00-18:30)。
HttpClient 学习笔记笔记一:1、HttpClient的功能1.基于标准,纯正java,实现了http1.0和1.1。
2.在一个可扩展的OO框架内,实现了HTTP的全部方法(GET, POST,PUT, DELETE, HEAD, OPTIONS, and TRACE)3.支持HTTPS(ssl上的HTTP)的加密操作4.透明地穿过HTTP代理建立连接5.通过CONNECT方法,利用通过建立穿过HTTP代理的HTTPS连接6.利用本地Java socket,透明地穿过SOCKS(版本5和4)代理建立连接7.支持利用Basic、Digest和NTLM加密的认证8.支持用于上传大文件的Multi-Part表单POST方法9.插件式安全socket实现,易于使用第三方的解决方案10.连接管理,支持多线程应用,支持设定单个主机总连接和最高连接数量,自动检测和关闭失效连接11.直接将请求信息流送到服务器的端口12.直接读取从服务器的端口送出的应答信息13.支持HTTP/1.0中用KeepAlive和HTTP/1.1中用persistance设置的持久连接14.直接访问由服务器送出的应答代码和头部信息15.可设置连接超时时间16.17.HttpMethods 实现Command Pattern,以允许并行请求或高效连接复用18.遵循the Apache Software License协议,源码免费可得2、预备工作对jre1.3.*,如果要HttpClient支持https,则需要下载并安装jsse和jce.安装的步骤如下:1)下载jsse和jce.2)检查CLASSPATH中没有与jsse和jce相关的jar包3)将US_export_policy.jar、local_policy.jar、jsse.jar、jnet.jar、jce1_2_x.jar、sunjce_provider.jar、jcert.jar复制到目录:UNIX:$JDK_HOME/jre/lib/extWindows:%JDK_HOME%\jre\lib\ext4)修改下述目录下的java.security文件。
UNIX:$JDK_HOME/jre/lib/security/Windows:%JDK_HOME%\jre\lib\security\5)将## List of providers and their preference orders:#security.provider.1=sun.security.provider.Sunsecurity.provider.2=com.sun.rsajca.Provider改为:## List of providers and their preference orders:#security.provider.1=com.sun.crypto.provider.SunJCEsecurity.provider.2=sun.security.provider.Sunsecurity.provider.3=com.sun.rsajca.Providersecurity.provider.4=.ssl.internal.ssl.ProviderHttpClient还要求安装commons-logging,下面跟httpclient一块安装。
3、取得源码cvs -d :pserver:anoncvs@:/home/cvspublic loginpassword: anoncvscvs -d :pserver:anoncvs@:/home/cvspublic checkout jakarta-commons/loggingcvs -d :pserver:anoncvs@:/home/cvspublic checkout jakarta-commons/httpclient编译:cd jakarta-commons/loggingant distcp dis/*.jar ../httpclient/lib/cd ../httpclientant dist4、使用HttpClient编程的基本步聚1.创建HttpClient 的一个实例.2.创建某个方法(DeleteMethod,EntityEnclosingMethod,ExpectContinueMethod,GetMethod,HeadMethod,MultipartPostMethod,OptionsMethod,PostMethod,PutMethod,TraceMethod)的一个实例,一般可用要目标URL为参数。
3.让HttpClient 执行这个方法.4.读取应答信息.5.释放连接.6.处理应答.在执行方法的过程中,有两种异常,一种是HttpRecoverableException,表示偶然性错误发生,一般再试可能成功,另一种是IOException,严重错误。
这儿有这个教程中的一个例程,可以下载。
5、认证HttpClient三种不同的认证方案: Basic, Digest and NTLM. 这些方案可用于服务器或代理对客户端的认证,简称服务器认证或代理认证。
1)服务器认证(Server Authentication)HttpClient处理服务器认证几乎是透明的,仅需要开发人员提供登录信息(login credentials)。
登录信息保存在HttpState类的实例中,可以通过setCredentials(String realm, Credentials cred)和getCredentials(String realm)来获取或设置。
注意,设定对非特定站点访问所需要的登录信息,将realm参数置为null. HttpClient内建的自动认证,可以通过HttpMethod 类的setDoAuthentication(boolean doAuthentication)方法关闭,而且这次关闭只影响HttpMethod当前的实例。
抢先认证(Preemptive Authentication)可以通过下述方法打开.client.getState().setAuthenticationPreemptive(true);在这种模式时,HttpClient会主动将basic认证应答信息传给服务器,即使在某种情况下服务器可能返回认证失败的应答,这样做主要是为了减少连接的建立。
为使每个新建的HttpState实例都实行抢先认证,可以如下设置系统属性。
setSystemProperty(Authenticator.PREEMPTIVE_PROPERTY, "true");Httpclient实现的抢先认证遵循rfc2617.2)代理认证(proxy authentication)除了登录信息需单独存放以外,代理认证与服务器认证几乎一致。
用setProxyCredentials(String realm, Credentials cred)和getProxyCredentials(String realm)设、取登录信息。
3)认证方案(authentication schemes)Basic是HTTP中规定最早的也是最兼容(?)的方案,遗憾的是也是最不安全的一个方案,因为它以明码传送用户名和密码。
它要求一个UsernamePasswordCredentials实例,可以指定服务器端的访问空间或采用默认的登录信息。
Digest是在HTTP1.1中增加的一个方案,虽然不如Basic得到的软件支持多,但还是有广泛的使用。
Digest方案比Basic方案安全得多,因它根本就不通过网络传送实际的密码,传送的是利用这个密码对从服务器传来的一个随机数(nonce)的加密串。
它要求一个UsernamePasswordCredentials实例,可以指定服务器端的访问空间或采用默认的登录信息。
NTLM这是HttpClient支持的最复杂的认证协议。
它M$设计的一个私有协议,没有公开的规范说明。
一开始由于设计的缺陷,NTLM的安全性比Digest差,后来经过一个ServicePack 补丁后,安全性则比较Digest高。
NTLM需要一个NTCredentials实例. 注意,由于NTLM 不使用访问空间(realms)的概念,HttpClient利用服务器的域名作访问空间的名字。
还需要注意,提供给NTCredentials的用户名,不要用域名的前缀- 如: "adrian" 是正确的,而"DOMAIN\adrian" 则是错的.NTLM认证的工作机制与basic和digest有很大的差别。
这些差别一般由HttpClient处理,但理解这些差别有助避免在使用NTLM认证时出现错误。
1.从HttpClientAPI的角度来看,NTLM与其它认证方式一样的工作,差别是需要提供'NTCredentials'实例而不是'UsernamePasswordCredentials'(其实,前者只是扩展了后者)2.对NTLM认证,访问空间是连接到的机器的域名,这对多域名主机会有一些麻烦.只有HttpClient连接中指定的域名才是认证用的域名。
建议将realm设为null以使用默认的设置。
3.NTLM只是认证了一个连接而不是一请求,所以每当一个新的连接建立就要进行一次认证,且在认证的过程中保持连接是非常重要的。
因此,NTLM不能同时用于代理认证和服务器认证,也不能用于http1.0连接或服务器不支持持久连接的情况。
6、重定向由于技术限制,以及为保证2.0发布版API的稳定,HttpClient还不能自动处重定向,但对重定向到同一主机、同一端口且采用同一协议的情况HttpClient可以支持。
不能自动的处理的情况,包括需要人工交互的情况,或超出httpclient的能力。
当服务器重定向指令指到不同的主机时,HttpClient只是简单地将重定向状态码作为应答状态。
所有的300到399(包含两端)的返回码,都表示是重定向应答。
常见的有:1.301 永久移动. HttpStatus.SC_MOVED_PERMANENTL Y2.302 临时移动. HttpStatus.SC_MOVED_TEMPORARILY3.303 See Other. HttpStatus.SC_SEE_OTHER4.307 临时重定向. HttpStatus.SC_TEMPORARY_REDIRECT当收到简单的重定向时,程序应从HttpMethod对象中抽取新的URL并将其下载。
