Android 中的ListView选中项的背景颜色怎么设置
Android中activity背景色的设置

Android中activity背景⾊的设置主题Theme就是⽤来设置界⾯UI风格,可以设置整个应⽤或者某个活动Activity的界⾯风格。
在Android SDK中内置了下⾯的Theme,可以按标题栏Title Bar和状态栏Status Bar是否可见来分类:这些主题可以应⽤到整个应⽤Application范围或者某个活动Activity范围中。
应⽤Application范围:在AndroidManifest.xml中的application节点中设置theme属性,主题theme应⽤到整个应⽤程序中。
活动Activity范围:使⽤java代码或者在AndroidManifest.xml中对活动Activity的主题进⾏设置,主题仅应⽤到当前活动中。
在AndroidMainifest.xml设置⽅法:(XML中代码间不能有空格,注意中英⽂引号)使⽤java代码进⾏设置,在当前活动Activity的onCreate中进⾏设置:[java] view plaincopyprint?@Overridepublic void onCreate(Bundle savedInstanceState){super.onCreate(savedInstanceState);setTheme(android.R.style.Theme_Translucent_NoTitleBar);setContentView(yout.main);}背景颜⾊还可以在布局XML中设置:<LinearLayout xmlns:android="/apk/res/android"android:orientation="vertical" android:layout_width="fill_parent"android:layout_height="fill_parent"android:background="#ffffff">直接设置Activity的背景颜⾊⼀般我们都是使⽤布局⽂件直接加载到Activity,从⽽覆盖了Activity的颜⾊。
ListView 控件属性与方法

ListView 控件可以用来显示各项带图标的列表,也可以用来显示带有子项的列表,Windows操作系统的资源管理器中文件夹窗口就是最好的应用例子。
如下图一所示就是“我的电脑”中使用L i s t V i e w控件来显示本机所有盘符:说明:可以通过“查看”菜单来观察其它三种显示方式,这些都是ListView的视图模式之一。
下面我们就先来了解下ListView控件的基本应用,在中的工具箱中,ListView 控件的图标如下图二所示:一、View 属性ListView 控件作为一个可以显示图标或者子项的列表控件,它最重要的属性就是View 属性,该属性决定了以哪种视图模式显示控件的项,这四种视图模式分别如下:1、LartIcon:大图标视图模式,在项的文本旁显示大的图标,在控件宽度足够的情况下,项是如图一中的盘符一样优先以平行排列的,排列不完的则自动换行显示在新行中。
2、SmallIcon:小图标视图模式,与大图标模式一样,但是显示的是小的图标。
3、List:列表视图模式,显示小图标,但是项是垂直排列的,只显示单列。
4、Details:详细资料视图模式,是最丰富的选项,它不但允许您查看项,还允许您查看为各项指定的任何子项。
各项在网格中显示,它们垂直排列且其子项会显示在列中(带有列标头)。
对应地,只有在Details 视图模式中起作用的控件属性为:GridLines 和FullRowSelect,GridLines 属性指示在包含控件中项及其子项的行和列之间是否显示网格线。
FullRowSelect 属性指示单击某项是否选择其所有子项(即整行选中),如下图三所示便是GridLines 和FullRowSelect 属性都设置为True的情况:ListView 控件中还有一个HeaderStyle 属性也是在Details 视图模式下才起作用,HeaderStyle 属性指示列标头样式,它有下面三种显示样式:1、Clickable:列标头的作用类似于按钮,单击时可以执行操作(例如排序)。
Android实现修改状态栏背景、字体和图标颜色的方法

Android实现修改状态栏背景、字体和图标颜⾊的⽅法前⾔:Android开发,对于状态栏的修改,实在是不友好,没什么api可以⽤,不像ios那么⽅便.但是ui⼜喜欢只搞ios⼀套.没办法.各种翻源码,写反射.真的蛋疼.需求场景:当toolbar及状态栏需要为⽩⾊或浅⾊时(如简书),状态栏由于⽤的Light风格Theme,字体,图标也都是⽩⾊,会看不清.如果改变成⿊⾊就很和谐了.⼀.修改状态栏颜⾊:改变状态栏颜⾊,可以看看这篇⽂章.传送门:传送门实现的效果:这种⽅法实现的状态栏变⾊,没有⿊⾊背景.使⽤全屏模式实现的效果如下(QQ的效果):很明显的⿊⾊背景.我⽤的⼿机是华为,系统7.0⼆.修改状态栏字体:通⽤⼯具类:public class StatusBarUtil {/*** 设置状态栏⿊⾊字体图标,* 适配4.4以上版本MIUIV、Flyme和6.0以上版本其他Android** @return 1:MIUUI 2:Flyme 3:android6.0*/public static int getStatusBarLightMode(Window window) {int result = 0;if (Build.VERSION.SDK_INT >= Build.VERSION_CODES.KITKAT) {if (MIUISetStatusBarLightMode(window, true)) {result = 1;} else if (FlymeSetStatusBarLightMode(window, true)) {result = 2;} else if (Build.VERSION.SDK_INT >= Build.VERSION_CODES.M) {window.getDecorView().setSystemUiVisibility(View.SYSTEM_UI_FLAG_LIGHT_STATUS_BAR);result = 3;} else {//5.0}}return result;}/*** 已知系统类型时,设置状态栏⿊⾊字体图标。
setbackgroundcolor用法

setbackgroundcolor用法setBackgroundColor是Android开发中常用的方法之一,它可以实现对View或布局的背景颜色进行设置。
具体使用步骤如下:1.找到需要设置背景颜色的View或布局。
在Android开发中,每个View或布局都有对应的ID,通过findViewById方法可以找到这个ID。
假设我们想要设置一个Activity 的背景颜色,可以使用以下代码:LinearLayout ll = findViewById(R.id.ll_layout);其中R.id.ll_layout是我们在xml文件中设置的布局ID。
如果想要设置的是整个Activity的背景颜色,可以使用以下代码:View view = getWindow().getDecorView();这里的getWindow()获取的是当前Activity的Window对象,而getDecorView()则获取的是这个Window的根视图。
2.调用setBackgroundColor方法进行设置。
接下来,我们就可以使用setBackgroundColor方法对View或布局进行颜色设置。
setBackgroundColor有多种使用方式:2.1. 设置为颜色值。
setBackgroundColor方法的参数可以是一个颜色值,例如:ll.setBackgroundColor(Color.parseColor("#FF4081"));这条代码的作用是将ll这个布局的背景颜色设置为深粉色。
2.2. 设置为资源文件。
Android开发中,我们也可以将颜色值写在资源文件(例如values/colors.xml)中进行管理,以方便复用。
在这种情况下,我们可以使用如下代码:ll.setBackgroundResource(R.color.colorPrimary);这里的R.color.colorPrimary就是我们在colors.xml文件中定义的一个颜色值。
androidstudiolistview的用法

androidstudiolistview的用法1. 创建ListView控件要使用ListView,首先需要在布局文件中创建一个ListView控件。
在XML文件中,添加以下代码:```xml<ListView/>```2.创建数据源ListView的数据源是一个数组或集合,其中每个元素都对应列表中的一个数据项。
通常情况下,我们会将数据存储在一个数组或集合中。
```javaString[] data = {"Item 1", "Item 2", "Item 3"};```3.创建适配器适配器是ListView的关键组件,它负责将数据源中的数据与列表项的布局进行绑定。
我们可以使用BaseAdapter或ArrayAdapter来创建适配器。
```javaArrayAdapter<String> adapter = new ArrayAdapter<String>(this, yout.simple_list_item_1, data);```4.设置适配器将适配器设置给ListView:```javaListView listView = findViewById(R.id.list);listView.setAdapter(adapter);```5.设置列表项点击事件我们可以为ListView的每个列表项设置点击事件。
只需要为ListView设置OnItemClickListener即可。
```javalistView.setOnItemClickListener(newAdapterView.OnItemClickListenepublic void onItemClick(AdapterView<?> parent, View view,int position, long id)//处理点击事件}});```6.自定义列表项布局如果想要自定义列表项的布局,可以创建一个自定义的布局文件,并在适配器中指定该布局。
Android开发中颜色的自定义方法
欢迎登录清源教育官方网站查看更多视频教程Android开发中颜色的自定义方法1、使用Col or类的常量,如:int col or = Col or.BLUE; // 创建一个蓝色是使用Android提供的颜色int col or = Col or.RED;int col or = Col or.WHITE;2、通过ARGB构建,如:int col or = Col or.argb ( 127, 255, 0, 255 ); // 半透明的紫色其中第一个参数表示透明,0表示完全透明,255(ff)表示完全不透明;后三位分别代表RGB的值了。
3、使用XML资源文件来定义颜色该方法扩展性好,便于修改和共享,如在values目录下创建一个col or.xml:<?xml version=”1.0”encoding=”utf -8”><resources><col or name=”mycol or”> #7fff00ff</col or></resources>定义了一个名为mycol or的颜色,在别的地方就可以通过引用mycol or来获取该颜色值,如textView 定义中:android:textCol or= "@drawabl e/mycol or"Java代码中可以使用ResourceManager类中的getCol or来获取该颜色:int col or = getResources().getCol or(R.col or.mycol or);这与第二种方法得到的值是一样的,getResources()方法返回当前活动Activity的ResourceManager类实例。
说明:XML定义方法接受6位和8位两种表示法,而且开头必须是#,8位定义时前两位表示透明。
4、直接定义色值,如:int col or = 0xff00ff00;这种方法必须使用0x开头,而不是用我们常用的#。
pbsetitembackground用法

pbsetitembackground用法背景颜色是指列表项或者其他组件的背景的颜色。
在编程中,可以使用不同的方法来设置背景色,其中之一就是使用pb setitembackground 方法。
这个方法通常会接受一个颜色值作为参数,用来指定背景的颜色。
使用pb setitembackground方法的步骤如下:1. 首先,确保你已经创建了一个列表或者其他的组件,该组件包含多个列表项或者子项。
这个组件可以是一个ListView或者RecyclerView 等。
2.然后,找到需要设置背景色的列表项或者子项。
这个可以通过索引值、ID或者其他的方法来实现。
3. 使用pb setitembackground方法,将所需的颜色值作为参数传递给该方法。
这个颜色值通常是一个整数值,可以通过调用相关的API方法来获取。
4.最后,刷新或者重新绘制该组件,以便显示新设置的背景色。
使用pb setitembackground方法可以实现多种不同的效果,比如在列表中交替显示不同颜色的背景、根据不同的条件设置不同的背景色等。
具体的用法取决于具体的编程语言和所使用的编程框架。
以下是使用pb setitembackground方法的一个示例:```// 创建一个ListView组件ListView listView = new ListView(;// 创建一个适配器,并设置给ListViewArrayAdapter<String> adapter = newArrayAdapter<String>(context,yout.simple_list_item_1, data);listView.setAdapter(adapter);//设置列表项的背景色for (int i = 0; i < listView.getCount(; i++)if (i % 2 == 0)//偶数项设置为蓝色listView.setItemBackground(Color.BLUE);} else//奇数项设置为灰色listView.setItemBackground(Color.GRAY);}// 刷新ListViewadapter.notifyDataSetChanged(;```在这个示例中,首先创建了一个ListView组件,并设置了一个适配器用于显示数据。
Android ListView _____在点击ListView的Item时背景变色 点击释放时背景变为无色且跳转别的Activity
lv.setBackgroundColor(Color.BLUE);
}
else if(event.getAction() == MotionEvent.ACTION_UP){
分享到:
推广链接 魔方舞台桁架做最好的背景架电话:13048010190
魔方演出器材主销背景架 玻璃舞台 折叠背景架 移动背景架 升降背景架 演出背景架 tr.. 用户名:
密码码:
记住我的登录状态ctivity(intent);
}
return true;
}
游戏王iduel0回答5求五迷、、五月天粉丝加我吧、401140971、互动哦、、1回答佛山恒娥不锈钢制品厂的产品怎样的?质量过关吗?更多等待您来回答的问题>>其他回答
共3条
2011-7-25 17:31 zoey19900624 | 二级
public void onItemClick() {
Android ListView .....在点击ListView的Item时背景变色 点击释放时背最好的背景架..
魔方演出器材主销背景架 玻璃舞台 折叠背景架 移动背景架 升降背景架 演g3) {
Intent intent=new Intent(Test01.this,Test02.class);
Test01.this.startActivity(intent);
});
这样就能进行跳转了 赞同
0
} 追问onitemclick 怎么知道是ACTION_DOWN 还是ACTION_UP?
赞同
android自定义radiobutton样式文字颜色随选中状态而改变

android⾃定义radiobutton样式⽂字颜⾊随选中状态⽽改变主要是写⼀个 color selector在res/建⼀个⽂件夹取名colorres/color/color_radiobutton.xml1<selector xmlns:android="/apk/res/android">2<item android:state_checked="true" android:color="@color/color_text_selected"/>3<!-- not selected -->4<item android:color="@color/color_text_normal"/>5</selector>程序使⽤:1 //layout/main.xml2<?xml version="1.0" encoding="utf-8"?>3<LinearLayout xmlns:android="/apk/res/android"4 android:layout_width="fill_parent"5 android:layout_height="fill_parent"6 android:orientation="vertical">7<RadioGroup8android:id="@+id/radiogroup_personal_condition"9 android:layout_width="wrap_content"10 android:layout_height="wrap_content"11 android:orientation="horizontal">12<RadioButton13android:id="@+id/radiobutton_1"14 android:layout_width="wrap_content"15 android:layout_height="wrap_content"16 android:background="@drawable/selector_radio"17 android:button="@null"18 android:checked="true"19 android:gravity="center"20 android:text="⽬录"21 android:textColor="@color/color_radiobutton"22 android:textSize="@dimen/font_size"23 android:textStyle="bold"/>24<RadioButton25android:id="@+id/radiobutton_2"26 android:layout_width="wrap_content"27 android:layout_height="wrap_content"28 android:background="@drawable/selector_radio"29 android:button="@null"30 android:gravity="center"31 android:text="书签"32 android:textColor="@color/color_radiobutton"33 android:textSize="@dimen/font_size"34 android:textStyle="bold"/>35</RadioGroup>36</LinearLayout>附录,点击radio改变radio图⽚1<?xml version="1.0" encoding="utf-8"?>2<selector xmlns:android="/apk/res/android">3<item android:state_checked="true" android:drawable="@drawable/ic_radio_checkon"/>4<!-- not selected -->5<item android:drawable="@drawable/ic_radio_checkoff"/>67</selector>。
listview 方法

listview 方法ListView是Android开发中常用的控件之一,它可以展示一系列的数据,并且支持滚动。
在这篇文章中,我们将会介绍ListView 的一些常用方法。
1. setAdapter(Adapter adapter)这个方法是ListView最为重要的方法之一。
它用于设置ListView的适配器,适配器用来为ListView提供数据源。
2.setOnItemClickListener(AdapterView.OnItemClickListener listener)这个方法用于设置ListView的点击事件监听器。
3.setOnItemLongClickListener(AdapterView.OnItemLongClickListe ner listener)这个方法用于设置ListView的长按事件监听器。
4. setDivider(Drawable divider)这个方法用于设置ListView的分割线,分割线可以是一个Drawable对象。
5. setDividerHeight(int height)这个方法用于设置ListView的分割线的高度。
6. setSelector(Drawable selector)这个方法用于设置ListView的选中项背景,选中项背景可以是一个Drawable对象。
7. smoothScrollToPosition(int position)这个方法可以平滑地将ListView滚动到指定的位置。
8. setChoiceMode(int choiceMode)这个方法用于设置ListView的选择模式,选择模式可以是单选模式或多选模式。
9. getCheckedItemPosition()这个方法返回当前ListView中被选中的项的位置。
10. getFirstVisiblePosition()这个方法返回当前ListView中第一个可见项的位置。
listview控件使用的基本流程

listview控件使用的基本流程
1. 简介
ListView是一种常用的Android界面控件,用于显示一系列垂直滚动的列表项。
在Android应用中,我们经常会使用ListView来展示一些数据集合,如联系人列表、新闻列表等。
2. ListView的基本属性
在使用ListView之前,我们首先需要了解它的一些基本属性:
•android:id:ListView的唯一标识符。
•android:layout_width:ListView的宽度属性,可以使用match_parent(填充父容器)或具体数值(如200dp)进行设置。
•android:layout_height:ListView的高度属性,同样可以使用match_parent或具体数值进行设置。
•android:divider:分隔线的样式属性,可以设置为@null表示不显示分隔线,也可以设置为具体颜色的资源ID。
•android:dividerHeight:分隔线的高度属性,可以设置具体数值或wrap_content。
•android:listSelector:列表项被选中时的背景样式属性。
3. 使用ListView的基本步骤
使用ListView控件的基本步骤如下:
1.在XML布局文件中添加ListView控件。
```xml <ListView android:id=。
textview.setbackgroundcolor 用法

textview.setbackgroundcolor 用法"TextView.setBackgroundColor" 方法是用于设置TextView 的背景颜色。
在Android 应用程序开发中,TextView 是最常用的用于显示文本内容的界面元素之一。
通过设置背景颜色,可以使TextView 的外观更加美观,提升用户体验。
下面,我将一步一步回答有关"TextView.setBackgroundColor" 方法的用法,以帮助您更好地了解和使用该方法。
第一步:引入TextView组件在您的Android 项目中,打开相应的布局文件或活动文件,并确保已经引入了TextView 组件。
可以使用以下代码实现:xml<TextViewandroid:id="+id/myTextView"android:layout_width="wrap_content"android:layout_height="wrap_content"android:text="Hello World" />请注意,我们为TextView 设置了一个唯一的ID(在此示例中为"myTextView"),这将有助于在Java 代码中找到并操作此视图。
第二步:在Java代码中找到TextView对象打开与TextView 组件相关的Java 文件,并通过以下代码找到TextView 对象:javaTextView myTextView = findViewById(R.id.myTextView);这里我们使用了findViewById 方法来获取TextView 对象。
请注意,这里使用的ID("myTextView")必须与布局文件中TextView 的ID 相匹配。
setstylesheet用法 背景色

setstylesheet用法背景色
setStyleSheet是Qt框架中的一个方法,用于设置部件的样式表。
通过样式表可以修改部件的外观和布局,非常灵活。
setStyleSheet方法的用法如下:
widget.setStyleSheet("样式表字符串")
其中,widget表示要设置样式表的部件对象,样式表字符串是一
个类似CSS的语法,用于描述部件的外观和布局。
在样式表中,可以设置各种样式属性,包括背景色、字体、边框
等等。
对于设置背景色,可以使用background-color属性。
详细用法如下:
widget.setStyleSheet("background-color: red")
上述代码将设置widget的背景颜色为红色。
拓展:
除了setStyleSheet方法,还可以使用QPalette类来设置部件的背景色,QPalette提供了更详细的对颜色进行设置的方法。
可以通过QPalette的setBrush方法来设置背景色。
示例代码如下:
palette = QPalette()
palette.setBrush(QPalette.Background, QBrush(QColor(255, 0, 0))) #设置背景颜色为红色
widget.setPalette(palette)
通过以上代码可以实现与setStyleSheet相同的效果,将widget 的背景色设置为红色。
不过相比于setStyleSheet,QPalette提供了更多的颜色设置选项,可以更加细致和精确地设置部件的颜色。
listview控件的基本用法access
listview控件的基本用法access关于ListView控件的基本使用,本文将一步一步回答这个问题。
一、ListView控件的基本概念ListView是一种常见的控件,用于显示列表数据。
它可以以列表的形式展示数据,并且支持用户的滑动操作,以便查看更多的数据。
二、ListView控件的常见属性1. android:id:设置ListView的唯一标识符,用于在代码中找到该控件。
2. android:layout_width和android:layout_height:设置ListView的宽度和高度。
3. android:divider:设置列表项之间的分割线,可以是颜色、图片或者绘制的形状。
4. android:dividerHeight:设置列表项之间的分割线的高度。
5. android:listSelector:设置列表项的选中效果,可以是颜色、图片或者绘制的形状。
三、ListView控件的布局在XML布局中,可以通过以下代码创建一个简单的ListView控件:xml<ListViewandroid:id="@+id/listView"android:layout_width="match_parent"android:layout_height="match_parent" />注意:要在代码中操作ListView控件,需要给它一个唯一的id,以便在后续的代码中找到它。
四、ListView控件的数据源在ListView中显示数据需要一个数据源,常用的数据源有数组或者集合。
可以通过以下代码将数组作为ListView的数据源:javaString[] data = {"item1", "item2", "item3"};ArrayAdapter<String> adapter = new ArrayAdapter<String>(this, yout.simple_list_item_1, data);ListView listView = findViewById(R.id.listView);listView.setAdapter(adapter);在以上代码中,yout.simple_list_item_1是一个内置的布局文件,用于显示一个文本的列表项。
android实现下拉框(spinner),自己定义大小颜色背景位置,去掉默认样式黑边
android实现下拉框(spinner),⾃⼰定义⼤⼩颜⾊背景位置,去掉默认样式⿊边1. 实现最简单的spinnerxml⽂件,有⼀个TextView,⼀个Spinner:<RelativeLayout xmlns:android="/apk/res/android"xmlns:tools="/tools" android:layout_width="match_parent"android:layout_height="match_parent" android:paddingLeft="@dimen/activity_horizontal_margin"android:paddingRight="@dimen/activity_horizontal_margin"android:paddingTop="@dimen/activity_vertical_margin"android:paddingBottom="@dimen/activity_vertical_margin" tools:context=".MainActivity"><TextView android:text="@string/hello_world" android:layout_width="wrap_content"android:layout_height="wrap_content"android:id="@+id/textView" /><Spinnerandroid:layout_width="match_parent"android:layout_height="wrap_content"android:id="@+id/spinner"android:layout_below="@+id/textView"android:layout_alignParentLeft="true"android:layout_alignParentStart="true"android:layout_marginTop="50dp" /></RelativeLayout>.java⽂件public class MainActivity extends ActionBarActivity {private static final String[] name={"刘备","关⽻","张飞","曹操","⼩乔"};private TextView text ;private Spinner spinner;private ArrayAdapter<String> adapter;@Overrideprotected void onCreate(Bundle savedInstanceState) {super.onCreate(savedInstanceState);setContentView(yout.activity_main);text = (TextView) findViewById(R.id.textView);spinner = (Spinner) findViewById(R.id.spinner);//将可选内容与ArrayAdapter连接起来,simple_spinner_item是android系统⾃带样式adapter = new ArrayAdapter<String>(this,yout.simple_spinner_item,name);//设置下拉列表的风格,simple_spinner_dropdown_item是android系统⾃带的样式,等会⾃⼰定义改动adapter.setDropDownViewResource(yout.simple_spinner_dropdown_item);//将adapter 加⼊到spinner中spinner.setAdapter(adapter);//加⼊事件Spinner事件监听spinner.setOnItemSelectedListener(new SpinnerSelectedListener());}//使⽤数组形式操作class SpinnerSelectedListener implements AdapterView.OnItemSelectedListener {public void onItemSelected(AdapterView<?> arg0, View arg1, int arg2,long arg3) {text.setText("我的名字是:"+name[arg2]);}public void onNothingSelected(AdapterView<?> arg0) {}}执⾏效果:—————————————————————使⽤xml⽂件作为数据源创建adapter:<?xml version="1.0" encoding="utf-8"?><resources><string-array name="songs"><item>没有⼈</item><item>我的快乐时代</item><item>黄⾦时代</item><item>习惯失恋</item><item>你来⾃哪颗星</item></string-array></resources>.java⽂件:public class SpinnerActivity extends Activity {private TextView text;private Spinner spinner;private ArrayAdapter adapter;@Overrideprotected void onCreate(Bundle savedInstanceState) {// TODO Auto-generated method stubsuper.onCreate(savedInstanceState);setContentView(yout.spinner);spinner = (Spinner) findViewById(R.id.spinner);text = (TextView) findViewById(R.id.textView);//将可选内容与ArrayAdapter连接起来adapter = ArrayAdapter.createFromResource(this, R.array.songs, yout.simple_spinner_item); //设置下拉列表的风格adapter.setDropDownViewResource(yout.simple_spinner_dropdown_item);//将adapter2 加⼊到spinner中spinner.setAdapter(adapter);//加⼊事件Spinner事件监听spinner.setOnItemSelectedListener(new SpinnerXMLSelectedListener());}//使⽤XML形式操作class SpinnerXMLSelectedListener implements OnItemSelectedListener{public void onItemSelected(AdapterView<?> arg0, View arg1, int position,long arg3) {text.setText("你使⽤什么样的⼿机:"+adapter.getItem(position));}public void onNothingSelected(AdapterView<?> arg0) {}}}spinner有三个属性能够记⼀下:android:spinnerMode="dropdown"android:dropDownVerticalOffset="-50dp"android:dropDownHorizontalOffset="20dp"android:popupBackground="#f0000000"spinnerMode=dropdown时,为下拉模式spinnerMode=dialog时,会在界⾯中间弹出android:popupBackground=”#f0000000”,能够去除spinner的默认⿊边dropDownVerticalOffset和dropDownHorizontalOffset都是改变下拉框位置的2.⾃⼰定义spinner样式改变字体颜⾊、⼤⼩和背景:新建⼀个xml布局⽂件,命名为spinner_item.xml:<?xml version="1.0" encoding="utf-8"?><TextViewxmlns:android="/apk/res/android"android:layout_width="match_parent"android:layout_height="wrap_content"android:paddingRight="5dp"android:textColor="#f77718"android:gravity="left"android:textSize="15sp"android:padding="10dp"android:singleLine="true"android:text="New Text"android:id="@+id/textView32" />再创建⼀个下拉框样式布局的xml⽂件。
Android ListView保持选中项高亮
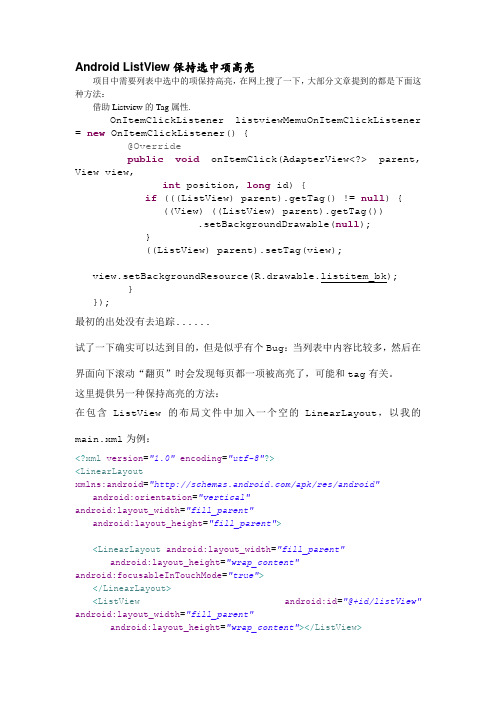
Android ListView保持选中项高亮项目中需要列表中选中的项保持高亮,在网上搜了一下,大部分文章提到的都是下面这种方法:借助Listview的Tag属性.OnItemClickListener listviewMemuOnItemClickListener = new OnItemClickListener() {@Overridepublic void onItemClick(AdapterView<?> parent, View view,int position, long id) {if (((ListView) parent).getTag() != null) {((View) ((ListView) parent).getTag()).setBackgroundDrawable(null);}((ListView) parent).setTag(view);view.setBackgroundResource(R.drawable.listitem_bk);}});最初的出处没有去追踪......试了一下确实可以达到目的,但是似乎有个Bug:当列表中内容比较多,然后在界面向下滚动“翻页”时会发现每页都一项被高亮了,可能和tag有关。
这里提供另一种保持高亮的方法:在包含ListView的布局文件中加入一个空的LinearLayout,以我的main.xml为例:<?xml version="1.0"encoding="utf-8"?><LinearLayoutxmlns:android="/apk/res/android"android:orientation="vertical"android:layout_width="fill_parent"android:layout_height="fill_parent"><LinearLayout android:layout_width="fill_parent"android:layout_height="wrap_content"android:focusableInTouchMode="true"></LinearLayout><ListView android:id="@+id/listView" android:layout_width="fill_parent"android:layout_height="wrap_content"></ListView></LinearLayout>然后在onItemClick中加入listView.clearFocus();listView.requestFocusFromTouch();其中listView是你用findViewById获得的ListView这样就可以了,具体原理未知。
Android开发实现按钮点击切换背景并修改文字颜色的方法
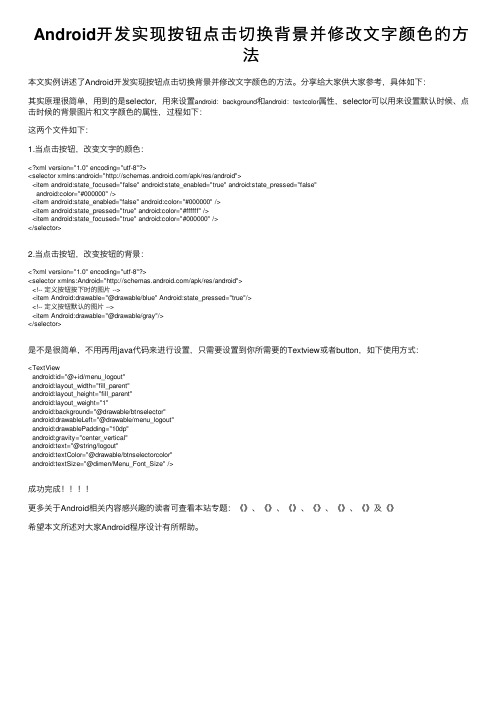
Android开发实现按钮点击切换背景并修改⽂字颜⾊的⽅法本⽂实例讲述了Android开发实现按钮点击切换背景并修改⽂字颜⾊的⽅法。
分享给⼤家供⼤家参考,具体如下:其实原理很简单,⽤到的是selector,⽤来设置android:background和android:textcolor属性,selector可以⽤来设置默认时候、点击时候的背景图⽚和⽂字颜⾊的属性,过程如下:这两个⽂件如下:1.当点击按钮,改变⽂字的颜⾊:<?xml version="1.0" encoding="utf-8"?><selector xmlns:android="/apk/res/android"><item android:state_focused="false" android:state_enabled="true" android:state_pressed="false"android:color="#000000" /><item android:state_enabled="false" android:color="#000000" /><item android:state_pressed="true" android:color="#ffffff" /><item android:state_focused="true" android:color="#000000" /></selector>2.当点击按钮,改变按钮的背景:<?xml version="1.0" encoding="utf-8"?><selector xmlns:Android="/apk/res/android"><!-- 定义按钮按下时的图⽚ --><item Android:drawable="@drawable/blue" Android:state_pressed="true"/><!-- 定义按钮默认的图⽚ --><item Android:drawable="@drawable/gray"/></selector>是不是很简单,不⽤再⽤java代码来进⾏设置,只需要设置到你所需要的Textview或者button,如下使⽤⽅式:<TextViewandroid:id="@+id/menu_logout"android:layout_width="fill_parent"android:layout_height="fill_parent"android:layout_weight="1"android:background="@drawable/btnselector"android:drawableLeft="@drawable/menu_logout"android:drawablePadding="10dp"android:gravity="center_vertical"android:text="@string/logout"android:textColor="@drawable/btnselectorcolor"android:textSize="@dimen/Menu_Font_Size" />成功完成更多关于Android相关内容感兴趣的读者可查看本站专题:《》、《》、《》、《》、《》、《》及《》希望本⽂所述对⼤家Android程序设计有所帮助。
WPFDataGridListView等等改变选中行颜色;以及不变的原因
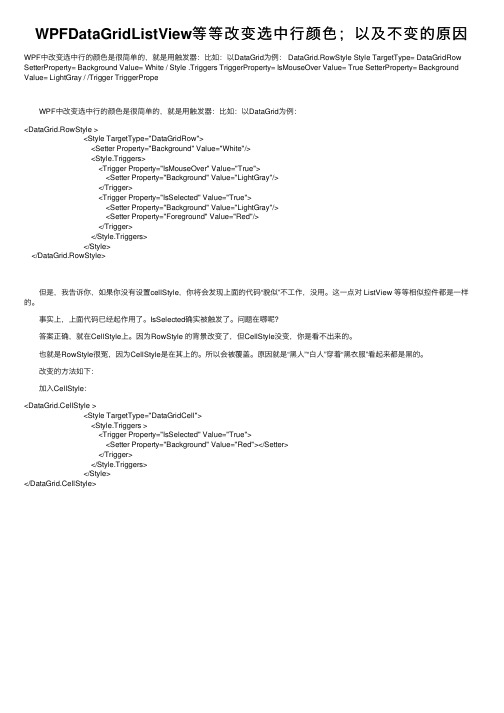
WPFDataGridListView等等改变选中⾏颜⾊;以及不变的原因WPF中改变选中⾏的颜⾊是很简单的,就是⽤触发器:⽐如:以DataGrid为例: DataGrid.RowStyle Style TargetType= DataGridRow SetterProperty= Background Value= White / Style .Triggers TriggerProperty= IsMouseOver Value= True SetterProperty= Background Value= LightGray / /Trigger TriggerPrope WPF中改变选中⾏的颜⾊是很简单的,就是⽤触发器:⽐如:以DataGrid为例:<DataGrid.RowStyle ><Style TargetType="DataGridRow"><Setter Property="Background" Value="White"/><Style.Triggers><Trigger Property="IsMouseOver" Value="True"><Setter Property="Background" Value="LightGray"/></Trigger><Trigger Property="IsSelected" Value="True"><Setter Property="Background" Value="LightGray"/><Setter Property="Foreground" Value="Red"/></Trigger></Style.Triggers></Style></DataGrid.RowStyle> 但是,我告诉你,如果你没有设置cellStyle,你将会发现上⾯的代码“貌似”不⼯作,没⽤。
TreeView控件改变其选中的背景色

TreeView控件改变其选中的背景⾊对于TreeView控件⽽⾔,改变选中节点的背景⾊,有俩种⽅法:1。
利⽤SelectAction属性可以实现,再在其属性中加以配置相应的背景⾊和前景⾊就可以;rootnode.SelectAction = TreeNodeSelectAction.Select可以实现缺点:页⾯会刷新2。
JS实现我要说的就是⽤第⼆种⽅法实现选中以后改变背景⾊,效果图如下:其只要aspx页⾯的JS代码如下:<script language="javascript" type="text/javascript">var tmp_background_val;var tgs;function getNode(evt,flags){evt1 = window.event ? window.event.srcElement : evt.target;//傳過來本次點擊前的的背景顏⾊if (tgs){tgs.style.background= tmp_background_val ;}//考慮到連續點同⼀個對象的情況,就不要改變保留的顏⾊evt1.style.background= '#ddedfd';tmp_background_val=flags;tgs=evt1;}</script>在后台aspx.CS中的Page_Load⽅法中添加如下的语句:TreeView1.Attributes.Add("onclick", "getNode(event,'#0099ff');");即可实现TreeView控件的选中改变背景⾊。
- 1、下载文档前请自行甄别文档内容的完整性,平台不提供额外的编辑、内容补充、找答案等附加服务。
- 2、"仅部分预览"的文档,不可在线预览部分如存在完整性等问题,可反馈申请退款(可完整预览的文档不适用该条件!)。
- 3、如文档侵犯您的权益,请联系客服反馈,我们会尽快为您处理(人工客服工作时间:9:00-18:30)。
Android 中的ListView选中项的背景颜色怎么设置?
android中ListView获得焦点的项默认是黄色的(模拟器上)现在因为需求想要自己定义被选中项的背景能实现吗?
最佳答案
完全可以实现,这用到了Android的Selector(根据组件的状态显示该状态对应的图片,并以此图片作为背景显示)。
把下面的XML文件保存成你自己命名的.xml文件(比如list_bg.xml),注意,这个文件相当于一个背景图片选择器,在系统使用时根据 ListView中的列表项的状态来使用相应的背景图片,什么情况使用什么图片我在下面都进行了说明。
还有,你可以把它看成是一个图片来使用,放于 drawable目录下,配置背景属性
android:background="@drawable/list_bg"就能达到你需要的目的了。
<?xml version="1.0" encoding="utf-8" ?>
<selector xmlns:android="/apk/res/android"> <item android:state_window_focused="false"
android:drawable="@drawable/没有焦点时图片背景" />
<item android:state_focused="true"
android:state_pressed="true" <!--双条件-->
android:drawable="@drawable/非触摸模式下获得焦点并单击时的背景图片" />
<item android:state_focused="false" android:state_pressed="true" android:drawable="@drawable/触摸模式下单击时的背景图片" />
<item android:state_selected="true" android:drawable="@drawable/
选中时的图片背景" />
<item android:state_focused="true" android:drawable="@drawable/获得焦点时的图片背景" />
<item android:drawable="@drawable/silver" /> <!--default color --> </selector>
---------------------------------------------------------------------------------------------------------------
在values下新建一个color.xml<?xml version="1.0" encoding="utf-8"?>
<resources>
<drawable name="darkgray">#808080FF</drawable>
<drawable name="white">#FFFFFFFF</drawable>
<drawable name="silver">#00ffffff</drawable> <!-- 透明色 -->
</resources>
-------------------------------------------------------------------------------------------------------------------------------------------------
main布局文件中的系统 ListView 控件,注意这不是 ListViewItem 控件。
<ListView android:id="@id/android:list"
android:layout_width="fill_parent"
android:layout_height="400dip"
android:drawSelectorOnTop="false"
android:listSelector="@drawable/list_selector_color"/>
<TextView android:id="@id/android:empty"
android:layout_width="wrap_content"
android:layout_height="wrap_content"
android:text="Can not find the file!" />
-------------------------------------------------------------------------------------------------------------------
你可以看下源代码ListView列表项背景的默认实现 :
SDK目录
\platforms\android-xx\data\res\drawable\list_selector_background.xml。
