Oracle Solaris 11 上手指南
Oracle Solaris 11 安装与部署快速参考说明书
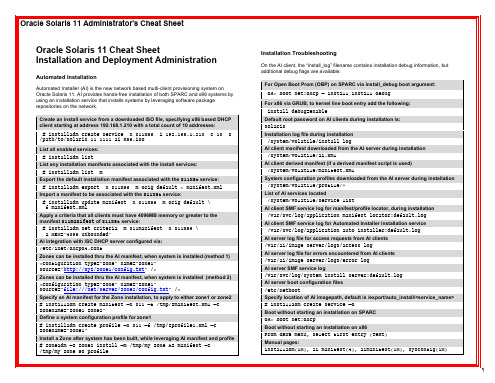
Oracle Solaris 11 Cheat Sheet Installation and Deployment Administration
Automated Installation
Automated Installer (AI) is the new network based multi-client provisioning system on Oracle Solaris 11. AI provides hands-free installation of both SPARC and x86 systems by using an installation service that installs systems by leveraging software package repositories on the network.
# installadm create-profile –n s11service –f sc_profile.xml –c MAC=00:11:22:33:44:55 List what system configuration profiles are associated with a service, and for which criteria (if any) # installadm list –n s11service –p List all non-default system configuration profiles associated with any of the install services:
Default root password on AI clients during installation is: solaris Installation log file during installation
solaris11网络基本操作
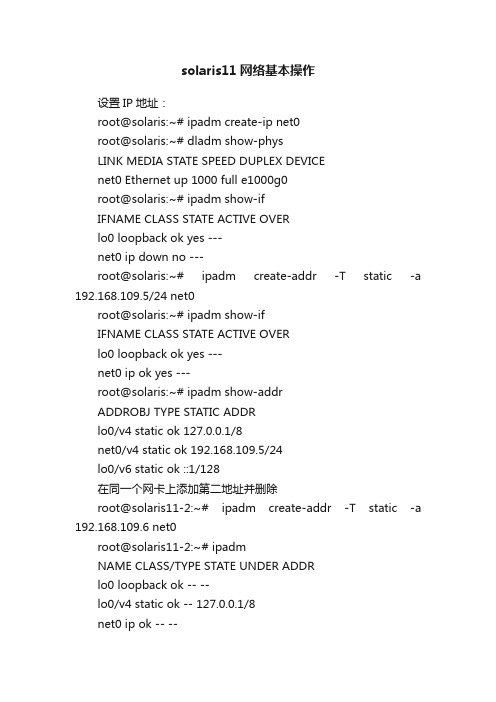
solaris11网络基本操作设置IP地址:root@solaris:~# ipadm create-ip net0root@solaris:~# dladm show-physLINK MEDIA STATE SPEED DUPLEX DEVICEnet0 Ethernet up 1000 full e1000g0root@solaris:~# ipadm show-ifIFNAME CLASS STATE ACTIVE OVERlo0 loopback ok yes ---net0 ip down no ---root@solaris:~# ipadm create-addr -T static -a 192.168.109.5/24 net0root@solaris:~# ipadm show-ifIFNAME CLASS STATE ACTIVE OVERlo0 loopback ok yes ---net0 ip ok yes ---root@solaris:~# ipadm show-addrADDROBJ TYPE STATIC ADDRlo0/v4 static ok 127.0.0.1/8net0/v4 static ok 192.168.109.5/24lo0/v6 static ok ::1/128在同一个网卡上添加第二地址并删除root@solaris11-2:~# ipadm create-addr -T static -a 192.168.109.6 net0root@solaris11-2:~# ipadmNAME CLASS/TYPE STATE UNDER ADDRlo0 loopback ok -- --lo0/v4 static ok -- 127.0.0.1/8net0 ip ok -- --net0/v4 static ok -- 192.168.109.5/24net0/v4a static ok -- 192.168.109.6/24root@solaris11-2:~# ipadm delete-addr net0/v4aroot@solaris11-2:~# ipadmNAME CLASS/TYPE STATE UNDER ADDRlo0 loopback ok -- --lo0/v4 static ok -- 127.0.0.1/8net0 ip ok -- --net0/v4 static ok -- 192.168.109.5/24设置主机名:root@solaris11-2:~# svccfg -s svc:/system/identity:node setprop config/nodename = astring: testroot@solaris11-2:~# svcadm refresh svc:/system/identity:noderoot@solaris11-2:~# svcadm restart identity:node这三个命令改变了系统的主机名test,但是不会自动更改/etc/hosts文件,注意手动修改ipmp probe模式要仅使用probe探测,请执行以下步骤:缺省情况下此参数为“false”,probe和link模式同时支持# svccfg -s svc:/network/ipmp setprop config/transitive-probing=true# svcadm refresh svc:/network/ipmp:defaultipadm create-ip net0ipadm create-ip net1ipadm create-addr -T static -a ip0 net0ipadm create-addr -T static -a ip1 net1ipadm create-ipmp ipmp0ipadm add-ipmp -i net0 net1 ipmp0ipadm create-addr -a ip ipmp0ipmpstat -gipmpstat -aipmpstat -iipmp link模式如果要使用link模式,只要删除两个底层网卡的ip地址即可,或者一开始就不配地址# ipadm delete-addr net0/v4# ipadm delete-addr net1/v4# ipadmNAME CLASS/TYPE STATE UNDER ADDRipmp1 ipmp ok -- --ipmp1/v4 static ok -- 192.168.109.10/24lo0loopback ok -- --lo0/v4 static ok -- 127.0.0.1/8net0 ip ok ipmp1 --net1 ip ok ipmp1 --# ipmpstat -gGROUP GROUPNAME STATE FDT INTERFACESipmp1 ipmp1 ok -- net1 net0# ipmpstat -iINTERFACE ACTIVE GROUP FLAGS LINK PROBE STATEnet1 yes ipmp1 ------- up disabled oknet0 yes ipmp1 --mbM-- up disabled ok# ipmpstat -aADDRESS STATE GROUP INBOUND OUTBOUND:: down ipmp1 -- --192.168.109.10 up ipmp1 net0 net1 net0删除ipmp# ipadm remove-ipmp -i net0 -i net1 ipmp1 # ipadm delete-ipmp ipmp1。
Oracle Solaris 11.2 安装映像定制版说明书

创建定制 Oracle® Solaris 11.2 安装映像文件号码 E537582014 年 7 月版权所有 © 2008, 2014, Oracle 和/或其附属公司。
保留所有权利。
本软件和相关文档是根据许可证协议提供的,该许可证协议中规定了关于使用和公开本软件和相关文档的各种限制,并受知识产权法的保护。
除非在许可证协议中明确许可或适用法律明确授权,否则不得以任何形式、任何方式使用、拷贝、复制、翻译、广播、修改、授权、传播、分发、展示、执行、发布或显示本软件和相关文档的任何部分。
除非法律要求实现互操作,否则严禁对本软件进行逆向工程设计、反汇编或反编译。
此文档所含信息可能随时被修改,恕不另行通知,我们不保证该信息没有错误。
如果贵方发现任何问题,请书面通知我们。
如果将本软件或相关文档交付给美国政府,或者交付给以美国政府名义获得许可证的任何机构,必须符合以下规定:U.S. GOVERNMENT END USERS: Oracle programs, including any operating system, integrated software, any programs installed on the hardware, and/or documentation, delivered to U.S. Government end users are "commercial computer software" pursuant to the applicable Federal Acquisition Regulation and agency-specific supplemental regulations. As such, use, duplication, disclosure, modification, and adaptation of the programs, including any operating system, integrated software, any programs installed on the hardware, and/or documentation, shall be subject to license terms and license restrictions applicable to the programs. No other rights are granted to the U.S. Government.本软件或硬件是为了在各种信息管理应用领域内的一般使用而开发的。
Oracle Solaris 11.2 网络服务介绍说明书

Oracle® Solaris 11.2 网络服务介绍文件号码 E53863-022014 年 12 月版权所有 © 2002, 2014, Oracle 和/或其附属公司。
保留所有权利。
本软件和相关文档是根据许可证协议提供的,该许可证协议中规定了关于使用和公开本软件和相关文档的各种限制,并受知识产权法的保护。
除非在许可证协议中明确许可或适用法律明确授权,否则不得以任何形式、任何方式使用、拷贝、复制、翻译、广播、修改、授权、传播、分发、展示、执行、发布或显示本软件和相关文档的任何部分。
除非法律要求实现互操作,否则严禁对本软件进行逆向工程设计、反汇编或反编译。
此文档所含信息可能随时被修改,恕不另行通知,我们不保证该信息没有错误。
如果贵方发现任何问题,请书面通知我们。
如果将本软件或相关文档交付给美国政府,或者交付给以美国政府名义获得许可证的任何机构,必须符合以下规定:U.S. GOVERNMENT END USERS: Oracle programs, including any operating system, integrated software, any programs installed on the hardware, and/or documentation, delivered to U.S. Government end users are "commercial computer software" pursuant to the applicable Federal Acquisition Regulation and agency-specific supplemental regulations. As such, use, duplication, disclosure, modification, and adaptation of the programs, including any operating system, integrated software, any programs installed on the hardware, and/or documentation, shall be subject to license terms and license restrictions applicable to the programs. No other rights are granted to the U.S. Government.本软件或硬件是为了在各种信息管理应用领域内的一般使用而开发的。
Oracle Solaris 11.2 用户指南说明书
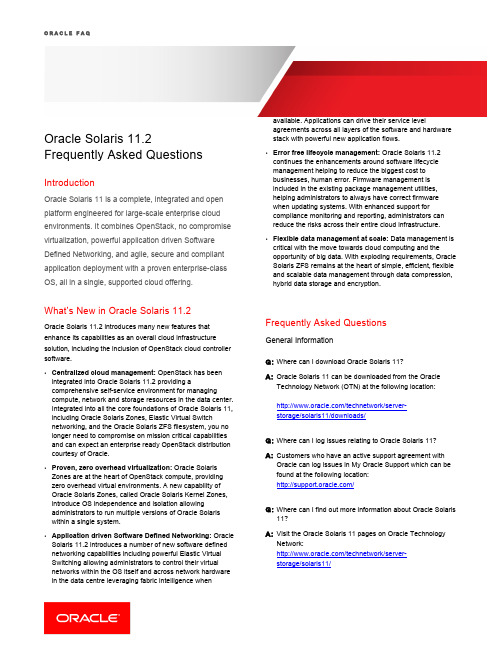
Oracle Solaris 11.2Frequently Asked QuestionsIntroductionOracle Solaris 11 is a complete, integrated and open platform engineered for large-scale enterprise cloud environments. It combines OpenStack, no compromise virtualization, powerful application driven Software Defined Networking, and agile, secure and compliant application deployment with a proven enterprise-class OS, all in a single, supported cloud offering.What’s New in Oracle Solaris 11.2Oracle Solaris 11.2 introduces many new features that enhance its capabilities as an overall cloud infrastructure solution, including the inclusion of OpenStack cloud controller software.• Centralized cloud management: OpenStack has been integrated into Oracle Solaris 11.2 providing acomprehensive self-service environment for managingcompute, network and storage resources in the data center.Integrated into all the core foundations of Oracle Solaris 11, including Oracle Solaris Zones, Elastic Virtual Switchnetworking, and the Oracle Solaris ZFS filesystem, you no longer need to compromise on mission critical capabilities and can expect an enterprise ready OpenStack distribution courtesy of Oracle.• Proven, zero overhead virtualization: Oracle Solaris Zones are at the heart of OpenStack compute, providing zero overhead virtual environments. A new capability ofOracle Solaris Zones, called Oracle Solaris Kernel Zones, introduce OS independence and isolation allowingadministrators to run multiple versions of Oracle Solariswithin a single system.• Application driven Software Defined Networking: Oracle Solaris 11.2 introduces a number of new software defined networking capabilities including powerful Elastic VirtualSwitching allowing administrators to control their virtualnetworks within the OS itself and across network hardware in the data centre leveraging fabric intelligence whenavailable. Applications can drive their service levelagreements across all layers of the software and hardware stack with powerful new application flows.• Error free lifecycle management: Oracle Solaris 11.2 continues the enhancements around software lifecyclemanagement helping to reduce the biggest cost tobusinesses, human error. Firmware management isincluded in the existing package management utilities,helping administrators to always have correct firmwarewhen updating systems. With enhanced support forcompliance monitoring and reporting, administrators canreduce the risks across their entire cloud infrastructure.• Flexible data management at scale: Data management is critical with the move towards cloud computing and theopportunity of big data. With exploding requirements, Oracle Solaris ZFS remains at the heart of simple, efficient, flexible and scalable data management through data compression, hybrid data storage and encryption.Frequently Asked QuestionsGeneral InformationQ: Where can I download Oracle Solaris 11?A: O racle Solaris 11 can be downloaded from the Oracle Technology Network (OTN) at the following location:/technetwork/server-storage/solaris11/downloads/Q: Where can I log issues relating to Oracle Solaris 11?A: C ustomers who have an active support agreement with Oracle can log issues in My Oracle Support which can be found at the following location:/Q: Where can I find out more information about Oracle Solaris 11?A: V isit the Oracle Solaris 11 pages on Oracle Technology Network:/technetwork/server-storage/solaris11/Q: Can I order Oracle Solaris 11 pre-installed on Oracle hardware products?A: Y es. Oracle Solaris 11 may be factory pre-installed at the time of order at no additional cost. Please check theavailable operating system configurations when ordering. System RequirementsQ: What architectures are supported with Oracle Solaris 11?A: Oracle Solaris 11 is supported on SPARC and x86.Q: Is Oracle Solaris 11 only available on Oracle based hardware?A: N o. Oracle Solaris 11 can be installed on both Oracle hardware and hardware from third party vendors asdetailed in the Oracle Solaris OS: Hardware CompatibilityList that can be found at the following location:/webfolder/technetwork/hcl/Q: What hardware and software are required to run Oracle Solaris Kernel Zones?A: O racle Solaris Kernel Zones have specific requirements on newer hardware and firmware as detailed in the followingproduct documentation:K WWS GRFV RUDFOH FRP FG ( B KWPO ( JQZRL KWPOQ: What languages are supported on Oracle Solaris 11?A: O racle Solaris 11 includes support for over 200 different locales. Translated messages include Japanese, Simplified Chinese, Traditional Chinese, Korean, French, German,Italian, Spanish and Brazilian Portuguese.InstallationQ: How do I choose which Oracle Solaris 11 ISO image to download and install?A: O racle Solaris 11 provides a number of installation options for different environments and customer scenarios, frominitial evaluation of the operating system, to single andmulti-node system provisioning. See the followingquestions for more details on each installation mediaoption.Q: What is the Oracle Solaris 11 Media?A: T he Oracle Solaris 11 Live Media, available only for x86 based systems, provides customers with an opportunity to explore a complete Oracle Solaris environment without the requirement of installing it onto a system by loading theoperating system into RAM. Once evaluated, customerscan start a graphical installer to install the operatingsystem. The graphical installer installs a fixed selection of software with minimal configuration, including a full desktop environment.Q: What is the Oracle Solaris 11 Interactive Text Install?A: T he Oracle Solaris 11 Interactive Text Install, available for SPARC and x86 based systems, provides a text orconsole-based installation most suitable for serversystems. The text installer installs a fixed selection ofsoftware with a greater level of configuration than theOracle Solaris 11 Live Media, but does not include adesktop environment (the required packages can easily be added later, if desired).Q: What is the Oracle Solaris 11 Automated Installer media?A: T he Oracle Solaris 11 Automated Installer media, available for SPARC and x86 based systems, provides anautomated ‘hands-free’ network installation for individualclients without requiring an existing Automated Installerserver. Administrators can boot this image and connectdirectly to an IPS package repository to install theirsystems.Q: What options are available to install Oracle Solaris 11 without access to a CD or DVD drive?A: O racle Solaris 11 can be installed through the network using an Oracle Solaris 11 Automated Installer server, or directly using USB bootable media.Q: How do I install a USB image onto a flash drive?A: I f you have an existing Oracle Solaris 11 system installed, use the usbcopy(1) utility. If you do not have such asystem then you can use the dd(1) utility on mostcommon platforms.On Oracle Solaris 11, follow these steps:Disable the HAL service.# svcadm disable -t halInsert the flash drive and locate the appropriate device.# rmformatCopy the image.# dd if=<path_to_b> \of=/dev/rdsk/<device> bs=16kEnable the HAL service again.# svcadm enable halOn MacOSX, follow these steps:# diskutil listIdentify the drive, /dev/diskN where N is the disknumber.# diskutil unmountDisk /dev/diskN# dd if=<path_to_b> of=dev/diskN \ bs=16kOn Linux, insert the flash drive and locate the appropriate device.# dmesg | tailThen copy the image using dd(1) as above.Q: Does Oracle Solaris 11 install on laptops?A: Y es. Oracle Solaris 11 installs onto many different laptop configurations. Check out the Oracle Solaris OS: Hardware Compatibility List to see a full list of supported systems:/webfolder/technetwork/hcl/index.htmlIf your laptop is not listed, Oracle VM VirtualBox canprovide a virtualized environment in which to run OracleSolaris 11 or other virtualization options from third partyvendors.Q: Can I install Oracle Solaris 11 into a virtual environment?A: Y es. Oracle Solaris 11 is a supported guest operating system on Oracle VM Server for SPARC, Oracle VMServer for x86, and Oracle VM VirtualBox. Oracle Solaris11 is known to work on a number of other third partyvirtualization offerings from vendors including VMware,Windows, and Red Hat.Q: How can I customize my Oracle Solaris 11 installation?A: O racle Solaris 11 installations can be customized using a number of administrative commands, including thepackage management utilities. You can learn more about administrative customization by reading the Oracle Solaris11.2 product documentation:/pls/topic/lookup?ctx=solaris11Q: Can I get an Oracle Solaris 11 Media Pack?A: Media Packs are only orderable from MOS. Log in, select "Contact Us", and "Software & OS Media Requests"http VXSSRUW RUDFOH FRPSystem UpdateQ: Can I update my systems from Oracle Solaris 11.1 to Oracle Solaris 11.2?A: Y es. Systems installed with Oracle Solaris 11.1 can be updated to Oracle Solaris 11.2 using the integrated IPSsoftware management tools. Refer to the Oracle Solaris11.2 Release Notes before attempting this update:/pls/topic/lookup?ctx=solaris11Q: Can I upgrade to Oracle Solaris 11 from Oracle Solaris 10?A: T here is no direct upgrade path from Oracle Solaris 10.Customers wishing to upgrade to Oracle Solaris 11 must either install a system from scratch, or consider the use of Oracle Solaris 10 Zones running on Oracle Solaris 11 and take advantage of built-in physical-to-virtual and virtual-to-virtual migration tools.Application SupportQ: How do I find out which applications are certified on Oracle Solaris 11?A: Y ou can view the latest list of certified applications on Oracle Solaris 11 by visiting the Oracle Partner Networkblog:/partnertechYou can also visit the Oracle Partner Network to see the“Oracle Solaris Ready” partners:/technetwork/server-storage/solaris11/partners-1544236.htmlOracle Solaris Ready recognizes qualifying OPN memberswho are developing and supporting their softwareapplications on the latest major releases of Oracle Solaris11. These partners can be viewed by application or bypartner nameQ: Will I need to recertify my application on Oracle Solaris11.2?A: N o. Applications certified for Oracle Solaris 11 do not need to be recertified when updating to Oracle Solaris 11.2 orlater updates. This is due to the Oracle Solaris BinaryCompatibility Guarantee:/us/products/servers-storage/solaris/solaris-guarantee-program-1426902.pdfThis guarantee ensures applications running on earlierversions of Oracle Solaris can be run on future versions of Oracle Solaris.Q: How can I package my application for Oracle Solaris 11?A: Y ou can learn more about packaging your application using IPS by checking out the Packaging and DeliveringSoftware with IPS Developer Guide:/pls/topic/lookup?ctx=solaris11&id=P KDEVQ: What recommendations are there for deploying applications on Oracle Solaris 11 and future updates?A: T hanks to the Oracle Solaris Binary Compatibility Guarantee, applications running on earlier versions ofOracle Solaris can be run on Oracle Solaris 11 and allfuture updates without being recompiled.To create new applications, or to move existingapplications to Oracle Solaris 11 from other platforms, the use of Oracle Solaris Studio is recommended as thecompiler of choice. Oracle Solaris Studio provides acomprehensive C, C++, and Fortran tool suite for OracleSolaris that accelerates the development of scalable,secure and reliable enterprise applications.During the development and deployment of applications on the Oracle Solaris platform, it is recommended thatcustomers consider the use of native OS virtualizationusing Oracle Solaris Zones. This virtualization technology provides a rapid provisioning environment with zero over-head helping to streamline the application deploymentprocess. You can learn more about Oracle Solarisvirtualization by looking at the Oracle Solaris 11Virtualization Technology Spotlight:/technetwork/server-storage/solaris11/technologies/Q: Where can I download Oracle Solaris Studio?A: O racle Solaris Studio is available for download at no cost from the Oracle Technology Network:/technetwork/server-storage/solarisstudio/Q: Does Oracle Solaris Cluster run on Oracle Solaris 11.2?A: Y es. Oracle Solaris Cluster 4.2 is supported on Oracle Solaris 11.2More InformationA: How can I get more news about Oracle Solaris 11?Q: Catch the latest news and information from our social media sites:Blogs:/solarisFacebook:ZZZ IDFHERRN FRP RUDFOHVRODULVLinkedIn:/groups/Oracle-Solaris-Insider-3951282YouTube:/oraclesolarisA: W hat training courses or certification programs are available for Oracle Solaris 11?Q: An extensive set of training courses and certification programs are available from Oracle University. A list of training courses can be found here:/technetwork/server-storage/solaris11/training/index.htmlOracle Corporation, World Headquarters Worldwide Inquiries500 Oracle Parkway Phone: +1.650.506.7000Redwood Shores, CA 94065, USA Fax: +1.650.506.7200C O N N E C T W I T H U S/solaris/oraclesolaris/orcl_solaris/solarisCopyright © 2014, Oracle and/or its affiliates. All rights reserved. This document is provided for information purposes only, and thecontents hereof are subject to change without notice. This document is not warranted to be error-free, nor subject to any otherwarranties or conditions, whether expressed orally or implied in law, including implied warranties and conditions of merchantability orfitness for a particular purpose. We specifically disclaim any liability with respect to this document, and no contractual obligations areformed either directly or indirectly by this document. This document may not be reproduced or transmitted in any form or by anymeans, electronic or mechanical, for any purpose, without our prior written permission.Oracle and Java are registered trademarks of Oracle and/or its affiliates. Other names may be trademarks of their respective owners.Intel and Intel Xeon are trademarks or registered trademarks of Intel Corporation. All SPARC trademarks are used under license andare trademarks or registered trademarks of SPARC International, Inc. AMD, Opteron, the AMD logo, and the AMD Opteron logo aretrademarks or registered trademarks of Advanced Micro Devices. UNIX is a registered trademark of The Open Group. 07/14。
Oracle(R)_Solaris_11_开发者环境介绍_E25908
Oracle®Solaris11开发者环境介绍文件号码E259082011年11月版权所有©2011,Oracle和/或其附属公司。
保留所有权利。
本软件和相关文档是根据许可证协议提供的,该许可证协议中规定了关于使用和公开本软件和相关文档的各种限制,并受知识产权法的保护。
除非在许可证协议中明确许可或适用法律明确授权,否则不得以任何形式、任何方式使用、拷贝、复制、翻译、广播、修改、授权、传播、分发、展示、执行、发布或显示本软件和相关文档的任何部分。
除非法律要求实现互操作,否则严禁对本软件进行逆向工程设计、反汇编或反编译。
此文档所含信息可能随时被修改,恕不另行通知,我们不保证该信息没有错误。
如果贵方发现任何问题,请书面通知我们。
如果将本软件或相关文档交付给美国政府,或者交付给以美国政府名义获得许可证的任何机构,必须符合以下规定:ERNMENT RIGHTSPrograms,software,databases,and related documentation and technical data delivered to ernment customers are"commercial computer software"or "commercial technical data"pursuant to the applicable Federal Acquisition Regulation and agency-specific supplemental regulations.As such,the use,duplication, disclosure,modification,and adaptation shall be subject to the restrictions and license terms set forth in the applicable Government contract,and,to the extent applicable by the terms of the Government contract,the additional rights set forth in FAR52.227-19,Commercial Computer Software License(December2007). Oracle America,Inc.,500Oracle Parkway,Redwood City,CA94065.本软件或硬件是为了在各种信息管理应用领域内的一般使用而开发的。
Oracle Solaris 11.1 系统升级指南说明书

Upgrading to Oracle Solaris11.1 November2012This article details the steps required to upgrade your Oracle Solaris1111/11system to Oracle Solaris11.1 using the Image Packaging System(IPS),a feature of Oracle Solaris.Introduction to Upgrading a System to Oracle Solaris11.1 There are two main approaches for upgrading a system to Oracle Solaris11.1.■Using the Oracle Solaris support repository,for customers with an Oracle support agreement■Using the Oracle Solaris release repository,for customers without an Oracle support agreementUsing the Oracle Solaris Support RepositoryCustomers who have an Oracle support agreement can use the Oracle Solaris support repository as their configured package repository.If you are using the support repository,the package publisher definition should look like the following:%pkg publisherPUBLISHER TYPE STATUS URIsolaris origin online https:///solaris/supportThe release process for Oracle Solaris11was changed to accelerate the release of critical bug fixes.A consequence of this process is that the update might not contain some bug fixes released in a Support Repository Update(SRU)for the preceding release.For example,the most recent SRU for Oracle Solaris1111/11is SRU#12.4.Some packages in SRU#12.4have a version number that is higher than the version number in the Oracle Solaris11.1release.To preserve these bug fixes,the version difference will prevent the upgrade to the Oracle Solaris11.1release.If the upgrade process is not blocked because of the version numbers,some fixes that are part of the SRU will be removed if you upgrade to the Oracle Solaris11.1release.For convenience,these bug numbers are listed in“Bugs Fixed in Later SRUs”on page7.For instructions,see“Upgrading a System With a Support Agreement to Oracle Solaris11.1”on page3. Once an SRU for Oracle Solaris11.1is released,the process is simplified if you want to install the11.1release, as well as the latest SRU.For instructions,see“How to Upgrade a System to Oracle Solaris11.1With the Latest SRU”on page6.Using the Oracle Solaris Release RepositoryUsers who have installed Oracle Solaris11without an Oracle support agreement can use the Oracle Solaris release repository as their configured package repository.If you are using the release repository,the package publisher definition should look like the following:%pkg publisherPUBLISHER TYPE STATUS URIsolaris origin online /solaris/release/For instructions,see“How to Upgrade a System to Oracle Solaris11.1Using the Oracle Solaris Release Repository”on page7.Upgrading From Oracle Solaris10There are no upgrade methods or tools available to transition from Oracle Solaris10to Oracle Solaris11or 11.1.You must either do a fresh installation of Oracle Solaris11or migrate your Oracle Solaris10OS instances or zones to an Oracle Solaris11system.For more information,refer to Transitioning From Oracle Solaris10to Oracle Solaris11.Upgrading to Oracle Solaris11.1and ZonesAll of the zones on your system should automatically be upgraded when you upgrade the global zone.Make sure that you follow any specific instructions to deal with specific packages as noted in the following procedures.Upgrading to Oracle Solaris 11.1and Third-Party Packages In general,third-party packages are not touched during the upgrade process.Third-party services,and the software they deliver,will only be disturbed by the upgrade process when the service shares configuration files with the OS,or when the files are installed in directories that are written over by the upgrade process.Upgrading a System With a Support Agreement to Oracle Solaris 11.1The steps that are required might be different due to some systems running different SRU versions.First,follow the instructions in “How to Verify Which SRU a System Is Running”on page 3.Depending on the SRU that the system is running,perform one of the following procedures:■“How to Upgrade a System Running A SRU Before SRU#10.5”on page 4■“How to Upgrade a System Running SRU#10.5or SRU#11.4”on page 4■“How to Upgrade a System Running at Least SRU#12.4”on page 5Note –The amount of time each procedure takes is dependent on many factors,including system and network resources.▼How to Verify Which SRU a System Is Running Display the information about pkg:/entire .In this example,SRU#10.5is installed.%pkg info entire Name:entire Summary:entire incorporation including Support Repository Update (Oracle Solaris 1111/11SRU 10.5).Description:This package constrains system package versions to the same build.WARNING:Proper system update and correct package selection depend on the presence of this incorporation.Removing this package will result in an unsupported system.For more information see https:///CSP/main/article cmd=show&type=NOT&doctype=REFERENCE&id=1372094.1.Category:Meta Packages/Incorporations State:Installed Publisher:solaris Version:0.5.11(Oracle Solaris 11SRU 10.5)Build Release:5.11Branch:0.175.0.10.0.5.0Packaging Date:Fri Aug 0318:26:272012Size:5.45kB FMRI:pkg://solaris/**********.11,5.11-0.175.0.10.0.5.0:20120803T182627Z Package Information Displayed for Oracle Solaris 1111/11If your system has Oracle Solaris 1111/11installed,without any SRUs,the package information looks like:#pkg info entire Name:entire Summary:Incorporation to lock all system packages to the same build Description:This package constrains system package versions to the same build.WARNING:Proper system update and correct package selection depend on the presence of this incorporation.Removing this package will result in an unsupported system.Category:Meta Packages/Incorporations State:Installed Publisher:solaris Version:0.5.11Build Release:5.11Branch:0.175.0.0.0.2.0Packaging Date:October 20,201102:38:22PM●Example 1Size:5.45kB FMRI:pkg://solaris/**********.11,5.11-0.175.0.0.0.2.0:20111020T143822Z▼How to Upgrade a System Running A SRU Before SRU#10.5You can choose to update to SRU#10.5or to a later SRU release.Note that SRUs starting with SRU#12.4havecertain fixes that will not be present in Oracle Solaris 11.1until the first Oracle Solaris 11.1SRU is available.Verify which Solaris 11SRU you have installed.For instructions,see “How to Verify Which SRU a System IsRunning”on page 3.Become an administrator.For more information,see “How to Use Your Assigned Administrative Rights”in Oracle Solaris 11.1Administration:Security Services .Update the system.These commands create a new boot environment.■To update to SRU#10.5,use the following command:#pkg update --accept **********.11,5.11-0.175.0.10■To update to the latest SRU,use the following command:#pkg update --acceptReboot using the updated boot environment.#rebootFollow the instructions for upgrading the SRU that you installed in Step 2.■“How to Upgrade a System Running SRU#10.5or SRU#11.4”on page 4■“How to Upgrade a System Running at Least SRU#12.4”on page 5▼How to Upgrade a System Running SRU#10.5or SRU#11.4Verify that you have SRU#10.5or SRU#11.4installed.For instructions see “How to Verify Which SRU aSystem Is Running”on page 3.Become an administrator.For more information,see “How to Use Your Assigned Administrative Rights”in Oracle Solaris 11.1Administration:Security Services .SPARC only:For each zone,remove the ldomsmanager package.For any SPARC based system that has one or more zones installed,you must perform an additional step.Foreach zone installed on the system,remove the pkg:/system/ldoms/ldomsmanager package as follows:#for z in ‘zoneadm list‘;do zlogin $z pkg uninstall ldomsmanager;done Update the IPS package.#pkg update pkg:/package/pkgDue to earlier bugs in some packages,it was possible to incorrectly install those packages on a system.Thiscommand removes the following bad packages,if they are installed:■x86:pkg://solaris ldoms/ldoms-incorporation ■SPARC:pkg://solaris/consolidation/nvidia/nvidia-incorporationpkg://solaris/driver/network/ethernet/elxlBeforeYou Begin 1234BeforeYou Begin 123pkg://solaris/driver/network/ethernet/pcnpkg://solaris/driver/network/ethernet/dnetpkg://solaris/driver/network/ethernet/iprbUpdate the remaining system packages.#pkg update --be-name s11.1ga --acceptReboot using the updated boot environment.#reboot▼How to Upgrade a System Running at Least SRU#12.4If any of the following packages are installed,you must either remove them and add them back after theupdate to Oracle Solaris 11.1,or disassociate them from the constraints on the system (called unlocking ),asdescribed in this procedure:■pkg://solaris/network/dns/bind ■pkg://solaris/service/network/dns/bind ■pkg://solaris/mail/fetchmailFor SRU#13.4,the pkg://solaris/networkdhcp/isc-dhcp package must be removed or unlocked as well.Become an administrator.For more information,see “How to Use Your Assigned Administrative Rights”in Oracle Solaris 11.1Administration:Security Services .Adjust packaging for the DNS and fetchmail services.If you are not using these packages,you can remove them.If you have dependencies on these packages,youmust unlock them.Only follow this step if one or more of the three packages listed is installed on your server.■To remove the packages,run this command:#pkg uninstall pkg://solaris/network/dns/bind pkg://solaris/service/network/dns/bind\pkg://solaris/mail/fetchmailFor SRU#13.4,also remove pkg://solaris/network/dhcp/isc-dhcp .If you have any zones installed on your system,you must also uninstall these packages in each zone.Forexample:#for z in ‘zoneadm list‘;do zlogin $z pkg uninstall pkg://solaris/network/dns/bind;done■To unlock the packages,run this command:#pkg change-facet facet.version-lock.mail/fetchmail=false #pkg change-facet work/dns/bind=false #pkg change-facet work/dns/bind=falseFor SRU#13.4,also unlock pkg://solaris/network/dhcp/isc-dhcp .Note –To save time,it is possible to combine these commands into one command:#pkg change-facet facet.version-lock.mail/fetchmail=false \work/dns/bind=false \work/dns/bind=falseThe previous commands must be performed in each configured zone with the packages installed.Update the IPS package.#pkg update pkg:/package/pkg45123Update the rest of the packages.#pkg update --be-name s11.1ga --acceptReboot using the updated boot environment.#rebootReverse the changes to the DNS and fetchmail services.■If you removed the packages in Step 2,reinstall them.#pkg install pkg://solaris/service/network/dns/bind #pkg install pkg://solaris/mail/fetchmailNote –The first command installs pkg://solaris/network/dns/bind ,so it is not necessary to install that package.For SRU#13.4,also reinstall pkg://solaris/network/dhcp/isc-dhcp .■If you unlocked the packages in Step 2,when the first SRU is released for Oracle Solaris 11.1,lock thepackages.#pkg change-facet facet.version-lock.mail/fetchmail=true #pkg change-facet facet.version-lock.service/network/dns/bind=true #pkg change-facet work/dns/bind=trueRelocking the packages updates them as required.For SRU#13.4,also lock pkg://solaris/network/dhcp/isc-dhcp .Note –To save time,it is possible to combine these commands into one command:#pkg change-facet facet.version-lock.mail/fetchmil=true \work/dns/bind=true \work/dns/bind=true▼How to Upgrade a System to Oracle Solaris 11.1With the Latest SRUOnce the first SRU for Solaris 11.1is released,use the following procedure to upgrade to Oracle Solaris 11.1with the new SRU.Verify which Solaris 11SRU you have installed.For instructions,see “How to Verify Which SRU a System IsRunning”on page 3.Become an administrator.For more information,see “How to Use Your Assigned Administrative Rights”in Oracle Solaris 11.1Administration:Security Services .For early SRUs only:Upgrade to the latest Oracle Solaris 11SRU.Perform these steps only on systems running an SRU earlier than 10.5.a.Update the SRU.This command updates the OS to Oracle Solaris 11with the latest SRU.#pkg update --accept b.Reboot using the updated boot environment.#reboot456BeforeYou Begin 12For all SRUs:Update to Oracle Solaris 11.1with the latest SRU.#pkg update --accept --be-name s11.1sruReboot using the updated boot environment.#rebootBugs Fixed in Later SRUsThe following is a list of the bug fixes that have been addressed in SRU#12.4,but not in Oracle Solaris 11.1until SRU#1for 11.1is released.Kernel fixes:■7071362tcp_icmp_source_quench and other tunables may no longer be field modifiable ■7181137sol_umad should allow userland MAD operations in NGZs ■7196540After 7174929integration 0.9.0is shown for first disk in second RAID volumeOther software fixes:■7166132vim should be able to run its test suite ■7190213libibmad and associated files need to be delivered in an NGZ ■7191495mkisofs install is incomplete ■7195687Update fetchmail to version 6.3.2■7195704Problem with utility/fetchmail ■7196234Problem with network/dns ■7197223vim shows high CPU usage when editing dtrace script with syntax highlighting enabledThe following is a list of bugs that have been addressed in SRU#13.4,but not in Oracle Solaris 11.1untilSRU#1for 11.1is released.■15805793SUNBT7186501-11.2net-snmp crashes in net_cpu_arch_load ■15494128assertion failed:zvol_get_stats(os,nv)==0,when encounter i/o error ■15797349Problem with shell/korn93■15800889s11:zonestat core dumps when executed in non-global zone ■15816060update zoneinfo timezones to 2012f (Fiji)■15797515SUNBT7176189-12.0nfs4_write()can dirty too much pages during an unmount attemptUpgrading a System Without a Support Agreement toOracle Solaris 11.1Use the following procedure to upgrade a Oracle Solaris 1111/11system if you do not have a supportagreement,or have no SRUs installed.Note –The amount of time the procedure takes is dependent on many factors,including system and network resources.▼How to Upgrade a System to Oracle Solaris 11.1Using theOracle Solaris Release RepositoryUpgrading to Oracle Solaris 1111/11is a multistep process due to the requirement that certain systempackages must be updated first in order to achieve a successful update for the remaining system packages.34Become an administrator.For more information,see “How to Use Your Assigned Administrative Rights”in Oracle Solaris 11.1Administration:Security Services .Update the system packages.This command creates a new boot environment.#pkg update --acceptNote –For systems that cannot directly connect to Oracle's hosted package repositories,download the Oracle Solaris 11.1Pre-Upgrade Repository Image.This image contains packages that you must update prior toupdating to Oracle Solaris 11.1.See /technetwork/server-storage/solaris11/downloads/index.htm for more information.The ISO image contains a README file that describes thenecessary steps for constructing the repository and updating to Oracle Solaris 11.1.Reboot using the updated boot environment.#rebootSPARC only:For each zone,remove the ldomsmanager package.For any SPARC based system that has one or more zones installed,you must perform an additional step.Foreach zone installed on the system,remove the pkg:/system/ldoms/ldomsmanager package as follows:#for z in ‘zoneadm list‘;do zlogin $z pkg uninstall ldomsmanager;doneUpdate the IPS package.#pkg update pkg:/package/pkgUpdate the rest of the packages.#pkg update --be-name s11.1ga --acceptReboot using the updated boot environment.#reboot1234567Copyright©2012Oracle and/or its affiliates.All rights reserved.This software and related documentation are provided under a license agreement containing restrictions on use and disclosure and are protected by intellectual property laws.Except as expressly permitted in your license agreement or allowed by law,you may not use,copy,reproduce,translate,broadcast,modify,license,transmit,distribute,exhibit,perform,publish,or display any part,in any form,or by any means.Reverse engineering, disassembly,or decompilation of this software,unless required by law for interoperability,is prohibited.The information contained herein is subject to change without notice and is not warranted to be error-free.If you find any errors,please report them to us in writing.If this is software or related documentation that is delivered to the ernment or anyone licensing it on behalf of the ernment,the following notice is applicable:ERNMENT END USERS.Oracle programs,including any operating system,integrated software,any programs installed on the hardware,and/or documentation,delivered to ernment end users are "commercial computer software"pursuant to the applicable Federal Acquisition Regulation and agency-specific supplemental regulations.As such,use,duplication,disclosure,modification,and adaptation of the programs, including any operating system,integrated software,any programs installed on the hardware,and/or documentation,shall be subject to license terms and license restrictions applicable to the programs.No other rights are granted to the ernment.This software or hardware is developed for general use in a variety of information management applications.It is not developed or intended for use in any inherently dangerous applications,including applications that may create a risk of personal injury.If you use this software or hardware in dangerous applications,then you shall be responsible to take all appropriate fail-safe,backup,redundancy,and other measures to ensure its safe use.Oracle Corporation and its affiliates disclaim any liability for any damages caused by use of this software or hardware in dangerous applications.Oracle and Java are registered trademarks of Oracle and/or its affiliates.Other names may be trademarks of their respective owners.Intel and Intel Xeon are trademarks or registered trademarks of Intel Corporation.All SPARC trademarks are used under license and are trademarks or registered trademarks of SPARC International,Inc.AMD,Opteron,the AMD logo,and the AMD Opteron logo are trademarks or registered trademarks of Advanced Micro Devices.UNIX is a registered trademark of The Open Group.This software or hardware and documentation may provide access to or information on content,products,and services from third parties.Oracle Corporation and its affiliates are not responsible for and expressly disclaim all warranties of any kind with respect to third-party content,products,and services.Oracle Corporation and its affiliates will not be responsible for any loss,costs,or damages incurred due to your access to or use of third-party content,products,or services.E38227-01Oracle Corporation500Oracle Parkway,Redwood City,CA94065U.S.A.。
Solaris11安装图解
内容摘要:Solaris 11 即Solaris Express Developer Edition ,SXDE是完全免费的,每个季度发布一个新的版本,适合作为应用程序开发环境。
512MB内存不足以安装Solaris ExpressDeveloper Edition GUI 安装程序。
要安装Developer 发行版,至少需要768MB内存。
解决方法: x86 系统:在GRUB 菜单中,选择"Solaris Express Serial Console ttyb" 安装选项(即第4 个选项)。
此选项提供了使用512MB内存的基于文本的安装。
该安装仅包括操作系统,而不包括开发者工具。
您可以在完成安装后添加开发者工具。
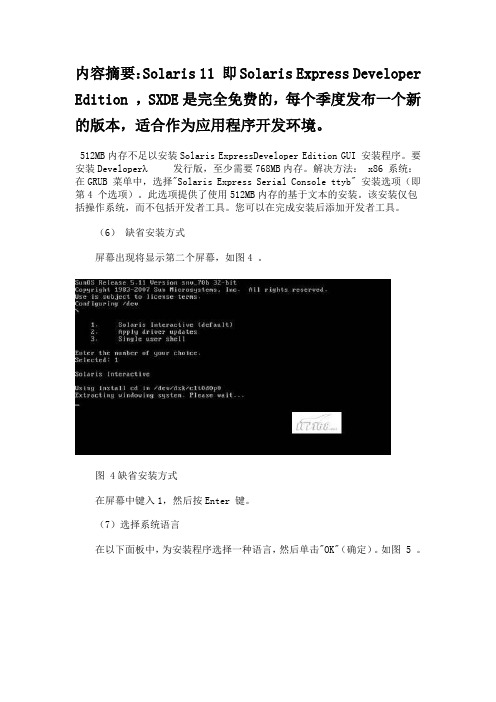
(6)缺省安装方式屏幕出现将显示第二个屏幕,如图4 。
图 4缺省安装方式在屏幕中键入1,然后按Enter 键。
(7)选择系统语言在以下面板中,为安装程序选择一种语言,然后单击"OK"(确定)。
如图 5 。
图5 选择系统语言(8)选择进行安装在以下面板中,单击“安装”或“升级”,然后单击“下一步”。
如图6 。
图 6选择进行安装单击“安装”将会执行Solaris OS 的初始安装,这会用新版本的Solaris OS 覆写现有的Solaris 文件系统。
如果您的系统未在运行Solaris OS,则必须执行初始安装。
注意:请注意以下重要注意事项■ 无法读取磁盘表。
■ 磁盘先前未曾分区。
■ 如果磁盘上存在现有Solaris 分区,且用户没有对分区进行任何修改,则安装会只覆写该Solaris分区。
其他现有分区不会被更改。
(9)确定磁盘大小和指定Solaris 11 的安装位置如图 7图 7确定磁盘大小和指定Solaris 11 的安装位置图 7的顶部部分会显示系统上可用的内部磁盘、外部磁盘和固态驱动器。
此面板还会显示每个磁盘的大小(以GB 为单位)。
要了解有关某个磁盘的详细信息,请将光标移至该磁盘图标上面。
Oracle Solaris 11.4 许可信息用户手册说明书
Oracle® Solaris 11.4 中提供的免费软件2018 年 8 月Oracle Solaris 11.4 捆绑软件更新免费开源软件 (Free and Open Source Software, FOSS)(简称免费软件)是随 Oracle Solaris 11 提供的软件包,它的数量已经随着每次更新而增加,在 Oracle Solaris 11.4 中有 1,000 多个软件包。
以下各表显示了 Oracle Solaris 11.4 发行版中捆绑的一些常用免费软件,并显示了 Oracle Solaris 11.4中提供的这些组件的版本,以及 Oracle Solaris 11.3 的初始发行版中提供的版本。
有关许可信息,请参见Licensing Information User Manual Oracle Solaris 11.4(《Oracle Solaris 11.4许可信息用户手册》)。
有关 Oracle 将为其提供标准支持 (Premier Support) 的免费软件列表,请参见“Oracle Solaris 11.4 中支持的免费软件” [3]。
表 1编译器和解释器软件Oracle Solaris 11.3 版本Oracle Solaris 11.4 版本Cython NA0.28.2gcc 3.4, 4.5, 4.7, 4.8 5.5, 7.3Go NA 1.7Java7, 88LLVM/Clang NA 6.0PHP 5.3, 5.6 5.6, 7.1Perl 5.8, 5.12 5.22, 5.26Python 2.6, 2.7, 3.4 2.7, 3.4, 3.5Ruby 1.9, 2.1 2.1, 2.3TCL/TK8.58.6表 2开发者和 DevOps 工具软件Oracle Solaris 11.3 版本Oracle Solaris 11.4 版本Cmake 2.8 3.9GDB7.68.0Git 1.7 2.15Mercurial 3.4 4.1MySQL 5.1, 5.5, 5.6 5.5, 5.6, 5.7Oracle Instant Client NA12.2OpenStack2014.2NAPuppet 3.6 5.5表 3网络服务和客户机软件Oracle Solaris 11.3 版本Oracle Solaris 11.4 版本Apache HTTPD 2.2, 2.4 2.4防火墙IPfilter、PF OpenBSD 5.5 包过滤器 (Packet Filter, PF) ISC BIND9.69.10Kerberos Sun 派生 1.16LDAP Mozilla LDAP、OpenLDAP 2.4OpenLDAP 2.4Open Fabric Enterprise Distribution NA 3.18Postfix 2.11 3.2Samba 3.6 4.7软件Oracle Solaris 11.3 版本Oracle Solaris 11.4 版本SSH SunSSH、OpenSSH 6.5OpenSSH 7.5Tomcat 6.0, 8.08.5Wireshark 1.12 2.6表 4用户环境软件Oracle Solaris 11.3 版本Oracle Solaris 11.4 版本bash 4.1 4.4vim7.3.6008.0.711zsh 5.0 5.3Firefox31.852.9GNOME 2.30 3.24Thunderbird31.652.8Xorg 1.14 1.19Oracle Solaris 11.4 中支持的免费软件下面列出了 Oracle 将根据 Oracle Solaris 11 的 Oracle 标准支持 (Oracle Premier Support) 为其提供支持服务的免费软件。
Oracle Solaris 11 部署指南说明书
Deploying Oracle Solaris 11Dave Miner – Senior Principal Engineer, Oracle Solaris Core Technology ORACLE PRODUCT LOGOThe following is intended to outline our general product direction. It is intended for information purposes only, and may not be incorporated into any contract. It is not a commitment to deliver any material, code, or functionality, and should not be relied upon in making purchasing decisions. The development, release, and timing of any features or functionality described for Oracle’s products remains at the sole discretion of Oracle.SECTION 1: Requirementsand IdeasBig Ideas for Simplified Deployments •Reduce up-front and ongoing cost of deployments–Ease-of-use a priority for all features–Engineer for efficiency at any scale•Leverage Oracle Solaris strengths–Integrate deployment of Zones–Design with SMF, ZFS, IPS–Best place to run Oracle ApplicationsRosetta Stone for Oracle Solaris 10 Users Oracle Solaris 10Oracle Solaris 11SVR4 Packages IPS PackagesInstall DVD Install CD + pkg repositoryLive Upgrade Boot EnvironmentsUpgrade from installer pkg(1), Update Manager JumpStart Automated Installer(AI) JumpStart Profiles AI manifestsBlueprints for custom DVD's Distribution ConstructorValue-engineering in Installation, Configuration •Simplified architecture•+ Improved automation•+ Improved safety•+ Improved flexibility•+ Improved integration•= Better user experience•No longer a sum of independent partsOn a Large ScaleReduced Downtime, Reduced Risk•Automated Installer and Image Packaging System make maintenance fool-proof and safe–Built-in dependency tracking prevents system modification if changes are incorrect–Upgrading in sand-boxed boot environments provides easy roll-back option–Ease of use through automatic dependency tracking•Drastic Improvement of Reboot Performance–Streamlined shutdown–“Fast Reboot” reduces time by not testing hardware we already know to be goodWhen “Good Enough” Is Not Reliable Enough6x faster Zone provisioning vs hypervisors4x faster upgrades vs Red Hat2.5x faster reboots vs Red HatSECTION 2: Snap Upgrades with Boot EnvironmentsSafe Upgrades “in a snap”•ZFS Boot Environments Benefits–No initial investment–Updates are applied to a file system clone, nointerruption–Reboot into upgraded environment when you’re ready–Trivial roll-back if failure occurs–Integrated, enforced best practice for safety •Fast reboot reduces planned maintenance windows•Excellent for recovery purposes Active BEActive BENew BEActive BE Updated BEBoot Environments•Make updates safe, reliable, recoverable •Different from/simpler than Solaris 10 Live Upgrade –Takes advantage of ZFS–Use liberally as an administrative safety net •Managed by beadm(1M), functionality includes:–List–Activate, Rename–Create, Destroy–Mount, UnmountBoot Environments in Non-global Zones•BE's automatically include installed/attached zones •Zone BE is linked to a global zone BE•Multiple zone BE's can be linked to a single global zone BE•Zone administrator can create, mount, activate BE's –Active BE is within the context of the active global zone BEListing Boot Environments{badboy} beadm listBE Active Mountpoint Space Policy Created -- ------ ---------- ----- ------ ------- b-140 - - 11.51M static 2010-05-26 12:47 b-141 - - 11.98M static 2010-06-10 15:40 b-142 - - 10.14M static 2010-06-24 08:05 b-143 - - 13.85M static 2010-07-12 09:47 b-144 - - 1.48G static 2010-07-22 12:09 b-145 - - 14.64M static 2010-08-03 22:23 b-146 - - 10.43M static 2010-08-20 15:31 b-147 - - 12.29M static 2010-09-06 19:28 b-148 - - 13.11M static 2010-09-23 17:05 b-149 - - 14.49M static 2010-09-30 18:53 b-150 - - 11.83M static 2010-10-15 10:32 b-151 - - 130.94M static 2010-11-15 10:10 b-152 NR / 56.03G static 2010-11-17 16:32More Fun with beadm{badboy} beadm activate b-151{badboy} beadm mount b-151 /tmp/mnt{badboy} beadm listBE Active Mountpoint Space Policy Created -- ------ ---------- ----- ------ ------- b-140 - - 11.51M static 2010-05-26 12:47 b-141 - - 11.98M static 2010-06-10 15:40 b-142 - - 10.14M static 2010-06-24 08:05 b-143 - - 13.85M static 2010-07-12 09:47 b-144 - - 1.48G static 2010-07-22 12:09 b-145 - - 14.64M static 2010-08-03 22:23 b-146 - - 10.43M static 2010-08-20 15:31 b-147 - - 12.29M static 2010-09-06 19:28 b-148 - - 13.11M static 2010-09-23 17:05 b-149 - - 14.49M static 2010-09-30 18:53 b-150 - - 11.83M static 2010-10-15 10:32 b-151 R /tmp/mnt 53.82G static 2010-11-15 10:10 b-152 N / 1.71G static 2010-11-17 16:32SECTION 3: Types of InstallersTwo types of interactive installers•Text-based UI for server systems (SPARC & x86)•GUI for x86 desktop/laptop systems•Principle: Install fixed software payload with basic configuration, customize after installation–GUI installs desktop/laptop-appropriate software (solaris-desktopgroup package), automatic network configuration–Text installer installs server-appropriate software (solaris-large-server group package), choice of automatic or manual network & name service configuration•Both provide configuration of initial user account, with administrative privileges via sudoText Install Summary ScreenLive Media GUI Install Summary ScreenAutomated Installation (AI)•Reduce initial and ongoing costs of deploying Solaris-based software stack•Leverages ZFS, SMF, IPS features to provide enhancedfeatures vs. JumpStart–Reduces need for third-party or customer-developed extensions–Most scripting moved to first-boot SMF services•Integrated, seamless Zones deployment•WAN-capable design provides operational flexibility •Designed to be manageable and observable–installadm(1M) provides one-stop management interfaceAI Terminology•Client – physical or virtual machine to be installed •Manifest – XML specification of installation (storage layout, software payload)•Profile – SMF profile to pre-configure system services •Service – server infrastructure needed to network boot an installation client•Criteria – mapping of clients to services, manifests and profiles •Repository – IPS package repository•“Bootable AI” - service-less AI boot from media–Manifest included on media or downloaded from network locationBasic Flow of Automated InstallationJumpStart to AI MappingJumpStart Automated Installation setup_install_server Installadm create-service add_install_client Installadm create-clientJumpStart profile & rules AI manifest & criteriasysidcfg file SMF configuration profile Begin script Derived Manifests, customimages from DistributionConstructorFinish script pkg actions, First-boot SMFservicesSECTION 4: System Configuration, Leveraging SMFNew System Configuration Framework•Enables streamlined configuration management •Leverages existing Oracle Solaris features •Provides a modernized, consistent mechanism forconfiguring systems to deliver servicesNew System Configuration Framework & UI •Replaces sysidtool/sysidcfg/sys-unconfig•sysconfig(1m)interactive UI–configure, unconfigure, create-profile subcommands •Interactive tool provides basic, required system configuration. UI similar to Text Installer.•Profiles can configure any SMF service property •sysconfig unconfigure reverts the properties configured by the interactive UI to shipped defaults–--destructive option requests more complete cleanup, e.g.deleting initial user account's home directorySystem Configuration Profiles•Common parameters available in Solaris 11:–User account, including RBAC roles, profiles and sudo –Root user: password, role/normal–Timezone, locale–Hostname–Console terminal type, keyboard layout–IPv4 and/or IPv6 interface, default route–DNS, NIS, LDAP clients–Name service switchCreating a Configuration Profile with sysconfig •Easiest starting point# sysconfig create-profile -o myprofile.xml •Runs the sysconfig UI, places output into specified profile •Edit further to add properties not configured by sysconfigSECTION 5: Automation ThroughManifestsStatic Manifests•Default manifest provided with service–Installs solaris-large-server package set from Oracle's Solarisrepository to firmware-designated boot disk–Sysconfig invoked automatically at first boot to interactively configure basic system• Manifest specifies:–Package repositories and lists; major group packages: solaris-small-server, solaris-large-server, solaris-desktop–Target disk: choose by device path, volume id, type, vendor, size,container/receptacle/occupant (CRO) label; ZFS configuration–Locales are installed/removed using package facets; all locales are installed by default<?xml version="1.0" encoding="UTF-8"?><!DOCTYPE auto_install SYSTEM "file:///usr/share/install/ai.dtd"> <auto_install><ai_instance name="default"><target><logical><zpool name="rpool" is_root="true"><filesystem name="export" mountpoint="/export"/><filesystem name="export/home"/><be name="solaris"/></zpool></logical></target><software type="IPS"><source><publisher name="solaris"><origin name="/solaris/release"/> </publisher></source><software_data action="install"><name>pkg:/entire@latest</name><name>pkg:/group/system/solaris-large-server</name></software_data></software></ai_instance></auto_install>•Dynamically generate manifest in a script•Scales AI management by reducing number of manifests maintained by administrators•Most effective model is to load template manifest, modify specific elements•Script uses the aimanifest(1M) command as interface to generate AI manifest•Generated manifest located on the client at:/system/volatile/manifest.xmlAI Criteria•Default manifest (if configured) is used when no criteria exist or match; similar to any rule in JumpStartCriterion Range Equivalent JumpStart Rulearch No karchcpu No archipv4Yes hostaddressmac Yes hostname (with RARP & ethers)mem Yes memsizeplatform No modelSECTION 6: Simplifying Zones DeploymentsDeploying Zones with AI•Zones can be specified in the AI manifest<configuration type=”zone” name=”zone1”source=”http://server/zone1/config”/><configuration type=”zone” name=”zone2”source=”file:///net/server/zone2/config”/>•config file is the zone's configuration file as output from “zonecfg export”•Automatically installed on first boot of the global zone svc:/system/zones-install:default•Use zonename criterion to associate manifests and profiles with a zone# installadm create-manifest -n S11-x86 -f /tmp/zmanifest.xml -c zonename=”zone1 zone2”# installadm create-profile -n S11-x86 -f /tmp/zprofile1.xml -c zonename=”zone1”# installadm create-profile -n S11-x86 -f /tmp/zprofile2.xml -c zonename=”zone2”•AI is also used when installing non-global zones from existing global zone•Default manifest is/usr/share/auto_install/manifest/zone_default.xml •Default profile enables interactive system configuration during first boot•Provide alternate manifest and/or profile with# zoneadm -z <zone> install -m <manifest> -c <profile>SECTION 7: Simplifying Solaris JumpStartTransitioningSteps to Convert from Solaris 10 JumpStart •Deploy Solaris 11 server instance to host AI service –Use as JumpStart server as well•Translate rules to criteria•Translate profiles to manifests•Translate sysidcfg to SMF profile•Publish manifests and profiles to AI service •Convert finish scripts to SMF service(s)•Publish SMF service package to IPS repositoryjs2ai JumpStart to AI translation tool •Automatically converts existing JumpStart rules, profiles, sysidcfg files to AI equivalents •Conversion is best-effort, with instructions on issues that need manual resolution•Result is a directory hierarchy with AI profiles, system config manifests, log of the tool's actions•See js2ai(1m)SECTION 8: Summary, Q & ASimplified Administration, Service ProvisioningSummary•Oracle Solaris 11 deployment is different from Solaris 10–Little required customization work to start deploying–Powerful, stable, supported capabilities for those who need tocustomize•Transition documentation, tools are provided •Feature set will expand & evolve•Development of IPS and Installation are still in the open as OpenSolaris projects–Many opportunities for advice, feedback, discussion–/bin/view/Community+Group+install/For More Information / Try Out Today•Product overview and download–/solaris•Oracle Technology Network–/technetwork/server-storage/solaris11•System administrators community–/technetwork/systems•@ORCL_Solaris•/oraclesolaris•Oracle Solaris InsiderReduce Deployment Time with Training•Expert-led training to support your adoption ofOracle Solaris 11•Learning paths for new and experienced systemadministrators•Flexible training formats to save you time andmoney: In-class, virtual-class or self-studyKey Courses Available for:•Transition to Oracle Solaris 11•Oracle Solaris 11 System Administration•Oracle Solaris 11 Advanced SystemAdministrationOracle University: Oracle Solaris TrainingPrepare Your Organization for SuccessOverview/training/solaris11Exclusive Offer For Premier SupportCustomers:•Save 20% on Training. Details at/renewalofferRecovery Example with beadm (1)。
Oracle Solaris11 安装步骤--on SPARC
Oracle Solaris11安装步骤-- on SPARC 听说只能装t和M 系列? it is nice if you reply 。
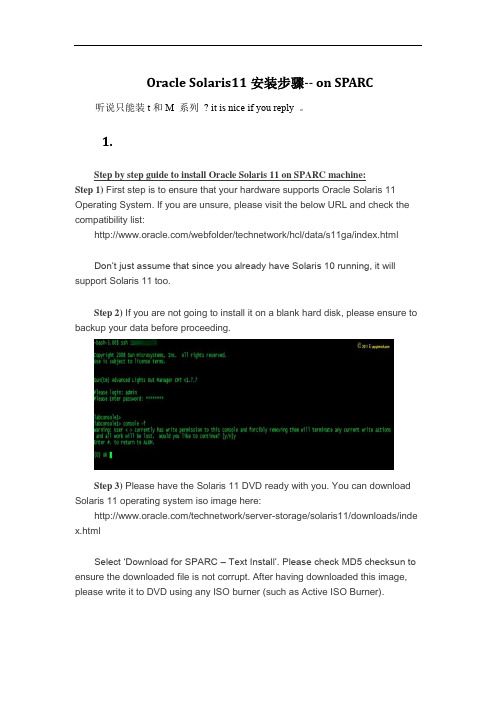
1.Step by step guide to install Oracle Solaris 11 on SPARC machine:Step 1) First step is to ensure that your hardware supports Oracle Solaris 11 Operating System. If you are unsure, please visit the below URL and check the compatibility list:/webfolder/technetwork/hcl/data/s11ga/index.htmlDon’t just assume that since you already have Solaris 10 running, it will support Solaris 11 too.Step 2) If you are not going to install it on a blank hard disk, please ensure to backup your data before proceeding.Step 3) Please have the Solaris 11 DVD ready with you. You can download Solaris 11 operating system iso image here:/technetwork/server-storage/solaris11/downloads/inde x.htmlSelect ‘Download for SPARC –Text Install’. Please check MD5 checksun to ensure the downloaded file is not corrupt. After having downloaded this image, please write it to DVD using any ISO burner (such as Active ISO Burner).Step 4) Connect to the system console either via iLO/ALOM etc through serial cable or ssh/telnet over the network in case of remote management configured.Step 5) Login to the console, in the example case a T2000 machine has been used.Step 6) Onsc or rsc prompt type console –f and console respectively and hit enter. You will now get OK prompt, if you powered on the server. In case if you are upgrading from Solaris 10, you will need to bring the server to OK prompt by typing init 0 or any other method you prefer. Please note, you cannot do a version upgrade from Solaris 10 to Solaris 11. There are several differences in these two versions, many features are now obsolete. Solaris 11 has to be a fresh install.Step 7) Make sure Solaris 11 DVD is inserted in the DVD drive. Now type‘boot cdrom’ without quote on OK prompt to begin installation as shown in the below screenshot:Step 8) The pre-installation phase or requirements gathering phase will being. Oracle Solaris 11 will ask several questions with options to you. The first step is to select the keyboard layout of your choice. Defaut keyboard layout for Oracle Solaris 11 installation via DVD is US-English.Step 9) Next, select the language of your choice, default installation language for Oracle Solaris 11 is English.Step 10) Hostname is by default selected as Solaris. You will get a chance to change it very soon.Step 11) Next step will give you an option to Install Oracle Solaris. If you are using a remote ssh session on shell, I would rather select 4 Terminal type and specify the correct terminal type I am using, in order for me to have a aligned display of the installation screens. The next page will give you further details about this.2.As mentioned in the previous post, lets select option 4 and select the correct terminal type. vt100 is your best bet if you are unsure about what terminal type are you using. While installing Oracle Solaris 11, the screen type chosen here will help you a lot.After choosing terminal type, on the installation menu, select 1 to install Oracle Solaris 11.Ads you can see 1 is the default value, hence you can just press enter/return key here.Next screen will show you the location of installation log, which is/system/volatile/install_log.Remember, from here until completion of install Oracle Solaris 11, you can move to forward screen by pressing F2 or to quit you can press F9.You have an option to press F6 for help.After you are on next screen of Solaris 11 installation, you will have the disk option, disk where Oracle Solaris 11 will be installed. Very important point to note and also, a considerable difference from Solaris 10 to Solaris 11 is noticed in this step. Solaris 11 is installed on rpool. Yes, zfs is the default file system of Oracle Solaris 11. To remind you, Solaris 10 has UFS as default file system.So, select the desired disk, I would recommend a whole disk for the installation, however, you have the option to install it on a single slice.3.Now, Oracle Solaris 11 installer will give you option to choose a hostname. Type any name that you want. If you want to change it later, you can change hostname from Solaris 11 operating system once the system is fully installed. The default name is solaris.You will also get options to choose from regarding how would you like to setup networking on the machine. If you are using DHCP you can select ‘Automatically’ or if you know the IP address, netmask value and gateway address, you can select Manually and provide these details for an interface to be plumbed and IP configured. Alternatively, if you are experienced with Oracle Solaris 9 or OracleSolaris 10, you can choose ‘None’ to manually plumb and configure network interface later, after the Operating System is installed.Next screen is to select time zone:Now select location that contains your time zone, press F2 to continue:In this example, I have selected United States as my server is located here:Eastern Time selected in this example, you can choose any other, based on your location or preference:4.Next, select option of date and time :Next, set root password, also, you need to create an user because solaris11 won’t allow direct root login.Review before installation of Oracle Solaris 11 begins, you can press F3 to go back and change any setting that you want:Press F2 to continue or F9 to quit installation. I pressed F2 and now watch the progress of Oracle Solaris 11 installation:5.Oracle Solaris 11 installation in progress:Installation of Oracle Solaris 11 is over. You can view install logs at/system/volatile/install_log before reboot.Once the system is rebooted install logs can be found at/var/sadm/system/logs/install_log.As mentioned earlier, Oracle Solaris 11 won’t allow direct root login because it treats root as a role. Use the user id created during installation and then su – to obtain root prompt:Congratulations on your installation of Oracle Solaris 11 operating system, now enjoy and explore this great OS.In next tutorial, I will show you how to install oracles Solaris 11 on Microsoft Windows OS as a virtual machine and save yourself from complex installation of dual boot. Stay tuned and keep learning.。
Oracle Solaris 11 使用iso镜像配置本地IPS
Oracle Solaris11使用iso镜像配置本地IPS原创:jerryjzm 随着oracle发布了solaris11,也将IPS正式引入到针对企业的solaris环境中。
它带来了很多方便管理软件包的地方,特别是解决软件包之间的依赖关系。
在日常的工作中,并不是所有的环境都具备连接外网,即使能连接外网也不能保证有很好的网络速度。
所有的包都从外网下载安装,也就受到了这些因素的限制。
幸好,oracle也提供搭建本地IPS环境的方式,而且可以将外网的IPS镜像到本地,利于本地环境搭建和部署。
这里就将自己搭建本地IPS的步骤写出来,有什么更好更优的方法,也请大家指出。
一、准备环境这个本地IPS环境是可以搭建在X86或是sparc系统上的。
对操作系统的要求是IPS所搭建的操作系统版本要高于等于IPS版本(也就是搭建的本地IPS服务于那个版本的操作系统)。
官方的解释是:这里我们用的就是solaris11for x86,而且我将使用web(http)而不是nfs,这样通过浏览器查询也方便。
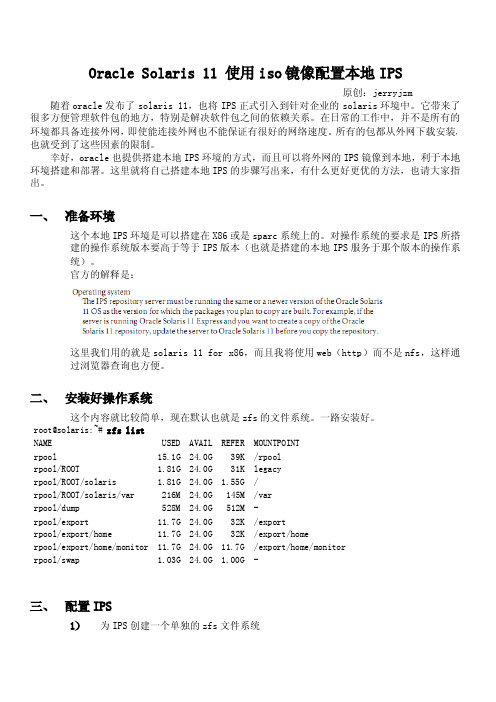
二、安装好操作系统这个内容就比较简单,现在默认也就是zfs的文件系统。
一路安装好。
root@solaris:~#zfs listNAME USED AVAIL REFER MOUNTPOINTrpool15.1G24.0G39K/rpoolrpool/ROOT 1.81G24.0G31K legacyrpool/ROOT/solaris 1.81G24.0G 1.55G/rpool/ROOT/solaris/var216M24.0G145M/varrpool/dump528M24.0G512M-rpool/export11.7G24.0G32K/exportrpool/export/home11.7G24.0G32K/export/homerpool/export/home/monitor11.7G24.0G11.7G/export/home/monitorrpool/swap 1.03G24.0G 1.00G-三、配置IPS1)为IPS创建一个单独的zfs文件系统root@solaris:~#zfs create rpool/export/repo11root@solaris:~#zfs listNAME USED AVAIL REFER MOUNTPOINTrpool15.1G24.0G39K/rpoolrpool/ROOT 1.81G24.0G31K legacyrpool/ROOT/solaris 1.81G24.0G 1.55G/rpool/ROOT/solaris/var216M24.0G145M/varrpool/dump528M24.0G512M-rpool/export11.7G24.0G33K/exportrpool/export/home11.7G24.0G32K/export/homerpool/export/home/monitor11.7G24.0G11.7G/export/home/monitorrpool/export/repo1131K24.0G31K/export/repo11rpool/swap 1.03G24.0G 1.00G-2)创建构造IPS的repository的基础机构root@solaris:~#pkgrepo create/export/repo11root@solaris:/export/repo11#ls-ltotal1-rw-r--r--1root root78Nov1717:47pkg5.repository3)从下载的文件生成ISO文件从oracle官网的/technetwork/server-storage/solaris11/downloads/index.html现在这2个压缩文件,解压后:root@solaris:/home/monitor#ls-ltotal24639827-rwx------1monitor staff2903566990Nov1601:03sol-11-1111-repo-full-iso-a-rwx------1monitor staff2762210301Nov1601:42sol-11-1111-repo-full-iso-b再cat sol-11-1111-repo-full.iso-a sol-11-1111-repo-full.iso-b>sol-11-1111-repo-full.isoroot@solaris:/home/monitor#ls-l*.iso-rw-r--r--1root root6940854272Nov1603:14sol-11-1111-repo-full.iso4)将生成的ISO文件以loopback的形式挂载使用root@solaris:~#mkdir/mnt/isoroot@solaris:~#lofiadm-a/mnt/iso//home/monitor/sol-11-1111-repo-full.isolofiadm:/mnt/iso is not a regular file,block,or character deviceroot@solaris:~#lofiadmBlock Device File Options/dev/lofi/1/home/monitor/sol-11-1111-repo-full.iso-root@solaris:~#mount-F hsfs/dev/lofi/1/mnt/isoroot@solaris:~#df-h/mnt/iso/Filesystem Size Used Available Capacity Mounted on/dev/lofi/1 6.5G 6.5G0K100%/mnt/iso5)从/mnt/iso中拷贝repository内容拷贝可以使用rsync也可以使用tar,使用过程中感觉到tar是相当快一些的,不过这一步都是比较耗费时间,毕竟有6G多内容嘛root@solaris:/mnt/iso/repo#tar cf-.|(cd/export/repo11;tar xfp-)6)为repository生产搜索索引root@solaris:/mnt/iso/repo#pkgrepo-s/export/repo11refreshInitiating repository refresh.四、配置web服务1)配置web服务,并检查root@solaris:/mnt/iso/repo#svccfg-s application/pkg/server setprop pkg/inst_root=/export/repo11root@solaris:/mnt/iso/repo#svccfg-s application/pkg/server setprop pkg/readonly=trueroot@solaris:/mnt/iso/repo#svcprop-p pkg/inst_root application/pkg/server/export/repo112)启动IPS(repository)服务root@solaris:/mnt/iso/repo#svcadm refresh application/pkg/serverroot@solaris:/mnt/iso/repo#svcadm enable application/pkg/server3)设置IPS的origin为本地的web服务地址root@solaris:~#pkg set-publisher-G'*'-g http://127.0.0.1:80solaris4)检查启动的服务情况root@solaris:/mnt/iso/repo#pkg publisherPUBLISHER TYPE STATUS URIsolaris origin online http://127.0.0.1:80/root@solaris:/mnt/iso/repo#pkgrepo info-s/export/repo11/PUBLISHER PACKAGES STATUS UPDATEDsolaris4292online2011-10-26T17:17:30.230911Zroot@solaris:/mnt/iso/repo#pkgrepo get-s/export/repo11/SECTION PROPERTY VALUEpublisher prefix solarisrepository description This\repository\serves\a\copy\of\the\Oracle\Solaris\11\Build\175b\Package\Repository. repository name Oracle\Solaris\11\Build\175b\Package\Repositoryrepository version4五、总结这样本地IPS就配置好了,安装一个包试试root@solaris:/mnt/iso/repo#pkg install SUNWdistro-constPackages to install:3Create boot environment:NoCreate backup boot environment:NoDOWNLOAD PKGS FILES XFER(MB)Completed3/365/650.2/0.2$<3>PHASE ACTIONSInstall Phase127/127PHASE ITEMSPackage State Update Phase3/3Image State Update Phase2/2打开web页面查看root@solaris:~#ifconfig net0net0:flags=1000843<UP,BROADCAST,RUNNING,MULTICAST,IPv4>mtu1500index2 inet130.30.3.249netmask ffffff00broadcast130.30.3.255ether8:0:27:d9:67:3。
5、solaris11基础管理和操作

如何设置一次性系统作业
%at [-m] time [date]
-m 任务完成后发送通知邮件 time 任务执行的时间,关键字有 am,pm,midnight,noon,now等 date 月份的前三个字母和日期,或关键字 today, tomorrow at> 输入任务的命令
at>Control-d
文件打包与压缩
1、利用tar 命令备份 $ tar cvf filename.tar 文件名 $ tar cvfP filename.tar /路径/文件名 f 选项表示不使用缺省设备,而使用提供的设备。 2、查看tar包内容: $ tar tvf filename.tar $ tar tvfP filename.tar 3、利用tar 命令复原(解tar): $tar xvf filename.tar x 表示将缺省设备中的文件复原到硬盘,v 表示复原时显示文件提 示。 $tar xvf /work/aaro1d /work/all.bak /work/state.wp
Page 5
Compress压缩命令
compress命令可将文件压缩以减少存储空间。压缩后 的文件以“.Z”结尾。展开命令为uncompress。压缩命令 格式: compress filename #则压缩后的文件名为file.Z 对file 文件进行压缩和解压缩 uncompress filename.Z
Page 10
在后台运行程序
在后台运行程序 要让程序在后台执行,只需在命令行的最后加上“&”符号。 [例1] 在后台运行find命令,在当前目录及其子目路下查找文件名为abc 的文件。 执行命令和立即显示的内容如下: root@sol11:/test# find . -name abc -print& [1] 3120 [1] Done find . -name abc –print 3120表示进程号(PID)。当find命令在后台执行完后,会显示结果。 在后台运行find命令,在当前目录及其子目路下查找文件名为abc的文 件并将结果存到myfind 文件中。 执行命令如下: $ find . -name abc -print>myfind&
Oracle TM Solaris 11 开发者安全性指南说明书

Oracle TM Solaris11开发者安全性指南文件号码E259122011年11月版权所有©2000,2011,Oracle和/或其附属公司。
保留所有权利。
本软件和相关文档是根据许可证协议提供的,该许可证协议中规定了关于使用和公开本软件和相关文档的各种限制,并受知识产权法的保护。
除非在许可证协议中明确许可或适用法律明确授权,否则不得以任何形式、任何方式使用、拷贝、复制、翻译、广播、修改、授权、传播、分发、展示、执行、发布或显示本软件和相关文档的任何部分。
除非法律要求实现互操作,否则严禁对本软件进行逆向工程设计、反汇编或反编译。
此文档所含信息可能随时被修改,恕不另行通知,我们不保证该信息没有错误。
如果贵方发现任何问题,请书面通知我们。
如果将本软件或相关文档交付给美国政府,或者交付给以美国政府名义获得许可证的任何机构,必须符合以下规定:ERNMENT RIGHTSPrograms,software,databases,and related documentation and technical data delivered to ernment customers are"commercial computer software"or "commercial technical data"pursuant to the applicable Federal Acquisition Regulation and agency-specific supplemental regulations.As such,the use,duplication, disclosure,modification,and adaptation shall be subject to the restrictions and license terms set forth in the applicable Government contract,and,to the extent applicable by the terms of the Government contract,the additional rights set forth in FAR52.227-19,Commercial Computer Software License(December2007). Oracle America,Inc.,500Oracle Parkway,Redwood City,CA94065.本软件或硬件是为了在各种信息管理应用领域内的一般使用而开发的。
- 1、下载文档前请自行甄别文档内容的完整性,平台不提供额外的编辑、内容补充、找答案等附加服务。
- 2、"仅部分预览"的文档,不可在线预览部分如存在完整性等问题,可反馈申请退款(可完整预览的文档不适用该条件!)。
- 3、如文档侵犯您的权益,请联系客服反馈,我们会尽快为您处理(人工客服工作时间:9:00-18:30)。
Oracle Solaris 11 上手指南作者:Brian Leonard 和Glynn Foster注:本文替代Solaris 11 Express 版本。
Oracle 不再支持Oracle Solaris 11 Express。
Oracle Solaris 11 安装简介,包括安装新软件和管理其他系统配置的步骤。
Oracle Solaris 11 分发时有多个不同安装选项:基于服务器的无需手动操作的自动化安装、基于文本的交互式安装(也适用于服务器)和包括完整桌面环境的交互式图形安装程序。
OTN 旨在帮助您充分熟悉Oracle 技术以便作出明智的决策。
提供文章、软件下载、文档等。
立即加入以获取完成工作所需的技术资源。
尽管本文所讨论的许多概念也适用于其他Oracle Solaris 11 安装选项,但本文重点介绍交互式图形安装程序。
强烈建议使用Oracle Solaris 10 的用户阅读从Oracle Solaris 10 转移到Oracle Solaris 11指南。
图形安装程序的正式名称为“Live Media”。
这意味着Oracle Solaris 将被引导到RAM 中,不会对现有操作系统造成任何影响。
加载安装安装程序后,您就可以随意体验Oracle Solaris,然后确定是否确实要将其安装到系统中。
您可以下载适用于x86 的Oracle Solaris 11 Live Media(该映像文件约为800 MB)并使用DVD 刻录机刻盘,也可以在虚拟机中或通过Oracle Integrated Lights Out Manager (ILOM) 远程控制台直接使用该ISO 映像。
Live Media 不适合长期使用。
例如,关闭系统后,您对系统的所有更改都将丢失。
因此,接下来您需要在系统上安装Oracle Solaris。
通过Live Media 在桌面上放置的Install Oracle Solaris 图标,您可以轻松进行安装。
在继续下一步之前,我们先来了解一下安装选项。
安装选项可通过以下几种方式安装Oracle Solaris 11:安装到现有操作系统的虚拟机上作为独立的操作系统安装到计算机上在已经安装了其他操作系统的计算机上进行安装(多重引导方案)安装在虚拟机上开始使用Oracle Solaris 的最简单方法是将其安装到现有操作系统的虚拟机上。
图 1 显示在使用Oracle VM VirtualBox 的Apple OS X 上安装的Oracle Solaris 11。
图 1. Apple OS X 上的Oracle SolarisOracle Solaris 11 可以识别虚拟机提供的虚拟设备。
实际上,如果以全屏幕模式运行Oracle Solaris 11,您甚至会忘记这是在另一个操作系统上运行。
该方法的一个缺点是您需要足够的内存来同时运行两个操作系统,为了保持良好的性能,建议内存最小为 2 GB。
您还需要至少7 GB 的磁盘空间来安装操作系统。
Oracle VM VirtualBox是一个可以免费下载的虚拟机监控程序,支持将Microsoft Windows、Apple OS X、Linux 和Oracle Solaris 作为主机平台,当然,Oracle Solaris 也可以作为它的一个来宾操作系统。
为方便您采用此方法,Oracle 为Oracle VM VirtualBox 提供了一些专用于特定用途(如评估Oracle Solaris 11 上可用的开发工具)的预先安装的虚拟机。
通过Live Media 引导启动之后,安装过程变得非常简单。
只需单击桌面上的Install Oracle Solaris图标,即可启动图形安装程序,如图 2 所示。
图 2. Oracle Solaris 图形安装程序如图 2 所示,安装过程十分简单,只是在部署一组固定的程序包之前询问几个基本问题。
Oracle Solaris 安装成功之后,您可以使用Package Manager 轻松定制安装。
安装过程完成后,就可以直接重新启动进入新的Oracle Solaris 环境或查看Oracle Solaris 安装日志,如图 3 所示。
图 3. 查看安装日志作为独立的操作系统安装到计算机上如果您有一个x86 系统专门用于安装Oracle Solaris 11,则此安装过程实际上与将操作系统安装到虚拟机中相同。
只需引导Live Media 并启动图形安装程序。
此方法最大的问题是Oracle Solaris 11 是否有适合您硬件设备的驱动程序。
如果您运行Live Media,就可以轻松确定您设备的受支持程度。
Live Media 桌面上有一个Device Driver Utility 图标,如图 4 所示。
双击该图标,等待扫描完成。
从Live Media 引导时,默认的用户登录名和口令都是jack。
如果需要成为root 用户,可以使用口令solaris。
稍后我们将进一步讨论如何在Oracle Solaris 安装过程中设置初始用户。
图 4. Oracle Solaris Device Driver Utility如果缺少驱动程序,该实用程序会告诉您从何处获得帮助。
您也可以用Google 搜索驱动程序。
如果仍无法解决问题,建议您在获得所需驱动程序或购买新系统、组件来解决驱动程序问题之前先使用Oracle VM VirtualBox。
如果要在基于SPARC 的系统上安装Oracle Solaris 11,则必须使用交互文本安装程序。
与Live Media 不同,该安装将有选择地安装适合面向服务器环境的软件。
它不包括桌面环境。
初始安装之后,可以使用Package Manager 安装solaris-desktop程序包来安装完整桌面环境。
多重引导方案在多重引导方案中,可以在已经安装了其他操作系统的计算机上安装Oracle Solaris 11。
该方案最复杂,且需要一些准备。
Oracle Solaris 11 Live Media 包括GNOME Partition Editor (GParted),可用于对硬盘进行分区。
您应创建Oracle Solaris 安装程序可识别的Linux swap类型的分区。
如果现有操作系统为Windows,则Oracle Solaris 引导加载程序可以顺利识别。
如果现有操作系统为Linux,请确保备份了GRUB配置文件,因为您需要把它的内容添加到Oracle Solaris GRUB菜单中。
请参见针对这些方案的Oracle Solaris 11 产品文档。
用户现在,Oracle Solaris 11 已经安装好,我们来讨论如何利用分配给用户ID(在安装期间创建)的权限来管理您的系统。
请回想一下,您在安装期间创建了一个用户帐户,如图 5 所示。
图 5. Oracle Solaris 图形安装程序—配置用户安装程序仅向您询问一个口令,以此作为root帐户和初始用户帐户的口令。
但是,root口令很快会过期,如果您尝试切换到root帐户就会发现这一点:bleonard@solaris:~$ suPassword:su: Password for user 'root' has expiredNew Password:需要管理员权限的GUI 工具还将提示您输入root口令,然后说明该root 用户已经到期,必须提供新的口令,如图 6 所示。
图 6. 提示输入新的root口令root角色如果您查看/etc/passwd文件,可以看到root已经定义。
bleonard@solaris:~$ cat /etc/passwdroot:x:0:0:Super-User:/root:/usr/bin/bashdaemon:x:1:1::/:bin:x:2:2::/usr/bin:sys:x:3:3::/:adm:x:4:4:Admin:/var/adm:lp:x:71:8:Line Printer Admin:/:...然而,您仍然无法作为root登录。
出于安全考虑,Oracle Solaris 11 不会将root定义为传统用户帐户。
如果您查看/etc/user_attr文件,将看到root被定义为一个角色,如清单 1 所示。
清单1:验证root被定义为角色bleonard@solaris:~$ cat /etc/user_attr## The system provided entries are stored in different files# under "/etc/user_attr.d". They should not be copied to this file.## Only local changes should be stored in this file.# This line should be kept in this file or it will be overwritten.#root::::type=rolebleonard::::type=normal;lock_after_retries=no;profiles=System Administrator;roles=root您还可以看到,默认情况下,为安装程序创建的用户ID 分配了root角色。
因此,虽然无法作为root 登录,但可以切换到root角色,此时将提示您输入root口令。
注:使用su时,默认用户名为root且不是必填的,这在前面更改默认口令的示例中已经介绍过。
bleonard@solaris:~$ su rootPassword:bleonard@solaris:~#sudo命令除了为安装时创建的用户分配root角色外,还将其添加到/etc/sudoers文件中。
/etc/sudoers 文件提供了详细记录。
您可以定义非常细粒度的规则,规定特定用户可执行的操作。
而安装期间创建的用户可以执行任何操作(就像root用户一样)。
安装期间所创建用户的条目如下所示:bleonard ALL=(ALL) ALL上述条目说明,用户bleonard可以在任何主机上作为任何用户运行任何命令。
要详细了解如何微调用户权限,请参阅sudoers手册页面。
理论上讲,您永远不应切换到root角色来执行授权的操作,例如,将文件写入文件系统根目录:bleonard@solaris:~$ touch /file1touch: cannot touch `/file1': Permission denied通过为命令添加前缀sudo可获得完成操作所需的权限:bleonard@solaris:~$ sudo touch /file1Password:注意,sudo所需的口令并非root口令,而是您的用户帐户口令。