AWS服务器配置部署手册
Amazon AWS部署文档

金风科技传播与信息云管理平台Amazon AWS部署文档1、Web服务器用于部署金风科技传播与信息云管理平台。
服务器要求:服务器类型:EC2推荐使用AMI:Amazon Linux AMI最低配置:t2.micro (变量ECU, 1 vCPU, 2.5 GHz, Intel Xeon Family, 1 GiB 内存, 8G存储)推荐配置:rge (6.5 ECU, 2 vCPU, 2.4 GHz, Intel Xeon E5-2676v3, 8 GiB 内存, 仅32G存储)数量:1台(根据实际情况可以部署多台)2、文件转换服务器用于部署文件转换服务器。
服务器要求:服务器类型:EC2推荐使用AMI:Amazon Linux AMI最低配置:t2.micro (变量ECU, 1 vCPU, 2.5 GHz, Intel Xeon Family, 1 GiB 内存, 8G存储)推荐配置:rge (6.5 ECU, 2 vCPU, 2.4 GHz, Intel Xeon E5-2676v3, 8 GiB 内存, 仅32G存储)数量:1台(根据实际情况可以部署多台)3、数据库服务用于数据存储。
服务要求:服务类型:RDS数据库类型:生产MySQL数据库版本:5.6.27最低配置:db.t2.micro (2 vCPU, 8 GiB 内存,5G)推荐配置:rge (2 vCPU, 8 GiB 内存,20G)4、文件存储服务用于平台用户文件的存储和下载。
服务要求:服务类型:S3存储桶:数量1 可以弹性最大5TB5、多媒体服务用于存储用户的较大的音频和视频文件,可以在线预览。
服务要求:服务类型:Elastic Transcoder、S3存储桶:数量1 可以弹性最大5TB注:多媒体服务申请时,只有个别地区有此服务,需要申请存储桶,存储视频、音频和封面文件,此服务的地区要与存储桶地区一致。
aws使用方法

aws使用方法AWS(亚马逊云服务)是一种云计算平台,为个人、企业和组织提供各种云服务和解决方案,包括虚拟服务器、存储、数据库、网络服务等。
在本文中,我们将介绍AWS的使用方法。
首先,您需要创建一个AWS账户。
前往AWS官方网站并按照指引注册账户。
在注册过程中,您需要提供一些个人或组织的信息,同时需要提供您的付款信息。
一旦注册成功并登录到AWS控制台,您将能够访问AWS的各种服务。
AWS提供了丰富的云服务,可以根据您的需求选择适合的服务。
例如,如果您想运行一个虚拟服务器,可以使用Amazon EC2(亚马逊弹性计算云)服务。
在EC2中,您可以选择不同的服务器实例类型、操作系统和存储选项。
根据您的需求配置您的虚拟服务器,并启动它。
AWS还提供了存储服务,例如Amazon S3(简单存储服务),用于存储和检索任意数量的数据。
您可以创建存储桶并将文件上传到该存储桶中。
这些存储桶可以供您公开访问,或者设置为私有以进行更高级别的安全性。
此外,AWS还提供了数据库服务,如Amazon RDS(关系数据库服务),可以轻松管理和扩展关系数据库实例。
您可以选择不同的数据库引擎(如MySQL、PostgreSQL、Oracle等)并配置实例规格、备份计划等。
AWS还提供了诸如Amazon Route 53(域名系统服务)、Elastic Load Balancer (弹性负载均衡器)和Amazon VPC(虚拟私有云)等网络服务,以提供可靠和安全的网络基础设施。
最后,AWS还提供了一系列工具和服务,用于监控和管理您的AWS资源。
例如,AWS CloudWatch可以帮助您监控资源利用率和性能指标,AWS Identity and Access Management(IAM)可以帮助您管理对AWS服务的访问权限。
总结来说,AWS是一种强大而灵活的云服务平台,提供了各种各样的服务和解决方案。
通过注册AWS账户并访问AWS控制台,您可以根据需求选择和配置适合您的服务,并轻松管理和扩展您的云基础设施。
AWS Storage Gateway 使用手册说明书

AWS Storage Gateway使用手册一、文档说明本文档将主要介绍如何使用AWS Storage Gateway的文件网关和VMwareESXI,来简化文件上传至S3的过程。
二、Storage Gateway介绍2.1 Storage GatewayAWS Storage Gateway 将本地软件设备与S3存储相连接,从而在本地IT 环境与S3存储基础设施传输数据。
可以使用此服务将数据存储到AWS S3,利用经济高效的可扩展存储来帮助保持数据安全性。
2.2 Storage Gateway分类AWS Storage Gateway 提供了基于文件网关、卷网关以磁网关的方式。
2.2.1 文件网关文件网关–文件网关支持连接到Amazon Simple Storage Service (Amazon S3) 的文件接口并将服务和虚拟软件设备组合在一起。
通过使用此组合,可以使用行业标准文件协议(如网络文件系统(NFS)) 在Amazon S3 中存储和检索对象。
软件设备(也就是网关) 作为运行在VMware ESXi 或Microsoft Hyper-V 管理程序上的虚拟机(VM) 部署到的本地环境中。
利用网关,可以将S3 中的对象作为NFS 装载点上的文件进行访问。
2.2.2 卷网关卷网关提供了支持云的存储卷,可以从本地应用程序服务器将该存储卷作为Internet 小型计算机系统接口(iSCSI) 设备安装。
2.2.3 磁带网关利用虚拟磁带库,将数据经济高效且持久的方式在Amazon Glacier 中,可以对备份数据进行存档。
2.3 工作原理(架构)2.3.1 文件网关通过服务器挂载NFS文件系统。
写入到NFS 的文件网关会异步更新Amazon S3 中的对象,所有数据传输都是通过HTTPS 完成的。
通过服务器挂载NFS文件系统。
写入到NFS 的文件网关会异步更新Amazon S3 中的对象,所有数据传输都是通过HTTPS 完成的。
AWS高可用性设计与自动化路由表更改的FortiGate NGFW部署指南说明书
AWS BEST PRACTICESHigh Availability Setup and Automating Route Table Change for an Active-Passive FortiGate Next Generation Firewall DeploymentQ3 2017• In an Active-Passive FortiGate HA environment in AWS, if the Active firewall has an issue and cannot process the traffic, amanual change is necessary for the route table to go through the Secondary Firewall. This is not ideal and might increasethe outage time.• To work around this, a python script can be used to automate the process. The python script monitors the primaryfirewall, and if the primary firewall goes down, it makes theappropriate API calls to automate the route table changesneeded to move to the secondary firewall.• When the primary firewall is restored, the python script will make the API calls to AWS to change the route table back to the primary firewall.• HA example:FORTIGATE HA SETUP: VPC_CFT STEPSStep 1. Download the CloudFormation template.https:///fortigatetemplates/FortiGate-HAtemplate5.4.5_ondemand.templateStep 2. Log in to AWS Management Console using your AWS login credentials. https://Step 3. Navigate to CloudFormation service in the Management Tools Section of the Management Console.Step 5. Choose the option “Upload a template to Amazon S3,” click on “Choose File,” and browse to the downloaded template from step 1. Click Next.Step 8. Click Next and provide a key name (optional).Step 10. Wait for the CloudFormation service to finish creating all the resources. The “events” tab should list the information the template is creating. The “resources” tab should list the resources as they are created.Step 13. Log in to the Worker Node through ssh. The IP address of the Worker Node is listed in the results section of the CloudFormation stack. The Worker Node is an Amazon Linux AMI that has the scripts required to monitor the FortiGates./AWSEC2/latest/UserGuide/EC2_GetStarted.html#ec2-connect-to-instance-linuxExample screenshot of the command to log in and how it looks after login.Step 14. Navigate to the folder fortigateha once you are logged into the worker node. • cd fortigatehaStep 15. Execute the python script fortigateha.py with the runtime variable stack name. python fortigateha.pyOnce this is done, FortiGate HA setup is complete.Copyright © 2017 Fortinet, Inc. All rights reserved. Fortinet , FortiGate , FortiCare and FortiGuard , and certain other marks are registered trademarks of Fortinet, Inc., and other Fortinet names herein may also be registered and/or common law trademarks of Fortinet. All other product or company names may be trademarks of their respective owners. Performance and other metrics contained herein were attained in internal lab tests under ideal conditions, and actual performance and other results may vary. Network variables, different network environments and other conditions may affect performance results. Nothing herein represents any binding commitment by Fortinet, and Fortinet disclaims all warranties, whether express or implied, except to the extent Fortinet enters a binding written contract, signed by Fortinet’s General Counsel, with a purchaser that expressly warrants that the identified product will perform according to certain expressly-identified performance metrics and, in such event, only the specific performance metrics expressly identified in such binding written contract shall be binding on Fortinet. For absolute clarity, any such warranty will be limited to performance in the same ideal conditions as in Fortinet’s internal lab tests. Fortinet disclaims in full any covenants, representations, and guarantees pursuant hereto, whether express or implied. Fortinet reserves the right to change, modify, transfer, or otherwise revise this publication without notice, and the most current version of the publication shall be applicable. Fortinet disclaims in full any covenants, representations, and guarantees pursuant hereto, whether express or implied. Fortinet reserves the right to change, modify, transfer, or otherwise revise this publication without notice, and the most current version of the publication shall be applicable.GLOBAL HEADQUARTERSFortinet Inc.899 Kifer RoadSunnyvale, CA 94086United StatesTel: +1.408.235.7700/sales EMEA SALES OFFICE 905 rue Albert Einstein 06560 Valbonne France Tel: +33.4.8987.0500APAC SALES OFFICE 300 Beach Road 20-01The Concourse Singapore 199555Tel: +65.6513.3730LATIN AMERICA HEADQUARTERS Sawgrass Lakes Center 13450 W. Sunrise Blvd., Suite 430Sunrise, FL 33323Tel: +1.954.368.9990Step 16. Once the script is started, the output will look like:Congratulations: You have created an active:passive automated HA architecture in your AWS VPC.。
AWS云计算技术手册
AWS云计算技术手册1. 引言随着云计算技术的快速发展,越来越多的企业选择使用亚马逊网络服务(Amazon Web Services,简称AWS)来满足其计算和数据存储需求。
本手册将介绍AWS云计算技术的基本概念、核心服务和最佳实践,旨在帮助读者全面了解和应用AWS的能力。
2. AWS云计算简介2.1 云计算概述2.1.1 云计算的定义2.1.2 云计算的优势2.1.3 云计算的分类2.2 AWS云计算平台2.2.1 AWS的起源和发展2.2.2 AWS的基本架构2.2.3 AWS的全球基础设施3. AWS核心服务3.1 计算服务3.1.1 Amazon Elastic Compute Cloud(EC2)- EC2实例的创建和管理- 安全组和密钥对的配置- 实例的自动伸缩3.2 存储服务3.2.1 Amazon Simple Storage Service(S3)- S3存储桶的创建和配置- 对象的上传和下载- S3数据备份和冗余3.3 数据库服务3.3.1 Amazon Relational Database Service(RDS) - RDS数据库实例的创建和管理- 数据库的备份和恢复- 数据库的扩展和优化3.4 网络与内容分发服务3.4.1 Amazon Virtual Private Cloud(VPC)- VPC网络的设置和操作- 子网和路由表的配置- 安全连接的建立4. 最佳实践指南4.1 安全性和合规性4.1.1 Identity and Access Management(IAM) - IAM用户的创建和权限管理- IAM角色和策略的配置- IAM安全最佳实践4.2 弹性和可伸缩性4.2.1 弹性负载均衡器(ELB)- ELB的配置和管理- 监控和调整负载均衡- 高可用性和自动伸缩4.3 成本优化4.3.1 AWS计费模型- 按需实例的优化策略- 预留实例的购买和利用- 成本管理和优化工具5. 结论云计算已经成为现代企业获取弹性和可伸缩计算资源的重要手段,而AWS作为全球领先的云计算平台,为用户提供了丰富的服务和工具。
亚马逊网络服务(AWS)云原生管理防火墙服务执行概述说明书
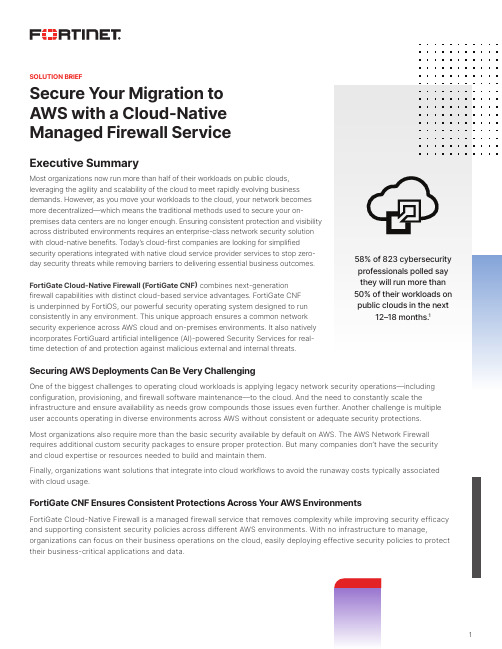
Secure Y our Migration to AWS with a Cloud-Native Managed Firewall ServiceExecutive SummaryMost organizations now run more than half of their workloads on public clouds,leveraging the agility and scalability of the cloud to meet rapidly evolving businessdemands. However, as you move your workloads to the cloud, your network becomesmore decentralized—which means the traditional methods used to secure your on-premises data centers are no longer enough. Ensuring consistent protection and visibilityacross distributed environments requires an enterprise-class network security solutionwith cloud-native benefits. Today’s cloud-first companies are looking for simplifiedsecurity operations integrated with native cloud service provider services to stop zero-day security threats while removing barriers to delivering essential business outcomes.FortiGate Cloud-Native Firewall (FortiGate CNF) combines next-generationfirewall capabilities with distinct cloud-based service advantages. FortiGate CNFis underpinned by FortiOS, our powerful security operating system designed to runconsistently in any environment. This unique approach ensures a common networksecurity experience across AWS cloud and on-premises environments. It also nativelyincorporates FortiGuard artificial intelligence (AI)-powered Security Services for real-time detection of and protection against malicious external and internal threats.Securing AWS Deployments Can Be Very ChallengingOne of the biggest challenges to operating cloud workloads is applying legacy network security operations—including configuration, provisioning, and firewall software maintenance—to the cloud. And the need to constantly scale the infrastructure and ensure availability as needs grow compounds those issues even further. Another challenge is multiple user accounts operating in diverse environments across AWS without consistent or adequate security protections.Most organizations also require more than the basic security available by default on AWS. The AWS Network Firewall requires additional custom security packages to ensure proper protection. But many companies don’t have the security and cloud expertise or resources needed to build and maintain them.Finally, organizations want solutions that integrate into cloud workflows to avoid the runaway costs typically associated with cloud usage.FortiGate CNF Ensures Consistent Protections Across Y our AWS EnvironmentsFortiGate Cloud-Native Firewall is a managed firewall service that removes complexity while improving security efficacy and supporting consistent security policies across different AWS environments. With no infrastructure to manage, organizations can focus on their business operations on the cloud, easily deploying effective security policies to protect their business-critical applications and data.58% of 823 cybersecurity professionals polled say they will run more than 50% of their workloads on public clouds in the next 12–18 months.1SOLUTION BRIEFFortiGate CNF is designed for three critical use cases:• Outbound traffic inspection: Content inspection of outgoing traffic from AWS workloads to the internet• Inbound traffic protection: Deep visibility into incoming traffic and advanced security measures to protect AWS workloads • East-west traffic filtering: Inspection and control of traffic between AWS VPCs and preventing the lateral spread of threats This CNF service delivers seamless scalability, implicit resiliency, streamlined workflows, and flexible consumption through deep cloud-native integrations with native AWS services like AWS Gateway Load balancer, AWS Firewall Manager, and AWS Marketplace. Through this service, Fortinet and AWS bring together the best of both worlds—deep security expertise and leading-edge cloud technology—in a simple-to-manage and easy-to-consume service.FortiGate CNF Enterprise-Grade ProtectionsCloud-native integrations: FortiGate CNF offers the robust inspection capabilities of a next-generation firewall. This includes support for security policies and deep visibility into the application layer—combined with advanced AI-powered detection and comprehensive protection, including geo-IP blocking, advanced filtering, threat protection, etc. It also supports metadata-based policies and dynamic objects to abstract away network dependencies and protect elastic workloads with changing IP addresses.It simplifies security delivery to deliver zero operations overhead. Unlike other solutions, FortiGate CNF requires just one CNF instance with an appropriate policy set to secure an entire AWS region, including multiple accounts, sub-nets, VPCs, and availability zones.Flexible management: The FortiGate CNF console provides a lightweight user interface and intuitive wizards to easily create, deploy, and manage security policies for AWS environments. For more sophisticated enterprise IT cases, a centralized management tool like FortiManager can define, deploy, and manage advanced security policies across multiple deployments and hybrid environments.Optimal pricing: By aggregating security across a region into a single CNF instance, enterprises can avoid the extra costs entailed by other vendor offerings that charge by cloud networks or availability zones. FortiGate CNF also offers competitive hourly and linear traffic inspection costs. The service also utilizes AWS Graviton instances to deliver even better price performance.November 23, 2022 12:07 PMBetter Protection EverywhereFortiGate CNF reduces the mean time to identify and remediate non-complianceissues. Its deeper traffic inspection reduces risks from attacks on AWS workloadscaused by web-based threats, vulnerability exploits, and other external andinternal threat vectors.Integration with the AWS Gateway Load Balancer helps network security teams moveat the speed and scale of applications teams. It eliminates do-it-yourself automationand easily secures Amazon VPC environments—while improving high availability andscale. And integration with the AWS Firewall Manager streamlines security workflowsand automates security rollout, saving time and increasing efficiency.The centralized FortiManager management solution allows enterprises to applysecurity policies consistently across hybrid environments—on-premises and onAWS. Complexity in securing elastic workloads, where network address–basedpolicies won’t work, is reduced using its dynamic object policies. Cloud-firstenterprises can also leverage the lightweight user interface and intuitive wizards inthe FortiGate CNF console to easily create, deploy, and manage security policiesfor their AWS environment.Organizations that deploy FortiGate CNF also save on infrastructure costs as thereis no security software infrastructure to build, deploy, or operate. They also save ontraining and resourcing costs otherwise necessary to deliver DIY security on AWS.FortiGate CNF delivers the following benefits:•Comprehensive network protection •Streamlined cloud workflows •Consistent hybrid-cloud security management • Optimized TCO Comprehensive Security for AWS Begins with FortiGate Cloud-Native FirewallWith today’s C-suite focused on the business value of cloud adoption, cloud security is now a business imperative. They need network security options in the cloud that offer enterprise-grade security, simplicity, flexibility, and predictable costs. And increasingly, they need those services to span their hybrid network environments. FortiGate Cloud-Native Firewall delivers on these needs, providing advanced network protection at any scale. With FortiGate CNF, you can maintain a robust security posture and accelerate your cloud journey on AWS without compromising security and compliance.Copyright © 2022 Fortinet, Inc. All rights reserved. Fortinet ®, FortiGate ®, FortiCare ® and FortiGuard ®, and certain other marks are registered trademarks of Fortinet, Inc., and other Fortinet names herein may also be registered and/or common law trademarks of Fortinet. All other product or company names may be trademarks of their respective owners. Performance and other metrics contained herein were attained in internal lab tests under ideal conditions, and actual performance and other results may vary. Network variables, different network environments and other conditions may affect performance results. Nothing herein represents any binding commitment by Fortinet, and Fortinet disclaims all warranties, whether express or implied, except to the extent Fortinet enters a binding written contract, signed by Fortinet’s General Counsel, with a purchaser that expressly warrants that the identified product will perform according to certain expressly-identified performance metrics and, in such event, only the specific performance metrics expressly identified in such binding written contract shall be binding on Fortinet. For absolute clarity, any such warranty will be limited to performance in the same ideal conditions as in Fortinet’s internal lab tests. Fortinet disclaims in full any covenants, representations, and guarantees pursuant hereto, whether express or implied. Fortinet reserves the right to change, modify, transfer, or otherwise revise this publication without notice, and the most current version of the publication shall be applicable.1 “Cloud Security Report,” Cybersecurity Insiders, accessed November 23, 2022.2Ibid.The public cloud Infrastructure-as-a-Service (IaaS) market is expected to reach $225 billion by 2025. The size of cloud security—at nearly $20 billion already in 2022—underscores the importance of security to organizations in various phases of their cloud journey.2。
如何使用AWS云服务进行应用部署与管理

如何使用AWS云服务进行应用部署与管理第一章:AWS云服务概述1.1 云计算与AWS云服务的关系1.2 AWS云服务的优势及适用场景1.3 AWS云服务的主要产品和服务介绍第二章:AWS基础设施搭建与环境准备2.1 注册AWS账号与创建IAM用户2.2 创建Virtual Private Cloud(VPC)2.3 设置安全组和网络访问控制列表(NACL)2.4 设置网络和子网2.5 创建EC2实例第三章:应用部署与管理工具介绍3.1 AWS Elastic Beanstalk3.1.1 Elastic Beanstalk的优势与适用场景3.1.2 Elastic Beanstalk的使用步骤和主要功能3.2 AWS OpsWorks3.2.1 OpsWorks的优势与适用场景3.2.2 OpsWorks的使用步骤和主要功能3.3 AWS CloudFormation3.3.1 CloudFormation的优势与适用场景3.3.2 CloudFormation的使用步骤和主要功能第四章:实际应用部署案例分析4.1 使用Elastic Beanstalk进行应用部署与管理4.1.1 创建应用环境4.1.2 配置环境变量4.1.3 持续集成与自动化部署4.2 使用OpsWorks进行应用部署与管理4.2.1 创建OpsWorks堆栈4.2.2 配置应用层和数据库层4.2.3 定制Chef运行列表4.3 使用CloudFormation进行应用部署与管理4.3.1 编写CloudFormation模板4.3.2 创建并部署Stack4.3.3 更新和删除Stack第五章:AWS云服务的监控与调优5.1 AWS CloudWatch监控服务详解5.1.1 CloudWatch监控指标5.1.2 创建和设置CloudWatch报警5.2 AWS自动扩展组(Auto Scaling)的使用5.2.1 配置自动扩展组5.2.2 设置自动伸缩策略5.3 AWS负载均衡(ELB)的配置与使用5.3.1 创建和配置负载均衡器5.3.2 与Auto Scaling、Elastic Beanstalk集成第六章:AWS云服务的安全管理6.1 AWS Identity and Access Management(IAM)的原理和使用6.1.1 创建用户和用户组6.1.2 设置权限和访问控制6.1.3 多因素身份验证(MFA)6.2 AWS Web Application Firewall(WAF)的配置与使用6.2.1 创建WebACL6.2.2 配置规则和条件6.2.3 实时流量监控和阻断6.3 AWS Key Management Service(KMS)的使用6.3.1 创建和管理加密密钥6.3.2 加密应用数据和存储第七章:备份与恢复7.1 AWS数据库备份与恢复策略7.1.1 RDS数据库的备份与恢复7.1.2 DynamoDB的备份与恢复7.2 AWS存储备份与恢复策略7.2.1 S3存储桶的备份与恢复7.2.2 Glacier冷存储的备份与恢复第八章:成本管理与优化8.1 AWS计费模型与定价方式8.2 使用AWS计费工具进行成本监控和报告生成8.3 成本优化的策略和实践第九章:最佳实践与经验分享9.1 保持应用高可用性的最佳实践9.2 提高应用性能的最佳实践9.3 安全管理的最佳实践9.4 成本管理和优化的最佳实践总结:AWS云服务在应用部署与管理方面的优势和应用案例的总结。
亚马逊AWS 蓝绿部署在AWS上的实践模式_武杰
本话题讨论的主要内容•系统部署的风险分析•蓝/绿部署的重要概念•在AWS上进行蓝/绿部署的益处•在AWS上进行蓝/绿部署模式•数据层面切换的最佳实践•成本优化系统部署的风险•面临的挑战•应用程序出错•基础架构失效•容量的问题•扩展的问题•人为的错误•流程失效•回滚的问题•对业务的影响•宕机时间•数据丢失•糟糕的客户体验•损失收入•业务人员的抱怨•员工压力太大•浪费时间和资源在AWS上定义蓝/绿部署什么是蓝/绿部署?•“蓝”•(existing production environment)•“绿”•(parallel environmentrunning a differentversion of theapplication)•“部署”•(ability to switch traffic betweenthe two environments)什么是环境?Boundary for where things changed and what needs to be deployed示例:App component, app tier, microservice 示例:DNS, load balancerv2.2.103v2.3.020在AWS上进行蓝/绿部署的益处•AWS:•弹性部署•多样的选择•容量可动态调整•按实际用量付费•高效快速在AWS上进行蓝/绿部署模式共有的问题: 环境的自动化•成功的部署取决于对如下风险的克服:•应用程序出问题(功能性的问题)•应用程序的性能问题•人员/流程失效•基础架构失效•回滚的容量•高额的成本•蓝/绿部署的不同模式对以上这些风险有不同的处理方式CloudFormation全面的自动化平台✓定义从网络到软件的整个环境✓控制高一级的自动化服务: Elastic Beanstalk,OpsWorks, Auto Scaling自动化平台的长处模式: 经典的DNS切换•部署流程:•从已有的应用环境开始•部署新的应用环境•测试绿的应用环境•通过DNS逐步切换流量•监控你的环境•出现问题,回滚到蓝的应用环境模式: 经典的DNS切换•部署流程:•从已有的应用环境开始•部署新的应用环境•测试绿的应用环境•通过DNS逐步切换流量•监控你的环境•出现问题,回滚到蓝的应用环境•部署流程:•从已有的应用环境开始•部署新的应用环境•测试绿的应用环境•通过DNS逐步切换流量•监控你的环境•出现问题,回滚到蓝的应用环境模式: 经典的DNS 切换模式: 经典的DNS切换•部署流程:•从已有的应用环境开始•部署新的应用环境•测试绿的应用环境•通过DNS逐步切换流量•监控你的环境•出现问题,回滚到蓝的应用环境模式: 经典的DNS切换•部署流程:•从已有的应用环境开始•部署新的应用环境•测试绿的应用环境•通过DNS逐步切换流量•监控你的环境•出现问题,回滚到蓝的应用环境模式: 经典的DNS切换•部署流程:•从已有的应用环境开始•部署新的应用环境•测试绿的应用环境•通过DNS逐步切换流量•监控你的环境•出现问题,回滚到蓝的应用环境模式: 经典的DNS切换•部署流程:•从已有的应用环境开始•部署新的应用环境•测试绿的应用环境•通过DNS逐步切换流量•监控你的环境•出现问题,回滚到蓝的应用环境•"Resources": {•"myApp": { "Type": "AWS::ElasticBeanstalk::Application "},•"myConfigTemplate": { •"Type":"AWS::ElasticBeanstalk::ConfigurationTemplate "•},•"myBlueAppVersion ": {•"Type": "AWS::ElasticBeanstalk::ApplicationVersion "•},•"myBlueEnvironment ": {•"Type":"AWS::ElasticBeanstalk::Environment "•},•"myBlueEndpoint ": {"Type": “AWS::Route53::RecordSet "},•..."myGreenAppVersion ": {"Type": "AWS::ElasticBeanstalk::ApplicationVersion "},"myGreenEnvironment ": {"Type": "AWS::ElasticBeanstalk::Environment "},"myGreenEndpoint ": {"Type": "AWS::Route53::RecordSet "}...自动化你的应用环境•Use CloudFormation templates to model your environment•Version-control your templates•Use Elastic Beanstalk or OpsWorks to model your applications inside the template•Update CloudFormationstack from updated template containing green environmentAmazon Route 53 基于权重的DNS切换•AWS Elastic Beanstalk environment endpoint swap•DNS record time-to-live (TTL)•Reaction time = (TTL ×no. of DNS caches) + Route53 propagation time, up to 1min •Beware of misbehaving DNS clients•Auto Scaling and Amazon Elastic Load Balancing (ELB) need time to scale•Measurable metrics•ELB: Latency, SurgeQueueLength, SpillOverCount, BackendConnectionErrors •Your application metrics•Your deployment goals模式回顾:经典的DNS切换风险克服的程度说明程序的功能问题优有利于逐层剖析问题程序的性能问题优平滑切换,流量分流管理人员/流程出错好取决于自动化框架基础架构失效好取决于自动化框架回滚中DNS TTL 的复杂性(reaction time,flip/flop)成本优通过Auto Scaling来优化成本让我们去掉DNS的切换…模式: 切换Auto Scaling Groups•部署流程:•Amazon Elastic Load Balancer(ELB) ,部署在应用前段•从现有的Auto Scaling Group(ASG)开始•部署&扩展新的ASG•测试绿的应用环境•在ELB上注册绿的ASG•在ELB上去除蓝的ASG模式: 切换Auto Scaling Groups•部署流程:•Amazon Elastic Load Balancer(ELB) 部署在应用前段•从现有的Auto Scaling Group(ASG)开始•部署&扩展新的ASG•测试绿的应用环境•在ELB上注册绿的ASG•在ELB上去除蓝的ASG模式: 切换Auto Scaling Groups•部署流程:•Amazon Elastic Load Balancer(ELB) 部署在应用前段•从现有的Auto Scaling Group(ASG)开始•部署&扩展新的ASG•测试绿的应用环境•在ELB上注册绿的ASG•在ELB上去除蓝的ASG模式: 切换Auto Scaling Groups•部署流程:•Amazon Elastic Load Balancer(ELB) 部署在应用前段•从现有的Auto Scaling Group(ASG)开始•部署&扩展新的ASG•测试绿的应用环境•在ELB上注册绿的ASG•在ELB上去除蓝的ASG模式: 切换Auto Scaling Groups•部署流程:•Amazon Elastic Load Balancer(ELB) 部署在应用前段•从现有的Auto Scaling Group(ASG)开始•部署&扩展新的ASG•测试绿的应用环境•在ELB上注册绿的ASG•在ELB上去除蓝的ASG模式: 切换Auto Scaling Groups•部署流程:•Amazon Elastic Load Balancer(ELB) 部署在应用前段•从现有的Auto Scaling Group(ASG)开始•部署&扩展新的ASG•测试绿的应用环境•在ELB上注册绿的ASG•在ELB上去除蓝的ASG模式: 切换Auto Scaling Groups•部署流程:•Amazon Elastic Load Balancer(ELB) 部署在应用前段•从现有的Auto Scaling Group(ASG)开始•部署&扩展新的ASG•测试绿的应用环境•在ELB上注册绿的ASG•在ELB上去除蓝的ASG模式: 切换Auto Scaling Groups•部署流程:•Amazon Elastic Load Balancer(ELB) 部署在应用前段•从现有的Auto Scaling Group(ASG)开始•部署&扩展新的ASG•测试绿的应用环境•在ELB上注册绿的ASG•在ELB上去除蓝的ASG在ELB后面切换Auto Scaling groups•Register with ELB:–One or more EC2 instances–One or more Auto Scaling groups •Least outstanding requests algorithm favors green ASG instances for new connections•Connection draining -gracefully stop receiving traffic•Scale out green ASG before ELB registration•Put blue instances in standby •$ aws autoscaling attach-load-balancers \•--auto-scaling-group-name "green-asg" \•--load-balancer-names "my-app-elb"•$ aws autoscaling set-desired-capacity \•--auto-scaling-group-name "green-asg" \•--desired-capacity X•$ aws autoscaling detach-load-balancers \•--auto-scaling-group-name "blue-asg" \•--load-balancer-names "my-app-elb"•$ aws autoscaling enter-standby \•--instance-ids i-xxxxxxxx\•--auto-scaling-group-name "blue-asg"\•--should-decrement-desired-capacity模式回顾: 切换Auto Scaling groups风险克服的程度说明程序的功能问题优有利于逐层剖析问题,附加ELB程序的性能问题好流量分流管理,力度较粗,ELB预热人员/流程出错好取决于自动化框架基础架构失效优Auto-scaling回滚优没有DNS的复杂性成本优通过Auto Scaling来优化成本让我们继续减少应用环境的限制…模式: 切换Launch Configurations•部署流程:•从现有的在ELB后面的ASG &Launch Configuration 开始•在ASG上注册更新的绿的LaunchConfiguration•将ASG的容量逐步增加到原有容量的2倍•将ASG的容量减少到原有的容量•为增加可控性,将老的实例切换到备份状态模式: 切换Launch Configurations•部署流程:•从现有的在ELB后面的ASG &Launch Configuration 开始•在ASG上注册更新的绿的LaunchConfiguration•将ASG的容量逐步增加到原有容量的2倍•将ASG的容量减少到原有的容量•为增加可控性,将老的实例切换到备份状态模式: 切换Launch Configurations•部署流程:•从现有的在ELB后面的ASG &Launch Configuration 开始•在ASG上注册更新的绿的LaunchConfiguration•将ASG的容量逐步增加到原有容量的2倍•将ASG的容量减少到原有的容量•为增加可控性,将老的实例切换到备份状态模式: 切换Launch Configurations•部署流程:•从现有的在ELB后面的ASG &Launch Configuration 开始•在ASG上注册更新的绿的LaunchConfiguration•将ASG的容量逐步增加到原有容量的2倍•将ASG的容量减少到原有的容量•为增加可控性,将老的实例切换到备份状态模式: 切换Launch Configurations•部署流程:•从现有的在ELB后面的ASG &Launch Configuration 开始•在ASG上注册更新的绿的LaunchConfiguration•将ASG的容量逐步增加到原有容量的2倍•将ASG的容量减少到原有的容量•为增加可控性,将老的实例切换到备份状态模式: 切换Launch Configurations•部署流程:•从现有的在ELB后面的ASG &Launch Configuration 开始•在ASG上注册更新的绿的LaunchConfiguration•将ASG的容量逐步增加到原有容量的2倍•将ASG的容量减少到原有的容量•为增加可控性,将老的实例切换到备份状态切换launch configurations•Launch configurations:Blueprints for ASG instance provisioning, each ASG points to exactly one •Scale-out & replacement:Events will use the attached (green) launch configuration to provision instances•Scale-in:ASG scale-in events will terminate instances with oldest launchconfiguration first while trying to keep capacity in AZs balanced•May need to address AZ imbalances separately•Temporarily remove instances from ASGPlace specific ASG instances (blue) into standby –stop receiving traffic模式回顾: 切换Launch Configurations风险克服的程度说明程序的功能问题中在异构环境中定位错误比较复杂程序的性能问题中流量分流的力度不够细, initial trafficload人员/流程出错好取决于自动化框架基础架构失效优Auto-Scaling回滚优没有DNS的复杂性成本好通过Auto Scaling来优化成本, 但是开始时需要额外的扩展蓝/绿部署模式总结模式对风险的克服经典式DNS切换切换Auto Scalinggroups切换launch configs程序的功能问题Canary analysis Canary analysis Mixed fleet程序的性能问题Granular traffic switch Instance-levelgranularityMixed fleet人员/流程的错误Automation: Use CloudFormation with Elastic Beanstalk, OpsWork, third party 基础架构失效Automation framework Auto Scaling, ELB Auto Scaling, ELB 回滚的能力DNS ELB ELB 成本管理Gradual scaling Gradual scaling Some over-provisioning部署的复杂性Simple,DNS weightsAuto Scaling control Scale-in adjustments。
AWS服务器配置部署手册

aws服务器配置部署手册一、实例的启动(创建)1.什么是实例?在所有工作之前,我们来看一看什么是AmazonEC2.根据其官方文档的解释如下:在知道什么是AmazonEC2,之后我们就可以开始我们的工作了。
AmazonEC2提供不同的实例类型,以便可以选择需要的CPU、内存、存储和网络容量来运行应用程序。
登录帐号,进入EC2的控制面板,启动实例。
2.实例的相关配置根据我们的需求选择MicrosoftWindowsServer2012R2Base,t2.micro。
其他过程直接选择默认配置,点击配置安全组。
默认的安全组只有一个规则,这条规则对应的是远程桌面连接的端口。
但是只有这条规则是不够的,为了方便我们之后服务器的配置以及网站的部署,我们得添加其他的规则,下图是我配置帕累托后台所用的安全组。
(有关安全组端口作用在附件中有部分说明,详见附件1)完成相关工作之后,点击审核和启动,会跳出如下页面,这一步很重要!因为在这创建的密钥对,以后都会用到。
在保存好密钥对之后就可以启动实例了。
3.绑定弹性IP在导航栏中找到弹性IP,点击分配新地址。
创建好之后右击,选择关联地址,将其关联到我们的实例上。
二、服务器的配置1.远程桌面连接实例在创建完成之后,就要配置服务器了。
在配置服务器时,需要通过远程桌面连接进入实例进行配置。
首先查看我们实例的安全组有没有配置远程连接的端口,如果没有进行添加配置(导航栏中找到安全组,点击进入)。
若实例需要添加安全组,在安全组创建之后可以右击实例更改安全组进行安全组的绑定。
在完成端口的开放之后,就可以进行远程桌面连接了。
右击我们的实例,点击连接,跳出如下画面。
首先通过之前保存的密钥对获取密码,然后通过下载的远程桌面文件和解密得到的密码进行连接。
2.服务器配置之添加角色和功能进入后点击开始按钮,选择服务器管理器(实例中默认的服务器只有一个,我们的工作只需要一个,所以暂不做添加修改。
)点击第二项添加角色和功能,一路下一步,直到服务器和角色页面,勾选Web 服务器(IIS)选项(根据个人需求进行相关筛选),在功能页面同样勾选需要的功能,最后确认并安装。
aws sct 操作手册

AWS SCT(AWS Schema Conversion Tool)是一种用于将数据库架构从一种数据库引擎转换为另一种数据库引擎的工具。
以下是使用AWS SCT的操作手册:
1. 安装AWS SCT:请参考AWS官方文档中有关安装AWS SCT的说明,以在您的计算机上安装AWS SCT。
2. 创建转换任务:运行AWS SCT并创建一个新的转换任务。
在创建转换任务时,您需要提供源数据库和目标数据库的详细信息,例如数据库类型、连接详细信息等。
3. 定义源架构:在转换任务中,您需要定义源数据库的架构。
这包括指定表、视图、存储过程等的逻辑结构。
4. 定义目标架构:您还需要定义目标数据库的架构。
这同样包括指定表、视图、存储过程等的逻辑结构。
5. 运行转换任务:运行转换任务以将源数据库的架构转换为目标数据库的架构。
在转换过程中,AWS SCT将自动处理数据类型、约束、索引等的映射问题。
6. 验证转换结果:转换完成后,您需要验证目标数据库的架构是否符合要求。
您可以运行一些测试查询或使用其他工具来验证数据的一致性和完整性。
7. 部署转换后的架构:一旦验证成功,您可以将目标数据库的架构部署到生产环境中。
请注意,这只是一份简要的AWS SCT操作手册。
为了更好地理解和使用AWS SCT,建议参考AWS官方文档中的详细说明和教程。
入门使用AWS进行云计算服务部署
入门使用AWS进行云计算服务部署云计算是当前热门的技术领域之一。
为了方便用户使用云计算服务,Amazon Web Services(AWS)提供了一系列云计算服务,用于部署应用程序、存储数据、管理网络等。
本文将介绍如何入门使用AWS进行云计算服务部署。
第一章:AWS账户注册与设置首先,用户需要前往AWS官网进行账户注册。
注册完成后,用户需要进行账户设置,包括配置安全组、启用多重身份验证等,以确保账户的安全性。
第二章:EC2实例的创建与配置EC2(Elastic Compute Cloud)是AWS提供的基础云计算服务,用户可以使用EC2创建和管理虚拟服务器实例。
本节将介绍如何创建和配置EC2实例,包括选择实例类型、配置网络和存储等。
第三章:S3服务的使用与数据存储S3(Simple Storage Service)是AWS提供的对象存储服务,用户可以使用S3存储和检索大量数据。
本节将介绍如何在S3中创建存储桶(Bucket)、上传和下载文件、设置权限等。
第四章:RDS服务的使用与数据库部署RDS(Relational Database Service)是AWS提供的托管关系型数据库服务,用户可以轻松部署、操作和扩展数据库。
本节将介绍如何创建和配置RDS实例,以及连接和管理数据库。
第五章:ELB与Auto Scaling的使用与负载均衡ELB(Elastic Load Balancer)和Auto Scaling是AWS提供的负载均衡服务,用于应对高流量和提高系统的可伸缩性。
本节将介绍如何配置ELB和Auto Scaling,实现负载均衡和自动扩展。
第六章:IAM的使用与权限管理IAM(Identity and Access Management)是AWS提供的身份和访问管理服务,用于管理用户、角色和权限。
本节将介绍如何创建和管理用户、分配权限以及设置角色等。
第七章:VPC的使用与网络配置VPC(Virtual Private Cloud)是AWS提供的私有虚拟网络服务,用户可以在其中运行AWS资源。
AWS 现代应用程序构建指南说明书

LEVEL 300
LEVEL 300
LEVEL 300
LEVEL 200
30mins
Build, run, and manage containerized application
on AWS Fargate
Break barriers to Kubernetes with Red Hat
OpenShift Service on AWS (ROSA)
applications on AWS
Generative AI Builders Zone
Hands-on labs/ digital training
Resource center
Customer stories
LEVEL 300
LEVEL 300
30mins
Jumpstart your Amazon ECS Solution
analytics
Intelligent document processing using
generative AI on AWS
Building always available applications with AWS Amplify and Flutter
Automate SAP business processes
Composer
LEVEL 300
LEVEL 300
Modernize Oracle E-Business Suite using AWS analytics and ML
low-code solutions
LEVEL 300
Accelerating software development with generative AI
Vertica 8.1.1 for AWS 部署指南说明书

Setting Up Vertica8.1.1for AWSLaunching Vertica8.1.1for AWS1.From the left menu go to AWS Marketplace and search for AI2.00-Vertica Analytic Database8.1.1-3 (Single Host)-CentOS7.42.Filter by General Purpose and select m4.4xlarge.3.From Configure Instance Details,modify all corresponding items to align the instance to your needs.4.You may not need to modify any setting in Add Storage.If you choose to increase storage volume capacity,follow the Amazon procedure to extend EBS volume once the instance is launched.Refer to the AWS User Guide and search"expanding the storage space of an EBS volume on Linux."5.Go to Tag Instance,click value and enter a name for the instance.6.From Configure Security Group,add any custom rules required for your environment and open the following ports:Inbound:Outbound7.From Reviewand Launch,correct any settings(if required),by clicking Previous and go back to the proper screen for editing.If they are correct,click Launch.8.Go to Create a newkey pair and click Download Key Pair.The key pair is required for connecting to the instance remotely.More details can be found in AWS User Guide.9.Click Launch unching Vertica AWS Elastic Compute Cloud(EC2)takes a few minutes. The progress can be monitored by accessing EC2's dashboard and clicking the Instances link on the left panel.Once the instance is running,you can continue with the configuration of ArcSight Investigate for AWS.Configuring Vertica8.1.1for AWSPerform the following steps to set a new password for Vertica's dbadmin account and a license update.Starting Vertica Database1.Connect to the Vertica EC2instance via ssh:sh-i<private_key>centos@<aws-assigned-address>2.From root account:2.1su-dbadmin2.2To check the database status:$ admintools-t view_cluster2.3To start the database:$ admintools-t start_db-d investigate-p<dbadmin pass>2.4To stop the database:$ admintools-t stop_db-d investigate-p<dbadmin pass> Changing Password1.Connect to the Vertica EC2instance via ssh:ssh-i<private_key>centos@<aws-assigned-address>.2.From root account,change the user to'dbadmin'.2.1su-dbadmin.2.2Issue vsql command.Password:cloud.2.3The following console must be displayed in the terminal:Type:\h or\?for help with vsql commands.\g or terminate with semicolon to execute query.\q to quit.2.4Run the following command:dbadmin=>alter user dbadmin IDENTIFIED BY'<NewPass>';ALTER USERdradmin=>\q2.5Verify the change has been applied by connecting to the database usingthe admintools console utility:$ a dmintools2.6Select Connect to Database(Option2).2.7Log in with dbadmin user and password.3.Connect to the Vertica EC2instance via ssh:ssh-i<private_key>centos@<aws-assigned-address>.3.1Using sudo access,change the user to'dbadmin'.3.2Run the following commands:NEW_PASS='<NewPass>'sed-i/^dba_password=/c\dba_password=$(echo${NEW_PASS}|base64)/opt/install-vertica/vertica.propertiesUploading your Entitled Vertica License1.Connect to the Vertica EC2instance via ssh:ssh-i<private_key>centos@<aws-assigned-address>.2.From root account,change the user to'dbadmin'.2.1su-dbadmin.3.Select Advanced Menu(Option7).4.Select Upgrade License Key(Option5).5.Enter your entitled license file path.6.Wait for the upgrading license to be ready.7.Exit admintools.8.To verify your license:8.1su-dbadmin.8.2Issue vsql command.Password:cloud8.3The terminal switches to:Type:\h or\?for help with vsql commands\gor terminate with semicolon to execute query\q to quit.8.4Run the following command to verify your license:dbadmin=>SELECT DISPLAY_LICENSE();Running the Kafka SchedulerCreate1.Connect to the Vertica EC2instance via ssh:ssh-i<private_key>centos@<aws-assigned-address>.2.From root account,navigate to/opt/install-vertica3.Run./kafka_scheduler create<Event Broker Worker Node1IP>:9092<Partition number>3.1The default number of partitions is6.Check kafka_scheduler Status1.Connect to the Vertica EC2instance via ssh:ssh-i<private_key>centos@<aws-assigned-address>.2.From root account,navigate to/opt/install-vertica3.Run./kafka_scheduler statusStarting&Stopping kafka_scheduler1.Connect to the Vertica EC2instance via ssh:ssh-i<private_key>centos@<aws-assigned-address>.2.From root account,navigate to/opt/install-vertica3.To start kafka_scheduler:Run./kafka_scheduler start4.To stop kafka_scheduler:Run./kafka_scheduler stopDeleting kafka_scheduler metadata1.Connect to the Vertica EC2instance via ssh:ssh-i<private_key>centos@<aws-assigned-address>.2.From root account,navigate to/opt/install-vertica3.Run./kafka_scheduler deleteTroubleshooting Vertica on AWSTroubleshooting Vertica on AWSTo check open ports using Netcat Utility,see Vertica Analytics documentation Additional InformationFor additional information on the use and operation of ArcSight Event Broker,see the HPE ArcSight product documentation,available from the HPE ArcSight support community athttps://You can also reach HPE ArcSight Software Support at:https://。
AWS Elemental Link HD配置指南说明书
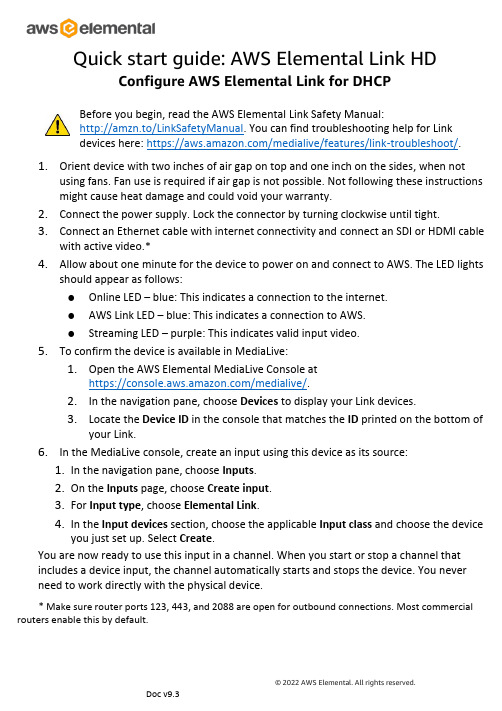
Configure AWS Elemental Link for DHCPBefore you begin, read the AWS Elemental Link Safety Manual:http://amzn.to/LinkSafetyManual. You can find troubleshooting help for Linkdevices here: https:///medialive/features/link-troubleshoot/.1.Orient device with two inches of air gap on top and one inch on the sides, when notusing fans. Fan use is required if air gap is not possible. Not following these instructions might cause heat damage and could void your warranty.2.Connect the power supply. Lock the connector by turning clockwise until tight.3.Connect an Ethernet cable with internet connectivity and connect an SDI or HDMI cablewith active video.*4.Allow about one minute for the device to power on and connect to AWS. The LED lightsshould appear as follows:●Online LED – blue: This indicates a connection to the internet.●AWS Link LED – blue: This indicates a connection to AWS.●Streaming LED – purple: This indicates valid input video.5.To confirm the device is available in MediaLive:1.Open the AWS Elemental MediaLive Console athttps:///medialive/.2.In the navigation pane, choose Devices to display your Link devices.3.Locate the Device ID in the console that matches the ID printed on the bottom ofyour Link.6.In the MediaLive console, create an input using this device as its source:1.In the navigation pane, choose Inputs.2.On the Inputs page, choose Create input.3.For Input type, choose Elemental Link.4.In the Input devices section, choose the applicable Input class and choose the deviceyou just set up. Select Create.You are now ready to use this input in a channel. When you start or stop a channel that includes a device input, the channel automatically starts and stops the device. You never need to work directly with the physical device.* Make sure router ports 123, 443, and 2088 are open for outbound connections. Most commercial routers enable this by default.Configure AWS Elemental Link with a static IP1.Orient device with two inches of air gap on top and one inch on the sides, when notusing fans. Fan use is required if air gap is not possible. Not following these instructions might cause heat damage and could void your warranty.2.Connect the power supply. Lock the connector by turning clockwise until tight.3.Connect an SDI or HDMI cable with active video.4.Allow about one minute for the device to power on. The red lights on the Online LEDand the AWS Link LED indicate that there is no connection to AWS ElementalMediaLive. This is expected.5.Press and hold the black button on the front of the device for 10 seconds. When theLED lights flash twice, release the button. The device has now switched to a default static IP address.**6.Make a note of the default static IP address, the admin username, and adminpassword located on a sticker on the bottom of the device.e an Ethernet cable to connect the device directly to your computer. Your computermust be configured with an IP address on the same subnet as the static IP address of the device.8.From your computer, use a web browser to navigate to the static IP address. Be sure touse https (not http). At the prompts, log in with the credentials noted in step 6.9.On the network configuration page; enter the static IP address that you want to usealong with the appropriate subnet mask, gateway, and DNS (optional).ing the left navigation pane, select Change Password. Update the admin usernameand admin password. We recommend using a strong password.11.Disconnect the device from your computer. Connect the device to an Ethernet cablewith internet connectivity.***12.Allow about one minute for the device to connect to AWS. The LED lights should appearas follows:a.Online LED – blue: This indicates a connection to the internet.b.AWS Link LED – blue: This indicates a connection to AWS.c.Streaming LED – purple: This indicates valid input video.13.To confirm the device is available in MediaLive:a.Open the AWS Elemental MediaLive Console athttps:///medialive/.b.In the navigation pane, choose Devices to display your Link devices.c.Locate the Device ID in the console that matches the ID printed on the bottomof your Link.14.In the MediaLive console, create an input using this device as its source:a.In the navigation pane, choose Inputs.b.On the Inputs page, choose Create input.c.For Input type, choose Elemental Link.d.In the Input devices section, choose the applicable Input class and choose thedevice you just set up. Select Create.You are now ready to use this input in a channel. When you start or stop a channel that includes a device input, the channel automatically starts and stops the device. You never need to work directly with the physical device.** To change the device from a static IP address back to DHCP, press and hold the black button on the front of the device for five seconds. When the LEDs flash once, release the button. Unplug the power supply and plug it back in to reboot the device. The device is now set to DHCP.*** Make sure router ports 123, 443, and 2088 are open for outbound connections. Most commercial routers enable this by default.You can find more information about Link features at:https:///medialive/features/link/Help for Link devices is provided by AWS Support:https:///support/home/。
VMware SD-WAN AWS 虚拟 Edge 部署指南说明书

AWS 虚拟 Edge 部署指南2020VMware SD-WAN 4.1您可以从 VMware 网站下载最新的技术文档:https:///cn/。
VMware, Inc.3401 Hillview Ave. Palo Alto, CA 94304 威睿信息技术(中国)有限公司北京办公室北京市朝阳区新源南路 8 号启皓北京东塔 8 层 801/cn上海办公室上海市淮海中路 333 号瑞安大厦 804-809 室/cn广州办公室广州市天河路 385 号太古汇一座 3502 室/cn版权所有© 2020 VMware, Inc. 保留所有权利。
版权和商标信息AWS 虚拟 Edge 部署指南目录1AWS 虚拟 Edge 部署指南4AWS 虚拟 Edge 部署概览4使用 CloudFormation 部署虚拟 Edge7EC2 实例类型15确认在 VMware SD-WAN Orchestrator 中激活了虚拟 Edge。
16AWS 虚拟 Edge 部署指南1本文档提供了《AWS 虚拟 Edge 部署指南》的分步说明。
本章讨论了以下主题:n AWS 虚拟 Edge 部署概览n使用 CloudFormation 部署虚拟 Edgen EC2 实例类型n确认在 VMware SD-WAN Orchestrator 中激活了虚拟 Edge。
AWS 虚拟 Edge 部署概览此《AWS 虚拟 Edge 部署指南》概述提供了一般概览、CloudFormation 模板概览和 CloudFormation 下载(绿地 VPC 模板和棕地模板)。
一般概览在过去几年中,多云或混合云部署越来越受欢迎,由于企业客户将工作负载移动到公有云计算基础架构,因此他们期望将 SD-WAN 从远程分支扩展到公有云,以保证 SLA。
根据以下用例,VMware 提供了两个主要方案:使用分布式 VCG 建立到公有云的 IPSec 隧道或直接在公有云虚拟专用网络中部署虚拟 Edge。
2023年Amazon Web Services云服务操作指南及界面介绍

2023年Amazon Web Services云服务操作指南及界面介绍随着云计算技术的不断发展,Amazon Web Services(AWS)已经成为企业和个人最重要的云服务提供商之一。
AWS提供了一系列的云计算服务和工具,帮助用户轻松构建、管理和扩展他们的应用程序和基础设施。
本文将为您介绍2023年最新的AWS操作指南,并详细介绍AWS界面的主要特点和功能。
一、AWS操作指南1. 注册AWS账户首先,访问AWS官方网站并创建一个免费账户。
填写必要的信息并完成创建。
2. 选择AWS云服务在AWS控制台中,您可以浏览和选择所需的云服务。
AWS提供了包括计算、存储、数据库、网络、人工智能等多种服务,根据您的需求选择适合的服务。
3. 创建和管理实例AWS EC2(弹性云服务器)是AWS提供的弹性计算服务。
通过EC2,您可以创建和管理虚拟机实例,包括选择实例类型、操作系统、存储和安全设置等。
4. 存储和备份数据AWS S3(简单存储服务)是一种对象存储服务,可用于存储和备份数据。
您可以创建存储桶(bucket)来存储和管理数据,并设定访问权限。
5. 构建和部署应用程序AWS提供了一系列工具和服务来帮助您构建和部署应用程序,如AWS Lambda、Elastic Beanstalk和CodePipeline等。
您可以根据自己的技术需求和偏好选择适合的工具。
6. 监控和管理资源AWS CloudWatch是一种监控和管理AWS资源的服务。
它可以监控计算实例、存储、数据库等资源的性能和健康状态,并提供警报和自动化处理。
7. 安全和访问管理AWS提供了多种安全性和访问管理服务,如Identity and Access Management(IAM)和Web Application Firewall(WAF)。
您可以设置访问权限、加密数据并保护应用程序安全。
二、AWS界面介绍AWS界面是用户与AWS控制台进行交互的主要入口。
使用AWS云平台进行应用部署和扩展的方法

使用AWS云平台进行应用部署和扩展的方法随着云计算技术的发展,越来越多的企业开始将应用部署到云平台上,其中AWS(亚马逊云服务)作为全球领先的云服务提供商,为用户提供了丰富的部署和扩展选项。
本文将介绍使用AWS云平台进行应用部署和扩展的方法,并探讨一些最佳实践。
一、选择适合的AWS服务AWS提供了众多的服务,包括计算、存储、数据库、网络等,根据应用的需求选择适合的服务是部署和扩展的基础。
例如,对于需要高可用性和弹性的应用,可以选择使用EC2(弹性计算云)实例和Auto Scaling(自动伸缩)服务;对于需要存储大量数据的应用,可以选择使用S3(简单存储服务)和EBS(弹性块存储)等。
二、使用云原生架构云原生架构是一种设计和构建应用程序的方法论,它充分利用云平台的优势,提高应用的弹性和可伸缩性。
在AWS云平台上,可以使用一些云原生工具和服务,如AWS Lambda(无服务器计算)、Elastic Beanstalk(弹性Beanstalk)等。
这些工具和服务可以帮助开发人员更好地构建和管理云原生应用。
三、使用自动化工具自动化是部署和扩展的关键,可以大大提高效率和减少错误。
AWS提供了一些自动化工具,如AWS CloudFormation(云形成)、AWS Elastic Beanstalk等。
使用这些工具,可以通过模板或配置文件定义应用的基础设施和环境,实现一键部署和扩展。
四、监控和日志管理在应用部署和扩展过程中,监控和日志管理是必不可少的。
AWS提供了一些监控和日志管理服务,如Amazon CloudWatch(云监控)、AWS CloudTrail(云追踪)等。
通过这些服务,可以实时监控应用的性能和健康状况,并记录关键事件和操作,方便故障排查和性能优化。
五、安全和权限管理安全是云平台部署和扩展的重要考虑因素。
AWS提供了一系列安全和权限管理服务,如AWS Identity and Access Management(身份和访问管理)、AWS Key Management Service(密钥管理服务)等。
如何使用AWS进行云计算与部署
如何使用AWS进行云计算与部署AWS(Amazon Web Services)是亚马逊公司提供的一种云计算服务平台。
云计算是基于互联网进行数据存储、网络服务和应用程序执行的一种方式,相较于传统的本地服务器,在成本、安全性和可扩展性等方面都具有明显的优势。
本文将介绍如何使用AWS进行云计算与部署,包括创建AWS账号、选择合适的AWS服务、进行云计算和部署应用程序。
1. 创建AWS账号要使用AWS进行云计算和部署,首先需要创建一个AWS账号。
访问AWS官方网站,选择“创建免费账号”,按照指引填写相关信息,验证电子邮件,并提供付款方式。
AWS提供了免费套餐和试用期,可以在一定范围内使用AWS的服务。
2. 选择合适的AWS服务AWS提供了众多的云计算服务,根据自己的需求选择适合的服务。
以下列举几个常用的AWS服务:- EC2(Elastic Compute Cloud):提供可调整大小的云服务器,可以灵活配置计算资源以满足应用程序的需求。
- S3(Simple Storage Service):提供无限扩展的云存储,支持上传、下载和存储各种类型的文件。
- RDS(Relational Database Service):提供托管的关系数据库服务,支持主流数据库引擎,如MySQL、Oracle等,可以轻松构建和管理数据库。
- Lambda:一种无服务器计算服务,让开发者可以在云端运行代码,无需关心服务器的管理和配置。
- Elastic Beanstalk:提供一种简化的应用程序部署和管理的平台,支持多种编程语言和开发框架。
根据具体需求和预算选择适合的AWS服务。
3. 进行云计算使用AWS进行云计算第一步是创建云服务器。
在AWS控制台中选择EC2服务,点击“创建实例”按钮,根据需求选择合适的实例类型、操作系统、存储和网络配置。
创建完成后,可以通过SSH等协议连接到云服务器,并在其中部署和执行应用程序。
在云服务器上部署应用程序有多种方式。
Amazon AWS 搭建及部署手册
Amazon AWS 搭建及部署手册现阶段,不断涌现的云服务厂商给这样的实战带来了福音——价格低廉甚至免费的云服务器正在向你招手。
如果你不想用国内厂商的云服务——或者就是单纯的嫌贵,那么免费12个月的亚马逊AWS就是你最合适的选择。
亚马逊AWS 介绍简单来说,AWS (Amazon Web Service) 提供了一整套基础设施和服务,使“建站”这件事变得轻松愉快。
你可以利用AWS构建博客主机,云存储(比如DropBox),手游数据中心,公司门户等等几乎所有你能想到的需要网络服务的场景。
作为一个入门介绍,我们从Wordpress 开始,因为Wordpress 几乎包含了入门级站点的全部需求元素:服务器主机,PHP运行环境,数据库,前端页面等等。
不得不多说一句,对于个人博客来说,如果经济性是首要考量因素,AWS 并非首选,大量专业博客虚拟主机以非常低廉的价格提供给低访问量的博客站长。
AWS的入门套餐价格也远比入门级博客主机价格高许多,当然,性能和容量也大许多。
在决定是否选用AWS提供服务前,有必要对自己的业务量有个初步估算。
好在AWS 对于初次注册的用户提供了为期一年的免费套餐,足以应对一个中等大小的博客站点(甚至多个)持续运行一年时间。
我们就从这个免费套餐开始入门的学习。
免费套餐的详细说明请参见官方介绍。
另外,AWS 有遍布全球的数据中心,而且,即使你的主机设置在美洲,也可以用CloudFront 服务来进行全球加速。
不过CloudFront 服务似乎并未包含在免费套餐中。
建议在创建主机时,选择日本节点,从大陆访问的速度还算不错。
有消息称亚马逊正在计划在中国大陆部署数据中心,并有望在2013年年底前正式上线。
非常令人期待啊。
第一步:注册账号在开始前,请先准备一张双币信用卡。
AWS 账号就是你的Amazon 账号(注意,不是 而是)。
若之前没有amazon 账号,请直接去 注册。
如果不想用AWS服务,这个账号还可以用来在美国亚马逊海涛心仪的商品。
AWS云计算架构与部署实战教程

AWS云计算架构与部署实战教程第一章:云计算的概念与原则云计算是一种基于互联网的计算模式,通过共享和动态分配计算资源,提供可扩展的及按需求付费的服务。
在云计算环境中,用户可以通过虚拟化的方式使用远程计算资源,而不需要拥有或者维护实际的硬件或者软件。
云计算的主要原则包括弹性伸缩、按需分配、付费即用、资源共享和可靠性等。
1.1 云计算的类型云计算通常可以分为三种类型:基础设施即服务(IaaS)、平台即服务(PaaS)和软件即服务(SaaS)。
其中,IaaS提供了虚拟化的基础设施资源,例如云服务器、存储空间和网络连接等;PaaS则提供了一个用于开发、部署和管理应用程序的平台;而SaaS则直接提供了一系列已经开发好的应用程序,用户只需要通过浏览器等方式访问即可。
1.2 云计算的优势云计算具有许多优势,包括灵活性、可扩展性、高可用性、易于管理和成本效益等。
由于云计算采用了虚拟化技术,用户可以根据需求灵活地调整计算资源的规模和配置。
同时,云计算提供了自动扩展和负载均衡等机制,能够自动适应流量变化和应对故障,提高了系统的可用性和可靠性。
此外,云计算提供了集中化的管理界面和监控工具,方便用户管理和监控自己的应用程序。
最重要的是,云计算采用按需支付的方式,用户只需根据使用情况支付实际的资源消耗,避免了传统的固定资产投入和运营成本。
第二章:AWS云服务概览2.1 AWS云服务的种类AWS是亚马逊公司提供的一套云计算平台,为用户提供了众多的云服务。
其中,核心服务包括计算服务、存储服务、数据库服务、网络服务和身份验证与访问管理服务等。
AWS还提供了各种增值服务,例如人工智能服务、物联网服务、开发工具和管理工具等。
2.2 AWS全球基础设施AWS在全球范围内构建了多个区域(Region)和可用区(Availability Zone),以满足用户的需求。
每个区域都包含多个可用区,每个可用区则是一个独立的数据中心。
通过将应用程序部署在不同的区域和可用区,可提高应用程序的容错性和可靠性。
- 1、下载文档前请自行甄别文档内容的完整性,平台不提供额外的编辑、内容补充、找答案等附加服务。
- 2、"仅部分预览"的文档,不可在线预览部分如存在完整性等问题,可反馈申请退款(可完整预览的文档不适用该条件!)。
- 3、如文档侵犯您的权益,请联系客服反馈,我们会尽快为您处理(人工客服工作时间:9:00-18:30)。
A W S服务器配置部署手
册
Company Document number:WTUT-WT88Y-W8BBGB-BWYTT-19998
aws服务器配置部署手册
一、实例的启动(创建)
1.什么是实例
在所有工作之前,我们来看一看什么是AmazonEC2.根据其官方文档的解释如下:
在知道什么是AmazonEC2,之后我们就可以开始我们的工作了。
AmazonEC2提供不同的实例类型,以便可以选择需要的CPU、内存、存储和网络容量来运行应用程序。
登录帐号,进入EC2的控制面板,启动实例。
2.实例的相关配置
根据我们的需求选择MicrosoftWindowsServer2012R2Base,。
其他过程直接选择默认配置,点击配置安全组。
默认的安全组只有一个规则,这条规则对应的是远程桌面连接的端口。
但是只有这条规则是不够的,为了方便我们之后服务器的配置以及网站的部署,我们得添加其他的规则,下图是我配置帕累托后台所用的安全组。
(有关安全组端口作用在附件中有部分说明,详见附件1)
完成相关工作之后,点击审核和启动,会跳出如下页面,这一步很重要!因为在这创建的密钥对,以后都会用到。
在保存好密钥对之后就可以启动实例了。
3.绑定弹性IP
在导航栏中找到弹性IP,点击分配新地址。
创建好之后右击,选择关联地址,将其关联到我们的实例上。
二、服务器的配置
1.远程桌面连接
实例在创建完成之后,就要配置服务器了。
在配置服务器时,需要通过远程桌面连接进入实例进行配置。
首先查看我们实例的安全组有没有配置远程连接的端口,如果没有进行添加配置(导航栏中找到安全组,点击进入)。
若实例需要添加安全组,在安全组创建之后可以右击实例更改安全组进行安全组的绑定。
在完成端口的开放之后,就可以进行远程桌面连接了。
右击我们的实例,点击连接,跳出如下画面。
首先通过之前保存的密钥对获取密码,然后通过下载的远程桌面文件和解密得到的密码进行连接。
2.服务器配置之添加角色和功能
进入后点击开始按钮,选择服务器管理器(实例中默认的服务器只有一个,我们的工作只需要一个,所以暂不做添加修改。
)
点击第二项添加角色和功能,一路下一步,直到服务器和角色页面,勾选Web 服务器(IIS)选项(根据个人需求进行相关筛选),
在功能页面同样勾选需要的功能,最后确认并安装。
3.服务器配置之防火墙配置
在服务器配置中还有一个非常重要的步骤——防火墙的配置。
之前因为没有对防火墙进行相关配置,导致本人焦头烂额,始终无法从外部网络连接至服务器。
点击开始按钮,选择控制面板,再选择查看网络状态和任务,最后找到windows防火墙,并点击高级设置。
右击入站规则,新建入站规则,选择端口并进行相关配置(注意,这里的规则应与之前配置的安全组一致,所以应按照之前的安全组一一添加)。
至此,服务器的配置就算完成了,接下来就是网站的部署了。
三、网站的部署
1.复制本地网站到服务器
将本地调测好的网站发布,并复制到服务器中
2.配置IIS管理器
打开服务器管理器,选择所有服务器,右击我们使用的服务器(默认只有一个服务器),点击IIS管理器。
进入IIS管理器之后展开右击网站,选择添加网站。
打开之后我们按需要取个名字,然后选择我们之前复制进服务器网站的物理内存,再修改端口(按照项目需要),点击确定。
3.根据在IIS中添加网站的端口修改相关内容
这是非常重要的一步也是最后一步,所以我把它单独列了出来。
根据我们之前在IIS管理器中给网站绑定的端口,分别修改添加安全组以及防
火墙出入站规则。
做完这一步,整个AWS服务器配置部署的过程也告一段落了。
希望大家通过
这份手册能配置部署属于自己的网站。
ByKAs233 附件1
部分端口及相关说明:
HTTP超文本传输协议:80 SQLServer常用端口:1433 FTP:20-21
RDP:3389
邮件常用端口:
一、POP3收邮件
POP3:110
POP3SSL:995
二、IMAP收邮件
IMAP:143
IMAPSSL:993
三、SMTP发邮件SMTP:25
STMPSSL:465 SMTPTLS:587。