华美A100无线路由器说明书(含目录)
无线路由器使用说明书
前言:路由器和无线路由器虽然普及得很快,大伙用得也很方便,但还是有很多刚接触路由器的朋友,不懂得如何设置路由器,毕竟它不是跟非网管交换机一样,插上即可用。
而厂商一般都配有说明书,有些却不够简明,过于复杂,有些虽然提供了傻瓜化的安装向导,但在设置的定制化方面显然无法体现。
今天,我们就用最浅显易懂的图文并茂的方式表达出来,希望对菜鸟朋友们有点帮助。
1.将TP-LINK无线路由器通过有线方式连接好后,在IE输入192.168.1.1,用户名和密码默认为admin,确定之后进入以上设置界面。
打开界面以后通常都会弹出一个设置向导的小页面,如果有一定经验的用户都会勾上“下次登录不再自动弹出向导”来直接进行其它各项细致的设置。
不过本人建议一般普通用户按下一步进行简单的向导设置,方便简单。
点击下一步来进行简单的安装设置。
2.通常ASDL拨号上网用户选择第一项PPPoE来进行下一步设置。
但是如果你是局域网内或者通过其它特殊网络连接(如视讯宽带、通过其它电脑上网之类)可以选择以下两项“以太网宽带”来进行下一步设置。
这里先说明一下ADSL拨号上网设置,以下两项在后面都将会进行说明。
到ADSL拨号上网的帐号和口令输入界面,按照字面的提示输入用户在网络服务提供商所提供的上网帐号和密码然后直接按下一步。
3.接下来可以看到有无线状态、SSID、频段、模式这四项参数。
检测不到无线信号的用户留意一下自己的路由器无线状态是否开启。
SSID这一项用户可以根据自己的爱好来修改添加,这一项只是在无线连接的时候搜索连接设备后可以容易分别需要连接设备的识别名称而已。
另外在频段这一项我们拉下来可以看到有13个数字选择,这里的设置只是你路由的无线信号频段,如果你附近有多台无线路由的话你可以在这里设置使用其它频段来避免一些无线连接上的冲突。
接着模式这一选项拉下来我们可以看到TP-LINK无线路由的几个基本无线连接工作模式,11Mbps(802.11b)最大工作速率为11Mbps;54Mbps(802.11g)最大工作速率为54Mbps,也向下兼容11Mbps。
A1 A100使用手册
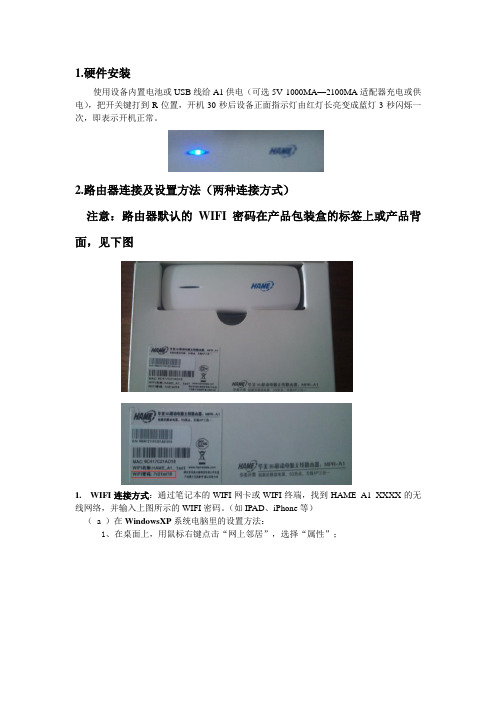
1.硬件安装使用设备内置电池或USB线给A1供电(可选5V 1000MA—2100MA适配器充电或供电),把开关键打到R位置,开机30秒后设备正面指示灯由红灯长亮变成蓝灯3秒闪烁一次,即表示开机正常。
2.路由器连接及设置方法(两种连接方式)注意:路由器默认的WIFI密码在产品包装盒的标签上或产品背面,见下图1. WIFI连接方式:通过笔记本的WIFI网卡或WIFI终端,找到HAME_A1_XXXX的无线网络,并输入上图所示的WIFI密码。
(如IPAD、iPhone等)(a )在WindowsXP系统电脑里的设置方法:1、在桌面上,用鼠标右键点击“网上邻居”,选择“属性”;2、在随后打开的窗口里,用鼠标右键点击“本地连接”或“无线网络连接”,选择“属性”;3、在弹出的对话框里,先选择“Internet协议(TCP/IP)”,再用鼠标点击“属性”按钮;4、在随后打开的窗口里,您可以选择“自动获得IP地址”、“自动获得IP地址”如图:设置完成后点击“确定”提交设置。
5、在无线网络连接列表里找到HAME_A1_XXXX的无线网络名称,并输入包装盒上标签所示的WIFI密码。
6、右键“无线网络连接”,点击“状态”,然后查看无线网络连接通过DHCP获取到的IP 地址应该为192.168.169网段,默认网关为192.168.169.1( b ) 在Windows 7系统电脑里的设置方法:1 在桌面上,用鼠标右键点击“网络”,选择“属性”或用鼠标右键点击右下角的网络连接图标,选中“打开网络和共享中心”,并点击左上角的更改适配器设置,2、在随后打开的窗口里,用鼠标右键点击“无线网络连接”,选择“属性”;3、在弹出的对话框里,先选择“Internet协议版本4(TCP/IPV4)”,再用鼠标点击“属性”按钮;4、在随后打开的窗口里,请选择“自动获得IP地址”、“自动获得IP地址”如图:5、右键点击“无线网络连接”,选择“状态”,然后点击“详细信息”,查看无线网络连接通过DHCP获取到的IP地址应该为192.168.169网段,默认网关为192.168.169.12.有线连接方式:使用网线一头插到路由器的网线接口,一头插到电脑的网卡RJ45接口( a ) 在Windows XP系统电脑里的设置方法:1 在桌面上,用鼠标右键点击“网上邻居”,选择“属性”2、在随后打开的窗口里,用鼠标右键点击“本地连接”,选择“属性”;3、在弹出的对话框里,先选择“Interne t协议(TCP/IP)”,再用鼠标点击“属性”按钮;4、在随后打开的窗口里,请选择“自动获得IP地址”、“自动获得IP地址”如图:设置完成后点击“确定”,提交设置。
路由功能ONU说明书参考
商标、版权说明是深圳市华美兴泰科技有限公司注册商标。
文中提及到的其它商标或商品名称均是深圳市华美兴泰科技有限公司的商标或注册商标。
本产品的所有部分,包括配件和软件,其版权属深圳市华美兴泰科技有限公司所有,在未经过深圳市华美兴泰科技有限公司许可的情况下,不得任意拷贝、抄袭、仿制或翻译成其它语言。
本手册中的所有图片和产品规格参数仅供参考,随着软件或硬件的升级会略有差异,如有变更,恕不另行通知,如需了解更多产品信息,请浏览我们的网站:目录第一章产品简介 (2)1.1包装清单 (2)1.2产品外观和指示灯 (2)第二章产品安装 (4)2.1 硬件安装 (4)第三章登陆管理界面 (6)3.1 正确设置您的计算机网络配置 (6)3.2 登陆路由器 (8)第四章进入功能设置界面 (11)4.1 网络设置 (11)4.1.1 广域网设置 (11)4.1.2 局域网设置 (13)4.1.3 DHCP客户端列表 (14)4.1.4 静态路由配置 (14)4.2 无线网络设置 (15)4.2.1 基本设置 (16)4.2.2 高级设置 (17)4.2.3 安全设置 (18)4.2.4 WDS设置 (21)4.2.5 WPS设置 (21)4.2.6客户端列表 (23)4.3防火墙 (23)4.3.1 MAC/IP/Port过滤 (23)4.3.2 虚拟服务 (24)4.3.3 DMZ设置 (25)4.3.4 系统安全设置 (26)4.3.5 内容过滤 (26)4.4 系统管理 (26)4.4.1 状态 (27)4.4.2 管理 (28)4.4.2.1 管理者设置 (28)4.4.2.2 网络时间设置 (28)4.4.2.3 动态域名服务器 (28)4.4.3 系统升级 (29)4.4.4 设置管理 (29)第一章产品简介1.1包装清单3Grouter 路由器快速安装指南Y型USB连接线3.7V 1500mAh Li-ion 电池1.2产品外观和指示灯闪灯详情:名称 闪灯状态 详细说明 电源灯 红灯 开启电源开关紫灯 当开启电源开关时给电池充电蓝灯 当关闭电源开关时给电池充电,充电完毕 ,电源灯灭蓝灯 电池电量充足电池蓝灯与红灯 交替闪烁 电池电量处于弱电临界点,不足,需充电电量灯红灯 电量不足,需要及时进行充电蓝灯 Wi-Fi 开启,未插入WAN/LAN线紫灯 Wi-Fi 开启,并插入WAN/LAN线 WIFI灯红灯 Wi-Fi 关闭,插入WAN/LAN线红灯 信号弱紫灯 信号一般信号灯蓝灯 信号强红灯1秒闪1次 网络注册中紫灯3秒闪1次 注册上2G网络,未拨号蓝灯3秒闪1次 注册上3G网络,未拨号紫灯1秒闪1次 注册上2G网络,拨号中蓝灯1秒闪1次 注册上3G网络,拨号中紫灯长亮 注册上2G网络,拨号成功网络模式灯蓝灯长亮 注册上3G网络,拨号成功第二章产品安装2.1 硬件安装在设置路由器之前,请您按照如下步骤进行正确连接。
Howay2000NRS用户手册_

HOW AY2000NRS系列无线接入点用户手册版权所有©2011~2012苏州汉明科技有限公司Rev 3.01HO WA Y2000N RS系列无线接入点用户手册3.01版2012 年07 月版权所有©2011~2012苏州汉明科技有限公司本手册包括但不限于其所包含的所有信息均受著作权法的保护,未经苏州汉明科技有限公司的许可,不得将本手册的任何部分影印、复制或翻译成其它语言。
本手册没有任何明确或隐含的保证,包括为了特殊目的进行销售或安装的保证。
若有任何因本手册所引起的直接或间接的资料流失、利益损失或业务终止,苏州汉明科技有限公司恕不为其担负任何责任。
苏州汉明科技有限公司有对本手册进行更改或修订的权利,其内容会随时更新,恕不另行通知。
苏州汉明科技有限公司不对本手册的技术性错误、编印错误或疏漏负任何责任。
目录目录 (3)第1章用户手册简介 (5)1.1本书约定 (5)1.2本书章节安排 (5)第2章产品介绍 (7)2.1产品简介 (7)2.2LED与接口定义 (7)第3章设备安装 (9)3.1安装准备 (9)第4章安全注意事项 (10)4.1安装注意事项 (10)4.2管理注意事项 (10)第5章F A T AP基本配置 (11)5.1设备的缺省配置 (11)5.3通过W EB 管理接口配置设备 (13)5.3.1 硬件连接 (13)5.3.2 建立正确的网络设置 (13)5.3.3 快速安装指南 (17)5.4修改基本设置 (18)5.4.1模式选择 (18)5.4.2 LAN设置 (20)5.4.3 日志服务器设置 (22)第6章胖瘦AP的切换 (23)6.1胖瘦一体AP切换方式 (23)第7章F A T AP无线设置 (25)7.1基本设置 (25)7.2射频设置 (25)7.3SSID设置 (27)第8章F A T AP高级管理配置 (31)8.1时间设置 (31)8.2ACL设置 (31)8.3静态路由 (33)8.4防火墙设置 (33)第9章F A T AP设备管理 (35)9.1用户管理 (35)9.2系统配置 (35)9.3重启设备 (38)第10章F A T AP信息统计 (39)10.1系统信息 (39)10.2接口信息 (39)第11章FIT AP基本配置 (40)11.1通过W EB 管理接口配置设备 (40)11.2发现方式 (41)11.3时间设置 (42)11.4系统配置 (43)11.4.1 软件升级 (43)11.4.2 恢复出厂设置 (43)11.5密码修改 (44)11.6重启设备 (45)第12章典型应用介绍 (45)12.1无线覆盖应用 (45)12.2无线桥接应用 (46)12.3路由模式接入组网 (47)第13章故障排除 (48)第1章用户手册简介本文档旨在帮助您正确使用路由器的功能,内容包括路由器的性能特征以及所有功能的详细说明。
华美A100无线路由器说明书(含目录)
华美A100无线路由器说明书(含目录)华美A1003Gmini路由器说明书………………………………………………………………- 1 -1.硬件安装 ...................................................................................................................- 1 -2.路由器连接及设置方法(两种连接方式) ..................................................................- 1 -1. WIFI连接方式: ..................................................................................- 2 -( a )在WindowsXP系统电脑里的设置方法:.........................................- 2 -( b )在Windows 7系统电脑里的设置方法: ..........................................- 3 -2.有线连接方式:.......................................................................................- 5 -( a )在Windows XP系统电脑里的设置方法:......................................- 5 -( b )在Windows 7系统电脑里的设置方法: ........................................- 7 -3.接入模式设置 ............................................................................................................- 9 -(1)3G网卡接入...................................................................................- 9 -(2)WAN口接入................................................................................. - 10 -①联机模式为:PPPOE(ADSL)…………………………………………..- 10 -②联机模式为:动态(自动取得)……………………………………- 10 -③联机模式为:静态(固定IP)………………………………………- 11 -4. 恢复出厂设置......................................................................................................... - 12 -1、硬件恢复 ........................................................................................ - 12 -2、软件恢复 ........................................................................................ - 12 -1.硬件安装使用设备内置电池或USB线给A1供电(可选5V 1000MA—2100MA适配器充电或供电),把开关键打到R位置,开机30秒后设备正面指示灯由红灯长亮变成蓝灯3秒闪烁一次,即表示开机正常。
无线路由器设置方法
无线路由器设置方法
首先,将路由器连接到电源并打开电源开关。
然后,将一端连接到路由器的WAN口,另一端连接到宽带调制解调器的LAN口。
打开电脑,找到无线网络连接选项,选择要连接的无线网络。
输入路由器的默认用户名和密码,这通常可以在路由器的说明书中找到。
进入路由器的管理界面,根据需要进行各种设置,如无线网络名称、加密方式、密码等。
设置完成后,保存并退出管理界面,然后重新启动路由器。
连接其他设备到无线网络,输入密码即可成功连接。
TL-AC100 V2.0、TL-AC200 V2.0用户手册2.0.0

-III-
第1章 用户手册简介
本手册旨在帮助您正确使用本系列无线控制器。内容包含对无线控制器性能特征的描述以及配置无 线控制器的详细说明。请在操作前仔细阅读本手册。
1.1 目标读者
本手册的目标读者为熟悉网络基础知识、了解网络术语的技术人员。
1.2 本书约定
在本手册中,
所提到的“无线控制器”、“本产品”等名词,如无特别说明,系指TL-AC100/TL-AC200无线控制
2.3.1 TL-AC100 .................................................................................................................... 2 2.3.2 TL-AC200 .................................................................................................................... 4
本手册中使用的特殊图标说明如下:
图标
含义
注意:
Nighthawk AC1900 WiFi LTE模式路由器R7100LG用户指南说明书
Do MoreWiFi Network Name and PasswordThe preassigned WiFi network name (SSID) and password (network key) are unique to your modem router, like a serial number. Because the modem router automatically uses WiFi security, you don’t need to set it up. The WiFi settings are on the label on the modem router.We recommend that you use the preassigned WiFi settings becauseyou can check the label if you forget them. You can also log in to the modem router to change these settings. If you do so, write down the new WiFi settings and store them in a safe place.You can write the WiFi settings from the label on your modem router in this space for easy reference. If you change the WiFi settings, write the new settings here for easy reference and store this booklet in a safe place.WiFi network name (SSID):Network key (password):Check the 3G/4G LED BehaviorThe 3G/4G LED on your modem router indicates your modem router’s mobile broadband signal strength.If your modem router is connected to a 4G network, the 3G/4G LED lights the following colors:If your modem router is connected to a 3G network, the 3G/4G LED lights the following colors:For information about the other LED behaviors, see the user manual, which is available online at .Connect Your Modem Router to a Modem You can connect your modem router to a cable or fiber modem. If you insert a micro SIM card into your modem router and you also connect a modem to the Internet port on the modem router, you can set up failover mode on your modem router. For more information, see Set Up Failover Mode on page 13.¾To connect your modem router to a modem and connect it to the Internet:1. Attach and position the antennas:2.a. Unplug your modem, remove and replace the backup battery if ituses one, and then plug the modem back in.b. Use the Ethernet cable to connect the modem to the yellowInternet port on the modem router.c. Connect the modem router to a power source.The modem router’s Power LED lights amber and then turns whitewhen the modem router is ready.3. Connect to the Internet:modem router.To connect with WiFi, do the following:a. Make sure that the modem router’s WiFi LED is lit.b. Find the modem router’s preassigned WiFi network name andpassword on the label on the modem router.c. Open the WiFi connection manager on a WiFi-enabled computeror mobile device, find the modem router’s WiFi network name,and use the modem router’s password to connect.d. Launch a web browser.If the NETGEAR installation assistant does not display, visit. If a login window opens, enter admin forthe user name and password for the password.e. Follow the NETGEAR installation assistant.The Internet LED lights when the modem router is connectedto the Internet.Join the WiFi NetworkYou can either use Wi-Fi Protected Setup (WPS) or select yourmodem router’s WiFi network and type its password.Join the WiFi Network Using WPSFor help with the WPS button on your WPS-enabled device, check the instructions or online help that came with that WPS-enabled device. Some older equipment cannot use WPS.¾To join the network using WPS:1. Press the WPS button on the modem router for three to five seconds.The WPS LED on the modem router blinks white.2. Within two minutes, on your WPS-enabled device, press its WPSbutton or click its onscreen WPS button.The WPS LED on the modem router lights solid white when theWPS-enabled device connects to your modem router.3. Repeat this process to add other WPS-enabled devices.Join the WiFi Network Using theModem Router’s WiFi SettingsUse the modem router’s WiFi network name and password to connect your WiFi-enabled computer or mobile device to the modem router’s network through WiFi. If you did not change the modem router’s WiFi network name and password, use the modem router’s preassigned WiFi network name and password, which are on the label on the modem router.¾To select your network and enter its password:1. On your WiFi-enabled computer or mobile device, open the WiFiconnection manager that manages your WiFi connections.The WiFi connection manager scans for WiFi networks in your area. 2. Find and select your modem router’s WiFi network name (SSID).The SSID is on the label on the modem router.3. Enter the modem router’s password (or your custom password if youchanged it).The password is on the label on the modem router.4. Repeat Step 1 through Step 3 to add other WiFi-enabled computer ormobile device.View or Change theModem Router SettingsAfter you use the NETGEAR installation assistant to set up themodem router, you can log in to the modem router to view or change its settings.Log In to the Modem Router¾To log in to the modem router:1. Connect a computer or mobile device to the modem router.You can connect using a wired connection or a WiFi connection:• To connect using a wired connection, use an Ethernet cable (not included) to connect an Ethernet port on your computer to anEthernet port on the modem router.• To connect using a WiFi connection, find the modem router’s preassigned WiFi network name and password on the label onthe modem router. Open the WiFi connection manager on yourWiFi-enabled computer or mobile device, find the modem router’sWiFi network name, and use the modem router’s password toconnect.2. Launch a web browser and visit .A login window opens.3. Enter admin for the user name and password for the password.The BASIC Home page displays.Change the WiFi Network Name and Password The router’s preset WiFi network name (SSID) and password are on the label on the router. If you want to change your router’s WiFi network name and password, log in to the modem router.¾To change the router’s WiFi network name and password: 1. Launch a web browser from a computer or mobile device that isconnected to the network and visit .A login window opens.2. Enter the modem router user name and password.The user name is admin and the default password is password. Use the default credentials if you did not change them.The BASIC Home page displays.3. Select Wireless.The Wireless Setup page displays.4. To change the WiFi network name (SSID), enter a new name in theName (SSID) field.5. To change the WiFi password, enter a new password in the Password(Network Key) field.6. Click the Apply button.Your settings are saved.Change the admin Password¾To change the admin password:1. Launch a web browser from a computer or mobile device that isconnected to the network and visit .A login window opens.2. Enter admin for the user name and password for the password.The BASIC Home page displays.3. Select ADVANCED > Administration > Set Password.The Set Password page displays.4. Type your old password and type the new password twice.5. To be able to recover the password, select the Enable PasswordRecovery check box.We recommend that you enable password recovery.6. Select two security questions and provide answers to them.7. Click the Apply button.Your settings are saved.Recover a Forgotten admin PasswordThe default password for the admin user name is password. If you changed the password and enabled the password recovery feature, you can retrieve this password.¾To retrieve a forgotten admin password:1. Launch a web browser from a computer or mobile device that isconnected to the network and visit .A login window opens.2. Click the Cancel button.If password recovery is enabled, you are prompted to enter the serial number of the modem router. The serial number is on the label on the modem router.3. Enter the serial number of the modem router.4. Click the Continue button.A page displays requesting the answers to your security questions.5. Enter the saved answers to your security questions.6. Click the Continue button.A page displays your recovered password.7. Click the Login again button.A login window opens.8. With your recovered password, log in to the modem router.Set Up Failover ModeIf you inserted a micro SIM card into your modem router and you also connected a modem to the Internet port on the modem router, you can set up failover mode on your modem router. Failover mode allows your modem router to switch to a mobile broadband connection if its Internet port connection fails. Note that the modem router’s Internet port is also referred to as a WAN Ethernet port.¾To set up failover mode:1. Connect a modem to the Internet port on your modem routerand insert a micro SIM card into the SIM slot on the back of themodem router.2. Set up your modem router’s WAN Ethernet connection:a. Launch a web browser from a computer or mobile device that isconnected to the network and visit .A login window opens.b. Enter the modem router user name and password.The user name is admin and the default password is password.Use the default credentials if you did not change them.The BASIC Home page displays.c. Select ADVANCED > Setup > Broadband Settings.The Broadband Settings page displays.d. In the Internet Connection Mode menu, select Always useEthernet connection to enable the Internet port’s (also referredto as a WAN Ethernet port) Internet connection only.e. Click the Apply button.Your settings are saved.f. Select ADVANCED > Setup > Internet Setup.The Internet Setup page displays.g. Specify your Internet connection settings.h. Click the Apply button.Your settings are saved.i. Test your modem router’s Internet connection to make sure thatyour modem router can connect to the Internet.3. Set up your modem router’s mobile broadband connection:a. Log back in to the modem router.The BASIC Home page displays.b. Select ADVANCED > Setup > Broadband Settings.The Broadband Settings page displays.c. In the Internet Connection Mode menu, select Always useMobile Broadband connection to enable the mobile broadbandconnection only.d. Click the Apply button.Your settings are saved.e. Select ADVANCED > Setup > Mobile Broadband Settings.The Mobile Broadband Settings page displays.f. Specify your mobile broadband connection settings.g. Click the Apply button.Your settings are saved.h. Test your modem router’s Internet connection to make sure thatyour modem router can connect to the Internet.4. Set the failover mode:a. Log back in to the modem router.The BASIC Home page displays.b. Select ADVANCED > Setup > Broadband Settings.The Broadband Settings page displays.c. In the Internet Connection Mode menu, select Use WANEthernet with mobile as back up in case of failure.The modem router will connect to the Internet using the WANEthernet connection. If the WAN Ethernet connection fails, themodem router will connect to the Internet using the mobilebroadband connection.d. Click the Apply button.Your settings are saved.If your modem router is connected to a mobile broadband network, you can log in to the modem router to check the status of the mobile broadband connection.¾To check the mobile broadband status:1. Launch a web browser from a computer or mobile device that isconnected to the network and visit .A login window opens.2. Enter the modem router user name and password.The user name is admin and the default password is password. Use the default credentials if you did not change them.The BASIC Home page displays.3. Click the ADVANCED tab.4. In the Internet Port pane, click the Connection Status button.The Mobile Broadband Status page displays.If your modem router is connected to a mobile broadband network, you can log in to the modem router and view the mobile broadband settings, such as the APN, PDP type, and network mode.¾To view the mobile broadband settings:1. Launch a web browser from a computer or mobile device that isconnected to the network and visit .A login window opens.2. Enter the modem router user name and password.The user name is admin and the default password is password. Use the default credentials if you did not change them.The BASIC Home page displays.3. Select ADVANCED > Setup > Mobile Broadband Settings.The Mobile Broadband Settings page displays.Access a USB Device on the Network ReadySHARE lets you access and share a USB storage device connected to the modem router’s USB ports. (If your USB device uses special drivers, it is not compatible.)¾To access the USB storage device from a Windows computer:1. Connect your USB storage device to a USB port on the modem router.We recommend that you use the blue USB 3.0 port on themodem router to get the best USB device access speed.When you connect the USB storage device to the modem router’s USB port, it might take up to two minutes before it is ready for sharing. By default, the USB storage device is available to all computers on your local area network (LAN).2. On a Windows computer that is connected to the network, selectStart > Run, enter \\readyshare in the dialog box, and click the OK button.A window displays the files and folders on the device.¾To access the USB storage device from a Mac:1. Connect your USB storage device to a USB port on the modem router.We recommend that you use the blue USB 3.0 port on themodem router to get the best USB device access speed.When you connect the USB storage device to the modem router’s USB port, it might take up to two minutes before it is ready for sharing. By default, the USB storage device is available to all computers on your local area network (LAN).2. On a Mac that is connected to the network, launch Finder and selectGo > Connect to Server.The Connect to server window opens.3. Enter the smb://readyshare in the Server Address field and clickthe Connect button.4. When prompted, select the Guest radio button.5. If you set up access control on the modem router and you allowedyour Mac to access the network, select the Registered Userradio button and enter admin for the name and password for thepassword.For more information about access control, see the user manual,which is available online at or through a link in the modem router’s user interface.6. Click the Connect button.A window displays the files and folders on the device.NETGEAR, Inc.350 East Plumeria DriveSan Jose, CA 95134, USA NETGEAR INTL LTD Building 3, University Technology CentreCurraheen Road, Cork, IrelandSupportThank you for purchasing this NETGEAR product. You can visit /support to register your product, get help, access the latest downloads and user manuals, and join our community. We recommend that you use only official NETGEAR support resources.Trademarks© NETGEAR, Inc., NETGEAR and the NETGEAR Logo are trademarks of NETGEAR, Inc. Any non-NETGEAR trademarks are used for reference purposes only.ComplianceFor the current EU Declaration of Conformity, visit /app/answers/detail/a_id/11621/.For regulatory compliance information, visit /about/regulatory/.See the regulatory compliance document before connecting the power supply.。
TL-AC100 V2.0、TL-AC200 V2.0用户手册2.1.0

TL-AC100 TL-AC200
用户手册
REV2.1.0 1910040532
声明
Copyright © 2015 普联技术有限公司 版权所有,保留所有权利 未经普联技术有限公司明确书面许可,任何单位或个人不得擅自仿制、复制、誊抄或转译本手 册部分或全部内容,且不得以营利为目的进行任何方式(电子、影印、录制等)的传播。 为普联技术有限公司注册商标。 本文档提及的其他所有商标, 由各自的所 有人拥有。 本手册所提到的产品规格和资讯仅供参考,如有内容更新,恕不另行通知。除非有特殊约定, 本手册仅作为使用指导,所作陈述均不构成任何形式的担保。
配置指南 .......................................................................................................... 5 登录 Web 界面 ................................................................................................. 5 Web 界面简介 .................................................................................................. 6 2.2.1 2.2.2 界面总览 ................................................................................................. 6 界面常见按键及操作 ............................................................................... 7
无线网络使用说明书
无线网络使用说明书无线网络使用说明书目录一、前言 (2)1.1什么是WLAN (2)1.2 WLAN的发展趋势 (2)1.2.1面向消费者的未来需求 (2)1.2.2面向智能的无线路由器 (2)1.3 WLAN优势分析 (2)1.3.1 灵活性和移动性 (2)1.3.2安装便捷 (3)1.3.3易于进行网络规划和调整 (3)1.3.4故障定位容易 (3)1.3.5易于扩展 (3)二、无线网络的安装使用 (3)2.1介绍无线网络如何连接 (3)2.1.1所需设备,使用思科设备 (3)2.1.2连接方法 (4)2.2无线路由器各接口怎么接 (4)三、无线网络的配置 (5)3.1配置IP地址 (5)3.3配置SSID (7)3.4身份验证 (8)四、无线网络测试 (8)4.1自动获取IP地址 (8)4.2 IP地址的测试 (9)4.3测试无线网络 (9)五、故障分析 (11)5.1排查无线网络连接线路,解决只发不收的无线网络故障 (11)5.2排查无线网络连接方式,解决间歇断网的无线网络故障 (11)5.3排查无线网络连接位置,解决上网迟钝的无线网络故障 (12)5.4排查无线网络连接状态,解决无法登录的无线网络故障 (12)5.5以面的各项排查任无法解决问题的情况 (13)一、前言1.1什么是WLAN无线局域网络 (Wireless Local Area Networks; WLAN)是相当便利的数据传输系统,它利用射频(Radio Frequency;RF)的技术,取代旧式碍手碍脚的双绞铜线(Coaxial)所构成的局域网络,使得无线局域网络能利用简单的存取架构让用户透过它,达到「信息随身化、便利走天下」的理想境界1.2 WLAN的发展趋势1.2.1面向消费者的未来需求随着社会的发展,人民的富裕,人们也在追求高质量的生活品质。
根据最近的市场调查显示,消费者越来越倾向于购买高档全面的无线路由器。
与以前喜欢购买低价格,品质一般的路由器趋势不同,消费者默契更喜欢多花钱,购买功能齐全、高品质、高服务的高端品牌无线路由器。
美国网件 ac2100 智能 wifi 路由器用户手册说明书
Nighthawk AC2100Smart WiFi Router Model AC2100NETGEAR, Inc.350 E. Plumeria Drive December 2018202-11908-02San Jose, CA 95134, USANighthawk AC2100Smart WiFi RouterSupportThank you for purchasing this NETGEAR product.You can visithttps:///support/to register your product,get help,access the latest downloads and user manuals,and join our community.We recommend that you use only official NETGEAR support resources.Compliance and ConformityFor regulatory compliance information including the EU Declaration of Conformity,visit https:///about/regulatory/.See the regulatory compliance document before connecting the power supply. Trademarks©NETGEAR,Inc.,NETGEAR,and the NETGEAR Logo are trademarks of NETGEAR,Inc. Any non-NETGEAR trademarks are used for reference purposes only.ContentsChapter1Hardware Overview of the RouterUnpack Your Router (9)Attach the Antennas (10)LEDs and Buttons on the Top Panel (11)Ports,Buttons,and Connectors on the Back Panel (12)USB Port on the Front Panel (13)Router Label (14)Position the Router (14)Cable Your Router (15)Chapter2Connect to the Network and Access the RouterConnect to the Network (18)Wired Connection (18)WiFi Connection (18)WiFi Connection Using WPS (18)Types of Logins (19)Install or Manage Your Router With the Nighthawk App (19)Log In to the Router (20)Change the Language (20)Chapter3Specify Your Internet SettingsUse the Internet Setup Wizard (22)Manually Set Up the Internet Connection (22)Specify an Internet Connection Without a Login (22)Specify an Internet Connection That Uses a Login (24)Specify IPv6Internet Connections (25)Requirements for Entering IPv6Addresses (26)Use Auto Config for an IPv6Internet Connection (26)Use Auto Detect for an IPv6Internet Connection (28)Set Up an IPv66to4Tunnel Internet Connection (29)Set Up an IPv66rd Internet Connection (30)Set Up an IPv6Pass Through Internet Connection (32)Set Up an IPv6Fixed Internet Connection (33)Set Up an IPv6DHCP Internet Connection (34)Set Up an IPv6PPPoE Internet Connection (36)Manage the MTU Size (37)MTU Concepts (37)Change the MTU Size (39)Chapter4Control Access to the InternetAllow or Block Access to Your Network (41)Use Keywords to Block Internet Sites (42)Block Services From the Internet (44)Delete Keywords From the Blocked List (45)Avoid Blocking on a Trusted Computer (45)Manage Network Access Control Lists (46)Schedule When to Block Internet Sites and Services (47)Set Up Security Event Email Notifications (48)Chapter5Manage Network SettingsView or Change WAN Settings (51)Set Up a Default DMZ Server (52)Change the Router’s Device Name (53)Change the LAN TCP/IP Settings (54)Specify the IP Addresses That the Router Assigns (55)Disable the DHCP Server Feature in the Router (57)Manage Reserved LAN IP Addresses (57)Reserve an IP Address (58)Edit a Reserved IP Address (58)Delete a Reserved IP Address Entry (59)Use the WPS Wizard for WiFi Connections (60)Specify Basic WiFi Settings (60)Change the WiFi Mbps Settings (62)Change the WiFi Password or the WiFi Security (63)Set Up a Guest WiFi Network (65)Control the WiFi Radios (67)Use the WiFi On/Off Button (67)Enable or Disable the WiFi Radios (67)Set Up a WiFi Schedule (68)Specify WPS Settings (69)Set Up the Router as a WiFi Access Point (70)Set Up the Router in Bridge Mode (71)Set Up a Bridge for a Port Group or VLAN Tag Group (72)Set Up a Bridge for a Port Group (73)Set Up a Bridge for a VLAN Tag Group (74)Set Up an IPTV Port to Lease an Intranet Port (75)Custom Static Routes (76)Set Up a Static Route (77)Edit a Static Route (78)Delete a Static Route (79)Chapter6Optimize PerformanceOptimize Internet Streaming With QoS (81)Turn On Internet Access QoS (81)Add a QoS Rule by Device (82)Add a QoS Rule by Service (83)Edit a QoS Rule (83)Delete a QoS Rule (84)Delete All QoS Rules (85)Manage Wi-Fi Multimedia Quality of Service (85)Improve Network Connections With Universal Plug-N-Play (86)Chapter7Manage Your RouterUpdate the Router Firmware (89)Check for New Firmware and Update the Router (89)Manually Upload Firmware to the Router (90)Change the admin Password (91)Enable admin Password Recovery (91)Recover the admin Password (92)View Information About the Router and the Internet and WiFiSettings (93)Display Internet Port Statistics (94)Check the Internet Connection Status (95)View and Manage Logs of Router Activity (96)View Devices Currently on the Network (97)Monitor Internet Traffic (97)Manage the Router Configuration File (99)Back Up Settings (99)Erase the Settings (99)Restore Configuration Settings (100)Remote Access (101)Set Up Remote Management (101)Use Remote Access (102)Remotely Access Your Router Using the Nighthawk App (102)Disable LED Blinking or Turn Off LEDs (103)Return the Router to Its Factory Default Settings (103)Use the Reset Button (104)Erase the Settings (104)Chapter8Share USB Storage Devices Attached to the Router USB Device Requirements (107)Connect a USB Storage Device to the Router (107)Access a Storage Device Connected to the Router From aWindows-Based Computer (108)Map a USB Device to a Windows Network Drive (108)Access a Storage Device That Is Connected to the Router From a Mac (109)Back Up Windows-Based Computers With ReadySHARE Vault..110 Back Up Mac Computers With Time Machine (110)Set Up a USB Hard Drive on a Mac (111)Prepare to Back Up a Large Amount of Data (111)Use Time Machine to Back Up Onto a USB Hard Disk (112)Enable FTP Access Within Your Network (113)View or Change Network Folders on a Storage Device (114)Add a Network Folder on a USB Storage Device (115)Edit a Network Folder on a USB Storage Device (116)Safely Remove a USB Storage Device (117)Chapter9Use Dynamic DNS to Access USB Storage Devices Through the InternetSet Up and Manage Dynamic DNS (119)Set Up FTP Access Through the Internet (119)Your Personal FTP Server (120)Set Up Your Personal FTP Server (120)Set Up a New Dynamic DNS Account (121)Specify a DNS Account That You Already Created (121)Change the Dynamic DNS Settings (122)Access USB Storage Devices Through the Internet (124)Remotely Access a USB Device Using ReadyCLOUD (124)Create a ReadyCLOUD Account (124)Register Your Router With ReadyCLOUD (125)Chapter10Use the Router as a Media ServerSpecify ReadyDLNA Media Server Settings (128)Play Music From a Storage Device With iTunes Server (129)Set Up the Router’s iTunes Server With iTunes (129)Set Up the Router’s iTunes Server With the Remote App (130)Set Up the Router to Work With TiVo (131)Change the NTP Server (132)Chapter11Share a USB PrinterInstall the Printer Driver and Cable the Printer (135)Download the ReadySHARE Printer Utility (135)Install the ReadySHARE Printer Utility (135)Print Using the NETGEAR USB Control Center (136)View or Change the Status of a Printer (137)Use the Scan Feature of a Multifunction USB Printer (138)Change NETGEAR USB Control Center Settings (138)Turn Off Automatic Startup for NETGEAR USB Control Center.138 Change the Language for the NETGEAR USB Control Center.139 Specify the USB Control Center Time-Out (139)Chapter12Manage Port Forwarding and Port Triggering Manage Port Forwarding to a Local Server (141)Set Up Port Forwarding to a Local Server (141)Add a Custom Port Forwarding Service (142)Edit a Port Forwarding Service (143)Delete a Port Forwarding Entry (144)Application Example:Make a Local Web Server Public (144)How the Router Implements the Port Forwarding Rule (145)Port Triggering (145)Add a Port Triggering Service (146)Enable Port Triggering (147)Application Example:Port Triggering for Internet Relay Chat port triggering (147)Chapter13TroubleshootingQuick Tips (150)Sequence to Restart Your Network (150)Check Ethernet Cable Connections (150)WiFi Settings (150)Network Settings (150)Troubleshoot With the LEDs (151)Standard LED Behavior When the Router Is Powered On (151)Power LED Is Off or Blinking (151)LEDs Never Turn Off (151)Internet or Ethernet Port LEDs Are Off (152)WiFi LED Is Off (152)You Cannot Log In to the Router (152)You Cannot Access the Internet (153)Troubleshoot Internet Browsing (154)Changes Are Not Saved (155)Troubleshoot WiFi Connectivity (155)Troubleshoot Your Network Using the Ping Utility (156)Test the LAN Path to Your Router (156)Test the Path From a Windows-Based Computer to a RemoteDevice (157)Appendix A Supplemental InformationFactory Settings (160)Technical Specifications (163)1Hardware Overview of the RouterThe chapter contains the following sections:•Unpack Your Router•Attach the Antennas•LEDs and Buttons on the Top Panel•Ports,Buttons,and Connectors on the Back Panel•USB Port on the Front Panel•Router Label•Position the Router•Cable Your RouterFor more information about the topics that are covered in this manual,visit the support website at /support.Firmware updates with new features and bug fixes are made available from time to time at .You can check for and download new firmware manually.If the features or behavior of your product does not match what is described in this guide,you might need to update your firmware.Unpack Your RouterThe box contains the following items.Figure1.Package contentsTable1.Legend1.Router2.Antennas(3)3.Ethernet cablePower adapter4In some regions,a CD is included in the package.Attach the AntennasThe router comes with three antennas.To attach the antennas:1.Remove the antenna caps from the antenna posts on the back panel of the router.2.Align the antennas with the antenna posts.3.Attach the antennas on the threaded antenna posts.4.Position the antennas for the best WiFi performance.We recommend that the center antenna be vertical and that you aim the others outward at45-degree angles,as shown.LEDs and Buttons on the Top PanelThe status LEDs and buttons are located on the top of the router.Table 2.LED and button descriptionsDescription LED and ButtonSolid amber .The router is starting.Blinking amber .The firmware is upgrading,or the Reset button was pressed.Solid white .The router is ready.Blinking white .The firmware is corrupted.Off .Power is not supplied to the router.Power Solid white .The Internet connection is ready.Solid amber .The router detected an Ethernet cable connection to the modem.Off .No Ethernet cable is connected between the router and the modem.Internet Solid white .The 2.4GHz WiFi radio is operating.Blinking white .The router is sending or receiving WiFi traffic.Off .The 2.4GHz WiFi radio is off.2.4GHzWiFi Solid white .The 5GHz WiFi radio is operating.Blinking white .The router is sending or receiving WiFi traffic.Off .The 5GHz WiFi radio is off.5GHzWiFi Solid white .The guest WiFi network is operating.Blinking white .The router is sending or receiving WiFi traffic.Off .The guest WiFi network is off.GuestWiFi Solid white .A USB device is connected and is ready.Blinking white .A USB device is plugged in and is trying to connect.Off .No USB device is connected,or someone clicked the Safely Remove Hardware buttonand it is now safe to remove the attached USB device.USB 3.0port The LED color indicates the speed:white for Gigabit Ethernet connections and amber for 100Mbps or 10Mbps Ethernet connections.Solid white or solid amber .A powered-on device is connected to the Ethernet port.Blinking white or blinking amber .The port is sending or receiving traffic.Off .No device is connected to this Ethernet port.Ethernet ports1–4Table 2.LED and button descriptions (Continued)Description LED and ButtonPressing this button for two seconds turns the 2.4GHz and 5GHz WiFi radios on and off.If this LED is solid white,the WiFi radios are on.If this LED is off,the WiFi radios are turned offand you cannot use WiFi to connect to the router.WiFi On/Offbutton withLED This button lets you use WPS to join the WiFi network without typing the WiFi password.TheWPS LED blinks white during this process and then lights solid white.WPS button withLEDFor information about disabling LED blinking for network communications and turning off all LEDs except the Power LED,see Disable LED Blinking or Turn Off LEDs on page 103.Ports,Buttons,and Connectors on the Back PanelThe back panel of the router provides ports,buttons,antenna connectors,and a DC power connector.For information about attaching the antennas,see Attach the Antennas on page10.Figure 2.Router back panelIn addition to the three antenna connectors,viewed from left to right,the back panel contains the following components:•Reset button .For information about using the Reset button,see Return the Router to Its Factory Default Settings on page 103.•Ethernet LAN ports .Use the four Gigabit Ethernet RJ-45LAN ports to connect the router to LAN devices.•WAN port .Use the yellow Gigabit Ethernet RJ-45WAN port to connect the routerto a modem.•Power On/Off button.Press the Power On/Off button to provide power to the router.•DC power connector.Connect the power adapter that came in the product package to the DC power connector.USB Port on the Front PanelA USB3.0port is located on the front of the router.B3.0portRouter LabelThe router label on the bottom panel of the router lists the login information,WiFi network name(SSID)and password(network key),serial number,and MAC address of the router.Figure4.Router labelPosition the RouterThe router lets you access your network anywhere within the operating range of your WiFi network.However,the operating distance or range of your WiFi connection can vary significantly depending on the physical placement of the router.For example,the thickness and number of walls the WiFi signal passes through can limit the range. Additionally,other WiFi access points in and around your home might affect your router’s signal.WiFi access points are routers,repeaters,WiFi range extenders,and any other device that emits a WiFi signal for network access.Position the router according to the following guidelines:•Place the router near the center of the area where your computers and other devices operate and within line of sight to your WiFi devices.•Make sure that the router is within reach of an AC power outlet and near Ethernet cables for wired computers.•Place the router in an elevated location,minimizing the number walls and ceilings between the router and your other devices.•Place the router away from electrical devices such as these:-Ceiling fans-Home security systems-Microwaves-Computers-Base of a cordless phone- 2.4GHz cordless phone-5GHz cordless phone•Place the router away from large metal surfaces,large glass surfaces,insulated walls, and items such as these:-Solid metal door-Aluminum studs-Fish tanks-Mirrors-Brick-ConcreteIf you are using adjacent access points,use different radio frequency channels to reduce interference.Cable Your RouterThe following image shows how to cable your router.To finish the installation,download and launch the Nighthawk app on your mobile device.For more information,see Install or Manage Your Router With the Nighthawk App on page19.Figure5.Router cablingTo cable your router:1.Unplug your modem’s power,leaving the modem connected to the wall jack foryour Internet service.If your modem uses a battery backup,remove the battery.2.Plug in and turn on your modem.If your modem uses a battery backup,put the battery back in.3.Connect your modem to the Internet port of your router with the yellow Ethernetcable that came with your router.4.Connect the power adapter to your router and plug the power adapter into an outlet.5.Press the Power On/Off button on the back panel of the router.2Connect to the Network and Access the RouterYou can connect to the router’s WiFi networks or use a wired Ethernet connection.This chapter explains the ways you can connect and how to access the router and log in. The chapter contains the following sections:•Connect to the Network•Types of Logins•Install or Manage Your Router With the Nighthawk App•Log In to the Router•Change the LanguageConnect to the NetworkYou can connect to the router’s network through a wired or WiFi connection.If you set up your computer to use a static IP address,change the settings so that it uses Dynamic Host Configuration Protocol(DHCP).Wired ConnectionYou can connect your computer to the router using an Ethernet cable and join the router’s local area network(LAN).To connect your computer to the router with an Ethernet cable:1.Make sure that the router is receiving power(its Power LED is lit).2.Connect an Ethernet cable to an Ethernet port on your computer.3.Connect the other end of the Ethernet cable an Ethernet port on the router.Your computer connects to the local area network(LAN).WiFi ConnectionTo find and select the WiFi network:1.Make sure that the router is receiving power(its Power LED is lit).2.On your computer or WiFi device,find and select the WiFi network.The WiFi network name is on the router label.3.Join the WiFi network and enter the WiFi password.The password is on the router label.Your device connects to the WiFi network.WiFi Connection Using WPSYou can connect your WPS-enabled device to the router’s WiFi network with Wi-Fi Protected Setup(WPS)or you can find and select the WiFi network.To use WPS to connect to the WiFi network:1.Make sure that the router is receiving power(its Power LED is lit).2.Check the WPS instructions for your WPS-enabled device.3.Press the WPS button on the router.4.Within two minutes,on your WPS-enabled device,press its WPS button or followits instructions for WPS connections.Your WPS-enabled device connects to the WiFi network.Types of LoginsSeparate types of logins serve different purposes.It is important that you understand the difference so that you know which login to use when.Several types of logins are associated with the router:•ISP login.The login that your ISP gave you logs you in to your Internet service.Your service provider gave you this login information in a letter or some other way.If you cannot find this login information,contact your service provider.•WiFi network key or password.Your router is preset with a unique WiFi network name(SSID)and password for WiFi access.This information is on the router label.•Router login.This logs you in to the router interface from a web browser as admin.Install or Manage Your Router With the Nighthawk AppWith the Nighthawk app,you can easily install and manage your router.The app automatically updates the router to the latest firmware,allows you to personalize your WiFi network,and even helps register your router with NETGEAR.The Nighthawk app is available for iOS and Android mobile devices.To install your router using the Nighthawk app:1.To download the app,visit .2.On your mobile device,tap Settings>Wi-Fi and find and connect to your router’sWiFi network.Your router’s WiFi network name(SSID)and network key(password)are on the router label.unch the Nighthawk app on your mobile device.4.Follow the instructions that display on the app to install your router and connect tothe Internet.Log In to the RouterWhen you first connect to your router and launch a web browser,the browser automatically displays the router web interface.If you want to view or change settings for the router later,you can use a browser to log in to the router web interface.To log in to the router:unch a web browser from a computer or mobile device that is connected to therouter network.2.Enter .Note:You can also enter or http://192.168.1.1.The procedures in this manual use .A login window opens.3.Enter the router admin user name and password.The user name is admin.The password is the one that you specified the first time that you logged in.The user name and password are case-sensitive.The BASIC Home page displays.Change the LanguageBy default,the language is set to Auto.To change the language:unch a web browser from a computer or WiFi device that is connected to thenetwork.2.Enter .A login window opens.3.Enter the router user name and password.The user name is admin.The password is the one that you specified the first time that you logged in.The user name and password are case-sensitive.The BASIC Home page displays.4.In the upper right corner,select a language from the menu.5.When prompted,click the OK button to confirm this change.The page refreshes with the language that you selected.3Specify Your Internet SettingsUsually,the quickest way to set up the router to use your Internet connection is to allow your router to detect the Internet connection when you first access the router with a web browser.You can also customize or specify your Internet settings.This chapter contains the following sections:•Use the Internet Setup Wizard•Manually Set Up the Internet Connection•Specify IPv6Internet Connections•Manage the MTU SizeUse the Internet Setup WizardYou can use the Setup Wizard to detect your Internet settings and automatically set up your router.The Setup Wizard is not the same as the pages that display the first time you connect to your router to set it up.To use the Setup Wizard:unch a web browser from a computer or mobile device that is connected to therouter network.2.Enter .A login window opens.3.Enter the router admin user name and password.The user name is admin.The password is the one that you specified the first time that you logged in.The user name and password are case-sensitive.The BASIC Home page displays.4.Select ADVANCED>Setup Wizard.The Setup Wizard page displays.5.Select the Yes radio button.If you select the No radio button,you are taken to the Internet Setup page(see Manually Set Up the Internet Connection on page22).6.Click the Next button.The Setup Wizard searches your Internet connection for servers and protocols to determine your Internet configuration.Manually Set Up the Internet Connection You can view or change the router’s Internet connection settings.Specify an Internet Connection Without a LoginTo specify the Internet connection settings:unch a web browser from a computer or mobile device that is connected totherouter network.2.Enter .A login window opens.3.Enter the router admin user name and password.The user name is admin.The password is the one that you specified the first time that you logged in.The user name and password are case-sensitive.The BASIC Home page displays.4.Select Internet.The Internet Setup page displays.5.In the Does your Internet connection require a login?section,leave the No radiobutton selected.6.If your Internet connection requires an account name or host name,click the Editbutton in the Account Name section and enter the account name.7.If your Internet connection requires a domain name,type it in the Domain Name(IfRequired)field.For the other sections on this page,the default settings usually work,but you can change them.8.Select an Internet IP Address radio button:•Get Dynamically from ISP.Your ISP uses DHCP to assign your IP address.Your ISP automatically assigns these addresses.•Use Static IP Address.Enter the IP address,IP subnet mask,and the gateway IP address that your ISP assigned.The gateway is the ISP router to which your router connects.9.Select a Domain Name Server(DNS)Address radio button:•Get Automatically from ISP.Your ISP uses DHCP to assign your DNS servers.Your ISP automatically assigns this address.•Use These DNS Servers.If you know that your ISP requires specific servers,select this option.Enter the IP address of your ISP’s primary DNS server.If a secondary DNS server address is available,enter it also.10.Select a Router MAC Address radio button:•Use Default e the default MAC address.•Use Computer MAC Address.The router captures and uses the MAC address of the computer that you are now using.You must use the one computer that the ISP allows.•Use This MAC Address.Enter the MAC address that you want to use.11.Click the Apply button.Your settings are saved.12.Click the Test button to test your Internet connection.If the NETGEAR website does not display within one minute,see You Cannot Access the Internet on page153.Specify an Internet Connection That Uses a LoginTo view or change the basic Internet setup:unch a web browser from a computer or mobile device that is connected to therouter network.2.Enter .A login window opens.3.Enter the router admin user name and password.The user name is admin.The password is the one that you specified the first time that you logged in.The user name and password are case-sensitive.The BASIC Home page displays.4.Select Internet.The Internet Setup page displays.5.In the Does your Internet connection require a login?section,select the Yes radiobutton.6.From the Internet Service Provider menu,select the encapsulation method:PPPoE,L2TP,or PPTP.7.In the Login field,enter the login name that your ISP gave you.This login name is often an email address.8.In the Password field,type the password that you use to log in to your Internetservice.9.If your ISP requires a service name,type it in the Service Name(if Required)field.10.From the Connection Mode menu,select Always On,Dial on Demand,or ManuallyConnect.11.To change the number of minutes until the Internet login times out,in the IdleTimeout(In minutes)field,type the number of minutes.This is how long the router keeps the Internet connection active when no one on the network is using the Internet connection.A value of0(zero)means never log out.12.Select an Internet IP Address radio button:•Get Dynamically from ISP.Your ISP uses DHCP to assign your IP address.Your ISP automatically assigns these addresses.•Use Static IP Address.Enter the IP address,IP subnet mask,and the gateway IP address that your ISP assigned.The gateway is the ISP router to which your router connects.13.Select a Domain Name Server(DNS)Address radio button:•Get Automatically from ISP.Your ISP uses DHCP to assign your DNS servers.Your ISP automatically assigns this address.•Use These DNS Servers.If you know that your ISP requires specific servers,select this option.Enter the IP address of your ISP’s primary DNS server.If a secondary DNS server address is available,enter it also.14.Select a Router MAC Address radio button:•Use Default e the default MAC address.•Use Computer MAC Address.The router captures and uses the MAC address of the computer that you are now using.You must use the one computer that the ISP allows.•Use This MAC Address.Enter the MAC address that you want to use.15.Click the Apply button.Your settings are saved.16.Click the Test button to test your Internet connection.If the NETGEAR website does not display within one minute,see You Cannot Access the Internet on page153.Specify IPv6Internet ConnectionsYou can set up an IPv6Internet connection if the router does not detect it automatically. To set up an IPv6Internet connection:unch a web browser from a computer or mobile device that is connected to therouter network.2.Enter .A login window opens.3.Enter the router admin user name and password.The user name is admin.The password is the one that you specified the first time that you logged in.The user name and password are case-sensitive.The BASIC Home page displays.。
华美HAME A12E路由器操作手册-7页精选文档
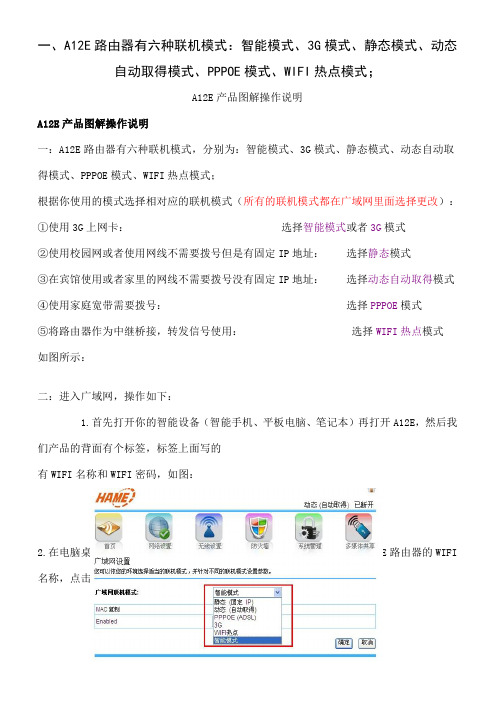
一、A12E路由器有六种联机模式:智能模式、3G模式、静态模式、动态自动取得模式、PPPOE模式、WIFI热点模式;A12E产品图解操作说明A12E产品图解操作说明一:A12E路由器有六种联机模式,分别为:智能模式、3G模式、静态模式、动态自动取得模式、PPPOE模式、WIFI热点模式;根据你使用的模式选择相对应的联机模式(所有的联机模式都在广域网里面选择更改):①使用3G上网卡:选择智能模式或者3G模式②使用校园网或者使用网线不需要拨号但是有固定IP地址:选择静态模式③在宾馆使用或者家里的网线不需要拨号没有固定IP地址:选择动态自动取得模式④使用家庭宽带需要拨号:选择PPPOE模式⑤将路由器作为中继桥接,转发信号使用:选择WIFI热点模式如图所示:二:进入广域网,操作如下:1.首先打开你的智能设备(智能手机、平板电脑、笔记本)再打开A12E,然后我们产品的背面有个标签,标签上面写的有WIFI名称和WIFI密码,如图:2.在电脑桌面右下角点击无线网图标,弹出无线列表框,然后在找到A12E路由器的WIFI 名称,点击链接后需要输入网络密钥就是WIFI名称,输完之后点击链接,连接上后会提示无线网已连接,如图:提示:以上操作设置仅限XP 系统电脑并且电脑具有无限搜索功能的客户使用,如果电脑没有无线搜索功能,需要客户用网线一端插在电脑主机上,另一端插在路由器网线接口上。
2.联上WIFI 后,打开浏览器输入网址192.168.169.1,然后进入路由器首页,点击登录输入密码:hame ,如图:3.进入设备管理界面,点击网络设置,然后点击广域网,如图:三:选择上网方式:提示:A12E 路由器出厂默认模式是智能模式,就是插上资费卡就可以直接使用;如果使用其他上网方式就需要设置:1.使用3G 资费卡上网,智能模式和3G 模式情况下都可以插资费卡直接使用;但是使用之前要确定资费卡没有欠费;在插资费卡的时候,按照资费卡切口朝里,芯片朝上的方向方向插入,然后拨上号就可以上网了,如图:2.使用校园网或者使用网线分配的有固定IP的选择静态模式,输入静态IP地址,然后点击确定就可以了,如图:3.使用宾馆网线或者家里网线不需要拨号的选择动态模式,然后点击确定:4.使用网线需要拨号的选择PPPOE模式,输入网线的帐号和密码,点击确定:5.将路由器作为桥接或者使用CMCC网络将联机模式改为WIFI热点,然后点击抓取附近热点,再在列表中找到你想要连接热点名称,点击连接输入密码,再点击确定就可以了,如图:四:在将联机模式改为动态情况下还上不了网,就需要输入电脑网线的MAC地址了(XP 系统电脑是实际IP,win7系统电脑是物理IP),操作步骤如下:1.打开我的电脑,点击网上邻居,然后双击本地连接图标,弹出本地连接状态框,然后点击支持,在点击详细信息,如图:2.然后弹出网络连接详细信息框,把里面的实际IP地址记录下来,如图:3.在用智能设备连接A12E,进入192.168.169.1界面,进入广域网,将广域网联机模式下边的Enablen点击启用,然后输入实际IP地址,在输的时候要将电脑上的XX-XX-XX-XX-XX-XX格式转变为XX:XX:XX:XX:XX:XX格式,然后点击确定就可以了,如图:根据你使用的模式选择相对应的联机模式(所有的联机模式都在广域网里面选择更改)①使用3G上网卡:选择智能模式或者3G 模式②使用校园网或者使用网线不需要拨号但是有固定IP地址:选择静态模式③在宾馆使用或者家里的网线不需要拨号没有固定IP地址:选择动态自动取得模式④使用家庭宽带需要拨号:选择PPPOE模式⑤将路由器作为中继桥接,转发信号使用:选择WIFI热点模式二:进入广域网,操作如下:1.首先打开你的智能设备(智能手机、平板电脑、笔记本)再打开A12E,然后我们产品的背面有个标签,标签上面写的有WIFI名称和WIFI密码,如图:2.在电脑桌面右下角点击无线网图标,弹出无线列表框,然后在找到A12E路由器的WIFI 名称,点击链接后需要输入网络密钥就是WIFI名称,输完之后点击链接,连接上后会提示无线网已连接,如图:提示:以上操作设置仅限XP系统电脑并且电脑具有无限搜索功能的客户使用,如果电脑没有无线搜索功能,需要客户用网线一端插在电脑主机上,另一端插在路由器网线接口上。
华美MPR-A1说明书
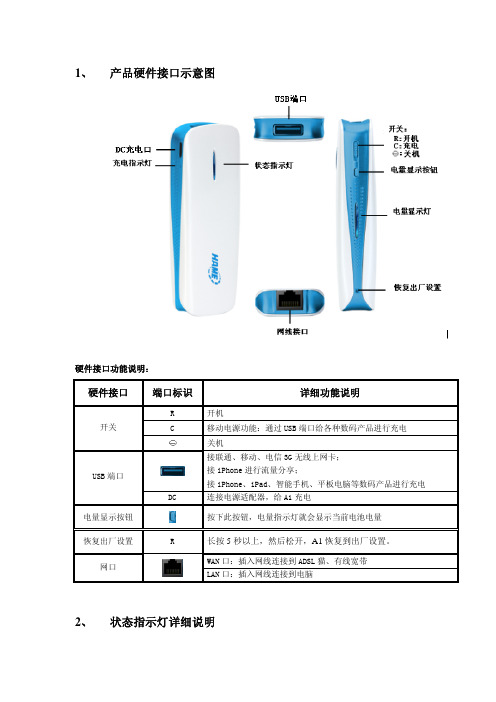
1、产品硬件接口示意图硬件接口功能说明:硬件接口 端口标识 详细功能说明R 开机C 移动电源功能:通过USB端口给各种数码产品进行充电开关关机接联通、移动、电信3G无线上网卡;接iPhone进行流量分享;接iPhone、iPad、智能手机、平板电脑等数码产品进行充电 USB端口DC 连接电源适配器,给A1充电电量显示按钮 按下此按钮,电量指示灯就会显示当前电池电量恢复出厂设置 R 长按5秒以上,然后松开,A1恢复到出厂设置。
WAN口:插入网线连接到ADSL猫、有线宽带网口LAN口:插入网线连接到电脑2、状态指示灯详细说明上网方式 闪灯状态 详细说明红灯长亮 A1开机,程序启动中,无法进行无线连接红灯闪烁(1秒/次) A1开机,WIFI关闭,无法进行无线连接 没有任何接入蓝灯闪烁(3秒/次) A1开机成功,可以进行无线连接蓝灯闪烁(1秒/次) 恢复出厂设置生效红灯长亮 无法兼容红灯闪烁(3秒/次) 可以兼容,未注册上网络紫灯闪烁(3秒/次) 注册上2G网络,未进行拨号连接 插入3G上网卡紫灯长亮 注册上2G网络,拨号成功,可以访问Internet网络。
蓝灯闪烁(3秒/次) 注册上3G网络,未进行拨号连接。
蓝灯长亮 注册上3G网络,拨号成功,可以访问Internet网络。
蓝灯闪烁(3秒/次) 未进行连接WIFI热点接入蓝灯长亮 连接成功,可以访问Internet网络紫灯闪烁(3秒/次) 未进行拨号连接插入网线(WIFI开启)紫灯长亮 DHCP/ADSL拨号连接成功,可以访问Internet网络。
红灯闪烁(3秒/次) 未进行拨号连接插入网线(WIFI关闭)红灯长亮 DHCP/ADSL拨号连接成功,可以访问Internet网络。
3、电池电量显示以及电池充满电的查看方式电池电量的查看方式:无论A1处于任何状态,按住电量显示按钮(开关旁边),然后根据电量灯的显示状态查看电池电量(4个灯全亮表示电量充足)。
电池充满的查看方式:关机状态下进行充电,亮蓝灯表示正在充电,蓝灯灭表示电池充满。
AX1000配置说明
AX配置说明1.开始配置AX1000可以通过命令行和Web GUI两种方式进行配置。
管理口的缺省IP为172.31.31.31缺省用户名/密码:admin/a10根据需要修改一些系统配置,例如配置界面的超时时间等。
配置时区命令行支持console, ssh 和Telnet 三种方式,输入用户名/密码,进入设备看到>后输入enable,密码默认为空默认所有端口都是down的,如果要启用端口,请参照以下命令操作:Interface ethernet nEnable或者直接在Web界面上启用选中的端口。
如果要通过数据端口管理设备,可采用如下命令:Enable-management service …….2.网络配置网络部分配置推荐使用命令行的方式。
2.1. 划分vlanQHD:vlan 2untagged ethernet 1 to 2router-interface ve 2!vlan 3untagged ethernet 5 to 6router-interface ve 3!FC:vlan 2untagged ethernet 1 to 2router-interface ve 2!vlan 3untagged ethernet 5 to 6router-interface ve 3!2.2. 配置IPQHD:interface ve 2ip address 10.244.19.133 255.255.255.248!interface ve 3ip address 10.244.189.154 255.255.255.252!FC:interface ve 2ip address 10.244.19.134 255.255.255.248!interface ve 3ip address 10.244.189.153 255.255.255.252!2.3. 配置路由ip route 0.0.0.0 /0 10.244.19.129 (两台机器相同)2.4. 配置管理IP默认管理IP是172.31.31.31,假设管理口IP要设置成其他地址,修改如下:interface managementip address *.*.*.*.* 255.*.*.*ip default-gateway *.*.*.*!3.配置HAQHD:ha id 1ha group 1 priority 20ha interface ethernet 1 vlan 2ha interface ethernet 6 vlan 3ha check vlan 2 timeout 10ha conn-mirror ip 10.244.189.153!ha preemption-enablefloating-ip 10.244.19.132 ha-group 1floating-ip 10.244.189.152 ha-group 1!FC:ha id 2ha group 1 priority 10ha interface ethernet 1 vlan 2ha interface ethernet 6ha check vlan 2 timeout 10ha conn-mirror ip 10.244.189.154!ha preemption-enablefloating-ip 10.244.19.132 ha-group 1floating-ip 10.244.189.152 ha-group 1!4.配置服务4.1. 配置模板4.1.1.建立TCP长连接模板AX带有默认的模板,但是对于某些情况,需要创建相应的模板进行处理,例如对于Ftp等长连接,需要将连接过期时间改长,操作如下:在Web界面配置模式,选择模板-L4-TCP->新建,如下设置命令行配置如下:slb template tcp tcp_template_longidle-timeout 600!4.1.2.配置HTTP协议模板由于通过负载均衡设备访问的源地址是经过转换了的,而服务器端要求能看到客户端源地址,所以这里将创建一个模板,将源地址包含在HTTP的头里面。
Avalon使用说明书
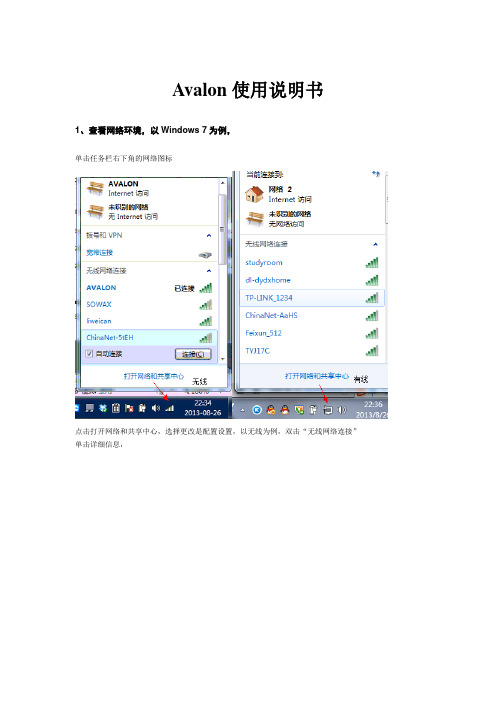
Avalon使用说明书1、查看网络环境,以Windows 7为例,单击任务栏右下角的网络图标点击打开网络和共享中心,选择更改是配置设置,以无线为例,双击“无线网络连接”单击详细信息,可以得到以下网络环境信息,IP段为192.168.5.X, ,子网掩码255.255.255.0 ,网关和DNS地址为192.168.5.1,记下以上信息,以便为avalon分配地址。
2、配置本机IP地址使用网线连接avalon至交换机或路由器,查看Avalon的地址,机箱顶盖贴有IP地址,本说明书以avalon 地址为192.168.3.185为例。
将本机地址更改为与avalon同一网段,如本地址与avalon地址为同一网段可跳过步骤2,。
方法如下单击,“打开网络和共享中心”→“更改适配器设置”→右击本地链接选择“属性”→双击将IP地址更改为192.168.3.X(X为2-254范围,为避免IP地址冲突,建议选择比较大的数字)点“确定”3、配置A V ALON打开任一浏览器,输入avalon地址,http://192.168.3.185点击登录,默认密码为空,不建议配置密码。
选择配置完成后点击右下角点击网络,“修改”,点击红色字体会指示部分导致不可逆操作,造成无法登录avalon。
根据上图修改信息,修改完成后点击保存并应用,一分钟后,将A V ALON关闭,开关在电源位置。
断电后请勿马上通电,等待1分钟后再开启A V ALON。
4、更改本机IP地址,步骤与2相同5、通过步骤3修改,Avalon地址为http://192.168.5.185,打开浏览器登陆,下图为正常运行状态,avalon启动时间大约为30秒,请等待红灯熄灭再登陆。
- 1、下载文档前请自行甄别文档内容的完整性,平台不提供额外的编辑、内容补充、找答案等附加服务。
- 2、"仅部分预览"的文档,不可在线预览部分如存在完整性等问题,可反馈申请退款(可完整预览的文档不适用该条件!)。
- 3、如文档侵犯您的权益,请联系客服反馈,我们会尽快为您处理(人工客服工作时间:9:00-18:30)。
华美A100无线路由器说明书(含目录)华美A1003Gmini路由器说明书………………………………………………………………- 1 -1.硬件安装 ...................................................................................................................- 1 -2.路由器连接及设置方法(两种连接方式) ..................................................................- 1 -1. WIFI连接方式: ..................................................................................- 2 -( a )在WindowsXP系统电脑里的设置方法:.........................................- 2 -( b )在Windows 7系统电脑里的设置方法: ..........................................- 3 -2.有线连接方式:.......................................................................................- 5 -( a )在Windows XP系统电脑里的设置方法:......................................- 5 -( b )在Windows 7系统电脑里的设置方法: ........................................- 7 -3.接入模式设置 ............................................................................................................- 9 -(1)3G网卡接入...................................................................................- 9 -(2)WAN口接入................................................................................. - 10 -①联机模式为:PPPOE(ADSL)…………………………………………..- 10 -②联机模式为:动态(自动取得)……………………………………- 10 -③联机模式为:静态(固定IP)………………………………………- 11 -4. 恢复出厂设置......................................................................................................... - 12 -1、硬件恢复 ........................................................................................ - 12 -2、软件恢复 ........................................................................................ - 12 -1.硬件安装使用设备内置电池或USB线给A1供电(可选5V 1000MA—2100MA适配器充电或供电),把开关键打到R位置,开机30秒后设备正面指示灯由红灯长亮变成蓝灯3秒闪烁一次,即表示开机正常。
2.路由器连接及设置方法(两种连接方式)注意:路由器默认的WIFI密码在产品包装盒的标签上或产品背面,见下图1. WIFI连接方式:通过笔记本的WIFI网卡或WIFI终端,找到HAME_A1_XXXX的无线网络,并输入上图所示的WIFI密码。
(如IPAD、iPhone等)(a )在WindowsXP系统电脑里的设置方法:1、在桌面上,用鼠标右键点击“网上邻居”,选择“属性”;2、在随后打开的窗口里,用鼠标右键点击“本地连接”或“无线网络连接”,选择“属性”;3、在弹出的对话框里,先选择“Internet协议(TCP/IP)”,再用鼠标点击“属性”按钮;4、在随后打开的窗口里,您可以选择“自动获得IP地址”、“自动获得IP地址”如图:设置完成后点击“确定”提交设置。
5、在无线网络连接列表里找到HAME_A1_XXXX的无线网络名称,并输入包装盒上标签所示的WIFI密码。
6、右键“无线网络连接”,点击“状态”,然后查看无线网络连接通过DHCP获取到的IP地址应该为192.168.169网段,默认网关为192.168.169.1( b )在Windows 7系统电脑里的设置方法:1 在桌面上,用鼠标右键点击“网络”,选择“属性”或用鼠标右键点击右下角的网络连接图标,选中“打开网络和共享中心”,并点击左上角的更改适配器设置,2、在随后打开的窗口里,用鼠标右键点击“无线网络连接”,选择“属性”;3、在弹出的对话框里,先选择“Internet协议版本4(TCP/IPV4)”,再用鼠标点击“属性”按钮;4、在随后打开的窗口里,请选择“自动获得IP地址”、“自动获得IP地址”如图:5、右键点击“无线网络连接”,选择“状态”,然后点击“详细信息”,查看无线网络连接通过DHCP 获取到的IP地址应该为192.168.169网段,默认网关为192.168.169.12.有线连接方式:使用网线一头插到路由器的网线接口,一头插到电脑的网卡RJ45接口(a )在Windows XP系统电脑里的设置方法:1 在桌面上,用鼠标右键点击“网上邻居”,选择“属性”2、在随后打开的窗口里,用鼠标右键点击“本地连接”,选择“属性”;3、在弹出的对话框里,先选择“Internet协议(TCP/IP)”,再用鼠标点击“属性”按钮;4、在随后打开的窗口里,请选择“自动获得IP地址”、“自动获得IP地址”如图:设置完成后点击“确定”,提交设置。
5、右键点击“本地连接”,选择“状态”,然后查看本地连接通过DHCP获取到的IP地址应该为192.168.169网段,默认网关为192.168.169.1( b )在Windows 7系统电脑里的设置方法:1 在桌面上,用鼠标右键点击“网络”,选择“属性”或用鼠标右键点击右下角的网络连接图标,选中“打开网络和共享中心”,并点击左上角的更改适配器设置,2、在随后打开的窗口里,用鼠标右键点击“本地连接”,选择“属性”;3、在弹出的对话框里,先选择“Internet协议版本4(TCP/IPV4)”,再用鼠标点击“属性”按钮;4、在随后打开的窗口里,请选择“自动获得IP地址”、“自动获得IP地址”如图:5、右键点击“本地连接”,选择“状态”,然后点击“详细信息”,查看本地连接通过DHCP获取到的IP地址应该为192.168.169网段,默认网关为192.168.169.13.接入模式设置本路由器支持3G上网卡、WIFI热点接入以及W AN口接入,常用的联机模式有:智能模式、3G、WIFI热点、PPPOE(ADSL)、动态(自动取得)、静态(固定IP)。
登录到广域网联机模式设置界面:无线或有线连接成功后,登录管理界面,点击“登录”并输入hame,进入路由器功能设置界面,点击“网络设置一广域网设置”。
温馨提示:A1特有的智能模式能实现3G模式和DHCP模式自动切换功能:在默认的智能模式下,插入数据卡可以拨号成功,如果将数据卡拔掉,直接插入网线,联机模式自动变为DHCP模式,在等待1-3分钟左右,路由器指示灯灯蓝灯长亮代表DHCP已经连接成功。
(1)3G网卡接入:路由器默认联机模式为智能模式或3G模式,此时不用任何设置,将3G无线网卡插入到无线路由器的USB端口,自动拨号成功后就可以上网。
如果调整过其他联机模式后,再使用上网卡时需要将模式切换到智能模式或3G模式。
(1.兼容的3G上网卡列表请到这里查看:/Download.aspx?id=26;2.如果SIM卡也就是资费卡有设置PIN码,请先解除)如下图所示拨号成功后设备灯的状态(2)W AN口接入:将上级设备通过网线连接到A1路由器的网线接口。
①联机模式为:PPPOE(ADSL)---上级设备为猫或者光纤,需要输入ISP(例如:中国电信、网通等)指定的用户名和密码。
软件设置:在页面中将广域网联机模式中选择为:PPPOE(ADSL),并在下方输入运营商提供给你的用户名、密码以及确认密码,然后点击“确定”按钮。
设置完毕后,需要重启猫和路由器,当网线插入后,指示灯会变成蓝灯长亮,就可以上网。
(连接成功后灯的状态如下图所示)备注:如果您的ISP(如网通)需要绑定你的电脑MAC地址,此时必须启用MAC复制功能,并填入绑定电脑的MAC地址,以英文输入法的“:”分开,然后点击界面的“确定”按钮。
②联机模式为:动态(自动取得)----上级设备为路由器,您可以自动从ISP(例如:中国电信、长城宽带、广电)获取IP地址,不需要填写任何内容即可直接上网。
软件设置:在页面上将广域网联机模式中选为:动态(自动取得),然后点击“确定”按钮。
如果您的ISP需要绑定你的电脑MAC地址,此时必须启用MAC复制功能,并填入绑定电脑的MAC地址然后点击界面的“确定”按钮。
如下图所示拨号成功后设备灯的状态③联机模式为:静态(固定IP)----上级设备为路由器,您拥有ISP(例如:中国电信、长城宽带)提供的固定IP地址。
(静态模式设置成功后第四、五个灯不亮)软件设置:在广域网设置界面,联机模式选择:静态(固定IP),在界面中输入ISP提供的IP地址、子网掩码、默认网关、首选和备用DNS服务器等信息。
如果您的ISP需要绑定你的电脑MAC地址,此时必须启用MAC复制功能,并点击“Fill my MAC”按钮,将电脑的MAC地址复制到路由器,然后点击界面的“确定”按钮。
4. 恢复出厂设置如果你需要恢复网络默认设置或是忘记某些参数变化时,你可以通过以下两种方法对路由器恢复出厂设置进行配置。
(进行恢复出厂设置操作前,请先拔掉3G上网卡和网线)1、硬件恢复:在开机的状态下(指示灯蓝灯连续闪烁),请使用尖状的物品如:牙签或别针等长按住路由器上的恢复出厂设置(R)按钮5秒钟,然后松开,指示灯蓝灯一秒一次先连续闪烁然后路由器会重启,即表示硬件恢复出厂设置成功。
