USB驱动程序安装说明
1.ICETEK-5100 USB驱动安装说明书
4.2 驱动安装说明:注:在整个安装过程中,建议一直关闭防火墙及杀毒软件。
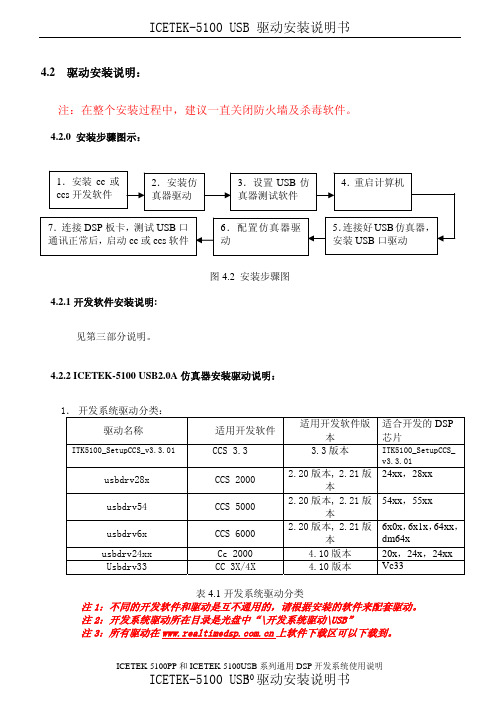
4.2.0 安装步骤图示:图4.2 安装步骤图4.2.1开发软件安装说明:见第三部分说明。
4.2.2 ICETEK-5100 USB2.0A仿真器安装驱动说明:1.开发系统驱动分类:驱动名称 适用开发软件适用开发软件版本适合开发的DSP芯片ITK5100_SetupCCS_v3.3.01CCS 3.3 3.3版本 ITK5100_SetupCCS_v3.3.01usbdrv28x CCS 2000 2.20版本, 2.21版本24xx,28xxusbdrv54 CCS 5000 2.20版本, 2.21版本54xx,55xxusbdrv6x CCS 6000 2.20版本, 2.21版本6x0x,6x1x,64xx,dm64xusbdrv24xx Cc 2000 4.10版本 20x,24x,24xx Usbdrv33 CC 3X/4X 4.10版本 Vc33表4.1开发系统驱动分类注1:不同的开发软件和驱动是互不通用的,请根据安装的软件来配套驱动。
注2:开发系统驱动所在目录是光盘中“\开发系统驱动\USB”注3:所有驱动在上软件下载区可以下载到。
4.2.3 CCS 3.3版本下ICETEK-5100 USB2.0A仿真器驱动安装及配置说明1.CCS3.3软件按照默认安装路径“C:\ CCStudio_v3.3”安装后,双击光盘根目录下的“开发系统驱动/USB”目录中的“ITK5100_SetupCCS_v3.3”文件,等待安装结束。
2.假如CCS3.3软件没有安装在默认的安装路径下,我们同样双击光盘根目录下的“开发系统驱动/USB”目录中的“ITK5100_SetupCCS_v3.3”文件,此时要注意在下图中指定位置输入CCS3.3软件的安装路径,然后等待安装结束。
在此处输入当前CCS3.3软件安装路径图4.33.安装USB接口驱动。
USB驱动安装指南说明书
USB Driver Installation GuideCopyright and Technical SupportUSB Driver Installation GuideMTCMR-xx-All Versions, MTSMC-xx-IP/GP-All Versions, MTCBA-H3/EV1-U1, MTSMC-H3/EV1-U,S000507A, Revision ACopyrightThis publication may not be reproduced, in whole or in part, without prior expressed written permission from Multi-Tech Systems, Inc. All rights reserved.Copyright © 2011 by Multi-Tech Systems, Inc.Multi-Tech Systems, Inc. makes no representation or warranties with respect to the contents hereof and specifically disclaims any implied warranties of merchantability or fitness for any particular purpose.Furthermore, Multi-Tech Systems, Inc. reserves the right to revise this publication and to make changes from time to time in the content hereof without obligation of Multi-Tech Systems, Inc., to notify any person or organization of such revisions or changes. Check Multi-Tech’s Web site for current versions of our product documentation.Revision HistoryRevision Date DescriptionA10/19/11 Initial release.Trademarks and LogosThe Multi-Tech logo, SocketModem, and MultiModem are registered trademarks of Multi-Tech Systems, Inc. Windows is a registered trademark of Microsoft in the U.S. and other countries. Other trademarks and trade names mentioned in this publication belong to their respective owners.Contacting Multi-Tech SupportIn order to better serve our customers, manage support requests and shorten resolution times, we have created the online web portal allowing you to submit questions regarding Multi-Tech products directly to our technical support team. Get answers to your most complex questions, ranging from implementation, troubleshooting, product configuration, firmware upgrades and much more.To create an account and submit a Support Case on the Portal, visit https://Online Web Portal https://The Knowledge Base provides immediate answers to your questions and gives you access to support resolutions for all Multi-Tech products. Visit our support area on the website for other support services.Knowledge Base and Support Services /support.goWorld HeadquartersMulti-Tech Systems, Inc.2205 Woodale DriveMounds View, Minnesota 55112Phone: 763-785-3500 or 800-328-9717Fax: 763-785-9874Technical SupportBusiness Hours: M-F, 9am to 5pm CSTCountry By Email By PhoneEurope, Middle East, Africa: ********************.uk+(44) 118 959 7774U.S., Canada, all others: *********************(800) 972-2439 or (763) 717-5863WarrantyTo read the warranty statement for your product, please visit: /warranty.goContentsChapter 1 – Product Description (4)Introduction (4)Models and Build Option Descriptions (4)Chapter 2 – USB CDC-ACM Driver Installation on Windows (5)Introduction (5)Installing a Virtual COM Port (5)Installing the Modem Driver (6)Verifying That Your Modem Has Been Installed Successfully (9)Account Activation for Cellular Devices (9)Chapter 3 – USB Huawei Driver Installation on Windows (10)Introduction (10)Installing the Huawei Driver (10)Account Activation for Cellular Devices (11)Chapter 4 – Installing Drivers on Linux kernel 2.6.x (12)Introduction (12)Account Activation for Cellular Devices (12)IntroductionThe Multi-Tech® USB Driver Installation Guide provides driver installation procedures for the Multi-Tech SocketModem®, MultiModem® Cell and MultiModem® iCell products. This Installation Guide is organized into four chapters; Chapter 2 provides installation procedures for the USB CDC-ACM drivers on a Windows Operating System; Chapter 3 provides installation procedures for the Huawei drivers on a Windows Operating System; and finally Chapter 4 provides installation procedures on Linux Kernel 2.6.X and newer Operating Systems.The SocketModem models with Universal IP capabilities in a Windows environment use the USB CDC-ACM driver; SocketModem models without UIP capabilities in a Windows environment use the Huawei Driver; modem models in a Linux environment have the drivers embedded in the Linux Operating System. An example Linux installation, using Ubuntu Operating System version 11.04 with the Linux kernel 2.6.38 is provided in Chapter 4 for the Linux environment.After you have installed the modem driver, you need to activate your modem by going to the Multi-Tech Activation website and establishing an account with your cellular carrier.Models and Build Option DescriptionsCDC-ACM Drivers MTCMR-xx – All versionsMTSMC-xx-IP/GP – All versionsHuawei Drivers MTCBA-H3/EV1-U1MTSMC-H3/EV1-UIntroductionFor Windows XP (SP3 or greater), VISTA, 2003/2008 Server, Windows 7 (32-bit or 64-bit), run the automatic installer from the driver you just downloaded from the Multi-Tech website.Note: Certain versions of Windows have an issue with their CDC-ACM driver (Usbser.sys). If you are having connection problems (file download, web pages not loading) your version of Usbser.sys must be updated. Microsoft article 925681 documents this issue and provides a fix.After installing the virtual com port, the correct modem driver may be installed to the com port. This is covered below.Installing a Virtual COM PortYour downloaded driver files contain an installer program for current Windows operating systems (Windows XP and newer only) . Run install.bat from the VCOM_autoinstall directory you down loaded.1.Ensure that the USB cable is connected to your PC.2. For GSM build options, ensure that the SIM card is installed prior to powering up.3. From the Drivers folder, run the install.bat file to initiate the install.4.If any Windows Install Wizard pops up, close or cancel the wizard.5.Windows may pop-up a User Account Control window. Select the YES button to continue with the driverinstallation.6.Click on the Next button to start the driver pre-installation.Chapter 2 – USB CDC-ACM Driver Installation7.There will be a transitory screen, then the process will complete. Click on the Finish button.8.Next, continue with installing the modem driver.Installing the Modem Driver1.Click on the Control Panel button. On the Control Panel screen, double-click on Phone and Modem Options icon.Then click on the Modems tab.Chapter 2 – USB CDC-ACM Driver Installation 2. When this Phone and Modem Options screen appears, click on the Add button.3. On the Install New Modem screen, click Don’t detect my modem, I will select it from a list. Then click Next >.4. On the Install New Modem screen, click the Have Disk button to browse to the Driver folder on your local PC.Chapter 2 – USB CDC-ACM Driver Installation5. Browse to the Driver folder on local PC.6. Select the MTSMCIP_MTCMRIP.INF file. Then click OK.7. In the Models window, scroll down the list of Models and select the model that is applicable to your modem.Once you have selected your model, click on Next>.8. You will now have to choose which com port the MultiModem is connected to.If you know exactly which port your modem is on, click on that port; otherwise, go to Device Manager > Ports (COM & LPT) to verify which port your modem is installed on. Click Next>.Chapter 2 – USB CDC-ACM Driver Installation9. To finish the install, click on Finish.You have now successfully installed the MultiModem driver to your PC.Verifying That Your Modem Has Been Installed Successfully1. After you have successfully installed the MultiModem driver as stated above, you should be brought back to thePhone and Modems Options screen. Make sure that the modem is now listed under the column Modem andAttached To (the correct com port).2. Highlight the modem and then click on Properties.3. A Properties screen will open for the Multi-Tech modem. Click on the tab labeled Diagnostics.4. In the middle of the screen, click on the Query Modem button. Windows will now try to query the Multi-Techmodem. If this process passes, the second box on this screen will show the columns Command and Response.Note:To make sure that the modem is correctly being queried, look at the LED lights of the modem after you click on Query Modem. The TR light should come on and the TD and RD lights should flicker.5. If this process passes, then the modem should be properly installed and ready for use. Click OK to close themodem Properties window. Then click on OK to close the Phone and Modem Options window. Account Activation for Cellular DevicesPre-Configured Multi-Tech ProductsSome Multi-Tech cellular modems have been pre-configured to operate on a specific cellular network, such as Verizon Wireless.However, before you can begin to use the modem, you must set up a cellular data account with your cellular network provider. Please refer to Multi-Tech’s Cellular Activation Web site /activation.go forinformation on activating your cellular modem.IntroductionThis chapter provides procedures on how to install the Huawei Drivers on a Windows Operating System. Installing the Huawei Driver1.Download drivers to a Temp folder on your local PC.2.From the Temp folder, select DriverSetup.exe file.3.The Program Compatibility Assistant screen appears.Chapter 3 – USB Huawei Driver Installation4.Click This program installed correctly.5.Plugin the USB cable into the PC.6.When the Driver Software Installation screen states Your device is ready to use, your modem is installed.Account Activation for Cellular DevicesPre-Configured Multi-Tech ProductsSome Multi-Tech cellular modems have been pre-configured to operate on a specific cellular network, such as Verizon Wireless.However, before you can begin to use the modem, you must set up a cellular data account with your cellular network provider. Please refer to Multi-Tech’s Cellular Activation Web site /activation.go forinformation on activating your cellular modem.IntroductionThis chapter provides procedures on how to install drivers on Linux kernel 2.6.X or higher. The drivers are embedded in the Linux kernel.1.Boot Ubuntu Operating System2.Plugin the USB cable into the PC.3.The Multi-Tech modem will be detected and installed immediately.4.To show system status and the last devices installed, enter dmesg command. The following screen is an example.Account Activation for Cellular DevicesPre-Configured Multi-Tech ProductsSome Multi-Tech cellular modems have been pre-configured to operate on a specific cellular network, such as Verizon Wireless.However, before you can begin to use the modem, you must set up a cellular data account with your cellular network provider. Please refer to Multi-Tech’s Cellular Activation Web site /activation.go forinformation on activating your cellular modem.。
USB转串口线 驱动安装及使用说明
1.说明:下面的操作步骤只适用于UT-810型号的USB转串口黑色线缆;
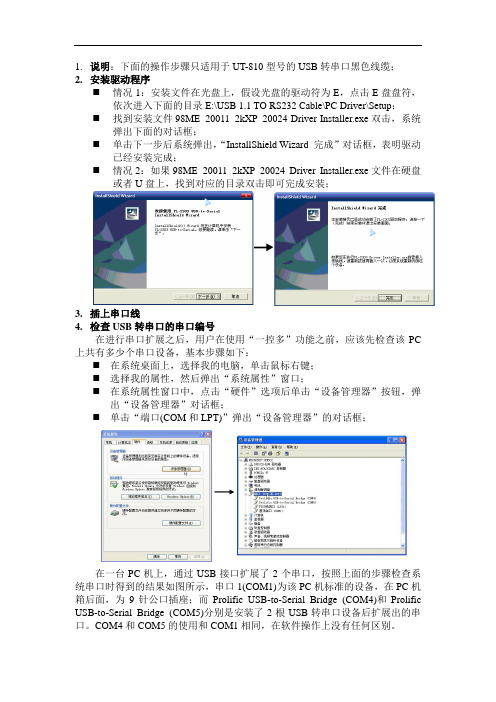
2.安装驱动程序
⏹情况1:安装文件在光盘上,假设光盘的驱动符为E,点击E盘盘符,
依次进入下面的目录E:\USB 1.1 TO RS232 Cable\PC Driver\Setup;
⏹找到安装文件98ME_20011_2kXP_20024 Driver Installer.exe双击,系统
弹出下面的对话框;
⏹单击下一步后系统弹出,“InstallShield Wizard 完成”对话框,表明驱动
已经安装完成;
⏹情况2:如果98ME_20011_2kXP_20024 Driver Installer.exe文件在硬盘
或者U盘上,找到对应的目录双击即可完成安装;
3.插上串口线
4.检查USB转串口的串口编号
在进行串口扩展之后,用户在使用“一控多”功能之前,应该先检查该PC 上共有多少个串口设备,基本步骤如下:
⏹在系统桌面上,选择我的电脑,单击鼠标右键;
⏹选择我的属性,然后弹出“系统属性”窗口;
⏹在系统属性窗口中,点击“硬件”选项后单击“设备管理器”按钮,弹
出“设备管理器”对话框;
⏹单击“端口(COM和LPT)”弹出“设备管理器”的对话框;
在一台PC机上,通过USB接口扩展了2个串口,按照上面的步骤检查系统串口时得到的结果如图所示,串口1(COM1)为该PC机标准的设备,在PC机箱后面,为9针公口插座;而Prolific USB-to-Serial Bridge (COM4)和Prolific USB-to-Serial Bridge (COM5)分别是安装了2根USB转串口设备后扩展出的串口。
COM4和COM5的使用和COM1相同,在软件操作上没有任何区别。
2、USB转串口线驱动程序的安装
USB转串口线驱动程序的安装
USB转串口线是STC单片机的USB接口ISP下载线,也是在没有串口的笔记本上调试RS-232通信的利器。
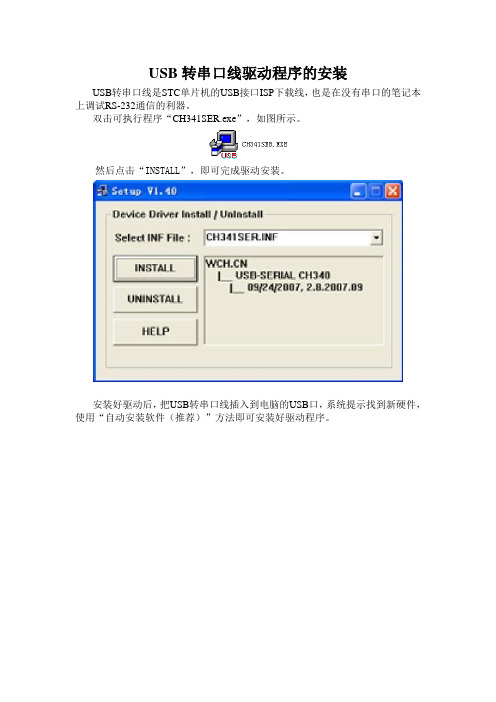
双击可执行程序“CH341SER.exe”,如图所示。
然后点击“INSTALL”,即可完成驱动安装。
安装好驱动后,把USB转串口线插入到电脑的USB口,系统提示找到新硬件,使用“自动安装软件(推荐)”方法即可安装好驱动程序。
这时,操作系统会使用USB接口虚拟出一个串口来,可以在设备管理器中查看。
在上图中,可以看到虚拟出来的串口设备为“USB-SERIAL CH340(COM3)”,其中串口号为3。
请注意,并不是在所有电脑上虚拟出来的串口号都为3,这跟电脑具体配置有关系,请在使用USB 转串口线时一定到设备管理器中确定串口号,否则会造成通信无法连接。
Windows2000USB接口驱动安装步骤
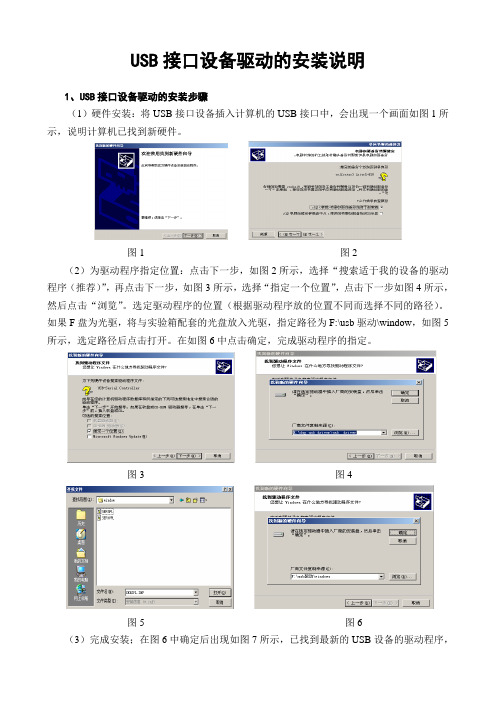
USB接口设备驱动的安装说明1、USB接口设备驱动的安装步骤(1)硬件安装:将USB接口设备插入计算机的USB接口中,会出现一个画面如图1所示,说明计算机已找到新硬件。
图1 图2(2)为驱动程序指定位置:点击下一步,如图2所示,选择“搜索适于我的设备的驱动程序(推荐)”,再点击下一步,如图3所示,选择“指定一个位置”,点击下一步如图4所示,然后点击“浏览”。
选定驱动程序的位置(根据驱动程序放的位置不同而选择不同的路径)。
如果F盘为光驱,将与实验箱配套的光盘放入光驱,指定路径为F:\usb驱动\window,如图5所示,选定路径后点击打开。
在如图6中点击确定,完成驱动程序的指定。
图3 图4图5 图6(3)完成安装;在图6中确定后出现如图7所示,已找到最新的USB设备的驱动程序,开始安装驱动程序所需的信息和文件,点击下一步出现如图8所示,点击完成后,则USB设备驱动程序已全部安装完成。
2、查看USB设备的信息选择“我的电脑”点击右键,选择“属性”就出现系统特性,对话框显示如图9所示。
图7 图8选择“硬件”选项卡,选择“设备管理器”,选择“查看”→“依类型排序设备”。
再双击“端口(com 和LPT)”如图10所示,可以看到(prolific usb-to-serial bridge(com3)桥控制器)。
注意!这个com3在通信过程中要与usb接口设备的上位机软件中通信口设置一样,否则会出问题。
图9 图103、注意!(1)不要直接在驱动程序文件夹中,点击setup来直接安装USB设备的驱动程序。
(2)这个过程是在win2000系统中的安装过程,在win98和winxp中,步骤一样,可能有些不同的图片。
USB编程电缆驱动程序安装说明书-232
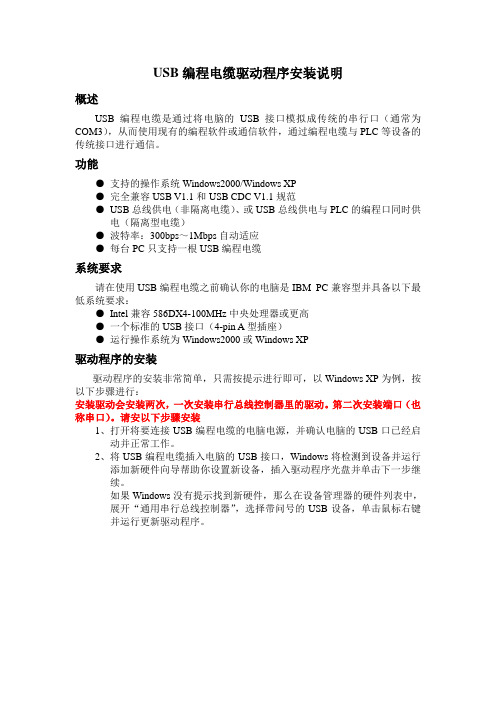
USB编程电缆驱动程序安装说明概述USB编程电缆是通过将电脑的USB接口模拟成传统的串行口(通常为COM3),从而使用现有的编程软件或通信软件,通过编程电缆与PLC等设备的传统接口进行通信。
功能●支持的操作系统Windows2000/Windows XP●完全兼容USB V1.1和USB CDC V1.1规范●USB总线供电(非隔离电缆)、或USB总线供电与PLC的编程口同时供电(隔离型电缆)●波特率:300bps~1Mbps自动适应●每台PC只支持一根USB编程电缆系统要求请在使用USB编程电缆之前确认你的电脑是IBM PC兼容型并具备以下最低系统要求:●Intel兼容586DX4-100MHz中央处理器或更高●一个标准的USB接口(4-pin A型插座)●运行操作系统为Windows2000或Windows XP驱动程序的安装驱动程序的安装非常简单,只需按提示进行即可,以Windows XP为例,按以下步骤进行:安装驱动会安装两次,一次安装串行总线控制器里的驱动。
第二次安装端口(也称串口)。
请安以下步骤安装1、打开将要连接USB编程电缆的电脑电源,并确认电脑的USB口已经启动并正常工作。
2、将USB编程电缆插入电脑的USB接口,Windows将检测到设备并运行添加新硬件向导帮助你设置新设备,插入驱动程序光盘并单击下一步继续。
如果Windows没有提示找到新硬件,那么在设备管理器的硬件列表中,展开“通用串行总线控制器”,选择带问号的USB设备,单击鼠标右键并运行更新驱动程序。
3、选择”否,暂时不”,然后点下一步。
3、Windows将检测到安装信息,显示“DGYCGK USB High Speed SerialConverter ”设备,并出现如下没有通过Windows徽标测试的信息框,单击“从列表或指定位置安装(高级)”。
4、把上面两个选项打上钓,在“浏览”里把路径指向光盘所对应的驱动,然后点“下一步”。
USB-SC-09驱动安装说明
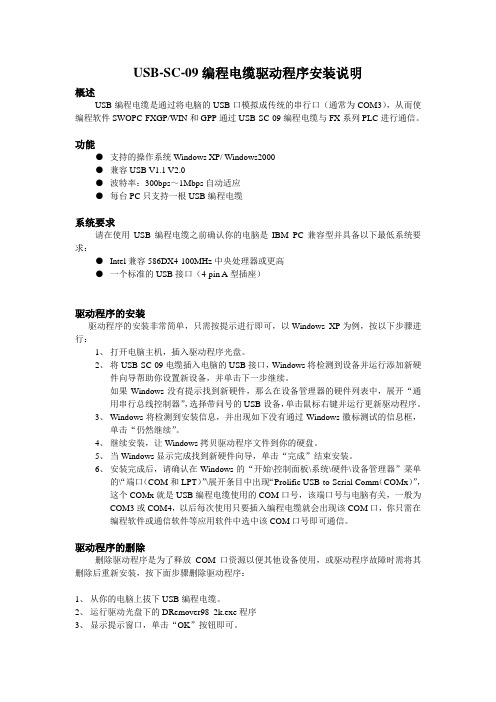
USB-SC-09编程电缆驱动程序安装说明概述USB编程电缆是通过将电脑的USB口模拟成传统的串行口(通常为COM3),从而使编程软件SWOPC-FXGP/WIN和GPP通过USB-SC-09编程电缆与FX系列PLC进行通信。
功能●支持的操作系统Windows XP/ Windows2000●兼容USB V1.1 V2.0●波特率:300bps~1Mbps自动适应●每台PC只支持一根USB编程电缆系统要求请在使用USB编程电缆之前确认你的电脑是IBM PC兼容型并具备以下最低系统要求:●Intel兼容586DX4-100MHz中央处理器或更高●一个标准的USB接口(4-pin A型插座)驱动程序的安装驱动程序的安装非常简单,只需按提示进行即可,以Windows XP为例,按以下步骤进行:1、打开电脑主机,插入驱动程序光盘。
2、将USB-SC-09电缆插入电脑的USB接口,Windows将检测到设备并运行添加新硬件向导帮助你设置新设备,并单击下一步继续。
如果Windows没有提示找到新硬件,那么在设备管理器的硬件列表中,展开“通用串行总线控制器”,选择带问号的USB设备,单击鼠标右键并运行更新驱动程序。
3、Windows将检测到安装信息,并出现如下没有通过Windows徽标测试的信息框,单击“仍然继续”。
4、继续安装,让Windows拷贝驱动程序文件到你的硬盘。
5、当Windows显示完成找到新硬件向导,单击“完成”结束安装。
6、安装完成后,请确认在Windows的“开始\控制面板\系统\硬件\设备管理器”菜单的\“端口(COM和LPT)”\展开条目中出现“Prolific USB-to-Serial Comm(COMx)”,这个COMx就是USB编程电缆使用的COM口号,该端口号与电脑有关,一般为COM3或COM4,以后每次使用只要插入编程电缆就会出现该COM口,你只需在编程软件或通信软件等应用软件中选中该COM口号即可通信。
Windows 7和USB 3.0驱动程序安装指南说明书
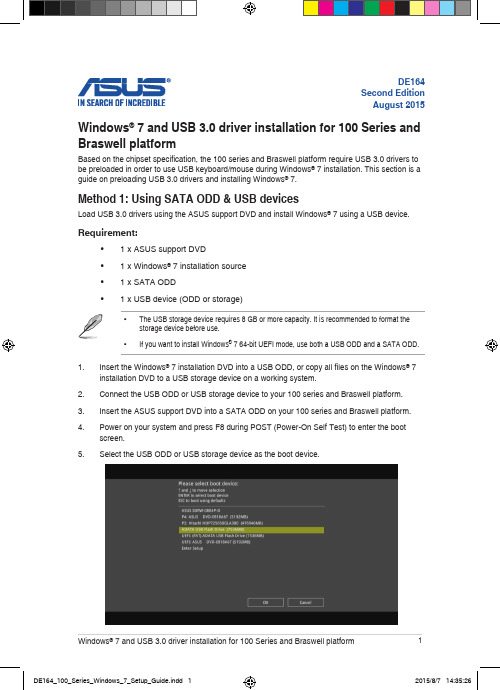
The “Setup is starting...” screen will show up if the USB 3.0 driver is loaded correctly.Follow the onscreen instructions to complete the Windows® 7 installation. Method 2: Using a modified Windows® 7 ISOLoad USB 3.0 drivers and install Windows® 7 using a modified Windows® 7 installation DVD. Requirement:• 1 x ASUS support DVD• 1 x Windows® 7 installation source• 1 x Working system (PC or notebook)- Select the USB storage device and click next.Click the refresh icon if the USB storage device is not displayed.- C lick Yes to clear the contents on the USB storage device and create a bootable USB device.Make sure to backup contents on the USB storage device, as it will be formatted.- Once completed, click OK to finish.- Check I agree and then click Next.- Once completed, click OK to finish.- Burn this ISO file onto an empty DVD to create a modified Windows® 7 installation DVD.Insert the modified Windows® 7 installation DVD into an ODD or connect the USB storage device with modified Windows® 7 installation files onto your 100 series and Braswell platform.Power on your system and press F8 during POST (Power-On Self Test) to enter the boot screen.Select the ODD or USB storage device as the boot device.The USB 3.0 driver will be loaded automatically during installation startup.。
USB驱动安装说明
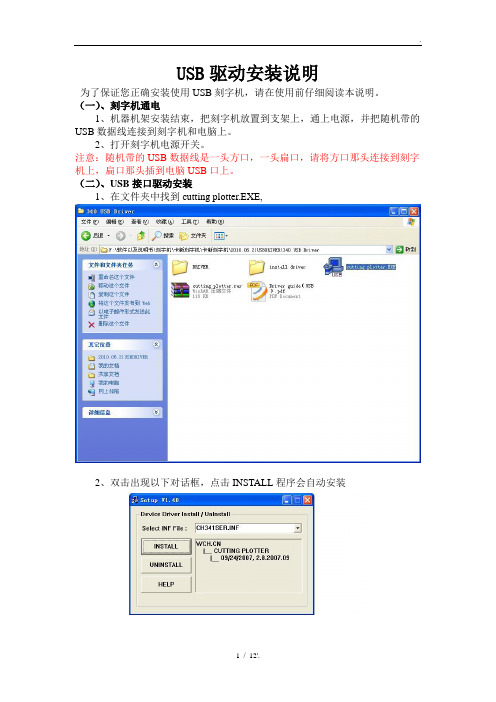
USB驱动安装说明为了保证您正确安装使用USB刻字机,请在使用前仔细阅读本说明。
(一)、刻字机通电1、机器机架安装结束,把刻字机放置到支架上,通上电源,并把随机带的USB数据线连接到刻字机和电脑上。
2、打开刻字机电源开关。
注意:随机带的USB数据线是一头方口,一头扁口,请将方口那头连接到刻字机上,扁口那头插到电脑USB口上。
(二)、USB接口驱动安装1、在文件夹中找到cutting plotter.EXE,2、双击出现以下对话框,点击INSTALL程序会自动安装3、如果安装过程请出现其他对话框时请点击“仍然继续”,如下图:4、如果没有出现上面情况,就直接等到出现“驱动安装成功”字样。
USB 接口驱动安装完毕。
虚拟串口设置1、USB驱动安装完毕后,请用鼠标右键点击桌面“我的电脑”——“属性”,如下图:2、点击上方菜单栏中的“硬件”——“设备管理器”,如下图:3、用鼠标右键点击“端口”——“USB-SERIAL CH34(COM1)——“属性”如下图:4、点击“端口设置”,如下图:注意:每秒位数(就是软件中的输出波特率)设置成9600。
5、用鼠标点击“高级”,出现以下对话框:选择COM3,然后点击“确定”,虚拟端口设置完成。
文泰2009版本或更高版本支持虚拟COM3或COM4,用户在设置本虚拟端口时请根据计算机实际闲置的端口来设置。
不一定非要设置在COM1或COM2端口。
注意:请将“接收缓冲区”“传输缓冲区”调到最低那头。
6、如果USB端口显示的不是“COM3”, 右键选择“扫描检测硬件改动”,则自动变为“COM3”,如下图:文泰刻绘软件输出设置1、打开文泰软件,编辑好文本,点击“文件——刻绘输出”或点击菜单栏中的出现以下对话框:2、点击对话框左上角的“刻绘设备”,出现一下对话框:3、选择“其他”——支持HPGL指令刻字机,然后点击“添加”,如下图;4、输出端口设置:点击“端口设置”如下图:“端口类型”选择“串口”,在“已安装端口”那里选择“COM3”,如果没有就在“端口号”选择“3”,点击“增加”即设置好COM3端口。
USB-PC-MPI驱动安装说明
USB-PC-MPI编程电缆驱动程序安装说明概述USB编程电缆是通过将电脑的USB口模拟成传统的串行口(通常为COM3),从而使编程软件STEP7通过USB-PC-MPI编程电缆与S7-300系列PLC进行通信。
功能●支持的操作系统Windows XP/ Windows2000●兼容USB V1.1 V2.0●波特率:300bps~1Mbps自动适应●每台PC只支持一根USB编程电缆系统要求请在使用USB编程电缆之前确认你的电脑是IBM PC兼容型并具备以下最低系统要求:●Intel兼容586DX4-100MHz中央处理器或更高●一个标准的USB接口(4-pin A型插座)驱动程序的安装驱动程序的安装非常简单,只需按提示进行即可,以Windows XP为例,按以下步骤进行:1、打开电脑主机,插入驱动程序光盘。
2、将USB-PC-MPI电缆插入电脑的USB接口,另一端插入S7-300PLC并使PLC加电情况下Windows将检测到设备并运行添加新硬件向导帮助你设置新设备,并单击下一步继续。
如果Windows没有提示找到新硬件,那么在设备管理器的硬件列表中,展开“通用串行总线控制器”,选择带问号的USB设备,单击鼠标右键并运行更新驱动程序。
3、Windows将检测到安装信息,并出现如下没有通过Windows徽标测试的信息框,单击“仍然继续”。
4、继续安装,让Windows拷贝驱动程序文件到你的硬盘。
5、当Windows显示完成找到新硬件向导,单击“完成”结束安装。
6、安装完成后,请确认在Windows的“开始\控制面板\系统\硬件\设备管理器”菜单的\“端口(COM和LPT)”\展开条目中出现“USB Serial Port(COMx)”,这个COMx就是USB编程电缆使用的COM口号,该端口号与电脑有关,一般为COM3或COM4,以后每次使用只要插入编程电缆就会出现该COM口,你只需在编程软件或通信软件等应用软件中选中该COM口号即可通信。
Hytera USB驱动安装程序用户操作指南
文档编号:文档版本:密页Hytera USB 驱动安装程序用户操作指南修订记录修订版本日期作者描述备注1.00 2010年9月5日李良晓描述USB驱动安装程序的使用初稿2.00 2010年9月30日李良晓提升为全自动化安装目录Contents修订记录 (2)目录 (3)1概述 (4)1.1目的 (4)1.2背景 (4)1.3范围 (4)1.4安装环境 (4)1.5文件组织 (4)1.6缩略语和定义 (4)2安装USB驱动操作指南 (5)第一部分:安装驱动程序软件 (5)2.1步骤1: (5)2.2步骤2: (6)2.3步骤3: (6)2.4步骤4: (7)2.5步骤5: (7)2.6步骤6: (9)第二部分:安装硬件 (9)2.8安装过程提示 (9)3特殊情况解决办法 (10)3.1系统禁止安装的情况 (10)3.2W INDOWS 7或V ISTA上的安装: (13)3.2.1需要管理员权限 (13)3.2.2.遇到W INDOWS 安全提示 (13)3.3硬件安装出现问题 (14)4驱动安装程序的卸载 (14)4.1步骤1: (14)4.2步骤2: (14)4.3步骤3: (15)1 概述1.1 目的本手册说明USB驱动程序安装的过程。
1.2 背景USB驱动的安装存在较大难度,手动安装住住出错,本安装程序用于解决手动安装的问题。
本手册讲解驱动程序安装的过程。
1.3 范围本文档适用所有需要使用USB驱动程序的用户。
1.4 安装环境Windows XP, Windows Vista, Windows 7.驱动程序仅适用32位操作系统。
1.5 文件组织仅一个安装程序文件。
1.6 缩略语和定义缩略语全称描述2 安装USB驱动操作指南驱动程序安装,仅需要运行安装程序,按提示操作即可完成安装,正常情况无需阅读本部分。
本部分仅供参考使用。
第一部分:安装驱动程序软件2.1 步骤1:断开对讲机与PC机的连接,双击驱动安装软件。
Testo USB驱动安装说明书

Application informationTesto USB driverWindows ® 7, Windows ® 8.1, Windows ®10General informationPlease take the time to read the Installation Instructions through carefully and makesure you become familiar with how the device operates before using it. Always keep this document close to hand for reference purposes.SymbolsFont style- Terms which you will find on the screen are written in italics.- Terms which you will find on the screen and which you can “click on” are written in bold.TrademarksMicrosoft ® and Windows® are registered trademarks of the Microsoft Corporation in the USA and/or other countries.Intel ® and Pentium ® are trademarks of the Intel Corporation in the USA and/or other countries.Other trademarks or product names are the property of the respective companies.Operating SystemsThe images are taken from a Windows 7 System. For a detailed description, see the user manual for your Windows operating system.23ContentsGeneral information (2)Contents (3)1. Licence agreement (4)2. Installation (5)3. Virtual COM port settings (6)4. Troubleshooting (7)1. Licence AgreementThis is a legally valid contract between you, the end user, and Testo. When you or a person authorised by you opens the sealed CD-ROM package, you recognise the provisions of this contract. If you do not agree with the terms and conditions, you must immediately return the unopened software package with the accompanying items, including all written documents and other containers, to the place from which you bought the software, which will give you a full refund of the purchase price.Granting of a licenceThis licence entitles you to use a copy of the Testo software which was acquired with this licence on a single computer subject to the condition that the software is only ever used on one single computer at any one time. If you have bought multiple licences for the software, you may only have as many copies in use as you have licen-ces. The software is “in use” on a computer if it is loaded in the intermediate memory or RAM or stored on a per-manent memory, e.g. a hard disk, of this computer, with the exception that a copy which is installed on a network server for the sole purpose of distribution to other computers is not “in use”. If the foreseeable number of users of the software exceeds the number of licences acquired, you must ensure, through the necessary mechanisms or procedures, that the number of persons using the software at the same time does not exceed the number of licences.CopyrightThe software is protected against copying by copyright laws, international agreements and other legal provisions.You may not copy the software, the handbooks for the product or any other written documents accompanying the software. The software may not be licensed, let or leased to third parties. If the software is not fitted with a dongle, you may either make a single copy of the software solely for backup or archiving purposes or transfer the software to a single hard disk, provided that you keep the original solely for backup or archiving purposes. You are not permitted to reverse engineer, decompile or disassemble the software. Testo SE & Co. KGaA, Lenzkirch, may take legal action against you for any breach of property rights by you or by any person acting, directly or indirectly, under your authority.Limited guaranteeTesto guarantees for a period of 90 days from purchase of the software by the buyer, or for a longer minimum period if such a period is prescribed by the laws of the country in which the product is sold, that the software conforms to general standards defined in the accompanying documentation. Testo expressly does not guarantee that the software will operate without interruption or without errors. Should the software not function according to the accompanying documentation when in normal use, the buyer will have the right to return the software to Testo within the warranty period and to inform Testo in writing of the deficient functional capacity. Testo will only be bound to make a functional copy of the software available to the buyer within a reasonable period of time from receipt of the notification of functional incapacity or, should a copy not be available for any reason, to reimburse the buyer for the purchase price.Any warranty in respect of the software, the associated manuals and written material extending above and bey-ond the limited guarantee outlined above is excluded.Neither Testo nor the suppliers of Testo are liable to pay compensation for any losses arising as a result of use of this Testo product or the inability to use this Testo product, even if Testo has been informed of the possibility ofsuch a loss. This exclusion does not apply for losses occasioned through intent or gross negligence on the part ofTesto. Claims founded on mandatory statutory provisions regarding product liability are likewise unaffected.Copyright © 2018 by Testo SE & Co. KGaA5Administrator rights are necessary for installation.3 USB interface/adapter is not connected to thecomputer.1 Insert CD-ROM.If the installation program does not start automatically:> Open My Computer, select the CD drive, doubleclick on TestoSetup.exe.- The question Do you want to allow the followingprogram to install Software on this computer? isdisplayed.2 Confirm with Yes.- The assistent for the testo USB Driver setupappears.3 Continue with Next.- The status Installing testo USB Driver is displayed.- The text Completed the testo USB driver SetupWizard is displayed.4 End installation with Finish.2. Installation6The following description applies only to testo 174(0563 1741), testo 175 (0563 1754-1761), testo 177(0563 1771-1775), testo 580 (0554 1778)3 USB interface/adapter is connected to the comput-er, USB-driver and, if necessary, adapter-driver areinstalled.For Windows 7®:1 Select Start > Control Panel > System and Security >System > Device Manager.For Windows 8.1®:1 Select Start (right mouse buttom) > Device Manager.For Windows 10®:1 Select Start (right mouse buttom) > Device Manager.2 Click on Ports (COM & LPT).- The entries for this category are displayed.3 Search for entries with …Testo ...“ ,followed by a COMinterface number.You require this COM interface number when youconnect the data logger to the Comsoft software.The COM interface number only remains the same ifyou always connect the USB interface to the sameUSB port, or if it is left connected.3. Virtual COM port settings7 4. TroubleshootingError report:In the instrument manager appears.Cause:Driver installation was not carried out correctly.Error correction:Re-install driver.In Windows 7®:Context menu Properties > Driver > Update Driver... > OK.In Windows 8.1®Context menu Properties > Driver > automaticallyIn Windows 10®Context menu Properties > Driver > automatically.If malfunctions occur which you cannot solve yourself, please contact your dealer or Testo customer service. For contact data see the rear of this document or www.testo. comTesto SE & Co. KGaATesto-Straße 179853 LenzkirchGermanyTel.: +49 7653 681-0Fax: +49 7653 681-7699E-Mail:*************www.testo.de0973 0441 en 05。
屏通软件USB驱动安装说明
USB驱动安装
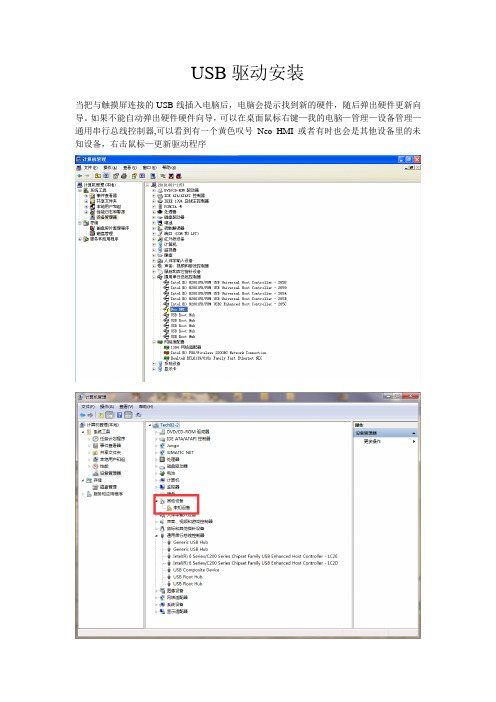
当把与触摸屏连接的USB线插入电脑后,电脑会提示找到新的硬件,随后弹出硬件更新向导。
如果不能自动弹出硬件硬件向导,可以在桌面鼠标右键—我的电脑—管理—设备管理—通用串行总线控制器,可以看到有一个黄色叹号Neo HMI 或者有时也会是其他设备里的未知设备,右击鼠标—更新驱动程序
硬件更新向导,选择从列表或指定位置安装
路径指向软件安装目录下的USB,根据用户操作系统选择32bit还是64bit
这一步选择路径是根据你安装屏通触控大师路径而选择。
在目录下有一个USB文件夹里面程序分32位64位,根据你的电脑系统位数而选择。
(简单方式是点击桌面上屏通软件图标
属性查看安装目录)点击下一步,进行安装
安装完成
安装完成后就可以使用了。
三代USB驱动程序安装(Ⅲ version usb drive install)(1)
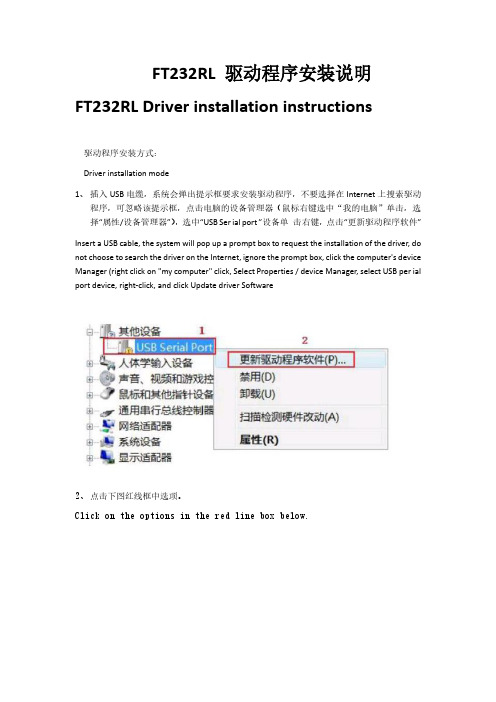
FT232RL 驱动程序安装说明FT232RL Driver installation instructions驱动程序安装方式:Driver installation mode1、插入USB电缆,系统会弹出提示框要求安装驱动程序,不要选择在Internet上搜索驱动程序,可忽略该提示框,点击电脑的设备管理器(鼠标右键选中“我的电脑”单击,选择“属性/设备管理器”),选中“USB Ser ial port ”设备单击右键,点击“更新驱动程序软件”Insert a USB cable, the system will pop up a prompt box to request the installation of the driver, do not choose to search the driver on the Internet, ignore the prompt box, click the computer's device Manager (right click on "my computer" click, Select Properties / device Manager, select USB per ial port device, right-click, and click Update driver Software2、点击下图红线框中选项。
Click on the options in the red line box below.3、点击“浏览”按钮,选择你的驱动程序所在的文件夹,如下图Click the Browse button and select the folder where your driver is located, as shown in the following figure4、安装完驱动程序后,在Windows 的设备管理器” 菜单的“端口(COM 和LPT)”下面出现一个新的串口,如下图红框中的 COM3,这个COM3就是编程电缆使用的COM 口。
TC-4850USB驱动安装说明
TC-4850爆破测振仪USB驱动程序安装说明
TC-4850采用USB2.0与计算机通讯,安装分析软件前需安装USB驱动程序,具体操作步骤如下:
1、将软件光盘放入计算机光驱,并将“TC-4850USB驱动.rar”解压至计算机;
2、仪器与计算机连接后开机,此时系统弹出“找到新硬件”对话框,如图:
3、选择“从列或表指定位置安装(高级)(S)”单击“下一步”:
4、选择“不要搜索,我要自己选择要安装的驱动程序(D)”,单击下一步:
5、选择“从磁盘安装(H)…”:
6、在“从磁盘安装”对话框中选择“浏览(B)…”,通过路径选择对话框找到“TC-4850驱动”文件夹;
7、从“TC-4850驱动”文件夹中选择“”文件,点击“打开”按钮;
8、点击“确定”;
9、选择“下一步”;
10、安装需要几秒钟,等待进度条完成;
11、单击“完成”按钮,USB驱动程序安装成功。
注意:计算机只能通过已装过USB驱动的USB接口连接仪器,使用不同USB接口时请注意再次安装USB驱动程序。
USB驱动安装说明
USB驱动安装说明
1 将USB驱动文件USB Drivers 放到指定位置(本例中,USB Drivers放在_D:\烧录文件\USB Drivers)
2 插入USB烧录器会出现以下对话框
选择从列表或指定位置安装,然后点击下一步
3 此时会出现以下对话框
选择在搜索中包含这个位置选项前打钩然后点击浏览找到 USB 驱动的位置
本例中在D:\烧录文件\USB Drivers 然后点击确定
4 此时会出现安装界面
5 安装完成后,会出现下面的对话框
6 后面还需要安装两个其他的驱动,重复以上的步骤就行了
安装完成后插入USB烧录器,打开ISP_Tool V4.3.2.2点击出现以下图标说明安装正确。
Silicon Labs CP210x USB-to-UART 驱动程序下载与安装指南说明书
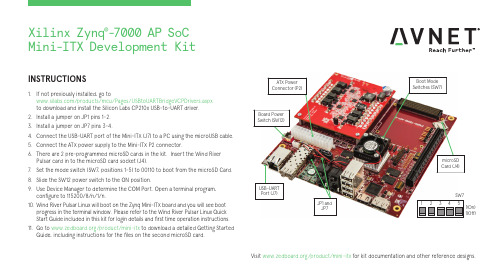
INSTRUCTIONS1. If not previously installed, go to /products/mcu/Pages/USBtoUARTBridgeVCPDrivers.aspx to download and install the Silicon Labs CP210x USB-to-UART driver.2. Install a jumper on JP1 pins 1-2.3. Install a jumper on JP7 pins 3-4.4. Connect the USB-UART port of the Mini-ITX (J7) to a PC using the microUSB cable.5. Connect the ATX power supply to the Mini-ITX P2 connector.6. There are 2 pre-programmed microSD cards in the kit. Insert the Wind River Pulsar card in to the microSD card socket (J4).7. Set the mode switch (SW7, positions 1-5) to 00110 to boot from the microSD Card.8. Slide the SW12 power switch to the ON position.9. Use Device Manager to determine the COM Port. Open a terminal program, configure to 115200/8/n/1/n.10. Wind River Pulsar Linux will boot on the Zynq Mini-ITX board and you will see boot progress in the terminal window. Please refer to the Wind River Pulsar Linux Quick Start Guide included in this kit for login details and first time operation instructions.11. Go to /product/mini-itx to download a detailed Getting Started Guide, including instructions for the files on the second microSD card.Visit /product/mini-itx for kit documentation and other reference designs.1(Off)1(On)JP1 and JP7Xilinx Zynq ®-7000 AP SoCMini-ITX Development KitAVNET DESIGN KIT LICENSE AND PRODUCT WARRANTYTHE AVNET DESIGN KIT (“DESIGN KIT” OR “PRODUCT”) AND ANY SUPPORTING DOCUMENTATION (“DOCUMENTATION” OR “PRODUCT DOCUMENTATION”) IS SUBJECT TO THIS LICENSE AGREEMENT (“LICENSE”). USE OF THE PRODUCT OR DOCUMENTATION SIGNIFIES ACCEPTANCE OF THE TERMS AND CONDITIONS OF THIS LICENSE. THE TERMS OF THIS LICENSE AGREEMENT ARE IN ADDITION TO THE AVNET CUSTOMER TERMS AND CONDITIONS, WHICH CAN BE VIEWED AT. THE TERMS OF THIS LICENSE AGREEMENT WILL CONTROL IN THE EVENT OF A CONFLICT.1. Limited License. Avnet grants You, the Customer, (“You” “Your” or “Customer”) a limited, non-exclusive, non-transferable, license to: (a) use the Product for Your own internal testing, evaluation and design efforts at a single Customer site; (c)make, use and sell the Product in a single production unit. No other rights are granted and Avnet and any other Product licensor reserves all rights not specifically granted in this License Agreement. Except as expressly permitted in this License, neither the Design Kit, Documentation, nor any portion may be reverse engineered, disassembled, decompiled, sold, donated, shared, leased, assigned, sublicensed or otherwise transferred by Customer. The term of this License is in effect until terminated. Customer may terminate this license at any time by destroying the Product and all copies of the Product Documentation.2. Changes. Avnet may make changes to the Product or Product Documentation at any time without notice. Avnet makes no commitment to update or upgrade the Product or Product Documentation and Avnet reserves the right to discontinue theProduct or Product Documentation at any time without notice.3. Product Documentation. Product Documentation is provided by Avnet on an “AS-IS” basis and does not form a part of the properties of the Product. All Product Documentation is subject to change without notice. Avnet makes no representationas to the accuracy or completeness of the Product Documentation, and DISCLAIMS ALL REPRESENTATIONS, WARRANTIES AND LIABILITIES UNDER ANY THEORY WITH RESPECT TO PRODUCT INFORMATION.4. Limited Product Warranty. AVNET WARRANTS THAT AT THE TIME OF DELIVERY, THE PRODUCTS SHALL MEET THE SPECIFICATIONS STATED IN AVNET DOCUMENTATION FOR SIXTY (60) DAYS FROM DELIVERY OF PRODUCTS. IF THE CUSTOMER CANPROVIDE PROOF THAT THE QUALIFIED AVNET PRODUCT WAS PURCHASED FOR THE PURPOSE OF AND DEPLOYED AS A COMPONENT IN THE CUSTOMER’S COMMERCIALLY AVAILABLE PRODUCT THE WARRANTY WILL BE EXTENDED TO TWELVE (12) MONTHS FROM THE DATE OF PURCHASE. TO THE EXTENT PERMITTED BY LAW, AVNET MAKES NO OTHER WARRANTY, EXPRESS OR IMPLIED, SUCH AS WARRANTY OF MERCHANTABILITY, FITNESS FOR PURPOSE OR NON-INFRINGEMENT. YOUR SOLE AND EXCLUSIVE REMEDY FOR BREACH OF AVNET’S WARRANTY IS, AT AVNET’S CHOICE: (I) REPAIR THE PRODUCTS; (ii) REPLACE THE PRODUCTS AT NO COST TO YOU; OR (iii) REFUND YOU THE PURCHASE PRICE OF PRODUCTS.5. LIMITATIONS OF LIABILITY. CUSTOMER SHALL NOT BE ENTITLED TO AND AVNET WILL NOT LIABLE FOR ANY INDIRECT, SPECIAL, INCIDENTAL OR CONSEQUENTIAL DAMAGES OF ANY KIND OR NATURE, INCLUDING, WITHOUT LIMITATION, BUSINESSINTERRUPTION COSTS, LOSS OF PROFIT OR REVENUE, LOSS OF DATA, PROMOTIONAL OR MANUFACTURING EXPENSES, OVERHEAD, COSTS OR EXPENSES ASSOCIATED WITH WARRANTY OR INTELLECTUAL PROPERTY INFRINGEMENT CLAIMS, INJURY TO REPUTATION OR LOSS OF CUSTOMERS, EVEN IF AVNET HAS BEEN ADVISED OF THE POSSIBILITY OF SUCH DAMAGES. THE PRODUCTS AND DOCUMENTATION ARE NOT DESIGNED, AUTHORIZED OR WARRANTED TO BE SUITABLE FOR USE IN MEDICAL, MILITARY, AIR CRAFT, SPACE OR LIFE SUPPORT EQUIPMENT NOR IN APPLICATIONS WHERE FAILURE OR MALFUNCTION OF THE PRODUCTS CAN REASONABLY BE EXPECTED TO RESULT IN A PERSONAL INJURY, DEATH OR SEVERE PROPERTY OR ENVIRONMENTAL DAMAGE. INCLUSION OR USE OF PRODUCTS IN SUCH EQUIPMENT OR APPLICATIONS, WITHOUT PRIOR AUTHORIZATION IN WRITING OF AVNET, IS NOT PERMITTED AND IS AT CUSTOMER’S OWN RISK. CUSTOMER AGREES TO FULLY INDEMNIFY AVNET FOR ANY DAMAGES RESULTING FROM SUCH INCLUSION OR USE.6. LIMITATION OF DAMAGES. CUSTOMER’S RECOVERY FROM AVNET FOR ANY CLAIM SHALL NOT EXCEED CUSTOMER’S PURCHASE PRICE FOR THE PRODUCT GIVING RISE TO SUCH CLAIM IRRESPECTIVE OF THE NATURE OF THE CLAIM, WHETHER INCONTRACT, TORT, WARRANTY, OR OTHERWISE.7. INDEMNIFICATION. AVNET SHALL NOT BE LIABLE FOR AND CUSTOMER SHALL INDEMNIFY, DEFEND AND HOLD AVNET HARMLESS FROM ANY CLAIMS BASED ON AVNET’S COMPLIANCE WITH CUSTOMER’S DESIGNS, SPECIFICATIONS OR IN¬STRUCTIONS,OR MODIFICATION OF ANY PRODUCT BY PARTIES OTHER THAN AVNET, OR USE IN COMBINATION WITH OTHER PRODUCTS.8. U.S. Government Restricted Rights. The Product and Product Documentation are provided with “RESTRICTED RIGHTS.” If the Product and Product Documentation and related technology or documentation are provided to or made available tothe United States Government, any use, duplication, or disclosure by the United States Government is subject to restrictions applicable to proprietary commercial computer software as set forth in FAR 52.227-14 and DFAR 252.227-7013, et seq., its successor and other applicable laws and regulations. Use of the Product by the United States Government constitutes acknowledgment of the proprietary rights of Avnet and any third parties. No other governments are authorized to use the Product without written agreement of Avnet and applicable third parties.9. Ownership. Licensee acknowledges and agrees that Avnet or Avnet’s licensors are the sole and exclusive owner of all Intellectual Property Rights in the Licensed Materials, and Licensee shall acquire no right, title, or interest in the LicensedMaterials, other than any rights expressly granted in this Agreement.10. Intellectual Property. All trademarks, service marks, logos, slogans, domain names and trade names (collectively “Marks”) are the properties of their respective owners. Avnet disclaims any proprietary interest in Marks other than its own. Avnet andAV design logos are registered trademarks and service marks of Avnet, Inc. Avnet’s Marks may be used only with the prior written permission of Avnet, Inc.11. General. The terms and conditions set forth in the License Agreement or at will apply notwithstanding any conflicting, contrary or additional terms and conditions in any purchase order, sales acknowledgement confirmation orother document. If there is any conflict, the terms of this License Agreement will control. This License may not be assigned by Customer, by operation of law, merger or otherwise, without the prior written consent of Avnet and any attempted or purported assignment shall be void. Licensee understands that portions of the Licensed Materials may have been licensed to Avnet from third parties and that such third parties are intended beneficiaries of the provisions of this Agreement. In the event any of the provisions of this Agreement are for any reason determined to be void or unenforceable, the remaining provisions will remain in full effect. This constitutes the entire agreement between the parties with respect to the use of this Product, and supersedes all prior or contemporaneous understandings or agreements, written or oral, regarding such subject matter. No waiver or modification is effective unless agreed to in writing and signed by authorized representatives of both parties. The obligations, rights, terms and conditions shall be binding on the parties and their respective successors and assigns. The License Agreement is governed by and construed in accordance with the laws of the State of Arizona excluding any law or principle, which would apply the law of any other jurisdiction. The United Nations Convention for the International Sale of Goods shall not apply.Copyright © 2017 Avnet, Inc. AVNET, "Reach Further," and the AV logo are registered trademarks of Avnet, Inc. All other brands are the property of their respective owners. LIT# 5117-QSC-AES-MINI-ITX-7Z100-BAS-G-V1。
- 1、下载文档前请自行甄别文档内容的完整性,平台不提供额外的编辑、内容补充、找答案等附加服务。
- 2、"仅部分预览"的文档,不可在线预览部分如存在完整性等问题,可反馈申请退款(可完整预览的文档不适用该条件!)。
- 3、如文档侵犯您的权益,请联系客服反馈,我们会尽快为您处理(人工客服工作时间:9:00-18:30)。
USB编程电缆驱动程序安装说明
概述
USB编程电缆或USB接口产品是通过将电脑的USB接口模拟成传统的串行口(通常为COM3),从而使用现有的编程软件或通信软件,通过编程电缆与PLC 等设备的传统接口进行通信。
功能
●支持的操作系统Windows2000/Windows XP
●完全兼容USB 2.0规范
●USB总线供电(非隔离产品)、或USB总线供电与PLC的编程口同时供
电(隔离型产品)
●波特率:300bps~1Mbps自动适应
●每台PC只支持一个USB接口转换产品(如一台电脑需使用多个USB
接口产品,需为各个USB接口产品设置不同的序列号,请咨询生产厂家
索取序列号设置工具软件)
系统要求
请在使用USB编程电缆之前确认你的电脑是IBM PC兼容型并具备以下最低系统要求:
●Intel兼容586DX4-100MHz中央处理器或更高
●一个标准的USB接口(4-pin A型插座)
●运行操作系统为Windows2000或Windows XP
驱动程序的安装
驱动程序的安装非常简单,只需按提示进行即可,以Windows XP为例,按以下步骤进行:
1、打开将要连接USB编程电缆或USB接口产品的电脑电源,并确认电脑
的USB口已经启动并正常工作。
2、将USB编程电缆或USB接口产品插入电脑的USB接口,Windows将检
测到设备并运行添加新硬件向导帮助你设置新设备,插入驱动程序光盘
并单击下一步继续。
如果Windows没有提示找到新硬件,那么在设备管理器的硬件列表中,
展开“通用串行总线控制器”,选择带问号的USB设备,单击鼠标右键
并运行更新驱动程序。
3、Windows将检测到安装信息,显示“CP2102 USB Composite Device ”
设备,如果出现“没有通过Windows徽标测试”的信息框,单击“仍然继续”。
4、继续安装,让Windows拷贝驱动程序文件到你的硬盘。
5、当Windows显示完成找到新硬件向导,单击“完成”结束安装。
6、安装完成后,请确认在Windows的“开始\设置\控制面板\系统\硬件\设
备管理器”菜单的“端口(COM和LPT)”展开条目中出现“CP2101 USB to UART Bridge Controller(COMx)”,这个COMx(如下图中的COM5)
就是USB编程电缆使用的COM口号。
以后每次使用只要插入编程电缆
就会出现该COM口,你只需在编程软件或通信软件等应用软件中选中
该COM口即可。
驱动程序的删除
删除驱动程序是为了释放COM口资源以便其他设备使用,或驱动程序故障时需将其删除后重新安装,按下面步骤删除驱动程序:
1、从你的电脑上拔下USB编程电缆。
2、运行面板中的“添加或删除程序”,选择“CP2101 USB to UART Bridge
Controller”,单击删除按钮。
3、显示如下提示窗口,单击“是”按钮。
4、当驱动程序被删除后显示如下信息窗口,单击“确定”按钮结束
也可以直接运行驱动程序光盘中的uninstall文件来删除驱动程序。
如何改变COM口号
有些早期的应用软件支持的串口数量是有限的,如某PLC编程软件支持的串口号为COM1~COM4,由于安装USB编程电缆之前已安装了其它的USB转UART设备,安装USB编程电缆驱动程序后在设备管理器中显示该电缆地址为COM5,这样一来编程软件就无法访问该COM口。
这时候就需改变编程电缆的COM口号,有以下二个方法:
1、删除所有的USB转UART产品的驱动程序以释放COM口资源,重新安装
USB编程电缆驱动程序,这时设备管理器将显示该电缆地址为COM3。
2、在Windows2000/XP系统中可直接更改COM口号,双击设备管理器中需更
改的COM口设备,出现设备属性信息窗口,选择“端口设置”,如下图所示。
点击“高级”按钮,出现下面高级设置信息窗口,将COM口设置成你所希望的COM口序号(如下图中将COM口强制改变成COM2),并单击“确定”
按钮完成。
使用中的注意事项:
1、如果电脑开机时未检测到插在电脑上的USB编程电缆(Windows的设备管理器中没有
出现该电缆对应的COM口)或出现其它异常情况,请重新将USB插头拔插一次。
2、USB转UART是即插即用的USB设备,正在进行数据传输过程中不可以将其断开(断
开是指从USB插座中拔出USB电缆),也就是说,必须在应用程序关闭该串口后,才能从USB插座中拔出电缆。
3、有时Windows系统故障或通信过程中拔插USB电缆也会出现USB通信异常,这时也许
需要重新启动电脑和PLC。
4、一般来讲,最好先将USB电缆插入电脑的USB插座,让计算机检测到COM口后再将
编程电缆的另一端插到PLC的编程口上,因为有些PLC工作在主站方式时,其通信口始终在不停的往外发送数据,如先将编程电缆插入PLC的端口则会降低计算机正确识别COM口的速度。
5、编程电缆的USB插头必须直接插入计算机的USB端口,其间不能加入其它USB延长电
缆。
拒绝条款:
此文件以提供信息为目的,里面条目和内容在修改时并不另行通知。
因为此说明文件中的内容或变更所引起的直接或间接或与此相关的任何损失和错误,厂商均不负责任。
2005-4-25 RS232/RS485/RS422系列接口转换器、长线驱动器、隔离器、PLC编程接口电缆、PLC周边产品。
