IBM DS4300配置手册
DS4300 使用维护指南

DS4300 使用维护指南(1)在笔记本(或管理机)上安装Storage Manager Version 9.15
软件缺省安装在C:/Program Files/IBM_DS4000目录下
(2)启动软件
注:部分机器因为安装Java 虚拟机版本问题可能无法正常启动,处理办法如下
到C:/Program Files/IBM_DS4000/client目录下执行SMclient.bat
(3) DS4300配置过程
1把DS4300的两块控制卡的网络接口和安装有SM9的管理机连接在同一个交换机上
2DS4300控制卡的IP地址192.168.128.101和192.168.128.102,管理机IP地址192.168.128.103
3创建hotspare 盘
4创建逻辑卷
打开向导
选择RAID级别及硬盘
选择创建逻辑盘的大小及LUN号创建完成,可继续创建新逻辑盘
5定义主机输入主机名
6定义主机端口
选择光纤通道卡的串号(光纤卡串号可以在服务器启动时按ctrl +Q查看)
选Edit,写个alias名为erp
输入主机类型及主机端口名字7完成
8在服务器计算管理中可搜到新划盘,格式化后即可正常使用。
9日常维护时注意看硬盘灯有无告警,如有黄灯亮,可能有故障。
通过storage manager client 查看报错信息。
IBM TS4300磁带库产品指南说明书
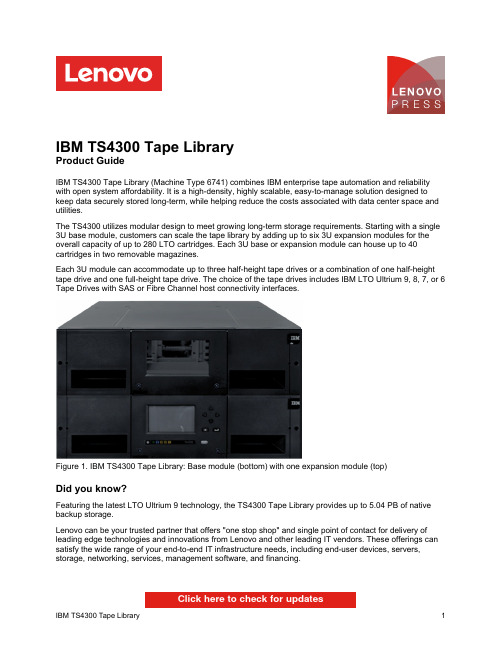
IBM TS4300 Tape LibraryProduct GuideIBM TS4300 Tape Library (Machine Type 6741) combines IBM enterprise tape automation and reliability with open system affordability. It is a high-density, highly scalable, easy-to-manage solution designed to keep data securely stored long-term, while helping reduce the costs associated with data center space and utilities.The TS4300 utilizes modular design to meet growing long-term storage requirements. Starting with a single 3U base module, customers can scale the tape library by adding up to six 3U expansion modules for the overall capacity of up to 280 LTO cartridges. Each 3U base or expansion module can house up to 40 cartridges in two removable magazines.Each 3U module can accommodate up to three half-height tape drives or a combination of one half-height tape drive and one full-height tape drive. The choice of the tape drives includes IBM LTO Ultrium 9, 8, 7, or 6 Tape Drives with SAS or Fibre Channel host connectivity interfaces.Figure 1. IBM TS4300 Tape Library: Base module (bottom) with one expansion module (top)Did you know?Featuring the latest LTO Ultrium 9 technology, the TS4300 Tape Library provides up to 5.04 PB of native backup storage.Lenovo can be your trusted partner that offers "one stop shop" and single point of contact for delivery of leading edge technologies and innovations from Lenovo and other leading IT vendors. These offerings can satisfy the wide range of your end-to-end IT infrastructure needs, including end-user devices, servers, storage, networking, services, management software, and financing.Click here to check for updatesFigure 2. Front view of the TS4300 Tape Library base moduleThe following figure shows the front view of the TS4300 Tape Library expansion moduleFigure 3. Front view of the TS4300 Tape Library expansion moduleThe following figure shows the rear view of the TS4300 Tape Library base moduleFigure 4. Rear view of the TS4300 Tape Library base moduleThe following figure shows the rear view of the TS4300 Tape Library expansion module.Figure 5. Rear view of the TS4300 Tape Library expansion moduleSystem specificationsThe following table lists the TS4300 Tape Library system specifications.Table 1. System specificationsAttribute SpecificationForm factor Base module: 3U rack-mount or stand-aloneExpansion module: 3U rack-mount; up to 6 expansion modules7-module library: 21U rack-mountDrive technology LTO Ultrium 9, 8, 7, and 6 Full-High (FH) and Half-High (HH) tape drives Drive interface UItrium LTO9 12 Gbps SAS Half and Full High drivesUItrium LTO8 6 Gbps SAS Half-High driveTape drivesTape drivesEach TS4300 module (base or expansion) can accommodate up to three LTO Ultrium half-height tape drives or a combination of one LTO Ultrium half-height tape drive and one LTO Ultrium full-height tape drive.The following table lists the supported tape drives for the TS4300.Table 4. Tape drive optionsPart number Featurecode DescriptionMaximumquantityper moduleFull Height 8 Gb Fibre Channel02JH837BLW0LTO 9 FH Fibre Channel Drive101KP954B1ET LTO 8 FH Fibre Channel Drive101KP938B16Y LTO 7 FH Fibre Channel Drive1Half Height 8 Gb Fibre Channel02JH835BLVZ LTO 9 HH Fibre Channel Drive301KP952B1ER LTO 8 HH Fibre Channel Drive301KP936B16W LTO 7 HH Fibre Channel Drive3Full Height 12 Gb SAS02JH838BLW6LTO 9 FH SAS Drive3Half Height 12 Gb SAS02JH836BLW7LTO 9 HH SAS Drive3Half High 6 Gb SAS01KP953B1ES LTO 8 HH SAS Drive301KP937B16X LTO 7 HH SAS Drive3Tape drive support (Wrap tool)01KP939B16R Fibre Tape Drive Support (Wrap Tool)701KP940B16S SAS Tape Drive Support (Wrap Tool) (for LTO8, LTO7)702JH839BLW8Mini SAS-HD Tape Drive Support (wrap tool) (for LTO9)7A wrap tool is a loopback connector that provides the ability to run port tests and isolate sled problems in tape drives. The Fibre Tape Drive Support is required when at least one Fibre Channel tape drive is installed in the tape library, and the SAS Tape Drive Support is required when at least one SAS tape drive is installed in the tape library.Cables for host connectivityCables for host connectivityA SAS cable or Fibre Channel cable is required to attach a tape drive in the TS4300 Tape Library to a host. The following table lists supported cable options for LTO9 connectivity.Table 5. SAS cables for LTO9Description PartnumberFeaturecodeMaximumquantitySAS connectivity cables: Mini-SAS HD (HBA SFF-8644 host) to Mini-SAS HD (HBA SFF-8644 tape drive) 3 m Mini-SAS HD/Mini-SAS HD 1x Cable(from HBA with SFF-8644 to tape drive (LTO-9) with SFF-8644)02JH830BLW311.5 m Mini-SAS HD/Mini-SAS HD 1x Cable(from HBA with SFF-8644 to tape drive (LTO-9) with SFF-8644)02JH831BLW41 3 m Mini-SAS HD/Mini-SAS HD (Y) 2X Cable02JH832BLW51 The following table lists supported cable options for LTO8 and LTO7 connectivity.Table 6. Cable options for LTO 8 & LTO 7Description PartnumberFeaturecodeMaximumquantityper driveSAS connectivity cables - Mini-SAS (SFF-8088 host) to Mini-SAS (SFF-8088 tape)Mini-SAS/Mini-SAS 4x Interposer (from HBA with SFF-8088 to max 4 cableswith SFF-8088)00NA077AS0Y1*2 m Mini-SAS/Mini-SAS 1x Cable (host SFF-8088 to target SFF-8088)00NA009AS0Z2SAS connectivity cables - Mini-SAS HD (SFF-8644 host) to Mini-SAS (SFF-8088 tape)HD-SAS Cable to Mini-SAS (4 m)00NV419AS102Y SAS HD to Mini-SAS Cable (3 m)00NV420AS122**Fibre Channel connectivity cable8s10 m LC-LC Fibre Cable01KP929B16M2* The interposer is used on the host side to connect up to four SAS tape drives to a single Mini-SAS x4 port on a SAS HBA with up to four 2 m Mini-SAS to Mini-SAS cables (part number 00NA009).** The Y SAS HD cable is used to connect up to two SAS tape drives to a single Mini-SAS HD x4 port on a SAS HBA.Tape mediaLenovo Financial ServicesLenovo Financial Services reinforces Lenovo’s commitment to deliver pioneering products and services that are recognized for their quality, excellence, and trustworthiness. Lenovo Financial Services offers financing solutions and services that complement your technology solution anywhere in the world.We are dedicated to delivering a positive finance experience for customers like you who want to maximize your purchase power by obtaining the technology you need today, protect against technology obsolescence, and preserve your capital for other uses.We work with businesses, non-profit organizations, governments and educational institutions to finance their entire technology solution. We focus on making it easy to do business with us. Our highly experienced team of finance professionals operates in a work culture that emphasizes the importance of providing outstanding customer service. Our systems, processes and flexible policies support our goal of providing customers with a positive experience.We finance your entire solution. Unlike others, we allow you to bundle everything you need from hardware and software to service contracts, installation costs, training fees, and sales tax. If you decide weeks or months later to add to your solution, we can consolidate everything into a single invoice.Our Premier Client services provide large accounts with special handling services to ensure these complex transactions are serviced properly. As a premier client, you have a dedicated finance specialist who manages your account through its life, from first invoice through asset return or purchase. This specialist develops an in-depth understanding of your invoice and payment requirements. For you, this dedication provides a high-quality, easy, and positive financing experience.For your region-specific offers, please ask your Lenovo sales representative or your technology provider about the use of Lenovo Financial Services. For more information, see the following Lenovo website: https:///us/en/landingpage/lenovo-financial-services/Seller training coursesTrademarksLenovo and the Lenovo logo are trademarks or registered trademarks of Lenovo in the United States, other countries, or both. A current list of Lenovo trademarks is available on the Web athttps:///us/en/legal/copytrade/.The following terms are trademarks of Lenovo in the United States, other countries, or both:Lenovo®Lenovo ServicesThinkSystem®The following terms are trademarks of other companies:Linux® is the trademark of Linus Torvalds in the U.S. and other countries.Microsoft®, Hyper-V®, Windows Server®, and Windows® are trademarks of Microsoft Corporation in the United States, other countries, or both.Other company, product, or service names may be trademarks or service marks of others.。
4300用户手册
多功能打印机
用户指南
想象无穷,可能无限
感谢您购买 Samsung 产品。要享受更完善的服务,请在
/global/register
上注册您的产品。
© 2008 Samsung Electronics Co., Ltd. 保留所有权利。 本手册仅用于提供信息。本手册中的信息如有变更,恕不另行通知。 Samsung Electronics 对因本手册的使用引起的、或与本手册的使用相关的变更不负任何责任(无论 是直接的还是间接的) 。 • SCX-4300 是 Samsung Electronics Co., Ltd. 的型号名称。 • Samsung 和 Samsung 徽标是 Samsung Electronics Co., Ltd. 的商标。 • IBM 和 IBM PC 是国际商用机器公司的注册商标。 • PCL 和 PCL 6 是 Hewlett-Packard company 的商标。 • Microsoft、 Windows、 Windows 2000、 Windows XP 和 Windows Vista 是 Microsoft Corporation 的注册商标。 • TrueType、 LaserWriter 和 Macintosh 是 Apple Computer, Inc 的商标。 • 所有其他品牌和产品名称均为其各自所属公司和组织的商标。
目录
1. 介绍
特殊功能 ............................................................................................................................................................... 1.1 了解组件位置 ........................................................................................................................................................ 1.2
4300说明书中文

动平衡机使用说明书geodyna 43001内容提要1。
安全规则和功能2。
机器安装定位3。
电路连接4。
控制与显示5。
开机6。
装夹车轮7。
输入轮胎类型,平衡模式和轮胎尺8。
平衡车轮9。
在轮辐后放置平衡块101112/平衡块小型化131********。
安全规则和功能1,1导读手册中的一些具体图标说明有利于读者理解1,2应用概述车轮平衡机设计平衡车轮最大直径950毫米和最大车轮重量70公斤的轿车及轻型货车的车轮进行动平衡和静平衡除进行动平衡之外,本机还可以测量和改善由于轮圈和轮胎,几何尺寸误差所引起的车轮运行跳动并尽可能排除,仔细调整车轮轮圈和轮胎的匹配可以使车轮达到行车时减少跳动以降低应加的平衡块的重量,即车轮镇静性优化和平衡块小型化。
寸。
改变操作模式。
错误代码。
镇静性优化。
操作员的再调整。
重新调整。
维修。
技术参数。
电路图2图1机器一览图1按键和显示器2,轮罩3,用于测量轮圈直径和间距的测量杆4,制动器踏板5,电源开关1,3一般安全规则仅由被正确训练过人员和专业人员才能允许操作平衡机平衡机须在操作手册说明范围内进行使用对由操作人员自行决定对机器的改装或变动而引起的责任厂家不负责严禁私自拆除或关闭安全装置所有电源连接或转接工作只允许指定的专业电工进行,并符合所在国家的供电部门的有关规定工作中应注意不可预知的危险因此操作员应排除上面讲的危险下面几点应该注意:使用的技术装备仅在应用范围永远使用适合和适当的装备和工具遵循车轮平衡机制造商的说明,注解和技术参数盖上适当的保护罩和附件一些特殊的安全提示将在以下章节中给出1,4功能屏幕和键盘屏幕和键盘在前面板上屏幕和键盘在前面板上根据人体工程学排列,前面机箱3测量杆测量.轮圈直径及左侧校正面与机器的间距可以通过一个随机配带的测量杆测量或通过键盘输入.通过键盘输入时在按住菜单键的同时转动车轮,所需的输入数据将被显示出来并写入电子单元进行处理测量杆用于从左边开始确定粘块的精确位置〈安装位置准确表明〉。
IBM DS4300存储控制器更换电池带拆电池步骤

IBM DS4300存储控制器更换电池(图文并茂)二0一一年五月十三日1、系统报错日志1-1、服务器端报错信息8B88700A0408133011T H hdisk2CACHE BATTERY CHARGE BELOW87.5%1-2、DS4300存储报错在SM软件中可以看到报警灯亮红灯电池状态为:Battery status: Removed(failure)2、更换DS4300电池全部过程2-1、确定电池坏后,准备笔记本、螺丝刀、标签纸。
2-2、给光纤线打上标签,用笔记本连接上存储管理口,打开SM软件在SM里面,用鼠标右键点Array1>>(逻辑盘)>>change>>Cache Settings,把Enable read caching、Enable write caching、Enable write caching without batteries前面小方框的的“勾号”去掉,点OK,即把Cache关了;然后在右边栏目里,Advanced一栏里,用鼠标有键点控制器B,选Place>>offline,即把控制器A关掉;2-2、取出DS4300电池第一步:第二步:第三步:2-2、装上DS4300电池、插入DS4300存储2-3、在SM里面,在Advanced一栏里,用鼠标有键点控制器B,选Place>>online,即把控制器A打开;用鼠标右键点Array1>>(逻辑盘)>>change>>Cache Settings,把Enable read caching、Enable write caching、Enable write caching without batteries前面小方框的的“勾号”打上,点OK,即把Cache打开;把逻辑盘切换到最佳路径。
安琪酵母股份有限公司IBM DS4300存储实施文档
安琪酵母股份有限公司IBM DS4300存储实施文档IBM DS4300(FastT600)配置过程(1)把IBM DS4300(FastT600)的两块控制卡的网络接口和安装有SM9.1x的管理机连接在同一个交换机上(2)在SM管理界面增加设备,输入IBM DS4300(FastT600)控制卡的IP地址A控制器:192.168.128.101和B控制器192.168.128.102登录管理界面:设置时间同步;(将管理客户端的系统时间与DS4300控制器时间同步),选择“ok”;打开向导点击鼠标右键,点击“create logical drive”;根据向导提示,选择RAID 级别及硬盘;选择raid5,手动添加1-6号磁盘;如下图:选择创建逻辑盘的大小及LUN号将逻辑盘命名为SAP_DataVG;选择主机类型为:AIX创建完成,可继续创建新逻辑盘创建完成,按照以上步骤,继续创建第二个逻辑盘;定义热备盘,选择手动添加;(4)定义主机输入主机名输入主机组名称;(5)定义主机端口选择光纤通道卡的串号输入主机类型及主机端口名字DS4300磁盘阵列配置完成!IBM P550 AIX的配置1.安装光纤卡的驱动程序和RDAC软件(该驱动在AIX安装CD中),并确认安装成功。
通过如下命令确认安装成功:lslpp –ah devices.fcp.disk.array.rte,检查RDAClslpp –ah devices.pci.df10*,检查光纤卡驱动2.重新检测硬件通过如下命令:cfgmgr –v3.检查从DS4000分配过来的磁盘状态通过如下命令:lsdev –Cc disk如下结果是正确的:hdisk3,hdisk4,hdisk5,hdisk6是从DS4000分配的磁盘,标识为3552 Disk Array Device。
在AIX下通过光纤连接LTO 3582磁带库,驱动的安装方法1.从以下的网站下载LTO 3582的驱动程序,并将其拷贝到/tmp目录下。
DS4300安装配置手册

DS4300安装配置手册安装前的准备工作:在以下网址下载IBM DS4000 系列Storage Manager软件V9.16版本,用来控制DS4000系列磁盘阵列,以及RAID的划分:/support/docview.wss?uid=psg1MIGR-60595在以下网址下载AIX操作系统补丁及磁阵控制器微码文件,AIX V5.3操作系统补丁最高级别为5300-04。
/eserver/support/fixes/DS4300的安装调试:1、确认磁阵已开机,双控制器已与PC通过交换机连接。
控制器A的IP地址为192.168.128.101,控制器B的IP地址为192.168.128.102,子网掩码均为255.255.255.0。
将PC的IP地址也设置为同一网段。
2、在PC上运行。
3、连接DS4300磁阵:因为要升级微码,因此输入两个控制器的IP地址。
连接时的状态。
提示是否加入另一个,此处选择No。
同步双控制器的时间。
4、升级DS4300磁阵的微码。
双击Storage Subsystem Unnamed。
查看当前磁阵的属性,含微码信息。
此处显示当前(未升级微码)的Firmware版本。
从PC上传微码文件。
必须同时升级磁盘阵列的firmware和NVSRAM。
选择PC上的微码文件。
提示,选择Yes。
正在上传微码文件。
正在升级微码。
控制器微码升级完成。
5、配置DS4300磁阵(划分Hot Spare Disk和RAID)配置Hot Spare Disk,选择第一块磁盘点右键。
手工配置。
设定完热备盘后,请区别热备盘的状态标志。
点击右键开始划分RAID。
选择RAID类型及磁盘数。
选择OK确认开始。
此处选择AIX。
查看RAID状态及属性。
查看控制器信息。
升级后微码信息。
DS4300(FastT600)安装配置
IBM DS4300磁盘陈列安装报告IBM DS4300的安装分为两个部分一、DS4300微码升级二、DS4300具体安装过程一、DS4300微码升级1、用一根交叉线把工作计算机连接DS4300控制器上的以太网接口,把工作计算机IP改为192.168.128.100 255.255.255.0,(两个网口缺省IP为192.168.128.101/24; 192.168.128.102/24),然后打开storage manager管理工具,进入>storage subsystem >profile view检查控制器和HDD微码情况,目前的firmware version:06.10.11.00;HDD 的firmware version:B356如下图:2、从IBM网站上下载最新微码版本为06.12.03.00,然后>advanced>maintenace>download,如下图所示:3、执行Contraller firmware,如下图选择firmware源文件:4、点“OK”开始升级过程,如下图:如下图,选择Drive firmware的源文件:别进行升级),然后进入升级过程,如下图:8、firmware升级完成后,将DS4300设备关闭电源,30秒后再重启。
二、DS4300具体安装过程1、重新进入store manager后,在下图中选择“add stormae subsystem”:2、在下图中选择“Automatic”,DS4300会自动查找到磁盘系统:3、如下图所示:执行>storage subsystem>manage storage subsystem:4、在上图中执行执行>storage subsystem>manage storage subsystem后,如下图在右边显示出了七块硬盘的情况:5、然后如下图所示,执行“create logical drive”选项:6、执行“create logical drive”后如下图进入配置引导程:7、如下图选择slot2、3、4、5、6、7六块硬盘,然后执行“add”,如下图:8、执行上图中的“calculate capacity”,由系统自动计算出系统识别的硬盘的容量,然后执行“next”,如下图:9、按照用户要求,在一个RAID 5上面做两个逻辑盘,所以在下图中的“new logical drive capacity”中改变逻辑分区大小为100GB,选择“customize setting (I/O characteristics and controller ownership)”选项:10、然后如下图选择,执行“next”11:然后如下图选择,执行“next”12、然后如下图选择,执行“next”13、在下图中选择“yes”后,如下图,执行:“next”14、然后如下图选择,执行“next”:15、然后如下图选择,执行“next”16、然后如下图选择,执行“next”17、然后如下图选择,执行“NO”18、然后如下图选择,执行“OK”19、在上图中选择“mapping view”后如下图:填入IBMp570_AIX后执行“ADD”21、如下图执行>host group IBMp570_AIX>define host22、如下图进入define host引导界面:23、在下图的“Identifier”中输入5716光纤卡的WWN名,在“Alias”中输入p570HBA1 ,然后“ADD”24、在下图中执行Next25、在下图中执行Finish26、在下图中执行Yes27、在下图中,在Slot 1硬盘的属性中,执行“Hot spare coverage”28、在下图中选择“Manually assign individual drivers”29、如下图所示,Slot 1硬盘已被设置为热备盘P570升级包下载地址:/eserver/support/fixes/maintpkg.jsp?system=2&&release=5.2 AIX 5200(03)-07 maintenance package Recommended maintenance for AIX 5.2.0This package updates AIX 5.2 from maintenance level 03 to maintenancelevel 07 (5200-07), and is a recommended maintenance package for AIX 5.2.IBM recommends that customers install the latest available maintenacepackage for their AIX release.To determine if AIX 5200-07 is already installed on your system, run thefollowing command:oslevel -rGeneral descriptionThis package contains code corrections for the AIX operating system and many related subsystems. Unless otherwise stated, this package is released for all languages. For additional information, refer to the Package information This package has been divided into two volumes: Volume 1Contains all the basic maintenance level updates that all customers will need to update to maintenance level 5200-07.Volume 2Contains certain LOCALE updates that many customers will not require. To determine if you need Volume 2, first download, and then install Volume 1. Next, run the oslevel -r command. If the output is 5200-07, then you do not need Volume 2. If the output is less than 5200-07, then you need to download and install Volume 2.Download and installation instructionsNote:IBM recommends that you create a separate file system for /usr/sys/inst.images to prevent the expansion of the /usr file system.More informationPackageReleasedChecksum Size (Bytes)520007_v2.tar.gz09/30/052674523155 3594000918437,463,361438,176,111 Additional space needed to extract the filesetsv1. 613,324,800 v2. 609,914,880Procedure1. Click the link for the Volume 1 package above.2. Put the package (a tar.gz file) in /usr/sys/inst.images3. Extract the filesets from the package.1. cd /usr/sys/inst.images2. gzip -d -c 520007_v1.tar.gz | tar -xvf -4. Back up your system.5. Install the package by creating a table of contents for install to use.Then update the install subsystem itself. Run SMIT to complete the installation.1. inutoc /usr/sys/inst.images2. installp -acgXd /usr/sys/inst.images bos.rte.install3. smit update_all6.Run the oslevel -r command. Depending on the output, do one of thefollowing:Output from oslevel -r is 5200-07Your system has all the files it needs. Reboot your system. Thismaintenance package replaces critical operating system code.OROutput from oslevel -r is not 5200-07Your system needs Volume 2 of the maintenance package. Repeat Steps 1 through 5 of the Procedure, clicking the Volume 2 package link and using 520007_v2.tar.gz as the filename in Step 3. Afterinstalling Volume 2, reboot your system. This maintenance package replaces critical operating system code.。
(完整版)博科光纤交换机基本配置
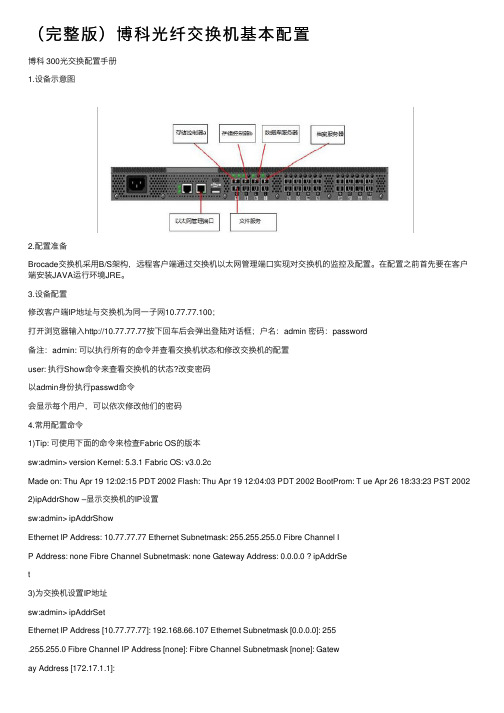
(完整版)博科光纤交换机基本配置博科 300光交换配置⼿册1.设备⽰意图2.配置准备Brocade交换机采⽤B/S架构,远程客户端通过交换机以太⽹管理端⼝实现对交换机的监控及配置。
在配置之前⾸先要在客户端安装JAVA运⾏环境JRE。
3.设备配置修改客户端IP地址与交换机为同⼀⼦⽹10.77.77.100;打开浏览器输⼊http://10.77.77.77按下回车后会弹出登陆对话框;户名:admin 密码:password备注:admin: 可以执⾏所有的命令并查看交换机状态和修改交换机的配置user: 执⾏Show命令来查看交换机的状态?改变密码以admin⾝份执⾏passwd命令会显⽰每个⽤户,可以依次修改他们的密码4.常⽤配置命令1)Tip: 可使⽤下⾯的命令来检查Fabric OS的版本sw:admin> version Kernel: 5.3.1 Fabric OS: v3.0.2cMade on: Thu Apr 19 12:02:15 PDT 2002 Flash: Thu Apr 19 12:04:03 PDT 2002 BootProm: T ue Apr 26 18:33:23 PST 2002 2)ipAddrShow –显⽰交换机的IP设置sw:admin> ipAddrShowEthernet IP Address: 10.77.77.77 Ethernet Subnetmask: 255.255.255.0 Fibre Channel IP Address: none Fibre Channel Subnetmask: none Gateway Address: 0.0.0.0 ? ipAddrSet3)为交换机设置IP地址sw:admin> ipAddrSetEthernet IP Address [10.77.77.77]: 192.168.66.107 Ethernet Subnetmask [0.0.0.0]: 255.255.255.0 Fibre Channel IP Address [none]: Fibre Channel Subnetmask [none]: Gateway Address [172.17.1.1]:Set IP address now? [y = set now, n = next reboot]: y ? sw2:4)显⽰交换机配置admin> switchShowswitchName: sw2 switchType: 9.1 switchState: Online switchMode: Native switchRole: Subordinate switchDomain: 97 switchId: fffc61switchWwn: 10:00:00:60:69:04:23:03 switchBeacon: OFFport 0: id 2G No_Light port 1: id 2G No_Light port 2: id 2G No_Light port 3: id 2G No_Lightport 4: id 2G Online F-Port 10:00:00:00:c9:20:d0:99 port 5: id 2G No_Lightport 6: id N2 Online E-Port 10:00:00:60:69:50:3e:1b “sw2” (downstream)port 7: id 1G Online L-Port 8 Private, 2 phantom port 8: id 1G No_Light port 9: id N2 No_Light port 10: id 2G No_Light port 11: id N1 Online port 12: id 2G No_Lightport 13: id 2G Online E-Port 10:00:00:60:69:50:02:73 “sw8" (upstream) (Trunk master)port 14: id N2 No_Light5)显⽰交换机运⾏状态admin> switchstatusshowSwitch Health Report Report time: 06/22/2015 07:53:50 AMSwitch Name: adminIP address: 192.168.99.9SwitchState: HEALTHYDuration: 00:05Power supplies monitor HEALTHYTemperatures monitor HEALTHYFans monitor HEALTHYFlash monitor HEALTHYMarginal ports monitor HEALTHYFaulty ports monitor HEALTHYMissing SFPs monitor HEALTHYFabric Watch is not licensedDetailed port information is not included6)显⽰交换机配置信息admin> cfgshowDefined configuration:cfg: cfg_1 a750l1_vtl12; b750l1_v7000; b750l2_v7000; b750l2_vtl12; ha1;vm1l_v7000; vm2l_v7000; vm3l_v7000; vtape; xenserver_a;xenserver_bzone: a750l1_vtl121,2; 1,20; 1,21; 1,22; 1,23zone: b750l1_v70001,0; 1,1; 1,2zone: b750l2_v70001,0; 1,1; 1,3zone: b750l2_vtl121,3; 1,20; 1,21; 1,22; 1,23zone: ha1 1,2; 1,3zone: vm1l_v70001,0; 1,1; 1,4zone: vm2l_v70001,0; 1,1; 1,5zone: vm3l_v70001,0; 1,1; 1,6zone: vtape 1,20; 1,21; 1,22; 1,23zone: xenserver_a1,0; 1,1; 1,8zone: xenserver_b1,0; 1,1; 1,77)备份交换机配置admin> configuplocadadmin> Protocol (scp or ftp):ftp (输⼊协议,如果你是FTP就输⼊FTP)admin> host: (FTP服务器地址:192.168.99.100)admin> user name: (⽤户名)admin> filename: 备份⽂件名称admin> password: 密码8)已有备份⽂件还原admin> switchdisable 停⽤交换机所有交换端⼝admin>configdownloadadmin>Protocol (scp or ftp):ftpadmin>Server Name or IP Address [host]:admin>User Name [user]:admin>File Name [config.txt]:config.txt.........admin>Do you want to continue [y/n]:yadmin>Password:admin>reboot9)划分zone定义:zone是当你有不同平台的主机连到SAN上时,⽤来隔离不同主机对磁盘阵列的存取,严格⼀点的,任何⼀台主机连到交换机访问任何⼀个存储设备都要作zone。
IBM TotalStorage DS4300手册
!"#$%&'()* !"#$% ! !"#$%&'()*+, !"# $% & ! !"#$% !"#$%& !"#$%&' !"#$%
!"#$%&'(
!"#$%&'(
!"#$"%&'()*+ !"# !" !"#$ !"#$%"&'()*+
!"#$%&'(
IBM Tivoli Tivoli IBM Tivoli DS4300 !"# IBM !"#$%&'( !"#$%&'( ! ! !"#$%&'() !"#!$%&'()* !"#$ DS4300 IBM TotalStorage Proven !"#$%&' DS4300 IBM !" !"#$%&' !"#$%&'()* !"#$%&' !"#$%&'
!
!"#$%&'()( !" 768MB/ )1 !" 112 !"#$ !" DS4300 Turbo2 !"# 2Gb FC ! !"#$%&' 32.8TB !" DS4300 DS4300 !"#$ ATA !" !"#$ 28TB DS4300 !"#$%&'( 14 !"#$%&'() 2TB
IBM DS4300简易维护手册
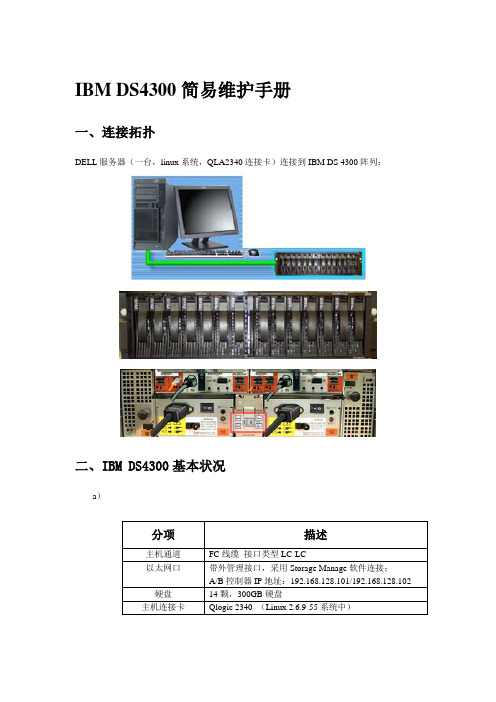
IBM DS4300简易维护手册一、连接拓扑DELL服务器(一台,linux系统,QLA2340连接卡)连接到IBM DS 4300阵列;二、IBM DS4300基本状况a)分项描述主机通道FC线缆接口类型LC-LC以太网口带外管理接口,采用Storage Manage软件连接;A/B控制器IP地址:192.168.128.101/192.168.128.102 硬盘14颗,300GB硬盘主机连接卡Qlogic 2340 (Linux 2.6.9-55系统中)b)分项描述Hot Spare 1颗逻辑盘RAID 5,13颗,2个逻辑盘(2TB和1.3TB)控制器A控制器管理三、IBM DS4300基本操作a)系统开关机顺序i.系统开机1.检查连接线缆,包括电源、光纤;2.打开IBM DS4300阵列电源开关;3.等待IBM存储上电后30秒;4.启动DELL服务器的操作系统ii.系统关机顺序(与开机顺序相反)1.关闭服务器系统;2.等待30秒;3.关闭阵列;b)连接软件IP设置i.启动管理软件client后,选择配置网络(第一次连接设置时);ii.选择添加阵列(Edit-Add Storage Subsystem)iii.添加阵列的IP地址,iv.进入配置管理界面c)热备盘添加过程,将新盘跟换插入到阵列后,软件操作步骤:i.进入到管理界面中:ii.选择热备盘转换,Drive--Hot Spare Coverage,根据向导执行;iii.添加完成热备盘IBM DS4300 STORAGE + LINUX 配置存储: IBM DS4300 Storage系统: Linux ES 4.01.安装IBM Storage Manager和DS4300同一个网段里的一台主机上安装IBM Storage Manager,然后再给这个主机添加一个IP地址192.168.128.100,网络掩码是:255.255.255.0打开Storage Manager, 过一小会会自动找出DS4300 Storage.2.服务器(1)取得主机的scsi-qla0-adapter-port#cd /proc/scsi/qla2300#cat 1SCSI Device Information:scsi-qla0-adapter-node=200000112592957e;(2)在Storage Manager里将分区指定给scsi-qla0-adapter-port=210000112592957e的blade服务器(3)卸载旧的qla2300模块,并重新加载模块#modprobe -r qla2300#modprobe qla2300现在能够用fdisk看一下啦,/dev/sda则为新加的存储空间.#fdisk -l(4)格式化新加的存储分区/dev/sda,并将其mount到/database目录下#mkfs -t ext3 /dev/sdb#mkdir /test#mount /dev/sdb1 /home#lslost+found .。
IBM TS4300 磁带库说明说明书
IBM TS4300 Tape LibrarySupports secure, long-term data storageScalable Tape LibraryRequirements for secure, long-term data retention—especially in the financial services, healthcare and life sciences industries—are common and increasingly stringent, with data volumes growing massively as a result. Tape storage offers a less costly long-term storage option than disk drives or flash. And datastored on tape kept offline, or on write-once media, is nearly invulnerable to hacking.IBM® TS4300 Tape Library is a high-density, highlyscalable, easy-to-manage tape library designed to keep data securely stored long-term, while helping reduce the costs associated with data center space andutilities. Its modular design enables users to increase cartridge and drive capacity as needed.Built around a 3U-high modular base library, TS4300can scale vertically with up to seven modules (including the base library), with expansion for Linear Tape-Open (LTO) Ultrium cartridges (LTO 9, 8, and 7) drives and redundant power supplies. A single robot manages all modules in the stack.In a seven-module configuration, TS4300 offers acapacity of more than 280 LTO cartridges. A wizard for installation and configuration enables users to install,expand and service the library without special training.Get Automatic ControlHelp meet security and compliance requirements and improve business continuity with IBM TS4300 Tape Library. Supported features like automatic control-path and data-path failover to provide automatic control in the event of a loss of a host adapter or control path.Start With a BaseThe TS4300 base library contains all of the necessary robotics and intelligence to manage the base library system, with a maximum of 40 slots of LTO cartridge capacity per module, up to five input/output (I/O)slots, and support for three combinations of full-and/or half-height (FH or HH) LTO drives per module.The TS4300 base library is rack or tabletop mountable.Module expansions are rack-mountable only. TS4300leverages IBM Spectrum Archive™ for direct, intuitive,and graphical access to data stored in IBM tape drives and libraries by incorporating the IBM Linear Tape File System™ (LTFS) format standard. LTFS compatibility allows tape-stored data to be accessed as if it were ondisk or flash storage.Simplify Tape StorageTS4300 is based on an embedded, open-source software architecture to help speed deployment and simplify management. Best-in-class error recovery and reporting, library health monitoring and alerting, and auto-recovery features help to speed diagnostics and resolution. An automation drive interface significantly increases drive communication speed for faster code updates and log downloads.IBM offers diverse management software solutions for TS4300 to enhance the use of multipath architecture, as well as the use of a single TS4300 library. The library software includes application programming interface (API) hooks that enable easy integration of IBM software.TS4300 Tape Library configurationsMinimum configuration - Base module Maximum configuration - TS4300 base modulewith 6 expansion modules40280LTO Ultrium cartridgecapacityCartridges for I/O slots535Tape drives 1 FH LTO, 3 HH LTO, or 1 FH and 1 HH LTO7 FH LTO or 21 HH LTOHH/FH drive mixture range 19/1 or 7/7Total physical capacity720TB 5.04PBLogical libraries17© 2023 Lenovo. All rights reserved.Availability : Offers, prices, specifications and availability may change without notice. Lenovo is not responsible for photographic or typographic errors. Warranty : For a copy of applicable warranties, write to: Lenovo Warranty Information, 1009 Think Place, Morrisville, NC, 27560. Lenovo makes no representation or warranty regarding third-party products or services. Trademarks: Lenovo and the Lenovo logo are trademarks or registered trademarks of Lenovo. Linux® is the trademark of Linus Torvalds in the U.S. and other countries. Microsoft® and Windows® aretrademarks of Microsoft Corporation in the United States, other countries, or both. Other company, product, or service names may be trademarks or service marks of others. Document number DS0021, published May 3, 2022. For the latest version, go to /ds0021.About LenovoLenovo (HKSE: 992) (ADR: LNVGY) is a US$62 billion revenue global technology powerhouse, ranked #171 in the Fortune Global 500, employing 77,000 people around the world, and serving millions of customers every day in 180 markets. Focused on a bold vision to deliver smarter technology for all, Lenovo is expanding into new growth areas of infrastructure, mobile, solutions and services. This transformation is building a more inclusive, trustworthy,and sustainable digital society for everyone, everywhere.For More InformationTo learn more about the IBM TS4300 Tape Library,contact your Lenovo representative or Business Partner,or visit: /storage.。
DS4300更换电池
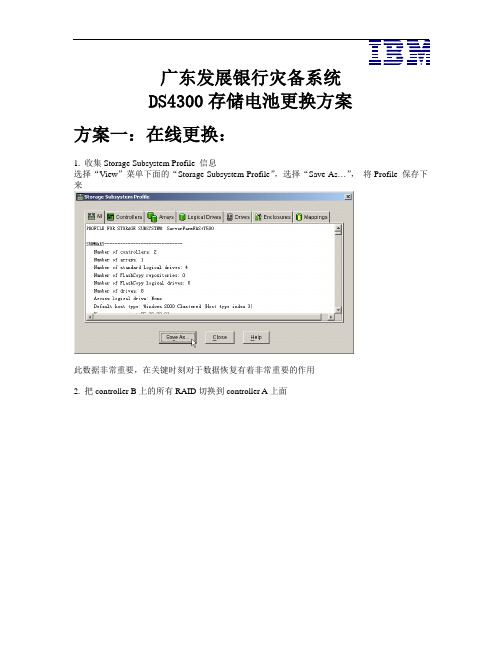
广东发展银行灾备系统DS4300存储电池更换方案方案一:在线更换:1. 收集Storage Subsystem Profile 信息选择“View”菜单下面的“Storage Subsystem Profile”,选择“Save As…”,将Profile 保存下来此数据非常重要,在关键时刻对于数据恢复有着非常重要的作用2. 把controller B上的所有RAID切换到controller A上面二:把controller B 设置成offline状态四:拔出controller B,更换CACHE电池。
五:插回controller B,和所有的线缆,最后插电源线。
六:把controller B设置online,并把相关RAID都切回controller B。
七:重置更换过的电池的时间。
八:把controller A上的所有RAID切换到controller B上面。
九:把controller A 设置成offline状态十:拔掉controller A上面所有的线缆,标记好每根线。
.十一:拔出controller A,更换里边的电池。
十二:插回controller A,和所有的线缆,最后插电源线。
十三:把controller A设置online,并把相关RAID都移回controller A。
十四:重置更换过的电池的时间。
十五:检查DS4300状态,确认更换成功。
方案二:离线更换:一:关闭callcenter 系统的数据库。
二:varyoff 系统中使用DS4300存储资源的卷组。
三:保存DS4300里的profile信息。
四:关闭DS4300电源。
五:做好相关线缆的标签。
六:拔出相关controller,更换CACHE电池,插回controller。
七:重置更换过的电池的时间。
八:检查DS4300状态,确认更换成功。
九:启动DS4300,varyon卷组,启动oracle。
Ds4300更换电池
Ds4300更换电池一. 机器故障现象通过Storage Manager8进入到系统里面,“Recover from failures(小听诊器)”在闪动,点开后,发现里面报A、B控制器电池错误,即有效期已到,一般是3年。
二. 更换步骤备份数据,里面有两个逻辑盘,分别放在A控制器和B控制器。
先在B控制器里操作(带电热插拔控制器):1. 在SM里面,用鼠标右键点Arr2>>2(逻辑盘2)>>change>>Cache Settings,把Enable read caching 、Enable write caching、Enable write caching without batteries前面小方框的的“勾号”去掉,点OK,即把Cache关了;2. 然后在右边栏目里,Back一栏里,用鼠标有键点控制器B,选Place>>offline,即把控制器B关掉;3. 取下来B控制器,更换电池,把控制器B再插入原来位置;4. 然后在右边栏目里,Back一栏里,用鼠标有键点控制器B,选Place>>online,即把控制器B打开;5. 用鼠标右键点Arr2>>2(逻辑盘2)>>change>>Cache Settings,把Enable read caching 、Enable write caching、Enable write caching without batteries前面小方框的的“勾号”加上,点OK,即把Cache打开;6. 在SM里看到两个逻辑盘现在都在A控制器里面,正常切换;7. B控制器电池更换完毕。
然后在A控制器里操作(带电热插拔控制器):1. 在SM里面,用鼠标右键点Arr1>>1(逻辑盘1)>>change>>Cache Settings,把Enable read caching 、Enable write caching、Enable write caching without batteries前面小方框的的“勾号”去掉,点OK,即把Cache关了;2. 然后在右边栏目里,Back一栏里,用鼠标有键点控制器A,选Place>>offline,即把控制器A关掉;3.取下来A控制器,更换电池,把控制器A再插入原来位置;4.然后在右边栏目里,Back一栏里,用鼠标有键点控制器A,选Place>>online,即把控制器A打开;5.用鼠标右键点Arr1>>1(逻辑盘1)>>change>>Cache Settings,把Enable read caching 、Enable write caching、Enable write caching without batteries前面小方框的的“勾号”加上,点OK,即把Cache打开;6.在SM里看到两个逻辑盘现在都在B控制器里面,正常切换7.A控制器电池更换完毕。
IBM TotalStorage DS4400 DS4500

产品:IBM TotalStorage DS4400/DS4500主机平台:all操作系统:all其他软件版本:IBM TotalStorage DS4000 StorageManager本文介绍在日常使用中,如何处理DS4400/DS4500的问题。
用户作为问题的第一处理人员,如何判断故障的位置?采取什么措施解决?或采集什么信息提供给专业人员区分析?1)发现错误,并通过指示灯初步判断原因:由于DS4000系列磁盘阵列被设计成高可用的结构,所以很多部件如果发生故障并不会使整个系统停止运行。
也就是说即使您的系统运行完全正常,也要经常检查设备的状态指示。
DS4000系列磁盘阵列的外部设置了一系列的指示灯1.1)前面板:前面板的有(绿)总电源指示灯(黄)电源故障指示灯(绿)快速写缓存指示灯(黄)控制器错误指示灯(黄)风扇错误指示灯(绿)电池充电指示灯(黄)电池错误指示灯黄颜色表示故障,绿颜色表示正常。
电池充电指示灯常亮绿色表示电池充满;闪烁表示正在充电。
1.2) 前面板控制器指示灯面板:1.3)后面板:错误指示灯:琥珀色:亮表示接口模块有错误正常状态:灭错误状态:灭出口旁路指示灯:琥珀色: l亮表示GBIC端口没有连接或连接断开。
正常状态:灭(当连接了光纤)错误状态:亮(当连接了光纤)环路正常指示灯:绿:亮表示FC loop工作正常正常状态:亮错误状态:灭(当用户连接了这个接口的时候)入口旁路指示灯:琥珀色:亮表示GBIC端口没有连接或连接断开。
正常状态:灭(当连接了光纤)错误状态:亮(当连接了光纤)电源指示灯:绿:亮表示电源供电正常正常状态:亮错误状态:灭2)查找原因:如果通过状态指示灯发现了错误,我们还需要使用管理软件查找错误的原因。
DS4400/DS4500随机提供了管理软件IBM TotalStorage DS4000 StorageManager。
软件的安装使用请查阅相关文档。
2.1)企业管理窗口:通过企业管理窗口用户可以发现哪一台磁盘阵列发生了故障。
IBM-DS4300配置手册教学内容
6、AIX主机端进行识别
在DS4300可以看到主机的WWN
而手工艺制品是一种价格适中,不仅能锻炼同学们的动手能力,同时在制作过程中也能体会一下我国传统工艺的文化。无论是送给朋友还是亲人都能让人体会到一份浓厚的情谊。它的价值是不用金钱去估价而是用你一颗真诚而又温暖的心去体会的。更能让学生家长所接受。
(二)创业优势分析
与此同时,上海市工商行政管理局也对大学生创业采取了政策倾斜:凡高校毕业生从事个体经营的,自批准经营日起,1年内免交登记注册费、个体户管理费、集贸市场管理费、经济合同鉴证费、经济合同示范文本工本费等,但此项优惠不适用于建筑、娱乐和广告等行业。如果选择定制IP环境则按下面操作
1、修改本机IP地址,192.168.128.179/24,ping 192.168.128.101/102
可是创业不是一朝一夕的事,在创业过程中会遇到很多令人难以想象的疑难杂症,对我们这些80年代出生的温室小花朵来说,更是难上加难。
2、
3、(二)创业弱势分析运行storage manager,如果是第一次配置,需要添加一个连接,输入磁盘阵列IP地址即可
4、
5、我们认为:创业是一个整合的过程,它需要合作、互助。大学生创业“独木难支”。在知识经济时代,事业的成功来自于合作,团队精神。创业更能培养了我们的团队精神。我们一个集体的智慧、力量一定能够展示我们当代大学生的耐心.勇气和坚强的毅力。能够努力克服自身的弱点,取得创业的成功。配置RAID及LUN
Voyager 4300 UC Series Bluetooth 耳機 使用者指南说明书

Voyager 4300 UC Series Bluetooth 耳機使用者指南目錄耳機概觀3注意安全3USB Bluetooth 轉接器3充電座 (僅限特定機型)4連接與配對5連接至 PC5設定 USB 轉接器5與行動裝置配對5重新配對 USB 轉接器6配對模式6配戴與充電7左右耳配戴7充電7查看耳機電池狀態7載入軟體9更新您的 Poly 博詣裝置9基本功能10電源開啟/關閉10調整音量10調整語音提示音量10撥打/接聽/結束通話10啟動 Microsoft Teams (僅限 Teams 機型)11播放或暫停音訊11語音助理11更多功能12選取語言12DeepSleep 模式12線上指示燈12有線模式 (以 USB 傳輸音訊)12疑難排解13包裝盒內容15支援16LED/線上指示燈調高音量/ 通話按鈕/按下即可與 Microsoft Teams 互動 (需有應用程式) Siri®、GoogleAssistant™智慧型手機功能:預設語音助理播放/暫停**下一首曲目**上一首曲目**調低音量充電連接埠電源Bluetooth® 配對靜音/解除靜音附註**功能會因應用程式而異。
可能無法透過網路應用程式使用。
使用新耳機前,請先閱讀安全指南以瞭解重要安全說明、電池充電與法規資訊。
您的高傳真 Bluetooth USB 轉接器與 Poly 博詣裝置已先行配對。
將它插入電腦,即可連接至電腦音訊。
附註轉接器設計可能有差異耳機概觀注意安全USB Bluetooth 轉接器USB LED 燈含意呈紅色和藍色交替閃爍正在配對呈藍色持續亮起已連接耳機呈藍色閃爍通話中持續亮紅燈啟用靜音呈紫色閃爍從電腦串流媒體USB LED 燈含意呈紅色和藍色交替閃爍正在配對持續亮紫燈Microsoft Teams 已連線呈藍色閃爍通話中持續亮紅燈啟用靜音脈動紫燈Microsoft Teams 通知附註*需有 Microsoft Teams桌面應用程式充電座 (僅限特定機型) Array附註充電座可插入電腦或壁式充電器的 USB 連接埠。
ds4300盘阵控制器更改ip方法
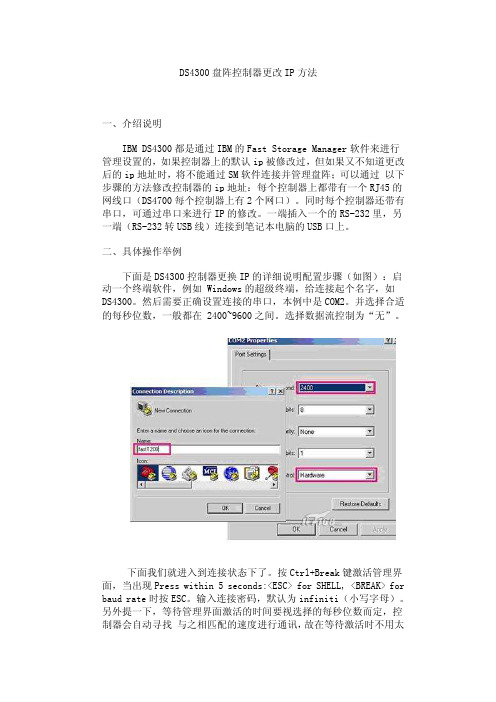
DS4300盘阵控制器更改IP方法一、介绍说明IBM DS4300都是通过IBM的Fast Storage Manager软件来进行管理设置的,如果控制器上的默认ip被修改过,但如果又不知道更改后的ip地址时,将不能通过SM软件连接并管理盘阵;可以通过以下步骤的方法修改控制器的ip地址:每个控制器上都带有一个RJ45的网线口(DS4700每个控制器上有2个网口)。
同时每个控制器还带有串口,可通过串口来进行IP的修改。
一端插入一个的RS-232里,另一端(RS-232转USB线)连接到笔记本电脑的USB口上。
二、具体操作举例下面是DS4300控制器更换IP的详细说明配置步骤(如图):启动一个终端软件,例如 Windows的超级终端,给连接起个名字,如DS4300。
然后需要正确设置连接的串口,本例中是COM2。
并选择合适的每秒位数,一般都在 2400~9600之间。
选择数据流控制为“无”。
下面我们就进入到连接状态下了。
按Ctrl+Break键激活管理界面,当出现Press within 5 seconds:<ESC> for SHELL, <BREAK> for baud rate时按ESC。
输入连接密码,默认为infiniti(小写字母)。
另外提一下,等待管理界面激活的时间要视选择的每秒位数而定,控制器会自动寻找与之相匹配的速度进行通讯,故在等待激活时不用太心急而误以为是连接失败。
连接上网络后,我们就该正式进行设置了。
键入netCfgSet命令:用来设置控制器上面的网卡的TCP/IP地址,以便通过以太网口对它进行管理。
在ip地址光标处键入新的ip地址回车,键入子网掩码,按回车直到退出到-〉提示符下。
当所有的设置完成后,我们还需要最后一步。
我们可以键入netCfgShow命令,例如下显示:-> netCfgShow==== CURRENT NETWORK CONFIGURATION ====My Host Name : ITSO_RIGHT_AInterface Name if0 : fei0MAC Address if0 : 00:a0:b8:11:15:4cIP Address if0 : 9.11.231.109Subnet Mask if0 : 255.255.254.0Connection Status if0 : Link UpInterface Name if1 : fei1MAC Address if1 : 00:a0:b8:11:15:4dIP Address if1 : 192.168.129.101Subnet Mask if1 : 255.255.255.0Connection Status if1 : Link DownServer Host Name : fast113Server IP Address : 9.11.231.53Gateway IP Address : 9.11.230.1Network Init Flags : 0x81User Name : rootUser Password : ************value = 38 = 0x26 = '&'->以检查所有的设置是否正确。
