solidworks2011安装方法
SolidWorks 2011 中文用户指南说明书

SOLIDWORKS 2011內容新增功能:SolidWorks2011重點提示 (ix)法律注意事項 (11)1使用者介面 (13)SolidWorks搜尋 (13)在標準工具列上的另存新檔與檔案屬性的按鈕 (13)PropertyManager圖示 (13)錯誤報告 (13)2SolidWorks基礎知識 (15)應用程式設計介面 (15)隨身攜帶 (16)文件 (16)新的學習單元 (16)Toolbox管理概要 (16)33D ContentCentral (17)Defeature工具 (17)Configuration Publisher (17)3D ContentCentral供應商 (17)4管理 (19)將檔案轉換為SolidWorks2011 (19)安裝改進 (19)SolidWorks Rx (20)診斷 (20)可用性與工作流程改進 (21)硬體基準 (21)圖形顯示卡健康狀況檢視器 (21)5組合件 (23)組合件特徵 (23)圓角和導角 (23)熔珠 (23)組合件視覺化 (24)適用於組合件的Defeature (24)Defeature-步驟1:零組件 (25)Defeature-步驟2:動作 (26)Defeature-步驟3:保持 (26)Defeature-步驟4:移除 (27)Defeature-完成特徵移除 (28)數學關係式 (28)干涉檢查 (29)忽略隱藏的本體 (29)品質和性能 (29)結合 (29)取代結合圖元 (29)動作中的結合 (29)重新計算報告 (29)SpeedPak (30)6CircuitWorks (31)零組件方位的使用者定義座標 (31)使用者介面的改善 (33)工作流程改進 (33)比較電路板 (33)輸出為PADS PowerPCB格式 (34)7模型組態 (35)Configuration Publisher (35)3D ContentCentral (35)父子關係(Parent/Child Relationships) (36)修改模型組態 (36)參數 (36)SpeedPak (36)8Design Checker (37)自SolidWorks檔案的Design Checker標準 (37)檔案位置檢查 (37)尺寸精度檢查 (38)特徵定位檢查 (38)標準範本檢查 (38)Design Checker報告 (38)工作排程器的摘要報告 (38)在Enterprise PDM的Design Checker工作 (38)9DFMXpress (39)射出模型成形 (39)執行射出成型檢查 (39)10工程圖和尺寸細目 (40)尺寸調色盤的對正選項 (40)自動排列尺寸 (45)使用自動排列尺寸 (45)鈑金的邊界方塊 (46)工程圖中的除料清單屬性 (48)組合件工程圖中的中心符號線 (48)裝飾螺紋線 (49)顯示正交視圖的比例 (49)工程圖圖頁格式 (50)導角的雙重單位尺寸 (50)工程視圖中的隱藏本體 (50)隱藏本體 (50)顯示本體 (51)鑽孔表格 (51)標籤 (51)雙重單位支援 (51)在表格中合併和不合併儲存格 (52)註解 (52)調整文字於註解內 (52)複製排列註解 (52)顯示尺寸單位 (53)在組合件工程圖中顯示模型色彩 (54)GB草稿標準 (54)ANSI草稿標準 (54)基準特徵符號 (55)幾何公差符號 (56)3D工程視圖 (56)11DriveWorksXpress (58)工作窗格介面 (58)12eDrawings (59)顯示增強功能 (59)檔案同步化 (59)三合一操控 (59)根據零組件名稱進行過濾 (59)Native64-Bit支援 (60)13Enterprise PDM (61)檔案Explorer和SolidWorks附加程式 (61)Enterprise PDM功能表 (61)擴展的搜尋功能 (63)擴充的檔案開啟功能 (63)更新斷開的檔案參考 (64)儲存eDrawings標示檔案 (64)從冷藏中回復檔案 (64)產生子功能表 (65)Collecting Support Information (65)Group Import from Active Directory (66)3DVIA Composer檔案格式支援 (66)Design Checker驗證 (67)Aliases in Card Lists (68)Arithmetic and String Functions in Input Formulas (69)匯出的工作流程連結 (70)與檔案類型相關的工程圖類型 (70)API (71)將指令新增至子功能表 (71)使用附加程式以定義品項Explorer功能表指令 (71)使用API更新BOM數量 (71)安裝 (71)SQL-DMO驅動程式 (71)14Flow Simulation (72)電子冷卻模組 (72)HVAC設計 (72)15輸入/輸出 (74)輸出.IFC檔案 (74)DXF/DWG匯入精靈 (74)從.DWG or.DXF檔案匯入圖層 (74)定義在.DWG或.DXF匯入上的草圖原點和方位 (74)過濾在.DWG或.DXF匯入上的草圖圖元 (75).DWG或.DXF匯入後修復草圖 (75)匯出鈑金零件至DXF或DWG檔案 (75)匯出邊界方塊 (75)輸出彎折線方向 (76)16大規模設計 (77)排練預演 (77)輸出.IFC檔案 (78)網格線系統 (79)17模型顯示 (80)DisplayManager (80)外觀 (80)光源 (81)全景 (82)移畫印花 (83)PhotoView360 (83)PhotoView整合式預覽 (83)PhotoView預覽視窗 (84)動作 (84)64位元的電腦上的PhotoView支援 (84)外觀操作和計算模型影像操作 (84)學習DisplayManager (85)新增和編輯外觀 (85)新增移畫印花 (87)變更模型上的其他外觀 (87)準備計算影像:操作使用光源與全景 (88)執行最終的影像計算 (88)18模具設計 (90)產生零件曲面的手動模式 (90)19動作研究 (91)力與動力函數的函數產生器 (91)使用者介面變更 (92)反射負載慣量和反射負載質量 (92)線性聯結器的參考零組件 (92)沿路徑的動作 (92)20零件和特徵 (94)零件 (94)零件的Defeature (94)數學關係式 (94)整體變數 (99)特徵 (100)螺旋曲線 (100)旋轉 (101)比例 (101)曲面 (102)從2D或3D面曲面伸長 (102)為伸長曲面加蓋 (107)FeatureWorks (108)填料與除料辨識 (108)拔模特徵的自動辨識 (110)自動辨識特徵期間合併類似特徵 (111)21線路設計 (112)Routing Library Manager (112)沿現有幾何的路線 (113)熔接縫隙 (113)自動縮放大小 (114)移動和旋轉接頭 (114)P&ID輸入 (114)P&ID報告 (115)在隔離顯示中的線路設計選項 (115)22鈑金 (117)彎折計算表格 (117)轉換為鈑金 (117)平板型式 (119)在模型組態的K-Factor (119)匯出至DXF/DWG檔案時對應彎折方向 (119)鏡射邊線凸緣和斜接凸緣 (119)鈑金屬性 (120)標籤特徵和邊線凸緣的複製排列 (120)23Simulation (122)新Simulation研究 (122)新2D簡化研究(Professional) (122)新回應譜分析研究(Premium) (131)介面 (135)本體組織 (135)過濾Simulation研究樹狀結構 (136)Simulation研究的顯示增強功能 (137)Simulation符號的顯示 (137)輸入欄位的表達式 (137)薄殼 (137)薄殼偏移 (137)在複材的疊層方位(Premium) (138)複合堆疊資訊(Premium) (139)橫樑 (140)橫樑的不均勻與部分負載 (140)錐形樑 (141)連接器 (141)邊線熔接的歐洲標準(Professional) (141)聯絡 (142)簡化結合的自動選項 (142)網格 (142)網格增強 (142)非線性研究 (142)提升非線性固定物的精確度(Premium) (142)結果 (143)非線性繪圖(Premium) (143)熱功率和熱能 (143)清單結果表格的相互作用 (143)探查標註增強功能 (143)暫態研究的感測器 (145)研究報告 (145)24草圖繪製 (147)網格線系統 (147)25Sustainability (149)新支援區域 (149)自訂材質的Sustainability連結 (149)26SolidWorks Utilities (150)對稱檢查公用程式 (150)搜尋/修改/抑制特徵選取 (151)27Toolbox (152)使用參考的Toolbox零組件來開啟模型 (152)GB標準齒輪 (152)28熔接 (153)除料清單 (153)除料清單圖示 (153)重新排序以及排除除料清單項次 (153)熔珠 (153)熔珠顯示 (154)組合件中的熔珠 (154)工程圖中的熔接支撐 (158)熔接符號 (158)熔接表格 (158)新增功能:SolidWorks2011重點提示SolidWorks®2011包括許多增強和改進,大多數是對客戶要求的直接回應。
solidworks安装教程
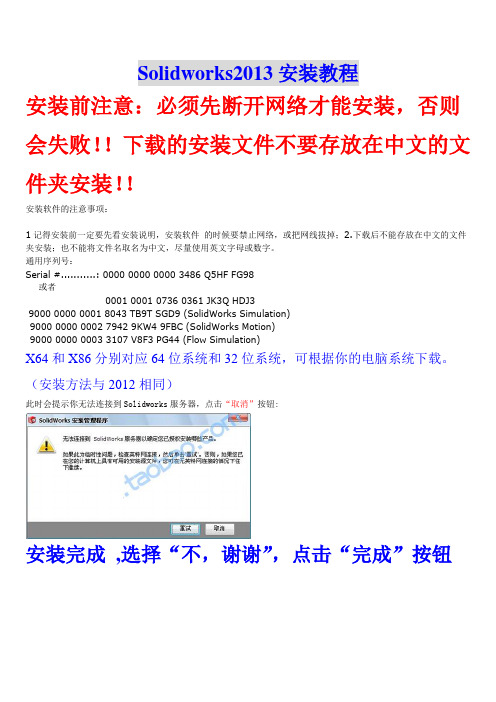
Solidworks2013安装教程
安装前注意:必须先断开网络才能安装,否则会失败!!下载的安装文件不要存放在中文的文件夹安装!!
安装软件的注意事项:
1记得安装前一定要先看安装说明,安装软件的时候要禁止网络,或把网线拔掉;2.下载后不能存放在中文的文件夹安装;也不能将文件名取名为中文,尽量使用英文字母或数字。
通用序列号:
Serial #...........: 0000 0000 0000 3486 Q5HF FG98
或者
0001 0001 0736 0361 JK3Q HDJ3
9000 0000 0001 8043 TB9T SGD9 (SolidWorks Simulation)
9000 0000 0002 7942 9KW4 9FBC (SolidWorks Motion)
9000 0000 0003 3107 V8F3 PG44 (Flow Simulation)
X64和X86分别对应64位系统和32位系统,可根据你的电脑系统下载。
(安装方法与2012相同)
此时会提示你无法连接到Solidworks服务器,点击“取消”按钮:
安装完成,选择“不,谢谢”,点击“完成”按钮
注意以下一步很重要,由于破解补丁会被360报毒(绝对安全!!!),所以请关闭360卫士和杀毒软件!
此时运行SW2010-2013.Activator.SSQ.exe(WIN7/Vista用户请右击—以管理员身份运行),一路点“是,是,是”即可完成SolidWorks2013的破解。
SolidWorks安装方法

给大家推荐个SolidWorks的研究论坛:/solidworks 2009 下载+安装说明/viewthread.php?tid=38第一部分软件的安装1、把电脑网线拔掉,禁止连接网络;2、运行下载的SolidWorks2009 ISO镜像(用虚拟光驱打开,现在winrar 也可以打开ISO文件)或者运行sldim文件夹下的sldim文件进行安装;出现下图所示的窗口。
3、出现上面的输入序列号提示框后,输入序列号:0001 0001 0736 0361 JK3Q HDJ3进行安装;如下图所示:4、单击“下一步”继续安装,会出现如下图所示的连接网络失败提示窗口:5、点“取消”进行手动安装;6、单击“下一步”继续安装;7、选择“单击安装(此计算机上)”,单击“下一步”继续安装。
8、手动安装可选择安装的路径(单击“浏览……”进行更改)、及SolidWorks2009的各大组件(有SolidWorks professional、SolidWorks premium、SolidWorks office等四种可供选择,其中SolidWorks premium所占空间最大,功能也最全,约5.2G左右,可根据需要选择);9、可以单击“浏览……”对异型孔向导与Toolbox进行路径的选择,这里推荐默认即可。
单击“下一步”继续安装;10、单击“现在安装”;11、等待安装完成,出现下面的界面。
12、这里默认勾选了“为我显示Solidworks 2009中的新增功能”和“告诉我们如何改进您的安装经历(仅限英文)”,如果没有特别需要的话,可以将对勾勾选去掉,下面的“SolidWorks Customer Experience Program”也可以自行选择参加和不参加。
单击“完成”结束安装过程。
第二部分软件的破解1、软件补丁的安装(1)运行crack文件夹下Win32或Win64(依所装系统而定)中的sw2k9sp0.0_x32(x64)_crk.exe补丁程序,这里我装的系统是32位的,所以选择的是Win32文件夹下的补丁文件,双击打开,如下图所示:(2)点后面的浏览按钮(…),找到安装目录下的“X:\****\SolidWorks Corp\SolidWorks”,选择SolidWorks2009安装根目录下的sldappu.dll文件;(3)点击start按钮,完成补丁的安装,安装完成后,系统会提示安装成功,如下图所示:2、PhotoView 360功能破解打开crack文件夹下的PhotoView 360文件夹,把里面的nexus3.dll链接库文件拷贝到安装目录下“X:\****\SolidWorks Corp\PhotoView 360”,替换掉原来的nexus3.dll,PhotoView 360功能破解成功;如下图所示:3、COSMOS功能破解(1)打开破解文件目录下的COSMOS文件夹,复制license.dat粘贴于路径“X:\****\SolidWorks Corp\SolidWorks Motion\license”,并点击license文件夹下的LicenseAdmin.exe出现Crack框,如下图所示:(2)点击nfigure License,出现下面的窗口:(3)点击Browse..选择license.dat,点击“打开”,回到原始窗口:(4)点击“OK”后,点击“确定”退出,COSMOS功能破解成功!最后,软件的各项功能就可以用了!。
SolidWorks安装教程

SolidWorks2016 安装教程安装前准备,1.关闭电脑UAC;2.关闭杀毒软件(防止错误拦截)
开始安装
下载的安装包示意图
被标记的三个文件是必须要的,其他文件可以不要.
第一步,添加序列号.
打开_SolidSQUAD_文件夹,解压_SolidSQUAD_.7z压缩包。
如果找不到这些文件,有可能是被杀毒软件杀了,所以下载的时候要注意不要被杀毒软件杀了。
找到SolidWorksSerialNumbers2016.reg文件,双击运行,然后点“是”,然后点“确定”。
第二步,回到安装包,用虚拟光驱加载Solidworks_2016_SP0.0_Full_DVD1.iso。
电脑上没装虚拟光驱的先装一个虚拟光驱(在360软件管家里面搜虚拟光驱,安装一个即可),然后进入加载的虚拟光驱里面,
第三步,启动setup.exe;
这步报错的概率不低。
而且错误的种类也很多,无法像出书一样把所有错误都一一列出来好。
所有,我们的安装教程只以一般的正常状态,做示范。
请谅解。
如果安装过程中弹出这个界面,这是提示你换盘,(我们的安装包里面有两个iso文件,用虚拟光驱加载第二iso文件)
等待安装完成之后,点完成即可。
这个时候不要急着去启动软件,我们的安装步骤还有最后几步。
打开_SolidSQUAD_文件夹,找到SW2010-2016.Activator.GUI.SSQ.exe文件。
双击运行。
点击“ok”,,安装结束。
可以启动软件了。
精选-solidworks安装方法-word范文

solidworks2019安装方法1 解压SW2019_sp0_x64_SSQ.iso 文件,用虚拟光驱打开或者直接用压缩软件解压。
2 打开安装程序安装程序,然后选择setup.exe,(已管理员运行)如下图:如果您是 win8 系统,或者其他系统也有可能运行这个setup.exe 出现问题,那么您可以打开 sldim 文件夹,然后运行 sldim.exe 程序,也可以打开安装程序。
3 运行 setup 后的界面,然后选择下一步:4 根据需要选择要安装的产品,同时,输入对应的序列号:附序列号: SolidWorks Serial: 0000 0000 0000 3486 Q5HF FG98 或者 0001 0001 0736 0361 JK3Q HDJ3 其他产品的序列号:SolidWorks Simulation 9000 0000 0001 8043 TB9T SGD9 SolidWorks Motion 9000 0000 0002 7942 9KW4 9FBC Flow Simulation 9000 0000 0003 3107 V8F3 PG44 SW Composer 9000 0000 0021 4754 DCB4 HC3J SW ComposerPlayer 9000 0000 0022 1655 536J H9KH SW Electrical 2D 9000 0000 0000 1616 MDZ8 R8J2 5 断网验证以后,会出现以下提示,选择取消即可。
6 如果您的电脑上没有安装其他版本的 solidworks,那么下一步可以忽略。
之前装过其他版本的 solidworks,会出现以下提示,根据自己的要求选择即可,然后选择下一步:7 到了这,可以选择安装位置。
点击红色方框内的“更改”即可。
8 设置完安装位置以后,选择,现在安装,如下图:9 安装完成,如下图所示:10 选择完成以后,会提示您重启电脑,这里可以暂时丌重启电脑,先注册软件。
solidworks单机版的安装方法

s o l i d w o r k s单机版的安装方法Document serial number【KKGB-LBS98YT-BS8CB-BSUT-BST108】SolidWorks单机版的安装方法序列号: 0001 0020 0524 2214Solidworks注册码:Y8W23019Solidworks Office注册码:EDJ4G708Solidworks Office Pro注册码:0AVCFAH2Piping注册码:0727 0806 0763 0345SN:0301 0000 7785 7977L14QQ6EE————SWY82H0D3U————SWOfficeO0FTT3DR————ProSWOfficeC14TBF07————OfficePremiumSN:0001 0001 0736 0361Solidworks????? 注册码:MA2OSBAESolidworks Office?? 注册码:O20WD75VSolidworks Office Pro?? 注册码:3B6FX35RSolidworks Office Premium 注册码:HD9FJE17SOLIDWORKS2006SPO注册码:装是生成的C14TBF07HD9FJE17用单机版序列号安装的好处:如果你的系列号是网络版的,如:8818 8888 8888 7637,那就得一是安装网络许可文件,二是要打补丁,三是出了新版本得重新找破解,四是不能同时安装多个版本,很是麻烦。
用单机版序列号安装就不一样了,不要安装网络许可文件和补丁,可升级;而且可同时安装多个版本。
SolidWorks单机版的安装方法一、用单机版序列号:1、序列号1: 0001 0020 0524 2214Solidworks注册码:Y8W23019Solidworks Office注册码:EDJ4G708Solidworks Office Pro注册码:0AVCFAH2Piping注册码:0727 0806 0763 03452、序列号2: 0001 0001 0736 0361 用这个序列号在我的电脑安装后得到一个Solidworks注册码为:MA20SBAE,但我查一下Solidworks产品,这个序列号的产品是OFFICE用的。
Solidworks2011安装说明
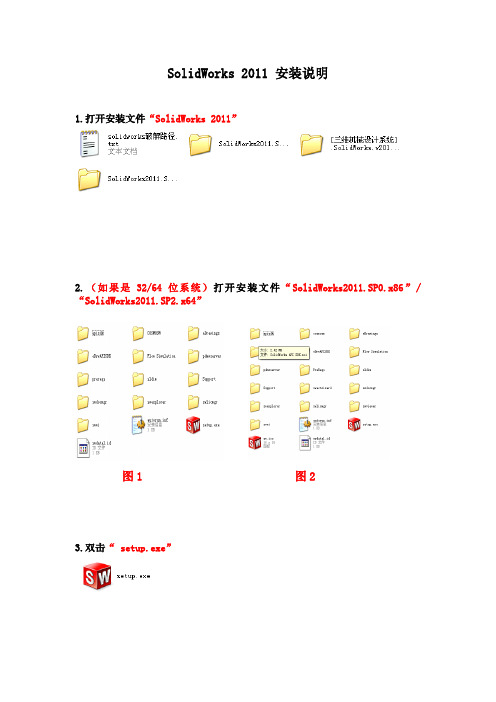
SolidWorks 2011 安装说明
1.打开安装文件“SolidWorks 2011”
2.(如果是32/64位系统)打开安装文件“SolidWorks2011.SP0.x86”/“SolidWorks2011.SP2.x64”
图1 图2
3.双击“ setup.exe”
4.点击“下一步”
5.点击“下一步”
6.等待连接
7.若没断开网络,会提示是否更新,选择“不更新”,点击“下一步”
8. 1.更改安装位置;2.点击“现在安装”
9.请耐心等待安装完成(约30分钟)
10.选择“不,我选择不参与”,点击“完成”
11.选择“现在重启”
“破解”
1. 打开“[三维机械设计].SolidWorks.v2011. SP0.0.fixed.crack-2
2.
10.2010-SSQ”
2. 打开“SW2011_SSQ_fixed”
3.打开“srtup”
4.打开“i386”
5.复制“图中四个文件”
6.找到安装路径“D:\Program Files\SolidWorks Corp\SolidWorks \setup\i386”,粘贴上面复制的文件,选择全部
8.打开“swlmwiz.exe”与“swactwiz.exe”等待并点击“确定”
9.若提示“All done! Enjoy!”点击确定,完成破解!!
恭喜完成安装!!!。
solidworks安装教程
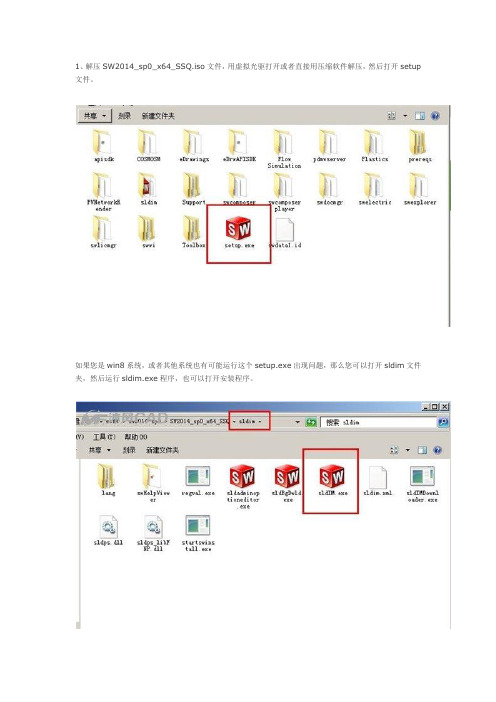
1、解压SW2014_sp0_x64_SSQ.iso文件,用虚拟光驱打开或者直接用压缩软件解压,然后打开setup 文件。
如果您是win8系统,或者其他系统也有可能运行这个setup.exe出现问题,那么您可以打开sldim文件夹,然后运行sldim.exe程序,也可以打开安装程序。
3 运行setup后的界面,然后选择下一步:4 根据需要选择要安装的产品,同时,输入对应的序列号:附SolidWorks2014序列号:SolidWorks Serial:0000 0000 0000 3486 Q5HF FG98 或者0001 0001 0736 0361 JK3Q HDJ3 其他产品的序列号:SolidWorks Simulation9000 0000 0001 8043 TB9T SGD9SolidWorks Motion9000 0000 0002 7942 9KW4 9FBCFlow Simulation9000 0000 0003 3107 V8F3 PG44SW Composer9000 0000 0021 4754 DCB4 HC3JSW ComposerPlayer9000 0000 0022 1655 536J H9KHSW Electrical 2D9000 0000 0000 1616 MDZ8 R8J2注意,输入SolidWorks2014序列号以后,最好是先断网,以跳过远程验证。
5 断网验证以后,会出现以下提示,选择取消即可。
6 如果您的电脑上没有安装其他版本的solidworks,那么下一步可以忽略。
之前装过其他版本的solidworks,会出现以下提示,根据自己的要求选择即可,然后选择下一步:7 到了这,可以选择安装位置。
点击红色方框内的―更改‖即可8 设置完安装位置以后,选择,现在安装,如下图:9 安装完成,如下图所示:10 选择完成以后,会提示您重启电脑,这里可以暂时不重启电脑,先注册软件。
solidworks安装方法

[三维机械设计系统].TLF-SOFT-SOLIDWORKS.2010.SP0.0.MULTILANGUAGE.WIN64.ISO-LZ0 [行业3D.设计软件].SolidWorks.2010.SP0.0.Multilingual.Win32.Full.DVDiSO1、终于装成了必须注意!!!在照着LZo中给的instill文件所说的之前一定要:::::首先运行prereqs这个文件夹里的子文件夹dotNetFx里面的dotnetfx3.exe文件;再运行子文件夹OfficeWeb里面的owc11.exe文件然后运行子文件夹VCRedist里面的vcredist_x86.exe文件!!!!!哥们装了2遍装的时候都没什么异常反应就是双击图标打不开想卸载呢出来个17**什么错误也卸不掉没办法就没卸然后把这些东西补上以后就ok了2、我看了以上各位大大的方法安装一次成功了,现在给大家分享下:SolidWorks2010安装可能要先运行prereqs文件夹内“dotNetFx文件夹中dotnetfx3、OfficeWeb文件夹中owc11、VCRedist文件夹中vcr edist_x86”三个文件。
pre预先reqs要求,然后根据Lz0文件夹\install.txt。
txt内提供的注册号。
主程序没有安装在c:\盘不会出现C:\Program Files\Solidworks\路径。
方法1--Copy sw2010.lic and sldappu.dll到你安装的位置。
方法2--c:\program files内建一个Solidworks文件夹,Copy sw2010.lic andsldappu.dll进去。
方法3--C:\Program Files\Common Files\SolidWorks Shared。
Copysw2010.lic and sldappu.dll进去。
都试试。
估计是没有运行prereqs内容。
solidworks详细使用方法

solidworks详细使用方法(原创版2篇)目录(篇1)一、solidworks详细使用方法的介绍1.solidworks软件介绍2.solidworks的使用范围和优势3.solidworks软件的安装步骤和使用方法二、solidworks软件的安装和使用方法1.下载和安装solidworks软件2.注册solidworks软件账户3.创建新的solidworks文件4.使用solidworks软件进行建模5.保存和导出solidworks文件三、solidworks软件的建模方法1.solidworks软件的建模基础2.使用solidworks软件进行草图绘制3.使用solidworks软件进行特征建模4.使用solidworks软件进行细节处理和渲染正文(篇1)solidworks是一款广泛应用于机械设计领域的三维建模软件,它可以帮助设计师快速构建三维模型,提高设计效率。
下面是solidworks详细使用方法的介绍。
一、solidworks软件介绍solidworks是一款由达索系统公司开发的机械设计软件,它具有易学易用、功能强大、可视化等特点,可以快速创建三维模型,提高设计效率。
它广泛应用于机械、汽车、航空航天等领域,是设计师们必备的工具之一。
二、solidworks软件的安装和使用方法1.下载和安装solidworks软件首先,需要从达索系统公司官网下载solidworks软件,然后按照安装向导的提示进行安装。
安装完成后,需要注册solidworks软件账户,才能开始使用。
2.创建新的solidworks文件在打开solidworks软件后,需要创建一个新的文件。
在文件菜单中选择“新建”,然后选择需要的模板即可。
3.使用solidworks软件进行建模建模是solidworks软件的核心功能之一,可以使用它来创建各种形状的三维模型。
首先,需要在草图面板上绘制所需的几何图形,然后使用特征建模工具将其转换为三维模型。
GearTrax安装方法

Solidworks齿轮插件geartrax安装
1.首先solidworks2011已安装成功,下载一个geartrax2011汉化破解版。
解压该压缩文件得到两个文件geartrax2011.exe和geartrax2011install.exe 如下图:
2.先点击运行geartrax2011install.exe后出现下图
点setup →
点ok →
点change directory更改安装目录→(要说明的是:安装到这时,可能会出错,“部件COMCT232.OCX或其附件之一不能正确注册:一个文件丢失或无效”或出现类似死机,
解决:1.下载COMCT232.OCX,复制放到:C:\WINDOWS\system32目录下;
2.然后在开始菜单运行中,输入regsvr32 comct232.ocx进行注册;
3、此时再打开GearTrax2011.exe汉化版时或许软件没反应,注销或重启系统;
4、对文件COMCTL32 .OCX进行步骤2的操作,会显示注册成功。
打开GearTrax2011.exe就可以操作了。
再安装时,我突然点到了上面图片中的左上的图标,就出现了下面的安装画面,自动安装到了C盘了;
点ok确定安装→
点continue后,开始安装→
3.安装完成后,将刚才解压的geartrax2011.exe文件复制到安装目录下,覆盖原文件
4.进入solidworks2011 选择菜单“文件”,按“打开”打开geartrax2011安装目录下geartrax2011.dll文件。
程序装载后,插件选项中多了geartrax2011选项,如果无,也无妨; 可直接点击安装程序的geartrax2011图标也能打开程序。
SW2011图解安装教程1

图解安装教程SolidWorks 2010 32位+64位破解版下载(包能下载,包满载下载)破解:fixes- pop-up window "Thank you for using SolidSQUAD's SolidWorks 2011 release!" at every SW2011 start is deleted- fixed problem with crack applying on some Win64 computers with warning" Error: Can not initialize library (%d, %d, %d)"or" Error: Can not open handle (%d, %d, %d)"Using1) Install SW2011 using any of serials0001 0001 0736 0361 JK3Q HDJ30101 0000 1289 1488 R4H5 Q5330000 0000 0000 3486 Q5HF FG980001 1234 5678 8012 5559 Q7KJyou can use any other valid LOCAL (not NETWORK) SW Serial too!At SW2011 SP0.0 Setup DO NOT INPUT serials for SW Motion, SW Simulation or SW Flow Simulation!2) Copy folder "setup" from crack to <SW2010 progdir> and overwrite original one3) Run <SW2010 progdir>\setup\i386\swlmwiz.exeyou have to wait for free SSQ's windows and click OK in every windowfirst window "Thank you for using SolidSQUAD's SolidWorks 2011 release!" > OKsecond window "Trial Reset Successfuly! Perfoming activation.." > OKfird window "All done! Enjoy!" > OK4) If you've got a problem with crack on 64bit computer (after first SSQ's window you get a message " Error: Can not initialize library (%d, %d, %d)" or " Error: Can not open handle (%d, %d, %d)")you need to run <<SW2010 progdir>\setup\i386\x64_fix\ServiceInst.exe and repeat steps described in 3)That's allTeam-SolidSQUAD<<SW2010 progdir>\:---\Program Files\SolidWorks Corp\SolidWorks\setup。
SolidWorks2011安装说明

SolidWorks2011安装说明首先用虚拟光驱加载镜像文件,运行安装文件,出现如下画面:选择单击安装即可,点击下一步,在序列号中输入0001 0001 0736 0361 JK3Q HDJ3,点击下一步。
在摘要中,通过“更改”可配置安装路径、可选程序等。
配置完成点击下一步,如果没有连接网络,会有检查网络的窗口弹出,直接点取消,出现如下画面:接下来的时间就是漫长的等待(大约3-5分钟),具体时间取决于你的计算机配置和你所选择的安装项目。
你可以冲上一杯咖啡,准备点零食听听音乐,这是安装过程中的几幅截图:安装完成后将会出现如下画面:根据自己的喜好选择,上图是我自己的选择,仅供参考。
点击“完成”即可完成安装。
这个时候软件是安装好,接下来是破解过程,正版用户可以无视了。
首先不要急着运行程序,把破解包中的setup文件夹复制到Solidworks安装目录下,替换原来的setup文件夹,例如我的路径是D:\SolidWorks\SolidWorks,一定要找对位置,如果没有弹出确认替换的窗口,说明你没有找对位置,下面是截图:替换完成之后进入该文件夹下面的\setup\i386文件夹,运行swlmwiz.exe,将会出现如下的三个窗口,每一个你都点击OK就可以了:现在破解已经完成。
因为桌面上已经有了SolidWorks的图标,现在你可以放心的运行SW 了,Splash如下:运行会有一个对话框,如下:一大堆废话,点击接受。
又出现一个窗口,这个你就要留点心了:根据你自己的熟练程度和专业背景,选择不同的种类,各人自己看着办。
最后是程序截图:你可以在“帮助”中的“显示许可”查看激活状态:最后,感谢Team-SolidSQUAD为我们提供的破解。
SolidWorks.v2011.SP0.0.x64.Multilingual-SSQ安装方法如下

安装方法如下:
1.下载完解压文件(右键解压会不?)(用虚拟光驱加载比解压快)
2. 打开SolidWorks.v2011.SP0.0.x86.Multilingual-SSQ双击setup.exe,一步步的安装,当提示序列号时候打开.SolidWorks.v2011.SP0.0.fixed.crack-22.10.2010-SSQ 找到里面的readme!.txt (读我,很多人就是不读,里面写的很详细呀,只要一般的英语基础都能看懂的,哥,求你们看看吧)随便复制一个序列号0001 0001 0736 0361 JK3Q HDJ3 ,粘贴到安装程序里,然后继续下一步。
3.在安装过程中你可以自己选安装的路径,期间会出现提示几次什么错误的,不管他,点继续安装就行了。
直到安装完成,安装过程可能有点慢,电脑性能好,会很快。
4.等安装完成后,其实就可以用了,只是提示试用30天,所以我们要破解它。
5.打开SolidWorks.v2011.SP0.0.fixed.crack-22.10.2010-SSQ 找到里面的setup,继续打开i386,然后全选复制里面的所有文件。
6.找到你安装好的solidworks2011(注意是安装好了的文件),名称是SolidWorks Corp,打开,再打开SolidWorks,找到里面的setup,继续打开i386,现在就是把刚复制的文件粘贴在这里就行了,(就是替换破解文件呀)
7.然后双击粘贴好的文件:swlmwiz.exe 等待破解点确定。
solidworks 2011安装教程
0000 0000 0000 3486 Q5HF FG98
0001 1234 5678 8012 5559 Q7KJ任意一组(图4);
7.正在安装,请耐心等待(图7);
8.安装完成,请参照红框内选项进行选择(图7);
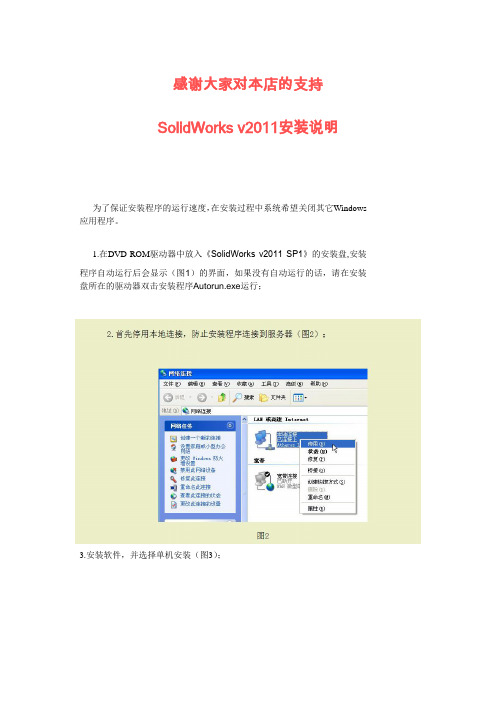
1.在DVD-ROM驱动器中放入《SolidWorks v2011 SP1》的安装盘,安装程序自动运行后会显示(图1)的界面,如果没有自动运行的话,请在安装盘所在的驱动器双击安装程序Autorun.号:0001 0001 0736 0361 JK3Q HDJ3
在dvdrom驱动器中放入solidworksv2011sp1的安装盘安装程序自动运行后会显示图1的界面如果没有自动运行的话请在安装盘所在的驱动器双击安装程序autorunexe运行
感谢大家对本店的支持
SolidWorks v2011安装说明
为了保证安装程序的运行速度,在安装过程中系统希望关闭其它Windows应用程序。
Solidworks齿轮插件geartrax2011(汉化破解版)下载地址及安装图解

Solidworks齿轮插件geartrax2011(汉化破解版)下载地址及安装图解注:1.geartrax 2011好像只能在solidworks2011上运行,之前版本的solidworks没试过~2.因为geartrax2011是汉化破解版,所以不用将solidworks2011改成英文界面,直接打开使用,哈哈~1.首先保证你的solidworks2011已安装成功,下载一个geartrax2011汉化破解版。
geartrax2011下载地址:/space/file/3dviabbs/-4e0a-4f20-520 6-4eab/2011/1/22/GearTrax2011-ff08-6c49-5316-7834-89e3-724 8-ff09.zip/.page下载好后如图2.解压该压缩文件得到两个文件geartrax2011.exe和geartrax2011install.exe 如下图:3.点击运行geartrax2011install.exe后出现下图点setup →点ok →点changedirectory更改安装目录→点ok确定安装→点continue后,开始安装→4.安装完成后,将刚才解压的geartrax2011.exe文件复制到安装目录下,覆盖原文件5.进入solidworks2011 选则菜单“文件”,按“打开”打开geartrax2011安装目录下geartrax2011.dll文件。
程序装载后就可以看到插件选项中多了geartrax2011选项,如果点击它无法载入,也不要紧直接点击安装程序的geartrax2011图标也能打开程序。
6.因为geartrax2011是汉化破解版,所以不用将solidworks2011改成英文界面,直接打开使用,哈哈~。
AutoCAD 2011和斯维尔的安装教程

安装AutoCAD 2011和斯维尔的过程如下(部分图使用的是我原先发的AutoCAD 2013安装教程的图,只是AutoCAD 2013和2011的安装方法相似):安装准备:注意:一定要先安装AutoCAD 2011再安装斯维尔,否则斯维尔的使用容易出问题。
AutoCAD 2011的下载地址:64位系统版本:/s/1geUYg5132位系统版本:/s/1nuBPcW5斯维尔的下载地址:/s/1skAuKRr附赠破解版的百度云管家的地址(如果百度云管家下载速度慢就用这个,注意把原先的百度云管家卸了再使用破解版的百度云管家):/s/1i4KK2K9其使用方法不用我说了Tips:如果不知道你的系统是32位还是64位,Win7、Win8和Win8.1中,右键单击“计算机”,点“属性”,即可看到你的电脑系统是32位的还是64位的,请下载对应版本的AutoCAD 2011。
Step 1:下载完后解压压缩包,然后双击“setup.exe”这个文件。
Step 2:点击“安装产品”。
Step 3:点击“下一步”。
Step 4:点“我接受”,再点“下一步”。
Step 5:序列号:666-69696969 密钥:001C1 姓氏、名字、组织必填(这三项可以随便填),然后进入“下一步”。
Step 6:配置安装设置,点击“配置”可以看到更多的设置,第二页是设置安装路径。
Step 7:开始安装。
Step 8:安装完成。
Step 9:开始激活。
过一会儿出现“激活界面”,点“激活”。
Step 10:出现“错误的”提示框,无视它,点下方的“关闭”。
注意:如果提示页面证书过期的话,一定要点“是”。
Step 11:提示:激活未完成,无视它,你点“是”,如图。
Step 12:再次出现激活提示框,点“激活”,如下页图。
Step 13:但是这一次出现如下图所示的对话框。
请点击“我具有Autodesk提供的激活码”,如图。
Step 14:别急,打开安装包文件夹内的“注册机”这个文件夹(就是图一的那个文件夹),然后找到注册机程序,右键单击注册机,然后点击“以管理员的身份运行”。
SolidWorks Education Edition 2010-2011 安装指南说明书

SolidWorks ® Education Edition Academic Year 2010-2011 Installation InstructionsPreparation∙ Verify that your system meets the criteria specified in /System_Requirements .∙ Back up all SolidWorks files (parts, assemblies, and drawings, document templates, sheet formats, libraryfeatures, and form tools) before upgrading to SolidWorks 2010. Files you open and saved in SolidWorks 2010 cannot be opened in earlier versions.∙ To minimize disk space consumed, please consider uninstalling your older Education Edition and using anew installation of the new Education Edition product. If you uninstall the older version please be sure to also uninstall Simulation products, along with older versions of eDrawings, DWGeditor, etc.∙ Locate your Serial Number (S/N). The number typically begins with 9710 (Network) or 9701 (StandAlone). NEW Customer – S/N is located on the front of the box on a sticker. CURRENT Customer - S/N is located inside SolidWorks under HELP then ABOUT SOLIDWORKS. If you cannot find or you have misplaced your number, contact your local educational reseller to obtain one.∙ Uninstall any alpha, beta, or pre-release versions of the SolidWorks software.Installation and Licensing ProcessYou are ready to begin your installation of theSolidWorks ® Education Edition!Network Users OnlySection 2 Page 21Section 1Ver. 4STEPS FOR SECTION 1: NETWORK INSALLATION:1.Remove previous SolidNetWork License Managers2.Remove previous SolidWorks software3.Install 2010 SolidNetWork License Manager4.Activate 2010 Network License5.Install SolidWorks software on individual clients Note: At the present time, Windows 7 is not officially supported as a SolidNetWork License Manager. However, the EDU team, has tested the SolidNetWork License Manager on Windows 7 and has provided in this document.Section 1 | SolidWorks® Education Edition Installation (Network)Note:If you are installing SolidWorks on a Network with Restricted Rights, please go to the Customer Portal for additional documentation or contact your local reseller for assistance.This step is only for users who are on NETWORK. If you purchased a Stand Alone, proceed to Section 2 in the installation process.Note:∙All previous SolidWorks License Managers must be removed from your computer before beginning the installation of the new SolidWorks License Manager (i.e. 2009 must be removed before installing 2010).∙The SolidWorks License Manager must be installed on the machine that will be used to distribute SolidWorks licenses on your network.∙The SolidWorks License Manager for 2010 will license all SolidWorks EDU applications., including SolidWorks Simulaton, SolidWorks Sustainability, eDrawings and PhotoView 360.Remove previous SolidNetWork License Managers1.Stop the Licensing Service onthe host machine.For Window XP, open the TaskManager from the Control Paneland select the Processes tab andclick the Image Name header tosort in alphabetical order. LocateImgrd.exe process and selectEnd Process.unch Add/Removeprograms and uninstall theprevious version of theinstallation Manager. AccessAdd/Remove programsfrom Start > Control Panel> Add/Remove Programs.Locate the SolidWorksSolidNetWork LicenseManager and selectRemove.-Once the remove option is selected you will beprompted to confirm theproducts to uninstall.-The product will thenuninstall itself. A progressonly box will appear.-After the productuninstall is complete,close theAdd/Removeprogram s windowand launch WindowsExplorer. Locate thefolder in which thelicense manager waspreviously installedto and delete it. Bydefault the licensemanager is installedto: C:\ProgramFiles\SolidWorksSolidNetWorkLicense Manager.Remove previous SolidWorks Software1.If required, uninstall SolidWorks using Add/Remove Programs.2.If required, Delete SolidWorks folders located in C:\ Program Files\SolidWorks CorpBegin 2010 SolidNetWork License Manager Installation1. Insert your 2010 SolidWorks DVD in your local DVD Drive to begin the software installationprocess. If SolidWorks Master Setup does not come up automatically, select My Computer and double click the DVD drive and double-click setup.exe. Generally your DVD drive is the D: drive.Note: Once DVD is placed in your local DVD Drive, the SolidWorks 2010 SP2.1 Installation Manager will appear. Select Administrative image and server products andSolidWorks License Manager. Unselect “Create or update an Administrative Image.”Click Next.Enter your product serial number. Click Next.Note: Server Installation Status will appear.Note: Once done checking for Updates, the SolidWorks SolidNetWork License Manager Setup will appear.Click Next.3. Enter your SolidWorks SolidNetWork Serial Number, Click Next.4. The next screen will show the default installation location for the license manager; it is recommended that you do no change its location. Click Next.6.The final screen before the installation is a confirmation. Select Install to continue. Theinstallation will begin and the server product will be installed.- After theinstallation is completethere will be aconfirmation of thesuccessful install. Oncecompleted theInstallation Managerconfirms the product(s)are installed correctly.7.Select Finishand close theinstallationmanager. Thiscompletes theinstallation ofthe SolidWorksSolidNetWorkLicenseManager.Activate 2010 SolidnetWork License-2010 introduced a new licensing method for network licenses. The new process will require internet connectivity to ‘activate’ the license on the SolidWorks server.-What does this mean for the user?-The end user will no longer need a license file or existing dongle. The dongle must be returned to your value added reseller.1.To activate thenewly installedsoftware go toStart > Allprograms >SolidWorks2010 >SolidWorksLicenseManager >SolidNetWorkLicense Manger.2. A message box willappear prompting youto activate a licensebecause one does notexist; select Yes toactivate the license.Port exceptions can be done after installing the license manager.A server information window will appear that will allow you to choose the license server port(s)and apply an options file if desired. It is recommended that you select the option for firewall in use on this server. Select Next to continue.The SolidWorks Product Activationwindow will appear and you will berequired to fill out an email toassociate to the activation. Enter anemail address and select Next.Note: If you do not have internetaccess, please contact your ValueAdded Reseller.The product will now activate via internet.3.After a successful activation there willbe a succeeded message which willshow all the products associated withyour serial number.4.Select Finish, completing activation.The license manager will appear andyou can close it out to complete theactivation process.SolidnetWork License Installation is complete.Note: You will need to add exceptions in your firewall software, example shown in Windows XP and Windows 7 Firewall settings on the next page. For Windows 7, skip the Windows XP firewall section and go to Page 15.For Windows XP Firewall1.Select Security Center from the Control Panel.2.If the Windows Firewall is on, Click WindowsFirewall and then select Exceptions Tab.Select the Add Program button. Otherwise,skip Firewall insrtructionsFor Windows XP Firewall 3.Browse to the folder where youinstalled the SolidWorksSolidNetwork License Manager andselect both Lmgrd.exe and sw_d.exe.If lmgrd.exe is added successfully, lmgrd.exe will appear in the list of programs.If sw_d.exe is added successfully, sw_d.exe will appear in the list of programs.For Windows 7 Firewall1.Bring up the Control Panel and Select System and Security2.If the Windows Firewall is enabled, Allow programs through the firewall.3.Click “allow another program”And Browse to the folder where you installed the SolidWorks SolidNetwork License Manager. Add both executables.Lmgrde.exe and sw_d.exeWhen lmgrd.exe is added successful to the exceptions list, it will appear as Accresso Software Inc in the list of Allowed programsFor Windows 7 FirewallWhen sw_d is allowed successfully, it will as sw_dn in the allowed programs list.NOTE:You have now finished installing the SolidWorks License Manager. You must now go to your client computers, and insert the DVD and proceed as follows on steps.Before beginning the installation process, please be sure to close out of all SolidWorks programs currently open on your computer.You can also install SolidWorks on your server machine. Follow the instructions in the next section.Section 2 | SolidWorks® Education Edition Installation (Stand Alone or Client)Note:For SolidWorks Network install, the software does not get installed on the network machine (Server). SolidWorks should be installed on the user machines (Client).Before beginning the installation process, please be sure to close out of all SolidWorks programs currently open on your computer.1.On the CLIENT Machine Insert DVD. Select Individual (on this computer). Click Next inlower right corner.2.For new installation enter your serial number below (24 digits). Click Next.Note: The message in the center of the window under the green bar, “Connecting to SolidWorks”will appear.You may see a screen that a newer version is available, ALWAYS select continue installing from DVD and click Next.Go to step 3 for individual installation2a. During the installation you will be presented with the following screen(if the computer you have installed SolidWorks on is not the license server). Click Add. 2b. Enter your license server and the port number that you specified in step 12.****************************************************************“OK”3.After you have clicked Next, the SolidWorks 2010 SP2.1 Installation Manager will guide youthrough the installation. Accept Defaults on the screen (DO NOT change anything) Click Install Now to continue installation.Note: The screen below will pop-up when installation is in process4. Installation is Complete! Select how often you would like to receive product updates, confirm your participation in a survey, then click Finish. In most classrooms, we recommend clearing the “check for updated every x days”Survey Screen:Note: Depending uponyour computerconfiguration you mayor may not need torestart your computer.Installing SolidWorkswill also installSimulation productsautomatically. You donot have to re-installSimulation after theSolidWorks installationis complete.Click I prefer not to register online (Recommended for classroom install), the Click OK to continue.6. DVD is now installed. Start SolidWorks from the desktop.For Standalone Client Only.Once SolidWorks icon is selected, the SolidWorks Product Activation will appear. Click Next, to continue with activation.7. To activate you SolidWorks product you must request a license key from SolidWorks. The SolidWorks Product Activation will help you collect the information necessary to activate yourproduct. Choose which method and then click Next.8. Now you are done registering your SolidWorks Education Edition. Click Finish.YOU CAN NOW RUNSOLIDWORKS EDUCATION EDITION!More information about installation options is available in the SolidWorks 2010 Installation Guide。
- 1、下载文档前请自行甄别文档内容的完整性,平台不提供额外的编辑、内容补充、找答案等附加服务。
- 2、"仅部分预览"的文档,不可在线预览部分如存在完整性等问题,可反馈申请退款(可完整预览的文档不适用该条件!)。
- 3、如文档侵犯您的权益,请联系客服反馈,我们会尽快为您处理(人工客服工作时间:9:00-18:30)。
4.等安装完成后,其实就可以用了,只是提示试用30天,所以我们要破解它。
5.打开SolidWorks.v2011.SP0.0.fixed.crack-22.10.2010-SSQ 找到里面的setup,继续打开i386,然后全选复制里面的所有文件。
安装方法如下:
1.下载完解压文件(右键解压会不?)
2. 打开SolidWorks.v2011.SP0.0.x64.Multilingual-SSQ双击 setup.exe,一步步的安装,当提示序列号时候 打开.SolidWorks.v2011.SP0.0.fixed.crack-22.10.2010-SSQ 找到里面的readme!.txt(读我,很多人就是不读,里面写的很详细呀,只要一般的英语基础都能看懂的,哥,求你们看看吧)随便复制一个序列号0001 0001 0736 0361 JK3Q HDJ3 ,粘贴到安装程序里,然后继续下一步。
6.找到你安装好的solidworks2011(注意是安装好了的文件),名称是SolidWorks Corp,打开,再打开SolidWorks,找到里面的setup,继续打开i386,现在就是把刚复制的文件粘贴在这里就行了,(就是替换破解文件呀)
7.然后双击粘贴好的文件:swlmwiz.exe 等待破解 点确定。
8.好了。完成。写的很多,怕有些人不懂 ,其实过程很简单。
