红外球M4新解码器说明书
X4高清解码播放器中文-1
操作说明书尊敬的顾客朋友:感谢您购买本高清播放器,为了确保您的使用安全,并保护本播放器,请您在使用前详细阅读本操作说明书,以便了解产品的操作方式与注意事项。
并请妥善保管本手册以备日后参考。
使用注意事项�在安装使用之前,请仔细阅读本操作说明书;�请勿用湿手触摸带电的插头;�为节约用电及安全考虑,使用完后请关闭电源;�长时间不使用本机时,请将电源线从插座上拔下;�请勿自行打开本机外壳,如需维修请联系专业维修人员;�请将本机安放在通风良好的平坦支撑物上;�请用干抹布来擦拭清洁机身,勿使用稀释剂、酒精或喷雾剂清洗本机;�本产品附件电源内有危险电压,请勿打开以免触电,如需维修,请联系专业维修人员;�不要让液体流入产品内,以免触电或损坏产品。
如不慎流入,请立即断电并用干布吸干;�请勿用化学试剂或清洁剂清洁本机,以免损伤表面和腐蚀喷漆;�不要将产品保存及使用在有明显震动的场合,不要给产品施以过大的外力和冲击;�因本产品的性能和功能而发生的变更,可能会不另行通知,请您谅解。
机器的接口机器的上部接口如右图:1、AV:将配备的AV线从这里插入,AV线另一端的三个插头:黄色的是视频插头,接电视机的黄色视频输入插座,红色和白色是左右声道插头,接到电视机(或功放机)的音频输入对应插座。
2、USB HOST:通过这个插口将播放器连接到电脑作移动硬盘使用。
一般来说电脑USB口的电已可以供硬盘使用(插USB线联电脑时,不能同时插外接DC电源,插入DC电源后,本机直接转入播放状态,USB将没有作用)。
注:对于本播放机,此插口还可以当作USB HOST使用,具有OTG功能,在播放状态时,可以直接外接移动硬盘、U盘、读卡器等,将这些移动存储设备中的影音文件直接播放出来。
3、HDMI:电视机的HDMI线从这里插入,调节电视机和本机都在HDMI模式,就可以得到高清晰720P或1080P的图像信号以及数字音频信号,不论你在观看电影还是欣赏音乐,都能有身临其境的感觉。
HUS-D4 MANUAL

ii
Honeywell
目录
1 前言 ............................................................................................. 35 适用范围..................................................................................... 35 章节概述..................................................................................... 35 字体与符号 ................................................................................. 36 使用说明..................................................................................... 36 2 系统简介...................................................................................... 37 概述 ............................................................................................ 37 规格参数..................................................................................... 38 使用环境..................................................................................... 39 3 安装与操作 .................................................................................. 40 面板介绍..................................................................................... 40 前面板..................................................................................... 40 后面板..................................................................................... 41 安装注意事项 ............................................................................. 42 外部电源连接 .......................................................................... 42 安装 ........................................................................................ 42 网络连接..................................................................................... 42 界面 ............................................................................................ 42 启动 ........................................................................................ 42 操作 ........................................................................................ 45 4 HUS-D4 网络客户端 .................................................................... 47 登录 ............................................................................................ 47 功能属性配置 ............................................................................. 48 系统配置 .................................................................置 ................................................................................. 50 用户管理 ................................................................................. 52 5 HUS 数据管理中心 ...................................................................... 55 在 HUS 数据管理中心配置解码器............................................... 55 登录 ........................................................................................ 55 添加解码器设备 ...................................................................... 56 将解码器添加到设备视图 ........................................................ 59 添加解码器的“窗口布局切换”权限 ...................................... 62
通用解码器使用手册

通用解码器使用手册室内外通用型解码器安装使用说明书室内外通用型解码器安装使用手册注意在使用本产品前,请详细阅读本说明书~请务必遵守所有的操作规程~注意为保证安全,请仔细核对云台电压跳线~为保证安全通信,请将系统良好接地~为保证远距离安全通信,请使用485通信并跳接最远端解码器的120Ω电阻跳线~出厂云台电压设定为24V~出厂镜头电压设定为9V~警告非专业人员不允许拆机或更换元器件~使用产品前,请仔细检查供电电源~- 2 -室内外通用型解码器安装使用手册目录一、简介...................................................................... . (1)三、技术指标 ..................................................................... ...................................................... 1 四、解码器接线示意图 ..................................................................... ...................................... 2 五、选择云台驱动电压 ..................................................................... ...................................... 3 六、选择镜头驱动电压 ..................................................................... ...................................... 3 七、解码器协议/波特率设置 ..................................................................... ............................. 3 八、解码器地址设置 ..................................................................... (3)8.1 解码器自检功能操作设置 ..................................................................... . (3)8.2 解码器正常运行模式下地址设置 ..................................................................... . (4)8.2.1 PELCO_P、TIANDY协议下地址的设定 (4)8.2.2 PELCO_D协议下地址的设定 ............................................................................... 8 九、解码器的安装、连接、通电 ..................................................................... . (8)9.1 解码器的安装 ..................................................................... (8)9.2解码器的连接 ..................................................................... .. (10)9.2.1 连接前的准备 ..................................................................... . (10)9.2.2 RS-485传输线的连接: .................................................................... . (10)9.2.3 云台控制线的连接: .................................................................... .. (11)9.2.4 镜头控制线的连接: .................................................................... .. (11)9.2.5 辅助功能开关的连接: .................................................................... . (12)9.2.6 报警传输线的连接: .................................................................... .. (12)9.2.7 摄像机电源端的连接: .................................................................... . (12)9.3 解码器通电 ..................................................................... ......................................... 12 十、特殊功能预置位 ..................................................................... ........................................ 12 十一、常见疑问解答 ..................................................................... ........................................ 13 十二、解码器使用注意事项 ..................................................................... . (14)- 3 -室内外通用型解码器安装使用手册一、简介室内外通用型智能解码器可配合矩阵、网络视频服务器、PC式/嵌入式DVR使用。
红外高速智能球型摄像,机使用说明书
3.3 异常情况处理.................................................................................................................................... - 25 -
4 线缆连接 .............................................................................................................................. - 26 4.1 线缆连接 ........................................................................................................................................... - 26 4.1.1 电源板线缆连接 ....................................................................................................................... - 26 4.1.2 报警线缆连接 ........................................................................................................................... - 27 4.2 系统连接 ........................................................................................................................................... - 28 4.2.1 4.2.2 4.2.3 系统图 .................................................................................................................................... - 28 报警连接图............................................................................................................................. - 29 键盘连接图............................................................................................................................. - 29 -
Hikvision DS-2DE4A404IW-DE 4 MP 网络红外PTZ摄像头说明说明书
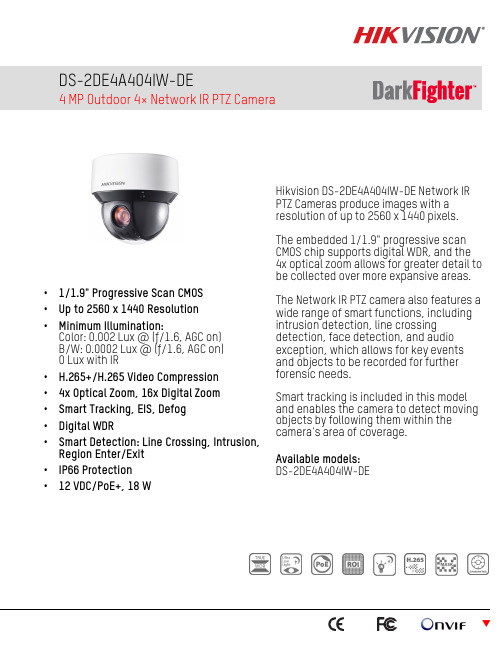
DS-2DE4A404IW-DE4 MP Outdoor 4× Network IR PTZ Camera• 1/1.9" Progressive Scan CMOS • Up to 2560 x 1440 Resolution •Minimum Illumination:Color: 0.002 Lux @ (ƒ/1.6, AGC on) B/W: 0.0002 Lux @ (ƒ/1.6, AGC on) 0 Lux with IR• H.265+/H.265 Video Compression • 4x Optical Zoom, 16x Digital Zoom • Smart Tracking, EIS, Defog • Digital WDR• Smart Detection: Line Crossing, Intrusion, Region Enter/Exit • IP66 Protection • 12 VDC/PoE+, 18 WHikvision DS-2DE4A404IW-DE Network IR PTZ Cameras produce images with a resolution of up to 2560 x 1440 pixels. The embedded 1/1.9" progressive scan CMOS chip supports digital WDR, and the 4x optical zoom allows for greater detail to be collected over more expansive areas. The Network IR PTZ camera also features a wide range of smart functions, including intrusion detection, line crossing detection, face detection, and audio exception, which allows for key events and objects to be recorded for further forensic needs.Smart tracking is included in this model and enables the camera to detect moving objects by following them within the camera’s area of coverage.Available models: DS-2DE4A404IW-DE© 2018−2020 Hikvision USA Inc. • All Rights Reserved • Specifications subject to change without notice.Hikvision USA Inc., 18639 Railroad Street, City of Industry, CA 91748, USA • Hikvision Canada, 4848 rue Levy, St-Laurent, Quebec, Canada, H4R 2P1 Tel:+1-909-895-0400•TollFreeinUSA:+1-866-200-6690•E-Mail:***********************•Rev. 021320NASpecificationsDS-2DE4A404IW-DECamera Module Image Sensor1/1.9" progressive scan CMOSMinimum IlluminationColor: 0.002 lux @ (ƒ/1.6, AGC on); B/W: 0.0002 lux @(ƒ/1.6, AGC on); 0 lux with IRWhite BalanceAuto/manual/ATW (Auto-Tracking White Balance)/indoor/outdoor/fluorescent lamp/sodium lamp AGCAuto/manualShutter Speed1/1 s to 1/30,000 s w/slow shutter mode (2x, 3x, 4x, 6x, 8x) Day/Night IR cut filter Digital Zoom 16×Privacy Mask 24 programmable privacy masks (only 8 masks are visible at one time) Focus ModeAuto/semi-automatic/manual WDR Digital WDRLensFocal Length 2.8 mm to 12 mm, 4× optical zoomZoom Speed Approximately 2.2 s (optical lens, wide to tele) Angle of ViewHorizontal field of view: 69.5° to 26.48° (wide-tele) Vertical field of view: 38° to 14.94° (wide-tele) Diagonal field of view: 81.2° to 20.38° (wide-tele)Minimum Working Distance 10 mm to 1,500 mm (wide to tele)Aperture Range ƒ/1.5 to ƒ/2.8IRIR Distance 165 ft (50 m) Smart IR SupportedPTZMovement Range (Pan)360° endlessPan Speed Configurable, from 0.1°/s to 300°/s, preset speed: 350°/sMovement Range (Tilt)From -5° to 90° (auto-flip)Tilt Speed Configurable, from 0.1°/s to 160°/s, preset speed: 200°/sProportional Zoom SupportedPresets 300Patrol Scan 8 patrols, up to 32 presets for each patrolPattern Scan 4 pattern scans, record time over 10 minutes for each scan Power-off Memory:SupportedPark Action Preset/pattern scan/patrol scan/auto scan/tilt scan/random scan/frame scan/panorama scan 3D Positioning Supported PTZ Status Display Supported Preset Freezing SupportedScheduled Task Preset/pattern scan/patrol scan/auto scan/tilt scan/random scan/frame scan/panorama scan/dome reboot/dome adjust/aux output Compression StandardVideo Compression Main stream: H.265+/H.265/H.264+/H.264; sub-stream: H.265/H.264/MJPEG; third stream: H.265/H.264/MJPEGH.264 Type Baseline profile/main profile/high profileH.264+Supported H.265 Type Main profileH.265+SupportedVideo Bitrate 32 kbps to 16,384 kbpsAudio Compression G.711alaw/G.711ulaw/G.722.1/G.726/MP2L2/PCMSVC SupportedSmart FeaturesBasic Event Detection Motion detection, video tampering detection, alarm input, alarm output, exception detectionSmart Event Detection Audio exception detection, face detection, intrusion detection, line crossing detection, region entrance detection, region exiting detection,unattended baggage detection, object removal detectionSmart Record ANR (Automatic Network Replenishment), dual-VCASmart Tracking Manual tracking, auto tracking, event tracking, supports multi scenes patrol trackingROI Main stream, sub-stream, and third stream respectively support four fixed areas ImageMaximum Resolution 2560 x 1440Main Stream 30 fps (2560 × 1440, 2048 × 1536, 1920 × 1080, 1280 × 960, 1280 × 720), 60 fps (1920 × 1080, 1280 × 960, 1280 × 720) Sub-Stream 30 fps (704 × 480, 640 × 480, 352 × 240)Third Stream 30 fps (1920 × 1080, 1280 × 960, 1280 × 720, 704 × 480, 640 × 480, 352 × 240)Image Enhancement HLC/BLC/3D DNR/defog/EIS/regional exposure/regional focusNetworkNetwork Storage Built-in memory card slot, supports microSD/SDHC/SDXC, up to 256 GB; NAS (NPS, SMB/CIPS), ANRAlarm Linkage Alarm actions such as notify surveillance center, upload to FTP, send e-mail, trigger recording, recording linkage, and alarm input, etc.Protocols IPv4/IPv6, HTTP, HTTPS, 802.1x, QoS, FTP, SMTP, UPnP, SNMP, DNS, DDNS, NTP, RTSP, RTCP, RTP, TCP/IP, DHCP, PPPoE, BonjourAPI Open-ended, supports ONVIF, ISAPI, and CGI, supports HIKVISION SDK and third-party management platformsSimultaneous Live View Up to 20User/Host Up to 32 users. Three levels: administrator, operator, and userSecurity Measures User authentication (ID and PW), host authentication (MAC address); HTTPS encryption; IEEE 802.1x port-based network access control; IP addressfilteringClient iVMS-4200, iVMS-4500, Hik-ConnectWeb Browser IE 8 to 11, Chrome 31.0 to 44, Firefox 30.0 to 51InterfaceAudio Interface 1-ch audio input and 1-ch audio output Alarm Interface 2-ch alarm input and 2-ch alarm outputNetwork Interface 1 RJ-45 10 M/100 M Ethernet Interface; PoE+ (802.3at, class 4)GeneralPower 12 VDC and PoE+ (802.3at, class 4), maximum:18 W (IR maximum: 5 W)Working Temperature -22° to 149° F (-30° to 65° C); humidity: ≤90% (non-condensing)Protection Level IP66 standard, TVS 4,000 V lightning protection, surge protection, and voltage transient protectionMaterial Aluminum alloyDimensions Φ6.65" x 6.34"(Φ169 mm x 161 mm)Weight Approximately 5.40 lb (2.45 kg)© 2018−2020 Hikvision USA Inc. • All Rights Reserved • Specifications subject to change without notice.Hikvision USA Inc., 18639 Railroad Street, City of Industry, CA 91748, USA • Hikvision Canada, 4848 rue Levy, St-Laurent, Quebec, Canada, H4R 2P1 Tel:+1-909-895-0400•TollFreeinUSA:+1-866-200-6690•E-Mail:***********************• Rev. 021320NAAccessories 1NOT INCLUDEDRequires WMLRequires CPMRCM-DE4A Recessed Ceiling Mount CB-DE4A Conduit BaseWML Long Wall MountPC-DE4APendant CapPM Pole Mount Adapter CMCorner Mount AdapterCPM Ceiling Pendant Mount CPME CPM Extension PipeDimensionsBox Contents (Subject To Change without Notice)Drill TemplateMounting Plate (Stainless Steel) PoE Injector Power CordQuick Start Guide ScrewsSteel Security Cord Wrench1Additional accessories not shown may fit without, or in combination with, these accessories. See your sales representative for information about your needs. Unit: mm。
红外球M4新解码器说明书
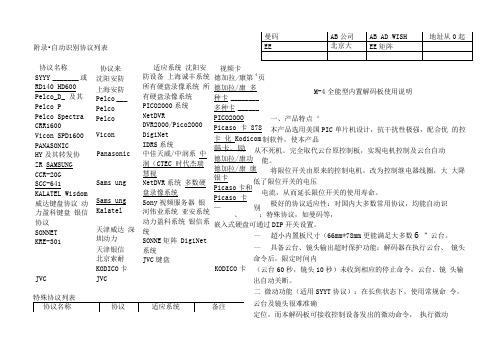
附录•自动识别协议列表 协议名称 SYYY_______ 或 RD140 HD600 Pelco_D_ 及其 Pelco P Pelco Spectra CRR1600 Vicon SPD1600 PANASONIC HY 及其转发协 ZR SAMSUNG CCR-20GSCC-641KALATEL Wisdom 威达键盘协议 动力盈科键盘 银信协议 SONNET KRE-301JVC 协议来 沈阳安防 上海安防 Pelco ___ Pelco Pelco Vicon PanasonicSams ung Sams ungKalatel天津威达 深圳动力 天津银信 北京索耐 KODICO 卡JVC适应系统 沈阳安防设备 上海诚丰系统 所有硬盘录像系统 所有硬盘录像系统 PICO2000系统 NetDVRDVR2000/Pico2000 DigiNet IDRS 系统中佳天威/中润系 中润(CTEC 时代杰瑞慧视NetDVR 系统 多数硬盘录像系统Sony 视频服务器 银河伟业系统 亚安系统 动力盈科系统 银信系统SONNE 矩阵 DigiNet系统JVC 键盘视频卡德加拉/康第4页 德加拉/康 多种卡 ________ 多种卡 ______PICO2OOO Picaso 卡 878卡 化 Kodicom 韩卡、励 德加拉/康功 德加拉/康 康银卡Picaso 卡和Picaso 卡— 别M-4全能型内置解码板使用说明一、产品特点‘本产品选用美国PIC 单片机设计,抗干扰性极强,配合优 的控制软件,使本产品从不死机。
完全取代云台原控制板,实现电机控制及云台自动能。
将限位开关由原来的控制电机,改为控制继电器线圈,大 大降低了限位开关的电压 电流,从而延长限位开关的使用寿命。
极好的协议适应性:对国内大多数常用协议,均能自动识、 ;特殊协议,如曼码等, 嵌入式硬盘可通过DIP 开关设置。
— 超小内置板尺寸(66mm*78mm 更能满足大多数6 ”云台。
解码器说明书

解码器使用说明书(中文版)注意事项:1.安装场所远离高温的热源和环境,避免阳光直接照射。
为确保本机的正常散热,应避开通风不良的场所。
本机应水平安装,为了防止电击和失火,请勿将本机放置于易燃、易爆的场所。
小心轻放本机避免强烈碰撞、振动等,避免安装在会剧烈震动的场所。
避免在过冷、过热的场所间相互搬动本机,以免机器内部产生结露,影响机器的使用寿命。
2.避免电击和失火使用说明书切记勿用湿手触摸电源开关和本机。
勿将液体溅落在本机上,以免造成机器内部短路或失火。
(中文版第二版)勿将其它设备直接放置于本机上部。
当本机的电源线与电源插座连接后,即使未启动本机,机器内部仍有电压。
安装过程中进行接线或改线时,都应将电源断开,预防触电。
接通本机电源后,露在外面的接线端子有危险电压,切记勿触碰。
重要提示:为了避免损坏,请勿自动拆开机壳,必须委托有资格有专业维修人员在指定的维修单位进行维修。
清洁装置时,请勿使用强力清洗剂,当有灰尘时用干布擦拭装置。
不得在电源电压过高和过低的场合下使用该本机。
务请通读本使用说明书,以便您掌握如何正确使用本机。
当您读本说明书后,请把它妥善保存好,以备日后参考。
如果需要维修,请在当地与经本公司授权的维修站联系。
环境防护:本机符合国家电磁辐射标准,对人体无电磁辐射伤害。
Copyright 2000-2005. All Rights Reserved.智能解码控制器产品的发行和销售由原始购买者在许可协议条款下使用;未经允许,任何单位和个人不得将该产品全部或部分复制、再生或翻译成其它机器可读形式的电子媒介; PTZ Intelligent Controller1. 设备概述智能型解码器是与安防监控系统设备配套使用的一种前端控制设备,可控制室内外云台、电动变焦镜头、摄像机、灯光和雨刷。
控制方式为RS-485,兼容多种控制协议。
智能型解码器具有超强抗死机性能,镜头电机保护、自动匹配控制协议的功能,还具有直流12V 输出、交流24V 输出。
红外高速球说明书

用户操作手册USER MANUAL红外智能高速球型云台Infrared High Speed Dome PAN/TILT红外智能高速球型摄像机用户手册目录第1章产品概述 (4)1.1 产品简介 (4)1.2 性能特点 (4)1.3 功能说明 (5)第2章安装 (7)2.1 球机拨码开关设置 (7)2.2 进入拨码开关设置 (8)第3章球机的基本操作 (10)3.1通电自检与控制摄像机 (11)3.2预置点的设置 (11)3.3调用预置点 (11)3.4特写镜头和广角镜头 (12)3.5镜头聚焦控制 (13)3.6手动光圈功能 (13)第4章菜单的设置 (13)4.1主菜单 (14)4.2 System Parameter 系统信息菜单 (15)4.3 Dome Setting 球机扫描设置菜单 (16)4.3.1 Frame Scan Setting 边界扫描设置菜单 (17)4.3.2 <Cruise Setting>花样扫描设置菜单 (18)4.3.3 Power Up上电设置菜单 (20)4.3.4 Gaurd Setting 守望位设置菜单 (20)4.4 Camera Setting 镜头设置菜单 (21)4.5 IR setting 红外模式设置菜单 (21)第5章简易故障排除及维修 (22)5.1 简易故障排除表 (22)5.2 注意事项 (23)第1章产品概述1.1 产品简介红外一体化智能高速球形摄像机是采用当今最新的科技成果、最精尖的制造工艺;综合多年的宝贵经验研制成功的,配置了自动变焦镜头的高性能数字信号处理(DSP)摄像机;集内置云台和数字解码器于一体,代表新一代高技术监控产品的发展潮流。
它采用全数码控制,机械设计精巧简单,可任意迅速定位及连续追踪扫描,实现真正意义上的全方位、无盲点的智能监视;可以自动适应环境明暗和目标远近的变化;可靠性高,可长期稳定运行,无须维护。
海康威视4 MP 42 × 无见红外网络速度球镜摄像头说明书

DS-2DF8A442INXS-AEL (T2)4 MP 42 × Invisible IR Network Speed DomeHikvision DS-2DF8A442INXS-AEL (T2) 4 MP 42 × Invisible IR Network Speed Dome adopts 1/1.8" progressive scan CMOS chip. With the 42 × optical zoom lens, the camera offers more details over expansive areas. This series of cameras can be widely used for wide ranges of high-definition, such as the rivers, forests, roads, railways, airports, ports, squares, parks, scenic spots, stations and large venues, etc. ⏹1/1.8" Progressive Scan CMOS⏹Up to 2560 × 1440 resolution⏹Min. Illumination:Color: 0.002 Lux @(F1.2, AGC ON),B/W: 0.0002 Lux @(F1.2, AGC ON),0 Lux with IR⏹42 × optical zoom, 16 × digital zoom⏹140 dB WDR, 3D DNR, HLC, Smart IR⏹24 VAC & Hi-PoE⏹Up to 200 m IR distance⏹Support H.265+/H.265 video compression⏹Support Rapid focus⏹IK10, IP67⏹Support Vandal-proof alarm⏹Support face capture to detect, track, capture, grade, and select face in motion⏹Support road traffic to detect vehicles, including license plate number, vehicle model, and vehicle colorSpecificationCamera ModuleImage Sensor 1/1.8" progressive scan CMOSMin. Illumination Color: 0.002 Lux @ (F1.2, AGC ON) B/W: 0.0002 Lux @ (F1.2, AGC ON), 0 Lux with IR Shutter Speed 1/1 s to 1/30,000 sSlow Shutter YesFocus semi-auto, manual, autoDay & Night ICRDay/Night Switch day, night, auto, scheduled-switchBLC YesWDR 140 dB WDRHLC Yes3D DNR YesEIS Yes. Built-in gyroscope to improve EIS performance.Regional Exposure YesRegional Focus YesWhite Balance auto,ATW,sodium lamp,fluorescent lamp,indoor,outdoor,MWBDigital Zoom 16 ×Optical Zoom 42 ×Privacy Mask Up to 24 masks, polygon region, mosaic mask, mask color configurableSNR ≥52dBGeneral Function mirror, password protection, watermark, IP address filterOptical Defog YesLensFocal Length 6.0 mm to 252 mm, 42 × OpticalZoom Speed Approx. 4.9 sFOV Horizontal field of view: 56.6° to 1.7° (wide-tele), Vertical field of view: 33.7° to 0.9° (wide-tele), Diagonal field of view: 63.4° to 1.9° (wide-tele)Aperture F1.2PTZMovement Range (Pan) 360°Movement Range (Tilt) -20° to 90° (auto flip)Pan Speed pan speed: configurable from 0.1° to 210°/s; preset speed: 280°/s Tilt Speed tilt speed: configurable from 0.1° to 150°/s, preset speed 250°/s Proportional Zoom YesPresets 300Patrol Scan 8 patrols, up to 32 presets for each patrolPattern Scan 4 pattern scans, record time over 10 minutes for each scan Power-off Memory YesPark Action preset, pattern scan, patrol scan, auto scan, tilt scan, random scan, frame scan, panorama scan3D Positioning Yes PTZ Status Display Yes Preset Freezing YesScheduled Task Preset, pattern scan, patrol scan, auto scan, tilt scan, random scan, frame scan, panorama scan, dome reboot, dome adjust, aux outputVandal-proof Alarm YesVideoMax. Resolution 2560 × 1440Main Stream 50Hz:25fps(2560×1440,1920×1080,1280×960,1280×720); 50fps(2560×1440,1920×1080,1280×960,1280×720);60Hz:30fps(2560×1440,1920×1080,1280×960,1280×720); 60fps(2560×1440,1920×1080,1280×960,1280×720);Sub-Stream 50Hz: 25fps (704 × 576, 640 × 480, 352 × 288) 60Hz: 30fps (704 × 480, 640 × 480, 352 × 240)Third Stream 50Hz: 25fps (1920 × 1080, 1280 × 960, 1280 × 720, 704 × 576, 640 × 480, 352 × 288)60Hz: 30fps (1920 × 1080, 1280 × 960, 1280 × 720, 704 × 480, 640 × 480, 352 × 240) Video Compression H.265,H.264,MJPEGVideo Bit Rate 32 Kbps to 16384 KbpsH.264 Type baseline profile, main profile, high profileH.265 Type main profileH.264+ YesH.265+ YesSVC YesROI dynamic face tracking, fixed region, dynamic license plate trackingAudioAudio Compression G.711alaw, G.711ulaw, G.722.1, G.726, MP2L2, PCMAudio Bit rate 64 Kbps (G.711)/16 Kbps (G.722.1)/16 Kbps (G.726)/32 Kbps to 192 Kbps(MP2L2) Smart FeaturesFace Capture Support detecting up to 30 faces at the same time. Support detecting, tracking, capturing, grading, selecting of face in motion, and output the best face picture of the face.Road Traffic Support vehicle detection (license plate number, vehicle model, and vehicle color recognition)Basic Event motion detection, video tampering alarm, alarm input and outputSmart Event unattended baggage detection,object removal detection,Intrusion Detection, Line Crossing Detection, Region Entrance Detection, Region Exiting Detection, Audio Exception DetectionSmart Tracking manual tracking, event tracking, auto-tracking Smart Record ANRAlarm Linkage Alarm actions, such as Preset, Patrol Scan, Pattern Scan, Memory Card Video Record, Trigger Recording, Notify Surveillance Center, Upload to FTP/Memory Card/NAS, Send Email, etc.Perimeter Protection Line crossing, intrusion, region entrance, region exitingSupport alarm triggering by specified target types (human and vehicle)NetworkNetwork Storage NAS (NFS, SMB/ CIFS)Protocols IPv4/IPv6, HTTP, HTTPS, 802.1x, Qos, FTP, SMTP, UPnP, SNMP, DNS, DDNS, NTP, RTSP,RTCP, RTP, TCP/IP, DHCP, PPPoE, UDP, IGMP, ICMP, BonjourAPI ISAPI, Hikvision SDK, Open Network Video Interface (Profile S, Profile G, Profile T) Simultaneous Live View Up to 20 channelsUser/Host Up to 32 users. 3 levels: Administrator, Operator and UserSmooth Streaming YesSecurity Measures User authentication (ID and PW), Host authentication (MAC address); HTTPS encryption; IEEE 802.1x port-based network access control; IP address filteringClient iVMS-4200, HikCentral, Hik-ConnectWeb Browser IE 8 to 11, Chrome 31.0+, Firefox 30.0+, Safari 11+InterfaceCommunication Interface 1 RJ45 10 M/100 M Ethernet Interface; Hi-PoEOn-board Storage Built-in memory card slot, support Micro SD/Micro SDHC/Micro SDXC, up to 256 GB;NAS (NFS, SMB/ CIFS), ANRAlarm Input 7 alarm inputsAlarm Output 2 alarm outputsAudio Input 1 audio input, 2.0 to 2.4Vp-p, 1k Ohm±10%Audio Output 1 audio output, line level, impedance: 600 ΩVideo Output 1.0V[p-p]/75Ω,PAL,NTSC,BNC connectorRS-485 HIKVISION, Pelco-P, Pelco-D, self-adaptiveSupplement LightIR Distance 200 mSmart IR YesWavelength invisible IRGeneralPower 24 VAC (Max. 60 W, including max. 18 W for IR and max. 6 W for heater), Hi-PoE (Max.50 W, including max. 18 W for IR and max. 6 W for heater)Operating Conditions Temperature: -40°C to 70°C (-40°F to 158°F), Humidity: ≤ 95% Dimensions Φ 267 mm × 405 mm (Φ 10.51" × 15.94")Weight Approx. 8.5 kg (18.74 lb)Web Client Language 32 languages: English, Russian, Estonian, Bulgarian, Hungarian, Greek, German, Italian, Czech, Slovak, French, Polish, Dutch, Portuguese, Spanish, Romanian, Danish, Swedish, Norwegian, Finnish, Croatian, Slovenian, Serbian, Turkish, Korean, Traditional Chinese, Thai, Vietnamese, Japanese, Latvian, Lithuanian, Portuguese (Brazil)ApprovalProtection Lightning Protection, Surge Protection and Voltage Transient Protection,±6kV Line to Gnd, ±3kV Line to Line, IEC61000-4-5, IP67 Standard, IK10DORIThe DORI (detect, observe, recognize, identify) distance gives the general idea of the camera ability to distinguish persons or objects within its field of view.It is calculated based on the camera sensor specification and the criteria given by EN 62676-4: 2015.DORI Detect Observe Recognize IdentifyDefinition 25 px/m 63 px/m 125 px/m 250 px/mDistance (Tele) 2979.3 m (9774.6 ft) 1182.3 m (3878.9 ft) 595.9 m (1955.1 ft) 297.9 m (977.4 ft)⏹Dimension⏹Accessory⏹IncludedInstallation Adapter⏹OptionalDS-1673ZJ-P DS-1682ZJ-P DS-1604ZJ-Pole-P DS-1604ZJ-BOX-PDS-1662ZJ-P DS-1604ZJ-Corner-P DS-1663ZJ-P DS-1661ZJ-P DS-1667ZJ-P DS-1604ZJ-BOX-POLE-P DS-1604ZJ-BOX-CORNER-P DS-1604ZJ-PDS-1660ZJ-P LAS60-57CN-RJ45Hi-PoE MidspanTEAC-66-243000V (EU)MKAC-66-243000U (USA)TEAC-66-243000VB (UK)Power adapterDS-1005KIUSB Joy-stickDS-1100KINetwork KeyboardAvailable Model DS-2DF8A442INXS-AEL (T2)。
全自动红外线遥控器解码测试仪使用说明

全自动红外线遥控器解码测试仪使用说明一:基本参数电源 AC 220V,红外载波38K,最大可存储168个按键信息(视不同红外编码格式).二:性能描述1, 技术领先,功能齐全;全自动解码,无须手工操作;显示信息量大,红外编码格式及码值一目了然。
2, 带学习功能,可录入遥控器码值,方便成品测试。
3, 丰富的蜂鸣器声提示,减轻眼睛的疲劳,加快测试进度。
三:面板说明四:操作方法1,全自动解码&指定格式解码全自动解码:把拨动开关拨至“解码”方向,小数码管显示“AUTO”字样,解码仪进入自动解码模式。
使遥控器对着解码仪发码,若解码正确,解码仪则会在小数码管显示遥控器所使用的红外编码格式,下方大数码管则显示客户码及数据码信息,同时解码仪绿色LED闪烁一下,蜂鸣器BEEP一下,提示解码成功。
如果解码不成功,则LED不闪烁,蜂鸣器不响,显示也不改变。
指定格式解码:对于一祯码包含多种编码格式的遥控器,可以通过按“ENTER”键指定格式解码,用以精确捕捉每段码的码值,此时解码仪红色LED亮,小数码管显示的格式表示指定格式解码。
循环按“ENTER”可在多种格式预选。
按“RESET”键则返回全自动解码模式2,录入模式(成品录入)把拨动开关拨至“录入”方向,解码仪红色LED慢闪,小数码管显示“REC.000”字样(REC.000表示录入按键数为000),解码仪进入录入模式。
经测试,无次序按键测试会有大量按键被重复按下,实际花费时间比按按设定顺序按键测试反而要长,所以本产品仍设计为录入及校对须按相同的按键次序进行操作。
因此,在录入模式下,请根据各自遥控器先安排一个方便自己的按键顺序,然后依次按按键录入键码。
若解码仪解码成功,而且判断到接收到码与之前一个按键不同,则绿灯闪烁一下,录入按键号+1,该按键录入成功,效果如下图所示:用户码解码仪录入成功显示:数据码当解码仪无法识别到接收到的红外编码或判断到当前接收到的码与之前一个按键码一样,则解码仪的红灯闪烁一下,数码管显示不改变,不记录此次按键资料。
景阳红外球机说明书
目录一、产品概述---------------------------------------------------2二、技术指标 ---------------------------------------------------3三、性能特点-----------------------------------------------------4四、功能说明-----------------------------------------------------5五、设备安装连接-------------------------------------------------85.1 球机外形尺寸 ----------------------------------------------8 5.2 安装准备---------------------------------------------------8 5.3 壁挂式球机安装---------------------------------------------95.4 吊装式球机安装---------------------------------------------12六、球机的系统设置 ----------------------------------------------146.1 协议设置---------------------------------------------------14 6.2 波特率设置-------------------------------------------------146.3 地址设置---------------------------------------------------15七、基本功能 ----------------------------------------------------187.1 球机上电与自检 --------------------------------------------18 7.2 预置位的设置和调用 ----------------------------------------18 7.3 左右扫描 --------------------------------------------------19 7.4 巡航扫描 --------------------------------------------------19 7.5 360º扫描 --------------------------------------------------20 7.6 看守位功能 ------------------------------------------------20 7.7 摄像机参数设置 --------------------------------------------217.8 红外灯亮度控制 --------------------------------------------22八、常用功能设置和调用命令列表-----------------------------------23九、简易故障排除表 ---------------------------------------------25安全注意事项1. 运输及保管过程中要防止重压、剧烈振动和水浸泡等对产品造成的损坏。
Dwyer Instruments IR4无接触红外温度计操作手册说明书

Forthose long range applications, the IR4 Non Contact Infrared Thermometer is the perfect instrument. It has a distance to spot ratio of 20:1 and laser sighting to accurately measure within 1% of reading. The adjustable emissivity allows this thermometer to measure the temperature of virtually any surface. There is no guessing when the battery is low as the IR4 has a battery indicator on its back lit display.This useful hand held has programmable low and high audible alarms built in. The IR4 accepts any K-type thermocouple to display both a IR and a contact reading simultaneously. MAX, MIN, DIF, and AVG can be displayed with a push of a buttonOPERATING INSTRUCTIONSSimply aim the thermometer at the target and press the “MEAS” key to display the surface temperature.Press “DOWN” key to switch between °F and ºC.Hold down on the “MEAS” key and “DOWN” key for laser.SPECIFICATIONSMeasurement Range:-76 to 1400°F (-70 to 760°C).Accuracy: 1% of reading or 1.8°F (1°C) whichever is greater.Emissivity Range: 0.95 default - adjustable 0.05 to 1.00 Emissivity.Distance Spot: 20:1 optics ratio.Resolution: 0.1°F/0.1°C.Response Time: 1 s.Operating Range: 32 to 122°F (0 to 50°C).Battery Life: Typical 180 hours continuous use (auto power off after 15 sec.). (2) AAA batteries included.Weight: 3.61 oz (179 g).Dimensions: 6.9 x 1.54 x 2.83 in (175.2 x 39.0 x 71.9 mm).Additonal Input:K-type thermocouple.For Continuous MeasurementPress the “UP” key to enter Lock Mode. The lock mode is particularly useful for continuous monitoring of temperatures for up to 60 minutes.EMISSIVITY: Press “Emissivity” key for setting the emissivity, then press “UP” key or “DOWN” key to set the emissivity, then press “MODE”key to confirm it. The emissivity can be changed from 0.10 (10E) to 1(100E).Function:Press the “MODE” key for scrolling to display more functions as follows.E: Will show the emissivity data.MAX, MIN DIF,AVG: Press“MODE” keyfor the Maximum (MAX),Difference between MAX and MIN (DIF) and Average (AVG) modes.During the measurement, the special modes reading will be displayed beside the mode icon.HAL, LAL: Press “UP” key or “DOWN” key to change the High Alarm (HAL) or Lo Alarm (LAL) then press “MEAS” key to confirm it.PRB:Connect the thermocouple to the thermocouple socket and put the probe in/on the target to be measured, the thermometer will display the temperature automatically without pressing any button. To see the minimum or maximum data during the probe measurement, please hold down the “UP” key or “DOWN” key.After measuring high temperatures the probe may remain HOT for a while.LED Error MessagesThe thermometer incorporates visual diagnostic messages as follows.“HI/LOW”: “Hi” or “Lo” is displayed when the temperature being measured is outside of the settings of HAL and LAL.“Er2”: Displays when the thermometer is exposed to rapid changes in the ambient temperature.“Er3”: Displays when the ambient temperature exceeds 32°F (0°C) or 122°F (50°C). The thermometer should be allowed plenty of time (minimum 30 minutes) to stabilized to the working/room temperature.For all other error messages it is necessary to reset the thermometer. To reset it, turn the instrument off, remove the battery and wait for a minimum of one minute, reinsert the battery and turn it on. If the error message remains please contact the Dwyer Customer Service department for further assistance.Batteries:The thermometer incorporates visual low battery indication as follows.Battery OK: Measurements are possible.Battery Low:Battery needs to be replaced, measurements are still possible.Battery Exhausted: Measurements are not possible. When the low battery icon indicates the battery is low, the batteries should be replaced immediately with AAA, 1.5V batteries.Please Note:It is important to turn the thermometer off before replacing the battery otherwise the thermometer may malfunction. Dispose of used battery promptly and keep away from children.CAUTION1. When device is in use, do not look directly into the laser beam - Permanent eye damage may result.e extreme caution when operating the laser.3.Never point the device towards anyone’s eyes.4.Keep out of reach of all children.EMC/RFIReadings may be affected if the unit is operated within radio frequency electromagnetic field strength of approximately 3 volts per meter, but the performance of the instrument will not be permanently affected. **Note:under the electromagnetic field of 3V/m from 350 to 550 MHz, the maximum error is 14.4˚F (8˚C).MAINTENANCEA periodic check of the system calibration is recommended. The Series IR4 is not field serviceable and should be returned if repair is needed (field repair should not be attempted and may void warranty). Be sure to include a brief description of the problem plus any relevant application notes. Contact customer service to receive a return goods authorization number before shipping.Storage and CleaningThe sensor lens is the most delicate part of the thermometer. The lens should be kept clean at all times, care should be taken when cleaning the lens using only a soft cloth or cotton swab with water or medical alcohol.Allowing the lens to fully dry before using the thermometer. Do not submerge any part of the thermometer. The thermometer should be stored at room temperature between -4 and 149ºF (-20 to 65ºC).page 2©Copyright 2014 Dwyer Instruments, Inc.Printed in U.S.A. 5/14FR # R7-443521-00 Rev. 1。
成都盛瑟 人体红外感应模组 SM04-IRA-P01 使用说明书
人体红外感应模组(型号:SM04-IRA-P01)使用说明书版本号:1.5实施日期:2021.9.24电话:邮箱:网址:https://声明本说明书版权属成都盛瑟传感技术有限公司(以下称本公司)所有,未经书面许可,本说明书任何部分不得复制、翻译、存储于数据库或检索系统内,也不可以电子、翻拍、录音等任何手段进行传播。
感谢您使用盛瑟传感的系列产品。
为使您更好地使用本公司产品,减少因使用不当造成的产品故障,使用前请务必仔细阅读本说明书并按照所建议的使用方法进行使用。
如果您不依照本说明书使用或擅自去除、拆解、更换传感器内部组件,本公司不承担由此造成的任何损失。
您所购买产品的颜色、款式及尺寸以实物为准。
本公司秉承科技进步的理念,不断致力于产品改进和技术创新。
因此,本公司保留任何产品改进而不预先通知的权力。
使用本说明书时,请确认其属于有效版本。
同时,本公司鼓励使用者根据其使用情况,探讨本产品更优化的使用方法。
请妥善保管本说明书,以便在您日后需要时能及时查阅并获得帮助。
成都盛瑟传感技术有限公司电话:************邮箱:****************网址:https://一、产品描述数字热释电传感器是将传统热释电传感器的敏感元与信号处理芯片集成化设计,将敏感元与IC芯片集成封装到传感器屏蔽罩内部,敏感元通过感应外界人体移动产生的红外信号,以差分输入的方式传送到高精度的数字智能处理芯片进行处理,信号处理完成,传感器直接输出数字信号再搭配外围电路就可以直接使用。
产品特点:1.支持宽电压输入(DC3.3-18V输入)2.灵敏度可调(通过电位器和换电阻二种方式可调)3.延时时间可调(通过电位器和换电阻二种方式可调)4.体积小(18MM*18MM)5.数字量输出(0V和3.3V)6.响应速度快7.静态功耗小(微安级)8.搭配菲涅尔透镜电话:************邮箱:****************网址:https://二、性能参数产品型号SM04-IRA-P01工作电压范围DC+3.3V-18V静态电流<20uA电平输出高 3.3V/低0V触发方式重复触发延时时间 2.0-3600S(可调)封锁时间2秒电路板外形尺寸18mm*18mm感应角度125度至138度工作温度-20℃至+70℃感应透镜尺寸直径:13.8mm(默认)感应距离最大6M,建议0-4.5M光敏电阻选择性焊接(默认不焊接)存储温度-40℃至+125℃三、产品尺寸和样式1.电位器调节款直接调节电位器来调节传感器的探测距离和输出的延迟时间(方便)电话:************邮箱:****************网址:https://电话:************邮箱:****************网址:https://2.更换电阻款通过更换R5和R7的电阻来调节传感器的探测距离和输出的延迟时间(比较方便)电话:************邮箱:****************网址:https://3.模块的尺寸是18MM*18MM 高度为20MM电话:************邮箱:****************网址:https://四、硬件连接电源接口VCC为宽电压电源输入,建议输入电压在3.3V-18V之间。
高清网络红外高速球机使用手册

透明罩的 4 颗螺钉拧紧。
美国卡姆士 安全新视野
第二章 产品概述
高清网络红外球采用一体化设计,同步带传动和精密步进电机,运行精确、
平稳;多种安装方式,充分满足不同场合的需要;全天候室外设计,双层外壳结
构;多种监控方式,如扫描、巡航、模式路径等,方式灵活;集成预置位功能,
性能更为强大。
正视图
左视图
● 球机的断电记忆功能
● 255 个预置位随意储存,支持 8 条巡航路径,每条可存储 32 个预置位点
● 支持待机动作功能
● 8 条自动扫描,每条可设置左右限位和扫描速度
● 8 条模式(PATTERN)路径。
● 支持 1 路报警输入、一路报警输出。
● 支持 TF 卡存储本地抓拍功能
2. 集成万向变速云台
美国卡姆士国际有限公司® 美国加州91786 阿普兰市第13 西街1525号 电话:909-931-2540
中国销售公司:深圳市卡姆士监控系统设备有限公司 地址:深圳市南山区松坪山新西路7号兰光科技园C403 电话:0755-83283530
-6-
第三章 功能描述
美国卡姆士 安全新视野
3.1 性能特点
中国销售公司:深圳市卡姆士监控系统设备有限公司 地址:深圳市南山区松坪山新西路7号兰光科技园C403 电话:0755-83283530
-1-
美国卡姆士 安全新视野
目录
第一章 注意事项.........................................................................................................................3 第二章 产品概述.........................................................................................................................6 第三章 功能描述.........................................................................................................................7 第五章 安装指南.......................................................................................................................12 第六章 WEB 客户端.................................................................................................................21 第七章 参数配置.......................................................................................................................34 第八章 简单故障解决方法.......................................................................................................82 第九章: 售后服务.......................................................................................................................83 第十章: 有害元素.......................................................................................................................84 附录Ⅰ:防雷击、浪涌 ................................................................................................................. 85 附录 II:吊装施工指导................................................................................................................87
红外遥控解码器

红外遥控解码器 The document was finally revised on 2021编号:电子线路设计实训 (论文)说明书题目:红外遥控解码器院(系):应用科技学院专业:电子信息工程学生姓名:石佳杰学号: 04指导教师:符强王守华归发弟2011年 1 月 7 日《单片机原理》实训任务书本次实训制作的是红外遥控解码器,此设计主要通过运用一体化红外接头读取由万能电视机遥控器发送来的红外遥控信号信息,将所得到的红外信息传输到单片机当中进行解码,然后对应万能电视机遥控器上的键值,使单片机将解码后的数据用数码管显示出来,并且用8个LED来显示其编码的方式。
红外遥控信号的调制方式很简单,一般都是将数字信号经过调制至38kHz左右的红外载波上,然后经过红外发射器发射出去。
其解码的方式也很简单,只要知道调制的数字信号的引导码、系统码、数据码和数据反码各自的周期和其调制的数字信号所表达的数字信息,就能利用软件编译进行解码。
本文中所使用的万能电视机遥控器使用的是脉宽调制方法,当按下按键的时候遥控器就向外发射一组频率在38kHz上左右的调制码,其中包含引导码、系统码1、系统码2、数据码和数据反码,连续发射数据码和数据反码使得所调制的信息更为容易解调,也就是更容易让机器识别。
但是由于硬件设施上的限制,本文所用的单片机印制电路板所能识别的有效范围只在1米内,根据理论,其最大有效范围可达5米左右。
红外信号接收的元件则是使用一体化红外接头,它将红外接收管(光电二极管)、放大器、滤波器及解调器集成在个硅片上,不仅尺寸小、无需外部元件,并且具有抗光电干扰性能好 (无需外加磁屏蔽及滤光片)、并有接收角度宽等特点。
关键词:红外信号调制,红外信号接收,单片机解码The production of the infrared remote control training decoder, the design of the main connector through the use of integrated infrared TV remote control to read from the universal infrared remote control signals sent to the information obtained will be transmitted to the microcontroller which infrared information to decode Then the corresponding universal TV remote control key, the microcontroller will decode the data after the display with digital control and display with 8 LED to the way their code.Infrared remote control signal modulation is very simple, usually a digital signal to 38 kHz modulated infrared carrier around, and then transmitted out through the infrared emitter. The decoding method is also very simple; just know that the digital signal modulation boot code, system code, data code and data against the respective period and the code modulation digital signal expressed by the digital information can be compiled using software to decode. Used in this universal TV remote control uses pulse width modulation method, when you press the button when the remote control to launch out on a group of around 38kHz frequency modulation code, which contains the boot code, system code 1, 2 systematic code, data code and data against code, continuous emission data code and data modulated by the anti-code makes it easier to demodulate the information, which is easier for the machine identification. However, due to hardware constraints, the microcontroller used in this article printed circuit board can recognize the effective range of only 1 meter, according to theory, the maximum effective range of up to 5 meters.Infrared signal receiver component is the use of integrated infrared connection, it will be infrared receiver (photo diode), amplifier, filter and demodulator integrated in a silicon chip, not only small size, no external components, and optical interference with anti-Performance (without additional magnetic shielding and filters), and have received wide-angle characteristics.Key words: infrared signal modulation, infrared signal receiver, microcontroller decoding目录引言在我们平时的生活中,用红外线来传输信息的方式处处可见。
海康威视红外高速智能球操作手册

红外高速智能球用户手册红外高速智能球·用户手册非常感谢您购买我司产品,如您有任何疑问或需求请随时联系我们。
本手册适用于红外高速智能球机。
本手册可能包含技术上不准确的地方、或与产品功能及操作不相符的地方、或印刷错误。
我司将根据产品功能的增强或变化而更新本手册的内容,并将定期改进及更新本手册中描述的软硬件产品。
更新的内容将会在本手册的新版本中加入,恕不另行通知。
本手册中内容仅为用户提供参考指导作用,不保证与实物完全一致,请以实物为准。
本手册中提到的部件、组件和附件仅作说明之用,不代表购买机型的配臵,详细配臵请以装箱单为准。
10000010210121红外高速智能球·用户手册2安全使用注意事项此内容的目的是确保用户正确使用本产品,以避免危险或财产损失。
在使用此产品之前,请认真阅读此说明手册并妥善保存以备日后参考。
如下所示,预防措施分为“警告”和“注意”两部分: 警告:无视警告事项,可能会导致死亡或严重伤害。
注意:无视注意事项,可能会导致伤害或财产损失。
事项提醒用户防范潜在的死事项提醒用户防范潜在的伤警告● 在本产品安装使用中,必须严格遵守国家和使用地区的各项电气安全规程。
● 请使用正规厂家提供的电源适配器,供电电源要求为AC24V/3A 。
●请不要将多个智能球连接至同一电源适配器(超过适配器负载量,可能会产生过多热量或导致火灾)。
● 在接线、拆装等操作时请一定要将智能球电源断开,切勿带电操作。
● 在墙壁或天花板上安装本产品时,请牢固地固定住智能球。
●如该智能球中出现冒烟现象,或产生恶臭,或发出杂音,请立即关掉电源并且将电源线拔掉,并同经销商或服务中心联系。
●如果设备工作不正常,请联系购买设备的商店或最近的服务中心,不要以任何方式拆卸或修改设备。
(对未经认可的修改或维修所导致的问题,本公司不承担责任)。
红外高速智能球·用户手册3注意●请不要使物体摔落到设备上或大力震动设备,并使设备远离存在磁场干扰的地点。
- 1、下载文档前请自行甄别文档内容的完整性,平台不提供额外的编辑、内容补充、找答案等附加服务。
- 2、"仅部分预览"的文档,不可在线预览部分如存在完整性等问题,可反馈申请退款(可完整预览的文档不适用该条件!)。
- 3、如文档侵犯您的权益,请联系客服反馈,我们会尽快为您处理(人工客服工作时间:9:00-18:30)。
附录.自动识别协议列表
4页 M-4全能型内置解码板使用说明
一、产品特点‘ 本产品选用美国PIC 单片机设计,抗干扰性极强,配合优 完全取代云台原控制板,实现电机控制及云台自动
将限位开关由原来的控制电机,改为控制继电器线圈,大
极好的协议适应性:对国内大多数常用协议,均能自动识 DIP 开关设置。
超小内置板尺寸(66mm*78mm ),更能满足大多数6”云台。
具备云台、镜头输出超时保护功能:解码器在执行云台、
60秒,镜头10秒)未收到相应的停止命令,云台、镜
微动功能(适用SYYT 协议):在长焦状态下,使用常规命 定位,而本解码板可接收控制设备发出的微动命令,执行微动
操作,实现云台、镜头的 精确定位。
二、接线说明
J1、485通信接线插座。
1脚:485A+,外部接线红色
(RED );2脚:485B-, 外部接线兰色(BLUE )。
J2、120Ω负载电阻跳线。
485通信需在通信线路最远端的A、B之间,接通一个 120Ω负载电阻,以提高通信可靠性。
将短插头插接在标有120一侧,即接通120Ω负载
电阻。
J7、DIP 开关:共9位,向上为ON ,用1表示;向下为OFF ,用0表示。
第1-3位表
示波特率及特殊协议选择,详见表1;第4-9位表示解码板地
注:曼码协议时地址从0起始,即DIP4-9位均为2、地址设置表2
OFF(000000)
四、参数指标
.外部电源输入电压:220V AC 20%(配备变压器)
.云台驱动电压:12VAC,最大驱动电流350mA
.摄像机12V输出电压:12V DC 10%,额定输出电流500mA .镜头驱动电压:12VDC,最大驱动电流200mA
注意:严禁镜头控制线互相短路
第3页。