手持终端使用说明
神舟链威C4000手持终端用户手册说明书
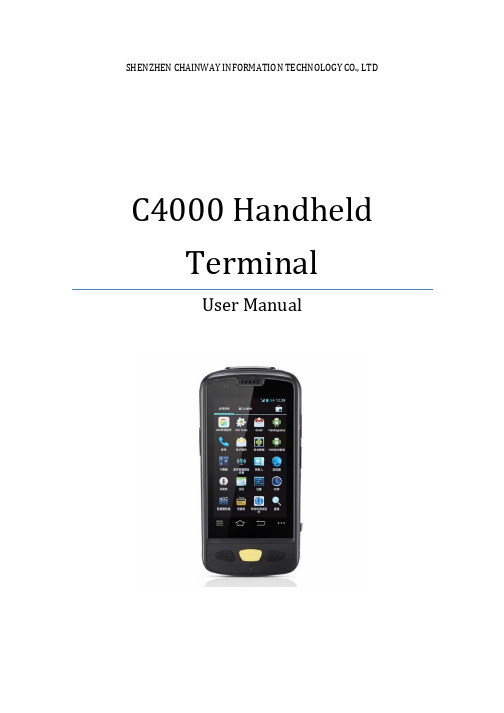
SHENZHEN CHAINWAY INFORMATION TECHNOLOGY CO., LTDC4000 Handheld TerminalUser Manual1ContentsStatement (4)1.Getting Started (6)1.1 Brief Instruction (6)1.2Precaution before Using Battery (7)2.About The Device (8)2.1 Structure (8)2.2 SD Card Installation (10)2.3 SIM Card Installation (11)2.4 Battery Installation (12)2.5 Battery Charging (13)2.5.1 Direct Charging (13)2.5.2 Cradle Charging (13)2.6 Device Power on/off (13)3.Call Function (14)3.1 Phone (14)3.2 Contacts (15)3.3 Messaging (16)4. Barcode Reader (17)4.1 1D Barcode (17)4.2 2D Barcode (18)4.3 2D(S) Barcode (19)5.RFID Reader (20)5.1 Low Frequency (20)25.2 High Frequency (22)5.2.1 14443A (22)5.2.215693 (23)5.3 Ultra High Frequency (24)6.Fingerprint Reader (26)7.Other Functions (27)7.1 PING (27)7.2Bluetooth (28)7.3 GPS (30)7.4 Volume Settings (31)7.5 Sensor (32)7.6 Keyboard (33)7.7 Network (34)7.8 Keyboardemulator (35)8. Device Specifications (36)3Statement2013 by Shenzhen Chainway Information Technology Co., Limited. All rights reserved.No part of this publication may be reproduced or used in any form, or by any electrical or mechanical means, without permission written from Shenzhen Chainway. This includes electronic or mechanical means, such as photocopying, recording, or information storage and retrieval systems. The material in this manual is subject to change without notice.The software is provided strictly on an “as is” basis. All software, including firmware, furnished to the user is on a licensed basis. Shenzhen Chainway grants to the user a non-transferable and non-exclusive license to use each software or firmware program delivered hereunder (licensed program). Except as noted below, such license may not be assigned, sublicensed, or otherwise transferred by the user without prior written consent of Shenzhen Chainway. No right to copy a licensed program in whole or in part is granted, except as permitted under copyright law. The user shall not modify, merge, or incorporate any form or portion of a licensed program with other program material, create a derivative work from a licensed program, or use a licensed program in a network without written permission from Shenzhen Chainway.Shenzhen Chainway reserves the right to make changes to any software or product to improve reliability, function, or design.Shenzhen Chainway does not assume any product liability arising out of, or in connection with, the application or use of any product, circuit, or application described herein.No license is granted, either expressly or by implication, estoppel, or otherwise under any Shenzhen Chainway intellectual property rights. An implied license only exists for equipment, circuits, and subsystems contained in Shenzhen Chainway products.Shenzhen Chainway Information Technology Co., LtdAddress: 9/F, Building 2, Phase 2, Gaoxinqi Industrial Park, Liuxian 1st Rd, District 67, Bao’an, Shenzhen, Guangdong, ChinaTelephone:+0086-755-23223300 Fax: +0086-755-23223310Web Site: Email:*******************451. G etting Started1.1 Brief InstructionChainway C4000 is a series of Android powered smart terminals, with data capture, data processing, wireless communication. It is with high-reliability &high-expansibility. Auto & Accurate data collection is achieved in various business fields via a complete solution of premium options, the flexible solution among options and operators is suited-up. You will find out with C4000, much easier deployment, reduced complexity, decreased maintenance, are the benefits for enterprises.C4000 meets industrial level IP64 (IEC sealing), is sufficient to routine applications, eg, railway inspection, road parking toll, vehicle inspection, logistics express, power inspection, warehousing management, chain retail, etc. Whether the mobile operators are working indoor or outdoor, with Chainway C4000, your business is always &highly efficient on-line.Meeting industrial standards, designed to support a various of mobile solutions. With the build-in high performance Cortex-A7 1.3GHZ quad core processor technology, the operators need only one device to enjoy a convenient and easy job, C4000 will be the ideal choice for key-fact business in mobile solutions, for simplified task flow, enhanced work efficiency, for shortened time to customer response, more satisfied customer care service.Chainway C4000 comes with world wide band WCDMA technology. Multi channels data and voice communication guarantees the real-time communication and data efficiency, C4000 brings you the best ROI.61.2 Precaution before Using Battery•Do not leave batteries unused for extended periods of time, either in the product or in storage. When the battery has been unused for 6 months, check the charge status and charge or dispose of the battery as appropriate. •The typical estimated life of a Lithium-Ion battery is about two to three years or 300 to 500 charge cycles, whichever occurs first. One charge cycle is a period of use from fully charged, to fully discharged, and fully recharged again. Use a two to three year life expectancy for batteries that do not run through complete charge cycles.•Rechargeable Lithium-Ion batteries have a limited life and will gradually lose their capacity to hold a charge. This loss of capacity (aging) is irreversible. As the battery loses capacity, the length of time it will power the product (run time) decreases.•Lithium-Ion batteries continue to slowly discharge (self-discharge) when not in use or while in storage. Routinely check the battery’s charge status. The user manual typically includes information on how to check battery status, as well as battery charging instructions.•Observe and note the run time that a new fully-charged battery provides for powering your product. Use the new battery run time as a basis to compare run times for older batteries. The run time of your battery will vary depending on the product’s configuration and the applications that you run. •Routinely check the battery’s charge status. Carefully monitor batteries that are approaching the end of their estimated life.Consider replacing the battery with a new one if you note either of thefollowing conditions:The battery run time drops below about 80% of the original run time.•The battery charge time increases significantly.•If a battery is stored or otherwise unused for an extended period, be sure to follow the storage instructions in this document. If you do not follow theinstructions, and the battery has no charge remaining when you check it,consider it to be damaged. Do not attempt to recharge it or to use it. Replace it with a new battery.•Always follow the charging instructions provided with your product. Refer to your product’s user manual and/or online help for detailed information about charging its battery.•Charge or discharge the battery to approximately 50% of capacity before storage. Charge the battery to approximately 50% of capacity at least once every six months.•Remove the battery and store it separately from the product.•Store the battery at temperatures between 5 °C and 20 °C (41 °F and 68 °F).72. A bout The Device2.1 Structure<Front>89<Back>Buttons:ButtonFunctionPower ButtonPress and hold to turn the device on or off App List View Button View a list of apps running Home ButtonPress to return to the home screen Cancel ButtonTap to return to the previous screenDetailed installation steps are as follows:•Open the SIM slot as the direction of ‘Open/Lock’ labeled.•Open the SD slot as the direction of ‘Open/Lock’ labeled.•Install the SD card properly.•Lock the SD slot and SIM slot properly.101. Open the SIM slot as the direction of ‘Open/Lock’ labeled.2. Install the SIM card correctly.3. Lock the SIM slot properly.2 3112.4 Battery Installation1. Push the battery down into the bottom of the battery.2. Push the battery to the direction of the array.3. Turn the battery lock.122.5 Battery Charging2.5.1 Direct ChargingUse the adapter to charge the battery via the USB connector of the snap-on. 2.5.2 Cradle ChargingConnect the adapter with the power cable to charge the device.2.6 Device Power on/offPress the ‘Power’ button on the side shortly due to turn on/off.13143. C all Function3.1 Phone1. Click this icon.2. Click the number button to input the numbers.3. Click the button to confirm and dial.4. Click theto end the calling.Contacts LogsVoice CallingEmulated Numeric Keypad3.2 Contacts1. Click ‘Contacts’ to open the contacts list.2. Click ‘’ to add the new contact.3. Click ‘’ to import/export or delete the contact list.FavoritesContact List Group153.3 Messaging1. Click ‘’ to open the message list.2. Click ‘’ to input the content.3. Click ‘’ to send the message.4. Click ‘’ to add photos, videos.164. Barcode Reader4.1 1D Barcode1. Open the 1D Barcode Demo in Appcenter.2. Press the ‘Scan’ button to start scanning, then the auto interval parameterscan also be set.174.2 2D Barcode1. Open the 2D Barcode Demo in Appcenter.2. Press the ‘Scan’ button to start scanning, then the auto interval parameterscan also be set.184.3 2D(S) Barcode1. Open the 2D(S) Barcode Demo in Appcenter.2. Press the ‘Scan’ button to start scanning, then the auto interval parameterscan also be set.3. Also, the barcode types enabling/disabling can also be set.Note: Please scan the barcode in a correct way, otherwise the scanningmight be failed.19205. R FID Reader5.1 Low Frequency1. Open the RFID_LF Demo within Appcenter and then press the ‘Scan’ button tostart reading.2. Tag types including ID Card/Animal Tag/Hitag/HDX Tag/EM4450 can be alsoselected, and Hitag-S and EM4305 reading/writing are already supported by the device.Please ensure that the LF module is embedded in the device, also please select the tag type correctly, otherwise the operation might not work. Meanwhile, please pay attention to the HDX and FDX-B since they are using different hardware due to the different working principles.215.2 High Frequency5.2.1 14443A1. Open the 14443A demo within Appcenter, and press the ‘Scan’ button to startreading.2. Mifare and Ultra Light reading/writing are also supported.225.2.2 156931. Open the RFID_15693 demo within Appcenter, and press the ‘Scan’ button tostart scanning.2. 15693 writing are also supported.235.3 Ultra High Frequency1. Open the UHF demo within Appcenter, and press the ‘Start’ button to startscanning.2. Multiple tags reading and single tag reading/writing are also supported.2425266. F ingerprint Reader1. Open the Fingerprint Demo in Appcenter.2. Put the finger to the fingerprint module and set the ID/name of the templateunder ‘ACQUISITION’.3. Put the finger to the fingerprint module properly and identify by ID/Name/Scoreunder ‘IDENTIFICATION’.4. The local templates can also be checked under ‘Data’.Please be aware that ISO standards are only supported by devices with ISO fingerprint hardware modules.7. O ther Functions7.1 PING1. Open the Ping in Appcenter.2. Set the Ping parameters and select the internal/external addresses.277.2 Bluetooth1. Open the Bluetooth demo in Appcenter and turn on the Bluetooth.2. Input the content or select the file, then scan the nearby Bluetooth printer andpair them.3. Select the printer and click ‘Print’ to print the content.2829307.3 GPS1. Open the GPS demo in Appcenter and turn on GPS module.2. Set the GPS parameters and get the GPS data information.7.4 Volume Settings1. Open the Volume Setting demo in Appcenter.2. Set the volumes based on the requirements.317.5 Sensor1. Open the Sensor demo in Appcenter.2. Test the sensor based on the requirements.321. Open the Keyboard demo in Handset Appcenter.2. Set and test the key values of the device.331. Open the Network demo in Appcenter.2. Test the WIFI/Mobile signal based on the requirements.34357.8 KeyboardemulatorKeyboard Emulator can be used directly for multiple using environments and the output formats can include prefix/suffix/enter/tap can also be defined, please define the options properly based on the features of the device.1. Open the Keyboardemulator which is preinstalled in the device.2. Click the options correctly based on the features of the device hardware,please also press the physical button to define the scan button, then please define the output formats based on the requirements, finally click ‘Open’ to save and enable it.8. Device SpecificationsPhysical CharacteristicsDimensions 153mm*75mm*29mm/6.02*2.95*1.14in.Weight 286g/10.09oz. (includes main battery)Screen 4in.WVGA (480*800) TFT-LCD, capacitive dual touchKeyboard 3 function keys, 3 side buttonsBattery Main bat. (rechargeable li-ion polymer, 3.7V, 3200 mAh)Pistol bat. (rechargeable li-ion polymer, 3.7V, 5200 mAh)Expansion Slot MicroSD/TF, maximum capacity of 32GSIM Slot 1 PSAM, 1 SIM, 1 MicroSDAudio 0.5WCamera OV 8M pixels, auto focus with LED flashPerformance CharacteristicsCPU Cortex-A7 1.3GHz quad coreOS Android 4.4.2Memory 1GB RAM, Build-in 4GB FlashInterface USB Micro-B, serial port RS-232(TTL)Storage Card Type MicroSD cardMaximum Expansion Storage 32GBUser Environmental CharacteristicsOperating Temperature -10℃to 50℃Storage Temperature -40℃to 70℃Humidity 5%RH-95%RH(non-condensing)Dropping Survive 1.2m/3.9ft. drop, 6 sides (concrete floor under operating temp.)Sealing IP64, IEC complianceWireless CommunicationWAN WCDMA/HSDPA/HSPA+ (850/1900/2100MHz)GSM/GPRS/EDGE (850/900/1800/1900MHz)WLAN IEEE802.11b/g/n, internal antenna36WPAN Bluetooth v4.0 Low EnergyBluetooth 3.0+HSBluetooth v4.0 Low Energy (LE)Data CollectionBarcode Scan Engine 1D barcode(Symbol SE955, laser)(optional)2D CMOS laser scanner: Symbol SE4750(optional) Sensor resolution: 750 * 480Roll tolerance: 360ºRFID LF 125KHz/134.2KHz, HDX/FDX-B(optional)HF 13.56MHz, ISO14443A/ISO15693(optional)UHF 860-960MHz, EPC C1 GEN2/ISO18000-6C(optional) Developing EnvironmentSDK Chainway SDKProgramming Language JavaDeveloping Tool Eclipse37。
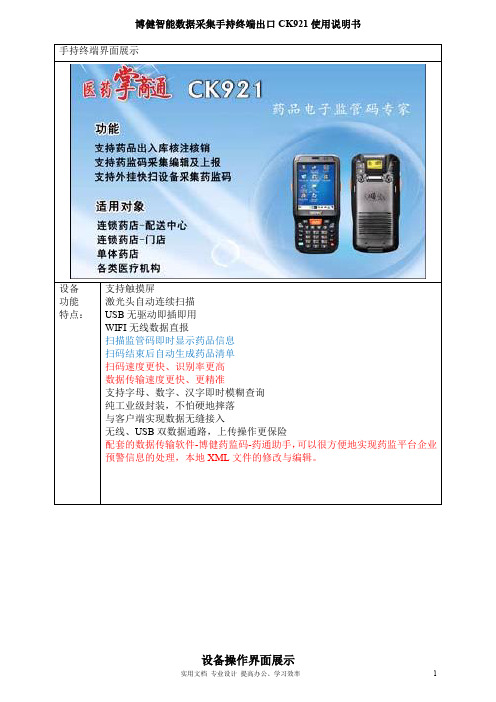
博健智能数据采集手持终端出口CK921使用说明书
博健智能数据采集手持终端出口CK921使用说明书设备支持触摸屏设备操作界面展示初始用户名为1,密码为配合电脑端软件直接按此界面可以通过上下左右箭头设置日期时间主菜单5.系统设置1.出入库监管码扫描2.查询已扫描单号及条码,可单条删除、单据号查询修改3.监管码数据上传、往来单位信息下载初次使用先进行系统设置!设置药品类型:普药、特药设置企业类型:生产、批发、物流、使用等类型5.1药品类型选择5.2企业类型选择请按企业经营范围设置。
无特药请选“2、普药” 依企业经营方式设置,批发企业请选“2、批发企业”为了防止同一单据不同终端扫码造成数据覆盖,不同终这里主要设置扫描时是否可以跳过往来的单有线通讯:通过USB线将数据导入电脑;无线通讯:可以通过无线方式将数据导入电脑或者直接传入监管网两种方式供选择,选择方式见?无线已开启连续扫描:只需按一次扫描键;请设置合适自己的时间间隔,初学者建议使用手动扫描。
手动扫描:每次扫描都需要按扫描键(两个黄色按键为扫描件)如果无线未开启,进行无线设置时提示是否开启无线。
开启无线后,无线卡自动检测无线网络,此时需进行无线网络设置(设置wifi密码等)。
5.8高速设置5.9单号设置电脑左下端通知区域图标中有橙色图标,右键,弹出小菜单如上图,如果勾选xml 单号快速处理(直报模式)需要在这里设置监管网密码,在弹出的菜单中输入监管网的数字证书密码,点击确定,成功后自动退出设置页面。
,无线退出方法:右键该图标后选择“退出”!高速操作是不解析扫描品种信息以及扫描完成后跳过数量统计。
普通扫描时:扫描时解析品种,完成后先生成扫描品种数量明细单。
单据号自动生成时比较适2.操作员导入及往来单位管理操作员的导入(需要分别操作监管网设置并把数据导入电脑、手持终端与电脑端工具进行通讯) 功能模块“信“操作人员管理”,没有设置的点击页面的新增按钮进行操作员查询出来后可以点击界面右下方的设置密码个功能模块,点击右侧的“导出”按钮,开启电脑端无线功能;手持终端选择:主菜单--3、数据通讯—4数据同步。
MC32N0手持终端使用说明
MC32N0手持终端使用说明一.常用快捷方式1.PDA死机后,热启动快捷方式:长按红色电源键5秒以上。
PDA开始执行热启动时,松开电源按钮。
2.PDA死机后,冷启动快捷方式:按住数字1和9不放,再按红色电源键。
3.屏幕重新校验快捷方式:FUNC+ESC键;在检验屏幕中不想进行校验,按esc键取消即可。
4.PDA发送程序快捷方式到桌面的步骤:a.双击桌面“我的设备”→双击“Application”磁盘→双击新建的“WXWS_PDA”文件夹(根据实际情况新建文件夹)→单击选中“WXWS_PDA"程序;b.打开菜单栏“文件”→“发送到”→“桌面快捷方式”。
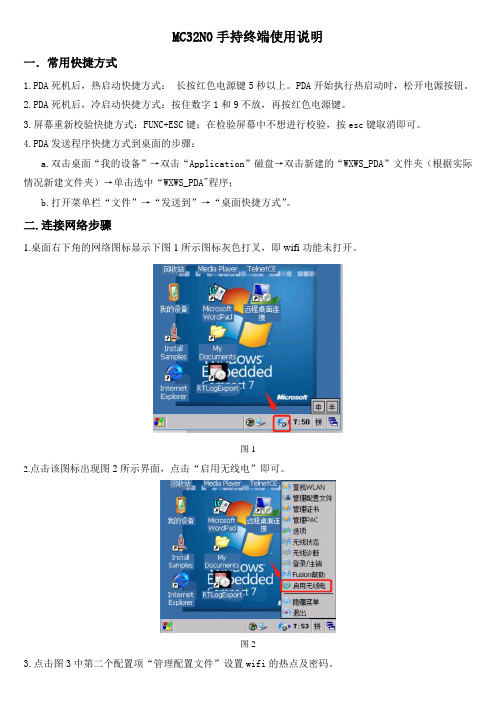
二.连接网络步骤1.桌面右下角的网络图标显示下图1所示图标灰色打叉,即wifi功能未打开。
图12.点击该图标出现图2所示界面,点击“启用无线电”即可。
图23.点击图3中第二个配置项“管理配置文件”设置wifi的热点及密码。
图34.在弹出界面图4所示根据实际情况选择对应的wifi热点,长按该热点2秒以上弹出菜单界面,点击“创建配置文件”。
图45.配置热点有9到10个步骤,每个步骤都有一张截图,截图中没有说明即默认接着点击下一步即可。
6.有时显示已经成功连上wifi,但实际就是连不上网络,此时可以通过如下步骤进行设置下(如果wifi 可以正常访问网络就忽略该步骤)。
7.该步骤是实现冷启动后wifi配置不丢失的功能,一劳永逸。
三.打开DataWedge扫码程序步骤四.把项目PDA程序拷贝到设备中1.设备冷启动后,application磁盘下的文件不会丢失,所以需将项目PDA程序拷贝到该磁盘下。
2.设备需要通过底座及数据线连到电脑上,安装Windows Mobile设备中心驱动。
3.设备连接成功的标志是在电脑里能看到如下Compact的磁盘图标(类似U盘图标)4.在application目录下根据实际情况新建一个文件夹,比如这里新建了一个“WXWS_PDA”的文件夹5.将项目PDA程序文件从电脑上拷贝到上述新建的文件夹中6.发送pda程序快捷方式到桌面。
MC32N0手持终端使用说明
MC32N0手持终端使用说明一.常用快捷方式1.PDA死机后,热启动快捷方式:长按红色电源键5秒以上。
PDA开始执行热启动时,松开电源按钮。
2.PDA死机后,冷启动快捷方式:按住数字1和9不放,再按红色电源键。
3.屏幕重新校验快捷方式:FUNC+ESC键;在检验屏幕中不想进行校验,按esc键取消即可。
4.PDA发送程序快捷方式到桌面的步骤:a.双击桌面“我的设备”→双击“Application”磁盘→双击新建的“WXWS_PDA”文件夹(根据实际情况新建文件夹)→单击选中“WXWS_PDA"程序;b.打开菜单栏“文件”→“发送到”→“桌面快捷方式”。
二.连接网络步骤1.桌面右下角的网络图标显示下图1所示图标灰色打叉,即wifi功能未打开。
图12.点击该图标出现图2所示界面,点击“启用无线电”即可。
图23.点击图3中第二个配置项“管理配置文件”设置wifi的热点及密码。
图34.在弹出界面图4所示根据实际情况选择对应的wifi热点,长按该热点2秒以上弹出菜单界面,点击“创建配置文件”。
图45.配置热点有9到10个步骤,每个步骤都有一张截图,截图中没有说明即默认接着点击下一步即可。
6.有时显示已经成功连上wifi,但实际就是连不上网络,此时可以通过如下步骤进行设置下(如果wifi 可以正常访问网络就忽略该步骤)。
7.该步骤是实现冷启动后wifi配置不丢失的功能,一劳永逸。
三.打开DataWedge扫码程序步骤四.把项目PDA程序拷贝到设备中1.设备冷启动后,application磁盘下的文件不会丢失,所以需将项目PDA程序拷贝到该磁盘下。
2.设备需要通过底座及数据线连到电脑上,安装Windows Mobile设备中心驱动。
3.设备连接成功的标志是在电脑里能看到如下Compact的磁盘图标(类似U盘图标)4.在application目录下根据实际情况新建一个文件夹,比如这里新建了一个“WXWS_PDA”的文件夹5.将项目PDA程序文件从电脑上拷贝到上述新建的文件夹中6.发送pda程序快捷方式到桌面。
手持终端药监系统功能操作说明(附)

手持终端药监系统功能操作说明一、登录,三个仓库编号、密码分别为:(如图1)(图1)一库(外库):编号0162 密码:0162二库(二楼):编号0163 密码:0163三库(一楼):编号0164 密码:0164登录进去后,即显示‘是否要同步基础数据’,选择‘是’,开始同步数据,同步完成后返回‘监管码采集系统’。
采集系统具体功能说明(图2)(图2)点击图标进入“入库单据”子业务。
一、“入库单据”业务分为四个子业务,我公司涉及的只需以下两种单据形式1. “采购入库” ;2. “退货入库”点击相应的图标进入对应单据的操作界面。
1、采购入库流程说明。
(如图3)(图3)入库单据>> 采购入库界面依次填写或扫描“单号”、“发货单位”、“入出库日期” 、“监管码”字段。
流程说明如下:1)、单号:输入电脑入库单上右上角单号,如:11030100004在一推入库单据里面怎样判断哪些单据需要进行扫描呢?凡是品名前带有‘#’标记的,均需要扫描,电脑入库单右上角均有明显的标记:‘扫描人签字’,另外在进行出入库复核时,电脑点单程序有提示‘此单需要扫描’。
注意:单号不能重复,如果一张单号上有几个需要扫描的品种,则需要一次性扫完。
2)、发货单位:输入汉字拼音的首字母,然后按OK键查询。
如没有查找到该发货单位,请先在电脑药监系统里添加该往来单位,(添加方法再客户端操作中说明)然后在手持设备中选择“基础数据”同步功能同步数据后在进行采购入库操作。
(注意:按Fn键转换输入法状态。
“数字”、“大写字母”、“小写字母”之间转换。
)3)、货主不需要填。
4)、入出库日期:该字段默认为当前时间,如果不对,请根据单据自行修改。
5)、监管码:直接按‘SCAN’键或两侧的扫描键,对准药品包装进行扫描,扫码过程中药品列表会显示扫入监管码对应的药品信息。
包括、“产品信息”、“包装规格” 和“码数”。
选中列表中的一行后可点击查看产品的详细信息。
PD560数字手持终端使用说明书

数字手持终端PD560 使用说明书非常感谢您对我们产品的青睐!本手册旨在让您快速掌握本产品的使用,了解产品详细功能和操作。
为了避免因不当操作而给您带来身体伤害或财产损失,请于使用本产品前详细阅读《安全信息手册》。
本手册适用于以下机型:PD560 数字手持终端版权信息Hytera为海能达通信股份有限公司(以下简称“我司”)在中华人民共和国和世界其他国家和/或地区的商标或注册商标。
我司仅对自有商标及产品名称享有所有权,本手册中可能提及的其他商标和产品名称为各自所有者所有。
本手册介绍的产品中可能包括存储于内存或其他媒介中的计算机程序。
我司对此等程序享有的专有权利受中华人民共和国或其他国家及相关国际法的保护。
购买本产品并不意味着我司以明示或暗示方式向购买者授予有关此等电脑程序的权益。
未经我司事先书面授权,任何企业、组织或个人不得对计算机程序进行任何形式的复制、更改、散发、反编译和反向工程。
免责声明本手册在编制过程中力求内容的准确性与完整性,但对于可能出现的错误或疏漏,我司不承担任何责任。
由于技术的不断发展,我司保留不予通知而更改产品设计与规格的权利。
未经我司事先书面授权,不得以任何形式对本手册进行复制、修改、翻译和散发。
本手册中涉及的第三方产品和内容归第三方所有,我司对其准确性、有效性、及时性、合法性或完整性均不提供保证。
如需更多信息或对本手册有任何建议,欢迎访问我们的网站:,或拨打我司服务热线:400-830-7020。
美国联邦通信委员会监管要求按照美国联邦通信委员会的监管要求,终端必须符合美国联邦通信委员会射频辐射限制规定,否则不能在美国市场上销售。
并要求制造商可通过在产品上张贴标签的方式,告知用户应注意的事项,提高用户的防辐射意识。
射频辐射控制及操作说明为了使产品发挥最佳性能及确保符合上述标准中有关职业或受控环境中的辐射限制要求,发送时间不得超过额定因数的50%(最高50%的时间发射),且需遵照下列说明:l 仅在发射(讲话)时产生射频能量辐射,接收(收听)和待机时均不会产生。
电压监测装置手持蓝牙终端操作说明

二、手持蓝牙终端操作说明
(一)国电新源手持蓝牙终端操作说明 c 数据查询
进入03菜单:按Ent进入界面,首先输入要查询的年月,然后按Ent进入查询界面, 再按Ent刷新即可看到月统计数据。(其他数据和此类似)
注意:当出现“成功启动蓝牙 第N次”说明 蓝牙连接成功;然后按照界面的提示操作!
二、手持蓝牙终端操作说明
二、手持蓝牙终端操作说明
(二)武汉豪迈手持蓝牙终端操作说明 d、电压监测仪升级
• 1、电压监测仪器的升级。升级前,先将升级文件拷贝到手持设备(平板)上,进入到 【升级】界面,然后点击【读取文件】,寻找该升级文件。I、先点击【 mnt 】 文档
二、手持蓝牙终端操作说明
(二)武汉豪迈手持蓝牙终端操作说明 d、电压监测仪升级
二、手持蓝牙终端操作说明
(一)国电新源手持蓝牙终端操作说明 b 扫描、连接装置
1、WP-DT10掌机蓝牙设置 选中WP-DT10掌机蓝牙设置,按“Ent”键进入,选择主机模式,然后进行 “扫描”当找到蓝牙时,可输入配对密码进行配对;当“配对成功”后,确 定点击 “退出”按钮; 注意: 电压监测仪 原始蓝牙密码是“1234”;掌机屏幕为触摸屏,可触摸 操蓝牙终端操作说明 b 扫描、连接装置
1、进入主界面后,点击右上角的【菜单】,出现【Scanning】、【Setting】两 个选项。其中【Scanning】是扫描搜索周边的蓝牙设备,【Setting】是设置电 压监测装置的ID号。
二、手持蓝牙终端操作说明
• • •
注意:当出现“成功启动蓝牙 第N次” 说明蓝牙连接成功;然后按照界面的 提示操作!
二、手持蓝牙终端操作说明
(二)武汉豪迈手持蓝牙终端操作说明 a 启动软件
1、打开手持设备(平板)后,点击如下图【电压监测仪】图标,启动软件。
手持终端操作说明书

手持终端操作说明操作说明书中关村工信二维码技术研究院2013年12月1日目录一.产品介绍 (3)二.操作流程 (3)2.1登录流程 (3)2.2连接蓝牙打印机 (4)2.3上班 (5)单路段上班 (5)多路段上班 (5)2.4交易 (7)车辆进场-1 (7)车辆进场-2 (10)车辆离场 (10)未缴费 (13)2.5打印 (15)2.6逃费补交 (15)2.7信息查询 (16)2.8系统设置 (19)2.9关于 (22)三.故障排除 (23)手持终端使用说明书一·产品介绍产品外观图如下:二·操作流程2·1登录流程开机后系统自动进入登录界面(图1-1),等待网络连接成功后点击登录,登录时后台服务器会将交班信息下载更新到POS机中,参数有变动时系统会自动下载并更新参数,联机登录完成后会提示登录成功(图1-2)。
2-1登录界面2-2 登录成功2·2连接蓝牙打印机登录完成后,如果蓝牙打印机没有绑定(图2-3),根据提示点确定先绑定蓝牙mac,选择可用设备,输入pin密码0000,完成绑定。
绑定完成后返回自动连接蓝牙打印机。
如果打印机已绑定,则开机自动连接。
进入主界面。
2-3 2-42·3上班单路段上班收费员在签退状态下点击“上班”图标,进入系统主菜单界面(图2-5),打印机打印签到凭据(图2-6)。
(注:上班成功后,才能使用停车收费、逃费补交、信息查询、打印等相关功能,并且图标会由灰色不可点击变成彩色可点击的状态)2-5 2-6多路段上班点击上班,可以选择相应的路段上班(图2-7),实现收费员轮岗操作。
2-7占道停车上班凭证执收单位:停车收费管理中心终端序列号:2A002757终端号:00000015工号:PB0020 姓名:XXX批次号:000001 流水号:000003收费路段:国际大厦日期时间:2013/07/26 12:00交班预收款:¥30.00车位序号车位唯一号车牌01 00000577 冀A1234502 00000578 冀A1234603 00000579 冀A1234704 00000580 冀A1234805 00000581 冀A1234906 00000582 冀A12340签到凭据说明:收费员完成上班操作后,POS机自动连接管理平台下载上一班没有离场的车辆信息,包括车辆停放的泊位、车牌号等信息、上一班预收。
日本densobht系列手持终端相关操作说明文档

操作说明1.连接无线网络双击桌面【BhtShell】图标→点击第三项【System Properties】→找到【Wireless LAN】点击【Open】打开无线模块(如已开启请忽略此步骤)→点击屏幕上方【Profiles】选项卡→点击下方的【Scan】按钮开始搜索无线→然后在中间列表处选中您的无线网络→点击下方【Create Profile】按钮进行无线网络配置SSID:无线网络名称-保持默认Authentication:安全类型-通常为WPA2-PSK,如无密码请选择OpenEncryption:加密类型-通常为AES,具体根据您的无线配置来设定PSK:网络安全密钥-在此处输入您的无线网络密码配置完毕后点击下方的【Apply】应用按钮即可,连接成功后再屏幕下方任务托盘处会有无线网络的信号格,如没有则代表信号弱,如是一个红色的X则表明无线未连接成功,请重新确认您的无线网络配置图解连接成功2.系统备份双击桌面【BhtShell】图标→点击第三项【System Properties】→找到【BHT Backup】点击【Backup】→输入本次备份名称→点击【BackUp】开始备份(电量不足时禁止备份)备份成功后会有相应的提示,如果已有备份再次备份时会提示是否覆盖上次备份,点击【是】按钮即可,如果不想覆盖上次备份点击【否】按钮重新输入新的备份文件名称即可图解3.设置声音双击桌面【BhtShell】图标→点击第三项【System Properties】→找到【ControlPanel】→找到【音量和声音】→双击打开声音配置界面通过拖动滚动条来调节音量的大小,也可在其他选项卡对系统进行其他声音相关配置设定完毕后点击右上方的【OK】按钮进行保存图解4.程序安装1.安装设备与PC端同步软件(ActiveSync)2.将手持设备通过USB数据线与电脑连接,连接成功后打开“我的电脑”会看到一个便携式设备盘符(XP是移动设备),如图3.将程序安装文件拷入盘符中,然后在手持端“我的设备”中找到这个文件,点击运行安装,安装完毕后即可使用。
手持终端操作说明1
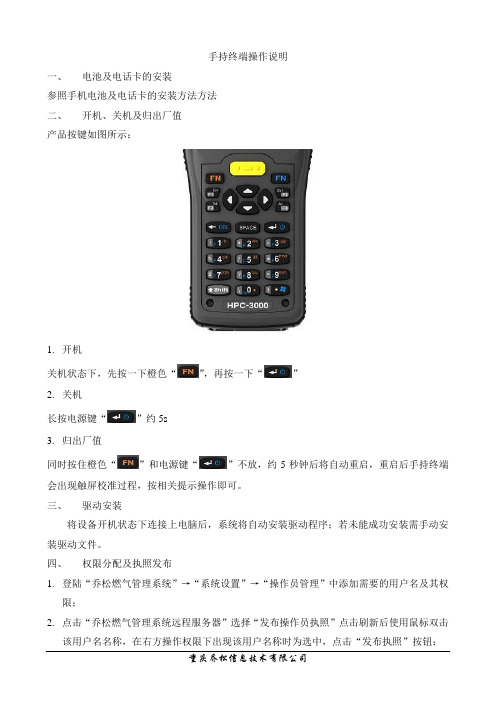
手持终端操作说明一、电池及电话卡的安装参照手机电池及电话卡的安装方法方法二、开机、关机及归出厂值产品按键如图所示:1.开机关机状态下,先按一下橙色“”,再按一下“”2.关机长按电源键“”约5s3.归出厂值同时按住橙色“”和电源键“”不放,约5秒钟后将自动重启,重启后手持终端会出现触屏校准过程,按相关提示操作即可。
三、驱动安装将设备开机状态下连接上电脑后,系统将自动安装驱动程序;若未能成功安装需手动安装驱动文件。
四、权限分配及执照发布1.登陆“乔松燃气管理系统”→“系统设置”→“操作员管理”中添加需要的用户名及其权限;2.点击“乔松燃气管理系统远程服务器”选择“发布操作员执照”点击刷新后使用鼠标双击该用户名名称,在右方操作权限下出现该用户名称时为选中,点击“发布执照”按钮;3.在“QsIpServer”文件夹下选择“license.dat”文件,将其拷贝到“智能手持终端”→“我的设备”→“FlashDisk2”中。
五、软件登陆及GPRS连接1.双击“QSMT”图标,进入设置界面,在用户名一栏中输入以上发布的执照名称和对应的密码;2.等待“GPRS连接”图标变为黑色后,点击该按钮,等待提示“连接成功”后即可进行相应操作。
若未提示“连接成功”则反复连接直到成功为止。
(由于各地区信号强度不同,则连接的所需时间均不相同)六、日常操作说明1.购气输入需要购气用户的缴费账号点击“读手持器”按钮或将用户的手持器打开点击“读手持器”按钮将用户信息读出后,填入需要购入气量方数和对应的金额(只有输入的金额大于或等于应收的金额时才能完成购气)2.维护输入需要购气用户的缴费账号点击“读手持器”按钮或将用户的手持器打开点击“读手持器”按钮将用户信息读出。
在窗口的下方选择需要进行的维护操作。
“配置”:配置相关参数,通过软件对燃气表的使用状态进行监控。
“稽核”:将手持器写入稽核信息即归出厂状态。
“重写当前”:即重写当前数据,用于更换手持器或购气信息的写入。
现场总线设备 手持终端 EX600-HT1A 使用说明书
文件No.EX※※-OML0010CN-C现场总线设备手持终端EX600-HT1A安全注意事项2型式表示・型号体系8产品各部分名称及功能8用语说明9安装・设置10安装前的准备10配线方法11设定・调整12基本操作12模式选择131. I/O monitor(I/O监视模式)152. Diagnosis Data(诊断数据确认模式)243. Sys. Configuration(系统动作设定模式)274. Parameter Setting(参数设定模式)335. Terminal Setting(终端设定模式)47故障一览表50设定参数52规格53外形尺寸图53安全注意事项此处所示的注意事项是为了确保您能安全正确地使用本产品,预先防止对您和他人造成危害和伤害而制定的。
这些注意事项,按照危害和损伤的大小及紧急程度分为“注意”“警告”“危险”三个等级。
无论哪个等级都是与安全相关的重要内容,所以除了遵守国际规格(ISO/IEC)、日本工业规格(JIS)*1)以及其他安全法规*2)外,这些内容也请务必遵守。*1) ISO 4414: Pneumatic fluid power -- General rules relating to systemsISO 4413: Hydraulic fluid power -- General rules relating to systemsIEC 60204-1: Safety of machinery -- Electrical equipment of machines (Part 1: General requirements) ISO 10218: Manipulating industrial robots-SafetyJIS B 8370: 空气压系统通则JIS B 8361: 油压系统通则JIS B 9960-1: 机械类的安全性、机械的电气装置(第1部:一般要求事项)JIS B 8433: 产业用操作机器人-安全性等*2) 劳动安全卫生法等注意误操作时,有人员受伤的风险,以及物品破损的风险。警告误操作时,有人员受到重大伤害甚至死亡的风险。
海能达PD68X数字手持终端使用说明书

DIGITAL PORTABLE RADIO数字手持终端OWNER’S MANUAL使用说明书Instructional IconsIndicates functions that are available on digital channel only.Indicates functions that are available on analog channel only.Functions marked with no function icons are available on both analog and digital channels.DisclaimerHytera Communications Corporation Limited (the Company) endeavors to achieve the accuracy and completeness of this manual, but no warranty of accuracy or reliability is given. All the specifications and designs are subject to change without notice due to continuous technology development. No part of this manual may be copied, modified, translated, or distributed in any manner without the express written permission of us.We do not guarantee, for any particular purpose, the accuracy, validity, timeliness, legitimacy or completeness of the Third Party products and contents involved in this manual.If you have any suggestions or would like to learn more details, please visit our website at:.RF Radiation InformationThis product must be restricted to operations in an Occupational/Controlled RF exposure Environments. Users must be fully aware of the hazards of the exposure and able to exercise control over their RF exposure to qualify for the higher exposure limits.RF Radiation ProfileRadio Frequency (RF) is a frequency of electromagnetic radiation in the range at which radio signals are transmitted. RF technology is widely used in communication, medicine, food processing and other fields. It may generate radiation during use.RF Radiation SafetyIn order to ensure user health, experts from relevant industries including science, engineering, medicine and health work with international organizations to develop standards for safe exposure to RF radiation. These standards consist of:●United States Federal Communications Commission, Code of Federal Regulations; 47CFR part 2 sub-part J;●American National Standards Institute (ANSI)/Institute of Electrical and Electronic Engineers (IEEE) C95. 1-1992;●Institute of Electrical and Electronic Engineers (IEEE) C95.1-1999;●International Commission on Non-Ionizing Radiation Protection (ICNIRP) 1998.FCC RegulationsFederal Communication Commission (FCC) requires that all radio communication products should meet the requirements set forth in the above standards before they can be marketed in the U.S, and the manufacturer shall post a RF label on the product to inform users of operational instructions, so as to enhance their occupational health against exposure to RF energy.Operational Instructions and Training GuidelinesTo ensure optimal performance and compliance with the occupational/controlled environment RF energy exposure limits in the above standards and guidelines, users should transmit not more than 50% of the time and always adhere to the following procedures:●RF energy will be generated only when the radio is transmitting.●The radio must be 2.5 centimeters away from human body when transmitting.EU Regulatory ConformanceAs certified by the qualified laboratory, the product is in compliance with the essential requirements and other relevant provisions of the Directive 1999/5/ EC.Please note that the above information is applicable to EU countries only.ContentsItems in the Package ----------------------------------------1 Product Overview --------------------------------------------2 Product Controls ---------------------------------------------------2 Programmable Keys ----------------------------------------------3 Before Use ------------------------------------------------------3 Assembling the Radio --------------------------------------------3 Charging the Battery----------------------------------------------4 Checking the Battery Power ------------------------------------5 Status Indication ---------------------------------------------5 LCD Icon-------------------------------------------------------------5 LED Indicator -------------------------------------------------------6 Menu Navigation----------------------------------------------7 Basic Operations ---------------------------------------------8 Powering On/Off ---------------------------------------------------8Adjusting the Volume ---------------------------------------------8 Selecting a Zone ---------------------------------------------------8 Selecting a Channel -----------------------------------------------8 Inputting via Keypad ----------------------------------------------9 Locking and Unlocking the Keypad ---------------------------9 Managing the Contacts-------------------------------------------9 Call Services ---------------------------------------------------10Private Call ------------------------------------------------------10 Group Call -------------------------------------------------------11 Calling on Analog Channel (No Signaling) --------------11 Emergency Alarm -------------------------------------------------11Message Service -----------------------------------------12 Troubleshooting ----------------------------------------------13 Care and Cleaning -------------------------------------------14 Optional Accessories ---------------------------------------153To remove the battery, please turn off the radio first. Then slide the battery latch upwards to unlock the battery. Programmable KeysSK1to the corresponding Feature Book for feature details.Assembling the Radio 1. Assembling the Battery2. Assembling the Antenna”Assemble DisassembleNote4 3. Assembling the Belt Clip12Remove the screws Assemble the Belt ClipCharging the Battery Please use the charger specified by the Company, and follows thecharging steps as shown below.Read the Safety Information Booklet in advance to get necessary safety information. ●To achieve optimal battery performance, please charge the battery for at least 5 hours before initial use.Do not hold the radio by its antenna, otherwise the performance and lifespan of the antenna will be reduced.CautionChecking the Battery PowerYou may check the current battery power by holding down the programmed Battery Power Indicator key preset by your dealer. And release the key to exit. Battery power indications are listed below:DIconLED IndicatorD7Powering On/Off Adjusting the Volume Selecting a ZoneA zone is a group of channels exhibiting the same property, which is programmed by your dealer and can facilitate convenient management over the channel. The radio supports up to 3 zones, each with a maximum of 16 channels. You can switch to the appropriate zone by pressing the programmed Zone Up or Zone Down key preset by your dealer.Selecting a ChannelAfter the radio is powered on, you can rotate the Channel Selector knob to select an appropriate channel. You can also switch to the designated channel by pressing the programmed Preset Channel key preset by your dealer.If the Channel Notify feature is enabled, you will hear the corresponding channel number when switching to any channel.Selecting a Zone Selecting a Channel8Inputting via KeypadYou can input alias, call numbers and messages via the keypad of theradio. Besides, you may need to do the following during inputting.●●●Locking and Unlocking the KeypadWhen the keypad is not in use, you can lock the keypad to avoidmishandling. You can lock or unlock the keypad through any of thefollowing methods:●Key Combination: Press the OK●Programmable Key: Press the programmedby your dealer.●Menu Navigation: Go to “Settings -> Radio Settings -> Keypad Lock”to enable or disable the feature.»Enable: The keypad will be locked automatically if there is no radiooperation within the preset time. After this feature is enabled, youcan press the Up/Down key to set the Keypad Auto Lock DelayTime.»Disable: The keypad will not be locked automatically. However, youcan lock or unlock the keypad via the key combination or KeypadLock key mentioned above.configure other lockable keys or knobsManaging the ContactsYou can manage the contacts via the “Contact” menu.Contact ListThe Contact List is used to save Private Call/Group Call/All Call contactsinformation such as Call Alias, Call Type and Call ID. You can accessthe “Contact List” menu via the “Contact” menu or by pressing theprogrammed Contact List key.In the “Contact List” menu, you can check the contact information, editor delete the private contact. You can send to a private call contact thefollowing commands: Alert Call, Radio Check, Remote Monitor, RadioEnable or Radio Disable. Please refer to Feature Book for more details.New ContactYou can add and save a new contact to the contact list. The number andalias of each contact must be unique.Note10After the radio is powered on, you can make and receive calls. To ensure optimal volume of the receiving radio, keep the microphone about 2.5 toPrivate CallInitiating a Private CallWhen initiating a private call, the radio will display the icon . Youcan make a private call through the following ways:Preset ContactIn the home screen, hold down the PTT key to initiate a Private Call to the Private Call contact preset for the current channel.You may request your dealer to preset a regular Private Call contact, Group Call contact or an All Call contact for each digital channel.Contact List or Call Logs1. Go to “Menu -> Contact -> Contact List” or “Menu -> Call Logs -> Outgoing/Incoming/Missed”.2. Use the Up/Down key to select an appropriate contact.3. Hold down the PTT key to initiate a Private Call.Manual Dial1. Go to “Menu -> Contact -> Manual Dial”.2. Input a Private Call number via the numeric keypad.3. Hold down the PTT key to initiate a Private Call.●display the call type (private call ID/ group call ID).●If the Default Numeric Key Selection feature is enabled by your dealer, you can enter a private call number in the home screen, and then press the PTT key to transmit the call. However, if the DTMF keypad is enabled, the number entered in the home screen is a phone number. You can dial the private call number through the menu “Manual Dial” only.Note11Receiving and Responding to a Group CallAfter receiving a group call, the radio will display the icon . You canhold down the PTT key to call back within the preset time.Call on Analog Channel (No Signaling)On an analog channel, you can hold down the PTT key and talk to the microphone to transmit, and release the PTT key to receive.Please refer to the corresponding Feature Book for operation description on how to make and receive calls on the analog channel with signaling.Emergency CallIn case of emergency, you can use this feature to ask for help from your companion or the control center. The Emergency Call has the highest priority which can terminate the ongoing calls with lower priorities on the current channel. You can make an emergency call even when your radio is transmitting or receiving.This feature needs to be configured and enabled by your dealer. Please refer to the corresponding Feature Book for details.Receiving and Responding to a Private CallAfter receiving a private call, the radio will display the icon, thenyou can listen without any operation. You can hold down the PTT key to call back within the preset time. If you do not respond it, the radio will display appropriate indications.Group CallInitiating a Group CallWhen initiating a group call, the radio will display the icon. Youcan make a group call through the following ways. The operation is similar to initiating a private call.Preset ContactIn the home screen, hold down the PTT key to initiate a Group Call to the Group Call contact preset for the current channel.Contact List1. Go to “Menu -> Contact -> Contact List”.2. Use the Up/Down key to select an appropriate contact.3. Hold down the PTT key to initiate a Group Call.Manual DialThe operation is the same as initiating a private call.This feature allows you to edit and send a new message, to directly send a quick text message and to forward the messages in the Inbox, Outbox and Drafts.Sending a message1. Go to “Menu -> Message -> New Msg” to enter the relevant screen.2. Type the text and press the OK key. Save it to Drafts, or send it to aprivate call contact or a group call contact.3. Select the contact or input the contact number manually.4. Press the OK key to send the message. When the message is sentsuccessfully, the radio will display the prompt “Send Success!”.Quick TextQuick Text are frequently used messages preset by your dealer. You can choose to edit and send any entry.InboxThe radio saves the received messages into the Inbox and marks every message with a corresponding icon to indicate its status.● : Read message● : Unread messageWhen the Inbox is full, the radio will display theicon , and theearliest message will be overwritten by the latest one automatically. Outbox The radio will save the sent messages into the OutBox and marks every message with a corresponding icon to indicate its status.● : The message is sent successfully.● : The message is not sent successfully. In this case, you canresend it.When the Outbox is full, the earliest message will be overwritten by the latest one automatically.DraftsThe radio saves the edited messages into the Drafts. When the Drafts is full, the earliest message will be overwritten by the latest one automatically. After the message in the Drafts is sent successfully, it will be removed from the Drafts and be saved into the Outbox. If not sent successfully, the message will be saved into the Drafts and the Outbox.1214To guarantee optimal performance as well as a long service life of the product, please follow the tips below.Product CareKeep the product far away from substances that can corrode the circuit.Product Cleaning●Clean up the dust and fine particles on the product surface and charging piece with a clean and dry lint-free cloth or a brush regularly.●Use neutral cleanser and a non-woven fabric to clean the keys, control knobs and front case after long-time use. Do not use chemical preparations such as stain removers, alcohol, sprays or oil preparations, so as to avoid surface case damage.●Make sure the product is completely dry before use.Caution H M N O 4PC45 Programming Cable (USB Port)The following items are the main optional accessories for the radio. Formore information of other accessories, please consult your local dealer.Use the accessories specified by Hytera only. If not, theCompany shall not be liable for any losses or damagesarising out of use of unauthorized accessories.CautionBL2010 2000mAh Li-Ion battery,MCA08 MCU Multi-unit Charger (for ThickBattery),CH10A06 Dual Pocket MCU Charger Kit (forLi-ion/Ni-MH Batteries),PS7501 Switching Power Adapter for MCUMulti-unit Rapid-rate Charger,MCA05 Battery Optimizing SystemEAN21 3-wire Surveillance Earpiece with TransparentAcoustic Tube(Beige),ESN14 Remote Earbud,EHN20 Remote Swivel Earset,EHN21 Remote C-Earset,EAN22 Detachable Earpiece with Transparent AcousticNCN011 Nylon Carrying Case (half-folded)(non-swivel) (black)SM26N2 Waterproof Remote Speaker Microphone(IP54),EAN24 2-wire Surveillance Earpiece with TransparentAcoustic Tube (Beige),EWN08 Digital Wireless Covert Earpiece (FlatpackSensor)图标说明:表示数字信道独有的功能,只能在数字信道上使用。
全国邮政速递手持终端应用系统使用手册
全国邮政速递手持终端应用系统版本号:使用手册建方信息技术有限公司2007年07月目录第一章手持终端应用系统( 使用说明 (3)第一节投递处理使用说明 (3)一、系统登录 (3)二、投递处理 (4)第二节揽收处理使用说明 (17)一、系统登录 (17)二、揽收处理 (18)第三节无线数据传输功能说明 (28)一、无线上传邮件功能 (28)二、无线跟踪查询邮件功能 (30)三、版本验证(有线验证、无线验证) (32)四、无线同步时间 (33)第四节系统设置说明 (34)一、修改密码 (34)二、屏幕校准 (35)三、本机参数设置 (35)一、设备日常维护注意事项 (37)二、系统应用注意事项 (37)三、数据传输注意事项 (38)四、故障设备报修 (39)附录一MC1000拼音输入法及笔画输入法说明 (40)附录二MC70激活无线连接方法说明 (45)第一章 手持终端应用系统( 使用说明第一节 投递处理使用说明一、 系统登录手持终端设备启动后会首先出现EMS 手持终端收寄投递系统登录主界面如下:(图1-1 EMS 手持终端收寄投递系统登录主界面)● 登录类型:系统提供两种登录类型:揽收或投递。
默认登录类型为“揽收”。
此时您需要点击【下箭头键】将登录类型变更为“投递”,并点击【回车键】确认,之后光标进入下一输入框。
● 登录工号:请输入登录工号,并点击【回车键】确认。
● 姓名:此栏不需要手工输入,系统会根据您的登录工号自动显示相对应的投递员姓名。
● 登录密码:技巧:您也可以在此输入框为空时直接点击【回车键】,系统会自动弹出与本机绑定的所有投递员工工号列表,您可以直接从此列表中选择适当的用户名进行登陆。
键盘输入状态提示符。
“1”为数字输入;“A ”为字母输入;“1F ”或“AF ”为Fn 输入。
电量显示。
当连接电源时显示为“AC ”。
系统时间日期显示请在此栏中输入正确的登录密码,之后点击【回车键】即完成登录并进入下一级界面(图1-2)。
EXcon VEX4000手持终端产品说明书

EXcon handheld terminalMenus and alarmsVEX4000Original instructions3005263-2015-08-20EXcon Handheld terminal EXHAUSTO A/SOdensevej 76DK-5550 Langeskov Tel.: +45 65 66 12 34Fax: +45 65 66 11 10********************www.exhausto.dk1.The handheld terminal1.1.Operation (4)1.1.1.Operation and functions (4)1.1.2.Operating levels (5)1.2.Passwords (5)er modeer menu (6)2.1.1.Fan operation (7)2.1.2.Extended operation (8)2.1.3.Temperature (8)2.1.4.Time and date (9)2.1.5.Alarm log (9)2.1.6.About the control system (9)2.1.7.Internet (10)3.Installer level3.1.Installer menu (11)3.1.1.Fan operation (12)3.1.2.Temperature (15)3.1.3.Initial adjustment (17)3.1.4.Fire (18)munication (19)nguage (19)3.1.7.Factory setting (20)3.1.8.Store functions (21)4.Service level4.1.Service menu (24)4.1.1.Fan (25)4.1.2. Filter (28)4.1.3.Heating (30)4.1.4.Heating recovery (35)4.1.5.Cooling (38)4.1.6.Damper (42)4.1.7.Temperature sensor correction (44)4.1.8.Pressure transmitter (45)5.Alarm summaryAlarm list manual terminal (46)2/52Symbols and termsProhibition symbol Failure to observe instructions marked with a prohibition symbolmay result in serious or fatal injury.Danger symbol Failure to observe instructions marked with a danger symbol mayresult in personal injury and/or damage to the unit.Terms These instructions use the following terms for air flows as given in DS447-2013:●Supply air●Extract air●Outdoor air●Exhaust air●RecirculationScreen displays These guidelines contain screen displays intended to the help the user and indicate which menu the user is currently viewing.NB:The order of screen displays/menus depends on the VEX units settings. Therefore there may be discrepancies between the order of screen displays in the guidelinesand in the VEX unit's handheld terminal.Software versionSoftware versionThese instructions are for use with the following version:●EXcon Master SW: 3.19●Handheld terminal SW: 1.04The current software version for both the EXcon Master and the handheld terminal canbe seen in the menu: User > On control of the handheld terminal.3/521. The handheld terminal1.1 OperationFunctional descrip-tionReading, programming and control can be performed from the handheld terminal. Theterminal has a graphic display, a button with PRESS and TURN function, a "?" (help)-button and an "Esc” button.The handheld terminal menu and settings are structured to correspond to the menuand settings found in the EXcon control system’s web server. The functionality, set-tings, etc. of the EXcon control system are described in the EXcon instructions. Handheld terminalA Graphic displayB Light diode: Green LED which lightsup when voltage on the handheldterminal is OK.C Light diode: Red LED which flashesin the event of an alarm from theunit or the system alarms.D PRESS buttonE TURN buttonF? buttonG ESC button1.1.1 Operation and functionsTURN function The TURN function is used to switch between menus and for setting values.Turn to the right > next menu/increase valueTurn to the left > previous menu/decrease valuePRESS function The PRESS function is used to enter the menu.✠ One press > confirm and next value✠✠ Two presses > confirm and previous valueESC button The ESC button is used to exit a menu.4/52button Press the ? button to bring up help text on the display.Changing the set value The hatched field indicates the active value, which can be changed by turning the turn button. Press the press button to confirm the selected choice. Press the ESC button to exit a menu. The following describes a programming sequence.NB! If the buttons on the handheld terminal are not activated in 30 minutes, the unit automatically logs out to user level.1.1.2 Operating levelsThe menus in the hand terminal are divided into three operating levels:●User level - free access●Technician/Installation engineer level - requires password●Service level - requires password1.2 PasswordsLogin at a higher level also gives access to the underlying levels. Handheld terminalIt is not possible to change password on the terminal.5/522. User mode2.1 User menuThe user level menu gives access to operating times, temperature setpoint, clock,alarms, software version and IP address.No password is required for user level.6/522.1.1 Fan operationSubmenu Submenu7/522.1.2 Extended operationSubmenu Any comments2.1.3 TemperatureSubmenu Any comments*Shown ifpoint offset.8/522.1.4 Time and dateSubmenu Any comments2.1.5 Alarm logSubmenu Any comments2.1.6 About the control systemSubmenu Any comments9/522.1.7 InternetSubmenu Any comments10/523. Installer level3.1 Installer menuThe menu at installer level gives access to selections and settings for regulationtypes and integral functions.Password The password for the installer level must be set to allow access to underlying menus.●Code 1111Failure to observe instructions marked with a danger symbol mayresult in personal injury and/or damage to the unit.3.1.1 Fan operationSubmenu Any comments3.1.2 TemperatureSubmenu Any commentsShown if Outdoor airtemperature (externalShown only when room operation is installed.Symbols which are only shown when Summer/WinterShown only when the unit is in summer operation.Shown only when the unit is in winter operation.Set temperature setpoint●3.1.3 Initial adjustmentSubmenu Any comments3.1.4 FireSubmenu Any commentsNB:The selected fans mode must meet regulatory standards.3.1.5 CommunicationSubmenu Any comments 3.1.6 LanguageSubmenu Any comments3.1.7 Factory settingSubmenu Any comments3.1.8 Store functionsSubmenu Submenu4. Service level4.1 Service menuThe service level menu gives access to the operating values, settings and forcedoperation of the unit's components.Password The password must be set to allow access to underlying menus. The password gives automatic access to installer level.●Code 1112Failure to observe instructions marked with a danger symbol mayresult in personal injury and/or damage to the unit.4.1.1 FanSubmenu Any commentsSymbol is shown when an alarm from the frequencyconverter is triggered.Forced control of supply air fan and setting of K fac-Symbol is shown when an alarm from the frequencyconverter is triggered.Extract air fan operating statusSymbol is shown when an alarm from the frequencyconverter is triggered.Symbol is shown when an alarm from the frequency converter is triggered.Setting of delayed fan start4.1.2 FilterSubmenu Any commentsSymbol is shown when a filter alarm is triggered.* Shown only in the event of a dynamic filter alarmSymbol is shown when a filter alarm is triggered.* Shown only in the event of a dynamic filter alarm4.1.3 HeatingSubmenu Any commentsSymbol is shown when an alarm from the heat inter-face is triggered.Symbol is shown when an alarm from the heat inter-face is triggered.Water heating coil4.1.4 Heating recoverySubmenu Submenu/Any com-ments Crossflow heat exchangerRotary heat exchanger4.1.5 CoolingSubmenu Any commentsWater coolingExternal DX Cooling4.1.6 DamperSubmenu Any comments Outdoor air damperRecirculation damper Smoke-evacuation damper4.1.7 Temperature sensor correctionSubmenu Any commentsShown if heating coil1 is configured4.1.8 Pressure transmitterSubmenu Submenu5. Alarm summary Alarm list manual terminal Alarm list EXcon SW version 3.13。
全国邮政速递手持终端应用系统使用手册
全国邮政速递手持终端应用系统版本号:使用手册建方信息技术有限公司2007年07月目录第一章手持终端应用系统( 使用说明 (3)第一节投递处理使用说明 (3)一、系统登录 (3)二、投递处理 (4)第二节揽收处理使用说明 (17)一、系统登录 (17)二、揽收处理 (18)第三节无线数据传输功能说明 (28)一、无线上传邮件功能 (28)二、无线跟踪查询邮件功能 (30)三、版本验证(有线验证、无线验证) (32)四、无线同步时间 (33)第四节系统设置说明 (34)一、修改密码 (34)二、屏幕校准 (35)三、本机参数设置 (35)一、设备日常维护注意事项 (37)二、系统应用注意事项 (37)三、数据传输注意事项 (38)四、故障设备报修 (39)附录一MC1000拼音输入法及笔画输入法说明 (40)附录二MC70激活无线连接方法说明 (45)第一章 手持终端应用系统( 使用说明第一节 投递处理使用说明一、 系统登录手持终端设备启动后会首先出现EMS 手持终端收寄投递系统登录主界面如下:(图1-1 EMS 手持终端收寄投递系统登录主界面)● 登录类型:系统提供两种登录类型:揽收或投递。
默认登录类型为“揽收”。
此时您需要点击【下箭头键】将登录类型变更为“投递”,并点击【回车键】确认,之后光标进入下一输入框。
● 登录工号:请输入登录工号,并点击【回车键】确认。
● 姓名:此栏不需要手工输入,系统会根据您的登录工号自动显示相对应的投递员姓名。
● 登录密码:技巧:您也可以在此输入框为空时直接点击【回车键】,系统会自动弹出与本机绑定的所有投递员工工号列表,您可以直接从此列表中选择适当的用户名进行登陆。
键盘输入状态提示符。
“1”为数字输入;“A ”为字母输入;“1F ”或“AF ”为Fn 输入。
电量显示。
当连接电源时显示为“AC ”。
系统时间日期显示请在此栏中输入正确的登录密码,之后点击【回车键】即完成登录并进入下一级界面(图1-2)。
pa692使用手册

pa692使用手册PA692是一款功能强大的手持终端设备,可广泛应用于物流配送、仓储管理、零售管理等领域。
本手册将为您提供关于PA692的详细使用指南,以帮助您充分发挥设备在工作中的优势。
1. 开机与关机:- 开机:长按设备侧面的电源按钮,待屏幕亮起后松开按钮即可。
- 关机:长按设备侧面的电源按钮,选择"关机"选项并确认。
2. 界面导览:- 屏幕下方有一排横向排列的应用图标,点击可快速进入相应应用。
- 在主屏幕上滑动可以调出快速设置面板,可调整亮度、音量等设置。
- 主屏幕中央有一个搜索框,可用于搜索应用或内容。
3. 应用程序:- PA692内置了多个实用的应用程序,如物流管理、库存管理、采购管理等。
- 点击应用程序图标即可打开对应的应用程序界面。
- 在应用程序界面上滑动可以查看更多功能选项。
4. 数据输入:- PA692配备了物理键盘、虚拟键盘和触摸屏,可根据需要选择不同的输入方式。
- 物理键盘:使用物理键盘进行数据输入,适用于需要高频率输入的场景。
- 虚拟键盘:通过屏幕上显示的虚拟键盘进行数据输入,适用于少量文字输入。
- 触摸屏:轻触屏幕以选中操作区域或输入文字。
5. 数据传输:- PA692支持多种数据传输方式,如蓝牙、Wi-Fi和USB等。
- 蓝牙:通过蓝牙功能与其他设备进行数据传输,如打印机或电脑。
- Wi-Fi:连接到Wi-Fi网络后,可通过网络传输数据。
- USB:通过USB接口将设备与电脑连接,以实现数据传输。
6. 资料管理:- PA692可以存储和管理各种类型的文件和资料。
- 使用文件管理器应用程序,您可以创建文件夹、移动和复制文件等操作。
- 支持通过USB接口或Wi-Fi将文件传输到其他设备。
请按照以上内容仔细阅读和操作,您将更好地了解和使用PA692手持终端设备。
如有其他疑问,请咨询相关技术支持人员或查阅PA692的详细使用手册。
CRADLE DT-963 条码手持终端 说明书

Parity Odd/Even/No Parity
8
使用方法
步骤 1 通讯座 DT-963 的波特率可通过产品底部的拨码开关设置, 拨码开关
状态与波特率的对应关系如表一所示。使用前请将通讯座设置为所需波特 率。
需要注意: 在使用 Multidrop 软件通讯时,DT-963 用 RS-232 通讯接口时支持波 特率 2400 ̄115200bps,使用 USB 接口时支持波特率 2400 ̄19200bps,详细 请参考表二。 重要提示:必须保证通讯软件、手持终端、红外通讯座的波特率设置 一致。
off
on
x
2400 bps off
on
on
x
* “x”表示可以为任意状态
10
表二
Multidrop
波特率
USB
RS-232
115200 bps NO
YES
57600 bps NO
YES
38400 bps NO
YES
19200 bps YES
CRADLE DT-963
用户手册 A001019
目录 产品简介 .............................................................................................................1 打开包装 .............................................................................................................2 外观与界面 .........................................................................................................3 性能指标 .............................................................................................................6 使用方法 .............................................................................................................8 问题及对策 .......................................................................................................12 注意事项 ...........................................................................................................13
手持移动终端PDA使用手册
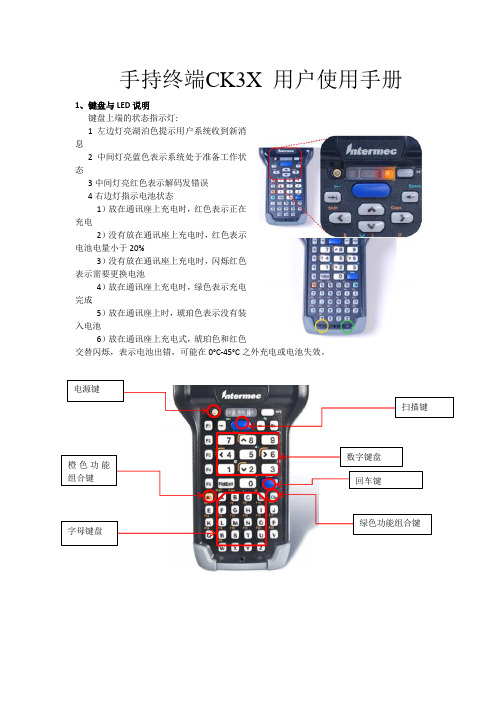
手持终端CK3X 用户使用手册
1、键盘与LED 说明
键盘上端的状态指示灯:
1左边灯亮湖泊色提示用户系统收到新消
息
2中间灯亮蓝色表示系统处于准备工作状
态
3中间灯亮红色表示解码发错误
4右边灯指示电池状态
1)放在通讯座上充电时,红色表示正在
充电
2)没有放在通讯座上充电时,红色表示
电池电量小于20%
3)没有放在通讯座上充电时,闪烁红色
表示需要更换电池
4)放在通讯座上充电时,绿色表示充电
完成
5)放在通讯座上时,琥珀色表示没有装
入电池
6)放在通讯座上充电式,琥珀色和红色
交替闪烁,表示电池出错,可能在0°C-45°C 之外充电或电池失效。
屏幕图示:
关闭声音状态。
点击可以设置其状态
计算机已连接到网络中
计算机没连接到网络中
已连接到802.11b/g 协议的无线网络中
通过USB 口已连接到PC 中
点击它可以设置网络参数
2、CK3输入法
键盘组合键输入法:。
Hytera 数字手持终端 BD552i 使用说明书

DIGITAL PORTABLE RADIO数字手持终端BD552i OWNER’S MANUALBD552i使用说明书Welcome to the world of Hytera and thank you for purchasing this product.This manual includes a description of the functions and step-by-step procedures for use.It also includes a troubleshooting guide.To avoid bodily injury or property loss caused by incorrect operation,please carefully read the Safety Information Booklet before use.This manual is applicable to the following product:BD552i Digital Portable RadioCopyright InformationHytera is the trademark or registered trademark of Hytera Communications Corporation Limited(the Company)in the People's Republic of China(PRC) and/or other countries or areas.The Company retains the ownership of its trademarks and product names.All other trademarks and/or product names that may be used in this manual are properties of their respective owners.The product described in this manual may include the Company's computer programs stored in memory or other ws in PRC and/or other countries or areas protect the exclusive rights of the Company with respect to its computer programs.The purchase of this product shall not be deemed to grant,either directly or by implication,any rights to the purchaser regarding the Company's computer programs.The Company's computer programs may not be copied,modified,distributed,decompiled,or reverse-engineered in any manner without the prior written consent of the Company.DisclaimerThe Company endeavors to achieve the accuracy and completeness of this manual,but no warranty of accuracy or reliability is given.All the specifications and designs are subject to change without notice due to continuous technological development.No part of this manual may be copied,modified,translated,or distributed in any manner without the prior written consent of the Company.We do not guarantee,for any particular purpose,the accuracy,validity, timeliness,legitimacy or completeness of the third-party products and contents involved in this manual.If you have any suggestions or would like to receive more information, please visit our website at:.FCC StatementThis equipment has been tested and found to comply with the limits for a Class B digital device,pursuant to part15of FCC Rules.These limits are designed to provide reasonable protection against harmful interference in a residential installation.This equipment generates and can radiate radio frequency energy.If not installed and used in accordance with the instructions,it may cause harmful interference to radio communications. However,there is no guarantee that interference will not occur in a particular installation.Verification of harmful interference by this equipment to radio or television reception can be determined by turning it off and then on.The user is encouraged to try to correct the interference by one or more of the following measures:·Reorient or relocate the receiving antenna.Increase the separation between the equipment and receiver.·Connect the equipment into an outlet on a different circuit to that of the receiver's outlet.·Consult the dealer or an experienced radio/TV technician for help. Operation is subject to the following two conditions:·This device may not cause harmful interference.·This device must accept any interference received,including interference that may cause undesired operation.Note:Changes or modifications to this unit not expressly approved by the party responsible for compliance could void the user's authority to operate the equipment.Compliance with RF Exposure StandardsHytera's portable radio complies with the following RF energy exposure standards and guidelines:·United States Federal Communications Commission,Code of Federal Regulations;47CFR§1.1307,1.1310and2.1093.·American National Standards Institute(ANSI)/Institute of Electrical and Electronic Engineers(IEEE)C95.1:2005;Canada RSS102Issue5 March2015.·Institute of Electrical and Electronic Engineers(IEEE)C95.1:2005 EditionRF Exposure Compliance and Control Guidelines and Operating InstructionsTo control your exposure and ensure compliance with theoccupational/controlled environmental exposure limits,always adhere to the following procedures.Guidelines:·Do not remove the RF Exposure Label from the device.·User awareness instructions should accompany device when transferred to other users.·Do not use this device if the operational requirements described herein are not met.Operating Instructions:·Transmit no more than the rated duty factor of50%of the time.To transmit(talk),push the Push-To-Talk(PTT)button.To receive calls, release the PTT button.Transmitting50%of the time,or less,isimportant because the radio generates measurable RF energy only when transmitting(in terms of measuring for standards compliance).·Keep the radio unit at least2.5cm away from the face.Keeping the radio at the proper distance is important as RF exposure decreases with distance from the antenna.The antenna should be kept away from the face and eyes.·When worn on the body,always place the radio in a Hytera-approved holder,holster,case,or body harness or by use of the correct clip for this e of non-approved accessories may result in exposure levels which exceed the FCC's occupational/controlled environmental RF exposure limits.·Use of non-approved antennas,batteries,and accessories causes the radio to exceed the FCC RF exposure guidelines.·Contact your local dealer for the product's optional accessories.IC StatementThe device has been tested and complies with SAR limits,users can obtain Canadian information on RF exposure and complianceAprès examen de ce matériel aux conformitéaux limites DAS et/ou aux limites d’intensitéde champ RF,les utilisateurs peuvent sur l’exposition aux radiofréquences et la conformitéand compliance d’acquérir les informations correspondantesThis device complies with Industry Canada license-exempt RSS standard(s). Operation is subject to the following two conditions:·This device may not cause harmful interference.·This device must accept any interference received,including interference that may cause undesired operation.Le présent appareil est conforme aux CNR d'Industrie Canada applicables aux appareils radio exempts de licence.L'exploitation est autorisée aux deux conditions suivantes:(1)l'appareil ne doit pas produire de brouillage, et(2)l'utilisateur de l'appareil doit accepter tout brouillage radioélectrique subi,même si le brouillage est susceptible d'en compromettre le fonctionnementEU Regulatory ConformanceAs certified by the qualified laboratory,the product is in compliance with the essential requirements and other relevant provisions of the following directives:1999/5/EC or2014/53/EU,2006/66/EC,2011/65/EU,and 2012/19/EU.Please note that the above information is applicable to EU countries only.ContentsPacking List2 Product Overview3 Product Controls3 LCD Icons4 LED Indications4 Before Use4 Attaching the Antenna4 Attaching the Battery4 Attaching the Belt Clip5 Attaching the Audio Accessories5 Charging the Battery5 Checking the Battery Power5 Basic Operations6 Call Services6 Call on Digital Channel6 Call on Analog Channel(Without Signaling)6 Optional Features7 Troubleshooting9 Care and CleaningProduct Care11 Product Cleaning11 Optional Accessories1111 ContentsPlease unpack carefully and check that all items listed below are received.If any item is missing or damaged,please contact your dealer.Item Quantity(PCS)Item Quantity(PCS) Radio1Antenna1 Battery1Belt Clip1 Charger1Strap1 Power Adapter1Documentation Kit1Check whether the frequency band marked on the antenna label matches that on the radio label.If not,please contact your dealer.You can request your dealer to program your radio to use the SK as the shortcut to a radio featureProduct ControlsLCDIconsLED IndicationsLED Indicator Radio StatusFlashes green Being turned on.Glows green Receiving.Glows redTransmitting.Flashes orange slowlyScanning.Glows orangeCall hang time:No voice is being transmitted or received on the channel during a call.Within such a period,you can press and hold the PTT key and speak.Attaching the Antenna1.Place the antenna inits receptacle.2.Rotate the antenna clockwise until hand tight.Do not hold the radio by the antenna,as it may reduce the radio performance and life span of the antenna.Attaching the Battery1.Insert the top of the battery into the top of the battery slot.2.Press the bottom of the battery until the latch snaps into place.To remove the battery,make sure the radio is turned off,and then slide the battery latch upwards to unlock the battery.Attaching the Belt Clipe a Phillips screwdriver to turn the screws counterclockwise on the back of the radio and remove them.2.Align the screw holes on the belt clip with those on the back of the radio.3.Put the screws back in place,and use the Phillips screwdriver to turn them clockwise until hand tight.Attaching the Audio Accessories1.Open the accessory connector cover.2.Plug the accessory into the accessory connector.3.Turn the screw on the accessory plug clockwise until hand tight.Charging theBattery·Use the charger specified by Hytera to charge the battery.·Read the Safety Information Booklet before charging.The battery delivered with the radio is uncharged.To ensure optimum performance,fully charge the battery before initial use.It is recommended that your radio remain powered off during charging.To charge the battery,do as follows:1.Insert the output connector of the power adapter into the port on the backof the charger.2.Plug the power adapter into a power outlet.3.Place the battery or the radio with battery attached into the charger,andthen switch the power outlet on.To determine the charging status,check the light-emitting diode(LED) indicator on the charger according to the following table:LED Indicator Charging StatusGlows greenThe battery is fully charged or fails to make propercontact with the charger.Glows red The battery is charging.Glows orange The battery is charged to85%or above.If the LED indicator does not glow red after you place the battery or radio into the charger,take the battery or radio out of the charger,and thenreplace it into the charger while ensuring it makes proper contact with the charger.Checking the Battery PowerTo check the current battery power,press andhold the Battery Power Indicatorkey preprogrammed by your dealer.The following table lists battery powerindications.The icon indicates that the battery runs low. In this case,please recharge or replace the batteryLED Indicator Alert Tone Battery Power Glows green Three beepsGlows orange Two beepsGlows red One beepFlashes red Low battery toneIf you want to…Then...Turn on/off the radioRotate the On-Off/Volume Control knob clockwise/counterclockwise.Increase/Decrease the volume Rotate the On-Off/Volume Control knob clockwise/counterclockwise after turning on the radio.Select a channelRotate the Channel Selector knob.Call on Digital ChannelYou can initiate a call to or receive a call from theprivate or group contact preset fora digital channel.Initiating a Call1.Select the required channel.2.Hold the radio vertically 2.5to 5cm from your mouth.3.Press and hold thePTT key,and then speak into themicrophone.The radio displays for an outgoing group call andfor an outgoingprivate call.Receiving and Responding to a CallWhen receiving a call,you can listen to it without any operation.The radio displays for an incoming group call andfor an incoming privatecall.You can press and hold the PTT key and speak within the preset time period.Call on Analog Channel (Without Signaling)You can initial a call to or receive calls from all other users on an analogchannel.The operations are the same as those on a digital channel.The following features need to be programmed by your dealer.Please contact your dealer for detailed operations.Type Feature DescriptionGeneral Feature Zone Allows you to select a zone.The radio supports up to16zones,with a maximum of256channels per zone.Power Level Allows you to switch the transmit power level between high and low.Scan Allows the radio to scan all channels in the scan list preset for the current channel and stay on a channel with activities. Emergency Alarm Allows you to initiate an emergency alarm or call to ask for help in case of emergencies.Busy Channel Lockout Prevents the radio from transmitting on a busy channel.Time-out Timer(TOT)Terminates transmission when the preset time period expires.Keypad LockAllows the keypad to be locked automatically when the radio does not detect any activity or operation within the presetperiod.Battery SaveAllows the radio to automatically enter the battery save mode when it does not detect any activity or operation within thepreset period.Digital Feature All Call Allows you to initiate a call to all users on a digital channel.One Touch Call Allows you to press one key to call the predefined private or group contact. TDMA Direct Mode Allows the radio to operate on a channel with two time slots.Type Feature DescriptionAnalog Feature Squelch Off Allows the radio's speaker to always keep unmuted.Squelch Off Momentary Allows the radio's speaker to keep unmuted when you press and hold the preprogrammed key. Squelch Level Allows you to adjust the squelch threshold required for the radio to unmute.Monitor Allows the radio to monitor activities on the channel.Scrambler Allows you to encrypt the transmitted voice to prevent eavesdropping.CTCSS/CDCSS Allows you to prevent unwanted calls on the same frequency.Phenomena Analysis SolutionThe radio cannot be turned on.The battery may be installed improperly.Remove and reattach the battery.The battery power may run out.Recharge or replace the battery.The battery may suffer from poor contact caused by dirty ordamaged battery contacts.Clean the battery contacts or replace the battery.During reception,the voice is weak,intermittent or totally inactive.The battery voltage may be low.Recharge or replace the battery.The volume level may be low.Increase the volume.The antenna may be loose or may be installed incorrectly.Turn off the radio,and remove and reattach the antenna. The speaker may be blocked.Clean the surface of the speaker.You cannot communicate with other group members.The frequency or signal strength may be low in comparisonto other members.Verify your TX/RX frequency and signal strength are correct. The channel type(digital or analog)may be set incorrectly.Verify you are on the correct digital or analog channel.You may be too far away from other members.Move towards other members.Unknown voices or noise is heard on the channel.You may be interrupted by radios using the same frequency.Change the frequency,or adjust the squelch level.The radio in analog mode may be set with no signaling.Set signaling for all radios operating at the same frequency to avoidinterference.Phenomena Analysis SolutionYou are unable to hear anyone because of too much noise and hiss.You may be too far away from other members.Move towards other members.You may be located in an unfavorable position.Forexample,your communication may be blocked by highbuildings or blocked in an underground area.Move to an open and flat area,and restart the radio and trycontacting again.It could be the result of external disturbance(such aselectromagnetic interference).Stay away from equipment that may cause interference.The OLED does notdisplay any information.The OLED may fail to function temporarily.Restart the radio.If the above solutions cannot fix your problems, or you may have some other queries, please contact us or your local dealer for more technical support.To guarantee optimal performance as well as a long service life of the product,please follow these tips.Product Care·Do not pierce or scrape the product.·Keep the product far away from substances that can corrode the circuitry.·Do not hold the product by the antenna or earpiece cable.·Close the accessory connector cover when no accessory is in use.ProductCleaningTurn off the product and remove the battery before cleaning.·Clean up the dust and fine particles on the products surface and charging piece with a clean and dry lint-free cloth or a brush regularly ·Use neutral cleanser and a non-woven fabric to clean the keys,knobs and front case after long-time use.Do not use chemical preparationssuch as stain removers,alcohol,sprays or oil preparations,so as to avoid surface case damage.·Make sure the product is completely dry before use.Use the accessories specified by Hytera only;otherwise,the Company will not be liable for any loss or damage arising out of the use of anyunauthorised accessories.Contact your local dealer for the optional accessories used with the product.非常感谢您对我们产品的青睐!本手册旨在让您快速掌握终端的使用。
- 1、下载文档前请自行甄别文档内容的完整性,平台不提供额外的编辑、内容补充、找答案等附加服务。
- 2、"仅部分预览"的文档,不可在线预览部分如存在完整性等问题,可反馈申请退款(可完整预览的文档不适用该条件!)。
- 3、如文档侵犯您的权益,请联系客服反馈,我们会尽快为您处理(人工客服工作时间:9:00-18:30)。
Copyright ◎ 2010 Beijing XinChuangJiaYe Information System Engineering Co.Ltd. All Rights Reserved 北京鑫创佳业信息系统工程有限公司 保留所有权利
鑫创佳业 XC-DMS 手持终端用户使用手册
V2.0
图 3.8 上传出库单文件到中信平台,拷贝出库单文件到电脑“D:\SFDA\InData\Business”目录 下,登录中信客户端进行操作。
鑫创佳业 XC-DMS 手持终端用户使用手册
V2.0
图 5.1 点击“退出”按钮退出当前操作,输入出库单号并选择收货方后点击按钮“下一步” , 如图 5.2
鑫创佳业 XC-DMS 手持终端用户使用手册
V2.0
图 3.4 按终端“SCAN”扫描键,激光对准条码,扫描大箱监管码,扫描后界面如图 3.5,监 管码重复扫描只记录一次
图 3.5 点击“退出”按钮退出当前入库操作,点击按钮“下一步”转到完成界面,如图 3.6
Copyright ◎ 2010 Beijing XinChuangJiaYe Information System Engineering Co.Ltd. All Rights Reserved 北京鑫创佳业信息系统工程有限公司 保留所有权利
鑫创佳业 XC-DMS 手持终端用户使用手册
V2.0
图 4.2
图 4.3
Copyright ◎ 2010 Beijing XinChuangJiaYe Information System Engineering Co.Ltd. All Rights Reserved 北京鑫创佳业信息系统工程有限公司 保留所有权利
3. 产品出库
登录成功后点击“产品出库” ,界面如图 3.1
图 3.1 点击“退出”按钮点击“是(Y) ”退出当前出库操作,如图 3.2,;点击按钮“下一步” , 选择往来单位,如图 3.3;如果没有往来单位请导入,操作步骤请查看 “9.数据导入”
Copyright ◎ 2010 Beijing XinChuangJiaYe Information System Engineering Co.Ltd. All Rights Reserved 北京鑫创佳业信息系统工程有限公司 保留所有权利
鑫创佳业 XC-DMS 手持终端用户使用手册
V2.0
2. 产品入库
登录成功后点击“产品入库” ,界面如图 2.1
图 2.1 点击“退出”按钮,点击“是(Y)”取消当前入库操作,如图 2.2,输入或修改入库单号, 点击下一步,开始扫描大箱监管码,如图 2.3
图 2.2
Copyright ◎ 2010 Beijing XinChuangJiaYe Information System Engineering Co.Ltd. All Rights Reserved 北京鑫创佳业信息系统工程有限公司 保留所有权利
Copyright ◎ 2010 Beijing XinChuangJiaYe Information System Engineering Co.Ltd. All Rights Reserved 北京鑫创佳业信息系统工程有限公司 保留所有权利
鑫创佳业 XC-DMS 手持终端用户使用手册
V2.0
1. 登录
鑫创佳业 XC-DMS 手持终端用户使用手册
V2.0
目录
鑫创 XC-DMS 手持终端 ................................................................................................................ 1 使用手册................................................................................................................................... 1 1. 2. 3. 4. 5. 6. 7. 8. 9. 登录................................................................................................................................... 3 产品入库........................................................................................................................... 4 产品出库........................................................................................................................... 7 快速入库......................................................................................................................... 11 快速出库......................................................................................................................... 14 库存盘点......................................................................................................................... 16 监管码替换..................................................................................................................... 18 监管码注销..................................................................................................................... 19 数据导入......................................................................................................................... 20
图 4.7
5. 快速出库
登录成功后点击“快速出库” ,界面如图 5.1
Copyright ◎ 2010 Beijing XinChuangJiaYe Information System Engineering Co.Ltd. All Rights Reserved 北京鑫创佳业信息系统工程有限公司 保留所有权利
鑫创佳业 XC-DMS 手持终端用户使用手册
V2.0
鑫创 XC-DMS 手持终端
使用手册
Copyright ◎ 2010 Beijing XinChuangJiaYe Information System Engineering Co.Ltd. All Rights Reserved 北京鑫创佳业信息系统工程有限公司 保留所有权利
系统开机后软件自动运行,输入用户名、密码后点击“登录”按钮,如图:1.1
图 1.1 输入正确的用户名、密码后界面如图 1.2
图 1.2
Copyright ◎ 2010 Beijing XinChuangJiaYe Information System Engineering Co.Ltd. All Rights Reserved 北京鑫创佳业信息系统工程有限公司 保留所有权利
4. 快速入库
登录成功后点击“快速入库” ,界面如图 4.1
图 4.1 点击“退出”按钮,点击“是(Y)”取消当前入库操作,如图 4.2,输入或修改入库单号, 点击下一步,选择货物存放的仓库及货位信息,如果没有货位信息,如图 4.3,如果有 货位信息如图 4.4
Copyright ◎ 2010 Beijing XinChuangJiaYe Information System Engineering Co.Ltd. All Rights Reserved 北京鑫创佳业信息系统工程有限公司 保留所有权利
鑫创佳业 XC-DMS 手持终端用户使用手册
V2.0
图 4.6 拷贝快速入库单 XML 文件到电脑,快速入库单文件在终端“\SFDA\InData\Fast”目录 下,如图 4.7 ; ,打开 B/S 管理系统,打开“业务管理”“快速出入库”模块,打开 “快速入库” ,选择导入快速入库单文件执行后续操作。
鑫创佳业 XC-DMS 手持终端用户使用手册
V2.0
图 2.3 按终端“SCAN”扫描键,激光对准条码,扫描大箱监管码,扫描后界面如图 2.4;监管 码重复扫描只记录一次
图 2.4 点击“退出”按钮退出当前入库操作,点击按钮“下一步”转到完成界面,如图 2.5
Copyright ◎ 2010 Beijing XinChuangJiaYe Information System Engineering Co.Ltd. All Rights Reserved 北京鑫创佳业信息系统工程有限公司 保留所有权利
鑫创佳业 XC-DMS 手持终端用户使用手册
V2.0
图 3.2
图 3.3 点击“返回”按钮返回出库单输入界面,点击按钮“下一步”执行扫描操作,如图 3.4
Copyright ◎ 2010 Beijing XinChuangJiaYe Information System Engineering Co.Ltd. All Rights Reserved 北京鑫创佳业信息系统工程有限公司 保留所有权利