真空清扫装置安装-使用-维护说明书
LG VK9120UHAQ 真空清洁器用户手册说明书

VK9120UHAQOWNER’S MANUALVACUUM CLEANERThis information contains important instructions for the safe use and maintenance of the vacuum cleaner. Especially, please read all of the information on page 4, 5 for your safety. Please keep this manual in an easily accessible place and refer to it anytime.Table of contentsImportant safety instructions ......................................................................... 4~5 How to use .................................................................................................... 6~16 Assembling vacuum cleaner (6)Operating vacuum cleaner (8)Using all floor nozzle (9)Cleaning all floor nozzle (10)Using hard floor nozzle / mini turbine nozzle (11)Using the accessory nozzles (12)FOLLOW ME function (13)Emptying dust tank (14)Cleaning dust tank (15)Cleaning air filter and motor safety filter (16)How to assemble dust separator (17)Cleaning exhaust filter (18)What to do if your vacuum cleaner does not work (19)What to do if FOLLOW ME function does not work (19)What to do when the suction performance decreases (19)Read and follow all instructions before using your vacuum cleaner to prevent the risk of fire, electric shock, personal injury, or damage when using the vacuum cleaner. This guide do not cover all possible conditions that may occur. Always contact your service agent or manufacturer about problems that you do not understand. This appliance complies with the following EC Directives :-2006/95/EC Low Voltage Directive -2004/108/EC EMC Directive.This is the safety alert symbol.This symbol alerts you to potential hazards that can kill or hurt you and others.All safety messages will follow the safety alert symbol and either the word “WARNING” or “CAUTION.”These words mean:How to use Operating vacuum cleanerHow to use Using all floor nozzleHow to useCleaning all floor nozzleHow to use Using hard floor nozzle / mini turbine nozzleHow to use Using the accessory nozzlesccessory nozzles included in the"BOX" with owner's manual.How to use FOLLOW ME functionFOLLOW ME function can measure distance between the user and vacuum cleaner.After the measurement, vacuum cleaner will move automatically to keep a constant distance (about 1.0m) between the user and the vacuum cleaner.When distance between transmitting sensor in the grip handle and receiving sensors on the vacuum cleaner becomes more than 1m, Vacuum cleaner will move automatically toward the user.Indicator on hose is flickering for 1 minute, it sounds “ding~ding” like a buzzer from vacuum body.How to use Cleaning air filter and motor safety filterHow to use Cleaning exhaust filterWhat to do if your vacuum cleaner does not workCheck that the vacuum cleaner is plugged in correctly and that the electrical socket is working.What to do when the suction performance decreases• Turn off the vacuum cleaner and unplug it.• Check the telescopic pipe, flexible hose and cleaning tool for blockages or obstructions.• Check that the dust tank is not full. Empty if necessary.• Check that dust separator is not clogged with obstruction. Eliminate it.• Check that the exhaust filter is not clogged. Clean the exhaust filter if necessary.• C heck that the air filter and motor safety filter of dust separator is not clogged.Clean the air filter and motor safety filter if necessary.What to do if FOLLOW ME function does not work.• Check the transmitting sensor and receiving sensors• P lease make sure that is blocked by obstacles (wall, clothes, etc.).If the sensors were blocked, FOLLOW ME function cannot work properly.• I f transmitting sensor and receiving sensors were blocked by dust, clean the sensors using a cotton swab. Clean the sensor holes using a cotton swab periodicallyMade in Korea。
真空抽吸器使用指南及维修保养
真空抽吸器使用指南及维修保养---1. 简介真空抽吸器是一种常用于医疗、实验室和工业领域的设备,用于排除空气并产生真空状态。
本文档将介绍真空抽吸器的使用指南、维修保养及一些常见问题的解决方法。
2. 使用指南2.1 准备工作在使用真空抽吸器之前,确保以下工作已经完成:- 检查真空抽吸器的电源线是否连接并正常;- 安装好相关的抽吸管或连接器;- 预先了解相关设备的工作原理和操作流程。
2.2 使用步骤1. 将真空抽吸器放置在平稳的工作台上,确保设备稳固并不易倾倒;2. 打开电源开关,等待真空抽吸器启动;3. 根据需要调节真空抽吸器的抽吸力度,可以通过控制面板或旋钮进行调整;4. 使用相应的抽吸管或连接器,将其插入待抽吸的物体或管道中;5. 完成抽吸后,及时拔除抽吸管或连接器,并关闭真空抽吸器电源开关。
2.3 注意事项- 在使用真空抽吸器时,请确保操作人员具备相关的安全知识,并了解相关操作规程;- 避免将真空抽吸器长时间连续工作,以免过热或损坏设备;- 定期清理真空抽吸器的滤网,以确保正常的工作效率;- 如发现设备出现异常情况(如发出异常声音、烧焦气味等),请立即停止使用并联系售后服务人员。
3. 维修保养3.1 日常保养- 定期清理真空抽吸器的滤网和抽吸管道,以便保持正常的抽吸效果;- 检查电源线和连接器是否有损坏,如有磨损或断裂应及时更换;- 注意避免将液体或固体物质进入真空抽吸器内部,以免损坏设备;- 对真空抽吸器进行定期维护和检修,包括润滑、更换零部件等。
3.2 维修和故障排除对于一些常见故障,可以尝试以下排除方法:- 若真空抽吸器无法启动,首先检查电源是否连接正常,然后检查开关是否处于正确的状态;- 若抽吸效果不佳,可检查滤网是否清洁,或者调节抽吸力度的旋钮;- 若真空抽吸器出现异常声音或烧焦气味,应立即停止使用,并联系售后服务人员进行维修。
4. 常见问题解答- Q: 真空抽吸器突然停止工作了,该怎么处理?A: 首先检查电源是否正常,然后检查开关是否处于正确的状态,并检查电源线和连接器是否有损坏。
真空除尘装置操作与注意事项

传阅真空除尘装置操作与注意事项
本设备有手动与自动两种操作功能
自动操作时原理与手动操作时相同,当控制开关打到自动位置时,通过集控室启停吸尘系统。
本系统未设此功能。
手动操作时,把面板上控制开关打到手动位,启动真空泵,此时真空泵通过软启动器启动真空泵,旋风除尘与布袋除尘的下排污阀关到位,下平衡阀关到位,上平衡阀开到位,上排污阀开到位,此时开始吸尘作业,通过调整吸尘的大小和多少保持真空度维持在—
0.02~—0.03MPa ,吸尘的同时喷吸脉冲阀每间隔75秒工作一次,依次轮流。
真空泵工作20分钟后,旋风除尘与布袋除尘的上排污阀关到位,上平衡阀关到位,下平衡阀开到位,下排污阀开到位,开始卸灰,同时仍可维持吸尘作业,仓振器每隔60秒工作一次振打灰斗,此过程维持5分钟,5分钟后,所有阀门回到起始工作位,继续吸尘,按20—5—20—5一直工作下去,此过程为不间断连续吸尘,可同时卸灰。
当吸尘作业停止时,通过面板真空泵停止按纽,停止真空泵,转换开关打到中间位置,整个系统停运,停止吸尘。
等待下次工作时启动。
注意事项:注意保持吸口畅通,吸尘时维持真空度在—0.02~—0.03MPa ,安全阀放空的真空度是—0.051MPa ,注意真空泵的油位,切勿断油少油,否则对真空泵是致命的,当排风口有灰尘排出时,说明布袋有破损,应立即停机检查,否则大量大颗粒灰尘进入真空泵,对泵的危害是相当大的。
张家港科迪机械有限公司
二○○七年七月十九日。
真空除尘器的日常维护与保养
真空除尘器的日常维护与保养真空除尘器是一种常用的清洁设备,用于清理地板、地毯等区域的灰尘和杂物。
正确的日常维护和保养可以延长真空除尘器的使用寿命,并保持其高效的清洁效果。
本文将介绍一些常见的维护和保养方法。
1. 清空和更换过滤器定期清空和更换真空除尘器的过滤器是保持其正常运行的关键。
过滤器可以捕捉尘埃和微小颗粒,但随着时间的推移会变得堵塞,影响吸尘器的吸力。
根据使用频率,建议每一至两个月清空过滤器,或者根据制造商的建议进行更换。
2. 清理集尘袋或真空除尘器通常配有集尘袋或,用于收集吸入的尘埃和杂物。
定期清理集尘袋或可以避免其过度堵塞,并确保吸尘器的正常运行。
根据需要,可以使用清水和温和的清洁剂清洗集尘袋或,然后彻底晾干后再放回真空除尘器。
3. 检查和清理刷头真空除尘器的刷头可能会缠绕着头发、纱线或其他杂物,影响其清洁效果。
定期检查刷头并清理上述杂物可以确保其正常工作。
可以使用剪刀或其他适当的工具将缠绕在刷头上的杂物剪除,并确保刷头干净。
4. 检查和清理真空管道确保真空管道没有堵塞也很重要。
定期检查管道并清除任何堵塞物可以保持吸尘器的吸力。
如果发现堵塞,可以使用专门的管道清洁工具或一些细长的工具(如钢丝)进行清理。
5. 定期维修和保养除了上述日常维护工作外,定期进行专业的检修和保养也是必要的。
建议按照制造商的建议或用户手册的指引,将真空除尘器送至专业维修中心进行维护。
以上是真空除尘器的日常维护与保养方法。
通过遵循这些方法,您可以确保真空除尘器的正常工作,延长其寿命,并获得更高效的清洁效果。
请记住,安全操作和遵循制造商的指南至关重要。
气力输灰(真空清扫)系统运行原理操作手册

气力除灰系统及设备运行、操作、维护手册一、概述正压气力除灰系统设计,根据《火力发电厂除灰设计技术规程 (DL/T5142-2002)》的要求,采用瑞典菲达公司和澳大利亚ABB公司浓相气力输灰技术,结合我厂十多年来的气力输送实践经验,按照“切实可行,节省投资,确保系统长期稳定、可靠运行”为原则。
系统采用LD型(或L型)浓相气力输送泵作为输送设备、螺杆式空气压缩机作为主要动力源,配备灰库系统及输灰管道等。
二、力除灰系统的运行及操作1.仓泵部分1.1仓泵的组成仓泵一般由进料阀、加压阀、吹堵阀、输送阀及泵体和管路等组成,其控制气源采用输送用气源(也可以单独设置)。
其系统见下图(图一为单泵制输送系统,图二为多泵制输送系统)。
在图一中,压缩气源从DN40球阀(图中序号1)进入,分成二路气,其中一路经气源处理两联件(图中序号8-2)进入就地控制箱,在程控柜的控制下,通过就地控制箱内部的电磁阀对各阀门进行控制;另一路气通过节流阀(图中序号2)和减压阀(图中序号3)后作为输送气源。
气源的压力及泵内的料位和压力通过传感器送入程控柜。
在仓泵的上部设置了进料阀(图中序号9)和输送阀(图中序号10)及料位计(图中序号17)等,在仓泵的下部设置了气化装置(图中序号16),另外对气源压力监控设置了压力变送器(图中序号15)。
图一图二1.2仓泵输送原理气力输送泵在本系统中主要用于粉煤灰的输送,它自动化程度高,利用PLC控制整个输送过程实行全自动控制。
主要由进料装置、气动出料阀、泵体、气化装置、管路系统及阀门组成。
仓泵输送过程分为四个阶段:进料阶段:仓泵投入运行后进料阀打开,物料自由落入泵体内,当料位计发出料满信号或达到设定时间时,进料阀自动关闭。
在这一过程中,料位计为主控元件,进料时间控制为备用措施。
只要料位到或进料时间到,都自动关闭进料阀。
流化加压阶段:泵体加压阀打开,压缩空气从泵体底部的气化室进入,扩散后穿过流化床,在物料被充分流化的同时,泵内的气压也逐渐上升。
真空设备维修手册
真空设备维修手册维修手册目录:1. 引言2. 真空设备的基本原理3. 常见问题及解决方法3.1 漏气问题3.2 泵速问题3.3 泵油问题3.4 泄露问题3.5 温度问题3.6 噪音问题4. 维护与保养4.1 定期检查4.2 清洁与润滑4.3 更换耗损零件5. 安全注意事项5.1 电气安全5.2 操作规范5.3 应急处理6. 维修故障排除流程6.1 故障检查和定位6.2 故障处理步骤7. 工具和材料清单8. 结束语1. 引言真空设备在工业制造和实验研究中扮演着重要角色,然而,随着时间的推移和使用频率的增加,设备可能会遇到各种故障和问题。
为了能够及时和准确地维修真空设备,本手册将提供必要的信息和指导。
在使用本手册时,维修人员需要具备一定的机械和电气知识。
2. 真空设备的基本原理真空设备通过创建一个低于大气压的环境来实现其功能。
设备主要由真空泵、真空室和相关管道组成。
真空泵负责抽取空气,使真空室内保持低压状态。
通过合适的管道连接,设备可以用于各种应用,如蒸馏、薄膜沉积、真空烘烤等。
3. 常见问题及解决方法以下列举了真空设备常见的问题和解决方法。
漏气是真空设备中最常见的问题之一。
漏气可能发生在管道连接处、密封件损坏等地方。
解决漏气问题的方法包括检查和调整管道连接、更换密封件等。
3.2 泵速问题泵速不足可能导致设备工作效率低下。
这可能是由于泵内部零件磨损、泵油不足或污染等原因造成的。
对于泵速问题,可以尝试更换耗损零件、清洁或更换泵油等。
3.3 泵油问题泵油是真空泵正常运行的关键。
如果泵油过多、过少或者污染,都会影响设备的性能。
维护人员应该按照设备要求定期检查泵油,确保其质量和数量符合要求。
3.4 泄露问题除了漏气外,泄露也是真空设备常见的问题之一。
泄露可能发生在设备本体或接口处,造成真空度下降。
维修人员需要通过检查设备密封性以及合适的修补方法来解决泄露问题。
3.5 温度问题真空设备在工作过程中会产生热量,如果无法有效散热,可能导致设备过热、损坏甚至发生事故。
15ATEX真空除尘机使用说明书翻译版

15 ATEX 使用说明阅读操作说明,符合重要安全建议,其标识为:操作者安全开始使用之前,必须阅读这些操作介绍并保留在手以供随时查询。
此真空除尘机只能被熟悉其工作方式且接受过相关培训并被明确授权的人使用。
开始使用之前,使用者必须被给予如何使用和被允许使用于哪些物质包括安全清除和处理被吸入材料的告知、介绍和培训。
每次使用后以及当温度限制器开始运行时(防止过热),关闭真空除尘机并拔掉插头。
真空除尘机冷却(约120分钟)后,才能插上插头再次开始使用。
使用真空除尘机的基本信息真空除尘机的使用在相关使用国家通过法律进行有效管理。
除了操作介绍和使用国家的法律效力,技术规范也用于保证安全和正确操作(关于环境和劳动安全的立法,如欧盟导则89/391/EC和其他)。
不要进行任何可能危害人员、财产和环境安全的操作。
要符合本介绍手册中的安全指示和规定。
适用此真空除尘机适用于收集用途,如在酒店、学校、医院、工厂、商店、办公室和住宅。
本介绍手册中描述的真空除尘机被设计作工业用途。
他们生产的版本不同且用途不同。
真空除尘机被设计为每次只能有一名操作者。
危害等级此真空除尘机的不同版本:1- 用于吸入在22区的干燥可燃性粉尘:2- 用于吸入燃烧热小于1摩焦的粉尘,其他版本均可。
真空除尘机只能用于不会吸入燃烧活性源的情况下。
如果真空除尘机需要和其他机器连接,检查所有结构的部件要接地以防止静电。
真空除尘机不适用于在可能产生燃烧源的机器上操作。
真空除尘机必须使用于通风良好的区域,来提供合适的空气流通;符合所在国家的法律要求。
过滤等级符合EN60335-2-69参考标准—附录AA 根据下述粉尘等级,有害健康的粉尘的过滤器可分为:1-L(低风险)适合于分离暴露限度值超过1mg/m3的粉尘,取决于所占体积;2-M(中等风险)适合于分离暴露限度值超过0.1mg/m3的粉尘,取决于所占体积;3-H(高风险)适合于分离暴露限度值低于0.1mg/m3所有的粉尘,取决于所占体积。
真空抽取设备操作规程及维护保养
真空抽取设备操作规程及维护保养1. 引言本操作规程旨在指导使用人员正确操作真空抽取设备并进行维护保养,以确保设备的正常运行和延长设备寿命。
2. 操作规程2.1 开机前准备- 确保设备已连接电源,并检查电源线是否完好无损。
- 检查设备的各个部件和连接管道是否安装正确,并确保紧固部件的紧固度。
- 检查真空泵的油位是否在正常范围内,必要时添加或更换真空泵油。
2.2 开机操作- 打开主控电源开关,并等待设备启动。
- 启动真空泵,并观察真空度指示是否正常。
- 根据实际需求,调整设备的真空度,并确保真空度稳定在所需范围内。
- 如果设备配有加热功能,可根据需要调节加热温度。
2.3 关机操作- 先关闭加热功率,再关闭真空泵。
- 关闭主控电源开关。
3. 维护保养3.1 日常清洁- 关机后,用干净软布擦拭设备外部,特别是操作面板和控制按钮,以保持设备的清洁和正常运行。
- 定期检查设备的各个部件和连接管道是否存在松动或磨损,必要时进行紧固或更换。
3.2 润滑维护- 按照设备使用说明书的要求进行润滑维护,确保设备各个运动部件的润滑状态良好。
3.3 定期保养- 按照设备使用说明书的要求,定期进行设备的维护保养。
- 定期更换真空泵油,并清洗真空泵的滤网。
4. 安全注意事项- 操作人员在使用设备时应穿着合适的个人防护装备,如手套、防护眼镜等。
- 禁止擅自拆卸设备的外壳或进行非法改装。
- 在操作设备时要保持专注,并避免操作失误。
- 紧急情况下,应立即关闭设备电源,并及时联系维修人员进行处理。
5. 总结本文档总结了真空抽取设备的操作规程及维护保养要点,希望通过遵守规程和正确维护保养,能够保持设备的稳定运行,确保操作人员的安全,并延长设备的使用寿命。
在操作和维护保养过程中,如果遇到任何问题,请及时联系相关人员进行咨询和处理。
特洁SV4真空蒸汽清洗机使用说明书
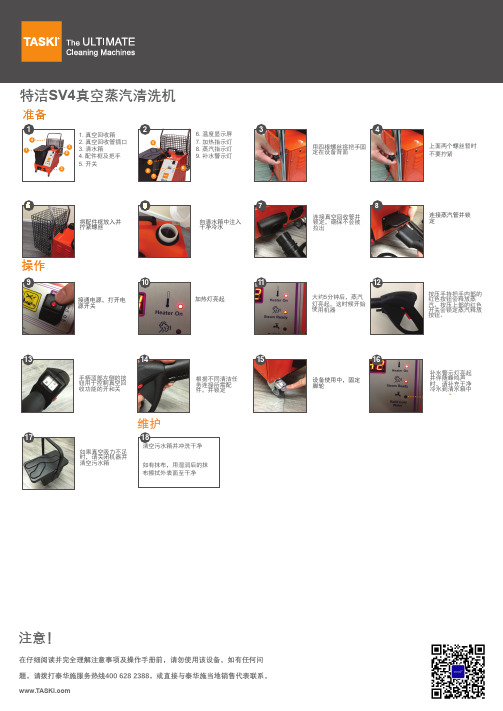
特洁SV4真空
蒸汽清洗机
用四根螺丝将把手固定在设备背面
上面两个螺丝暂时不要拧紧
将配件框放入并拧紧螺丝
向清水箱中注入干净冷水
连接真空回收管并锁定,确保不会被拉出
连接蒸汽管并锁定
接通电源,打开电源开关
加热灯亮起
大约5分钟后,蒸汽灯亮起,这时候开始使用机器
按压手持把手内部的红色按钮会释放蒸汽。
按压上部的红色开关会锁定蒸汽释放按钮。
2
手柄顶部左侧的按钮用于控制真空回收功能的开和关
根据不同清洁任务连接所需配件,并锁定
设备使用中,固定脚轮
补水警示灯亮起并伴随蜂鸣声时,请补充干净冷水到清水箱中
如果真空吸力不足时,请关闭机器并清空污水箱
1.真空回收箱
2.真空回收管插口
3.清水箱
4.配件框及把手
5.开关
6.温度显示屏
7.加热指示灯
8.蒸汽指示灯
9.补水警示灯
注意!
在仔细阅读并完全理解注意事项及操作手册前,请勿使用该设备。
如有任何问题,请拨打泰华施服务热线400 628 2388,或直接与泰华施当地销售代表联系。
准备
操作
维护。
凯驰 清扫车 真空清扫车 说明书
亲爱的用户:用电瓶操作的设备 ---不要打扫/真空吸尘处理任何正燃烧或正发热的物体。
附注请您在第一次使用设备前仔细地阅读这些操作说明,并在操作中遵循它们。
把这些操作说明保存好以备将来做参考或可以提供给后来的使用者。
---本设备只适合用来清扫在本使用说明书中所规定类型的表面。
只有当你使用凯驰所推荐的电瓶和充电器时,才能接受保修索赔。
---总是遵从电瓶制造商和充电器制造商的使用说明。
请遵从搬运和处理电瓶的法定要求。
---不可以在危险区域使用或贮存设备。
不允许在危险地点使用设备。
---以下普遍适用:使高度易燃的物质远离设备(爆炸/着火的危险)。
---决不要让电瓶处于放电状态;一有可能就给它们重新充电。
环境保护---总是保持电瓶干净和干燥以防止蠕变电流。
保护电瓶避免它与杂质如金属粉末接触。
目录包装材料可以回收利用。
请不要把包装扔进普通垃圾的垃圾箱里,而应该安排对它们进行适当的回收利用。
安全使用说明2 指定用途2 操作和功能元件 2 启动之前3 启动 3 运行4 停止运转 4 维护保养 4 故障5 技术规格6 EC 一致声明 6 保修 6---在第一次使用设备之前,阅读并遵守这些使用说明及其附随的小册子:对于清扫车和真空清扫车的安全信息,编号:5.956-250。
---操作者必须正确使用本设备。
当用设备进行工作时,操作者必须考虑当地情况且必须注意第三者,特别是儿童。
---不可以让儿童,少年人或没有经过相应培训的人操作本设备。
---当从尘箱里清除玻璃,金属或其他锐边材料时,要戴适当的安全手套。
警告在传动带,边刷,容器和手推把柄处有被挤压或受伤害的危险。
当打开产品包装时,如果存在任何运输损坏,请通知您产品的销售地点。
→在使用设备前请阅读您设备的使用说明书,特别注意以下安全说明。
---在设备上的警示牌和信息牌所提供的关于安全操作的重要指示。
---除了本文中的说明,还必须遵守为防止出事故,由立法人所制定的安全技术措施和安全条例。
真空清扫装置安装-使用-维护说明书资料
印尼棉兰EPC项目固定式真空清扫设备技术资料项目单位:北京赛德联合机电设备技术有限公司目录1、产品名称、型号及规格2、产品工作原理3、主要技术参数4、产品主要构件的材料5、产品结构示意图、外形图、电器线路图6、产品安装说明及安装图7、产品运行、维护说明及注意事项一、产品名称、型号及规格1.1 设备名称:固定式真空清扫设备1.2 数量:3台1.3 设备型号及用途1.4 型号:SVAC-S-401.5 设备用途:锅炉本体、锅炉房及输煤系统的真空吸尘二、产品工作原理真空吸尘设备是利用电机通过皮带带动真空风机产生抽吸气流,将物料或粉尘吸入管道进入设备,再进行气料分离,物料落入料斗中。
不同的输送量和输送距离要求不同的风量和负压值,风量直接和输送效率有关,负压值和输送距离有关。
气料分离的是把进入管道以及到达设备的物料和气体进行分离,收集需要回收的物料。
该设备采用离心分离和筒式过滤器两级分离,第一级为离心分离,可达80~95%的过滤效率,第二级为筒式过滤,选用布袋过滤材质,过滤效率为99.9%的亚微级颗粒可以被过滤,所有被过滤的物料集中收集在一个端卸式的料斗内。
气体经过真空泵、消音器被排到大气中。
布袋过滤采用压缩空气反吹实现设备连续工作。
注:压缩空气需要现场业主提供:压力0.4~0.8Mba , 流量15CFM,设备接口:ZG1/4内螺纹当设备料斗满时,需要使用叉车把料斗从设备中移出,人工倒料。
设备工作原理图如下:二、主要技术参数序号项目固定式真空吸尘装置备注1 设备型号SVAC-S-402 设备功率(kW) 30kw3输送量(t/h) 额定值10 最大值124输送距离(m) 额定值120 最大值1505风量(m3/h) 额定值1250 最大值16006 真空度(kPa) -607 真空泵型号及驱动方式型号Durovac4512,电机驱动8 接口尺寸(DN) 100(设备接口)DN65(端管接口)9 滤袋材料及过滤级数PE806聚酯滤料,三级过滤离心,重力及布袋过滤10 排气标准(mg/m3) ≤2511 料斗容积(m3) 2 m312 清灰方式脉冲自动清灰13 排料方式人工倒灰14同时工作的吸口数量(个)2个DN65吸口15 机组噪声dB(A) ≤8516 外形尺寸(mm) 2100×1650×260017 重量1550kg18 数量(台) 3 露天布置三、产品主要构件的材料设备材质表序号部件名称材质及牌号单位尺寸(mm)数量/重量产地备注1 设备本体16Mn 台2100×1650×1台/1550kg 北京26002 设备支架Q235A 台950 1台/650kg 北京3 滤袋PE806聚酯只Φ320×660 4(2.2kg/只)北京4 系统附件组合件台600kg 北京四、产品结构示意图、外形图、电器线路图产品安装说明及安装图SVAC-S-40无需安装基础设备和管道系统的连接示意图(见产品外形尺寸及结构图CAD):六、产品运行、维护说明及注意事项6.1 验收规程收到全部货物后,应立即检验有否外部损伤!!1.检查所有的金属板件与钢结构件,看是否有硬伤、扭曲、变形和断裂。
空段清扫器说明书

DB—KQ聚氨酯空段清扫器安装使用★重要声明检查产品包装箱有无损坏。
如发现损坏,请立即与承运人反映货物损坏短少情况,并双方签字确认,交给焦作市德邦科技有限公司或与其销售代表取得联系,作为向承运人索赔的证据。
安装前的重要提示1.安装之前,必须熟知工作中所用相关设备的安全操作规程以及施工现场的安全生产规范。
2.切断输送机的启动电源,挂上“有人操作,禁止合闸”的警示牌。
3.如果设备在井下或密闭的区域内,动用割枪或电焊之前,必须对煤气和灰尘含量进行检测。
确认煤气和灰尘含量在安全值范围内方可操作,否则,可能发生事故。
4.使用割枪或电焊机前,应使用阻燃罩将输送机皮带罩住,否则将有可能损坏皮带。
5.安装工作完毕,在启动输送机皮带之前,应将安装区域内和输送机皮带上的工具、铁器、焊渣等收拾干净。
否则将有可能造成严重的人身伤害,或者导致输送机皮带的损坏。
6.在输送机运行状态下,如果要调整清扫器,操作时千万要小心谨慎,防止手中的工具、身体或衣服被卷入输送带,导致严重的人身伤亡。
对于维护的操作,请在停机状态下进行,切记!产品说明输送带输送的物料往往带有粘性物质,如煤尘、泥浆、粉状物料,其中一部分会粘在输送带工作面上,在卸料时不能完全卸掉,随着皮带运转会粘在托辊上,长时间会造成以下后果:1.物料进入托辊的壳体内,从而增大轴承磨损,托辊壳体粘上物料会损伤和拉毛输送带的面胶,加速输送带损坏。
2.粘着物进入尾轮和改向滚筒,物料会粘在滚筒表面上,且越粘越多,造成输送带跑偏,增加输送带磨损,酿成不良后果。
3.物料粘在驱动滚筒上,加大对滚筒的摩擦力,会引起输送带面胶和滚筒包胶层的损坏。
4.物料没有及时清除,在整个工作通道内会形成落料区,造成环境污染,清扫劳动量增加,影响员工身心健康,增加企业成本。
因此,为保证带式输送机正常运转,必须将输送带上的附着物清扫干净。
如果清扫装置良好,对托辊、输送带等的寿命都可以延长。
由此可见,清扫器在带式输送机上有着不可忽视的作用。
清洁器安装 操作 维护说明书

Table of ContentsIntroduction . . . . . . . . . . . . . . . . . . . . . . . . . . . . . . . . . . . . . . . . . . . . . . . . . . . . . . . . . . . . . . . . . . . . . . . . . . . . . . . . . . . . . .3 Safety . . . . . . . . . . . . . . . . . . . . . . . . . . . . . . . . . . . . . . . . . . . . . . . . . . . . . . . . . . . . . . . . . . . . . . . . . . . . . . . . . . . . . . . . . . . .4 At A Glance . . . . . . . . . . . . . . . . . . . . . . . . . . . . . . . . . . . . . . . . . . . . . . . . . . . . . . . . . . . . . . . . . . . . . . . . . . . . . . . . . . . . . . .5 Components . . . . . . . . . . . . . . . . . . . . . . . . . . . . . . . . . . . . . . . . . . . . . . . . . . . . . . . . . . . . . . . . . . . . . . . . . . . . . . . . . . . . .6 Installation . . . . . . . . . . . . . . . . . . . . . . . . . . . . . . . . . . . . . . . . . . . . . . . . . . . . . . . . . . . . . . . . . . . . . . . . . . . . . . . . . . . . .7-8 Sequence of Operation . . . . . . . . . . . . . . . . . . . . . . . . . . . . . . . . . . . . . . . . . . . . . . . . . . . . . . . . . . . . . . . . . . . . . . . .9-12 Maintenance . . . . . . . . . . . . . . . . . . . . . . . . . . . . . . . . . . . . . . . . . . . . . . . . . . . . . . . . . . . . . . . . . . . . . . . . . . . . . . . . .13-14 Parts Lists . . . . . . . . . . . . . . . . . . . . . . . . . . . . . . . . . . . . . . . . . . . . . . . . . . . . . . . . . . . . . . . . . . . . . . . . . . . . . . . . . . . .15-18 Notes . . . . . . . . . . . . . . . . . . . . . . . . . . . . . . . . . . . . . . . . . . . . . . . . . . . . . . . . . . . . . . . . . . . . . . . . . . . . . . . . . . . . . . . . .19-20 Warranty . . . . . . . . . . . . . . . . . . . . . . . . . . . . . . . . . . . . . . . . . . . . . . . . . . . . . . . . . . . . . . . . . . . . . . . . . . . . . . . . . . . . . . . .21IntroductionABOUTThank you for purchasing a TrueClean® product.This manual contains installation, operation, and maintenance instructions for the TrueClean ToteCleaner™ .TrueClean ToteCleaners are designed for minimal routine maintenance, but care and attention should be given to the instructions provided in this manual .Do not remove any labeling on any TrueClean product .Immediately replace any label that is missing .If, at any point, you have questions or concerns regarding your ToteCleaner, please call 800.654.5635 or 417.831.1411.SafetyIMPORTANT SAFETY INFORMATIONRead this manual before installing, operating, and maintaining this equipment .Failure to read the manual can result in personal injury and/or equipment damage .Do not attempt to remove and/or modify any TrueClean products or programming. Doing so can create unsafe conditions for the operator(s) and/or surrounding persons .Any change to TrueClean products or programming will void any and all warranties .Do not place any TrueClean product in an application where general product service ratings are exceeded. Doing so puts the operator(s) and/or surrounding persons at risk of personal injury and/ or result in equipment damage .Do not remove any labeling on any TrueClean product. Immediately replace any label that is missing .DISCLAIMER OF LIABILITYTrueClean does not assume responsibility and expressly disclaims liability for loss, damage, or expenses that arise in any way from the installation, operation, use, or maintenance performed in accordance with this manual .TrueClean assumes no responsibility for any infringement of patents or other rights of third parties that may result from use of the module .No license is granted by implication or otherwise under any patent or patent rights .TrueClean reserves the right to make changes to the product, specifications, or this manual without prior notice .At a Glance TOTECLEANER™1 Jet Spray Assembly Device2 Rotary Spray Assembly Device3 Tank Lid (a) with Down Tube (b)4 Pump5 VFD6 Pump Cart7 ToteTilter™ (sold separately)8Hose Kit (sold separately)78ComponentsVARIABLE FREQUENCY DRIVE (VFD):Become familiar with the control panel functions before operating the ToteCleaner . The following glossary defines objects found on the control panel.•START — turns the pump on once the system is completely installed •STOP — shuts the pump off • SPEED UP/DOWN — increases or decreases the motor Hz setpoint for pump speed .During cleaning, operators will target 30psig for the rotary spray device or full speed(60Hz) for the jet device.Note: The entire VFD user manual can be viewed online here.Stop Speed UpStartSpeed DownFig. 1 - VFDSPRAY ASSEMBLY INSTRUCTIONS:1. Apply anti-seize to threads on spray tube.2. Attach spray tube onto lid by threading it into the center bung. Be careful not to over-tighten,as this could damage the bung .3. Attach the provided cleaning device by screwing it onto the spray tube. Secure with an open-ended or adjustable wrench .a. Tighten, using the flats nearest the threads. Using the flats on the lower body can causedamage to the device .b. For full assembly, please refer to Figures 2 and 3.Fig. 2 - Alfa Laval GJ9 4-Nozzle 0.150Fig. 3 - MultiMidget 360 3/4” NPT1. Confirm that the tote is drained of all flowing product.2. Confirm that the tote to be cleaned is elevated at least seven inches off the floor.3. Confirm that the ToteCleaner cart is on a structurally sound, flat, and level surface.4. Screw spray assembly into large opening on the top of the tote .5. Connect 1.5” elbow to spray assembly with gasket* and clamp*.6. Connect 1.5” supply hose to elbow with gasket* and clamp*.7. Connect supply hose to pump outlet with gasket* and clamp*.8. Attach Camlock by Tri-Clamp® adapter to the tote outlet drain .9. Connect 2” elbow to the adapter with gasket* and clamp*.10. Connect 2” elbow to the return port on the cart with gasket* and clamp*.11. Connect 2” return hose from elbow on the tote outlet to the elbow on the cart.12. Connect water supply to supply port on cart with gasket* and clamp*.13. Connect drain hose to drain port with gasket* and clamp*. Run the hose to a safe place to drain.14. Plug the power cord into appropriate power supply, as labelled on the control panel .15. If appropriate, switch disconnect on remotely mounted electrical panel to ON .Note: *Included with Optional Hose Kit, sold separately.The TrueClean ToteCleaner is designed to allow versatility in the washes that can be performed . If cleaning needs are minimal, a rinse wash may be run by following the Rinse Wash sequence of operation .If the use of chemicals is desired, a caustic or acid wash may be run by following the Caustic/ Acid Wash sequence of operation .If both a caustic and an acid wash are desired, repeat the sequence of operation outlined under Caustic/Acid Wash .The steps for each are identical .If a sanitizer wash is desired, follow the Sanitizer Wash sequence of operation .Below are examples of common wash recipes .• Caustic wash: Initial rinse • Caustic wash • Post rinse• Caustic wash with sanitizer: Initial rinse • Caustic wash • Post rinse • Sanitizer wash• Caustic/acid wash: Initial rinse • Caustic wash • Post rinse • Acid wash • Post rinse• Caustic/acid wash with sanitizer: Initial rinse • Caustic wash • Post rinse • Acid wash • Post rinse • Sanitizer washRINSE WASH1. Close recirculation valve, and open supply and drain valves.• Please refer to Figure 4 for valve configuration.2. Confirm that there is water flowing to the supply valve.3. Press START button to start the pump .4. When wash is complete, push STOP button .5. Next, close the supply valve and allow the tote to completely drain.• If a rinse wash is the only wash to be run, also open the recirculation valve to allow the pump and supply hose to drain with the tote .• Please refer to Figure 5 for valve configuration.Fig. 4Fig. 5CAUSTIC/ACID WASH1. Close drain valve. Open recirculation and supply valves, allowing water to fill the tote.• Please refer to Figure 6 for valve configuration.2. Monitor water level until there are four to six inches of water in the bottom. Close the supplyvalve, taking care to leave the recirculation valve open .• Please refer to Figure 7 for valve configuration.3. Disconnect the elbow at the spray assembly, unscrew the spray assembly, and dose causticsolution into the tote through the lid connection .• CAUTION: Personal protective equipment (PPE) should be used when handling hazardous chemicals to protect the operator and/or bystanders from chemical contact .• Please refer to Figure 8 as an example of proper dosing procedure.4. Screw spray assembly back onto lid connection, and reattach elbow .5. Press START button to start the pump .6. When wash is complete, push STOP button .7. Next, open the drain and recirculation valves .Allow the tote to completely drain .• Please refer to Figure 5 for valve configuration.Fig. 7Fig. 6Fig. 8SANITIZER WASH1. Close drain valve. Open recirculation and supply valves, allowing water to begin filling the tote.• Please refer to Figure 6 for valve configuration.2. Monitor water level until there are four to six inches of water in the tote, then close the supplyvalve, taking care to leave the recirculation valve open .• Please refer to Figure 7 for valve configuration.3. Disconnect the elbow at the spray assembly, unscrew the spray assembly, and dose sanitizersolution into the tote through the lid connection .• CAUTION: Personal protective equipment (PPE) should be used when handling hazardous chemicals to protect the operator and/or bystanders from chemical contact .• Please refer to Figure 8 as an example of proper dosing procedure.4. Screw spray assembly back onto lid connection, and reattach elbow .5. Press START button to start the pump .6. When wash is complete, push STOP button .7. Close the supply valve and open the recirculation valve to allow the tote and hoses tocompletely drain .• Please refer to Figure 5 for valve configuration.8. Upon completion of the final wash power down, close all valves and disconnect all hoses fromthe tote .It is advised that preventative maintenance be performed periodically throughout the lifetime of this system to ensure longevity and maintain efficiency. There are four items that are maintainable on this system: pump, butterfly valves, spray device, and all Tri-Clamp gaskets.Click the links below to view the manuals and maintenance procedures for the pump, butterfly valves, and spray device .• VFD Manual• Alfa Laval MultiMidget Spray Device Manual• Alfa Laval GJ9 Spray Device Manual• Alfa Laval Solid C Pump Manual• Alfa Laval LKB Butterfly Valve Manual• Ace Hose ManualCentrifugal pump maintenance can be found on pages 14-22 of Alfa Laval SolidC Pump Manual . The recommended maintenance schedule can be found below in Figure 9.Fig. 9 - Pump Maintenance ScheduleButterfly valve maintenance can be found on pages 17-25 of Alfa Laval LKB Butterfly Valve Manual. The recommended maintenance schedule can be found below in Figure 10.Fig. 10 - Butterfly Maintenance ScheduleAlfa Laval GJ9 4-Nozzle 0.150 maintenance can be found on pages 18-29 of GJ9 Manual . MultiMidget 360 3/4” NPT maintenance can be found on pages 11 of MultiMidget Manual .The Tri-Clamp gaskets should be replaced once every three to six months. If it is found that the gaskets are failing prior to three months, replace gaskets accordingly .SPRAY ASSEMBLY PARTS LIST: TTC-SA-SDSPRAY ASSEMBLY PARTS LIST: TTC-SA-JDTOTECLEANER PARTS LISTOPTIONAL HOSE KIT PARTS LIST: TTC-HOSEKITParts ListWarrantyA .GENERAL PROVISIONS: Central States Industrial Equipment & Service Inc. (the “Company”) warrants exclusively tothe original purchaser (the “Customer”) that equipment or parts thereof manufactured and sold by the Company will be free from defects in material and workmanship only, under normal use and service, for a period of one (1) year from the original shipment date. The Company shall not be liable for any loss of revenue or profit, loss by reason of plant shutdown, non-operation or increased cost of operation, loss of products or materials, or other special or consequential loss or damages resulting from any such warranted defects .This warranty will not apply to any equipment or parts which has been subjected to accident, alteration, abuse, or misuse .This warranty is in lieu of all other warranties .All other warranties, both express or implied (including, but not limited to, the implied warranties of merchantability and fitness for a particular purpose) warranties are hereby excluded and waived. The Company’s only obligation and liability shall be to fulfill the warranty specifically stated herein. The Company will neither assume nor authorize any other person to assume for it any other obligation or liability in connection with the equipment or parts .In the event of a claim under this warranty, the Company’s sole and exclusive liability for any warranted equipment or parts shall be, at the Company’s option, limited to the following (a) the purchase price of the equipment or parts that are defective, (b) replacement of the defective equipment or parts or (c) repair of the defective equipment or parts .B .RETURN OF PARTS OR EQUIPMENT TO COMPANY PLANT: In the event the Company elects to inspect the allegeddefective equipment or parts for possible repair, Company will notify Customer in writing, and the equipment or parts must be returned with transportation cost prepaid by the Customer .In the event the Company’s inspection confirms defective equipment or parts covered by this warranty, the Company shall have the option to select any of the remedies described in Section A above .No transportation for returned or replaced items will be paid by the Company unless written approval for transportation charges is given by the Company .C .COMPONENTS NOT MANUFACTURED BY THE COMPANY: Components not manufactured by the Company, butfurnished as part of its equipment (for example: valves, controls, gauges, electrical switches or instruments, etc .) will be warranted by the Company only to the extent of the component manufacturer’s warranty .D .REPAIR OF EQUIPMENT INSTALLED IN THE CONTINENTAL UNITED STATES: In the event the Company electsto repair a covered item and it is, in the judgement of the Company, impractical to return the equipment or parts for repairs, the Company may arrange for the repairs to be made by its personnel or, at its option, sublet such repairs to a qualified company. The Customer will be expected to cooperate by making the equipment or parts available and accessible when the work is scheduled and is expected to provide the necessary utilities .If local labor conditions prohibit such work being done by Company personnel under the conditions and at the rates payable by its contracts with its employees, the Company obligation shall be limited to supervision of the work, replacement of defective parts, and labor costs in an amount equal to the amount which would be payable fora reasonable number of hours required to make the repairs at the rates payable under the terms of Companycontracts with its employees .In such event, all labor costs shall be paid by the Customer and the Company will reimburse the Customer to the extent set forth above .E .REPAIR OF EQUIPMENT INSTALLED OUTSIDE THE CONTINENTAL UNITED STATES: In the event the Companyelects to repair a covered item for a Customer located outside the continental United States and it is, in the judgement of the Company, impractical to return the equipment for repairs, the Company shall have the additional options (in addition to the other options described herein) of either sending a service representative to repair (or supervise the repairs) or paying Customer a reasonable amount to allow the Customer to have the repairs made locally; provided, that in such situation, Company shall have no obligation to repair or replace equipment or parts that are repaired on by third party contractors selected by Customer .21TC TOTECLEANER™ IOM—REV 2/21。
真空设备安全操作保养规程
真空设备安全操作保养规程前言真空设备是科研、工业生产中不可或缺的重要设备之一,因其具有高度真空环境来实现对物质的精细处理和分析等功能,是众多产业领域的重要装备。
然而设备的操作与保养需要遵循一定的规程,以确保设备的正常运行、维护人员的安全以及有效的使用。
本文将就此阐述真空设备的安全操作与保养规程。
真空设备安全操作规程1. 装置操作规程1.设立操作台,将设备放置在平稳的位置上,并与电源连接。
2.为真空设备提供电源之前,需先检查整个系统的电源开关和状态显示是否正常。
3.设备组装完成后,必须进行真空泵的加油和加注机油以保证其正常运行。
4.当系统需要进行热真空处理时,需先进行漏气试验,确保真空气低至5000Pa以下,避免发生意外事故。
5.当在真空环境中操作或尝试打开任何压力装置时,务必佩戴手套和眼镜等个人防护装备以避免意外。
2. 技术保护规程1.进行任何操作之前,均需了解设备完整的构造和性能,并严格遵循操作手册中给出的安全规范。
2.所有操作设备和设备之间的所有连接都需要经过检验,并确保氧化物、烟灰和其他污染物质在系统内部大量存在前已完全被清除。
3.确保设备的真空度保持在适宜的范围内,并注意保存真空泵和阀门的正确运作状况。
4.避免任何可能影响系统安全性和真空度的操作过程,例如:将加载重物放置在制氧系统中或良好运作的气压阀门关闭。
5.确保系统拥有适合的检测设备,以对任何异常情况进行及时判断和干预,例如:泄漏检测仪器、系统状态监测仪器等等。
3. 操作后的系统维护规程1.每次操作完成后,必须拔下设备断路器并退出设备,将设备表面进行清洁和消毒。
2.保持设备的通风良好,避免过度使用设备导致电机过热和进行内部零件防雾化处理。
3.确保设备连接和端口的干燥和清洁,以防止生锈和腐蚀等问题。
4.随时检查设备的确切位置,并了解那些易磨损的部件及时更换或维修,例如:真空泵、阀门、接头等等。
真空设备保养规程1.定期清洁设备内部和外部,包括排热板、真空管和接口。
真空清扫系统安全操作及保养规程

真空清扫系统安全操作及保养规程真空清扫系统是一个专业的工业清洁设备,使用它能够快速的清扫工业车间和设备上的灰尘,油污等物质。
但是在使用这个设备时我们必须遵守一些安全操作的规程,同时也需要进行定期的保养来延长设备的使用寿命。
本文将详细介绍真空清扫系统的安全操作和保养规程,让大家能够正确合理的使用这一设备,确保安全生产。
一、安全操作规程1.1 设备操作前的检查在使用真空清扫系统之前必须检查设备是否完好无损,包括电源、开关、插头、电线、吸嘴、过滤器等部件是否处于完好状态,并且检查吸烟机是否正常运作,同时检查所使用的插头与电源是否适配。
在正式使用之前,应根据设备使用手册及相关规定检查设备的电源线路是否接地。
1.2 使用设备前的准备在正式操作设备之前,需要先将设备的气密门关闭,并将连接真空泵的气压机开关关闭。
保证安装气密门的位置正确,并确保气密门的连接已经牢固。
在正式操作之前需要排放置于设备内的气体,这样可以防止在操作设备时产生气体堵塞。
1.3 使用设备时的注意事项在使用设备时,必须确保吸嘴正是贴合地面,不得悬空,以免压缩机过载。
同时,在操作设备时,需要留意设备的运行状态,掌握好一些基本的操作技巧,以避免设备在工作时出现异常状况。
在设备过程中,严禁操作人员进行调整、维修或其他操作。
1.4 停止使用设备时的注意事项在停止使用设备之前,需要关闭一切连接设备的开关,同时松开吸嘴与吸尘管之间的链接。
需要注意拆卸过滤器的顺序,以免在清洗过程中误拆,同时要保证设备放置的位置牢固稳定。
1.5 建立操作标准在使用真空清扫系统时,需要建立一个完善的操作规程,指导操作人员完成正确的操作流程。
建立操作标准可以有效地避免操作人员因误操作而造成设备的故障或者产生安全隐患,保障设备的正常使用。
二、设备保养规范真空清扫系统的操作人员需要定期对设备进行保养,这样可以更好地保证设备的正常使用寿命,同时避免因设备问题导致的安全事故的发生。
2.1 定期清洗过滤器在使用过程中,设备会积累大量的灰尘或杂质,因此需要定期清洗设备的过滤器,通常每个月一次。
真空机操作规程设备维修与保养作业指导书

审核日期
批准日期
1.3清洗调压阀,更换不合用的配件﹔
1.4检查调压表,灵活可靠﹔
1.5检查气压门,更换磨损件﹔
1.6填写保养记录。
2.0二保维修与保养内容
2.1更换不合用的线路﹔
2.2更换不合用的气管﹔
2.3检查调压表,更换不合用的配件﹔
Байду номын сангаас2.4填写保养记录。
3.0设备的日常保养由使用部门负责进行。
编写人
审核人
批准人
设备自检
操作步骤
相关要求及注意事项
辅助工具
备注
检查线路及电机开关
1.开机
2.调表的压力
3.放货到真空箱内
4.关真空箱门
5.打开真空箱门取货
6.关机
1.开机后检查机器的吸口管有没有吸力。
2.真空箱门的吸力要达到要求。
板手
1.0一保维修与保养内容
1.1检查电机线路是否完整,绝缘良好﹔
1.2检查气管畅通﹔
真空吸尘器产品说明书掌握真空吸尘器的使用技巧和滤网清洁方法

真空吸尘器产品说明书掌握真空吸尘器的使用技巧和滤网清洁方法真空吸尘器产品说明书一、前言感谢您选择使用本款真空吸尘器。
本产品采用先进技术制造而成,旨在为您提供一种高效、方便、健康的清洁解决方案。
本说明书将详细介绍真空吸尘器的使用技巧和滤网清洁方法,帮助您更好地了解和使用本产品。
二、产品概述本款真空吸尘器采用先进的真空吸尘技术,能够高效清洁家庭环境中的灰尘、污垢和宠物毛发。
它拥有以下主要特点:1. 强大的吸力:装备高性能电机,提供强大的吸力,可快速吸附各种灰尘和污垢。
2. 多功能设计:配备多种吸头和配件,可适用于不同场景和不同材质的地面、家具和窗帘等清洁。
3. 轻便易操控:精心设计的轻便机身,重量适中,便于携带和操作。
4. 高效过滤系统:采用优质滤网,能够有效过滤空气中的微尘和细菌,提供清洁健康的室内环境。
三、使用技巧1. 使用前准备在使用真空吸尘器之前,请确保电源插座良好接地,并检查各部件是否安装牢固。
2. 吸尘操作a) 调整吸力:本款真空吸尘器配备吸力调节开关,根据需要调整吸力大小,以免对不同地面造成过大或不足的吸力。
b) 合理走动:在进行吸尘时,应保持走动的方向一致,避免重复清洁同一区域,以提高清洁效率。
c) 角落和狭小空间处理:使用配备的小吸头和延长管,可轻松清洁狭小角落和难以到达的区域,如床底、家具缝隙等。
d) 地毯和硬质地板:对于不同类型的地板,可使用配备的不同吸头,以获得最佳的清洁效果。
对于地毯,建议多次来回吸尘,确保彻底清除污垢。
e) 宠物毛发处理:使用专门的宠物毛发吸头,可以更好地吸附和清除家庭中宠物脱落的毛发,保持环境清洁。
3. 滤网清洁方法a) 常规清洁:定期清洗滤网,以保持吸尘器的清洁效果和工作效率。
将滤网取出,用清水或温和的清洁剂轻轻清洗并晾干后重新安装即可。
b) 滤网更换:滤网使用一段时间后,会逐渐积累灰尘和污垢,影响吸尘效果。
建议每隔一段时间更换新的滤网,以确保吸尘器的性能和持久使用。
- 1、下载文档前请自行甄别文档内容的完整性,平台不提供额外的编辑、内容补充、找答案等附加服务。
- 2、"仅部分预览"的文档,不可在线预览部分如存在完整性等问题,可反馈申请退款(可完整预览的文档不适用该条件!)。
- 3、如文档侵犯您的权益,请联系客服反馈,我们会尽快为您处理(人工客服工作时间:9:00-18:30)。
印尼棉兰EPC项目固定式真空清扫设备技术资料项目单位:北京赛德联合机电设备技术有限公司目录1、产品名称、型号及规格2、产品工作原理3、主要技术参数4、产品主要构件的材料5、产品结构示意图、外形图、电器线路图6、产品安装说明及安装图7、产品运行、维护说明及注意事项一、产品名称、型号及规格1.1 设备名称:固定式真空清扫设备1.2 数量:3台1.3 设备型号及用途1.4 型号:SVAC-S-401.5 设备用途:锅炉本体、锅炉房及输煤系统的真空吸尘二、产品工作原理真空吸尘设备是利用电机通过皮带带动真空Array风机产生抽吸气流,将物料或粉尘吸入管道进入设备,再进行气料分离,物料落入料斗中。
不同的输送量和输送距离要求不同的风量和负压值,风量直接和输送效率有关,负压值和输送距离有关。
气料分离的是把进入管道以及到达设备的物料和气体进行分离,收集需要回收的物料。
该设备采用离心分离和筒式过滤器两级分离,第一级为离心分离,可达80~95%的过滤效率,第二级为筒式过滤,选用布袋过滤材质,过滤效率为99.9%的亚微级颗粒可以被过滤,所有被过滤的物料集中收集在一个端卸式的料斗内。
气体经过真空泵、消音器被排到大气中。
布袋过滤采用压缩空气反吹实现设备连续工作。
注:压缩空气需要现场业主提供:压力0.4~0.8Mba , 流量15CFM,设备接口:ZG1/4内螺纹当设备料斗满时,需要使用叉车把料斗从设备中移出,人工倒料。
设备工作原理图如下:二、主要技术参数三、产品主要构件的材料设备材质表四、产品结构示意图、外形图、电器线路图产品安装说明及安装图SVAC-S-40无需安装基础设备和管道系统的连接示意图(见产品外形尺寸及结构图CAD):六、产品运行、维护说明及注意事项6.1 验收规程收到全部货物后,应立即检验有否外部损伤!!1.检查所有的金属板件与钢结构件,看是否有硬伤、扭曲、变形和断裂。
2.检查所有的接线,看是否有磨损、割痕、裂纹等,如发现有,则应在接电源之前进行修理或更换。
连接3.检查所有的气管及接头,看是否有缺陷。
4.检查电动机与真空泵。
在安装后第一次接电启动前,看它们是否能转动自如。
5.对照所附的装箱单,逐项查对每一批货和每一件货。
6.核对装箱单上每件货的规格与名称。
6.2 安全操作须知为了操作者的安全,本公司在机器上设计有标签、遮板、安全罩等保护装置。
违规操作和对机器使用不当往往是事故的根源。
在操作机器之前,需仔细阅读和理解本手册中的所有说明。
△只有经过全面培训的人员才可操作机器。
△切勿将面孔或头部任何部位放在吸嘴或吸料口的前面。
△操作者和靠近真空吸尘器工作的人员必须使用听力保护设施。
△切勿操作不带皮带防护罩的机器,远离运动部件。
△当机器运转时,不要将手放在吸嘴的前方。
△不要抽吸任何可燃液体。
△切勿在未关机的情况下进行吸尘器的润滑或修理。
△当主设备在抬起的位置时,切勿移动吸尘设备。
当主设备在抬起的位置时,切勿在主设备下检修或工作。
△在穿着宽松的衣着,带有手表或手环时,不可操作吸尘器。
△定期检查,看是否有松动的螺栓和调整螺丝。
6.3 设备存放须知一.设备闲置少于30天, 与正常使用相同。
二.设备闲置多于30天少于6个月, 每2-3周转动所有的轴, 以防止轴承变形。
三.设备闲置多于6个月, 应采取以下措施:主机应放入仓库; 防尘塞堵好;;保护主机的电器部件;断开压缩空气源, 同时释放压缩空气管线内的气压。
一、SVAC-S-40操作规程警告:1.开机前必须检查真空泵的油位是否正常!!2.在任何情况下,消音器排出口不得有灰尘排出,如若发生,必须立即停机检查!!Ⅰ、预备(Prearrangement )1.设备要求的外接电源为380V/50Hz/3P。
Equipment require power source 380V/50Hz/3P.2.SV AC-S-40应安装在平坦的地方。
vacuum machine should stay on flat.连接主机入口软管到管网主吸尘管。
Link tube between machine and pipe.3.检查各种电线电缆的连接是否正确且完好无损。
Confirm the electricity line is right link and fine.4.检查管网管接件及快速接头与防尘塞的连接是否完好。
Confirm the pipe net joint link right.5.关闭所有的电控柜门、检修门,放下动力头,保持设备密封。
Close control panel, examine coping. Down the power head, airproof the hopper.7. 检查空压机、真空泵的所有油位,达到油位视窗有油,标准油位应在视窗内正常,高出或低出均为不正常状态,应排除多余的油或补充不足的油。
油位视窗口油位视窗口注油口Confirm the level of Lub oil isi in the middle of sight-windows.Any lack or superfluous shoud be regulated.6.检查皮带的张力和磨损。
Confirm drive belt tense and wear.8. 检查电动机和真空泵的旋转方向,正确方向为开启电动机后消音器出口盖开启,否则应立即停机,改变电机的转向。
真空泵的正确转向为该排气口打开,否则应立即停机调整电机的转向!( correct rotation of motor make cover open, otherwise change rotation direction)二、启动真空泵(start vacuum blower )1. 完成开机前检查。
打开管网1~2个快速接头, 使真空泵启动时处于空载状态;2..将开启启动电源和控制电源开关,电源指示灯亮;3. 压缩空气控制阀至脉冲反吹位置。
4. 按“启动”按钮,启动真空泵,开始吸料工作After prearrangement, open 1~2 suck end , opening power switch and switchibg the control valve to pulse position , you can start vacuum machine to suck dust.三、运行( run )在任何情况下,消音器空气排出口不得看见有灰尘排出,如若发生,必须立即停机检查;1.定期检查并做记录, 以保证设备正常运行;2.过滤筒压正常由控制系统进行自动脉冲反吹清理。
当差表一直超过110厘米水柱时, 应人工清理或更换过滤筒;3.急停按钮复位,停止-启动按钮放在启动位置,按下启动按钮,设备启动。
In case of dust discharge from silence, stop machine immediately. When pressure difference attain 110 cm w.c, the cartridge filters should be exchanged.四、停机(stop)在停机之前, 让真空吸尘装置空吸3~5分钟, 以抽空管道内的残留物料;按下“停止”按钮,真空泵和空压机同时停机;Before stop machine, let vacuum 2~3 minute so as to clearing material in the pipe.五、排料(dust discharge)1、在设备设备停机状态下。
2、操作料斗脱离阀门,料斗和设备脱离。
3、用叉车移动料斗,人工倒料。
When hopper full or requiring download dust, make sure that:Push transport button.六、复位(reset)1、在设备处于输送状态下,按下复位(或关)按钮。
设备停止工作。
Push reset button.三维护规程maintenance用户需建立必要的检修制度,以确保设备能够运行良好。
User should establish indispensable examine system so as to make order to machine.日检(daily inspecting)根据日检内容检查并将结果填入日检表。
Fill in daily inspecting list.1、真空泵润滑油液位(when stop, inspect the Lub oil level):Fill in some lub oil to half level of checking windows.注意:设备必须水平放置,真空泵和空压机油位必须处于恰当的位置。
Notice: the machine must stay in flats.2 、过滤筒差压(when run , inspect the pressure difference):将吸入口完全地打开,记录下过滤筒压差表的读数(厘米水柱)。
Open suck mouth completely, record the pressure difference.3、空载真空度(when run ,inspect the vacuum rate):将吸入口完全打开,检查并记录下真空表的读数。
空载读数是显示吸尘器情况的重要参数,正常情况下应为0.01~0.10bar。
Open suck mouth completely, record vacuum rate. Normally it is0.01~0.10bar.1、如果空载时真空表读数为零:A、检查真空表连接管线是否破裂、松开或堵塞;B、检查真空泵入口管与料斗的连接处是否泄漏。
If vacuum rate is zero, the line link vacuum gauge may loose or damaged.Otherwise leakage between power head and hopper may cause no vacuum rate.2、如果空载时真空表读数过高:A、检查主机入口是否有堵塞物;B、检查压差表,读数应为5-20厘米水柱。
如果高于35厘米水柱,应打开拱形顶盖检查物料在过滤筒表面是否粘附着过多,并清理或更换。
If pressure difference too high (above 35cm w.c, normally 5~20cm w.c), the cartridge filters may adhere too much. clearing or exchange cartridge filters is necessary.4 、消音器排出灰尘 (when run, inspect if dust discharge fromsilence )注意:一旦发现有灰尘排出,必须立即关机!Notice: if dust discharge from silence stop the machine!关机后,打开拱形顶盖检查过滤筒是否有破裂或泄漏处,并更换破损或泄漏的过滤筒。
