兄弟 xl2600说明书简体 (1)
兄弟缝纫机XL-2230用户手册说明书

兄弟缝纫机使用说明
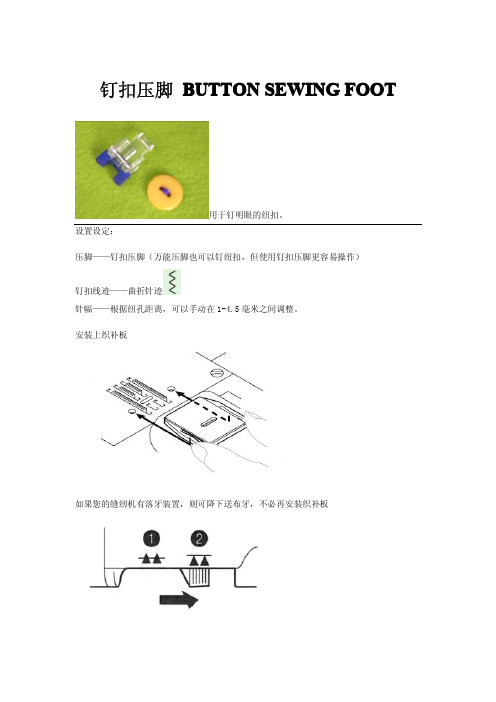
钉扣压脚BUTTON SEWING FOOT
用于钉明眼的纽扣。
设置设定:
压脚——钉扣压脚(万能压脚也可以钉纽扣,但使用钉扣压脚更容易操作)
钉扣线迹——曲折针迹
针幅——根据纽孔距离,可以手动在1-4.5毫米之间调整。
安装上织补板
如果您的缝纫机有落牙装置,则可降下送布牙,不必再安装织补板
钉纽扣步骤:
1)在衣物需钉扣的地方标出纽扣的位置。
2)压脚起针位对着织物上纽扣的起针记号,放入纽扣,放下压脚。
3)转动手轮以确定机针的左摆针刺入纽扣的左孔、右摆针刺入纽扣的右孔内。
如有必要调整针幅.
4)横向缝纫8-10个线迹。
为防止脱线,可以将两根线头穿到背面,并打结。
若想让纽扣与织物间有点空隙,可以在纽扣的两孔间放一枚珠针,再横向缝纫。
缝完后,抽去珠针即可。
HP Integrity rx2600 视频更新 - 2003年10月(第1版)说明书
HP Integrity rx2600 Video Resolution Limitation in Microsoft® Windows®
Some HP Integrity rx2600 servers may have a limitation on their VGA resolution settings. This limitation restricts customers to a resolution of 640 x 480. The update is provided on the CD-ROM, part number: 5013-1135, which will allow the HP Integrity rx2600 customers to remove the video limitation. This update must be manually installed, only once, after successfully installing the operating system.
Errata for the HP Integrity rx2600 Video Update
October 2003 (First Edition) Part Number 5990-6812 Version: 1.00 DC-10/3/03
© 2003 Hewlett-Packard Development Company, L.P.
than “q”.
NOTE: This patch copies two files to the EFI partition: a patched EFI driver that resolves the resolution restriction and a script that loads this EFI driver on system boot. Hitting “q” to quit the patch process
Canon imageRUNNER 2600系列多功能打印机产品介绍说明书
ROBUST, RELIABLE AND HIGHLY EFFICIENT A3 MONO MULTIFUNCTION PRINTERS The ultimate document solution devices designed to excel in a modern office environment imageRUNNER 2600 SeriesPRODUCTIVITYUSER EXPERIENCE SECURITY CONTROL AND MAINTENANCEMOBILE CONNECTIVITYCanon Inc. Canon Europe English edition© Canon Europa N.V.,2019imageRUNNER 2600 SeriesPRODUCTIVITY• Fast print outputs and first copy out time (FCOT)• Customisation of on-screen applications increases workflow efficiency• Scan and convert documents to searchable PDF, Microsoft Word or Power Point files • Print Hold function for a convenient finaladjustment of print setting before job release • Smart media handling enables up to 30 paper types registration and automated size detection • Space saving optional inner finisher with staple-free binding and integrated manual staplingUSER EXPERIENCE• Intuitive operation via a large colour touchscreen with smartphone like usability• Advanced personalisation and customisation options tailored for user’s workflow needs• Integrated Home UI enables choice of frequently used settings from a single menu• Automatic recovery from sleep mode* byplacing paper on DADF or opening platen glass • Innovative production processes, includingwelded frame, ensure lasting machine longevity and reliabilityQUICK FACTS• Easy replacement of toner cartridge featuring anti-spill technology• Compact design allows for a convenient office arrangementsSECURITY• Secure boot at start-up enables preventative security measures to protect device from unauthorised modifications• Advanced device and cloud-based authentication options• Central control of security settings reduces administrator burden• Encrypted PDF, plus device and optional user signature PDF provide additional authentication security levels• Secure PIN and Forced Hold Print enhance document confidentiality• Further actions to counter malware attack on the network include third party SIEM system integration• Ensure data privacy across your network with IPsec and port filteringMOBILE CONNECTIVITY• Wireless LAN and QR code connection options for working from tablets and smartphones• Mobile compatible remote UI with optimised display layout allows users to change the settings of print jobs on the go• Support for Mopria, Apple Air Print, Google Cloud Print and Windows 10 Print• Canon’s PRINT Business app adds furtherfunctions to printing and scanning from mobile devices• Status of the machine and consumables can be read from the connected mobile devicesCONTROL AND MAINTENANCE• Centrally manage all devices on the network with cloud-based remote management options • Remote Operators Software Kit providesalternative access to device, simulating control panel and hard keys on a network PC screen for remote operation of all system functions • Compatibility with Canon’s uniFLOW software solutions allows for tracking and reporting of print jobs• e-Maintenance can improve uptime through remote diagnostics, automated meter readings and consumables monitoring*imageRUNNER 2645i onlySERVICESSOFTWAREHARDWARESERVICES• Print, Copy, Scan, Send and optional Fax • 7-inch/17.8cm WVGA colour touchscreen • Print Speed: 25ppm (A4)• Print resolution: 1,200x1,200 dpi • Automatic double-sided printing• Platen or DADF option (50 sheet capacity)• Scan speed: 25ipm (A4, Mono/CL)• Network, Wi-Fi, USB and QR code connectivity • Max paper input capacity: 2,300 sheetsimageRUNNER 2625i• Print, Copy, Scan, Send and optional Fax • 7-inch/17.8cm WVGA colour touchscreen • Print Speed: 30ppm (A4)• Print resolution: 1,200x1,200 dpi • Automatic double-sided printing • DADF standard (50 sheet capacity)• Scan speed: 30ipm (A4, Mono/CL)• Network, Wi-Fi, USB and QR code connectivity • Max paper input capacity: 2,300 sheetsimageRUNNER 2635i• Print, Copy, Scan, Send and optional Fax • 7-inch/17.8cm WVGA colour touchscreen • Print Speed: 45ppm (A4)• Print resolution: 1,200x1,200 dpi • Automatic double-sided printing • DADF standard (100 sheet capacity)• Scan speed: 55ipm (A4, Mono/CL)• Network, Wi-Fi, USB and QR code connectivity • Automatic recovery from sleep mode • Max paper input capacity: 2,300 sheetsimageRUNNER 2645i。
打印机使用说明
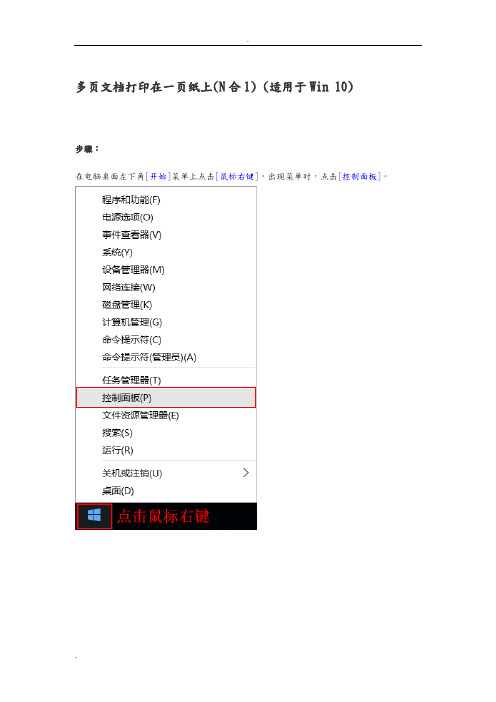
多页文档打印在一页纸上(N合1) (适用于Win 10)步骤:在电脑桌面左下角[开始]菜单上点击[鼠标右键],出现菜单时,点击[控制面板]。
手动调整扫描深浅(适用于ControlCenter4标准模式)操作步骤:对于WindowsXP、Windows Vista、Windows7从[开始]菜单,依次选择[所有程序]→[Brother]→[MFC-XXXX/DCP-XXXX]→[ControlCenter4]对于Windwos8、Windows8.1、Windows10点击[Brother Utilities]。
点击左侧导航栏中的[扫描],然后点击[ControlCenter4]手动调整扫描深浅(适用于ControlCenter4高级模式)说明:通过设置扫描的亮度和对比度,就可以手动调整扫描深浅操作步骤:对于WindowsXP、Windows Vista、Windows7从[开始]菜单,依次选择[所有程序]→[Brother]→[MFC-XXXX/DCP-XXXX]→[ControlCenter4]对于Windwos8、Windows8.1、Windows10点击[Brother Utilities]。
点击左侧导航栏中的[扫描],然后点击[ControlCenter4]重置硒鼓单元计数器说明:当设备提示[更换硒鼓]或[硒鼓停止工作],建议您更换兄弟原装硒鼓,并重置硒鼓单元计数器。
操作步骤:1、打开前盖,按[清除/返回(Clear/Back)键]。
2、按[▲]键。
3、屏幕显示接受,合上前盖。
恢复出厂设置操作步骤:1、按[功能]键。
2、按[↑]或[↓]键选择到[常规设置],按[OK]键。
3、按[↑]或[↓]键选择[重置],按[OK]键。
4、按[OK]键。
按[↑]键选择[重置]。
5、按[↑]键选择[是]。
6、设备将自动重启。
开启墨粉继续运行模式说明:当液晶屏幕显示[更换墨粉/更换墨粉盒]时,可以开启墨粉继续运行模式进行打印。
Epson ET-2600SP 墨水打印机设置指南说明书
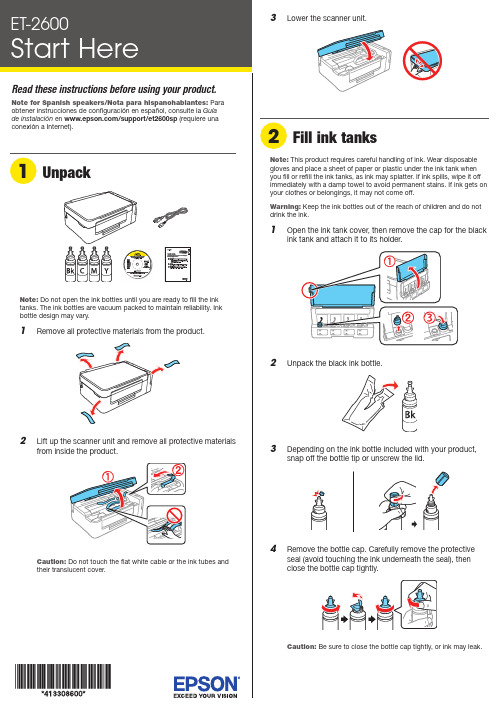
Do not open the ink bottles until you are ready to fill the ink tanks. The ink bottles are vacuum packed to maintain reliability. Inkemove all protective materials from the product.11 R aise the control panel and turn on the product. Wait forthe power light to stop flashing, then follow step 12 tocontinue ink charging.Note: If all the product lights are flashing, turn off the product and check that no protective material has been left inside the product.Caution: Do not lower the control panel without first squeezing the release bar underneath or you may damage the product.12 P ress and hold the button for 3 seconds untilthe power light starts flashing, to begin charging theink. Ink charging takes approximately 20 minutes. Ink charging is complete when the power light stopsflashing.20 minutesNote: The ink bottles included with the printer are designed for printer setup and not for resale. After some ink is used for charging, the rest is available for printing.Caution: Do not turn off the product or load paper while theproduct is charging or you’ll waste ink.1 M ake sure the product is not charging. Then flip thefeeder guard forward, raise the paper support, and tilt itbackwards slightly.2 Slide the edge guide to the left.5 Fill the tank using all of the ink in the bottle.Note: Refer to the color coded sticker on the ink tank to identify the color of each tank.Caution: Be sure to fill each tank with the correct ink color.6 C arefully seal the bottle using the reverse side of thebottle tip or screw on the lid for proper disposal.789 Close the ink tank cover.10 C onnect the power cord to the back of the product and toan electrical outlet.C aution:Do not connect to your computer yet.4 W hen you see the Select Your Connection screen, selectone of the following:• Wireless connectionIn most cases, the software installer automatically attempts to set up your wireless connection. If setup is unsuccessful, you may need to enter your network name (SSID) and password.• Direct USB connectionM ake sure you have a USB cable (not included).Mobile printing optionsConnect wirelessly from your smartphone, tablet, or computer.Print documents and photos from across the room or around the world. See your online User’s Guide for instruction or learn more at .Any problems?Network setup was unsuccessful• Make sure you select the right network name (SSID).• Restart your router (turn it off and then on), then try toconnect to it again.• The printer can only connect to a network that supports 2.4 GHz connections. If your router offers both 2.4 GHz and 5 GHz connections, make sure the 2.4 GHz network is enabled.• If you see a firewall alert message, click Unblock or Allow to let setup continue.• If your network has security enabled, make sure you enter your network password (WEP key or WPA passphrase) correctly. Be sure to enter your password in the correct case.There are lines or incorrect colors in my printoutsRun a nozzle check to see if any of the print head nozzles areclogged. Then clean the print head, if necessary. See the online User’s Guide for more information.Setup is unable to find my product after connecting it with a USB cableMake sure the product is on and securely connected as shown:3 L oad paper, glossy or printable side up and short edgefirst, against the right side of the rear paper feed slot.4 S5 P Note: If your computer does not have a CD/DVD drive or you are using a Mac, an Internet connection is required to obtain the product software.1 M ake sure the product is NOT CONNECTED to yourcomputer.W indows ®: If you see a Found New Hardware screen, click Cancel and disconnect the USB cable.2I nsert the product CD or download and run your product’ssoftware package:/support/et2600 (U.S.) orwww.epson.ca/support/et2600 (Canada)3 F ollow the instructions on the screen to run the setupprogram.nsure peak performance and brilliant results。
brother标签机说明书
撤消 重复
剪切 复制 粘贴
菜单
单击“撤消”可以撤消上一次操作。 单击“重复”可以恢复撤消的操作。
功能
选择要剪切或复制的文本区域(或对象),然后选择“剪切”或“复制”。单击目标区域,然后选择“粘贴”。
页边 插入 方向
设置标签两侧空白区域的长度(“最大”或“最小”)。
单击“插入”。 选择“文本框”可以将文本插入标签。 选择“从文件”可以插入计算机上存储的图像。 选择“画面捕捉”可以插入计算机屏幕的选定区域。 选择“符号”可以插入一个计算机的内置符号。 选择“装饰框”可以插入一个 P-touch Editor Lite 的内置装饰框。
注意
• 为避免损伤,请勿触摸切刀的刀刃或靠近打印头的任何金属部件。 • 如果打算长时间不用普贴趣标签机,请取出电池并断开电源适配器。 • 请勿将新旧电池一起使用或将碱性电池与其它类型电池混用,或者将电池的正负极放错位置,否则,电池可能会漏电或损坏。 • 为防止损坏或破损,请勿摔扔或撞击普贴趣标签机 / 电源适配器。 • 只使用普贴趣标签机随附的 USB 数据线。
一般注意事项
• 根据位置、材料和环境条件,标签可能会脱落或无法清除,标签颜色可能会变化或染到其它物品上。贴标签之前,请检查环境条件和表 面材料。
• 不得以本指南未介绍的任何方式或任何目的使用普贴趣标签机,否则,可能会导致意外事故或损坏机器。 • 对这种机型只可使用 Brother TZ 色带或 Brother HG 色带。请勿使用没有 或 标记的色带。
* HG tape 的打印速度和清晰度与 TZ tape 相同。 • 请勿使用酒精或其它有机溶剂清洁普贴趣标签机,只使用柔软的干布。 • 任何时候都不得用手指触摸打印头,以防可能烧伤。清洁打印头时请使用软纸或棉签。 • 请勿将任何异物放入色带出口槽或电源适配器连接器等。 • 请勿将普贴趣标签机 / 电池放在日晒雨淋、靠近加热器或其它热电器的地方,或暴露在任何极高或极低温度(如汽车仪表板或后部)、高
Lexmark E260dn 打印机使用指南说明书

Connection Guide(連線指南)支援的作業系統您可使用軟體與說明文件 光碟,來安裝所需的印表機軟體,適用的作業系統包括:•Windows 7•Windows Server 2008 R2•Windows Server 2008•Windows Vista•Windows Server 2003•Windows XP•Mac OS X 10.5 版或更新的版本•Red Hat Enterprise Linux WS•openSUSE Linux•SUSE Linux Enterprise Desktop•SUSE Linux Enterprise Server•Debian GNU/Linux•Ubuntu Linux•Linpus Linux Desktop•Red Flag Linux Desktop•Fedora•Linux Mint•PCLinuxOS請注意:•若是 Windows 作業系統,32 及 64 位元版本均支援印表機驅動程式及公用程式。
•如需與 Mac OS X 10.4 版本相容的驅動程式與公用程式,請造訪 Lexmark 網站,網址為:。
•如需支援的特定 Linux 作業系統版本,請造訪 Lexmark 網站,網址為:。
•如需有關軟體與其他所有作業系統的相容性資訊,請聯絡客戶支援中心。
利用軟體與說明文件 光碟安裝印表機1關閉所有開啟的應用程式。
2請放入軟體與說明文件 光碟。
如果稍後仍未出現安裝對話畫面,請手動啟動光碟:a按一下開始,然後按一下執行。
b在「開始搜尋」或「執行」方框中,輸入D:\setup.exe,其中D是指您 CD 或 DVD 光碟機的代號。
c按下Enter,或按一下確定。
3按一下安裝,然後遵循電腦螢幕上的指示。
本端安裝印表機 (Windows)請注意:若軟體與說明文件 光碟不支援該作業系統,您便須使用「新增印表機精靈」。
Lexmark 網站也可能提供印表機軟體的更新項目,網址如下:。
brother打印机使用说明书
Brother 激光打印机使用说明书HL-2140 HL-2150N HL-2170W 对于视障的用户您可以使用“ 文本发声” 软件阅读本使用说明书。
在您使用打印机之前,您必须设置硬件并安装驱动程序。
请使用快速安装指南设置打印机。
包装箱内有印刷副本。
请在使用打印机之前,仔细阅读使用说明书。
将随机光盘放置在方便的地方,以便随时迅速查询。
请访问。
您可以获取更多产品支持信息、最新的打印驱动程序和实用程序、常见问题解答FAQs 和技术问题等。
版本B SCHN使用本说明书本说明书使用的符号本使用说明书使用以下图标:此图标警告您避免可能造成的人身伤害。
此图标警告您避免可能发生的触电伤害。
此图标警告您不要触摸烫热的设备部件。
此图标说明了您必须遵守或避免的一些步骤以防止损坏打印机或其他物品。
此图标提醒您与打印机不兼容的设备和操作。
此图标提醒您如何对应可能出现的情况或提供有关当前操作如何与其它功能工作的提示。
i安全注意事项安全使用打印机请妥善保存说明书以备日后参考,进行任何维护之前请仔细阅读。
警告打印机内部有高压电极。
清洁打印机内部之前,务必关闭电源开关,并将打印机插头从电源插座中拔出。
不要用湿手插拔插头,否则可能会导致触电伤害。
始终确保插头完全插入。
不要使用吸尘器清洁打印机中泄漏的墨粉,否则可能导致吸尘器内部墨粉阻塞,引起火灾。
使用干燥的无绒毛布清除残余墨粉,并根据当地法规处理废弃的墨粉。
不要使用易燃物品或任何类型的喷雾清洁设备的内部或外部。
否则可能引起火灾或触电伤害。
关于如何清洁设备,请参阅第73 页上的清洁。
ii在您刚使用过打印机后,打印机内部的一些零件温度会非常高。
当您打开打印机的前盖或后盖后出纸托板时,不要触摸图中所示的阴影部分。
打印机内部打印机内部前视图后视图塑料袋用于包装设备。
请将这些塑料袋放于儿童不易触及的地方,以免儿童误吞而窒息。
清洁打印机的外部: 请确保已经从交流电源插座上拔下打印机插头。
请使用中性清洁剂。
brother缝纫机说明书

9. 保养 ····················································· 39
请使用兄弟工业公司指定更换的零部件。
T-8421B, 8422B, 8452B, 8722B, 8752B
iii
[3] 警告标签
缝纫机上有下列警告标签。 当使用缝纫机时,请遵守标签上的说明。如果标签脱落或模糊不清,请和购买商店联系。
1
2
3
必须接地。
接驳地线不牢固,是造成触电或误动作的原因。
4
表示转动方向
10. 旋梭供油量的调整 ·························· 44
11. 故障检修··········································· 45
11-1. 缝纫 ··················································· 45 11-2. 显示错误代码 ······································· 50
7. 缝纫 ····················································· 32
7-1. 缝纫····················································· 32 7-2. 倒缝加固的方法 ······································ 33 7-3. 缝纫密针的方法 ······································ 34
LEXMARK 2600 Series打印机 说明书

2600 Series 用户手册2009年1月机器类型:4433, 4445型号:目录安全信息 (5)序言 (6)查找有关打印机的信息 (6)安装打印机 (9)处理安装过程中的安全性警告 (9)安装打印机(只用作复印机) (9)了解打印机的部件 (14)使用打印机操作面板 (15)了解打印机软件 (17)安装打印机软件 (17)安装可选的XPS驱动程序(仅限于Windows Vista用户) (17)使用Windows打印机软件 (18)使用Macintosh(英文版)打印机软件 (19)装入纸张和文档原件 (21)装入纸张 (21)装入各种类型的纸张 (21)将文档原件放置在扫描仪玻璃上 (24)打印 (26)打印基本文档 (26)打印文档 (26)打印网页 (26)打印多份文档 (27)逐份打印 (27)先打印最后一页(倒序打印) (28)将多页文档打印到一张纸上 (28)暂停打印作业 (29)取消打印作业 (30)打印特殊文档 (31)选择适当的特殊类型纸张 (31)使用打印机软件打印照片 (31)打印信封 (32)打印标签 (32)打印自定义尺寸的纸张 (33)打印其他的特殊文档 (34)保存和删除打印设置 (35)复印 (36)进行复印 (36)复印4 x 6照片 (36)扫描 (37)扫描文档原件 (37)取消扫描作业 (37)传真 (39)发送传真 (39)自动接收传真 (40)维护打印机 (41)维护打印墨盒 (41)安装打印墨盒 (41)取出旧的打印墨盒 (42)再填充打印墨盒 (43)使用原装Lexmark打印墨盒 (43)清洗打印墨盒喷头 (44)擦洗打印墨盒的喷头和触点 (44)维护打印墨盒 (45)擦洗扫描仪玻璃 (45)清洗打印机的外壳 (45)订购耗材 (46)订购打印墨盒 (46)订购纸张和其他耗材 (46)回收Lexmark产品 (47)问题解答 (48)使用打印机问题解答软件(仅限于Windows) (48)安装问题解答 (48)电源指示灯不亮 (48)软件不能安装 (49)页面不能打印 (50)反安装并重新安装软件 (52)启用USB端口(Windows) (53)解决打印机电源问题 (54)通告 (55)产品信息 (55)版本通告 (55)能源消耗 (58)索引 (64)安全信息请只使用随同此产品提供的电源和电源线,或者使用经过制造商认证的电源和电源线作为替代。
兄弟打印机说明书
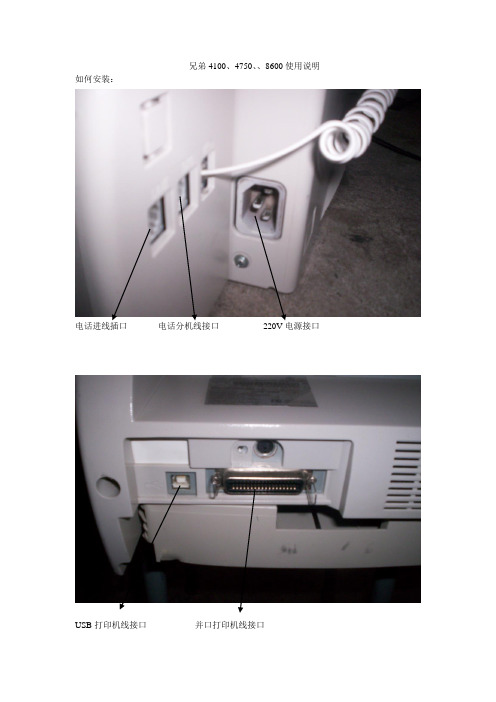
兄弟4100、4750、、8600使用说明如何安装:
电话进线插口电话分机线接口220V电源接口
USB打印机线接口并口打印机线接口
送纸稿台
机器放纸纸盒
打印晒鼓晒鼓前门
走纸后盖
兄弟8600的软件安装,本机的所有驱动软件是所以XP系统自带的,不需用按装的,只有把机器的打印机线连接到你的电脑上再连接上220V电源,电脑系统就可以自动找到新硬件,即就可以自动安装软件。
如何传真:请把你要传真的文件放入送纸稿台(一定要放进去),打通对方的传真电话,在听到对方的传真信号后按一下传真件就可以了。
如何收传真:当你在接听到对方的传真电话时,听到对方给出的传真信号后,请按一下传真键即可。
如何使用无纸接收:当你的打印机纸、机器碳粉用完时,如果你有传真需要接收,这时请你步要着急,你按正常收传真时一样,给对方传真信号,这时虽然你所收到的传真不可以打印出来,但机器可以将你收到的传真记忆在自身的内存里面,(一次最多可以无纸接收550页左右),后在你将打印机纸买回、碳粉加好后,你装好了之后机器就可以自动打印出你所收到的传真出来。
如何使用扫描:将你要扫描的文件放如送纸稿台,将你要扫描的面向下,再打开我的电脑里面的扫描仪和照相机下面的扫描仪图标,双击扫描仪图标后面根据你需要选择你所扫描的文件是到文档还是照片里面保存。
如图:
:
请将打印机设为默认打印机,如图:
这是所以机器的说明如果有不详之处请联系我们,
机器的面板主要功能键介绍:
免提键功能键确定键选择键音量大键音量小键接收方式选择键
重拨键停止键传真键复印键。
兄弟打印机使用说明

兄弟打印机使用说明如何进行用Brother一体机进行扫描、复印及打印?在一体机待机状态下,可进行如下操作:1、扫描1-1A4扫描:将纸张翻页放在进纸口,要扫描的内容面朝上,纸张头朝左。
注意:一次不超过20张不能按键一次即正反面都扫描,扫描反面须翻页后再进行扫描一次。
扫描→选择“扫描到PC”→选择“图像”→选择要存档的计算机(自己的计算机名)→更改设置(否)→确定→启动1-2非A4纸张、票据、照片、身份证等扫描:打开上盖,将扫描的内容面朝下,纸张靠近左上(可扫描区域与A4纸张边界相同),放在透明面板上的可扫描区域。
扫描→扫描到PC→图像→选择要存档的计算机(自己的计算机名)→更改设置(否)→确定→启动2、复印2-1A4复印:将纸张翻页放在进纸口,要扫描的内容面朝上,纸张头朝左。
按下启动键。
注意:一次不超过20张,不能一次性正反面全部复印,复印反面须翻页后再进行扫描一次。
2-2 非A4纸张、票据、照片、身份证等复印:打开上盖,将复印的内容面朝下,纸张靠近左上(可扫描区域与A4纸张边界相同),放在透明面板上的可复印区域。
按身份证键→正面朝下,人物图像保持头朝左,与透明面板平行→启动→身份证翻面,放置同一位置→启动按票据键→启动照片→启动3、打印1、单面打印(默认)→启动2、手动双面打印→office中,点击“打印”→选择要打印的范围(如:1,3,5,7,9)→打印A面→取出已打印纸张(按取出的原序),打开机器最下方纸槽,将已印字的一面朝上,字与人呈相反的方向,将纸放进纸槽,打印B 面(如:2,4,6,8,10)3、自动双面打印:office中,点击“打印”→选择“属性”→选择“双面打印”→选择“确定”。
(如需单面打印,须选择“属性”→“双面打印”选择“无”→点击确定)。
XL使用说明书
a.检查漆膜有无剥落,屏内是否清洁。
b.操作机构是否灵活,不应有卡住或操作力过大现象。
c.主要电器的通断是否可靠准确。
d.电器的辅助接点的通断是否可靠准确。
e.仪表与互感器的接线极性是否正确。
f.母线连接是否良好,其支持绝缘子、夹持件及附件是否安装牢固可靠。
9.2按所选方案的电气原理图,列出电器元件明细表,标出电器元件型号及具体的技术数据。
9.3配电柜数量及运行时的排列顺序图。
9.4配电柜的进出线方式。
附产品外形及安装尺寸。
XL动力配电柜
ZCKJ/QS-026.2-2005
安装使用说明书
共3页
第2页
6.结构
6.1本产品系户内用户安装,具有开启式单、双(单)面维护的低压配电装置。
a.其基本结构采用型材组合或型钢焊接而成。
b.柜前有门,柜面上方有仪表门,可装指示仪表,因此维修方便。
c.组合并列拼装的柜,柜与柜之间架有钢板弯制而成的隔板,这样就减少了单柜内故障扩大的可能性。
2.型号编制说明
XL–□-□-□
辅助电路方案号
主电路方案号
设计序号
动力配电柜
3.正常使用条件
3.1周围环境温度不高于+40℃,而在24h周期内平均温度不高于+35℃,周围空气温度的下限为-5℃。
3.2相对湿度在最高温度为+40℃时,不超过50%;在温度较低时,允许有较高的相对湿度,例如:+20℃时为90%。
5主要技术参数
5.1绝缘电压660V
5.2主电路额定工作电压AC380V
主电路额定工作电流Ie≤400A
5.3辅助电路额定工作电压为AC220V、380V;DC110V、220V。
XL XL 系列使用手冊说明书

XLXL系列使用手冊著作權著作權所有 © 2017 年,BenQ Corporation。
所有權利均予保留。
未經BenQ Corporation 事前書面之許可,本文的任何部分皆不可以任何形式或任何方法,包括電子、機械、磁性、光學、化學、手寫或任何方式予以重製、傳輸、轉譯、儲存於檢索系統或翻譯成任何文字或電腦語言。
免責聲明對於本文之任何明示或暗示內容,BenQ Corporation不做任何保證,亦拒絕對任何特殊目的之商用性或適用性目的予以保證。
此外,BenQ Corporation保留修改或變更本文之權利,並且修改或變更內容將不另行通知。
不閃爍的效能表現,可能會受到諸多外在因素影響(例如訊號線品質不良、電源供應不穩、訊號干擾或接地不當),且並不侷限於以上述及的這些外在因素。
(僅適用於不閃爍的型號。
)BenQ ecoFACTSBenQ has been dedicated to the design and development of greener product as part of itsaspiration to realize the ideal of the "Bringing Enjoyment 'N Quality to Life" corporate vision with the ultimate goal to achieve a low-carbon society. Besides meeting international regulatory requirement and standards pertaining to environmental management, BenQ has spared noefforts in pushing our initiatives further to incorporate life cycle design in the aspects ofmaterial selection, manufacturing, packaging, transportation, using and disposal of the products.BenQ ecoFACTS label lists key eco-friendly design highlights of each product, hoping to ensure that consumers make informed green choices at purchase. Check out BenQ's CSR Website at / for more details on BenQ's environmental commitments andachievements.23電源安全說明•交流電插頭會將本設備與交流電電源隔離。
兄弟打印机使用方法
打印方式 ............................................................................................................................................ 1-7 在普通纸、铜版纸和透明胶片上打印 ........................................................................................... 1-7 在纸盒中进纸的普通纸、铜板纸或透明胶片上打印 ................................................................. 1-7 在从手动进纸槽中进纸的普通纸、铜板纸或透明胶片上打印 ................................................. 1-10 在厚纸、标签和信封上打印 ....................................................................................................... 1-13 在手动进纸槽中进纸的厚纸、标签和信封上打印 ................................................................... 1-13 避免使用的信封类型 .............................................................................................................. 1-16
兄弟多功能打印机MFC的操作手册说明书

"Manual Feed" is an indication that your machine's Tray Setting or the paper source in the printer driver has been set to Manual Feed, but there's no paper loaded in the manual feed slot. 1. Load a sheet of paper in the manual feed slot. The document should print and clear the error message. 2. Check the machine's Tray Setting: a. Press ▲ or ▼ to display General Setup, then press OK. b. Press ▲ or ▼ to display Tray Setting, then presst Reset. The machine's display will ask if it's okay to reboot the machine. e. Press ▼ to select Yes. The machine will take a moment to reboot. 5. Send a print job to the machine. - If the document prints, the issue has been resolved. - If the document doesn't print and "Manual Feed" continues to appear on your machine's display, go to step 6. 6. Select the correct paper source in the printer driver. Follow the instructions below based on your operating system: Windows a. Open the Printers folder. For instructions, click here. b. Right-click on the printer driver and then left-click on Printing Preferences. c. Set the Paper Source to Auto for First Page and Other Pages. d. Click Apply → OK. Go to step 7. Macintosh a. From the application, click File → Print. b. Select the Brother printer driver from the Printer List. c. Select Print Settings from the Application Dropdown. d. Set the Paper Source to Auto. e. Go to step 7. 7. Send your print job to the machine. - If the document prints, the issue has been resolved. - If the document doesn't print and "Manual Feed" continues to appear on the machine's display, go to step 8. 8. The settings in the application you're using may be overriding the settings in the Brother printer driver. Double-check the print settings in the application to verify the paper source isn't set to Manual. When you've verified that the paper source has been set correctly, try printing your document again. If you're printing from Microsoft Word or a similar application, refer to: "Manual Feed", "No Paper", "Load Paper" or "MP Tray" when printing from Microsoft Word or a similar application - If the problem continues, go to WARRANTY AND SERVICE OPTIONS. WARRANTY AND SERVICE OPTIONS Products Mono Laser Printer HLL2325DW HLL2350DW HLL2370DW HLL2379DW Original Brother ink cartridges and toner cartridges print perfectly every time. Tested to ISO standards, they have been designed to work seamlessly with your Brother printer. Longer-life hardware Optimum cartridge and toner yields Crisp, sharp text and greater permanence Supplies Wil je assistentie bij het instellen of gebruiken van je Brother apparaat? Hier vind je handige gebruikershandleidingen voor onze printers, scanners en meer.
- 1、下载文档前请自行甄别文档内容的完整性,平台不提供额外的编辑、内容补充、找答案等附加服务。
- 2、"仅部分预览"的文档,不可在线预览部分如存在完整性等问题,可反馈申请退款(可完整预览的文档不适用该条件!)。
- 3、如文档侵犯您的权益,请联系客服反馈,我们会尽快为您处理(人工客服工作时间:9:00-18:30)。
使用缝纫机之前请先阅读这些说明。
安全使用本缝纫机须知 1. 进行缝制时,请务必仔细看着针。请勿触碰手轮、挑线杆、针或其它运动部件。 2. 在如下情况下,请务必关闭电源开关,拔出电源线插头:
• 当停止使用缝纫机时 • 当更换或拆卸针或其它任何部件时 • 使用缝纫机过程中发生断电时 • 正在检查或清洁缝纫机时 • 无人看管缝纫机时 3. 请勿在脚踏控制器上存放任何物品。 4. 请务必将电源线插头直接插入墙壁中的电源插座。请勿使用拖线板接插电源。 如何延长缝纫机的使用寿命 1. 请勿将缝纫机存放在阳光直射或湿度高的场所。请勿在加热器、熨斗、卤素灯或其它高温物体 附近使用或存放缝纫机。 2. 清洁外壳时只能使用中性肥皂或洗涤剂。苯、稀释剂和洗涤粉等可能会损伤缝纫机外壳,切勿 使用。 3. 请勿让缝纫机从高处跌落或使之受到撞击。 4. 当更换或安装压脚、针或其它部件时,请务必参考本说明书以确保正确安装。 如何修理或调节本缝纫机 当本缝纫机发生故障或需要进行调整时,首先请参考说明书末尾故障排除表,自己进行检查和调整 缝纫机。如果自己无法解决问题,请向当地授权的代理经销商咨询。
缝纫机穿线 ........................................................................................................................ 16
使用缝纫机 .......................................................................................................................... 7
连接插头 .............................................................................................................................................................................7 主电源和缝制照明灯开关 ................................................................................................................................................. 8 脚踏控制器 ......................................................................................................................................................................... 8 检查针的状况 ..................................................................................................................................................................... 8 更换针 ................................................................................................................................................................................. 8 更换压脚 .............................................................................................................................................................................9 附加工作平台 ................................................................................................................................................................... 10 使用自由臂方式 ............................................................................................................................................................... 10
用。请将缝纫机送到就近的授权代理经销商或维修服务中心,请专业人员对其进行检修、电气 或机械调整。 4. 操作缝纫机时切勿堵塞任何通风口。要确保缝纫机的通风口和脚踏控制器中不要堆积任何飞 绒、灰尘或碎布。 5. 切勿让任何物体掉进开口或将异物插入任何开口。 6. 切勿在室外使用。 7. 请勿在使用喷雾剂或存放氧气的场所使用本缝纫机。 8. 若要断开电源,请先将主电源开关置于表示关闭的 “{”位置,然后再从电源插座拔出插头。 9. 拔插头时请勿直接拉电源线。请握住插头部分 ( 而不是电源线 ) 将它拔出。 10. 请勿用手指触碰任何运动部件。在缝纫机针附近要特别小心。 11. 请务必使用合适的针板。使用不合适的针板会引起断针。 12. 请勿使用弯曲的针。 13. 缝制过程中请勿推或拉布料。否则可能引起针弯曲或断针。 14. 在针附近进行穿针线、更换针、梭芯穿线或更换压脚等调整操作时,请务必先将缝纫机的电源 开关置于 “{”位置关闭电源。 15. 当打开机盖、上润滑油或进行其他本说明书中提到的用户维护·调整操作时,请务必从电源插 座中拔出缝纫机的电源线插头。 16. 在没有监护的情况下,本缝纫机不适合年幼儿童或残疾人使用。 17. 应妥善看护年幼儿童,不要让他们玩耍缝纫机。
2. 更换照明灯泡前,请务必拔出缝纫机的电源线插头。 请更换额定功率为 15W 的同类型灯泡。
警告 - 为了降低灼伤、火灾、触电或人身伤害的危险:
1. 请勿将本缝纫机作为玩具使用。当儿童使用本缝纫机或使用缝纫机时附近有儿童时,请务必悉 心看护。
2. 只能将本缝纫机用于本说明书规定的用途。只能使用厂商在本说明书中推荐的配件。 3. 当电源线或插头破损、缝纫机不能正常工作、发生过跌落或损坏或曾掉入水中时,切勿继续使
1 њ㾷㓱㑿ᴎ 2 Ⳉ㒓᳆ᡬ䩜䗍 3 ݙ㮣䩜䗍 4 䫕䪂ᄨ䩝䪂 5 Փ⫼䰘ӊঞ⡍⅞ᑨ⫼ 6 䰘ᔩ
Փபைடு நூலகம்䇈ᯢк
安全须知
当使用缝纫机时,必须遵守基本安全注意事项,这些事项包括:
使用之前请务必阅读使用说明书。
危险 - 为了降低触电的危险:
1. 缝纫机在无人看管时,切勿将电源线插头插入电源插座。使用之后和清洁缝纫机之前,请务必 将缝纫机电源线插头从电源插座中拔出。
关于更详细的产品信息或升级,请访问浏览我们的网站 。 本说明书的内容和本产品的规格若有变更,恕不另行通知。
2
目录
1. 了解缝纫机 ......................................................................................................5
各种控制旋钮 .................................................................................................................... 11
样式选择转盘 ................................................................................................................................................................... 11 样式和针迹名称 ............................................................................................................................................................... 12 针迹长度转盘 ................................................................................................................................................................... 14 伸缩针迹 ...........................................................................................................................................................................15 针迹宽度转盘 ................................................................................................................................................................... 15 倒缝拨杆 ...........................................................................................................................................................................15