爱普生陀螺仪XV-3700CB角速度传感器规格书
陀螺仪芯片手册L3G4200D亲手译

L3G4200D MEMS 运动传感器: 超稳定的三轴数字输出陀螺仪
特点
■三种可选的全尺度(250/500/2000DPS) ■I2C/SPI 数字输出接口 ■16 比特率值的数据输出 ■8 位温度数据输出 ■两个数字输出线(中断和数据就绪) ■集成的低和高通滤波器与用户可选择带宽 ■超稳定的温度和时间 ■宽电源电压:2.4 V 至 3.6 V ■低电压兼容的 IOS(1.8 伏) ■嵌入省电和睡眠模式 ■嵌入式温度传感器 ■嵌入式 FIFO(先入现出堆栈) ■高冲击的生存能力 ■扩展的工作温度范围(-40℃至+85℃) ■ECOPACK® RoHS 和“绿色”兼容
5.2.2 SPI 写………………………………25 5.2.3 SPI 读三线模式…………………………26 6 输出寄存器映射…………………………27 7 寄存器的描述…………………………29 7.1 WHO_AM_I(0FH)……………………………… … 29 7.2 CTRL_REG1(20H)……………………………… 29 7.3 CTRL_REG2(21H)……………………………… 30 7.4 CTRL_REG3(22H)……………………………… 31 7.5 CTRL_REG4(23H)……………………………… 32 7.6 CTRL_REG5(24 小时)……………………………… 32 7.7 参考/ DATACAPTURE(25H)……………………34 7.8 OUT_TEMP(26H)……………………………… 34
应用
■游戏和虚拟现实输入设备 ■运动控制与人机界面(人机接口) ■全球定位导航系统 ■家电和机器人技术
说明
L3G4200D 是一种低功耗三轴角 速率传感器能够提供前所未有的 安然的零利率水平和灵敏度超过 温度和时间…它包括一个传感 元素,并能够提供一个 IC 接口 外部世界的测角速率 通过数字接口(I2C/SPI)…
L-sensor产品规格承认书正式稿

天津金米特电子有限公司 KING-METER ELECTRONIC CO., LTDPage 1 of 12 产品规格承认书电动自行车传感器类 型号: L-SENSOR 版本:V1.0内 容1. 功能介绍2. 外观尺寸、材料与图片3. 安装说明4. 技术参数5. 接插件与引线6. 可靠性测试7. 环保要求8. 包装要求9. 技术确认 10. 售后服务天津金米特电子有限公司 KING-METER ELECTRONIC CO., LTDPage 2 of 12一、 功能介绍L-SENSOR 是天津金米特电子有限公司根据专利技术设计生产的一款速度传感器,此款传感器具有更长的感应距离,一般不小于27mm。
L-SENSOR 内置霍尔元件,固定在电动车的后平叉或斜叉上,磁头安装在电动车的辐条上。
当车轮转动时,磁头每经过一次,传感器内的霍尔会向控制器输出一个脉冲信号。
控制器采集到信号,计算出车轮转动一圈的时间,根据时间和轮径大小计算出电动车前进的速度。
二、外观尺寸、材料与图片图1图2天津金米特电子有限公司KING-METER ELECTRONIC CO., LTD Page 3 of 12图3L-SENSOR 外壳材料选用PC 材质,具有很好的抗氧化性和耐腐蚀性。
天津金米特电子有限公司 KING-METER ELECTRONIC CO., LTDPage 4 of 12三、安装说明L-SENSOR 安装在电动车的后平叉或斜叉上。
磁头安装在电动车的辐条上,开槽尺寸为3.2mm,适用于直径3.0mm 以下的辐条,且磁头须对准传感器的十字架标志,以提高敏感度。
L-SENSOR 的有效感应距离一般不小于27mm。
在安装时可采用拉铆钉和螺丝固定,如图4。
也可采用扎带固定,如图5。
用户可根据自己需要选择。
图4 拉铆钉和螺丝固定方式配件 图5 扎带固定方式配件如果采用拉铆钉和螺丝固定,需先在安装位置打孔,钻头规格为7.0mm。
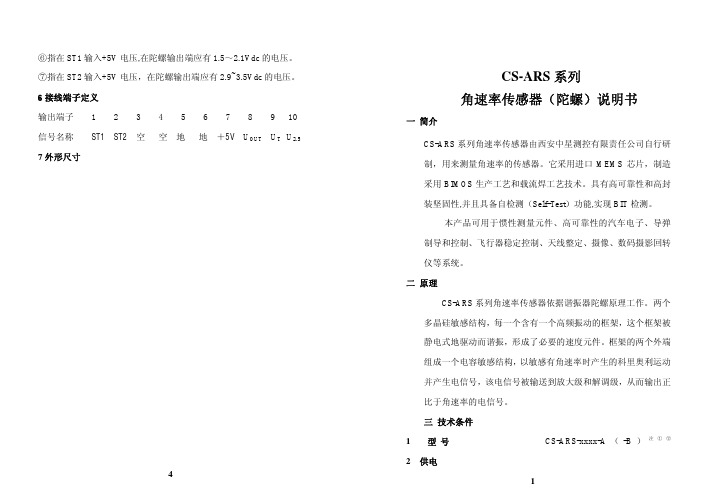
CS-ARS 系列 角速率传感器(陀螺)说明书
⑥指在ST1输入+5V电压,在陀螺输出端应有1.5~2.1Vdc的电压。
⑦指在ST2输入+5V电压,在陀螺输出端应有2.9~3.5Vdc的电压。
6接线端子定义输出端子 1 2 3 4 5 6 7 8 9 10 信号名称 ST1 ST2 空空地地+5V U OUT U T U2.5 7外形尺寸4CS-ARS系列角速率传感器(陀螺)说明书一简介CS-ARS系列角速率传感器由西安中星测控有限责任公司自行研制,用来测量角速率的传感器。
它采用进口MEMS芯片,制造采用BIMOS生产工艺和载流焊工艺技术。
具有高可靠性和高封装坚固性,并且具备自检测(Self-Test)功能,实现BIT检测。
本产品可用于惯性测量元件、高可靠性的汽车电子、导弹制导和控制、飞行器稳定控制、天线整定、摄像、数码摄影回转仪等系统。
二原理CS-ARS系列角速率传感器依据谐振器陀螺原理工作。
两个多晶硅敏感结构,每一个含有一个高频振动的框架,这个框架被静电式地驱动而谐振,形成了必要的速度元件。
框架的两个外端组成一个电容敏感结构,以敏感有角速率时产生的科里奥利运动并产生电信号,该电信号被输送到放大级和解调级,从而输出正比于角速率的电信号。
三技术条件1 型号 CS-ARS-xxxx-A(-B)注①②2 供电1输入电压(V .dc ) +5±5%V 输入电流(mA ) 6mA 3 性能3.1测量范围(s ο) 150sο注③3.2偏置电压(V ) 2.5±0.2V 3.3输出电压U OUT (V) 0~5V注④3.4 短期(1小时)偏置稳定性(sο) ≤0.05sο3.5 长期(100小时)偏置稳定性(sο) ≤1.0sο3.6 非线性度 ( % ) ≤0.5% 3.7 分辨力 (sο) ≤0. 04sο3.8 温度传感器输出U T (V .在25℃) 2.5±0.02V 3.9 温度传感器刻度因子(mV/℃) 8.4±0.2mV/℃ 3.10 参考电压U 2.5 (V) 2.5±0.05Ⅴ 3.11 启动时间(ms) ≤35ms 3.12 带宽(HZ) >300HZ 3.13自检测功能注⑤3.13.1 ST1输出响应(V) -0.66Vmin-0.4V ,max-1.0V) 3.13.2ST2输出响应(V)注⑦+0.66V(min+0.4V ,,max +1.0V)3.14可靠性:MTBF10万小时24 工作环境4.1 使用温度(℃) -45~+85℃ 4.2 储存温度(℃) -55~+100℃4.3 耐加速度4.3.1 不供电、任何轴,0.5ms(g) 2000g 4.3.2 供电、任何轴,0.5ms(g) 1000g 5 重量体积5.1 重量(g) 50g 5.2 体积(mm 3 ) 38×28×15(带安装底座) 28×28×15(不带安装底座)注 : ① 型号中的 “xxxx” 表示测量范围 , 例如:0150表示是150sο② -A 是外接引线束结构,-B 是外接插座结构③可选择±200、±250、±300、±350、±400、±450、±500、±550、±600sο 和 ±900、±1400、±2600、±5500sο④ 全测量范围输出为:0.625~4.375V⑤ 注⑥注⑦是对±150sο的角速率陀螺,对于其它测量范围的陀螺,其自检输出电压值各不相同3。
爱普生Epson CB-L250F使用说明书

投影机介绍
10
投影机的功能 .................................................................................... 11
打开镜头盖 ........................................................................................ 33
安装遥控器电池 ................................................................................ 31
遥控器操作 ........................................................................................ 32
投影机部件和功能............................................................................. 14
投影机部件 - 前面/上面............................................................................................................. 14 投影机部件 - 后面 ........................................................................................................................ 15 投影机部件 - 底面 ........................................................................................................................ 16 投影机部件 - 控制面板............................................................................................................... 16 投影机部件 - 遥控器 ................................................................................................................... 17
恒定倾角传感器-陀螺仪产品目录说明书

GeneralWeight0.14 kgTemperature (operating) -40°C to 85°C Temperature (storage) -40°C to 105°CNumber of axes 3 (X/Y/Z/) or 2 (SSI2)Angular range ±90° (X/Y/Z)Pitch range ±180° (SSI2)Roll range±90° (SSI2)Communication CAN protocol SAE J1939CAN messages see part drawing CAN bus speed250 k, up to 500 k Data broadcast rate 50 Hz, up to 200 Hz CAN source address 0xE4Mechanical characteristics Mounting bolt 1/4”-20 UNC or M6x1.0Mounting torque 135 in-lb max Mounting surface flatness .010”ConnectorDeutsch DTElectrical specifications Operating voltage 6 - 36 VdcStartup voltage 5.25 Vdc (20 ms max)Reverse polarity-48 VdcShort circuit protection -V BAT and 48 Vdc Current draw19.0 mA (12 V)18.0 mA (24 V)Tilt resolution 0.01°/BIT Pitch/Roll resolution 0.00003°/BIT Static repeatability 0.05°Static accuracy (pitch/roll) ±0.3° typical Dynamic accuracy (pitch/roll) ±0.5° typical Starting time 50 ms max.Settling time 100 ms Ordering part numberUTS-G163161ECD Steel shield 165361ECDEMIISO 11452-2100 V/m ISO7637-2 and -3 transientsEN 61000-6-2 and 6-4 conducted disturbance ISO 13766:2010 radiated emission ISO 14982:2009 radiated emission ESDISO 10605:2008 ±15 kV Mechanical Shock 1m drop Vibration40 GsApplicationThe UTS-G belongs to the Parker family of accessories provided to complement electronic control systems. The UTS-G is a multi-axis, MEMS technology tilt sensor for mobile hydraulic applications. The sensor communicates over a CAN bus using SAE J1939 protocol and has an integral Deutsch connector. The UTS-G is an enhanced version of the standard UTS with gyroscopic compensation that meets increasing mobile equipment requirements for dynamic performance monitoring. Other properties we focus on are stability, reliability, electromagnetic immunity, and ease of installation.PropertiesReliabilityThe UTS-G has a glass-filled, hybrid plasticconstruction for sturdiness and corrosion resistance. The sensor is very robust and able to withstand rugged applications while being protected and sealed against harsh environments using spin-weld technology. These features give the sensor IP68/IP69K protection for exposed outdoor applications. Electromagnetic immunityThe design of the UTS-G has a high level of EMI protection.InstallationThis design allows for the use of standard ¼” or M6 bolts for mounting. T he 3 mounting holes are in a tripod pattern to facilitate a mistake proof installation reducing overall manufacturing time. The 4 pinconnector is a sealed Deutsch DT type designed for automotive use. These features provide for easy installation and removal, even in field conditions. Environmental protection Climate Sealing IP68 / IP69K(with rear connector protection, such as backshell)ChemicalLiquids (resistance) standard automotive Markings and Approvals CE2014/30/EU EMC 2011/65/EU RoHS2MOUNTING SURFACEØ 4.00” [101.6]BOLT CIRCLE110°110°ACCOMMODATE Ø 0.25”-20 [M6 x 1.0] BOLT X 31.33” [33.8]0.52” [13.1]Ø 4.52” [114.8]4.66” [118.4]OFFER OF SALEThe items described in this document are hereby offered for sale by Parker-Hannifin Corporation, its subsidiaries or its authorized distributors. This offer and its acceptance are governed by the provisions stated in the detailed “Offer of Sale” available from your Parker representative or at .Parker Hannifin Corporation Electronic Controls Division 850 Arthur AvenueElk Grove Village, IL, 60007 USA phone 800 221 9257******************Parker Motion Systems International Sales OfficesNorth AmericaMotion Systems Group Headquarters6035 Parkland BoulevardCleveland, OH 44124-4141 USA Tel: 216-896-3000 Fax: 216-896-4031Parker Canada Division 160 Chisholm Drive Milton Ontario Canada L9T 3G9 Tel: 905-693-3000 Fax: 905-876-1958Parker Hannifin de México Industrial Hydraulic Sales Eje Uno Norte No.100Parque Industrial Toluca 2000 Toluca, Edo, de Mexico CP 50100 Tel: 52 722 275 4200 Fax: 52 722 279 9308Parker Hannifin de México Mobile Hydraulic SalesVia de FFCC a Matamoraos 730 Apodaca, NL, de Mexico CP 66600 Tel: 52 81 8156 6000 Fax: 52 81 8156 6068EuropeMotion Systems Group Headquarters La Tuilière 61163 Etoy - Switzerland Tel: 41 21 821 8500 Fax: 41 21 821 8580South AfricaParker Hannifin Africa Pty Ltd P .O. Box 1153ZA-Kempton Park 1620, Republic of South Africa Tel: 27 11 961 0700 Fax: 27 11 392 7213Mobile SalesMobile Sales Organization and Global Sales 850 Arthur AvenueElk Grove Village, IL 60007 USA Tel: 847-258-6200 Fax: 847-258-6299Industrial SalesCentral Region1042 Maple Avenue Unit 331Lisle, IL 60532 USA Tel: 630-964-0796Great Lakes Region6035 Parkland BoulevardCleveland, OH 44124-4141 USA Tel: 216-896-2740 Fax: 866-498-7507Gulf Region20002 Standing Cypress Drive Spring, TX 77379 USA Tel: 817-473-4431 Fax: 888-227-9454Southwest Region 700 S. 4th AvenueMansfield, TX 76063 USA Tel: 817-473-9341 Fax: 817-473-2680Mid Atlantic and Southeast Regions1225 Old Alpharetta Road Suite 290Alpharetta, GA 30005 USA Tel: 770-619-9767 Fax: 770-619-9806Midwest Region 8145 Lewis RoadMinneapolis, MN 55427 USA Tel: 763-513-3535 Fax: 763-544-3418Northeast Region P .O. Box 396Pine Brook, NJ 07058 USA Tel: 973-227-2565 Fax: 973-227-2467 Northwest Region6458 North Basin Avenue Portland, OR 97217 USA Tel: 503-283-1020 Fax: 866-611-7308 Pacific Region 8460 Kass DriveBuena Park, CA 90621 Tel: 714-228-2510 Fax: 714-228-2511Asia PacificParker Hannifin Shanghai Ltd 280 Yunqiao Road,Jin Qiao Export Processing Zone Shanghai 201206, China Tel: 86 21 2899 5000 Fax: 86 21 6445 9917Parker Hannifin Hong Kong Ltd 8/F , Kin Yip Plaza 9 Cheung Yee StreetCheung Sha Wan, Hong Kong Tel: 852 2428 8008 Fax: 852 2425 6896Parker Hannifin Korea Ltd 9F KAMCO Yangjae Tower949-3 Dogok1-dong, Gangnam-gu Seoul, 135-860, Korea Tel: 82 2 559 0400 Fax: 82 2 556 8187Parker Hannifin India Pvt Ltd Plot No. EL-26, MIDC TTC Industrial AreaMahape, Navi Mumbai, 400 709 India Tel: 91 22 6513 7081 Fax: 91 22 2768 6841Parker Hannifin Australia Parker Hannifin Pty Ltd. 9 Carrington RoadCastle Hill, NSW 2154, Australia Tel: 612 9634 7777 Fax: 612 9842 5111Latin AmericaParker Hannifin Ind. e Com. Ltda Hydraulics Division Av. FredericoRitter, 110094930-000 Cachoeirinha RS, Brazil Tel: 55 51 3470 6090 Fax: 55 51 3470 9281Parker Hannifin Argentina S.A.I.C.Stephenson 27111667-T ortuguitas-Malvinas Argentinas Pcia. de Buenos Aires, Argentina Tel: 54 3327 44 4129 Fax: 54 3327 44 4199Pan American Division7400 NW 19th Street, Suite A Miami, FL 33126 USA Tel: 305-470-8800 Fax: 305-470-8808MSG33-2382/US04/2020© 2020 Parker Hannifin Corporation. All rights reserved.。
爱普生 EB-C713X C715X 多媒体液晶投影机 说明书
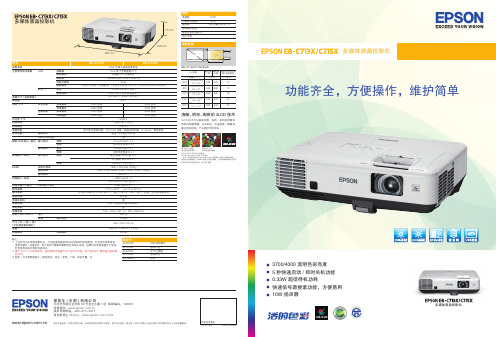
快速四角调整功能
支持快速四角调 整功能,特别对 于吊顶用户的画 面调整更加方 便。
A/V Mute 滑盖
■ 在演示过程中,如果需要在电子白板上书写,暂停使用 投影机,只需要通过简单的关闭或开启滑盖,就可以使投 影机快速休眠或重新启动,既方便快捷又节能环保,同时 避免了板书时投 影 光 线 的 干 扰, 让您的教学更加 方便高效。
60"/
122cmx91cm 47"×35"
169
275
10
80"/
163cmx122cm 63"×47"
226
368
13
100"/
203cmx152cm 79"×59"
283
460
16
150"/
305cm×229cm 120"×90"
426
692
24
200"/406cm×305cm 1来自1"×118"
垂直 -30 度到 +30 度
有
D-sub 15pin x 2
立体声迷你接口 x 2
D-sub 15pin x 1
立体声迷你接口 x 1
复合视频 :RCA( 黄 )×1
S- 视频 :Mini Din×1
RCA×1 ( 白/红 )
1280 x 720 dots (720p)
480i / 576i / 480p / 576p / 720p / 1080i / 1080p
*2 基于 ISO21118 标准制定,该标称值代表量产时产品的平均值,而产品的出厂最低值为标称值 的 80%。
*3 亮度、对比度数据基于:颜色模式:动态、变焦:广角、自动光圈:开。
爱普生晶振XV-8000CB汽车应用陀螺仪规格书
关于在目录内使用的记号
●无铅。 ●符合欧盟 RoHS 指令。 欧盟 RoHS 指令免检的含铅产品。 (密封玻璃、高温熔化性焊料或其他材料中包含铅。 ) ●为汽车方面的应用,如汽车多媒体、车身电子、遥控无钥门锁等。
●为汽车行驶安全方面的应用(引擎控制单元、气囊、电子稳定程序控制系统) 。
注意事项
·本材料如有变更,恕不另行通知。量产设计时请确认最新信息。 ·未经 Seiko Epson 公司书面授权,禁止以任何形式或任何方式复制或者发布本材料中任何部分的信息内容。 ·本材料中的书面信息、应用电路、编程、使用等内容仅供参考。Seiko Epson 公司对第三方专利或版权的侵权行为不负有任何责任。本材料 未对任何专利或知识版权的许可权进行授权。 ·本材料中规格表中的数值大小通过数值线上的大小关系表示。 ·当出口此材料中描述的产品或技术时,你应该遵守相应的出口管制法律和法规,并按照这些法律和法规的要求执行。 请不要将产品(以及任何情况下提供任何的技术信息)用于开发或制造大规模杀伤性武器或其他军事用途。还要求,不要将产品提供给任何 将产品用于此类违禁用途的第三方。 ·此类产品是基于在一般电子机械内使用而设计开发的,如将产品应用于需要极高可靠性的特定用途,必须实现得到弊公司的事前许可。若 无许可弊公司将不负任何责任。 1.太空设备(人造卫星、火箭等) 2.运输车辆机器控制装置(汽车、飞机、火车、船舶等) 3.用于维持生命的医疗器械 4.海底中转设备 5.发电站控制机器 6.防灾防盗装置 7.交通设备 8.其他,用于与 1~7 具有同等可靠性的用途。
连接至外部设备epson晶振大中华区样品中心深圳扬兴科技有限公司wwwyxchk推进环境管理体系符合国际标准在环境管理体系的运行方面使用iso14001国际环境标准通过计划实施检查验证pdca的循环来实现持续改进
爱普生(EPSON)陀螺仪传感器XV7001BB

请不要将产品(以及任何情况下提供任何的技术信息)用于开发或制造大规模杀伤性武器或其他军事用途。还要求,不要将产品提供给任何 将产品用于此类违禁用途的第三方。 ·此类产品是基于在一般电子机械内使用而设计开发的,如将产品应用于需要极高可靠性的特定用途,必须实现得到弊公司的事前许可。若 无许可弊公司将不负任何责任。
ISO/TS16949 是一项国际标准,是在 ISO9001 的基础上增 加了对汽车工业的特殊要求部分。
关于在目录内使用的记号
●无铅。
●符合欧盟 RoHS 指令。 欧盟 RoHS 指令免检的含铅产品。 (密封玻璃、高温熔化性焊料或其他材料中包含铅。)
●为汽车方面的应用,如汽车多媒体、车身电子、遥控无钥门锁等。
±5 % 0.9 mA Typ. 160 µA Typ.
3 µA Typ. 0.003 (º/s)/√Hz
º
16bit, Ta=+25 °C Ta=+25 °C
脚aº=º+待我º Cº º Ta=+25 °C Ta=+25 °C
at 10Hz
XV700 1 B B * * *
商
噪
商度条螺 噪
待
商滤条º联系的尺的 C噪
º
º商
噪º
XV7001BB
•联系的º尺º的待Cº
•
(16bit)
•
•
º
•
º
•
态
•
业应
型的待C-滤us 符X系º联em陶速on部u速tors
Epson陀螺仪应用手册

ASIA EPSON (CHINA) CO., LTD. 23F, Beijing Silver Tower 2# North RD DongSangHuan ChaoYang District, Beijing, China Phone: (86) 10-6410-6655 Shinghai Branch High-Tech Building,900 Yishan Road Shanghai 200233,China Phone: (86) 21-5423-5577 Fax: (86) 21-5423-4677 EPSON HONG KONG LTD. 20/F., Harbour Centre, 25 Harbour Road, Wanchai, Hong kong Phone: (852) 2585-4600 Fax: (852) 2827-2152 EPSON ELECTRONIC TECHNOLOGY DEVELOPMENT (SHENZHEN )CO., LTD. 12/F, Dawning Mansion,#12 Keji South Road, Hi-Tech Park, Shenzhen, China Phone: (86) 755-26993828 Fax: (86) 755-26993838 EPSON TAIWAN TECHNOLOGY & TRADING LTD. 14F, No.7, Song Ren Road, Taipei 110 Phone: (886) 2-8786-6688 Fax: (886)2-8786-6660 EPSON SINGAPORE PTE. LTD. 401, Commonwealth Drive, #07-01 Haw Par Technocentre Singapore 149598 Phone: (65) 6-586-3100 Fax: (65) 6-472-4291 .sg SEIKO EPSON CORPORATION KOREA Office 50F, KLI 63 Building,60 Yoido-dong, Youngdeungpo-Ku, Seoul, 150-763, Korea Phone: (82) 2-784-6027 Fax: (82) 2-767-3677 http://www.epson-device.co.kr Gumi Branch Office 2F, Grand Blde,457-4, Songjeong-dong Gumi-City, Gyongsangbuk-Do, 730-090, Korea Phone: (82) 54-454-6027 Fax: (82) 54-454-6093 Fax: (86) 10-6410-7319
EPSON EH-TW3700C EH-TW3300C投影机 说明书
故障排除
■ 认为出了故障时 ............................................37
看了指示灯仍不明白时 ................. 39
安
读懂指示灯 ........................... 37
• 与映像有关的问题 ...................... 39
■ 调节投影屏.............................焦调节 ............................. 16 投影尺寸调节(缩放调节).............. 16 投影映像的位置调节(镜头移动)........ 16 调节投影机的倾角 ..................... 17 显示测试图案 ......................... 17
按该键打开和关闭投影机的电 源。
• Source 键 15 页
将输入源切换到各个按钮中 所指示的输入终端。
• Default 键 26 页
显示菜单时,恢复为默认设置。
• 遥控发光部 13 页
输出遥控信号。
•
键
18,20,22,26 页
按下以选择菜单项目和调节值。
• Menu 键 26 页
显示和关闭完整 配置菜单。
■ 遥控器的准备 ................................................13 将电池装入遥控器 ..................... 13 使用遥控器 ........................... 13
基本操作
■ 开始和停止投影 ............................................ 14 开启电源和投影映像.................... 14 如未能投影预.......................... 15 关闭电源.............................. 15
A3 Super 4 中文使用说明书

4中文使用说明书修订:2023-06-14感谢您购买和使用我们的产品。
A3 Super 4是一款专门为遥控固定翼模型飞机设计的高性能、功能强大的六轴陀螺仪和平衡仪产品。
为了让您更好地了解和使用本产品和安全飞行,请认真阅读本说明书并按说明书的要求进行相关设置。
注意事项遥控飞机模型不是玩具!螺旋桨高速旋转带来的潜在风险相当高,它们可能会导致严重的伤害,一切的使用要符合并遵守共同的安全规则和相关法规。
我们建议您在第一次使用我们的陀螺仪进行飞行时,寻求具有丰富飞行经验的玩家的指导和帮助!陀螺仪在通电后需要进行精确的陀螺仪校准,所以,在接通飞机电源后,请保持飞机静止,等待蓝灯闪烁若干秒完成校准后,才能开始飞行,如果在这个阶段陀螺仪检测到有轻微的移动,蓝灯会一直保持常亮,直至飞机不再移动才重新开始校准过程,尽管如此,开机初始化阶段只需要保持静止即可,并不需要将飞机水平放置;陀螺仪在通电后还需要进行摇杆中位校准,所以,通电前,先把发射机的所有摇杆放在中间位置,油门摇杆放在最低,打开发射机电源,然后再接通飞机电源,在初始化过程中不要移动任何摇杆直至初始化完成。
摇杆校准只针对副翼(副翼2)、升降(升降2)和方向通道;安装完成后请务必逐一检查副翼、升降、方向三个通道的陀螺仪修正方向是否正确!并且养成在每次起飞前都检查确认陀螺仪方向的习惯,错误的陀螺仪方向将会导致失控甚至坠机!安装陀螺仪后,由于舵机的修正动作明显增加,将导致工作电流增大,请务必确保UBEC或电调内置BEC能够提供足够的输出电流,否则可能造成电压不稳定,对飞行带来安全隐患。
为了获得更加稳定的电压,建议将配送的大电容插在陀螺仪或接收机的任意一个空闲的接口上。
安装方法注意事项• 切记不要用热熔胶或尼龙扎带等方式将陀螺仪硬性地安装在机身上!• 一次安装使用1块双面胶即可,太厚或太软的双面胶都有可能影响陀螺仪的性能;•陀螺仪是敏感部件,安装时应尽量在陀螺仪周围预留足够的空间,与其他电子设备或连接线保持足够的距离,避免挤压。
osiris陀螺参数
osiris陀螺参数【原创版】目录1.OSIRIS 简介2.OSIRIS 陀螺参数的定义3.OSIRIS 陀螺参数的应用4.OSIRIS 陀螺参数的示例正文1.OSIRIS 简介OSIRIS(Open Source Inertial Reference Integration System)是一款开源的惯性参考集成系统,主要用于模拟和处理导航、定位和授时(NLP)数据。
该系统广泛应用于无人驾驶汽车、无人机、机器人以及虚拟现实等领域。
OSIRIS 项目的目标是提供一种可扩展、灵活且具有高度适应性的惯性参考系统,以便开发人员能够根据具体需求对其进行配置和优化。
2.OSIRIS 陀螺参数的定义在 OSIRIS 中,陀螺参数是用于描述陀螺仪传感器数据的关键参数。
陀螺仪是一种利用角动量守恒原理来检测和测量物体角速度的装置。
OSIRIS 支持多种陀螺仪传感器,每种传感器都有其特定的参数设置。
陀螺参数主要包括以下几个方面:- 采样率(Sample Rate):陀螺仪传感器的数据采样频率,通常以赫兹(Hz)为单位。
采样率越高,传感器输出的数据越接近实际物理值。
- 传感器噪声(Sensor Noise):陀螺仪传感器在测量过程中产生的随机误差。
噪声值越小,传感器的测量精度越高。
- 传感器偏置(Sensor Bias):陀螺仪传感器在测量过程中产生的系统误差。
偏置值越小,传感器的测量精度越高。
- 传感器非线性(Sensor Nonlinearity):陀螺仪传感器在测量过程中输出数据与实际物理值之间的非线性关系。
非线性越小,传感器的测量精度越高。
3.OSIRIS 陀螺参数的应用OSIRIS 中的陀螺参数在实际应用中具有重要意义。
通过对陀螺参数的设置和调整,可以有效提高陀螺仪传感器的测量精度和稳定性,从而确保导航、定位和授时数据的准确性。
此外,根据不同的应用场景和需求,开发人员可以选择合适的陀螺仪传感器和参数配置,以实现对运动状态的精确监测和控制。
EPSON机器人产品说明书
EPSON RC+ 7.0 SPEL +语言参考Rev.4 C1M218S4861FVer.7.5EPSON RC+ 7.0 (Ver.7.5) SPEL+语言参考Rev.4EPSON RC+ 7.0 (Ver.7.5)SPEL+语言参考Rev.4Copyright 2012-2021 SEIKO EPSON CORPORATION. All rights reserved. EPSON RC+ 7.0 (Ver.7.5) SPEL+ 语言参考 Rev.4i前言感谢您购买本公司的机器人产品。
本手册记载了正确使用 EPSON RC+7.0 软件所需的事项。
请阅读本手册及相关手册后正确使用系统。
阅读之后,请妥善保管,以便随时取阅。
本公司的产品均通过严格的测试和检查,以确保机器人系统的性能符合本公司的标准。
但是如果在超出本手册所描述的环境中使用本产品,则可能会影响产品的基本性能。
本手册阐述了本公司可以预见的危险和问题。
请务必遵守本手册中的安全注意事项,安全正确地使用机器人系统。
商标Microsoft、Windows、Windows 标识、Visual Basic、Visual C++ 为美国MicrosoftCorporation 在美国及其它国家的注册商标或商标。
Pentium为美国英特尔公司的商标。
其它公司名称、商标名称、产品名称均为各公司的注册商标或商标。
关于标记Microsoft® Windows® 8 Operating systemMicrosoft® Windows® 10 Operating system在整个手册中,Windows 8以及Windows 10分别指上述相应的操作系统。
在某些情况下,Windows泛指Windows 8和Windows 10。
注意事项禁止擅自复印或转载本手册的部分或全部内容。
本手册记载的内容将来可能会随时变更,恕不事先通告。
爱普生晶振最小包装数量_标准包装规格
L L L L L L L L L L L L L L L L L L L L L L L L L L L
【南京南山:EPSON晶振代理证书编号14013】
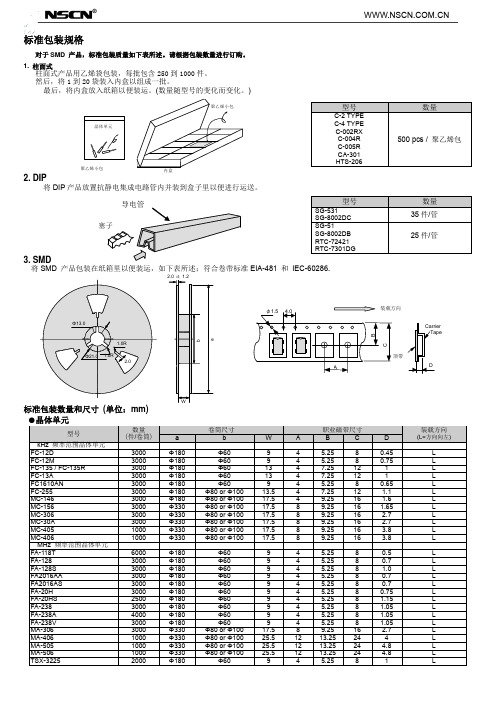
●SAW 谐振器
型号 FS-335 FS-555 FS-585 NS-21R NS-32R 数量 (件/卷筒) 4000 4000 4000 3000 4000 1000 3000 3000 3000 1000 1000 2000 1000 2000 2000 2000 1000 1000 1000 1000 1000 1000 1000 1000 1000 1000 1000 1000 1000 1000 1000 1000 1000 1000 2000 1000 1000 1000 2000 1000 2000 3000 1000 2000 1000 1000 2000 1000 1000 1000 1000 2000 1000 1000 1000 1000 12000 2000 2000 12000 1000 1000 1000 1000 a Φ330 Φ330 Φ330 Φ180 Φ330 Φ254 Φ180 Φ180 Φ180 Φ330 Φ254 Φ180 Φ330 Φ180 Φ180 Φ180 Φ180 Φ330 Φ330 Φ254 Φ254 Φ180 Φ254 Φ180 Φ180 Φ180 Φ180 Φ180 Φ180 Φ180 Φ180 Φ180 Φ180 Φ254 Φ180 Φ330 Φ330 Φ254 Φ254 Φ254 Φ180 Φ180 Φ254 Φ254 Φ254 Φ330 Φ254 Φ330 Φ330 Φ254 Φ180 Φ180 Φ254 Φ180 Φ180 Φ180 Φ330 Φ180 Φ180 Φ330 Φ180 Φ180 Φ254 Φ180 卷筒尺寸 b Φ80 or Φ100 Φ80 or Φ100 Φ80 or Φ100 Φ60 Φ80 or Φ100 Φ100 Φ60 Φ60 Φ60 Φ80 or Φ100 Φ100 Φ60 Φ80 or Φ100 Φ60 Φ60 Φ60 Φ60 Φ80 or Φ100 Φ80 or Φ100 Φ100 Φ100 Φ60 Φ100 Φ60 Φ60 Φ60 Φ60 Φ60 Φ60 Φ60 Φ60 Φ60 Φ60 Φ100 Φ60 Φ80 or Φ100 Φ80 or Φ100 Φ100 Φ100 Φ100 Φ60 Φ60 Φ100 Φ100 Φ100 Φ80 or Φ100 Φ100 Φ80 Φ80 Φ100 Φ60 Φ60 Φ100 Φ60 Φ60 Φ60 Φ100 Φ60 Φ60 Φ100 Φ60 Φ60 Φ100 Φ60 W 13.5 13.5 13.5 9.0 13.5 17.5 9 9 13 17.5 17.5 13 17.5 13 9 9 13 25.5 17.5 17.5 17.5 17 17.5 13 13 13 17 17 17 17 13 17 13 17.5 9 25.5 17.5 17.5 13.4 17.5 9 9 17.5 13.4 17.5 17.5 13.4 25.5 25.5 17.5 13 9 17.5 17 13 17 9.4 9 9 9.4 13 13 17.5 17 A 8.0 8.0 8.0 4.0 8.0 8 4 4 4 8 8 4 8 4 4 4 8 12 8 8 8 8 8 8 8 8 8 8 8 8 8 8 8 8 4 12 8 8 8 8 4 4 8 8 8 8 8 12 12 8 8 4 8 8 8 8 4 4 4 4 8 8 8 8 职业磁带尺寸 B C 7.25 12.0 7.25 12.0 7.25 12.0 5.25 8.0 7.25 12.0 9.25 5.25 5.25 7.25 9.25 9.25 7.25 9.25 7.25 5.25 5.25 7.25 13.25 9.25 9.25 9.25 9.25 9.25 7.25 7.25 7.25 9.25 9.25 9.25 9.25 7.25 9.25 7.25 9.25 5.25 13.25 9.25 9.25 7.5 9.25 5.25 5.25 9.25 7.5 9.25 9.25 7.5 13.25 13.25 9.25 7.25 5.25 9.25 9.25 7.25 9.25 5.25 5.25 5.25 5.25 7.25 7.25 9.25 9.25 16 8 8 12 16 16 12 16 12 8 8 12 24 16 16 16 16 16 12 12 12 16 16 16 16 12 16 12 16 8 24 16 16 12 16 8 8 16 12 16 16 12 24 24 16 12 8 16 16 12 16 8 8 8 8 12 12 16 16
桓诗-EPSON Stylus Pro 7800和9800产品参数说明书
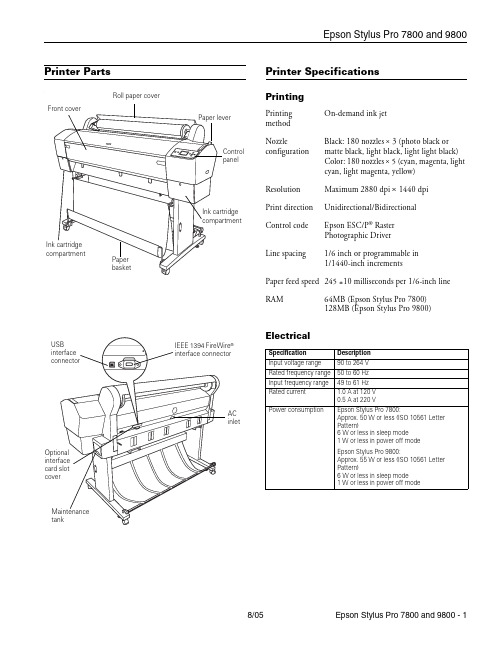
Printer PartsPrinter SpecificationsPrintingElectrical®AC inletRoll paper coverPrinting method On-demand ink jetNozzleconfigurationBlack: 180 nozzles × 3 (photo black or matte black, light black, light light black)Color: 180 nozzles × 5 (cyan, magenta, light cyan, light magenta, yellow)ResolutionMaximum 2880 dpi × 1440 dpi Print direction Unidirectional/Bidirectional Control code Epson ESC/P ® Raster Photographic Driver Line spacing1/6 inch or programmable in 1/1440-inch incrementsPaper feed speed 245 ±10 milliseconds per 1/6-inch line RAM64MB (Epson Stylus Pro 7800)128MB (Epson Stylus Pro 9800)Specification Description Input voltage range 90 to 264 V Rated frequency range 50 to 60 Hz Input frequency range 49 to 61 Hz Rated current1.0 A at 120 V 0.5 A at 220 VPower consumptionEpson Stylus Pro 7800:Approx. 50 W or less (ISO 10561 Letter Pattern)6 W or less in sleep mode 1 W or less in power off modeEpson Stylus Pro 9800:Approx. 55 W or less (ISO 10561 Letter Pattern)6 W or less in sleep mode 1 W or less in power off modeMechanicalEnvironmentalPaperThe allowable paper dimensions are shown below: Notes:❏Poor quality paper may reduce print quality and cause paper jams and other problems. If you encounter problems, switch to ahigher grade of paper.❏Avoid touching the printable surface with bare hands.Fingerprints may affect print quality. Handle media by the edges or use cotton gloves.❏If paper is curled or folded, flatten it before loading. Keep unused media in its original packaging and store it in a cool, dry place.❏Store sheet media on a flat surface.❏Unload roll paper from the paper path when not in use to prevent curling.Safety ApprovalsInk CartridgesDriversMacintosh® Operating System OS X 10.3.9 or later, Windows Windows 2000 or XP. Raster drivers are standard. Interfaces❏USB 1.1 and 2.0 compatible, recommended cable length up to 10 feet (3 meters)❏IEEE-1394 FireWire, recommended cable length up to10 feet (3 meters)In addition, a Type B expansion slot is available for installing the EpsonNet Ethernet™ network card (10/100 BaseTX).Dimensions Epson Stylus Pro 7800:Width: 47.12 inches (1178 mm)Depth: 20.04 inches (501 mm)Height: 22.4 inches (560 mm)Epson Stylus Pro 9800:Width: 68.08 inches (1702 mm)Depth: 27.12 inches (678 mm)Height: 47.84 inches (1196 mm)Weight (without ink cartridges)Epson Stylus Pro 7800: 131 lb (59 kg) Epson Stylus Pro 9800: 198 lb (40 kg) Stand: 23.1 lb (90 kg)Temperature Operation: 50 to 95 °F (10 to 35 °C)Storage:–4 to 104 °F (–20 to 40 °C)1 month at 104 °F (40 °C)Print qualityguarantee: 59 to 77 °F (15 to 25 °C)Humidity (without condensation)Operation: 20 to 80% RH Storage: 20 to 85% RH (stored inshipping container) Print qualityguarantee: 40 to 60% RH Optimaloperation: 35 to 45% RHRoll paper Cut sheetsEpson Stylus Pro 78008 to 24 in.(203 to 610mm) wideletter size up to 24 in.wideEpson Stylus Pro 98008 to 44 in.(203 to 1118mm) wideletter size up to 44 in.wideMaximum external roll diameter 2 in. core: 4 in. (103 mm)3 in. core: 6 in. (150 mm)—Thickness 3.15 to 19.7 mil(0.8 to 0.5 mm)3.15 to 59 mil(0.8 to 1.5mm)Safety standards UL 60950, CSA 22.2 No. 60950EMC FCC Part 15 Subpart B, Class B,CSA C108.8 Class BCartridge life2years from production date if unopened;within 6 months after opening package.Temperature Storage–22 to 104°F (–30 to 40°C);(uninstalled): 1 month at 104°F (40°C)Storage –4 to 104°F (–20 to 40°C);(installed): 1 month at 104°F (40°C)Capacity110 or 220 mlConsumables and AccessoriesInk CartridgesWhen you install the printer’s first ink cartridges, it takes about 10 minutes to initialize the printer. Do not interrrupt this process by turning off the printer, opening the front cover, or releasing the paper lever, or the printer will have to re-initialize. In that case, there may not be enough ink left in the original cartridges and you may have to replace them with new ones.Use the following UltraChrome K3™ Epson ink cartridges before the expiration date on the package:* A new printer can be initially charged with matte black ink instead of the standard photo black, or you can change the ink later using the Black Ink Conversion Kit included with your printer. Changing black ink uses about 20% of your ink and maintenance tank, and should beperformed infrequently.User-Replaceable PartsYou can order these user-replaceable parts:OptionsThe following optional equipment and warranties are available:*Must be purchased within 12 months of printer purchase. Control PanelSlot no.Cartridge110 ml220 ml1Light Light Black T562900T5639002Light Magenta T562600T5636003Light Cyan T562500T5635004Light Black T562700T5637005Photo Black T562100T563100Matte Black*T566800T5678006Cyan T562200T5632007Magenta T562300T5633008Yellow T562400T563400Part Part number Relacement Ink Maintenance Tank C12C890191Replacement Printer Cutter Blade (replaces the printer’s built-in cutter)C12C815291Part Part numberAutomatic Take-up Reel System (9800 only)C12C815251Replacement 44-inch Take-up Reel Core (9800 only)C815121EpsonNet Internal 10/100 BaseTX (Ethernet) Type-BPrint Server (interface card)C12C824341Paper Roller Spindle (Normal Tension) — 2- or 3-inchEpson Stylus Pro 7800Epson Stylus Pro 9800C12C811161C12C811151Paper Roller Spindle (High Tension) — 2- or 3-inchEpson Stylus Pro 7800Epson Stylus Pro 9800C12C811155C12C811152Manual Media Cutting System (for thick media)Epson Stylus Pro 7800Epson Stylus Pro 9800C12C815231C815182Replacement Manual Cutting Blade (for Manual MediaCutting System)C815192Extended warranties*1-year2-yearEPP7898B1EPP7898B2seconds tocancel a printjob or resetthe printer.seconds tocut roll paperafter printing.buttonHold for 3secondsto cleanthe printhead.Control Panel MenusBoldface indicates the default setting. Press the Menu r button to access the menus and the arrow buttons to navigate.Menu Item Settings/ExplanationPRINTER SETUP ROLL PAPER COUNTERROLL PAPER LENGTHROLL LENGTH ALERT Available only if REMAINING PPR SETUP is enabled in Maintenance ModePLATEN GAP STANDARD, NARROW,WIDE, WIDER, WIDESTPAGE LINE ON, OFFINTERFACE AUTO, USB, IEEE 1394,OPTIONAL I/F CARDCODE PAGE PC437, PC850ROLL PAPER MARGIN DEFAULT,TOP/BOTTOM15mm,TOP 35/BOTTOM15mm,15mm, 3mmPAPER SIZE CHECK ON, OFFPAPER SKEW CHECK ON, OFFTIME OUT OFF, 30sec, 60sec,180sec, 300secCUTTER ADJUSTMENT EXECUTEREFRESH MARGIN ON, OFFAUTO NOZZLE CHECK ON, OFFAUTO CLEANING ON, OFFQUIET CUT ON, OFFINITIALIZE SETTINGS Restores defaultsettingsTEST PRINT NOZZLE CHECK Shows clogged nozzlesSTATUS CHECK Ink and paper remainingand status of partsJOB INFORMATION Ink and paper used forthe last 10 jobsCUSTOM PAPER Registered paperconfigurationinformationPRINTER STATUS VERSION Current firmware versionPRINTABLE PAGES For the ink remaining ineach cartridgeINK LEVEL E*****F for each colorMAINTENANCE TANK E*****FUSAGE COUNT Ink in milliliters, paper insquare centimetersCLEAR USAGE COUNT EXECUTEPRINTERSTATUS(continued)JOB HISTORY Ink used in milliliters,and paper in squarecentimeters, for eachsaved jobTOTAL PRINTS Number of pages printedSERVICE LIFE E*****F for CUTTER,CR MOTOR (carriage)PF MOTOR (paper feed)HEAD UNIT (print head)CLEANING UNITPRESSURE MOTORCUSTOM PAPER PAPER NUMBER STANDARD,NO. (1 to 10)PLATEN GAP STANDARD, NARROW,WIDE, WIDERTHICKNESS PATTERN PRINTTHICKNESS NUMBER 1 to 15CUT METHOD STANDARD,THIN PAPER, THICKPAPER FAST, THICKPAPER SLOWPAPER FEED ADJUST–0.70% to 0.70%DRYING TIME0. 0 sec. to 10.0 sec.PAPER SUCTION STANDARD, –1, –2, –3,–4M/W ADJUSTMENT STANDARD, 1, 2MAINTENANCE CUTTERREPLACEMENTEXECUTEBK INK CHANGE EXECUTEPOWER CLEANING EXECUTECLOCK SETTING EXECUTECONTRASTADJUSTMENT–20 to +20HEADALIGNMENTPAPER THICKNESS STANDARD, 0.1 mm to1.5 mmALIGNMENTAUTO UNI-D, BI-D 2-COLOR,BI-D ALL, BI-D #1,BI-D #2, BI-D #3MANUAL UNI-D, BI-D 2-COLOR,BI-D ALLMenu Item Settings/ExplanationPrinting a Status SheetThe status sheet shows some of the current default settings, the amount of ink remaining in each cartridge, the page count, and the status of the cutter blade, maintenance tank, and other printer parts.Note: You can replace the ink cartridges, cutter blade, and maintenance tank yourself. Other parts need to be replaced by an authorized Epson service technician.1.Make sure paper is loaded in the printer.2.Press the Menu button.3.Press the d button to highlight TEST PRINT, then pressMenu.4.Press d to highlight STATUS SHEET, then press Menu.You see PRINT.5.Press to start printing.The amount of ink left or the component life is indicated asfollows:E*****F= 100–81% of ink or service life remainingE****F= 80–61%E***F= 60–41%E**F = 40–21%E*F= 20–11%%= less than 10% of ink or service life remainingReplacing an Ink CartridgeThe easiest way of checking ink levels is from the controlpanel LCD display. The numbers below the ink icons on theLCD display correspond to the 8 ink cartridge slots on theprinter. The icons show the percentage of ink remaining asfollows:When the red B ink light is flashing (andINK LOW appearson the LCD display), the indicated cartridge is almost out ofink. Make sure you have a replacement cartridge. When thelight stays on and INK OUT is displayed, the cartridge isempty. You must replace the cartridge before you cancontinue printing.See page 3 for information on selecting the correctreplacement cartridges. Before you start, make sure the printeris turned on. Then follow these steps to replace an inkcartridge:1.Note the color of the cartridge that is low or empty. This is3.4.5.Make sure the replacementcartridge is the correct color,and remove it from itspackage.6.Gently shake the cartridgebefore installing it.7.8.9.Close the ink compartment cover(s).Once the cartridge is installed, the printer returns to its READY state. Paper Type and BandingBanding can be caused by several problems, such as clogged print head nozzles or a misaligned print head. It can also be caused by using a paper that is not defined in the Epson printer driver or in a third-party RIP. To correct this problem, make sure you select the correct paper type in the driver.If your paper type is not defined, use the printer’s menu system to create a custom paper type. See “Optimizing the Settings for Your Paper” in the Printer Guide.Checking and Cleaning the Print Head If your printed image shows a color shift or horizontal lines, you should check the print head to see if any nozzles are clogged or deflected. If necessary, the printer will automatically run a cleaning cycle to clear the nozzles.1.Press the Menu button.2.Press the d button until TEST PRINT is highlighted, thenpress Menu. NOZZLE CHECK is selected.3.Press Menu, then press to start printing the nozzle checkpattern.The nozzle check pattern is printed and automatically read. If the printer finds clogged nozzles, it runs a cleaning cycle. Note: You can clean the print head manually by pressing and holding the Menu button. You also can check the print head and turn on the Auto Cleaning feature using your printer utility software.Running a Power Cleaning CycleYou can run a power cleaning cycle from the printer’s control panel if the normal cleaning process is not sufficient to clear the nozzles. However, the power cycle uses a larger quantity of ink, so it is recommended only as a last resort.The cartridges need to be at least 50% full to use power cleaning. You may need to replace a low cartridge to run the cleaning cycle. If the waste ink tank is nearly full, you may need to replace it. After running the cleaning cycle, you can reinsert the old cartridge.1.Print a nozzle check to make sure the print head needscleaning, as described above.2.Make sure the printer is ready and the red B ink light on theprinter’s LCD display is not on or flashing.3.Press the Menu button.4.Press the d button until MAINTENANCE is highlighted,then press Menu.5.Press the d button until PWR CLEANING is highlighted,then press Menu . Press Menu again, then press to start the power cleaning.6.Follow the instructions on the LCD display to raise or lowerthe ink levers.7.When cleaning is finished and the Pause light stopsflashing, print the nozzle check again to confirm that the head is clean.For effective cleaning, always run a nozzle check between cycles.If the pattern is still missing segments or has deflections after a power cleaning cycle, turn the printer off and leave it overnight. Then clean the print head again the following morning with regular cleaning cycles. If you still see no improvement, contact Epson for assistance.Aligning the Print HeadAligning the print head is the most important thing you can do to ensure the best print quality. If banding appears on your prints, if they look grainy or blurry, or you see misregistration or “ghosting,” you may need to align the print head. Although you can align the print head using the printer utility software, it’s also easy to align from the control panel. This will do the most thorough job in the shortest time, and it’s all automatic.If you haven’t already done so, it’s a good idea to run a nozzle check before aligning the print head (see page 6). This ensures that the print head alignment patterns print correctly.Follow these steps to align the print head using the control panel:1.Make sure the printer is turned on. Then load EpsonEnhanced Matte, Doubleweight Matte, Premium Luster Photo paper, or the paper that came with the printer. 2.Press the Menu button.3.Press thed button until HEAD ALIGNMENT ishighlighted, then press Menu. PAPER THICKNESS is highlighted. 4.Press Menu . The STANDARD setting is selected by default.This is the correct thickness setting for most Epson papers.5.Pressto save the setting.6.Press l , then press d to highlight ALIGNMENT .7.Press the Menu button to highlight AUTO , then pressMenu again. UNI-D (uni-directional) is highlighted. This is the type of alignment to start with.8.Press thebutton to start the alignment process.Each head alignment takes about 7 minutes. The printer’s white beam sensor reads the alignment pattern and adjusts the printer automatically. Make sure you don’t open the front cover or turn off the printer during this process.9.When the uni-directional alignment is finished, press the dbutton until BI-D 2-COLOR is highlighted. Then press the button to start the bi-directional black alignment process.10.When the bi-directional black alignment is finished, pressthe d button until BI-D ALL is highlighted. Then press the button to start the alignment process. 11.When done, press the Pause button to exit headalignment mode. If you want to verify or fine-tune the automatic alignment process, you can perform a manual head alignment. See your electronic Reference Guide for instructions.Replacing the Cutter BladeIf you notice that your paper isn’t cut cleanly, the cutter blade may need to be replaced. For a list of media that are not recommended for use with the cutter, see the Printer Guide .You can check the status of your cutter by printing a status sheet. See page 5 for instructions. You can obtain a new cutter blade from Epson (part number C12C815291).Removing the Old Blade1.Press the Menu button.2.Press the d button until MAINTENANCE is highlighted,then press Menu .3.Press Menu again to select CUTTER REPLACEMENT .4.Press the button. The print head moves to thereplacement position. OPEN FRONT COVER TO SEE CUTTER REPLACEMENT LABEL is displayed. 5.Open the front cover.Installing the New Cutter Blade6.When SEE LABEL TO REPLACE CUTTER appears on theReplacing the Maintenance TankThe maintenance tank stores ink that gets flushed from the system during the initial ink charge and manual and automatic print head cleaning. When the tank is almost full, the message MAINTENANCE TANK NEAR FULL appears on the LCD display. When the tank is completely full, the printer stops working and MAINTENANCE TANK FULL appears on the LCD.You can check how much space remains in the maintenance tank by viewing its indicator on the control panel, shown below. You can also check its status by printing a status sheet (see page 5).*The Epson Stylus Pro 9800 has two maintenance tank indicators.The icons show the percentage of space remaining in the tank as follows:The Epson Stylus Pro 7800 has one maintenance tank (on the right side), and the 9800 has two (one on either side). Replacement tanks are available from Epson (part numberC12C890191).The printer will not print if one of the maintenance tanks is full. On the Epson Stylus Pro 9800, the right tank is used more than the left. To maximize tank life, you can switch the tanks when the right tank reaches approximately 50%. Follow these steps to replace the tank:1.Make sure the printer is not printing or performing anyother operations (READY or PAPER OUT should appear on the LCD display).2.If you have the Epson Stylus Pro 9800, check the LCDdisplay to determine which tank needs to be replaced (left or right).3.Grasp the handle at the bottom of the tank (on the side ofthe printer) and gently pull out the maintenance tank.Caution: Be careful not to spill ink from the maintenance tankwhen removing it. Hold it upright at all times and dispose of itcarefully.4.Place the used tank in the plastic bag included with the newtank.5.Insert the new tank.Updating the Driver and FirmwareTo ensure that you have the most up-to-date firmware and driver for your new printer, please visit . Choose your printer and click Drivers & Downloads to see if there are any updates posted. Check back regularly to maintain compatibility with existing and future applications. When your printer is set up and your software is installed, run the EPSON LFP Remote Panel to check your printer’s firmware ROM version and update it if necessary. Related DocumentationCPD-20271Epson Stylus Pro 7800 and 9800 PrinterGuideCPD-20272Epson Stylus Pro 7800 and 9800 QuickReference GuideCPD-20270Epson Stylus Pro 7800 and 9800CD-ROM with electronic Reference Guide。
EPSON ET-3700 扫描仪设备使用说明书
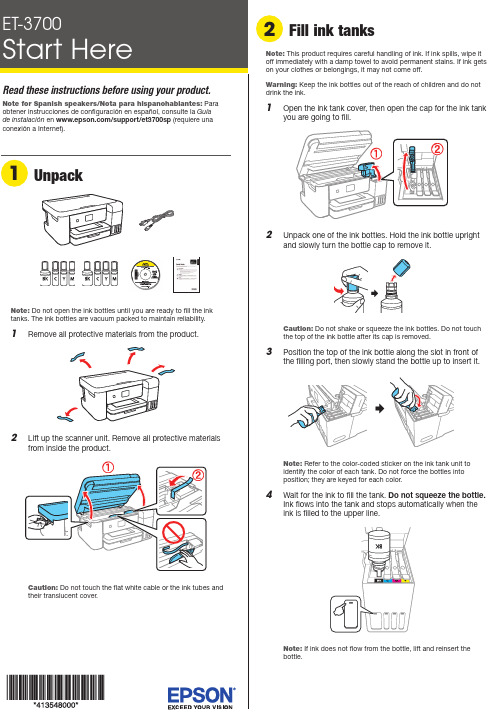
Do not open the ink bottles until you are ready to fill the inktanks. The ink bottles are vacuum packed to maintain reliability.emove all protective materials from the product.Note:1 2 3 412 W hen the message to start initialization appears onthe LCD screen, press the OK button to start chargingthe ink. Ink charging takes approximately 10 minutes. A message appears when ink charging is complete. Press the OK button to continue.Note: After some ink is used for charging, the rest is available forprinting.Caution: Do not turn off the product, raise the scanner unit, orload paper while the product is charging or you’ll waste ink.13 T o complete filling the ink tanks, repeat steps 1 through 6using the remaining ink in the bottles.Note: Replace the bottle cap before disposing of the bottles.14 Close the ink tank cover and scanner unit.15 S elect Next and press the OK button. Follow theon-screen instructions to reset the ink levels.16 F ollow the on-screen instructions to adjust the printquality. Press the OK button to continue.Note: You can change these settings later using the product’scontrol panel. For more information, see the online User’s Guide.See the online User’s Guide for information about loading capacity and available paper types and sizes.1 M ake sure the product is not charging, and then openthe front of the paper cassette and pull out the paper2 S..2I nsert the product CD or download and run your product’ssoftware package:/support/et3700 (U.S.) orwww.epson.ca/support/et3700 (Canada)3 F ollow the instructions on the computer screen to run the setup program.4 W hen you see the Select Your Connection screen, selectone of the following:• Wireless connectionIn most cases, the software installer automatically attempts to set up your wireless connection. If setup is unsuccessful, you may need to enter your network name (SSID) and password.• Direct USB connectionM ake sure you have a USB cable (not included).• Wired network connectionMake sure you have an Ethernet cable (not included).Mobile printingConnect wirelessly from your smartphone, tablet, or computer.Print documents and photos from across the room or around the world:• P rint directly from a smartphone or tablet using iOS or Android with Epson iPrint™. Simply connect your printer and device to the same network and tap the action icon to select the print option.• U se Epson Print Enabler (free from Google Play™) withAndroid™ devices (v4.4 or later). Then connect your printer and device to the same network and tap the menu icon to select the print option.• P rint remotely with Epson Connect™ and Google Cloud Print™. See your online User’s Guide for instructions or learn more at /connect (U.S.) or www.epson.ca/connect (Canada).Any problems?Network setup was unsuccessful.• Make sure you select the right network name (SSID).• Restart your router (turn it off and then on), then try to connect to it again.• The printer can only connect to a network that supports 2.4 GHz connections. If your router offers both 2.4 GHz and 5 GHz connections, make sure 2.4 GHz is enabled.• If you see a firewall alert message, click Unblock or Allow to let setup continue.• If your network has security enabled, make sure you enter your network password (WEP key or WPA passphrase) correctly. Be sure to enter your password in the correct case.3 INote: Make sure the paper is loaded against the front edgeguide and not sticking out from the end of the cassette.4 S lide the side edge guides against the paper, but not too5 K6 P7Select the paper settings on the product’s control panel.Note: If your computer does not have a CD/DVD drive or you are using a Mac, an Internet connection is required to obtain the product software.To print from a Chromebook™, go to /support/gcp (U.S.) or www.epson.ca/support/gcp (Canada) for instructions.1 M ake sure the product is NOT CONNECTED to yourcomputer.Windows ®: If you see a Found New Hardware screen, click Canceland disconnect the USB cable.nsure peak performance and brilliant results。
Ex3500陀螺仪使用手册
-40 °C to +85 °C -20 °C to +80 °C -0.3 V to VDD+0.3 V 0.67 mV/deg/s Typ.
1350 mV Typ. 1350 mV Typ.
±100 deg/s 4 (Degree) 1.7 mA Typ. 1 mA Typ.
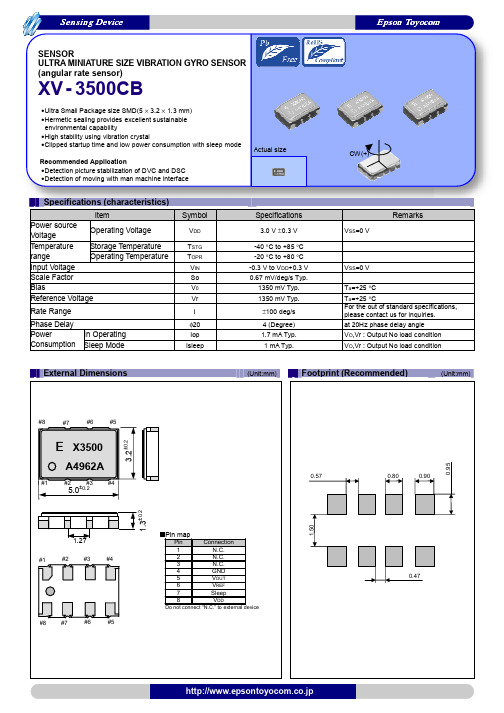
Sensing Device
Epson ห้องสมุดไป่ตู้oyocom
SENSOR ULTRA MINIATURE SIZE VIBRATION GYRO SENSOR (angular rate sensor)
XV - 3500CB
•Ultra Small Package size SMD(5 × 3.2 × 1.3 mm) •Hermetic sealing provides excellent sustainable
any liability for the occurrence of infringing on any patent or copyright of a third party. This material does not authorize the licensing on for any patent or intellectual copyrights. ●Any product described in this material may contain technology or the subject relating to strategic products under the control of the Foreign
ISO 14000 is an international standard for environmental management that was established by the International Standards Organization in 1996 against the background of growing concern regarding global warming, destruction of the ozone layer, and global deforestation.
20151010爱普生投影(定标参数X04 )
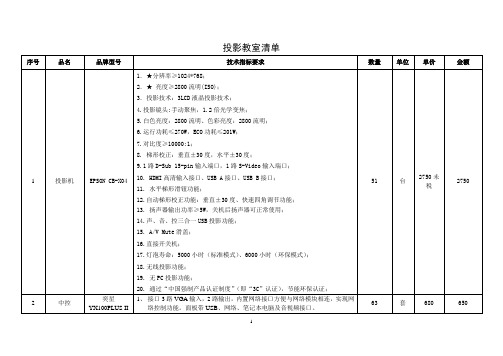
投影教室清单序号品名品牌型号技术指标要求数量单位单价金额1 投影机EPSON CB-X04 1.★分辨率≥1024*768;2.★亮度≥2800流明(ISO);3.投影技术:3LCD液晶投影技术;4.投影镜头:手动聚焦,1.2倍光学变焦;5.白色亮度:2800流明、色彩亮度:2800流明;6.运行功耗≤270W,ECO功耗≤201W;7.对比度≥10000:1;8. 梯形校正:垂直±30度,水平±30度;9.1路D-Sub 15-pin输入端口,1路S-Video输入端口;10. HDMI高清输入接口、USB A接口、USB B接口;11. 水平梯形滑钮功能;12.自动梯形校正功能:垂直±30度、快速四角调节功能;13. 扬声器输出功率≥5W,关机后扬声器可正常使用;14.声、音、控三合一USB投影功能;15. A/V Mute滑盖;16.直接开关机;17.灯泡寿命:5000小时(标准模式)、6000小时(环保模式);18.无线投影功能;19. 无PC投影功能;20. 通过“中国强制产品认证制度”(即“3C”认证),节能环保认证;51 台2750未税27502 中控奕星YX100PLUS II1、接口3路VGA输入,2路输出,内置网络接口方便与网络模块相连,实现网络控制功能。
面板带USB、网络、笔记本电脑及音视频接口。
63 套680 65012、音量自动记忆功能,开机即调到音量舒适状态。
3、开机方式选择,可选择打开滑盖自动降屏幕开启投影机。
4、滑盖式主机,强弱电分体设计,面板带系统锁,5、具备升级为网络集中管理。
3 投影屏幕三星120寸电动244CM*183CM,长宽比4:3 63 幅400 4004 功放KERDZ KB170 输出功率:2 ×100W 8ohm频率范围:20Hz-20KHz信噪比: >95 dB线路输入灵敏度: ≤250mv尺寸(mm): 340 ×430 ×130输入: 三路话筒输入、话筒具有高、中、低音音量旋钮可调,具有混响、延时效果,两路线路输入,具有切换开关,线路具有高、中、低音音量旋钮可调。
Velomitor CT速度传感器 说明书

尺寸图
图 1: Velomitor® CT 外形图
BN 部件号 141636-01 版本 A, 2001 年 4 月
Page 4 of 8
备件安装接头
标准双头螺栓 Standard Studs
3/8-24 to 3/8-24 04365657 M6X1 to M6X1 87931-01 3/8-24 04284020
Page 6 of 8
100
10
"
1"
.1
"
1 .0
" 1" 10 1" 00 0
10 2.5
g
00 .0 1 00 0
g
Velocity (in/s pk)
1
g 01 g 01 " "
.1
Operating Region
0 00 .0 1 0
0.009
.01
0 .0 1 0 00 g
.001 (Hz) 1 1.5 (CPM) 60 90
六角平 板双头螺栓 1-3/8 Hex Plate Studs
3/8-24 UNF to 1/4 NPT 107754-01
3/8-24 to 3/8-24 107756-01
3/8-24 UNF to 1/4-28 UNF 128038-01
M6X1 to M6X1 107757-01
Quick Disconnect Studs 快速拆卸双头螺栓
粘合性安装基座组件 这些组件用于因壳体太薄而无法钻孔和攻出螺纹安 装孔的机器。
BN 部件号 141636-01 版本 A, 2001 年 4 月
Page 3 of 8
®特 特氟伦涂层不锈钢铠装 Teflon®
爱普生投影仪说明书
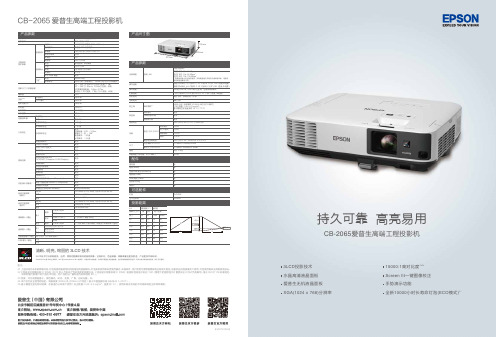
15000:1高对比度*2*3Screen fit 一键图像校正手势演示功能全新10000小时长寿命灯泡(ECO 模式)*13LCD 投影技术水晶高清液晶面板爱普生无机液晶面板XGA(1024 x 768)分辨率产品尺寸图EVS170121AZ备注:*1 上述时间为非承诺保修时间。
灯泡亮度将随使用时间的增加而逐渐降低。
灯泡实际使用寿命受使用模式、环境条件、用户使用习惯等因素影响会有很大差别。
投影机在低亮度模式下使用,灯泡使用寿命会得到有效延长。
*2 《信息显示测量标准》(IDMS)2012 年6 月发布了色彩亮度的测量方法,《信息显示测量标准》(IDMS)由国际信息显示协会(SID)管理下的国际显示计量委员会ICDM 负责编写。
基于ISO21118标准制定, 该标称值代表量产时产品的平均值,而产品的出厂最低值为标称值的80%。
*3 亮度、对比度数据基于:颜色模式:动态、变焦:广角、自动光圈:开。
*4 本产品可安全使用的地区:海拔高度2000m 及2000m 以下地区(基于中国国家标准GB4943.1-2011)。
*5 基于爱普生室内测试结果,在普通办公环境下使用(灰尘数量: 0.04-0.2 mg/m ,温度25°C )。
使用环境及状况的不同将影响防尘网保养周期。
CB-2065爱普生高端工程投影机SVGA 和XGA 是IBM 注册商标,NSF 是Analog Devices B.V .的商标。
本宣传页中的数据,为来源于爱普生实验室数据,与实际使用数据存在差异。
彩页中技术规格如有变更,恕不另行通知。
清晰、明亮、绚丽的3LCD 技术3LCD 技术可以获取明亮、自然、柔和的图像和锐利的视频影像。
没有彩虹、色溢现象,眼睛观看也更加舒适,产品更加节能环保。
持久可靠 高亮易用CB-2065爱普生高端工程投影机CB-2065爱普生高端工程投影机爱普生工程投影机CB-2065,采用爱普生水晶高清无机液晶面板,5500流明高色彩亮度**输出,呈现更加清晰、锐利的画质。
- 1、下载文档前请自行甄别文档内容的完整性,平台不提供额外的编辑、内容补充、找答案等附加服务。
- 2、"仅部分预览"的文档,不可在线预览部分如存在完整性等问题,可反馈申请退款(可完整预览的文档不适用该条件!)。
- 3、如文档侵犯您的权益,请联系客服反馈,我们会尽快为您处理(人工客服工作时间:9:00-18:30)。
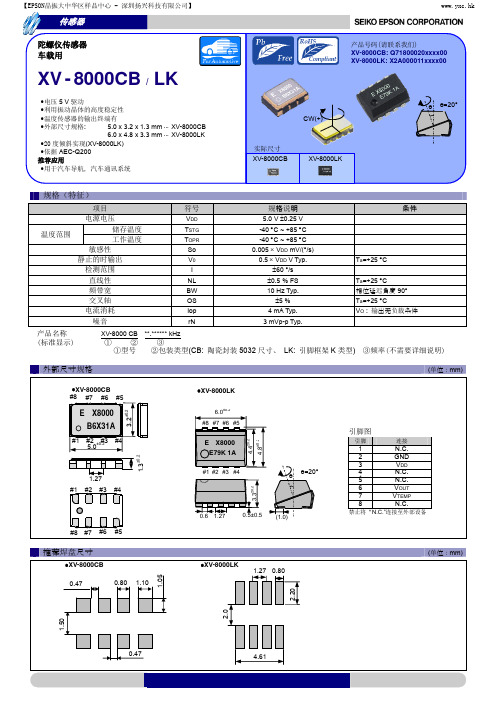
规格(特征)
项目 电源电压 储存温度 温度范围 工作温度 VO1 敏感性 VO2 VO1 检测范围 VO2 直线性 静止的时输出(VO1, VO2) 基准电压 功率消耗 产品名称 (标准显示)
XV-3700 CB **.****** kHz
符号
VDD TSTG TOPR SO1 SO2 I1 I2 NL V0 Vr Iop
【EPSON晶振大中华区样品中心 - 深圳扬兴科技有限公司】
www.yxc.hk
传感器
产品号码(请联系我们) X2A000021xxxx00
陀螺仪传感器 高度稳定性、2 输出类型
XV - 3700CB
小封装尺寸的 SMD (5.0 3.2 1.3 mm) 通过采用真空密封实现优异的耐环境特性 利用振动晶体的高度稳定性 高速方式和低速方式的同时输出 推荐应用 Motion UI , 把宽广的运动查出作为必要机、器(分析·hobby) RC 直升飞机 实际尺寸 CCW(+)
规格说明
3.0 V 0.3 V -40 C ~ +85 C -20 C ~ +80 C 0.8 mV/(°/s) 3.624 mV/(°/s) 1500 °/s 300 °/s 5 % FS 1500 mV Typ. 1500 mV Typ. 2.2 mA Typ.
条件
请联系我们以获取超出本范围的规格说明的 相关信息 Ta=+25 C Ta=+25 C Ta=+25 C VO,Vr : 输出无负载条件
①
② ①型号
③ ②包装类型
③频率(不需要详细说明)
(单位:mm)外部尺寸规格推荐焊源自尺寸(单位:mm)#8
#7
#6
#5
3.2±0.2
E X3700
B6ZA 1A
#1 #2 #3 #4
0.57
0.80
0.90
5.0±0.2 1.3±0.2
1.50
1.27
#1 #2 #3 #4
引脚图
引脚 连接
0.47
#8
关于在目录内使用的记号
●无铅。 ●符合欧盟 RoHS 指令。 欧盟 RoHS 指令免检的含铅产品。 (密封玻璃、高温熔化性焊料或其他材料中包含铅。 ) ●为汽车方面的应用,如汽车多媒体、车身电子、遥控无钥门锁等。
●为汽车行驶安全方面的应用(引擎控制单元、气囊、电子稳定程序控制系统) 。
注意事项
·本材料如有变更,恕不另行通知。量产设计时请确认最新信息。 ·未经 Seiko Epson 公司书面授权,禁止以任何形式或任何方式复制或者发布本材料中任何部分的信息内容。 ·本材料中的书面信息、应用电路、编程、使用等内容仅供参考。Seiko Epson 公司对第三方专利或版权的侵权行为不负有任何责任。本材料 未对任何专利或知识版权的许可权进行授权。 ·本材料中规格表中的数值大小通过数值线上的大小关系表示。 ·当出口此材料中描述的产品或技术时,你应该遵守相应的出口管制法律和法规,并按照这些法律和法规的要求执行。 请不要将产品(以及任何情况下提供任何的技术信息)用于开发或制造大规模杀伤性武器或其他军事用途。还要求,不要将产品提供给任何 将产品用于此类违禁用途的第三方。 ·此类产品是基于在一般电子机械内使用而设计开发的,如将产品应用于需要极高可靠性的特定用途,必须实现得到弊公司的事前许可。若 无许可弊公司将不负任何责任。 1.太空设备(人造卫星、火箭等) 2.运输车辆机器控制装置(汽车、飞机、火车、船舶等) 3.用于维持生命的医疗器械 4.海底中转设备 5.发电站控制机器 6.防灾防盗装置 7.交通设备 8.其他,用于与 1~7 具有同等可靠性的用途。
本材料中记载的品牌名称或产品名称是其所有人的商标或注册商标。
Seiko Epson Corporation
#7
#6
#5
1 N.C. 2 N.C. 3 N.C. 4 GND 5 VO1 6 VREF 7 VO2 8 VDD 禁止将“N.C.”连接至外部设备
0.95
【EPSON晶振大中华区样品中心 - 深圳扬兴科技有限公司】
www.yxc.hk
推进环境管理体系 符合国际标准
在环境管理体系的运行方面,使用 ISO14001 国际环境标准,通过“计 划-实施-检查-验证(PDCA)的循环来实现持续改进。公司位于日本和 海外的主要制造基地已取得了 ISO14001 资格认证。
ISO 14000 是国际标准化组织于 1996 年在全球化变暖、 臭 氧层破坏、以及全球毁林等环境问题日益严重的背景下提 出的环境管理国际标准。
追求高品质
Seiko Epson 为了向顾客提供高品质、卓越信赖性的产品、服务,迅 速着手通过 ISO 9000 系列资格认证的工作,其日本和海外工厂也在通 过 ISO 9001 认证。 同时, 也在通过大型汽车制造厂商要求规格的 ISO/TS 16949 认证。 ISO/TS16949 是一项国际标准,是在 ISO9001 的基础上增 加了对汽车工业的特殊要求部分。